1
Innovations in Trunked & Conventional 2-Way Radios
RUGGED, PROFESSIONAL TWO-WAY RADIOS
Synthesized and Programmable on a per-Channel Basis
Conventional and Trunked Operation (LTR® and PassPort® Protocols);
Programmable on a per-Channel Basis
2- or 4-Watt Transmitter Power
Eleven Channels in Conventional Mode
In Trunking Mode: Flexible Dynamic Allocation allows up to 100 Channels
in any number of System Configurations
Large Speaker with Very Loud Audio Output, Great in Noisy Environments
Companded Audio: Reduces Background Noise and Increases Received
Voice Audio for Clearer Voice Communications
30 Megahertz Bandwidth
Multi-Mode Capability - Wide or Narrow Bandwidth Switching, Programmable
on a Per-channel Basis
Programmable Quiet Call® Tone Squelch, Digital Quiet Call and DTMF
Encode
TM
Channel Scan, Normal and Priority
Battery Saver
High-capacity Battery
Model:
RTX-454
PATRIOT HANDHELD OWNER'S MANUAL
Innovations in Trunked & Conventional 2-Way Radios
RUGGED, PROFESSIONAL TWO-WAY RADIOS
Synthesized and Programmable on a per-Channel Basis
Conventional and Trunked Operation (LTR® and PassPort® Protocols);
Programmable on a per-Channel Basis
2- or 4-Watt Transmitter Power
Eleven Channels in Conventional Mode
In Trunking Mode: Flexible Dynamic Allocation allows up to 100 Channels
in any number of System Configurations
Large Speaker with Very Loud Audio Output, Great in Noisy Environments
Companded Audio: Reduces Background Noise and Increases Received
Voice Audio for Clearer Voice Communications
30 Megahertz Bandwidth
Multi-Mode Capability - Wide or Narrow Bandwidth Switching, Programmable
on a Per-channel Basis
Programmable Quiet Call® Tone Squelch, Digital Quiet Call and DTMF
Encode
TM
Channel Scan, Normal and Priority
Battery Saver
High-capacity Battery
PATRIOT HANDHELD OWNER'S MANUAL
Model:
RTX-454
TABLE OF CONTENTS
DESCRIPTION
PAGE
FCC LICENSE REQUIRED
FCC Regulations: Licensing .................................................................. 1
FCC Regulations: Safety Standards ...................................................... 1
Service .................................................................................................... 1
How to Obtain an FCC License ............................................................. 1
ACCESSORIES ............................................................................................. 2
INTRODUCTION
General ................................................................................................... 2
Inspection ............................................................................................... 2
Model Identification ................................................................................ 2
CONTROL AND OPERATION ...................................................................... 3
FIG1: Radio Controls & Connectors ................................................. 3
BATTERIES
Maintenance and Conditioning .............................................................. 4
General ................................................................................................... 4
Charging ................................................................................................. 4
Battery Removal/ Installation ................................................................. 4
Precautions and Notes ........................................................................... 4
FIG2: Patriot Plus RTX Battery Pack Installation .............................. 5
BELT CLIP INSTALLATION .......................................................................... 5
DESCRIPTION
PAGE
CONVENTIONAL OPERATION .................................................................... 6
To Switch On the Radio .......................................................................... 6
To Adjust the Volume ............................................................................. 6
To Hear Calls from Other Users ............................................................. 6
To Call Other Users ................................................................................ 6
To Monitor ............................................................................................... 6
To Turn Off the Radio ............................................................................. 6
Scanning: Priority Scanning ................................................................... 6
Scanning: Normal Scanning .................................................................. 6
Busy Channel Delete .............................................................................. 6
TRUNKED OPERATION ................................................................................ 6
Receiving a Dispatch Call ...................................................................... 6
Placing a Dispatch Call .......................................................................... 6
WHAT THE RADIO TONES MEAN .............................................................. 7
TROUBLESHOOTING
General ................................................................................................... 8
Battery ..................................................................................................... 8
Error Tones ............................................................................................. 8
Quiet Call ................................................................................................ 8
Troubleshooting Notes ........................................................................... 9
RITRON, INC. LIMITED WARRANTY ................................... BACK COVER
RADIO CARE ................................................................................................. 5
FIGURES:
1. Radio Controls and Connectors ......................................................... 3
2. Patriot Plus RTX Battery Pack Installation ........................................ 5
NOTE:
Refer to page 2 for Accessory information; call RITRON at 1800USA1USA (800-8721872) for a complete Accessory listing.
page ii
TABLE OF CONTENTS
DESCRIPTION
PAGE
FCC LICENSE REQUIRED
FCC Regulations: Licensing .................................................................. 1
FCC Regulations: Safety Standards ...................................................... 1
Service .................................................................................................... 1
How to Obtain an FCC License ............................................................. 1
ACCESSORIES ............................................................................................. 2
INTRODUCTION
General ................................................................................................... 2
Inspection ............................................................................................... 2
Model Identification ................................................................................ 2
CONTROL AND OPERATION ...................................................................... 3
FIG1: Radio Controls & Connectors ................................................. 3
BATTERIES
Maintenance and Conditioning .............................................................. 4
General ................................................................................................... 4
Charging ................................................................................................. 4
Battery Removal/ Installation ................................................................. 4
Precautions and Notes ........................................................................... 4
FIG2: Patriot Plus RTX Battery Pack Installation .............................. 5
BELT CLIP INSTALLATION .......................................................................... 5
DESCRIPTION
PAGE
CONVENTIONAL OPERATION .................................................................... 6
To Switch On the Radio .......................................................................... 6
To Adjust the Volume ............................................................................. 6
To Hear Calls from Other Users ............................................................. 6
To Call Other Users ................................................................................ 6
To Monitor ............................................................................................... 6
To Turn Off the Radio ............................................................................. 6
Scanning: Priority Scanning ................................................................... 6
Scanning: Normal Scanning .................................................................. 6
Busy Channel Delete .............................................................................. 6
TRUNKED OPERATION ................................................................................ 6
Receiving a Dispatch Call ...................................................................... 6
Placing a Dispatch Call .......................................................................... 6
WHAT THE RADIO TONES MEAN .............................................................. 7
TROUBLESHOOTING
General ................................................................................................... 8
Battery ..................................................................................................... 8
Error Tones ............................................................................................. 8
Quiet Call ................................................................................................ 8
Troubleshooting Notes ........................................................................... 9
RITRON, INC. LIMITED WARRANTY ................................... BACK COVER
RADIO CARE ................................................................................................. 5
FIGURES:
1. Radio Controls and Connectors ......................................................... 3
2. Patriot Plus RTX Battery Pack Installation ........................................ 5
NOTE:
Refer to page 2 for Accessory information; call RITRON at 800USA1USA (800-8721872) for a complete Accessory listing.
page ii
FCC LICENSE REQUIRED
FCC REGULATIONS
LICENSING
The FCC requires the owners of the radios to obtain a station license before using them.
The station licensee is responsible for ensuring that transmitter power, frequency and deviation
are within the limits specified by the station license. The station licensee is also responsible for
proper operation and maintenance of the radio equipment, including checking the transmitter
frequency and deviation periodically by use of appropriate methods.
To get a FCC license for VHF or UHF frequencies, submit FCC application Form 600 as
indicated in the block at right. Your Ritron dealer can help you with this process.
SAFETY STANDARDS
The FCC (with its action in General Docket 79-144, March 13, 1985) has adopted a safety
standard for human exposure to radio frequency electromagnetic energy emitted by FCCregulated equipment. Ritron observes these guidelines and recommends that you do also:
DO NOT hold the radio so that the antenna is very close to or touching exposed parts of
the body, especially the face or eyes, while transmitting. Keep the radio vertical, two-tothree inches away while talking into the front panel.
DO NOT press the Push-To-Talk except when you intend to transmit.
DO NOT operate radio equipment near electrical blasting caps or in an explosive
atmosphere.
DO NOT allow children to play with any radio equipment that contains a transmitting
device.
Repair of Ritron products should be performed only by Ritron authorized personnel.
SERVICE
Federal law prohibits you from making any internal adjustments to the transmitter, and/ or from
changing transmit frequencies unless you are specifically designated by the licensee.
If your radio equipment fails to operate properly, or you wish to have the radio programmed,
contact your authorized dealer or Ritron.
RITRON, INC., Repair Department
505 West Carmel Drive
Carmel, IN 46032 USA
HOW TO OBTAIN AN FCC RADIO LICENSE
Federal Communications Commission
(FCC) Licensing Information
Because your Ritron radio operates on Private Land
Mobile frequencies, it is subject to the Rules and
Regulations of the FCC, which requires all operators
of these frequencies to obtain a station license before
operating their equipment. Make application for your
FCC license on FCC Forms 600 and 159.
To have forms and instructions faxed to you by
the FCC, call the FCC Fax-On-Demand system at
202-418-0177 from your fax machine;
request Document 000600 & Form 159.
To have Document 000600 & Form 159 mailed to you,
call the FCC Forms Hotline at
800-418-FORM (1-800-418-3676).
For help with questions concerning the
license application, contact the FCC at
888-CALL-FCC (1-888-225-5322).
You must decide which radio frequency(ies) you
can operate on before filling out your application.
For help determining your frequencies, call Ritron at
800-USA-1-USA (1-800-872-1872).
Phone: 317-846-1201
FAX: 317-846-4978
For assistance, call 800-USA-1-USA (800-872-1872)
page 1
FCC LICENSE REQUIRED
FCC REGULATIONS
LICENSING
The FCC requires the owners of the radios to obtain a station license before using them.
The station licensee is responsible for ensuring that transmitter power, frequency and deviation
are within the limits specified by the station license. The station licensee is also responsible for
proper operation and maintenance of the radio equipment, including checking the transmitter
frequency and deviation periodically by use of appropriate methods.
To get a FCC license for VHF or UHF frequencies, submit FCC application Form 600 as
indicated in the block at right. Your Ritron dealer can help you with this process.
SAFETY STANDARDS
The FCC (with its action in General Docket 79-144, March 13, 1985) has adopted a safety
standard for human exposure to radio frequency electromagnetic energy emitted by FCCregulated equipment. Ritron observes these guidelines and recommends that you do also:
DO NOT hold the radio so that the antenna is very close to or touching exposed parts of
the body, especially the face or eyes, while transmitting. Keep the radio vertical, two-tothree inches away while talking into the front panel.
DO NOT press the Push-To-Talk except when you intend to transmit.
DO NOT operate radio equipment near electrical blasting caps or in an explosive
atmosphere.
DO NOT allow children to play with any radio equipment that contains a transmitting
device.
Repair of Ritron products should be performed only by Ritron authorized personnel.
SERVICE
Federal law prohibits you from making any internal adjustments to the transmitter, and/ or from
changing transmit frequencies unless you are specifically designated by the licensee.
If your radio equipment fails to operate properly, or you wish to have the radio programmed,
contact your authorized dealer or Ritron.
RITRON, INC., Repair Department
505 West Carmel Drive
Carmel, IN 46032 USA
HOW TO OBTAIN AN FCC RADIO LICENSE
Federal Communications Commission
(FCC) Licensing Information
Because your Ritron radio operates on Private Land
Mobile frequencies, it is subject to the Rules and
Regulations of the FCC, which requires all operators
of these frequencies to obtain a station license before
operating their equipment. Make application for your
FCC license on FCC Forms 600 and 159.
To have forms and instructions faxed to you by
the FCC, call the FCC Fax-On-Demand system at
202-418-0177 from your fax machine;
request Document 000600 & Form 159.
To have Document 000600 & Form 159 mailed to you,
call the FCC Forms Hotline at
800-418-FORM (800-418-3676).
For help with questions concerning the
license application, contact the FCC at
888-CALL-FCC (888-225-5322).
You must decide which radio frequency(ies) you
can operate on before filling out your application.
For help determining your frequencies, call Ritron at
800-USA-1-USA (800-872-1872).
Phone: 317-846-1201
FAX: 317-846-4978
For assistance, call 800-USA-1-USA (800-872-1872)
page 1
ACCESSORIES
TO ORDER, CALL 1-800-USA-1-USA
SPARE/ REPLACEMENT BATTERY PACKS:
BPX-8N ................ 700 mAH, 9.6 VDC, NiCd
BPX-8N-HC ......... 850 mAH, 9.6 VDC, NiCd
BPX-8N-MH ......... 1200 mAH, 9.6 VDC, NiMH
BATTERY CHARGERS:
BC-A ..................... 120 VAC Cube Charger
BCP-AD ................ Drop-In Charger Adapter
BCP-FS ................ Dual Rate Drop-In Charger, Single Unit
BCP-FD ................ Dual Rate Drop-In Charger, Two Unit
INTRODUCTION
GENERAL
TO ORDER, CALL 1-800-USA-1-USA
AUDIO ACCESSORIES:
REP-2 ..................... Low-Profile Earphone
RHD-5X ................... Ear Clip Headset w/ Boom Mic
This manual covers Ritron models:
RTX-454
The PATRIOT Plus RTX-454 handheld is a
synthesized, PC-programmable, eleven-channel
two-way radio that operates in Trunking and
Conventional Modes in the professional UHF FM
Business Band.
All RTX Plus radios feature quick-change battery
pack and drop-in charger capabilities. See
Accessories at left.
!
New !
REP-2
RHD-5X
RSM-3X .................. Remote Speaker/ Mic
RHD-4X ................... Dual Ear Headset w/ Boom Mic
RHD-1X ................... Single Ear Headset w/ Boom Mic
BCP-AD
CH
AR
GIN
G
BC-A
BCP-FD
BCP-FS
CH
AR
NO
RM
GI
AL
RSM-3X
NG
FA
ST
CH
AR
NO
RM
GI
AL
CH
AR
NG
GE
FA
ST
FA
ST
CH
CH
AR
GE
AR
NO
RM
FA
ST
GI
AL
INSPECTION
Check your package for the following items:
- PATRIOT Plus RTX-454 radio
- antenna
- rechargeable battery pack
- belt clip and screws
- any optional accessories ordered
Examine the equipment immediately after
delivery and report any damages to the shipping
company.
NG
FA
ST
CH
AR
MODEL IDENTIFICATION
GE
FA
ST
REPLACEMENT ANTENNAS:
AFM-450 .............. UHF Antenna, 6 inch
AFM-450-S .......... UHF Antenna, Stubby
RHD-1X
RHD-4X
LHX-A
HOLSTERS:
LHX-A .................. Leather Holster
The model number is stamped on the label
attached to the case back. The model number
indicates the radio's operating band.
ENVIRONMENTAL PROTECTION:
RTX-RS ................ Radio Rain Shield
BAND
OPERATING FREQUENCY
RTX-454
UHF
450 - 480 MHz
!
New !
RTX-RS
page 3
page 2
MODEL
RAIN
SHIE
LD
RITRON, INC. 1-800-USA-1-USA (1-800-872-1872)
For assistance, call 1-800-USA-1-USA (1-800-872-1872)
ACCESSORIES
TO ORDER, CALL 1-800-USA-1-USA
SPARE/ REPLACEMENT BATTERY PACKS:
BPX-8N ................ 700 mAH, 9.6 VDC, NiCd
BPX-8N-HC ......... 850 mAH, 9.6 VDC, NiCd
BPX-8N-MH ......... 1200 mAH, 9.6 VDC, NiMH
BATTERY CHARGERS:
BC-A ..................... 120 VAC Cube Charger
BCP-AD ................ Drop-In Charger Adapter
BCP-FS ................ Dual Rate Drop-In Charger, Single Unit
BCP-FD ................ Dual Rate Drop-In Charger, Two Unit
INTRODUCTION
GENERAL
TO ORDER, CALL 1-800-USA-1-USA
AUDIO ACCESSORIES:
REP-2 ..................... Low-Profile Earphone
RHD-5X ................... Ear Clip Headset w/ Boom Mic
This manual covers Ritron models:
RTX-454
The PATRIOT Plus RTX-454 handheld is a
synthesized, PC-programmable, eleven-channel
two-way radio that operates in Trunking and
Conventional Modes in the professional UHF FM
Business Band.
All RTX Plus radios feature quick-change battery
pack and drop-in charger capabilities. See
Accessories at left.
!
New !
REP-2
RHD-5X
RSM-3X .................. Remote Speaker/ Mic
RHD-4X ................... Dual Ear Headset w/ Boom Mic
RHD-1X ................... Single Ear Headset w/ Boom Mic
BCP-AD
CH
AR
GIN
G
BC-A
BCP-FD
BCP-FS
CH
AR
NO
RM
AL
GI
RSM-3X
NG
FA
ST
CH
AR
NO
RM
AL
GI
CH
AR
NG
GE
FA
ST
FA
ST
CH
CH
AR
GE
AR
NO
FA
RM
ST
AL
GI
INSPECTION
Check your package for the following items:
- PATRIOT Plus RTX-454 radio
- antenna
- rechargeable battery pack
- belt clip and screws
- any optional accessories ordered
Examine the equipment immediately after
delivery and report any damages to the shipping
company.
NG
FA
ST
CH
AR
MODEL IDENTIFICATION
GE
FA
ST
REPLACEMENT ANTENNAS:
AFM-450 .............. UHF Antenna, 6 inch
AFM-450-S .......... UHF Antenna, Stubby
HOLSTERS:
LHX-A .................. Leather Holster
RHD-1X
The model number is stamped on the label
attached to the case back. The model number
indicates the radio's operating band.
RHD-4X
LHX-A
ENVIRONMENTAL PROTECTION:
RTX-RS ................ Radio Rain Shield
BAND
OPERATING FREQUENCY
RTX-454
UHF
450 - 480 MHz
!
New !
RTX-RS
page 3
page 2
MODEL
RAIN
SHIE
LD
RITRON, INC. 1-800-USA-1-USA (1-800-872-1872)
For assistance, call 1-800-USA-1-USA (1-800-872-1872)
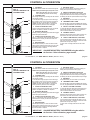
CONTROL & OPERATION
1
1
FIG1:
RADIO CONTROLS &
CONNECTORS
NOTES: Use only the antenna type packaged with the radio.
Before using the radio, make sure the antenna
base is threaded fully into the antenna bushing.
2
CHARGE JACK
This Charge Jack allows you to charge the radio with the
cube charger provided.
12
11
2
3
ANTENNA
The flexible antenna radiates and receives radio signals.
10
To use the cube charger, plug the cord into the charge
jackmarked CHG on top of the radiothen plug the
charger cube into an 110 VAC outlet. The chargers
GREEN lamp lights while the battery is charging, and
should go OFF only when the cube is unplugged.
3
AUDIO ACCESSORY JACK
4
MONITOR BUTTON
Used to connect optional accessories, such as a remote
speaker/ microphone, a headset or an earphone.
4
9
5
Normally, pressing and releasing the monitor button toggles
Quiet Call squelch ON and OFF.
5
PUSH-TO-TALK BUTTON (PTT)
The PTT, a push-button switch, activates the transmitter.
Hold down the PTT when you talk into the radio, and
release it to receive.
6
6
13
7
8
MICROPHONE
The Microphone allows your voice to be heard in other
radios. Hold the radio about two inches from your mouth
while talking into the microphone. Shouting does not
improve the listeners reception.
IMPORTANT:
7
BATTERY DOOR
8
DROP-IN CHARGER CONTACTS
9
SPEAKER
This door covers the battery compartment, holding the
battery pack in place. Refer to FIG-2, page 5.
See the diagram at right. Three charger contacts, visible
through the bottom of the radio case, permit charging of
the battery pack with an optional RITRON drop-in charger.
The speaker allows you to hear calls on your channel.
10 TRANSMIT/ BUSY LAMP
The Transmit/ Busy Lamp flashes GREEN if the channel
is in use, and glows RED when the transmitter is activated.
11 ON / OFF VOLUME CONTROL
To switch the radio ON, rotate this knob clockwise until it
clicks. Rotate it further to increase volume. Rotate this
control counterclockwise to turn the unit OFF.
12 CHANNEL SELECT
Rotate the Channel Select knob to select a channel. The
radio emits a short tone with each click of this knob.
13 TOUCH TONE KEYPAD, OPTIONAL
If your PATRIOT Plus RTX-450 has this option, you can
send Touch Tone digits. A sidetone sounds in the radio
speaker each time you enter a digit.
To send Touch Tone digits, hold down the PTT while
dialing.
CHARGE THE BATTERY PACK BEFORE using the radio for
the first time. Refer to Batteries, pages 4 and 5.
For assistance, call 800-USA-1-USA (800-872-1872)
page 3
CONTROL & OPERATION
1
1
FIG1:
RADIO CONTROLS &
CONNECTORS
NOTES: Use only the antenna type packaged with the radio.
Before using the radio, make sure the antenna
base is threaded fully into the antenna bushing.
2
CHARGE JACK
This Charge Jack allows you to charge the radio with the
cube charger provided.
12
2
3
ANTENNA
The flexible antenna radiates and receives radio signals.
11
10
To use the cube charger, plug the cord into the charge
jackmarked CHG on top of the radiothen plug the
charger cube into an 110 VAC outlet. The chargers
GREEN lamp lights while the battery is charging, and
should go OFF only when the cube is unplugged.
3
AUDIO ACCESSORY JACK
4
MONITOR BUTTON
Used to connect optional accessories, such as a remote
speaker/ microphone, a headset or an earphone.
4
9
5
Normally, pressing and releasing the monitor button toggles
Quiet Call squelch ON and OFF.
5
6
6
7
PUSH-TO-TALK BUTTON (PTT)
The PTT, a push-button switch, activates the transmitter.
Hold down the PTT when you talk into the radio, and
release it to receive.
13
8
MICROPHONE
The Microphone allows your voice to be heard in other
radios. Hold the radio about two inches from your mouth
while talking into the microphone. Shouting does not
improve the listeners reception.
IMPORTANT:
7
BATTERY DOOR
8
DROP-IN CHARGER CONTACTS
9
SPEAKER
This door covers the battery compartment, holding the
battery pack in place. Refer to FIG-2, page 5.
See the diagram at right. Three charger contacts, visible
through the bottom of the radio case, permit charging of
the battery pack with an optional RITRON drop-in charger.
The speaker allows you to hear calls on your channel.
10 TRANSMIT/ BUSY LAMP
The Transmit/ Busy Lamp flashes GREEN if the channel
is in use, and glows RED when the transmitter is activated.
11 ON / OFF VOLUME CONTROL
To switch the radio ON, rotate this knob clockwise until it
clicks. Rotate it further to increase volume. Rotate this
control counterclockwise to turn the unit OFF.
12 CHANNEL SELECT
Rotate the Channel Select knob to select a channel. The
radio emits a short tone with each click of this knob.
13 TOUCH TONE KEYPAD, OPTIONAL
If your PATRIOT Plus RTX-450 has this option, you can
send Touch Tone digits. A sidetone sounds in the radio
speaker each time you enter a digit.
To send Touch Tone digits, hold down the PTT while
dialing.
CHARGE THE BATTERY PACK BEFORE using the radio for
the first time. Refer to Batteries, pages 4 and 5.
For assistance, call 800-USA-1-USA (800-872-1872)
page 3
BATTERIES
GENERAL
BATTERY MAINTENANCE & CONDITIONING
Achieve maximum battery life by fully discharging the
battery periodically to condition it.
Condition battery packs by the following procedure as
either a preventive measure, or if you suspect reduced
capacity:
TO CONDITION THE BATTERY PACK:
1. Use your radio for a normal work day without
charging it.
2. If your radio is used only in the Trunked Mode,
you need only leave the radio turned On.
If your radio is used in Conventional Mode, with
the radio turned ON, hold the monitor button for
3 seconds to place the radio (on a Conventional
channel) in open squelch mode. Release the
monitor button when you hear the radio beep
rapidly; you will then hear a "rushing" noise. Turn
the Volume Control knob fully clockwise to
maximize this noise.
3. Put the radio away in a secure place -- possibly a
desk drawer -- where nothing can press against
the buttons or controls to accidentally turn it Off or
cause it to transmit. Allow the radio to run until it
shuts off when the battery is completely discharged.
A typical battery pack may require about 8 hours to
completely discharge.
4. When the radio has shut off, charge it overnight for
12 to 16 hours. The battery will be ready for use
with renewed capacity.
NOTE: A new battery must be fully discharged, then
recharged several times before it will reach its
maximum charge capacity.
page 3
page 4
The RTX Plus Series radio is powered by a rechargeable battery pack.
CHARGING
Because the battery pack loses its charge during storage and shipment, fully charge it before first use. To ensure
maximum performance for the next day, charge the battery overnight after each day of use.
TO CHARGE THE BATTERY USING A RITRON CUBE CHARGER: Plug the charger cord into the charge jack
(marked "CHG") on top of the radio. Then plug the cube into an 110 VAC outlet. The GREEN lamp lights while
the battery is charging, and should go out only when the cube or cord is unplugged.
TO CHARGE THE BATTERY USING A RITRON DROP-IN CHARGER: Three charger contacts, visible through
the radio case bottom, permit charging the battery with an optional Ritron drop-in charger. The battery pack may
be either removed from the radio case for charging, or charged inside the radio case.
Each drop-in charger comes with a spacer to permit charging a "spare" battery while the radio is in use.
To use the drop-in charger, plug it into a 110 VAC outlet. Set either the radio with the battery installed, or only
the battery with the battery spacer, into the charger. Each battery contact must rest on a charger contact pin.
BATTERY REMOVAL/ INSTALLATION
Unlock the door latch (see FIG-2, page 5). Press down on the door and slide it off the radio. Turn the portable over
and tap the battery compartment against the palm of your free hand until the pack drops into your hand.
To install the door, align it with the battery compartment, the top edge of the door facing the antenna. Place the
door as described, then slide it up and into the slots shown in FIG-2, page 5. Be sure to lock the door latch.
PRECAUTIONS AND NOTES
NOTE: Use only RITRON-supplied chargers; other chargers may cause fire, explosion or other damage.
Battery pack life averages one year. Follow these guidelines to maximize service life:
FULLY DISCHARGE the battery before recharging it.
CONDITION battery packs once a month as directed in Battery Maintenance & Conditioning.
CONDITION batteries that are run down.
CHARGE batteries for 16 hours before storage, and for 16 hours once a month thereafter.
DO NOT overcharge batteries. Unplug the cube charger after 16 hours to avoid overcharging.
DO NOT "fast" charge a brand new battery pack, because this may damage the battery. Once the battery
has been charged using the "trickle" rate, the fast rate may be used thereafter.
DO NOT "fast" charge a fully charged battery. This can shorten battery life.
DO NOT charge batteries in temperatures colder than about 45°F. Charging batteries in temperatures
above 95°F. does not harm them, but can reduce charge capacity.
DO NOT charge or replace a battery in an explosive atmosphere. Contact sparking can ignite an explosion.
DO NOT dispose of a battery in a fire. An explosion might result.
RITRON, INC. 1-800-USA-1-USA (1-800-872-1872)
For assistance, call 1-800-USA-1-USA (1-800-872-1872)
BATTERIES
BELT CLIP
Belt Belt
ClipClip
Attachment Points
Attachment
Points
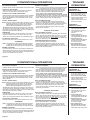
BELT CLIP INSTALLATION
The CBX-A belt clip is designed to
or
TAB
TAB
-450
IT07
IER C.
ID: A N, IN
FCC RITRO: RTX-454IES 6-1201
el
R
E
od
) 84
NOTE:Install
Installthe
the battery
battery (left)
AS SHOWN,
NOTE:
AS SHOWN
(left),
withthe
the battery
battery label
label facing
with
facingyou
you,right side upbend away rather than break,
damage the radio case.
right side up.
THIS
UP
END
9902
C. 2 USA
N, IN 4603
ry
RO
ly.
May
Batte
RIT mel, IN1380 8N
rs on cuit.
Car 843- BPX- rgeablecapablecharge ort cir
317- DEL: Recha harge RON or sh
MO VDC st C RIT utilate
9.6 le / FaN: Use fire, m rns.
.
Trick TIO put in e bu U.S.A
CAU NOT or caus ade in
DO de lls m
explottery ce
Ba
M
S S (317
PLU . PH: 45
.A
23
U.S
A 1
e in
Mad SN:
Charger
Contacts
Charger
Contacts
to the battery
Slot: Slot
Two(Two
slotsslots
matemate
to the
door
topdoor
edgetop
tabs)
battery
edge tabs.
Battery Compartment
Compartment
Battery
Door
Latch
Door
Latch
iddee
SSlli
BatteryDoor
Door(Top
(TopEdge)
Edge)
Battery
k
kk
LLoocc Loc
k
k
c
ck
c
lo
UUnnlo Unlo
ff
OOff
NOTE:
OBSERVE CAUTION IN THE FOLLOWING
ENVIRONMENTS TO MAXIMIZE THE LIFE
OF YOUR RADIO EQUIPMENT:
MOISTURE: PATRIOT Plus SST Series radios are
not waterproof. DO NOT directly expose them to rain
or excessive moisture.
CHEMICALS: Detergents, alcohol, aerosol sprays or
petroleum products can damage the radio case. DO
NOT use petroleum solvents of any kind; use a soft
cloth moistened with water to clean the case.
EXTREME HEAT: High temperatures can damage
the battery and other components. DO NOT expose
the units to extreme heat or leave them in direct
sunlight.
LOW TEMPERATURES: The capacity of the NiCd
battery is greatly reduced in extreme cold. When
using the unit in very cold environments, periodically
warm the radio under your coat.
EXCESSIVE TRANSMISSIONS: Maximum drain on
battery power occurs when transmitting. DO NOT
hold the Push-To-Talk switch down longer than
necessary during transmission intervals. DO NOT
reduce battery service life by attempting to power a
radio with a depleted battery; always charge
batteries overnight after each day of use.
VIBRATION/ SHOCK: Although your PATRIOT Plus
radio is designed to be rugged, it will not survive
excessive abuse. Avoid dropping the radio.
NOTE: The optional MHX-A holster provides added
protection from weather and shock.
ddee
SSllii
The battery door slides on and off
once the door latch is unlocked.
(See door latch above.) Lock this
latch after replacing the door.
Remove the clip to bend it back to its
original shape. See the following
instructions to attach the CBX-A belt
clip to your RTX Plus radio. Refer to
FIG2 at left.
1. Carefully remove the two peel-off
tabs located on the sides of the
label on the case back. Screw
holes are located under the tabs.
2. Place the belt clip on the radio
case back with the two screw
holes aligned with the holes in the
radio case. Secure the belt clip
with the included screws and
washers.
CAUTION: Use only the screws
included; longer screws
will damage radio
electronics.
If you later remove the
belt clip, reinstall the
screws and washers in
the case back to seal out
dirt and moisture.
RADIO CARE
n
OOn
FIG2: PATRIOT PLUS RTX
BATTERY PACK
INSTALLATION
For assistance, call 800-USA-1-USA (800-872-1872)
BATTERIES
BELT CLIP
Belt Belt
ClipClip
Attachment Points
Attachment
Points
BELT CLIP INSTALLATION
The CBX-A belt clip is designed to
or
TAB
TAB
-450
IT07
IER C.
ID: A N, IN
FCC RITRO: RTX-454IES 6-1201
el
R
E
od
) 84
M
S S (317
PLU . PH: 45
.A
23
U.S
A 1
e in
Mad SN:
NOTE:Install
Installthe
the battery
battery (left)
AS SHOWN,
NOTE:
AS SHOWN
(left),
withthe
the battery
battery label
label facing
with
facingyou
you,right side upbend away rather than break,
damage the radio case.
right side up.
THIS
UP
END
9902
C. 2 USA
N, IN 4603
ry
RO
ly.
May
Batte
RIT mel, IN1380 8N
rs on cuit.
Car 843- BPX- rgeablecapablecharge ort cir
317- DEL: Recha harge RON or sh
MO VDC st C RIT utilate
9.6 le / FaN: Use fire, m rns.
.
Trick TIO put in e bu U.S.A
CAU NOT or caus ade in
DO de lls m
explottery ce
Ba
Charger
Contacts
Charger
Contacts
to the battery
Slot: Slot
Two(Two
slotsslots
matemate
to the
door
topdoor
edgetop
tabs)
battery
edge tabs.
Battery Compartment
Compartment
Battery
Door
Latch
Door
Latch
iddee
SSlli
BatteryDoor
Door(Top
(TopEdge)
Edge)
Battery
k
kk
LLoocc Loc
k
k
c
ck
c
lo
UUnnlo Unlo
ff
OOff
NOTE:
ddee
SSllii
n
OOn
The battery door slides on and off
once the door latch is unlocked.
(See door latch above.) Lock this
latch after replacing the door.
FIG2: PATRIOT PLUS RTX
BATTERY PACK
INSTALLATION
Remove the clip to bend it back to its
original shape. See the following
instructions to attach the CBX-A belt
clip to your RTX Plus radio. Refer to
FIG2 at left.
1. Carefully remove the two peel-off
tabs located on the sides of the
label on the case back. Screw
holes are located under the tabs.
2. Place the belt clip on the radio
case back with the two screw
holes aligned with the holes in the
radio case. Secure the belt clip
with the included screws and
washers.
CAUTION: Use only the screws
included; longer screws
will damage radio
electronics.
If you later remove the
belt clip, reinstall the
screws and washers in
the case back to seal out
dirt and moisture.
page 5
RADIO CARE
OBSERVE CAUTION IN THE FOLLOWING
ENVIRONMENTS TO MAXIMIZE THE LIFE
OF YOUR RADIO EQUIPMENT:
MOISTURE: PATRIOT Plus SST Series radios are
not waterproof. DO NOT directly expose them to rain
or excessive moisture.
CHEMICALS: Detergents, alcohol, aerosol sprays or
petroleum products can damage the radio case. DO
NOT use petroleum solvents of any kind; use a soft
cloth moistened with water to clean the case.
EXTREME HEAT: High temperatures can damage
the battery and other components. DO NOT expose
the units to extreme heat or leave them in direct
sunlight.
LOW TEMPERATURES: The capacity of the NiCd
battery is greatly reduced in extreme cold. When
using the unit in very cold environments, periodically
warm the radio under your coat.
EXCESSIVE TRANSMISSIONS: Maximum drain on
battery power occurs when transmitting. DO NOT
hold the Push-To-Talk switch down longer than
necessary during transmission intervals. DO NOT
reduce battery service life by attempting to power a
radio with a depleted battery; always charge
batteries overnight after each day of use.
VIBRATION/ SHOCK: Although your PATRIOT Plus
radio is designed to be rugged, it will not survive
excessive abuse. Avoid dropping the radio.
NOTE: The optional MHX-A holster provides added
protection from weather and shock.
For assistance, call 800-USA-1-USA (800-872-1872)
page 5
CONVENTIONAL OPERATION
TO TURN ON THE RADIO
PRIORITY SCANNING
Rotate the ON/ OFF/ Volume Control clockwise out of the click position. NOTE: For priority scanning, determine a priority channel at the time
of programming; ask your PATRIOT Plus Dealer for help.
TO ADJUST THE VOLUME
Select the channel containing the scan listthe radio will beep
Rotate the ON/ OFF/ Volume Control clockwise to increase the
twice, then scan all the channels programmed into the scan list.
volume, and counterclockwise to decrease the volume.
When you receive a broadcast on the predetermined priority
channel, another beep sounds before the broadcast.
TO HEAR CALLS FROM OTHER USERS
A broadcast from any channel other than the priority channel
Rotate the Channel Control Knob to the desired channel and adjust
will not be preceded by this beep. It will initially have a slight pause
the volume. The radio can receive broadcasts only when the PTT
in the broadcast while the radio is checking for activity on the priority
button is not pressed; the volume setting determines if you hear
channel. Scanning resumes when the broadcast ends.
these broadcasts.
BUSY CHANNEL DELETE
TO CALL OTHER USERS
If you wish to temporarily delete a channel in the scan list (for
NOTE: Check the TX/ Busy Indicator before transmitting, to confirm
instance, if it is extremely busy), press the monitor button while
the channel is clear. Do not transmit when the indicator
scanning is on the channel to be deleted. To add the channel back
flashes GREEN, showing the channel is busy. When the
into the scan list, change channels, or power cycle the radio.
indicator stops flashing GREEN, the channel is open.
You may delete more than one channel. However, the priority
To transmit, hold the radio so the microphone is two inches from
channel may not be deleted.
your mouth, then press and hold the PTT Button. Talk in a normal
tone. When you press the PTT Button, the TX/ Busy Indicator glows
SPECIAL FEATURES
RED, showing the transmitter is activated.
TO MONITOR
Press the Monitor Button to monitor the channel, if your radio is
programmed with QC or DQC. You will hear either one or two
beeps. See Conventional Operation, Quiet Call/ Monitor, page 7.
TO TURN OFF THE RADIO
Rotate On/ Off/ Volume Control counterclockwise until it clicks.
SCANNING
NOTE: The PATRIOT Plus radio may be programmed to transmit
on either the last active channel or the priority channel by
pressing the PTT during scanning; ask your Dealer for help.
NORMAL SCANNING
For normal scanning, when the scan list channel is selected, the
radio will beep twice, then scan all the channels programmed into
the scan list. When a broadcast is received, scanning stops to let
you hear communications on that channel.
page 3
page 6
BUSY CHANNEL LOCKOUT
This feature keeps the radio from broadcasting when the channel
is busy, often used with Channel Monitoring Lockout. If you press
the PTT while the channel is busy with a signal not carrying your
QC code, this feature sounds a busy tone in the speaker and
keeps your transmitter shut off.
CHANNEL MONITORING LOCKOUT
(NOT AVAILABLE WITH TRUNKING)
This function may be programmed to keep the radio user from
listening to other licensees on a shared channel. The TX/ Busy
Indicator flashes GREEN to show when the channel is busy. QC or
DQC must be used with this option.
TRUNKED
OPERATION
RECEIVING A
DISPATCH CALL
1. Switch On the radio by rotating
the On/ OFF/ Volume Control out
of the click position. The TX/
Busy Indicator will flash GREEN.
2. Select the desired system/ group
with the Channel Control.
3. Adjust the Volume Control for the
desired volume setting.
PLACING A
DISPATCH CALL
1. Select the desired system/ group
with the Channel Control Knob.
2. Press and hold the PTT Button.
You will hear one of the
following:
Clear-to-Talk Tone
a short high tone indicates you
may begin speaking into the radio.
System Busy Tone
a series of low tones indicates
all channels are busy. Release
the PTT and try again.
Out-of-Range Tone
alternating high/ low tones
indicate you to move the radio to
within system range and try again.
RITRON, INC. 1-800-USA-1-USA (1-800-872-1872)
For assistance, call 1-800-USA-1-USA (1-800-872-1872)
CONVENTIONAL OPERATION
TO TURN ON THE RADIO
PRIORITY SCANNING
Rotate the ON/ OFF/ Volume Control clockwise out of the click position. NOTE: For priority scanning, determine a priority channel at the time
of programming; ask your PATRIOT Plus Dealer for help.
TO ADJUST THE VOLUME
Select the channel containing the scan listthe radio will beep
Rotate the ON/ OFF/ Volume Control clockwise to increase the
twice, then scan all the channels programmed into the scan list.
volume, and counterclockwise to decrease the volume.
When you receive a broadcast on the predetermined priority
channel, another beep sounds before the broadcast.
TO HEAR CALLS FROM OTHER USERS
A broadcast from any channel other than the priority channel
Rotate the Channel Control Knob to the desired channel and adjust
will not be preceded by this beep. It will initially have a slight pause
the volume. The radio can receive broadcasts only when the PTT
in the broadcast while the radio is checking for activity on the priority
button is not pressed; the volume setting determines if you hear
channel. Scanning resumes when the broadcast ends.
these broadcasts.
TO CALL OTHER USERS
NOTE: Check the TX/ Busy Indicator before transmitting, to confirm
the channel is clear. Do not transmit when the indicator
flashes GREEN, showing the channel is busy. When the
indicator stops flashing GREEN, the channel is open.
To transmit, hold the radio so the microphone is two inches from
your mouth, then press and hold the PTT Button. Talk in a normal
tone. When you press the PTT Button, the TX/ Busy Indicator glows
RED, showing the transmitter is activated.
BUSY CHANNEL DELETE
If you wish to temporarily delete a channel in the scan list (for
instance, if it is extremely busy), press the monitor button while
scanning is on the channel to be deleted. To add the channel back
into the scan list, change channels, or power cycle the radio.
You may delete more than one channel. However, the priority
channel may not be deleted.
TO MONITOR
Press the Monitor Button to monitor the channel, if your radio is
programmed with QC or DQC. You will hear either one or two
beeps. See Conventional Operation, Quiet Call/ Monitor, page 7.
BUSY CHANNEL LOCKOUT
This feature keeps the radio from broadcasting when the channel
is busy, often used with Channel Monitoring Lockout. If you press
the PTT while the channel is busy with a signal not carrying your
QC code, this feature sounds a busy tone in the speaker and
keeps your transmitter shut off.
TO TURN OFF THE RADIO
Rotate On/ Off/ Volume Control counterclockwise until it clicks.
SCANNING
NOTE: The PATRIOT Plus radio may be programmed to transmit
on either the last active channel or the priority channel by
pressing the PTT during scanning; ask your Dealer for help.
NORMAL SCANNING
For normal scanning, when the scan list channel is selected, the
radio will beep twice, then scan all the channels programmed into
the scan list. When a broadcast is received, scanning stops to let
you hear communications on that channel.
page 3
page 6
SPECIAL FEATURES
CHANNEL MONITORING LOCKOUT
(NOT AVAILABLE WITH TRUNKING)
This function may be programmed to keep the radio user from
listening to other licensees on a shared channel. The TX/ Busy
Indicator flashes GREEN to show when the channel is busy. QC or
DQC must be used with this option.
RITRON, INC. 1-800-USA-1-USA (1-800-872-1872)
For assistance, call 1-800-USA-1-USA (1-800-872-1872)
TRUNKED
OPERATION
RECEIVING A
DISPATCH CALL
1. Switch On the radio by rotating
the On/ OFF/ Volume Control out
of the click position. The TX/
Busy Indicator will flash GREEN.
2. Select the desired system/ group
with the Channel Control.
3. Adjust the Volume Control for the
desired volume setting.
PLACING A
DISPATCH CALL
1. Select the desired system/ group
with the Channel Control Knob.
2. Press and hold the PTT Button.
You will hear one of the
following:
Clear-to-Talk Tone
a short high tone indicates you
may begin speaking into the radio.
System Busy Tone
a series of low tones indicates
all channels are busy. Release
the PTT and try again.
Out-of-Range Tone
alternating high/ low tones
indicate you to move the radio to
within system range and try again.
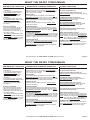
WHAT THE RADIO TONES MEAN
CONVENTIONAL OPERATION
CONVENTIONAL & TRUNKED OPERATION
TRUNKED OPERATION
SCANNING
TWO BEEPS
If you rotate the Channel Select Knob,
a second lower beep after the
channel-select beep indicates
selection of the Scan List Channel.
POWER ON/ SELF TEST "OK"
When it is first turned on, the radio emits an initial "beep" to
indicate it is ready to use. (NOTE: The radio runs a quick "self
test" to confirm basic functions.)
You will hear one of the following tones when
you press and hold the PTT:
ONE BEEP
If you rotate the Channel Select Knob,
a single lower-toned beep (without
a channel select beep) indicates
selection of the last active channel in
your scan list.
QUIET CALL/ MONITOR
On a channel programmed with QC or
DQC, you can turn the tone squelch
feature ON or OFF by pressing the
Monitor Button so you hear either one or
two beeps as follows:
One beep indicates QC/ DQC is ON.
Two beeps indicate QC/ DQC is OFF.
The radio beeps rapidly if you press
the Monitor Button for 3 seconds to put
the radio in open squelch.
ERROR TONES
In the self test (above), if a diagnostic error is detected, an
alternating error tone sounds. In this case, turn the radio off,
then on again. If the error tone still sounds, consult an authorized
Ritron service facility, or the Ritron Repair Department.
CHANNEL SELECT
When you rotate the Channel Control knob, a short beep
sounds at each detent.
TRANSMIT DISABLE
Some programmable features such as Receive Only and Busy
Channel Lockout will disable the transmitter and cause a busy
tone (series of low tones) when the PTT Button is pressed.
TRANSMITTER TIME-OUT
The radio sounds a low, then a high tone, then the transmitter
automatically shuts off if you press and hold down the PTT button
continuously longer than the dealer-programmed time. The radio
switches to "receive." Dealers can turn this feature ON and OFF.
LOW/ DEAD BATTERY
When the battery voltage has dropped below a certain level, the
radio will sound a short "beep" every 20 seconds to inform
you to charge the battery.
A longer low tone will sound when the battery is completely
discharged and should be recharged.
CLEAR-TO-TALK TONE (LTR/ PassPort)
A short high tone indicates you may begin speaking
into the radio.
SYSTEM BUSY TONE (LTR/ PassPort)
A series of low tones indicates all channels are
busy. Release the PTT and try again.
OUT-OF-RANGE TONE (LTR/ PassPort)
Alternating high/ low tones indicate you should
move within range of the system and try again.
Your radio may emit one of the following tones
without your activating the PTT:
REGISTRATION TONES (PassPort)
When you turn the radio on and select a channel with a
valid PassPort ID, the radio will emit three short high
tones, indicating a successful automatic registration.
NOTE: If you press the PTT before the unit registers, you
will hear the System Busy Tone (see above).
ROAMING TONE (PassPort)
If the radio is out of range of the system, the radio will
emit a short high tone to inform the user the radio is
searching for a valid system with which to register.
For assistance, call 800-USA-1-USA (800-872-1872)
page 7
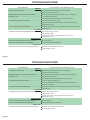
TROUBLESHOOTING
Problem
GENERAL
Possible Solution(s)
The radio does not work at all. ....................................................
Make sure the battery is installed correctly, as shown in FIG-2, Page 5.
Recharge or replace the battery. (Note 1.)
Operating features do not work exactly as expected. ................
The radio has been dealer programmed for customized operation. (Consult dealer.)
Reception is poor. ........................................................................
Move to a different location. (Note 2.)
Confirm the proper antenna is connected to the radio. (See p. 3, "Antenna.")
You cannot hear calls from other radios. ....................................
Turn Off Quiet Call (coded) squelch. (Note 3.)
Be certain your radio receives on the same frequency as the caller transmits. (Note 4.)
Recharge the battery. (Note 1.)
Your calls cannot be heard in other radios. ................................
Make sure your radio transmits on the receive frequency of radio(s) you want to call. (Note 4.)
Recharge the battery.
BATTERY
The battery loses its charge sooner than expected. ..................
Review the battery charging instructions.
Conserve the battery. (Note 5.)
If the radio is used in extreme cold, warm the radio under your coat. (Note 6.)
Replace the battery. (Note 1.)
ERROR TONES
An error tone sounds when the radio is first switch On. ...........
See "Error Tones" on p. 7.
An error tone occurs while you are transmitting. .......................
Refer to "Transmitter Time-Out" transmitting, p. 7.
QUIET CALL
You cannot screen out calls from outside your QC group. .......
page 3
page 8
Make sure the channel is programmed with Quiet Call.
Activate coded squelch. (Note 7.)
RITRON, INC. 1-800-USA-1-USA (1-800-872-1872)
For assistance, call 1-800-USA-1-USA (1-800-872-1872)
TROUBLESHOOTING NOTES
1. Try a battery pack from a working radio. If the radio in question works
with that pack, the original battery is suspect. Charge the suspect
battery as recommended in this manual. Then if the charged original
battery cannot power an RTX Plus handheld, try charging again with
another charger. If the battery still doesn't hold a charge, the pack
should probably be replaced. However, if the battery appears to be
"good" after you try the second charger, the first charger might be
faulty. If you think any accessory is not operating properly, contact
your dealer or RITRON.
6. In extreme cold, battery charge capacity is greatly reduced. If you use
the RTX Plus portable in very cold conditions, periodically warm the
radio under your coat if possible. Use of an optional remote speaker/
microphone will allow you to keep the radio under your coat while
transmitting and receiving.
2. Reception can often be improved by moving the radio a short
distance. This effect is more noticeable inside buildings. The range of
RTX Plus portables equipped with a standard battery pack is about
five miles, line-of-sight.
(For the status of QC squelch, press the Monitor switcha single
beep indicates QC squelch is On; a double beep indicates QC
squelch is Off.)
3. If your radio does not detect calls from other radios on the same
channel, turn Off Quiet Call squelch. (For the status of QC squelch,
press the Monitor switcha single beep indicates QC squelch is On;
a double beep indicates QC squelch is Off.)
4. CONVENTIONAL OPERATION: To hear a call, select a channel
programmed to receive your caller's transmit frequency. To call
another unit, select a channel programmed to transmit the other
radio's receive frequency.
TRUNKED/ REPEATER OPERATION: To operate in a repeater
system, your channel(s) must be programmed to work with the
repeater's transmit and receive frequencies. (NOTE: A radio channel
can hold two separate operating frequencies one to receive; one to
transmit.)
5. Because maximum battery power drain occurs when the radio is
transmitting, do not hold down the Push-To-Talk button longer than
necessary when transmitting each call. Some power is used if the
radio is left On to receive calls. When practical, switch Off the unit.
7. For radios to communicate using Quiet Call, each unit must be
programmed with the same Quiet Call code. Every code is unique,
and your radio will respond only to the code programmed for the
channel.
NOTES
.................................................................................................................
.................................................................................................................
.................................................................................................................
.................................................................................................................
.................................................................................................................
.................................................................................................................
.................................................................................................................
.................................................................................................................
.................................................................................................................
.................................................................................................................
For assistance, call 800-USA-1-USA (800-872-1872)
page 9
RITRON, INC. LIMITED WARRANTY
WHAT THIS WARRANTY COVERS
RITRON, INC. ("RITRON") provides the following warranty against defects in materials and/or
workmanship in RITRON Radios, Rechargeable Batteries and Accessories under normal use and
service during the applicable warranty period (as stated below). "Accessories" means antennas,
holsters, chargers, earphones, speaker/microphones and items contained in the programming and
programming/service kits. Rechargeable batteries will be replaced during the applicable warranty
period only if leakage occurs or the batteries drop below 75% of rated capacity.
WHAT IS COVERED
FOR HOW LONG
PATRIOT Plus RTX-454
Series Radios
1 year *
WHAT RITRON WILL DO
During the first year after date of purchase,
RITRON will repair or replace the defective
product, at RITRON's option, parts and
labor included at no charge.
1 year *
RITRON Rechargeable
Batteries
Accessories
RITRON will replace the defective battery
90 days*
* After date of purchase
WHAT THIS WARRANTY DOES NOT COVER
Any technical information provided with the covered product or any other RITRON products;
Installation, maintenance or service of the product, unless this is covered by a separate written
agreement with RITRON;
Any products not furnished by RITRON which are attached or used with the covered product, or
defects or damage from the use of the covered product with equipment that is not covered (such as
defects or damage from the charging or use of batteries other than with covered product);
Defects or damage, including broken antennas, resulting from:
- misuse, abuse, improper maintenance, alteration, modification, neglect, accident or act of God,
- the use of covered products other than in normal and customary manner or,
- improper testing or installation;
Defects or damages from unauthorized disassembly, repair or modification, or where unauthorized
disassembly, repair or modification prevents inspection and testing necessary to validate warranty
claims;
Defects or damages in which the serial number has been removed, altered or defaced.
Batteries if any of the seals are not intact.
IMPORTANT: This warranty sets forth the full extent of RITRONs express responsibilities regarding
the covered products, and is given in lieu of all other express warranties. What RITRON has agreed to
do above is your sole and exclusive remedy. No person is authorized to make any other warranty to you
Pub. 14500005
REV. D
on behalf of RITRON. Warranties implied by state law, such as implied warranties of merchantability
and fitness for a particular purpose, are limited to the duration of this limited warranty as it applies to the
covered product. Incidental and consequential damages are not recoverable under this warranty (this
includes loss of use or time, inconvenience, business interruption, commercial loss, lost profits or
savings). Some states do not allow the exclusion or limitation of incidental or consequential
damages, or limitation on how long an implied warranty lasts, so the above limitations or
exclusions may not apply to you. Because each covered product system is unique, RITRON
disclaims liability for range, coverage, or operation of the system as a whole under this warranty.
WHO IS COVERED BY THIS WARRANTY
This warranty is given only to the purchaser or lessee of covered products when acquired for use, not resale.
This warranty is not assignable or transferable.
HOW TO GET WARRANTY SERVICE
To receive warranty service, you MUST deliver or send the defective product, delivery costs and insurance
prepaid, within the applicable warranty period, to RITRON, INC., 505 West Carmel Drive, Carmel, Indiana
46032, Attention: Warranty Department. Please point out the nature of the defect in as much detail as you
can.
You MUST retain your sales or lease receipt (or other written evidence of the date of purchase) and
deliver it along with the product. If RITRON chooses to repair or replace a defective product, RITRON
may replace the product or any part or component with reconditioned product, parts or components.
Replacements are covered for the balance of the original applicable warranty period. All replaced covered
products, parts or components become RITRONs property.
RIGHTS TO SOFTWARE RETAINED
Title and all rights or licenses to patents, copyrights, trademarks and trade secrets in any RITRON software
contained in covered products are and shall remain in RITRON. RITRON nevertheless grants you a limited
non-exclusive, transferable right to use the RITRON software only in conjunction with covered products.
No other license or right to the RITRON software is granted or permitted.
YOUR RIGHTS UNDER STATE LAW
This warranty gives you specific legal rights, and you may also have other rights which vary from state to state.
WHERE THIS WARRANTY IS VALID
This warranty is valid only within the United States, the District of Columbia and Puerto Rico.
02-05
© 2002 RITRON, INC.
ALL RIGHTS RESERVED
RITRON, PATRIOT, and QUIET CALL ARE REGISTERED TRADEMARKS OF RITRON, INC.
RITRON, INC. LIMITED WARRANTY
WHAT THIS WARRANTY COVERS
RITRON, INC. ("RITRON") provides the following warranty against defects in materials and/or
workmanship in RITRON Radios, Rechargeable Batteries and Accessories under normal use and
service during the applicable warranty period (as stated below). "Accessories" means antennas,
holsters, chargers, earphones, speaker/microphones and items contained in the programming and
programming/service kits. Rechargeable batteries will be replaced during the applicable warranty
period only if leakage occurs or the batteries drop below 75% of rated capacity.
WHAT IS COVERED
FOR HOW LONG
PATRIOT Plus RTX-454
Series Radios
1 year *
RITRON Rechargeable
Batteries
Accessories
WHAT RITRON WILL DO
During the first year after date of purchase,
RITRON will repair or replace the defective
product, at RITRON's option, parts and
labor included at no charge.
1 year *
RITRON will replace the defective battery
90 days*
* After date of purchase
WHAT THIS WARRANTY DOES NOT COVER
Any technical information provided with the covered product or any other RITRON products;
Installation, maintenance or service of the product, unless this is covered by a separate written
agreement with RITRON;
Any products not furnished by RITRON which are attached or used with the covered product, or
defects or damage from the use of the covered product with equipment that is not covered (such as
defects or damage from the charging or use of batteries other than with covered product);
Defects or damage, including broken antennas, resulting from:
- misuse, abuse, improper maintenance, alteration, modification, neglect, accident or act of God,
- the use of covered products other than in normal and customary manner or,
- improper testing or installation;
Defects or damages from unauthorized disassembly, repair or modification, or where unauthorized
disassembly, repair or modification prevents inspection and testing necessary to validate warranty
claims;
Defects or damages in which the serial number has been removed, altered or defaced.
Batteries if any of the seals are not intact.
IMPORTANT: This warranty sets forth the full extent of RITRONs express responsibilities regarding
the covered products, and is given in lieu of all other express warranties. What RITRON has agreed to
do above is your sole and exclusive remedy. No person is authorized to make any other warranty to you
Pub. 14500005
REV. D
00-06
© 1999-2002 RITRON, INC. ALL RIGHTS RESERVED
RITRON, PATRIOT, and QUIET CALL ARE REGISTERED TRADEMARKS OF RITRON, INC.
on behalf of RITRON. Warranties implied by state law, such as implied warranties of merchantability
and fitness for a particular purpose, are limited to the duration of this limited warranty as it applies to the
covered product. Incidental and consequential damages are not recoverable under this warranty (this
includes loss of use or time, inconvenience, business interruption, commercial loss, lost profits or
savings). Some states do not allow the exclusion or limitation of incidental or consequential
damages, or limitation on how long an implied warranty lasts, so the above limitations or
exclusions may not apply to you. Because each covered product system is unique, RITRON
disclaims liability for range, coverage, or operation of the system as a whole under this warranty.
WHO IS COVERED BY THIS WARRANTY
This warranty is given only to the purchaser or lessee of covered products when acquired for use, not resale.
This warranty is not assignable or transferable.
HOW TO GET WARRANTY SERVICE
To receive warranty service, you MUST deliver or send the defective product, delivery costs and insurance
prepaid, within the applicable warranty period, to RITRON, INC., 505 West Carmel Drive, Carmel, Indiana
46032, Attention: Warranty Department. Please point out the nature of the defect in as much detail as you
can.
You MUST retain your sales or lease receipt (or other written evidence of the date of purchase) and
deliver it along with the product. If RITRON chooses to repair or replace a defective product, RITRON
may replace the product or any part or component with reconditioned product, parts or components.
Replacements are covered for the balance of the original applicable warranty period. All replaced covered
products, parts or components become RITRONs property.
RIGHTS TO SOFTWARE RETAINED
Title and all rights or licenses to patents, copyrights, trademarks and trade secrets in any RITRON software
contained in covered products are and shall remain in RITRON. RITRON nevertheless grants you a limited
non-exclusive, transferable right to use the RITRON software only in conjunction with covered products.
No other license or right to the RITRON software is granted or permitted.
YOUR RIGHTS UNDER STATE LAW
This warranty gives you specific legal rights, and you may also have other rights which vary from state to state.
WHERE THIS WARRANTY IS VALID
This warranty is valid only within the United States, the District of Columbia and Puerto Rico.