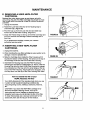
1
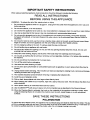
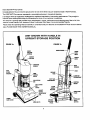
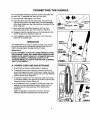
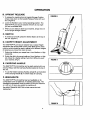
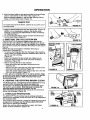
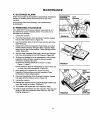
SEARS
OWNER'S
MANUAL
DESTINY_ PLUS
THE UPRIGHT WITH
CANISTER POWER
MODEL NO.
204.36999690
Kenmore"
DESTINY°PLUS
CAUTION
Before using this product,
read this manual and
follow all Safety Rules and
Operating Instructions
SAVE THIS
MANUAL FOR
FUTURE REFERENCE
Sears, Roebuck and Co., Hoffman Estates, IL 60179 U.S.A.
DESTINY°PLUS
THE UPRIGHT WITH CANISTER POWER
FULL ONEYEAR
WARRANTY
When used for private household purposes, if within one year from the date of purchase, this vacuum
cleaner fails due to a defect in material or workmanship, RETURN IT TO THE NEAREST SEARS
SERVICE CENTER DEPARTMENT IN THE UNITED STATES and Sears will repair it free of charge.
It this cleaner is used for commercial or rental purposes, the above warranty coverage applies for only
90 days from the date of purchase.
This warranty gives you specific legal rights, and you may also have other rights which vary from state to
state.
Sears, Roebuck and Co., Dept. 817 WA, Hoffman Estates, IL 60179
TABLE OF CONTENTS
1.
Limited Warranty
..........................................................................................
2.
Important Safety Instructions ...........................................................................
2
3.
Introduction ...................................................................................................
3
4.
Connecting the Handle ....................................................................................
4
5.
Operation
A. Power Cord Use & Storage
B. Updght Release
C. Switch
........................................................................
.......................................................................................
...................................................................................................
D. Carpet Height Adjustment
E. Carrying Handle
...........................................................................
.......................................................................................
4
5
5
5
5
F. Headlights ................................................................................................
5
G. Activating the Cleaning Wand
6
H. 3 On-Board Attachments
I. Attachments to Hose
.....................................................................
...........................................................................
.................................................................................
J. Emptying the Collection Bin
........................................................................
K. Keeping the Rotating Bruch Clean
...............................................................
L. Ovedoad Protection ....................................................................................
6.
1
6
6
7
7
7
Maintenance:
A. Blockage Alarm
.......................................................................................
B. Removing a Blockage ..............................................................................
8
8, 9
C. Replacing a Broken Belt ...........................................................................
10
D. Replacing a Ught Bulb ..............................................................................
10
E. Removing a used HEPA Filter Cartridge
......................................................
11
.........................................................
11
F. Inserting a new HEPA Filter Cartridge
G. Replacement of Filter Housing
............
: .....................................................
12
IMPORTANT
SAFETY INSTRUCTIONS
When using an electrical appliance, basic precautions should be followed, including the following:
READ ALL INSTRUCTIONS
BEFORE USING THIS APPLIANCE
WARNING - To reduce the risk of fire, electric shock, or injury:
1.
Do not leave the appliance when it is plugged in. Unplug from the outlet when the appliance is not in use, and
before servicing.
2.
Do not use outdoors, or on wet surfaces.
3.
Do not allow the appliance to be used as a toy. Close attention is necessary when it is used by or near children.
4.
Use only as described in this manual. Use only manufacturer's
5.
Do not use with damaged cord or plug. If the appliance is not working as it should, if it has been dropped,
damaged, left outdoors, or has been dropped into water, return it to an authorized Sears Service Center for
inspection.
6.
Do not pull or carry by cord, use the cord as a handle, close a door on the cord, or pull the cord around sharp
edges or comers. Do not run appliance over the cord. Keep cord away from heated surfaces.
7.
Do not unplug by pulling on the cord. To unplug, grasp the plug, not the cord.
8.
Do not handle plug or appliance with wet hands.
9.
Do not put any object into openings. Do not use with any opening blocked; keep free of dust, lint, hair, and
anything that may reduce air flow.
recommended attachments.
10. Keep hair, loose clothing, fingers, and all parts of the body away from openings and moving parts.
11. Do not pick up anything that is burning or smoking, such as cigarettes, matches, or hot ashes while operating
the machine.
12. Do not use without the Collection Bin in proper place.
13. Turn off the switch before unplugging.
14. Use extra care when cleaning on stairs.
15. Do not use to pick up flammable or combustible liquids such as gasoline, or use in areas where they may be
present.
16. Unplug cleaner before servicing. This includes such tasks as cleaning the rotating brush, removing a blockage,
replacing a broken belt or a light bulb.
17. The machine should be turned off before removing or replacing the Collection Bin.
18. Avoid the use of extension cords.
19. Pick-up hard, sharp objects and other large surface litter by hand.
20. When cleaning the outside of your machine, wipe with a damp versus dry cloth. This will reduce the effect of any
static electdcity.
21. Have repairs made by an authorized Sears Service Center.
22. Use the DESTINY e PLUS vacuum cleaner only for its intended use as described in this Owner's Manual.
23. When the Cleaning Wand is activated, the brush on the underside of the machine continues to rotate. When
using the Cleaning Wand, do not station the machine over the cord, carpet fringes or on soft upholstered
Surfaces.
SAVETHESEINSTRUCTIONS
POLARIZATION
To reduce the risk of electric shock, this appliance has a polarized plug (one blade is wider than the other). This plug
will fit in a polarized outlet only one way. If the plug does not fit fully in the outlet, reverse the plug. If it still does not
fit, contact a qualified electrician to install the proper outlet. Do not change the plug in any way.
Dear DESTINY e Plus Owner:
Congratulations!
You are now the proud owner of one of the finest vacuum cleaners made in North America.
The DESTINY e Plus vacuum represents a remarkable advance in household cleaning.
It all began when its originators challenged the traditional standards of vacuuming performance. They sought to
improve upon existing technology by harnessing the force of two cyclones in sequence.
The result is a product that provides many advantages in power, performance and cleaning ease. Best of all, this
vacuum is user friendly. And, because it doesn't use paper filter bags, it is environmentally friendly.
Please read this Operating Manual carefully to understand fully the features of the DESTINY e Plus vacuum cleaner.
Also, PLEASE SAVE THIS OWNER'S MANUAL.
UNIT SHOWN WITH HANDLE IN
UPRIGHT STORAGE POSITION
FIGUREla
FIGURElb
WAND
RELEASE
BUTTON
UPPER
CORD
HOOK
SWITCH
POWER
CORD
HANDLE
CHANNEL
HEPA
FILTER
--
HOSE
CREVICE
CONE
HOLES
PASSAGEWAY
DIRTYAIR
PASSAGEWAY
COLLECTION
BIN
BRUSH
COLLECTION
FLOOR
CATCH
CARPET
HEIGHT
HOLSTER
INSPECTION
PLATE
DIAL
LOWER
BASECOVER
UPRIGHT
HEADLIGHTS
PEDAL
3
OVERLOAD"
RESET
BUTTON
CONNECTING
THE HANDLE
The Handle/Wand Assembly has been packed separately with
the main unit. To assemble the Wand into the Hose:
a) Hold the Hose Collar tightly in one hand.
b) Insert the Wand end into the Hose Collar and push firmly
until the Wand enters and slides easily into the full length
of the Hose, Make sure the Wand reaches the bottom of the
Hose. (Figure 2)
FIGURE2
c) Next, place this Hose/Wand Assembly into the Hose
Channel located at the rear of the machine. (Figure 3)
HOLE
d) Engage the bottom Handle-hole over its mating post at the
rear of the top of the machine. (Figure 3)
e) Once engaged, press the Handle down until it locks into
place with an audible click.
BOTTOM
HANDLE-HOLE
OPERATION
The DESTINY e PLUS vacuum cleaner is ready to go to work
for you as soon as you connect the Handle to the unit. BUT
FIRST, PLEASE READ THESE INSTRUCTIONS:
IMPORTANT:
DO NOT ATTEMPT TO PICK UP LARGE SURFACE LITTER,
CELLOPHANE, TWINE, OR LARGE SOLID OBJECTS LIKE
PAPER CLIPS, SAFETY PINS, ETC. IF OBJECTS SUCH AS
THESE ACCIDENTALLY BECOME CAUGHT IN THE
ROTATING BRUSH, A LOSS OF SUCTION AND CLEANING
ABILITY CAN RESULT.
maiD
i
BOT)'OM
HANDLE-HOLE
MATINGPOST
4.
FIGURE3
FIGURE4
A. POWER CORD USE AND STORAGE
1. Uncoil the Cord which is coiled tightly for shipping.
2. To store the Cord on the machine, wind the Power Cord
around the Upper and Lower Cord Hooks. Fasten the Cord
Plug to the Power Cord by snapping the Cord Plug Retainer
over the Power Cord. (Figure 4)
3. To ready the machine for use, rotate the Upper Cord Hook
to the down position, then remove the Power Cord from the
Upper and Lower Hooks. (Figure 4a)
FI!URE4al
4. A Cord Retainer Clip is provided to enable the Cord to be
retained in a more convenient location. Attach the Cord
Retainer Clip onto the lower part of the Handle Grip.
(Figure 5)
Note: Remember to remove the Cord from the Cord
Retainer Clip before activating the Cleaning Wand.
CORD
RETAINING
CLIP
FIGURE5
4
OPERATION
B. UPRIGHT RELEASE
FIGURE6
1, To release the machine from its Upright Storage Position,
simply press down on the Upright Release Pedal with your
foot. (Figure 6)
2. Lower the Handle to your normal operating position. The
DESTINY _ PLUS vacuum cleaner will work at any angle
you are comfortable with.
3. When you are ready to store your machine, simply return it
to the Upright Storage Position.
C. SWITCH
1. To switch On and Off, press the Switch Button at the top of
the unit. (Figure 1)
D. CARPET
HEIGHT
ADJUSTMENT
The DESTINY e PLUS vacuum cleaner has a Carpet Height
Adjustment Dial at the center of the Lower Base Cover of the
machine which should be used to adjust to the different heights
of carpet as you move from room to room.
1. Determine whether your carpet has a Low, Medium or High
carpet pile.
2. Rotate the dial to its correct setting of Low, Medium or High
pile. Adjust to a higher setting if you find it difficult to push
your machine. (Fig 7)
FIGURE7
E. CARRYING HANDLE
The DESTINY _ PLUS machine can be easily carried with one
hand by lifting it with the Carrying Handle located at the top of
the unit.
1. To use the hidden Carrying Handle, simply lift up the bottom
of the Carrying Handle lip. It is then ready for carrying.
F. HEADLIGHTS
The DESTINY e PLUS machine has two headlights on its
Lower Base Cover to assist you in cleaning dark areas. The
headlights automatically come on when you turn the machine
on, and turn off when you switch the machine off.
See MAINTENANCE SECTION of this manual for bulb
replacement.
FIGURE8
5
OPERATION
G. ACTIVATING THE CLEANING WAND
The DESTINY e PLUS vacuum cleaner's Handle is able to turn
itself into a Cleaning Wand with 10 feet of reach.
1. To activate the Cleaning Wand, first put the machine in its
upright position.
2. Press the Wand Release Button located at the top of the
unit behind the On/Off Switch. (Figure 9)
3. Detach the Handle from the top of the machine by pulling
the Handle straight up, then pull-out the Cleaning Wand
which resides inside the Hose. Any of the attachments can
be now inserted into the Handle-end. (Figure 10)
4. To return the machine to its Upright Operating Mode, simply
reverse the order of activity. That is: Push the Cleaning
Wand back inside the Hose. Then, engage the bottom
handle-hole over its mating post at the rear of the top of the
machine.
FIGURE9
' "
FIGURE10
Helpful Hint
When using the Wand, the DESTINP PLUS machine can
easily be moved by holding the wand in one hand and, with
the other hand, grasping the Carrying Handle and tilting
the machine onto its rear wheels. (Figure 11)
H. 3 ON BOARD AI-I'ACHMENTS
The DESTINY _ PLUS vacuum cleaner carries three handy
attachments on its base. (Figures 1 & 12) They are:
A Crevice Tool to help you get at the most difficult nooks
and crannies.
FIGURE11
DUSTINGBRUSH
CREVICE
TOOL
A Dusting Brush so you can vacuum sofas, drapes,
pillows, etc.
A Floor Nozzle with an air flow adjustment feature for
cleaning either carpeted or hard floor surfaces.
The Floor Nozzle is stored on the machine in the Floor Nozzle
Holster. (Figures 1 & 13)
I. ATTACHMENTS TO HOSE
J
\
FLOOR
NOZZLE
RING
ADJUSTMEN
FIGURE12
HOLSTER
The attachments can be fitted onto the end of the Cleaning
Wand as per Section G, or for added versatility, inserted
directly into the Hose-end as follows:
1. Activate the Cleaning Wand as per Section G.
2. Slide the Metal Tube of the Cleaning Wand as far out of the
Hose as it will freely go.
' FIGURE13
OPERATION
3. Hold the Hose Collar in one hand and with thumb and finger
press in both latches on the Hose Collar. (figure 14)
With the latches pressed in, use the other hand to pull the
Wand out of the Hose Collar. (Figure 14)
Helpful Hint
WAND
For easier remova/ of the Wand, rotate it as you puff it out of
the Hose Co//ar.
LATCHES
FIGURE14
4. Insert the desired attachment into the Hose Collar. (Figure 15)
NOTE: It is not necessary to press in the latches when
inserting or removing the attachments or when re-inserting
the Cleaning Wand.
5. To re-assemble the Wand, simply re-insert the Wand back
into the Hose Collar. (Figure 2)
J. EMPTYING THE COLLECTION BIN
The DESTINY _ PLUS vacuum cleaner has a see through
Collection Bin with a Maximum Fill line indicated on it, so you
know exactly when the bin needs to be emptied of its collected
dirt. It is best to empty the Collection Bin before the dirt rises to
this line.
NOTE: Be sure the machine is off before removing or
replacing the Collection Bin.
• To remove the Collection Bin from the base of the machine,
simply insert your fingers under the Collection Bin Catch, lift
up and out, and pull away.
(Figure 16)
• Empty the collected dirt into a trash can. Make sure to
empty the dirt from both the Outer and Inner Collection
Chambers. (Figure 16)
• Before returning the Bin to the machine:
- Make sure all the dirt has been removed from the
Collection Bin.
- Remove any dirt or lint that may have accumulated at the
entrance to the outer cyclone. (Figure 17)
- Clear the Screen Holes on the Cone of any dirt or lint that
may have accumulated. (Figure 17)
• Then, return the Collection Bin to its original position. Make
sure the Bin Catch locks into place on the machine. If the Bin
is not securely in place, a loss of suction may occur
during vacuuming.
FIGURE15
OUTER
COLLECTION
CHAMBER
CYCLEENTRANCE
NNER
;OLLECTIOI
_HAMBER
FIGURE16
i FIGURE17
K. KEEPING THE ROTATING BRUSH CLEAN.
The Rotating Brush is designed to perform effectively for long
periods of time. However, hair, string, and debris can
accumulate. It is recommended that you occasionally check
the brush for accumulation. Note: Be sure to unplug the
machine before removing any debris. See the
MAINTENANCE SECTIONof this manual for the removal of
debris and blockages. (Figure 18)
L. OVERLOAD
PROTECTION.
The DESTINY e PLUS machine has an overload protection
system that is designed to shut the motor off if it _ssubjected to
any excessive load.
If the machine shuts itself off, unplug the machine and proceed
to check for a blocka.ge. See the following MAINTENANCE
SECTION for removing a blockage.
Before the machine can be switched on again, the Reset
Button must be pressed in. (Figure 19)
7
FIGURE18
BASE
COVER
SCREW
FIGURE19
BASE
COVER
/SCREW
RESET
BU'I'I'ON
MAINTENANCE
A. BLOCKAGE ALARM
When the air intake of the machine is substantially restricted or
blocked, a whistling sound will be heard at the top of the
machine.
REARINSPECTION
PLATEKNOBS
FLUFF
"
(SHOWNUNLOCKED) COLLECTOR
'
If this occurs, check for a blockage. (see "REMOVING A
BLOCKAGE")
B. REMOVING A BLOCKAGE
If the DESTINY ° PLUS vacuum cleaner shuts itself off, or if
you experience a loss of suction power, it may be due to a
blockage in air passage.
1.
Unplug the machine.
2.
Press the Reset Button if the Overload Protection System
has shut the machine down. (Figure 19)
3.
Lay the machine down on its front face with the rear of the
base facing up.
4,
Rotate both of the two Inspection Plate Knobs out of their
locked position and then swing the Rear Inspection Plate
away from the rear of the machine. Three openings will be
visible. (Figure 20)
.
6.
FIGURE20
With the Rear Inspection Plate open, remove any fluff that
may have accumulated in the Fluff Collector. (Figure 20)
To check for blockage in an air passageway, with the Rear
Inspection Plate still open, stand the vacuum upright,
remove the Collection Bin and;
a) Check the Cyclone Entrance to ensure it is clean.
(Figure 17, page 7)
FIGURE21
b) Also check the Dirty Air Passageway to ensure there are
no clogs along this passageway. (Figure 20)
\
7,
Now replace the Collection Bin, reclose the Rear
Inspection Plate and then pivot both Inspection Plate
Knobs back in their locked position.
8.
Press the Reset Button if the Overload Protection System
has again shut the machine down. (Figure 19)
9.
Unplug the machine.
, ,HEIGHT
ADJUSTMENT
ROTAR
VALV
10. Release the machine from its Upright Storage Position and
lower the Handle to the floor. (Figure 21)
11. This position will expose the Front Inspection Plate.
12. Insert a blade screwdriver into the Inspection Plate slot and
gently pry the front Inspection Plate away from the main
housing. (Figure 21)
8
FIGURE22
5 TABSLOTS
LOCATED
BEHINDBUMPE
MAINTENANCE
13. If there is a blockage hero, clean it out and then
reassemble the Front Inspection Plate.
If you do not find any blockage in this area, and/or the
machine shuts itself off or the loss of suction persists, a
more detailed inspection will be necessary as follows:
14. Unplug the machine.
15. Press in the Reset Button if the Overload Protection
System has once again shut the machine down.
(Figure 19)
16. Place the machine in its Upright Storage Position.
(Figure 1)
17. Remove the Collection Bin.
18. Unscrew the two screws which are located in the bumper
at the roar of the Lower Base Cover. (Figure 19)
19. Pivot the Lower Base Cover toward the front to disengage
the 5 cover locking tabs, then lift the Lower Base Cover
away,
20. Remove any accumulated dirt or threads from the brush
and/or remove any large objects from this area that may
have jammed the brush. Also, check that the Rotary Valve
Inlet is not clogged with dirt or objects. (Figure 22)
21. Check the belt to be sure that it is in good condition. A
stretched or faulty belt will prevent the machine from
operating properly.
22. Replace Cover by hooking all 5 Cover lock tabs into the 5
tab slots of the base Assembly. (Figure 22)
NOTE: Height Adjustment Dial must be positioned as
shown in Figure 22 to allow easy assembly of cover.
23. When all tabs are engaged, swing the Cover into place.
24. With the Cover in place, pull the top edge of the Bumper
forward to check that all 5 tabs are still engaged. Refasten
the screws. Do not over tighten.
If the machine still does not start, or if you still experience a
loss of suction power, then take it to an authorized Sears
Service Center for repair by an Authorized Service
Technician.
25. If there is little or no suction at the end of the Wand, detach
the Wand from the Hose. (Figure 14, page 7) Ensure that
the Hose and Wand are both clear.
9
MAINTENANCE
C. REPLACING A BROKEN BELT
1. Unplug the machine.
2. Remove the Lower Base Cover (as described previously in
Removing a Blockage).
3, Lift the Brush Assembly up and out of the slots of the base
that retain the metal plates on each end of the Brush
Assembly.
4. Discard the old belt.
5. Place one end of the new belt around the motor shaft, and
the other end around the brush. Be sure the belt is not
twisted. (Figure 23) Use DESTINY _ PLUS replacement belt
#71023.
6. Pull the Brush Assembly toward you, and insert the left hand
metal plate into the base slot from which it was previously
removed.
7. Insert the right hand metal plate in the right hand base slot.
(See Figure 23 for the correct positioning of the assembled
metal plates.)
FIGURE23
CORRECT
POSITIONFOR
METALPLATES
\
8. Rotate brush by hand to check that the belt is running freely
and easily in its designated space between the bristles.
9. Re-assemble the Lower Base Cover, and refasten the two
screws. Do not over tighten.
D, REPLACING A LIGHT BULB
1. Unplug the machine.
LIGHT
BULBS
2. Remove the Lower Base Cover Case described in the
section on Removing a Blockage.
3. Remove the burned-out bulb. Press in a new bulb, and twist
into place. (Figure 24) Use DESTINY ® PLUS replacement
bulb #63635.
4. Re-assemble the Lower Base Cover and refasten the two
screws. Do not over tighten.
lO
I FIGURE24
MAINTENANCE
E. REMOVING A USED HEPA FILTER
CARTRIDGE.
t
Replace filter when button pops up and shows red while
vacuuming. (Fig. 25) The Filter Cartridge should last for more
than a year when the machine is used for normal household
purposes.
1. Unplug the machine.
lib
[]
2. Rotate the Lock Tab at the rear of the Housing Cap to
unlock the Cap. (Figure 26)
3. Pivot the Cap up from the Lock Tab end and slide Cap
forward and off the Filter Housing. (Figure 27)
4. Grasp the Plastic Strap on the top of the Filter Cartridge and
pull up to remove the Cartridge. Discard Cartridge into a
trash can.
FIGURE25
i
For a replacement cartridge, contact your nearest
authorized service center.
F. INSERTING A NEW HEPA FILTER
CARTRIDGE.
1. Unplug the machine.
2. When handling the new filter cartridge be very careful not to
damage or tear the pleated filter.
3. Slide the Cartridge down inside the Filter Housing until it
touches the bottom of the Housing. The arrow on the top of
the Cartridge must face the front of the Filter Housing.
FIGURE26
t.
4. Assemble the Housing Cap onto the Filter Housing by
reversing the procedure of paragraph E.3. That is, slide the
Housing Cap onto the front of the Filter Housing to engage
the underside lip of the Cap onto the small ledge at the top
front of the Filter Housing. (Figure 28) Once engaged, pivot
the Cap down onto the top of the Filter Housing and rotate
How to extend the life of your
HEPA Absolute Air filter
FIGURE27
Your HEPA Absolute Air filter operates best when you use
it under normal household cleaning conditions like
vacuuming living rooms, hallways, bedrooms, kitchens,
etc.
CAUTION: If you leave the HEPA filter cartridge in for
abnormal domestic cleaning chores, such as for
vacuuming ash from a fireplace or sawdust from a
carpentry work area, you will shorten the life of the filter.
To clean these areas use a dust pan and brush for the
excess dirt, then use the vacuum for the residue.
11
,1
IIII
FIGURE28
MAINTENANCE
G. REPLACEMENT
OF FILTER
HOUSING
1. Unplug the machine.
2. If dis-assembly of the Filter Housing is required, press in the
Filter Housing Latch Button and slide the Filter Housing
upward until free. (Figure 29)
3. To re-assemble, locate the Filter Housing Post Pocket over
the Bottom Post of the vacuum cleaner while also
positioning the Filter Housing Tab above the Vacuum
Cleaner Housing Tab. (Figure 30)
FILTER
HOUSING
LATCH
BU'FrON
4. When the two positions are aligned, slide the Filter Housing
downward until the Filter Housing Latch Button click-locks
into place. (Figure 31)
FIGURE29
FILTER , , t
HOUSING
_
I
VACUUM TAB
I _l
CLEANER_t
I ]
HOUSING
_
TAB
_I_---"-"-"-"-'_L
_
_ / /_
t I
Illfl/
FILTER
I t I
HOUSING
-......._......__I _
POST
__
J,,,,I I
J,JB,
LX _l
POCKET
BO'I"rOM_
POST
FIGURE30
/'_"z/_
_
!
BRUSH
POST
FIGURE31
12
DESTINY° PLUS
THE UPRIGHT WITH CANISTER POWER
For the repair
or replacement
parts
you need
Call 7 am-7 pm, 7 days a week
1-800-366-PART
(1-800-366-7278)
For in-home
major brand
repair
service
Call 24 hours a day, 7 days a week
1-800-4-MY-HOME"
(1-800-469-4663)
For the location of a
Sears Parts and Service Center
in your area
Call 24 hours a day, 7 days a week
1-800-488-1222
For more information
on purchasing
a
Sears Maintenance
Agreement
or to inquire about an existing Agreement
Call 9 am-5 pro, Monday-Saturday
1-800-827-6655
HomeCent_l"
|
The ServloeSideof Seal
PT. NO. 71510-1"
PRINTED IN CANADA