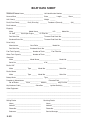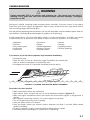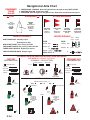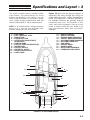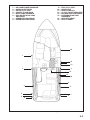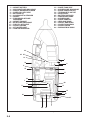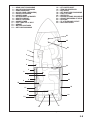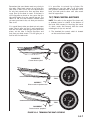
1
Cruisers
Owner’s Manual
Model/Number: _____________________________________
Hull Identification Number:____________________________
Date of Purchase/First Use: __________________________
Dealer Name: _______________________________________
Address: ___________________________________________
___________________________________________
Phone Number: _____________________________________
WORLD CLASS BOATS ™
Catalog Requests Call 1-800-603-BOAT
© 2000 Wellcraft Marine Corp., a subsidiary of Genmar Industries, Inc. 1651 Whitfield Avenue, Sarasota, FL 34243
For a complete list of standard and optional features and equipment, consult your local Wellcraft dealer. Due to a policy of continual product improvement, specifications are subject
to change without notice. The weights and volumes shown are estimated and can vary from boat to boat because of equipment, etc. Wellcraft boats meet or exceed U.S. Coast Guard
regulations at date of manufacture. Wellcraft is a trademark of Genmar Industries, Inc. Scarab is a registered trademark of Team Scarab, Inc.
Printed in USA. Part No. 2601-2589
1
BOATS DESIGNED WITH NATURE IN MIND.
As privileged visitors to the world’s oceans, lakes and waterways, we share an
obligation to help protect our marine environment. Wellcraft is leading the way
with a variety of unique systems designed to help minimize the impact of
recreational boating.
Introduction
Congratulations on your new boat purchase and
welcome to our boating family!
We want your boating experience to be the most
enjoyable possible. The more you know about
your new boat, the more you’ll enjoy the time
you spend aboard. That’s why we prepared this
manual. It’s your guide for safe operation as
well as understanding your boat’s systems and
equipment. It has been written for the beginning
boater but experienced boaters will find helpful
information as well. Be sure to read the contents thoroughly.
The popularity of boating and other water sports
has grown tremendously in the past few years.
Because of this, safety is an important issue
for everyone who shares our waterways.
Remember that along with the freedom and exhilaration of boating comes the responsibility that
you have for the safety of your passengers and
the other boaters who share the water with you.
Throughout this manual, specific precautions and
symbols identify safety-related information. Be
sure to pay close attention to them.
!
This symbol means “pay attention!” Here
is important information for your safety.
If you don’t follow these instructions, you
can damage your boat, hurt yourself or
someone else or, even worse, have a
fatal accident.
! CAUTION
This symbol and signal word indicate a
potentially hazardous situation. If you
ignore this safety message, property
damage or minor or moderate personal injury MAY or CAN result.
! WARNING
This symbol and signal word indicate a
potential hazard. If you ignore this
safety message, serious injury or
death CAN result.
! DANGER
This symbol and signal word indicate
an immediate hazard. If you ignore this
safety message, serious personal
injury or death WILL result.
Due to our policy of continuous product improvement, the illustrations used in this manual may
not be identical to the components, controls,
gauges, etc. on your boat, as they are intended
to be representative reference views. Some controls, indicators or information may be optional
and not included on your craft.
The precautions in this manual can’t and don’t
cover ever y boating situation. If a specific
method or procedure is not recommended, you
must make sure that what you do is safe for
you and others. Always use common sense
when boating! Remember too that ever y safe
boating excursion is a happy experience.
We’d also like to remind you to be kind to our
environment while you’re boating. Don’t throw
garbage and other refuse overboard. And do
your best to keep harmful compounds like gasoline and antifreeze out of the water.
This manual has been compiled to help you operate your craft with safety and pleasure. It contains the
details of the craft, the equipment supplied or fitted, its systems, and information on its operation and
maintenance. Please read it carefully and familiarize yourself with the craft before using it.
If this is your first craft, or if you are changing to a type of craft you are not familiar with, for your own
comfort and safety, please ensure that you obtain handling and operating experience before “assuming command” of the craft. Your dealer or national sailing federation or yacht club will be pleased to
advise you of local sea schools and competent instructors.
PLEASE KEEP THIS MANUAL IN A SECURE PLACE, AND HAND IT OVER TO THE NEW OWNER WHEN
YOU SELL THE CRAFT.
Table of Contents
Introduction
Table of Contents
General Information .............................1-1
YOU AND YOUR NEW BOAT....................1-2
BOATING LAWS AND REGULATIONS ........1-6
RECOMMENDED READING.....................1-8
SERVICE MAINTENANCE LOG...............1-11
BOAT DATA SHEET ..............................1-12
FUEL LOG...........................................1-13
FLOAT PLAN .......................................1-14
WARRANTY REGISTRATION TRANSFER..1-15
Boating Safety ....................................2-1
ADVISORY STATEMENTS........................2-1
HAZARD COMMUNICATION ....................2-1
SAFE BOATING RECOMMENDATIONS ......2-1
SAFETY EQUIPMENT..............................2-2
SAFE BOATING COURSES ......................2-5
DRUGS AND ALCOHOL ..........................2-5
SAFE OPERATION ..................................2-5
CARBON MONOXIDE .............................2-7
CARBON MONOXIDE ACCUMULATION .....2-8
WATER SPORTS ....................................2-9
RULES OF THE ROAD ..........................2-10
GENERAL RULES OF SEAMANSHIP .......2-12
NAVIGATIONAL AIDS CHART .................2-15
Electrical Systems Cont. .....................6-1
GALVANIC CORROSION..........................6-8
BONDING .............................................6-9
TROUBLESHOOTING CHART.................6-10
Boat Equipment...................................7-1
STOVE .................................................7-1
REFRIGERATOR.....................................7-1
OVEN...................................................7-1
COFFEE MAKER ....................................7-1
MARINE STEREO...................................7-1
AIR CONDITIONING SYSTEM ..................7-2
AUTOMATIC FIRE SUPPRESSION
SYSTEM .........................................7-3
TV/VCR (OPTIONAL) ..............................7-3
VHF RADIO ...........................................7-3
Underwater Gear .................................8-1
PROPELLERS........................................8-1
PROPELLER SHAFT ...............................8-1
STRUTS ...............................................8-1
SHAFT LOG AND STUFFING BOX.............8-1
RUDDERS ............................................8-2
TRIM TABS ...........................................8-2
TROUBLESHOOTING CHART...................8-2
Controls and Indicators........................9-1
Specifications and Layout ....................3-1
SPECIFICATIONS ...................................3-8
SAFETY LABEL LOCATIONS ....................3-9
Water Systems ....................................4-1
FRESH WATER SYSTEM .........................4-1
WATER SYSTEM TROUBLESHOOTING .....4-4
RAW WATER SYSTEM ............................4-4
SEACOCKS...........................................4-4
WASTE SYSTEM....................................4-5
BILGE SYSTEM .....................................4-6
WASTE SYSTEM TROUBLESHOOTING .....4-6
Fuel System ........................................5-1
FUEL SYSTEM COMPONENTS ................5-1
FUEL SYSTEM TROUBLESHOOTING ........5-2
Electrical Systems...............................6-1
WIRING COLOR CODE ...........................6-1
12-VOLT DC ELECTRICAL SYSTEM ..........6-1
AC ELECTRICAL SYSTEM .......................6-4
MAIN ELECTRICAL PANEL ......................6-6
INSTRUMENTATION ...............................9-1
STEERING ............................................9-2
STERN DRIVE THROTTLE/
SHIFT CONTROLS ............................9-3
INBOARD ENGINE AND
TRANSMISSION CONTROLS .............9-4
Pre-launch and Underway...................10-1
LAUNCH AND CRUISE CHECKLIST ........10-1
FUELING ............................................10-2
LOADING PASSENGERS AND GEAR.......10-3
STARTING PROCEDURES .....................10-4
MANEUVERING ...................................10-5
ACCELERATION...................................10-5
TRIMMING YOUR BOAT........................10-6
EXCESSIVE NOISE ..............................10-8
ANCHORING .......................................10-8
NAVIGATION LIGHTS............................10-9
HAZARDOUS CONDITIONS ...................10-9
REACTING TO EMERGENCIES.............10-11
ADDITIONAL UNDERWAY INFO ............10-13
RETURNING TO SHORE .....................10-13
Winterization and Commissioning.......11-1
LIFTING THE BOAT ..............................11-1
ENGINE, SYSTEMS & COMPONENTS ....11-2
STORAGE ON TRAILER ........................11-5
RECOMMISSIONING THE
BOAT AFTER STORAGE...................11-5
General Maintenance.........................12-1
SERVICE SCHEDULE ...........................12-1
SALTWATER CORROSION .....................12-2
BOTTOM MAINTENANCE ......................12-2
PROTECTION AGAINST ELECTROLYSIS..12-3
DECK AND HULL CARE ........................12-3
FIBERGLASS REPAIR ...........................12-4
HARDWARE AND FITTINGS...................12-5
UPHOLSTERY .....................................12-5
INTERIOR FABRICS..............................12-6
WINDSHIELDS AND WINDOWS.............12-6
CARPETING ........................................12-6
CANVAS .............................................12-6
Trailering...........................................13-1
GROSS VEHICLE WEIGHT RATING.........13-1
WEIGHT DISTRIBUTION .......................13-1
HITCH ................................................13-1
SAFETY CHAINS..................................13-2
TRAILERING GUIDELINES.....................13-2
BACKING A TRAILER............................13-3
LAUNCHING GUIDELINES.....................13-3
LOADING YOUR BOAT
ON THE TRAILER ...........................13-4
Nautical Glossary ..............................14-1
TC-2
General Information – 1
This manual has been compiled to help you to
operate your boat with safety and pleasure. It
contains details of the vessel, the equipment
supplied or fitted, its systems and information
on its operation and maintenance. Please read
it carefully, and familiarize yourself with the boat
before using it.
If this is your first boat or if you are changing to
a type of boat you are not familiar with, for your
own comfort and safety, please ensure that you
obtain handling and operation experience before
“assuming command” of the boat. Your dealer,
or U.S. Coast Guard Auxiliary or yacht club will
be pleased to advise you of local sea schools,
or competent instructors.
AFT
FORWARD
STERN
GUNWALE
BRIDGE
CLEARANCE
FREEBOARD
BOW
DRAFT DRIVES
DOWN
KEEL
STERNDRIVE
PROPELLER
WATERLINE
STERNDRIVE POWER
LENGTH OVERALL (LOA)
BEAM
PORT
SIDE
STARBOARD
SIDE
HELM
TRANSOM
AFT
FORWARD
STERN
GUNWALE
BRIDGE
CLEARANCE
FREEBOARD
BOW
DRAFT
RUDDER
SHAFT
KEEL
WATERLINE
PROPELLER
STRUT
INBOARD POWER
FIGURE 1.1 TERMINOLOGY
1-1
YOU AND YOUR NEW BOAT
Congratulations on your new boat and welcome
to the Wellcraft family. We want you to receive
the most enjoyment possible from your new
boat, and the more you know about it, the easier that will be.
It is important that you take the time to read
this entire manual prior to taking your boat out
for the first time. Also read all literature supplied with your boat by the manufacturers of the
various components and accessories which are
used on your boat. In par ticular, you want to
become familiar with operating your engine. This
owner’s manual does not supersede or change
any of the original manufacturers’ specifications, operation or maintenance instructions.
If you are new to boating, you may not be familiar with some common boating terms. Figure
1.1 lists some of these terms and identifies
their meaning in relation to a typical boat.
Review and train yourself and your family in safety,
emergency and operating procedures. Pay close
attention to all highlighted safety warnings, cautions and hazards, and remember that along with
the freedom and fun of a powerboat, comes the
responsibility for the safety of your passengers,
other boaters and the environment which we all
share. We recommend that you read the boating
literature published by your state boating agency
and the U.S. Coast Guard. Other suggested reading can be found later in this section.
1-2
Also, take the time to know your boat. Look it
over, walk around in it, locate the different components, gauges, and operating equipment and
figure out how to use them before you go out on
the water. This familiarity allows for a much
safer and smoother boating experience.
CONSTRUCTION STANDARDS/
CERTIFICATION
All our boats meet or exceed the construction
standards set by the U.S. Coast Guard and the
American Boat and Yacht Council (ABYC) concerning:
•
•
•
•
•
•
Navigational lights
Factory installed fuel systems
Engine and fuel tank compartment
ventilation
Flotation
Steering systems
Backfire flame arresters
Most Wellcraft models have also been certified
to carry the CE mark. The CE mark certifies that
the boat meets relevant parts of the European
Directive for Recreational Craft 94/25/EC of the
European Parliament, including the International
Organization for Standards (ISO) and Recreational Marine Agr eement Gr oup (RMAG)
guidelines in effect at the time of manufacture.
We recommend that you see your dealer if you
wish to modify factor y–installed equipment or
add new equipment. Your dealer is qualified to
make such modifications or additions without
placing the safety or design integrity of your boat
at risk and without invalidating the warranty.
RESPONSIBILITIES
Boat Owner
1. Sign the warranty registration card including
your address and the boat and hull serial
numbers and mail it to us.
2. Inspect the boat at the time of delivery to
verify that all systems and components are
operating safely and acceptably. Read all
manuals and instructions.
3. Operate all equipment in compliance with
the manufacturer’s instructions.
4. Review the pre-deliver y checklist for the
boat and engine with your dealer when you
take delivery.
5. Schedule your 20-hour boat and engine
checkup with your dealer.
6. Know your boat and the rules of the road
before you use your boat.
IMPORTANT: Make sure that your dealer checks
the engine alignment during your boat’s 20-hour
checkup. The engine alignment check should be
performed in accordance with the recommended
procedures as stated by the engine manufacturer in your engine owner’s manual. Failure to
do so could result in drive train damage which is
not covered under the warranty.
environment. Please think about the future of
our water ways, oceans and marine life while
you’re out enjoying them and take all necessar y measures to help protect what natural
habitats we have left. Keeping our water ways
and marine habitats free from debris, and
showing consideration for the creatures who
thrive in these environments are some ways
you can help assure the pleasure of boating for
years to come.
The operator is also responsible for complying
with the following procedures and operational
requirements:
•
•
•
•
•
•
•
•
•
•
•
•
•
•
•
State registration
Insurance
Warranty registration
Warranty terms and conditions
Rules of the road
Break-in procedure
Proper maintenance of the boat and its systems
Safety equipment
Safety training of passengers and crew
Knowledge of boat systems
Seaworthiness/operational inspection
Safe operating practices
Avoiding use of drugs/alcohol
Environmental regulations
Accident reports
Dealer
Your dealer will complete the pre-delivery checklist with you when you take deliver y of your
boat. A copy of the checklist is at the end of
this section. Your dealer will also provide the following services:
1. Sign the checklist to certify that your boat is
in top-notch condition and that all components are working properly.
2. Discuss the terms of all warranties and
emphasize the impor tance of registering
each warranty with the manufacturer.
7. We recommend that you reference your
engine warranty certificate for initial inspection and service requirements.
3. Explain the proper procedures for obtaining
warranty service.
8. Perform or provide for the scheduled maintenance checks outlined in this manual and
all related service guides and manuals.
4. If requested, provide you with comprehensive
instruction in the operation of your boat and
all its installed systems and components.
Along with boating, comes responsibility.
Responsibility for safety, boating laws, and the
1-3
manufacturer. (Most component manufacturers r epair or r eplace the defective
component if it is returned to them.) The
customer is responsible for all travel time,
freight, or postage costs. We will pay for the
cost to remove and replace the component.
WARRANTY
The Limited Warranty, in its entirety, appears on
the warranty registration card and is included at
the end of this chapter. We have made ever y
effort to simplify our warranty so that it may be
easily understood. However, if you have any
questions regarding the warranty please don’t
hesitate to contact us.
Wellcraft Marine Corp.
Attn: Customer Service
1651 Whitfield Avenue
Sarasota, FL 34243
Phone: (941) 753-7811
•
Engines, parts or accessories not installed
by Wellcraft Marine Corp.
•
Plexiglas windscreen breakage, rainwater
leakage through convertible tops, minor gelcoat discoloration, cracks, crazing, or air
voids.
•
Windshield and canvas top leakage: A certain amount of leakage can occur at the
fasteners and at the stitching.
NOTE: There are items which are not covered
by this warranty, including:
•
Incidental and consequential damages (storage charges, telephone or rental charges of
any type, inconvenience or loss of time or
income.)
•
Minor gelcoat discoloration or chalking may
occur if regular washing and waxing has
been neglected. Proper care of the gelcoat
finish is the responsibility of the owner.
•
Damage caused by neglect, lack of maintenance, accident, abnor mal operation,
improper installation or service.
•
•
Haul-out, launch and towing charges.
•
Transportation charges and/or travel time to
and from a repair facility.
•
Travel time to customer’s home or marina.
Hull blisters that form below the waterline:
Osmosis blistering is not covered by our limited warranty. The phenomenon is most
likely to occur in warm, fresh water. However, it can also occur in saltwater. Any boat
left in the water for any period of time is
susceptible. Nearly all the marine bottom
paint manufacturers today of fer coatings
that help protect the hull against osmosis
blistering. We highly recommend that you
add a protective coating to your hull.
•
Ser vice requested by customer other than
that necessary to satisfy the warranty obligation.
•
Normal deterioration, i.e. wear, tear, or corrosion of hardware, vinyl tops, vinyl and
fabric upholster y, plastic, metal, wood, or
trim tape.
•
Hardware: Metal hardware that has rusted
or pitted will not be replaced under warranty.
You should keep this hardware clean and
wiped down with a light oil (WD40).
•
Vinyl tops: Wellcraft does not warrant damage that might occur when a boat is being
towed on a trailer with the top up, and does
not warrant shrinkage, mildew, or other normal deterioration.
•
Any boat used for commercial purposes:
This includes boats used for char ter purposes or time-share.
•
Any defect caused by failure of the customer
to provide reasonable care and maintenance.
•
Oils, lubricants or fluids used in normal
maintenance.
•
Air freight, next-day or second-day air, or any
special delivery fees unless pre-approved.
•
Gelcoat cracking, yellowing, crazing or blistering, plexiglas, canvas, vinyl or tape
unless noted on equipment check off list at
time of delivery.
•
•
Engines, drive trains, controls, props, batteries, or other equipment or accessories
carrying their own individual warranties.
It is important to note that on many of the
components in our boats, i.e. stoves, refrigerators, generators, trim tabs, etc., the
warranties are extended by the component
1-4
By signing the warranty registration card you,
the new owner, indicate an understanding of the
terms and conditions of the Limited Warranty.
The warranty registration card should be properly completed by the dealer, signed by the new
owner, and returned to us within fifteen (15)
days after the original purchase in order to validate the warranty. Be sure to keep the Owner’s
Registration Card for your records.
All boat manufacturers are required by The Federal Boat Safety Act of 1971 to notify first time
owners in the event any defect is discovered
“which creates a substantial risk of personal
injury to the public.” In order for us to comply
with that law, if it becomes necessar y, it is
essential that your warranty registration card
with the owner’s name, address, and boat
serial number be completed and mailed to Wellcraft Marine, 1651 Whitfield Ave., Sarasota,
Florida 34243.
The limited warranty for your boat is transferable
and can be extended to the next purchaser for
the remainder of the warranty period by notifying
Wellcraft Marine in writing within 15 days of the
transfer, by using the warranty registration transfer form found at the end of this chapter. The
transfer request must be accompanied by a copy
of the title/registration and the transfer fee as
determined by the boat length overall:
BOAT LENGTH OVERALL
Up to 21'
Over 21' to 26'
Over 26'
TRANSFER FEE
$200.00
$300.00
$500.00
WARRANTY SERVICE
As the owner, you are responsible for the proper
registration of your boat at the time of purchase. You must also follow proper operation
procedures and adhere to the care and maintenance procedures set forth in this manual. Be
sure to read your boat’s warranty, as well as the
information and warranties (provided in your
owner’s por tfolio) for major components. You
are responsible for notifying your dealer in writing of any claimed defect within a reasonable
period of time and returning your boat to your
dealer for service.
Your dealer has been carefully selected to
assist you with your sales and service needs.
Your dealer will be glad to answer any of your
questions about your new boat. The dealer has
a direct interest in you as a customer and
wants to see that you are completely satisfied
with your purchase. The dealer is in the best
position to help you and has full support and
assistance from Wellcraft Marine.
If, for any reason, you are dissatisfied with the
services performed by your dealer, we suggest
that you discuss the matter with the ser vice
manager. The service manager is responsible for
the quality of service being performed and has a
direct interest in your satisfaction. If the matter
is complicated and cannot be resolved to your
satisfaction by the service manager, we suggest
that you talk to the general manager or owner. In
most cases a compromise can be reached.
If the matter cannot be resolved by the dealership to your satisfaction, contact the Wellcraft
Marine Customer Service Department by calling
(941) 753-7811 or by writing to:
Wellcraft Marine Corp.
Customer Service Department
1651 Whitfield Avenue
Sarasota, FL 34243
Have the following information available:
•
•
•
•
•
•
•
HIN (hull identification number)
Selling dealer’s name and location
Date of purchase
Ser vicing dealer (if dif ferent from selling
dealer)
Nature of problem
Names of dealership personnel involved
with the situation
Record of ser vice per formed and approximate dates
When contacting Wellcraft Marine, keep in
mind that your problem will most likely be
resolved at the dealership, using the dealership’s facilities, equipment, and personnel.
OWNER’S PORTFOLIO
Some manufacturers of components such as
the engine and AM/FM stereo cassette supply
their own instr uction manuals which ar e
included in your water-resistant “Owner’s Portfolio.” The infor mation in the component
instruction manuals may be different from the
information in this manual because of product
improvements. If you notice a discrepancy,
ALWAYS FOLLOW THE INSTRUCTIONS IN THE
SUPPLIER'S MANUAL. Additionally, the suppliers
of these products maintain their own manufacturer’s war ranty and ser vice facilities. To
register your ownership, fill out and mail each
1-5
warranty card. Use your Owner’s Por tfolio to
retain instructions and data on additional equipment or accessories installed after delivery.
IMPORTANT : Operation, maintenance and
safety information is outlined by the manufacturer of most installed equipment. Properly
operating and maintaining the equipment on
your boat will help you to enjoy many years of
SAFE boating.
OWNER’S LOGS AND RECORDS
At the end of this section are several forms
which you will find very helpful.
Use the Boat Data Record to record all important information about your boats and the major
components installed. After you have entered all
the data, remove this form from your Owner’s
Manual and store in a safe place. Do not keep
this form aboard your boat.
The Float Plan provides a record of your destination, depar ture and retur n times, boat
description, passenger list, and other information about the trip you have planned. At the
bottom of the form is space for listing emergency telephone numbers in case your return is
delayed past the expected time. It also has
space for indicating information about the person filing this report. Leave the completed form
ashore with a responsible person. We recommend you make several copies of this form each
boating season to assure an ample supply.
The Fuel Log is a handy way to record information covering engine hours, fuel on board, and
range as well as engine speed, travel speed
and fuel consumption.
The Service/Maintenance Log provides a
record of maintenance work completed on your
boat, the date of completion and the engine
hour reading. This log will also help you identify
the frequency of routine maintenance work,
such as engine oil changes. If you should
decide to sell your boat, it will demonstrate to
prospective buyers that you have done a good
job of taking care of your boat.
BOATING LAWS AND REGULATIONS
The U.S. Coast Guard is the authority of the
waterways; they are there to help the boating
public. State boating regulations are enforced
by local authorities. You are subject to marine
traffic laws and “Rules of the Road” for both
federal and state waterways; you must stop if
signaled to do so by enforcement officers, and
permit to be boarded if asked.
There are many pamphlets, prepared by the
Coast Guard, available to you. These pamphlets
explain “Rules of the Road,” signal lights,
buoys, safety, international and inland regulations and other information which goes beyond
the scope of this manual. For more information
contact your local U.S. Coast Guard Unit or call
the Coast Guard Boating Safety Hotline at
1-800-368-5647.
BOAT OWNER REGISTRATION
Federal and state laws require that every boat
equipped with propulsion machinery of any type
must be registered in the primar y state of
usage. Registration numbers and validation
stickers must be displayed on the boat according to regulations. In most states, this means
registration with the designated state agency. In
a few jurisdictions, the Coast Guard retains registration authority. Your dealer will either supply
registration forms or tell you where they may be
obtained. The registration agency will issue you
a cer tificate that must be carried on board
when the boat is in use. Some states require
additional registration when an out of state boat
is used within their boundaries.
HIN
(LOCATION MAY VARY,
HIN MAY BE LOCATED
ON STARBOARD HULL
SIDE)
WEL XX XXX J3 94
MODEL YEAR
MONTH/YEAR OF MANUFACTURING
SERIAL NUMBER
MODEL DESIGNATOR
MANUFACTURER'S I.D. CODE
FIGURE 1.2 HIN
Your boat has a hull identification number on
the starboard side of the hull. Figure 1.2 shows
1-6
a typical identification number. Use this hull
identification number for registration and to
identify your boat for warranty service.
INSURANCE
In most states, the boat owner is legally responsible for damages or injuries he or she causes,
even if someone else is operating the boat at
the time of the accident. Common sense dictates that you carry adequate personal liability
and property damage insurance on your boat,
just as you would on an automobile. You should
also protect your investment by insuring your
boat against physical damage or theft.
ACCIDENT REPORTING
The operator of the boat is responsible for filing
a report with the appropriate authorities. In general, repor ts are necessar y for accidents
involving loss of life, injur y, or damage over
$500. In the case of accidents with reportable
injuries or death, a formal repor t is required
within 48 hours. If only proper ty damage is
involved, a repor t must be made within ten
days. The 1994 Recreational Boating Act may
impose a $1,000 civil fine for people who fail to
submit a boating accident repor t. Ask your
insurance agent for more information.
If you see a distress signal, you must assume it
is a real emergency and render assistance
immediately. The master or person in charge of
a boat is obligated by law to provide assistance
to any individual in danger at sea. However, you
should not put your boat or crew in a dangerous
situation which exceeds your capabilities or
those of your boat. The 1971 Boating Safety Act
grants protection to a Good Samaritan boater
offering good faith assistance, and absolves a
boater from any civil liability arising from assistance given.
DISCHARGE OF OIL
The Federal Water Pollution Control Act prohibits
the discharge of oil or oily waste into or upon
the navigable waters of the United States or the
waters of the contiguous zone if such discharge
causes a film or sheen upon or a discoloration
of the surface of the water or causes a sludge
or emulsion beneath the surface of the water.
Violators are subject to a penalty of $5,000.
DISPOSAL OF PLASTICS
& OTHER GARBAGE
Plastic refuse dumped in the water can kill fish
and marine wildlife and can foul boat propellers
and cooling water intakes. Other forms of waterborne garbage can litter our beaches and make
people sick. U.S. Coast Guard regulations prohibit the dumping of plastic refuse or other
garbage mixed with plastic into the water anywhere, and restrict the dumping of other forms
of garbage within specified distances from
shore.
MARPOL TREATY
Boats 26 feet or longer must display a sign stating the disposal regulations of the Federal
Water Pollution Control Act. The U.S. Coast
Guard has issued these regulations to implement Annex V of the International Convention
for the Prevention of Pollution from Ships,
1973, commonly known as Annex V of the MARPOL (Marine Pollution) Treaty 73/78. They apply
to all U.S. boats wherever they operate (except
waters under the exclusive jurisdiction of a
State) and foreign boats operating in U.S.
waters out to and including the Exclusive Economic Zone (200 miles). It is important to know
these regulations and adhere to them.
The regulations require U.S. recreational
boaters, if your boat is 26 feet or more in
length, to affix one or more USCG Trash Dumping Restrictions placards to your boat. The
placard warns against the discharge of plastic
and other forms of garbage within the navigable
waters of the United States and specify discharge restrictions beyond the territorial sea.
(The territorial sea generally ends three nautical
miles from the seashore.) In addition, the placard must contain the warning that a person who
violates these requirements is liable to civil
($25,000) and criminal (imprisonment) penalties. The placard also must note that State and
local regulations may fur ther restrict the disposal of garbage.
Operators shall display one or more placards in
a prominent location and in sufficient numbers
so they can be observed and read by crew and
passengers. These locations might include
embarkation points, food service areas, galleys,
garbage handling spaces and common deck
spaces frequented by crew and passengers. We
recommend that these placards be installed on
all boats. The placards may be purchased from
1-7
local marinas, boat dealerships and marine
equipment suppliers. A special placard is available for boats operating on the Great Lakes.
IMPORTANT: It is illegal to discharge waste
from your marine sanitary device (toilet) into the
water in most areas. It is your responsibility to
be aware of and adhere to all local laws concerning waste discharge. Consult with the Coast
Guard, local marina or your dealer for additional
information.
NOTE: Some states and localities have legal
limits on speed, noise and trailer specifications.
It is your responsibility to be aware of these
laws and limits and to insure that your boat
(and trailer) comply. Consult with your local
Marine Patrol or local Coast Guard office.
RECOMMENDED READING
Damford, Don. Anchoring.
(ISBN 0-915160-64-1). Seven Seas.
United States Coast Guard Auxiliar y. Boating
Skills and Seamanship. LC74-164688. (illus.).
(ISBN 0-930028-00-7). U.S. Coast Guard.
Bottomley, Tom. Boatman’s Handbook, (illus.).
316 p. pap. (ISBN 0-688-03925-1, Hearst
Marine Bk.). Morrow.
Whiting, John and Bottomley, Tom. Chapman’s
Log and Owner’s Manual. 192 p. (ISBN 0-87851801-0); (ISBN 0-686-96737-2). Hearst Bks.
Strahm, Virgil. Does Your Fiberglass Boat Need
Repair? LC81-90093. (illus.). 46 p. pap (ISBN
0-9606050-0-2). Strahm.
Chapman, Charles F. and Maloney. E.S. Chapman’s Piloting, Seamanship and Small Boat
Handling. (illus.) 62 p. (ISBN 0-87851-814-2,
Pub. by Hearst Bks.); deluxe ed. (ISBN 0-87851815-0). Morrow
National Fire Protection Association. Fire Protection Standard for Pleasure and Commercial
Motor Craft. (ISBN 0-317-07388-5, NFPA 302).
Natl. Fire Prot.
Brother ton, Miner. Twelve-Volt Bible . Plastic
comb. (ISBN 0-915160-81-1). Seven Seas.
1-8
CONTACTS
Education programs are sponsored by publications and organizations such as the U.S. Power
Squadron, U.S. Coast Guard Auxiliary and The
American Red Cross. See your dealer about
special courses available in your area. For
detailed information contact:
American Red Cross (For local address consult
the telephone directory).
Boat U.S. Foundation for Boating Safety Hotline
1-800-336-BOAT
1-800-245-BOAT (in Virginia)
Coast Guard Boating Safety Hotline
1-800-368-5647
Skippers Course
GPO Superintendent of Documents
Washington, DC 20012
United States Coast Guard Auxiliary
Local Flotilla or contact appropriate Coast Guard
District Headquarters
United States Coast Guard Headquarters
202-512-1800
202-512-2250 (fax)
United States Power Squadron
P.O. Box 30423
Raleigh, NC 27617
WELLCRAFT MARINE CORPORATION LIMITED WARRANTY
Wellcraft Marine Corporation (“Wellcraft”), warrants to you, the first
retail purchaser of this 2001 model year or later boat, that it will
repair or replace defects in materials or workmanship that occur
within the applicable warranty periods, subject to limitations set
forth below. The applicable Warranty Period runs from the date the
boat is delivered:
Any boat which has been misused, used in a negligent manner,
used for racing, used for rental, charter, military or other commercial purposes, used without normal maintenance, operated contrary
to any instruction furnished by Wellcraft, or operated in violation of
any Federal, State, Coast Guard or other governmental agency laws,
rules or regulations.
Defects in non-structural parts and components: One (1) year Warranty Period.
Any representation relating to speed, range, fuel consumption or
other estimated performance characteristic.
Defects in structural parts and components: Five (5) year Warranty
Period.
Loss of time, inconvenience, boat payments, retail charges,
improper lifting or trailering, travel expense, loss of use, in-and-outof-water charges, towing and storage charges, loss of or damage to
personal property, or other remedies not specifically allowed.
Your sole and exclusive remedy is the repair or replacement, at
Wellcraft’s sole option, of parts and components covered by this
warranty.
This Wellcraft boat, including any alleged defective part, must be
returned to an authorized Wellcraft dealer within the applicable warranty period to obtain warranty service. The Wellcraft dealer will
carry out the warranty procedures on the owner’s behalf. All warranty work will be performed at an authorized dealer, at the Wellcraft
factory, or at another repair facility that Wellcraft selects. The owner
is responsible for the expense associated with transporting the boat
to and from the repair facility.
An action for breach of warranty shall be barred unless it is commenced within four (4) years from the date the cause of action
accrues. An action for breach of any duty or obligation to repair or
replace shall be barred unless it is commenced within one year from
the date the cause of action accrues regardless of the time remaining in the Warranty Period.
WHAT THIS WARRANTY DOES NOT COVER
A boat purchased from any party other than an authorized Wellcraft
dealer.
A boat, including its components, that has been altered or modified
so as to adversely affect its operation, performance or durability.
Engines, outdrives, controls, propellers, batteries, appliances and
other equipment or accessories which are not manufactured by
Wellcraft, whether or not warranted by other manufacturers.
Gelcoat finishes (including blistering and osmotic blistering, cracking, crazing or discoloration), mirrors, window glass, varnishes,
paints, fabrics, chromium plated and stainless steel finishes,
because of the varying effects resulting from different climatic and
use conditions.
Dealer preparation, cleaning, final adjustments and alignments in
preparing the boat for delivery or commissioning.
Leakage around windshield, hatches or other designed openings.
Fit and adjustment of exterior canvas tops, enclosures, and weather
covers.
Sacrificial deterioration of anti-fouling paint or zinc anodes.
Remedy under this warranty is expressly limited to repair or replacement of defects in materials or workmanship, and does not include
incidental or consequential damages which are specifically DISCLAIMED. Note: SOME STATES DO NOT ALLOW THE EXCLUSION OR
LIMITATION OF INCIDENTAL OR CONSEQUENTIAL DAMAGES, SO THE
ABOVE LIMITATION OR EXCLUSION MAY NOT APPLY TO YOU. The
express limited warranty described above is exclusive. IMPLIED
WARRANTIES (IF ANY), INCLUDING MERCHANTABILITY and FITNESS FOR A PARTICULAR PURPOSE, ARE LIMITED IN DURATION
TO THE APPLICABLE WARRANTY PERIOD AND ARE EXPRESSLY DISCLAIMED AFTER EXPIRATION OF THE APPLICABLE WRITTEN
WARRANTY PERIOD. There are no warranties which extend beyond
the description on the face herof. NOTE: SOME STATES DO NOT
ALLOW LIMITATION ON HOW LONG AN IMPLIED WARRANTY LASTS,
SO THE ABOVE LIMITATION MAY NOT APPLY TO YOU. THIS WARRANTY GIVES YOU SPECIFIC LEGAL RIGHTS WHICH VARY FROM
STATE TO STATE.
This document contains the entire warranty given by Wellcraft. Wellcraft does not authorize any person or persons, including Wellcraft
dealers, to change the terms of this express limited warranty, which
is Wellcraft’s only warranty. Wellcraft reserves the right to change or
improve the design or manufacture of Wellcraft boats without obligation to modify any boat previously manufactured.
The cost of removal or re-instatement of parts or disassembly of
units to repair or replace components covered by this warranty.
1-9
Return to: WELLCRAFT (Warranty Department) 1651 Whitfield Avenue • Sarasota, FL 34243
1-10
SERVICE/MAINTENANCE LOG
DATE
HOUR METER
READING
SERVICE/REPAIRS PERFORMED
1-11
BOAT DATA SHEET
Wellcraft Model Name ______________________
Hull Identification Number _____________________
Name of Boat _______________________________ State ________ Length ______ Beam_________
Hull Color(s) ________________________________ Weight ______
Draft (Drive Down) ________ Draft (Drive Up)
________ Freeboard (Forward)________ (Aft)________
Draft–Inboard ___________
Engine(s)
Make ________________ Model Name________________ H.P. _____ Model No. _____________
Oil: SAE _____ Quarts per Engine _____ Oil Filter No. ______________
Port Serial No. ___________________________ Transom Plate Serial No. ______________________
Starboard Serial No._______________________ Transom Plate Serial No. ______________________
Drive Unit(s)
Manufacturer ____________ Gear Ratio _______________ Model No. ________________________
Port Serial No. ___________ Starboard Serial No. __________________
Fuel Tank Capacity______________ Number of Tanks ______ Fuel Filter No. ______________________
Water Tank Capacity ____________ Number of Tanks ______
Generator
Make __________________ Model Name ______________________ Model No. ________________
Serial No. _______________________________ K.W._________________
Radio–VHF
Make ______________ Type ______ Model No. ______________ Serial No. ________________
Radio–Stereo
Make ______________ Type ______ Model No. ______________ Serial No. ________________
Battery Make _______________________________ Type________________________
Propeller(s) Manufacturer _________________________
Diameter/Pitch _________________________
/
No. of Blades ______ Style ___________ Material____________ Mfg. Part No. _______________
Key Numbers Cabin ________________ Glove Box ______
Ignition Switch(s)_________
__________
Other Equipment
______________________________________________________________________________________
______________________________________________________________________________________
______________________________________________________________________________________
Selling Dealer
Servicing Dealer
Name________________________________
Name ___________________________________
Address ______________________________
Address _________________________________
Phone No. ____________________________
Phone No. _______________________________
Salesman ____________________________
Service Manager __________________________
1-12
FUEL LOG
DATE
HOURS
RUN
FUEL
(GAL)
RANGE
(MI)
RPM
MPH
GPH
1-13
FLOAT PLAN
Copy this page and fill out the copy before going boating. Leave the completed copy with a reliable person
who can be depended upon to notify the Coast Guard, or other rescue organization, should you not return
as scheduled. DO NOT file this plan with the Coast Guard.
Name _____________________________________ Telephone__________________________________
Description of Boat:
Type________________ Color ______________ Trim ___________________
Registration Number __________________________________________________________________
Length ______________________ Name __________________ Make ________________________
Wellcraft Hull Identification Number _______________________________________________________
Other Info. __________________________________________________________________________
Persons Aboard:
Name
Age
Address & Telephone
______________________________________________________________________________________
______________________________________________________________________________________
______________________________________________________________________________________
______________________________________________________________________________________
Engine Type: _______________________________ HP _______________________________________
No. of Engines:______________________________ Fuel Capacity: ______________________________
Survival Equipment:
PFDs ______________________ Flares__________________ Mirror ________________________
Smoke Signals ______________ Flashlight ______________ Food _________________________
Paddles ____________________ Water __________________ Anchor _______________________
Raft or Dinghy ________________ EPIRB ________________ Sea Anchor ___________________
Navigation Equipment
Compass __________ Loran _____________ GPS ______________ Radar __________________
Radio:
Yes ____ No ____ Type
______________________ Freq _________________________
Phone:
Yes ____ No ____ Phone No.__________________________________________________
Destination __________________________ Est. Time of Arrival ________________________
Expect to Return By ____________________
Auto Type ____________________ License No. ____________ Where____________________
If not returned by ______________ call the Coast Guard, or ____________________________.
(Local Marine Authority)
Coast Guard Telephone Number: ____________________________________
Local Marine Authority Telephone Number: ____________________________
1-14
WELLCRAFT MARINE CORP., 1651 Whitfield Avenue, Sarasota, Florida 34243
Phone (941) 753-7811
WARRANTY REGISTRATION TRANSFER REQUEST
Original Owner Name & Address:
_______________________________________________
_______________________________________________
_______________________________________________
Original Date of Purchase:
_______________________________________________
Hull Identification Number:
_______________________________________________
Boat Model:
_______________________________________________
Selling Dealer:
_______________________________________________
Name and address of new purchaser:
_______________________________________________
_______________________________________________
_______________________________________________
Telephone Number:
_______________________________________________
Date of Purchase:
_______________________________________________
1995-1998 Model year transfer fee: $100.00 all models.
1999 Model year transfer fees:
16' - 21' Boats
$200.00
22' - 26' Boats
$300.00
27' and up Boats
$500.00
This transfer request must be accompanied by the applicable transfer fee and a copy of the new
owner’s title/registration. Warranty transfers must be received within 15 days of the subsequent purchase to be valid.
This warranty registration request, if accepted, transfers the warranty coverage remaining on the boat
to the new purchaser. Acceptance of the request does not create any additional warranties or obligation
on Wellcraft.
Warranty Expiration Date:
_______________________________________________
Wellcraft Transfer Acceptance Date:
_______________________________________________
Wellcraft Authorized Signature:
_______________________________________________
Mail to Wellcraft Marine, 1651 Whitfield Ave., Sarasota, FL 34243, Attn: Customer Service Department.
WELLCRAFT MARINE CORP.
1-15
Boating Safety – 2
The popularity of boating and other water sports
has undergone an explosion of growth in the
past few years. Because of this, safety is an
impor tant issue for ever yone who shares our
waterways.
Your safety, the safety of your passengers and
the safety of other boaters are among your
responsibilities as operator of this boat. Your
boat must be in compliance with U.S. Coast
Guard safety equipment regulations. You should
know how to react correctly to adverse weather
conditions, have good navigation skills and follow the “Rules of the Road” as defined by the
Coast Guard and state/county/local regulations.
Before each outing you should check all safety
equipment such as bilge pumps, fire extinguishers, personal flotation devices, flares, distress
flags, flashlights, ignition interrupter switch, etc.
They should be operable, readily visible and
easily accessible.
Complete a float plan and tell someone of your
travel plans. Check local weather reports before
casting off. Do not leave the dock area when
strong winds and electric storms are in the area
or predicted to be in the area. A sample float
plan is at the end of Section 1.
ADVISORY STATEMENTS
Advisor y statements forewarn conditions that
affect equipment operation, maintenance and
servicing practices, and they have two levels:
NOTE: Signals a general advisor y statement
that clarifies or highlights a particular section of
text.
IMPORTANT: Used to signal the possibility of
damage to equipment or associated components.
HAZARD COMMUNICATION
Safety is an important issue for everyone who
shares in the use of our waterways. Throughout
this manual, specific precautions and symbols
identify safety related information.
!
The Safety Aler t Symbol means pay
attention! Your safety is involved. Not following the recommendations contained
in any of these statements may result in
proper ty damage, personal injur y or
death.
! CAUTION
This symbol and signal word indicate a
potentially hazardous situation which,
if not avoided, WILL or CAN cause
minor or moderate personal injury or
property damage if the warning is
ignored.
! WARNING
This symbol and signal word indicate a
potentially hazardous situation which,
if not avoided, CAN cause serious
injury, death or substantial property
damage if the warning is ignored.
! DANGER
This symbol and signal word indicate
an immediate hazard, which if not
avoided, WILL result in serious personal injury or death.
The precautions listed in this manual are not allinclusive. If a procedure, method, tool or part is
not specifically recommended, you must satisfy
yourself that it is safe for you and others and
that your boat will not be damaged or made
unsafe as a result of your decision. REMEMBER
ALWAYS USE COMMON SENSE WHEN BOATING!
SAFE BOATING
RECOMMENDATIONS
Boating safety and the safety of your passengers is YOUR responsibility. You should fully
understand all of the following safety precautions before you launch your boat.
2-1
1. Never operate a boat while under the influence of drugs or alcohol. Doing so is a
Federal offense. Make sure only qualified
drivers operate your boat.
2. Keep your boat and its equipment in safe
operating condition. Regularly inspect the
hull, engine, safety equipment and all other
boating gear.
3. Keep all lifesaving equipment including fire
extinguisher in safe operating condition and
in easily accessible locations. All passengers should know where this equipment is
and how to use it.
4. Use extreme CAUTION while fueling your
boat. Become familiar with the capacity of
your boat’s fuel tank and fuel consumption
for commonly used RPMs. Avoid fueling at
night except under well-lit conditions. Gas
spills are hard to see in the dark.
! WARNING
Each time you fill up, inspect fuel lines
for leaks and hose deterioration, and
be sure the engine compartment is
free of gasoline vapors. Leaking fuel is
a fire and explosion hazard and can
cause severe injury or death. The use
of alcohol modified fuels can cause
deterioration of the fuel system.
5. Keep enough fuel on board for your planned
cr uising r equir ements as well as for
changes in your plans due to adverse
weather or other situations. We recommend
the 1/3 rule: use 1/3 of your fuel to reach
your destination, use 1/3 to return, and
keep 1/3 in reserve.
6. Keep an eye on the weather. Be aware of
possible changing conditions by monitoring
local weather broadcasts prior to departure.
The captain or first mate should personally
monitor strong winds and electrical storms.
7. Always keep accurate up-to-date char ts of
your boating area on board.
8. Before departure file your Float Plan with a
responsible person ashore.
2-2
9. Always operate your boat with consideration,
courtesy and common sense.
10. At least one other passenger aboard should
be indoctrinated on the basic operating procedures for handling your boat in the event
you unexpectedly become unable to do so.
NOTE: The presence of the boat’s maximum
capacity plate does not override your responsibility to use common sense or rational
judgment. The capacity of your boat is reduced
by turbulent water and other adverse weather
conditions. You should have prior knowledge of
existing water and weather conditions before
getting underway.
SAFETY EQUIPMENT
NOTE: As the owner of the boat, you are responsible for supplying a fire extinguisher approved
by the U.S. Coast Guard and all other required
safety equipment. Check state and local regulations and call the U.S. Coast Guard Boating
Safety Hotline at 1-800-368-5647 for information about required safety equipment. You
should also consider supplying additional equipment recommended for your safety and that of
your passengers. A list of this equipment
appears later in this section. Make yourself
aware of its availability and its use.
PERSONAL FLOTATION DEVICES (PFDS)
You are required by Federal Regulations to have
at least one Coast Guard approved personal
flotation device (PFD) for each person in your
boat. You may not use your recreational boat
unless all your PFD’s are in serviceable condition, are readily accessible, legibly marked with
the Coast Guard approval number, and are of an
appropriate size (within the weight range and
chest size marked on the PFD) for each person
on board. Your PFD provides buoyancy to help
keep your head above the water and to help you
remain in a satisfactor y position while in the
water. Figures 2.1 through 2.5 show the five
types of PFDs approved by the U.S. Coast
Guard.
PFD Type I, Wearable, (Figure 2.1) has the
greatest required buoyancy. Its design allows for
turning most unconscious persons in the water
from face down position to a vertical or slightly
backward, face-up position. Type I is most effective for all waters, especially of fshore when
rescue may be delayed.
viceable condition. This PFD is required in addition to the PFDs previously discussed.
PFD Type V, Wearable, (Figure 2.5) must be
worn to be effective. When inflated, it provides
buoyancy equivalent to Type I, II or III PFDs.
When it is deflated, however, it may not support
some people.
FIGURE 2.1 PFD TYPE I, WEARABLE
PFD Type II, Wearable, (Figure 2.2) turns its
wearer in the same way as Type I, but not as
effectively. The Type II will not turn as many persons under the same conditions as a Type I.
FIGURE 2.5 PFD TYPE V, WEARABLE
FIRE EXTINGUISHERS
FIGURE 2.2 PFD TYPE II, WEARABLE
PFD Type III, Wearable, (Figure 2.3) allows the
wearers to place themselves in a ver tical or
slightly backward position. It has the same
buoyancy as a Type II PFD. It has little or no
turning ability.
FIGURE 2.3 PFD TYPE III, WEARABLE
PFD Type IV, Throwable, (Figure 2.4) can be
thrown to a person in the water, grasped and
held by the user until rescued. The most common Type IV PFDs are a buoyant cushion or ring
buoy. The throwable Type IV PFD should be
immediately available for use and always in ser-
All Class 1 (16 to 26 feet) powerboats are
required to carry one (1) B-I type hand portable
fire extinguisher unless the boat is equipped
with a fixed fire extinguishing system in the
engine compartment.
All Class 2 (26 to 39.4 feet) powerboats are
required to carr y two (2) approved B-I Extinguishers or one (1) approved B-II type hand
portable fire extinguisher unless equipped with
a fixed fire extinguishing system in the engine
compartment. When equipped with a fixed fire
extinguishing system, only one (1) B-I type hand
portable fire extinguisher is required.
All Class 3 (40 to 65 feet) powerboats are
required to carr y three (3) approved B-I extinguishers or one (1) approved B-II and one (1)B-1
type hand por table fire extinguisher unless
equipped with an approved fixed fire extinguishing system in the engine compartment. When
equipped with an approved fixed fire extinguishing system, only two (2) B-I type hand portable
fire extinguishers or one (1) B-II extinguishers
are required.
All hand portable fire extinguishers should be
mounted in a readily accessible location away
from the engine compar tment. All persons
aboard should know the location and proper
operation of the fire extinguisher(s).
If your fire extinguisher has a charge indicator
FIGURE 2.4 PFD TYPE IV, THROWABLE
2-3
gauge, cold or hot weather may have an effect
on the gauge reading. Consult the instruction
manual supplied with the fire extinguisher to
SAFETY
SWITCH
BUTTON
In order for the engine to run, the lock plate on
the end of the lanyard must be attached to the
engine stop switch. To reset the switch after
engine shutdown, reinstall the switch slip above
the interrupter switch and flip the interrupter
switch.
VISUAL DISTRESS SIGNAL DEVICES
FORK
CENTER
PRONG
Coast Guard approved visual distress signal
devices are required on all recreational boats
operating on coastal waters, (including the
Great Lakes, territorial seas and those waters
directly connected to the Great Lakes and the
territorial seas)
Day Use Only
LANYARD
•
•
CLOTHING
HOOK
Three orange smoke signals, one hand held
and two floating or
One orange flag with black square and disk
Night Use Only
•
One S-O-S Electric distress light
Day and Night Use
FIGURE 2.6 IGNITION INTERRUPTER
WITH LANYARD
•
Three flares of the hand held, meteor or
parachute type
! WARNING
No single signaling device is appropriate for all
purposes. Consideration should be given to possessing various types of equipment. Careful
selection and proper stowage of the equipment
is ver y IMPORTANT if young children are frequently aboard.
The ignition interrupter switch must
never be removed or modified and
must always be kept free from
obstructions that could interfere with
its operation.
NOTE: Regulations prohibit display of visual distr ess signals on the water under any
circumstances except when assistance is
required to prevent immediate or potential danger to persons on board a vessel.
determine the accuracy of the gauge.
IGNITION INTERRUPTER SWITCH
WITH LANYARD
The ignition interrupter switch (Figure 2.6) is a
safety device which automatically stops the
engine when the operator falls from the control
station. The ignition safety switch incorporates
a shutoff switch, switch clip, lanyard and lanyard clip. The lanyard clip is securely attached
to the operator’s clothing, arm or leg. Be sure
to attach the lanyard to a place where it is free
of obstructions and to something that will move
with the operator if he or she leaves the helm
station.
2-4
SOUND SIGNALLING DEVICES
All Class 1 (16 to 26 feet) powerboats are
required to carry a hand, mouth or power operated horn or whistle. It must produce a blast of
two-second duration and audible at a distance
of at least one-half (1/2) mile.
All Class 2 (26.1 to 39.4 feet) powerboats are
required to carry a hand, mouth or power operated horn or whistle. It must produce a blast of
two-second duration and audible at a distance
of at least one (1) mile.
ADDITIONAL RECOMMENDED
EQUIPMENT
The following list (not an exhaustive list) indicates some additional recommended equipment
which should be considered for safe, enjoyable
boating.
Tools
•
•
•
•
•
•
•
•
•
•
Spark plug wrench
Hammer
Screwdrivers
Jackknife
Pliers
Electricians tape
Adjustable wrench
Lubricating oil
Prop wrench
Duct tape
SAFE BOATING COURSES
Your local U.S. Coast Guard Auxiliar y and the
U.S. Power Squadrons of fer comprehensive
safe boating classes several times a year. You
may contact the Boat/U.S. Foundation
at 1-800-336-BOAT (2628) or, in Vir ginia,
1-800-245-BOAT (2628) for a course schedule
in your area. Also contact your local U.S. Coast
Guard Auxiliar y or Power Squadron Flotilla for
the time and place of their next scheduled
class.
! WARNING
Alcohol consumption and boating do
not mix. Operating any boat while
intoxicated or under the influence of
drugs is both dangerous and illegal.
Impaired vision or judgment on the
water can quickly lead to disaster.
Driving any boat, requires sober, attentive care. Federal laws prohibit
operating a boat under the influence of
alcohol or drugs. These laws are vigorously enforced.
Spare Parts
•
•
•
•
•
•
•
Extra Bulbs
Spare Propeller
Extra fuses
Extra drain plug
Spark plugs
Spare wire
Extra prop nut/washer
Basic Gear
•
•
•
•
•
•
•
•
•
•
•
•
•
•
•
•
•
•
•
•
Flashlight
Spare batteries
Tow line
Oar or paddle
Mooring lines
Compass
Dock fenders
Distress signals
First aid kit
Boat hook
Foul weather gear
VHF Radio
EPIRB
Suntan lotion
Extra warm clothing
Charts
Second Anchor & line
Ring life buoy with length of line attached
Dewatering device (pump or bailer)
Emergency supply of drinking water and food
DRUGS AND ALCOHOL
The operator is responsible for the safety of all
passengers. Refrain from the use of drugs
and/or alcohol while operating your boat. Operation of motorized vessels while under the
influence is a Federal offense carrying a significant penalty. The use of drugs and/or alcohol
will decrease reaction time, impede judgment,
impair vision and inhibit your ability to safely
operate a boat.
SAFE OPERATION
Avoid product misuse including but not limited
to the following actions:
•
Riding seat back, gunwale, engine cover,
bow or in other unsafe positions.
•
Failure to use handholds or and other safety
hardware.
•
Overloading or improper handling.
•
Excessive speeds for operating conditions or
speeds exceeding the local limit. Allow
enough distance to stop in an emergency.
Observe “No Wake” warnings. The wake from
your boat can jeopardize the safety of others.
2-5
•
Use in weather or sea conditions beyond the
skill or experience of the operator or the
comfor table capability of the boat or passengers.
•
Continued operation with operator’s visibility
blocked or impaired.
•
Operating under the influence of drugs or
alcohol.
PASSENGER SAFETY
Be sure at least one of your passengers is
familiar with the operation and safety aspects of
the boat in case of an emergency. Show all passengers the location of emergency equipment
and explain how to use it. Don’t allow passengers to drag their feet or hands in the water or
sit on the bow, deck, or gunwale while the boat
is moving.
POWER CAPACITY
OPERATION BY MINORS
Do not exceed the maximum engine power rating stated on the certification plate attached to
your boat.
Minors should always be supervised by an adult
whenever operating a boat. Many states have
laws regarding the minimum age and licensing
requirements of minors. Be sure to contact the
state boating authorities for information.
2-6
CARBON MONOXIDE
! WARNING
Carbon monoxide (CO) is an odorless and colorless gas. You cannot see it or smell it.
Inhaling it for a short time can cause unconsciousness and brain damage. Prolonged
exposure can kill!
Burning any material containing carbon produces carbon monoxide. A common source is the exhaust
fumes from your boat’s engines and generator. Other sources include fumes from open flame devices
such as cooking ranges and charcoal grills.
Even with the best boat design and construction, CO may still accumulate in accommodation spaces under certain conditions. Continually observe passengers for symptoms of CO poisoning.
In high concentrations, CO can be fatal within minutes. In lower concentrations, its effects are cumulative and can be just as lethal over time. Watch for these are common symptoms of CO poisoning:
• Headaches
• Dizziness
• Itchy, watering eyes
• Incoherence
• Convulsions
• Drowsiness
• Fatigue
• Flushed appearance
• Ringing in the ears
• Physical collapse
• Nausea
• Vomiting
• Throbbing temples
• Difficulty breathing
If you observe any of the above symptoms, begin treatment immediately.
• Evacuate the area
• Move the victim to fresh air. Administer oxygen if available. Get medical help.
• Open all windows and hatches to ventilate the area.
• Investigate the source of CO and take immediate corrective action.
FIGURE 2.7 PROPER VENTILATION WHILE UNDERWAY
Prevention is the best solution!
• Make sure exhaust outlets are not blocked.
• Open hatches, doors, windows and vents to ensure adequate ventilation. (Figure 2.7)
• Make sure engine compartment doors and hatches are closed when engines or the generator is
running.
• When docked or anchored, check for CO sources adjacent to your boat.
• Turn off the generator while you are sleeping.
• Have your dealer install a CO detector.
• Have your dealer inspect your exhaust systems whenever your boat is serviced. Make needed
repairs immediately.
• Be alert to changes in engine sound caused by a leaking exhaust system.
• Continually observe passengers for symptoms of CO poisoning.
2-7
CARBON MONOXIDE ACCUMULATION
!
PRECAUTIONS
DANGER
THESE CONDITIONS MAY CAUSE CARBON
MONOXIDE TO ACCUMULATE.
2-8
SEE INFORMATION ON CARBON MONOXIDE DETECTOR
ON FOLLOWING PAGE
Carbon monoxide in generator
or hull exhaust from other vessels while docked or anchored
can accumulate within the
cabin and cockpit areas of
your boat.
Be alert for generator and
engine exhaust from other
vessels alongside your boat.
Under certain conditions, tail
wind, boat speed, or high bow
angle can direct carbon monoxide into your boat (backdrafting).
CO can accumulate to dangerous levels without proper
airflow.
Open hatches and doors to provide adequate ventilation,
redistribute the load, or bring
boat out of high bow angle.
When you are using protective
weather coverings, hull exhaust
while underway can cause CO
to accumulate in the cabin and
cockpit areas.
Provide adequate ventilation
when the canvas top, side
curtains and/or back curtains
are in their closed protective
positions.
When hull exhaust outlets are
blocked by a pier, dock, seawall
or any other means, CO can
accumulate in the cockpit and
cabin areas.
Make sure hull exhaust outlets
are not blocked.
CO in engine exhaust from your
boat can accumulate within the
cabin and cockpit areas when
operating at slow speed or
stopped in the water. Tail wind
can increase accumulation.
Open windshield and cabin
vents and remove any installed
canvas to provide adequate
air flow. Increase speed if
possible.
CARBON MONOXIDE (CO) DETECTOR
We strongly recommend you have marine grade
CO detectors installed in boats with canvas
enclosures and in any boats with enclosed sleeping areas. Monitors are available from your
dealer. Monitors should be professionally
installed, calibrated, and tested.
NOTE: A CO detector is not a gas fuel vapor
detector. Gas fuel vapor detectors do not monitor the buildup of carbon monoxide in an
enclosed area.
7. Approach a person in the water from the lee
side (opposite the direction of the wind). Stop
the motor before coming close to the person.
8. Turn off engine and anchor your boat before
swimming.
9. Swim only in areas designated as safe for
swimming. These are usually marked with a
swim area buoy (Figure 2.8). Do not swim
alone or at night.
WATER SPORTS
! WARNING
Your boat is not designed for and
should not be used for pulling parasails, kites, gliders or any device which
can become airborne.
Water skiing, kneeboarding or riding a towed,
inflatable apparatus are some of the more popular water sports. Taking part in any water sport
requires increased safety awareness by the participant and the boat operator. If you have never
pulled someone behind your boat before, it is a
good idea to spend some hours as an observer,
working with and learning from an experienced
driver. It is also important to be aware of the
skill and experience of the person being pulled.
SW
IM
ARE A
FIGURE 2.8 SWIM AREA BUOY
10. Do not allow anyone near the propeller(s),
even when the engine is of f. Propeller
blades can be sharp and can continue to
turn even after the engine if of f. Stay at
least 150 feet away from areas marked by a
diver down float (Figure 2.9).
Everyone participating in a water sport should
observe these guidelines:
1. Allow only capable swimmers to take part in
any water sport.
2. Always wear a personal flotation device (PFD)
approved by the U.S. Coast Guard. Wearing
a properly designed PFD will help a stunned
or unconscious person stay afloat.
3. Always par ticipate in water spor ts in safe
ar eas. Stay away fr om other boats,
beaches, swimmers and heavily traveled
waterways.
4. Be considerate to others you share the
water with.
6. Give immediate attention to a person who has
fallen. He or she is vulnerable in the water
alone and may not be seen by other boaters.
FIGURE 2.9 DIVER DOWN FLOAT
WATER SKIING
The popular sport of water skiing has brought a
special set of safety precautions to observe in
boating. The following guides, in addition to the
guides listed above will do much to reduce the
hazards while water skiing.
1. Water ski only in safe areas, away from other
boats and swimmers, out of channels, and in
water free of underwater obstructions.
2-9
5. Do not water ski between sunset and sunrise. It is illegal in most states.
2. Allow no one who cannot swim to water ski.
! WARNING
6. For more information about water skiing,
please contact the American Water Ski
Association, 799 Overlook Drive, Winter
Haven, FL 33884 (1-800-533-2972).
Skiers must wear a USCG approved
personal flotation device. A Type III
water-ski vest is an approved and
practical PFD.
RULES OF THE ROAD
NOTE: The information in this section pertains
only to navigation in the United States and its
coastal waters. In other areas, the boat owner
or captain is responsible for learning about navigation laws.
3. Have a second person aboard to obser ve
the skier and informer the driver about the
skier’s hand signals (Figure 2.10). The
driver must give full attention to operating
the boat and the waters ahead.
Your boat is subject to U.S. Coast Guardenforced marine traffic laws known as “Rules of
the Road.” There are two sets of rules: the
United States Inland Navigational Rules and the
International Rules. The United States Inland
Rules are applicable to all vessels inside the
demarcation lines separating inland and international waters. The “Rules of the Road” can be
obtained from your local U.S. Coast Guard Unit
or the United States Coast Guard Headquarters
by calling (202) 512-1800 or faxing your
request to (202) 512-2250, and asking for the
publication titled “Navigational Rules, International-Inland.”
4. Give immediate attention to a fallen skier.
Be careful not to swamp the boat while taking a skier on board.
! WARNING
Switch engine off before taking skiers
aboard from in the water. Do not leave
engine running in neutral; if the shift is
accidentally engaged the skier could
be seriously injured by the propeller.
1. Thumb Up: Speed up the boat.
2. Thumb Down: Slow down the boat.
3. Cut Motor/Stop: Immediately stop boat. Slashing motion over neck (also used by driver or
observer).
4. Turn: Turn the boat (also used by driver). Circle
motion—arms overhead. Then point in desired
direction.
5. Return to Dock: Pat on the head.
6. OK: Speed and boat path OK. Or, signals
understood.
7. I'm OK: Skier OK after falling.
2
1
7
3
5
4
FIGURE 2.10 SKIER'S HAND SIGNALS
2-10
6
“Aids to Navigation” (U.S. Coast Guard pamphlet #123) explains the significance of various
lights and buoys. This and other pamphlets,
including the “Boating Safety Training Manual”
and “Federal Requirements For Recreational
Boats,” are also available from the U.S. Coast
Guard Headquarters.
Because of proposed alterations in buoys and
markers, contact the U.S. Coast Guard to stay
informed of changes.
The spoken word “MAYDAY” is the international
signal of distress. MAYDAY should NEVER be
used unless there is grave or imminent danger,
and you are in need of immediate assistance.
AIDS TO NAVIGATION
Aids to navigation (ATONS) help you to travel
safely on the water. They help you get from one
place to another, and are most helpful if you have
a nautical char t. NEVER tie your vessel to an
ATON. It is illegal, and blocks it from view of other
boaters, which can cause serious problems.
There are two ATON systems. The first system,
used on federal waters, is known as the International Association of Lighthouse Authorities
System B (IALA-B). The Coast Guard maintains
this system. The second system is the Uniform
State Waterway Marking System (USWMS). This
system is maintained by state authorities.
IALA System B
In the United States, IALA-B uses four types of
ATONS. These are lateral marks, safe water
marks, special marks, and isolated danger
marks. The Navigational Aids Chart at the end
of this section reflects these aids.
Red, Right, Returning
Red, Right, Returning is a basic rule to assist you
in using lateral markers. When you are returning
from seaward, keep red markers on your starboard side when you pass them. These markers
may either be buoys or fixed ATONS. Since lateral
markers are either red or green, keep the green
markers to your port (or left) side.
Returning from seaward is very clear if you have
been on the ocean. You are returning to port. By
agreement, going up a navigational river is
returning from sea. The outlet ends of the Great
Lakes are also the seaward ends. Also travelling from a large body of water to a smaller one
is considered returning from seaward.
You are returning from seaward if you travel in a
clockwise direction around the United States.
So, going south on the Atlantic coast, nor th
along the west coast of Florida, west along the
Gulf coast, and north along the Pacific coast is
returning from seaward.
Lateral Marks
Look at the left and right columns of the upper
part of The Navigational Aids Chart. (The chart
is at the end of this section.) These lateral
marks indicate the sides of navigable channels.
They consist of lighted buoys, CAN or NUN
BUOYS, and DAYMARKS. Each has a number
and is either red or green. The numbers on
green markers are odd. Red markers have even
numbers.
Buoys
Buoys are red or green floating ATONS. If
lighted, they have either red or green lights.
Unlighted green buoys, called cans, look like
cylinders. Unlighted red nun buoys have cone
shaped tops with their points cut of f. Don’t
pass too close to a buoy. You may foul your propeller in its chain.
! CAUTION
Buoys are anchored floating objects
and may not always be exactly in the
same position.
Daymarks
Daymarks are red or green boards with numbers. They are on posts or groups of pilings tied
together and called dolphins. Daymarks and
their suppor ts are daybeacons. Daybeacons
may or may not have lights. If a red or green
daybeacon has a light, it is the same color as
the marker red or green. Red daymarks are triangular and have even numbers. Gr een
daymarks are square and have odd numbers.
Safe Water Marks
You can find Safe Water Markers at the center
of the Navigational Aids Char t. These signals
have ver tical red and white stripes and mark
the center of navigable channels and fairways.
Safe water markers included both lighted and
unlighted buoys and daymarks. If it is lighted,
the light will be white, and will flash the letter A
in Morse code.
2-11
Preferred Channel Markers
USWMS Lateral Markers
Preferred Channel Markers have horizontal red
and green bands. If lighted, the color of the light
is the same as the top of the band. They show
the preferred channel for you to use at a junction point. Be sure to notice the color of the top
band, and treat it as any other marker you
would of that color. If the band is red and you
are returning from seaward, keep the marker to
your right.
Lateral buoys in the USWMS system are either
red or black. They have numbers, and black
buoys may have green reflectors or lights. They
are the equivalent of green buoys in the IALA-B
system. Red buoys may have red reflectors or
lights, as well. Red and black buoys are usually
found in pairs pass between them.
Lights on Markers
In Florida, you may see a special sign: “Caution,
Manatee Area”. When you see this sign, slow
down to idle speed. Manatees, an endangered
species, are passive, large, slow-moving mammals. Many manatees are seriously injured or
killed each year by boat propellers.
Most lights on markers flash on and off. Others
such as lights on aids with no lateral significance are fixed. They stay on all night. ATON
lights flash in regular patterns. For example,
they may flash ever y three seconds, or in
groups such as two flashes and a pause. There
are a number of flashing patterns, which help
you identify the light at night. To identify a light,
note its color and pattern or timing of flashes,
and compare it to your chart to find its location.
THE UNIFORM STATE WATERWAY
MARKING SYSTEM
There are four kinds of markers in the system
Regulatory, Informational, Cardinal and Lateral.
USWMS Regulatory Markers
The markers in this system are either signs or
buoys. Signs are square with orange borders.
Regulator y buoys are white and shaped like
cylinders. They have horizontal orange bands
near their tops and just above the sur face of
the water.
An orange circle on a marker means a controlled area. A message such as No Wake, Idle
Speed, No Skiing, or 5 MPH may appear on the
marker.
An orange diamond means danger. If the diamond has an orange cross inside it, don’t enter
the area. The reason you should stay out, such
as “Swim Area” may be printed in black on the
marker.
A Special Sign
GENERAL RULES OF SEAMANSHIP
1. Cross waves at right angles.
2. When caught in heavy water or squalls,
head either directly into the waves or at a
slight angle. Reduce speed, but maintain
enough power to maneuver your boat safely.
3. Keep your speed under control. Respect the
rights of boaters engaged in fishing, swimming, water skiing or diving. Give them
“wide berth”.
4. When meeting a boat head on, keep to the
right whenever possible.
5. When two boats cross, the boat to the right
or starboard has the right of way.
6. When overtaking or passing, the boat being
passed has the right of way. The boat being
passed is required to maintain the same
course and speed.
RIGHT-OF-WAY
In general, boats with less maneuverability have
right-of-way over more agile craft. In your power
boat, you must stay out of the way of the following vessels:
USWMS Informational Markers
•
USWMS informational markers are white signs
with orange borders. They give information such
as direction, distance, and location.
A vessel not under command or aground.
Due to their circumstances, these vessels
have no maneuverability.
•
A vessel restricted in its maneuverability.
These vessels are per forming work which
limits their maneuverability such as: surveying, dredging, laying pipe or cable, or
2-12
HONK
HONK
HONK
HONK
PASSING
PORT TO
PORT
MEETING
HEAD TO
HEAD
PASSING
STARBOARD TO
STARBOARD
FIGURE 2.11 MEETING HEAD-ON
ser vicing navigational markers among
others.
12 O'CLOCK
•
•
A vessel engaged in fishing. These include
boats fishing with lines, trawls or nets; but
not trolling lines.
PRIVILEGED
VESSEL
Sailboats. Sailboats have the right-of-way
over power boats; however, if a sailboat is
using a propeller to move forward, it is considered a power boat even if its sails are up.
MEETING A VESSEL HEAD-ON
In a head-on situation, neither boat has the rightof way. Both boats should decrease speed and
pass port to port (Figure 2.11). However, if both
boats are on the left side of a channel, each vessel should sound two short horn blasts and pass
starboard to starboard.
DANGER ZONE
BURDENED
VESSEL
CROSSING SITUATIONS
In a crossing situation, the boat on the right
from the 12-4 o’clock position has the right-ofway. It must hold course and speed. The boat
without right-of-way must keep clear and pass to
the stern as shown on Figure 2.12.
4 O'CLOCK
FIGURE 2.12 CROSSING
2-13
STAND-ON
(PRIVILEGED)
VESSEL BEING
OVERTAKEN
OVERTAKING
The boat overtaking the one ahead must yield
the right-of-way to the boat being passed. The
over taking boat must make any necessar y
adjustments to keep out of its path. See Figure
2.13. The boat being passed should hold its
course and speed.
WHISTLE SIGNALS
Out on the water, whistle signals are commonly
used. Although using a whistle signal is not necessary every time a boat is nearby, operators
must signal their intentions when necessary to
avoid potentially confusing or hazardous situations. It is customary for the privileged boat to
signal first and the give-way boat to return the
same signal to acknowledge she understands
and will comply. Use the danger signal (five or
more shor t and rapid blasts) if intent is not
clear. A short blast is 1 or 2 seconds long. A
long blast is 4 to 6 seconds long.
GIVE-WAY
(BURDENED)
VESSEL
OVERTAKING
FIGURE 2.13 OVERTAKING
USE WHISTLE BLASTS EARLY ENOUGH TO BE
NOTICED AND UNDERSTOOD BY OTHER
BOATERS. The Navigational Aids Char t at the
WHITE
GREEN
IF YOU SEE GREEN:
CAUTIOUSLY HOLD
COURSE
WHITE
RED
IF YOU SEE RED:
GIVE WAY!
FIGURE 2.14 NIGHT RUNNING
2-14
end of this section lists the meanings of the
various whistle signals.
THE GENERAL PRUDENTIAL RULE
The general prudential rule regarding right-ofway is that if a collision appears unavoidable,
neither boat has right-of-way. As prescribed in
the Rules of the Road, both boats must act to
avoid collision.
NIGHT RUNNING
Boats operating between sunset and sunrise
(hours var y by state), or in conditions of
reduced visibility, must use navigational lights.
Nighttime operation, especially during bad
weather or fog, can be dangerous. All Rules of
Road apply at night, but it is best to slow down
and stay clear of all boats regardless of who
has right-of-way.
To see more easily at night, avoid bright lights
when possible. Also, it is helpful to have a passenger keep watch for other boats, water
hazards and navigational aids.
To determine the size, speed and direction of
other vessels at night, you should use the running lights. A green light indicates the starboard
side, and a red light indicates the por t side.
Generally, if you see a green light, you have the
right-of-way; if you see a red light, give way to
the other vessel. See Figure 2.14.
NAVIGATIONAL AIDS CHART
The illustrated Navigational Aids Chart located
on the next page contains information concerning whistle signals, storm warnings, bridge
signals and buoy descriptions and information.
2-15
Navigational Aids Chart
REMEMBER
THESE
RULES
1. OVERTAKING - PASSING: Boat being passed has the right-of-way. KEEP CLEAR.
2. MEETING HEAD ON: Keep to the right.
3. CROSSING: Boat on right has the right-of-way. Slow down and permit boat to pass.
STORM WARNINGS
STARBOARD
PORT
DANGER
ZONE
(Dead ahead
to 2 points
abaft your
starboard
beam)
Yield
right-of-way
to boats
in your
DANGER
ZONE!
RED FLAG
Small craft
(winds to
33 knots)
2 RED FLAGS
Gale
(winds up to
47 knots)
WHISTLE SIGNALS
SQUARE
RED FLAG
BLACK BOX
(Storm)
2 SQUARE
RED FLAGS
BLACK BOX
(Hurricane)
BRIDGE SIGNALS
ONE LONG BLAST: Warning signal
(Coming out of slip)
ONE SHORT BLAST: Pass on my port side
TWO SHORT BLASTS: Pass on my starboard side
THREE SHORT BLASTS: Engine(s) in reverse
FOUR OR MORE BLASTS: Danger signal
SOUND
VISUAL
VESSEL: Open
VESSEL: Open
DAY
(Flag)
NIGHT
(Lights)
Same
or
Same
BRIDGE: OK
BRIDGE: OK
No
VESSEL: Replies:
No
RADIO: VHF CH. 13
LATERAL AIDS AS SEEN ENTERING FROM SEAWARD
SAFE WATER MID-CHANNELS OR FAIRWAYS
NO NUMBERS — MAY BE LETTERED
PORT SIDE
ODD NUMBERED AIDS
■ WHITE LIGHT ONLY
STARBOARD SIDE
EVEN NUMBERED AIDS
MORSE CODE
Mo (A)
GREEN LIGHT ONLY
RED LIGHT ONLY
FLASHING
FLASHING
OCCULTING
OCCULTING
QUICK FLASHING
QUICK FLASHING
RW
"A"
RW
SP "G"
ISOPHASE
SPHERICAL
RW "N"
Mo (A)
ISOPHASE
LIGHTED
AND OR SOUND
MR
PREFERRED CHANNEL
G "9"
FI G 4sec
■■
LIGHTED BUOY
COMPOSITE GROUP FLASHING ( 2 + 1)
■
■■
■
■■
GREEN LIGHT ONLY
R "8"
FI R 4sec
■
RED LIGHT ONLY
GR "C"
FI (2 + 1)
LIGHTED BUOY
RG "B"
FI (2 + 1)
LIGHTED
G
C "7"
PREFERRED
CHANNEL TO
PORT
TOPMOST BAND
RED
RG
N "W"
PREFERRED
CHANNEL TO
STARBOARD
TOPMOST BAND
GREEN
GR
C "L"
CAN
NUN
CAN
JR
JG
2-16
G
" 1"
NUN
TR
SG
DAYMARK
R
N "6"
DAYMARK
GR
"A"
RG
"B"
R
"2"
Specifications and Layout – 3
This owner’s manual covers a number of Wellcraft models. The specifications for these
models are detailed in this section. You will
need to become aware of your boat’s dimensions, weight, bridge clearance and draft and
learn the importance of these measurements.
NOTE: In all specifications, bridge clearance
dimension is figur ed with average load.
Antenna, canvas etc. are not included.
Figures 3.1–3.7 show the general locations of
equipment and many through–hull fittings on
various Wellcraft cruiser models. Depending on
model, this equipment is standard, optional, or
not available. Seacocks are generally near the
component they ser ve. The locations of fills,
vents and other equipment may var y from
model to model. Check with your dealer if you
have any questions about how your boat is
equipped.
1 ......FUSE PANEL
2 ......FUEL TANK VENT & FILL
3 ......WASTE TANK
4 ......LOWER UNIT TRIM
5 ......STERN LIGHT BASE WITHOUT
RADAR ARCH
6 ......TRIM TAB PUMP
7 ......BATTERY TRAY IN ENGINE ROOM
8 ......WATER PUMP
9 ......BATTERY SWITCH
10 ......WATER FILL & VENT
11 ......SHORE POWER OUTLET
12 ......AC/DC PANEL
13 ......WASTE PUMPOUT
14 ......WASTE TANK VENT
15 ......SHOWER SUMP DISCHARGE
16 ......COCKPIT DRAIN DISCHARGE
17 ......AIR CONDITIONER DISCHARGE
18 ......AIR CONDITIONER UNIT
19 ......SINK DRAIN
20 ......COCKPIT DRAIN
21 ......SHOWER SUMP
22 ......BILGE PUMP DISCHARGE
23 ......OVERBOARD DISCHARGE
19
15
12
21
16
17
20
1
18
11
14
13
3
9
23
8
10
7
5
2
6
4
20
22
20
FIGURE 3.1 2400 MARTINIQUE
3-1
1 ......FUSE PANEL
2 ......SHOWER SUMP DISCHARGE
3 ......COCKPIT DRAIN DISCHARGE
4 ......AIR CONDITIONER PUMP
DISCHARGE
5 ......WASTE PUMPOUT
6 ......WASTE TANK VENT
7 ......WATER TANK VENT & FILL
8 ......WATER PUMP
9 ......STERN LIGHT WITHOUT
RADAR ARCH
10 ......COCKPIT DRAIN
11 ......FUEL VENT & FILL
12 ......BILGE PUMP DISCHARGE
13 ......LOWER UNIT TRIM
14 ......TRIM TAB RESERVOIR
15 ......COCKPIT DRAIN
16 ......BATTERY TRAY
17 ......BATTERY SWITCH
18 ......MACERATOR DISCHARGE
19 ......SHOWER SUMP
20 ......SHOREPOWER OUTLET
21 ......AC/DC PANEL
22 ......SINK DRAIN
23 ......AIR CONDITIONER UNIT
22
21
1
15
19
2
20
3
4
23
6
18
5
17
8
16
7
9
14
10
12
10
11
13
15
15
FIGURE 3.2 2600 MARTINIQUE
3-2
1 ......AIR
......WATER
CONDITIONER
TANK VENTDISCHARGE
2 ......SPRING
......AIR CONDITIONER
CLEAT DRAIN
DISCHARGE
3 ......WATER
......CIRCUITFILL
BREAKERS
& VENT ON HELM
4 ......COCKPIT
......WATER FILL
FLOOR DRAIN
5 ......BILGE
......FUEL CROSS
PUMP DISCHARGE
OVER VALVE
6 ......HIGH
......BATTERIES
WATER(2)BILGE PUMP
7 ......A/C
DISCHARGE
SEACOCK & STRAINER
8 ......GENERATOR
7
......GENSET
DISCHARGE
9 ......OVERBOARD
8
......FUEL TANK VENT
DISCHARGE
10 ......GENSET EXHAUST
11 ......BILGE PUMP DISCHARGE
12 ......ENGINE EXHAUST
13 ......FUEL FILL
14 ......COCKPIT DRAINS
15 ......CITY WATER INLET
16 ......FUEL FILL
179......ENGINE
......FUEL FILL
EXHAUST
& VENT
18
10......TRIM
......WASTE
TAB
VENT
RESERVOIR
19
11......FUEL
......WASTE
TANK
PUMPOUT
VENT
20
12......WASTE
......12 VOLT
TANK
CIRCUIT
VENT
BREAKERS
21
13......BILGE
......SHOWER
PUMP
SUMP
DISCHARGE
DISCHARGE
22
14......SHOWER
......FORWARD
SUMP
BILGE
DISCHARGE
PUMP
23 ......SHORE
DISCHARGE
POWER OUTLET
24
15......TELEPHONE/TV
......HEAD SINK DRAIN
OUTLET
25
16......AC/DC
......GALLEY
PANEL
DRAIN
26 ......BATTERY SWITCHES
27 ......FRESHWATER PUMP
28 ......SHOWER SUMP
29 ......WASTE PUMPOUT
30 ......HEAD SINK DRAIN
31 ......GALLEY SINK DRAIN
16
1
14
15
13
2
2
12
11
10
9
3
8
4
5
4
7
6
FIGURE 3.3 2800 MARTINIQUE
3-3
1 ......GENSET BATTERY
2 ......AIR CONDITIONER DISCHARGE
3 ......CIRCUIT BREAKERS ON HELM
4 ......WATER FILL WITH VENT
5 ......BATTERIES (2)
6 ......A/C SEACOCK & STRAINER
7 ......GENSET
8 ......FORWARD BILGE PUMP
DISCHARGE
9 ......GENSET EXHAUST
10 ......BILGE PUMP DISCHARGE
11 ......FUEL FILL WITH VENT
12 ......COCKPIT DRAINS
13 ......CITY WATER INLET
14 ......TRIM TAB RESERVOIR
15 ......WASTE TANK VENT
16 ......SHOWER SUMP DISCHARGE
17 ......SHORE POWER OUTLET
18 ......TELEPHONE/TV OUTLET
19 ......AC/DC PANEL
20 ......BATTERY SWITCHES
21 ......FRESHWATER PUMP
22 ......SHOWER SUMP
23 ......WASTE PUMPOUT
24 ......HEAD SINK DRAIN
25 ......GALLEY SINK DRAIN
26 ......COCKPIT SINK DRAIN
27 ......COCKPIT DRAIN
28 ......DUNNAGE BOX DRAIN
22
24 25
21
2
18
16
8
19
4
15
3
17
7
23
20
5
11
11
6
12
9
26
13
28
14
1
FIGURE 3.4 3000 MARTINIQUE
3-4
10
27
1 ......HEAD VANITY DISCHARGE
2 ......GALLEY SINK DISCHARGE
3 ......SUMP DISCHARGE
4 ......A/C D/C PANEL (BREAKERS)
5 ......FRESH WATER PUMP
6 ......SHOWER SUMP
7 ......A/C SEACOCK & STRAINER
8 ......WASTE PUMPOUT
9 ......WASTE TANK VENT
10 ......SHORE POWER
11 ......FUEL TANK FILL & VENT
12 ......GENSET
13 ......BATTERY SWITCHES
14 ......WET BAR DISCHARGE
15 ......CITY WATER INLET
16 ......TRIM TAB RESERVOIR
17 ......BATTERIES
18 ......AFT BILGE PUMP DISCHARGE
19 ......FUEL FILL/VENT
20 ......WATER FILL
21 ......FWD BILGE PUMP DISCHARGE
22 ......CIRCUIT BREAKERS AT HELM
23 ......A/C SUMP
24 ......TV & TELEPHONE OUTLET
25 ......AIR CONDITIONER
25
24
23
1
2
3
4
22
5
6
21
7
8
20
9
10
19
11
12
13
18
14
16
17
15
FIGURE 3.5 3300 MARTINIQUE
3-5
1 ......#1 PORT, #2 STARBOARD/
HOUSE BATTERY SWITCHES
2 ......AC/DC PANEL
3 ......SHORE POWER INLET
4 ......TELEPHONE/TV OUTLET
5 ......CIRCUIT BREAKERS
6 ......FUEL FILL & VENT
7 ......BATTERIES (2)
8 ......FUEL VALVES
9 ......UPPER DECK DRAIN
10 ......LIVEWELL DRAIN
11 ......GENSET
12 ......HATCH DRAIN (2)
13 ......GENSET EXHAUST
14 ......BILGE PUMP DISCHARGE
15.......BAIT STATION SINK DRAIN
16 ......UPPER DECK DRAIN
17 ......WATER FILL & VENT
18 ......MACERATOR DISCHARGE
19 ......SINK DRAIN
20 ......SUMP PUMP DRAIN
21 ......SHORE POWER OUTLET
22 ......SHOWER SUMP
DISCHARGE
23 ......GALLEY SINK DRAIN
23
1
22
2
21
20
19
18
3
5
6
7
8
17
16
14
15
9
10
11
13
12
FIGURE 3.6 330 COASTAL
3-6
4
1 ......TELEPHONE OUTLET
2 ......HEAD SINK DISCHARGE
3 ......GALLEY SINK DISCHARGE
4 ......SUMP PUMP DISCHARGE
5 ......AC OUTLET
6 ......A/C D/C PANEL
7 ......AIR CONDITIONER STRAINER
& SEACOCK
8 ......WASTE TANK PUMPOUT
9 ......WASTE TANK VENT
10 ......FUEL TANK FILL & VENT
11 ......WET BAR DISCHARGE
12 ......GENERATOR
13 ......BATTERY SWITCHES
14 ......CITY WATER INLET
15 ......TRIM TAB RESERVOIR
16 ......BATTERIES
17 ......AFT BILGE PUMP DISCHARGE
18 ......WATER TANK FILL & VENT
19 ......AIR CONDITIONER
20 ......FORWARD BILGE DISCHARGE
21 ......CIRCUIT BREAKERS
(12 VOLTS)
22 ......TV & TELEPHONE OUTLET
23 ......AIR CONDITIONER & HEAD
SUMP
24 ......AIR CONDITIONER UNIT
1
24
2
23
22
3
4
5
6
21
20
19
7
8
9
18
10
10
12
13
17
11
14
15
16
FIGURE 3.7 3700 MARTINIQUE
3-7
SPECIFICATIONS
2400 MARTINIQUE
2800 MARTINIQUE
Metric
Metric
Design Category
C (Inshore)
Certification
CE
Length Overall
(w/pulpit)
7.75 m
Centerline Length
7.01 m
Beam
2.59 m
Dry\Unladen Weight 2041.2 kg
Maximum Load
Weight
1174 kg
Persons
8
Fuel Capacity (gas)
230.89 l
Water Capacity
98.41 l
Holding Tank Capacity 45.42 l
Deadrise
20°
Draft: drive up
0.51 m
Draft: drive down
1.02 m
Bridge Clearance*
1.91 m
Sleeping Capacity
(persons)
4
Headroom
1.83 m
Max HP @ Prop
209kw
US
25’5”
23’0”
8’6”
4,500 lb
2,590 lb
8
61 gal
26 gal
12 gal
20°
20”
40”
6’3”
Design Category
B (Offshore)
Certification
Length Overall
(w/pulpit)
8.48 m
Beam
2.9 m
Dry\Unladen Weight 3266 kg
Fuel Capacity (gas)
378.5 l
Fresh Water Tank
Capacity
132.51 l
Holding Tank Capacity 113.6 l
Deadrise
20°
Draft: drive up
0.43 m
Draft: drive down
.71 m
Bridge Clearance*
2.16 m
Headroom
1.88 m
Sleeping Capacity
(persons)
6
Max HP @ Prop
313.2kw
4
6’0”
280HP
Metric
Design Category
B (Offshore)
Certification
CE
Length Overall
(w/pulpit)
8.36 m
Centerline Length
(w/o pulpit)
7.93 m
Beam
2.59 m
Dry\Unladen Weight 2268 kg
Maximum Load
Weight
1350
Persons
8
Fuel Capacity (gas)
291.45 l
Fresh Water Tank
Capacity
98.41 l
Holding Tank Capacity 45.42 l
Deadrise
20°
Draft: drive up
0.49 m
Draft: drive down
1.02 m
Bridge Clearance*
1.98 m
Sleeping Capacity
(persons)
4
Headroom
1.83 m
Max HP @ Prop
231kw
US
27’5”
26’0”
8’6”
5,000 lb
N/A
N/A
77 gal
26 gal
12 gal
20°
19”
40”
6’6”
Design Category
B (Offshore)
Certification
CE
Length Overall
(w/pulpit)
9.85 m
Centerline Length
9.3 m
Beam
3.20 m
Dry\Unladen Weight 4990 kg
Maximum Load
Weight
2500 kg
Persons
12
Fuel Capacity (gas)
605.6 l
Water Capacity
155.18 l
Holding Tank Capacity 75.7 l
Deadrise
16°
Draft: drive up
0.69 m
Draft: drive down
.94 m
Bridge Clearance*
2.62 m
Sleeping Capacity
(persons)
6
Headroom
1.91 m
Max HP @ Prop
417kw
4
6’0”
310HP
*Dimension with average load; antennas, canvas, etc. not included
3-8
NMMA
27’10”
9’6”
7,200 lb
100 gal
35 gal
28 gal
20°
17”
28”
7’1”
6’2”
6
420HP
3000 MARTINIQUE
Metric
2600 MARTINIQUE
US
US
32’4”
30’6”
10’6”
11,000 lb
N/A
N/A
160 gal
41 gal
20 gal
16°
27”
37”
8’7”
6
6’3”
560HP
SPECIFICATIONS
3300 MARTINIQUE
3700 MARTINIQUE
MetrIc
Metric
Design Category
B (Offshore)
Certification
Length Overall
10.1 m
Beam
3.53 m
Dry\Unladen Weight 4990 kg
Fuel Capacity (gas)
855.41 l
Water Capacity
151.4 l
Holding Tank Capacity 132.48 l
Deadrise
22°
Draft:
0.84 m
Bridge Clearance
(w/arch)*
2.74 m
Sleeping Capacity
(persons)
6
Headroom
1.9 m
Max HP @ Prop
567kw
US
US
330 COASTAL
Design Category
B (Offshore)
Certification
Length Overall
11.25 m
Beam
3.96 m
Dry\Unladen Weight
(approx. w/engine)
7711 kg
Fuel Capacity
1090 l
Fresh Water Tank
Capacity
216 l
Holding Tank Capacity 132 l
Deadrise
22°
Draft
1.02 m
Bridge Clearance
(w/arch)*
2.87 m
Headroom
1.9 m
Sleeping Capacity
(persons)
6
Max HP @ Prop
567kw
Metric
SAFETY LABEL LOCATIONS
Design Category
B (Offshore)
Length Overall
11.76 m
Hull Length
10.16 m
Beam
3.86 m
Dry\Unladen Weight
(w/gas)
7257.60 kg
Maximum Load
Weight
2500
Persons
12
Fuel Capacity (gas)
1090.20 l
Fresh Water Tank
Capacity
196.84 l
Holding Tank Capacity 75.7 L
Deadrise
16°
Draft: down
0.91 m
Bridge Clearance*
2.97 m
Headroom
2.00 m
Sleeping Capacity
(persons)
4
Max HP @ Prop
552kw
NMMA
33’2”
11’7”
11,000 lb
226 gal
40 gal
35 gal
22°
35”
9’0”
6
6’3”
760HP
US
38’7”
33’4”
12’8”
16,000 lb
N/A
N/A
288 gal
NMMA
36’11”
13’0”
16,400 lb
288 gal
57 gal
35 gal
22°
40”
9’5”
6’3”
6
760HP
Safety labels are placed at various locations
on your boat to aler t you to potentially hazardous conditions. Figures 3.8–3.14 show the
locations of these safety labels. Check with
your dealer if you have any questions about
safety labels or replacing labels if they are
missing from your boat.
Be sure to read ALL hazard labels. Understanding the information on these labels is of vital
importance.
52 gal
20 gal
16°
36”
9’9”
6’7”
4
740HP
*Dimension with average load; antennas, canvas, etc. not included
3-9
YELLOW
CAUTION:
© 1993 Aldon Industries
TO AVOID INJURY, WINDOW MUST BE SECURED
IN THE CLOSED POSITION WHEN VESSEL IS IN
MOTION. USE BOTH WINDOW LOCKS.
CLEANING "PLEXIGLASS" SURFACES:
WASH ACRYLIC WITH A MILD SOAP OR
DETERGENT AND PLENTY OF LUKE WARM
WATER. USE A CLEAN SOFT CLOTH.
RINSE WITH CLEAR WATER.
CAUTION:
DO NOT USE WINDOW CLEANING SPRAYS,
SCOURING COMPOUNDS, OR SOLVENTS
SUCH AS GASOLINE, BENZENE, OR
LACQUER THINNER.
MAXIMUM CAPACITIES
8
PERSONS OR 1200 LBS
2590 LBS. PERSONS, GEAR
THIS BOAT COMPLIES WITH U.S. COAST GUARD SAFETY
STANDARDS IN EFFECT ON THE DATE OF CERTIFICATION
MANUFACTURER:
WELLCRAFT MARINE
SARASOTA, FL 34243
MODEL: 2400 MARTINIQUE
ORANGE
!
DESIGN COMPLIANCE WITH NMMA REQUIREMENTS BELOW IS
VERIFIED. MFGR RESPONSIBLE FOR PRODUCTION CONTROL.
LOAD CAPACITY * COMPARTMENT VENTILATION
STEERING, FUEL AND ELECTRICAL SYSTEMS
NAVIGATION LIGHTS
MANEUVERABILITY
CERTIFIED
WARNING
NATIONAL MARINE MANUFACTURERS ASSN
To minimize shock and fire hazards:
(1) Turn off the boat's shore connection
switch before connecting or
disconnecting shore cable.
(2) Connect shore-power cable at the
boat first.
(3) If polarity warning indicator is activated, immediately disconnect cable.
(4) Close shore-power inlet cover tightly.
DO NOT ALTER SHORE-POWER
CABLE CONNECTORS
RED
!
DANGER
SHUT OFF MOTOR WHEN NEAR SWIMMERS.
SEVERE INJURY OR DEATH WILL RESULT
FROM CONTACT WITH A ROTATING PROPELLER.
IGNITION STOP
LANYARD MUST BE ATTACHED
TO OPERATOR WHILE UNDERWAY
RED
DISCHARGE OF OIL PROHIBITED
!
THE FEDERAL WATER POLLUTION CONTROL ACT
PROHIBITS THE DISCHARGE OF OIL OR OILY WASTE
INTO OR UPON THE NAVIGABLE WATERS AND
CONTIGUOUS ZONE OF THE UNITED STATES IF
SUCH DISCHARGE CAUSES A FILM OR SHEEN
UPON, OR DISCOLORATION OF, THE SURFACE OF
THE WATER, OR CAUSES A SLUDGE OR EMULSION
BENEATH THE SURFACE OF THE WATER.
DANGER
CARBON MONOXIDE IS COLORLESS, ODORLESS AND
DANGEROUS. ALL GASOLINE POWERED ENGINES AND
GENERATORS EXHAUST CARBON MONOXIDE (CO.)
DIRECT AND PROLONGED EXPOSURE TO CO WILL
CAUSE BRAIN DAMAGE OR DEATH. SIGNS OF EXPOSURE
TO CO INCLUDE NAUSEA, DIZZINESS AND DROWSINESS.
Keep Cabin and Cockpit Areas Well Ventilated.
Avoid Blockage of Exhaust Outlets.
See Owner's Manual for More Details.
VIOLATORS ARE SUBJECT TO
A PENALTY OF $5,000
ORANGE
!
WARNING
LEAKING FUEL IS A FIRE AND EXPLOSION
HAZARD. INSPECT SYSTEM REGULARLY.
EXAMINE FUEL SYSTEM FOR LEAKS OR
CORROSION AT LEAST ANNUALLY.
BLUE
RED
NOTICE
!
DANGER
THIS FILL FOR WATER ONLY!
NEVER APPROACH STERN WHEN
MOTOR IS RUNNING.
ROTATING PROPELLER CAN CAUSE
SERIOUS INJURY OR DEATH.
FIGURE 3.8 2400 MARTINIQUE
3-10
YELLOW
CAUTION:
© 1993 Aldon Industries
TO AVOID INJURY, WINDOW MUST BE SECURED
IN THE CLOSED POSITION WHEN VESSEL IS IN
MOTION. USE BOTH WINDOW LOCKS.
ORANGE
!
WARNING
To minimize shock and fire hazards:
(1) Turn off the boat's shore connection
switch before connecting or
disconnecting shore cable.
(2) Connect shore-power cable at the
boat first.
(3) If polarity warning indicator is activated, immediately disconnect cable.
(4) Close shore-power inlet cover tightly.
DO NOT ALTER SHORE-POWER
CABLE CONNECTORS
RED
DANGER
!
SHUT OFF MOTOR WHEN NEAR SWIMMERS.
SEVERE INJURY OR DEATH WILL RESULT
FROM CONTACT WITH A ROTATING PROPELLER.
CLEANING "PLEXIGLASS" SURFACES:
WASH ACRYLIC WITH A MILD SOAP OR
DETERGENT AND PLENTY OF LUKE WARM
WATER. USE A CLEAN SOFT CLOTH.
RINSE WITH CLEAR WATER.
CAUTION:
DO NOT USE WINDOW CLEANING SPRAYS,
SCOURING COMPOUNDS, OR SOLVENTS
SUCH AS GASOLINE, BENZENE, OR
LACQUER THINNER.
IGNITION STOP
LANYARD MUST BE ATTACHED
TO OPERATOR WHILE UNDERWAY
RED
!
DANGER
CARBON MONOXIDE IS COLORLESS, ODORLESS AND
DANGEROUS. ALL GASOLINE POWERED ENGINES AND
GENERATORS EXHAUST CARBON MONOXIDE (CO.)
DIRECT AND PROLONGED EXPOSURE TO CO WILL
CAUSE BRAIN DAMAGE OR DEATH. SIGNS OF EXPOSURE
TO CO INCLUDE NAUSEA, DIZZINESS AND DROWSINESS.
Keep Cabin and Cockpit Areas Well Ventilated.
Avoid Blockage of Exhaust Outlets.
See Owner's Manual for More Details.
DISCHARGE OF OIL PROHIBITED
THE FEDERAL WATER POLLUTION CONTROL ACT
PROHIBITS THE DISCHARGE OF OIL OR OILY WASTE
INTO OR UPON THE NAVIGABLE WATERS AND
CONTIGUOUS ZONE OF THE UNITED STATES IF
SUCH DISCHARGE CAUSES A FILM OR SHEEN
UPON, OR DISCOLORATION OF, THE SURFACE OF
THE WATER, OR CAUSES A SLUDGE OR EMULSION
BENEATH THE SURFACE OF THE WATER.
ORANGE
VIOLATORS ARE SUBJECT TO
A PENALTY OF $5,000
!
WARNING
LEAKING FUEL IS A FIRE AND EXPLOSION
HAZARD. INSPECT SYSTEM REGULARLY.
EXAMINE FUEL SYSTEM FOR LEAKS OR
CORROSION AT LEAST ANNUALLY.
BLUE
RED
NOTICE
!
DANGER
THIS FILL FOR WATER ONLY!
NEVER APPROACH STERN WHEN
MOTOR IS RUNNING.
ROTATING PROPELLER CAN CAUSE
SERIOUS INJURY OR DEATH.
FIGURE 3.9 2600 MARTINIQUE
3-11
BLUE
NOTICE
YELLOW
!
SHOWER PUMP MUST BE ON
TO DRAIN THE SHOWER STALL.
TURN OFF WHEN THE SHOWER
IS NOT IN USE.
CAUTION
TURN HEAD ACC BREAKER (AT AC/DC) PANEL
AND SUMP PUMP SWITCH (IN HEAD) TO "ON"
POSITION WHEN AIR CONDITIONER IS IN OPERATION
ORANGE
!
RED
!
WARNING
GASOLINE VAPORS CAN EXPLODE
BEFORE STARTING ENGINE:
- CHECK ENGINE COMPARTMENT
FOR GASOLINE OR VAPORS.
- OPERATE BLOWER FOR 4 MINUTES.
RUN BLOWER BELOW CRUISING SPEED.
DANGER
RED
CARBON MONOXIDE IS COLORLESS, ODORLESS AND
DANGEROUS. ALL GASOLINE POWERED ENGINES AND
GENERATORS EXHAUST CARBON MONOXIDE (CO.)
DIRECT AND PROLONGED EXPOSURE TO CO WILL
CAUSE BRAIN DAMAGE OR DEATH. SIGNS OF EXPOSURE
TO CO INCLUDE NAUSEA, DIZZINESS AND DROWSINESS.
Keep Cabin and Cockpit Areas Well Ventilated.
Avoid Blockage of Exhaust Outlets.
See Owner's Manual for More Details.
!
DANGER
SHUT OFF MOTOR WHEN NEAR SWIMMERS.
SEVERE INJURY OR DEATH WILL RESULT
FROM CONTACT WITH A ROTATING PROPELLER.
NOTICE
WASH ACRYLIC WITH A MILD SOAP OR
DETERGENT AND PLENTY OF LUKE WARM
WATER. USE A CLEAN SOFT CLOTH. RINSE
WITH CLEAR WATER. DO NOT USE CLEANING
SPRAYS, SCOURING COMPOUNDS, OR
SOLVENTS SUCH AS GASOLINE, BENZENE,
LAQUER THINNER OR
ANY PETROLEUM BASED PRODUCT.
ORANGE
!
WARNING
To minimize shock and fire hazards:
(1) Turn off the boat's shore connection
switch before connecting or
disconnecting shore cable.
(2) Connect shore-power cable at the
boat first.
(3) If polarity warning indicator is activated, immediately disconnect cable.
(4) Close shore-power inlet cover tightly.
DO NOT ALTER SHORE-POWER
CABLE CONNECTORS
ORANGE
!
WARNING
LEAKING FUEL IS A FIRE AND EXPLOSION
HAZARD. INSPECT SYSTEM REGULARLY.
EXAMINE FUEL SYSTEM FOR LEAKS OR
CORROSION AT LEAST ANNUALLY.
IN ENGINE COMPARTMENT
BLUE
NOTICE
DISCHARGE OF OIL PROHIBITED
RED
THIS FILL FOR WATER ONLY!
!
DANGER
NEVER APPROACH STERN WHEN
MOTOR IS RUNNING.
ROTATING PROPELLER CAN CAUSE
SERIOUS INJURY OR DEATH.
FIGURE 3.10 2800 MARTINIQUE
3-12
THE FEDERAL WATER POLLUTION CONTROL ACT
PROHIBITS THE DISCHARGE OF OIL OR OILY WASTE
INTO OR UPON THE NAVIGABLE WATERS AND
CONTIGUOUS ZONE OF THE UNITED STATES IF
SUCH DISCHARGE CAUSES A FILM OR SHEEN
UPON, OR DISCOLORATION OF, THE SURFACE OF
THE WATER, OR CAUSES A SLUDGE OR EMULSION
BENEATH THE SURFACE OF THE WATER.
VIOLATORS ARE SUBJECT TO
A PENALTY OF $5,000
YELLOW
!
CAUTION
TURN HEAD ACC BREAKER (AT AC/DC) PANEL
AND SUMP PUMP SWITCH (IN HEAD) TO "ON"
POSITION WHEN AIR CONDITIONER IS IN OPERATION
BLUE
NOTICE
SHOWER PUMP MUST BE ON
TO DRAIN THE SHOWER STALL.
TURN OFF WHEN THE SHOWER
IS NOT IN USE.
CLEANING "PLEXIGLASS" SURFACES:
WASH ACRYLIC WITH A MILD SOAP OR
DETERGENT AND PLENTY OF LUKE WARM
WATER. USE A CLEAN SOFT CLOTH.
RINSE WITH CLEAR WATER.
CAUTION:
DO NOT USE WINDOW CLEANING SPRAYS,
SCOURING COMPOUNDS, OR SOLVENTS
SUCH AS GASOLINE, BENZENE, OR
LACQUER THINNER.
RED
DANGER
!
SHUT OFF MOTOR WHEN NEAR SWIMMERS.
SEVERE INJURY OR DEATH WILL RESULT
FROM CONTACT WITH A ROTATING PROPELLER.
IGNITION STOP
LANYARD MUST BE ATTACHED
TO OPERATOR WHILE UNDERWAY
BLUE
NOTICE
RED
THIS FILL FOR WATER ONLY!
!
ORANGE
!
DANGER
CARBON MONOXIDE IS COLORLESS, ODORLESS AND
DANGEROUS. ALL GASOLINE POWERED ENGINES AND
GENERATORS EXHAUST CARBON MONOXIDE (CO.)
DIRECT AND PROLONGED EXPOSURE TO CO WILL
CAUSE BRAIN DAMAGE OR DEATH. SIGNS OF EXPOSURE
TO CO INCLUDE NAUSEA, DIZZINESS AND DROWSINESS.
Keep Cabin and Cockpit Areas Well Ventilated.
Avoid Blockage of Exhaust Outlets.
See Owner's Manual for More Details.
WARNING
LEAKING FUEL IS A FIRE AND EXPLOSION
HAZARD. INSPECT SYSTEM REGULARLY.
EXAMINE FUEL SYSTEM FOR LEAKS OR
CORROSION AT LEAST ANNUALLY.
ORANGE
!
WARNING
To minimize shock and fire hazards:
(1) Turn off the boat's shore connection
switch before connecting or
disconnecting shore cable.
(2) Connect shore-power cable at the
boat first.
(3) If polarity warning indicator is activated, immediately disconnect cable.
(4) Close shore-power inlet cover tightly.
DO NOT ALTER SHORE-POWER
CABLE CONNECTORS
IN ENGINE COMPARTMENT
DISCHARGE OF OIL PROHIBITED
THE FEDERAL WATER POLLUTION CONTROL ACT
PROHIBITS THE DISCHARGE OF OIL OR OILY WASTE
INTO OR UPON THE NAVIGABLE WATERS AND
CONTIGUOUS ZONE OF THE UNITED STATES IF
SUCH DISCHARGE CAUSES A FILM OR SHEEN
UPON, OR DISCOLORATION OF, THE SURFACE OF
THE WATER, OR CAUSES A SLUDGE OR EMULSION
BENEATH THE SURFACE OF THE WATER.
VIOLATORS ARE SUBJECT TO
A PENALTY OF $5,000
ORANGE
RED
!
!
DANGER
NEVER APPROACH STERN WHEN
MOTOR IS RUNNING.
ROTATING PROPELLER CAN CAUSE
SERIOUS INJURY OR DEATH.
WARNING
LEAKING FUEL IS A FIRE AND EXPLOSION
HAZARD. INSPECT SYSTEM REGULARLY.
EXAMINE FUEL SYSTEM FOR LEAKS OR
CORROSION AT LEAST ANNUALLY.
FIGURE 3.11 3000 MARTINIQUE
3-13
ORANGE
!
WARNING
GASOLINE VAPORS CAN EXPLODE
BEFORE STARTING ENGINE:
- CHECK ENGINE COMPARTMENT
FOR GASOLINE OR VAPORS.
- OPERATE BLOWER FOR 4 MINUTES.
RUN BLOWER BELOW CRUISING SPEED.
RED
RED
!
SHUT OFF MOTOR WHEN NEAR SWIMMERS.
SEVERE INJURY OR DEATH WILL RESULT
FROM CONTACT WITH A ROTATING PROPELLER.
DANGER
!
DANGER
CARBON MONOXIDE IS COLORLESS, ODORLESS AND
DANGEROUS. ALL GASOLINE POWERED ENGINES AND
GENERATORS EXHAUST CARBON MONOXIDE (CO.)
DIRECT AND PROLONGED EXPOSURE TO CO WILL
CAUSE BRAIN DAMAGE OR DEATH. SIGNS OF EXPOSURE
TO CO INCLUDE NAUSEA, DIZZINESS AND DROWSINESS.
Keep Cabin and Cockpit Areas Well Ventilated.
Avoid Blockage of Exhaust Outlets.
See Owner's Manual for More Details.
NOTICE
WASH ACRYLIC WITH A MILD SOAP OR
DETERGENT AND PLENTY OF LUKE WARM
WATER. USE A CLEAN SOFT CLOTH. RINSE
WITH CLEAR WATER. DO NOT USE CLEANING
SPRAYS, SCOURING COMPOUNDS, OR
SOLVENTS SUCH AS GASOLINE, BENZENE,
LAQUER THINNER OR
ANY PETROLEUM BASED PRODUCT.
BLUE
NOTICE
THIS FILL FOR WATER ONLY!
ORANGE
!
IN ENGINE COMPARTMENT
WARNING
DISCHARGE OF OIL PROHIBITED
To minimize shock and fire hazards:
(1) Turn off the boat's shore connection
switch before connecting or
disconnecting shore cable.
(2) Connect shore-power cable at the
boat first.
(3) If polarity warning indicator is activated, immediately disconnect cable.
(4) Close shore-power inlet cover tightly.
DO NOT ALTER SHORE-POWER
CABLE CONNECTORS
THE FEDERAL WATER POLLUTION CONTROL ACT
PROHIBITS THE DISCHARGE OF OIL OR OILY WASTE
INTO OR UPON THE NAVIGABLE WATERS AND
CONTIGUOUS ZONE OF THE UNITED STATES IF
SUCH DISCHARGE CAUSES A FILM OR SHEEN
UPON, OR DISCOLORATION OF, THE SURFACE OF
THE WATER, OR CAUSES A SLUDGE OR EMULSION
BENEATH THE SURFACE OF THE WATER.
VIOLATORS ARE SUBJECT TO
A PENALTY OF $5,000
ORANGE
ORANGE
!
!
WARNING
LEAKING FUEL IS A FIRE AND EXPLOSION
HAZARD. INSPECT SYSTEM REGULARLY.
EXAMINE FUEL SYSTEM FOR LEAKS OR
CORROSION AT LEAST ANNUALLY.
RED
!
DANGER
NEVER APPROACH STERN WHEN
MOTOR IS RUNNING.
ROTATING PROPELLER CAN CAUSE
SERIOUS INJURY OR DEATH.
FIGURE 3.12 3300 MARTINIQUE
3-14
WARNING
LEAKING FUEL IS A FIRE AND EXPLOSION
HAZARD. INSPECT SYSTEM REGULARLY.
EXAMINE FUEL SYSTEM FOR LEAKS OR
CORROSION AT LEAST ANNUALLY.
BLUE
NOTICE
POSSIBLE HEATING ELEMENT DAMAGE.
FILL HOT WATER HEATER WITH WATER
BEFORE TURNING POWER ON.
CLEANING "PLEXIGLASS" SURFACES:
WASH ACRYLIC WITH A MILD SOAP OR
DETERGENT AND PLENTY OF LUKE WARM
WATER. USE A CLEAN SOFT CLOTH.
RINSE WITH CLEAR WATER.
CAUTION:
DO NOT USE WINDOW CLEANING SPRAYS,
SCOURING COMPOUNDS, OR SOLVENTS
SUCH AS GASOLINE, BENZENE, OR
LACQUER THINNER.
ORANGE
!
WARNING
Secure door when cruising.
Do not sit, stand or place
heavy objects on door.
Keep cabin door closed when
engines or generator are running.
Do not use
caustic materials to clean.
Wash with mild soap and water.
ORANGE
!
WARNING
To minimize shock and fire hazards:
(1) Turn off the boat's shore connection
switch before connecting or
disconnecting shore cable.
(2) Connect shore-power cable at the
boat first.
(3) If polarity warning indicator is activated, immediately disconnect cable.
(4) Close shore-power inlet cover tightly.
DO NOT ALTER SHORE-POWER
CABLE CONNECTORS
BLUE
NOTICE
THIS FILL FOR WATER ONLY!
RED
DANGER
!
SHUT OFF MOTOR WHEN NEAR SWIMMERS.
SEVERE INJURY OR DEATH WILL RESULT
FROM CONTACT WITH A ROTATING PROPELLER.
RED
RED
!
!
DANGER
DANGER
CARBON MONOXIDE IS COLORLESS, ODORLESS AND
DANGEROUS. ALL GASOLINE POWERED ENGINES AND
GENERATORS EXHAUST CARBON MONOXIDE (CO.)
DIRECT AND PROLONGED EXPOSURE TO CO WILL
CAUSE BRAIN DAMAGE OR DEATH. SIGNS OF EXPOSURE
TO CO INCLUDE NAUSEA, DIZZINESS AND DROWSINESS.
Keep Cabin and Cockpit Areas Well Ventilated.
Avoid Blockage of Exhaust Outlets.
See Owner's Manual for More Details.
NEVER APPROACH STERN WHEN
MOTOR IS RUNNING.
ROTATING PROPELLER CAN CAUSE
SERIOUS INJURY OR DEATH.
DISCHARGE OF OIL PROHIBITED
THE FEDERAL WATER POLLUTION CONTROL ACT
PROHIBITS THE DISCHARGE OF OIL OR OILY WASTE
INTO OR UPON THE NAVIGABLE WATERS AND
CONTIGUOUS ZONE OF THE UNITED STATES IF
SUCH DISCHARGE CAUSES A FILM OR SHEEN
UPON, OR DISCOLORATION OF, THE SURFACE OF
THE WATER, OR CAUSES A SLUDGE OR EMULSION
BENEATH THE SURFACE OF THE WATER.
VIOLATORS ARE SUBJECT TO
A PENALTY OF $5,000
IN ENGINE COMPARTMENT
ORANGE
!
WARNING
LEAKING FUEL IS A FIRE AND EXPLOSION
HAZARD. INSPECT SYSTEM REGULARLY.
EXAMINE FUEL SYSTEM FOR LEAKS OR
CORROSION AT LEAST ANNUALLY.
FIGURE 3.13 330 COASTAL
3-15
RED
!
DANGER
CARBON MONOXIDE IS COLORLESS, ODORLESS AND
DANGEROUS. ALL GASOLINE POWERED ENGINES AND
GENERATORS EXHAUST CARBON MONOXIDE (CO.)
DIRECT AND PROLONGED EXPOSURE TO CO WILL
CAUSE BRAIN DAMAGE OR DEATH. SIGNS OF EXPOSURE
TO CO INCLUDE NAUSEA, DIZZINESS AND DROWSINESS.
Keep Cabin and Cockpit Areas Well Ventilated.
Avoid Blockage of Exhaust Outlets.
See Owner's Manual for More Details.
RED
!
DANGER
SHUT OFF MOTOR WHEN NEAR SWIMMERS.
SEVERE INJURY OR DEATH WILL RESULT
FROM CONTACT WITH A ROTATING PROPELLER.
CLEANING "PLEXIGLASS" SURFACES:
WASH ACRYLIC WITH A MILD SOAP OR
DETERGENT AND PLENTY OF LUKE WARM
WATER. USE A CLEAN SOFT CLOTH.
RINSE WITH CLEAR WATER.
CAUTION:
DO NOT USE WINDOW CLEANING SPRAYS,
SCOURING COMPOUNDS, OR SOLVENTS
SUCH AS GASOLINE, BENZENE, OR
LACQUER THINNER.
IGNITION STOP
LANYARD MUST BE ATTACHED
TO OPERATOR WHILE UNDERWAY
BLUE
ORANGE
NOTICE
WARNING
!
THIS FILL FOR WATER ONLY!
To minimize shock and fire hazards:
(1) Turn off the boat's shore connection
switch before connecting or
disconnecting shore cable.
(2) Connect shore-power cable at the
boat first.
(3) If polarity warning indicator is activated, immediately disconnect cable.
(4) Close shore-power inlet cover tightly.
DO NOT ALTER SHORE-POWER
CABLE CONNECTORS
DISCHARGE OF OIL PROHIBITED
THE FEDERAL WATER POLLUTION CONTROL ACT
PROHIBITS THE DISCHARGE OF OIL OR OILY WASTE
INTO OR UPON THE NAVIGABLE WATERS AND
CONTIGUOUS ZONE OF THE UNITED STATES IF
SUCH DISCHARGE CAUSES A FILM OR SHEEN
UPON, OR DISCOLORATION OF, THE SURFACE OF
THE WATER, OR CAUSES A SLUDGE OR EMULSION
BENEATH THE SURFACE OF THE WATER.
VIOLATORS ARE SUBJECT TO
A PENALTY OF $5,000
ORANGE
!
WARNING
LEAKING FUEL IS A FIRE AND EXPLOSION
HAZARD. INSPECT SYSTEM REGULARLY.
EXAMINE FUEL SYSTEM FOR LEAKS OR
CORROSION AT LEAST ANNUALLY.
ORANGE
!
RED
!
DANGER
NEVER APPROACH STERN WHEN
MOTOR IS RUNNING.
ROTATING PROPELLER CAN CAUSE
SERIOUS INJURY OR DEATH.
FIGURE 3.14 3700 MARTINIQUE
3-16
WARNING
LEAKING FUEL IS A FIRE AND EXPLOSION
HAZARD. INSPECT SYSTEM REGULARLY.
EXAMINE FUEL SYSTEM FOR LEAKS OR
CORROSION AT LEAST ANNUALLY.
Water Systems – 4
To fill the fresh water tank:
This section describes the fresh water, waste,
and bilge systems on your cruiser. Some models
may also be equipped with a raw water system.
1. Make sure the dockside water supply is suitable
for drinking. Not all dockside water is drinking
water. Check with the dockmaster if necessary.
FRESH WATER SYSTEM
2. Insert the filler cap key provided with your
boat into the slot on the filler cap and turn
counterclockwise to unlock. Remove the
filler cap.
The fresh water system on your cruiser consists
of a water tank, pump, water heater, and a distribution system. Fresh water is supplied to
various areas including the galley, the head, and
a transom shower. Some models have male
hose connections for cockpit and foredeck
washdown. Figure 4.1 shows a typical fresh
water system. Some components are optional
equipment. Check with your dealer if you have a
question about your cruiser’s system.
3. Using the hose from the dockside water
supply, fill the tank until water flows out of
the vent.
Note: Garden hoses are not recommended
for filling the tank. See your dealer for a sanitary drinking water hose.
FRESH WATER TANK
4. Close the fill fitting.
The fresh water system has a water tank in the
aft section of the boat. The tank has a separate
filler on the gunwale. A water tank vent is next
to the fill plate.
HOT WATER
DOCKSIDE
WATER
CONNECTION
COLD WATER
WATER
HEATER
FILTER &
PUMP
ICE MAKER
GALLEY
SINK
ENGINE HEAT
EXCHANGER
FRESH
WATER
TANK
COCKPIT
WASHDOWN
HEAD SINK/
SHOWER
VACUFLUSH
COCKPIT
WET BAR
TRANSOM
SHOWER
VENT
STERN
FILL
BOW
FIGURE 4.1 TYPICAL COMPLEX FRESHWATER SYSTEM
4-1
FRESH WATER PUMP
The fresh water pump supplies water under
pressure to the system when the dockside
water supply is not connected. The FRESH
WATER PUMP breaker switch on the DC CONTROL panel controls its operation. The pump is
under the engine hatch.
Before entering the pump, the water passes
through a filter to capture any contaminants.
When the breaker is switched to ON, the pump
runs until the hot and cold water systems are
pressurized. An automatic pressure switch
shuts the pump off until the pressure drops to
a preset level (for example, a pressure drop
caused by opening a faucet). The pump will then
run again until the system is pressurized and
turn itself off.
If the pump runs from time to time even though
no water is being used, a leak in a water line is a
likely cause. Check all lines for a leak and repair.
SANITIZING THE FRESH
WATER SYSTEM
Before using your fresh water system for the
first time or if you suspect the water system
has been contaminated, do the following:
1. Drain the fresh water tank completely. Open
all faucets, showers, and other outlets until
the flow of water stops. Shut off the fresh
water pump as soon as the tank is empty.
2. Mix a solution of 2 ounces household
bleach to 1 gallon of water for every 15 gallons of tank capacity. Pour the solution into
the fresh water tank.
3. Fill the tank with clean fresh water.
4. Turn the fresh water pump on and bleed air
from all faucets, showers, and other outlets.
5. After 3 hours, drain the system completely.
Important: Operate the fresh water pump only
when there is water in the tank. Running the
pump dry will damage the impeller. The pump
will not automatically turn off when the tank is
empty. If the breaker switch is left on when the
tank is empty, the pump may overheat.
6. Fill the tank with clean fresh water. Flush
system by draining tank again.
INITIAL STARTUP
1. Drain the system completely.
1. Fill the tank approximately 1/2 – 3/4 full.
Section 3, Specifications, lists the capacity
of the water tank on your cruiser.
2. Mix a solution of 1 quart white vinegar to 5
gallons of water. Pour the solution into the
fresh water tank.
2. Turn the FRESH WATER PUMP switch on.
3. Allow the solution to remain in the tank until
one hour of cruising time has been logged.
The boat’s motion will wash down the tank
with the vinegar/water solution and neutralize the bleach.
3. Open each cold water faucet, beginning with
the faucet furthest from the water tank, to
let air escape. Close the faucet when the
water flow becomes steady, and leave it
closed.
7. Fill the tank with clean, fresh drinking water.
If you can smell or taste bleach in the water:
4. Drain the fresh water system completely.
4. Open a hot water faucet to fill the water
heater and allow air to escape from the line.
Close the faucet.
5. Flush the system with one full tank of water.
5. Open each hot water faucet, beginning with
the faucet furthest from the water heater, to
let air escape. Close the faucet when the
water flow becomes steady, and leave it
closed.
DOCKSIDE WATER HOOKUP
The pump will run until the system is pressurized and then shut off.
6. Fill the tank to its capacity.
4-2
6. Fill the tank with clean fresh drinking water.
As an alternative to the fresh water tank, the
system can be connected to a dockside water
supply. Because the water enters the boat under
pressure, it bypasses the fresh water tank, filter
and pump. The pump should be shut off when
the system is connected to dockside water.
NOTE: Using dockside water does not replenish
water supply in your tank. The tank can only be
filled at the fresh water fill plate.
4. Before connecting the dockside water outlet, open the valve fully to flush away any
rust particles which may be present.
The fresh water system operates at a lower
pressure than that supplied from a dockside
water source. Unless the pressure is regulated,
dockside water may r upture lines or leak
through gaskets. Monitor the water system
carefully the first time you hook it up to the
dockside water system because the system is
connected to an unlimited supply of water. The
dockside water inlet on your cruiser may be
equipped with a pressure regulator to reduce
the pressure of the water supplied to your
boat’s system. Check with your dealer if you
have a question.
5. Connect the hose to the dockside water outlet.
! CAUTION
NEVER leave the boat unattended
while using the dockside water
hookup. If a line ruptures or other
major leak develops, excess water in
the bilge could damage the engines or
other boat components, or — worse
yet — the excess water could sink
your boat. Turn the water supply off
before leaving.
To connect dockside water:
WATER HEATER
Your boat is equipped with a water heater to provide hot water to the fresh water system. A
breaker marked WATER HEATER on the AC control
panel controls the operation of the heater. The
heater will not operate using DC power. Some
models may have an adjustable thermostat to
regulate hot water temperature. Check with your
dealer for the capacity of the water heater.
Important: Before turning the water heater circuit breaker ON, make sure the water heater is
full of water. Turning on power to an empty
heater could damage the heating elements and
make the water heater useless.
Follow these procedures to use the water heater:
1. Make sure the water heater is full of water
by opening a hot water faucet until a steady
stream of water flows out of the faucet and
all air is removed from the hot water lines.
2. With the generator running or shore power
connected to your boat, switch on the
WATER HEATER circuit breaker at the AC
CONTROL panel.
1. Turn the FRESH WATER PUMP switch off.
! WARNING
Before connecting to any water fitting
be sure the water is potable and suitable for human consumption. Also, a
special sanitary drinking water hose is
required for the potable water connection. Do not use a common garden
hose for drinking water.
2. Remove the threaded plug from the female
swivel hose connector of the water inlet fitting. Be sure to clean both ends and flush
the hose before connecting. Foreign matter
may damage the pressure regulator.
3
Attach the proper sanitar y drinking water
hose to the water inlet fitting.
3. Wait for the water in the tank to heat up;
then use as you would at home.
HEAT EXCHANGER
If your boat is equipped with a heat exchanger,
heat from the engine is used to heat water in
the heater. Water in the heater is heated whenever the engine is running. On twin engine
boats, the heat exchanger is normally on the
starboard engine.
! WARNING
This water may be very hot, especially
after the engines have been running
for several hours. Be sure to check the
temperature of the water before using
water from the heater.
4-3
WATER SYSTEM TROUBLESHOOTING
PROBLEM
CAUSE
SOLUTION
Air in system
Water tank empty
Fill tank. With pump on, bleed air from
lines by opening faucets until water flows
out.
Fresh water pump cycles
on and off
Leak in water system
Locate leak and repair.
No water at shower or
sinks with faucets on
FRESH WATER
breaker off
Switch breaker to ON.
PUMP
Water tank empty
Fill tank.
Blocked or pinched water
lines
Clear obstruction or straighten line.
Loose electrical connections
Check connections; tighten as needed.
See your dealer for service.
Defective pump
See your dealer for service.
Low water pressure at all
sinks and shower
Defective pump
See your dealer for service.
Low water pressure at one
sink
Pinched water line
Straighten line.
Raw water pump not
pumping water
Tripped circuit breaker
Reset if tripped.
No water supply
Check for clogged pump. Remove material
as needed.
Check for clogged thru–hull fitting. Clean
fitting.
Loose electrical connections
Check and tighten connections. Make
sure wires are not broken.
RAW WATER SYSTEM
SEACOCKS
A raw water system is provided as optional
equipment on some models. The raw water
pump switch is at the helm. The pump location
varies by model. The raw water system has
male hose connections for washing down the
cockpit and foredeck. If the raw water hose nozzle is closed, the pump will stop working when
the hose is pressurized and start working again
when the nozzle is opened.
Your boat is equipped with seacocks to shut off
openings below the water line in emergencies or
when removing various components for repair.
Close seacocks when your boat will be unattended for extended periods of time.
4-4
A sea strainer installed on the intake side of the
water cooling system protects the system from
clogging and provides an easy way to remove occasional debris (Figure 4.2). Periodic inspection and
removal of debris is essential for effective operation, but the frequency will vary depending on the
amount of use and local conditions.
To flush, press flush lever sharply to floor until
contents clear bowl. A sharp popping noise is
normal when the vacuum seal is broken. Hold
flush lever down for three seconds. If flush lever
is accidentally released before waste clears
bowl, do not attempt to flush toilet again until
vacuum pump stops running. A small amount of
water should remain in the bowl after flushing.
Do not dispose of sanitar y napkins or other
insoluble items in toilet.
FIGURE 4.2 SEACOCK AND SEA STRAINER
Make sure all guests understand the operation
of the VacuFlush system and that the instruction label is easy to read and in plain sight.
Refer to your VacuFlush manual for complete
information about the operation of the system.
WASTE SYSTEM
All waste system components are made of materials which prevent odor permeation and resist
chemical actions. See manufacturer’s manual
before adding chemicals to your waste system.
VACUFLUSH ® HEAD
If your boat is equipped with the VacuFlush
head, your waste system is actuated by a HEAD
or TOILET SYSTEM switch at the DC electrical
panel. It uses fresh water to minimize odor
problems. To add water to the bowl, raise flush
lever until desired water level is reached. Add
deodorizer before use the head. The pedal at
the base of the head evacuates waste and a
vacuum forces the waste to the holding tank.
Figure 4.3 is a diagram of a typical VacuFlush
system.
HOLDING TANK
Waste from the toilet is flushed to the holding
tank. You can empty the holding tank using a
dockside pumpout or, when permitted, through
a macerator through hull fitting in the hull bottom.
! WARNING
Waste in the holding tank can form
methane, an explosive gas. Use suitable
precautions when any maintenance is
done to the sanitary system.
FIGURE 4.3 TYPICAL VACUFLUSH SYSTEM
4-5
The holding tank is equipped with a waste tank
level indicator in the head compartment. Check
this regularly to see how full the tank is. When
the tank is full, do not use the head. If the tank
is overfilled, waste can plug the vent or cause
the tank to rupture, allowing its contents to
empty into the bilge. Checking the level regularly
is time well spent.
To empty the holding tank, Wellcraft recommends using a dockside pumpout facility.
Connect the hose from the pumpout facility to
the fitting marked WASTE on the starboard side
deck.
waste from the holding tank, grinds the waste
into small particles, and pumps the waste overboard through a hull discharge fitting above the
water line.
Follow these procedures to operate the macerator:
1. Switch the MACERATOR breaker switch at
the DC main electrical control panel to ON.
2. Allow the macerator to run until the holding
tank is empty, but no longer. Running the
macerator when the tank is empty will
cause damage to the pump.
3. When you hear the pump speed up (indicates tank is empty), immediately switch the
MACERATOR breaker to OFF.
When pumping out the holding tank, place the
waste cap in a secure place. If you drop it into
the water or it falls overboard, you will probably
not be able to retrieve it. Consider keeping an
extra cap on board in case you drop one overboard. Flush the head several times to clean
waste buildup out of the lines and rinse out the
tank.
BILGE SYSTEM
Flushing fresh water through the head is also a
good idea if you will be leaving the boat for two
or more days. Doing so will clear all waste from
the lines into the holding tank. Waste in the
lines tends to dry out. These hardened wastes
may affect future operation because they make
the inside diameter of the hose smaller.
Your cruiser is equipped with several bilge
pumps. (The number of pumps will var y by
model). The automatic bilge pumps remove
water from the bilge area. Rising water activates
a float switch to start the pump. When most of
the water has been pumped out, the float
switch shuts the pump of f. The pump has a
manual override. The pump can be turned on
manually using the switch at the helm.
OVERBOARD DISCHARGE
IMPORTANT: Overboard discharge of untreated
sewage within three miles of land is prohibited
by law. Check with local authorities for proper
discharge procedures in your area. If your boat
is going to be used on inland waters, have your
dealer seal the overboard discharge portion of
your waste system.
If regulations permit, the macerator can be
used to pump waste from the holding tank overboard. The MACERATOR circuit breaker switch
at the DC Control panel controls the power supply to the macerator. The macerator pulls the
AUTOMATIC BILGE PUMP
If for some reason the pump fails to star t,
check the fuse and wiring connections. If the
pump motor runs but no water is discharged, it
may be clogged. Keep the area around the
switch and the pump free of debris. If there is
no visible debris clogging the pump or blocking
the float switch and water is still not being
removed, inspect the discharge hose for kinks
or obstruction.
Be kind to our environment. If oil or fuel is
spilled in the bilge, do not run the pump. Keep
the oil or fuel from spreading in the bilge and
properly dispose of it on shore.
WASTE SYSTEM TROUBLESHOOTING
PROBLEM
CAUSE
SOLUTION
Head not flushing
Fresh water tank empty
Fill tank
Head not emptying
Blocked line to holding
tank
Remove material from line.
4-6
BILGE BLOWER
! WARNING
Turn on the bilge blower for at least 5
minutes before starting the engine to
eliminate gasoline fumes in the bilge.
Open the engine cover during that
time and smell for fumes. DO NOT
start engine if gasoline fumes are present. Do not operate blower while
fueling boat.
The bilge blower forces fumes out of the engine
compar tment area and circulates fresh air
drawn in through the deck vents. The deck
vents must be kept clear and open at all times.
The blower must run at least five minutes
before starting the engine. It must also be running during engine start-up and operation below
cruising speed. At cruising speed, air flows into
and out of engine compartment because of the
boat’s speed and the shape and placement of
the vents.
4-7
Fuel System – 5
FUEL SYSTEM COMPONENTS
The configuration of your boat’s fuel system
varies depending on the number and type of
engines it has and whether it has an onboard
generator.
FUEL TANKS
Single engine boats have one fuel tank. Twin
engine boats have two tanks. The starboard
tank supplies fuel to the starboard engine; the
port tank, to the port engine. The port tank supplies fuel to the generator if provided. Each
engine and the generator have separate fuel
pickup tubes. An electrical sending unit inside
the tanks provides an electrical signal to the
fuel gauge at the helm to indicate the fuel level
amount in the tank. The gauge is marked in 1/4
tank increments.
If your boat has diesel engines, a fuel return
line is also connected to the manifold.
FUEL SHUTOFF VALVES
If your boat has one engine, the fuel supply line
has a shutoff valve in the engine room on top of
the fuel tank. Turning the handle so it is perpendicular to the valve body shuts of f the fuel
supply as shown on Figure 5.1. Turning the handle so it is in–line with the valve body opens the
valve. The fuel system on twin engine boats
does not have fuel shutoff valves.
The fuel fill fittings for the tanks are on the port
and starboard sides. The fill fitting is marked
GAS (gasoline engines) or DIESEL (diesel
engines). The fuel vent is near the top of the
hull. See Section 10 for fueling instructions and
recommendations.
FUEL MANIFOLD
Note: This section provides general information
about the fuel manifold. See your dealer for
more detailed information.
Boats with twin engines have twin fuel tanks
and a fuel manifold. The fuel manifold has a
crossover valve which allows the operator to run
both engines off of either fuel tank. In normal
operation, the crossover valve is closed. With
both in–line valves open, the engines will be
fueled by individual tanks. To supply both
engines from the port tank, open the crossover
valve and close the in–line valve from the starboard fuel tank. To fuel both engines from the
starboard tank, open the crossover valve and
close the inline valve from the port fuel tank.
FIGURE 5.1 FUEL SHUTOFF VALVE
(SINGLE ENGINE BOATS ONLY)
FUEL FILTERS
Each gasoline engine has a separate fuel filter
mounted on the engine. The generator has a filter and a remote–mounted valve. The filters
have replaceable filter elements.
Boats equipped with diesel engines also have
water separating fuel filters in the engine compar tment. These filters should be checked
regularly. Remove the wing nut on the fuel filter
to remove the bowl and empty the water.
5-1
FUEL SYSTEM TROUBLESHOOTING
PROBLEM
CAUSE
SOLUTION
Fuel overflows at fill plate
(tank not full)
Fill or vent line blocked
Check lines. Clear obstruction from line or
straighten line if kinked.
Water or moisture in fuel
tank
Cap on deck fuel fill plate
not tight
Check cap; tighten.
Condensation forming on
walls of partially filled tank
Gasoline engines: Add fuel drying product
to fuel supply. See your dealer for recommendations.
Diesel engines: Check fuel/water separators; drain if necessary. Check with your
dealer.
Engine cranks but will not
start (fuel system)
Poor quality fuel fr om
marina tanks
Follow remedies for “Condensation”
above. If remedies fail to correct problem,
fuel tank and lines may need to be
drained and flushed. See your dealer for
service.
Lack of fuel
Clean fuel filter, check fuel level; check
whether anti–siphon valve, if so equipped,
is stuck shut.
Improper starting procedure Review starting procedures in engine manual.
5-2
Clogged fuel filter
Check and replace fuel filter element.
No fuel reaching engine
with all fuel valves open.
Check fuel pump, fuel pump filter, carburetor fuel filter, and fuel tank line for
cracked flanges or restricted fittings.
Contaminated fuel
Inspect for water or other contaminants in
fuel. If contaminated, drain tank and flush
with fresh fuel.
Electrical Systems – 6
This section of the manual includes information
about your boats AC and DC electrical systems
and components. Please note that this manual
does not designate equipment as standard or
optional. Some equipment is not available on
some models. Have all service performed by a
professional electrician. See your dealer for
electrical schematics or if you have any other
questions.
WIRING COLOR CODE
The American Boat and Yacht Council (ABYC)
has published a standard for color coding of
boat wiring. We voluntarily comply with this standard to simplify installing new equipment or
troubleshooting the electrical system. Here is
the color code system:
RED wire is used for the positive (+) side of the
battery in DC systems on wires that go to fuses
or circuit breakers, to distribution panels and
high-draw equipment (engine star ters), star t
ignition switches and to meters.
YELLOW WITH RED STRIPE wire is used on one
circuit only; from the star ter switch to the
starter solenoid.
NOTE: There are 10 basic colors and color combinations for different circuits used beyond the
ignition switch. Some of these colors, however,
can ser ve more than one type of circuit. For
example, they can be used in engine and nonengine circuits.
YELLOW wire is used for the power lead to the
bilge blower from a fuse or switch. It is also the
color used for the wire from the generator or
alternator field terminal to the field terminal on
the voltage regulator.
DARK GRAY wire is used for navigation lights
and wire between the fuse or the fuse and the
lights. It is also the color used for the sensor
wire from the tachometer sender to the gauge.
BROWN wire is used for leads to the bilge
pumps from fuses or switches.
PURPLE wire is used between the ignition
switch and the coil and from the ignition switch
to electrical instruments through the distribution
panel.
DARK BLUE wire is used for instrument and
cabin lights. These wires run from switches or
fuses to the lights.
LIGHT BLUE wire is used for the sensor wire
from the engine oil pressure sender to the oil
pressure gauge. The pressure sensor most
likely will be three wires — a light blue wire
from the sender, a black negative wire to the
ground or return and a purple hot wire from the
switch or fuse.
TAN wire is used for the wire from the water
temperature sender to its gauge.
PINK wire is used for the sensor wire from the
fuel tank’s sender to the fuel gauge.
GREEN wire is used for bonding wires and normally does not carry current.
The table on the following page lists fuses and
circuit breakers on your boat. The location of
breaker panels varies by boat model. The
breaker panel is usually at the helm or in the
engine room. Check with your dealer if you cannot find the panel. Your boat will not have all the
fuses and breakers listed.
12-VOLT DC ELECTRICAL SYSTEM
! WARNING
Considerable care has been taken to
design a safe electrical system to protect you from hazardous shocks. To
protect from hazardous electric shock,
always have a qualified technician
make any modifications to the system.
Your boat’s 12-volt DC system obtains its power
from a batter y. An engine-driven alternator
charges the battery whenever the engine is running. An automatic batter y charger keeps the
batter y charged whenever your boat is connected to shore power. The voltmeter on the
electrical load center indicates the charging
level of the battery.
The electrical system ground is GROUNDED by
grounding the batteries to the engine(s). The
auxiliar y batteries (if so equipped) are in turn
6-1
Equipment
Wire
Circuit Breaker or
Color
Fuse (amps)
Accessory Feed................................................Orange ..............................................as required
Alarm ..............................................................Tan-Blue.............................................**
Anchor Light.....................................................Gray-Blue ...........................................5
Anchor Windlass........................................................................................................**
Auto Bilge Aft ............................................................................................................10
Auto Bilge Fwd ..........................................................................................................10
Auto Pilot..................................................................................................................20
Battery Parallel .........................................................................................................5
Bilge Pump Manual ..........................................Brown................................................*
Bilge Pump Auto...............................................Brown-Red .........................................**
Blower ............................................................Yellow................................................**
Cabin Lights ....................................................Blue ..................................................10
Courtesy Lights .........................................................................................................5
Depth Finder .............................................................................................................3
Electronics................................................................................................................50
Engine Room Hatch Motor..........................................................................................20
Engine Room Lights...................................................................................................5
Fuel ................................................................Pink...................................................5
Gauge .............................................................Purple................................................***
Helm Main Power ......................................................................................................50
High Water Pump.......................................................................................................10
Horn................................................................Yellow................................................**
Ignition ............................................................Purple................................................**
Key Switch.......................................................Orange ..............................................***
Lights .......................................................................................................................5
Livewell ....................................................................................................................10
Navigation/Anchor.....................................................................................................10
Navigation Light ...............................................Gray ..................................................5
Oil Pressure.....................................................Light Blue ..........................................***
Oil Temperature ...............................................Tan-Black ...........................................none
Panel Lights.....................................................Blue ..................................................5
Port Ignition ..............................................................................................................20
Port Wiper .......................................................White-Black........................................5
Power Trim.......................................................Purple-White.......................................20
Raw Water ................................................................................................................10
Starboard Wiper ...............................................White ................................................5
Solenoid..........................................................Yellow-Red .........................................***
Start Switch.....................................................Purple................................................***
Tachometer......................................................Gray ..................................................***
Transom Hatch Motor ................................................................................................20
Trim Tabs..................................................................................................................20
Water Temperature ...........................................Tan....................................................***
Stereo.............................................................Blue ..................................................**
Stereo Memory ................................................Red ...................................................2
VHF ..........................................................................................................................10
Winch .......................................................................................................................10
Windlass ..................................................................................................................10.5
Wiper .......................................................................................................................**
Grounds ..........................................................Black.................................................none
Battery and Main Feed .....................................Red ...................................................**
* Rule 500 or equal — 7.5 amps
** Indicates fuse determined by model
*** Fused off ignition
6-2
grounded to the cranking batteries. The engines
are connected by a ground cable for added
assurance of proper grounding. The engines are
then grounded to a bonding strip in the engine
compartment. This type of negative ground system is the approved system for marine DC
electrical systems. If additional equipment is to
be installed, it must be adaptable to the negative ground system. When installing additional
equipment, ensure that each item’s current
supply is taken from the main DC distribution
panel. This service should be performed only by
your dealer. All required additional circuit protection must also be added at the DC distribution
panel.
The DC switch breakers allow you to interrupt or
enable a circuit and they also protect the system by shutting down power if a short circuit or
an overload occurs.
NOTE: Power feeds for accessor y equipment
must NOT be taken from the voltmeter terminals.
BATTERIES
! WARNING
POISON! Batteries contain sulfuric
acid which can cause severe burns.
Avoid contact with skin, eyes or clothing. Wear goggles, rubber gloves and
protective apron when working with a
battery. In case of contact, flush with
water at least 15 minutes. If swallowed, drink large quantities of water
or milk. Follow with Milk of Magnesia,
beaten egg or vegetable oil. Get medical attention immediately.
Your dealer has installed batteries which supply
power to the DC electrical system components.
Check with your dealer if you have questions
about battery capacity. Marine batteries provide
high reserve capacity plus cold cranking performance. When the engine is running, the battery
is charged automatically. If your boat has twin
engines, the starboard batter y is the “house”
battery, the one that powers any DC equipment
on your boat.
Batteries produce hydrogen and oxygen gases
when being charged. These explosive gases
escape through the vent/fill caps and may form
an explosive atmosphere around the battery if
ventilation is poor. This gas may remain around
the batter y for several hours after charging.
Sparks or flames can ignite the gas and cause
an explosion.
BATTERY PARALLELING SWITCH
On some boats with twin engines, you can use
the batter y paralleling switch to star t one
engine using both batteries. Use this switch to
start an engine if either battery does not have
sufficient power to start the engine because of
a low charge level. The switch is at the helm.
BATTERY CHARGER
The boat’s batteries are normally charged whenever the engines are running. If you are docked
for an extended period of time, operating DC
devices and equipment will drain the power
from the batteries. Unless the batteries are
kept charged, they may not have enough power
to start the engines when you need them.
If your boat is equipped with a battery charger,
it will automatically charge the batteries when
your boat is connected to shore power or when
the generator is running and the BATTERY
CHARGER breaker at the AC CONTROL panel is
switched to ON.
Leaving the battery charger switch on whenever
AC power is available is a good idea. It will keep
the batteries fully charged. After the batteries
are recharged, it provides a maintenance or
trickle charge as needed.
ALTERNATORS
The engine alternators will recharge the batteries while the engines are running. Voltage
regulators control the rate of charge by sensing
voltage variations and increase or decrease output accordingly.
OVERLOAD PROTECTION
The engine is equipped with a circuit breaker to
protect the engine wiring harness and instrumentation power leads. If an electrical overload
occurs, a circuit breaker will open and interrupt
current flow when the circuit draw exceeds the
rated amperage. Refer to your engine owner’s
manual for location and resetting procedure.
DUAL BATTERY SWITCH
The dual battery switch enables DC power to be
used from one or two batteries. It controls
power to the engine and all 12-volt electrical
equipment, except the automatic bilge pump
6-3
and the stereo memory. The settings available
are OFF, 1, 2 and ALL. We recommend using
only one battery at a time by using the number
one (1) or two (2) setting. Avoid using the ALL
setting unless a single battery is not sufficient
to start the engine.
IMPORTANT: The dual battery switch should be
in the OFF setting when the boat is not in use
and especially while the boat is unattended.
! DANGER
should be in position number two (2) when
starting the engines.
If you can’t start an engine because the battery
is low, try starting the other engine. Once the
second engine is running, turn both batter y
switches to all, and then start the first engine
using both batteries. Once the first engine is
running, return both battery switches to the preferred setting.
AC ELECTRICAL SYSTEM
Do not turn dual battery switch to OFF
setting while engine is running. The
alternator and electrical wiring may be
damaged.
Your boat has been equipped with an AC electrical system which meets or exceeds national
standards at the time it was built. To work, your
boat’s AC system must be connected to a shore
power supply or the generator.
While in the OFF setting, only the automatic
bilge pump and stereo presets are supplied
with DC power. All other electrical items are
OFF.
Dockside power service is available in 110 volt
or 220 volt configurations. In Nor th American
and Pacific Rim countries, the standard power
supply is 110 V, 60 her tz (Hz). However, in
some European countries, the standard power
supply is 220 V, 50 Hz.
The description and function for each of the settings on the dual batter y switch is described
below:
•
OFF: All 12-volt power to boat is shut OFF
except for the automatic bilge pump and
stereo presets. When boat is unattended for
extended periods of time, turn the dual battery switch to the OFF position.
•
Setting one (1) will use battery #1 to power
engine and all 12-volt equipment. Batter y
#2 is isolated and remains in reserve. Battery #1 is charged by the alternator.
•
Setting two (2) uses battery #2. Except for
bilge pump, batter y #1 is isolated and
remains in reser ve. Batter y #2 is charged
by the alternator.
•
Setting ALL will use both batteries. Both batteries are used by the engine and all 12-volt
equipment and are charged by the alternator
when the engine is running.
NOTE: Rotating battery usage will increase battery longevity.
Some twin engine models will have two dual
battery switches, one for each engine and battery. The port side switch should be in position
number one (1) and the starboard side switch
6-4
The main AC breaker(s) on your boat turns your
entire AC system on and off, allowing you to
check for proper voltage and polarity immediately after a shore power connection has been
made and before individual circuits are enabled.
These switches have an LED indicator to indicate when they are on. Most panels also have a
transfer switch which allows you to operate
some functions on the second load panel from
the first load panel.
TRANSFER SWITCH
The transfer switch can be used to temporarily
run equipment from AC Load Group 2 off of the
shore power cord for AC Load Group 1. With a
shore power cord attached to AC power hookup
#1 flip the transfer switch to be able to run
selected equipment from Load Group 2. Be
careful not to exceed 30 amps on one power
cord. The table on page 6–7 lists the amperage
drawn by AC components.
NOTE: Exceeding 30 amps on one power cord
will cause the main ser vice breaker to trip. If
the main breaker trips, shut off equipment to
reduce the load before resetting the main service breaker.
SHORE POWER
! DANGER
To prevent damage to electrical system, never operate shore power
system at less than 105 volts.
Your boat has a single male receptacle outside
on the deck for shore power connection (two
receptacles if you have air conditioning).
Before you connect your boat to shore power,
turn off the main cabin circuit breakers. Attach
the shore power cord to the boat first and turn
clockwise to lock. Thread the locking ring on the
cord to secure it to the receptacle. Connecting
the cord to the boat first will prevent dropping a
“hot” cord into the water. (When you leave the
dock, remove the cord from the dockside shore
outlet first.) If you have any questions, contact
your dealer.
Make sure the dockside shore power breaker is
OFF; then plug in the cord. Turn the dockside
shore power breaker on. Immediately check the
polarity lights on the main electrical panel in the
boat. If the REVERSED POLARITY light on the
panel illuminates, do not turn on the main
cabin breaker. Turn of f the dockside shore
power breaker and disconnect your shore power
cord. Inform the marina manager of the problem. If you have any questions, contact your
dealer.
Important: Some equipment will not work or
may be damaged if polarity is reversed. Damage
caused by reversed polarity is not covered
under your warranty. Be sure polarity is correct
when you connect your boat to shore power.
Note: Reversed polarity occurs only with 110 V
systems. It is not a concern for boats having
220 V systems.
An AC circuit may overload if the current draw
(amperage) of the accessories in use exceeds
the capacity of the load group. For each load
group, an AC amp indicator in the main electrical panel indicates the amperage draw. If a
circuit overloads, turning off one or more accessories may be necessar y while you operate
another.
GENERATOR
The optional onboard generator provides AC
power to your boat’s electrical system. If your
boat has a generator, it is mounted in the
engine compartment.
Accidental starting of the generator can cause
severe personal injury or death. Stop generator
and disable by disconnecting batter y cables
(negative [–] cable first) when maintenance or
repairs are made to the engine, controls, or
generator. Do not disconnect cables if gas
fumes are present.
Note: Follow all generator instructions in the
operator’s manual. The manual includes
detailed information on specifications and procedures for safe operation, maintenance, and
winterizing. It also explains how you can obtain
service for the generator, if required. The manual is in your owner’s packet.
Follow these procedures to operate the generator:
1. Run bilge blower for five minutes before
starting generator. Run blower while generator is operating.
2. Make sure seawater intake valve (seacock)
for the generator is open. Seacock must
remain open at all times when generator is
operating. Seawater strainer must be free of
debris to prevent clogging intake. Inspect
seawater strainer frequently.
Note: Wellcraft recommends not using the
generator when underway. When underway
and not using the generator, the seacock
should be closed.
3. Press or toggle START switch on main panel
in cabin. When star ting generator, never
operate starter for more than 30 seconds.
Wait at least 30 seconds before each
attempted start.
On the generator in the engine compartment
are a choke and starter switch. If starting
the generator from the cabin is difficult, use
the choke and starter on the generator.
4. Look over side of boat and check for water
flowing from discharge port. If water is not
flowing, stop the generator. Check for the
following: blocked water intake, air in line,
clogged sea strainer, or closed sea cock
that should be open. Correct the problem
before restarting the generator.
6-5
5. Before stopping, run generator at no load
for three to five minutes to allow lubricating
oil and engine cooling water to carr y heat
away from combustion chamber.
GFCI OUTLET
One outlet on boar d your boat has been
equipped with ground fault circuit interrupter.
This outlet has been designed to protect your
passengers and equipment from the damage
caused by ground faults. There are two buttons
in between the two receptacles on the outlet. To
test the ground fault interrupter, press the test
button. If the reset button pops out, the outlet
is working properly. If the outlet is not working
properly, have your electrical system checked by
a qualified electrician.
You will have to press the reset button back in
for your AC electrical equipment to work. If the
reset button pops out at any time other than
when you are testing the system, you have a
ground fault and should have your system
checked as soon as possible.
MAIN ELECTRICAL PANEL
The main electrical panel is below deck in the
cabin or companionway. The location varies by
boat model. This panel is the electrical heart of
your boat. At this panel are the switches which
Switch
Amps
Component Powered
12V Outlets
15
DC outlets in the cabin
Accessory
5
Optional equipment wired to this switch
Battery Test
N/A
Power supply in batteries (DC volts and amperes
indicated on gauges at main electrical panel)
Blower
N/A
Bilge blower
Cabin Lights
10, 15
Lights in the cabin
Courtesy Lights
10, 25
Cockpit lighting
DC Main Breaker
40, 50
DC portion of electrical panel
Galley lights
10
Lights in the galley
Head
10, 15, 25
Light in head
Lavatory Accessories
15, 20
DC accessory outlet in the head
Macerator
20
Holding tank overboard discharge (macerator)
Refrigerator
10
Refrigerator on DC power
Salon Lights
10
Lights in the salon
Stereo
5, 10
Stereo system (There is also an ON/OFF switch
located on the stereo.)
Toilet System
15
VacuFlush system
TV Antenna
25
TV antenna
Water Pressure
10
Fresh water pump
Stereo
10
Stereo system (There is also an ON/OFF switch
located on the stereo.)
6-6
as do the identification tags and the ratings of
the breakers. Switches and breakers are listed
below in alphabetical order.
supply power to the components which operate
using AC and DC power.
DC BREAKERS AND SWITCHES
The number and type of DC switches and breakers at the main electrical panel varies by model
Switch
Amps
Component Powered
Accessories
5
Circuit available for installation of owner–supplied
equipment
Air Conditioner
20, 30
Air conditioner
Battery Charger
5
Battery charger
Cabin Lights
10
Lights in the cabin
Coffee Maker
5, 15
Coffee maker
Converter
10
Battery charger
Food Center
15
Galley
Head
15
Lights and AC outlets in head
Hot Water
15
Water heater
Icemaker
15
Ice maker
Microwave
5
Microwave
Outlets Port
15
Outlets on port side of cabin
Outlets Starboard
15
Outlets on starboard side of cabin
Range
20
Stove in galley
Refrigerator
2.5, 5, 10
Refrigerator on AC power
Stove
10
Stove in galley
Toilet System
15
VacuFlush system
TV
15
TV
Water Heater
20
Water heater
The generator, if provided, has toggle switches at the main electrical panel:
Blower
Ventilate the generator room
Preheat
Preheat fuel supply (diesel only)
Start
Start the generator
Stop
Turn the generator off
6-7
AC BREAKERS AND SWITCHES
GALVANIC CORROSION
The number and type of AC switches and breakers at the main electrical panel varies by model
as do the identification tags and the ratings of
the breakers. Switches and breakers are listed
below in alphabetical order.
Corrosion of metal parts, especially those submerged in salt water, is a common problem for
boat owners. Corrosion is caused by stray electric currents from shore stations supplying AC
current, improperly grounded AC lines and circuits, and poorly insulated DC–power ed
equipment from boats moored nearby.
AC panels have gauges indicating voltage of AC
power supply and amperage drawn by AC components and accessories.
NOTE: If the transfer switch is activated, the
electrical load can exceed the capacity of a single 30 amp power cord. Exceeding 30 amps will
cause the main ser vice breaker to trip. If the
main breaker trips, shut of f equipment to
reduce the load before resetting the main service breaker.
HELM SWITCHES
The number and type of switches and breakers
at the helm varies by model as do the identification tags and the ratings of the breakers.
Switches and breakers are listed below in
alphabetical order.
Zinc anodes have been installed either on your
boat’s sterndrives or, on inboard powered
boats, on the transom. These anodes will corrode before any other submerged metal parts.
Consult your dealer for their exact location.
Whenever your boat is hauled out of the water,
have your anodes inspected and replaced if necessar y. Do not paint over zinc anodes. If new
anodes are installed in spring, be sure to
inspect them again in late summer, especially if
you have done a lot of cruising to other marinas.
Use only Wellcraft replacement par ts. When
adding accessories not supplied by Wellcraft,
consult your dealer regarding proper selection
and installation.
Switch
Function
Accessory
Supplies power to any customer supplied equipment
Anchor Winch
Raises or drops anchor (3–position toggle switch, defaults to off)
Aft Bilge
Operates aft bilge pump
Anchor Lights
Turn anchor lights on or off
Battery Parallel
Allows use of both batteries
Bilge
Operate bilge pump(s) manually
Blower
Supplies power to bilge blowers
Cockpit Lights
Turn cockpit lights on or off
Courtesy
Turn courtesy lights on or off
Depth
Controls power to depth finder, if so equipped
Dimmer
Controls brightness of dash lights
Dock Lights
Turn dock lights on or off
Engine Room Lights
Turn lights in engine room on or off
6-8
BONDING
Your boat is fitted with a bonding system to minimize cor rosion. This system involves the
connection of all underwater fittings and hardware by individual jumper wires which are then
connected to the engine’s common ground
point.
! DANGER
Alteration of the bonding system can
void your boat owner’s warranty.
Switch
Function
Forward Bilge
Operate forward bilge pump
High Water
Turns on high water bilge pump
Horn
Operate horn
Livewell
Operates livewell pump
Mid Wiper
Operates middle windshield wiper
Navigation/ Anchor Lights
Turn navigation or anchor lights on or off (3–position toggle switch
defaults to neutral center position)
Panel Lights
Turn helm panel lights on or off
Port Wiper
Turn port windshield wiper on or off
Raw Water
Operates your boat’s raw water pump
Safety Switch
Shuts down engine(s) if operator is thrown from helm (lanyard connects
to switch and operator)
Spreader Lights
Turns lights on radar arch on or off
Starboard Wiper
Turn starboard windshield wiper on or off
Trailer
Raises stern drive all the way up when boat is being trailered or
beached. Do not use this switch when engine is running.
Windlass
Operates your boat’s power windlass, if so equipped (3–position toggle
switch defaults to neutral center position)
Wiper
Turns windshield wiper on or off
6-9
TROUBLESHOOTING CHART
DC ELECTRICAL SYSTEM
PROBLEM
CAUSE
SOLUTION
12 V equipment not working
Batter y selector switch
turned to OFF
Turn selector switch ON for starboard (2)
battery.
Weak or dead battery
Recharge battery.
Batter y not char ging
(engine running)
Engine alter nator belt
loose
Tighten belt.
Batter y not holding a
charge
Bad battery
Replace battery.
12 V device not working
Circuit breaker for device
is OFF
Switch breaker to ON.
Weak or dead battery
Change batter y selector switch position;
recharge battery.
Faulty electrical connection
Check 12 V connections. Tighten or repair
as needed.
Weak or dead battery
Change batter y selector switch position;
recharge battery.
Light bulb burned out
Replace bulb.
AC ELECTRICAL SYSTEM
PROBLEM
No AC power
No power to AC devices
6-10
CAUSE
SOLUTION
Main breaker(s) in engine
compar tment tripped or
off
Turn breakers on or reset.
Breaker(s) at AC CONTROL
panel tripped or off
Turn breakers on or reset.
Shore power cord not connected
Check cord; plug in if necessary.
Loose or disconnected
wire
Tighten connections. See your dealer.
Breaker(s) at AC CONTROL
panel tripped or off
Turn breakers on or reset.
Shore power cord not connected
Check cord; plug in if necessary.
AC ELECTRICAL SYSTEM TROUBLESHOOTING
No power to AC devices
(Continued)
Loose or disconnected
wire
Tighten connections. See your dealer.
Inadequate power to AC
devices (generator r unning)
Electrical demand greater
than generator output
Switch of f devices and equipment not
needed.
No power at AC outlets
Outlet breakers in AC CONTROL panel OFF
Switch breakers to ON.
Ground fault interrupter
tripped
Reset button on outlet and test.
6-11
Boat Equipment – 7
STOVE
Important: The refrigerator can drain the power
from a batter y in a shor t time, par ticularly if
other devices are powered from the DC power
supply. Operate the engines from time to time
to recharge the batteries if an AC power supply
is not available. See the refrigerator manual for
more information.
ALCOHOL/ELECTRIC
OVEN
This section covers the appliances found in the
galley, the air conditioning system, the stereo
system and the TV. Power is supplied to many
of these components through a breaker switch
in the main electrical panel.
! WARNING
Alcohol flame can not be seen in direct
sunlight. Fueling an ignited burner can
cause it to flare up. Do not light burner
unless flame is extinguished and
burner is cool.
! WARNING
Use only manufacturer approved fuel.
Always provide adequate ventilation
when using an open flame. Do not use
stove near fuel fill or fuel vent.
Your boat may be equipped with an
alcohol/electric stove. See the manufacturer’s
manual for more information on use and maintenance.
ELECTRIC
Your boat may be equipped with an electric
stove. This stove can only be operated when
your boat is connected to shore power or when
the generator is running. Refer to the stove
owner’s manual for details about using this
appliance safely.
REFRIGERATOR
The refrigerator supplied with your boat operates off DC power from the battery or AC power
through the main electrical panel. Switch the DC
breaker for the refrigerator to ON to power the
refrigerator from the battery. Using DC power to
cool the interior of a warm refrigerator will take
longer than cooling it with AC power.
Your boat may have a microwave oven or a convection/microwave oven. The operation of either
unit is similar.
The microwave oven is controlled by an electronic touch control panel on the oven. The
controls for the convection oven are on the
oven. The MICROWAVE or FOOD CENTER
breaker at the main panel must be on to use
the oven. For a detailed description of oven features, see the owner’s manual supplied by the
manufacturer.
! CAUTION
To reduce the risk of burns, electric
shock, fire, injury to persons or exposure to excessive microwave energy,
read ALL instructions before using the
microwave oven. Be sure to secure
turntable while underway to prevent
damage to the unit.
COFFEE MAKER
Your boat may be equipped with a coffee maker.
See the equipment manufacturer’s manual for
information operation and maintenance.
MARINE STEREO
This unit is a highly sensitive electronic tuning
AM/FM stereo receiver with an optional CD
player. It employs several electronic circuits
especially designed for superb radio reception
on both AM and FM bands. Your boat has waterproof marine stereo speakers. The number of
speakers and their location may vary on each
model. See the stereo owner’s manual for a
complete list of features and instructions.
7-1
AIR CONDITIONING SYSTEM
Your boat may have an optional air conditioning
system. Figure 7.1 shows the components of a
typical air conditioning system.
The air conditioning pump draws in sea water
through a seacock in the bilge when the air conditioner is running. It discharges this through a
thru–hull fitting above the water line. The locator
drawings in Section 3 show the location of air
conditioning system components on your boat.
Air conditioning units are controlled through
breaker switches at the AC control panel. When
using an air conditioner, its breaker switch must
be on.
When you operate the air conditioner:
1. Open the air conditioner seacock. The valve
is open when the handle is in line with the
hose.
2. Check the sea strainer next to the seacock.
Clean it if necessary to assure a steady flow
of water to the unit.
3. Set the thermostat to the temperature
desired.
Important: Be sure to close air conditioner seacock when air conditioner is not in use.
The heat pump on the air conditioner can be
used to heat the cabin. The heat pump runs in
reverse and extracts heat from sea water to
heat your boat. Using the heat pump feature
AIR VENT
AIR DUCT
CONTROL PANEL
AIR CONDITIONER/
HEATER COMPRESSOR
BLOWER ASSEMBLY
WATER PUMP
SEA STRAINER
COOLING WATER
DISCHARGE
(THRU-HULL FITTING)
COOLING WATER INTAKE
(A.C. SYSTEM SEACOCK)
FIGURE 7.1 TYPICAL AC SYSTEM
7-2
when the sea water temperature is below 40°
can damage the air conditioning system.
Refer to the manual furnished with the air conditioning unit for more detailed infor mation
regarding its operation.
AUTOMATIC FIRE
SUPPRESSION SYSTEM
Your boat may be equipped with an automatic
fire suppression system in the engine compartment. This system uses a fire extinguishing
agent. A heat–sensitive automatic nozzle
releases the agent as a vapor, cutting off the
supply of oxygen to the fire. The system’s indicator light is illuminated when the system is
fully charged. When the system is discharged,
the indicator light will go out. The light is on the
dash or a separate monitoring panel, depending
on boat model.
! WARNING
If system discharges, immediately turn
OFF engine, bilge blower(s), and electrical systems. Extinguish all smoking
materials. Do not open engine compartment. Fresh air supplies oxygen to
fire and fire may flash back through
opening.
If the system discharges, do not open engine
compartment for at least 15 minutes. Hot metals or fuel can also begin cooling during this
time. Cautiously inspect compartment for cause
of fire and damage to equipment. Have portable
extinguishers readily available. Do not breathe
fire caused fumes or vapors.
Note: The fire suppression agent is an ozone–
depleting substance. In order to help safeguard
the environment, following the manufacturer’s
maintenance recommendations is important. Be
sur e to check the equipment manual for
detailed information about safety precautions
and procedures for operating and maintaining
the fire suppression system.
TV/VCR (OPTIONAL)
Your boat may be equipped with a television set
or TV/VCR combination. See the manufacturer’s
manual for information on operation and maintenance.
VHF RADIO
Your boat may be equipped with a VHF radio.
See the manufacturer’s manual for information
on operation and maintenance.
7-3
Underwater Gear – 8
This section discusses your boat’s propulsion
equipment. Depending on boat model, your boat
is powered either by inboard engines through a
transmission or by sterndrive(s). If your boat
has a sterndrive, the manufacturer’s manual provides detailed information about its operation.
Note: The information in this section, except for
troubleshooting, trim tabs, and propellers
applies primarily to inboard–powered boats.
PROPELLERS
The propellers supplied with your boat have
been selected as the best propeller for average
use. Consider keeping an extra set of propellers
on your boat. If the propellers become damaged, you can replace them with the spares and
continue your outing. Check with your dealer if
you want to purchase an extra set.
synthetic fiber rings compressed around the
shaft by the packing retainer.
A very slight leak helps lubricate the packing.
One drop every 60 seconds is desirable. More
than one drop per minute indicates wear
caused by the rotating shaft. Tightening the
packing retainer slightly will usually stop excessive leakage. If the leakage continues after
tightening the retainer, the packing may need
replacement, the log may be out of alignment,
or the shaft may be bent or scored. Have your
dealer check any persistent excess leakage.
Important: Overtightening the packing retainer
may score the propeller shaft.
ALIGNMENT
Note: You, as owner, can change propeller sizes
to suit other conditions. However, you assume
all responsibility for any damage caused by the
change in propeller size.
Aligning the engine with the propeller shaft is
critical for smooth operation of your boat. The
shafts are properly aligned at the factory. Check
the alignment after deliver y or an extended
lay–up. A slight misalignment can result in a
loss of power, vibration, or wear in the bearings.
PROPELLER SHAFT
To check the alignment:
The propeller shaft is made of stainless steel
which has excellent corrosion resistance and
very high strength. The coupling at one end of
the shaft is bolted to the transmission. The
other end of the shaft is tapered, threaded, and
keyed for installation of the propeller.
1. Remove the coupling bolts and spread the
couplings very slightly.
2. Use a feeler gauge to measure the space
between the couplings at the edges of the
coupling. The difference in reading should
not exceed 0.003 inch.
STRUTS
Each propeller shaft is supported by struts fastened to the bottom of the hull. The struts have
replaceable bearings to minimize wear and to
protect the shaft at the points where it passes
through the strut hubs. Strut bearings should
be lubricated by your dealer.
SHAFT LOG AND STUFFING BOX
The shaft log is a bronze tube inser ted in an
opening in the bottom of the boat for the propeller shaft. A shor t length of flexible hose
connects the shaft stuffing box to the shaft log.
The stuf fing box keeps water from leaking
around the shaft into the boat. The stuffing box
has a packing gland filled with waxed flax or
3. A second check is to leave the flange on the
engine fixed and rotate the propeller shaft
coupling in 90° steps. Check the clearance
between the fixed engine flange and the
rotating propeller flange with the feeler
gauge at the top. If the four measurements
differ by more than 0.003 inch, it may be an
indication that there is a slight bend in the
propeller shaft. This is an important check
after striking a submerged object.
4. The straightness of the shaft can be further
checked with the boat out of the water by
setting up a dial indicator on a solid fixed
sur face and rotating the propeller shaft by
hand (use the blades of the propeller to
turn the shaft by hand. This test will clearly
indicate whether the propeller shaft has
been bent.
8-1
Shaft alignment may change slightly after your
boat is in use. Your dealer should check alignment occasionally, par ticularly if there is
vibration, a drumming sound, or loss of RPMs.
RUDDERS
Your boat has dual rudders. The rudder shaft
stuffing box provides an opening for the rudder
shaft through the bottom of the boat. The stuffing box keeps water from leaking around the
shaft into the boat. The rudder stuffing boxes
are similar to those used for propeller shafts.
IMPORTANT : Over tightening the packing
retainer to stop stuffing box leakage may score
the rudder shaft.
TRIM TABS
Trim tabs are mounted on the por t and starboard transom near the bottom of the hull. Trim
refers to the running angle of the boat while
underway. You can trim your boat by adjusting
the single–piston trim tabs to achieve the most
efficient planing angle.
A set of switches on the helm command console controls the trim tabs. The switches
operate a hydraulic pump along the transom.
The pump applies hydraulic pressure to operate
the pistons attached to the trim tabs.
You will find information about trimming your
boat in Section 10, Pre–Launch and Underway.
TROUBLESHOOTING CHART
PROBLEM
Excessive vibration
Poor performance
8-2
CAUSE
SOLUTION
Material obstructing propeller
Remove material from propeller, shaft, or
rudder by reversing engines. If necessary,
stop engines and cut or pull away.
Bent prop or shaft
Replace propeller. If vibration continues,
see your dealer for service.
Excessive play in shaft log
Check shaft log for wear. Avoid sudden
torque changes. See your dealer for
repairs.
Bent rudder
Replace. See your dealer for service.
Material wrapped around
propeller
Run engine in reverse. If necessary stop
engines and cut or pull material away.
Damaged propeller; wrong
propeller in use
Replace propeller.
Controls and Indicators – 9
INSTRUMENTATION
A full set of instruments at the helm of your boat
shows what is taking place within your engine.
Boats with twin engines have duplicate gauges,
one for each engine. When you take delivery of
your boat, ask your dealer about normal readings
of the gauges. This information will provide you
with a reference point for the life of the engine.
Keep in mind that the readings on some gauges
tend to fluctuate which is not uncommon. But
when operating your boat, investigate the problem if a gauge reading varies substantially from
the normal reading.
read higher than the actual level due to the bow
of the boat being higher. Since gauge readings
are approximate, it is best to compare them to
the hours of use versus known fuel consumption
in liters per hour (l/h) or gallons per hour (gph).
The most common practice of good fuel management is the one-third (1/3) rule. Use one-third
(1/3) of your total fuel on board to travel to your
destination, one-third (1/3) in returning, and the
remaining one-third reserve for emergencies.
1/2
Note: Your boat may not have all the instruments
discussed in this section. The ranges of your
gauges may also vary from the readings listed.
F
E
TACHOMETER
The tachometer displays the number of revolutions per minute (RPM) that the engine is
running. The gauge is displayed in increments of
200 rpm. The tachometer will show the RPM’s
under all engine operating conditions. Consult
with your dealer if you require additional information. Do not exceed engine manufacturer’s
recommendations.
4
1
OIL PRESSURE GAUGE
The oil pressure gauge is a good indicator of
most, if not all, serious problems that may occur
within your engine. A preset valve in the oil pump
controls the maximum oil pressure. If a complete
loss of oil pressure occurs, stop the engine
immediately. If the engine continues to run after
loss of oil pressure, serious damage to the
engine can result. Check the engine oil level
3
2
FUEL
5
0 RPM 6
40
x1000
140
280
420
80
0
OIL
FUEL GAUGE
PSI/kPA
The fuel gauge displays the approximate amount
of fuel in the fuel tank(s). The gauge reading is
most accurate when your boat is at a level position. While running, the fuel gauge will usually
9-1
before every trip and fill if low. If oil level is full
and gauge reading is low, contact your dealer or a
qualified mechanic to rectify the problem. Do not
restart the engine until correcting the problem.
See the engine manufacturer’s specifications for
correct pressure ranges.
12
10
TEMPERATURE GAUGE
The temperature gauge measures the temperature of the engine water cooling system. You
should make a practice of always checking this
gauge right after star ting the engine. Marine
engines draw sea water, circulate it through the
engine, and expel it overboard through the
exhaust system. If the temperature gauge
shows that the engine is hot, stop the engine
immediately. Refer to your engine owner’s manual for instructions and corrective action.
200
160
85
70
100
240
120
14
16
VOLTS
SYNCHRONIZER
A synchronizer is an aid in adjusting the throttles so both engines are running at the same
speed. Lack of engine synchronization leads to
vibration which can be detrimental to the
engine, the boat and passengers.
The engines are synchronized when the indicator needle is centered. When the needle points
to port, the port engine is running faster than
the starboard engine. When the needle points
to starboard, the starboard engine is running
faster than the port engine.
STEERING
TEMP
°F/°C
VOLTMETER
The voltmeter measures the condition of the
main or cranking batter y in volts DC. Normal
operating voltage when the engine is running at
1000 RPM or higher is between 12 and 15
volts. If your battery is fully charged, the voltmeter should read in the 11.5 to 12.5 volt
range when the ignition is on and the engine is
not running. Check your batter y and charging
system if the voltmeter reads below these normal ratings. An oscillating voltmeter reading
may indicate loose belts or loose electrical connections.
Become familiar with the “feel” of your boat’s
steering system. Steering does vary from boat
to boat depending on hull shape, engine type,
water and wind conditions and load. Various
steering systems are used on our boats. On
smaller boats, a push/pull cable system is
used; on larger boats, power assisted and fully
hydraulic systems are common.
All steering systems require periodic maintenance to be trouble–free and safe. Regular
checks are essential. Be sure to read the manufacturer supplied operator’s manual before
heading out on the water.
A manually adjustable trim tab is provided on
some sterndrives. Follow the instructions provided by the engine manufacturer for proper
adjustment. This trim tab, when cor rectly
adjusted, will help reduce steering ef for t
through the entire trim range.
To maintain a straight course, keep at least one
hand in control of the steering wheel at all
times while underway.
9-2
Note: Deep vee boats have a tendency to
“hunt” (wander from side to side) at slow
speeds with the steering wheel held straight
ahead. This is a normal occurrence and can be
minimized by anticipating boat movement and
giving a slight turn of the steering wheel in the
opposite direction.
Note: If the steering system needs repair, your
dealer has the correct tools. Do not try to service the system yourself.
STEERING SYSTEM
The steering system on your boat does not have
a rudder position indicator. To find the rudders’
center position:
1. Turn the wheel to port until it stops.
2. Now turn the wheel to starboard until it
stops, counting the number of revolutions
as you turn.
3. Divide the number of revolutions by two.
4. Turn the wheel to port that number of revolutions to center the rudders.
voir. A relief valve protects both the mechanical
portion of the rudder (in case the rudder strikes
a hard object) and the hydraulic system.
This is a manual hydraulic system, not a power
steering system. The effort required to turn the
wheel will increase as the system is called on
to exert more force on the rudder. At no time,
should anyone expect this system to turn as
easily as a car’s power steering.
Check the level of hydraulic fluid in the reservoir
regularly and replenish if necessary. The fill cap
behind the wheel has a gauge indicating the
fluid level. All other maintenance should be performed by your dealer.
STERN DRIVE THROTTLE/
SHIFT CONTROLS
The information in this section deals with the
controls on boats equipped with stern drives.
The controls vary depending on the number of
engines your boat has. Be sure to consult the
engine and controls manuals for information
specific to the controls on your boat.
SINGLE LEVER ENGINE CONTROL
NEUTRAL
IDLE
MECHANICAL STEERING SYSTEM
If your boat is equipped with a mechanical
steering system, periodic lubrication is required
to insure a smooth operating system.
The mechanical system consists of a push–pull
cable. This cable should be checked for proper
lubrication and alignment. There should be no
binding or looseness. Cable and attachments
should be checked for wear, rust, or corrosion,
and be properly lubricated. Check the anchor
post at the aft end of the cable to be sure it is
secure and free from rust and corrosion.
FORWARD
IDLE
REVERSE
IDLE
FORWARD
INCREASING
THROTTLE
INCREASING
THROTTLE
IN REVERSE
TRIM/TILT
SWITCH
HYDRAULIC STEERING SYSTEM
Your boat may have a hydraulic steering system.
This system has four basic elements: helm
pump, reservoir, relief valve, and cylinder. The
steering wheel is mounted to the shaft of the
helm pump. Turning the steering wheel pumps
hydraulic fluid to the steering cylinder. Extra
hydraulic fluid and pressure head maintained by
the reservoir prevents air from entering the system. An air pressure gauge on the reser voir
shows that the reser voir is charged to the
proper pressure. To keep dirt from entering the
system, hydraulic fluid in the reservoir passes
through a filter as it is flows out of the reser-
NEUTRAL
THROTTLE
BUTTON
SHIFT INTERLOCK
(SQUEEZE TO
SHIFT)
FIGURE 9.1 STERN DRIVE
ENGINE CONTROL
A single lever engine control operates as both a
gear shifter and a throttle for a single engine
(Figure 9.1). To shift, move the lever into the
first 15° of travel. Advance the lever beyond 15°
9-3
to move from shifting range to throttle range.
Never attempt to shift gears while the engine is
not running.
ments while engine is idling during warm-up. See
the engine manufacturer’s specifications for
proper operating ranges.
On boats equipped with a single lever engine
control, the control has an engine warmup button near the base. Pressing the warmup button
allows the transmission to remain in neutral
while the operator advances the throttle for
warming up the engine.
INBOARD ENGINE AND
TRANSMISSION CONTROLS
Controls for inboard engines and transmissions
consist of two double levers: two for the engines
and two for the transmissions (see Figures 9.3
and 9.4). Red and black dots on the handles
help the operator distinguish between engine
and transmission controls. The dots on the
engine throttle controls are imprinted with a T.
TWIN LEVER ENGINE CONTROL
A twin lever engine control operates as both a
gear shifter and a throttle for twin engines. The
placement of the controls allows the operator to
grasp both controls and control both engines
with one hand (see Figure 9.2). To shift, move
the lever into the first 15° of travel. Advance the
lever beyond 15° to move from shifting range to
throttle range. Never attempt to shift gears
while the engine is not running.
ENGINE CONTROLS
The two levers on the starboard side of the
helm control the engine throttles. The speed of
both engines can be changed simultaneously by
gripping both throttle levers in one hand, and
moving them back and forth together.
The twin lever control has an engine warmup
button near the base. Pressing the warmup button allows the transmission to remain in neutral
while the operator advances the throttle for
warming up the engine.
Cables and linkage connect each lever to the fuel
injection throttle valve on gasoline engines or the
fuel distributor on diesel engines. Moving a lever
forward increases its engine’s speed by increasing the fuel supply to the engine (Figure 9.4).
Increasing engine speed controls the boat’s
speed in forward or reverse. Move the throttle
slowly and smoothly. Moving the throttle lever
rapidly can stall an engine by flooding it with
excess fuel.
The trim switch for both the port and starboard
engines is on the port engine control lever.
IMPORTANT: Allow the engine to warm up before
engaging the shift control. Monitor all instruFORWARD
IDLE
FORWARD
INCREASING
THROTTLE
NEUTRAL
IDLE
STARBOARD
ENGINE
CONTROL
PORT
ENGINE
CONTROL
REVERSE
IDLE
INCREASING
THROTTLE
IN REVERSE
TRIM
SWITCH
NEUTRAL
WARM-UP
BUTTON
NEUTRAL
WARM-UP
BUTTON
(ALTERNATIVE
POSITION)
FIGURE 9.2 TWIN STERN DRIVE ENGINE CONSOLES
9-4
IMPORTANT : Allow the engine to warm up
before engaging the shift control. Monitor all
instr uments while engine is idling during
warmup. See the engine manufacturer’s specifications for proper operating ranges.
After your dealer has adjusted the throttle controls, they usually require ver y little ser vice.
They should move smoothly through the full
range of lever movement. Be careful when you
are in the engine room. Stepping on the cables
may cause them to bind. Hard operation of the
controls is not normal. At the first sign of difficult or stiff operation, have your dealer check
the cable and linkage and make the necessary
adjustments or repairs.
TRANSMISSION CONTROLS
FIGURE 9.3 INBOARD GEAR SHIFTS AND
THROTTLE CONTROLS
PORT
The two levers on the port side of the helm control the transmissions and the direction of boat
movement. Both shift levers have three positions: forward (up), neutral (center), and reverse
(back) as shown on Figure 9.4. The neutral
position has a detent positioning pin. You can
feel the pin drop into the detent when the lever
is in neutral. The levers must be in neutral
before you can start the engines.
PORT
STARBOARD
STARBOARD
FULL THROTTLE
FORWARD
VARIABLE
NEUTRAL
REVERSE
IDLE
TRANSMISSION CONTROLS
ENGINE THROTTLES
FIGURE 9.4 TYPICAL INBOARD GEAR SHIFT & THROTTLE FUNCTIONS
9-5
If an engine does not star t even though its
transmission lever is in neutral, the neutral
safety switch may be slightly out of adjustment.
While you are turning the ignition key, slowly
move the transmission lever up or down a short
distance over the detent until the engine starts.
Have your dealer adjust the switch as soon as
practical.
DEPTH SOUNDER
When maneuvering at speeds under 1,000 rpm,
you can reverse (move control lever forward or
aft) the transmission. This causes a braking
action to help stop the boat. When shifting from
forward to reverse or vice-versa, hesitate in neutral long enough for the propeller to slow its
turning. Quickly shifting from forward to reverse
and back again is hard on the engine and the
transmission. Never shift from for ward to
reverse or vice versa when your tachometer
reads over 1,000 rpm.
This gauge indicates engine operating conditions and warns you when to check your engine.
When the CHECK ENGINE indicator lights, you
should have your engine checked by your dealer.
When the LOW OIL indicator lights, the oil level
in the oil reser voir is low . If the NO OIL or
WATER TEMP indicator lights, stop your engine
immediately and correct the problem.
MARINE COMPASS
You will find that the marine compass is a useful, but sensitive, instrument. In order for the
compass to be accurate, it must be adjusted to
compensate for the effects of iron or magnets
and wires carr ying electricity in the vicinity of
the compass. Have your dealer make the initial
and subsequent periodic adjustments.
9-6
Your electronic depth-finding instrument measures the time a sound wave takes to travel
from the vessel to the bottom and return, and
displays the result in feet, fathoms or meters.
SYSTEMS MONITOR
Depending on the type of engines, you boat is
also equipped with audible alarms which will
sound when you start the engine(s). These audible alarms also indicate the visual alarms
indicated on the system monitor. Refer to your
engine manual for complete details about the
operation of engine alarms.
Pre-launch and Underway – 10
LAUNCH AND CRUISE CHECKLIST
■ Get a current weather report. If the weather will not be favorable, postpone your trip.
■ Install hull drain plugs.
■ Inspect the hull and propeller for damage. Excessive dirt or marine growth will affect your
boat’s performance and fuel efficiency.
■ Check the electrical system and navigation lights.
■ If your boat has been in the water, run the bilge pump until the flow of water stops.
■ If your boat has been out of the water, check to see that all bilge water has drained out.
Then install the drain plug.
■ Check that all required safety equipment is on board and in good working condition. Examples include personal flotation devices (PFDs), horn, fire extinguisher, visual distress
signals, etc. Take along a gallon of drinking water.
■ Check that all other required equipment is on board. Examples include mooring lines,
anchor and line, tool kit, first aid kit, etc.
■ Open engine compartment. Inspect for fuel odors and visible leaks in the fuel, oil, coolant,
exhaust and power steering systems.
■ Visually inspect engine for cracked hose, defective belts, or other signs of engine problems. Check engine oil and battery water levels. Check power steering fluid level. Check
battery electrolyte range.
■ Check fuel level. Fuel tanks should be filled to slightly less than capacity. Allow for fuel
expansion.
■ Check that all engine drains are closed (stern drives).
■ Make sure navigation charts and equipment are on board.
■ Check operation of bilge blower, steering system, navigation lights, and operation of horn.
■ Make sure passengers and crew know what to do in case of an emergency and how to
operate safety equipment.
■ Make sure all required documents are on board.
■ File a float plan with a responsible party ashore.
10-1
FUELING
5. Use only fuel lubricants recommended by
the engine manufacturer.
! WARNING
Do not smoke, extinguish all open
flames, STOP all engines and other
devices that could cause sparks,
including the bilge blower. Do not use
electrical switches or accessories.
Shut OFF all stoves that may produce
a spark or flame. Close all openings
into the cabin area of the boat.
RECOMMENDATIONS
! CAUTION
Follow engine manufacturer’s recommendations for types of fuel and oil.
Use of improper products can damage
the engine and void the warranty.
Although alcohol boosts the octane level of
gasoline, it also attacks the rubber fuel distribution lines and even metal fuel system
components. Alcohol will permeate most fuel
hoses and other components such as fuel
pump, gaskets and seals, and can also contribute to fuel system contamination.
The hoses we use in our boats are alcoholresistant as are the materials used by the
engine manufacturers. If only fuel containing
alcohol is available, or the presence of alcohol
is unknown, you must per form more frequent
inspections for leaks and abnormalities. Any
sign of leakage or deterioration requires your
immediate attention. Refer to the engine manufacturer’s recommendations on fuel type and
octane ratings.
PRELIMINARY GUIDELINES
1. Safely secure your boat to the dock.
2. Close all hatches, windows, doors and compartments to prevent accumulation of fuel
vapors.
3. Ensure that a fire extinguisher is readily
available.
4. Do not store fuel in areas that are not adequately ventilated.
10-2
PUMPING FUEL
! WARNING
When fueling or having your boat
fueled by an attendant, be sure the
waste pump-out or fresh water fitting
is not mistaken for the gas fill.
1. Be sure to fuel in a well-lit area gasoline
spills are unnoticeable under poor lighting or
in the dark.
2. Remove the gas fill cover.
3. Insert the fuel supply nozzle, keeping it in
contact with the fuel fill plate to guard
against static produced sparks.
4. Stand away from the fuel tank vent and gas
fill during fueling. Splashback may occur and
can be an eye irritant and/or a fire hazard.
5. Avoid spillage. Fuel spilled or pumped into
the water is harmful to fish and wildlife. Discharging fuel into the water contaminates
the environment and violates the law. Wipe
up any excess fuel immediately.
! DANGER
Fumes from rags used to wipe up fuel
spills can explode if stored on the
boat. Dispose of rags properly ashore
before getting underway.
6. After pumping approximately 10 gallons of
fuel into the fuel tank, inspect the engine
and fuel tank area for any signs of leakage.
If no leaks or other problems are detected,
resume fueling.
7. Allow space at the top of the tank for thermal expansion.
8. If fuel cannot be pumped in at a reasonable
rate, check for fuel vent blockage or a kink
in the line.
AFTER FUELING
LOADING PASSENGERS AND GEAR
1. Replace the gas fill cover and wipe up any
fuel spilled.
NOTE: All boats under 26 feet in length must
have a capacity rating plate showing the recommended person capacity as well as the
maximum capacity of the boat including persons, engine and gear. Boats over 26 feet do
not have a capacity plate. The captain is
responsible for using common sense and good
judgment regarding boat loading and the number of passengers allowed aboard.
2. Open the engine compar tment and all
hatches, windows, doors and other compartments that were closed during fueling.
Inspect these areas for the odor of fuel
vapors and visible fuel leakage.
3. If there is no fuel leakage, run the bilge
blower for at least five (5) minutes before
starting the engine, and until the boat has
reached its cruising speed. If you detect
spilled fuel, do not run the blower as it will
not evacuate all gas fumes. Contact fuel
dock personnel for assistance.
! WARNING
Investigate and correct any sign of fuel
leakage or indication of vapors before
starting engine. Do not run blower or
operate any electrical switch until
problem is corrected. Fire or explosion
may result.
When loading, always step into the boat, never
board by jumping. Have someone on the dock
pass your gear aboard. Secure all gear firmly so
it doesn’t move or inter fere with operation of
the boat. Passengers should board the boat
one-at-a-time and be seated. Passengers should
remain seated during loading of the boat to
maintain an even trim (Figure 10.1).
! WARNING
Passengers seated in the bow area
should not obstruct the driver’s vision.
CORRECT
Balanced load: gives
maximum performance
INCORRECT
Overload forward: causes
boat to "plow"
INCORRECT
Overload aft: causes
boat to "porpoise"
INCORRECT
CORRECT
FIGURE 10.1 LOADING PASSENGERS AND GEAR
10-3
IMPORTANT: Passengers are prohibited from
riding on the bow with feet hanging over the
side or ride while sitting on the stern, gunwales
or setbacks. The Coast Guard considers these
acts to be negligent or grossly negligent operation. They are prohibited by law because falls
from moving boats are a major cause of fatal
recreational boating accidents.
IMPORTANT: The presence of the capacity plate
does not relieve the boat operator from the
responsibility of using common sense or sound
judgment. Turbulent waters and adverse
weather conditions will reduce the maximum
load capacity rating of the boat.
STARTING PROCEDURES
The operation and maintenance manual supplied with your engine provides pre-star t,
starting and cold-starting instructions. The following information is merely a guide and not
intended to explain in detail all starting procedures and instructions. Refer to your engine
owner’s manual.
PRELIMINARY CHECKS
1. Secure boat to the dock before attempting
to star t engine. The boat should be kept
secure until the engine is r unning and
warmed up.
2. Operate the bilge pump until the flow of
water stops.
3. Make sure the throttle is in the neutral position and stern drive or outboard is lowered
into water.
4. Make sure passengers seated in the bow
area do not obstruct the driver’s vision.
STARTING
! DANGER
To prevent excessive exposure and
reduce the possibility of carbon
monoxide accumulation in the cabin
and cockpit areas of the boat, the
operator should provide adequate ventilation in each of these areas. Utilize
all hatches, doors, windows and side
vents to increase air movement. See
Section 2 for information about the
dangers of Carbon Monoxide.
10-4
1. Check all electrical systems and navigation
lights.
2. If your boat is equipped with an optional battery selector switch, turn the battery switch
to 1, 2 or ALL position.
3. If your boat has fuel injection, turn the key
to start the engine. Engine will not turn over
if throttle is not in the neutral position.
If your boat does not have fuel injection,
depress the engine war mup button to
advance the throttle several times and leave
it in the SLOW/START position. This will
actuate the carburetor accelerator pump
and feed fuel to the engine. Turn ignition key
to START position.
4. When engine is cold, run engine approximately one (1) to two (2) minutes at fast
idle speed (1200 to 1500 RPM). This step
is not necessary with fuel injected engines.
5. Once engine has warmed up, check water
temperature gauge to ensure engine temperatur e stays within optimum range. If
temperature reading is abnormally high,
stop engine immediately and inspect for
cause of high reading.
6. With engine running, voltmeter should show
a reading between 12 and 15 volts.
7. Check steering operation. Turn steering
wheel full to por t and starboard while
observing outdrive movement.
8. Inspect for fuel odors and visible leaks in
the fuel, oil, coolant, exhaust and power
steering systems.
9. Make sure boat is securely moored to the
dock and engine is idling. Then move the
throttle for ward and then aft and back to
neutral to check for proper operation of the
shifting motion. Be careful. Leave the
engine in gear for only a second or two.
MANEUVERING
! WARNING
Boat steering is not self-centering.
Steering is affected by engine and propeller torque, trim tab setting, wave
and current action and the speed of
the hull through the water. Constant
attention to steering is required for
safe operation.
When all your pre-departure checks have been
completed and the engine has warmed up, you
will be ready to leave the dock. Take into
account the amount of wind, tide current, and
other forces that may affect your maneuvering
as you leave the dock. Idle speeds work best
when maneuvering to and from the dock. Do not
forget to release the mooring lines.
LEAVING THE DOCK
You are ready to leave the dock after the engine
has warmed up. Check all gauges for appropriate readings before casting off. If oil pressure
is abnormally low or engine temperature is
abnormally high, stop the engine immediately.
Check voltmeter to be sure the charging system
is working properly. Check for fuel, oil, and
exhaust leaks. Correct the cause of any abnormal condition before getting underway.
! WARNING
Make sure passengers sitting in the
bow area do not obstruct the operator’s vision when casting off or while
underway.
Once away from the dock, devote some time to
learning how to maneuver. Practice docking
using an imaginary dock. Practice stopping and
reversing.
STOPPING
You do not have brakes on a boat. Practice
stopping maneuvers and learn early how your
boat reacts. From forward motion, pull the throttle back towards NEUTRAL. Depending on your
speed, the distance the boat travels until it
comes to a complete stop will vary. The ability
to measure the distance will only be acquired
through experience.
Once the boat has slowed and motor is idling,
place the shift in REVERSE. Gradually increasing
reverse power with the throttle will allow you to
stop the boat in a very short distance.
NOTE: A boat will not respond to steering in
reverse nearly as well as it does when going forward, so do not expect to accomplish tight
turning maneuvers when backing up.
Remember that all boats steer by the stern (the
feeling is much like steering your automobile in
reverse). This means that the stern of your boat
will swing in the direction opposite to your turn.
For example, when you turn the helm wheel to
the left, the stern of your boat will swing in the
direction opposite to your turn. This is especially important to keep in mind when docking,
operating in close quarters with other boats, or
when approaching a swimmer or downed skier
in the water.
Once you have spent enough time practicing
maneuvers and have a feel for how the boat handles, you will be ready to run in open waters.
ACCELERATION
After making sure your boat is ready, check
wind, tide, current and other forces that will
affect the way you maneuver your boat away
from the dock. Throw mooring lines off to your
boat. Shift your boat’s engine into for ward or
reverse depending on whether you want to move
the bow or the stern away from the dock first.
Run your engine at a slow speed as you move
away from the dock. If you move the bow out
first, watch that the stern of the boat does not
swing into the dock or a piling.
! WARNING
Before accelerating be sure your path
is clear; the bow will rise and momentarily obstruct forward vision. Make
your passengers aware of your intention to accelerate.
10-5
Before bringing your boat “on plane”, check the
entire area to make sure you have a clear, safe
path. As you throttle up to accelerate, your boat
will increase its angle of trim, causing the bow
to ride high. From a maximum angle, the boat
will level out to its planing attitude with continued acceleration. This maximum angle is known
as the “hump”. Because visibility, handling, and
performance are reduced, it is advisable to get
“over the hump” as soon as possible. A few
seconds at full throttle should get the boat over
the hump and into its planing attitude.
When you are sitting dead in the water, your outboard should be down and the trim tab switches
are in the BOW UP position. Accelerate until you
get onto plane. At this point your boat will be
plowing through the water with the bow down
too far. Trim the lower unit up slightly until the
bow comes up. If you trim the lower unit out too
far, your boat will porpoise or the propeller will
cavitate, and the bow will slam up and down on
the water. Your boat is trimmed correctly when it
is just shor t of porpoising or propeller cavitation, under ideal running conditions.
After getting over the hump, accelerate until
reaching a comfor table plane, then throttle
down to cruising speed. This also will provide
for better fuel efficiency.
Trim your boat to compensate for seas, winds,
or uneven loads.
Head Seas
Trim drives in more than usual.
Use tabs to keep bow down
and go at a slower speed.
Following Seas
To prevent taking seawater
over the bow, trim drives out
and keep tabs up to keep bow
up.
Listing Due to
Quartering Seas,
Beam Wind, or
Uneven Load
Use tabs independently to
adjust for list. If listing to starboard, press port bow down
switch. If listing to port., Press
starboard bow down switch.
TRIMMING YOUR BOAT
Trim tabs are used to add lift to the boat’s
stern, thereby changing the boat’s attitude (see
Figure 10.2). This lift can help the boat get on
plane faster and remain on plane at slower
speeds than if no tabs were used. Used independently, tabs can also cor r ect listing
conditions caused by crosswinds, unbalanced
loading and quartering seas. Trimming your boat
properly involves two separate procedures, trimming or tilting the lower unit and setting the trim
tabs.
PORT TAB LOWERED
• PORT STERN RISES
• STARBOARD BOW LOWERS
STARBOARD TAB LOWERED
• STARBOARD STERN RISES
• PORT BOW LOWERS
STERN
TRIM TAB
HULL
AS WATER PASSES UNDER
THE HULL AND HITS THE
TRIM TAB, THE STERN OF
BOAT IS PUSHED UP.
FIGURE 10.2 TRIMMING THE BOAT WITH TRIM TABS
10-6
Remember that most boats react very slowly to
trim tabs. Often boat owners do not give trim
tabs time to work. Press the trim tab switches
for only two seconds at a time and then allow
some time for the boat to react. If the boat is
still listing after a minute or two, press the trim
tab switch again for a two second interval. The
labels on the trim tab switches indicate what
you want your boat to do, not what you want the
tabs to do.
It is a good idea to take your boat out onto open
water shor tly after you get it and experiment
with the trim tabs. After you get your boat onto
plane, set the tabs in various positions and
note how your boat reacts. This will give you a
feel for the trim tabs work.
It is possible to extend the cylinder life
expectancy on your trim tabs. To do this, keep
the cylinders retracted while at dockside. Press
both trim tab controls down until tabs reach
their full up position.
TILT/TRIM CONTROL SWITCHES
NOTE: Trim refers to the angle of the lower unit
or outboard motor in relation to the bottom of
the boat. With respect to trimming, the words
in, down, under, and for ward, have the same
meaning as do up, out, and aft.
1. The standard trim control switch is located
on the control lever handle.
TRIM
DN
TRIM
UP
DN
TRIM
UP
DN
TRIM
UP
INCORRECT
Causes boat to "plow"
TRIM
CORRECT
Gives maximum performance
TRIM
INCORRECT
Causes boat to "porpoise"
FIGURE 10.3 TRIMMING THE BOAT OUTDRIVE
10-7
2. The switch controls the position of the stern
drive or outboard motor. Proper trim is very
important in boating.
3. In the case of low or heavy bow attitude,
the boat tends to “plow” (Figure 10.3).
The lower unit is trimmed too far under or
for ward. Trim the unit UP (out) to correct
this situation.
4. If the bow is too high, the boat tends to
“porpoise” (Figure 10.3). The drive unit
is trimmed up or out too far. Trim DN (in)
to correct.
5. A good practice is to get under way (especially when fully loaded or pulling a skier)
with the unit trimmed all the way DN (under).
After the boat is on plane, adjust the trim
out slightly to obtain the proper bow attitude
and engine speed.
6. Trim also af fects propeller selection and
fuel ef ficiency. All models should be
“propped” to be in the upper half of the
maximum RPM range with the boat lightly
loaded and the drive trimmed up to maximum. This configuration allows the engine
to operate within the recommended RPM
range with a heavy load.
The power unit should never be trimmed up
to a point where the propeller cavitates (or
slips). A rapid increase in engine RPM’s is
evidence of cavitation. If this occurs accidentally while r unning at full throttle,
immediately lower the drive trim and reduce
the throttle until the slipping stops. If necessar y, have your dealer reset the trim limit
switch (if provided) to avoid overtrimming in
the future.
If the prop slips at lower planing speeds,
the drive may be trimmed too high. Immediately lower the drive unit until the prop grabs
again to restore efficiency.
7. Trimming out, in addition to raising the bow,
also lifts the boat higher, gaining speed
because less hull is in the water.
8. Raise tabs all the way up when coming off
plane. Retrim boat when accelerating again.
Readjust tabs if necessary to compensate
for new direction of wind or seas.
9. The trailering position of some stern drives
is controlled by a separate switch on the
dash switch panel or throttle/shift control.
Do not activate this switch while engine is
running. Doing so can severely damage the
lower unit and engine.
NOTE: Refer to the control instructions regarding
the power trim controls installed on your boat.
EXCESSIVE NOISE
Remember to be a good boating neighbor.
Sounds can carr y a long distance over water,
especially at night. Loud conversations and
music can be disturbing to others as can excessive engine noise. Check with local authorities
regarding any noise restrictions.
ANCHORING
1. The weight of the anchor and diameter of
anchor line should be governed by the size
and weight of your boat. Get advice from
your dealer before you buy an anchor.
2. Keep anchor secure while underway to prevent damage or injury due to sudden shifting
in the boat’s attitude.
3. Use two or more anchors if anchoring
overnight or for extended periods. If not
using two anchors, make cer tain there is
sufficient clearance for your boat to swing in
a full circle to prevent damage in case of
shifting winds.
4. Make certain you have enough anchor line
(or scope) for the depth of water. Your
anchor line should be 6 to 7 times the
depth of water anchored in. For example, if
you are in 20 feet of water, use 120 to 140
feet of anchor line.
! CAUTION
Secure anchor line only to bow eye or
deck cleat. Never tie anchor line to a
rail, rail fitting or other hardware not
designed to support this stress.
DROPPING ANCHOR
1. Have a crew member carefully lower the
anchor. Keep slight tension on the anchor
line while lowering and maintain your tension after reaching the bottom.
10-8
2. Maneuver the boat slowly backwards until
length of anchor line is 6 or 7 times the
depth of the water.
3. Fasten the anchor line around the bow eye
or deck cleat. Anchor flukes should dig in
and catch. Watch for anchor drag by checking shoreline landmarks at the time the
anchor is dropped and one-half hour later. If
the boat has drifted away from these reference marks, the anchor is dragging and
must be reset.
WEIGHING
1. Star t the engine running before pulling in
anchor.
2. Slowly maneuver the boat forward to reduce
tension on the line and make retrieval of the
anchor line easier.
3. Pull in anchor line until the line is vertical.
Pull firmly to lift the anchor’s shank and free
the flukes from the bottom.
If the anchor becomes stuck, attach the vertical
line to the mooring cleat. Wave action on the
bow may lift flukes from the bottom and free the
anchor. If the anchor is still stuck, feed out a
few feet of line and attach it to the bow cleat.
Maneuver the boat around the anchor, keeping
the line firm. Determine the angle that will work
to pull the anchor free.
Anchors are available in different shapes, sizes
and weights to fit different boats, uses, and
conditions. Your dealer can tell you which
anchor will work best for your boat.
NAVIGATION LIGHTS
Although night activities are limited, cruising at
night can be ver y pleasurable. It can also be
dangerous if you don’t pay close attention to
water levels and obstacles. Be especially careful of shallow waters and watch for submerged
debris, rocks and other obstacles in the water.
Your navigation lights are intended only to prevent collision, not to improve your night vision.
You may choose to use a spotlight instead.
NOTE: It is illegal to use your spotlight as a
headlight. Use it only temporarily to check the
position of your boat and the surrounding area.
Your boat has one white (stern), one red (port)
and one green (starboard) light. The stern light
may be a removable pole light. To use the light,
line up the two-prong plug in the pole with the
receptacle in the base. Plug the light in, and
lock it into place with lever/slide lock. When not
in use, stow the light inside your boat for safekeeping. This light can be turned on or off at
the helm.
Check lights for proper operation before heading
out at night. You should also learn to identify
the running light combinations for other vessels. We recommend that you participate in a
boating safety course to further learn about navigation lights and safe boating practices.
The anchor lights and navigation lights are controlled by a switch at the helm. The anchor light
switch allows you to turn on just the stern
(white) light when anchored or moored. While
underway, use the navigation light switch to turn
on the stern (white), por t (red) and starboard
(green) lights. Lights are off when switches are
in the OFF position.
HAZARDOUS CONDITIONS
STORMS
Storms sometimes appear without advance
notice. Although weather information from meteorological observation and reporting stations is
available, weather bureaus are known to have
failures in their predictions or information gathering equipment. There is no substitute for a
strong understanding of what action to take
when the weather takes a turn for the worst.
Many marinas fly weather signals. You should
learn to recognize these signals and monitor
your local weather forecasts before leaving port.
The present and forecasted weather conditions
are of primar y consideration, but a threat of
possible storms should always be a concern.
Obser vance of the following information will
help in your safety afloat if storms do occur:
•
Keep a watch on the horizon for approaching
storm indicators.
•
Turn radio ON. Dial in local weather station
and monitor forecast. If your boat has a VHF
radio, check the weather channels.
•
The best possible situation is to return to a
safe port if time allows.
•
Close and secure all portals and hatches.
Stow all loose gear below deck and tie down
any gear required to remain on deck.
10-9
•
Reduce speed as the seas build. Make sure
all passengers are wearing their PFDs.
•
If you lose power, keep the boat headed into
the waves by rigging a sea anchor off the
bow (Figure 10.4). If there is no sea anchor
on board, use a canvas bucket or any object
that will offer resistance.
FIGURE 10.4 SEA ANCHOR
•
Radar reflectors (if installed on your boat)
should be 18 inches diagonally and placed
12 feet above the waterline.
FOG
Fog is a result of either warm surface or cold
surface conditions. You can judge the likelihood
of fog formation by periodically measuring the
air temperature and dew point temperature. If
the spread (difference) between these two temperatures is small, you likely will incur a fog
situation. Remember the following guidelines:
•
Turn on running lights.
•
As fog sets in, take bearings and mark your
position on the chart while continuing to log
your course and speed.
•
Make sure all persons aboard are wearing
their PFDs.
•
If your boat has depth finding equipment,
take sounding and match them with soundings on your charts.
•
Station a person forward on the boat as a
lookout.
•
Reduce your speed. From time to time, stop
engine and listen for fog signals.
•
Sound the proper horn or fog bell at proper
intervals to warn other boaters.
•
If there is any doubt in continuing boat
movement, anchor. Listen for other fog signals while continuing to sound the proper
fog horn or bell for a boat at anchor.
10-10
RUNNING AGROUND
! WARNING
To prevent boat damage, DO NOT use
deck hardware for towing. Use a commercial towing service.
Operating in shallow water can present a number of hazards. Sand bars in narrow inlets are
constantly shifting, making it difficult to mark
them with buoys. Sometimes sand bars are indicated by waves as they form into breakers when
passing over sand bars. In coastal areas, tides
can change water levels by as much as 30 feet.
Check with local marinas or Coast Guard stations for tide tables and current charts.
If your boat runs aground, first check persons
aboard for injury. Then check for damage to the
boat. If the drive unit strikes an underwater hazard, check for boat and drive unit damage. If the
engine vibrates excessively after striking an
underwater obstruction, it may indicate a damaged propeller. If vibration is noticeable, return
to por t slowly to prevent fur ther drive and
engine damage from an out-of-balance condition. Watch the temperature gauge to make
sure you do not overheat the engine.
If the boat is not taking on any water, it may be
possible to rock the boat by shifting the weight
of the passengers and gear and by raising the
drive unit while reversing the engine.
If you ground your boat on a sand bar, shut
down the engine and seek help from another
boater or radio for help. See your dealer as
soon as possible, as sand ingested in the
engine cooling system can cause major engine
damage.
WARNING MARKERS
It is a good idea to find out about hazardous
areas and how they are marked by asking your
local authorities.
•
Boaters must also r ecognize the flag
designs which indicate that scuba divers are
present and keep well clear of the area.
•
Watch for swimmers. Swimming areas may
not be marked. Steer clear from the area
and always remain alert.
•
Distress flags indicate a fellow boater is in
need of assistance.
•
Move throttles to idle position immediately
and yell “MAN OVERBOARD.”
•
Navigation markers ser ve as a means of
identifying navigable routes and indicate
water hazards. Boaters should become
familiar with navigation markers and
stay within marked boundaries and clear
of hazards.
•
Throw some floating object overboard
immediately. Keep your required Type
IV PFD accessible at all times for such
an emergency.
•
Keep the person in the water in sight at all
times. Have a passenger do nothing but
watch the person. Do not go into the water
to help the victim. One person in the water
is enough trouble.
•
Circle around quickly, approaching into the
wind and waves. When the person is alongside, put the engine in neutral and throw
them a Type IV PFD with a line attached or
extend a paddle or boat hook within his/her
reach.
REACTING TO EMERGENCIES
Be prepared to deal with emergencies before
they happen. Try to formulate a plan for each
type of emergency in advance so that decisions
can be made quickly and without hesitation.
Precious moments lost can mean the difference
between losing and saving a life.
FLOODING
If your boat starts taking on water, activate the
bilge pump immediately. Make sure all passengers are wearing their PFDs. Open the engine
compartment, look for the cause of the flooding. Check all hoses, through hull fittings, sea
cocks and strainers. If flooding occurs as a
result of collision or grounding damage, call for
assistance and head for shore if possible.
CAPSIZING AND MAN OVERBOARD
By far, the largest number of boating fatalities
involve capsizing and falling overboard accidents. By being prepared ahead of time with an
appropriate plan of action, you can greatly lower
your chances and your passengers’ chances of
becoming seriously injured.
CAPSIZING
Wear PFD’s or have them readily available at all
times. If your boat capsizes, and others were on
board, locate them and guide them to the safety
of the hull. Even if the boat floats in an upsidedown position, stay with it. The boat hull is
much easier for rescuers to spot than a human
head sticking out of the water. DO NOT attempt
to swim ashore, it may be further than it looks.
MAN OVERBOARD
Think through and follow these procedures if
someone in your boat falls overboard.
•
Remember, every second counts, you must
act fast.
COLLISION
If a serious collision occurs, you should first
check the condition of all passengers aboard,
then inspect your boat to determine the extent
of damage.
1. Make sure all persons aboard are wearing
their PFDs.
2. If you need help and your boat has a ship-toshore radio, first contact the U.S. Coast
Guard (VHF Channel 16) or other rescue
authorities immediately.
3. Prepare to assist the other vessel unless
your passengers and/or boat are in danger.
4. If the bow of the other boat penetrated your
boat’s hull, prepare to block the opening
once the boats are separated.
5. Shore up the hole with a spare PFD or bunk
cushion from your boat.
6. While blocking the hole, trim the boat so
that the hole is out of the water.
FIRE
Most fires are caused by electrical problems or
careless fueling practices. A fire on board your
boat is a serious emergency. You must work
quickly to implement safety procedures. If a fire
occurs, immediately stop the engine.
1. Make sure all persons aboard are wearing
their PFDs.
10-11
2. If the fire is small, attempt to put it out with
your fire extinguisher. If the fire is in the
engine compar tment, turn of f the bilge
blower. Do not open the engine compar tment. This feeds oxygen to the fire and may
cause it to flare up.
3. If the fire gets out of control, execute a distress signal and call for help if equipped
with a ship-to-shore radio.
4. All persons aboard should jump overboard
and swim a safe distance away from the
flames.
IMPORTANT: All persons aboard should know
the location and proper operation of the fire
extinguishers.
Guidelines
•
Use only approved marine cooking and
heating systems.
•
Open flames demand constant attention.
•
Keep flammable materials in approved containers in a overboard vented locker sealed
from the interior of the boat.
•
Ensur e ventilation systems ar e unobstructed.
•
Allow only a qualified marine electrician to
service the boats electrical system.
MEDICAL EMERGENCY
Accidents while boating can and may happen.
Be prepared to handle these emergencies when
they happen. Keeping a first aid kit and dr y
blankets on board can assist during these situations. It is also a good idea to contact your local
Red Cross for information and training on first
aid and CPR.
PROPULSION FAILURE
Before you call for help regarding an engine or
drive unit failure, it is a good idea to eliminate
the possibility of simple problems. Turn off the
engine and check to see that (1) there is fuel in
the tank; (2) the engine cooling intakes on the
outdrive are not clogged; (3) props are clean
and free of weeds, netting, etc.; (4) no hoses
are leaking; (5) there is oil in the engine.
Once you have checked out the possibilities
listed above and find they are not the problem,
call for help giving your position and a detailed
description of your boat.
CONTROL FAILURE
•
Remove mooring covers before star ting
engine.
•
Check the bilge for fuel leaks.
•
Extinguish smoking materials carefully.
•
Use special care with flame or high temperatures around urethane foam.
•
Check cleaning products for flammability.
In the unlikely event of a throttle/shift failure,
shut down the engine immediately. Carefully
check the control connections in the engine
compartment to see if they are secure. If not,
tr y to locate the attaching har dware and
reassemble. If that is not possible, try to use
whatever is available such as paper clips, hair
clips, tape, etc., to secure the connections. If a
temporary repair is made, return to port at the
slowest steerable speed and be prepared to
take emergency action should the temporar y
repair fail also. Have your dealer make repairs
before using the boat again.
•
Ventilate when cleaning or painting.
STEERING FAILURE
•
Disconnect electrical system from its power
source before performing maintenance.
•
Replace breaker or fuse with same amperage device.
•
Electrical appliances must be within rated
amperage of boat circuits. Observe the boat
carefully while the electrical system is being
energized.
If a problem with the steering occurs, shut down
the engine immediately. Check the connections
to the outboard motor or drive unit in the engine
compar tment. Some boats have a push/pull
cable while others will have hydraulic hose connections. With cable connections, check the
attaching hardware and tighten it if necessary. If
you have hydraulic hose connections, check to
see if they are leaking. If so, tighten the connections and check the hydraulic fluid reser voir
level. Most stern drives are power assisted and
10-12
have their own hydraulic reser voir and engine
mounted drive pump; check the level of reservoir and drive pump belt. If the steering is not
operating properly, do not operate the boat and
call for assistance.
ADDITIONAL UNDERWAY
INFORMATION
•
Always be aware of local laws on noise limits. Noise means engine noise, radio noise
or even yelling by people on your boat. Good
seamanship demands that you operate your
boat quietly so as not to infringe on the
rights of others. Don’t use the thru-transom
exhaust unless you are well off shore.
•
You are responsible for any damage or injury
caused by your boat’s wake. Obser ve no
wake speed zone warnings. Operate your
boat with regard for the safety of other
boats and people in your boating area.
•
Keep your engine well tuned to decrease
exhaust hydrocarbon emissions that pollute
the air and water.
RETURNING TO SHORE
DOCKING
Always approach the dock slowly. Think before
acting. If you are wondering whether your boat
will fit in a space against a dock, remember that
pilings are often (but not always) spaced 10
feet apart.
Remember that it is easier to control a boat in
reverse because a boat steers from the stern.
When backing into a slip, back so that bow
swings into the wind if possible. You will have
more control.
If you have a twin engine boat, center the steering wheel. Use the throttles and shifters to
control the boat’s movement.
Use extreme caution if wind or current is from
your stern. Back in towards the dock slowly at a
slight angle with engine in slow reverse. Gently
swing parallel. Tie stern first, then the bow.
If the weather looks bad, use spring-lines from
the bow and stern to dock amidships of the
boat. Tie up on the downwind side of the dock.
If the wind is changeable, place fenders over
the side between the boat and the dock.
MOORING
After you have positioned your boat next to the
dock, you must secure it with mooring lines to
keep it in position. Mooring lines must be long
enough to secure your boat in any docking situation. For example, the length of the lines for a
16-foot runabout should be at least 15 feet. An
eye splice at the end of each line works well
with bow or stern cleats.
The mooring lines you will use most often are
the bow line, the stern line, and spring lines as
shown on Figure 10.5. Each line has a specific
purpose. The bow line and the stern line secure
your boat’s bow and stern. The two spring lines
keep your boat from moving for ward or backward when you are moored alongside a dock.
If you are mooring your boat for a short time,
bow and stern lines may be the only lines you
will need. If you are mooring your boat for a
longer time or the currents are swift, you should
use spring lines. The stern spring line leads
from the boat’s stern cleat forward to the piling
or cleat on the dock. The bow spring line leads
from the bow cleat aft to the dock.
If you are mooring your boat in a slip, bow and
spring lines, port and starboard, will keep your
boat in position.
NOTE: If tides are a consideration, be sure to
leave slack in the lines to make up for the rise
and fall of the water while your boat is docked.
If possible, come in against the wind or current,
whichever is stronger. Approach the dock at a
30-45° angle. As the boat nears the dock,
slowly swing parallel to it. Tie the bow line first;
then the stern.
If wind or current is moving toward the dock,
move parallel to the dock further out. Let the
wind or current push you in. Tie the stern first,
then the bow.
10-13
FIGURE 10.5 MOORING LINES
10-14
Winterization and Commissioning – 11
If properly used and maintained, your boat will give
you years of use and enjoyment. By keeping your
boat “ship shape,” you will be doing more than
protecting your investment; you will also ensure
good performance and safety on the water.
When cold weather has arrived or a change in
your boat’s usage requires extended storage,
we suggest that you use the following guidelines. Special preparations are necessar y to
prevent damage by rust and corrosion, mildew,
discharged batteries, and freezing water. If you
live in an area that does not require seasonal
storage, we recommend a thorough inspection
once a year.
IMPORTANT: Your warranty does not cover damage to your boat if it is not properly stored and
winterized. We recommend that, at a minimum,
you check with your dealer about proper winterization procedures. Better yet, have your dealer
prepare your boat for storage for you.
CRADLE
A cradle is the ideal support for your boat whenever it is not in the water. Properly designed and
located, the cradle will support the boat under
the main frames. Suppor t at these points is
essential for preventing damage to the hull. Purchase a cradle from your dealer to ensure that
your boat has the correct support.
PREPARATION FOR STORAGE
Remove the bilge drain plug immediately after
taking the boat out of the water. Store the plug
in a plastic bag and tape it to the throttle control lever so that it can easily be found.
After washing the boat, raise the bow out of the
water high enough to allow as much water as
possible to drain while you are completing other
storage preparations. Before covering your boat,
apply a coat of Meguiar’s Boat/RV Wax to prevent excessive oxidation.
LIFTING THE BOAT
Unless your boat is trailerable, have your dealer
or qualified marina personnel lift your boat out
of the water for you. Each boat has main frame
components designed to support the boat when
it is being lifted out of the water. Severe gelcoat
crazing or more serious hull damage can occur
if the lifting slings exert pressure on the gunwales. Flat, wide belting-type slings should be
used. Don’t use cable-type slings. The spreader
bar at each sling should be as long as the distance acr oss the widest point the sling
surrounds.
•
Never hoist the boat with more than a minimal amount of water in the bilge.
•
Empty fuel and water tanks, especially if
they have large capacities.
•
Larger boats that are not normally trailerable have sling placement labels on the sides
of the boat. Be sure to position slings as
indicated by the labels.
•
Do not place the slings where they may lift
on the propeller shaft or underwater fittings.
•
Do not use deck cleats or bow or stern eyes
for lifting unless they are labeled.
TRAILER
Per form the following steps to winterize your
trailer for storage.
•
Check tire inflation.
•
Clean and repack the wheel bearings. Make
sure there is no water in the wheel hubs.
Inspect the bearings and races for pitting.
Inspect the grease seals for wear. Replace if
necessary and fill the bearings with grease.
•
Examine the entire trailer and running gear
for signs of cracking or metal fatigue. Repair
weld cracks, and tighten any loose bolts and
screws.
•
Check the frame. Make sure there are
no signs of bending or swaying due to
overloading.
•
Repair or replace worn or misadjusted
bunks or rollers.
•
If rust has formed on the trailer, remove it
by sanding and paint the bare spots to
match the trailer.
11-1
•
Inspect and adjust the brake system according to the manufacturer’s recommendations.
Look inside brakes for excessive rust.
•
Lubricate the winch, the coupler, all rollers
and pivot points.
•
Check the safety chains.
•
Inspect the winch and fastening hook for
wear.
•
Check tie-downs for fraying. Loosen or
remove tie-downs.
•
Inspect the underwater gear and propellers
for excessive wear or damage.
DECK
•
Wash the deck, superstructure, and/or
cockpit, clean all chrome and coat with a
rust inhibitor before storing.
•
Clean the indoor/outdoor carpet.
ENGINE, SYSTEMS & COMPONENTS
•
Check the electrical system for wear or
loose connections, and repair if necessary.
•
Open tail light lenses and inspect bulbs and
sockets for excessive rust and corrosion.
Coat metal base of bulb with a die-electric
grease or spray with WD-40.
•
If storing your boat on a trailer, make sure
that the trailer supports are aligned with the
structural members of the hull. Distribute
the weight properly. Make sure your boat is
well suppor ted across the transom and
keel.
•
Put the rig on blocks or else move the trailer
from time to time to prevent flat spots on
the tires.
•
Position your boat’s bow to allow water to
drain via the transom drain. Do not allow
rain water to collect inside the boat.
•
If it is possible for water to accumulate on
the boat covers, poke a small hole near the
back of your boat cover canvas. Prepare the
hole with a grommet to prevent tearing. If
your boat is tilted backwards, rain water will
run through the hole and out the bilge drain
hole.
HULL
•
If your boat is going to be placed in dry storage, as soon as the boat is hauled out,
scrape off any barnacles and other growth if
necessar y. Scrub the hull and deck thoroughly to remove marine growth and scum.
(The hull is easiest to clean when the boat
is first hauled out and while the adhering
material is still wet.)
11-2
ENGINE AND OUTDRIVE
Have your dealer prepare the engine and outdrive for winter storage. Your dealer will service
the cooling system as part of the engine winterization. Special skills, tools, and equipment are
required.
IMPORTANT: In regions where temperatures fall
below freezing, all water in the engine must be
removed or replaced with a marine antifreeze
solution before storing your boat for the winter.
Mix antifreeze according to label directions for
the lowest expected temperature. Use non-toxic
antifreeze to prevent damage to the environment. Failure to do so will seriously damage the
engine. Freeze damage is not covered by the
warranty. Make sure your boat’s engine is
slightly bow up during the extended storage
period.
FUEL SYSTEM
Fill the fuel tank to minimize condensation. If
tank is completely filled, fuel may overflow from
the tank during weather. Help prevent damage to
the environment. Leave enough space for fuel to
expand. Add a gasoline stabilizer solution to the
fuel prior to storage. Follow the stabilizer manufacturer’s recommended procedure.
BATTERIES
! WARNING
To prevent personal injury, wear goggles, rubber gloves and a protective
apron when working with battery. Battery electrolyte can cause severe eye
damage and burns to the skin. In case
of spillage, wash area with a solution
of baking soda and water.
When working on or around battery connections,
do not allow metal tools or loose wires to contact terminals. Contact across positive (+) and
negative (-) terminals will cause a short circuit.
Electrical burns or personal injury may result.
•
Remove the batteries. Check water level
and store away from freezing temperatures.
IMPORTANT: Batteries should be stored in a
cool, dry place.
•
Clean outside batter y case, terminals and
batter y clamps with a solution of baking
soda and water.
NOTE: Do not allow baking soda/water solution
to enter the cells.
faucet or outlet when antifreeze star ts to
flow. (See icemaker manual for winterization
instructions.)
7. One by one, open each hot water faucet
beginning with the one fur thest from the
water heater. Close faucet when antifreeze
starts to flow.
8. Winterize remaining system components
such as shower and icemaker. (See icemaker manual for winterization instructions.)
9. Shut off water pump
VACUFLUSH ® SYSTEM
The fresh water system must be winterized
before winterizing the waste system. Refer to
the VacuFlush System manual for additional
information.
•
Lightly sand battery posts and clamps with
fine grit emery cloth.
•
Apply a light coat of petroleum jelly to cover
the end of the battery cables.
1.
•
A monthly recharge or continuous trickle
charge should be applied to the battery during storage.
2. If necessary, add nontoxic antifreeze to fresh
water tank. Mix antifreeze in accordance with
the manufacturer’s recommendations.
FRESH WATER SYSTEM
Water must be removed from the fresh water
system to prevent damage to system components during cold weather.
1. Turn on fresh water pump.
2. Open faucets and allow pump to empty
fresh water tank.
3. Close faucet when tank is empty. Shut off
water pump.
4. Mix nontoxic antifreeze in accordance with
manufacturer recommendations and add
to fresh water tank. The amount of
antifreeze mixed should be equivalent to
the capacity of the water heater plus
approximately 2 gallons.
Note: Nontoxic antifreeze in fresh water tank
will also be needed to winterize head and
macerator.
5. Turn on water pump.
6. One by one, open each cold water faucet
and fresh water outlet beginning with the
one fur thest from the water tank. Close
Have holding tank pumped out at an
approved pumpout station.
3. Operate head until antifreeze flows into
bowl. Allow sufficient time between flushes
for vacuum to build up before flushing.
4. Operate macerator until antifreeze flows
through discharge fitting on side of hull.
Flush head as needed to provide enough
antifreeze to winterize macerator.
5. Dispose of antifreeze according to manufacturer’s instructions.
RAW WATER SYSTEM
Water must be drained from the raw water system to prevent damage to seacock and water
lines.
1. Locate hose that connects raw water pump
with raw water through hull pickup fitting,
and close seacock.
2. Disconnect hose at the point that it connects with the through hull fitting.
3. Mix one gallon of non–toxic antifreeze mixed
in accordance with the manufacturer’s recommendations. Place end of hose in
antifreeze.
11-3
Attach a hose to the cockpit washdown
hose connector.
4. Position an empty container to catch the
flow of antifreeze from cockpit hose.
5. Operate raw water system pump by turning
on the raw water washdown switch at the
helm.
6. When antifreeze flows through hose into
container, shut off pump.
7. Repeat for foredeck washdown.
8. Reconnect the hose to the through hull fitting, and close the seacock.
9. Dispose of unused antifreeze according to
manufacturer’s instructions.
10. After boat has been lifted from water, open
seacock so water can drain from valve. Do
not open seacock while boat is in the water.
IMPORTANT: During commissioning, be sure to
close raw water system seacock before lowering
your boat into the water.
RAW WATER HOSES
Water must be drained from engine cooling
lines to prevent damage to seacock, sea
strainer, and hoses. Refer to the engine manufactur er’s manual for detailed engine
winterization procedures.
1. Open seacock valve and allow water to
drain.
2. Disconnect hose at engine and lift hose up
so water drains from hose.
3. Open petcock at bottom of sea strainer and
allow water to drain. Have a suitable container to catch water as it drains from
seacock.
4. If your boat is out of the water, leave seacock open and hose disconnected.
IMPORTANT: During commissioning, be sure to
close engine seacocks and connect hoses
before lowering your boat into the water.
11-4
AIR CONDITIONING SYSTEM
Water must be drained from air conditioning
lines to prevent damage to seacock, sea
strainer, and air conditioning system components. Refer to the manufacturer’s manual for
detailed winterization procedures.
1. Open seacock valve and allow water to
drain.
2. Close seacock. Seacock must remain
closed while winterizing the air conditioning
system.
3. Open sea strainer by unscrewing wing nuts
on top of the strainer housing. Remove
screen.
4. Mix 2-3 gallons of nontoxic antifreeze
according to manufacturer’s directions.
5. Fill sea strainer housing with antifreeze.
6. Operate air conditioning pump. Refill sea
strainer with antifreeze as level in strainer
goes down.
7. Continue to operate pump until antifreeze
flows out of thru–hull fitting.
8. Shut off air conditioning pump.
9. Close sea strainer and tighten wing nuts.
10. Open seacock to allow any water trapped in
valve to drain. If your boat is out of the
water, leave seacock open.
11. Dispose of unused antifreeze according to
manufacturer’s instructions.
IMPORTANT: During commissioning, be sure to
close air conditioning seacock before lowering
your boat into the water.
SEACOCKS
Seacocks and sea strainers are normally winterized as part of winterizing the equipment and
systems they serve. When winterization is complete, check to make sure that water is drained
from all seacocks and sea strainers. Water
freezing in valves or sea strainer can damage
those components.
When your boat is out of the water:
STORAGE ON TRAILER
1. Open seacock and allow water to drain.
•
Loosen all tie-downs to relieve the stress on
the hull.
2. Open petcock at bottom of sea strainer and
allow water to drain.
•
Place blocks under the axles to keep tires
off the ground.
•
Re-pack the trailer wheel bearings. Water
may be trapped inside the bearings. (Your
dealer can help you do this.)
•
Store with the bow up and remove the drain
plug to allow for any excess water to drain.
3. Leave seacocks open.
IMPORTANT: During commissioning, be sure to
close all seacocks and sea strainer petcocks
before lowering your boat into the water.
INTERIOR CLEANING
•
Scrub all interior sur faces including cupboards, cabinets and drawers.
RECOMMISSIONING THE BOAT
AFTER STORAGE
•
Be sure to remove everything that can hold
moisture and cause mildew. Remove and
store OFF the boat all cushions, mattresses,
cur tains, blankets, sheets, pillows, towels
and clothing.
•
•
If it is necessar y to store cushions on
board, open all zippers and lift cover away
from the foam padding by placing a small
plastic bowl or other round blunt object
inside the cushion to allow for adequate air
circulation. Seats that can be, should be
stored in the down or folded out position.
Inspect the fuel system and all associated
equipment for proper connections, corrosion, leaks or other damage. Always be
aware of any odor of fuel vapors.
IMPORTANT: For detailed information concerning recommissioning of the engine, refer to your
engine manual.
•
Charge and install battery(s) in boat.
•
Inspect all battery wiring. Repair or replace
if necessary.
•
Make sure the cabin is well-ventilated.
•
•
PFD’s and other safety equipment must be
cleaned and dried. If left on board, place
them where air can circulate around them.
Before lowering your boat into the water, be
sure to close all seacocks. Check sea
strainer petcocks and close if open.
•
Attach the batter y cables and tighten the
cable clamps.
•
•
•
Clean and thoroughly dr y the bilge area.
Remove all rags, sponges or other cleaning
materials from bilge area.
Allow the interior to completely air out for a
couple of days, weather permitting.
If you store your boat outside, we recommend that you do not store it with the
bimini top raised. Cover with a storage
cover, tarp or plastic (available from your
dealer) especially if you live in an area
where heavy snow is possible. Whatever
material you use as a cover, be sure the
boat is properly ventilated.
NOTE: After cleaning, make sure everything is
thoroughly dr y and air can circulate freely
throughout the inside of your boat.
IMPORTANT: Do Not apply petroleum jelly or
marine grade grease before connecting and
tightening clamps.
•
Apply petroleum jelly or marine grade grease
on posts and clamps to eliminate air pockets and acid build up after clamps are
tightened.
•
Check engine compar tment and bilge for
signs of nesting animals and clean as
necessar y.
•
Check entir e engine for cracks/leaks
caused by freeze damage.
•
Coat hull drain plug threads with petroleum
jelly and reinstall drain plug.
•
Clean the bilge area.
11-5
•
Inspect all exhaust connections for carbon
monoxide leakage. Adjust and repair as
required.
•
Test the navigational lights and all other
lighting on board.
•
Inspect all wiring for fraying, wear, loose
connections and other damage.
•
Inspect all switches, controls and other
related equipment for proper operation.
•
Inspect all safety equipment for proper operation and physical condition.
•
Open all faucets and fill freshwater holding
tank with water. Turn freshwater pump on to
allow water to flow through faucets until all
antifreeze is flushed out and the water runs
clear, then close faucets. Fill the freshwater
tank until full, then check the entire system
for water leaks.
11-6
•
Launch the boat and star t the engine. It
may take a minute of cranking to allow the
fuel system to prime. When the engine
starts, keep a close watch over the gauge
readings and check for leakage and abnormal noises. Keep speeds low until the
engine has reached normal operating temperature. If your engine was fogged for
winterization, you will see exhaust smoke
for a few minutes while the fogging oil is
burned off.
Refer to engine and boat accessory manuals for
further recommissioning instructions.
General Maintenance – 12
This section contains information that requires
use and disposal of oils, fuels, and chemicals.
Pay particular attention to the environment during the use and disposal of these materials.
We recommend that maintenance and repairs
be per formed by your dealer. However, some
owners may prefer to take care of routine maintenance and repairs themselves. For those
individuals, this section includes general information and basic procedures. Keep a record of
all completed work in the Maintenance/Service
Log. A copy of this log is in Section 1.
This section also includes recommendations for
cleaning fiberglass, hardware, fabrics, vinyl, and
carpeting. Although household cleaners may be
used, they should be used in small quantities.
Cleaners containing chlorine, solvents, or
petroleum may damage boat components and
are a pollutant if they get into the water. In addition, cleaners containing phosphates encourage
algae blooms. Mixing cleaners can cause harmful chemical reactions. Use citr us–based
cleaners or the cleaners recommended. Check
with your dealer for additional information about
cleaners.
•
Inspect the hull for gelcoat damage. Have
your dealer repair gelcoat damage as soon
as possible.
•
Check fluid levels in batteries and clean terminals with a wire brush if corroded.
•
Inspect zinc anodes for deterioration and
replace if 50% or more of the anode is deteriorated.
•
Inspect the steering for looseness or binding and perform service in accordance with
steering system manufacturer’s recommendations if required.
•
Inspect and clean sea strainers regularly.
The frequency of cleaning will var y
depending on the amount of use and local
conditions. To clean the strainer, close
the seacock and unscrew the wing nuts
on top of the strainer housing (Figure
12.1). Remove screen and wash. After
replacing the screen, replace and tighten
the wing nuts. Open the seacock and
check for leaks.
IMPORTANT: Check with your dealer before
beginning any maintenance or repair if you are
not sure about the proper tools, equipment and
supplies to be used. Always refer to the manufacturers’ manuals for detailed maintenance
and repair procedures.
WINGNUT
COVER
SERVICE SCHEDULE
SCREEN
The manufacturer of each system or component
in your boat should provide a recommended service schedule, listing items requiring routine
attention, type of maintenance, and frequency.
STRAINER
The service schedule is a guide based on average operating conditions. Under sever e
operating conditions, shorten service intervals.
DAILY (EACH USE)
•
Inspect your stern drive for damage. If a propeller is damaged, have it repaired or
replaced.
FIGURE 12.1 SEA STRAINER
•
Wash down you boat with fresh water and
wipe down with a cotton towel or chamois. If
you used your boat in salt water, this washdown is especially important!
12-1
•
Flush engine (sterndrives) with fresh water
to clean out sand and salt. Make sure bow
is higher than engine to prevent water from
backing up into engine. See your dealer for
attachments that allow flushing engine with
a garden hose.
While flushing, run engine approximately 1015 minutes. Observe engine multi-function
gauge to make sure engine does not overheat. Be sure that flushing hose remains
attached to outdrive.
•
While cleaning engine compartment, inspect
all belts and hoses for deterioration. Make
sure clamps are tight.
EVERY 100 HOURS OF OPERATION
OR SEMIANNUALLY
•
Inspect the engine and stern drive mounting
hardware for tightness.
•
Clean the engine flame arrester and ventilation hoses.
•
Clean and polish the hull bottom using a
marine recommended cleaner and wax.
•
Inspect the bilge pumps and float switches.
Float switches gradually lose sensitivity due
to an accumulation of bilge oil on the operating sur faces. Remove and clean or
replace the float switches periodically.
•
Clean and inspect the entire bilge. Dir t in
the bilge will accumulate, soak up oil and
eventually become a fire hazard, so keep
your bilge clean. See your dealer for environmentally safe bilge cleaners.
ANNUAL MAINTENANCE
•
Have a qualified technician thoroughly
inspect your entire electrical system, including performing a leakage test of each circuit.
ENGINE EXHAUST SYSTEM
The exhaust system collects engine combustion
gases and exhausts them through fittings at the
stern. The hydrocarbons in engine exhaust are
pollutants. A well–tuned engine operating at its
best engine reduces air and water pollution by
exhausting fewer hydrocarbons.
! WARNING
Exhaust gases contain carbon monoxide. Carbon monoxide is poisonous
and can cause unconsciousness or
death. Shut down engines immediately
if any exhaust leaks are detected.
Visually inspect the engine and generator
exhaust systems (hoses, joints, manifolds, etc.)
for leaks. Make sure all clamps are tight. Check
hoses and exhaust boxes for damage. Replace
any damaged exhaust system component.
Do not remove or bypass mufflers. Local regulations may establish maximum noise limits.
Note: Any discoloration around a joint or gasket
usually indicates a leak.
SALTWATER CORROSION
The entire boat should be rinsed with fresh
water immediately after a cruise in salt water. If
the boat is used primarily in salt water, wax the
hull monthly and apply corrosion inhibitor to all
hardware. See your dealer for products suitable
for the marine salt water environment. Fresh
water internal flushing is recommended when
used in salt, polluted or brackish waters. Recommended products include Meguiar’s One
Step Cleaner/Wax.
•
Visually inspect all electrical connections for
chafing and corrosion and tighten connections if they are loose.
•
Carefully inspect all lifesaving equipment
(PFDs) for cut or torn fabric and other signs
of deterioration and replace if necessary.
•
Carefully check hull for cracks and contact
your dealer if you suspect damage has
occurred.
BOTTOM MAINTENANCE
Check the entire fuel system for any evidence of line deterioration or fuel leaks. If
any suspicious lines or connections are discovered, have them repaired or replaced
before going out on the water.
IMPORTANT: If your boat will be in water continuously, we recommend sealing the bottom of
the hull with a high quality barrier coating.
Unsealed gelcoat may form water blisters.
Repair of water blister damage is not covered
under the warranty. If required, contact your
dealer for further information.
•
12-2
The best way to prevent blistering is to minimize
the amount of time the boat remains in the water.
If the boat must remain in the water, the application of a “blister guard” system to the hull below
the waterline will lessen the possibility of blistering. The application of blister guard will decrease
the maximum speed of your boat. Proper application is essential; contact your dealer or marine
service center for additional information.
We recommend your boat be removed from saltwater and rinsed after each use to prevent
unwanted marine growth on the hull and to
maintain ultimate high per formance. The bottom of your boat must be kept clean! Any
buildup of marine life from water will create drag
and af fect the boat’s per formance and ef ficiency. Never use brushes or scouring pads on
the bottom of your boat, as this can cause
small scratches that will actually trap in dirt.
Antifouling bottom paint is designed to dissolve
slowly to prevent marine growth. Therefore, the
hull bottom should be repainted at the beginning
of the boating season. Factors to take into consideration when selecting a protective bottom
paint are water temperature, pollution, salinity,
current and organic material in the water.
IMPORTANT: Consult with your dealer for recommended bottom paints and local laws that
govern your area. Many states regulate the
chemical content of bottom paints to meet environmental standards and regulations. Contact
your dealer for information.
1. Scrub hull bottom with a bristled brush and
mixture of soap and water.
NOTE: Repainting the hull bottom is not
required after each scrubbing unless bare areas
are visible in the bottom paint.
2. Sand entire bottom surface of boat.
3. Smooth out all rough areas as required.
4. Clean bottom sur face to remove all dust
and foreign materials.
5. Make sure bottom sur face is completely
dry.
6. Apply new coat of bottom paint.
NOTE: Always follow manufacturer’s procedures
and recommendations concerning application of
paint and drying time before putting your boat in
the water.
PROTECTION AGAINST
ELECTROLYSIS
IMPORTANT: It is the boat owner’s responsibility
to periodically inspect and replace the sacrificial
zinc anodes. Damage resulting from electrolytic
corrosion is not covered by the warranty.
Sacrificial zinc anodes, installed by the dealer
or the engine manufacturer, protect the hardware that is exposed to the water. Electrolysis
attacks the softest or least noble metals first.
Because zinc is a less noble metal, it will
decompose before the more noble metals.
Check these zinc anodes periodically and have
them replaced as required. See your dealer for
parts and service.
Zinc is also used to protect metal that is
exposed to saltwater. The salt causes a galvanic action that decomposes metals.
DECK AND HULL CARE
! CAUTION
Waxed gelcoat surfaces can be very
slippery. Do not wax normally used
portions of the floor deck or gunwales.
Do not wax any textured or non-skid
surfaces such as floors, walkways,
steps or ladders.
IMPORTANT: Keep fiberglass sur faces clean
to prevent dir t from scratching and dulling the
finish. Wash down with a mild soap (dish
detergent or car wash soap) and plenty of
clear water, especially if your boat has been
exposed to salt water.
The finish on your boat is made of highly
durable marine gelcoat. With proper care, this
finish will last for many years, retaining its lustrous appearance. For added protection you can
have the hull of your boat coated with an
antifouling paint. See your dealer for fur ther
information.
Routine, periodic cleaning is the only practical
way to keep the sur face of your boat looking
shiny and new. Keeping your boat in showroom
condition means greater personal satisfaction
and higher resale value. Special cleaning products are available from your dealer to remove
mildew. Boats left outdoors will gradually deteriorate from exposure to sunlight, water, dust and
chemicals in the air. Outdoor exposure may
12-3
cause your boat’s surface to show a variety of
changes, including:
•
•
•
•
Chalking (fine, powder y whiteness on the
surface)
Fading (gradual loss of color)
Yellowing
Loss of gloss
Darker colors tend to exhibit these changes
more rapidly than light colors because they
absorb more of the sun’s rays (ultraviolet and
infrared).
! CAUTION
If nonskid or textured surfaces on decks, walkways, and steps become stained, clean them
with a bristle brush and a bathroom fiberglass
cleaner. Be careful! Scrubbing smooth gelcoat
sur faces with a bristle brush may scratch the
gelcoat.
Keeping both the interior and exterior of your
boat in good condition and inspecting your boat
regularly to keep minor problems from becoming
major ones are good rules of thumb for proper
boat care. REMEMBER, A BOAT KEPT IN NEARLY
NEW CONDITION, REGARDLESS OF AGE,
RETAINS A HIGH RESALE VALUE.
FIBERGLASS REPAIR
Wire brushes, scouring pads or other
abrasive type materials/solutions
should never be used on the deck or
hull of your boat. They create small
scratch marks that will collect marine
growth and other foreign materials.
Although your deck and hull have been designed
to withstand normal use, it is inevitable that
surfaces will become scratched or chipped over
a period of time. Superficial scratches can usually be rubbed out with Meguiar's Heavy Duty
Oxidation Remover.
NOTE: Before using a par ticular cleaning solution or method for cleaning, it is a good idea
to test the material to be cleaned in a hidden
or inconspicuous area for possible adverse
reactions.
“Hairline cracks” or “spider webbing” may
develop in the gelcoat surface of a hull or deck.
This can be caused by weathering, impact or
other factors. Small blisters or gouges may also
occur through normal wear. These do not affect
the strength of the hull or deck and can easily
be repaired by you or your dealer.
The deck and hull can be easily cleaned with
Meguiar's Marine Boat Gel Wash and water
(with the exception of oil or heavy grime). Use a
clean cloth or sponge. Dir t, sand, or grit in a
dirty rag could scratch the gelcoat surface. DO
NOT USE abrasives to clean your boat.
Boat sur faces, even textured walkways and
steps, can be very slippery when covered with
soap suds. Use caution to protect yourself and
others from slips and falls. Wear deck shoes or
boat shoes whenever you are in your boat.
After you have thoroughly cleaned your boat,
you are ready for a wax application to bring back
the original sheen of your hull. If the deck or
hull has oxidized (appearing as a light white
milky film), you may want to use Meguiar’s
Heavy Duty Oxidation Remover or Mirror Glaze
Color Restorer before waxing. It is a good idea
to wax your boat at least twice a year. In southern climates, waxing more frequently may be
necessar y to protect the boat from the sun’s
rays.
NOTE: Do not use a spray wax. Wax accidentally
sprayed on nonskid sur faces will make them
very slippery.
12-4
The affected area should be chipped or sanded
away and a thin layer of color-matched gelcoat
applied. This layer is then sanded smooth and
buffed back to its original luster. Your dealer
can obtain color-matched gelcoat and provide
further instructions from the manufacturer.
Fiberglass hulls are tough, but like hulls of any
other materials, they can be damaged. A fiberglass hull has vir tually no internal stresses.
Thus, when a part is broken or punctured, the
rest of the hull retains its shape. A severe blow
will either be absorbed or result in a definite,
localized break. In the case of a break of this
nature, the boat should be returned to your
dealer for repair.
You will need the following items for minor
repairs:
•
•
•
•
•
•
Gelcoat
DDM (clear liquid catalyst)
Putty knife or equivalent
Razor blade
Fine sandpaper (400 to 600 grade)
Wax paper (piece big enough to cover repair)
! WARNING
AVOID THE USE OF DETERGENTS OR ABRASIVES WHEN CLEANING HARDWARE.
Gelcoat and fiberglass resin are
flammable; work in well-ventilated
area free from any fire hazard.
Inspect all hardware and fittings to make sure
they are secure. All screws, bolts, clamps,
cleats, etc., must be tight.
UPHOLSTERY
For minor repairs follow this procedure:
1. Clean the area to be repaired and clear it of
wax and oil.
2. Thoroughly clean out nicks, chips and
scratches.
3. Sand area to be repaired so gelcoat will
bond.
4. IN A SEPARATE CONTAINER, MEASURE ONLY
THE AMOUNT OF GELCOAT YOU NEED. Mix a
2% ratio of catalyst to the amount of gelcoat
being used (a spoonful of gelcoat will
require only a drop or two of catalyst).
NOTE: DO NOT pour any unused portions of the
gelcoat/catalyst mixture back into either original
container.
5. Apply gelcoat to area leaving a slight lift
above the surface.
6. Cover with wax paper (lack of oxygen helps
mixture set) and let set 20 to 30 minutes.
7. Remove wax paper and shave off excess
gelcoat with a razor blade.
8. By the time the area is shaved smooth, you
are ready to sand (Use 400 to 600 grade
sandpaper, NO SUBSTITUTES.)
9. Rub or buff the fiberglass with Fiberglass
Cleaner/Compound, then polish, then wax.
Some discoloration may occur if your boat has
weathered. For your first attempt at repair,
experiment on an area not normally visible. With
a little experience, even the novice can repair a
scratch with few, if any, visible repair marks.
HARDWARE AND FITTINGS
Chrome, stainless steel and aluminum hardware should be cleaned with Meguiar’s All
Metal Cleaner, followed with an application
of Meguiar’s All Purpose Metal Polish.
Your boat’s seats and vinyl upholster y should
be kept as clean as the exterior finish to prolong life and beauty.
SEAT COVERINGS & VINYL
The seat coverings and vinyl trim are made of
temperature resistant vinyl.
1. Always try to clean up spills quickly to prevent staining.
2. Clean dirt and smudges with Meguiar's Vinyl
& Rubber Cleaner/Conditioner. If necessary,
scrub with a soft bristle brush to remove
dirt from textured vinyl. Dry with a soft, lintfree cloth or towel.
3. Use a stronger detergent such as Meguiar’s
Heavy Duty Vinyl Cleaner for tough stains. Follow the instructions on the bottle label for
ground-in dirt, a nylon brush can be used to
scrub out stains.
Cer tain household cleaners, powdered abrasives, steel wool and industrial cleaners can
cause damage and discoloration and are not
recommended. Petroleum-based cleaning products such as dr y cleaning fluids and lacquer
solvents should not be used, as they will
remove the printed pattern and gloss. Waxes
should be used with caution. Many contain dyes
or solvents that can permanently damage the
protective coating.
4. Suntan oil will damage vinyl upholstery. Use
suntan lotion instead of suntan oil.
5. Removable outside seat cushions should be
placed inside when not in use.
Exposure to the sun is the enemy of all upholster y materials. For maximum life, we
recommend keeping them covered with a cockpit or full length cover when you are not using
your boat.
12-5
INTERIOR FABRICS
Treat the fabric upholstery the same as home
fabric upholster y. Vacuum and shampoo to
maintain upholster y and to keep it clean and
odor free. Spray with Lysol™ or other disinfectant to prevent the build up of mildew.
WINDSHIELDS AND WINDOWS
Safety glass windows and windshields may be
cleaned just like those in a car. Plastic and Plexiglass surfaces require special attention. Flood
acr ylic windshields and por t windows with
plenty of clean warm water. Use a soft clean
cloth. Rinse with clear water.
! CAUTION
Do not use window cleaning sprays,
scouring compounds or solvents to
clean plastic windows. Scouring compounds will scratch the windows.
Sprays and solvents penetrate the surfaces and cause hazing which will
obstruct visibility.
To keep exterior seat cushion foam from getting
wet, we recommend that the cushions be
removed and properly stored when not in use
unless the boat is fitted with a full length cover.
CLEANING
IMPORTANT: Do not use hot water, dr y in an
automatic dryer, dry clean or steam press canvas.
1. Wet down all canvas. Use a soft bristle
brush and scrub with a mild detergent and
water solution.
2. Use a mild solution of ammonia/water and
scrub for heavy soil or mildew build up. Be
sure to rinse thoroughly.
3. Brush or sweep underside of the top. Spray
with Lysol™ or other disinfectant to prevent
mildew.
CARE
1. Care for vinyl-coated canvas as you would
vinyl upholstery.
2. Lubricate zippers with paraffin and snaps
with petroleum jelly.
Vibration may loosen windshield fasteners and
braces during normal use. These should be
checked periodically for tightness.
3. If a leak occurs along a canvas seam, rub
with paraf fin or apply a light coating of
Scotch Guard®.
CARPETING
EXTERIOR
Scrub indoor/outdoor carpeting with a brush
using mild detergent and warm water, then thoroughly rinse with clear water. Allow carpet to dry
completely before use. Apply a light coating of
Scotch Guard to protect against accidental
spills.
INTERIOR
Vacuuming and occasional carpet shampoo are
recommended for extended life and appearance. Apply a light coating of Scotch Guard to
protect against accidental spills.
CANVAS
Canvas or “bimini tops” are designed to protect
the helm seating areas from the sun. Although
these tops are intended to provide ample weather
protection for the helm, they are not completely
weather tight like a winter storage cover.
12-6
4. Air dr y all canvas material before storing.
Never store canvas while damp or wet and
provide proper ventilation to prevent mildew.
5. Avoid mooring under trees.
6. Never tow your boat with the top up.
7. When not in use, remove the top and store
in the boot on board your boat.
Nautical Glossary – 14
Abaft
Toward the stern.
Abeam
Amidships, at a right angle to the keel.
Aboard
On, in, or into a boat.
ABYC
American Boat and Yacht Council, Inc., the
organization that sets voluntary safety and
construction standards for small craft in the
USA.
Adrift
Without motive power and without anchor or
mooring.
Afloat
On the water.
Aft
Describing the after section of a vessel, or
things to the rear of amidships and near the
stern.
Aground
Touching bottom.
Amidships
In the center, the center portion of a vessel.
Anchor
A forging or casting shaped to grip the sea
bottom and, by means of a cable or rope,
hold a boat in a desired position.
Anchorage
A customar y, suitable and (usually) designated harbor area in which vessels may
anchor.
Astern
Toward the stern. An object that is aft of a
boat is said to be astern of the boat.
Athwart
Across.
Aweigh
Off the bottom, said of an anchor.
Aye
Yes, while aboard a boat or ship. Means “I
understand.”
Bail (Bale)
To remove water from a boat by pump or
bailer.
Ballast
Heavy material such as iron, lead, or stone
placed in the bottom of the vessel.
Beacon
A post or buoy placed over a shoal or bank
to warn vessels, also a signal mark on land.
Beam
Imaginary line amidships at right angles to
keel of vessel. Also vessel’s width amidships.
Bearing
The direction or point of the compass in
which an object is seen.
Belay
To make fast to a cleat or belaying pin; to
cancel an order.
Below
Beneath, or under, the deck. One goes
below when going down into the cabin.
Bend
To fasten by means of a bend or knot.
Berth
A position, as a place to sleep or in which a
vessel maybe made fast; a margin of safety,
as “a wide berth.”
Bilge
The lower internal part of a boat’s hull.
Bollard
A strong post for holding lines fast.
Bow
The forward part or front of the boat.
Breakers
Waves cresting as they reach shallow water,
as at or on a beach.
14-1
Breakwater
A structure, usually stone or concrete,built
to create a harbor or improve an existing
one.
Coaming
A raised edge, as around par t or all of a
cockpit, that prevents seawater from entering the boat.
Bulkhead
Vertical partition in a boat.
Coast Guard
The federal marine law enforcement and
rescue agency in the US.
Burdened Vessel
Former term for the vessel which must stay
clear of vessels with the right-of-way.
Calking (Caulking)
Forcing filler material into the seams of the
planks in a boat’s deck or sides, to make
them watertight.
Cockpit
A well or sunken space in the afterdeck of a
small boat for the use of the helmsman and
crew.
Companionway
A hatch or entrance, from deck to cabin.
Camber
The arch of a deck, sloping downward from
the center toward the sides.
Compass
The instrument which shows the heading of
a vessel.
Capsize
To turn over.
Cowls
Hooded openings used for ventilation.
Carburetor Backfire Flame Arrestor
Required equipment on all motorboats
except outboards and diesels. Reduces
chance of fire caused by backfires in internal combustion engines.
Cradle
A frame used to support a vessel on land.
Cardinal Points
The four main points of a compass; north,
east, south, and west.
Ceiling
The inside lining of the hull.
Certificate
Gover nment paper, such as a boat’s
license.
Chart
A map of a body of water that contains piloting information.
Chine
The intersection of sides and bottom of a
boat.
Cleat
A piece of wood or metal with projecting
ends to which lines are made fast.
Clinker
A method of planking in which the lower
edge of each strake overlaps the upper
edge of the strake next below. (Also called
lapstrake.)
14-2
Current
The movement of the water in a horizontal
direction.
Deadrise
The rise of the bottom of a midships frame
from the keel to the bilge.
Deck
Any permanent covering over a compar tment.
Deep-six
To discard or throw overboard.
Depth Sounder
An electronic depth-finding instrument, measuring the time a sound wave takes to go
from the vessel to the bottom and return,
then displaying the result in feet, fathoms,
or meters.
Dinghy
A small, open boat.
Displacement Hull
Type of hull that plows through the water
even when more power is added.
Dock
An enclosed or nearly enclosed water area;
all the port installations; a place where vessels can moor, as a pier, wharf, or floating
dock.
Documented Vessel
Vessel registered with the U.S. Coast Guard.
Dolphin
A small group of piles, in the water, generally used for mooring or as a channel
marker.
Draft
The depth of the vessel below the water
line, measured vertically to the lowest part
of the hull.
Dunnage
Mats, boughs, pieces of wood, or other
loose materials placed under or among
goods carried as cargo in the hold of a ship
to keep them dry and to prevent their
motion and chafing; cushioning or padding
used in a shipping container to protect fragile articles against shock and breakage;
baggage or personal effects.
Ebb
An outgoing tide.
Estuary
An inlet or arm of the sea.
Freeboard
The vertical distance measured on a boat’s
side from the waterline to the gunwale.
Galley
The kitchen area of a boat.
Gimbals
Swivels used to keep equipment level.
Give-Way Vessel
The one which must stay clear of vessels
which have the right-of-way.
Grab Rail
A convenient grip, on a cabin top or along a
companion ladder.
Gunwale (pronounced gunnel)
The upper edge of a boat’s side.
Harbor
A safe anchorage, protected from most
storms; may be natural or man-made, with
breakwaters and jetties; a place for docking
and loading.
Hatch
An opening in a boat’s deck for persons or
cargo to go below.
Head
A marine toilet.
Fathom
Six feet.
Headway
For ward motion of a vessel through the
water.
Fenders
Objects placed along the side of the boat to
protect the hull from damage.
Helm
The wheel or tiller by which a ship is
steered.
Flare
The outward spread of the boat’s sides from
the waterline to the rail at the bow. Also, a
pyrotechnic signalling device that can indicate distress.
Holding Tank
Storage tank for sewage, so that it will not
be pumped overboard into the water.
Fore
Used to distinguish the for ward par t of a
boat or things for ward of amidships. It is
the opposite of aft or after.
Forward
Toward the bow.
Frame
Ribs of the hull, extending from the keel to
the highest continuous deck.
Hull
The body of a boat.
Hypothermia
A physical condition where the body loses
heat faster than it can produce it.
Inboard
More toward the center of a vessel; inside;
a motor fitted inside the boat.
14-3
Inland Rules
Rules of the road that apply to vessel operation in harbors and certain rivers, lakes, and
inland waterways.
LOA
Length over all; the maximum length of a
vessel’s hull, excluding projecting spars or
rudder.
Intracoastal Waterways
ICW: bays, rivers and canals along the
coasts (such as Atlantic and Gulf of Mexico
coasts), connected so that vessels may
travel without going into the open sea.
Locker
A storage place, a closet.
Jetty
A structure, usually masonry, projecting out
from the shore; a jetty may protect a harbor
entrance.
Lubber’s Line
A mark or permanent line on a compass
that shows the course of the boat.
Keel
The permanently positioned, fore-and-aft
backbone member of a boat’s hull.
Knot
To bend a line. Also, a unit of speed equal
to one nautical mile (6,076.10 feet) an
hour.
Launch
(1) To put a vessel into the water;
(2) A small open powerboat, mainly used for
transpor tation between a vessel and
shore.
Lee
The side opposite to that from which the
wind blows.
Leeward
Situated on the side turned away from the
wind. (Opposite of windward.)
Leeway
The amount a boat is carried sideways by
the wind’s force or current.
Limber Holes
Drainage holes in the bilge timbers of a vessel, allowing to r un to a low point for
pumping out.
List
(1) A continuous leaning to one side, often
caused by an imbalance in stowage or a
leak into one compartment;
(2) A light list is a printed listing of aids to
navigation, in geographical order or
inclining of a vessel toward the side.
14-4
Log
A record or diary of a vessel’s journey.
Making Way
Making progress through the water.
Marina
A place, essentially a dock area, where
small recreational craft are kept; usually
floats or piers, as well as service facilities,
are available.
MAYDAY
A radio distress call, fr om the french
m’aidez (help me); SOS in Morse Code.
Mooring
Commonly, the anchor chain, buoy, pennant,
etc., by which a boat is per manently
anchored in one location.
Motor
A source of mechanical power.
Motorboat
Any watercraft 65 feet or less in length propelled by machiner y, whether or not such
machinery is the principal source of propulsion.
Navigation
The ar t of conducting a ship from por t to
port.
Nautical Mile
6076.12 feet, or 1852 meters, an international standard; the geographical mile, the
length of one minute of latitude at the equator, is 6087.20 feet.
Nun Buoy
A conical, red buoy bearing an even number
and marking the starboard side of a channel
from seaward.
Oar
A long, wooden instrument with a flat blade
at one end, used for propelling a boat.
Outboard
(1) A propulsion unit for boats, attached at
the transom; includes motor, drive-shaft,
and propeller; fuel tank and battery may
be integral or installed separately in the
boat;
(2) Outside or away from a vessel’s hull;
opposite of inboard.
Outdrive
A propulsion system for boats, with an
inboard motor operating an exterior drive,
with driveshaft, gears, and propeller; also
called stern-drive and inboard/outboard.
Overall Length
The extreme length of a vessel, excluding
spars or rigging fittings. See LOA.
Painter
A rope attached to the bow of a boat for
making it fast.
PFD
Personal Flotation Device.
Pier
A str ucture, usually wood or masonr y,
extending into the water, used as a landing
place for boats and ships.
Pile
A vertical wooden or concrete pole, driven
into the bottom; may be a support for a pier
or floats; also used for mooring.
Piling
A structure of piles.
Pitch
(1) The up and down movement as the bow
and stern rise and fall due to wave
action;
(2) The theoretical distance advanced by a
propeller in one revolution.
Privileged Vessel
Former term for the vessel with the right-ofway.
Propeller
Wheel or screw. Mechanism that pushes
water aft to propel the boat.
Rigging
The general term for all lines(ropes) of a
vessel.
Roll
The sideward motion of a boat caused by
wind or waves.
Rules of the Road
The nautical traffic rules for preventing collisions on the water.
Scope
The length of the anchor rope or chain. 6 to
1 scope means that the length of the
anchor rope from the boat to the anchor is 6
times the depth of the water.
Scupper
A hole allowing water to run off the deck.
Sea Anchor
A floating canvas cone, held open by wire
rings, with an opening in the smaller end,
and a rope bridle at the larger end attached
to a line leading to the vessel; used in
storm conditions to (a) keep the bow of the
boat to the wind, and (b) slow downwind
drift of the boat.
Sea Cock
A through-hull valve, a shut-off on a plumbing or drain pipe between the vessel’s
interior and the sea.
Slip
(1) A berth for a boat between two piers or
floats;
(2) The percentage difference between the
theoretical and the actual distance that
a propeller advances when turning in
water under load.
Planing Hull
Type of hull that is shaped to lift out of the
water at high speed and ride on the surface.
Sole
The cabin or cockpit floor.
Port
The left side of a boat when you are facing
the bow, also a destination or harbor.
Spar Buoy
A channel marker that looks like a tall, slender pole.
14-5
Stand-On Vessel
The vessel with the right-of-way.
Starboard
The right side of a boat when you are facing
the bow.
Stern
The after end or back of the boat.
Stow
To store items neatly and securely.
Strake
Planks running fore and aft on the outside
of a vessel.
Taffrail
The rail around a boat’s stern.
Tide
The alternate rise and fall of waters caused
by the gravitational attraction of moon or
sun.
Topsides
(1) The sides of a vessel above the waterline;
(2) On deck as opposed to below deck.
Transom
The transverse planking which forms the
afterend of a small, square-ended boat.
(Outboard motors are usually attached to a
transom.)
Vessel
Ever y kind of watercraft, other than a seaplane on the water, capable of being used as a
means of transportation on water.
VHF Radio
A Very High Frequency electronic communications and direction finding system.
Wake
Moving waves, created by vessel motion.
Track or path that a boat leaves behind it,
when moving across the water.
Wash
The loose or broken water left behind a vessel as it moves along; the surging action of
waves.
Waterline
The intersection of a vessel’s hull and the
water’s surface; the line separating the bottom paint and the topsides.
Way
Movement of a vessel through the water.
Technically it is under way when not at
anchor, aground, or made fast to the shore.
The common usage is interpr eted as
progress through the water. Headway when
going forward and Sternway when it is going
backwards.
Well
Area at the rear of a boat where the motor
may be located.
Trim
To arrange weights in a vessel in such a
manner as to obtain desired draft at bow
and stern.
Wharf
A structure, parallel to the shore, for docking vessels.
Trimaran
Boat with three hulls, the center one is the
largest.
Wheel
(1) The steering wheel;
(2) The propeller.
Unbend
To cast-off or untie.
Whistle Signal
A standard communication signal between
boats, to indicate change of course, danger,
or other situations.
Underway
Vessel in motion, i.e., when not moored, at
anchor or aground.
USPS
United States Power Squadron, a private
membership organization that specializes in
boating education and good boating practices.
14-6
Windward
Situated on the side closest to the wind.
(Opposite of leeward.)
Yaw
To swing or steer off course, as when running with a quartering sea.
Trailering – 13
Improper towing can result in personal injur y
and equipment damage. Familiarize yourself
with proper towing procedures before taking
your boat out on the road.
Improper trailering is a major cause of hull damage. Your boat’s warranty does not cover this
type of damage. Have your dealer assist you
when selecting the appropriate trailer for your
boat.
! WARNING
The total weight of your loaded trailer
must not exceed the capacity marker
on the hitch of your tow vehicle. Overloading can cause hitch failure leading
to injury-causing accidents.
IMPORTANT: The published weight is the dr y
weight of your boat. Dry weight does not include
the weights of outboard motors, batteries, gasoline, any optional items, gear or trailers. The
weight of these items must be added to the dry
weight to determine the proper trailer GVWR
needed. On boats equipped with stern drive
engines, the dry weight includes the weight of
the standard engine. If your boat is equipped
with a larger than standard engine, you must
allow for this added weight.
WEIGHT DISTRIBUTION
If your towing vehicle is equipped with a weight
distribution hitch, it must be capable of handling the GVWR. The weight on the trailer should
be evenly distributed and can be checked by
determining the tongue weight.
Tongue weight is a percentage of the total
weight of the loaded trailer on its tongue. Ideal
tongue weight is not less than five percent (5%)
and not more than ten percent (10%) of the
GVWR. For example, if the weight of the loaded
trailer is 3000 pounds, the weight on the
tongue should be more than 150 pounds, but
less than 300 pounds. Excessive tongue weight
will cause the front end of the towing vehicle to
sway. Insufficient tongue weight will cause the
trailer to sway or fishtail.
To avoid personal injury and property damage,
be sure to balance the load when trailering. If
too much weight rests on the hitch, the front
end of the vehicle will sway or oversteer. Insufficient weight on the trailer will cause the trailer
to fishtail. In either case, the vehicle will be
hard to handle and could become uncontrollable
at high speeds.
State regulations usually require that trailers
above a specified weight rating be equipped
with brakes. Requirements vary; check with your
dealer for additional information.
GROSS VEHICLE WEIGHT RATING
If your boat does not come with a trailer package, selection of a trailer is extr emely
important. Your trailer should be able to accommodate the weight of the boat, engine, full fuel
tank and any other equipment that will normally
be carried. Check the certification label on the
frame of the trailer for the Gross Vehicle Weight
Rating (GVWR). The total weight of your boat,
engine, fuel, gear and trailer should not exceed
the GVWR.
IMPORTANT: The side supports should only be
tight enough to keep the boat from leaning side
to side. Any unnecessary pressure may damage
the hull.
Always use bow and stern tie downs to prevent
the boat from shifting. Do not put other gear in
your boat while trailering.
! WARNING
The total weight of the trailer, boat and
gear must not exceed the GVWR of the
trailer. Overloading can lead to injury,
causing accidents.
HITCH
Hitches are divided into classes that specify the
gross trailer weight (GTW) and maximum tongue
weight for each class. Always use a hitch with
the same class number as the trailer. Most
boat trailers connect to a ball hitch that is
bolted or welded to the towing vehicle. Special
heavy-duty equalizing hitches are necessary for
trailer tongue weights of 350 pounds or greater.
13-1
The trailer hitch coupler must match the size of
the hitch ball. The correct ball diameter is
marked on the trailer coupler.
SAFETY CHAINS
Safety chains on your boat trailer provide added
insurance that it will not become completely
detached from the towing vehicle. Crisscross
the chains under the trailer tongue (as shown
on Figure 13.1) to prevent the tongue from
dropping to the road if the trailer separates
from the hitch ball. Be sure to leave some slack
when attaching the chains; otherwise, the angle
of the tongue in relation to the tow vehicle can
cause the chains to become too tight when the
tow vehicle is turning. Safety chain should be of
the “Proof Coil” type and must have a minimum
breaking strength equal to the upper limit of the
GVWR. Some states require chains to be locked
so they can’t shake, bounce or vibrate off their
hook.
SIDE VIEW
TRAILERING GUIDELINES
1. Be sure that the rollers or bunks displace a
large amount of hull sur face and the boat
and equipment distribute evenly on the
trailer.
2. Make sure your boat is properly tied down
and a safety chain is used.
3. Do not trailer with your boat’s conver tible
top or its side and aft curtains up. They can
be severely damaged.
4. Be sure your trailer is equipped with functional tail lights and turn signals as required
by state and federal laws.
5. Check with your state Department of Motor
Vehicles for registration and licensing regulations in your state. Some states require
that boat trailers be registered and licensed.
6. Be aware that a turn for the trailer will be
wider than a turn for the tow vehicle (Figure
13.2). When making a turn, be careful that
your trailer does not strike another vehicle
or object.
7. Inspect your trailer regularly to make sure
the side supports are in good working order.
Check bolts which secure rollers and sup-
TRAILER PATH
BOTTOM VIEW
FIGURE 13.1 SAFETY CHAINS
13-2
FIGURE 13.2 TRAILER PATH
BACKING TO RIGHT
FOLLOWING THRU TURN
BACKING TO LEFT
FIGURE 13.3 BACKING A TRAILER
por ts for tightness. Check wheel bearings
frequently for sufficient grease.
8. Check local and state laws for any additional requirements for trailers.
2. Removing any trailering tie-downs from the
boat.
3. Attaching the docking lines and fenders.
4. Disconnecting the trailer lights from the car.
BACKING A TRAILER
Practice backing with a trailer before you get
into a confined launch site. Get accustomed to
using your trailer in an open area. Take someone with you who knows how to back a trailer.
Backing a trailer works the opposite of backing
a car (Figure 13.3). If the trailer needs to travel
to the right, turn the steering wheel to the left
and vice versa. Do not turn the wheel too far or
oversteer. Turn the wheel gradually until you get
the feel of safe backing.
If you do not have experience in backing up with
a trailer, practice! Take your trailer to an open
area and master using it before you and your
boat get into a confined public or private launch
site.
LAUNCHING GUIDELINES
Before launching your boat, stay to one side
and watch a couple of launchings to notice any
problems on the ramp and the effects of the
wind and the current on launching. It s a common courtesy to prepare the boat for launching
away from the ramp. This preparation includes:
1. Checking that the bilge drain plug is in
place.
NOTE: If you have a bunk trailer, the boat’s transom must be deeper than several inches in the
water before launching.
Here are some tips to remember when putting
your boat in the water:
1. Have an individual at the launch ramp give
you directions. Back slowly down the ramp.
If the trailer needs to be maneuvered to the
right, turn the towing vehicle’s steering
wheel to the left. If trailer movement to the
left is required, turn the steering wheel to
the right. Always remember to launch your
boat at a right angle to the shoreline.
2. Before backing your boat down the launch
ramp:
•
•
•
•
•
•
Remove all stern tie-downs.
Properly secure all loose gear.
Inventory your safety equipment.
Load all personal gear.
Lock winch and trailer unit.
Disconnect trailer wiring from towing
vehicle to prevent short circuits caused
by submersion.
4. If launching from a trailer, tilt the stern drive
or outboard motor up to the high tilt trailer
position to avoid damage during the launch.
13-3
5. When the boat’s transom is in several
inches of water:
•
STOP the towing vehicle.
•
If you have a manual transmission,
leave it in gear. If you have an automatic
transmission, shift to PARK.
6. Turn of f the engine and set the parking
brake.
7. Place blocks behind the vehicle’s back
wheels.
8. Do not detach the winch cable from the bow
eye until a mooring line has been secured to
one of the boat s cleats. Attach one line to
bow and one line to the stern to help control
the boat. See the Mooring Lines information
later in this section for suggested securing
procedures.
9. Launch the boat; move it down and OFF the
trailer into the water.
10. Secure boat to dock or have someone hold
mooring lines.
•
Turn off the engine.
•
Set the parking brake.
NOTE: If you have a bunk trailer, the trailer may
need to be more than several inches in the
water before loading.
3. Tilt the boat’s drive up to the high tilt position to avoid damage while loading.
4. Pull boat up onto trailer and secure safety
chain.
5. After securing the boat to the trailer star t
engine on towing vehicle and pull trailer out
of water to boat securing area. (If blocks are
connected with a rope to the trailer tongue,
you will not need to remove them before
pulling trailer out.)
6. Remove the drain plug and drain the bilge.
Put drain plug in a conspicuous place for the
next launch. Securing to steering wheel will
help you remember to replace it.
7. Use tie-downs to secure boat on trailer.
8. Make sure stern drive is raised and secure.
11. Lower stern drive or outboard all the way
into the water.
12. Pull your towing vehicle away from the
launch ramp.
13. Park only in designated areas. When parking, be sure your towing vehicle and trailer
do not block other boaters from approaching
the launch ramp or hinder their ability to
maneuver a boat and trailer when launching.
LOADING YOUR BOAT
ON THE TRAILER
Follow these guidelines for loading your boat
back onto the trailer.
1. Back the trailer into the water.
2. When the trailer is in several inches of
water:
•
STOP the towing vehicle.
•
Leave manual transmission in gear or
place automatic transmission in park.
•
Place blocks behind the vehicle’s back
wheels.
13-4
9. Wipe hull down to prevent water spots and
keep hull clean.
10. Make sure everything in the boat is secure
or tied down. Place anything loose in towing
vehicle.
11. Reconnect trailer lights. Check that lights
are working.