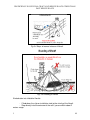
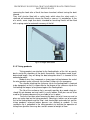
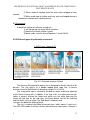
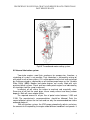
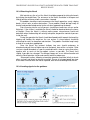
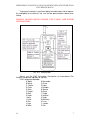
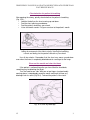
1
This course has been developed under
RoNoMar - Romanian Norwegian
Maritime Project
(2008/111922)
Supported by a grant from Norway through the
Norwegian Cooperation Programme for Economic
Growth and Sustainable Development with Romania.
PROFICIENCY IN SURVIVAL CRAFT AND RESCUE BOATS OTHER THAN FAST
RESCUE BOATS
1. Introduction and safety
1.1 Introduction
The course aims are to provide the training for candidates to launch and take
charge of a survival craft or rescue boat in emergency situations, in accordance with
Section A-VI/2 of the STCW Code.
This course is both practical and theoretical, after the theoretical lessons conducted
by following the practical applications of craft and their accessories. Instructors will
provide the necessary theoretical and practical applications to perform and will
oversee the entire progress of the exercise.
At the end of the course, students will gain extra experience in terms of
proficiency in survival craft and rescue boats other than fast rescue boats and will be
better-integrated teamwork intervention in case of emergency.
The syllabus covers the requirements of the 1995 STCW Convention Chapter VI,
Section VI/2, Table A-VI/2-1.
Students will gain knowledge on:
- Preparation and launching of survival craft
- Use of equipment
- Operation rescue boat engine
- Crew management and craft after abandoning ship
- Use of signaling equipment and GMDSS equipment
- First aid medical survivors
- Actions taken for survival in rescue boat
1.2 Safety guidance
During the training time, the trainees must follow the safety rules teach by
instructors or experts, mostly during practical period when the saving equipment are
used.
The orders “STILL” and “CARRY ON” must be strictly respected during all
period of training with the watercrafts from training base.
2. General
2.1 Emergency situation
2.1.1 Types of emergency
Without to limit of these, the most common of emergency situation are:
- Fire (Accommodation fire, Galley fire, Engine room fire, Cargo
hold fire, Cargo fire on deck, Pump room fire, Emergency generating room fire).
- Abandon ship.
1-2
1
PROFICIENCY IN SURVIVAL CRAFT AND RESCUE BOATS OTHER THAN FAST
RESCUE BOATS
- Damage to ship ( Collision, Grounding, Flooding, Main engine
failure, Steering gear failure, Black out, Tank explosion, Tank leakage (in double
bottoms, side spaces, cofferdams, etc)).
- Personal Accidents ( Man overboard, Rescue from enclosed
space).
- Unlawful Acts (Pirate attack).
- Emergency Assistance to Other Ships (Rescue at sea)..
- Cargo Related Accidents ( Hose burst or Cargo overflow, break
away from jetty during cargo transfer, Toxic liquid release at sea or at anchor, Toxic
liquid release at terminal, Cargo jettisoning, Gas release at sea or at anchor, Gas
release at terminal).
- Pollution (Bunker spills, Sea pollution).
- Terrorist boarding
- Loosing of ship’s stability
- Bad weather ( heavy gale, icing).
Fire/Explosion can arise due to failure or faulty operation of equipment, by
self-ignition caused by carelessness with open fire or smoking in the bunk.
Collision can be caused by failure of machinery or rudder, insufficient
watchkeeping or navigation faults.
Grounding or stranding, like collision can be caused by navigation faults,
failure of machinery or rudder, bad weather or the ship’s anchors dragging.
Leakage occurs, when the ship’s hull, deck or hatches are damaged.
Icing can be dangerous for smaller vessel. It reduce the stability of the vessel,
possibly resulting in capsizing.
Man over board : to rescue a person fallen overboard safely on board again,
a last and efficient action is required by the crew.
All the above emergencies present danger to human lives, most of them
eventually can lead to the abandoning and loss of the ship.
A happy ending of an emergency implies that you must perform your duties
with responsibility and care.
The life saving equipment must be ready to use at any time.
There are some situations when the life saving equipment as life boats or fast
rescue boats must be lowered at sea: abandon ship, man over board, towing and
rescue the survival craft from a sea or/and from a ship’s wreck.
On different emergency situations may appear difficulties to abandon ship,
as blocking of evacuation ways, impossibility to lowering of boats or rafts (excessive
list of the ship, damages, failures, etc), lack of lighting, lack of the crew members
with duties regarding boats/ rafts launching, very bad weather, etc.
In case of fire is safe to launch only a part of survival boats/rafts, for being
on “stand by”, while the fighting against fire must be continued.
1-2
2
PROFICIENCY IN SURVIVAL CRAFT AND RESCUE BOATS OTHER THAN FAST
RESCUE BOATS
2.1.2 Emergency signals and public address system
The general emergency alarm system is capable of sounding the
general alarm signal consisting of seven or more short blasts followed by one long
blast on the vessel's whistle or siren and additionally on an electrically operated bell
or klaxon or other equivalent warning system which shall be powered by means of
two circuits, one from the ship's main supply and the other from the emergency
source of electrical power.
The general emergency alarm system is to be supplemented by either a public
address system or other suitable means of communication.
The entertainment sound system is to be automatically turned off when the
general alarm system is activated.
The system is to be continuously powered and is to have an automatic
change-over to a standby power supply in case of loss of the normal power supply.
An alarm is to be given in the event of failure of the normal power supply.
The system is to be capable of operation from the navigation bridge and,
except for the ship's whistle, also from other strategic points.
The alarm system is to be audible throughout all the accommodation and
normal crew working spaces and on all open decks.
The minimum sound pressure level for the emergency alarm tone in interior and
exterior spaces is to be 80 dB (A) and at least 10 dB (A) above ambient noise levels
existing during normal equipment operation with the ship underway in moderate
weather.
Every day the test of General emergency system and Public address system
must be done and the note must be inserted into the Log Book.
The public address system is to be one complete system consisting of a
loudspeaker installation which enables simultaneous broadcast of messages from
the navigation bridge, and at least one other location on board for use when the
navigation bridge has been rendered unavailable due to the emergency, to all
spaces where crew members or passengers, or both, are normally present
(accommodation and service spaces and control stations and open decks), and to
assembly stations (i.e. muster stations).
In spaces such as under deck passageways, busun's locker, hospital and pump
room, the public address system is/may not be required.
The public address system is to be arranged to operate on the main source of
electrical power, the emergency source of electrical power and transitional sources
of electrical power.
The controls of the system on the navigation bridge are to be capable of
interrupting any broadcast on the system from any other location on board.
The system is to be arranged to minimise the effect of a single failure so that
the emergency messages are still audible (above ambient noise levels) also in the
event of failure of any one circuit or component.
The combined General emergency alarm - Public address system: where the
public address system is the only means for sounding the general emergency alarm
signal and the fire alarm, the following are to be satisfied:
1-2
3
PROFICIENCY IN SURVIVAL CRAFT AND RESCUE BOATS OTHER THAN FAST
RESCUE BOATS
•
•
•
the system automatically overrides any other input system when an
emergency alarm is required.
the system automatically overrides any volume control provided to give the
required output for the emergency mode when an emergency alarm is
required.
the system is arranged to minimize the effect of a single failure so that the
alarm signal is still audible (above ambient noise levels) also in the event of
failure of any one circuit or component, by means of the use of more than one
device for generating an electronic sound signal.
Fig.2.1 Public Address System and General alarm panel
EMERGENCY SIGNALS
EMERGENCY SIGNAL = continuous blast of the whistle for a period of not less
than 10 seconds, supplemented by the continuous ringing of the general alarm bells
for not less than 10 seconds.
ABANDON SHIP SIGNAL = a succession of seven or more short blasts followed by
one long blast of the whistle supplemented by a comparable signal on the general
alarm bells.
ABANDON signal MUST always be confirmed by word from the Master.
HANDLING THE LIFEBOATS:
- To lower lifeboats, one short blast.
- To stop lowering the lifeboats, two short blasts.
- Dismissal from boat station, three short blast
The emergency signals from the alarm bells could be verbally confirmed by the
duty officer using the amplifier station/public address system.
The signals should be repeated few times, with a long enough pause in
between in order not to create confusion.
1-2
4
PROFICIENCY IN SURVIVAL CRAFT AND RESCUE BOATS OTHER THAN FAST
RESCUE BOATS
2.1.3 Muster List
Regulation 37 (1974, SOLASConvention): Muster list and emergency instructions
In order to cope an emergency situation in the best way it is necessary having
planned ahead. The plan are called the Muster List and all vessels shall be
provided with this clear instructions for each crew member, which shall be followed
in case of emergency.
The muster list shall be posted up in several parts of the vessel and, in
particular, in the wheelhouse, the engine room and in the crew accommodation and
shall include the information specified in the following paragraphs.
The muster list shall specify details of the general alarm signal and also the
action to be taken by the crew when this alarm is sounded.
The muster list shall also specify how the order to abandon ship will be given.
The muster list shall show the duties assigned to the different members of the
crew including:
a) closing of watertight doors, fire doors, valves, scuppers, overboard
shoots, side scuttles, skylights, portholes and other similar openings in the vessel;
b) equipping the survival craft and other life-saving appliances;
c) preparation and launching of survival craft;
d) general preparation of other life-saving appliances;
e) use of communication equipment; and
f ) manning of fire parties assigned to deal with fires.
g) muster of passengers
h) use of communication equipment
i) special duties assigned in respect of the use of fire-fighting
equipment and installations.
The muster list shall specify which officers are assigned to ensure that the lifesaving and fire appliances are maintained in good condition and are ready for
immediate use.
The muster list shall specify substitutes for key persons who may become
disabled, taking into account that different emergencies may call for different actions.
The muster list shall be prepared before the vessel proceeds to sea. After the
muster list has been prepared, if any change takes place in the crew, which
necessitates an alteration in the muster list, the skipper shall either revise the list or
prepare a new list.
The master shall ensure that:
- copies of the muster list are exhibited in conspicuous places
throughout the ship including the navigating bridge, engine-room and crew
accommodation spaces;
- clear instructions to be followed in the event of an emergency are
provided for every person on board; and
- illustrations and instructions in English and in any other appropriate
language are posted in passenger cabins and conspicuously displayed at muster
stations and other passenger spaces to inform passengers of:
- their muster stations;
- the essential action they must take in an emergency;
- the method of donning life-jackets.
The muster list shall show the duties assigned to members of the crew
in relation to passengers in case of emergency, these duties shall include:
1-2
5
PROFICIENCY IN SURVIVAL CRAFT AND RESCUE BOATS OTHER THAN FAST
RESCUE BOATS
- warning the passengers;
- seeing that they are suitably clad and have donned their
life-jackets correctly;
- assembling passengers at muster stations;
- keeping order in the passageways and on the stairways and
generally controlling the movements of the passengers.
- ensuring that a supply of blankets is taken to the survival craft.
1-2
6
PROFICIENCY IN SURVIVAL CRAFT AND RESCUE BOATS OTHER THAN FAST
RESCUE BOATS
Live Saving Appliance I.M.O. Signs
Recommended symbol indicating the location of emergency equipment
and muster and embarkation stations
Lifeboat
Rescue boat
Life raft
Davit launches life
raft
Embarkation
ladder
Evacuation slide
Lifebuoy
Lifebuoy with line
Lifebuoy with light
Lifebuoy with light
and smoke
Lifejacket
Child's lifejacket
Immersion suit
Survival craft
portable radio
EPIRB
Survival craft pyrotechnic
distress signals
Line-throwing
appliance
Radar transponder
Fasten seat
belts
Secure hatches
Lower rescue Start water spray
boat to water a
Start engine
Start air supply
Muster station
Lower liferaft
to water
Release gripes
Fig.2.2 I.M.O. signs regarding life saving appliances
1-2
7
PROFICIENCY IN SURVIVAL CRAFT AND RESCUE BOATS OTHER THAN FAST
RESCUE BOATS
2.2 Training, drills and operational readiness
2.2.1 On board training and instructions
Onboard training in the use of the vessel’s lifesaving appliances, including
survival craft equipment, should be given as soon as possible but not later than 2
weeks after a crew member joins the vessel. However, if the crew member is on a
regularly scheduled rotating assignment to the vessel, such training should be given
not later than 2 weeks after the time of first joining the vessel.
Instructions in the use of the vessel's lifesaving appliances and in survival at
sea should be given at the same intervals as the drills. Individual instruction may
cover different parts of the vessel's lifesaving system, but all the vessel's lifesaving
equipment and appliances should be covered within any period of 2 months.
Each member of the crew should be given instructions which should include but not
necessarily be limited to:
operation and use of the vessel's inflatable life rafts, including
precautions concerning nailed shoes and other sharp objects;
problems of hypothermia, first aid treatment for hypothermia and
other appropriate first aid procedures;
special instructions necessary for use of the vessel's lifesaving
appliances in severe weather and severe sea conditions.
Onboard training in the use of davit launched life rafts should take place at
intervals of not more than 4 months on every vessel fitted with such appliances.
Whenever practicable this should include the inflation and lowering of a life raft.
This life raft may be a special life raft intended for training purposes only, which is
not part of the vessel's lifesaving equipment; such a special life raft should be
conspicuously marked.
Regulation 19 (1974, SOLAS Convention): Emergency training and drills
19.1
: This regulation applies to all ships.
19.2
: Familiarity with safety installations and practice musters
19.2.1 : Every crew member with assigned emergency duties shall be
familiar with these duties before the voyage begins.
19.2.2 : On a ship engaged on a voyage where passengers are
scheduled to be on board for more than 24 hours, musters of the passengers shall
take place within 24 hours after their embarkation. Passengers shall be instructed in
the use of the lifejackets and the action to take in an emergency.
19.3
: Drills
19.3.1 : Drills shall, as far as practicable, be conducted as if there were
an actual emergency.
19.3.2 : Every crew member shall participate in at least one abandon
ship drill and one fire drill every month. The drills of the crew shall take place within
24 h of the ship leaving a port if more than 25 % of the crew have not participate in
1-2
8
PROFICIENCY IN SURVIVAL CRAFT AND RESCUE BOATS OTHER THAN FAST
RESCUE BOATS
abandon ship and fire drills on board that particular ship in the previous month.
When a ship enters service for the first time, after
modification of a major character or when a new crew is engaged, these
drills shall be held before sailing. The Administration may accept other
arrangements hat are at least equivalent for those classes of ships for which this is
impracticable.
19.3.3 : Abandon ship drill
Each abandon ship drill shall include:
* summoning of passengers and crew to muster stations with the
alarm followed by drill announcement on the public address or other communication
system and ensuring that they are made aware of the order to abandon ship;
* reporting to stations and preparing for the duties described i
the muster list;
* checking that passengers and crew are suitably dressed;
* checking that lifejackets are correctly donned;
* lowering of at least one lifeboat after any necessary
preparation for launching;
* starting and operating the lifeboat engine;
* operation of davits used for launching liferafts;
* a mock search and rescue of passengers trapped in their
state rooms;
* instructions in the use of radio life-saving appliances.
19.3.4 Fire drills
Each fire drill shall include:
* reporting to stations and preparing for the duties described in
the muster list ;
* starting of a fire pump, using at least the two required jets of
water to show that the system is in proper working order;
* checking of fireman's outfit and other personal rescue equipment;
* checking of relevant communication equipment;
* checking the operation of watertight doors, fire doors, fire
dampers and main inlets and outlets of ventilation systems in the
drill area;
* checking the necessary arrangements for subsequent abandoning
of the ship.
The equipment used during drills shall immediately be brought back
to its fully operational condition and any faults and defects discovered
during the drills shall be remedied as soon as possible.
19.4 Records
The date when musters are held, details of abandon ship drills and fire drills,
drills of other life-saving appliances and on-board training should be recorded in
such logbook as may be prescribed by the competent authority.
1-2
9
PROFICIENCY IN SURVIVAL CRAFT AND RESCUE BOATS OTHER THAN FAST
RESCUE BOATS
If a full muster, drill or training session is not held at the appointed time, an entry
should be made in the logbook stating the circumstances and the extent of the
muster, drill or training session held.
Regulations 20 (1974, SOLAS Convention): Operational readiness, maintenance
and inspections
20.1 This regulation applies to all ships
20.2 Operational readiness
Before the ship leaves port and at all times during the voyage, all life-saving
appliances shall be in working order and ready for immediate use.
20.3 Maintenance
Instructions for on-board maintenance of life-saving appliances
complying with the requirements of regulation 36 shall be provided and
maintenance shall be carried out accordingly.
The Administration may accept, in lieu of the instructions required by above
paragraph, a shipboard planned maintenance programme which
includes the requirements of the Training Manual.
20.4 Maintenance of falls
Falls used in launching shall be turned end for end at intervals of not more
than 30 months and be renewed when necessary due to deterioration of the falls or
at intervals of not more than five years, whichever is the earlier.
The Administration may accept in lieu of the "end for ending" required in
above paragraph, periodic inspection of the falls and their renewal whenever
necessary due to deterioration or at intervals of not more than four years, whichever
one is earlier.
20.5 Spares and repair equipment
Spares and repair equipment shall be provided for life-saving appliances
and their components which are subject to excessive wear or consumption and need
to be replaced regularly.
20.6 Weekly inspection
All survival craft, rescue boats and launching appliances shall be
visually inspected to ensure that they are ready for use.
All engines in lifeboats and rescue boats shall be run for a total
period of not less than 3 min provided the ambient temperature is above the
minimum temperature required for starting and running the engine. During this
period of time, it should be demonstrated that the gear box and gear box train are
engaging satisfactorily. If the special characteristics of an outboard motor
1-2
10
PROFICIENCY IN SURVIVAL CRAFT AND RESCUE BOATS OTHER THAN FAST
RESCUE BOATS
fitted to a rescue boat would not allow it to be run other than with its propeller
submerged for a period of 3 min, it should be run for such period as prescribed in the
manufacturer's handbook.
The general emergency alarm system shall be tested.
20.7 Monthly inspections
Inspection of the life-saving appliances, including lifeboat equipment, shall
be carried out monthly using the checklist required by the Training Manual to ensure
that they are complete and in good order. A report of the inspection shall be entered
in the log-book.
20.8 Servicing of inflatable liferafts, inflatable lifejackets, marine
evacuation systems, and inflated rescue boats
Every inflatable liferaft, inflatable lifejacket, and marine evacuation
system shall be serviced:
- at intervals not exceeding 12 months, provided where in any case
this is impracticable, the Administration may extend this period to 17 months.
- at an approved servicing station which is competent to service
them, maintains proper servicing facilities and uses only properly
trained personnel.
20.9 Periodic servicing of hydrostatic release
Every hydrostatic release shall be serviced:
- at intervals not exceeding 12 months. The Administration may
extend this period to 17 months, in cases where if appears proper and reasonable.
- at a servicing station which is competent to service it, maintains
proper servicing facilities and uses only properly trained personnel.
Regulation 36 ( 1974, SOLAS Convention): Instructions for on-board maintenance
Instructions for on-board maintenance of life-saving appliances shall be
easily understood, illustrated wherever possible, and, as appropriate, shall include
the following for each appliance:
* a check list for use when carrying out the inspections
required by Regulations;
* maintenance and repair instructions;
* schedule of periodic maintenance;
* diagram of lubrication points with recommended lubricants;
* list of replaceable parts;
* list of sources of spare parts;
* log for record of inspection and maintenance.
1-2
11
PROFICIENCY IN SURVIVAL CRAFT AND RESCUE BOATS OTHER THAN FAST
RESCUE BOATS
2.2.2 Training manual
Regulation 35 (1974, SOLAS Convention) : Training manual and on-board training
aids
Each ship shall carry a training manual, which may comprise several
volumes, shall contain instructions and information, in easily understood terms
illustrated wherever possible, on the life-saving appliances provided in the ship and
on the best methods of survival.
Any part of such information may be provided in the form of audio visual aids
in lieu of the manual.
The following shall be explained in detail:
- donning of lifejackets, immersion suits, thermal protective aids,
anti-exposure suits;
- muster at the assigned stations;
- boarding, launching and clearing the survival craft and rescue
boats;
- method of launching from within the survival craft;
- release from launching appliances;
- methods and use of devices for protection in launching areas
where appropriate;
- illumination in launching areas;
- use of survival equipment;
- use of detection equipment;
- with the assistance of illustrations, the use of radio-saving
appliances;
- use of drogues;
- use of engine and accessories;
- recovery of survival craft and rescue boats including stowage and
securing;
- hazards of exposure and the need for warm clothing;
- best use of survival craft facilities in order to survive;
- methods of retrieval, including use of helicopter rescue gear
(slings, baskets, stretchers) and shore life-saving apparatus and ship’s line throwing
apparatus;
- all other functions contained in the muster list and emergency
instructions;
- instructions for emergency repair of the life-saving appliances.
2.3 Actions to be taken when called to survival craft stations
2.3.1 Definitions as per Life Saving Appliances Code (L.S.A. Code)
Regulation 3 (1974, SOLAS Convention ): Definitions
* Anti-exposure suit is a protective suit designed or use by rescue
boat crews and marine evacuation system parties.
* Certificated person is a person who holds a certificate of proficiency in
survival craft issued under the authority of, or recognized as valid by, the
1-2
12
PROFICIENCY IN SURVIVAL CRAFT AND RESCUE BOATS OTHER THAN FAST
RESCUE BOATS
Administration in accordance with the requirements of the International
Convention on Standards of Training, Certification and Watchkeeping for
Seafarers, in force; or a person who holds a certificate issued or recognized
by the Administration of a State not a Party to that Convention for the same
purpose as the convention certificate.
* Embarkation ladder is the ladder provided at survival craft embarkation
stations to permit safe access to survival craft after launching.
* Float-free launching is that method of launching a survival craft
whereby the craft is automatically released from a sinking ship and is ready
for use.
* Free-fall launching is that method of launching a survival craft whereby the
craft with its complement of persons and equipment on board is released and
allowed to fall into the sea without any restraining apparatus.
* Immersion suit is a protective suit which reduces he body heat loss of a
person wearing it in cold water.
* Inflatable appliance is an appliance which depends upon non-rigid, gas
filled chambers for buoyancy and which is normally kept uninflated until
ready for use.
* Inflated appliance is an appliance which depends upon non-rigid, gas filled
chambers for buoyancy and which is kept inflated and ready for use at all times.
* International Life-Saving Appliance (LSA) Code means the International
Life-Saving Appliance (LSA) Code adopted by the Maritime Safety Committee of the
Organization by resolution MSC.48(66).
* Launching appliance or arrangement is a means of transferring a survival
craft or rescue boat from its stowed position safely to the water.
* Marine evacuations system is an appliance for the rapid transfer of
persons from the embarkation deck of the ship to a floating survival craft.
* Rescue boat is a boat designed to rescue persons in distress and to
marshal survival craft.
* Survival craft is a craft capable of sustaining the lives of persons in
distress from the time of abandoning the ship.
* Thermal protective aid is a bag or suit made of waterproof material
with low thermal conductance.
2.3.2 Personal life-saving appliances
Chapter II (L.S.A.Code)
* Lifebuoys
- have an outer diameter of not more than 800 mm and an
inner diameter of not less than 400 mm;
- be capable of supporting not less than 14.5 kg of iron in fresh
water for a period of 24 h;
- have a mass of not less than 2.5 kg;
- not sustain burning or continue melting after being totally
enveloped in a fire for a period a 2 s;
- if it is intended to operate the quick-release arrangement provided
for the self-activated smoke signals and self-igniting lights, have a mass sufficient to
operate the quick-release arrangement;
1-2
13
PROFICIENCY IN SURVIVAL CRAFT AND RESCUE BOATS OTHER THAN FAST
RESCUE BOATS
- be fitted with a grabline not less than 9.5 mm in diameter and
not less than four times the outside diameter of the body of the buoy in length.
Fig.2.3 Life buoys and lifebuoy’s lights
Self-igniting lights of the lifebuoy shall:
- be such that they cannot be extinguished by water;
- be of white color and capable of either burning continuously with a
luminous intensity of not less than 2 cd in all directions of the upper hemisphere or
flashing (discharge flashing) at a rate of not less than 50 flashes and not more than
70 flashes per min with at least the corresponding effective luminous intensity;
- be provided with a source of energy capable of meeting the
requirement of previous paragraph for a period of at least 2 hours;
- be capable of withstanding the drop test into the water from the
height at which it is stowed above the waterline in the lightest seagoing condition or
30 m, whichever is the greater, without impairing either its operating capability or
that of its attached components.
Self-activating smoke signals shall:
- emit smoke of a highly visible color at a uniform rate for a period of
at least 15 min when floating in calm water;
- not ignite explosively or emit any flame during the entire smoke
emission time of the signal;
- not be swamped in a seaway;
- continue to emit smoke when fully submerged in water for a period
of at least 10 s;
- be capable of withstanding the drop test into the water from the
height at which it is stowed above the waterline in the lightest seagoing condition or
1-2
14
PROFICIENCY IN SURVIVAL CRAFT AND RESCUE BOATS OTHER THAN FAST
RESCUE BOATS
30 m, whichever is the greater, without impairing either its operating capability or
that of its attached components
Fig. 2.4 “Man over board “ smoke and lights buoy
* Lifejackets
- a lifejacket shall not sustain burning or continue melting after being
totally enveloped in a fire for a period of 2 s;
- after demonstration, all persons can correctly don it within a
period of 1 min without assistance;
- it is clearly capable of being worn in only one way or, as far as is
practicable cannot be donned incorrectly;
- it allows the wearer to jump from a height of at least 4.5 m into the
water without injury and without dislodging or damaging the lifejacket;
- lift the mouth of an exhausted or unconscious person not less than
120 mm clear of the water with the body inclined backwards at an angle of not less
than 20' from the vertical position;
- an adult lifejacket shall allow the person wearing it to swim a short
distance and to board a survival craft.
- a lifejacket shall have buoyancy which is not reduced by more than
5% after2 4 h submersion in fresh water.
Fig.2.5 Lifejacket and lifejacket light
1-2
15
PROFICIENCY IN SURVIVAL CRAFT AND RESCUE BOATS OTHER THAN FAST
RESCUE BOATS
Life-jacket light shall:
- have a luminous intensity of not less than 0.75 cd in all directions of
the upper hemisphere;
- have a source of energy capable of providing a luminous intensity
of 0.75 cd for a period of at least 8 hours;
- be visible over as great a segment of the upper hemisphere as is
practicable when attached to a lifejacket;
- be of white color.
If the light referred above is a flashing light it shall, in addition:
- be provided with a manually operated switch; and
- flash at a rate of not less than 50 flashes and not more than 70
flashes per min with an effective luminous intensity of at least 0.75 cd.
* Inflatable lifejackets
- a lifejacket which depends on inflation for buoyancy shall have not
less than two separate compartments and comply with the all requirements for
ordinary lifejacket, and shall:
- inflate automatically on immersion, be provided with a device to
permit inflation by a single manual motion and be capable of being inflated by
mouth;
- in the event of loss of buoyancy in any one compartment be
capable of complying with the all requirements for ordinary lifejacket;
- shall have buoyancy which is not reduced by more than 5% after
24h submersion in fresh water after inflation by means of the automatic mechanism.
Fig. 2.6 Inflatable lifejacket
* Immersion suits
- It can be unpacked and donned without assistance within 2 min, taking
into account any associated clothing and a lifejacket if the immersion suit is to be
worn in conjunction with a lifejacket;
1-2
16
PROFICIENCY IN SURVIVAL CRAFT AND RESCUE BOATS OTHER THAN FAST
RESCUE BOATS
- It will not sustain burning or continue melting after being totally
enveloped in a fire for a period of 2 s;
- It will cover the whole body with the exception of the face; hands shall
also be covered unless permanently attached gloves are provided;
- It is provided with arrangements to minimize or reduce free air
in the legs of the suit;
- Jump from a height of not less than 4.5 m into the water
with out damaging or dislodging the immersion suit or being injured;
- If the immersion suit is to be worn in conjunction with a lifejacket, the
lifejacket shall be worn over the immersion suit. A person wearing such an
immersion suit shall be able to don a lifejacket without assistance;
- An immersion suit made of material with inherent insulation,
when worn either on its own or with a lifejacket if the immersion suit is to be worn in
conjunction with a lifejacket, shall provide the wearer with sufficient thermal
insulation, following one jump into the water from a height of 4.5 m, to ensure that
the wearer's body core temperature does not fall more than 2'C after a period of 6 h
immersion in calm circulating water at a temperature of between 0"C and 2'C.
Fig. 2.7 Immersion suits
* Anti-exposure suits
- Is made of material which reduces the risk of heat stress
during rescue and evacuation operations;
- Can be unpacked and donned without assistance within 2 minutes;
- Does not sustain burning or continue melting after being
totally enveloped in a fire for a period of 2 s;
- Has a lateral field of vision of at least 120˚;
- Provides inherent buoyancy of at least 70 N;
1-2
17
PROFICIENCY IN SURVIVAL CRAFT AND RESCUE BOATS OTHER THAN FAST
RESCUE BOATS
Shall permit the person wearing it to:
- Climb up and down a vertical ladder of at least 5 m in length;
- Swim through the water at least 25 m and board a survival
craft;
- Jump from a height of not less than 4.5 m into the water with
feet first, without damaging or dislodging the suit, or being injured;
- Perform all duties associated with abandonment, assist others
and operate a rescue boat.
- Able to turn from a face-down to a face-up position in not more than 5
seconds and shall be stable face-up. The suit shall have no tendency to turn the
wearer face-down in moderate sea conditions.
Fig. 2.8 Anti-exposure suit
* Thermal protective aids
- Cover the whole body of persons of all sizes wearing a life jacket
with the exception of the face. Hands shall also be covered unless permanently
attached gloves are provided;
- Be capable of being unpacked and easily donned without
assistance in a survival craft or rescue boat;
- Permit the wearer to remove it in the water in not more than
2 min, if it impairs ability to swim;
- The thermal protective aid shall function properly throughout an air
temperature range -30˚C to +20˚C.
1-2
18
PROFICIENCY IN SURVIVAL CRAFT AND RESCUE BOATS OTHER THAN FAST
RESCUE BOATS
Fig. 2.9 Thermal protective aid
2.3.3 Personal preparation for abandoning ship
Being properly prepared is the best way to ensure survival at sea. Since it is
somewhat impractical to actually sink a ship for practice, the alternative is training.
Crew members and research personnel should be thoroughly trained in all
aspects of survival techniques from the Muster list to launching lifeboats.
You should participate in the weekly emergency drills as if they were the real thing.
Report to stations fully clothed, wear shoes, put on your lifejacket, and bring your
immersion suit. In an actual emergency, you may not have time to go back to your
quarters.
When the command "Prepare to Abandon Ship" is passed, along with the
appropriate emergency signal, the crew instantly begins a planned series of actions
similar to the following scenario:
- Muster at your assigned station; provide all equipment to the scene as
assigned on the Station Bill; come to your station fully clothed with your lifejacket on
and carrying your immersion suit.
If there is sufficient time before the actual evolution begins, don your immersion suit
first and keep your lifejacket handy. The suit provides flotation and protects you from
the elements.
- Prepare all survival craft for immediate launching. Swing out lifeboats or
prepare life rafts according to standard procedures. DO NOT LAUNCH any
equipment until instructed to do so by the Master. Stand by calmly at your station
and await further orders.
- When the Master orders "Abandon Ship," launch all survival craft. Enter
boats and rafts using ladders rather than jumping over the side. Keep calm and
organized.
- Once boarded, all rafts or boats are tethered and towed away from the
ship by a motor lifeboat or the rescue boat. Keep all craft together in the vicinity of
the ship's last position.
- While waiting for rescue units to arrive, maintain a continuous visual and
radio communication watch. Your lifeboat or life raft is well-stocked with equipment
1-2
19
PROFICIENCY IN SURVIVAL CRAFT AND RESCUE BOATS OTHER THAN FAST
RESCUE BOATS
and provisions to sustain life comfortably. Use the supplies in the survival craft with
care-they may have to last a while.
2.3.4 Crew duties to passengers & launching survival craft
- summoning of passengers to muster stations with the alarm required
announcement on the public address or other communication system and ensuring
that they are made aware of the order to abandon ship;
- reporting to stations and preparing for the duties described in the muster
list;
- checking that passengers are suitably dressed;
- checking that lifejackets are correctly donned;
- lowering survival craft after any necessary preparation for launching;
- starting and operating the lifeboat engine;
- a search and rescue of passengers trapped in their staterooms.
Preparation and handling of survival craft at any one launching station shall
not interfere with the prompt preparation and handling of any other survival craft or
rescue boat at any other station.
During preparation and launching, each survival craft, its launching
appliance, and the area of water into which it is to be launched shall be adequately
illuminated by lighting supplied from the emergency source of electrical power.
2.3.5 Lowered of survival craft at embarkation deck or sea level and deployed
of the marine evacuation system
The order to lowering of survival craft or to deploy the marine evacuation
system will be done ONLY by master or his deputy.
2.3.6 Radio equipment and other aids to attract attention
As per muster list duties, the radio equipment as two way VHF
radiotelephone apparatus, Search and Rescue Transponder (SART), Emergency
Position Indicating Radiobeacon (EPIRB), pyrotechnics, torch, whistle, orange cover
or canopy, daylight signalling mirror, must be taken into the survival craft.
1-2
20
PROFICIENCY IN SURVIVAL CRAFT AND RESCUE BOATS OTHER THAN
FAST RESCUE BOATS
3. Abandon ship
NO SHIP IS ABANDONED EXCEPT BY ORDER OF THE MASTER
The order “ABANDON SHIP” will be done ONLY by master or his deputy
and ABANDON signal MUST always be confirmed by word from the Master
3.1 Actions to be taken when required to abandon ship
It cannot be overstressed that the order to abandon ship is the final
decision to be taken by the Master when, according to his judgment, there is no
other way to save the lives the of passengers and the crew.
Hasting to abandon ship is not recommended because in most emergency
cases the ship remains the safest place to be on and people have often drowned
after abandoning a ship that eventually did not sink.
3.1.1 Additional items which can be carry in the life boat
If it is obvious that the ship is in great danger of sinking, but that there is still
a little time in hand before it will become necessary to abandon ship, a coxswain
would do well to have some extra gear put in the boat, always remembering that
more extra gear put in the boat, the less room will be available for survivors.
A suitable collection of extra gear might be summed up as follows:
- as many blankets as possible
- tinned milk
- milk tablets
- biscuits
- fruits
- torches, batteries and bulbs
- recipients with drinking water and provisions
- extra fuel and lubricants
- medicines and sanitary items
- binoculars and a sextant
- small radio receiver
- the ship’s pyrotechnics if unused
- ship’s flag and signaling flag
- ship’s radio equipment as portable VHF
- individual documents of embarked personnel
3
1
PROFICIENCY IN SURVIVAL CRAFT AND RESCUE BOATS OTHER THAN
FAST RESCUE BOATS
3.1.2 Abandon ship – immediate action
- Sound the general emergency signal and make announcements
instructing all personnel to proceed to their lifeboat muster stations;
- Initiate vessel shutdown procedures;
- Send a «Mayday» signal with the vessel’s position on 2182 KHz
and VHF channel 16 (156.8 KHz) and INMARSAT (where applicable);
- Collect, secure ship log books and documents and ensure that
there are safely transferred in the boats;
- Ensure that the two on board SART’s and EPIRB are carried to
the muster stations;
- Carry out a muster of personnel against the lifeboat checklist
reporting the names of any missing personnel to the bridge;
- Give the final order to embark all personnel into the lifeboat and to
abandon ship;
- Prepare the lifeboat and then lower it to the embarkation position;
- Vacate the bridge and board the lifeboat;
- When ordered by the Master, embark the lifeboat;
- Immediately after the lifeboat is waterborne, and everybody has
embarked, move away from the vessel.
3.1.3 Manning of survival craft and supervision
Regulation 10 (1974, SOLAS Convention)
There shall be a sufficient number of trained persons on board for
mustering and assisting untrained persons.
There shall be a sufficient number of crew members, who may be
deck officers or certificated persons, on board for operating the survival craft
and launching arrangements required for abandonment by the total number
of persons on board.
A deck officer or certificated person shall be placed in charge of each
survival craft to be used. However, the Administration, having due regard to
the nature of the voyage, the number of persons on board and the
characteristics of the ship, may permit persons practised in the handling and
operation of liferafts to be placed in charge of liferafts in lieu of persons
qualified as above.
A second-in-command shall also be nominated in the case of lifeboats.
The person in charge of the survival craft shall have a list of the
survival craft crew and shall see that the crew under his command are
acquainted with their duties. In lifeboats the second-in-command shall also
have a list of the lifeboat crew.
Every motorized survival craft shall have a person assigned who is
capable of operating the engine and carrying out minor adjustments.
3
2
PROFICIENCY IN SURVIVAL CRAFT AND RESCUE BOATS OTHER THAN
FAST RESCUE BOATS
3.1.4 Launching procedure of open lifeboat
3
3
PROFICIENCY IN SURVIVAL CRAFT AND RESCUE BOATS OTHER THAN
FAST RESCUE BOATS
Fig. 3.1 Launching steps of open life boat
3
4
PROFICIENCY IN SURVIVAL CRAFT AND RESCUE BOATS OTHER THAN
FAST RESCUE BOATS
3.1.5 Launching procedure of enclosed lifeboat
3
5
PROFICIENCY IN SURVIVAL CRAFT AND RESCUE BOATS OTHER THAN
FAST RESCUE BOATS
3
6
PROFICIENCY IN SURVIVAL CRAFT AND RESCUE BOATS OTHER THAN
FAST RESCUE BOATS
Fig.3.2 Launching steps of enclosed lifeboat
3
7
PROFICIENCY IN SURVIVAL CRAFT AND RESCUE BOATS OTHER THAN
FAST RESCUE BOATS
3.1.6 Launching procedure of the inflatable liferaft
The web straps securing the raft in its stowage cradle should be released
by slipping the manually operated senhouse slip positioned above the float-free
arrangement. The liferaft container should then be manhandled to the launching
position at the ship’s side. If ship’s guard are in position, these should be
removed to facilitate an easier launching.
The painter line from the liferaft should be secured to a strong point aboard
the vessel. Where a hydrostatic release unit is featured, the painter and the “ D”
ring should be inspected to ensure that they are well fast.
Pull out a limited amount of the painter line from the container, and check
that water surface is clear of other survivors or debrits. Throw the liferaft in its
container, over the side into clear water. Inflation will be caused by a sharp ”tug”
on the painter once it is fully extended. The action of pulling sharply on the
painter line will cause the CO2 gas bottle to be fired, so inflating the liferaft.
Abandon ship by means of a throw overboard inflatable liferaft
- Check that the painter is well secured to a strong point;
- Check that all is clear overside. Let go lashing and take the raft to the
ship’s side, remove a portable rail if necessary;
- Launch the liferaft overboard in its container;
- Pull the remainder of the painter out of the floating container and tug it
hard to fire the gas bottle;
- The liferaft will take 20 to 30 seconds to inflate;
- Board the liferaft from a side ladder, a rope or from sea;
- Jettison all shoes and sharp objects ( rings, diamond, brooches, etc.)
- When everyone is aboard, cut the painter with the safety knife;
- In cold weather inflate the double floor;
- Ventilate the raft well before closing entrances. Stream the seaanchor;
- Endeavour to remain in the vicinity with the other rafts and boats.
3
8
PROFICIENCY IN SURVIVAL CRAFT AND RESCUE BOATS OTHER THAN
FAST RESCUE BOATS
Fig.3.3 Steps of automatic release of liferaft
3
9
PROFICIENCY IN SURVIVAL CRAFT AND RESCUE BOATS OTHER THAN
FAST RESCUE BOATS
Fig.3.4 Steps of manual release of liferaft
Fig. 3.5 Boarding of liferaft
Embarkation into inflatable liferafts:
- Climb down the ship or installation side to the vicinity of the liferaft.
- Step directly into the entrance of the raft if you are within about 2
meters range.
3
10
PROFICIENCY IN SURVIVAL CRAFT AND RESCUE BOATS OTHER THAN
FAST RESCUE BOATS
- Do not attempt to jump into the liferaft from any greater height than
this or you will probably injure yourself on the buoyancy ring chambers
of the liferaft.
- Failing this, you could cause damage to the floor or canopy of the raft
with the fabric tearing away from the buoyancy support.
- Once inside the liferaft, clear away from entrances and carry out full
survival procedures.
- You don't want to be wet and freezing if you can just as easily be dry
and freezing. If there is no means of climbing down and you must jump, do not
jump into the raft.
- Do not jump into the water unless it is essential;
- Use an overside ledder or, if unavoidable, never jump from higher
than 6meters (20 feet) into the water.
- If it is necessary to enter the water, choose a suitable place from
which to leave the ship.
Fig. 3.6 Clear the ship
3
11
PROFICIENCY IN SURVIVAL CRAFT AND RESCUE BOATS OTHER THAN
FAST RESCUE BOATS
Fig. 3.7 Use of sea anchor
Fig. 3.8 Closing the entrance
3.1.7 Points to bear in mind before jumping overboard
a) Have your life jacket securely tied on and hold it down by crossing the
arms over the chest; blocking off the nose and mouth with one hand.
b) Keep your feet together, check that it is all clear below; look straight
ahead; jump feet first.
c) Do not look down when jumping as it makes you unstable and likely to
fall forward.
3
12
PROFICIENCY IN SURVIVAL CRAFT AND RESCUE BOATS OTHER THAN
FAST RESCUE BOATS
d) Wearing a lifejacket and possibly an immersion suit or thermal
protective aid and certainly wearing heavy clothing. It may be easier when
swimming to a survival craft, to swim on your back. Do not swim or tread water
unnecessarily; It wastes valuable body heat and energy.
Stay out of the water as long as possible! Try to minimize the shock of sudden cold
immersion. A sudden plunge into cold water can cause rapid death, or an uncontrollable
rise in breathing rate may result in an intake of water into the lungs.
If jumping into the water is unavoidable, you should try to keep your elbows to
your side and cover your nose and mouth with one hand while holding the wrist or elbow
firmly with the other hand. Avoid jumping onto the liferaft canopy or
jumping into the water astern of a liferaft, in case the ship has some remaining
headway
Jumping into the raft will likely break either one or both of your legs, or
break the legs or other vital body parts of those already in the raft. If you have to
jump, aim for the water - better to be wet and freezing than unable to swim or
walk.
3.1.8 Importance to keep dry when boarding survival craft
In a survival craft wearing clothes that are wet with salt water, you will be
much more prone to the debilitating effects of salt water boils and bed sores, all
of which will quickly turn into open wounds.
Woollen clothing next to the skin will aggravate the condition. While wool is
probably the best type of warm clothing you can wear.
A long sleeved cotton shirt and cotton underpants next to the skin will
reduce the aggravation.
Do not urinate in your clothes, it will quickly cause a most painful nappy
rash.
Provided you have been castaway in a temperate zone and encounter a
heavy rainstorm and you are not suffering badly from hypothermia.
Undress, wash the salt and sweat from your body and the salt out of your
clothing.
Having wrung out your clothing, put it on again.
Clean wet clothes and a clean body will be far more comfortable than dry
salt laden clothes and body heat will dry your clothes.
Unfortunately, sitting for long periods in a survival craft is bound to cause
the formation of bed sores on the back, buttocks and heels, the presence of salt
in your clothes adds to the inflammation and increases the resulting pain.
If your clothing is wet, remove it, wring it out as dry as possible and put it
back on.
In general, clothing should be shared among survivors, but take special
care of the sick and injured. Waterproof or windproof clothing should be made
available to those on lookout duty in the open.
3.1.9 Life boat in-board engine
3
13
PROFICIENCY IN SURVIVAL CRAFT AND RESCUE BOATS OTHER THAN
FAST RESCUE BOATS
- Every lifeboat shall be powered by a compression ignition engine. No
engine shall be used for any lifeboat if its fuel has a flashpoint of 43˚C (109˚F) or
less (closed cup test).
- The engine shall be provided with either a manual starting system or a
power starting system with two independent rechargeable energy sources.
- The engine starting system and starting aids shall start the engine at
an ambient temperature of -15˚C (+5˚F) within 2 minutes of commencing the start
procedure.
- The engine shall be capable of operating for not less than 5 minutes
after starting from cold with the life boat out of the water.
- The engine shall be capable of operating when the lifeboat is flooded
up to the centreline of the crankshaft.
- The lifeboat engine, transmission and engine accessories shall be
enclosed in a fire-retarding casing or other suitable arrangements providing
similar protection.
- The lifeboat engine and accessories shall be designed to limit electromagnetic emissions so that engine operation does not interfere with the
operation of radio equipment used in the lifeboat.
- Water resistant instructions for starting and operating the engine shall
be provided and mounted in a conspicuous place near the engine starting
controls.
- The exhaust pipe shall be arranged as to prevent water from entering
the engine in normal operation.
- The engine are to be test run once a week.
- The speed of a life boat when proceeding ahead in calm water when
loaded with its full complement of persons and equipment, shall be at least 6
knots and at least 2 knots when towing a 25 person liferaft loaded with its full
complement of persons and equipment.
- Sufficient fuel shall be provided to run the fully loaded lifeboat at 6
knots for a period of not less than 24 hours.
3
14
PROFICIENCY IN SURVIVAL CRAFT AND RESCUE BOATS OTHER THAN
FAST RESCUE BOATS
Fig.3.9 Lifeboat in-board engine
3.1.9 Lifeboat out-board engine
- Where an outboard motor has been fitted, the boat must be equipped
with a dry powder fire extinguisher suitable for oil fires and a set of tools and
spares.
- The motor shall be permanently attached to the boats they are
intended to propel.
- Portable engine will have securing lines in the bow of the boat for
securing the fuel tank. There shall be a means of ensuring that fuel cannot
escape when fuel pipes are disconnected.
- Outboard motor must never de laid horizontally and if unshipped, must
be stowed upright in a rack. Cases have occurred when outboard motors have
been laid horizontally, of sea water getting into the engine and causing corrosion
which has put the engine completely out of service.
- Out board engine are to be test run once a week.
Fig.3.10 Lifeboat
out- board engines
3.2 Actions to
3
15
PROFICIENCY IN SURVIVAL CRAFT AND RESCUE BOATS OTHER THAN
FAST RESCUE BOATS
be taken when in the water
If go into the water, never go in without a lifejacket, and an immersion suit
or thermal aid.
However, warm clothing will trap air and air provides warmth.
You cannot swim far in heavy clothing, neither can you swim far in a
lifejacket.
Do not try to swim unnecessarily, it uses vital energy and assists
hypothermia to set in.
Try and take something buoyant with you into the water to assist you to
keep afloat.
If you are only scantily clothed, you will certainly die of exposure either in or
out of the water.
Wet clothing is far better than no clothing.
In cold weather is a survival craft, remove and wring out the top layer of wet
clothing and put it on again as quickly as possible.
If you have to go into the water from a survival craft, perhaps to help rescue
another survivor.
Be sure to take a line with you. A survival craft will drift far faster than you
can swim, without a line to help you to get back to the survival craft, you may well
find yourself unable to get back to safety.
Survivors in the water should hang onto lifeboats, liferafts, and buoyant
apparatus by putting their arms through the loops of the lifelines, rather than hold
onto them, for the hands get numb and let go.
- Avoid staying in the water for one second longer than you need to.
Body heat will be lost to the surrounding water more rapidly than it can be
generated. This leads to hypothermia (cold exposure), unconsciousness and
death.
- Wearing extra clothing will help delay the start of hypothermia.
Get into the liferaft as soon as possible.
- When you are in the water, whether or not you are in a liferaft, try to
stay near the boat. It may not sink and you may be able to re-board. If it stays
afloat, searches will be able to spot it more easily than they can spot you. Staying
close to the boat also keeps you closest to the position reported in your distress
call.
- If you cannot get into a liferaft, do not swim aimlessly; swimming
increases heat loss. Remain as still as possible using flotation to keep you high
in the water. Heat loss occurs much faster in water than in air, so the more of
your body you can keep out of the water the better.
- Now is the time to inflate the external bladder on your exposure suit by
means of the mouth tube. You may be able to get on top of floating debris (a
lifebuoy, a board, even a dead body) to help keep you out of the water.
- If you don't have an exposure suit, use the H.E.L.P. (heat escape
lessening posture) technique. If your exposure suit of PFD has a whistle
attached, use it to attract attention.
3
16
PROFICIENCY IN SURVIVAL CRAFT AND RESCUE BOATS OTHER THAN
FAST RESCUE BOATS
- You may not be visible, but using the whistle will enable you to let
others know where you are. If you have taken the time to prepare a personal
survival kit, you may have other signaling devices that will boost your chances of
rescue. Use them wisely.
- If possible, form a group with other survivors in the water. There is
safety in numbers, and a group is more easily located and more likely to
maintain morale. Huddling together will also decrease heat loss.
3
17
PROFICIENCY IN SURVIVAL CRAFT AND RESCUE BOATS OTHER THAN
FAST RESCUE BOATS
4. Survival craft and rescue boats
4.1 Lifeboats
LSA Code, Chapter IV
4.1.1 General requirements for lifeboats
a) Materials
The materials from which the lifeboat hull, deck, and canopy are constructed
shall be resistant to deterioration from:
- air temperature in the range of -30 to +65°C.;
- rot, corrosion, seawater, oil and fungus; and,
- sunlight.
Lifeboats shall be constructed of steel, aluminum or fibrous glass reinforced
plastics, except other materials if such are equivalent or superior to the specified
materials in physical properties and durability in a marine environment.
b) Design and Construction
All lifeboats shall
- be properly constructed;
- have rigid hulls;
- be of such form and proportions that they have ample
stability in a seaway and sufficient freeboard when loaded with their full
complement of persons and equipment;
- be capable of maintaining positive stability when in an
upright position in calm water and loaded with their complement and equipment
and holed in any one location below the waterline, assuming no loss of buoyancy
material or other damage.
Every lifeboat shall be capable of being launched and its equipment capable
of being operated by persons wearing immersion suits.
All lifeboats shall be of sufficient strength to:
- enable them to be safely lowered into the water when
loaded with their complement and equipment;
- be capable of being launched and towed when the ship is
making headway at a speed of 5 knots in calm water.
Hulls and rigid canopies shall be fire retardate or noncombustible.
Seating shall be provided on thwarts, benches or fixed chairs fitted as low
as practicable in the lifeboat capable of supporting the number of persons each
weighing 100 kg. for which spaces are provided.
4
1
PROFICIENCY IN SURVIVAL CRAFT AND RESCUE BOATS OTHER THAN
FAST RESCUE BOATS
Each lifeboat shall be of sufficient strength to withstand a load, without
residual deflection on removal of that load:
- in the case of boats with metal hulls, 1.25 times the total
mass of the lifeboat when loaded with its full complement of persons and
equipment; or
- in the case of other boats, twice the total mass of the
lifeboat when loaded with its full complement of persons and equipment.
Each lifeboat shall be of sufficient strength to withstand, when loaded with
its full complement of persons and equipment and with, where applicable, skates
or fenders in position, a lateral impact against the ship's side at an impact
velocity of at least 3.5 m/s and also a drop into the water from a height of at least
3m.
The vertical distance between the floor surface and the interior of the
canopy or enclosure over at least 50 % of the floor area shall be
not less than 1.3 m for a lifeboat permitted to
accommodate 9 persons or less;
not less than 1.7 m for a lifeboat permitted to
accommodate 24 persons or more;
- not less than the distance as determined by linear
interpolation between 1.3 m & 1.7 m for a lifeboat permitted to accommodate
between 10 and 23 persons.
c) Carrying capacity
The number of persons which a lifeboat shall be permitted to accommodate
shall be equal to:
- the number of persons, all wearing immersion suits, that
can be seated in a normal position with out interfering with the means of
propulsion or the operation of any of the lifeboat's equipment; or,
- the number of spaces that can be provided on the seating
arrangements. The shapes may be overlapped as shown, provided that footrests
are fitted and there is sufficient room for legs and the vertical separation between
the upper and lower seats is not less than 350 mm.
Each seating position within a lifeboat shall be clearly indicated.
d) Access
Every passenger ship lifeboat shall be so arranged that:
- it can be rapidly boarded by its full complement of persons;
and,
- rapid disembarkation can be possible.
4
2
PROFICIENCY IN SURVIVAL CRAFT AND RESCUE BOATS OTHER THAN
FAST RESCUE BOATS
Every cargo ship lifeboat shall be so arranged that:
- it can be boarded by its full complement of persons in not
more than 3 minutes from the time that the instruction to board is given; and,
- rapid disembarkation can be possible.
Surfaces on the lifeboat on which persons might walk shall have a non-slip
finish.
Every lifeboat shall have a boarding ladder so arranged that:
- it can be used on either side to enable persons in the water
to board;
and
- the lowest step shall not be less than 0. 4 m below the light
waterline.
Every lifeboat shall be so arranged that helpless persons can be brought
on board both from the water and on stretchers.
Fig. 4.1 The seating arrangements
4
3
PROFICIENCY IN SURVIVAL CRAFT AND RESCUE BOATS OTHER THAN
FAST RESCUE BOATS
e) Buoyancy
All lifeboats shall have inherent buoyancy or shall be fitted with inherently
buoyant material sufficient to float the lifeboat with all its equipment on board
when flooded and open to the sea.
The buoyant material used in a lifeboat shall not be adversely affected by
sea water, oil or oil products. Notwithstanding the up mentioned requirements, all
lifeboats shall have additional inherently buoyant material equal to 280 N of
buoyant force per person for the number of persons the lifeboat is permitted to
accommodate.
Buoyant material, shall not be installed external to the hull of the lifeboat.
f) Freeboard and Stability
All lifeboats shall be stable and have a positive GM value when loaded
with 50% of the number of persons the lifeboat is permitted to accommodate in
their normal positions to one side of the centre line.
All lifeboats, when loaded with 50% of the number of persons the lifeboat
is permitted to accommodate seated in their normal positions to one side of the
centre line, shall have a freeboard, measured from the waterline to the lowest
opening through which the lifeboat may become flooded, of at least 1.5% of the
lifeboat's length or 100 mm, whichever is greater.
g) Fittings
Every lifeboat shall be provided with at least one drain valve fitted near the
lowest point in the hull, which shall
- open automatically to drain water from the hull when not
waterborne;
- close automatically to prevent entry of water when
waterborne;
Each drain shall be:
- provided with cap or plug to close the valve which shall be
securely attached to the lifeboat by a lanyard, chain, or other suitable means;
- readily accessible from inside; and,
- clearly indicated as to its position.
Every lifeboat shall be provided with a rudder and tiller.
When a wheel or other remote steering mechanism is also provided, the
tiller shall be capable of controlling the rudder in case of failure of the steering
mechanism.
The rudder shall be permanently attached to the lifeboat and the tiller shall
be permanently installed on, or linked to, the rudder stock; however, if the lifeboat
has a remote steering mechanism, the tiller may be removable and securely
stowed near the rudder stock.
4
4
PROFICIENCY IN SURVIVAL CRAFT AND RESCUE BOATS OTHER THAN
FAST RESCUE BOATS
The rudder and tiller shall be arranged so as not to be damaged by the
operation of the lifeboat release mechanism or the propeller.
A buoyant lifeline shall be around the outside of the lifeboat, except in the
vicinity of the rudder and propeller.
Lifeboats which are not self-righting when capsized, shall have suitable
handholds on the underside of the hull to enable persons to cling to the lifeboat.
The handholds shall be fastened to the lifeboat in such a way that, when
subjected to an impact sufficient to cause them to break away, they break away
without causing damage to the lifeboat.
Every lifeboat shall be fitted with sufficient watertight lockers or
compartments to provide for the storage of the small items of equipment, water
and provisions.
Means shall be provided for the collection and storage of rainwater.
Every lifeboat to be launched by a fall or falls shall be fitted with a release
mechanism complying with the following requirements:
- the mechanism shall be so arranged that all hooks are
released simultaneously;
- the mechanism shall have two release capabilities as
follows
- a manual release which will release the
lifeboat when waterborne or when there is no load on the hooks;
- an "on-load" release capability which will
release the lifeboat with a load on the hooks and be so arranged as to release
the lifeboat under any conditions of loading from no-load with the lifeboat
waterborne to a load of 1.1 times the loaded mass of the lifeboat when loaded
with its complement of persons and equipment.
- the release control shall be clearly marked in a color that
contrasts with its surroundings;
- the release mechanism shall be designed with a safety
factor of 6 based on the ultimate strength of the materials used, assuming the
mass of the lifeboat is equally distributed between the falls.
Every lifeboat shall be fitted with a means to enable the forward painter to
be released when under tension.
Every lifeboat shall be provided with a permanently installed earth
connection and arrangements for adequately sitting and securing in the operating
position the antenna provided with the portable radio apparatus.
Lifeboats intended for launching down the side of a ship shall have skates
or fenders as necessary to facilitate launching and prevent damage.
A manually controlled lamp visible on a dark night with a clear atmosphere
at a distance of at least 2 miles for a period of not less than 12 hours shall be
fitted to the top of the cover of closure. If the light is designed to flash it shall
initially flash at a rate of not less than 50 flashes per minute over the first 2 hours
of operation of the 12 hour operating period.
4
5
PROFICIENCY IN SURVIVAL CRAFT AND RESCUE BOATS OTHER THAN
FAST RESCUE BOATS
Every lifeboat shall have fitted on the inside a lamp or source of light to
provide illumination for not less than 12 hours to enable reading of survival and
equipment instructions; however, oil lamps shall not be permitted for this
purpose.
Every lifeboat shall, unless expressly provided otherwise, be provided with
effective means of bailing or be automatically self-bailing.
Every lifeboat shall be constructed and fitted so that an adequate view,
forward, aft, and to both sides is provided from the control and steering position
for safe launching and maneuvering.
h) Equipment
All items of the lifeboat equipment, whether required by this section or
elsewhere in this standard, with the exception of boat-hooks which shall be kept
free for fending off purposes, shall be secured within the lifeboat by lashings,
stored in lockers or compartments, stored in brackets or other similar mounting
arrangements or other suitable means.
The equipment shall be secured in such a manner as not to interfere with
any abandonment procedure.
All items of the lifeboat equipment shall be as small and of as little mass as
possible and shall be packed in a suitable and compact form.
The normal equipment, unless otherwise stated, shall consist of:
- sufficient oars to make headway in calm seas, hole pins,
crutches or equivalent arrangements attached to the boat by lanyards or chains
shall
be provided for each oar,
- two boat hooks,
- a buoyant bailer and two buckets,
- a survival manual,
- a binnacle containing an efficient compass which is
luminous or provided with a suitable means of illumination. In a totally enclosed
lifeboat, the binnacle shall be permanently fitted at the steering position; in any
other lifeboat, it shall be provided with suitable mounting arrangements,
- a sea anchor of adequate size fitted with a shock
resistant hawser and tripping line which provides a firm hand grip when wet. The
strength of the sea anchor, hawser and tripping line shall be adequate for all sea
conditions,
- two painters, manila or other suitable line, having a
diameter of not less than 255 mm diameter and of a length equal to not less than
twice the distance from the stowage position of the lifeboat to the waterline in the
lightest seagoing condition, or, 15 m, whichever is greater. One painter shall be
attached to the release device at the forward end of the boat, and the other
painter shall be firmly secured at or near the bow of the boat ready for use,
- two hatchets, one at each end of the boat,
4
6
PROFICIENCY IN SURVIVAL CRAFT AND RESCUE BOATS OTHER THAN
FAST RESCUE BOATS
- rustproof, watertight container or individually sealed units
containing a total of 3 liters of fresh water for each person the lifeboat is
permitted to accommodate, of which 1 liter per person may be replaced by an
approved desalting apparatus capable of producing an equal amount of fresh
water in 2 days,
- a rustproof dipper with lanyard, for the purpose of drawing
water from the bunghole of a fresh water container, but this item may be waived
in cases where the construction of the containers renders it unnecessary,
- a rustproof graduated drinking vessel, marked at 30, 45
and 60 ml levels,
- an approved food ration totaling not less than 10,000 kJ
for each person the lifeboat is permitted to accommodate in airtight packaging
and stowed in a watertight container,
- 4 rocket parachute flares,
- 6 hand flares,
- 2 buoyant smoke signals,
- one waterproof electric torch suitable for Morse signaling
together with one spare set of batteries and one spare bulb, in a waterproof
container,
- one daylight signaling mirror with instructions for its use
in signaling to ships and aircraft,
- one copy of lifesaving signals on a waterproof card or in
a waterproof container,
- one whistle or equivalent sound signal,
- a first aid kit,
- 6 doses of anti-seasickness medicine and one seasickness bag for each person,
- a buoyant safety knife,
- 3 safety openers suitable for opening water and rations
supplies,
- two buoyant rescue quoits attached to buoyant lines
each not less than 30 m long,
- a manual pump,
- one set of fishing tackle,
- sufficient tools to undertake minor adjustments to the
engine and its accessories,
- portable fire extinguishing equipment suitable for
extinguishing oil fires,
- a searchlight capable of effectively illuminating a light
colored object at night having a width of 18m, at a distance of 180m for a total
period of 6 hours and of working for not less than 3 hours continuously,
- an efficient radar reflector or radar transponder.
4
7
PROFICIENCY IN SURVIVAL CRAFT AND RESCUE BOATS OTHER THAN
FAST RESCUE BOATS
i) Markings on lifeboats
The lifeboat shall be marked in clear permanent letters showing the
dimensions, persons which it is permitted to accommodate, approval number,
and serial number.
The name and port of registry of the ship to which the lifeboat belongs shall
be marked on each side of the lifeboat's bow in block capitals of the Roman
alphabet, of not less than 100 mm in height.
Means of identifying the ship to which the lifeboat belongs and the number
of the lifeboat shall be marked in such a way that they are visible from above.
Every lifeboat shall have affixed to it retro-reflective tape that complies for
the type prescribed therein with the highest level of reflectivity.
4.1.2 Open lifeboat
Open lifeboat shall comply with all requirements up mentioned at 4.1.1
Fig.4.2 Open lifeboat
4.1.3 Partially enclosed lifeboat
Partially enclosed lifeboats shall comply with the requirements of open type
and in addition shall comply with the following requirements:
Every partially enclosed lifeboat shall be:
- provided with permanently attached rigid covers extending over not less
than 20% of the length from the stem and not less than 20% of the length from
the aftermost part of the lifeboat; and,
- fitted with a permanently attached foldable canopy witch together with
the rigid covers completely encloses the occupants of the lifeboat in a
4
8
PROFICIENCY IN SURVIVAL CRAFT AND RESCUE BOATS OTHER THAN
FAST RESCUE BOATS
weatherproof shelter and provides protection from exposure.
The canopy required under shall be so arranged:
- that it is provided with adequate rigid sections or battens to
permit erection;
- that it can be easily erected by not more than 2 persons;
- that it is insulated to protect the occupants against heat and
cold by means of not less than 2 layers of material separated by an air gap or
other equally efficient means, with provision to prevent accumulation of water in
the air gap as applicable;
- that the exterior of the rigid cover and canopy, and the interior of that
part of the lifeboat covered by the canopy, is of a highly visible color;
- that it has entrances at both ends and on each side, provided with
efficient adjustable closing arrangements which can be easily and quickly opened
and closed from the inside or outside so as to permit ventilation, but exclude
seawater, wind and cold;
- that means shall be provided for holding the entrances securely in the
open and closed positions;
- that with the entrances closed, it admits sufficient air for the occupants
at all times;
- that it has means for the collection of rainwater; and,
- that the occupants can escape in the event of the lifeboat capsizing.
Fig 4.3 Partially enclosed lifeboat
4.1.4 Self – righting partially enclosed lifeboat
4
9
PROFICIENCY IN SURVIVAL CRAFT AND RESCUE BOATS OTHER THAN
FAST RESCUE BOATS
Self-righting partially enclosed lifeboats shall comply with all up mentioned
requirements and in addition shall comply with the following requirements:
Enclosure
- every self righting partially enclosed lifeboat shall be provided with
permanently attached rigid covers extending over not less than 20% of the length
from the stem and not less than 20% of the length from the aftermost part of the
lifeboat.
The rigid covers required shall form two shelters which shall:
- if they have bulkheads, have openings of sufficient size to permit easy
access by persons, each wearing an immersion suit; and,
- be of sufficient interior height to permit persons easy access to their
seats in the bow or stern of the lifeboat.
The rigid covers shall be so arranged that they include windows or
translucent panels to admit sufficient daylight to the inside of the lifeboat with the
openings and canopies closed so as to make artificial light unnecessary.
The rigid covers shall have railings attached to the outside of them to
provide a secure handhold for persons moving about the exterior of the lifeboat.
Open parts of the lifeboat shall be fitted with a permanently attached
folding canopy so arranged that it can be easily erected by not more than 2
persons in not more than 2 minutes and insulated to protect the occupants
against heat and cold by means of not less than 2 layers of material separated by
an air gap or other equally efficient means.
The enclosure formed by the rigid cover and canopy shall be so arranged:
- as to allow launching and recovery operations to be performed without
any occupant having to leave the enclosure;
- that it has entrances at both ends and on each side, provided with
efficient adjustable closing arrangements which can be easily and quickly opened
and closed from the inside or outside so as to permit ventilation, but exclude
seawater, wind and cold;
- means shall be provided for holding the entrances securely in the open
and closed positions;
- that with the canopy erected and with the entrances closed, sufficient
air is admitted for the occupants at all times;
- it has means for the collection of rainwater;
- that the exterior of the rigid covers and canopy and the interior of that
part of the lifeboat covered by the canopy is of a highly visible color. The interior
of the shelters shall be of a color which does not cause discomfort to the
occupants; and
4
10
PROFICIENCY IN SURVIVAL CRAFT AND RESCUE BOATS OTHER THAN
FAST RESCUE BOATS
- that it is possible to row the lifeboat.
Capsizing and Re-righting
A safety belt shall:
- be fitted at each indicated seating position; and
- be so designed as to hold a person of a mass of 100 kg securely in
place when the lifeboat is in a capsized position.
The stability of the lifeboat shall be such that it is inherently or automatically
self-righting when loaded with its full or partial complement of persons and
equipment and all entrances and openings are closed watertight, and the
persons are secured with safety belts.
The lifeboat shall, in the event of capsizing, automatically attain a position
that will provide an above water escape for its occupants.
The design of the engine exhaust pipes, air ducts, and other openings shall
be such that water is excluded from the engine when the lifeboat capsizes and
re-rights.
The lifeboat shall be automatically self-bailing.
Propulsion
The lifeboat engine and transmission be controlled from the helmsman
position.
The engine and engine installation shall be capable of running in any
position during capsize, and continue to run after the lifeboat returns to the
upright, or, shall automatically stop on capsizing and be easily re-started after the
lifeboat has returned to the upright and the water has been drained from the
lifeboat.
The design of the lifeboat engine and lubricating systems shall prevent the
loss of fuel and the loss of more than 250 ml of lubricating oil from the engine
during capsize.
In addition a self-righting partially enclosed lifeboat shall be so constructed
and fendered as to ensure that the lifeboat renders protection against harmful
accelerations resulting from an impact of the lifeboat, when loaded with its full
complement of persons and equipment, against the ship's side at an impact
velocity of not less than 3.5 meters per second.
4.1.5 Totally enclosed lifeboats
4
11
PROFICIENCY IN SURVIVAL CRAFT AND RESCUE BOATS OTHER THAN
FAST RESCUE BOATS
Enclosure
- every totally enclosed lifeboat shall be provided with a rigid watertight
enclosure which totally encloses the lifeboat.
The lifeboat enclosure shall be constructed and fitted so that:
- it protects the occupants against heat and cold;
- access into the lifeboat is provided by hatches which can be closed to
make the lifeboat watertight;
- hatches are positioned so as to allow launching and recovery
operations to be performed without any occupants having to leave the enclosure;
- access hatches are capable of being opened and closed from both
inside and outside and are equipped with a means to hold them securely in the
open position;
- it is possible to row the lifeboat;
- it is capable, when the lifeboat is in the capsized position with the
hatches closed and without significant leakage, of supporting the entire mass of
the lifeboat, including all equipment, machinery and its full complement of
persons;
- it includes windows or translucent panels on both sides, which admit
sufficient daylight to the inside of the lifeboat with the hatches closed, to make
artificial light unnecessary;
- its exterior is of a highly visible color and its interior of a color which
does not cause discomfort to the occupants;
- handrails provide a secure handhold for persons moving about the
exterior of the lifeboat, and aid embarkation and disembarkation;
- persons have access to their seats from an entrance without having to
climb over thwarts or other obstructions; and,
- the occupants are protected from the effects of dangerous subatmospheric pressures which might be created by the lifeboat's engine.
Fig.4.4 Totally enclosed lifeboat
4.1.6 Free-Fall lifeboat
4
12
PROFICIENCY IN SURVIVAL CRAFT AND RESCUE BOATS OTHER THAN
FAST RESCUE BOATS
Free-fall lifeboats shall comply with the requirements of totally enclosed
lifeboats described above.
The carrying capacity of a free-fall lifeboat is the number of persons
that can be provided with a seat without interfering with the means of propulsion
or the operation of any of the lifeboat's equipment.
The width of the seat shall be at least 430 mm. Free clearance in front of
the backrest shall be at least 635 mm. The backrest shall extend at least 1,000
mm above the seat pan.
Each free-fall lifeboat shall make positive headway immediately after water
entry and shall not come into contact with the ship after a free-fall launching
against a trim of up to 10° and a list of up to 20° either way from the certification
height when fully equipped and loaded with:
- its full complement of persons;
- occupants so as to cause the centre of gravity to be in the
most forward position;
- occupants so as to cause the centre of gravity to be in the
most aft position;
- its operating crew only.
Each free-fall lifeboat shall be of sufficient strength to withstand, when
loaded with its full complement of persons and equipment, a free-fall launch from
a height of at least 1.3 times the free-fall certification height.
Each free-fall lifeboat shall be fitted with a release system which shall:
- have two independent activation systems for the release
mechanisms which may only be operated from inside the lifeboat and be marked
in a color that contrasts with its surroundings;
- be so arranged as to release the boat under any condition of
loading from no load up to at least 200% of the normal load caused by the fully
equipped lifeboat when loaded with the number of persons for which it is to be
approved;
- be adequately protected against accidental or premature
use;
be designed to test the release system without launching
the lifeboat;
be designed with a factor of safety of 6 based on the
ultimate strength of the materials used.
In addition to the requirements for fully enclosed lifeboat certificate of
approval for a free-fall lifeboat shall also state:
- free-fall certification height;
- required launching ramp length; and
- launching ramp angle for the free-fall certification height.
4
13
PROFICIENCY IN SURVIVAL CRAFT AND RESCUE BOATS OTHER THAN
FAST RESCUE BOATS
Fig.4.5 Free-Fall lifeboats
4.1.7 Totally enclosed lifeboat with a self contained air support systems
The self-contained air support system shall be so arranged that when
proceeding with all entrances and openings closed, the air within the lifeboat
remains safe and breathable and the engine runs normally for a period of not
less than 10 minutes.
During the period described (10 min) the atmospheric pressure inside the
lifeboat shall never fall below the atmospheric pressure, nor shall it exceed it by
more than 20 m/bar.
The self-contained air support system shall have provided visual indicators
to indicate the pressure of the air supply within the system at all times.
4.1.8 Fire protected totally enclosed lifeboat
The lifeboat, when waterborne shall be capable of protecting the number of
persons it is permitted to accommodate, when subjected to a continuous oil fire
that envelops the lifeboat for a period of not less than 8 minutes.
Water spray system
A lifeboat that has fitted a water spray system shall comply with the
following:
- water for the system shall be drawn from the sea by a self-priming
motor pump, and it shall be possible to turn "on" and turn "off" the flow of water
over the exterior of the lifeboat;
- the sea water intake shall be so arranged as to prevent the intake of
flammable liquids from the sea surface; and,
4
14
PROFICIENCY IN SURVIVAL CRAFT AND RESCUE BOATS OTHER THAN
FAST RESCUE BOATS
- the system shall be arranged to allow flushing with fresh water, and
complete draining.
Fig. 4.6 Totally enclosed lifeboats with a self contained air support systems
and fire protected
4.2 Liferafts
4.2.1 General requirements for liferafts
Construction of life-rafts
A life-raft must be so constructed as to be capable of withstanding
exposure for 30 days afloat in all sea conditions.
A life-raft must be so constructed that when it is dropped into the water
from a height of 18 meters, the life-raft and its equipment will operate
satisfactorily. If the life raft is to be stowed at a height of more than 18 meters
above the water-line in the lightest seagoing condition, it must be of a type which
has been satisfactorily drop-tested from at least that height.
A floating life-raft must be capable of withstanding repeated jumps on to it
from a height of at least 4.5 metes above its floor both with and without the
canopy erected.
A life-raft and its fittings must be so constructed as to enable it to be towed
at a speed of 3 knots in calm water when loaded with its full complement of
persons and equipment and with one of its sea-anchors streamed.
A life-raft must have a canopy to protect the occupants from exposure
which is automatically set in place when the life-raft is launched and waterborne.
The canopy must comply with the following:
4
15
PROFICIENCY IN SURVIVAL CRAFT AND RESCUE BOATS OTHER THAN
FAST RESCUE BOATS
- it must provide insulation against heat and cold by means of either 2
layers of material separated by an air gap or other equally efficient means.
Means must be provided to prevent accumulation of water in the air gap;
- its interior must be of a color that does not cause discomfort to the
occupants;
- each entrance must be clearly indicated and be provided with efficient
adjustable closing arrangements which can be easily and quickly opened by
persons clothed in immersion suits from inside and outside, and closed from
inside, the life-raft so as to permit ventilation but exclude sea water, wind and
cold.
A life-raft accommodating more than 8 persons must have at least 2
diametrically opposite entrances;
- it must admit sufficient air for the occupants at all times, even with the
entrances closed;
- it must be provided with at least one viewing port;
- it must be provided with means for collecting rain water;
- it must be provided with means to mount a survival craft radar
transponder at a height of at least 1 meter above the sea;
- it must have sufficient headroom for sitting occupants under all parts
of the canopy.
Minimum carrying capacity and mass of life-raft
No life-raft will be approved which has a carrying capacity of fewer than 6
persons. The total mass of a life-raft, its container and its equipment must not be
more than 185 kg.
Life-raft fittings
Lifelines must be securely around the inside and outside of a life-raft. A liferaft must be fitted with an efficient painter of length equal to not less than 10
meters plus the distance from the stowed position to the water-line in the lightest
seagoing condition or 15 meters, whichever is the greater.
The breaking strength of the painter system, including its means of
attachment to the life raft, except the weak link, must be:
- not less than 15.0 kN for life rafts permitted to accommodate more than
25 persons,
- not less than 10.0 kN for life rafts permitted to accommodate 9 to 25
persons
- not less than 7.5 kN for any other life raft.
A manually controlled lamp must be fitted to the top of the life raft canopy.
The light must be white and be capable of operating continuously for at least 12
hours with a luminous intensity of not less than 4.3 candela in all directions of the
upper hemisphere.
However, if the light is a flashing light it must flash at a rate of not less than
4
16
PROFICIENCY IN SURVIVAL CRAFT AND RESCUE BOATS OTHER THAN
FAST RESCUE BOATS
50 flashes and not more than 70 flashes per minute for the 12 hour operating
period with an equivalent effective luminous intensity. The lamp must light
automatically when the canopy is erected. Batteries must be of a type that does
not deteriorate due to dampness or humidity in the stowed life raft.
A manually controlled lamp must be fitted inside the life raft capable of
continuous operation for a period of at least 12 hours. It must light automatically
when the canopy is erected and be of sufficient intensity to permit reading of
survival and equipment instructions. Batteries must be of a type that does not
deteriorate due to damp or humidity in the stowed life raft.
Fig. 4.7 Inflatable liferaft
4.2.2 Davit launched liferaft
In addition to the above requirements, a liferaft for use with a launching
appliance must:
- when the life-raft is loaded with its full complement of persons and
equipment, be capable of withstanding a lateral impact against the ship's side at
an impact velocity of not less than 3.5 meters per second and also a drop into the
water from a height of not less than 3 meters without damage that will affect its
function; and
- be provided with means for bringing the life-raft alongside the
embarkation deck and holding it securely during embarkation.
A passenger ship davit-launched life-raft must be so arranged that it can be
rapidly boarded by its full complement of persons.
A cargo ship davit-launched life-raft must be so arranged that it can be
boarded by its full of persons in no more than 3 minutes from the time the
4
17
PROFICIENCY IN SURVIVAL CRAFT AND RESCUE BOATS OTHER THAN
FAST RESCUE BOATS
instruction to board is given.
Fig.4.8 Davit launched liferaft
4.2.3 Equipment of the life raft
The normal equipment of a life-raft must consist of:
(a) a buoyant rescue quoit, attached to not less than 30 meters of buoyant line;
(b) a knife of the non-folding type having a buoyant handle and lanyard attached
and stowed in a pocket on the exterior of the canopy near the point at which the
painter is attached to the life-raft. In addition, a life-raft which is permitted to
accommodate 13 persons or more must be provided with a second knife;
(c) for a life-raft which is permitted to accommodate:
(i) no more than 12 persons = one buoyant bailer;
(ii) 13 persons or more = 2 buoyant bailers;
(d) 2 sponges
(e) 2 sea-anchors each with a shock-resistant hawser and tripping line, one
spare and other permanently attached to the life-raft in such a way that when the
life-raft inflates, to lie oriented to the wind in the most stable manner. The seaanchor must be fitted with a swivel at each end of the line and must be of a type
which is unlikely to turn inside-out between its shroud lines. The sea-anchor
permanently attached to davit-launched life rafts and life rafts fitted on passenger
ships must be arranged for manual deployment only. All other life rafts are to
4
18
PROFICIENCY IN SURVIVAL CRAFT AND RESCUE BOATS OTHER THAN
FAST RESCUE BOATS
have the sea-anchor deployed automatically when the life raft inflates;
(f) 2 buoyant paddles;
(g) 3 tin openers and a pair of scissors. Safety knives containing special tinopener blades are satisfactory for this requirement;
(h) a first-aid outfit in a waterproof case capable of being closed tightly after use;
(i) a whistle or equivalent sound signal;
(j) 4 rocket parachute flares;
(k) 6 hand flares;
(l) 2 buoyant smoke signals;
(m) a waterproof electric torch suitable for Morse signaling together with a spare
set of batteries and a spare bulb in a waterproof container;
(n) an efficient radar reflector or survival craft radar transponder, and an EPIRB;
(o) a daylight signaling mirror with instructions on its use;
(p) a copy of the life-saving signals on a waterproof card or in a waterproof
container;
(q) a set of fishing tackle sealed in a transparent plastic bag and must include at
least:
- a line on a hand reel ready for use with sinker and hook fitted;
- a selection of at least 6 spare hooks; and
- a colored lure or spinner;
(r) a food ration of 10000 kJ;
(s) watertight receptacles containing a total of 1.5 liters of fresh water for each
person the life-raft is permitted to accommodate, of which 0.5 liters per person
may be replaced by a de-salting apparatus capable of producing an equal
amount of fresh water in 2 days or 1 liter per person may be replaced by a
manually powered reverse osmosis desalinator, capable of producing an equal
amount of fresh water in 2 days;
(t) a rustproof graduated drinking vessel;
4
19
PROFICIENCY IN SURVIVAL CRAFT AND RESCUE BOATS OTHER THAN
FAST RESCUE BOATS
(u) 6 doses of anti-seasickness medicine and a seasickness bag for each
person the life-raft is permitted to accommodate.
(v) instructions on how to survive;
(w) instructions for immediate action;
Float-free arrangements for life-rafts:
a) Painter system
The life-raft painter system must provide a connection between the ship and
the life-raft and must be so arranged as to ensure that the life-raft when released
and, in the case of an inflatable life-raft, inflated is not dragged under by the
sinking ship.
b) Weak link
If a weak link is used in the float-free arrangement, it must:
(a) not be broken by the force required to pull the painter from the
life-raft container;
(b) if applicable, be of sufficient strength to permit the inflation of the
life-raft; and
(c) break under a strain of 2.2 +/- 0.4 Kilo Newton.
4.2.4 Hydrostatic release unit
If a hydrostatic release unit is used in the float-free arrangements, it must:
(a) be constructed of compatible materials so as to prevent
malfunction of the unit. Galvanizing or other forms of metallic coating on parts of
the hydrostatic release unit is not acceptable;
(b) automatically release the life-raft at a depth of not more than 4
meters;
(c) have drains to prevent the accumulation of water in the
hydrostatic chamber when the unit is in its normal position;
(d) be so constructed as to prevent release when seas wash over
the unit;
(e) be permanently marked on its exterior with its type and serial
number;
(f) be permanently marked on the unit or identification plate securely
attached to the unit stating the date of manufacture, type and serial number and
whether the unit is suitable for use with a life raft with a capacity of more than 25
persons;
(g) be such that each part connected to the painter system has a
4
20
PROFICIENCY IN SURVIVAL CRAFT AND RESCUE BOATS OTHER THAN
FAST RESCUE BOATS
strength of not less than that required for the painter; and
(h) if of a disposable type, indicate in a way that cannot be removed
the date by which it is to be replaced.
Fig.4.9 Different types of H.R.U.
Fig.4.10 Liferafts on the cradles with H.R.U.
4.2.5 Inflatable liferafts
Inflatable life raft must comply with the following provisions in addition to
those up-mentioned.
a) Construction of inflatable life-rafts
The main buoyancy chamber must be divided into no fewer than 2 separate
4
21
PROFICIENCY IN SURVIVAL CRAFT AND RESCUE BOATS OTHER THAN
FAST RESCUE BOATS
compartments, each inflated through a non-return inflation valve on each
compartment.
The buoyancy chambers must be so arranged that, in the event of any one
of the compartments being damaged or failing to inflate, the intact compartments
are able to support, with positive freeboard over the life-raft's entire periphery, the
number of persons which the life-raft is permitted to accommodate, each having
a mass of 75 kg and seated in their normal positions.
The floor of the life-raft must be waterproof and must be capable of being
sufficiently insulated against cold either:
(a) by means of one or more compartments that the occupants can
inflate, or which inflate automatically and can be deflated and re-inflated by the
occupants; or
(b) by other equally efficient means not dependent on inflation.
The life raft must be capable of being inflated by one person. The life-raft
must be inflated with a non-toxic gas. Inflation must be completed within a period
of one minute at an ambient temperature of between 18°C and 20°C and within a
period of 3 minutes at an ambient temperature of -30°C.
After inflation the life-raft must maintain its form when loaded with its full
complement of persons and equipment.
Each inflatable compartment must be capable of withstanding a pressure
equal to at least 3 times the working pressure and must be prevented from
reaching a pressure exceeding twice the working pressure either by means of
relief valves or by a limited gas supply.
b) Carrying capacity of inflatable life-rafts
The number of persons which a life-raft is permitted to accommodate is
equal to the lesser of:
(a) the greatest whole number obtained by dividing by 0.096 the
volume, measured in cubic meters, of the main buoyancy tubes (which for this
purpose include neither the arches nor the thwarts if fitted) when inflated; or
(b) the greatest whole number obtained by dividing by 0.372 the
inner horizontal cross-sectional area of the life-raft measured in square meters
(which for this purpose may include the thwart or thwarts, if fitted) measured to
the innermost edge of the buoyancy tubes; or
(c) the number of persons having an average mass of 75 kg, all
wearing either immersion suits and lifejackets or, in the case of davit-launched
life rafts, lifejackets, that can be seated with sufficient comfort and headroom
without interfering with the operation of any of the life raft's equipment.
c) Access into inflatable life-rafts
At least one entrance must be fitted with a semi-rigid boarding ramp,
capable of supporting a person weighing 100 kg, to enable persons to board the
4
22
PROFICIENCY IN SURVIVAL CRAFT AND RESCUE BOATS OTHER THAN
FAST RESCUE BOATS
life-raft from the sea so arranged as to prevent significant deflation of the life-raft
if the ramp is damaged. In the case of a davit-launched life-raft having more than
one entrance, the boarding ramp must be fitted at the entrance opposite the
bowsing lines and embarkation facilities.
Entrances not provided with a boarding ramp must have a boarding ladder,
the lowest step of which must be situated not less than 0.4 metres below the liferaft's light waterline.
There must be means inside the life-raft to assist persons to pull themselves
into the life-raft from the ladder.
d) Stability of inflatable life-rafts
An inflatable life-raft must be so constructed that, when fully inflated and
floating with the canopy uppermost, it is stable in a seaway.
The stability of the life-raft when in the inverted position must be such that it
can be righted in a seaway and in calm water by one person.
The stability of the life-raft when loaded with its full complement of persons
and equipment must be such that it can be towed at speeds of up to 3 knots in
calm water.
The life raft must be fitted with water pockets complying with the following
requirements:
(a) the water pockets must be of a highly visible color;
(b) the design must be such that the pockets fill to at least 60% of
their capacity within 25 seconds of deployment;
(c) the pockets must have an aggregate capacity of at least 220
liters for life rafts up to 10 persons;
(d) the pockets for life rafts certified to carry more than 10 persons
must have an aggregate capacity of not less than 20xN liters, where N = number
of persons carried; and
(e) the pockets must be positioned symmetrically round the
circumference of the life raft. Means must be provided to enable air to readily
escape from underneath the life raft.
e) Containers for inflatable life-rafts
A life-raft must be packed in a container that is:
(a) so constructed as to withstand hard wear under conditions
encountered at sea;
(b) as far as practicable watertight, except for drain holes in the
container bottom.
A life-raft must be packed in its container in such a way as to ensure, as far
as possible that the waterborne life-raft inflates in an upright position on breaking
free from its container.
4
23
PROFICIENCY IN SURVIVAL CRAFT AND RESCUE BOATS OTHER THAN
FAST RESCUE BOATS
f) The container must be marked with:
(a) maker's name or trade mark;
(b) serial number;
(c) name of approving authority and the number of persons it is
permitted to carry;
(d) SOLAS;
(e) type of emergency pack enclosed;
(f) date when last serviced;
(g) length of painter;
(h) maximum permitted height of stowage above water-line
(depending on drop-test height and length of painter);
(i) launching instructions.
g) Markings on inflatable life-rafts
A life-raft must be marked with:
(a) maker's name or trade mark;
(b) serial number;
(c) date of manufacture (month and year);
(d) name of approving authority;
(e) name and place of servicing station where it was last serviced.
Such marking is to be placed on a buoyancy tube inside the raft adjacent to a
doorway;
(f) number of persons it is permitted to accommodate over each
entrance in characters not less than 100 millimeters in height of a color
contrasting with that of the life-raft;
(g) name and port of registry of the ship to which it is to be fitted, in
such a form that the ship identification can be changed at any time without
opening the container.
2 retro-reflective tapes not less than 50 millimeters wide must be placed
on the underside of the floor of an inflatable life-raft in such a way that the tapes
form a cross at the centre of the floor :
(a) in the case of a circular inflatable life-raft of a length that is not
less than half the diameter of the life-raft; or
(b) in the case of any other inflatable life-raft of lengths that are not
less than half the length and width, respectively, of the life-raft.
4
24
PROFICIENCY IN SURVIVAL CRAFT AND RESCUE BOATS OTHER THAN
FAST RESCUE BOATS
Fig. 4.11 Liferaft stowage containers
Fig. 4.12 Life raft container and hydrostatic release
Fig.4.13 Inflatable liferaft
4
25
PROFICIENCY IN SURVIVAL CRAFT AND RESCUE BOATS OTHER THAN
FAST RESCUE BOATS
4.2.6 Rigid liferafts
Rigid liferafts shall comply with the requirements of section 4.2.1(General
requirements for liferafts) and, in addition shall comply with the requirements of
this section.
a) Construction of rigid liferafts
The buoyancy of a life-raft must be provided by approved inherently buoyant
material placed as near as possible to the periphery of the life-raft.
The buoyant material must be fire-retardant or be protected by a fire-retardant
covering.
The floor of a life-raft must prevent the ingress of water and must effectively
support the occupants out of the water and insulate them from the cold.
b) Carrying capacity of rigid life-rafts
The number of persons which a life-raft is permitted to accommodate is
equal to the lesser of:
(a) the greatest whole number obtained by dividing by 0.096 the
volume, measured in cubic meters, of the buoyancy material multiplied by a
factor of (1-SG) where SG is the specific gravity of that material; or
(b) the greatest whole number obtained by dividing by 0.372 the
horizontal cross sectional area of the floor of the life-raft measured in square
meters; or
(c) the number of persons having an average mass of 75 kg, all
wearing immersion suits and life-jackets, that can be seated with sufficient
comfort and headroom without interfering with the operation of any of the liferafts equipment.
c) Access into rigid life-rafts
At least one entrance must be fitted with a rigid boarding ramp to enable
persons to board the life-raft from the sea. In the case of a davit-launched life-raft
having more than one entrance, the boarding ramp must be fitted at the entrance
opposite to the bowing and embarkation facilities.
Entrances not provided with a boarding ramp must have a boarding ladder,
the lowest step of which must be situated not less than 0.4 meters below the liferaft's light waterline.
There must be means inside the life-raft to assist persons to pull
themselves into the life-raft from the ladder.
4
26
PROFICIENCY IN SURVIVAL CRAFT AND RESCUE BOATS OTHER THAN
FAST RESCUE BOATS
d) Stability of rigid life-rafts
Unless a life-raft is capable of operating safely whichever way up it is
floating, its strength and stability must be such that it is either self-righting or can
be readily righted in a sea way and in calm water by one person.
The stability of a life-raft when loaded with its full complement of persons
and equipment must be such that it can be towed at speeds of up to 3 knots in
calm water.
e) Markings on rigid life-rafts
A life-raft must be marked with:
(a) name and port of registry of the ship to which it belongs;
(b) maker's name or trade mark;
(c) serial number;
(d) name of approving authority;
(e) number of persons it is permitted to accommodate over each
entrance in characters not less than 100 millimeters in height of a color
contrasting with that of the life-raft;
(f) SOLAS;
(g) type of emergency pack enclosed;
(h) length of painter;
(i) maximum permitted height of stowage above water-line (drop-test
height); and
(j) launching instructions.
Each canopy of a rigid life-raft must be fitted with retro-reflective tapes not
less than 50 millimeters wide in such a way that:
(a) tapes not less than 300 millimeters long are spaced around the
canopy so that the distance between the centre of a tape and the centre of the
tape next in line is not greater than 500 millimeters and the distance between the
lower edge of a tape and the lower edge of the canopy is not less than half the
height of the canopy; and
(b) 2 tapes form a cross at the centre of the top of the canopy, the
tapes being:
- on a circular life-raft of a length that is not less than half the
diameter of the life-raft; and
- on any other life-raft of lengths that are not less than half
the length and width, respectively, of the life-raft.
4.2.7 Stowed of liferafts
Every liferaft shall be stowed with its painter permanently attached to
the ship.
Each liferaft or group of liferafts shall be stowed with a float-free
4
27
PROFICIENCY IN SURVIVAL CRAFT AND RESCUE BOATS OTHER THAN
FAST RESCUE BOATS
arrangement complying with the requirements of paragraph 4.1.6 (Float-free
arrangements for liferafts) of the L.S.A.Code so that each floats free and, if
inflatable, inflates automatically when the ship sinks.
Liferafts shall be so stowed as to permit manual release of one raft or
container at a time from their securing arrangements.
The above aragraphs do not apply to liferafts required by regulation
31.1.4.(Survival craft and rescue boats) of the S.O.L.A.S. Convention.
Davit-launched liferafts shall be stowed within reach of the lifting hooks,
unless some means of transfer is provided which is not rendered inoperable
within the limits of trim and list prescribed in paragraph 1.2 (Stowage of survival
craft) S.O.L.A.S. Convention only ship motion or power failure.
Liferafts intended for throw-overboard launching shall be so stowed as
to be readily transferable for launching on either side of the ship unless liferafts,
of the aggregate capacity required by regulation 31.1 ( Survival crafts) of
S.O.L.A.S. Convention to be capable of being launched on either side, are
stowed on each side of the ship.
Fig.
4.14 Liferaft elements
4.3 Rescue boats
Chapter V, L.S.A.Code
Chapter III, S.O.L.A.S Convention
Passengers ships of 500 gross tonnage and over shall carry at least one
rescue boat on each side of the ship.
Cargo ships shall carry at least one rescue boat; a rescue boat may be a
lifeboat either of rigid or inflated construction or a combination of both.
4
28
PROFICIENCY IN SURVIVAL CRAFT AND RESCUE BOATS OTHER THAN
FAST RESCUE BOATS
a) General requirements
- be not less than 3.8 meters and not more than 8.5 meters in length;
and
- be capable of carrying at least 5 seated persons and a person lying
on a stretcher.
Unless a rescue boat has adequate sheer, it must be provided with a bow
cover extending for not less than 15 % of its length.
A rescue boat must be capable of maneuvering at a speed of 6 knots and
maintaining that speed for a period of at least 4 hours.
A rescue boat must have sufficient mobility and maneuverability in a
seaway to enable persons to be retrieved from the water, marshal life-rafts and
tow the largest life raft carried on a ship when loaded with its full complement of
persons and equipment or its equivalent at a speed of at least 2 knots.
A rescue boat must be fitted with an inboard engine or outboard motor. If it
is fitted with an outboard motor, the rudder and tiller may form part of the engine.
Arrangements for towing must be permanently fitted in a rescue boat and
must be sufficiently strong to marshal or tow life-rafts.
Unless expressly provided otherwise, a rescue boat must be provided with
effective means of bailing or be automatically self-bailing.
A rescue boat must be fitted with weather-tight stowage for small items of
equipment.
b) Rescue boat equipment
All items of rescue boat equipment, with the exception of boat-hooks which
must be kept free for fending off purposes, must be secured within the rescue
boat by lashings, storage in lockers or compartments, storage in brackets or
similar mounting arrangements, or other suitable means.
The equipment must be secured in such a manner as not to interfere with
any launching or recovery procedures. All items of rescue boat equipment must
be as small and of as little mass as possible and must be packed in suitable and
compact form.
The normal equipment of a rescue boat must consist of:
(a) a sufficient number of buoyant oars or paddles to make headway in calm
seas. Pins, crutches or equivalent arrangements must be provided for each oar.
Pins or crutches must be attached to the boat by lanyards or chains;
(b) a buoyant bailer;
(c) a binnacle containing an efficient compass which is luminous or provided with
suitable means of illumination;
4
29
PROFICIENCY IN SURVIVAL CRAFT AND RESCUE BOATS OTHER THAN
FAST RESCUE BOATS
(d) a sea-anchor and tripping line with a hawser of adequate strength not less
than 10 meters in length;
(e) a painter of sufficient length and strength, attached to the release device and
placed at the forward end of the rescue boat;
(f) a buoyant line, not less than 50 meters in length, of sufficient strength to tow a
life raft
(g) a waterproof electric torch suitable for Morse signaling, together with a spare
set of batteries and a spare bulb in a waterproof container;
(h) a whistle or equivalent sound signal;
(i) a first-aid outfit in a waterproof case capable of being closed tightly after use;
(j) 2 buoyant rescue quoits, attached to not less than 30 meters of buoyant line;
(k) a searchlight with a horizontal and vertical sector of at least 6° and a
measured luminous intensity of 2500 candela which can work continuously for
not less than 3 hours;
(l) an efficient radar reflector;.
(m) portable fire-extinguishing equipment.
In addition to the equipment up-mentioned, the normal equipment of a rigid
rescue boat must include:
(a) a boat-hook;
(b) a bucket; and
(c) a knife or hatchet.
In addition to the equipment up-mentioned, the normal equipment of a
inflated rescue boat must include:
(a) a buoyant safety knife;
(b) 2 sponges;
(c) an efficient manually operated bellows or pump;
(d) a repair kit in a suitable container for repairing punctures; and
4
30
PROFICIENCY IN SURVIVAL CRAFT AND RESCUE BOATS OTHER THAN
FAST RESCUE BOATS
(e) a safety boat-hook.
The following equipment, or other equally efficient means, must be fitted to
assist the recovery of a lifeboat which is also a rescue boat in bad weather
conditions:
(a) rope pennants attached to the lower fall blocks after launching is
completed to enable the boat to be hung off, the rope pennants removed, and the
lower blocks overhauled and attached to the boat so that it may be hoisted safely
and expeditiously; and
(b) wire pennants attached to the davit heads to enable the boat to be
brought up into its stowed position.
An inflated rescue boat must be so constructed as to be capable of
withstanding exposure:
(a) when stowed on an open deck on a ship at sea; and
(b) for 30 days afloat in all sea conditions.
Inflated rescue boats must be marked with a serial number, the maker's
name or trade mark and the date of manufacture.
The buoyancy of an inflated rescue boat must be provided by either a single
tube subdivided into at least five separate compartments of approximately equal
volume or two separate tubes.
The buoyancy tubes must be so arranged that the intact compartments
must be able to support the number of persons which the rescue boat is
permitted to accommodate, each having a mass of 75 kilograms, when seated in
their normal positions with positive freeboard over the rescue boat's entire
periphery under the following conditions:
(a) with the forward buoyancy compartment deflated;
(b) with the entire buoyancy on one side of the rescue boat deflated;
and
(c) with the entire buoyancy on one side and the bow compartment
deflated.
The buoyancy tubes forming the boundary of an inflated rescue boat must
on inflation provide a volume of not less than 0.17 cubic meters for each person
the rescue boat is permitted to accommodate.
Each buoyancy compartment must be fitted with a non-return valve for
manual inflation and means for deflation. A safety relief valve must also be fitted.
An inflated rescue boat must be maintained at all times in a fully inflated
condition.
4
31
PROFICIENCY IN SURVIVAL CRAFT AND RESCUE BOATS OTHER THAN
FAST RESCUE BOATS
c) Marking of rescue boats
An inflated rescue boat must be fitted:
(a) on the outside of the boat, arranged vertically with the lower edge
at the waterline, with retro-reflective tapes, each tape being not less than 150
millimeters long and not less than 50 millimeters wide, spaced so that the
distance between the centre of a tape and the centre of the tape next in line is
not greater than 500 millimeters;
(b) on the bow, with a vertical strip of retro-reflective tape 600
millimeters long and 50 millimeters wide and two horizontal strips of retroreflective tape 150 millimeters long and 50 millimeters wide, these strips being
placed in the form of an arrowhead;
(c) on the transom, above the water-line, with retro-reflective tapes,
each tape being not less than 150 millimeters long and not less than 100
millimeters wide;
(d) on each float, with retro-reflective tapes, each tape being not less
than 150 millimeters long and not less than 50 millimeters wide, spaced so that
the distance between the centre of a tape and the centre of the tape next in line
is not less than 500 millimeters;
(e) at the rear of each float, with a retro-reflective tape, being not less
than 300 millimeters long and not less than 50 millimeters wide;
(f) on each side of the bow cover, with retro-reflective tapes forming a
cross, each tape being not less than 300 millimeters long and not less than 50
millimeters wide; and
(g) on the underside of the boat, with retro-reflective tapes, each tape
being not less than 300 millimeters long and not less than 50 millimeters wide,
spaced so that the distance between the centre of a tape and the centre of the
tape next in line is not less than 500 millimeters.
d) Stowage of rescue boats
Rescue boats shall be stowed:
- in a state of continuous readiness for launching in not more than 5
min;
- in a position suitable for launching and recovery;
- so that neither the rescue boat nor its stowage arrangements will
interfere with the operation of any survival craft at any other launching station;
- if it is also a lifeboat, in compliance with the requirements of
regulation 13 (Stowage of survival craft) of S.O.L.A.S. Convention.
4
32
PROFICIENCY IN SURVIVAL CRAFT AND RESCUE BOATS OTHER THAN
FAST RESCUE BOATS
Fig. 4.15 Semi-rigid rescue boat
Fig. 4.16 Rigid rescue boat
Fig. 4.17 Inflatable rescue boat
e) Requirements for the carriage of survival craft and rescue
Regulation 21.2 of S.O.L.A.S. Convention
Survival craft and rescue boats ( Passenger Ships)
- Passenger ships of 500 gross tonnage and over shall carry at least one
rescue boat complying with the requirements of section 5.1 of the Code on
each side of the ship.
- Passenger ships of less than 500 gross tonnage shall carry at least
one rescue boat complying with the requirements of section 5.1 of the Code.
- A lifeboat may be accepted as a rescue boat provided it also complies
with the requirements for a rescue boat.
Regulation 31.2 of S.O.L.A.S Convention
Rescue boats (Cargo ship)
Cargo ships shall carry at least one rescue boat complying with the
requirements of section 5.1 of the Code. A lifeboat may be accepted as a rescue
boat, provided that it also complies with the requirements for rescue boat.
4
33
PROFICIENCY IN SURVIVAL CRAFT AND RESCUE BOATS OTHER THAN
FAST RESCUE BOATS
In addition to their lifeboats, all cargo ships constructed before 1 July
1986 shall carry:
- one or more liferafts capable of being launched on either side of the
ship and of such aggregate capacity as will accommodate the total number of
persons on board. The liferaft or liferafts shall be equipped with a lashing or an
equivalent means of securing the liferaft which will automatically release it from a
sinking ship;
- where the horizontal distance from the extreme end of the stem or
stern of the ship to the nearest end of the closest survival craft is more than 100
m, in addition to the liferafts required by above paragraph, a liferaft stowed as far
forward or aft, or one as far forward and another as hr aft, as is reasonable and
practicable.
Notwithstanding the requirements of above paragraph , such liferaft or liferafts
may be securely fastened so as to permit manual release.
4.4 Fast rescue boats
A fast rescue boat may be provided in place of a standard rescue boat.
a) General requirements
A fast rescue boat may be either of rigid, inflated or rigid/inflated
construction and must:
(a) be of a length adequate for its intended use; and
(b) be capable of carrying at least five seated persons and a person
lying down.
A fast rescue boat must be self-righting or capable of being readily righted
by its crew. Unless the fast rescue boat has adequate sheer, it must be provided
with a bow cover extending for not less than 15% of its length, and be self-bailing
or capable of being rapidly cleared of water.
A fast rescue boat must be capable of maneuvering, for at least 4 hours, at
a speed of at least 20 knots in calm water with a suitably qualified and
experienced crew of at least 3 persons and at least 8 knots with a full
complement of persons and equipment.
A fast rescue boat must have sufficient mobility and maneuverability in a
seaway to enable persons to be retrieved from the water, marshal life-rafts and
tow the largest life-raft carried on the ship when loaded with its full complement
of persons and equipment or its equivalent at a speed of at least 2 knots.
A fast rescue boat must be fitted with an inboard engine or engines or an
outboard motor or motors commensurate with its speed, size and displacement.
It should be steered by a wheel which is remote from the rudder, water jet or jets
and outboard motor or motors and an approved form of emergency steering must
be fitted.
4
34
PROFICIENCY IN SURVIVAL CRAFT AND RESCUE BOATS OTHER THAN
FAST RESCUE BOATS
Each engine or motor in a fast rescue boat must stop automatically or be
stopped by the helmsman's emergency release switch should the boat capsize.
When the boat has righted, each engine or motor must be capable of being
restarted, provided the helmsman's emergency release, if fitted, has been reset.
Arrangements for towing must be permanently fitted in fast rescue boats
and should be sufficiently strong to marshal or tow life-rafts.
A fast rescue boat must be fitted with weather tight stowage for small items
of equipment.
If a fast rescue boat is stowed on a ship, a disengaging gear must be fitted.
b) Fast rescue boat equipment
All items of fast rescue boat equipment, with the exception of boat-hooks
which should be kept free for fending off purposes, must be secured within the
rescue boat by lashings, storage in lockers or compartments, storage in brackets
or similar mounting arrangements, or other suitable means. The equipment must
be secured in such a manner as not to interfere with any launching or recovery
procedures. All items of fast rescue boat equipment must be as small and of as
little mass as possible and must be packed in suitable and compact form.
The normal equipment of every fast rescue boat must consist of:
(a) sufficient buoyant oars or paddles to make headway in calm seas. Thole pins,
crutches or equivalent arrangements must be provided for each oar and be
attached to the boat by lanyards or chains;
(b) a buoyant bailer;
(c) a binnacle containing an efficient compass which is luminous or provided with
suitable means of illumination;
(d) a sea-anchor with a hawser of adequate strength not less than 10 meters in
length;
(e) a painter of sufficient length and strength, attached to the release device and
placed at the forward end of the fast rescue boat;
(f) one buoyant line, not less than 50 meters in length, of sufficient strength to
tow a life-raft;
(g) one waterproof electric torch suitable for Morse signaling, together with one
spare set of batteries and one spare bulb in a waterproof container;
(h) one whistle or equivalent sound signal;
(i) a first-aid outfit;
(j) two buoyant rescue quoits, attached to not less than 30 meters of buoyant
line;
(k) a searchlight capable of effectively illuminating a light-colored object at night
having a width of 18 meters at a distance of 180 meters for a total period of 6
hours and of working for at least 3 hours continuously;
(l) unless a radar transponder is stowed in the fast rescue boat, an efficient radar
reflector;
4
35
PROFICIENCY IN SURVIVAL CRAFT AND RESCUE BOATS OTHER THAN
FAST RESCUE BOATS
(m) thermal protective aids sufficient for 10% of the number of persons the
rescue boat is permitted to accommodate or 2, whichever is the greater;
(n) portable fire-extinguishing equipment of an approved type suitable for
extinguishing oil fires.
In addition to the equipment up-mentioned, the normal equipment of every
rigid fast rescue boat must include:
(a) a boat-hook;
(b) a bucket; and
(c) a knife or hatchet.
In addition to the equipment up-mentioned, the normal equipment of
every rigid/inflated and every inflated fast rescue boat must include:
(a) a buoyant safety knife;
(b) two sponges;
(c) an efficient manually-operated bellows or pump;
(d) a repair kit in a suitable container for repairing punctures; and
(e) a safety boat-hook.
A fast rescue boat must be equipped with an easily operated fixed singlepoint suspension arrangement or equivalent.
Hooks and fastening devices for lowering and hoisting fast rescue boats
must be so designed as to have a safety factor of 6 on the ultimate strength in
relation to the loads occurring in a fully loaded condition.
Fig.4.18 Fast rescue boats in action
4
36
PROFICIENCY IN SURVIVAL CRAFT AND RESCUE BOATS OTHER THAN
FAST RESCUE BOATS
5. Launching arrangements
5.1 Boat davits
5.1.1 Life Saving Appliance Code provisions
( Chapter Vl Launching and embarkation appliances)
a) General requirements
With the exception of the secondary means of launching for freefall
lifeboats, each launching appliance shall be so arranged that the fully equipped
survival craft or rescue boat it serves can be safely launched against
unfavourable conditions of trim of up to 10˚ and a list of up to 20˚either way:
a) when embarked as required with its full complement of persons;
b) with not more than the required operating crew on board.
Notwithstanding the requirements of paragraph (a) above, lifeboat
launching appliances for oil tankers chemical tankers and gas carriers with a
final angle of heel greater than 20˚ calculated in accordance with the
International Convention for the Prevention of Pollution from Ships,1973, as
modified by the 1978 Protocol, shall be capable of operating at the final angle of
heel on the lower side of the ship.
A launching appliance shall not depend on any means other than gravity
or stored mechanical power which is independent of the ship’s power supplies to
launch the survival craft or rescue boat it serves in the fully loaded and equipped
condition and also in the light condition.
Each launching appliance shall be so constructed that only a minimum
amount of routine maintenance is necessary. All parts requiring regular
maintenance by the ship's crew shall be readily accessible ano easily
maintained.
The launching appliance and its attachments other than winch brakes
shall be of sufficient strength to withstand astatic proof load on test of not less
than 2.2 times the maximum working load.
Structural members and all blocks, falls, padeyes, links, fastenings
and all other fittings used in connection with launching equipment shall be
designed with a factor of safety on the basis of the maximum working load
assigned and the ultimate strengths of the materials used for construction. A
minimum factor of safety of 4.5 shall be applied to all structural members, and a
minimum factor of safety of 6 shall be applied to falls, suspension chains, links
and blocks.
Each launching appliance shall, as far as practicable, remain effective
under conditions of icing.
A lifeboat launching appliance shall be capable of recovering the lifeboat
with its crew.
5
1
PROFICIENCY IN SURVIVAL CRAFT AND RESCUE BOATS OTHER THAN
FAST RESCUE BOATS
Each rescue boat launching appliance shall be fitted with a powered
winch motor capable of raising the rescue boat from the water with its full rescue
boat complement of persons and equipment at a rate of not less than 0.3 m/s.
The arrangements of the launching appliance shall be such as to enable
safe boarding of the survival craft in accordance with the requirements of
paragraphs 4.1.4.2, 4.1.4.3, 4.4.3.1 and 4.4.3.2 of the L.S.A.Code.
b) Launching appliances using falls and a winch
The launching mechanism shall be so arranged that it may be actuated
by one person from a position on the ship's deck and, except for secondary
launching appliances for free-fall lifeboats from a position with in the survival craft
or rescue boat. When launched by a person on the deck, the survival craft or
rescue boat shall be visible to that person.
Falls shall be of rotation resistant and corrosion resistant steel wire rope.
In the case of a multiple-drum winch, unless an efficient compensatory
device is fitted, the falls shall be so arranged as to wind off the drums at the
same rate when lowering, and to wind on to the drums evenly at the same rate
when hoisting.
The winch brakes of a launching appliance shall be of sufficient strength
to withstand:
a) a static test with a proof load of not less than 1.5 times the
maximum working load;
b) a dynamic test with a proof load of not less than 1.1 times the
maximum working load at maximum lowering speed.
An efficient hand gear shall be provided for recovery of each survival
craft and rescue boat. Hand-gear handles or wheels shall not be rotated by
moving parts of the winch when the survival craft or rescue boat is being lowered
or when it is being hoisted by power.
Where davit arms are recovered by power, safety devices shall be fitted
which will automatically cut off the power before the davit arms reach the stops in
order to prevent overstressing the falls or davits, unless the motor is designed to
prevent such overstressing.
The speed at which the fully loaded survival craft or rescue boat is
lowered to the water shall not be less than that obtained from the formula:
S = 0.4 + 0.02 x H
where:
* S is the lowering speed in metres per second
* H is the height in metres from the davit head to the
waterline with the ship in the lightest sea-going condition.
The maximum lowering speed shall be established by the Administration
having regard to the design of the survival craft or rescue boat, the protection of
its occupants from excessive forces, and the strength of the launching
arrangements taking into account inertia forces during an emergency stop
Every launching appliance shall be fitted with brakes capable of stopping
the descent of the survival craft or rescue boat and holding it securely when
5
2
PROFICIENCY IN SURVIVAL CRAFT AND RESCUE BOATS OTHER THAN
FAST RESCUE BOATS
loaded with its full complement of persons and equipment; brake pads shall,
where necessary, be protected from water and oil.
Manual brakes shall be so arranged that the brake is always applied
unless the operator, or a mechanism activated by the operator, holds the brake
control in the "off" position.
c. Float-free launching
Where a survival craft requires a launching to float free, the float-free
release of the position shall be automatic.
d. Launching appliances for free-fall lifeboats
Every free-fall launching appliance shall comply with the General
Requirements and, in addition, shall comply with the following requirements:
- The launching appliance shall be designed and installed so that it and
the lifeboat it serves operate as a system to protect the occupants from harmful
acceleration forces and to ensure effective clearing of the ship.
- The launching appliance shall be constructed so as to prevent
sparking and incendiary friction during the launching of the lifeboat.
- The launching appliance shall be designed and arranged so that, in
its ready-to-launch position, the distance from the lowest point on the lifeboat it
serves to the water surface with the ship in its lightest seagoing condition does
not exceed the lifeboat’s free-fall certification height.
- The launching appliance shall be arranged so as to preclude
accidental release of the lifeboat in its unattended stowed position. lf the means
provided to secure the lifeboat cannot be released from inside the lifeboat, it shall
be so arranged as to preclude boarding the lifeboat without first releasing it.
5.1.2 Gravity davits
Gravity davits are any davits which use the weight of the boat to do the
work required to launch the boat overside; they may operate on pivots or have a
carriage mounted on roller-track ways which are fixed either to the deck or
overhead.
The boat is launched by the lifting of a brake handle. The brake is
required to apply itself automatically immediately the handle is released by the
brake operator.
The rate of the boat’s descent is controlled by an independent centrifugal
brake.
These davits are all fitted with wire rope falls and winches.
They are required to be fitted with tricing pendants to bring the boat
alongside and bowsing-in tackles to replace the tricing pendants and keep the
survival craft alongside. The tricing pendants must always be released and the
5
3
PROFICIENCY IN SURVIVAL CRAFT AND RESCUE BOATS OTHER THAN
FAST RESCUE BOATS
weight of the boat transferred to the falls before persons are embarked in the
boat.
Fig. 5.1 Gravity davit
Gravity davits are provided with a safety device which will prevent the
davits from operating while it is in position. This device usually takes the form of
a trigger to which the gripes are attached and is so adjusted that while the gripes
are “on”, the davits cannot operate.
In addition, holes are being inadvertently operated in port. These bolts,
known as “Harbour safety pins “are to be shipped only in port.
When the falls and winches are being overhauled the lifeboat must be
floated or landed before the falls are let go for overhauling.
Harbour safety pins are always to be unshipped before the vessel
proceed to sea, so that the boats are at all times ready for immediate use.
Gravity davit “Miranda “System
The boat is contained in and attached to a cradle that is hoisted to the
davit head by means of two single wire rope falls; there are therefore no floating
blocks. The boat is attached to the cradle by means of two short wire straps
placed between the cradle head and the boat’s lifting hooks. The painter whinch
is attached to the lifeboat by means os a quick release system is also attached to
the cradle and not to the ship.
The davits is static and contain no moving parts except the sheaves.
The gripes clear automatically as the boat is lowered by means of the control
wire, which is also situated at the helmsman’s position. No bowsing-in tackles or
tricing pendants are required.
5
4
PROFICIENCY IN SURVIVAL CRAFT AND RESCUE BOATS OTHER THAN
FAST RESCUE BOATS
5.1.3 Luffing davits
Luffing davits require the boat to be taken from inboard to outboard by
the manual turning of a worm screw or telescope screw.
These davits are required to be capable of launching a boat against an
adverse list of 15˚ and like gravity davits, are fitted in pairs.
The boat normally rests in chocks at deck level and is firmly held down
by means of deck gripes.
Fig. 5.2 Luffing davit
5.1.4 Single arm davits
Single arm davits are mechanically controlled and are required to
befitted with wire falls and a winch. They may be sited on the stern of small
vessels attached to a lifeboat or rescue boat. Inflated boats will be secured at an
approved position by approved fastenings.
Single arm davits attached to boats are normally required to be able to
launch the boat on one side of the ship only and are not required to launch the
boat against an adverse list.
Two men only are to be in the boat while it is being launched. Survivors
join the boat when it is afloat.
Single arm davit may also be placed amidship for launching and
recovery of inflatable boats and for the launching of liferafts. When intend for use
with liferafts, the fall is require to have a tricing line attached for the purpose of
5
5
PROFICIENCY IN SURVIVAL CRAFT AND RESCUE BOATS OTHER THAN
FAST RESCUE BOATS
recovering the hook after a liferaft has been launched, without turning the davit
inboard.
They shall also be fitted with a safety hook, which when the safety catch is
released, will automatically release the liferaft as soon as it is waterborne. In lieu
of a winch, some single arm davits intended for launching liferafts will be fitted
with a spring motor for automatic recovery of the fall.
Fig. 5.3 Single arm davits
5.1.5 Tricing pendants
Tricing pendant are attached to the floating blocks of the falls on gravity
davits and to the shoulders of the davits themselves. Having been made a predetermined length, they will bring the boat alongside when it is lowered to the
embarkation deck.
Made of wire, they incorporate a strong rope lashing between the end of
the wire pendant and a senhouse slip, to allow it to be cut in an emergency.
The shackle attaching the senhouse slip to the floating block is required
to be elongated, so that it is impossible for the tongue of the senhouse slip or the
link holding the tongue, to be jammed against the floating block.
The link of the senhouse slip is secured in position by a wood safety pin,
should this pin become wet and swell it is easily broken. Steel pins are not to be
used for this purpose because they are liable to rust in place.
Care must be taken when lowering the boat, not to let it over-run and so
place an undue load on the tricing pendants. Bowsing-in tackles are to be made
fast to the floating blocks and the ship’s side, hauled tight and made fast and the
tricing pendants released before persons are allowed to embark. A true
senhouse slip is embodied in the tricing pendants to facilitate the operation of
letting them go while there may be a certain amount of weight of them.
5
6
PROFICIENCY IN SURVIVAL CRAFT AND RESCUE BOATS OTHER THAN
FAST RESCUE BOATS
Fig. 5.4 Bowsing-in tackles
Fig. 5.5 Bowsing-in tackles and force systems
5.1.6 Gripes
The function of the gripes is to hold the boat firmly down in the chocks or
in the case of gravity davits, firmly against the shoulder chocks of the davits.
Gripes are required to be fitted so that they can be let-go from inboard.
The normal method of fitting is to have the gripe wires taken over fairleads on the
gunwale and fastened on the outboard side to the deck or davit frame, a
senhouse slip is attached to the inboard end of the gripes for letting-go.
A strong rope lashing is incorporated next to the senhouse slip to allow it
to be cut in an emergency. Care must be taken as the boat is turned out, that the
thimble on the inboard end of the gripes, which has to pass over the boat, does
not foul anything. It is the responsibility of the two men in the boat to clear the
5
7
PROFICIENCY IN SURVIVAL CRAFT AND RESCUE BOATS OTHER THAN
FAST RESCUE BOATS
gripes. On gravity davits it is the responsibility of the men who let-go the gripes to
ensure that when a trigger is fitted, it does in fact fall.
Fig. 5.7 The gripes
5.1.7 Skates
Every lifeboat attached to davits, except emergency lifeboat and rescue
boats, is fitted with two skates on the inboard side, for the purpose of assisting
the passage of the boat down the side of a ship with an adverse list.
That is to say, the skates are there to act as skids and help slide or
skates the boat down the side of the ship.
When the boat is in the water, the skates ceases to have any value and
will greatly hamper the movement of the boat. Therefore, as soon as it may be
convenient, unship them and tow them.
5
8
PROFICIENCY IN SURVIVAL CRAFT AND RESCUE BOATS OTHER THAN
FAST RESCUE BOATS
5.1.8 On board maintenance
S.O.L.A.S., Chapter III
R 20 Operational readiness, maintenance and inspection
Before the ship leaves port and at all times during the voyage, all lifesaving appliances shall be in working order and ready for immediate use.
Instructions for on-board maintenance of life-saving appliances
complying with the requirements of regulation 36 shall be provided and
maintenance shall be carried out accordingly.
The Administration may accept, in lieu of the instructions required by
above paragraph, a shipboard planned maintenance programme.
Falls used in launching shall be turned end for end at intervals of not
more than 30 months and be renewed when necessary due to deterioration
of the falls or at intervals of not more than five years, whichever is the earlier.
The Administration may accept in lieu of the "end for ending" required in
above paragraph, periodic inspection of the falls and their renewal whenever
necessary due to deterioration or at intervals of not more than four years,
whichever one is earlier.
Spares and repair equipment shall be provided for life-saving appliances
and their components which are subject to excessive wear or consumption and
need to be replaced regularly.
Weekly inspection:
-
all survival craft, rescue boats and launching appliances shall be
visually
inspected to ensure that they are ready for use;
- all engines in lifeboats and rescue boats shall be run for a total period
of not less than 3 min provided the ambient temperature is above the minimum
temperature required for starting and running the engine. During this period of
time, it should be demonstrated that the gear box and gear box train are
engaging satisfactorily. If the special characteristics of an outboard motor fitted to
a rescue boat would not allow it to be run other than with its propeller submerged
for a period of 3 min, it should be run for such period as prescribed in the
manufacturer's handbook;
- the general emergency alarm system shall be tested.
Monthly inspections
- Inspection of the life-saving appliances, including lifeboat equipment,
shall be carried out monthly using the checklist to ensure that they are complete
and in good order. A report of the inspection shall be entered in the log-book.
5
9
PROFICIENCY IN SURVIVAL CRAFT AND RESCUE BOATS OTHER THAN
FAST RESCUE BOATS
R 36 Instructions for on-board maintenance
Instructions for on-board maintenance of life-saving appliances shall be easily
understood, illustrated wherever possible, and, as appropriate, shall include the
following for each appliance:
- a checklist for use when carrying out the inspections required;
- maintenance and repair instructions;
- schedule of periodic maintenance;
- diagram of lubrication points with the recommended lubricants;
- list of replaceable parts;
- list of sources of spare parts;
- log for records of inspections and maintenance.
See also the attached MSC.1/Circ.1206/Rev.1 , 11 June 2009 : “ Measures to
prevent accidents with lifeboats.
5.2 Liferaft davits
5.2.1 Life Saving Appliance Code provisions
(Chapter Vl Launching and embarkation appliances)
Liferaft launching appliances
Every liferaft launching appliance shall comply with the requirements,
except with regard to embarkation in the stowed position, recovery of the loaded
liferaft and that manual operation is permitted for turning out the appliance. The
launching
appliance shall include an automatic release hook arranged so as to prevent
premature release during lowering and shall release the liferaft when
waterborne. The release hook shall include a capability to release the hook under
load. The
on-load release control shall:
- be clearly differentiated from the control which activates the automatic
release function;
- require at least two separate actions to operate;
- with a load of 150 kg on the hook, require a force of at least 600 N and
not more than 700'N to release the load, or provide equivalent adequate
protection against inadvertent release of the hook.
- be designed such that the crew members on deck can clearly observe
when the release mechanism is properly and completely set.
5
10
PROFICIENCY IN SURVIVAL CRAFT AND RESCUE BOATS OTHER THAN
FAST RESCUE BOATS
5.2.2 Liferaft launching davits
See 5.1.4 for single arm davits.
Davit-launched liferafts shall be stowed within reach of the lifting hooks,
unless some means of transfer is provided which is not rendered inoperable
within the limits of trim and list.
Fig.5.8 The single arm davit and servicing liferaft
Fig. 5.9 The liferaft launching davit simple scheme
The davit arrangements are included in the life-saving equipment of
vessel and are intended for gravity launching of life raft with set of occupants
onto water. The life rafts are pulled from deck outboard vessel after the
5
11
PROFICIENCY IN SURVIVAL CRAFT AND RESCUE BOATS OTHER THAN
FAST RESCUE BOATS
unloaded outrigger has been slewed. The davit arrangements operate at
vessel's heel up to 20° at-either side and trim up to 10°.
5.2.3 Automatic release hook
The primary aim in fitting these particular types of release equipment is to
facilitate the safe release of the rafts and boats from the davit falls during an
evacuation, especially in heavy weather conditions.
Whilst this type of release equipment represents a great technical advance
over the traditional hook, which has been used for so many years, it is also much
more complex. Consequently, to ensure that it will always function efficiently, it
must be properly adjusted, regularly maintained and correctly operated at all
times. Of particular importance is the need to ensure that the correct design of
ring or shackle is being used to connect the release equipment to the davit falls.
Failure to attend to any of these factors could cause a malfunction of the release
equipment, resulting in the raft or boat being released prematurely or,
alternatively, being retained on the falls when waterborne, with potentially
disastrous results in either case.
Unfortunately several serious accidents involving the use of these release
mechanisms have already been reported , they include:—
(a) premature release of lifeboats from the falls; causing death and
serious injuries to the occupants and extensive damage to the boats;
(b) retention of a lifeboat on the falls when waterborne; the occupants
were uninjured but great difficulties were experienced in releasing the boat;
(c) premature release of davit launched liferafts from the falls;
causing loss of confidence to members of the crew witnessing the launches and
also damage to the rafts.
The testing to be conducted in the following manner:
(a) the operation of automatic release hooks for liferafts - by
suspending an appropriate weight; setting the hook and then lowering the weight
to the deck where it should be automatically released;
(b) the operation of “on-load” disengaging gear and “off-load” release
mechanisms - by lowering the boat into the water and then pulling on the control
lever after which the hooks should open. It should be noted that this equipment
should never be tested whilst the boat is hanging in the davits.
5
12
PROFICIENCY IN SURVIVAL CRAFT AND RESCUE BOATS OTHER THAN
FAST RESCUE BOATS
Fig. 5.9 Automatic release hook scheme
Fig. 5-10 Automatic release hooks
5
13
PROFICIENCY IN SURVIVAL CRAFT AND RESCUE BOATS OTHER THAN
FAST RESCUE BOATS
5.3 Rescue boat davits
Fig. 5.10 The rescue boat launching davit simple scheme
5
14
PROFICIENCY IN SURVIVAL CRAFT AND RESCUE BOATS OTHER THAN
FAST RESCUE BOATS
5.4 Free-fall
It should be demonstrated that the free-fall release mechanism can operate
effectively when loaded with a force equal to at least 200% of the normal load
caused by the fully equipped lifeboat when loaded with the number of persons for
which is to be approved.
5.5 Float – free arrangements
5.5.1 Float free arrangements
Float free arrangements shall provide for a liferaft to be released
automatically in the event of a vessel's sinking.
5.5.2 Painter system
The liferaft painter system shall provide a connection between the ship and
the liferaft and shall be so arranged as to ensure that the liferaft when released
and in the case of an inflatable liferaft, inflated, it is not dragged under by the
sinking vessel.
5.5.3 Hydrostatic Release Unit
a) Construction
A hydrostatic release unit used in float-free arrangements shall be so
constructed that:
1.The materials used are compatible so as to prevent malfunction
of the unit; galvanizing or other forms of metallic coating on parts of the release
unit will not be accepted;
2.It has drains to prevent the accumulation of water in the
hydrostatic chamber when the unit is in its normal position;
3. Each part connected to the painter system has a strength not
less than that required by the painter;
4. It can readily be removed for replacement or annual servicing.
b) Materials and Components
Materials and components shall be corrosion-resistant and not affected by
seawater, oil or detergents.
c) Performance
A hydrostatic release unit shall:
5
15
PROFICIENCY IN SURVIVAL CRAFT AND RESCUE BOATS OTHER THAN
FAST RESCUE BOATS
1. Function properly throughout an air temperature range of 30˚C to +65˚C;
2. Function properly throughout a seawater temperature range of
-1˚C to +30 ˚C;
3. Automatically release the liferaft at a depth of not more than 4
metres;
4. Not release prematurely when seas wash over the unit;
5. Be capable of releasing a liferaft when the stowage is:
- horizontal
- tilted 45˚ and 100˚ with the hydrostatic release unit at
the upper side;
- tilted 45˚ and 100˚ with the hydrostatic release unit at
the lower side;
- vertical.
d) Marking
A hydrostatic release unit shall be marked permanently on its exterior with a
means of identifying its type, serial number, depth at which it will release, and in
addition if of a type which:
1) Requires annual servicing with its date of manufacture and a
small plate permanently attached to the unit for recording the date of servicing;
2) Is disposable, with the date at which it must be replaced.
Markings must be done solely by a manufacturer or an authorised service
station. The expiry date is 2 years from month of installation onboard. The
release unit is labelled with a marking for year and month. Use a knife and
carefully scratch away the appropriate square for month and year of expiry two
years ahead. A hydrostatic release unit, which is not properly marked with its
date of expiry, is not approved.
e) Instructions and Information
Instructions and information shall be provided in English in a clear and
concise form and shall include the following:
1) General description of the unit;
2) Installation instructions;
3) Any on board maintenance requirements;
4) Servicing requirement
5.5.4 Weak link
a) Construction and Materials
A weak link used in the float free arrangements shall:
1) Be made from a material which is corrosion resistant and not
affected by seawater, oil or detergent;
5
16
PROFICIENCY IN SURVIVAL CRAFT AND RESCUE BOATS OTHER THAN
FAST RESCUE BOATS
2) When made of cordage have the ends either whipped or heat
treated;
3) When made from a flexible wire have each end looped around a
thimble and secured with a locking ferrule.
b) Performance
A weak link shall be of sufficient strength to—
1) pull the painter out of the liferaft container;
2) operate the liferaft inflation system;
3) break under a tensile force of between 1.8 and 2.6 kN.
5.5.5 Different types of hydrostatic release unit
1. H.R.U. type “ Hammar 20”
1
2
3
4
Fig. 5.11 Automatic release of liferaft
The Hammar 20 hydrostatic release unit is designed for liferafts from 6 to 20
persons. The unit consist of a double looped white rope line, a release
mechanism and a Red Weak Link breaking strength 2.2 ± 0.4 kN.
The strong white rope is secured to the deck or liferaft cradle and attached
to the liferaft lashing with a sliphook. If the ship sinks, the water pressure will
(within 4 metres) activate the sharp knife which cuts the white rope and the
liferaft will float free. As the ship sinks, the liferaft painter line will be stretched
and the liferaft starts to inflate. The Red Weak Link breaks and
survivors can board the floating liferaft.
The unit is made of glassfibre reinforced nylon, which means it won't rust.
The HRU H20 needs no annual service maintenance or spare parts, however it
5
17
PROFICIENCY IN SURVIVAL CRAFT AND RESCUE BOATS OTHER THAN
FAST RESCUE BOATS
must be replaced after 2 years. HRU H20 must be marked with its expiry date in
order to be approved. Each has its own individual serial number.
Fig. 5.12 Instalation of H.R.U. “Hammar 20 “
Fig. 5.13 Hydrostatic release unit “ Hammar 20 “
5
18
PROFICIENCY IN SURVIVAL CRAFT AND RESCUE BOATS OTHER THAN
FAST RESCUE BOATS
CORRECT INSTALLATION OF HYDROSTATIC RELEASE UNIT
Fig. 5.14 Correct installation of H.R.U.
5
19
PROFICIENCY IN SURVIVAL CRAFT AND RESCUE BOATS OTHER THAN
FAST RESCUE BOATS
2. H.R.U. type ”SALCOM SERVO-RELEASE
Manufactured by SalcomMarine Products Ltd, the SALCOM SERVORELEASE™ S-R Mk1 Hydrostatic Release Unit (H.R.U.) is designed for Liferafts
from 4 to 150 persons and to sustain a maximum load of 10kN(2250lbs).
The “SALCOM SERVO-RELEAS” H.R.U. is a mechanical device that will
operate automatically when immersed to a certain depth in water, to release a
liferaft, or any other device requiring liberation under these conditions.
The HRU is installed as part of the liferaft stowage lashing system, (on the
inboard side of the liferaft), being fitted between a deck plate, or liferaft cradle,
and the lashing.
The fitting of Senhouse Slip Hook is NOT necessary as the SALCOM HRU
is equipped with a MANUAL RELEASE facility.
Note: failure to adhere to the correct installation procedure may restrict the
H.R.U. from releasing.
The liferaft painter is secured to a WEAK LINK (breaking strength 2.2 +/- 0.4
kN)and this in turn is fitted at the deck attachment of the HRU.
Liferafts that have not been launched in the usual manner are taken down with
the sinking vessel. At a depth of between 1.5 to 4 meters (or 5 to 12 feet), the
water pressure is sufficient to depress an internal diaphragm in the HRU and
operate the release mechanism.
Once released, the liferaft container will then float free of the sinking vessel
and rise towards the surface, with the painter line paying out as the vessel
continues to sink.
When all the free length of the painter line is paid out, the inflation
mechanism of the liferaft is activated, the liferaft inflates, bursting open the
container, and continues to rise to the surface.
At this point of inflation, the WEAK LINK parts and allows the liferaft to
continue to float to the surface ready for boarding by survivors.
5
20
PROFICIENCY IN SURVIVAL CRAFT AND RESCUE BOATS OTHER THAN
FAST RESCUE BOATS
Fig. 5.15 Installation of HRU
Fig. 5-16 Installation components
5
21
PROFICIENCY IN SURVIVAL CRAFT AND RESCUE BOATS OTHER THAN
FAST RESCUE BOATS
Fig. 5-17 Manual release and reassembling the manual release
Manual release: The H.R.U. has a manual release facility eliminating
the requirement for a Senhouse Slip Hook. For annual liferaft service the
SALCOM SERVORELEASE catch can be detached by lifting the release lever as
illustrated in the adjacent picture.
Pull the release lever UP AND OUT.
Reassembling the manual release: Using the weak link placed over the
release catch assembly, press the assembly down and slide the cam block
towards the centre of the Hydrostatic Release Unit as show.
When sufficient downwards force is applied it will be possible to slide the cam
block/release lever assembly between the Cam Tongue and the Shackle
Release Catch tongues until it snaps into place. (Use the weak link as a tool to
protect the hand from protrusions and distribute the
load while applying force.
Fig-18 Manual release and maintenance of HRU
5
22
PROFICIENCY IN SURVIVAL CRAFT AND RESCUE BOATS OTHER THAN
FAST RESCUE BOATS
3. H.R.U Type “ HKY -1 “
Hydrostatic release unit is a quick release device for inflatable liferafts.
In case of ship sinks, it will automatically release the liferaft within 2-4 metres of
water pressure.
Easy-breaking rope ( under appropriate pressure ).
Rope features include having a breaking strength of 2.2 ± 0.4KN and a 4mm
diameter.
Material : Stainless steel
5.5.6 Maintenance of hydrostatic release unit
a. All hydrostatic release units should be inspected for correct installation
and, if in doubt, correct installation information should be obtained from
the unit's manufacturer.
b. All hydrostatic release units should be serviced annually, concurrent with
the Inflatable Life Raft Service.
c. A record of the hydrostatic release unit's service should be kept on board
the ship.
d. An operation and instruction manual should be kept on board the ship and
all mariners should make themselves familiar with the hydrostatic release
unit's function.
e. Each hydrostatic release unit, other than a disposable unit, must be
serviced: within 12 months of its manufacture and within 12 months of
each subsequent servicing, except when servicing is delayed until the next
scheduled inspection of the vessel, provided that the delay does not
exceed 5 months;
5
23
PROFICIENCY IN SURVIVAL CRAFT AND RESCUE BOATS OTHER THAN
FAST RESCUE BOATS
5.6 Marine evacuation systems
5.6.1 Construction of marine evacuation system
(Life Saving Appliances Code Chapter VI, 6.2.1)
The passage of the marine evacuation system shall provide for safe
descent of persons of various ages, sizes and physical capabilities, wearing
approved lifejackets from the embarkation station to the floating platform or
survival craft.
Strength and construction of the passage and platform shall be to the
satisfaction of the Administration.
The platform, if fitted, shall be:
- such that sufficient buoyancy will be provided for the
working load. In the case of an inflatable platform the main buoyancy chambers,
which for this purpose shall include any thwarts or floor inflatable structural
members, are to meet the requirements of section 4 .2 based upon the platform
capacity, except that the capacity shall be obtained by dividing by 0.25 the
usable area given in paragraph 6 .2.1. 3.3;
- stable in a seaway and shall provide a safe working area
for the system operators;
- of sufficient area that will provide for the securing of at
least two liferafts for boarding and to accommodate at least the number of
persons that at any time are expected to be on the platform.
This usable platform area shall be at least equal to:
20% of total number of persons that
the marine evacuation system is certified for (m² )
4
or 10 m², whichever is the greater. However, Administrations may approve
alternate arrangements which are demonstrated to comply with all of the
prescribed performance requirements;
- self-draining
- subdivided in such a way that the loss of gas from any one
compartment will not restrict its operational use as a means of evacuation. The
buoyancy tubes shall be subdivided or protected against damage occurring from
contact with the ship's side;
- fitted with a stabilizing system to the satisfaction of the
Administration;
- restrained by a bowsing line or other positioning systems
which are designed to deploy automatically and, if necessary, to be capable of
being adjusted to the position required for evacuation; and
- provided with mooring and bowsing line patches of
sufficient strength to securely attach the largest inflatable liferaft associated with
the system.
lf the passage gives direct access to the survival craft, it should be
provided with a quick-release arrangement.
5
24
PROFICIENCY IN SURVIVAL CRAFT AND RESCUE BOATS OTHER THAN
FAST RESCUE BOATS
5.6.2 Performance of marine evacuation system
(Life Saving Appliances Code Chapter VI, 6.2.2)
A marine evacuation system shall be:
- capable of deployment by one person;
- such as to enable the total number of persons for which it is
designed, to be transferred from the ship into the inflated liferafts within a period
of 30 min in the case of a passenger ship and of 10 min in the case of a cargo
ship from the time the abandon ship signal is given;
- arranged such that liferafts may be securely attached to the
platform and released from the platform by a person either in the liferaft or on the
platform;
- capable of being deployed from the ship under
unfavourable conditions of trim of up to 10˚and list of up to 20˚either way;
- in the case of being fitted with an inclined slide, such that
the angle of the slide to the horizontal is:
- within a range of 30˚ to 35˚ when the ship is
upright and in the lightest sea-going condition; and
- in the case of a passenger ship, a maximum
of 55˚ in the final stage of flooding set by the requirements
- evaluated for capacity by means of timed evacuation
deployments conducted in harbour;
- capable of providing a satisfactory means of evacuation in
a sea state associated with a wind of force 6 on the Beaufort scale;
- designed to, as far as practicable, remain effective under
conditions of icing; and
- so constructed that only a minimum amount of routine
maintenance is necessary. Any part requiring maintenance by the ship's crews
shall be readily accessible and easily maintained.
Where one or more marine evacuation systems are provide on a ship, at
least 50% of such systems shall be subjected to a trial deployment after
installation. Subject to these deployments being satisfactory, the untried systems
are to be deployed within 12 months of installation.
5.6.3 Marking on marine evacuation systems
The marine evacuation system shall be marked with:
- maker's name or trade mark;
- serial number;
- date of manufacture (month and year);
- name of approving authority;
- name and place of servicing station where it was last
serviced, along with the date of servicing; and
- the capacity of the system.
5
25
PROFICIENCY IN SURVIVAL CRAFT AND RESCUE BOATS OTHER THAN
FAST RESCUE BOATS
5.6.4 Containers for marine evacuation systems
The evacuation passage and platform shall be packed in a container that is:
- so constructed as to withstand hard wear under conditions
encountered at sea; and
- as far as practicable watertight, except for drain holes in
the container bottom.
The container shall be marked with:
- maker's name or trade mark;
- serial number;
- name of approval authority and the capacity of the system;
- SOLAS;
- name of approval authority and the capacity of the system;
- date of manufacture (month and year);
- maximum permitted height of stowage above waterline;
and
- stowage position on board.
Launching and operating instructions shall be marked on or in the vicinity of
the container.
5.6.5 Inflatable liferafts associated with marine evacuation systems
Any inflatable liferaft used in conjunction with the marine evacuation system
shall:
- conform with the requirementso f section4 .2;
- be sited close to the system container but be capable of
dropping clear of the deployed system and boarding platform;
- be capable of release one at a time from its stowage rack
with arrangements which will enable it to be moored alongside the platform;
- be stowed in accordancew ith regulationl ll/.13 .4; and
- be provided with pre-connected or easily connected
retrieving lines to the platform.
5.6.6 Stowage of marine evacuation systems
(SOLAS,Chapter III, Regulation 15)
The ship's side shall not have any openings between the embarkation
station of the marine evacuation system and the waterline in the lightest
seagoing condition and means shall be provided to protect the system from any
projections.
Marine evacuation systems shall be in such positions as to ensure safe
launching laving particular regard to clearance from the propeller and steeply
overhanging positions of the hull and so that, as far as practicable, the system
can be launched down the straight side of the ship.
5
26
PROFICIENCY IN SURVIVAL CRAFT AND RESCUE BOATS OTHER THAN
FAST RESCUE BOATS
Each marine evacuation system shall be stowed so that neither the
passage nor platform nor its stowage or operational arrangements will interfere
with the operation of any other life-saving appliance at any other launching
station.
Where appropriate, the ship shall be so arranged that the marine
evacuation systems in their stowed positions are protected from damage by
heavy seas.
5.6.7 Servicing of marine evacuation systems
( SOLAS,Chapter III, Regulation 20)
Every inflatable liferaft, inflatable lifejacket, and marine evacuation
system shall be serviced:
- at intervals not exceeding 12 months, provided where in
any case this is impracticable, the Administration may extend this period to 17
months; and
- at an approved servicing station which is competent to
service them, maintains proper servicing facilities and uses only properly trained
personnel.
In addition to or in conjunction with the servicing intervals of marine
evacuation systems, each marine evacuation system should be deployed from
the ship on a rotational basis at intervals to be agreed by the Administration
provided that each system is to be deployed at least once every six years.
5.6.8 Different types of marine evacuation system
1. The Zodiac/DBC Marine Evacuation Chute (MEC) System
Fig.5.19 Marine Evacuation Chute
A fabric descent chute and inflatable platform are stored in a compact
housing either on the evacuation deck (inside or outside the vessel) or
unobtrusively on the deck above.
5
27
PROFICIENCY IN SURVIVAL CRAFT AND RESCUE BOATS OTHER THAN
FAST RESCUE BOATS
During an emergency, a crew-member releases the MEC with a pull of a
handle. The chute and platform fall to the water and the platform automatically
inflates.
At the same time, the liferafts are launched from their racking system,
inflated and attached to the platform.
Passengers enter the chute by way of the housing and safely descend to
the platform.andle. The chute and platform fall to the water and the platform
theway of passenger or
traffic.
crew
Fig.5.22 MEC on deck
Zodiac/DBC's MEC System takes up very little space on deck. The chute
housing is compact, and the liferafts are tidily stored on rack out of the way of
passenger or crew traffic.
evacuation de
Fig. 5.23 Internal or External type housing
5
28
PROFICIENCY IN SURVIVAL CRAFT AND RESCUE BOATS OTHER THAN
FAST RESCUE BOATS
Fig. 5.24 Marine Evacuation Chute (MEC) System
5
29
PROFICIENCY IN SURVIVAL CRAFT AND RESCUE BOATS OTHER THAN
FAST RESCUE BOATS
Fig.5-25 MEC with inflated platform and liferaft. MEC housing installed above
evacuation deck
2. DSB Marine Evacuation System
5
30
PROFICIENCY IN SURVIVAL CRAFT AND RESCUE BOATS OTHER THAN
FAST RESCUE BOATS
Fig. 5.26 The DSB & Brude Slide evacuation system
Fig.5-27 CAT - Slide System
The CAT-Slide System is suitable for either self-righting and open
reversible liferaft arrangements up to 150 persons.
5
31
PROFICIENCY IN SURVIVAL CRAFT AND RESCUE BOATS OTHER THAN
FAST RESCUE BOATS
3. Viking marine evacuation system
The reinforced Kevlar evacuation chute provides a safe descent path and
compensates for ship and sea movement so that evacuation is not obstructed.
This system has the additional advantage of protecting evacuees from
environmental hazards, such as severe weather conditions, during evacuation
and is fitted with a protective cover.
The system is self-contained and compact, which means that it can be
installed anywhere onboard on open deck, between decks in an open recess, or
built into the ship’s side.
Fig.5.28 Evacuation chute
Fig. 5.29 Evacuation slide
The dual track slide consist of 12 main tubes with 8 separate compartments
that are individually inflated. This means that the slide’s stability is not
compromised in the unlikely event that slide becomes punctured in any one
place.
The angle between the slide and the ship ensures that the system can
absorb the movement between ship and even high seas. The 30˚ angle of the
slide also means that the evacuation slide system can be installed at extreme
forward and aft position. Capacity is easily adapted to suit the particular needs of
any vessel by combining any 25 to 101 person liferafts.
5
32
PROFICIENCY IN SURVIVAL CRAFT AND RESCUE BOATS OTHER THAN
FAST RESCUE BOATS
6 . Evacuation and recovery of survival craft and rescue
boats
6.1 Launching
6.1.1 Gravity davits
Fig. 6.1 Gravity davit scheme
These davits operate on the principle of the boat’s own weight doing the
work to bring about the launching. The construction of the davits includes a
safety device, usually a trigger arrangements attached to the gripes.
The launching procedure is as follows :
1. Two men should be ordered into the boats to ship the plug and check that
the painter is rigged and secure in a correct manner. (Toggle painter,
6
1
PROFICIENCY IN SURVIVAL CRAFT AND RESCUE BOATS OTHER THAN
FAST RESCUE BOATS
passed inside the fall and outside everything else, and secured well forward).
The two men should then clear the boat.
2. The coxswain should order the harbour pins removed if these have not
already cleared.
3. The gripes should be slipped and any trigger arrangement checked to see
that it is clear, the gripes being cleared away from the davits.
4. A winchman must be stood by, to lower the boat down to the embarkation
deck.
5. Check that the overside is clear, then lower away by lifting the “brake
handle”.
The boat should be allowed to descend from the davit until the tricing pendants
take the boat’s weight and draw the boat into the ship’s side.
6. Two men should enter the boat at the embarkation deck and pass the
bowsing-in tackles. These two tackles should be rigged in such a manner as to
have the downhaul secured in the boat, by a round turn and two half hitches, on
the bight, around the linkage at the end of the falls.
7. The coxswain should order the tricing pendants to be slipped when he is
satisfied that the bowsing-in tackles are secured and the men in the boat are
holding lifelines.
8. All passengers and remaining crew members should embark and seat
themselves in the boat, as low as possible.
9. Ease out the bowsing-in tackles and allow the boat to move off the ship’s
side, to hang vertically from the davit heads.
10. Final check overside, and order the winchman to lower away with a run.
If practicable the boat should be released from the falls when on the crest
of a wave. As the wave drops away from the ship’s side so it takes the boat clear
and into the trough.
During the preparation and launching operation, the survival craft, the
launching appliance and the water area to which the craft is being launched shall
be adequately illuminated by lighting supplied from the emergency source of
electrical power. Preparation and handling of survival craft at one launch station
shall not interfere with the handling of any other survival craft or rescue boat.
6.1.2 Launching the inflatable liferaft
The web straps securing the raft in tis stowage cradle should be released by
slipping the manually operated senhouse slip positioned above the float-free
arrangement. The liferaft container should then be manhandled to the launching
position at the ship’s side. If ship’s guard rails are in position, these should be
removed to facilitate an easier launching.
The painter line from the liferaft should be secured to a strong point aboard
the vessel. Where a hydrostatic release unit is featured, the painter and the “D”
ring should be inspected to ensure that they are well fast.
Pull out a limited amount of the painter line from the container, and check
that water surface is clear of other survivors or debrits. Throw the liferaft in its
container, over the side into clear water.
6
2
PROFICIENCY IN SURVIVAL CRAFT AND RESCUE BOATS OTHER THAN
FAST RESCUE BOATS
Throw the liferaft in its container, over the side into clear water. Inflation will
be caused by a sharp “tug” on the painter once it is fully extended. The action of
pulling sharply on the painter line will cause the CO2 gas bottle to be fired, so
inflating the liferaft.
Fig. 6.2 Manual and automatic release of lifeboat
6
3
PROFICIENCY IN SURVIVAL CRAFT AND RESCUE BOATS OTHER THAN
FAST RESCUE BOATS
6
4
PROFICIENCY IN SURVIVAL CRAFT AND RESCUE BOATS OTHER THAN
FAST RESCUE BOATS
Fig. 6.3 Actions after boarding the liferaft
6
5
PROFICIENCY IN SURVIVAL CRAFT AND RESCUE BOATS OTHER THAN
FAST RESCUE BOATS
Fig. 6.4 Righting upturned liferaft
6.1.3 Launching of the davit-launching liferaft
The launching procedure for the davit-launched follows a general format;
however of slight differences between manufacturers, some terms and
operational detail may be recognized under alternative labels.
Fig. 6.5 Single arm davit scheme
Checks prior to boarding
- Ensure that no person is in possession of, or wearing, any sharp
objects that may puncture or damage the liferaft.
- Ensure that the liferaft is well ventilated of excess of CO2 gas before
allowing persons to enter.
- When boarding, load the raft in a stable manner with persons on each
side with their feet into the centre.
6
6
PROFICIENCY IN SURVIVAL CRAFT AND RESCUE BOATS OTHER THAN
FAST RESCUE BOATS
Launching procedure of the davit-launched liferaft
1. Manhandle the liferaft in its canister/valise to a position of launching,
alongside the structure and under the davit head.
2. Remove any side protective rails and check that the overside and surface
level are clear of obstructions and other survivors.
3. Lower the release hook to the liferaft. Close the hook and check that it is
locked into “safe” position.
4. Extract the “container retaining lines” from the canister and secure them to
the vessel structure, either side of the launching position.
5. Extract the bowsing lines and secure them to the deck cleats provided.
6. Extract a length of the long rope painter and secure it to a fixed anchor
point on the vessel structure.
7. Pull out a short length of the webbing painter.
8. Hoist the liferaft towards the davit head and clear of the deck. Turn out the
davit arm overside, to an appropriate angle to suit the size of liferaft being
used.
9. Inflate the liferaft by pulling sharply on the full length of the webbing
painter.
10. Tension up on the bowsing lines and secure the boarding flap.
11. Board personnel in an orderly manner observing all checks.
12. Once the liferaft is fully loaded, release the boarding flap, the bowsing
lines and the short webbed painter and throw all parts into entrance of the
raft.
13. Lower the liferaft to about 2 metres above and clear of the water surface.
14. The person in charge of the liferaft should at this point activate the release
lock of the hook by pulling smartly on the knobbed cocking lanyard.
15. The liferaft is lowered to the surface and is automatically released from the
hook .Cut the painter line and manoeuvre the raft away and clear.
6
7
PROFICIENCY IN SURVIVAL CRAFT AND RESCUE BOATS OTHER THAN
FAST RESCUE BOATS
6.1.4 Automatic release hook for davit-launching liferaft
Fig. 6.6 Release hook
The automatic release hook is for use with liferafts or small boats where a
quick simple and automatic disengagement of the craft from the lowering gear is
required.The hook itself is a basically of the “ fail safe” or off load release type,
which means that it cannot be released whilst laden, but it has an automatic
device which releases as soon as the craft is waterborne.
The “fail safe “ characteristic is achieved by the geometry of the hook,
which is so shaped that in order to release the craft before it is waterborne the
entire weight of the craft would have to be lifted, this is due to the peculiar curve
of the bill of the hook. As is no force to swivel the hook, it is clearly impossible to
effect a release until the craft is settled on the water.
All the working parts are contained between the two side plates, which are
permanently riveted together. The hook and latch rotate on shafts through the
plates which are held in position by circlips visible on the outer surfaces of the
side plates. The pawl is retained by the pawl pin which is retained by the
instruction plates secured by screws to the side plates. As the latch and pawl are
approximately half the thickness of the hook, the latch shaft and the pawl pin
have spacers fitted each side of these components, holding them centrally
between the side plates. Only the nut (not shown) and bolt may be removed
when the tab washers are opened back. As the bolt is withdrawn, the two cones
are released. When the hook is in the Safe Position it is locked closed by a step
on the hook which bears against a corresponding step on the latch.
6
8
PROFICIENCY IN SURVIVAL CRAFT AND RESCUE BOATS OTHER THAN
FAST RESCUE BOATS
Fig. 6.10 The description of the automatic release hook Mk 5 from RFD
When the lanyard is pulled, the pawl travels along the slot through which is
the pawl pin, allowing it to move away from the return spring when the lanyard is
pulled, and to return when released. As the pawl moves so steps on the pawl and
latch, which are in engagement, rotate the latch. This also moves the lower step
on the latch out of engagement with that on the hook. The two large springs act
to open the hook as its load is reduced. In case of non-opening, the lanyard must
be pulled again, the second position latch rotating the latch still further and
contacting part of the hook. This applies an opening force capable of releasing a
load of up to 100 kg. on the fall.
Off load (normal) release
With the hook in the safe position, the hook cannot open. When the boat is
approximately 2m. above the water, pull the lanyard. The weight of the boat will
hold the hook closed. As the weight comes off the hook, it will open
automatically.
Partial load (emergency) release
Should the hook fail to open, pull the lanyard strongly again. In this case
the pawl engages in the second position on the latch, rotating it further when it
applies an opening force on the upper part of the hook, which is capable of being
forced open when the load on it is less than 100 kg.
6
9
PROFICIENCY IN SURVIVAL CRAFT AND RESCUE BOATS OTHER THAN
FAST RESCUE BOATS
Connection to the boat
Open the hook by pulling downwards on the release knob. Position the ring
in the cut out near the block. Press the hook closed between the hands. This will
return the pointer to the safe position and retain the ring which must not lie over
the tongue extension on the block.
WARNING
Hook release under load in a boat whose lifting sling is under tension will
cause the lifting ring to come off the hook with considerable violence. The boat
and lifting sling store up energy and act like a spring as the hook is released.
Boat crew must be made aware of this. Keep away from the ring and lifting sling.
Do not pull the lanyard until the boat is approximately 2 m. above the water.
Inspection and maintenance of 3.0 tonne Release Hook
Check the following visually :
- that the hook is securely attached to the loop at the end of the davit fall by
ensuring that the swaged eye on the end of the fall is secured under the cones,
and that the nut and bolt are secured by their tab washers.
- that there is no severe contamination. If so it should be washed off using a
suitable solvent cleaner. Apply the approved grease with a small brush, working
it well into the moving areas and parts of the mechanism. Do not use solidifying
or emulsifying grease.
- that all four circlips are in position on the hook and latch shafts.
Test hook operation and condition as follows:
- pull the operating knob to ensure that the hook opens fully and freely, and
that it can be reset easily and fully.
- check that the knob is secure on the end of the release cable.
- check that the cable is not frayed.
- hang a load of 9 kg. on the hook using a 25.4 mm dia. lifting ring. Operate
the hook by pulling the lanyard. The hook must open and release the load.
- close the hook. Hang a load of 50 kg. on the hook. Pull the lanyard. The
hook must not open. Release the lanyard completely, then pull the lanyard hard a
second time. This time the pawl will engage the second latch position. The hook
must open under lanyard action and release the load.
- check that the hook is secured to a suitable strong point nearby to prevent it
swinging with the ship’s motion.
6
10
PROFICIENCY IN SURVIVAL CRAFT AND RESCUE BOATS OTHER THAN
FAST RESCUE BOATS
6.2 Clearing the ship’s sides
The period of launching is potentially one of the most hazardous that the
boat and its crew will pass through.
Once a surface is reached and the falls are about to be released ( aft fall first) the
floating blocks/linkage on the end of the fall becomes a real danger to personnel
inside the boat. This danger is increased considerably if the sea conditions are
“choppy” and if a swell is present, causing excessive, violent motion of the boat.
The bow of the boat should be retained by the temporary painter and the
engine should be operational. The bowman should be employed constructively to
bear away by means of the boathook, while the coxswain should move ahead
and away by pushing the tiller towards the ship’s side. Extreme care must be
taken to ensure that persons are sitting low down in the boat to avoid contact
with the floating blocks, once released.
As the boat clears the side, weight will be seen to come on to the painter
and this should be slipped as soon as possible once sea room is obtained so that
the manoeuvre will keep the propeller clear of the slipped painter.
It is always desirable that the mother ship should provide a “ lee” when a
boat is launched. However, there may be occasions when this is not possible.
Neither must it be assumed that the parent vessel is always stopped; it could
very well have limited “ headway” when engaged on a launching operation.
6.2.1 Taking away a boat ( open boat without power, parent vessel stopped)
On reaching the surface the lifeboat falls should be released. This is
potentially one of the most dangerous times for the boat’s crew, whohave their
head height at the level of the fall blocks.
The outboard oars should be lowered while the inboard oars should remain
in the “ tossed” position. The bowman and the outboard oarsmen should stand by
to bear off from the ship’s side using the boathook and the looms of the oars
respectively.
Heaving on the painter, down the inboard side, would accentuate the
movement of the boat’s bow outward and away from the vessel’s side.
Once the bow is “arcing” away from the ship’s side the widening space
should permit the inboard oars to be lowered. Let the painter go as soon as
practicable.
The inboard oarsmen should gibe way on their oars while the outboard
oarsmen should hold water until that time when the boat’s stem is away from the
side.
Coxswain should give their orders sharply and clearly. It is equally
important that oarsmen should respond in a smart effective number in order to
clear the boat from the critical area of launching.
6
11
PROFICIENCY IN SURVIVAL CRAFT AND RESCUE BOATS OTHER THAN
FAST RESCUE BOATS
Fig. 6.11 Lowering and taking away
6.2.2 Taking away a boat ( parent vessel underway and making way)
In many cases this method can prove easier than the method used where
the vessel is stopped in the water. The parent vessel provides the motive power,
which should be under 4 knots.
On reaching the surface the lifeboats falls should be released.
Once these are seen to clear the full weight of the boat will be seen to be on
the painter secured in the fore part.
The coxswain should push the tiller towards the ship’s side. This action will
effectively cause the boat to sheer away from the parent vessel to a maximum
point of sheer.
The coxswain should then move the tiller across to the opposite position,
changing the aspect of the boat’s bow, and so relieving the weight on the painter.
As the weight is seen to be eased on the painter, the bowman activates the
release, so casting the boat clear of the parent vessel. The coxswain can now
control the boat in clear sea room.
6
12
PROFICIENCY IN SURVIVAL CRAFT AND RESCUE BOATS OTHER THAN
FAST RESCUE BOATS
6.3 Marshalling liferafts and rescuing survivors from the sea
6.4 Recovery of survival craft and rescue boats
6.4.1 Coming alongside
The uncontrollable factors of tide, sea state, swell and general weather
conditions should be taken into full account before any approach is made. In
normal circumstances the approach should be made head to wind and sea, or
head to tide, whichever has the greater effect on the handling of the craft.
The angle of approach varies depending on the force of the weather but can
normally be expected to be around the 45˚ - 60˚ mark. A steeper angle to the
wind effectively reduces the windage that the craft will experience.
The power applied should be such as to overcome the prevailing weather so
that a safe, slow and manageable speed over the ground is acquired by the craft.
Once alongside, the power should be maintained at a level to prevent the bow
from paying off. Full use of the “bowman” and employment of the boathook in the
forepart is essential when closing the objective.
When making the approach and when close in alongside expedient use of
the rudder will attain the required angle of approach and also maintain the bow at
a position on station. Prudent use of fenders, especially against concrete quays,
or the marine growth on installations, should be regular practice to afford limited
protection to heavy landings by the craft.
Should weather conditions be extreme or circumstances not permit a safe
landing, either an alternative berth should be approached or the craft should
have to, and stand off, until a safe approach can be made.
6.4.2 Towing operations
During the evacuation of a ship or installation, lifeboats are most certainly
rescue boats are expected to collect and marshal other survival craft. These may
be other lifeboats or liferafts. The towline should be of sufficient strength to
achieve a successful tow to a comparatively safe area after a disaster.
When securing the towline, the length should be such that “snatching” of
the line is avoided; this is specially important in choppy seas. The length of line
and the speed of the towing operation should be established to prevent the
towed vessel or craft from overrunning the towing craft.
Large alteration of the course should be avoided in favour of gradual turns,
so avoiding excessive strain on the towline. A zig-zag course may prove more
effective when it is desired to make headway into the weather, as opposed to a
head-on approach.
The aim should be establish an even tension on the towline throughout the
operation. Should the line be allowed to become slack with the towed craft
6
13
PROFICIENCY IN SURVIVAL CRAFT AND RESCUE BOATS OTHER THAN
FAST RESCUE BOATS
surging forward, a danger may arise that the towline could foul the propeller of
the towing craft. The tension on the towline is directly affected by the weight
aboard the craft being towed. Also, the resistance and speed of the operation
cause tensions to be increased. The speed can easily be adjusted but the
resistance experienced with a circular liferaft will be difficult to alleviate. In the
case of a boat, removing the propeller should be considered for lengthy tow
operation.
6.4.3 Control of disembarkation from survival craft
Any operation which involves the unstable platform of a small boat must, by
very nature, be considered hazardous. Should weather and sea conditions be
extreme, even simple procedures take on additional risk for the would-be
survivors. Disembarkation from survival craft is far from a simple procedure and
must be considered potentially one of the periods of greatest danger for
survivors.
The coxswain- and there is only one coxswain- takes responsibility for
controlling not only the craft but also the occupants. One of the greatest
problems in emergencies is to control emotions which may be running high. Lack
of thought by individuals, or complacency, panic or the loss of will to survive are
commonplace in an emergency. These characteristics must not be allowed to
develop and gather destructive momentum in the confines of a survival craft.
6.4.4 Controlling the transfer from survival craft to support vessel
Depending on the circumstances the support vessel will reduce her speed
and attain a course and position stern to the wind. The freeboard height of the
support vessel is critical and the mode of transfer, i.e. side ladders, nets or
boarding at deck level, will be determined by it.
The survival craft will probably close the support vessel on either quarter at
approximately 45˚ and hold a parallel station, adjusting speed to about 4 knots.
Once the boat is also in position, stern to the wind, the forward hatch should be
opened and bow-line made ready. All persons, other than bowman, should be
strapped into their respective seats to provide the bottom weight for adequate
stability.
The support vessel should adjust her speed accordingly to about 3.5 knots.
The deck point of embarking survivors should have a guest warp rigged and
additional lifebelts readily available. The deck party should be briefed to accept a
bow-line from the survival craft.
Both support vessel and survival craft should maintain their existing
courses and speeds alongside each other. The access door towards the support
vessel should be opened and an orderly disembarkation of personnel, one at a
time, should be made from the side of the survival craft. The coxswain should be
the last person to disembark after closing down the boat’s engine.
The survival craft will be cut away, to be recovered later or sunk.
6
14
PROFICIENCY IN SURVIVAL CRAFT AND RESCUE BOATS OTHER THAN
FAST RESCUE BOATS
6.5 Launching survival craft and rescue boats in rough sea
6.5.1 Use of wave-quelling oil with small boats
When engaged in heavy seas, where excessive pitching is being
experienced, the prudent use of oil on the surface of the water can effectively
reduce the motion of the boat. One gallon of oil is provided as standard issue to
all lifeboats. This oil is usually an animal or vegetable oil, rather than a mineral
oil. Coxswain are advised that the use of oil in limited quantities should prevent
waves from breaking over the craft and so reduce the violent movement on the
craft. The oil will not reduce any swell effects.
It is normal practice to use the oil bag in conjunction with the sea anchor
and heave the boat to, with the intention of riding the bad weather out. A small
amount of oil is used at any one time, ideally spread ahead of the craft to form an
advancing slick giving full benefit to the boat. In a towing operation the oil should
similary be spread from the fore part of the towing vessel. This will benefit both
craft, the tug and the towed vessel.
Heavy oils tends to be better than lighter oils and prevent solid water
landing on the top of the craft. The obvious danger is that the boat could be
swamped or stove in with large waves. Comparing the pollution aspect of the use
of oil with the safety of line, the priority must be in favour of safety of life at sea.
Fig. 6.12 Using of oil bag and sea anchor
6
15
PROFICIENCY IN SURVIVAL CRAFT AND RESCUE BOATS OTHER THAN
FAST RESCUE BOATS
7. Actions to take when clear of the ship
7.1 Immediate action checklist
- Stay clear of the airplane or ship (out of gas-saturated waters) but in the
vicinity until it sinks.
- Make a thorough search for missing people. Carefully patrol the entire
area near the location where the ship or plane went down, especially in the
direction toward which waves are moving. Look very carefully - some people may
be unconscious and floating low in the water.
- Inspect all debris that comes from the plane or ship. Salvage all rations,
water containers, thermos jugs, parachutes, seat cushions, extra clothing, and
maps. Look for raft supplies like the raft knife, signaling devices, and radio. Be
careful with items such as sharp metal objects.
- Lash equipment to the raft or store it in raft pockets and kit containers
where provided. Keep the containers closed when the equipment is not in use.
Keep dry such items as flashlights, signal guns, and flares.
- Check rafts for inflation, leaks, and points of possible chafing. Bail out your
raft. Be careful not to snag it with shoes or sharp objects.
- In cold oceans, wear as much clothing as possible. Rig a windbreak, spray
shield, and canopy. If you are with others, huddle together; exercise regularly.
- Check the physical condition of all aboard. Give first aid. Take
seasickness pills. Wash off gasoline from yourself.
- If there is more than one raft, connect rafts with at least 25 feet of line.
Unless the sea is very rough, shorten the line if you hear or see an airplane. Two
or more rafts tied close together are easier to spot than scattered rafts.
- Get the emergency radio into operation, if one is available. Prepare other
signaling devices (such as flares) for instant use. Use these items only if surface
vessels or aircraft are in plain sight.
- Keep compasses, watches, matches, and lighters dry. Place them in
water-proof containers or plastic.
- In warm oceans, rig sunshade and canopy. Keep your skin covered, this is
NO TIME to get a tan. Use sunburn cream and chapstick. Keep your sleeves
rolled down and your socks pinned up over your pants. Wear a hat and
sunglasses.
- Ration water and food (if you have no water, do not eat); assign duties;
use canopy or tarpaulins for catching and storing rainwater.
- Keep a log. Record the navigator’s last fix (if possible), time and date of
incident, names and physical condition of personnel, ration schedule, winds,
weather, direction of swells, times of sunrise and sunset, and other navigation
data. Inventory all equipment.
- Keep calm. Save water and food by saving energy. Don’t shout
unnecessarily. Don’t move around unnecessarily. Keep your sense of humor
sharp; use it often. Remember that rescue at sea is a cooperative project. Search
aircraft contacts are limited by the visibility of survivors. Increase your visibility by
7
1
PROFICIENCY IN SURVIVAL CRAFT AND RESCUE BOATS OTHER THAN
FAST RESCUE BOATS
using all possible signaling devices. Keep your mirrors handy; use your radio
whenever you see rescue vehicles.
7.2 After the wreckage
Use Clothing: A life jacket will save a lot of energy, but if you don’t have any and
can’t hold on to any buoyant thing, you might be able to use some of your
clothing to help you stay afloat with a minimum of energy.
Air might naturally be caught in your shirt (you might even blow in it to add
some). If you have pants on, tying knots on both legs will let you capture air
inside and use it as a float.
To do so hold the waistband open and swing it open in the air to fill it up and
place the inflated pant-legs deep in the water holding on to the waist.
The legs full of air will float you. It might take a few tries and you might have to
repeat this technique every few minutes (as the air escapes through the fabric),
but it might save you some energy. Note: It might be useful to keep on shoes (to
avoid injuries later. But boots might fill up with water and add weight).
Save Your Energy: If you are in the water and have nothing to help you
(equipment, clothing) keep afloat. It is important to save your energy.
Unless you can swim to shore (within a reasonable distance and the current isn’t
against you) you should avoid swimming and save your energy as much as
possible. The density of the human body is much lower than the density of salt
water (and for women density is lower than men). This means that it is easy to
stay afloat. However, fear often causes people to drown as exhaustion and
frenzied breathing leads to swallowing water.
A few sips can cause you to drown. It is important to relax. The easiest way to
save energy is to float on your back. You can become more buoyant by taking
deep breaths. Some people might have difficulties with this technique (ie. diving
legs). If so, lay on your stomach with your face in the water and spread your
arms apart. When you need to breathe, push your arms through the water and
raise your head just long enough to breathe.
This is the easiest way to float (all snorkelers have experienced it. Of course it is
much easier with a mask and snorkel as you don’t need to raise your head to
breathe). If the sea is too rough these two techniques might not work. Use the
second technique (float on your stomach), but let your legs dive in. You will
almost be in an upright position (more stable in the waves). Keeping your head
underwater until you need to breathe will save you a lot of energy (you
Avoiding Drowning: Inflatable rafts have proven to be the most seaworthy crafts
to survive storms and heavy seas. Life jackets (PFD) are mandatory equipment
on all vessels and represent the best personal floatation device. If you are not
wearing one and can’t possibly grab one or a rescue buoy at the time your ship
goes under, you should try to grab on anything else that might help you keep
afloat. On a dive boat, a wetsuit would be a great piece of equipment to grab).
On other boats, look for anything else that will support your weight and be easy
7
2
PROFICIENCY IN SURVIVAL CRAFT AND RESCUE BOATS OTHER THAN
FAST RESCUE BOATS
to hold on to (plastic containers used for fuel or food storage, pieces of the boat,
etc).
The first objective is to swim (or paddle) as far as possible away from the
ship before it goes under. Ships can suck people under as they sink. Once the
ship has sunk, if you are able to swim or paddle back to the wreckage area, you
might be able to find many useful things floating around don’t need to fight to
keep your head out of the water). Relaxing and controlling your breathing is the
key.
What are your chances to be rescued?
Were you able to send a distress signal? Did rescuers get it (did they
answer you)? Where you able to send your exact location (did you know it at the
time of wreckage)? Do you have any signaling and communication devices? (it is
nearly impossible to find a raft in the ocean without knowing its location if no
signaling (or communication) devices are onboard. Bad weather can also make
searches impossible.
In open ocean if you were able to send a distress message from your boat
and have low range communication and signaling equipment on your raft.
Waiting for the rescue party might be the best solution.
If you don’t expect any rescue team to look for you and you can see the coast
(especially if the wind or current push you in that direction), you might want to try
to make a sail or paddle to reach it.
If you are in the water (swimming with a life jacket or holding onto a floating
object). Unless you are sure that you can swim to shore (the current is not
against you), it might be better to save your energy and stay in place. Each
situation will call for a different action. It is important to think about everything
before deciding to leave the wreckage site.
For example, even if you had not sent any distress signals, it might be
better to stay where you are if you were sailing in an area where other ships
(shipping lane) or airplanes are likely to come to than to sail away to a very far
island you might have seen on a map.
Where to Go
You decided to move, but you are in the middle of the ocean (no coastline
on sight). Where should you go?
If you have a map. (or happen to know where you are and what is around
you), deciding where to go is the biggest decision. It is possible to sail a raft, but
it might be impossible to fight a current or wind to reach the closest island (even
if it’s only 50 miles away), but castaways have been able to drift for thousand of
miles and reach land. Sailing in the opposite direction of a known close-by island
might be a difficult decision to make, but it might save your life. Choose your
destination based on current and wind. Avoid small islands, your chance to reach
them is nearly null. It is better to aim toward a more distant but larger land mass).
7
3
PROFICIENCY IN SURVIVAL CRAFT AND RESCUE BOATS OTHER THAN
FAST RESCUE BOATS
You survived the wreckage, you were able to stay afloat and stay warm to
prevent hypothermia (or even better climb in your raft and stay dry). Now you
have to be ready to survive at sea for an unknown period of time.
Like on land, the basic survival rules apply. You must first protect yourself from
the elements, then find water, and food. In addition preparing yourself to signal
for help might increase your chances to be found by potential rescuers of passing
ships and crafts.
7.3 Initial action in a survival craft
- Cut or release the painter and move the survival craft a safe distance from
the stricken vessel. In a liferaft, before cutting the painter, pull in a much slack as
possible so that the line may be used as a towing line or for other purpose as
required.
- Liferaft will need to be paddled, allowed to drift down wind or towed by a
motor lifeboat or rescue boat.
- Some liferafts are packed so that on inflation the sea anchor deploys
automatically, so this must be recovered before attempting to paddle or tow the
raft.
- When clear of the ship stream the sea anchor. This will reduce the rate of
wind induced drift, in a liferaft it will increase the stability, and in a boat it will hold
the head ( or stern) into the wind and sea and so minimize the possibility of
broaching-to. It is important to stay as close as possible to the area of the
incident so that the search and rescue operation is given every chance of
success. A liferaft is provided with a spare sea-anchor.
- After making sure that there is no one still in the water, that there are no
useful objects to gather from the water or dangerous objects to avoid, close the
entrances. In a open lifeboat erect the exposure cover and in a liferaft with as
inflatable floor pump it up. When closing raft entrances use slip knots that may be
easily released with cold hands. In warmer climates it may not be necessary to
close both liferaft entrances.
- Maintain includes bailing and sponging out any water in the survival craft,
checking for air leaks in a liferaft.
7
4
PROFICIENCY IN SURVIVAL CRAFT AND RESCUE BOATS OTHER THAN
FAST RESCUE BOATS
8. Lifeboats engine and accessories
8.1 Start engine
8.1.1 Starting precaution
Starting any engine can be dangerous in the hands of inexperienced
people. Before attempting to start engine, the operator should be fully conversant
with starting procedure and controls.
- Ensure that the batteries are in serviceable condition and correctly
connected.
- Check that the oil levels in the engine and the gearbox are correct.
- Check that the all water drain plugs and cocks are closed. Check that
water inlet valves, if fitted, are opened.
- Check that water level in expansion tank is filled up with mixture of
water/antifreeze ( 40%).
8.1.2 Check before starting
-
oil level in oil sump tank and gearbox
collant level in the expansion tanker
battery main switch is on. Oil pressure light and changing light will now
be on and the buzzer will sound.
8.1.3 Manually start a motor lifeboat engine
- Check that the gear lever is in neutral position.
- Prime the fuel system if necessary.
- Check that the engine is free to turn without obstruction.
- Turn throttle control lever to almost vertical or “fast”.
- Move the de-compression lever towards the fly-wheel. Fit starting
handle.
- Turn engine slowly from 3 to 20 turns to prime combustion chamber
and lubricating system.
- Crank the engine really fast. When speed is obtained, return the decompression lever to the firing position. Continue to crank until the engine fires.
- Remove starting handle and reduce engine speed as required.
- To stop the engine : turn throttle control anti-clockwise and hold it until
the engine stop. Or, if fitted, pull the remote stopping control.
After starting: check the oil pressure gauge and with a water-cooled
engine the overboard discharging of cooling water.
8
1
PROFICIENCY IN SURVIVAL CRAFT AND RESCUE BOATS OTHER THAN
FAST RESCUE BOATS
Fig. 8.1 Marine diesel engine set 380 J-3
8.1.4 Automatic starting
- Move the speed/gear box lever into neutral position by means of the
control lever.
- Turn the switch to energize the starting motor.
Release immediately, if the engine start and it will return to position “O”.
The alarm light as well as the buzzer should now be off.
- If the engine should fail to start, due to poor battery condition, turn the
battery switch to the second start battery and repeat the starting procedure.
- If the engine fail to start in 15 seconds, despite good battery condition,
release the switch and investigate the cause. The starting motor should be
allowed to cool for at least 15 seconds before attempting to restart.
- At low temperature it may be necessary to ease the starting by means
of the start gas.
The operational method is shown as follows:
- open the dust cover of the liquid storage. insert the pouring liquid
pressure can into the hole of the liquid storage. Squeeze the can to pour the
liquid into liquid storage.
- Set the gear box at idle position and put the handle of fuel rack at midposition.
- Start the engine. At the same time, operate the hand-pump until the
engine runs stably.
- If knocking appears while the engine is starting; the operation of hand-
8
2
PROFICIENCY IN SURVIVAL CRAFT AND RESCUE BOATS OTHER THAN
FAST RESCUE BOATS
pump must be slowed or stopped, so as to regulate the injecting liquid quantity
for starting the engine stably.
Fig. 8.2 Low temperature procedure
8.1.5 Priming the fuel system
Fill fuel tank or connect fuel supply.
Slacken each bleed screw A on top of the filter body and in the outlet banjo
union. Tighten each bleed screw when a full air free flow of fuel is obtained
working from the fuel tank.
Slacken bleed screw B on fuel pump nearest the tank first; tighten when all
air has been displaced from fuel at each pump.
To ensure a fuel supply free of sediment and continous running in an
emergency, all life boat and rescue boat fuel tanks should be thoroughly cleaned
out annually.
Fig. 8.3 priming the fuel system
8
3
PROFICIENCY IN SURVIVAL CRAFT AND RESCUE BOATS OTHER THAN
FAST RESCUE BOATS
8.2 Cooling system
The cooling system of the engine set is of forced circulative watercooling
close type, which consists of lube oil radiator, water tanker, water pump, rubber
pipe etc.
The cooling system of the engine is closed water cooling system.
The cooling liquid comes from the keel cooler through the lube oil cooler
and water pump to the engine block, cylinder head, water cooling exhaust pipe
and outlet then feed back to keel cooler to make circulation cooling.
Too high cooling temperature will cause the lamp in the control panel to light
up and acoustic alarm to function.
Water temperature …………..75~95 C.
Antifreeze concentration of 40% should be used as an all year round
coolant. This concentration will give low temperature protection down to -25 C.
Additionally, 40% concentration will protect the cooling system from corrosion.
Warning: Antifreeze contains Glycol and other constituents which are toxic
if taken internally, and can be absorbed in toxic amounts under prolonged skin
contact.
If antifreeze is swallowed accidentally, medical advice should be sought
immediately.
Nearly all diesel engines rely on a liquid cooling system to transfer waste
heat out of the block and internals. The cooling system consist of a closed loop
similar to that of a car engine and contains the following major components:
water pump, radiator or heat exchanger, water jacket (which consist of coolant
passage in the block and heads) and a thermostat.
1.Cooling water pump 2.Lube cooler 3. Keel cooler 4.Lube oil pump 5.Lube oil filter 6.Pressure
control valve 7.Main bearing 8.Camshaft bearing 9.Rocker arm 10 Overflow pipe11. Fuel oil filter
12.Fuel feed pump 13. Fuel injection pump 14. Fuel high pressure pipe 15. Fuel injection nozzle
16. Water exhaust pipe 17. Fuel oil inlet
Fig.8.4 Piping layout
8
4
PROFICIENCY IN SURVIVAL CRAFT AND RESCUE BOATS OTHER THAN
FAST RESCUE BOATS
Fig. 8.5 Diesel engine cooling system
8.3 Electrical System
The electric system is composed of battery charging alternator, starting
motor, relay regulator, switch, alarm buzzer, alarm lamps and instruments.
If without FQ spring starter, two separated charging battery should be need.
Voltage: 12V.
Starter motor: 2.5kw
Alternator: 750W
8
5
PROFICIENCY IN SURVIVAL CRAFT AND RESCUE BOATS OTHER THAN
FAST RESCUE BOATS
Fig. 8.6 Electrical diagram of 380 J-3
General precautions about electric system
The following points must be strictly observed when working on the electric
system, otherwise serious damage can occur.
1.Never remove any electrical cable without first disconnecting the batteries.
2.Never disconnect the alternator cables while the engine is running.
3.Only disconnect the batteries with engine stopped and all switches in
the OFF position.
8
6
PROFICIENCY IN SURVIVAL CRAFT AND RESCUE BOATS OTHER THAN
FAST RESCUE BOATS
4.Always check that cables are connected to their correct terminals before
reconnecting the batteries .A reversal of polarity or short circuit will destroy
diodes and transistors in the alternator and regulator.
5.Never flash any connections to check the current flow.
6.Always keep the electrical connections properly tightened.
8.4 Fire extinguisher
Dry chemical
This is the most common type, in cars as well as boats. Suitable for
liquid-fuel fires like petrol (Class B fires), and it does not conduct electricity
(Class E). The smaller sizes usually contain powder which is not very effective
against solid fuel fires (Class A). Larger dry chemical extinguishers are suitable
for A, B and E. This information is printed on the container.
Dry chemical extinguishers are filled with either foam or powder, usually
sodium bicarbonate (baking soda) or potassium bicarbonate, and pressurized
with nitrogen. Baking soda is effective because it decomposes at 158 degrees
Fahrenheit and releases carbon dioxide (which smothers oxygen) once it
decomposes. Dry chemical extinguishers interrupt the chemical reaction of the
fire by coating the fuel with a thin layer of powder or foam, separating the fuel
from the surrounding oxygen.
- Find the source of the fuel and shut it off. It will be very hard to put out
the fire if it is constantly being fed new fuel.
-
Pull the pin on your fire extinguisher.
- Aim the extinguisher on top of the fire. You want the smothering
agents to fall over the top of the fire and smother it.
-
Squeeze the lever on the fire extinguisher.
- Move the spray around the top of the fire. Dry chemical and foam
extinguishers will leave a film across the top of the diesel fuel that keep the fire
from flaring back up.
- Keep an eye on the fire site for about half an hour to ensure there are
no more flare ups.
Dry chemical extinguishers usually have a locking mechanism which
must be released. Aim the extinguisher at the base of the fire and squeeze the
operating lever. Attack the fire near the edge and move toward the back of the
fire while sweeping the nozzle rapidly from side to side. Do not point the initial
discharge directly at the burning surface because the high velocity of the stream
can splash and scatter the burning material, making things worse.
8
7
PROFICIENCY IN SURVIVAL CRAFT AND RESCUE BOATS OTHER THAN
FAST RESCUE BOATS
Fig. 8.7 Dry fire extinguishers
8.5 Water spray system
8.6 Self-contained air support system
a) FireProtection :
A water spray system is installed for fire protection. The spray system
consists of an engine driven pump which takes sea water from an intake, location
under the lifeboat, ensuring that no flammable is drawn into the system. The
spray system provides water over the entire surface of the lifeboat. The system
8
8
PROFICIENCY IN SURVIVAL CRAFT AND RESCUE BOATS OTHER THAN
FAST RESCUE BOATS
includes a fresh water connection to flush through the system after testing the
sprinklers and an outlet valve to pump the water out of the lifeboat without using
the water spray system.
b) Air Support System :
The compressed air system has a sufficient capacity of 2x40 lt (200 bar)
bottles to provide air for the maximum number of persons and engine combustion
for a maximum of 10 minutes, to establish an over pressure inside the lifeboat to
prevent ingress of toxic fumes or gas during fire. The pressure reducer and all
the system can easily be controlled by the helmsman. It is possible to recharge
the air cylinders from the ship’s compressed air system without changing their
places.
Spray system
(of the MK V TOTALLY ENCLOSED SURVIVAL CRAFT HellasWatercraft)
The water spray system in conjunction with the air system enables the
lifeboat to proceed through oil fires without the occupants being harmed. If
should be noted that whereas the water spray system will continue to operate for
and unlimited time, the air system has a duration of not less than ten minutes,
and fire protection is thus limited to that time.
A pump, driven by a toothed belt from the engine, takes seawater from
an inlet valve in the bottom of the boat and pumps it through a system of pipes to
nozzles on the lifeboat canopy. The water is spread evenly in a thin film over the
whole surface of the boat by means of deflector plates fitted over the nozzles.
General maintenance of the system is as follows:
1. Check that the drill plate on the seawater inlet valve is clear and firmly fixed.
2. Check that the main water supply valve operates freely, from fully closed to
fully open positions.
3. Check that the clips securing the hose to the pump are tight but not seized.
4. Ensure that the pump mounting bolts are secure and that the pump is aligned
correctly.
5. Check that the toothed belt tension is correct (refer to this section of the
manual).
6. Should it be suspected that the pump is not running freely, a check should be
made by removing the belt and rotating the pump by hand.
7. Grease pump by rotating grease cup. Do not over tight greaser.
8. Check delivery hose.
9. Check hose clips on delivery side of plump for tightness and ensure that they
are not seized.
10. Check all points for leaks.
11. Ensure that the spray pump drain line fixings are secure and that the drain
valve is operational.
8
9
PROFICIENCY IN SURVIVAL CRAFT AND RESCUE BOATS OTHER THAN
FAST RESCUE BOATS
12. Check that the water spray film covers the whole of the boat.
13. Ensure that all spray nozzles are clear and that the spray deflectors are not
damaged.
14. Wash down and de-grease the boat periodically (a layer of grease is
detrimental to water coverage).
Flushing through spray system pipe work
This process is essential to prevent blockages and an accumulation of
salt in the system. It should be carried out immediately after the spray system
has been used or tested.
When following this procedure, make reference to the diagrammatic
layout of the system following these instructions:
1. Arrange for suitable flexible hose supplying fresh water from the
platform/parent vessel.
2. Pass this hose through the ventilator cowls and connect it to either forward or
aft flushing points . Attached hose securely with hose clips.
3. Open flushing valve by turning anticlockwise.
4. Shut sea suction valve .
5. Leave boat after shutting all hatches. Shut all doors securely.
6. Turn on fresh water supply and leave on for about 15 to 20 minutes.
7. Observe all jets and nozzles and ensure that water is flowing freely.
8. It is quite possible that water will not discharge from the highest nozzles on the
canopy or at extremities of the boat. This is because it is extremely difficult to
match the capacity of the installed pump. However, those nozzles without a
discharge of water should be inspected thoroughly for any obstructions.
9. When flushing is finished, turn off the water supply, enter the boat and
disconnect the flexible supply hose from the flushing point , open all
flushing/drain valves in the system to ensure no pockets for water remain in the
system.
10. Close all flushing/drain valves and open the sea suction valve . The system
will now be ready for emergency use.
Maintenance and Recharging Procedure for Air Cylinder Installation
This system provides air to enable the engine to run at maximum load
rpm and for the occupants to breathe when the lifeboat is closed down and
running through fire and/or toxic gases.
Under these circumstances, the air supply will last for at least ten minutes. This
time will not vary even if the engine is running at slow speeds, or if the boat is not
fully occupied, because the excess air will escape from the over pressure device
at the aft end of the boat, preventing any excess internal air pressure.
Lever type valves on cylinders must be open when boat is to be
operational. The main activating valve on the air pressure controller controlling
the release of air into the boat must be closed at all times when the boat is to be
8
10
PROFICIENCY IN SURVIVAL CRAFT AND RESCUE BOATS OTHER THAN
FAST RESCUE BOATS
operational. This valve is to be opened when required for use in fire and/or toxic
gas conditions. Check the pressure gauge regularly to ensure that the pressure
does not fall below 200 bar.
Should the gauge register below 180 bar the cylinder must be recharged
to its maximum of 200 bar.
However, should the pressure gauge register a low reading, a check for air leaks
should be carried out before recharging. The following procedure should be
followed:
Mix a strong solution of water and soap in a suitable receptacle and,
with a small brush, cover liberally all joints and connections. Should there be
serious leaks of air, bubbles will appear in the solution. If this occurs, tighten the
appropriate connection and retest. Should the leak persist, repair as necessary.
Normal Recharging Procedure
a). The main activating valve must be in the closed position.
b). The lever type valves at the air bottles must be fully open.
c). Remove plug from the inward side of the non-return valve.
d). Attach connection from recharging unit to the non-return valve.
e). Recharge the cylinders until the gauge registers 200 bar. (It will be necessary
to allow the cylinder to cool in order to measure the correct pressure). Having
cooled, top-up as necessary.
f). Remove recharging unit connection.
g). Replace plug on non-return valve.
Notes:
The air supplied for bottle recharging must be of breathing quality. It
must be oil-free, clean and with a water content of not more than 3 – 4 p.p.m.
Excessive moisture will cause misting of the inner surfaces of the air cylinder and
also can result in severe icing around the pressure controller and orifice when in
the process of discharging.
If it is necessary to test the air system, facilities must be available for the
immediate recharging of the bottle after the test.
8
11
PROFICIENCY IN SURVIVAL CRAFT AND RESCUE BOATS OTHER THAN
FAST RESCUE BOATS
9. Rescue boat outboard engine
9.1 General description
Most outboard motors are petrol-driven, two-stroke engines although
four-stroke engines are becoming more common. Outboard motors may have
from one to eight cylinders.
Fig. 9.1 A2-cylinder 25 HP Yamaha outboard engine
1.
2.
3.
4.
5.
6.
7.
8.
9.
10.
11.
12.
13.
14.
15.
16.
9
Manual start recoil handle
Choke knob
Overheat warning lamp
Electric start button
Gear-shift lever (usually absent on very small motors which are pivoted by 180° for
reverse drive)
Throttle control & steering handle
Emergency-stop (kill) switch, lock plate and lanyard
Engine securing clamp
Tilt lock for preventing accidental tilting
Anti-splash plates
Cooling water inlet
Propeller
Zinc anode used for steering adjustment
Anti-cavitation plate
Rod for adjusting trim angle
Rope attachment
1
PROFICIENCY IN SURVIVAL CRAFT AND RESCUE BOATS OTHER THAN
FAST RESCUE BOATS
17. Shallow-water lever for raising motor
18. Battery lead
19. Wiring harness
20. Remote control attachment
9.2 Portable fuel system
Portable fuel tanks for outboard motors are fitted with a manual priming
bulb. It is squeezed a few times to draw fuel when first starting the engine or to
continue to provide fuel to the engine in case of fuel pump failure. Care must be
taken to ensure that the bulb is not over squeezed as this may cause leaks in the
fuel system or flood the engine with too much fuel, making it difficult to start. The
bulb should be squeezed only until it becomes firm.
The tank is also fitted with a breather screw, which must be loosened to
vent the tank when operating the engine. Ensure the breather screw is fully
closed when transporting the tank to prevent spillage.
The fuel line connection to the tank should be self-locking, and the
connection to the motor should be either the quick-release type or automatic
shut- off type when the fuel line is disconnected.
Portable fuel tanks should not be left partially empty for long periods as the
fuel can become contaminated with moisture buildup and algae growth. They
should be filled ashore to avoid spillage on board and secured on board to
prevent movement.
Fig. 9.2 Portable fuel system
9
2
PROFICIENCY IN SURVIVAL CRAFT AND RESCUE BOATS OTHER THAN
FAST RESCUE BOATS
9.3 Fixed fuel system
a. Fuel filling point/cap
b. Anti-siphon fitting
c. Fuel tank breather
d. Fuel level indicator (float)
e.Manual priming bulb
f. External fuel filter
g. Flexible fuel line
Fig. 9.3 Fixed fuel tank
9.4 Cooling system
The outboard cooling system is the direct, raw water type. Sea water is
drawn up by an impeller pump, made of plastic or rubber, which is located in the
lower leg. It then passes through the galleries in the engine and out through the
exhaust.
A small stream of water is also bled off somewhere in the system as a tell
tale sign, indicating to the operator that water is circulating throughout the cooling
system. A thermostat maintains a minimum operating temperature. An audio
alarm and a “hot light” are also sometimes fitted.
9
3
PROFICIENCY IN SURVIVAL CRAFT AND RESCUE BOATS OTHER THAN
FAST RESCUE BOATS
Fig.9.5 The outboard motor cooling system
9.5 Internal lubrication system
Two-stroke engines need their crankcase for compression, therefore, a
circulating oil system is not possible. Their lubrication is achieved by mixing oil
with petrol in one of two systems. Oil is either poured into the fuel tank and mixed
by shaking or mixed as required by an oil injection pump known as the “Variable
Ratio Oiling” (VRO). Modern two-stroke engines are usually fitted with such
precision blend systems. Diesel and four-stroke petrol engines are lubricated by
oil circulation from the sump (crankcase).
Insufficient oil will cause the engine to overheat and eventually seize.
Excessive oil will foul the spark plugs, cause smoky exhaust and heavy carbon
deposits. Both will cause engine failure.
The required amount of oil per litre of petrol varies between 1:100 and
2:100. The manufacturer’s recommendations should be followed. Paint the
correct oil/petrol ratio on the fuel tank and use only the recommended two-stroke
outboard motor oil.
With oil injection systems, the VRO pump automatically adjusts and mixes
the amount of oil required by the engine under different conditions and speeds. It
9
4
PROFICIENCY IN SURVIVAL CRAFT AND RESCUE BOATS OTHER THAN
FAST RESCUE BOATS
may even be fitted with a no-oil alarm to warn the operator when the engine is
receiving no oil. If the reservoir of the VRO pump runs dry during engine
operation, the operator should stop the engine and refill it.
1. Lube oil tank 2. Oil injection pump 3. Carburetors 4. Fuel filter 5. Fuel pump
Fig. 9.6 Yamaha precision blend lubrication system (VRO)
9.6 Mounting an outboard motor
There are two methods of securing an outboard motor to the stern of a
vessel.
One involves the use of hand-tightened screw thread clamps. These clamp
the transom of the vessel between the engine mounting bracket and the screw
thread plates. Their tightness should be checked each time the engine is used. A
safety rope or chain should also be used to secure the motor to the vessel and
prevent the motor from dropping from the stern if the clamps get loose during
vessel operation. On larger outboard motors, the mounting bracket is usually
bolted through the transom plate.
This is a more secure method, but regular checks must be made for
looseness.
9
5
PROFICIENCY IN SURVIVAL CRAFT AND RESCUE BOATS OTHER THAN
FAST RESCUE BOATS
Motor height on the transom is an important factor in achieving optimal
performance. The motor should be as high as possible without ventilating or loss
of water pressure. This minimizes the effect of hydrodynamic drag while
underway, allowing for greater speed. Generally, the antiventilation plate should
be about the same height as, or up to two inches higher than, the keel, with the
motor in neutral trim.
Trim is the angle of the motor in relation to the hull, as illustrated below.
The ideal trim angle is the one in which the boat rides level, with most of the hull
on the surface instead of plowing through the water.
If the motor is trimmed out too far, the bow will ride too high in the water.
With too little trim, the bow rides too low. The optimal trim setting will vary
depending on many factors including speed, hull design, weight and balance,
and conditions on the water (wind and waves). Many large outboards are
equipped with power trim, an electric motor on the mounting bracket, with a
switch at the helm that enables the operator to adjust the trim angle on the fly. In
this case, the motor should be trimmed fully in to start, and trimmed out (with an
eye on the tachometer) as the boat gains momentum, until it reaches the point
where further trim adjustment results in an RPM reduction. Motors not equipped
with power trim are manually adjustable.
Fig. 9.7 Trim of outboard motor
Ventilation is a phenomenon that occurs when surface air or exhaust gas (in
the case of motors equipped with through-hub exhaust) is drawn into the
spinning propeller blades. With the propeller pushing mostly air instead of water,
the load on the engine is greatly reduced, causing the engine to race and the
prop to spin fast enough to result in cavitation, at which point no thrust is
generated at all. The condition continues until the prop slows enough for the air
bubbles to rise to the surface. The primary causes of ventilation are: motor
mounted too high, motor trimmed out excessively, damage to the antiventilation
plate, damage to propeller, foreign object lodged in the diffuser ring.
9
6
PROFICIENCY IN SURVIVAL CRAFT AND RESCUE BOATS OTHER THAN
FAST RESCUE BOATS
9.7 Starting procedure
1. Lower engine to running position and check the following
• Fuel level
• Oil level (if separate lube oil tank)
• Engine mount secure
• Propeller clear
2. Loosen air-vent screw on fuel tank cap by 2 or 3 turns (if fitted)
3. Firmly connect fuel hose to both fuel tank and engine
4. Squeeze primer bulb until it becomes firm
5. Make sure engine is in neutral, and throttle grip on handle in START
position
6. Clip lock plate onto emergency-stop switch and tie lanyard to your wrist
7. Pull out choke if starting cold engine
8. Start motor by pulling starter handle (manual) or pushing starter switch
(electric)
9. Push choke back in
10. Check for “tell tale” water stream and allow engine to warm up before
moving off.
Fig. 9.8 Starting a Yamaha outboard motor
9
7
PROFICIENCY IN SURVIVAL CRAFT AND RESCUE BOATS OTHER THAN
FAST RESCUE BOATS
9.8 On board maintenance of outboard engine
a) Fuel system maintenance
The fuel system should be regularly inspected for leaks, cracks or
malfunction.
1. Carburetor leakage
2. Fuel pump malfunction or leakage
3. Fuel tank leakage
4. Fuel hose joint leakage
5. Fuel hose cracks or other damage
6. Fuel filter leakage
7. Fuel connector leakage
8. Primer bulb leakage or damage
Fig. 9.9 Fuel system inspection
*** Cleaning the portable fuel tank and its filter
9
8
PROFICIENCY IN SURVIVAL CRAFT AND RESCUE BOATS OTHER THAN
FAST RESCUE BOATS
At least once every six months, empty the fuel tank, pour a small quantity
of detergent, and clean the tank thoroughly by shaking it.
Flush the inside with fresh water and drain it completely. Repeat the
flushing and draining procedures several times until all the detergent has been
removed from inside the tank.
Thoroughly clean the tank filter (located at the end of the suction pipe) with
detergent and air dry.
Fig. 9.10 Fuel tank and tank filter cleaning
*** Cleaning the engine fuel filter
The engine fuel filter should be cleaned every 20 hours of operation or
every month. In some countries, the fuel quality is poor so cleaning of the filter
should be carried out more frequently.
Stop the engine before removing the filter. Keep away from sparks,
cigarettes, flames or other sources of ignition.
Remove the fuel hoses and clean the filter with detergent. Air dry the filter
then put it back in place making sure the filter case is tightly screwed.
Fig.9.11 Fuel filter cleaning
b) Gear Box oil change
9
9
PROFICIENCY IN SURVIVAL CRAFT AND RESCUE BOATS OTHER THAN
FAST RESCUE BOATS
Gear-box oil should be changed every 100 hours of operation or six
monthly, whatever comes first.
Drain the gear-box into a container by opening the oil-drain plug (2) then
the oil-level plug (1). With the outboard motor in the upright position, inject the
recommended gear-box oil into the oil-drain plug hole (2) until it starts to flow out
of the oil-level plug hole (1). Insert and tighten both the drain plugs.
Fig. 9.12 Changing the gear box oil
c) External lubrication
Every three months, a recommended(marine) grease should be
injected through the specified points (grease nipples) on the outboard motor. This
procedure will ensure all moving parts operate smoothly.
Fig. 9.13 Yamaha grease points
d) Cooling system
9
10
PROFICIENCY IN SURVIVAL CRAFT AND RESCUE BOATS OTHER THAN
FAST RESCUE BOATS
The outboard motor cooling system is the part of the engine most likely to
cause problems due to salt, sand and dirt entering the system. Water pumps
should be inspected and the pump impeller changed every 200 hours of
operation or once a year, whatever comes first.
It is important to keep an eye on the tell tale water stream as a drop in flow
is likely to indicate a problem with the cooling system. It could be a blockage
around water intakes (plastic bags in the water are a common cause), sand in
the system, water pump failure, damaged pump impeller and so on. It may also
simply be a blockage of the outflow (sand) from the tell tale although the engine
cooling system is operating correctly.
Flushing the cooling system with fresh water
You can help prevent some of the problems caused by salt buildup in and
around the motor by washing the body and flushing the cooling system with fresh
water after use. To clean the cooling water passages, mount the motor in a tank
partly filled with fresh water (water level above the anti-cavitation plate). Put the
motor into neutral, start and run at low speed for a few minutes. This procedure
should be carried out at least once every month.
If possible, run the engine in fresh water on completion of each trip.
1. Water surface 2. Lowest water level
Fig. 9.14 Cooling system
e) Fuses, Batteries, Propellers, Zinc anodes
Fuses protect electrical wiring and equipment from damage or fire due to
electrical overloads. A fuse is designed to melt when overheated due to
excessive current flowing through an electrical circuit. The circuit becomes open,
no more current flows through it and therefore the electrical equipment is
protected.
9
11
PROFICIENCY IN SURVIVAL CRAFT AND RESCUE BOATS OTHER THAN
FAST RESCUE BOATS
If a fuse does “blow”, it should be replaced with one that is recommended
for that purpose.
Some spare fuses should be carried on board in case this happens. If a
fuse repeatedly “blows”, it indicates a serious problem which should be looked at
by a qualified person to find the cause.
Batteries should be inspected regularly to make sure they are secured in
place to stop movement as a vessel rolls. They should also be kept topped up
with distilled water to just above the plates. Batteries must be kept dry and clean,
and the connections tight. The terminal posts should be coated in Vaseline to
prevent them from corroding.
Batteries contain hydrogen gas, which is highly explosive so must be kept
clear of sparks, heat, flames, lit cigarettes and so on. They also contain acid,
which burns the skin so must be handled carefully.
Propellers are easily damaged by hazards in the water, hitting the bottom
and corrosion. Even slight damage can cause a reduction in speed.Propellers on
outboard motors are fitted with a shear pin, which is designed to break, if the
propeller hits a solid object. The pin is easily replaced.
If a propeller blade is bent or badly chipped, it is best to fit a new propeller as it
will not work very well. Make sure you only fit a propeller, which is recommended
by the outboard manufacturer.
Every three months, the propeller should be pulled off and the propeller shaft
greased.
A zinc anode is fitted near the propeller to prevent corrosion and should be
replaced when almost worn away. The zinc anode should be pulled off and
scrubbed once every three months.
9.9 Periodic inspection and service
The following table is given as a guideline for periodic maintenance
procedures.
These inspections and services are recommended for outboard motors used
on an average of 20 hours per month. Depending on operating conditions, the
intervals between maintenance procedures may need to be changed.
9
12
PROFICIENCY IN SURVIVAL CRAFT AND RESCUE BOATS OTHER THAN
FAST RESCUE BOATS
9
13
PROFICIENCY IN SURVIVAL CRAFT AND RESCUE BOATS OTHER THAN FAST
RESCUE BOATS
10. Handling survival craft and rescue boats in rough
weather
10.1 Using sea-anchor and oilbag
Throw out the sea anchor, or improvise a drag from the raft's case, bailing
bucket, or a roll of clothing.
A sea anchor helps you stay close to your ditching site, making it easier for
searchers to find you if you have relayed your location.
Without a sea anchor, your raft may drift over 160 kilometers in a day, making it
much harder to find you.
You can adjust the sea anchor to act as a drag to slow down the rate of travel
with the current, or as a means to travel with the current. You make this adjustment
by opening or closing the sea anchor's apex. When open, the sea anchor acts as a
drag that keeps you in the general area.
When closed, it forms a pocket for the current to strike and propels the raft in
the current's direction.
Additionally, adjust the sea anchor so that when the raft is on the wave's crest,
the sea anchor is in the wave's trough.
Fig. 10.1 Sea anchor and deployment of sea anchor
When engaged in heavy seas, where excessive pitching is being experienced,
the prudent use of oil on the surface of the water can effectively reduce the motion of
the boat. One gallon of oil is provided as standard issue to all lifeboats. This oil is
usually an animal or vegetable oil, rather than a mineral oil. Coxswain are advised
that the use of oil in limited quantities should prevent waves from breaking over the
craft and so reduce the violent movement on the craft. The oil will not reduce any
swell effects.
It is normal practice to use the oil bag in conjunction with the sea anchor and
heave the boat to, with the intention of riding the bad weather out. A small amount of
oil is used at any one time, ideally spread ahead of the craft to form an advancing
slick giving full benefit to the boat. In a towing operation the oil should similary be
1
PROFICIENCY IN SURVIVAL CRAFT AND RESCUE BOATS OTHER THAN FAST
RESCUE BOATS
spread from the fore part of the towing vessel. This will benefit both craft, the tug and
the towed vessel.
Heavy oils tends to be better than lighter oils and prevent solid water landing on
the top of the craft. The obvious danger is that the boat could be swamped or stove
in with large waves. Comparing the pollution aspect of the use of oil with the safety
of line, the priority must be in favour of safety of life at sea.
If the weather continues to to deteriorate and the boat labours badly, take the
jib halyard block off the mast head band and bend the two ends of the halyard
together to make endless fall. Haul in about two fathoms (3.7m) of the se anchor
hawser and bend the jib halyard block onto the hawser, then pay the hawser out
again.
Put a little oil in the oil bag, cork the bag and make it fast to the jib halyard. Haul
the bag a little way out towards the sea anchor. The oil will seep out of the bag and
help prevent the seas from breaking and the boat will be able to lie better to the sea
anchor. The best position for the oil bag will have to be found by experiment. If the
weather is very cold and the oil to thick to seep through the bag, prick the bag a few
times with a sail needle or something similar.
10.3 Beaching
10.3.1 Detecting land and general information regarding rafting or beaching
techniques
Detecting Land
You should watch carefully for any signs of land. There are many indicators that
land is near.
A fixed cumulus cloud in a clear sky or in a sky where all other clouds are moving
often hovers over or slightly downwind from an island.
In the tropics, the reflection of sunlight from shallow lagoons or shelves of coral reefs
often causes a greenish tint in the sky.
In the arctic, light-colored reflections on clouds often indicate ice fields or snowcovered land. These reflections are quite different from the dark gray ones caused
by open water.
Deep water is dark green or dark blue. Lighter color indicates shallow water,
which may mean land is near.
At night, or in fog, mist, or rain, you may detect land by odors and sounds. The
musty odor of mangrove swamps and mud flats carry a long way. You hear the roar
of surf long before you see the surf. The continued cries of seabirds coming from
one direction indicate their roosting place on nearby land.
There usually are more birds near land than over the open sea. The direction
from which flocks fly at dawn and to which they fly at dusk may indicate the direction
of land. During the day, birds are searching for food and the direction of flight has no
significance.
Mirages occur at any latitude, but they are more likely in the tropics, especially
during the middle of the day. Be careful not to mistake a mirage for nearby land. A
mirage disappears or its appearance and elevation change when viewed from
slightly different heights.
2
PROFICIENCY IN SURVIVAL CRAFT AND RESCUE BOATS OTHER THAN FAST
RESCUE BOATS
You may be able to detect land by the pattern of the waves (refracted) as they
approach land.. By traveling with the waves and parallel to the slightly turbulent area
marked "X" on the illustration, you should reach land.
Fig. 10.2 Wave patterns about an island
Rafting or Beaching Techniques
Once you have found land, you must get ashore safely. To raft ashore, you can
usually use the one-man raft without danger. However, going ashore in a strong surf
is dangerous. Take your time. Select your landing point carefully. Try not to land
when the sun is low and straight in front of you. Try to land on the lee side of an
island or on a point of land jutting out into the water. Keep your eyes open for gaps
in the surf line, and head for them. Avoid coral reefs and rocky cliffs. There are no
coral reefs near the mouths of freshwater streams. Avoid rip currents or strong tidal
currents that may carry you far out to sea. Either signal ashore for help or sail
around and look for a sloping beach where the surf is gentle.
If you have to go through the surf to reach shore, take down the mast. Keep
your clothes and shoes on to avoid severe cuts. Adjust and inflate your life vest. Trail
the sea anchor over the stem using as much line as you have. Use the oars or
paddles and constantly adjust the sea anchor to keep a strain on the anchor line.
These actions will keep the raft pointed toward shore and prevent the sea from
throwing the stern around and capsizing you. Use the oars or paddles to help ride in
on the seaward side of a large wave.
The surf may be irregular and velocity may vary, so modify your procedure as
conditions demand. A good method of getting through the surf is to have half the
men sit on one side of the raft, half on the other, facing away from each other. When
a heavy sea bears down, half should row (pull) toward the sea until the crest passes;
then the other half should row (pull) toward the shore until the next heavy sea comes
along.
Against a strong wind and heavy surf, the raft must have all possible speed to
pass rapidly through the oncoming crest to avoid being turned broadside or thrown
end over end. If possible, avoid meeting a large wave at the moment it breaks.
3
PROFICIENCY IN SURVIVAL CRAFT AND RESCUE BOATS OTHER THAN FAST
RESCUE BOATS
If in a medium surf with no wind or offshore wind, keep the raft from passing
over a wave so rapidly that it drops suddenly after topping the crest. If the raft turns
over in the surf, try to grab hold of it and ride it in.
As the raft nears the beach, ride in on the crest of a large wave. Paddle or row
hard and ride in to the beach as far as you can. Do not jump out of the raft until it
has grounded, then quickly get out and beach it.
If you have a choice, do not land at night. If you have reason to believe that
people live on the shore, lay away from the beach, signal, and wait for the
inhabitants to come out and bring you in.
If you encounter sea ice, land only on large, stable floes. Avoid icebergs that
may capsize and small floes or those obviously disintegrating. Use oars and hands
to keep the raft from rubbing on the edge of the ice. Take the raft out of the water
and store it well back from the floe's edge. You may be able to use it for shelter.
Keep the raft inflated and ready for use. Any floe may break up without warning.
10.3.2 Beaching a boat
- well outside the line of surf, let fly sheets, down helm and bring the boat
head to wind.
- stream sea anchor. Dredge a grapnel if one is available.
- send down the sails and strike the mast.
- unship the tiller and rudder. Ship the steering oar.
- man the oars.
- let the boat drift slowly in; keeping her head to sea.
- beach the boat stern first. Everyone should disembark over the stern, as
quickly as possible.
If you make a sandy beach with surf running ; you will have to beach the boat.
Never attempt to do this in the dark, stand-off until day light.
Altought the surf may not look much from seaward, it will be terrifying when the
boat is in it.
The important thing is to keep the boat’s head to sea all the time.
Whenever a large breaker is bearing down towards the boat, give way together
and row into it, letting the boat ride in on the back of each sea and keeping the sea
anchor out all the time, to help you keep head to sea.
If as you are coming in, the wind should drop and become an off-shore breeze,
it will not have any effect on the sea and no heed need be paid out.
When the boat is beached, no one is to be allowed to leave the boat over the
bow or amidship, because there is always a strong undertow which could carry
them out to sea.
Take the painter ashore with you. Do not lose the boat.
You will often see boats running before the surf and beaching bow first. This
method is not advised for an inexperienced crew landing on a strange beach. Do
remember to keep everyone seated as low as possible and so far as you can
towards the bow but out of the ends of the boat.
4
PROFICIENCY IN SURVIVAL CRAFT AND RESCUE BOATS OTHER THAN FAST
RESCUE BOATS
10.3.3 Beaching the liferaft
Well outside any line of surf the liferaft should be prepared for taking the beach
by inflating the double floor. The entrances to the liferaft should be in the open and
tied-off position with one or both sea anchors steamed.
The paddles should be used to maneouvre the liferaft opposite a sandy, sloping
beach, free of rocks or other obstructions. These paddles should be kept ready to
fend off and provide limited control to the raft when approaching the beach.
Prior to moving into the surf all persons should have immersion suits on and/or
lifejackets. If the choice is available the liferaft should be beached during the hours
of daylight. Since the liferaft is without motive power circumstances could well
determine when the beaching will actually take place, beyond the control of persons
inside the craft.
During the operation the liferaft should be allowed to drift towards the beach by
tripping and holding the weight on the sea anchor. A sharp lookout should be
maintained for rocks or dangerous obstructions. The paddles should be keep handy
to fend off as and when appropriate.
Once the liferaft has entered shallows two men should endeavour to
disembark and pull the craft higher up on to the beach, clear of the surf action. Other
survivors should disembark as soon as practicable with a view to saving themselves
together with as much of the life-support systems as possible. The liferaft itself
should, if possible, be salvaged. The orange canopy acts as an efficient location aid
while the liferaft provides shelter and warmth to distressed persons.
Subsequent actions following a beaching operation would be initially to check
other survivors and check for injuries/casualties. Ensure all salvaged goods are clear
of the water line and leave the liferaft exposed, clear of tree overhangs and the like.
10.3.4 Landing signals for the guidance
5
PROFICIENCY IN SURVIVAL CRAFT AND RESCUE BOATS OTHER THAN FAST
RESCUE BOATS
6
PROFICIENCY IN SURVIVAL CRAFT AND RESCUE BOATS OTHER THAN FAST
RESCUE BOATS
Fig. 10.3 Landing signals
7
PROFICIENCY IN SURVIVAL CRAFT AND RESCUE BOATS OTHER THAN FAST
RESCUE BOATS
11. Actions to take when aboard a survival craft
11.1 Initial action
11.2 Routines for survival
Initial vital action are :
- Cut the painter using the knife provided
- Stream the sea anchor, to reduce the risk of capsize and reduce the rate
of drift.
- Close up the acces points, to restrict incoming water and protect from
exposure.
- Maintain the craft, after checking for immediate damage.
Survivors should realize that by cutting the painter they are allowing the liferaft
to clear the area of immediate hazard, such as the side of an installation or the side
of a sinking parent vessel. Once the painter is cut, endeavours to move the raft into
clear water should be made by means of the paddles provided. Another method of
manoeuvre, for a circular craft, is to throw out the sea anchor and pull the liferaft
towards the weighted drogue.
It should not be the intention of survivors to clear the immediate disaster area.
The rate of drift on a inflated liferaft is considerable and unless a safe haven is within
sight, the sea anchor should be streamed at an early stage to effectively reduce the
drift and maintain the craft at the site of the last noted position.
It may be some time before the rescue services can locate survivors and it is
essential for the life raft entrances to be closed up to protect the occupants from
exposure. The floor should also be inflated at an early stage, when in cold climates,
to gain added insulation. This can also be deflated when in a warmer climate, to gain
an opposite cooling effect. Once the liferaft is closed up the natural body heat of
survivors will add to the interior warmth. When considered appropriate, ventilation
can later be allowed within the raft confines.
Survival in a liferaft needs to be managed correctly to bring about a successful
rescue. The maintenance of the craft needs to be managed by a person designated
leader. This is not to say that a dictatorial attitude should prevail, on the contrary
constructive ideas should be encouraged with a view to combined expertise
providing better solutions.
The other vital actions are :
- Sea sickness tablets : it is imperative that all survivors take the seasickness
medication as soon as practicable after boarding. Seasickness will incapacitate a
person, and to be useful a survivor needs to be both mentally and physically
aware.
- Dry out the survival craft : bale out loose from inside the liferaft/lifeboat with
balers provided. Employ one or two sponges to mop up dregs.
- Post a lookout : establish a lookout on the exterior of the liferaft .The lookout
should listen and watch for other survivors and locate other survival craft if
possible. An inside lookout should also be established to continually check the
buoyancy compartments of the liferaft and watch out for damage being
11
1
PROFICIENCY IN SURVIVAL CRAFT AND RESCUE BOATS OTHER THAN FAST
RESCUE BOATS
accidentally caused. The internal lookout can also keep a regular check on the
condition of casualties.
- Treat injured parties : the welfare of injured parties should be considered as
soon as practicable, but not to the detriment of the well-being of the liferaft. Use of
the first aid kit is limited to the prevailing conditions.
- Handbook / instructions: the waterproof instructions should be read out loud,
so that all occupants are reassured that what is being carried out is correct survival
procedure.
It is important that the “ will to survive “ is maintained throughout all survival
procedure. Good morale is essential to maintain confidence in eventual
rescue.
Circumstances may well alter the order of events in which they take place but in
general the following should occur :
- the person elected to take charge of the craft should carry out a rollcall/head count and examine the relevant expertise within the craft.
- A working routine should be established and discipline maintained from
the outset of the situation. A watch system should be brought into operation to
govern outside and inside duties.
- If survivors can communicate their location either by use of the EPIRBs,
SARTs, VHF or other similar means, these should be activated as soon as
practicable.
- A continuous lookout should be maintained in order to collect other
survivors or locate other craft, or attract the attention of the rescue service. All
wreckage should be saved if it is useful, and sharo obstructions should be given a
wide berth.
- Lookouts should be made aware of the position of pyrotechnics and how
they work, the instructions being read well before they actually need to be used. By
letting personnel read the instructions on equipment, and designating various job
functions the minds of survivors are kept active. Morale is maintained and the will to
survive is not lost.
It is essential in any situation like this to do what it is necessary to do. Very
often to do nothing is the correct approach. By resting and conserving energy there
is less burn-up of body fluid and the body’s resources.
• In stormy water, rig the spray and windshield at once. In a 20-man raft,
keep the canopy erected at all times. Keep your raft as dry as possible. Keep it
properly balanced. All personnel should stay seated, the heaviest one in the center.
• Calmly consider all aspects of your situation and determine what you and
your companions must do to survive. Inventory all equipment, food, and water.
Waterproof items that salt water may affect. These include compasses, watches,
sextant, matches, and lighters. Ration food and water.
• Assign a duty position to each person: for example, water collector, food
collector, lookout, radio operator, signaler, and water bailers.
Note: Lookout duty should not exceed 2 hours. Keep in mind and remind others that
cooperation is one of the keys to survival.
11
2
PROFICIENCY IN SURVIVAL CRAFT AND RESCUE BOATS OTHER THAN FAST
RESCUE BOATS
• Keep a log. Record the navigator's last fix, the time of ditching, the names
and physical condition of personnel, and the ration schedule. Also record the winds,
weather, direction of swells, times of sunrise and sunset, and other navigational
data.
• If you are down in unfriendly waters, take special security measures to
avoid detection. Do not travel in the daytime. Throw out the sea anchor and wait for
nightfall before paddling or hoisting sail. Keep low in the raft; stay covered with the
blue side of the camouflage cloth up. Be sure a passing ship or aircraft is friendly or
neutral be-fore trying to attract its attention. If the enemy detects you and you are
close to capture, destroy the log book, radio, navigation equipment, maps, signaling
equipment, and firearms. Jump overboard and submerge if the enemy starts
strafing.
• Decide whether to stay in position or to travel. Ask yourself, "How much
information was signaled before the accident? Is your position known to rescuers?
Do you know it yourself? Is the weather favorable for a search? Are other ships or
aircraft likely to pass your present position? How many days supply of food and
water do you have?"
11.3 Use of equipment
11.3.1 The heliograph
A small waterproof mirror. On a sunny day you can flash the sun's rays at a
passing ship or helicopter. Keep it up for long enough, and somebody may realise
that the flashing is not a window randomly catching the sun.
The mirror should be at least 10 cm square and of good optical quality. If you
can't see your face in it, bright, clear and in perfect detail, it will do a poor job of
reflecting sunlight. That describes most stainless steel mirrors.
Glass mirrors are much better although prone to break if dropped. Plastic
mirrors are lightest but need to be kept in a soft pouch so the surface does not get
scratched.
For aiming, a signal mirror may have a small hole in the middle and a thin
sighting rod, or a built-in optical aiming system.
11
3
PROFICIENCY IN SURVIVAL CRAFT AND RESCUE BOATS OTHER THAN FAST
RESCUE BOATS
Fig.11.1 Use of heliograph
11.3.2 Use of equipment
See the liferaft equipment description at page 14 of the present chapter.
11
4
PROFICIENCY IN SURVIVAL CRAFT AND RESCUE BOATS OTHER THAN FAST
RESCUE BOATS
11.4 Apportionment of food and water
11.4.1 Rations
It is recommended that no rations are issued for at least the first 24 hour period
from the time of evacuation from the parent vessel.
However, rainwater should be collected from the outset to supplement water rations
later. If the liferaft contains casualties, and they are conscious, water may be
administrated to them within the first 24 hours.
Survivors should eat only the rations provided and in no circumstances should
survivors drink or eat any of the following : seawater or urine, fish, seabirds, turtles (
protein foods such as fish absorb body fluids and should not be eaten without a
plentiful supply of water).
11.4.2 Ration issue
When rations are given out to survivors, follow the instructions. When used
correctly there is an adequate supply for the full complement of the liferaft for 4 days.
In a prolonged rescue rations should not be cut until the fourth day.
Continue to supplement rations with rainwater and/or condensation. The
second sponge can be gainfully employed to collect condensation from the inner
canopy of the liferaft. Old ice is another useful supply of water when located in ice
region.
The above procedure are intended for use with inflatable liferaft. Because of
obvious differences in construction from rigid craft the procedures may alter to suit
the circumstances, i.e. the majority of rigid craft have an engine and their role in an
emergency could differ considerably.
11.4.3 Short Water Rations
When you have a limited water supply and you can't replace it by chemical or
mechanical means, use the water efficiently. Protect freshwater supplies from
seawater contamination. Keep your body well shaded, both from overhead sun and
from reflection off the sea surface. Allow ventilation of air; dampen your clothes
during the hottest part of the day. Do not exert yourself. Relax and sleep when
possible. Fix your daily water ration after considering the amount of water you have,
the output of solar stills and desalting kit, and the number and physical condition of
your party.
If you don't have water, don't eat. If your water ration is two liters or more per
day, eat any part of your ration or any additional food that you may catch, such as
birds, fish, shrimp. The life raft's motion and anxiety may cause nausea. If you eat
when nauseated, you may lose your food immediately. If nauseated, rest and relax
as much as you can, and take only water.
To reduce your loss of water through perspiration, soak your clothes in the sea
and wring them out before putting them on again. Don't overdo this during hot days
when no canopy or sun shield is available. This is a trade-off between cooling and
saltwater boils and rashes that will result. Be careful not to get the bottom of the raft
wet.
11
5
PROFICIENCY IN SURVIVAL CRAFT AND RESCUE BOATS OTHER THAN FAST
RESCUE BOATS
Watch the clouds and be ready for any chance of showers. Keep the tarpaulin
handy for catching water. If it is encrusted with dried salt, wash it in seawater.
Normally, a small amount of seawater mixed with rain will hardly be noticeable and
will not cause any physical reaction. In rough seas you cannot get uncontaminated
fresh water.
At night, secure the tarpaulin like a sunshade, and turn up its edges to collect
dew. It is also possible to collect dew along the sides of the raft using a sponge or
cloth. When it rains, drink as much as you can hold.
11.4.4 Rainwater
You may collect more water by catching rainwater. Some parts of the inflatable
life raft canopy are designed to catch water. Rainwater catchment tubes will take the
water into storage bags on the inside of the raft. The storage bags are in the raft's
equipment container. Salt spray may dry on the canopy. The salt might be washed in
with the first few ounces of rainwater. It might be very difficult to collect
uncontaminated rainwater when the seas are rough and waves are constantly being
blown onto the canopy.
The lookout should alert everyone when it rains. Use and fill all available
containers with rainwater (such as equipment accessories bag, ration packs, and
empty tin cans). After all of the containers have been filled, everyone should drink as
much of the rainwater as they can.
Water might condense on the inside canopy of the inflatable life raft. Use one
of the cellulose sponges that is provided in the raft equipment to soak up the water.
Squeeze the water out of the sponge to drink or store. Be sure to keep a sponge
clean for this purpose.
In the Arctic Sea, you can collect "old saltwater ice." It is bluish in color with
smooth, rounded corners. It is usually pure enough to eat or drink. Do not make the
mistake of eating "salt ice." "Salt ice" is gray and milky. It should not be eaten.
11.5 Action to take to maximize detectability and location of
survival craft
The importance of a good lookout cannot be overstated. Remember, when in
a life raft, you are so small and the sea is so big that it is very easy for a search ship
or plane to overlook you. An alert lookout will make the difference in survival. Once
you have sighted a rescue ship or aircraft, use the following to attract their attention:
Signaling mirrors : Read the instructions for the particular kind of signaling
mirror in your survival equipment. Do not wait until you see a rescue craft to use the
signaling mirror. When the sun is shining, flash the mirror all around the horizon. An
aircraft can spot the flash long before you would see the aircraft. The signaling mirror
may save your life. Use it as long as the sun is shining. ( Fig.11.1)
Whistles : In calm weather, your voice can be heard only a few hundred
yards away. If you keep screaming, you will become hoarse and lose your voice. A
whistle, on the other hand, can be heard up to 4 miles away in favorable weather
conditions. It can come in handy when you are floating in the water trying to attract the
11
6
PROFICIENCY IN SURVIVAL CRAFT AND RESCUE BOATS OTHER THAN FAST
RESCUE BOATS
attention of nearby rescuers. A whistle can be used over and over again. It can be used
in fog, at night, or during the day.
Pyrotechnics: These are signals such as rockets, flares, and smoke.
Instructions for operating various brands of pyrotechnics are written by the
manufacturers. Once you are settled in your survival craft, read the instructions on each
type of pyrotechnic so you will know how to use them when a ship or aircraft is spotted.
Keep the pyrotechnics close by for immediate use, so you can signal when necessary.
Heed the following when using pyrotechnics:
- Be sure to fire the signals downwind on the lee side of the survival craft. When
firing hold them at a slight angle over the water.
Pyrotechnics have burning particles that might fall, which may burn you or damage the
raft.
- Only use smoke signals during the daytime. Smoke does not glow in the dark.
Only use pyrotechnics when you can see a ship or plane. Do not waste smoke signals.
- Rockets should be used when a vessel is spotted far away on the horizon. A
rocket will get the signal higher, where it can be seen from a greater distance.
- An aircraft directly overhead would be more likely to spot a hand flare than a
flare covered with a parachute.
EPIRBs : All EPIRBs rely on satellite relay of distress messages, but there
are distinct types. Standard 406 MHz EPIRBs such as the Satellite2 send a coded
signal with a Unique Identifier Number (UIN).
Newer GPS-enabled 406 MHz EPIRBs such as the GlobalFix iPro also transmit
position information along with the identifier. Time is saved by not having to wait for
successive passes of the satellite to determine a position fix on the beacon. All 406
MHz EPIRBs are either Category I, meaning they will deploy automatically if the
vessel sinks or Category II, meaning they need to be manually deployed.
If your EPIRB is floated, tie it to the survival craft, so it will not drift away
Automatic activation
EPIRB MP-406 is automatically activated during free emersion from depth of 4
meters after release from automatic release device.
EPIRB is automatically activated after it emerged to water by water sensor. EPIRB
can be thrown from deck to water surface after its manual release from bracket or
automatic release device. (not high then 20 meters).
Manual activation
To activate the EPIRB manually installed in bracket:
a. Upholding the EPIRB by case, pull out the pin and release the EPIRB from
bracket.
b. Turn the switcher to “ON” position.
After EPIRB activation one long flash of light-emitted beacon and alternately flashing
of “402/121” flashes by red color and then by green color show that EPIRB operates
normally.
After manual activation EPIRB can be installed in lifeboat. Avoid any conducting
things in radius of 1.5 meters or things shaded the antenna in tilt angles from 7 to 70
degrees.
After manual activation EPIRB can be also emerged to water. But note that you
should fix it to lifeboat with help of 7m floating line.
11
7
PROFICIENCY IN SURVIVAL CRAFT AND RESCUE BOATS OTHER THAN FAST
RESCUE BOATS
Fig. 11.2 EPIRBs ARC Global Fix iPro, Global Fix Pro and ACR Satellite
Fig.11.3 EPIRB secured to a liferaft
SARTs : SART installations include one or more search and rescue locating
devices. These devices may be either a radar-SART (Search and Rescue
Transponder), or (from 1.January 2010) an AIS-SART AIS-SART (AIS Search and
Rescue Transmitter). The radar-SART is used to locate a survival craft or distressed
vessel by creating a series of dots on a rescuing ship's radar display. A SART will
only respond to a 9 GHz X-band (3 cm wavelength) radar. It will not be seen on Sband (10 cm) or other radar.
The radar-SART may be triggered by any X-band radar within a range of
approximately 8 nautical miles (15 kilometers). Each radar pulse received causes it
to transmit a response which is swept repetitively across the complete radar
frequency band. When interrogated, it first sweeps rapidly (0.4 microsecond) through
the band before beginning a relatively slow sweep (7.5 microseconds) through the
band back to the starting frequency. This process is repeated for a total of twelve
complete cycles.
11
8
PROFICIENCY IN SURVIVAL CRAFT AND RESCUE BOATS OTHER THAN FAST
RESCUE BOATS
In some cases, lifeboats have passive radar reflectors, made up of light metal
at sharp angles, intended to reflect energy efficiently. They are less than ideal, as
they can be bulky and not at all useful for rafts or personal floatation gear. SART,
however, are much more efficient as radar beacons. They conserve battery life by
only operating a receiver, unless they detect an X-band pulse. When they detect
such as signal, they transmit an X-band signal in response, which will appear as a
bright radar target.
Further, the signal they send is not a single dot, but a pattern that will direct
rescuers. A SART sends a sequence of twelve pulses, timed, at first detection, so
they will display with the actual SART at the position of the first dot, and the
remainder radiating toward the edge of the screen. As the rescuers approach, the
dots will become short arcs. The closer the search radar gets to the SART, the
larger the arcs, until, when the SART is very near.
SARTs, like any marine rescue signaling device, work best when they are
elevated above sea level, distancing them from "clutter" caused by waves. If at all
possible, the SART should be mounted about 2 meters above the floor of a liferaft.
Fig.11.4 Signals of SART on radar screen
Fig.11.5 Different types of SARTs
11
9
PROFICIENCY IN SURVIVAL CRAFT AND RESCUE BOATS OTHER THAN FAST
RESCUE BOATS
Radar reflector : A radar reflector is a device which is attached to a boat to
make it more visible on radar. Radar reflectors consist of several pieces of metal
which intersect with each other to create a geometric shape which will strongly
reflect radar. There are a number of different styles and designs available, and
several boating safety organizations have tested a range of radar reflectors to see
which models and designs seem to work best, obtaining varying results which seem
to indicate that even with a radar reflector, a boat can sometimes be hard to spot on
radar.
A radar reflector reduces navigational hazards by providing a surface for radar
to bounce from, generating a return which can clearly be read on radar screens. This
will allow larger ships to clearly see small boats in front of them, which can help
captains reduce the risk of collision. Using a radar reflector also makes a craft like a
lifeboat more visible on radar, allowing it to be found more quickly.
Fig. 11.6 Different types of radar reflectors
11
10
PROFICIENCY IN SURVIVAL CRAFT AND RESCUE BOATS OTHER THAN FAST
RESCUE BOATS
2 way VHF radio:
•
•
•
•
•
•
•
•
•
Transmits and receives on VHF Channels 16 and 6
Capable of withstanding total immersion to 10 ft. (3.3 m)
Floats to prevent being lost overboard like other radios
Can be stored in a survival craft for up to 5 years
Easily User-replaceable "push/twist/lock" battery; 5 year replacement life
Operating life: 8 hours @ -20° C (-4° F), longer in temperate waters
The radio is equipped with a 5 year lithium survival battery pack
Unit meets all IMO, SOLAS and FCC requirements for survival craft two-way
VHF transceivers.
An optional rechargeable MaxCap battery pack is also available.
ACR - Survival Craft Radio 16-6 Model 2726A
The 16/6 Survival Craft Portable Two-Way VHF Radiotelephone is intended to
be used for on-scene emergency communications between survival craft and ship,
and survival craft and rescue units. The radio is equipped with a 5 year lithium
survival battery pack which is user replaceable. With the lithium battery pack
installed, the unit meets all IMO, SOLAS and FCC requirements for survival craft
two-way VHF transceivers. An optional rechargeable MaxCap™ battery pack is also
available.
SENDING DISTRESS COMMUNICATIONS
The following are a set of observations intended to help the user maximize his
success during the course of a rescue where two-way communication is possible.
1. Transmit only when the channel is clear of activity, or between other stations'
transmissions during a distress.
2. Use the world recognized expression M'AIDER or MAYDAY to call for help.
Note that MAYDAY is commonly pronounced as it is read in English, when utilized in
English speaking countries. To improve the chances of being understood
internationally, it is best to pronounce the above expression two ways:
a. The internationally recognized way, M'AIDER (in French) pronounced
phonetically as “mě - dě,” and,
b. The commonly used pronunciation in English speaking countries MAYDAY
pronounced phonetically as “mā - dā.”
To prevent the distress signal from being misunderstood, and to improve the
intelligibility of the distress call, use the two pronunciations above when calling.
Antenna height and range of communications are intimately related. In
general, a higher antenna will have a longer range than a similar lower antenna.
The typical range for a transmitting radio held at about 1.2 meters (4.0 ft) above
average water level is expected to equal 4.5 kilometers (2.8 statute miles). The
receiving shipborne antenna can extend the range if it is mounted high. Airborne
receivers greatly extend the above range (over 150 kilometers/100 miles for aircraft
flying over 1500 meters/5000 ft).
Because of the above fact, and to maximize the range of the survival craft VHF
radiotelephone, the unit should be held as high as possible without endangering the
safety of the operator.
11
11
PROFICIENCY IN SURVIVAL CRAFT AND RESCUE BOATS OTHER THAN FAST
RESCUE BOATS
CHANNEL 16 OPERATION
1. Remove control panel protective cover.
2. Strap the unit around operator's wrist, hand or glove.
3. Press ON/OFF button for one (1) second to turn ON the Survival Radio.
4. CHAN 16 button stays lit (red).
5. Listen for the tone and for the squelch action 3 seconds after activating the
unit.
6. Press blinking PUSH TO TALK button to transmit.
7. Speak loudly and clearly into speaker area from a distance of
approximately 3"to 6" (7.5 cm to 15 cm).
8. Both Volume indicators stay lit during transmission.
9. Release PUSH TO TALK button to listen.
10. Adjust Volume by pressing the respective buttons (Note: there are 4
preset volume settings from which to choose).
11. Keep transmissions to a minimum to conserve battery power.
12. Periodically verify that the CHAN 16 button is lit (red) to guard against
accidental selection of channel 6.
13. Press ON/OFF button to turn unit off.
CHANNEL 6 OPERATION
1. Remove control panel protective cover.
2. Strap the unit around operator's wrist, hand or glove.
3. Press ON/OFF button for one (1) second to turn on the Survival Radio.
4. CHAN 16 button stays lit (red)
5. Listen for the tone and for the squelch action 3 seconds after activating the
unit.
6. Press CHAN 6 button to select channel 6.
7. CHAN 6 button stays lit (green).
8. Adjust Volume by pressing the respective buttons (Note: there are 4 preset
volume settings from which to choose).
9. Press blinking PUSH TO TALK button to transmit.
10. Speak loudly and clearly into speaker area from a distance of
approximately 3"—6" (7.5 cm to 15 cm).
11. Both Volume indicators stay lit during transmission.
12. Release PUSH TO TALK button to listen.
13. Keep transmissions to a minimum to conserve battery power.
14. Press ON/OFF button to turn unit off.
11
12
PROFICIENCY IN SURVIVAL CRAFT AND RESCUE BOATS OTHER THAN FAST
RESCUE BOATS
Fig. 11.8 2 Way VHF Radio ACR Electronics
11
13
PROFICIENCY IN SURVIVAL CRAFT AND RESCUE BOATS OTHER THAN FAST
RESCUE BOATS
11
14
PROFICIENCY IN SURVIVAL CRAFT AND RESCUE BOATS OTHER THAN FAST
RESCUE BOATS
11
15
PROFICIENCY IN SURVIVAL CRAFT AND RESCUE BOATS OTHER THAN FAST
RESCUE BOATS
11
16
PROFICIENCY IN SURVIVAL CRAFT AND RESCUE BOATS OTHER THAN
FAST RESCUE BOATS
12. Methods of helicopter rescue
12.1 Communicating with the helicopter
Surface-to-air visual signals
Signals to survivors
12
1
PROFICIENCY IN SURVIVAL CRAFT AND RESCUE BOATS OTHER THAN
FAST RESCUE BOATS
In the event of a helicopter rescue situation the following points should
be noted and followed:
- All operations will be directed by the crew of the Helicopter –
follow all instructions they issue.
- Do not be distracted by the noise of the helicopter overhead,
it may be necessary to have a crewmember positioned inside the boat to maintain
radio communications with the helicopter due to the excessive noise on the outside
decks.
- Prepare well in advance of the arrival of the helicopter;
ensure crew are well briefed on correct procedures.
- Clear all obstructions on deck prior to its arrival ensure there
are no items of loose or moveable gear on deck.
- The pilot will give specific instructions regarding course and
direction he may wish you to steer, generally boats will maintain a course to give the
wind at 30 degree to the port bow, and the preferred area to conduct winching
operations is normally the port quarter. This affords the Pilot visual contact with both
the boat and his winch man.
- Due to the risk of static build up from a hovering helicopter,
follow the pilots instructions exactly with regard to earthing of a static discharge wire
prior to placing the winch man on board, generally the wire is dropped into the sea to
discharge static, prior to the commencing the operation.
- Under no circumstances should the winch line made fast at
any time to the boat.
- On arrival of the winch man on board, he will assume
command of all subsequent operations - follow his instructions at all times.
12
2
PROFICIENCY IN SURVIVAL CRAFT AND RESCUE BOATS OTHER THAN
FAST RESCUE BOATS
- Do not fire parachute flares when a helicopter is operating in
the vicinity.
12.2 Evacuation from ship and survival craft
12.3 Helicopter pick-up
Potential survivors should be aware that, in most cases, the helicopter will
first mark the location of the survivor. The pilot will fly the helicopter directly over
the survivor and then fly it away from the survivor’s position. At this time one to
three marine markers (flares) or electric sea marker lights will be dropped prior
to the start of the rescue pattern. The survivor should take caution not to touch
the markers, as they can be dangerous. A naval helicopter assigned to operate
as a rescue vehicle over water will have a rescue swimmer as a crewman.
When the rescue swimmer is deployed, the survivor should remain in the life raft
and await instruction from the swimmer.
Fig. 12.1 Rescue hook
Rescue Hook
12
3
PROFICIENCY IN SURVIVAL CRAFT AND RESCUE BOATS OTHER THAN
FAST RESCUE BOATS
The rescue hook is the primary rescue device. All other rescue devices can
only be used with the double rescue hook. In accordance with Aviation Crew
Systems Rescue and Survival Equipment, NAVAIR13-1-6.5, the large hook,
rated at 3000 pounds, shall be the only hook used to hoist personnel; the small
hook, rated at 1000 pounds, is to be used only for lightweight items such as mail.
Fig.12.2 Attaching the rescue hook to the gated D-ring
Hoisting personnel by the equipment ring or small hook can lead to failure of
the ring or hook and can result in injury or death of hoisted personnel. When wet
and cold, an individual may have difficulty handling the latch on the rescue hook.
However, by pushing down on the latch with the gated D-ring, you will force the
latch open on either the hook or the gated D-ring.
Rescue Swimmer’s Harness
During swimmer assisted rescues, the swimmer’s harness may be used to
attach the survivor to the hoist cable. When the rescue swimmer’s harness is
selected as the rescue lifting device, the rescue swimmer uses the following
procedure:
1. He approaches the survivor from the rear and pulls the chest strap
from the pocket of the rescue harness.
NOTE: When connecting to a survivor, he ensures that the chest strap on the
survivor is loosened slightly to avoid injury. If the survivor is wearing an
integrated torso harness, he uses extreme caution to ensure that the gated Drings are not disconnected before hoisting.
2. Connects the gated D-ring of the rescue swimmers harness to the
survivors lifting device. The connection of the survivor’s lifting device to the
rescue hook will negate the survivor’s quick release feature of the swimmer’s
harness.
3. Signals the aircraft “ready for pickup.” When the rescue hook is
lowered in the water, connects the lifting V-ring of the rescue swimmer’s
harness to the large rescue hook.
12
4
PROFICIENCY IN SURVIVAL CRAFT AND RESCUE BOATS OTHER THAN
FAST RESCUE BOATS
4. Signals the aircraft “ready for hoist.”
NOTE: If the survivor is wearing an integrated torso harness, the swimmer
ensures that the gated D-rings are not disconnected before hoisting. Upon
reaching the aircraft door opening and while bringing in the survivor, he ensures
that the gated D-rings do not twist and inadvertently disconnect.
5. Upon clearing the water, he places his arms and legs around the
survivor.
6. The rescue swimmer and survivor are hoisted up to the helicopter.
After reaching the helicopter, the rescue swimmer assists the survivor into the
helicopter.
Rescue Strop (Unassisted Rescue)
The rescue strop (sometimes called the horse collar or rescue sling) is
lowered attached to the rescue hook. The following is a step-by-step procedure
for the survivor to don the strop and attach the rescue hoist:
Fig. 12.3 Rescue strop (horse collar)
Fig.12.4 Hoisting the survivor’s sling
1. Stand by as the rescue device is lowered.
WARNING
12
5
PROFICIENCY IN SURVIVAL CRAFT AND RESCUE BOATS OTHER THAN
FAST RESCUE BOATS
Do not touch the rescue device until after the hook makes contact with the water.
This prevents any electrical shock that may occur because of static
electricity build up in the rescue device.
2. Swim to the rescue device. Grasp the free end of the rescue strop with
your right hand and rotate your body clockwise until the rescue strop is wrapped
around your body.
3. Attach the V-ring on the strop to the rescue hook.
4. Grasp the two pull tabs of the retainer straps and pull the straps out.
Attach the quick-ejector snap hook to the V-ring and pull the strop tightly across
your chest.
5. Ensure that the rescue strop is above the LPA/LPU waist lobes and
high on your back. Give a thumbs-up signal to the hoist operator. Wrap your
arms around the collar and keep your head down.
6. Upon clearing the water, cross your feet and remain in this position until
you are inside the helicopter.
Fig. 12.5 Grasping the rescue strop
Fig. 12.6 Attaching the V-ring
Rescue Seat
The rescue seat can be used to lower and hoist personnel performing
rescue operations from a helicopter over land or water. The rescue seat is
designed to accommodate one survivor at a time. It is a buoyant aluminum
device consisting of a hollow flotation chamber, a three-pronged seat, and a
safety strap.
W A R N I NG
Failure to assume proper position on rescue seat could result in serious injury if
hard contact is made with aircraft during hoist operation
12
6
PROFICIENCY IN SURVIVAL CRAFT AND RESCUE BOATS OTHER THAN
FAST RESCUE BOATS
Fig. 12.6 Rescue Seat
ATTACHMENT
PROCEDURE
The following is an attachment sequence for the rescue seat:
1. Swim to the rescue seat. Draw it to you and position one of the three
flukes of the seat between your legs.
2. Disconnect the snap hook of the safety strap from the V-ring, pull the
safety strap free, pass it under your arm, around your back, and under the other
arm; then reconnect the V-ring to the snap hook and tighten the strap.
3. Give a thumbs-up hand signal to the hoist operator, put your head
down to the left, and wrap your arms around the rescue seat. Upon clearing the
water, cross your legs.
RESCUE SEAT OPERATIONAL DIFFICULTIES
Ensure that the safety strap is on and that you hold tightly to the flotation
chamber. Do not lean back; it will cause the rescue seat to swing and tilt away
from the rescue hook.
The survivor must not attempt to get off the rescue seat until directed by the
crewman.
12
7
PROFICIENCY IN SURVIVAL CRAFT AND RESCUE BOATS OTHER THAN
FAST RESCUE BOATS
Fig. 12.7 Rescue seat maritime rescue procedure
Rescue Net
The rescue net is a simple and safe rescue device that can be used to hoist
two survivors into a helicopter. It is designed for multiple rescue scenarios or for
rescuing survivors who are unfamiliar with other rescue devices, such as the
rescue strop or rescue seat. A lifting ring for hoisting is located at the top or
upper portion of the net, along with locking support rods.
These rods incorporate sliding sleeves to prevent the net from collapsing
while it is occupied.
At the front of the net are two additional support rods that can be
disconnected from the top section when it is stored. When in use, the rescue net
tilts away from its open side. This design helps prevent survivors from falling out.
The following is a step-by-step procedure for the survivor to safely board the
rescue net:
1. When the net enters the water, swim to the net and position the net
with its opening directly in front of you. Grasp each of the lower support rib floats.
2. Pull yourself into the net and turn so you are facing the opening.
3. Move all the way to the back of the net with your back resting
against the rear of the net and your arms and legs completely inside. Give a
thumbs-up hand signal to the hoist operator and maintain a secure handhold
during the hoist.
The survivor must not attempt to get out of the rescue net until directed by
the crewman.
12
8
PROFICIENCY IN SURVIVAL CRAFT AND RESCUE BOATS OTHER THAN
FAST RESCUE BOATS
Fig. 12.8 Rescue net
12
9
PROFICIENCY IN SURVIVAL CRAFT AND RESCUE BOATS OTHER THAN
FAST RESCUE BOATS
13.Hypothermia
Hypothermia is the term given to the condition when deep body
temperature is lowered to less than 35 degrees C (95 degrees F) when normal
body function would be impaired. Loss of life may occur when deep body
temperature falls below 30 degrees C (86 degrees F).
In a cold environment, body heat production will automatically increase in
an effort to balance heat loss. However, if the rate of heat loss exceeds the rate
of heat production, then the body temperature must fall. The rate of heat loss is
many times greater in water than in air.
The rate of heat loss will vary depending on the difference in the
temperature between the body and the water. In tropical water hypothermia can
still occur but is likely to take far longer than in colder water, where death by
hypothermia can occur in less than 1 hour. In addition, death by drowning is a
frequent consequence of weakness caused by hypothermia. Crewmembers
should be aware that almost all seas in the world are at a temperature which can
be classed as a cold environment.
Hypothermia should always be suspected in every individual rescued at
sea.
There are three stages of uncomplicated hypothermia:
• excitation - indicated by marked shivering, confusion and disorientation
• adynamic - indicated by amnesia, slowing of the heart and possible
abnormal rhythms
• torpor.
The torpor stage may terminate in a comatose state, which can be difficult
to distinguish from death. The casualty is unconscious, there are no reflexes and
the pupils are dilated. The respiratory rate is very slow with only two or three
movements a minute, the pulse is imperceptible and heart sounds cannot be
heard, even with a stethoscope.
13
1
PROFICIENCY IN SURVIVAL CRAFT AND RESCUE BOATS OTHER THAN
FAST RESCUE BOATS
The treatment for hypothermia will of course depend on both the condition
of the survivor and the facilities available. Generally, survivors who are rational
and capable of recounting their experiences, although shivering dramatically,
merely require removal of all wet clothes and replacement with dry clothes or
blankets. Hot sweet drinks and rest in a warm environment not exceeding normal
room temperature is also recommended. However it should always be
remembered that even conscious survivors can collapse and become
unconscious shortly after rescue, they should therefore be laid down and not be
left alone. Alcohol should never be administered.
In more serious cases, where the survivor is not shivering but is semiconscious, unconscious or apparently dead, slow re-warming is essential. The
following measures will also be necessary to preserve life.
Upon rescue check the survivors breathing and listen for heart sounds. If
the surveyor is not breathing, ensure the airway is clear and start artificial
respiration immediately. Attempts at resuscitation should be continued until
medical advice can be obtained, or for at least 30 minutes.
• Prevent further heat loss due to evaporation or exposure to wind.
• Do not massage the limbs.
• Avoid all unnecessary handling, even the removal of wet clothing.
• Enclose the survivor in a plastic bag or blanket, or preferably both. The
blankets should not be warmed and it is important that the head, but not the face,
is well covered. The survivor should be placed in a room that is not too warm 15/20 degrees C (59/70 degrees F).
• Never attempt to give any fluids by mouth to an unconscious casualty.
• If the survivor is breathing but unconscious, lay him in the unconscious
position and when consciousness has been fully regained give a warm sweet
drink.
• Conscious survivors suffering from hypothermia should be laid on their
side and whenever possible, in a slightly head down attitude.
•
Maximize your chances of surviving by:
•
•
•
•
•
•
Wearing a personal flotation device (PFD)
Adopting a survival position
Keeping clothing on
Getting as much of body out of the water as possible
Remaining still and in place UNLESS a floating object, another person, or
the shore is nearby
Keeping a positive mental outlook (a will to survive really does matter)
Swimming isn't recommended unless there is little chance of being rescued and
shore is less than a mile away. Putting on a PFD after falling into cold water is
almost impossible – SO WEAR IT. If you find yourself in cold water without a
13
2
PROFICIENCY IN SURVIVAL CRAFT AND RESCUE BOATS OTHER THAN
FAST RESCUE BOATS
PFD and nothing to climb onto, tread water. Traditional drown-proofing by
repeatedly lowering your head into the water and floating speeds up heat loss.
Preventing hypothermia
Clothing
Savvy outdoors enthusiasts know that insulating critical heat loss regions
(head and neck, sides of chest, armpits, and groin) forestalls hypothermia,
frostbite, or simple cold discomfort. Layering appropriate fabrics helps preserve
body heat, also. No cotton. When wet it is worthless as an insulator and heavy.
1. "Wick, warmth, and weather." Wear a wicking fabric next to your skin,
insulating layers of fleece or wool, then an outer layer made of windproof,
watertight materials.
2. No cotton; seriously.
Clothing made of modern watertight materials like nylon and Gore-Tex are
good for keeping warmth in and cold water out. However, they require carefully
selected underclothing since the garments may not have built-in insulation. If
flotation materials are not used, then wear a PFD in addition to watertight
clothes.
Flotation
Wear a personal flotation device (PFD). For the greatest protection against
hypothermia, insulate the critical regions of your body with specifically designed
PFD. A vest PFD offers more protection than a collar-type, and will improve your
chances of survival. Insulated flotation jackets protect more of your body than
13
3
PROFICIENCY IN SURVIVAL CRAFT AND RESCUE BOATS OTHER THAN
FAST RESCUE BOATS
vest or collar-type PFDs. A hood protects the head and neck area, and a
removable seat panel reduces heat loss in the groin area.
Regardless of what you use to prevent hypothermia – life vest, float coat,
industrial work suit, survival suit, or drysuit – flotation and insulation are important
in increasing your survival time. PFDs designed to prevent hypothermia are
recommended for anyone who spends time on or near cold water. To increase
your visibility in the water, add reflective tape to your PFD. A strobe light, whistle,
or emergency position indicating radio beacon (EPIRB) will increase your chance
of being rescued.
Hypothermia symptoms
When you first fall into cold water you gasp (torso reflex). Next, your skin
begins to cool, and your body constricts surface blood vessels to conserve heat
for your vital organs. Blood pressure and heart rate increase. Muscles tense and
shiver; this produces more body heat, but results in a loss of dexterity and motor
control. As your body’s core temperature drops further, blood pressure, pulse,
and respiration rates all decrease.
As conditions worsen, your mental attitude and level of consciousness
change. Resisting help and acting irrational or confused are common indicators
of hypothermia. As your core temperature drops dangerously low, you become
semiconscious, then unconscious. Stress, shock, and low core temperatures
may cause cardiac and respiratory failure.
Hypothermia sneaks up on you, so you probably aren't the best judge of whether
or not you are hypothermic.
Signs that a person is nearing a hypothermic state include shivering, poor
coordination, and mental sluggishness. As hypothermia progresses, shivering
ceases, coordination is severely impaired, and confusion is coupled with
incoherence and irrationality. Severely hypothermic people have icy skin.
Extreme lethargy merges with unconsciousness and they might appear dead.
Since each individual reacts differently, the severity of hypothermia is best
measured by taking a core temperature reading using a rectal thermometer. Oral
measurements do not accurately measure changes in core temperature.
Treating hypothermia
First aid goals include:
• preventing further heat loss,
• re-warming the victim,
• quickly getting professional medical help as needed.
Minimize the victim’s physical exertion when removing her or him from cold
water. Rescuers may have to enter the water to get the victim. Once out of the
13
4
PROFICIENCY IN SURVIVAL CRAFT AND RESCUE BOATS OTHER THAN
FAST RESCUE BOATS
water, gently remove wet clothing and cover the person with dry clothing or
blankets. Protect the victim from wind, especially around the head and neck.
Move them to a warm environment if possible and avoid re-exposure to the
cold. Warm compresses and warm (not hot) liquids that are non-alcoholic and
non-caffeinated also help to restore heat.
Other recommendations include applying hot water bottles (maximum
temperature of 115° F (46° C) or hot, damp cloths to the victim’s head, neck,
trunk, and groin (change the water periodically to ensure a constant
temperature). Exhale into the victim’s face as s/he inhales. Immerse the victim’s
trunk but keep the arms and legs out of a warm bath (maximum temperature of
115° F (46° C).
If you are helping a hypothermic person, be gentle; internal organs are
sensitive to physical shocks. The victim should remain as inactive as possible so
blood from their cold extremities won't reach their core too quickly. A cold heart is
particularly susceptible to ventricular fibrillation.
During all first aid efforts, watch for changes in the victim’s temperature and
vital signs. “After drop" is a danger when re-warming hypothermia victims
because cold blood in the extremities returns to the body core, lowering the core
temperature further.
Hypothermia victims with moderate to critical symptoms should see a medical
professional as soon as possible.
•
•
•
•
•
•
Moderate Case: Body temperature is 93 – 90° F (33.9 – 32.2° C)
• Same as above, EXCEPT:
• Limit exercise.
Shivering may decrease or
• Offer warm, sweet liquids only if victim is
stop
fully conscious, begins to re-warm, and is
able to swallow – no alcohol.
•
Severe Case: Body temperature is 90 – 82° F (32.2 – 27.8° C)
Shivering decreases or
• Obtain medical advice/help as soon as
stops
possible.
Confusion, abnormal
• Avoid jarring victim - rough handling may
•
13
Symptoms
Treatment
Mild Case: Body temperature is 97 - 93° F (36.1 - 33.9° C)
Shivering
• Prevent further heat loss.
Cold hands and feet
• Allow body to re-warm itself.
Still alert and able to help
• Warm, sweet drinks - no alcohol.
self
• Apply gentle heat source.
Numbness in limbs, loss of
• Help victim exercise.
dexterity, clumsiness
• Keep victim warm for several hours, with
Pain from cold
head and neck covered.
5
PROFICIENCY IN SURVIVAL CRAFT AND RESCUE BOATS OTHER THAN
FAST RESCUE BOATS
•
•
•
•
•
Symptoms
behavior, i.e, loss of
reasoning and recall
Clumsiness
Slurred speech
Denies problem, may resist
help
Semiconscious or
unconscious
Muscular rigidity increases
•
•
•
•
•
•
•
•
•
•
•
13
Treatment
cause cardiac arrest or ventricular fibrillation
of heart.
No food or drink - no alcohol.
Ignore pleas of "Leave me alone." Victim is
in serious trouble.
Treat as for shock – lay down in bunk, wedge
in place, elevate feet.
Apply external mild heat to head, neck, chest,
and groin - keep temperature from dropping,
while avoiding too rapid a temperature rise.
Transport to hospital.
Critical Case: Body temperature is less than 82° (< 27.8° C)
• Assume patient is revivable; don’t give up.
• Handle with extreme care.
• Tilt the head back to open the airway – look,
listen and feel for breathing and pulse for one
Unconscious, may appear
dead
to two minutes.
• If there is breathing or pulse no matter how
Little or no apparent
breathing
faint or slow, do not give CPR, but keep a
close watch for changes in vital signs.
Pulse slow and weak, or no
pulse found
• If no breathing or pulse is detected for one to
two minutes, begin CPR immediately.
Skin cold, may be bluishgray color
Medical help is imperative – hospitalization
is needed.
Pupils may be dilated
Rigid body
• Stabilize temperature with external heat
sources, and/or use rescuer’s breath exhaled
in victim’s face in unison with victim’s
breathing.
6
PROFICIENCY IN SURVIVAL CRAFT AND RESCUE BOATS OTHER THAN
FAST RESCUE BOATS
14. Radio Equipment
14.1 Two-way VHF radiotelephone apparatus
14.1.1 Recommendation on performance standards for on-scene
(aeronautical) portable two-way VHF radiotelephone apparatus
( Annex 5 Resolution MSC 80 (70) Dec 1998)
General
The equipment should be portable and capable of being used for
on-scene communication between a ship and aircraft.
The equipment should comprise at least:
- an integral transmitter/receiver including antenna and battery;
- an integral control unit including a press-to-transmit switch; and
- a microphone and loudspeaker
The equipment should:
- be capable of being operated by unskilled personnel;
- withstand drops on to a hard surface from a height of 1 m;
- be of small size and light weight;
- be capable of operating in the ambient noise level likely to be
encountered during SAR operations;
- have provisions for the use of external microphone/headset; and
- have a colour which distinguishes it from the portable equipment
specified in resolution A.809(19).
Class of emission, frequency bands and channels
The two way radiotelephone should be amplitude-modulated and
capable of operation on the frequencies 121.5 MHz and 123.1 MHz.
Control and Indicators
An on/off switch should be provided with a positive visual indication that
the radiotelephone is switched on.
The receiver should be provided with a manual volume control by which
the audio output may be varied.
Frequency selection should be easily performed and the frequencies
should be clearly discernible.
Permissible warming-up period
The equipment should be operational within 5 s of switching on.
Safety precautions
The equipment should not be damaged by the effects of open-circuiting
or short-circuiting the antenna.
Transmitter power
The carrier power should be between 50 mW and 1.5 W.
14
1
PROFICIENCY IN SURVIVAL CRAFT AND RESCUE BOATS OTHER THAN
FAST RESCUE BOATS
Receiver output
The audio output should be sufficient to be heard in the ambient noise
level likely to be encountered during SAR operations.
In the transmit condition, the output of the receiver should be muted.
Power supply
The source of energy should be a primary battery integrated in the
equipment and may be replaceable by the user. In addition, provision may be
made to operate the equipment using an external source of electrical energy.
The primary battery should have sufficient capacity to ensure 8-hour
operation at its highest rated power with a duty cycle of 1:9. This duty cycle is
defined as 6-second transmission, 6-second reception above squelch opening
level and 48-second reception below squelch opening level.
Primary batteries should have a shelf life of at least 2 years
Labelling
In addition to the general requirements specified in resolution A.694(
17), the following should be clearly indicated on the exterior of the equipment:
- brief operating instructions;
- expiry date for the primary batteries; and
- the following text: "only for emergency communications with
aircraft.
MCA : Radio equipment and searchlights for survival craft, Chapter 12
Siting of equipment
The equipment should be kept in a suitable place ready to be moved into
a survival craft in case of emergency. Where lifeboats using ‘freefall
launching’ techniques are carried, and not provided with a fixed VHF
installations, each should be provided with appropriate means to securely
retain the portable equipment during launching. In ships where the disposition
of superstructures or deck houses is such as to involve substantial fore and
aft separation, all portable radio apparatus should not be located in the same
area of superstructure or in the same deck house. Where the equipment is
additionally used to comply with the appropriate 1999 LSA Regulations for
‘On-board communications and alarm systems’ or for any other purpose,
sufficient sealed primary batteries should be kept at a suitable place ready to
be moved into a survival craft in case of emergency, ideally with any other
items of equipment that may be required in such an eventuality.
Power supply
The source of energy should be integrated in the equipment although
provision may be made to operate the equipment using an external source of
electrical energy. The source of electrical energy should have sufficient
14
2
PROFICIENCY IN SURVIVAL CRAFT AND RESCUE BOATS OTHER THAN
FAST RESCUE BOATS
capacity to ensure at least 8 hour operation at the highest rated power of the
equipment with a duty cycle of 1:9. This duty cycle is defined as 6 seconds
transmission, 6 seconds reception above squelch opening level and 48
seconds below squelch opening level. The source of energy should comply
with one of the following:
(a) A sealed primary battery which should be of a type which will not emit
substances which may be injurious to personnel, or damaging to the
equipment or fabric of the survival craft. This requirement should be met
whether the power source is in a stored condition or normal use. The battery
should be clearly marked with the shelf life whose expiry should not be less
than 2 years from the date of survey. The battery should have sufficient
capacity so that routine testing of 2 minutes once per week should not reduce
its capacity below that needed to conform to the operational requirements
recommended above.
OR
(b) A re-chargeable battery which should not emit substances which may
in any way be injurious to personnel, or damaging to the equipment or fabric
of a survival craft. This requirement should be met whether the power source
is in a stored condition or in normal use. Batteries that have been in service
for more than two years should not be used for this purpose. The battery
should be capable of fulfilling the capacity requirements recommended above
at all times. A means of automatically charging such batteries should be
provided which should be capable of recharging them to minimum capacity
requirements within 10 hours from the ship’s main source of electrical power.
Equipment for which the source or energy is intended to be userreplaceable should be provided with a dedicated primary battery for use in the
event of a distress situation. This battery should be equipped with a nonreplaceable seal to indicate that it has not been used.
Equipment for which the source or energy is intended to be non-userreplaceable should be provided with a primary battery. The portable two-way
radiotelephone equipment should be fitted with a non-replaceable seal to
indicate that it has not been used.
Primary batteries should have a shelf life of at least 2 years, and if
identified to be user replaceable should be either or a highly visible
yellow/orange colour or marked with a surrounding yellow/orange marking
strip.
Batteries not intended for use in the event of a distress should be of a
colour or marking such that they cannot be confused with batteries intended
for such use.
Batteries should be disposed of strictly in accordance with manufacturer’s
instructions.
14
3
PROFICIENCY IN SURVIVAL CRAFT AND RESCUE BOATS OTHER THAN
FAST RESCUE BOATS
14.1.2 Description and technical details of two-ways VHF
- Transmits and receives on VHF Channels
16 and 6
- Capable of withstanding total immersion to
3.3 m
- Floats to prevent being lost overboard like
other radios
- Can be stored in a survival craft for up to 5
years
- Easily replaceable "push/twist/lock" battery;
5 year replacement
Specification for ACR SR-102 :
Operating frequency:
Channel 16
Channel 6
• Power output (ERP):
Frequency control:
Modulation type:
Max. modulation:
Audio width:
Sensitivity (12dB SINAD):
Audio output:
Battery type:
Storage life:
Operating life under typical duty:
Temperature Range:
Altitude:
Water resistance:
Dimensions (less antenna):
Antenna:
Weight (includes battery):
156.800 MHz, Distress Calling
156.300 MHz, Communications/USCG
500mW ± 2.5dB
Quartz crystal (±.001%)
Phase
± 5kHz
300/2500Hz
1.0 µV
300 mW
Primary: lithium
10 years
8 hours @ -20°C
–20°C to +60°C
0 to 12000 m
3m depth, max up to 5 minutes
193 × 99 × 43 mm
292 mm
0.5 kg
The 16/6 Survival Craft Portable Two-Way VHF Radiotelephone is
intended to be used for on-scene emergency communications between
survival craft and ship, and survival craft and rescue units. The radio is
equipped with a 5 year lithium survival battery pack which is user replaceable.
With the lithium battery pack installed, the unit meets all IMO, SOLAS and
FCC requirements for survival craft two-way VHF transceivers.
The Survival Radio and its protective cover shall be packed with the
ship’s survival craft or in a survival suit. When not packed with a life raft, the
radiotelephone should be stored in an accessible place, as close to the
survival craft as possible.
All radio controls are flat-panel, push-types located on the front surface
of the radio.
14
4
PROFICIENCY IN SURVIVAL CRAFT AND RESCUE BOATS OTHER THAN
FAST RESCUE BOATS
Fig.14-1 SR-102 Main feature
Operating indicators
CHAN 16 : The push switch includes a RED light which will be illuminated
when the radio is ON and Channel 16 is selected.
CHAN 6 : The push switch includes a GREEN light which will be illuminated
when the radio is ON and Channel 6 is selected.
VOL ▲ ▼ : Both of these push switches light up YELLOW when the PTT
switch is depressed - indicates that radio is transmitting.
PTT : The push switch blinks YELLOW at a slow rate to assist operator in
locating the PTT switch in darkness.
CHANNEL 16 OPERATION (CHAN 16)
1. Remove control panel protective cover.
2. Strap the unit around operator's wrist, hand or glove.
3. Press ON/OFF button for one (1) second to turn ON the Survival Radio.
4. CHAN 16 button stays lit (red).
5. Listen for the tone and for the squelch action 3 seconds after activating the
unit.
6. Press blinking PUSH TO TALK button to transmit.
7. Speak loudly and clearly into speaker area from a distance of
approximately 3"to 6" (7.5 cm to 15 cm).
8. Both Volume indicators stay lit during transmission.
9. Release PUSH TO TALK button to listen.
14
5
PROFICIENCY IN SURVIVAL CRAFT AND RESCUE BOATS OTHER THAN
FAST RESCUE BOATS
10. Adjust Volume by pressing the respective buttons (Note: there are 4
preset volume settings from which to choose).
11. Keep transmissions to a minimum to conserve battery power.
12. Periodically verify that the CHAN 16 button is lit (red) to guard against
accidental selection of channel 6.
13. Press ON/OFF button to turn unit off.
CHANNEL 6 OPERATION (CHAN 6)
1. Remove control panel protective cover.
2. Strap the unit around operator's wrist, hand or glove.
3. Press ON/OFF button for one (1) second to turn on the Survival Radio.
4. CHAN 16 button stays lit (red).
Y1-03-0079-1C 8
5. Listen for the tone and for the squelch action 3 seconds after activating the
unit.
6. Press CHAN 6 button to select channel 6.
7. CHAN 6 button stays lit (green).
8. Adjust Volume by pressing the respective buttons (Note: there are 4 preset
volume settings from which to choose).
9. Press blinking PUSH TO TALK button to transmit.
10. Speak loudly and clearly into speaker area from a distance of
approximately 3"—6" (7.5 cm to 15 cm).
11. Both Volume indicators stay lit during transmission.
12. Release PUSH TO TALK button to listen.
13. Keep transmissions to a minimum to conserve battery power.
14. Press ON/OFF button to turn unit off.
BATTERY SAVE FEATURE
To conserve battery life, the unit will automatically shut-off following a
period of approximately 20- 30 minutes of idle radio activity.
SENDING DISTRESS COMMUNICATIONS
The following are a set of observations intended to help the user maximize
his success during the course of a rescue where two-way communication is
possible.
1. Transmit only when the channel is clear of activity, or between
other stations' transmissions during a distress.
2. Use the world recognized expression M'AIDER or MAYDAY to
call for help. Note that MAYDAY is commonly pronounced as it is read in
English, when utilized in English speaking countries. To improve the chances
of being understood internationally, it is best to pronounce the above
expression two ways:
a. The internationally recognized way, M'AIDER (in French)
pronounced phonetically as “mě - dě,” (see any French language instruction
book for further details) and,
b. The commonly used pronunciation in English speaking
countries MAYDAY pronounced phonetically as “mā - dā.”
14
6
PROFICIENCY IN SURVIVAL CRAFT AND RESCUE BOATS OTHER THAN
FAST RESCUE BOATS
To prevent the distress signal from being misunderstood, and to improve
the intelligibility of the distress call, use the two pronunciations above when
calling.
EXAMPLE: “M’AIDER MAYDAY M’AIDER THIS IS MARY JANE WXT599
WXT599 WXT599”.
Fig. 14-2 Control panel
Always use the ICAO Convention (Convention on International Civil
Aviation) recognized alphabet for spelling.
ICAO recognized alphabet:
A Alpha
N November
B Bravo
O Oscar
C Charlie
P Papa
D Delta
Q Quebec
E Echo
R Romeo
F Foxtrot
S Sierra
G Golf
T Tango
H Hotel
U Uniform
I India
V Victor
J Juliet
W Whiskey
K Kilo
X X-ray
L Lima
Y Yankee
M Mike
Z Zulu
14
7
PROFICIENCY IN SURVIVAL CRAFT AND RESCUE BOATS OTHER THAN
FAST RESCUE BOATS
EXAMPLE: “M’AIDER MAYDAY M’AIDER THIS IS MARY JANE Whiskey Xray Tango 599 Whiskey X-ray Tango 599 Whiskey X-ray Tango 599”
To acknowledge that a transmission has been received and understood
in its entirety, simply use the expression “R R R” spoken as “Romeo Romeo
Romeo” (“R” stands for received). Note: some radio operators use the
expression “Roger” instead of “Romeo”.
The typical range for a transmitting radio held at about 1.2 meters (4.0 ft)
above average water level is expected to equal 4.5 kilometers (2.8 statute
miles). The receiving shipborne antenna can extend the range if it is mounted
high. Airborne receivers greatly extend the above range (over 150
kilometers/100 miles for aircraft flying over 1500 meters/5000 ft).
Because of the above fact, and to maximize the range of the survival craft
VHF radiotelephone, the unit should be held as high as possible without
endangering the safety of the operator.
14.2 Emergency position-indicating radio beacons (EPIRBs)
14.2.1 Requirements for the carriage of EPIRBs
MCA : Radio equipment and searchlights for survival craft, Chapter 12
General requirements
The equipment should be clearly marked with the manufacturer’s
identity, type or model identification, serial number, brief operating instructions
and the expiry date for the primary batteries used.
The minimum safe distance from the standard or magnetic steering
compass at which the equipment may be installed should also be marked;
where no marking exists surveyors should note the instructions provided in
the MCA’s publication ‘‘Survey of Merchant Shipping Navigational Equipment
Installations—Instructions for the Guidance of Surveyors’’, when considering
the arrangements for location.
The surveyor should ensure the identity of the beacon fitted to the ship
correlates with the information held on the appropriate beacon register.
The arrangements made in individual ships should be determined to the
satisfaction of the marine surveyor in consultation with the radio surveyor.
Performance standards
The EPIRB should conform with a performance standard adopted by the
IMO through Resolution. If operating on 406 MHz the EPIRB should conform
with:
12.3.2.1 if installed on or after 23 November 1996, Assembly Resolution
A.810(19);
12.3.2.2 if installed before 23 November 1986, Assembly Resolution
A.763(18); or
14
8
PROFICIENCY IN SURVIVAL CRAFT AND RESCUE BOATS OTHER THAN
FAST RESCUE BOATS
12.3.2.3 if installed before 4 November 1994, Assembly Resolution A.763(18),
except that they need not be provided with the 121.5 MHz homing beacon
required by 2.3.14 of part A thereof.
If operating on the INMARSAT system the EPIRB should conform with:
12.3.2.1 if installed on or after 23 November 1996, Assembly Resolution
A.812(19); or
12.3.2.2 if installed before 23 November 1996, Assembly Resolution
A.661(16).
Testing of equipment
Satellite EPIRBs are provided with a ‘self-test’ facility which a surveyor
may wish to activate.
Should the beacon ‘fail’ the ‘self-test’ it must be withdrawn from service.
The EPIRB should not be removed from its float-free arrangements other than
by an appropriately qualified engineer.
Siting of equipment
The installed EPIRB should be located in such a position that:
- upon foundering, it will automatically float free from the ship without
hindrance from any item of equipment or superstructure;
- objects, especially those within 1 metre of the antenna which cause
a shadow sector or greater than 2 degrees, are likely to significantly degrade
the antenna performance of the equipment; and
- it may be easily released manually and brought to the survival
craft.
Surveyors should pay particular attention to requirement .1 and great care
should be taken when assessing the appropriateness, or otherwise, of the
location adopted. Under no circumstances should this requirement be
compromised to fulfil any additional functions the EPIRB may be required to
perform. Where this is not practicable using a single EPIRB, additional
equipment should be provided.
Float free arrangements
The float free release and activation arrangements should comply with
the performance standards adopted by the IMO through Assembly Resolution
A.662(16).
The float free arrangements should carry a label indicating clearly the
operating instructions for manual release.
The installed EPIRB should be capable of local manual activation
(remote activation may also be provided from the navigating bridge) while the
device is installed in the float-free mounting.
14
9
PROFICIENCY IN SURVIVAL CRAFT AND RESCUE BOATS OTHER THAN
FAST RESCUE BOATS
Any connection to the EPIRB, for example for the purpose of supply of
data or power, should be corrosion resistant, protected against accidental
activation and must not in any way inhibit the release of the beacon in times of
emergency. Any hydrostatic release provided should be clearly marked with
the date of expiry and tested in accordance with the manufacturer’s
instructions to ensure satisfactory operation.
14.2.2 General
EPIRBs (pronounced ee-pirbs), formally Emergency Position Indicating
Radiobeacons, are devices that trasmit a digital signal on the international
distress signal frequency 406 MHz. Designed to work with satellites, EPIRBs
are detectable by COSPAS-SARSAT satellites, which orbit the poles, and by
the GEOSAR system which consists of GOES weather satellites and other
geostationary satellites.
There are two types of EPIRBs - Category I or Category II that are
approved for use in the United States today. Both transmit only on 406 MHz.
In February of 2009, the FCC phased out the use of EPIRBs that
transmitted on 121.5 MHz frequency (Class A, B, and S), and these devices
may no longer be used, marketed or manufactured in the U.S. If you have one
of these, please replace it with an approved 406 MHz device.
Category I EPIRBs float-free and are automatically activated by immersion in
water, and they are detectable by satellite anywhere in the world. Category II
EPIRBs are similar to Category I, except in most cases they are manually
activated, however some models can be automatically activated.
EPIRBs use a special type of lithium battery designed for long-term, lowpower consumption operation. The battery must be replaced by a dealer
approved by the manufacturer during the specified time or it will not work
properly. Also, consumers should be aware when ordering EPIRBs online,
added shipping charges may apply for hazardous material. Some EPIRBs and
PLBs are being manufactured that do not use hazardous material batteries.
Category I EPIRBs float-free and are automatically activated by
immersion in water, and they are detectable by satellite anywhere in the
world.
Category II EPIRBs are similar to Category I, except in most cases they
are manually activated, however some models can be automatically activated.
EPIRBs use a special type of lithium battery designed for long-term, lowpower consumption operation. The battery must be replaced by a dealer
approved by the manufacturer during the specified time or it will not work
properly. Also, consumers should be aware when ordering EPIRBs online,
added shipping charges may apply for hazardous material. Some EPIRBs and
PLBs are being manufactured that do not use hazardous material batteries.
Proper registration of your 406 MHz satellite emergency positionindicating radio beacon (EPIRB) is intended to save your life, and is mandated
by Federal Communications Commission (FCC) regulations.
The Coast Guard is enforcing this FCC registration rule.
14
10
PROFICIENCY IN SURVIVAL CRAFT AND RESCUE BOATS OTHER THAN
FAST RESCUE BOATS
According to the Coast Guard, "if the EPIRB is properly registered, [they]
will be able to use the registration information to immediately begin action on
the case. If the EPIRB is unregistered, a distress alert may take as much as
two hours longer to reach the Coast Guard over the international satellite
system. If an unregistered EPIRB transmission is abbreviated for any reason,
the satellite will be unable to determine the EPIRB's location, and the Coast
Guard will be unable to respond to the distress alert. Unregistered EPIRBs
have needlessly cost the lives of several mariners since the satellite system
became operational."
14.2.3 COSPAS-SARSAT EPIRBs
Compared with simple 121.5 MHz ELTs a 406,025-MHz or 406,028MHz EPIRB provide for some advantages. COSPAS-SARSAT satellites for
406-MHz beacons compute and store the estimated position of the EPIRB
when passing by. When reaching the next ground station these satellites
forward the stored distress call with the estimated position. Since COSPASSARSAT satellites are of polar surrounding LEO type, they guarantee a global
coverage. A 406 MHz EPIRB should be programmed with the owner's
particulars like serial number, MMSI or call-sign. This allows SAR forces to
identify the disabled vessel.
COSPAS/SARSAT satellite transponders are payloads on (e.g.) weather
satellites owned by the USA, Russia, France and Canada. The principle of
position estimation remains the same as with 121,5 MHz beacons, but
COSPAS/SARSAT 406-MHz EPIRBs carry very stable oscillators so-called
OCXOs (oven controlled crystal oscillators) or TCXO (temperature
compensated crystal oscillators). They improve the Doppler measurent.
14
11
PROFICIENCY IN SURVIVAL CRAFT AND RESCUE BOATS OTHER THAN
FAST RESCUE BOATS
Depending on the satellite geometry and the ship's drift the position error goes
down to 1 to 50 NM.
With COSPAS/SARSAT 406-MHz EPIRBs the amount of false alarms
could be reduced dramatically but is still quite high. The major disadvantege
of LEO satellites is the dependency of satellites in the low earth orbit. The
disabled vessel has to wait for the satellite to pass by. Depending on the
lattitude this may take hours. And a delay of 15 minutes to 4 hours may apply.
COSPAS/SARSAT EPIRBs like the navtec global-C plus EPIRB can be fitted
with GPS-receivers. This improves the position estimation to an accurate
position indication. GPS fitted COSPAS/SARSAT EPIRBs like the navtec
global-C plus EPIRB can operate via geostationary satellites (GEOSAR) when
available and when the geometry allows for reaching the satellite.
How will a 406MHz distress beacon help save your life?
It works. Only 406MHz distress beacons are monitored by satellite.
It’s faster. Once activated, the signal from a 406MHz distress beacon
is picked up almost instantly by satellite. The satellites supporting the old
121.5MHz and 243MHz distress beacons have been deactivated and can can
no longer determine your location - this could cost you your life.
• It’s more Accurate. 406MHz distress beacons give rescuers a search
area of approximately 20 square kilometres. However, we strongly
recommend GPS equipped EPIRB’s as they reduce the search area down to
only a few square metres. This takes the ‘search’ out of search and rescue,
and increases your chances of survival. Any 406MHz beacon is a huge
improvement on the old 121.5/243MHz beacons.
• It brings the right response. With 406MHz distress beacons, alerts
are cross-referenced against a database of registered owners. Having this
information improves rescuers’ ability to help you in an emergency, and to
respond appropriately. Being able to contact you (or a person you nominate)
also saves time and resources from being wasted on false alerts – out of the
1300 121.5MHz activations in the last two years, only 9% were for a real
emergency.
•
•
The COSPAS-SARSAT system provides distress alert and location
information to search and rescue authorities anywhere in the world for
maritime, aviation and terrestrial users in distress.
There are two satellite arrays carrying the COSPAS-SARSAT system. The
principal array is LEOSAR (Low Earth Orbit Search and Rescue) which has
seven satellites in polar and near-polar orbits. The orbits of these satellites
are arranged to scan the entire surface of the Earth; on average, a satellite
comes into view every 45 minutes.
Distress transmissions from EPIRBs are picked up by the satellites and
retransmitted to ground receiving stations, which then pass the message to
the appropriate rescue organisation. On average, the total delay from
activation of an EPIRB to the message being received by the rescue services
is 90 minutes.
COSPAS-SARSAT is in an advanced stage of commissioning the second
satellite array, GEOSAR (Geostationary Search and Rescue). This array uses
14
12
PROFICIENCY IN SURVIVAL CRAFT AND RESCUE BOATS OTHER THAN
FAST RESCUE BOATS
geostationary satellites which are always in view (over their area of coverage),
so that reception of the EPIRB signal is virtually instantaneous.
Fig. 14-3 LEOSAR satellite path and scan footprint
Fig. 14-4 GEOSAR coverage
Description of 406 MHz McMurdo EPIRB
The EPIRB is a powerful self-contained distress transmitter. It is powered
by a Lithium battery that has a replacement interval of 5 years. An EPIRB is
intended to be a one-shot device; once activated it can operate for at
least 48 hours. It operates best while floating in water, but it can also be
operated while on board or in a liferaft.
14
13
PROFICIENCY IN SURVIVAL CRAFT AND RESCUE BOATS OTHER THAN
FAST RESCUE BOATS
Fig. 14-5 McMurdo EPIRB
The key components of your EPIRB are:
- Antenna: This is a flexible whip. It must be near vertical when
operating. If the antenna gets bent, gently straighten it out.
- Strobe light: This is the glass U -tube visible through the clear lens
dome. When the EPIRB is activated this will flash every few seconds.
- Red lamp : Visible through the clear lens dome at the rear of the
EPIRB. This stays on or flashes to show which mode the EPIRB is in.
- Program point: A dimple in the clear dome, through which your
supplier can optically input the coded message unique to your EPIRB.
You must register the coded message with local authorities.
- READY button: Press this key once to de-activate the EPIRB. Hold
it down to run the built-in self-test, which checks basic operation.
- ON button : Press this key to activate the EPIRB manually. The key
is protected by a sliding door which is fitted with a security seal.
- Sea switch : The two screw heads below the keys are sea switch
contacts. Submerge these in water to automatically activate the EPIRB.
- Lanyard : Pull the lanyard spool down to free it. Use the cord to
tether the EPIRB to a survival craft.
Never tie the EPIRB to your vessel.
14
14
PROFICIENCY IN SURVIVAL CRAFT AND RESCUE BOATS OTHER THAN
FAST RESCUE BOATS
Float-free enclosure
Fig. 14-6 Free float
The diagram above illustrates the automatic release sequence:
1. As the vessel sinks, the enclosure fills with water. The HRU
contains a blade which is released due to water pressure acting on a
diaphragm.
Before it reaches a depth of 4 metres, the HRU will operate and cut the
plastic rod, releasing the coil spring.
2. The spring pushes the EPIRB and the enclosure lid outwards. As
the lid pivots off it disengages from the screw head that helped hold it in
place. The lid is weighted so it rolls over and falls away.
3. As the EPIRB floats away from the lid, it moves out of range of
the magnet. Once away from the magnet its sea switch becomes armed.
4. The sea switch activates. The EPIRB then floats on the surface
with its strobe light flashing. After 2 minutes it makes its first distress
transmission.
If you need to activate your EPIRB manually, it can be freed from the
enclosure after pulling out the R-shaped retaining pin and removing the lid.
Manual activation
If the vessel is not sinking but there is imminent danger, remove the
EPIRB from its
bracket and activate it manually as shown below. Note that once activated it
will flash immediately, but it will not transmit a distress call for 2 minutes. This
gives you a chance to turn it off if you activated it in error.
Once activated the EPIRB must have its antenna as upright as possible
and it must have a clear view of the sky for proper operation. Laying it on its
side or placing it next to a metal wall will impair its range and may fail to alert
the rescue services. Avoid handling the antenna, as this will also impair
performance.
14
15
PROFICIENCY IN SURVIVAL CRAFT AND RESCUE BOATS OTHER THAN
FAST RESCUE BOATS
Fig 14-7 Manual activation
Deactivation
If your EPIRB has been activated for a cumulative period in excess of 2
hours then its battery will need replacing. This is necessary to ensure that in
an emergency it will operate for the full 48 hours required by government
regulations.
If the EPIRB was activated by mistake or if the emergency ends then the
EPIRB can be reset back to its “ready” state as follows:
- Remove EPIRB from any water and dry its sea switch contacts
- Wait 8 seconds for sea switch to turn off
If EPIRB is still flashing then it must have been turned on manually:
- Slide the switch cover fully to the right.
- Press and release READY button.
If EPIRB is still flashing then it has a fault.
Fig. 14-8 Deactivation of EPIRB
14
16
PROFICIENCY IN SURVIVAL CRAFT AND RESCUE BOATS OTHER THAN
FAST RESCUE BOATS
How does it work ?
Your EPIRB contains two radio transmitters: one operating at 406 MHz
which transmits an alert which can be received by satellites, and one
operating at 121.5 MHz which transmits a signal which can be received by
overflying aircraft and Search & Rescue (SAR) homing receivers. When you
activate the EPIRB, both transmitters start broadcasting signals. Providing the
EPIRB’s batteries are in good condition, the transmission will continue for a
minimum of 48 hours.
The 406 MHz alert signal can be detected by SAR satellites. American,
European and Indian authorities operate a series of satellites in low-earth and
geostationary orbits to detect and locate aviators, mariners and land-based
users in distress. The satellites, together with a world-wide network of ground
stations and Mission Control Centres (MCC) form the International COSPASSARSAT Program whose mission is to relay distress signals to the
international search and rescue community.
Ground stations track these satellites and process the distress signals to
obtain a location (by using Doppler location techniques*) of the distress. The
processed information is then forwarded to an MCC where it is combined with
other location and registration information and passed to a Rescue
Coordination Centre (RCC) which alerts the appropriate SAR authorities.
Successive satellite passes refine and confirm this information. Alternatively,
some beacons operating at the 406 MHz frequency can use the GPS system
to obtain a very accurate position. This position is then transmitted as part of
the distress signal.
The network of orbiting satellites can detect signals over the entire
surface of the earth; in addition, there are four geostationary satellites that
appear fixed in position and which detect signals over enormous areas
(approximately one-third of the surface of the earth, but excluding Polar
regions). However, the geostationary satellites, because they are fixed with
respect to the earth, cannot determine the position of the EPIRB using
Doppler.
An EPIRB should not be switched off once activated for a distress
situation until the SAR agency directs this.
DO:
- Make sure you switch on the EPIRB
- Hold the EPIRB up as high as possible.
Note: the high intensity flashing strobe light may cause discomfort if viewed
for prolonged periods.
14
17
PROFICIENCY IN SURVIVAL CRAFT AND RESCUE BOATS OTHER THAN
FAST RESCUE BOATS
Carriage requirements for GMDSS in area A1
1. One VHF radio capable of DSC (Digital Selective Calling) on channel
70 and voice communications on channel 16, 13 and 6.
2. One SART (Search And Rescue Transponder) if under 500 gross tons
otherwise two.
3. Two approved lifeboat portable VHF radios if under 500 gross tons
otherwise two.
4. One Navtex receiver or an Inmarsat EGC receiver if operating in an
area where Navtex is not offered.
5. One 406 MHz or a 1.6 GHZ satellite EPIRB, (Emergency Position
Indicating Radio Beacon). Note: a VHF DSC EPIRB may replace the 406 MHz
and 1.6 MHz EPIRB if operating exclusively in area A1.
14.3 Search and rescue transponder beacons (SARTs)
General requirements, siting and marking of equipment
The radar transponders required by the Regulations should comply with
the performance standards adopted by the IMO through Assembly Resolution
A.802(19). The equipment should be provided with simple instructions for
operation.
The equipment should be kept on either side of the ship in a suitable
place ready to be moved into a survival craft in case of emergency; where
only one is required, it should be located at a suitable location for moving into
the survival craft. In ships where the disposition of superstructures or deck
houses is such as to involve substantial fore and aft separation and, where
two transponders are carried, they should not be located in the same area of
superstructure or in the same deck house.
The equipment should be clearly marked with the manufacturer’s
identity, type or model identification, serial number, brief operating
instructions and the expiry date for the primary batteries used.
The minimum safe distance from the standard or magnetic steering compass
at which the equipment may be installed should also be marked;
The arrangements made in individual ships and/or survival craft should
be determined to the satisfaction of the marine surveyor in consultation with
the radio surveyor who should inspect the equipment as part of each survey
of Life-Saving Appliances.
Securing the equipment in lifeboats
Arrangements should be made in every lifeboat carried by the ship for
erecting and securing the radar transponder at a height of not less than 1
metre above the water line. It is acceptable to mount the equipment within the
lifeboat; e.g.‘hang’, including enclosed lifeboats of GRP construction, the
equipment will operate satisfactorily. Alternatively the radar transponder may
form an integral part of the survival craft.
Where lifeboats using ‘free-fall launching’ techniques are carried each
should be provided with appropriate means to securely retain the transponder
14
18
PROFICIENCY IN SURVIVAL CRAFT AND RESCUE BOATS OTHER THAN
FAST RESCUE BOATS
during launching. Alternatively the transponder should form an integral part of
each lifeboat.
14.3.1 SART principle of operation
Actuating a SART enables a survival craft to show up on a search
vessel's radar display as an easily recognised series of dots. RADAR (radio
detection and ranging) is a device carried by most ships which is used to
determine the presence and location of an object by measuring the time for
the echo of a radio wave to return from it, and the direction from which it
returns.
A typical ship's radar will transmit a stream of high power pulses on a
fixed frequency anywhere between 9.2GHz and 9.5GHz. It will collect the
echoes received on the same frequency using a display known as a Plan
Position Indicator (PPI), which shows the ship itself at the centre of the
screen, with the echoes dotted around it. Echoes further from the centre of the
screen are thus further from the ship and the relative or true bearing of each
echo can be easily seen.
The SART operates by receiving a pulse from the search radar and sending
back a series of pulses in response, which the radar will then display as if they
were normal echoes.The first return pulse, if it sent back immediately, will
appear in the same place on the PPI as a normal echo would have done.
Subsequent pulses, being slightly delayed, appear to the radar like echoes
from objects further away.
A series of dots is therefore shown, leading away from the position of the
SART. This distinctive pattern is much easier to spot than a single echo such
as from a radar reflector. Moreover, the fact that the SART is actually a
transmitter means that the return pulses can be as strong as echoes received
from much larger objects.
A complication arises from the need for the SART to respond to radars
which may be operating at any frequency within the 9GHz band. The method
chosen for the SART is to use a wideband receiver (which will pick up any
radar pulses in the band), in conjunction with a swept frequency transmitter.
Each radar pulse received by the SART results in a transmission consisting of
12 forward and return sweeps through the range 9.2GHz to 9.5GHz.
The radar will only respond to returns close to its own frequency of
operation (i.e. within its receive bandwidth), so a "pulse" is produced at the
radar input each time the SART sweep passes through the correct frequency.
The text and diagrams on Pages 10 & 11 show this in more detail.
A slow sweep would give the radar a stronger echo to deal with as the
sweep would be inside the operating bandwidth for a longer period. The delay
for the sweep to reach the operating frequency may however lead to an
unacceptable range error, as delayed echoes appear to be coming from more
distant objects.
To minimise this problem, the SART uses a "sawtooth" response,
sweeping quickly, then slowly for each of its twelve forward and return
sweeps. At long range, only the slow sweeps, giving the strongest returns, are
picked up. At close range, where errors are more important, the fast sweeps
14
19
PROFICIENCY IN SURVIVAL CRAFT AND RESCUE BOATS OTHER THAN
FAST RESCUE BOATS
are also detected. As the first sweep is a fast one, then the range error is
minimised and should be less than 150 metres.
The timescale over which all this occurs is very short. Each "fast" sweep
takes about 0.4µs, each "slow" sweep about 7.5µs. The complete series of
twelve forward and return sweeps is therefore complete within 100µs.
Displayed on the PPI, the spacing between each pair of dots will be 0.6
nautical miles.
On a long range setting, a typical radar will be triggering the SART every
millisecond - but only during the period that the rotating radar scanner is
pointing in the correct direction. Most modern radars use sophisticated noise
rejection techniques, which prevent the display of echoes which are not
synchronized with the radar's own transmissions, so one radar will not
normally be confused by a SART's response to a neighbouring radar.
The SART indicates that it has been triggered by lighting an indicator
LED continuously (it flashes in standby mode) and by sounding an integral
buzzer. If no radar pulses are detected for a period exceeding 15 seconds,
the SART reverts to "standby" mode.
Fig 14-9 Different types of SARTs
LIFERAFT SART
Supplied with or without mast. Normally is packed as part of the liferaft
equipment.
The mast version is mounted in the same manner as the carry-off
version; the version without the mast is intended to be hung from the highest
point inside the liferaft.
14.3.2 Operating instructions
To switch on:
- Break the security tab away from the body of the SART.
- Rotate the switch ring clockwise (ie to the left) to the ON position
marked by “1”.
14
20
PROFICIENCY IN SURVIVAL CRAFT AND RESCUE BOATS OTHER THAN
FAST RESCUE BOATS
To extend the telescopic pole:
- Grasp rubber cover at bottom of pole, and twist the pole to release it
in the pole mount. Pull the pole down and twist to lock in place in the pole
mount.
- Remove rubber cover from bottom of pole; allow pole sections to
drop. Lock sections together by twisting each section.
To deploy in a survival craft (liferaft):
- Extend the SART supporting pole as detailed above
- Tether the SART to a suitable point using the lanyard which unwinds
from its base.
- Inset the SART through the port in the canopy
- Position the bottom of the support pole in the antenna pocket
- Secure the pole to the canopy support.
Some survival craft have the SART already packed as part of the
inventory. In general, these models of SART are not fitted with the support
pole. The SART should be switched ON then suspended by its top loop from
the highest point of the survival craft.
If the lanyard becomes unwound, it may be rewound by rotating the spool
in the base of the SART in the direction of the arrow.
14.3.3. Technical description
A single switched antenna is used for both receive and transmit
functions; the switch normally connects the antenna to the receiver circuit. In
the standby state only the receiver portion of the SART is powered to reduce
battery consumption to a minimum. In this condition the indicator circuit
causes the LED to flash once every two seconds.
14
21
PROFICIENCY IN SURVIVAL CRAFT AND RESCUE BOATS OTHER THAN
FAST RESCUE BOATS
On receipt of a radar pulse the video amplifier and detector circuit causes
the rest of the circuitry to become active and the unit switches to transmit
mode. In this condition the indicator circuit causes the LED to remain steady
and the buzzer to sound every two seconds.
The detection of a radar pulse causes the switch to connect the antenna
to the transmitter circuit. The output stage is fed by a Voltage Controlled
Oscillator (VCO), whose frequency is determined by a sweep generator.
When triggered by the detector the sweep generator turns on the VCO and
causes it to produce exactly 12 forward and reverse frequency sweeps before
shutting down again.
If no radar pulses are detected for a period of 15 seconds the unit reverts
to standby mode.
Start Status
OFF
STAND BY MODE
( Test or On )
ACTIVELY
TRANSPONDER
( Test or On )
Buzzer
OFF
OFF
ON EVERY
2 Seconds
Red led
OFF
FLASHING EVERY
3 Seconds
ON
Fig. 14- 9 Extending of SART
14
22
PROFICIENCY IN SURVIVAL CRAFT AND RESCUE BOATS OTHER THAN
FAST RESCUE BOATS
14.4 Distress signals, signalling equipment and pyrotechnics
14.4.1 Distress signals and signalling equipment
Distress signals at sea are defined in the International Regulations for
Preventing Collisions at Sea and in the International Code of Signals. Mayday
signals must only be used where there is grave and imminent danger to life.
Otherwise, urgent signals such as pan-pan can be sent. Most jurisdictions
have large penalties for false, unwarranted or prank distress signals.
Distress can be indicated by any of the following officially sanctioned
methods:
• transmitting a spoken voice Pan-pan, or a Mayday message by radio
over very high frequency (shorter range VHF) channel 16 (156.8 MHz) and/or
high frequency (longer range HF) on 2182 kHz
• transmitting a digital distress signal by activating (or pressing) the
distress button (or key) on a marine radio equipped with Digital Selective
Calling (DSC) over the VHF (channel 70) and/or HF frequency bands.
• transmitting a digital distress signal by activating (or pressing) the
distress button (or key) on a Inmarsat-C satellite internet device
• sending the Morse code group SOS by light flashes or sounds
• burning a red flare (either hand-held or aerial parachute flare)
• emitting orange smoke from a canister
• showing flames on the vessel (as from a burning tar barrel, oil barrel,
etc)
• raising and lowering slowly and repeatedly both arms outstretched to
each side
• making a continuous sound with any fog-signalling apparatus
• firing a gun or other explosive signal at intervals of about a minute
• flying the international maritime signal flags NC
• displaying a visual signal consisting of a square flag having above or
below it a ball or anything resembling a ball (round or circular in appearance)
The importance of a good lookout cannot be overstated. Remember,
when in a life raft, you are so small and the sea is so big that it is very easy for
a search ship or plane to overlook you. An alert lookout will make the
difference in survival. Once you have sighted a rescue ship or aircraft, use the
following to attract their attention:
- Signalling mirrors: Read the instructions for the particular kind of
signalling mirror in your survival equipment. Do not wait until you see a rescue
craft to use the signalling mirror. When the sun is shining, flash the mirror all
around the horizon .An aircraft can spot the flash long before you would see
the aircraft. The signalling mirror may save your life. Use it as long as the sun
is shining.
- Whistles In calm weather, your voice can be heard only a few
hundred yards away. If you keep screaming, you will become hoarse and lose
your voice. A whistle, on the other hand, can be heard up to 4 miles away in
favourable weather conditions. It can come in handy when you are floating in
the water trying to attract the attention of nearby rescuers. A whistle can be
used over and over again. It can be used in fog, at night, or during the day.
14
23
PROFICIENCY IN SURVIVAL CRAFT AND RESCUE BOATS OTHER THAN
FAST RESCUE BOATS
- Pyrotechnics : These are signals such as rockets, flares, and
smoke. Instructions for operating various brands of pyrotechnics are written
by the manufacturers. Once you are settled in your survival craft, read the
instructions on each type of pyrotechnic so you will know how to use them
when a ship or aircraft is spotted. Keep the pyrotechnics close by for
immediate use, so you can signal when necessary. Heed the following when
using pyrotechnics:
- Be sure to fire the signals downwind on the lee side of
the survival craft. When firing, hold them at a slight angle over the water.
Pyrotechnics have burning particles that might fall, which may burn you or
damage the raft.
- Only use smoke signals during the daytime. Smoke does
not glow in the dark. Only use pyrotechnics when you can see a ship or plane.
Do not waste smoke signals.
- Rockets should be used when a vessel is spotted far
away on the horizon. A rocket will get the signal higher, where it can be seen
from a greater distance.
- An aircraft directly overhead would be more likely to spot
a hand flare than a flare covered with a parachute.
14
Red Star
Shells
Fog Horn
Continuous
Soundings
Flames on
A Vessel
Gun Fired at
Intervals of
One Minute
Orange
Background
Black Ball &
Square
SOS
"Mayday"
by Radio
Parachute
Red Flare
24
PROFICIENCY IN SURVIVAL CRAFT AND RESCUE BOATS OTHER THAN
FAST RESCUE BOATS
Dye Marker
(any color)
Code Flags
November
Charlie
Square Flag
and Ball
Wave
Arms
RadioTelegraph
Alarm
RadioTelephone
Alarm
Epirb
Smoke
Fig. 14-10 Distress signals
Fig. 14-11 MK-3 Signal mirror
14
25
PROFICIENCY IN SURVIVAL CRAFT AND RESCUE BOATS OTHER THAN
FAST RESCUE BOATS
Fig.14-12 Survival whistle
Fig.14-13 Portable search light
Fig. 14-14 Torch with Morse Code signalling
Electric torch
An electric torch of an accepted type, suitable for Morse signalling, must
be provided together with a waterproof container containing one spare set of
batteries and one spare bulb. Sample torches submitted for acceptance
should be capable of being dropped at any angle on to a hard surface from a
height of 1.20 metres without damage affecting the efficient use of the torch,
14
26
PROFICIENCY IN SURVIVAL CRAFT AND RESCUE BOATS OTHER THAN
FAST RESCUE BOATS
other than failure of the bulb; it should also withstand immersion under 300
mm of water for a period of six hours without such leakage, discharge of the
batteries or other defect, as would affect the efficient use of the torch.
Fig. 14-15 Signal mirror
A signal mirror is one of the cheapest and most effective emergency
signalling devices a person can carry and with training can even be used in
overcast conditions and at night.
14.4.2 Pyrotechics
Red parachute flares
Are used to attract the attention of searching ships and aircraft some distance
off.
Only red parachute flares indicate distress.
The signals can be sighted at a long range and identify the general
area of search. If the searching boat or aircraft alter course, a second
parachute rocket or hand flare should be fired.
Their range is :
- 25 nautical miles by night
- 8 nautical miles or less by day
The signals burn for about 40 seconds failing from a height of about 300
meters.
The procedures for firing a parachute rocket are printed in English and in
picture format on every rocket.
14
27
PROFICIENCY IN SURVIVAL CRAFT AND RESCUE BOATS OTHER THAN
FAST RESCUE BOATS
Fig. 14-16 Different types of Red Parachute Flares
You must read and follow these procedures. Rockets can be fired by
hand with negligible recoil.
In strong winds, aim the rocket slightly downwind. This will prevent the
spent flare possible landing on the raft .
Ensure that the rocket is pointing upwards and clear of the survival craft.
It can cause injury if fired towards someone.
In order to be seen in low cloud conditions, it is best to fire the rocket at an
angle of 45°.
Never fire the rocket directly at an aircraft.
The intense brilliance of the red parachute rocket achieves 40,000
candela.
The use or exhibition of any of the foregoing signals [as a hand flare showing
a red light or rockets or shells, throwing red stars] except for the purpose of
indicating distress and need of assistance and the use of other signals which
may be confused with any of the above signals is prohibited." from the
COLREGS ANNEX IV.
Hand Held Red Flares
Hand flares are used to guide the searching ship or aircraft or pinpoint
the survivors position. They are ideal for day or night use.
Their range is :
- 5 nautical miles by day
- 10 nautical miles by night
They burn for about 60 seconds and brilliance about 15.000 candela.
Read the operating instructions on each hand flare as they may be
different.
The burning flare should be held downwind to prevent sparks falling
onto the survival craft.
Hold the flare by gripping it at the safe holding position marked on the
flare and tilt the flare.
Wrap your hand in wet cloth or towel to protect it against radiating heat
and falling sparks.
14
28
PROFICIENCY IN SURVIVAL CRAFT AND RESCUE BOATS OTHER THAN
FAST RESCUE BOATS
Fig. 14 -17 Red hand flares
Smoke signals
Smoke signals are of two types:
• buoyant orange smoke signals
• hand-held orange smoke signals.
Smoke signals are used to pinpoint the survivors’ position.
The smoke signal’s use to raise an alarm is doubtful. They will be more
readily seen from an aircraft than a surface craft. They are for daytime use
only.
Their range is at the most about two to three nautical miles in good
visibility.
The buoyant float smokes for at least 3 minutes.
Visible distance≥2miles
Hand held smoke signal give smoke for about 1 minute.
They should be used on the lee side of the survival craft.
Remember, they are good for signalling when winds are light. In strong
winds, however, the smoke may disperse quickly.
Fig.14-18 Hand held orange smoke signal
14
29
PROFICIENCY IN SURVIVAL CRAFT AND RESCUE BOATS OTHER THAN
FAST RESCUE BOATS
Fig.14-19 Hand held orange smoke signal
When and how to use each of the pyrotechnics
Lifesmoke :- A small and compact distress signal for daylight use only.
Signal for position marking during rescue operations Indicates wind direction
Safe use on oil or petrol covered water.
Red Handflare:- For use day or night the red handflare is a short-range
distress signal used to pinpoint position. May be carried on the ship’s bridge
and is a requirement in ship’s lifeboats and liferafts.
Parachute Red Rocket:- A day or night long-range distress signal.
14
30
PROFICIENCY IN SURVIVAL CRAFT AND RESCUE BOATS OTHER THAN
FAST RESCUE BOATS
15. First aid
15.1 Resuscitation techniques
15.1.1 Mouth-to-Mouth ( mouth-to-nose) resuscitation
1. Make sure the person is lying on a hard, flat
surface. Look into the mouth and throat to ensure that
the airway is clear. If an object is present, try to sweep
it out with your fingers (wear disposable surgical
gloves if they are available). Apply the Heimlich
manoeuver if unsuccessful and the object is blocking
the airway. If vomiting occurs, turn the person on his or
her side and sweep out the mouth with two fingers. Do not place your finger in
the mouth if the person is rigid or is having a seizure.
2. Tilt the head back slightly to open the airway. Put
upward pressure on the jaw to pull it forward.
3. Pinch the nostrils closed with thumb and index
finger. Place your mouth tightly over the person’s
mouth. Use a mouthpiece if one is available. Blow two
quick breaths and watch for the person’s chest to rise.
4. Release the nostrils. Look for the person’s chest to
fall as he or she exhales. Listen for the sounds of
breathing. Feel for the person’s breath on your cheek.
If the person does not start breathing on his or her
own, repeat the procedure.
15
1
PROFICIENCY IN SURVIVAL CRAFT AND RESCUE BOATS OTHER THAN
FAST RESCUE BOATS
Open the airway
The airway is the tube through which air passes from the mouth and
nose to the lungs. If it is blocked the patient cannot breathe and air cannot get
into or out of the lungs. A patient who cannot breathe will die within four
minutes.
In an unconscious patient the tongue may block the throat and the airway.
Make sure the airway is open and air can get down the throat. (Fig.15-1).
Fig. 15-1 In an unconscious patient, the tongue may fall
back, blocking the throat and stopping breathing.
Place the patient on his or her back.
Tilt the head back and lift the chin up with the finger and thumb of one
hand on the bony part of the chin, while pressing the forehead back with the
other hand. This will open the airway and stop the tongue blocking the throat.
(Fig.15-2).
Fig. 15-2 Open up the airway by pressing the forehead back
and lifting the clin with the thumb and fingers.
15
2
PROFICIENCY IN SURVIVAL CRAFT AND RESCUE BOATS OTHER THAN
FAST RESCUE BOATS
Check whether the patient is breathing
After opening the airway, quickly check whether the patient is breathing
(Fig. 15-3):
• Look for the belly or the chest moving up and down.
• Feel the chest moving up and down.
• Feel the patient's breath on your cheek.
• Listen for breath sounds. Put your ear close to the patient's mouth.
Fig.15-3 Check whether the pacient is breathing by looking and
feeling for movement of the chest or belly, listening for breathing
sounds and feeling for the pacient's breath on your check.
Use all four checks. Remember that the chest may move up and down
even when the throat is completely blocked and air cannot get to the lungs.
Clean out the mouth and clear the throat
If the patient is not breathing after you have tilted the head back,
something may be blocking the throat.
Turn the head to one side. With one or two fingers (and preferably
wearing gloves) scoop deeply round the mouth and throat to clear any
blockage such as vomit (Fig.15-4). Take out the patient's false teeth.
Fig. 15-4 Clear any blockage
15
3
PROFICIENCY IN SURVIVAL CRAFT AND RESCUE BOATS OTHER THAN
FAST RESCUE BOATS
If the patient starts breathing turn him or her onto one side, into the
recovery position. Check breathing and pulse frequently.
Whatever the cause, if the patient does not start breathing you must act
immediately to help the patient to breathe.
How to give mouth-to-mouth respiration or mouth-to-nose respiration to
an adult
1. With the patient lying flat on his or her back, clear any blockage from
the mouth. Kneel beside the patient's head.
2. Tilt the head back.
3. Pinch the nose with one hand. With the other hand pull the mouth
open.Do not press on the neck. For mouth-to-nose respiration, close the
patient's mouth with your thumb.(Fig.15-5).
Fig.15-5 Mouth-to-nose respiration: tilt the head back, pinch
the nose and pull the mouth open.
4. Breathe in deeply. Cover the patient's mouth completely with your own
mouth and breathe out steadily and smoothly so that all your breath goes into
the patient's mouth. Breathe out strongly to fill the chest (Fig.15-6). Look for
the patient's chest rising. For mouth-to-nose respiration put your mouth
around the patient's nose.
5. Lift your mouth away so that the patient can breathe out and you can
take another breath of air. Turn your head, look for the chest falling, feel the
breathed-out air on your cheek, and listen for the sound of the patient
breathing out (Fig.15-7). For mouth-to-nose respiration you may have to open
the patient's mouth to let air out.
15
4
PROFICIENCY IN SURVIVAL CRAFT AND RESCUE BOATS OTHER THAN
FAST RESCUE BOATS
Fig.15-6
Mouth-to-nose respiration:
breather steadily and smoothly
into the patient's mouth, filling his
or her chest with air.
Fig.15-7
Mouth-to-nose respiration: lift
your mouth away so that the
patient can breathe out; watch
for the chest falling, feel for the
patient's breath on your cheek,
and listen for the sound of
breathing.
6. Take another breath of air. Once the chest has fallen, blow into the
patient's mouth (or nose) again. Watch the patient breathe out again. Then
check that the heart is beating.
If the chest does not rise with each breath, and you cannot feel or hear
the patient breathing out, then either the airway is blocked or some of your
breath is not going into the patient's chest. Check that the head is held well
back and clear the airway again. Make sure there is no air escaping when you
breathe into the patient's mouth (or nose).
15.1.2 Cardiac arrest
Cardiac arrest signs and symptoms
Cardiac arrest is classified into "shockable" versus "non–shockable",
based upon the ECG rhythm. The two shockable rhythms are ventricular
fibrillation and pulseless ventricular tachycardia while the two non–shockable
15
5
PROFICIENCY IN SURVIVAL CRAFT AND RESCUE BOATS OTHER THAN
FAST RESCUE BOATS
rhythms are asystole and pulseless electrical activity. This refers to whether a
particular class of disrhythmia is treatable using defibrillation.
Cardiac arrest is an abrupt cessation of pump function in the heart (as
evidenced by the absence of a palpable pulse). Cardiac arrest can usually be
reversed with prompt intervention, but without such intervention, it will almost
always lead to death. In certain cases, it is an expected outcome to a serious
illness.
However, due to inadequate cerebral perfusion, the patient will be
unconscious and will have stopped breathing. The main diagnostic criterion to
diagnose a cardiac arrest, (as opposed to respiratory arrest which shares
many of the same features), is lack of circulation, however there are a number
of ways of determining this.
How to give heart massage to an adult
1. Check that there is no heartbeat.
2. Lay the patient on his or her back on a firm surface. Kneel beside the
patient's chest.
3. Find the right place to put your hands. Find the lower edge of the ribs.
Follow the edge of the ribs to where they meet the breastbone. Place your
middle finger on the base of the breastbone, and the index finger next to it
(Fig. 15-8), then place the heel of your other hand next to these two fingers,
on the breastbone in the midline of the chest (Fig. 15-9).
Fig.15-8 Place your middle finger on
the base of the breastbone and your
index finger next to it
Fig.15-9 Place the heel of your free
hand next to the two fingers on the
breastbone.
15
6
PROFICIENCY IN SURVIVAL CRAFT AND RESCUE BOATS OTHER THAN
FAST RESCUE BOATS
4. Now cover this hand with the heel of your other hand, lock your fingers
together, keeping them off the chest . Put your shoulders above the
patient's chest and keep your arms straight.
Fig.15-10 Interlock the fingers of both hands and, with the arms straight,
press down 4-5 cm.
5. Press down on the lower half of the breastbone 4-5 centimetres,
keeping your arms straight. Then stop pushing. While counting "one and two
and three and...", press 15 times, in time with the numbers (80 presses a
minute). Presses should be regular and smooth, not jerky and jabbing.
6. Remember that both mouth-to-mouth respiration and heart massage
are needed. After 15 presses tilt the head back again so that air can get down
the throat, put your mouth round the patient's mouth and give two breaths.
7. Continue with 15 presses followed by two full breaths. After one minute
check the heartbeat, then after 3 minutes or every 12 cycles check the
heartbeat again. As soon as the heartbeat returns stop heart massage
immediately. You may see the patient's colour become more normal and the
pupils return to normal size.
8. Continue mouth-to-mouth respiration at 12 breaths a minute, until the
patient breathes without help. It may be some time before breathing starts
again, even after the heart has started beating. When breathing starts again
put the patient onto his or her side in the recovery position.
If another person is with you, get him or her to do the breathing while
you do the heart massage (Fig. 15-11). The other person should kneel by the
patient's head while you kneel by the middle of the chest. The other person
should give two breaths and check the heartbeat. If there is no heartbeat you
should give five presses on the chest. Continue with the other person giving
15
7
PROFICIENCY IN SURVIVAL CRAFT AND RESCUE BOATS OTHER THAN
FAST RESCUE BOATS
one breath and you giving five presses on the chest. Check the heartbeat
after one minute then after every three minutes or 12 cycles.
Fig. 15-11 If there are two of you, work together so that one person
gives heart massage while the other gives mouth-to-mouth respiration
15.1.3 Recovery position for an unconscious person
An unconscious patient should be turned to lie on one side to stop the
tongue blocking the throat and to allow fluid to come out of the mouth. This is
called the recovery position.
Before you turn the patient over:
• If breathing is noisy, sweep your finger round the mouth to remove
anything blocking the airway, and take out the patient's false teeth if they are
loose.
• Empty the patient's pockets of anything that would be uncomfortable to
lie on.
• Take off the patient's spectacles in case they injure the eyes.
• Look for injury to the head or neck, and feel with your fingers to see
whether the back of the neck or the backbone is bent or swollen.
• Get help if the patient has an injury to the head or neck. Three people
should roll the patient keeping the head, neck and body in a straight line. Do
not let the patient sit up when he or she wakes up.
The patient should be turned onto one side with:
the head, neck and body in a straight line,
the head placed so that the tongue will not block the throat, and vomit
or saliva can come out of the mouth;
• the arms and legs placed so that the patient stays in the same position.
•
•
One way of turning a patient
1. Kneel beside the patient, turn the patient's face towards you, and tilt it
back, with the jaw jutting forward so the airway stays open. Place the arm
nearest you above the head. Place the patient's other arm across the chest.
Raise the patient's far leg under the knee, to bend it (Fig.15-12).
15
8
PROFICIENCY IN SURVIVAL CRAFT AND RESCUE BOATS OTHER THAN
FAST RESCUE BOATS
Fig.15-12 Putting a
patient
into
the
recovery position: place
the arm nearest you
above the patient’s
head, bring the other
arm across the chest,
and bend the leg
further from you.
2. Protect the patient's face with one hand. With your other hand, grasp the
patient's clothes at the hip and pull the patient towards you until he or she is
resting on one side, against your knees (Fig. 15-13).The patient's head should
be resting on the lower arm. Check that the airway is still open.
3. Take the patient's upper arm and place the hand under the face (Fig.
15-14). This will help to keep the head tilted back and the airway open. Now
position the upper leg so that the bent knee rests on the ground and supports
the patient's body.
If the patient is too heavy for you, get help. Someone else can support
the patient's head while you do the turning, or can push the patient towards
you as you pull.
Fig.15-13:Pull the
patient towards
you until he is lying
on one side with
the head resting
on the arm.
.
Fig.15-14 Make sure that the patient’s
head is tilted back so that the airway
stays open
15
9
PROFICIENCY IN SURVIVAL CRAFT AND RESCUE BOATS OTHER THAN
FAST RESCUE BOATS
15.2 Use of first-aid kit
15.2.1 First aid kit content
An adequate number of first aid kits must be provided by an employer
in his establishment. The kits must be placed as near as possible from the
work premises, be easy to reach and available at all times.
The minimum content of the first aid kit is the following:
a. A first-aid manual approved by the Commission
b. The following instruments:
• 1 pair bandage scissors
• 1 pair splinter forceps
• 12 safety pins (assorted sizes)
c. The following dressings (or equivalent sizes):
• 25 sterile bandages (25 mm x 75 mm), individually
wrapped
• 25 sterile gauze squares (101 mm x 101 mm),
individually wrapped
• 4 rolls sterile gauze bandage (50 mm x 9 m),
individually wrapped
• 4 rolls sterile gauze bandage (101 mm x 9 m),
individually wrapped
• 6 triangular bandages
• 4 sterile bandage compresses (101 mm x 101 mm),
individually wrapped
• 1 roll adhesive tape (25 mm x 9 m)
d. Antiseptics
• 25 alcohol swabs, individually wrapped.
In addition, a few other suggested items are as follows :
• Gloves
• Disposable emergency blanket
• Instant Cold pack
• Instant Hot pack
• CPR pocket mask with O2 inlet
• Blood exposure report sheet
• Adrenalin injection report sheet
15.2.2 How to deal with fractures
Forearm Fracture
There are two long bones in the forearm, the radius and the ulna. When
both are broken, the arm usually appears to be deformed. When only one is
broken, the other acts as a splint and the arm retains a more or less natural
appearance. Any fracture of the forearm is likely to result in pain, tenderness,
inability to use the forearm, and a kind of wobbly motion at the point of injury.
If the fracture is open, a bone will show through a bone will show
through.
15
10
PROFICIENCY IN SURVIVAL CRAFT AND RESCUE BOATS OTHER THAN
FAST RESCUE BOATS
If the fracture is open, stop the bleeding and treat the wound. Apply a
sterile dressing over the wound. Carefully straighten the forearm. (Remember
that rough handling of a closed fracture may turn it into an open fracture.)
Apply a pneumatic splint if available; if not, apply two well-padded splints to
the forearm, one on the top and one on the bottom. Be sure that the splints
are long enough to extend from the elbow to the wrist. Use bandages to hold
the splints in place. Put the forearm across the chest. The palm of the hand
should be turned in, with the thumb pointing upward. Support the forearm in
this position by means of a wide sling and a cravat bandage, as shown in
figure 15-15. The hand should be raised about 4 inches above the level of the
elbow. Treat the victim for shock and evacuate as soon as possible.
Fig. 15 -15 First aid for a fractured forearm
Upper Arm Fracture
The signs of fracture of the upper arm include pain, tenderness, swelling,
and a wobbly motion at the point of fracture. If the fracture is near the elbow,
the arm is likely to be straight with no bend at the elbow. If the fracture is
open, stop the bleeding and treat the wound before attempting to treat the
fracture.
NOTE: Treatment of the fracture depends partly upon the location of the
break. If the fracture is in the upper part of the arm near the shoulder, place a
pad or folded towel in the armpit, bandage the arm securely to the body, and
support the forearm in a narrow sling. If the fracture is in the middle of the
upper arm, you can use one well-padded splint on the outside of the arm.
The splint should extend from the shoulder to the elbow. Fasten the
splinted arm firmly to the body and support the forearm in a narrow sling,
as shown in figure. Another way of treating a fracture in the middle of the
upper arm is to fasten two wide splints (or four narrow ones) about the
arm and then support the forearm in a narrow sling. If you use a splint
between the arm and the body, be very careful that it does not extend too far
15
11
PROFICIENCY IN SURVIVAL CRAFT AND RESCUE BOATS OTHER THAN
FAST RESCUE BOATS
up into the armpit; a splint in this position can cause a dangerous
compression of the blood vessels and nerves and may be extremely painful
to the victim. If the fracture is at or near the elbow, the arm may be either bent
or straight. No matter in what position you find the arm, DO NOT
ATTEMPT TO STRAIGHTEN IT OR MOVE IT IN ANY WAY. Splint the arm
as carefully as possible in the position in which you find it. This will prevent
further nerve and blood vessel damage. The only exception to this is if there is
no pulse distal to the fracture, in which case gentle traction is applied and
then the arm is splinted. Treat the victim for shock and get him under the care
of a medical officer as soon as possible.
Fig.15-16 Splint and sling for a fractured upper arm
Thigh Fracture
The femur is the long bone of the upper part of the leg between the kneecap
and the pelvis. When the femur is fractured through, any attempt to
move the limb results in a spasm of the muscles and causes
excruciating pain. The leg has a wobbly motion, and there is complete loss
of control below the fracture. The limb usually assumes an unnatural position,
with the toes pointing outward.
By actual measurement, the fractured leg is shorter than the uninjured one
because of contraction of the powerful thigh muscles. Serious damage to
blood vessels and nerves often results from a fracture of the femur, and shock
is likely to be severe. If the fracture is open, stop the bleeding and treat the
wound before attempting to treat the fracture itself. Serious bleeding is a
special danger in this type of injury, since the broken bone may tear or cut
the large artery in the thigh.
Carefully straighten the leg. Apply two splints, one on the outside of the
injured leg and one on the inside. The outside splint should reach from the
armpit to the foot. The inside splint should reach from the crotch to the foot.
The splints should be fastened in five places: (1) around the ankle; (2) over
the knee; (3) just below the hip; (4) around the pelvis; and (5) just below the
armpit (fig. 15-17).The legs can then be tied together to support the
injured leg as firmly as possible.
It is essential that a fractured thigh be splinted before the victim is moved.
Manufactured splints, such as the Hare or the Thomas half-ring traction
15
12
PROFICIENCY IN SURVIVAL CRAFT AND RESCUE BOATS OTHER THAN
FAST RESCUE BOATS
splints, are best, but improvised splints may be used. Figure 15-17 shows
how boards may be used as an emergency splint for a fractured thigh.
Remember,
DO NOT MOVE THE VICTIM UNTIL THE INJURED LEG HAS BEEN
IMMOBILIZED. Treat the victim for shock, and evacuate at the earliest
possible opportunity.
Lower Leg Fracture
When both bones of the lower leg are broken, the usual signs of fracture
are likely to be present. When only one bone is broken, the other one acts as
a splint and, to some extent, prevents deformity of the leg. However,
tenderness, swelling, and pain at the point of fracture are almost always
present. A fracture just above the ankle is often mistaken for a sprain. If both
bones of the lower leg are broken, an open fracture is very likely to result. If
the fracture is open, stop the bleeding and treat the wound. Carefully
straighten the injured leg.
Apply a pneumatic splint if available; if not, apply three splints, one on
each side of the leg and one underneath. Be sure that the splints are well
padded, particularly under the knee and at the bones on each side of
the ankle. A pillow and two side splints work very well for treatment of a
fractured lower leg.
Place the pillow beside the injured leg, then carefully lift the leg and place
it in the middle of the pillow. Bring the edges of the pillow around to the front
of the leg and pin them together. Then place one splint on each side of the
leg (over the pillow), and fasten them in place with strips of bandage or
adhesive tape. Treat the victim for shock and evacuate as soon as possible.
Fig.15-17 Splint for a fractured femur
Fig.15-18 Immobilization of a fractured patella
15
13
PROFICIENCY IN SURVIVAL CRAFT AND RESCUE BOATS OTHER THAN
FAST RESCUE BOATS
Kneecap Fracture
The following first aid treatment should be given for a fractured kneecap
(patella): Carefully straighten the injured limb. Immobilize the fracture by
placing a padded board under the injured limb.
The board should be at least 4 inches wide and should reach from the buttock
to the heel. Place extra padding under the knee and just above the heel, as
shown in figure 15-18.
Use strips of bandage to fasten the leg to the board in four places: (1) just
below the knee; (2) just above the knee; (3) at the ankle; and (4) at the
thigh. Do not cover the knee itself. Swelling is likely to occur very rapidly, and
any bandage or tie fastened over the knee would quickly become too tight.
Treat the victim for shock and evacuate as soon as possible.
Clavicle Fracture
A person with a fractured clavicle usually shows definite symptoms. When
the victim stands, the injured shoulder is lower than the uninjured one. The
victim is usually unable to raise the arm above the level of the shoulder and
may attempt to support the injured shoulder by holding the elbow of that side
in the other hand.
This is the characteristic position of a person with a broken clavicle. Since
the clavicle lies immediately under the skin, you may be able to detect the
point of fracture by the deformity and localized pain and tenderness. If the
fracture is open, stop the flow of blood and treat the wound before attempting
to treat the fracture. Then apply a sling and swathe splint as described below
(and illustrated in figure 15-19).
Bend the victim’s arm on the injured side, and place the forearm across the
chest. The palm of the hand should be turned in, with the thumb pointed up.
The hand should be raised about 4 inches above the level of the elbow.
Support the forearm in this position by means of a wide sling. A wide roller
bandage (or any wide strip of cloth) may be used to secure the victim’s
arm to the body. A figure-eight bandage may also be used for a fractured
clavicle. Treat the victim for shock and evacuate to a definitive care facility as
soon as possible.
Fig.15-19 Sling for
immobilizing fractured
clavicle
15
14
PROFICIENCY IN SURVIVAL CRAFT AND RESCUE BOATS OTHER THAN
FAST RESCUE BOATS
Rib Fracture
If a rib is broken, make the victim comfortable and quiet so that the
greatest danger the possibility of further damage to the lungs, heart, or chest
wall by the broken ends is minimized. The common finding in all victims with
fractured ribs is pain localized at the site of the fracture.
By asking the patient to point out the exact area of the pain, you can often
determine the location of the injury. There may or may not be a rib deformity,
chest wall contusion, or laceration of the area. Deep breathing, coughing, or
movement is usually painful. The patient generally wishes to remain still and
may often lean toward the injured side, with a hand over the fractured area to
immobilize the chest and to ease the pain.
Ordinarily, rib fractures are not bound, strapped, or taped if the
victim is reasonably comfortable. However, they may be splinted by the use of
external support. If the patient is considerably more comfortable with the
chest immobilized, the best method is to use a swathe (fig.15-20) in which
the arm on the injured side is strapped to the chest to limit motion.
Place the arm on the injured side against the chest, with the palm flat,
thumb up, and the forearm raised to a 45°angle. Immobilize the chest, using
wide strips of bandage to secure the arm to the chest. Do not use wide strips
of adhesive plaster applied directly to the skin of the chest for immobilization
since the adhesive tends to limit the ability of the chest to expand (interfering
with proper breathing).
Treat the victim for shock and evacuate as soon as possible.
Fig. 15-20 Swathe bandage of fractured rib victim
15
15
PROFICIENCY IN SURVIVAL CRAFT AND RESCUE BOATS OTHER THAN
FAST RESCUE BOATS
Nose Fracture
A fracture of the nose usually causes localized pain and swelling, a
noticeable deformity of the nose, and extensive nosebleed. Stop the
nosebleed. Have the victim sit quietly, with the head tipped slightly backward.
Tell the victim to breathe through the mouth and not to blow the nose. If the
bleeding does not stop within a few minutes, apply a cold compress or an ice
bag over the nose.
Treat the victim for shock. Ensure the victim receives a medical officer’s
attention as soon as possible. Permanent deformity of the nose may result if
the fracture is not treated promptly.
Jaw Fracture
A person who has a fractured jaw may suffer serious interference with
breathing. There is likely to be great difficulty in talking, chewing, or
swallowing. Any movement of the jaw causes pain. The teeth may be out of
line, and there may be bleeding from the gums. Considerable swelling may
develop.
One of the most important phases of emergency care is to clear the upper
respiratory passage of any obstruction. If the fractured jaw interferes with
breathing, pull the lower jaw and the tongue well forward and keep them in
that position. Apply a four-tailed bandage, as shown in figure 15-21.
Be sure that the bandage pulls the lower jaw forward. Never apply a
bandage that forces the jaw backward, since this might seriously interfere with
breathing. The bandage must be firm so that it will support and immobilize the
injured jaw, but it must not press against the victim’s throat. Be sure that the
victim has scissors or a knife to cut the bandage in case of vomiting. Treat the
victim for shock and evacuate as soon as possible.
Fig.15-21 Four-tailed bandage for the jaw
Pelvic Fracture
Fractures in the pelvic region often result from falls, heavy blows, and
accidents that involve crushing. The great danger in a pelvic fracture is that
15
16
PROFICIENCY IN SURVIVAL CRAFT AND RESCUE BOATS OTHER THAN
FAST RESCUE BOATS
the organs enclosed and protected by the pelvis may be seriously damaged
when the bony structure is fractured. In particular, there is danger that the
bladder will be ruptured.
There is also danger of severe internal bleeding; the large blood vessels
in the pelvic region may be torn or cut by fragments of the broken bone. The
primary symptoms of a fractured pelvis are severe pain, shock, and loss of
ability to use the lower part of the body.
The victim is unable to sit or stand. If the victim is conscious, there may
be a sensation of “coming apart.” If the bladder is injured, the victim’s urine
may be bloody. Do not move the victim unless ABSOLUTELY necessary.
The victim should be treated for shock and kept warm but should not be
moved into the position ordinarily used for the treatment of shock. If you must
transport the victim to another place, do it with the utmost care. Use a rigid
stretcher, a padded door, or a wide board.
Keep the victim supine. In some cases, the victim will be more
comfortable if the legs are straight, while in other cases the victim will be more
comfortable with the knees bent and the legs drawn up. When you have
placed the victim in the most comfortable position, immobilization should be
accomplished. Fractures of the hip are best treated with traction splints.
Adequate immobilization can also be obtained by placing pillows or folded
blankets between the legs as shown in figure 15-22 and using cravats, roller
bandages, or straps to hold the legs together, or through the use of MAST
garments. Fasten the victim securely to the stretcher or improvised support,
and evacuate very carefully.
Fig.15-22 Immobilizing a fractured pelvis
15.2.3 Control of Haemorrhaging
The best way to control external bleeding is by applying a compress
to the wound and exerting pressure directly to the wound. If direct pressure
does not stop the bleeding, pressure can also be applied at an appropriate
pressure point. At times, elevation of an extremity is also helpful in controlling
haemorrhage. The use of splints in conjunction with direct pressure can be
beneficial. In those rare cases where bleeding cannot be controlled by any
of these methods, you must use a tourniquet. If bleeding does not stop after
a short period, try placing another compress or dressing over the first and
securing it firmly in place. If bleeding still will not stop, try applying direct
pressure with your hand over the compress or dressing.
15
17
PROFICIENCY IN SURVIVAL CRAFT AND RESCUE BOATS OTHER THAN
FAST RESCUE BOATS
Remember that in cases of severe haemorrhage, it is less important to worry
too much about finding appropriate materials or about the dangers of
infection. The most important problem is to stop rapid exsanguination.
If no material is available, simply thrust your hand into the wound. In most
situations, direct pressure is the first and best method to use in the control of
haemorrhage.
Pressure Points
Bleeding can often be temporarily controlled by applying hand
pressure to the appropriate pressure point. A pressure point is the spot
where the main artery to an injured part lies near the skin surface and over a
bone.
Apply pressure at this point with the fingers (digital pressure) or with the
heel of the hand. No first aid materials are required. The object of the
pressure is to compress the artery against the bone, thus shutting off the flow
of blood from the heart to the wound. There are 11 principal points on each
side of the body where hand or finger pressure can be used to stop
haemorrhage.
These points are shown in figure 15-23.
If bleeding occurs on the face below the level of the eyes, apply pressure
to the point on the mandible.
This is shown in figure 15-23 A.
To find this pressure point, start at the angle of the jaw and run your finger
forward along the lower edge of the mandible until you feel a small notch.
The pressure point is in this notch. If bleeding is in the shoulder or in the
upper part of the arm, apply pressure with the fingers behind the clavicle. You
can press down against the first rib or forward against the clavicle; either kind
of pressure will stop the bleeding.
This pressure point is shown in figure 15-23B. Bleeding between the
middle of the upper arm and the elbow should be controlled by applying
digital pressure to the inner (body) side of the arm, about halfway
between the shoulder and the elbow.
This compresses the artery against the bone of the arm. The application
of pressure at this point is shown in figure 15-23C.
Bleeding from the hand can be controlled by pressure at the wrist, as shown
in figure 15-24D. If it is possible to hold the arm up in the air, the bleeding will
be relatively easy to stop. Figure 15-24E shows how to apply digital pressure
in the middle of the groin to control bleeding from the thigh. The artery at this
point lies over a bone and quite close to the surface, so pressure with your
fingers may be sufficient to stop the bleeding. Figure 15-24F shows the proper
position for controlling bleeding from the foot.
As in the case of bleeding from the hand, elevation is helpful in controlling
the bleeding. If bleeding is in the region of the temple or the scalp, use your
finger to compress the main artery to the temple against the skull bone at the
pressure point just in front of the ear. Figure 15-23G shows the proper
position. If the neck is bleeding, apply pressure below the wound, just in front
of the prominent neck muscle. Press inward and slightly backward,
compressing the main artery of that side of the neck against the bones of the
spinal column.
15
18
PROFICIENCY IN SURVIVAL CRAFT AND RESCUE BOATS OTHER THAN
FAST RESCUE BOATS
The application of pressure at this point is shown in figure 15-23H. Do not
apply pressure at this point unless it is absolutely essential, since there is a
great danger of pressing on the windpipe, thereby choking the victim.
Bleeding from the lower arm can be controlled by applying pressure at the
elbow, as shown in figure 15-23I.
As mentioned before, bleeding in the upper part of the thigh can
sometimes be controlled by applying digital pressure in the middle of the
groin, as shown in figure 15-23E. Sometimes, however, it is more effective to
use the pressure point of the upper thigh, as shown in figure 15-23J. If you
use this point, apply pressure with the closed fist of one hand and use the
other hand to give additional pressure.
The artery at this point is deeply buried in some of the heaviest muscle
tissue in the body, so a great deal of pressure must be exerted to compress
the artery against the bone. Bleeding between the knee and the foot may
be controlled by firm pressure at the knee. If pressure at the side of the knee
does not stop the bleeding, hold the front of the knee with one hand and thrust
your fist hard against the artery behind the knee, as shown in figure 15-23K.
If necessary, you can place a folded compress or bandage behind the
knee, bend the leg back, and hold it in place by a firm bandage.
This is a most effective way of controlling bleeding, but it is so
uncomfortable for the victim that it should be used only as a last resort.
You should memorize these pressure points so that you will know immediately
which point to use for controlling haemorrhage from a particular part of the
body.
Remember, the correct pressure point is that which is (1) nearest the wound,
and (2) between the wound and the main part of the body. It is very tiring to
apply digital pressure, and it can seldom be maintained for more than 15
minutes. Pressure points are recommended for use while direct pressure is
being applied to a serious wound by a second rescuer. Using the pressurepoint technique is also advised after a compress, bandage, or dressing has
been applied to the wound, since this method will slow the flow of blood to
the area, thus giving the direct pressure technique a better chance to stop
the haemorrhage.
The pressure-point system is also recommended as a stopgap measure
until a pressure dressing or a tourniquet can be applied.
15
19
PROFICIENCY IN SURVIVAL CRAFT AND RESCUE BOATS OTHER THAN
FAST RESCUE BOATS
Fig. 15-23 Pressure points
15.2.4 Burns
Types of burn
The severity of your burn depends on how deeply it has affected the skin
tissue (see illustration).
There are three types of burn: superficial, partial-thickness and fullthickness.
15
20
PROFICIENCY IN SURVIVAL CRAFT AND RESCUE BOATS OTHER THAN
FAST RESCUE BOATS
Fig.15-24 The skin tissue
Superficial burns
Superficial burns only affect the surface of the skin (epidermis). Your
skin will be red and painful, but not blistered. Mild sunburn is an example of a
superficial burn.
Partial-thickness burns
Partial-thickness burns are deeper burns that damage your epidermis
and dermis to varying degrees. If the damage to your dermis is shallow, your
skin may be pale pink and painful, with blisters. Deeper burns to your dermis
will cause your skin to become dry or moist, blotchy and red. Deep partialthickness burns can be painful or painless and may blister.
Full-thickness burns
All layers of your skin are damaged by full-thickness burns. Your skin will
be white, brown or black and dry, leathery or waxy. Because the nerves in
your skin are destroyed with full-thickness burns, you won't feel any pain or
have blisters.
Symptoms of burns
If you're burned, you may have symptoms such as:
• changes in skin colour - burns can cause pink, red, white, brown and
black skin
• blisters
• pain in the burned area - but pain from burns isn't related to severity
Symptoms of an airway burn include:
• burned nose hairs
• soot in your mouth or nose
• change in your voice
• sore throat
• wheezing
15
21
PROFICIENCY IN SURVIVAL CRAFT AND RESCUE BOATS OTHER THAN
FAST RESCUE BOATS
Treatment of burns
Treatment for burns depends on their severity.
You can treat superficial and minor partial-thickness burns caused by
heat at home. However, seek medical help:
• all deep partial-thickness and full-thickness burns
• all chemical and electrical burns
• superficial and partial-thickness burns covering an area larger than the
palm of your hand
• burns that cover a joint or are on the face, hands, feet or groin
• all airway or suspected smoke inhalation burns
• advice if you're not sure about the extent of the burn or how to deal
with it.
For full-thickness burns or burns caused by chemicals or electricity, call
for emergency help. While waiting, valuable treatment can be given.
• For burns caused by heat, carefully remove any restricting clothing or
jewellery that isn't stuck to the burn. Flood the burn with cool (not cold) water
until medical help is available.
• For burns caused by chemicals, remove any affected clothing. Brush
the chemical off your skin if it's a dry powder and flood the burn with cool (not
cold) water. Don't try to neutralise the chemical with another chemical.
15.2.5 The shock
Causes of Shock
Shock can develop when the heart pump fails to work properly, causing
a reduction in the pressure of the circulating blood. The most common cause
of this type of shock is a heart attack.
Shock can develop as a result of a reduction in the volume of fluid
circulating around the body. The most common examples of this are external
or internal bleeding, or loss of other bodily fluids through severe diarrhoea,
vomiting, or burns. The blood supply is diverted from the surface to the core of
the body. The main symptoms and signs of shock relate to such redistribution
of the circulation.
Recognition of Shock
Initially, a flow of adrenaline causes:
A rapid pulse.
Pale, grey skin, especially inside the lips. If pressure is applied to a
fingernail or earlobe, it will not regain its colour immediately.
Sweating, and cold, clammy skin (sweat does not evaporate).
As shock develops, there may be:
15
Weakness and giddiness.
Nausea, and sometimes vomiting.
Thirst.
Rapid, shallow breathing.
22
PROFICIENCY IN SURVIVAL CRAFT AND RESCUE BOATS OTHER THAN
FAST RESCUE BOATS
A weak, ‘thready’ pulse. When the pulse at the wrist disappears, fluid
loss may equal half the blood volume.
As the oxygen supply to the brain weakens:
The casualty may become restless, anxious and aggressive.
The casualty may yawn and gasp for air (‘air hunger’).
The casualty will eventually become unconscious.
Finally, the heart will stop.
Treatment of Shock
DO NOT let the casualty move unnecessarily, eat, drink, or smoke.
DO NOT leave the casualty unattended. Reassure the casualty constantly.
Treat any cause of shock which can be remedied (such as external
bleeding).
Lay the casualty down, keeping the head low.
Raise and support the casualty’s legs (be careful if suspecting a
fracture).
Loosen tight clothing, braces, straps or belts, in order to reduce
constriction at the neck, chest and waist.
Insulate the casualty from cold, both above and below. Contact the
emergency service.
Check and record breathing, pulse and level of response. Be prepared
to resuscitate the casualty if necessary.
• Maintain body heat by insulating the victim from the surroundings and,
in some instances, applying external heat.
• If wet, remove all the victim's wet clothing as soon as possible and
replace with dry clothing.
• Improvise a shelter to insulate the victim from the weather.
• Use warm liquids or foods, a pre-warmed sleeping bag, another
person, warmed water in canteens, hot rocks wrapped in clothing, or fires on
either side of the victim to provide external warmth.
• If the victim is conscious, slowly administer small doses of a warm salt
or sugar solution, if available.
• If the victim is unconscious or has abdominal wounds, do not give
fluids by mouth.
• Have the victim rest for at least 24 hours.
• If the victim is conscious, place him on a level surface with the lower
extremities elevated 15 to 20 centimeters (6 to 8 inches).
• If the victim is unconscious, place him on his side or abdomen with his
head turned to one side to prevent choking on vomit, blood, or other fluids.
15
23
PROFICIENCY IN SURVIVAL CRAFT AND RESCUE BOATS OTHER THAN
FAST RESCUE BOATS
15.2.6 Immersion foot
Non-freezing cold injury – Immersion foot
This is a term given to the condition when the temperature of local tissues in
the limbs (usually the feet) remains sub-normal but above freezing for a
prolonged period. It is commonly encountered by shipwreck survivors who
have been adrift and cold for several days. Usually the feet have been wet
and immobile, but this injury can occur in dry conditions. Other contributory
factors are tight footwear and sitting still with the feet down for prolonged
periods.
Diagnosis
Feet become white, numb, cold and frequently are slightly swollen. When
returned to the warmth, the feet become hot, red, swollen and excruciatingly
painful.
Prevention
Every effort should be made by survivors to keep their feet warm and dry.
Shoe laces should be loosened; the feet should be raised and toe and ankle
exercises encouraged several times a day.
When possible, shoes should be removed and feet kept warm by placing
them under the armpits, but outside the clothing, of another occupant of the
life-raft or boat. Alternatively, unwanted spare clothing may be wrapped round
the feet to keep them warm. Smoking should be discouraged.
Treatment
After rescue every effort should be made to avoid rapid re-warming of the
affected limbs. Care should be taken to avoid damaging the skin or breaking
blisters. Do not massage affected limbs.
15.2.7 Freezing cold injury – frostbite
Frostbite is the term given to the condition when tissue fluids freeze in
localised areas of the body; the hands, face and feet are particularly
susceptible.
Cause
Exposure, particularly of bare skin to sub-zero temperatures, especially
when combined with air movement. Look-outs in life rafts or survivors in open
boats are particularly prone to this injury. Accordingly, consideration should be
given to the length of watch periods and watch keepers should be supplied
with any spare clothing.
Diagnosis
The signs are:
- extreme waxy pallor of the skin;
15
24
PROFICIENCY IN SURVIVAL CRAFT AND RESCUE BOATS OTHER THAN
FAST RESCUE BOATS
- initial local tingling and stiffness when it is difficult to wrinkle the face or
wiggle affected toes or fingers;
- complete absence of sensation in the area affected; and
- local hardness due to freezing of the flesh.
The depth of tissue damage can be graded, like burns, into 1st degree (frost
nip), 2nd degree, 3rd degree and 4th degree.
Prevention
If bare skin has to be exposed to the elements, the periods of exposure
should be kept to a minimum and freezing winds particularly avoided.
Moderate exercise and massage at an early stage will help to prevent the
onset of cold injury. Do not smoke; smoking reduces the blood supply to the
hands and feet.
Treatment
On detection of the above signs, immediate steps should be taken to rewarm the frozen parts before permanent damage occurs. Get out of the wind.
Re-warm the frozen area by applying it to a warmer part of the body, e.g.
hands under armpits, cupped hand over cheek, nose, ear, etc.
Once freezing has occurred do not rub or massage affected areas. When
treatment has been ineffective the skin dies and becomes black. If this occurs
dry dressings should be applied to the affected part.
15.2.8 Heat stroke
What is Heat Stroke?
Heat stroke is the most severe form of heat related illness. Heat stroke is
severe injury from high body temperatures that causes damage to many
organs, particularly the central nervous system, which include the brain and
spinal cord. Heat stroke is a life-threatening emergency. Without proper care,
heat stroke victims will most likely die.
People with heat stroke are dehydrated and require re-hydration. The
very young and old are very susceptible to the hazards of heat stroke.
Types of Heat Strokes
There are two main types of heat stroke: external and classic.
Exertional heat stroke
People who have exertional heat stroke are usually people who are
exercising in excessively warm conditions. Their bodies cannot manage the
stress of the physical activity and the hot environment together.
Classic heat stroke
People with classic heat stroke are usually elderly, very young (infants
and toddlers) or debilitated people who are in warm environments for too long.
The elderly are especially vulnerable to the heat. Elderly people are more
15
25
PROFICIENCY IN SURVIVAL CRAFT AND RESCUE BOATS OTHER THAN
FAST RESCUE BOATS
vulnerable to the heat because as the body ages, it is less able to handle
heat and cool itself off.
What are the Symptoms of Heat Stroke?
Some of the most common symptoms are: red, flushed skin, fever (body
temperature of 106-degrees or higher), seizures, headache, rapid pulse and
unconsciousness.
What causes a Heat Stroke?
Some of the most common causes of heat stroke are: high temperatures,
lack of body fluids and overexposure to the elements. Heat Stroke does not
have to be caused by exercise or exertion.
What happens during a Heat Stroke?
During a heat stroke, your body is unable to properly cool itself. When it is
unable to cool itself, the core body temperature rises rapidly.When the core
temperature rises, the brain begins to fail. (The brain can only function in a
very narrow temperature range). As the brain overheats, the individual will
become disoriented, combative, argumentative and may hallucinate.
How is a Heat Stroke Treated?
The main focus of treatment is to lower the body temperature. Different
techniques can be used.
Can a Heat Stroke be Prevented?
Heat stroke, like all heat-related illnesses, is preventable. Some of the
ways to prevent heat stroke is stay well hydrated, wear cool clothes, and keep
cool.
15.2.9 Contamination with oil
Do not clean oil off the skin (except around the mouth and eyes) until the
person is warm and comfortable.
Survivors who have recovered from hypothermia can be taken to a warm
shower or bathroom and should have all their clothes taken off.
Then their skin should be wiped with soft cloth and strong paper towels to
remove as much of the oil as possible. Injured or burned areas should be
wiped with care or not at all.
If a strong warm shower is available, mechanical removal of much of the
oil can be accomplished by the water jet effect.
Hair shampoo will remove oil from the hair and can be used to help
remove oil from the body.
Then, with time, patience, help, and wiping, and using good toilet soap or
shower gel to clean the skin, the rest of the oil can be washed away.
15
26
PROFICIENCY IN SURVIVAL CRAFT AND RESCUE BOATS OTHER THAN
FAST RESCUE BOATS
Solvents, scouring compounds, kerosene, and other cleaners not
designed for skin cleaning must not be used.
It is, however, all right to use jellied cleansing agents that are designed
for skin cleaning.
15.2.10 Dehydration and malnutrition
Survivors who have been adrift for several days may be suffering from
dehydration. If they have been adrift for several weeks malnutrition may also
be a problem.
Caution should be exercised in trying to reverse either dehydration or
malnutrition rapidly.
Give sweetened fluids in quantities which will produce a urinary output of
one litre per day initially. In temperate climatic conditions (or air-conditioned
accommodation) this will usually mean an input of about 2 litres a day. If the
weather is warm and the skin is moist or sweaty, higher intakes may be
permitted.
Initially, a diet of nourishing liquids (sugar and water or milk or soup) will
satisfy nutritional requirements and should be given for the first two days.
Then small amounts of normal food can be given additionally. RADIO
MEDICAL ADVICE should be sought.
This diet should continue until either the survivor can be transferred to
care ashore or medical assistance is given on board.
15.2.11 Problems in the lifeboat
Vomiting
This may be due to the unusual motion of the small craft (sea-sickness is
inevitable in a life raft), or to swallowing fuel oil or sea water. It is unlikely to
continue very long.
After severe vomiting the patient should lie down and be kept warm with coats
or blankets. Seasickness tablets may give relief if taken well before the onset
of vomiting. They should be issued at the earliest opportunity after entering a
life raft.
Constipation
Action of the bowels is not expected when taking little or no food. No
treatment is needed for this condition – in fact laxatives will do harm.
Difficulty in urination
There may be some difficulty in passing urine and the bladder may feel
uncomfortably full. In any case, not much water will be passed when the
drinking ration is small. The urine may appear dark in colour and thick. This is
to be expected and need not cause alarm.
Swollen legs
Swelling of the legs is a common occurrence in the boat and continues
for a few days after rescue. The condition subsides without treatment and, by
itself, is a matter of no importance but can be partially relieved by the
exercises recommended for immersion foot.
15
27