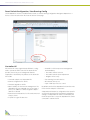
1
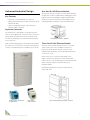
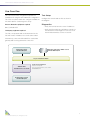
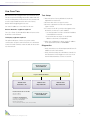
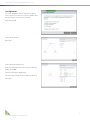
Extreme Networks Evaluation Guide
Altitude 4511
Access Point
Evaluation Guide
This document will describe the industrial design and
modularity, and provide step-by-step configurations for
typical use cases in multi-tenant markets such as hotels.
The glossary of features lists the webUI screens, along
with a short description of the functionality. The highpowered radio will need to be tested by comparing the
Altitude™ 4511 with other, “known” access points. When the
comparison is made, the value of the Altitude 4511 will
become more apparent.
© 2011 Extreme Networks, Inc. All rights reserved. Do not reproduce.
Extreme Networks Evaluation Guide: Altitude 4511 Access Point
The Extreme Networks Altitude 4511 Access Point can
change the way wireless networks are installed, while
lowering the deployment and operations expense
associated with a wireless network.
When evaluating the Altitude 4511, take note of these
three key features and their cost saving advantages:
Advanced Industrial Design –
“Hide-in-Plain-Sight”
The Altitude 4511 access point installs in minutes
anywhere a CAT 5/6 cable is located. Due to its tiny size,
the Altitude 4511 will hide in plain sight; ceiling mount,
tabletop, or wall surface. A patent-pending mechanical
design is optimized for installation over any structured
wiring CAT 5/6 wall jack. The wallplate form factor is
25mm (1 inch) thick, and flush mounted to the wall
surface. The AP does not protrude into the wall cavity.
This design allows for efficient heat transfer and a
universal installation over any structured wiring plate.
The modular design allows the end-user to add switched
Ethernet ports as needed, and snap in any keystone or
Leviton QuickPort® style connector to the wallplate.
Scope of this Document
This document will describe the industrial design and
modularity, and provide step by step configurations for
typical use cases in multi-tenant markets such as hotels.
The glossary of features lists the webUI screens, along
with a short description of the functionality. The high
powered radio will need to be tested by comparing the
Altitude 4511 with other, “known” access points. When
the comparison is made, the value of the Altitude 4511
will become more apparent.
Use Case 1: Configure a single AP as a standalone AP
using the configuration overrides.
Use Case 2: Use the Initial Setup Wizard to configure a
Controller AP and dependent APs with one WLAN.
Use Case 3: Use the configuration screens to configure a
Controller AP with two WLANs; one open and one
secure. VLANs will be added to WLANs and switched
Ethernet ports.
High-Powered 802.11a/b/g/n Radio
Under the sleek exterior, the Altitude 4511 packs a 26dBm
transmitter along with dual omni-directional 3dBi peak
gain antennas. The AP supports either 2.4Ghz or 5.2Ghz
operating bands. 2x2 multiple-input and multiple-output
(MIMO) technology and support for legacy 802.11a/b/g is
ideal for supporting a wide range of laptops, portable
media players, tablets, mobile computers, Wi-Fi phones
and wireless enabled smartphones.
Controller AP
The Altitude 4511 can be managed via CLI or webUI as a
standalone access point. When more than one AP is
installed, any single Altitude 4511 can operate as a
Controller AP for a network of up to 25 Altitude 4511s. By
using the hardware of an access point to run controller
features, the Altitude 4511 dramatically lowers the cost of
a managed, RF controller-based network for small
hotels. All the features you want from an RF controller
are here; firmware management, central configuration,
status and statistics. Also advanced features such as fast
roaming, Smart RF, and Rogue AP detection are all
included in the Controller AP function.
2
© 2011 Extreme Networks, Inc. All rights reserved.
Extreme Networks Evaluation Guide: Altitude 4511 Access Point
Advanced Industrial Design
Key Features
• Keystone or Leviton QuickPort® connector
• One port RJ-45 Ethernet Module, Three port RJ-45
Ethernet Module
One-Port RJ-45 Ethernet Module
The keystone port also accepts a one-port RJ-45 Ethernet
Module. This module is supplied in the shipping box with a
pigtail connector terminating in a 9-pin header. Snap in
the RJ-45 connector and connect the header pin to the
matching header on the back of the unit, labeled “FE1”
• Snap-on installation in any location where an
Ethernet cable is located
Keystone Connector
The snap-in port is designed to accept any keystonestyle or Leviton QuickPort® connector. These connectors
are a popular mechanical form factor for RJ-11, RJ-45,
F-connector and many more network and communications connectors.
Snap out the blanking plug on the wallplate and snap in
the connector of your choice. The latch on the keystone
connector should always face toward the top of the AP.
RJ-45 Ethernet Module – Supplied
Three-Port RJ-45 Ethernet Module
The front of the Altitude 4511 has an access cover that
can be removed to expose a hidden connector. A
three-port RJ-45 Ethernet Module connects to the
hidden header and snaps onto the Altitude 4511 in place
of the access cover.
Remove the access cover by using a sharp tool to
depress the latch on the bottom of the Altitude 4511.
Pull the access cover up and away from the Altitude 4511.
Reverse the procedure to install the three-port
Ethernet Module.
The Ethernet Module has three ports labeled “FE2”,
“FE3”, and “FE4”.
RJ-45 Connector for Ethernet
or Digital Phone
RJ-11 Analog
POTs Connector
Three Port RJ-45 Ethernet Module – Optional
3
© 2011 Extreme Networks, Inc. All rights reserved.
Extreme Networks Evaluation Guide: Altitude 4511 Access Point
Vital Information Before
We Begin
After the first login following a factory default configuration, the administrator will be prompted to change the
password.
Power
The Altitude 4511 requires Power over Ethernet. Connect
an 802.3af PoE switch or PoE midspan injector to the
port labeled UP1/PoE on the back of the unit. The AP
will draw between 6.5W and 9W of power depending on
the number of Ethernet ports connected and the transmission speed.
The AP takes three minutes to completely boot up. At two
minutes, the Web server is active and will respond to a
Web browser. However, the backend database will not
authenticate user login for another minute.
Login
The Altitude 4511 can be accessed from a webUI or CLI.
This guide will use the webUI login.
The webUI requires the Adobe Systems flash plugin. If it is
not installed, the webUI will prompt the administrator to
install flash.
For instructions on upgrading the system firmware, see
the Appendix.
Default user name: admin
Default password: admin123
Default IP address: IP address assigned by DHCP client, or
zero-config IP address where the last two octets in the IP
address are the decimal equivalent of the last two bytes in
the MAC address.
Example: MAC address 00:C0:23:00:F0:0A
Zero-config IP address: 169.254.240.10
To use the zero-config IP address, manually set your PC to
same IP subnet. See the Appendix for further assistance
converting the MAC bytes in hex to its decimal equivalent.
4
© 2011 Extreme Networks, Inc. All rights reserved.
Extreme Networks Evaluation Guide: Altitude 4511 Access Point
Reset Default Configuration, View Running Config
Use the Operations menu to reload firmware, restart, or view the running configuration. Navigate to Operations ->
Devices. Select the action from the list at the bottom of the page.
Controller AP
A Controller AP is any single Altitude 4511 that is configured to operate as an RF controller. The Controller AP
provides a necessary set of management features
required for a small facility. Key features of the Controller
AP include:
• Automatic adoption of dependent APs
• Central configuration for all APs
• Firmware upgrade on all APs
• One IP address for the network management. The
dependent APs are managed via a secure Layer 2
protocol. IP addresses can be assigned to dependent APs if desired
• Central status and statistics for APs and connected
wireless clients
• IPS/IDS for rogue AP detection
• SmartRF for efficient spectrum management
and redundancy
–– Automatic channel selection
–– Automatic transmit power adjustment
–– Neighbor AP recovery
• Fast roaming for mobile devices
• Role-based client access
• Layer 2 and Layer 3 access control
By default, an AP will be dependent if a Controller exists
in the network. Adoption is automatic.
A dependent AP obtains its configuration from a profile
stored on the Controller AP. Any manual configuration
changes on a dependent AP will be overwritten by the
Controller upon reboot. Up to 24 dependent APs can be
connected to a Controller AP.
5
© 2011 Extreme Networks, Inc. All rights reserved.
Extreme Networks Evaluation Guide: Altitude 4511 Access Point
Initial Setup Wizard
Policies, Profiles and Adoptions
The Wizard will run automatically after a factory reset. It
will walk the administrator through a set of minimum
required configurations. Once complete, profiles will be
created and assigned to the device. To restart the
Wizard, you must reset the unit to factory defaults. See
the Appendix for instructions on resetting the factory
default configuration.
Policies
The configuration screens in the Setup Wizard include:
Note that there are policies inside of policies. For
example, Wireless Clients can be allowed or denied
access to the network based on an IP or MAC firewall
policy. Thus, the Wireless Client Roles policy requires a
Firewall policy.
Operating Mode: Standalone AP; Controller AP;
Dependent AP
Basic System Info: Password, Timezone, Country,
Network Access
VLAN and IP Address: Set the native VLAN and member
VLANs for all interfaces. Set whether the interface is an
access or trunk port. Assign the IP address to the uplink
LAN port.
WLAN Configuration: Set up multiple WLANs and set
the minimum required information such as SSID,
Authentication, and VLAN. If needed, set up a RADIUS
server to authenticate a WLAN.
Most (but not all) configuration elements such as
Firewall and WLAN are configured as a policy. Multiple
policies can be created and edited. Once a policy is
created, it must be mapped onto a device profile. If a
policy is edited, those edited changes are automatically
applied to any device mapped to that policy.
Policies can be created at any time. When the administrator is presented with a drop down box to select a
policy, there will always be a “create” and “edit” button
to allow the additional policy to be created at that time.
To keep the configuration steps clear, we recommend
creating a core set of policies at the beginning. Thus,
these policies will be ready for selection when the device
profiles are created.
Device Profiles
Device Profiles are a container for policies and other
configurations, and are assigned to devices either
manually or by an adoption policy. Device profiles should
be created for major groups of devices. For example, a
typical network would have at least two profiles; one
profile for the Controller AP, and one profile for all
dependent APs. If APs will service distinct areas of a
hotel; such as guest rooms and meeting rooms, then a
unique dependent AP profile may be created for each of
these unique applications.
Device Overrides
Note that any profile configuration can be overridden by
specifically configuring the device. It is recommended
that device overrides be used at a minimum. Commonly,
a device override is used to assign the management IP
address and default gateway to a Controller AP. Another
use for device overrides is to quickly configure a
standalone AP. If a device configuration is overridden, be
certain to document the configuration to prevent
confusion later.
6
© 2011 Extreme Networks, Inc. All rights reserved.
Extreme Networks Evaluation Guide: Altitude 4511 Access Point
Adoption
Dependent APs are adopted by a Controller AP. By default, each AP is standalone or dependent. When a new AP is
installed in the network, it will begin the network discovery process to find a Controller AP. On the Controller AP, an
adoption policy can be created to control which APs are adopted. The policy rules can include MAC address, serial
number, DHCP option, and other parameters.
TIP
Configure Policies first then map policies to Device Profiles.
In a simple network, edit the “default” policy to match your requirements rather than create new policies.
Policies Available for Configuration
Refer to the Appendix for a description of each of these policies. The core policies that will always be configured are
shown in green. Note that there are policies inside of policies. Also, some policies, notably firewall policies, can be
selected in multiple screens.
Policies
WebUI Navigation
Devices Menu
Adoption Policy
Profile -> <profile name>
RF Domain Menu
RF Domain
RF Domain
Wireless Menu
WLANs
Profile -> <profile name> -> Radio -> WLAN Mapping
WLAN QoS
<link to other policy> Wireless -> Wireless LAN -> Basic Configuration
Radio QoS
Profile -> <profile name> -> Radio -> Radio Settings
Remote AAA Server
<link to other policy> Wireless -> Wireless LAN -> Security
Services -> Captive Portal
MAC Association ACL
Profile -> <profile name> -> Radio -> Radio Settings
<link to other policy> wireless -> wireless lan -> firewall
SmartRF
<link to other policy> RF domains -> Basic Configuration
Bridging
Profile -> <profile name> -> General
Security Menu
Wireless Firewall
Profile -> <profile name> -> Security -> Settings
IP Firewall
Profile -> <profile name> -> Interface -> Ethernet ports
Profile -> <profile name> -> Interface -> Virtual Interface
<link to other policy> Wireless, Wireless LAN, Firewall
MAC Firewall
Profile -> <profile name> -> Interface -> Ethernet ports
Profile -> <profile name> -> Interface -> Virtual Interface
<link to other policy> Wireless, Wireless LAN, Firewall
Wireless IPS
<link to other policy> RF Domains -> Basic Configuration
Wireless Client Roles
Profile -> <profile name> -> Security -> Services
Services Menu
Hotspot
<link to other policy> Wireless -> Wireless LAN -> Security
DNS Whitelist
Services -> Captive Portal
Management Menu
Management Policy
Profile -> <profile name> -> Management -> Settings
7
© 2011 Extreme Networks, Inc. All rights reserved.
Extreme Networks Evaluation Guide: Altitude 4511 Access Point
Use Case One
This case will show the configuration required for a
Standalone AP using the device Overrides configuration.
This is the most direct method to configure a standalone
AP and is ideal for conducting a site survey.
Test Setup
Extreme Networks equipment required:
Diagnostics
Configure the network and test PCs as shown in
the diagram.
One (1) Altitude 4511
• Verify the test PCs have the correct IP addresses
Third-party equipment required:
• Verify the AP actually has a WLAN associated. Use
the information in the Diagnostics section to view
the WLANs and wireless clients on each AP
Two PCs; one upstream and one downstream. Set the
PCs with a static IP address to be on the same subnet.
Alternatively, connect the Altitude 4511 to a subscriber
gateway and test using an Internet connection.
Upstream Test PC
192.168.100.2/24
Gateway and Router DHCP Server
192.168.100.254/24
Layer 2 Network Switch
Altitude 4511
Standalone Access Point
Controller Configuration
Password: helpme
Access Method: Telnet, SSH, HTTP
192.168.100.1/24
Downstream Test PC
192.168.100.3/24
5644-01
8
© 2011 Extreme Networks, Inc. All rights reserved.
Extreme Networks Evaluation Guide: Altitude 4511 Access Point
Configuration
Use the device Overrides configuration to configure a standalone AP. Profiles can be used, but the easier path is to
directly configure the device.
RF Domain Overrides
webUI navigation:
Configuration -> Devices -> Device Configuration ->
RF Domain Overrides
Select Time Zone and Country
Click OK
Profile Overrides
webUI navigation:
Configuration -> Devices -> Device Configuration ->
Profile Overrides
Virtual Interface with IP
Click Interfaces -> Virtual Interfaces
Click Add, leave the VLAN 1 name
Uncheck “Use DHCP to Obtain IP”
Assign an IP address, 192.168.100.1/24
Click OK, then Exit
Radio and WLAN
Click Interfaces -> Radios
Select Radio1, click Edit
Under Radio Settings
Select an operating Channel. Do not select “Smart”
Enter a Transmit power e.g. “24”. Do not select “Smart”
Click OK
Select the WLAN Mapping screen
Click Create a New WLAN
Enter a friendly name in the top box, Enter an SSID
Click create next to the WLANQoS box. Enter a friendly name
Click OK, then Exit
Click OK, then Exit
Select your WLAN from the right side pane, click the << arrow
Click OK, then Exit
Default Gateway
Click Network -> Static Routes
Click Add Row
Enter 0.0.0.0/0 as the network address
Enter 192.168.100.254 as the gateway
Click OK
Commit and Save
Click the Commit button, then Save in the upper right corner
9
© 2011 Extreme Networks, Inc. All rights reserved.
Extreme Networks Evaluation Guide: Altitude 4511 Access Point
Use Case Two
One WLAN will be configured with open authentication.
The access points will bridge all packets and VLANs will
not be used anywhere in the network. This Use Case will
use the setup wizard. Reset the unit to the factory
default before beginning this use case.
Set static IP addresses on test PCs for this test.
Test Setup
1. Reset the unit to factory defaults. Consult the
Appendix for instructions
2.Connect three APs to a Layer-2 switch
3.Connect a upstream test PC to the upstream
Layer-2 switch
4.To connect to the AP you wish to designate as the
Controller, use the zero-conf IP address:
Extreme Networks® equipment required:
Two (2) or Three (3) Altitude 4511s. One will serve as the
Controller for the network.
• Set the upstream Test PC to a manual IP address
in the 169.254.x.x network
Third-party equipment required:
• Convert the last two bytes of the AP MAC
address to decimal (see Appendix)
The uplink LAN ports of the access points can be
connected to a Layer-2 network switch or to an Internet
router. A PC with a wireless network card can be used to
test the network.
5.When the configuration is done; set the IP address
of the upstream Test PC to 192.168.100.2.
Diagnostics
• Verify the wireless test PC and upstream PC have IP
addresses in the same subnet.
• Verify the AP actually has a WLAN associated. Use
the information in the Diagnostics section to view
the WLANs and wireless clients on each AP
Upstream Test PC
192.168.100.2/24
Layer 2 Network Switch
Altitude 4511
Controller + AP
Network Controller for all APs
WLAN 1: Open
FE1: Not Used
Altitude 4511
Dependent AP
Altitude 4511
Dependent AP
Downstream Test PC
192.168.100.3/24
Controller Configuration
IP Address: 192.168.100.1/24
Gateway: 192.168.100.1
Password: helpme
Access Method: Telnet, SSH, HTTP, HTTPS
5645-01
10
© 2011 Extreme Networks, Inc. All rights reserved.
Extreme Networks Evaluation Guide: Altitude 4511 Access Point
Configuration
The setup wizard will start on the first boot after a
factory reset. To reset the AP to factory defaults, press
the reset button on the bottom of the AP.
Click Start Wizard
Select “Controller AP”
Click Next
Enter a new system password
Enter a location and contact. This will be used in the
SNMP system OID.
Select the Time Zone and Country
Select the type of network access that you will allow
Click Next
11
© 2011 Extreme Networks, Inc. All rights reserved.
Extreme Networks Evaluation Guide: Altitude 4511 Access Point
Select Bridge Mode
Click Next
Enter 192.168.100.1/24 as the LAN IP
Click Next
In this example, we will not be using the router mode.
Click Next
12
© 2011 Extreme Networks, Inc. All rights reserved.
Extreme Networks Evaluation Guide: Altitude 4511 Access Point
Click the “Add WLAN” button
Enter an SSID, select No authentication
Click OK
Click Next
Since we are using Open authentication, RADIUS
configuration is not needed.
Click Commit/Next
The dependent APs will be adopted by this Controller
AP and will show up in the discovery list.
Click Next
13
© 2011 Extreme Networks, Inc. All rights reserved.
Extreme Networks Evaluation Guide: Altitude 4511 Access Point
Connect a wireless Test PC to the WLAN
The wireless Test PC will show up in the Wireless Client
Association list
Click Finish/Save
Set the time or enter an NTP serve
Click Finish
14
© 2011 Extreme Networks, Inc. All rights reserved.
Extreme Networks Evaluation Guide: Altitude 4511 Access Point
Use Case Three
Two WLANs will be configured; one with open authentication and the other with a pre-shared key authentication. The access points will bridge all packets and a
unique VLAN ID will be assigned to each WLAN and the
Fast Ethernet port.
This configuration can be done using the Wizard or the
webUI policies and profiles configuration screens.
Test Setup
1. Snap-in the RJ-45 module to the keystone port.
Connect the pigtail on the RJ-45 module to the
header on the back of the AP
2.Configure the network and test PCs as shown in
the diagram
Diagnostics
Static IP addresses will be assigned to the test PCs.
• Verify the test PCs have the correct IP addresses
Extreme Networks equipment required:
• Verify the AP actually has a WLAN associated. Use
the information in the Diagnostics section to view
the WLANs and wireless clients on each AP
Two (2) or Three (3) Altitude 4511 APs. One will serve as
the RF Controller for the network.
One RJ-45 snap-in Ethernet Module.
Third-party equipment required:
A subscriber gateway that understands 802.1Q VLANs is
recommended. Alternatively, a Layer-2 network switch
can be configured with VLAN trunk ports and access
ports. A PC with a wireless network card can be used to
test the network.
Gateway and Router
802.1Q VLAN Aware DHCP Server
Upstream Test PC
192.168.100.2/24
Native VLAN: 5
VLANs: 5
Mode: Access Port
Native VLAN: 1
VLANs: 5, 100, 200, 300
Mode: Trunk Port
Layer 2 Network Switch
Native VLAN: 1
VLANs: 5, 100, 200, 300
Mode: Trunk Port
Altitude 4511
Controller + AP
Native VLAN: 1
VLANs: 5, 100, 200, 300
Mode: Trunk Port
Altitude 4511
Dependent AP
Controller Configuration
Mgmt IP: 192.168.100.1/24
Mgmt VLAN: 5
Password: helpme
Access Method: Telnet, SSH, HTTP
Native VLAN: 1
VLANs: 5, 100, 200, 300
Mode: Trunk Port
Altitude 4511
Dependent AP
Downstream Test PC
192.168.100.3/24
Network Configuration for All APs
WLAN 1: Open, Native VLAN 200
WLAN 2: WPA PSK, Native VLAN 300
FE1: Enabled, Natvie VLAN 100, Access Port
UP1: Native VLAN 1, Member VLAN 5, 100, 200 Trunk Port
Management VLAN: 5
5646-01
15
© 2011 Extreme Networks, Inc. All rights reserved.
Extreme Networks Evaluation Guide: Altitude 4511 Access Point
Configuration
Create Adoption Policy
webUI navigation:
Configuration -> Device -> Adoption Policy
Click add
Enter a name
Click Continue
Click add
Select Match Type, any
Select Profile Name “dependent-AP4511”
Click OK, then Exit
Create an Open WLAN
webUI navigation:
Configuration -> Wireless -> Wireless LAN
Click add
Assign a friendly name for the WLAN
Enter an SSID e.g. Guest-Open
Enter 200 in the VLAN pool box
Click OK, then Exit
Create a Secure WLAN
webUI navigation:
Configuration -> Wireless -> Wireless LAN
Click add
Assign a friendly name for the WLAN
Enter an SSID e.g. Guest-Secure
Enter 300 in the VLAN pool box
Click OK
Click Security, click WPA2-CCMP in the “Select Encryption” option
Clear the Pre-Shared Key field, click the show box
Enter an ASCII string between 8 and 63 characters e.g. extremenetworks
Click OK
Click Client Settings, uncheck Client-to-client Communication
Click OK, then Exit
Create SmartRF Policy
webUI navigation:
Configuration -> Wireless -> SmartRF (or edit the default SmartRF policy to match
your settings)
Click add
Assign a name
Leave sensitivity at Medium
Check the option to Enable SmartRF policy
Click OK, then Exit
16
© 2011 Extreme Networks, Inc. All rights reserved.
Extreme Networks Evaluation Guide: Altitude 4511 Access Point
Create a Primary Controller AP Profile
webUI navigation:
Configuration -> Profiles (or edit the default Controller AP Profile to match your settings)
Click add
Assign a name, select the ALTITUDE 4511 type
Check the box to Set as Controller AP
Leave adoption policy at <none>
Click OK
Click Interface -> Ethernet Ports
Select FE1
Enter 100 as the Native VLAN
Click OK, then Exit
Select UP1
Set the mode to Trunk
Enter 5, 100, 200, 300 in the Allowed VLANs box
Click OK, then Exit
Click Virtual Interfaces
Click add
Enter 5 in the VLAN ID box
Enter management VLAN in the description
Enter 10.10.10.2/24 in the IP address field
Click OK, then Exit
Click add
Enter 100 in the VLAN ID box
Enter Fast Ethernet port 1 in the description
Click OK, then Exit
Click add
Enter 200 in the VLAN ID box
Enter Open WLAN in the description
Click OK, then Exit
Click add
Enter 300 in the VLAN ID box
Enter Secure WLAN in the description
Click OK, then Exit
Click Radio
Select radio1, click Edit
Click WLAN Mapping
Select your WLANS from the right side, click the arrow to map it to your radio
Click OK, then Exit
Click Network
Select Static Routes, click Add Row
Enter 0.0.0.0/0 in the Network Address field, and your router as the Gateway
Click OK, then Exit
17
© 2011 Extreme Networks, Inc. All rights reserved.
Extreme Networks Evaluation Guide: Altitude 4511 Access Point
Click Management
Select Settings, Select the default Management Policy, click the Edit button
Select the access modes you wish to enable; Telnet, SSH, HTTP, HTTPS
Under Access Restrictions, select “source-address” as the Filter Type
In the “Source Subnets” field, enter 10.10.10.0/24
Click OK, then Exit
Edit the Dependent-AP Profile
webUI navigation:
Configuration -> Profiles
Select dependent-AP4511, click Edit
Select your adoption policy from the drop down list
Click OK
Click Interface -> Ethernet Ports
Select FE1
Enter 100 as the Native VLAN
Click OK, then Exit
Select UP1
Set the mode to Trunk
Enter 100, 200, 300 in the Allowed VLANs box
Click OK, then Exit
Click add
Enter 100 in the VLAN ID box
Enter “Fast Ethernet port 1” in the description
Click OK, then Exit
Click add
Enter 200 in the VLAN ID box
Enter “Open WLAN” in the description
Click OK, then Exit
Click add
Enter 300 in the VLAN ID box
Enter “Secure WLAN” in the description
Click OK, then Exit
Click Radio
Select radio1, click Edit
Click WLAN Mapping
Select both of your WLANS from the right side, click the arrow to map it to
your radio
Click OK, then Exit
18
© 2011 Extreme Networks, Inc. All rights reserved.
Extreme Networks Evaluation Guide: Altitude 4511 Access Point
Diagnostics
Network and Access Point Statistics
The Controller AP and its network of connected access
points can be examined using the Statistics menu. From
here, note how the list of displayed statistics will change
depending if you select the RF Domain, the Controller
AP, or one of the Dependent APs.
To determine if a WLAN is operational, click Statistics,
then select the Controller AP. Click on the “Radios”
option. Note the State of the radio.
In the example shown below, the radio is OFF because a
WLAN has not been mapped to the radio.
19
© 2011 Extreme Networks, Inc. All rights reserved.
Extreme Networks Evaluation Guide: Altitude 4511 Access Point
Network View
The Dashboard view provides quick status of the
network and clients. One key feature of the Dashboard is
the Network View where the administrator can color
code the wireless clients using quality indicators.
The indicators are RF Quality, Utilization, SNR, and
Threat. For each indicator, a filter can be applied with
Low, Medium, and High thresholds.
Use the Dashboard Network View to quickly gauge the
status of the wireless clients and identify if corrective
action is needed.
Double click on a client to see detailed statistics about
the connection.
20
© 2011 Extreme Networks, Inc. All rights reserved.
Extreme Networks Evaluation Guide: Altitude 4511 Access Point
Common Configuration Mistakes
This section will be updated during the course of the
evaluation period. It will contain common configuration
mistakes and the corrections recommended by
Extreme Networks support.
The Most Common Mistake
All configurations must be committed to the Running
configuration before they are active. Be sure to click the
Commit button in the upper right corner of the configuration screen. If anything doesn’t appear to be working,
click Commit before doing any further diagnostics. Click
Save before rebooting or turning the AP off.
No Default Gateway Assigned to the
Management Interface
Within the Controller profile, select Network -> Static
Routes. Click Add Rows and enter 0.0.0.0/0 as the
network address and your router IP address as the
Gateway. This will set the default gateway for the system.
WLAN is not Broadcasting on My
Test Laptop
This usually means then WLANs are not mapped to a
radio. Within the Controller and Dependent AP profiles,
select Interface -> Radios. Select radio1 and click Edit.
Select WLAN Mapping and ensure WLANs are mapped
to the radio on the left side of the box. Click OK, then
exit. It may also mean the wrong country was selected.
Wrong Country Selected
US FCC certification requires that an access point used in
the United States can only have a US country option. If
the AP presents other country options in a list, the
WLAN will be disabled if the AP is a US SKU. Be sure to
check the label on the rear of the unit to see if you have
a WR (worldwide RoHS) or a US (United States) SKU.
The WR and US are appended to the end of the part
number. Use the information in the Diagnostics section
to view the State of the radio.
21
© 2011 Extreme Networks, Inc. All rights reserved.
Extreme Networks Evaluation Guide: Altitude 4511 Access Point
Glossary of Features
This glossary provides a short description of key features found in the Altitude 4511 webUI.
Dashboard
The Dashboard provides graphical and statistics view of the network. A key feature in the dashboard allows the
administrator to select from a list of critical parameters to display the network and client connectivity.
Summary
webUI navigation:
Dashboard -> Summary
details:
The overall health of the network is shown in summary. Top (or worst) five access points
are sorted by number of clients, RF quality, and threat index. The number of clients
connected on 5.2Ghz radios and 2.4Ghz radios is displayed in this summary view.
Network View
webUI navigation:
Dashboard -> Network View
details:
The network topology is displayed in a graphical view. Four key client parameters can be
overlaid on the network view for a quick reference; RF Quality, Utilization, SNR, Threat. To
view detailed statistics of the network, access points, and wireless clients; click on the
Statistics link from the Network view. If you select an adopted AP, the Statistics link will
show details for that particular AP. If you select the Controller AP, statistics will be
displayed for the network.
Configuration -> Devices
Devices Configuration
WebUI navigation:
Configuration -> Devices -> Device Configuration
details:
Select a single device from the list of known devices. All configurations found in a policy
can be overridden using this screen. It is recommended to use the policies and profiles to
configure devices and use the Device override configurations sparingly. It is common to
use policies for a group of devices, but use a configuration override to set a unique IP
address. Additionally, if using the Altitude 4511 as a single, standalone access point, device
configuration is the fastest way to configure the device.
Adoption Policy
webUI navigation:
Configuration -> Devices -> Adoption Policy
details:
Device adoption can be done manually, or by creating rules. When a dependent AP is
adopted by a Controller, adoption rules determine 1) whether the dependent AP is
adopted by this controller and 2) what profile to assign to the AP. Adoption rules include
common parameters such as MAC address, serial number and DHCP option.
To manually assign an adoption policy to a device, go to the “Configuration -> Devices ->
Device Configuration -> [select device in list] -> Cluster” menu. Select the policy from the
drop down list.
22
© 2011 Extreme Networks, Inc. All rights reserved.
Extreme Networks Evaluation Guide: Altitude 4511 Access Point
To manually assign a profile to a device (bypassing all rules or manual adoption), go to the
“Configuration -> Devices -> Device Configuration -> [select device in list] -> Basic
Configuration” menu. Select the policy from the drop down list.
Configuration -> Wireless
Create policies for WLANs and related parameters required for the wireless LAN.
Wireless LANs
webUI navigation:
Configuration -> Wireless -> Wireless LANs
details:
Create a WLAN policy and select access rules, QoS, firewall and VLAN policies to apply to
the WLAN. Note that some policies are embedded within policies. For example, a QoS
policy is required within the WLAN policy. This can lead to confusion during configuration.
Anywhere a policy is required in a drop down list, there will always be a Create and Edit
button. If the policy needs to be created, click the Create link next to the drop down box.
WLAN QOS Policy
webUI navigation:
Configuration -> Wireless -> WLAN QOS Policy
details:
Set the WMM QOS configurations to apply to clients connecting to the WLAN. WMM
QoS is applied to client packets based on DSCP bit.
Radio QoS Policy
webUI navigation:
Configuration -> Wireless –Radio QOS
details:
Radio QoS applies to all packets on the radio regardless of WLAN. WLAN QoS rules will
take priority.
AAA Policy
webUI navigation:
Configuration -> Wireless -> AAA Policy
details:
Create multiple AAA policies with unique RADIUS servers and secret phrase. AAA policies
are required for Enterprise (802.1x) client authentication.
Association ACL
webUI navigation:
Configuration -> Wireless -> Association ACL
details:
Create policies to control access to the wireless LANs by filtering on the MAC address of
the client.
Smart RF Policy
webUI navigation:
Configuration -> Wireless -> Smart RF Policy
details:
Create one SmartRF policy for the RF domain. An RF Domain is the collection of RF
spectrum management tools employed by the Altitude 4511 for efficient use of the RF
spectrum. The RF Domain is a key element of a Extreme Networks management entity.
Note that all APs “belong” to an RF Domain. On the Altitude 4511 Controller AP feature,
there is only one RF Domain supported. To configure multiple RF Domains for a large
enterprise network, use an Extreme Networks RF Controller such as the
Summit® WM3400, WM3600, or WM3700. These dedicated RF Controllers feature multiple
RF Domain management, along with a host of sophisticated Layer 2 and Layer 3 features.
23
© 2011 Extreme Networks, Inc. All rights reserved.
Extreme Networks Evaluation Guide: Altitude 4511 Access Point
SmartRF is a set of software algorithms that provides automatic transmit power
adjustment, automatic channel selection, and automatic neighbor recovery if a failure
occurs in a neighbor access point. On a dedicated RF Controller, SmartRF adds additional
functionality for an enterprise network.
Bridging Policy
webUI navigation:
Configuration -> Wireless -> Bridging Policy
details:
Set whether a common VLAN will be bridged between wired and wireless interfaces.
Configuration -> Profiles
Profiles are containers to hold policies and configurations. Assign profiles to devices. The administrator can create
multiple profiles for different applications of the wireless access points.
Most configurations will require the administrator to select a policy from a drop down list. For example, select an
adoption policy from a drop down list. Other configurations will be done directly in the profile and will not be found
in a policy. Examples of configurations that are not found in a policy include Fast Ethernet port configuration. These
configurations will be set within the profile itself.
Configuration -> RF Domains
The RF Domain contains the SmartRF policy to manage the RF spectrum, and the WIPs policy for wireless security
and intrusion protection.
Configuration -> Security
Security settings include complex firewall rules, WIPs policy, and Wireless Client Roles
Firewall Policy
webUI navigation:
Configuration -> Security -> Firewall Policy
details:
Create global denial of service rules and configuration and Storm Control with ARP, Ucast,
Bcast, Mcast. Advanced settings provide more detailed configuration of TCP protocol
and flows.
IP Firewall Rules
webUI navigation:
Configuration -> Security -> IP Firewall Rules
details:
Create multiple rules with filters based on source/destination IP address, and a set of IP
protocols. Mark packets with an 802.1p bit or DSCP bit.
MAC Firewall Rules
webUI navigation:
Configuration -> Security -> MAC Firewall Rules
details:
Create multiple rules with filters based on source/destination MAC address, VLAN ID,
802.1P bit. Mark packets with a 802.1p bit or DSCP bit.
WIPS Policy
webUI navigation:
Configuration -> Security -> WIPS Policy
details:
Create a wireless security policy that tracks excessive network activity, client (MU)
anomalies, and AP anomalies. Configure Rogue AP detection.
24
© 2011 Extreme Networks, Inc. All rights reserved.
Extreme Networks Evaluation Guide: Altitude 4511 Access Point
Wireless Client Roles
webUI navigation:
Configuration -> Security -> Wireless Client Roles
details:
Create filters to identify clients and apply a unique set of IP or MAC layer firewall rules.
Filter options include MAC address, connected AP, SSID, Authentication and
Encryption types.
Configuration -> Services
Captive Portals
webUI navigation:
Configuration -> Services -> Captive Portal
details :
A captive portal will redirect a client web browser to an internal web site, or an external
hosted site. Client authentication can be open, or by a RADIUS policy. A walled garden
can be created by entering a DNS Whitelist of allowed domains. Four internal Web pages
are supported; Login, Terms and Conditions, Welcome, and Fail. For a basic captive portal,
enter text into the boxes supplied. For a more custom captive portal, use an externally
hosted Website or link to an externally hosted set of Web pages.
DNS Whitelist
webUI navigation:
Configuration -> Services -> DNS Whitelist
details :
Enter domains that will be allowed in the captive portal prior to authentication. A client
that has not authenticated via the captive portal can access websites in the DNS whitelist.
Configuration -> Management
Create management policies for customizing the management access rights and password authentication. Note that
an External RADIUS server authentication is supported. Generally, one management policy is all that is required.
Diagnostics
Create filter rules to display network events. Filters can be set by severity and source MAC address. MAC addresses
can be a radio BSS or a client MAC address.
Core and panic snapshots and UI logs may be requested by Extreme Networks customer support for
remote diagnostics
Operations
Use the Operations menu to reset the AP to factory defaults, or reboot the AP to make changes effective. This screen
will generate the startup and running configuration files for debugging and configuration diagnostics.
Device Details
webUI navigation:
Operations -> Device Details
details:
Displays the Primary and Secondary firmware and allows the administrator to select which
firmware to use.
25
© 2011 Extreme Networks, Inc. All rights reserved.
Extreme Networks Evaluation Guide: Altitude 4511 Access Point
File Transfers
webUI navigation:
Operations -> File Transfers
details:
Use this menu to upload firmware and configuration files to and from the access point.
Click on the Advanced tab to select TFTP, FTP, SFTP, or HTTP and select the logical port
number to use.
File Browser
webUI navigation:
Operations -> File Browser
details:
Use this menu to browse the file system and view files that have been saved to the
access point
Statistics
Statistics are collected and displayed for the RF Domain, the Controller AP, and individual Dependent APs.
Depending on what is selected, a different set of statistics are displayed. One of the most useful statistics is the RF
Domain -> SmartRF History. This view will show the actions of the SmartRF feature in the network.
To view a list of wireless clients, click on the Controller AP and select Wireless Clients.
26
© 2011 Extreme Networks, Inc. All rights reserved.
Extreme Networks Evaluation Guide: Altitude 4511 Access Point
Appendix
LED Behavior
The Altitude 4511 has two LEDs to display device status.
The green LED is used to indicate 2.4Ghz operation and
the Amber LED is used to indicate 5Ghz operation.
You will note that the opposite LED will be used to
indicate other states. For example, if operating in 2.4Ghz
bands, the Green LED will indicate activity while the
Amber LED will indicate state.
The following acronyms are used in the table:
CAP = controller AP
DAP = dependent AP
Standalone = individual AP managed by itself
State
Description
1
AP is booting up
2
DAP that is not adopted; or does not have a profile
3
DAP that is adopted and functioning
4
DAP that WAS adopted, but the Controller has died. AP retains previous config
5
CAP (controller AP) or Standalone AP that is functioning
6
CAP or Standalone that is not configured
State
Green LED
Amber LED
1
Solid
Solid
2
Solid
Solid
3
Blink with activity if 2.4Ghz; else off
Blink with activity if 5Ghz; else off
4
Blink with activity if 2.4Ghz; else on Solid
Blink with activity if 5Ghz; else on Solid
5
Blink with activity if 2.4Ghz; else on Solid
Blink with activity if 2.4Ghz; else on Solid
6
Solid
Solid
27
© 2011 Extreme Networks, Inc. All rights reserved.
Extreme Networks Evaluation Guide: Altitude 4511 Access Point
Convert a MAC Address Into its ZeroConf IP Address Equivalent
For example:
MAC address 00:C0:23:00:F0:0A
Zero-conf IP address equivalent:
169.254.240.10
The last two bytes of the MAC address will become the
last two octets of the zero-conf IP address.
Use Windows Calculator to convert Hex to Decimal
Select View -> Scientific
Click “Hex”
Enter the hex byte, e.g. F0
Click “Dec”
28
© 2011 Extreme Networks, Inc. All rights reserved.
Extreme Networks Evaluation Guide: Altitude 4511 Access Point
Reset to Factory Defaults
There are two ways to reset the unit to factory defaults.
To revert to factory default configuration using the
hardware reset button on the bottom of the unit:
From the webUI, navigate to the Operations main menu.
Select Reset (factory default) from the menu at the
bottom of the page. Click Execute.
1. Remove power from the AP
2.Using a paper clip, press and hold the reset button
on the back of the unit. The reset button is located
on the serial label, below the words “part number”
3.Apply power by connecting a PoE source
4.The amber LED will blink slow three times
5.When ithe Amber LED blinks fast, release
the button
6.The AP will continue to boot in its default configuration state
29
© 2011 Extreme Networks, Inc. All rights reserved.
Extreme Networks Evaluation Guide: Altitude 4511 Access Point
Upgrade the Firmware
Click on Operations -> Devices. Select the AP on the left side.
Click the Upgrade Firmware button in the lower right corner.
Enter the TFTP or FTP URL and path. For an easier data entry, click the Advanced option to enter the IP address, user
name, password, and path in separate entry boxes.
When the upgrade is complete, note the firmware versions and the Next Boot image.
Select Restart from the menu in the lower left corner. Click Execute.
Corporate
and North America
Extreme Networks, Inc.
3585 Monroe Street
Santa Clara, CA 95051 USA
Phone +1 408 579 2800
Europe, Middle East, Africa
and South America
Phone +31 30 800 5100
Asia Pacific
Phone +65 6836 5437
Japan
Phone +81 3 5842 4011
www.extremenetworks.com
© 2011 Extreme Networks, Inc. All rights reserved. Extreme Networks, the Extreme Networks Logo and Altitude are either registered trademarks or
trademarks of Extreme Networks, Inc. in the United States and/or other countries. All other trademarks are the trademarks of their respective owners.
Specifications are subject to change without notice. 1811_01 09/11