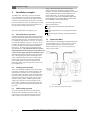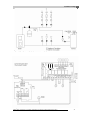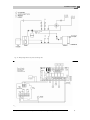
1
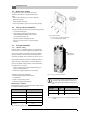
Installation and Servicing Manual
Wood Pellet Cast Iron Boiler
MESys 4000 - 6000 Series
Distributed by Maine Energy Systems
Caution!
Observe the safety instructions of this installation
and maintenance manual before placing the boiler
in operation.
Danger!
All installation, burner set-up and adjustment, and
maintenance operations must be performed by a
licensed service professional.
The directions of this installation and maintenance
manual must be followed precisely.
Contact a qualified service company or service provider if support or additional information is required
prior to installation, operating and service of the
equipment. SAVE THESE INSTRUCTIONS
Caution!
The Installation and Servicing manual is a component
of the technical documentation and must be handed
over to the operator of the heating system.
Discuss the content of this manual with the owner
or operator of the heating system to ensure that
they are familiar with all information required for
operation of the heating system.
For heating contractors. Please read carefully prior to installation and servicing.
6720617208-08/2008 US/CA
Contents
Contents
1
1.1
1.2
1.3
1.3.1
1.3.2
1.3.3
1.4
1.5
Safety Considerations and Symbol
Descriptions
Regarding this Manual
Explanation of Symbols
Observe the following Symbols
Installation Guidelines
Boiler Room Guidelines
Ash Removal Guidelines
Tools, Materials and Accessories
Disposal
2
2.1
2.2
2.3
2.3.1
2.3.2
2.4
2.5
2.6
2.7
2.8
2.8.1
2.8.2
2.8.3
2.8.4
2.8.5
2.8.6
Product description
Intended use
Standards and regulations
Notes on installation and operation
DHW Heating with an indirect tank
Installation of pellet fuel delivery system
Heating system water quality
Product description
Delivery contents
Dim. Specifications for MESys 4000/6000 Series
Conditions for operation
General operating conditions
Conditions for the power supply
Conditions for hydraulic system and water quality
Conditions for the boiler room & the environment
Combustion air supply conditions
Conditions, fuel
10
10
10
10
10
10
11
11
11
11
11
11
3
3.1
Moving the boiler
Reducing boiler weight for transportation purposes
12
12
4
4.1
4.2
4.3
4.4
4.4.1
4.4.2
4.5
4.5.1
4.5.2
4.5.3
4.6
4.7
4.8
4.9
Installing the boiler
Wall clearances
Burner door opening
Flue gas collector installation
Flue pipe installation
Chimney venting
Draft inducers
Fitting the water connections
Installing the B-kit
Installing system components
Installing baffles
Filling the heating system and checking for leaks
Mounting the Janfire NH Burner
Installing boiler jacket panels
Installing aquastat and burner sensors
13
13
13
13
14
14
14
14
14
14
15
15
16
16
16
16
16
16
16
17
18
19
20
5
5.1
5.2
5.3
5.4
5.5
5.6
Commissioning the heating system
Bringing the system up to operating pressure
Checking the safety valve
Preparing the heating system for operation
Starting up the burner
Notes on commissioning the pellet burner
Commissioning Log
21
21
21
21
21
21
22
22
22
23
24
6
6.1
6.1.1
Shutting down the heating system
Shutting down the heating system in an emergency
What to do in an emergency
25
25
25
2
3
3
33
3
4
4
55
55
55
66
6
66
6
6
66
66
77
88
9
10
10
7
7.1
7.2
7.3
7.4
7.5
7.5.1
7.6
Heating system servicing
Why is regular maintenance important?
Preparing the boiler for servicing
Checking heating system for operating pressure
Testing relief valve
Cleaning the boiler
Cleaning the boiler with brushes
Servicing and maintenance logs
8
Troubleshooting
26
26
26
26
26
26
26
26
27
27
28
30
9
9.1
9.2
9.3
9.4
Installation examples
Basic pellet burner operation
Heating system operation
DHW heating operation
Summertime DHW
31
31
31
31
31
10
Parts lists
37
MESys 4000 - 6000 Series - Technical specifications are subject to change without prior notice.
Safety Considerations and Symbol Descriptions
1
Safety Considerations and Symbol Descriptions
Below is an overview of the integrated safety features of
the MESys 4000 - 6000 Series boiler:
1.) Honeywell manual reset high limit aquastat
2.) Safeguard manual reset low water cut out
3.) Drop shaft burn back sensor
4.) External Auger resettable overload
5.) 15 Amp fast acting fuse
6.) 10 Amp circuit breaker
7.) Fuseable pellet feed hose
1.1
Regarding this Manual
This document contains important information regarding
safe and proper installation, operation and maintenance of
the MESys 4000 - 6000 series pellet boiler system.
The high tech MESys 4000 - 6000 series pellet boiler system
is designated as a hot water heating boiler.
The Installation and Service Manual is directed to the
installing contractor who has professional knowledge
regarding boiler installation and maintenance.
1.2
1
Explanation of symbols
Warnings are indicated by a warning triangle
and a grey background.
Signal words are used to indicate the seriousness of the ensuing risk if measures for minimizing damage are not taken.
1.3
Observe the following Standards
All applicable local, state, and national standards, codes and
regulations must be observed for the installation of the boiler:
– The local building code requirements regarding place-ment,
combustion air, venting and chimney system must be followed.
– Follow applicable electrical code requirements.
– Follow the local code and standards regarding safe boiler
operation.
NOTICE
Use only original boiler spare parts. MESys
can not be held liable for damage caused by
non-compliance.
NOTICE
The boiler installation must be performed by a
qualified installer in accordance with regulations put forth in NFPA-31 Installation of Solid
Fuel-Burning Equipment. The installation must
comply with all local and national codes, regulations and authorities having jurisdiction regarding the installation of solid fuel fired
boilers.
For the USA/Canada refer to the guidelines of
UL391/CSA/CAN B366.1 regarding installation
and operation of pellet fired equipment.
– Caution indicates that minor damage to property may
occur.
– Warning indicates that minor personal injury or severe
damage to property may occur.
– Danger means that severe personal injury may occur.
Very serious cases may result in death.
Notes are identified in the text by this symbol.
They are bounded by horizontal lines above and
below the text.
Notes contain important additional information.
Notes do not contain any warnings or information about hazards or risks.
MESys 2000 - 6000 Series - Technical specifications are subject to change without prior notice.
3
1
1.3.1
Safety Considerations and Symbol Descriptions
Installation Guidelines
Caution: DANGER TO LIFE
from electric shock.
V Do not work on electrical components un
less you have the required qualifications.
V Prior to opening the burner door: follow
Burner Installation Instructions, shut down
the power supply by turning off the emergency shut-off switch or disengaging the
heating system circuit breaker, to prevent
from accidental reactivation.
V
Observe all applicable installation guidelines.
1.3.2
Boiler Room Guidelines
Caution: DANGER TO LIFE
from flue gas poisoning.
Always ensure adequate combustion air provisions as described in Appendix G of CAN/
CSA-B365-M91.
Ensure adequate combustion air under all circumstances and, in case of exhaust fans installed in the boiler room or any adjacent areas,
make sure that their installation does not produce a negative pressure or affect pellet boiler
operation in any way.
Please observe that combustion air openings
V
are not reduced in size or closed.
V Make sure that no mechanical air openings
or devices remove combustion air from the
boiler room such as central vacuum systems,
exhaust fans, dryers and air conditioning appliances.
Make sure that the boiler is connected to a
V
chimney or vertical venting system that is
capable of handling and producing the negative breeching pressure.
Each pellet fired boiler must have its own
V
flue and cannot be connected to a chimney
flue serving any other appliance.*
If any of these problems have not been corV
rected, the boiler must not be operated.
V Make the end-user aware of these guidelines
and their potential danger.
*A pellet boiler and an oil fired boiler can be flued only
individually into an existing chimney provided the following
conditions are met:
1.) Electrical interlocks are in place to prevent simultaneous
operation.
2.) A mechanical lock-out mechanism must also be in place
to prevent simultaneous operation.
3.) At any given time, only one boiler can be vented into the
chimney flue. Allow either boiler to completely shut down
and cool off before switching the venting system.
4.) The chimney flue must be of adequate size to handle the
combustion products from either appliance.
4
Caution: FIRE DANGER
due to flammable or liquid materials.
V Make sure that flammable and liquid materi-
als are not stored in the close vicinity of the
boiler.
DO NOT USE CHEMICALS OR FLUIDS TO
START THE FIRE
Danger: Risk of Fire or Explosion:
DO NOT BURN GARBAGE, GASOLINE,
NAPHTHA, ENGINE OIL, OR OTHER INAPPROPRIATE MATERIALS.
Warning: Risk of Fire
Do not operate with flue draft exceeding 30
V
Pa draft (-.12 inches of WC) of the barometric
damper.
Do not operate with fuel loading door or ash
V
removal doors open.
V Do not store fuel or other combustible material within marked installation clearances.
(See pgs. 13 & 14 for clearance requirements).
Inspect and clean flues and chimney regularV
ly.
Caution: Hot Surfaces
Keep children away.
V
Do not touch equipment during operation.
V
V Maximum draft marked on name plate of
boiler.
MESys 4000 - 6000 Series- Technical specifications are subject to change without prior notice.
Safety Considerations and Symbol Descriptions
Refer to Table 1 regarding wood pellet characteristics suitable for use with this pellet boiler system. Please check with
your pellet fuel supplier regarding meeting these fuel requirements.
Characteristic
Premium Grade Only
Pellet diameter
1/4" - 3/8" (6 – 10 mm)
Pellet length
3/8" - 1" (10 – 25 mm)
Ash content
.2 – 1%
1
1.5 Disposal
Please dispose of any trash in an environmentally
V
friendly fashion.
Please discard properly of any heating system related
V
components.
Energy content** (ENHV) 7290 – 7750 Btu/lbs
Moisture
Moisture content
content
22 –– 10
10 %
%
Table 1: Pellet fuel characteristic requirements
– Maintain at least 4 ft lateral clearance from the appliance
on all sides to pellet fuel storage. Pellet fuel must be
stored in a metallic, solid wood or heavy-duty woven
air-tight plastic/linen type containment bin which either
vents directly to the outside, or has a removable cover to
avoid contamination of the pellet fuel.
– Carefully follow the Installation Instructions for the
burner to avoid over-loading or over-firing of the boiler.
**Note: Contact your pellet supplier regarding
the dry matter energy value, or European Net
Heat Value (ENHV), which is discounted for
pellet moisture content as the Janfire NH burner
requires this specific value. US PFI (Pellet Fuel
Institute) pellet standards at this point do NOT
record this value and the PFI energy content can
not be used directly.
1.3.3 Ash Removal Guidelines
Pellet burner shut-down - Prior to ash removal and cleaning
of the boiler, follow the Janfire NH burner shut-down
instructions. Wait 15-20 minutes following burner shutdown before opening the boiler clean-out door and removal
of ashes. Assure that the ash is sufficiently cooled down.
Disposal of ashes – Ashes should be placed in a metal container with a tight-fitting lid and moved outdoors. No other
waste shall be kept in this container. If the ashes are disposed
of by burial in soil or otherwise locally dispersed, they should
be retained in the closed container until all cinders have thoroughly
cooled.
1.4
Tools, Materials and Accessories
For the installation and maintenance of the boiler you will
need typical tools used in this industry.
In addition, the following components are useful:
– Hand truck with strap.
– Wood blocking.
– Cleaning brushes and/or chemical cleaning agents for wet
cleaning.
- Industrial grade high temperature resistant shop vac.
MESys 4000 - 6000 Series - Technical specifications are subject to change without prior notice.
5
2
2
Product description
Product description
This Installation and Service Manual contains important
information for the safe and intended installation, initial
start-up and maintenance of this boiler.
The wood pellet fired boiler MESys 4000 - 6000 Series is
generally referred to below as a boiler.
The installation and maintenance manual is provided for
technicians who have been trained and have experience in
working with heating systems and wood pellet fired installations.
2.1
Intended use
The MESys 4000 - 6000 Series is designed for central
heating and domestic hot water (DHW) systems, for instance
in residential homes, apartment buildings, or small
commercial applications.
2.2
Standards and regulations
Observe all standards and guidelines applicable
to the installation and operation of this heating
system in your jurisdiction.
2.3
Notes on installation and operation
When installing and operating the heating system, it is the
installer's responsibility to meet all applicable federal,
state, and local codes.
2.3.1 DHW heating with an indirect tank
The wood pellet fired boiler system can readily include an
indirect fired hot water tank to provide a complete system
solution which also includes the pellet fuel delivery system.
The DHW tank serves 3 purposes here:
(1) Generate domestic hot water using the boiler as heat
source by circulating boiler water through the tank coil.
(2) Act as thermal storage device by allowing the tank pump
to run longer, extend the run time on the pellet burner at low
modulation levels and increasing the DHW tank temperature.
(3) Be an additional heat source of space heating purposes
under high load conditions, see page 31 for system applications.
Detailed piping and wiring diagrams for most common
installations are found in section 9. The absence of a flow
control valve on the hot water tank loop allows for gravity
circulation and energy dissipation of heated boiler water
in case of a power outage. Also note the location of boiler
relief valve and system check valves to avoid undue
pressure formation in the system.
6
Key differentiating installation components are:
(1) Required installation of a tempering valve on the DHW
outlet connection of the tank; and
(2) The indirect tank MUST ALWAYS HAVE its own designated pump for water flow throught the tank coil and is
activated by means of a Honeywell L4006A aquastat.
Existing tank can be used in retro-fit applications.
2.3.2 Installation of pellet fuel delivery system
Please refer to the Installation Instructions for the burner for
detailed electrical schematics regarding pellet fuel delivery.
Pellet storage capacity for MESys 4000 boiler should not
V
exceed 2.5 tons to match ash removal intervals with pellet
delivery intervals.
V
Maintain at least 4 feet lateral clearance from the boiler to
the pellet storage facility.
Properly support the feed auger from above so that it is
V
positioned nearly above the drop shaft of the burner.
Ensure to locate the bottom end of the feed auger at the
V
lowest location in the storage facility.
Always place the more compact end of the feed auger at
V
the beginning of the auger to avoid possible “jamming” of
pellets inside the auger piping.
Always place the electric motor at the top end of the auger.
V
V Any extensions to the auger must be added to the motor
end of the auger.
Never touch the burner dosage auger or the feed auger
V
when the external motor is connected.
Place electrical interlock on access panel of pellet storage
V
system and interlock with power supply to external auger
operation to avoid operational hazard as applicable to
your specific system.
Caution: Always use Janfire Auger feeding
system. Do NOT use a vacuum feeder system
to deliver pellets to the burner.
2.4
Heating system water quality
Poor water quality can damage heating systems due to scale
formation and corrosion.
Please refer to Chapter 2.8.3, Tab. 6 for further details of the
water quality.
Caution: Risk of system damage due to unsuitable boiler water.
If oxygen-permeable pipes are used, e.g. for
V
radiant heating systems, the systems must be
separated from the boiler by a heat exchanger. Unsuitable heating system water promotes sludge formation and corrosion. This
can result in heating system malfunction and
boiler damage.
MESys 4000 - 6000 Series - Technical specifications are subject to change without prior notice.
2
Product description
2.5
Product details
The boiler is a wood pellet fired appliance with
modulating burner control for boiler water temperature
control.
Caution: Risk of system damage from use of
incorrect burner.
Only use Janfire NH pellet burners which
V
meets the technical boiler requirements.
The boiler system consists of:
– Boiler heat exchanger
– Boiler jacket panels with insulation
– Manual Reset High-limit L4006E aquastat and piping
accessories
– Set of flue baffles
– 8 ft long feed auger and 120V electric motor
– Janfire NH modulating pellet burner complete with:
– 1 PT100 sensor to measure boiler water temperature
– 1 PT100 sensor to measure outdoor temperature
– Wiring whip to connect feed auger through pellet
storage bin access interlock (if required) directly to
burner.
– Wiring whip
– Flexible drop tube w/2 clamps
– Low water cut off with manual reset capacity.
Detailed operational information regarding burner operation
is included in the Installation and Maintenance Instructions
for the Janfire NH pellet burner.
The boiler jacket prevents heat loss and acts as a noise insulator.
The boiler heat exchanger transfers the heat generated by the
burner to the heating water. The insulation prevents energy
loss.
Fig. 1
Boiler and burner system
Fig. 2
Conceptual System Diagram
MESys 4000 - 6000 Series - Technical specifications are subject to change without prior notice.
7
2
2.6
Product description
Delivery contents
Upon delivery, check that the packaging is complete and
undamaged.
Component
Qty
Packaging
Boiler heat exchanger block
1
Burner door, top clean out door
and burner door panel, factoryfitted to boiler heat exchanger
block
1 pallet
Boiler casing
Technical documentation
Baffle plate set for MESys
4000 - 6000 series model
Flue gas collector
Flanges & gaskets
Sealing material
packaged separately
foil package
1
1
packaged inside
boiler block
B-kit components:
–
–
–
–
–
–
1 1/4" Supply manifold
1 1/4" x 3" black nipple
1 1/4" black malleable elbow
3/4" black malleable street 90
1" x 3/4" black bushing
2 90 degree spacers &
tension wafer & PT100 Sensor contact sleeve
1
1 box
– boiler drain 3/4"
– relief valve 3/4" x 3/4"
30PSI
– temperature/pressure
gauge
– 6" barometric damper
– L4006E manual reset high
limit aquastat
– LWCO Control w/manual
reset capacity
– auger support chain, lag
and s-hook
– MESys Logo plate
- 120 V electrical auger motor
Janfire NH pellet burner (2
1
PT100 sensors and all wiring
harnesses & technical documentation packaged inside burner
box).
box
8 feet feed auger
1
box
Tab. 2 Package Contents
1
8
MESys 4000 - 6000 Series- Technical specifications are subject to change without prior notice.
2
Product description
2.7
Dimensions Specifications for MESys 4000 - 6000 Series
No. of Sections
4
6
Approx. Output (kW)
14
20
Approx. Output (Btu/hr)
48,000
67,000
Vent Size (mm)
150
150
Nominal Vent Size (inches)
6
6
Boiler Length (mm)
515
715
Boiler Length (inches)
20 1/4
28 1/4
Size of Fire box (w x h) (mm x mm)
338 x 438
338 x 438
Size of Fire box (w x h) (in x in)
13 1/2 x 17 1/4
13 1/2 x 17 1/4
Depth of Firebox (mm)
450
650
Depth of Firebox (inch)
17 3/4
25 3/4
Dry weight (lbs)
530
710
Wet weight (lbs)
600
800
Water volume (gal)
7.5
10
Tab. 3
Connections and Dimensions
Fig. 3 Boiler dimensions and connection locations
MESys 4000 - 6000 Series - Technical specifications are subject to change without prior notice.
boiler depth only
9
Product description
2
2.8
Conditions for operation
Maintaining the specified operating conditions will enable
the boiler to provide a high level of reliability and long service life.
Caution: Risk of system damage if operating
conditions are not maintained.
Irreversible damage to individual components
of the boiler as a whole or the heating system
may occur.
The information supplied in this boiler manV
ual and burner manual is binding and must
be observed.
2.8.1 General operating conditions
The boiler/burner system has not been tested for operation at altitudes above 2000 ft.
Operating conditions
Min. boiler water temperature
No requirements. The burner
control will ensure a minimum
140oF water temperature.
Tab. 4
Operating interruption
heating circuit with
Min. return temperature
(complete boiler shutdown)
heating circuit mixing valve1)
In combination with Janfire control for variable low-temperature operating modes.
Automatically by burner controls
not required but recommended with
Minimum boiler return temperature
o
o
low-temperature heating system design. must be at least 122 F (50 C).
External device such as a shunt pump
Required with:
and control are required as shown on
– Underfloor heating systems
page 36.
– Systems with high water content: >
115 gal/MBH
(1 MBH = 100.000 Btu/hr)
General operating conditions
1) A heating circuit with a mixing valve improves controllability and is specifically recommended for systems with several heating zones.
2.8.2
Conditions power supply
Operating conditions
Power supply voltage
Notes – Requirement in greater detail
120 V
AC nominal
Circuit breaker
15 A
Frequency
60 Hz
Enclosure rating
Tab. 5
2.8.3
IP 40 (protected against contact by entry of foreign objects > 0.04 inches Ø
(> 1 mm Ø ), no water proofing)
Power supply
Conditions for hydraulic system and water quality
Operating conditions
Operating pressure (above atmospheric)
Permissible site test pressure
Safety temperature limitation by
Honeywell L4006E Aquastat
Water quality
Tab. 6
10
Observe the voltage range of the burner and controls used. The outer casing/boiler must be
grounded for safety reasons and in order to function correctly.
Notes – Requirement in greater detail
15 – 58 psi
Maximum 30 psi with the supplied safety valve.
45 – 75 psi
122 – 194 °F
The heating system may only be filled and topped up with water of domestic water quality. We
recommend a pH value of 8.2 – 9.5.
System configuration and water quality
MESys 4000 - 6000 Series- Technical specifications are subject to change without prior notice.
Product description
2.8.4
2
Conditions for the boiler room and the environment
Operating conditions
Temperature in the boiler room
relative humidity
Dust/airborne particles
Notes – Requirement in greater detail
+40 to +104 °F
max. 70 %
No condensation or precipitation inside the boiler room
Excessive dust inside the boiler room must be avoided when the boiler is operating, e. g.:
– Dust from building work
Combustion air supplied from outside must not be excessively loaded with dust or airborne particles; if necessary, air filters should be fitted in case:
– Air supply contaminated with dust from dirt roads and paths.
– Air supply contaminated with dust from production and processing facilities, e. g. quarries,
mines, etc.
– Airborne particles from thistles and similar
Halogenated-hydrocarbon compounds
Fans that extract air from the boiler
room.
The combustion air must be free from halogenated-hydrocarbon compounds.
– Identify the source of halogen-hydrocarbon compounds and seal it off. Where this is impossible, route combustion air from areas that are not contaminated by halogen-hydrocarbon
compounds.
During burner operation, no mechanical air handling equipment may be operated that could
extract combustion air from the boiler room, e.g.:
– Exhaust hoods
– Tumble dryer
– Ventilation equipment
Small animals
Prevent small animals from entering the boiler room, particularly through the air inlet vents – by
fitting them with screens.
Fire safety
Maintain clearances between the boiler and flammable materials in accordance with local regulations. A minimum clearance of 4ft is required. Never store flammable materials or liquids in
the vicinity of the boiler.
Flooding
In case of an acute risk of flooding, disconnect the boiler in time from its fuel and power supply
before water enters the room. Any components or control equipment, which came in contact
with flood water, must be replaced before re-commissioning.
Tab. 7
Boiler room and ambient conditions
2.8.5
Combustion air supply conditions
Operating conditions
Boiler output (in case of
multi-boiler systems = total output)
Air intake flow cross-section for
combustion air drawn from outside
(divided between max. 2 apertures)
< 170,000 Btu/hr
Ventilation air cross-section in square inches
(unrestricted aperture)
Size free combustion air opening in sq. ft. equal to at least 3x the
cross section area of the chimney.
Tab. 8
Observe national regulations for boilers which draw their air supply from the boiler room. NFPA 31
2.8.6
Conditions, Fuel
Operating conditions
Notes – Requirement in greater detail
Permissible fuels for boilers without integral burners
Only premium high quality wood pellets with known energy density,volume density and low
ash content (0.2 - 1%).
Contamination
Free of contaminants (for example dust, mist, humidity),
Tab. 9
Fuels
MESys 4000 - 6000 Series - Technical specifications are subject to change without prior notice.
11
3
3
Moving the boiler
Moving the boiler
This chapter details how to move the boiler safely.
Caution: Risk of system damage from impact.
Fragile components could be damaged.
Observe the transport instructions on the
V
packaging.
Protect boiler connections from damage and
dirt if the boiler is not installed immediately.
Dispose of packaging in an environmentally responsible manner.
WARNING: Risk of injury from carrying heavy
loads.
V Always lift and move equipment with the help
of another person
WARNING: Risk of injury if load is inadequately
secured during transportation.
Use suitable means of transportation e.g. hand
V
trucks with straps.
Secure load against falling.
V
3.1
Reducing boiler weight for transportation purposes
If required, you can reduce the weight of the boiler by removing the burner mounting and clean out doors.
V Unscrew the burner door-panel bolts.
V Unscrew top clean-out door and remove.
Note: Reinstall all components as part of the boiler installation.
12
MESys 4000 - 6000 Series- Technical specifications are subject to change without prior notice.
Installing the boiler
4
4
Installing the boiler
This chapter details proper boiler installation. The individual
steps involve:
– 4.1 Wall clearances.
– 4.2 Flue pipe installations.
– 4.3 Fitting the water connections.
– 4.4 Filling the heating system and checking for leaks.
– 4.5 Mounting the Janfire NH Burner.
Dimension
A
B
– 4.6 Installing Boiler Jacket Panels.
– 4.7 Installing the aquastat and burner sensors.
C
Caution: Risk of system damage from freezing.
V Install the heating system in a frost-free
room.
Wall clearance
Recommended
51-1/8"
minimum
40"
Recommended
27-½"
minimum
16"
Recommended
16"
minimum
8"
Tab. 10 Recommended and minimum wall clearances
(dimensions in inches).
The boilers are designed for indoor use only.
4.1
Wall Clearances
The boiler is only approved for installation on non-combustible surfaces. In case of a combustible surface, one can use
cinder blocks (minimum of 2" height), spaced tightly together,
and then place the boiler on top.
In case of a placement on blocks on top of a combustible surface, heavy gauge sheet metal must be placed underneath the
boiler, protrude the sheet metal at 16” (406 mm) to the front
of the boiler, 8” (203 mm) to either side of the ash removal
door and boiler access door and underneath the chimney connector and barometric damper extending at least 4” (100
mm) on either side of the chimney connector.
Position the boiler with the recommended wall clearances.
Reducing the minimum clearances makes the boiler more
difficult to access during installation, maintenance and
cleaning.
The boiler base or foundation must be perfectly flat and
level.
Fig. 4
Boiler room clearances (boiler positioned on the
l.h. or r.h. side)
Floor must be able to support boiler gross weight.
The boilers are designed for a side clearance of
8".
Where applicable, allow extra wall clearances
for additional components such as DHW tank,
pipe connections.
Caution: Risk of fire from flammable materials or liquids
Clearances less than 6" must comply with
V
local and statutory codes.
V Make sure that there is a sufficient clearance
between combustible materials and the
chimney connection as specified by NFPA 31
(distance of 18")
V The floor must comply with the requirements of NFPA 31.
MESys 4000 - 6000 Series - Technical specifications are subject to change without prior notice.
13
Installing the boiler
4
4.2
Burner door opening
To open the burner door, electrically disconnect
the burner first if burner is already mounted on the
boiler.
- Remove the 2 hex bolts (Fig. 4a, item 2) below the
burner door opening.
- Swing the burner door open
- Now use top handle to open access door to flue passages.
4.3
Flue gas collector installation
If not pre-assembled, install collector by following steps below:
– Loosen the mounting nuts.
- Apply supplied sealing material on rear boiler
section to tighten the exhaust collector on the
rear section properly (Fig. 4b).
– Mount the collector and tighten the nuts.
- Do not use excessive force to avoid cracking the
collector
4.4
Fig. 4a Burner Door
1.) Eye screws for burner mounting
2.) Hex bolts for door closing
Flue pipe installation
4.4.1 Chimney venting
Refer to Table 11 to determine chimney size requirements
based on boiler size, chimney height and internal flue chase.
Always use a stainless steel chimney liner and cap off at the
top of the chimney in the space between chimney interior
and outside of chimney liner per NFPA 211 Section 12.4.1.2.
Application of
sealing material
Recommended chimney materials are Selkirk SureTemp or
Supervent (JSC) venting materials, or Security Chimneys
Secure Temp ASHT venting materials. All these materials
are approved per UL-103HT.
– Use heavy gauge (26ga. or better) black smoke pipe to
connect to existing chimney.
- Install factory supplied barometric near the boiler.
Inspecting and cleaning existing flue
- Remove blockages and dirt from chimney
- Clean chimney
- Repair or replace faulty sections
- If necessary repair mortar and joints
Minimum Size of Chimney
Follow guidelines below in terms of minimum chimney height
as a function of chimney diameter
Chimney Size
Min. Minimum
Height clearance
6" x 6"
17 ft.
7" x 7"
16ft.
8" x 8"
16 ft.
6" round
19 ft.
7" round
17 ft.
Fig. 4b Flue gas collector installation
To prevent down drafts extend chimney at least
3 feet above the roof opening and at least 2 feet
above any part of the roof within a radius of 10
feet.
Flue pipe
Type
Double-wall
L
Single-wall
26ga.
Minimum clearance
9"
18"
Tab. 12 Minimum clearances to combustible objects for flue
systems
Tab. 11 Minimum chimney height
14
MESys 4000 - 6000 Series- Technical specifications are subject to change without prior notice.
Installing the boiler
V Install flue connections between boiler and chimney to
Installing the flue pipe
Danger: Risk of death from escaping flue gases.
Installing V
theIfflue
pipe
the resistance
to flue gas flow is too great
and/or the flue pipe diameter is smaller than
the recommended size and/or the flue pipe is
too short.
V Install 6" vent pipe on flue collector and use high temp-
erature sealant for air tight connection.
Leakage leads to wrong CO2 measurement and
wrong burner adjustment.
Avoid long horizontal flue pipe runs and keep
the number of elbows to a minimum.
4000 Series
Inches of WC
6000 Series
Low fire
High fire
Low fire
High fire
Over fire draft
-.02 (-5)
-.03 (-7)
.02 (-5)
-.03 (-7)
Breeching draft
-.03 (-7)
-.04 (-10)
-.03 (-7)
-.04 (-10)
Tab. 13 Required Draft settings (inches of WC). Metric units in
brackets (Pa).
slope up at least ¼" per foot to the chimney.
Connect the flue pipe to the chimney above the bottom of
V
the chimney to prevent blockages.
Install cleaning and service hatches.
V
Always install the furnished barometric damper in the verV
tical position.
Always maintain the chimney and flue pipe components
V
in clean and good conditions.
On lateral runs, support flue pipe every 4 ft; on vertical
V
runs, support flue pipe every 8 ft with sufficiently strong
brackets. Install cleaning and service hatches.
During full fire burner operation, use Table 13 for approximate draft settings at various locations in the venting system. Use a draft gauge to verify the indicated draft values
Adjust barometric damper as required. Use the small hole
in breeching connector to measure draft at that location.
Do not adjust barometric damper beyond
its required setting as described above for
any reason. The pellet burner, boiler and
chimney combination is a balanced system
that typically do not require additional
adjustments following initial set-up.
4.4.2 Draft Inducers
In the case of a poorly drafting chimney (draft < .02 In WC)
it will be necessary to install a draft inducer. Either a Fields #DI-1
in-line style or a Fields #6 "Type C" chimney-top style.
Fields type "C"
draft inducer
Barometric
damper
4
Barometric
damper
Fields DI-1
Draft Inducer
Fig. 4b Draft Inducers
MESys 4000 - 6000 Series - Technical specifications are subject to change without prior notice.
15
4
4.5
Installing the boiler
Fitting the water connections
Caution: Risk of system damage from leaking
connections.
Support the pipes to the boiler to prevent
V
them from being under stress.
4.5.1 Installing the B-kit
Install the 1-1/4” x 3” nipple into the top rear connection
V
with the parallel thread into the boiler.
V
Install the 90° elbow into desired direction.
Install supply manifold into the 90° elbow. (Fig. 5).
V
Install the P&T gauge into the 1/4” manifold connection.
V
Install 1”x 3/4” bushing into lower connection.
V
Install 3/4” drain valve into bushing.
V
Install LWCO above boiler in system piping.
V
Do not fit the safety valve until the leak test
(Chapter 4.6, page 17) has been completed. The relief valve must be installed vertically.
4.5.2
Installing system components
See the installation diagram for installation of the heating
system components (Fig. 6).
Fig. 5 Near boiler fitting (B-kit) installation
1
2
3
4
5
6
90° 1¼" NPT street elbow
NPT X NPT nipple
Supply manifold
Pressure/temperature gauge
Pressure relief valve
90° 3/4" NPT elbow
Do not remove the flow venturi (factory installed)
at boiler return. Orient venturi with notch at the
6 o'clock position as shown in Fig. 7. The boiler
may crack without this piece.
For more installation examples refer to Chapter 9, page 31. 4.5.3 Installing baffles
See Figs. 4C and 4D below.
Open burner door.
V
Look inside boiler, near top of opening in chamber, for
V
hooks cast in to boiler.
Slide two baffle plates into boiler at a 45 degree angle.
V
Keeping front edges to the front of the boiler, drop
V
down inside edges until the two plates nest together.
Pull baffles in direciton of front section.
Fig. 6 Near boiler piping
Fig. 4C Baffles
Fig. 7 Venturi orientation
Fig. 4D Installing Baffles
16
MESys 4000 - 6000 Series- Technical specifications are subject to change without prior notice.
Installing the boiler
4.6
Filling the heating system and checking
for leaks
The boiler is tested for leaks at the factory. Before putting the
heating system into operation, it must be checked to ensure
that no leaks will occur during operation.
Caution: Risk of system damage from excess
pressure when testing for leaks.
Pressure, control and safety equipment may be
damaged by excessive pressure.
V When you carry out a leakage test, make
sure that no pressure, control or safety
equipment that cannot be isolated from the
boiler water chamber is fitted.
Maximum
operating pressure
30 psi (with safety valve supplied)
Maximum on-site
testing pressure
4
Caution: Risk of damage to system due to temperature stresses.
If you fill the heating system when it is hot, the
resulting temperature stresses can cause stress
cracks. The boiler will then leak.
Only fill the heating system when cold (the
V
flow temperature should be no more than
100°F).
Pay attention to the fill water quality as specV
ified in the system confirguration and water
quality table (Table 6, pg. 10 and
Commissioning Log, pg. 24), and record the
volume and quality of the water.
Carry out the leak test at 1.5 times the standard operating
pressure and in accordance with the codes.
45 psi
Tab. 14 Maximum testing pressure
Seal pressure relief valve connection (Fig. 5 "Installing V
B-Kit", page 16) and all other open connection with blind
plugs.
Isolate the expansion tank from the system by closing the
V
valve.
Open the mixing and shut-off valves on the heating water
V
(primary) side.
Slowly fill the boiler with tap water.
V
Fig. 8
Slowly fill the heating system. Observe the pressure gauge
V
while filling.
Check the connections and pipework for leaks.
V
Bleed the system via the radiator bleed valves if applicaV
ble.
Top with water if the pressure drops as a result of bleeding
V
the system.
Installing pressure relief valve (Fig.5 "Installing B- V
Kit", page 16)
Pressure/temperature gauge
Caution: Health risk from contaminated domestic water.
V Always observe the regulations and standards applicable in your jurisdiction for the
prevention of contamination of drinking water (e.g. by water from heating systems).
Open the cap of the automatic air vent by one full turn to
V
allow air to escape.
MESys 4000 - 6000 Series - Technical specifications are subject to change without prior notice.
17
4
4.7
Installing the boiler
Mounting the Janfire NH burner
Remove the Janfire burner from its box and verify the following components:
Janfire NH burner
V
Wiring harness with plugs for feed auger operation.
V
Power wiring harness with plug for power supply to
V
burner.
3 pin connector with 2 sensors and corresponding wiring
V
(labeled boiler and outdoor).
Second 3 pin connector for communication is not used.
V
Burner Installation and Service Manual.
V
Drop shaft hose and 2 hose clamps
V
Caution: Risk of Fire.
Assure that upper auger opening is not positioned
directly above drop shaft of the burner to prevent
accidental falling of pellets into the shaft (in case
of back burn).
Mounting of NH Burner
Install the burner mounting rings, supplied with the
V
burner, into the threaded tappings adjacent to the burner
mounting opening in the lower boiler door. Screw in
burner eye loops no more than 10mm (3/8") into burner
door.
Do not pierce the insulation on inside of door.
V
V
Door's burner opening is slightly wider than burner.
Adjust burner fit to site circumstances, centering if
there is no need to align to one side or the other.
Insert burner into mounting opening, ensure solid seal all
V
around mounting opening and latch burner into mounting
rings and tighten latches.
Check that burner/boiler connection is tight.
V
Follow Installation and Maintenance Instructions Manual
V
for Janfire NH Burner for additional burner installation
details. The NH burner has a door contact switch to
ensure solid connection between burner and boiler door.
Note: Route burner wiring cables to either side of the boiler
V
away from front cast iron parts.
18
MESys 4000 - 6000 Series- Technical specifications are subject to change without prior notice.
Installing the boiler
4.8
Installing Boiler Jacket Panels
Installation sequence, refer to Fig. 9:
–
–
–
–
–
–
–
–
–
1 Front top cross bar (3)
2 Rear top cross bar (5)
3 Right hand side panel (2)
4 Left hand side panel (10)
5 Rear panel (4)
6 Top insulation blanket (not shown; embedded in top panels)
7 Front top cover (7)
8 Rear top cover (8)
10 Front cover (90)
6) Installation of remaining cover panels.
– Slide the front top panel from the front with its tabs into
the slots of the side panels.
– Secure the front top cover to the front cross bar with
screws.
– Slide the top rear cover with its tabs into the slots.
– Make sure to remove the knock-out for the rear immersion well.
– Secure top rear cover with screws to the rear cross bar.
– Prior to installation of the front cover, install the supplied protective plate.
– Slide the front cover and protective plate between both
side panels and secure with furnished screws.
- Install the MESys Logo plate (part of the B-kit) on the top
front cover by removing the adhesive backing.
1) Installation of front cross bar:
– Remove counter nut and washer from boiler tie rod.
– Slide the top cross bracket on the boiler tie rod.
– Place washer either in front of, or behind the top cross
bar to ensure even alignment with boiler front section.
– Secure top cross bar by tightening the second nut.
2) Installation of rear cross bar:
– Nuts are mounted at the bolts at the back of the burner.
Remove first one and install Z profile in between.
– The cross bar has a Z profile and is equipped with strain
relief provisions.
– Install nut onto threaded stud at proper location.
– Slide rear cross bar in place and secure slightly with
second nut.
– After installation of side panels tighten nut securely.
Note: Tie bar with counter nut and place washer
before/after the front top cross bar
3) Installation of right hand and left hand side panels:
– Hang into the lower tie bars using the inward bent holding corners.
– Support the top of each side panel directly from the top
and rear cross bar.
– Secure side panels with furnished sheet metal screws.
– Repeat these instructions for left hand side panel.
– Adjust rear cross bar with nut & counter nut to ensure
proper alignment of jacket panels.
– Secure rear top cross bar using nut and counter nut.
4) Installation of rear jacket panel:
– Hang the rear jacket panel in between the side panels.
– Secure with furnished sheet metal screws.
5) Installation of insulation pieces:
– Place the loose supplied insulation piece on top of the
boiler.
– Make sure to extend the installed immersion wells
through the insulation.
4
Fig. 9 Boiler Jacket Panel Installation
MESys 4000 - 6000 Series- Technical specifications are subject to change without prior notice.
19
4
4.9
Installing the boiler
Installing the aquastat and burner sensors
This pellet boiler/burner system is equipped with an outdoor
sensor to provide outdoor temperature control for system
efficiency optimization. The boiler is equipped with a 3/4”
well for boiler water sensing near the boiler supply tapping.
A Honeywell L4006E aquastat (Fig. 10a) is supplied as a
manual reset high limit control to shut down burner in case of
a high temperature condition.
DANGER: Risk of fatal injury due to electric
shock!
V Electrical work may only be carried out by
qualified technicians.
Before opening or working on any electrical
V
equipment isolate it from the power supply
and take steps to ensure it cannot be inadvertently reconnected.
Fig. 10a: Aquastat bracket, aquastat and
PT100 boiler sensor installation
mounting.
Set L4006E at 200 degrees F.
Warning: Fire hazard from hot boiler components may damage electrical cables.
Make sure that all cables are sheilded in that
V
way that they cannot come in to contact
with hot boiler parts and are not placed in
hot zones (ie. boiler front door).
Make sure that the boiler is electrically groundV
ed to NEC requirements.
V Identify the boiler sensor as part of the Janfire NH burner
package. Slide contact sleeve (supplied in B-kit) around
PT100 Sensor (Fig. 10b).
V Route and insert the boiler sensor under the jacket panels
Aquastat bulb
into the well. Ensure fit to bottom of well.
Corrugated spaces
Remove adapter clam off of aquastat. Use the two screws
V
provided in B-kit to secure aquastat to top rear jacket panel.
Pie shape sensor
Uncoil the capillary of the Honeywell and insert into the
V
well.
Use 2 90 degree spacers furnished with the B-kit to
V
carefully block in the capillary and sensor. Make sure
that boiler sensor and capillary are fully inserted into the
immersion well.
Drill holes to fit the aquastat on the boiler jacket.
V
Refer to page 42 in this manual for detailed wiring
V
instructions of supplied safety componenets.
PT100
Sensor
.1
Fig. 10b: Sensor and capiallary sensor details
20
MESys 4000 - 6000 Series- Technical specifications are subject to change without prior notice.
5
( C
5
Commissioning the heating
system This chapter describes the initial start-up procedure following burner and pellet fuel supply installation.
5.2
Checking the safety valve
Complete the start-up protocol during this process
V
(Chapter 5.6, page 23).
V Make sure that no persons are in the discharge area of the
Further information on boiler room layout and clearances,
combustion air requirements and venting systems and boiler
operational requirements can be found in Chapter 2.8, pg. 10.
Raise the lever on the pressure relief valve.
V
Caution: Risk of boiler damage from excessive dust and airborne particle levels.
V Do not operate the boiler when there is a lot
of dust in the boiler room, e.g. due to construction work.
V Install an air filter if the combustion air sup
ply is very dusty (e.g. due to dirt roads and
paths or dust-generating working environments such as quarries, mines etc.) or contains airborne seeds from plants.
pressure relief valve.
The pressure relief valve must open and release pressure. If
the pressure relief valve does not discharge, it must be
replaced, because system components can be damaged by
excessive pressure.
Caution: Risk of boiler damage due to contaminated combustion air.
V Never use chloric cleaning agents and
halogenated hydrocarbons (ie. spray bottles,
solvents and cleaning agents, paints, glues).
Do not store or use these substances in the
V
boiler room.
5.1
Bringing system up to operating pressure
Bring the system up to the normal operating pressure before
commissioning.
Caution: Risk of damage to system due to material stresses caused by temperature differentials.
V
Only fill the heating system when cold (the
flow temperature should be no more than
100 °F).
WARNING: Health risk from contaminated
domestic water.
V Observe all national standards and regulations
regarding prevention of domestic water
contamination (e.g. by water from heating
systems).
Top up the heating water or drain via the boiler drain valve
V
between expansion tank and air eliminator until the required
operating pressure has been reached: minimum 15 psi,
maximum 30 psi pressure.
Bleed air from the heating system while filling.
V
MESys 4000 - 6000 Series - Technical specifications are subject to change without prior notice
21
5
5.3
Commissioning the heating system
Preparing the heating system for operation
Adhere to all instructions contained in the Boiler Installation
and Service Manual, Boiler Operating Manual and Burner
Installation Manual. Specifically, adhere to all clearance
requirements put forth in the Boiler Installation and Service
Manual.
V Check for ample pellet supply in the pellet fuel storage
bin.
V Check all pellet delivery system interlocks for proper
Check for proper installation of the venting system comV
ponents.
Refer to the Pellet Fuel burner Installation Manual for
V
electrical wiring diagram and interlocks on the pellet fuel
delivery system.
Switch on the boiler system emergency switch and/or
V
appropriate system breaker.
operation as applicable to your system.
5.4
Starting up the burner
For further start-up steps, follow the burner start-up
sequence. To do so, it is essential that you consult the burner
documentation.
Use the on/off switch on the boiler system to switch the
heating system on. The burner starts up if the water temperature
is below its setpoint.
22
MESys 4000 - 6000 Series- Technical specifications are subject to change without prior notice.
Commissioning the heating system
5.5
Notes on commissioning the pellet burner
Allow burner to operate for 15 to 20 minutes before performing a combustion test. Earlier combustion tests can lead to
incorrect readings as a result of burning off the sealing rope.
We recommend rechecking the burner after a few weeks of
operation.
Incorrect burner adjustment can cause contamination of the boiler (e.g. soot), leading to low
efficiency, high emissions, and a greater risk of
service calls.
Always check combustion with the proper
V
instruments.
Never adjust burner visually.
V
Once the pellet burner is set properly with
V
combustion instruments, it automatically
adjusts combustion air based on pellet fuel
delivery rate ensuring good, clean combustion over entire modulation range.
V
Make necessary corrections described below
to ensure good combustion with the new pellets using volumetric pellet density and energy pellet density data. This avoids overloading of the combusiton chamber and ensures good combustion
Required instruments:
– CO2 measuring equipment
– Draft measuring equipment
- Pellet fuel density canister
- Pellet fuel energy density (Btu/lbs)
- Stack thermometer
- Smoke tester
Create a steady heat demand in the house so that the
V
burner operates on a continual basis at a consistent
high output level.
V Record draft measurements in Table 16 below.
5
Required burner output level should be at least 80%
V
of the listed boiler output capacity. (4000 Series: 40,000
Btu/hr; 6000 Series: 60,000 Btu/hr).
Boiler temperature must be at least 150°F at the start of
V
the combustion test.
Record the volumetric pellet density (lbs/ft3) as measurV
ed with the pellet density bucket in Table 15 below.
V Record the pellet energy density (Btu/lbs) as provided
by the pellet supplier in the Table 15 below.
V
Carefully open the over fire sensing port located in the top
access door.
Insert draft probe 3" into the fire box and seal the opening
V
surrounding of the probe with a fire proof material.
Read and record over fire pressure using the draft gauge.
V
Remove draft probe and close and seal over fire sensing port.
V
Drill a small pilot hole in the boiler breeching adapter.
V
V
Insert probe, read draft breeching, CO2 and flue gas temperature and record all data in Table 16 below.
For CO2 adjustments, refer to Burner Installation Manual, pg. 29.
V
Adjust barometric damper to achieve listed values in Table 13
V
(page 15)
Recheck over fire and breeching pressure until values in
V
Table 13 are obtained.
Make sure that the chimney system can develop
sufficient draft; also ensure that the barometric
damper has sufficient capacity to provide draft
relief. Excessive draft will affect system operation; correct this condition corrected immediately.
Close pilot hole in breeching adapter and all other openings
V
following draft measurement.
Date
Volumetric measurement (lbs/ft3)
Energy Density (Btu/lbs) (see pg. 4)
Burner set-up adjustment (yes/no)
Signature of technician
Tab. 15 Pellet Characteristic Values
Date
Over fire draft (Inch W.C.)
Breeching draft (Inch W.C.)
Breeching: CO2 (%)
Breeching: stack temperature (°F)
Service Technician name/signature
Tab. 16 Combustion Data
23
MESys 4000 - 6000 Series- Technical specifications are subject to change without prior notice.
5
5.6
1.
Commissioning the heating system
Commissioning log (Initial and date the commissioning steps carried out)
Commissioning operations
Page
Fill heating system and check for leaks
17
Comments
____________ psi
– Heating system pressure
2.
Readings taken
Bring the system up to 15 - 20 psi operating pressure
21
Bleed heating system of air
V
____________ psi
Test functioning of pressure relief valve
V
Adjust expansion tank pressure (follow manufacturers’
V
recommendations).
3.
Check for ample combustion air supply.
4
Remove/eliminate effects of induced draft appliances such as gas
V
water heaters, central vacuum systems, oven range, kitchen and bath
fans.
Ensure ample screened free combustion air openings
V
Check venting system for blockages, safety and clean lines.
V
4.
Checking position of baffle plates
5.
Check burner operation (See Burner Installation & Servicing Manual)
22
Verify correct sensor values of Janfire burner before turning boiler on. If
necessary, calibrate sensors (Settings 71 - 75 Burner Installation &
Servicing Instructions Manual chapter, "NH Burner Menu System")
Perform combustion readings.
23
6.
16
V
Measure over fire draft.
_______ in WC
_______ in WC, °F
Measure the breeching draft, CO2 and stack temperature.
V
Record data in Table 16.
V
7.
31
Check operation of heating system components.
V
Check Honeywell L4006E on boiler. Does burner shut off?
V Check L4006A on hot water tank (if present). Does DHW tank
pump run?
Check operation of system thermostats. Do the respective zone
V
pumps/ valves operate?
8.
Adjusting the burner settings to suit the customer's pellet fuel charateristics (burners' documentation) 9.
Inform the end user and hand over technical documentation
Confirmation of properly completed commissioning
Company stamp/signature/date
Inform the customer about the correct fuel and
correct operating pressure. Enter the details in
the table (boiler operating instructions). 24
MESys 4000 - 6000 Series- Technical specifications are subject to change without prior notice.
Shutting down the heating system
6
6
Shutting down the heating system
Caution: Risk of system damage from freezing.
If the heating system has been turned off, it may
freeze up in cold weather conditions.
V Leave the heating system switched on as
long as possible.
Protect a disabled heating system from
V
freezing by draining the heating system and
hot water pipes at the lowest point.
V Padlock shut the emergency switch to prevent accidental operation of the pellet feeder
system.
V Shut off incoming water supply and padlock
shut.
Drain water from domestic hot water tank (if
V
present) to prevent freeze-up.
V
Open faucet at high location in the home to
ensure complete draining of domestic water
system.
6.1
Fig. 11
Boiler System Emergency Switch
Shutting down the heating system in an emergency
Use the heating system emergency shut-off
switch located outside the boiler room or the
heating system circuit-breaker for emergency
shutdown.
6.1.1 What to do in an emergency
Explain to the customer what to do in an emergency, e.g. a
fire.
V Never put yourself at risk of fatal injury. Your own safety
must always take the highest priority.
V Disconnect the heating system from the electrical power
supply by means of the emergency shutoff switch or the
heating system circuit-breaker.
Exit the building and call your service contractor and
V
local fire department.
MESys 4000 - 60000 Series - Technical specifications are subject to change without prior notice.
25
7
Heating system servicing
7
Heating system servicing
7.1
Why is regular maintenance important?
Danger:
Danger: Risk
Risk of
of death
death from
from electric
electric shock.
shock.
V
V Before
Before working
working on
on the
the boiler
boiler and
and prior
prior to
to
opening
opening control
control panel:
panel:
Shut
Shut down
down the
the power
power supply
supply by
by turning
turning off
off
the
the emergency
emergency shut-off
shut-off switch
switch or
or disengagdisengaging
ing the
the heating
heating system
system circuit
circuit breaker,
breaker, and
and
prevent
prevent from
from accidental
accidental reactivation.
reactivation.
Pellet heating systems should be maintained and inspected
every 2 - 3 months for the following reasons:
– To ensure economical operation for maximum efficiency.
– To achieve and maintain a high level of system reliability.
– To maintain the best possible combustion for low ash, CO
and particulate emissions.
– To ensure long life of all operating components.
– To detect early malfunction of components for long term
reliable operation.
Service work may only be carried out by a qualified service
technician or qualified pellet delivery driver. If parts are
replaced, only MESys approved components may be used.
Monitor burner and feeding auger operation daily to learn
V
its behavior.
Check pellets for lodging or bridging inside storage bin on
V
a regular basis.
Check boiler interior on a regular basis for creosote and ash
V
build-up to determine suitable cleaning interval.
7.2
Preparing the boiler for servicing
Shut down the heating system. (Chapter 6, page 25)
V
Disconnect electrical supply to burner. V
7.3
Checking heating system operating pressure
The boiler system water pressure should be between 15 to 30
psi. (1 – 2 bars).
V Check system pressure on boiler P & T guage.
V If the system pressure is less than 15 psi, the pressure must
be increased.
V Open automatic feed valve (if present) to increase pres-
sure.
V Check P & T guage and shut off the automatic feed valve
when completed.
Use of premium pellets and modulation burner
operation enhance combustion and minimize
creosote build-up.
Caution: Risk of system damage due to frequent topping up.
If you have to top up the heating water frequently, the heating system may suffer damage
from corrosion or scaling, depending on the
water quality.
Creosote formation and need for removal:
If pellets burn slowly tar and other organic vapors when combined with moisture can result in creosote. Creosote vapors
can condense in a cool chimney flue due to low fire input.
The creosote residue accumulates inside the flue lining. When
ignited it makes for a very hot fire. Chimney and chimney
connector should be periodically inspected for creosote buildup and this residue must be removed due to risk of chimney
fire.
Ensure that your heating system is bled
V
properly.
V Check the heating system for leaks and proper operation of the expansion vessel.
V Results of regular service work must be recorded in the
Servicing and Maintenance Log.
(
Danger: Risk of death due to chimney fire.
V Call Fire Department immediately in case
of a chimney fire.
V If possible, shut down pellet boiler, close
off barometric damper and prevent combustion air from entering the venting system or
chimney.
V Exit the building safely.
Spare parts can be ordered from MESys using
the parts list.
26
7.4
Caution: Risk of damage to system due to material stresses caused by temperature differentials.
Only fill the system when cold (the flow
V
temperature at the temperature/pressure
gauge should be no more than 100 °F).
Testing relief valve
Verify proper functioning of the relief valve annually as per
local code.
Make sure that no persons are in the discharge area of the
V
pressure relief valve.
Raise the lever on the pressure relief valve.
V
The pressure relief valve must open and release pressure. If
the pressure relief valve does not discharge, it must be
replaced, because system components may be damaged by
excessive pressure.
Heating system servicing
7.5
7
Cleaning the boiler
The boiler must be cleaned every 2 - 3 months periodically by
bushing the heating surfaces and baffles, and removal of ashes
from the ash compartment and main combustion chamber. The
use of an industrial grade, high temperature resistant shop vac
simplifies the removal of ashes from the ash compartment and
primary heating surfaces.
Follow the Burner Installation and Maintenance Instructions
for periodic service to the burner to ensure long, trouble free
life.
Wait at least 15 to 20 minutes after system shut-down before
opening the boiler. Visually check to ascertain that the pellets are completely burned out.
Caution: Risk of burning by touching hot boiler parts.
Wear appropriate protective personal safety
V
equipment.
V Open burner bulkhead by removing the two hexagon bolts
below burner (see Fig. 11.a).
Fig. 11.a Burner Door
1.) Eye screws for burner mounting
2.) Hex bolts for door closing
7.5.1 Cleaning the boiler with brushes
Note the position of the flue baffles for later reference.
V
V Carefully remove the hot baffles plate with protective
wear equipment.
V
Clean
off the baffles.
V Brush down the boiler from the top down. Use suitable
brushes available from MESys or your pellet supplier.
V Brush the combustion chamber side with an up & down
motion.
V Check venting system and clean as required.
V Remove all ashes from the combustion chamber.
V Place ashes into a metallic container with a metallic sealed
lid.
V In case of vacuum extraction, make sure to use a high tem
perature resistant vacuum system. Make sure not to blow
air into inner surroundings.
V Clean off the burner components and follow Burner
Installation and Maintenance Instructions
V Insert baffle plates back into the boiler.
V Check integrity of bulkhead sealing gaskets and replace
when necessary.
V Close and secure doors.
V Close burner bulkhead with the two hexagon bolts (approx.
90 inch-lbs). Tighten the hexagon bolts evenly.
MESys 4000 - 6000 Series- Technical specifications are subject to change without prior notice.
27
7
7.6
Heating system servicing
Servicing and maintenance logs
V Initial and date the servicing operations completed.
The inspection and servicing logs can also be used as copy
masters.
Service work
Page
1.
Check general condition of heating system
2.
Visual inspection and function check of the heating system
3.
Checking pellet fuel and water-carrying components of
the system for:
Date:______
Date:______
Date:______
Date:______
Date:______
Date:______
Company
stamp/signature
Company
Company
stamp/signature stamp/signature
– leaks during operation
– leak test
– visible signs of corrosion
– signs of aging
4.
Check the combustion chamber and the heating surface
for contamination; shut down the system for this step
5.
Checking the burner (burner documentation) 6.
Check the combustion air supply and flue gas routing for
function and safety
7.
Check the operating pressure, relief valve and expansion
tank inlet pressure
8.
Checking function of DHW tank and sacrificial anode (DHW tank documentation)
9.
Checking burner settings (burner documentation)
10.
Record the final checks of the inspection work, incl.
measurements and test results
26
26
Page
On-demand maintenance procedures
1.
Shutting down the heating system
25
2.
Removing and cleaning the heat exchanger baffles
27
3. Cleaning heat exchanger heater flue (heating surfaces) and
combustion chamber and afterwards refitting heat
exchanger baffles in original positions
27
4.
Checking seals/cord gaskets on burner door and burner
and replacing as necessary
27
5.
Commissioning the heating system
22
6.
Final check of the servicing work
7.
Checking safe and proper operation
Confirmation of properly completed servicing
28
MESys 4000 - 6000 Series - Technical specifications are subject to change without prior notice.
7
1.
Heating system servicing
Date:______
Date:______
Date:______
Date:______
Date:______
Date:______
Date:______
Date:______
Date:______
Date:______
Date:______
Date:______
Date:______
Date:______
1.
2.
3.
4.
5.
6.
7.
8.
9.
10.
1.
1.
2.
3.
4.
5.
6.
7.
If any condition requiring maintenance work is
identified in the course of servicing, that work
must be carried out as necessary to ensure safe
and proper operation.
29
MESys 4000 - 6000 Series - Technical specifications are subject to change without prior notice.
Trouble Shooting
8
8
Trouble Shooting
This Trouble shooting section is designed as an aid in identifying malfunctions of the system and provide corrective
action steps. It is broken down by major system components
to assist in problem identification and correction. The list is
not all inclusive but will cover most typical scenarios.
Malfunction
Possible observation
Potential causes
No space heating
No hot water flow through
heat emitters
Defective room thermostat, pump or zone valve, reset aquastat
Burner on lock-out, pellet storage empty/lodged pellets, system air bound
Cold DHW
Cold/luke warm domestic
water
Defective tank aquastat, seized tank pump
Burner on lock-out, pellet storage empty/lodged pellets, system air bound
Boiler remains very hot
Burner continues cycling
operation
Check burner sensor wiring, incorrect burner software settings,
check draft conditions, check room air conditions
Seized control panel relay, check boiler aquastat.
Boiler remains cold
Burner does not run
Summer time, burner in lock-out: check control lights, check
fuses, check pellet supply, check draft
Feed auger does not run
No burner operation
Check pellet supply, check pellet lodging, check electric
motor, check shaft spindle
Tab. 17 Note: During power outage periods, a small generator could be employed to power the pellet burner to provide heat.
All pump flow or check valves and/or zone valves would need to be lifted manually to induce a thermal flow through
the system. Its effectiveness will depend on the piping lay-out.
Note: For detailed burner trouble shooting see Janfire manuals.
MESys 4000 - 6000 Series - Technical specifications are subject to change without prior notice.
30
9
9
Installation examples
Installation examples
The MESys 4000 - 6000 Series system can be installed
in new applications and existing hot water based heating
systems. The boiler system can also be combined with an
existing hot water based heating system where now the pellet
boiler is the primary heat source. In addition to space heating,
the pellet system is ideally suited to provide domestic hot
water by means of an indirect hot water tank.
Watts 120°F domestic hot water tempering valve
9.1
Basic pellet burner operation
The pellet burner operates based on the outdoor temperature
control provided with the Janfire burner to maintain a certain
boiler water temperature range. The pellet boiler will operate
in a temperature range from 140 – 194 °F (60 - 90°C) based
on an outdoor temperature range of 68 – -40°F (20 - -40 °C).
In addition, the pellet burner operates in a modulating fashion with an adjustable temperature differential along the
heating curve. The burner increases heat output based an
integrated PID logic. The pellet burner therefore operates
fully independent from the heating system requirements and
requires no input signals from the heat distribution system.
cycling. The thermal storage will also assist the space
heating demand under high load/low water temperature
conditions. Therefore, a DHW TEMPERING VALVE MUST
ALWAYS BE INSTALLED ON THE DOMESTIC OUTLET OF THE TANK. All piping and wiring diagrams
clearly show this system aspect. THE DHW TANK PUMP
MUST OPERATE OFF ITS OWN RELAY WHEN USED
IN AN INDIRECT TANK APPLICATION.
Description: Piping and wiring
Application Descriptions
Multiple zoning with pumps and separate DHW tank
V
pump.
Multiple zoning with zone valves and separate DHW tank
V
pump.
Radiant floor application along with separate DHW tank
V
pump.
9.4
Summertime DHW
Since the boiler will be maintained at minimum temperature
in summer months (130oF - 150oF) it may be necessary to
install an outdoor temperature override timer for peak
domestic loads (see Fig. 11.2). Timer to be placed in an
easily accessed location.
The pellet burner measures outdoor and boiler water temperature. Other input signals include an internal hopper level
sensor, a drop shaft temperature sensor, a burning cup temperature sensor, contact micro-switch and internal time
clock. Output signals are: fan power and speed control,
feeder auger, dosage auger, ash scrape motor w/ power sensing and ignition coil.
9.2
Heating system operation
As the result of complete integrated controls for the Janfire
pellet burner, the heating system control components, such
as thermostats, end switches, zone valves and pumps, do
NOT connect back to the burner control. Water temperature
in the boiler is fully controlled by the burner control system.
Thermostats will simply turn on pumps, open zone valves
and heat is readily available. Radiant systems and other
complex sub-systems do not require integration into the
burner control. The following examples demonstrate common system applications including existing oil boiler backup systems.
9.3
Fig. 11.2 Outside Air temperature bypass
DHW heating operation
Any indirect fired hot water tank can be integrated into
the MESys 4000 - 6000 Series pellet boiler system. The
indirect tank is used as a thermal storage zone to extend
burner operation at low firing rates to minimize burner
31
MESys 4000 - 6000 Series - Technical specifications are subject to change without prior notice.
Installation Example 9
Fig. 12 Piping Diagram: Zoning w/pumps and dedicated DHW pump.
Fig. 13
MESys 4000 - 6000 Series - Technical specifications are subject to change without prior notice.
32
Installation Examples
9
Cold DHW
Fig. 14: Multiple zoning with zone valves.
Fig. 15
MESys 4000 - 6000 Series - Technical specifications are subject to change without prior notice.
33
9
Installation Examples
Fig. 16 : High and low temperature heating with injection loop.
Fig. 17
34
MESys 4000 - 6000 Series- Technical specifications are subject to change without prior notice.
Installation Examples
Fig. 18: Multiple high and low temp zones with mixing valve.
Fig. 19
M ESys 4000 - 6000 Series - Technical specifications are subject to change without prior notice.
35
9
Installation Examples
Fig. 20 Condensate protection piping
Fig. 21 Condensate protection wiring
M ESys 4000 - 6000 Series - Technical specifications are subject to change without prior notice.
36
9
10
Parts List
1 - Boiler block
2 - Flue collector assembly
3 - Boiler jacket
37
MESys 4000 - 6000 Series- Technical specifications are subject to change without prior notice.
Parts lists
10
10
Parts lists
The following parts are available from MESys. If there are
several article numbers for one item number, the numbers for
the various models are listed in the relevant columns. Otherwise the table shows the number of components for each
model.
MESys 4000 - 6000 Series - Technical specifications are subject to change without prior notice.
38
10
Parts lists
Fig. 22
39
MESys 4000 - 6000 Series- Technical specifications are subject to change without prior notice.
10
Parts lists
Fig. 23
MESys 4000 - 6000 Series- Technical specifications are subject to change without prior notice.
40
10
Parts List
Fig. 24 - Accessories
41
MESys 4000 - 6000 Series- Technical specifications are subject to change without prior notice.
10
Parts List
Fig. 25 - Safety Component Wiring Instructions
*Required for storage bins with service access panels.
MESys 4000 - 6000 Series- Technical specifications are subject to change without prior notice.
42
Maine Energy Systems, LLC
One Parkway, P.O. Box 547
Bethel, ME 04217-0547
Phone: 207.824.NRGY (6749)
www.maineenergysystems.com
Maine Energy Systems, LLC reserves the
right to make changes without notice due to continuing
engineering and technological advances.