1
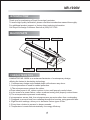
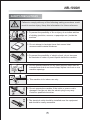
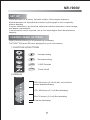
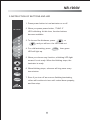
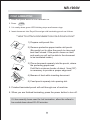
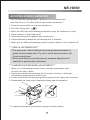
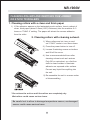
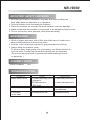
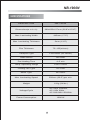
OWNER'S MANUAL
LAMINATOR
Model No. NB-1900N
Read all instructions carefully before use.
For any customer support needs, please choose
the « Customer Support » tab on www.royalsovereign.com.
Royal Sovereign International Inc.
NB-1900N
TABLE OF CONTENTS
TOPIC
PAGE
INTRODUCTION
3
MAJOR PARTS
3
CHARACTERISTICS OF NB-1900N
3
SAFETY PRECAUTIONS
4
SET UP
5
CONTROL PANEL SETTINGS
5
HOT LAMINATING
7
COLD LAMINATING
8
COLOR FOIL LAMINATING
9
MOUNTING BOARD LAMINATING
10
CLEAN ROLLERS AND REMOVE JAMMED FILMS
11
IMPORTANT SAFETY CONCERNS
12
MAINTENANCE
12
ASSEMBLY PARTS
12
TROUBLESHOOTING
12
SPECIFICATIONS
13
NB-1900N
INTRODUCTION
Thank you for purchasing a Royal Sovereign Laminator.
To insure high quality lamination, please read this instroduction manual thoroughly.
For additional product support or factory-direct ordering information.
Call Royal Sovereign Customer Service at (800) 397-1025.
MAJOR PARTS
Top Cabinet
Input
Output
Power Cord
Control Button Panel
LED
CHARACTERISTICS
LAMINATOR NB-1900N is an advanced laminator of contemporary design,
utilizing the lastest in laminating technology.
1. Contemporary design and rounded shape will enhance any decor.
2. A microprocessor is used for added protection.
1) The microprocessor protects the rollers
a.Even when power is off, rollers continue to turn until properly cooled down.
b.In the event of a power failure, rollers continue turning until properly cooled down.
2) The microprocessor prevents overheating
If a temperature sensor fails, the microprocessor prevents rollers from overheating.
3. Designed to prevent heat from radiating through the housing, using powerful fans.
4. Eight function settings, allow you to laminate various types of film.
5. Every time a button is pressed, a buzzor sounds.
6. Temperature is controled automatically for energy efficiency.
3
NB-1900N
SAFETY PRECAUTIONS
Failure to comply with any of the following safety procedures could
result in serious injury. Keep this information for future reference.
1.To prevent the possibility of fire or injury, do not allow articles
of clothing (neckties, scarves, or paperclips etc.) inside the
machine.
2. Do not attempt to laminate items that exceed total
recommended material thickness.
3.To prevent the possibility of electric shock, do not immerse
the laminator in water or permit liquids inside the machine.
4. Do not operate machine for any other purpose other than its
intended use.And do not insert sharp objects into front or rear
machine openings.
5. This machine is for indoor use only.
6. Do not operate the machine if the outlet or power cord is
damaged. And do not alter the electric plug in any way.
Contact a qualified electrician.
7.The electrical outlet should be installed near the equipment
and should be easily accessible.
4
NB-1900N
SET UP
Place laminator on a sturdy, flat work surface. Allow ample clearence
behind laminator for laminated document or photograph to exit completely
without bending.
Connect laminator to an electrical outlet that matches laminator's rated voltage
and power requirements.
If an extension cord is required, use a cord rated higher than the laminator's
capacity.
CONTROL PANEL SETTINGS
Eight Functions allow you to laminate as necessary.
TACT-BUTTON and LED were designed for your convenience.
1.FUNCTION OF BUTTONS
: Increase setting
TEMP
: Decrease setting
COLD
COLD
: COLD Function
ON/OFF
ON/OFF
: Power On/off
2.DISPLAY
NB-1900N
B
o
~F
200
il
7
6
5
0
~18
150
150~180 micron (6~7 mil) film laminating
4
3
125
80 ~ i c
M
200~250 micron (8~10 mil) film, color foil and
mount board laminating
80~125 micron (3~5 mil) film laminating
2
1
Cold film laminating
D
COL
5
NB-1900N
3.INSTRUCTION OF BUTTONS AND LED
1. Press power button to turn laminator on or off.
2. When you press power button, "FUNC 2"
NB-1900N
LED is blinking. At this time, function buttons
become available.
B
o
~F
200
il
7
6
3. To choose film thickness, press
or
and you will see the LED read-out.
5
0
~18
150
4
3
125
80 ~ i c
M
D
COL
4. For cold laminating, press
COLD
then green
LED will light up.
2
1
5. When you choose any function, a blinking LED light
means it's not ready. When the blinking stops, the
laminator is ready.
TEMP
6. When blinking stops, a buzzer will ring once every
two minutes.
COLD
7. Even if you turn off as soon as finishing laminating,
ON/OFF
rollers will continue to turn until cooled down properly,
and then stop.
6
NB-1900N
HOT LAMINATING
1. Press the power button.
2. Choose setting by
or
3. When red LED stops blinking and buzzer rings, you're ready to laminate.
(It takes 4~5 minutes depending on setting function.)
4. Put document to be laminated, into a laminating pouch. Leave a minimum
border of about 3mm(1/8"), to provide a proper edge seal.
5. Insert pouch squarely into opening slot.
6. Finished lamination will exit through rear of machine.
7. Emerging laminated document is hot to the touch.
(Always allow lamination to cool down on a flat surface for about a minute
before handling, to prevent permanent bending. If document is not
laminated well, re-insert it and run it through a second time.)
8. When continuously laminating, run the laminator at a lower setting
because the internal machine temperature may be higher than the
required temperatur, causing the document to bend or ripple.
9. When finished laminating, turn off the machine.
'***USEFUL INFORMATION***
Sometimes, when continuously laminating, LED may begin
blinking. If this happens, finish laminating the current document,
then wait until the LED stops blinking, before inserting the next
lamination.
* Do not laminate empty or thin pouch on a thick film setting.
The pouch could stick to the roller.
* Do not unplug laminator while laminating.
This could be fatal for the rollers due to the high internal temperature.
7
NB-1900N
COLD LAMINATING
1. Press the power button to turn laminator on.
2. Press
COLD
3. It is ready when green LED blinking stops and buzzer rings.
4. Insert document into Royal Sovereign cold laminating pouch as follows.
**HOW TO ATTACH DOCUMENT ON COLD POUCH FILM**
1) Prepare cold pouch film.
Back
2) Remove protective paper inside cold pouch.
(Be careful not to allow the pouch to close and
seal itself closed. If the pouch closes on itself
and seals,you will not be able to the document
to be laminated inside.)
Front
3) Place document squarely into the pouch, where
the protecting paper was.
Cold film's minimum border of about 3mm(1/8")
is necessary to provide a proper edge seal.
4) Beware of dust while inserting document.
Back
5) Feed pouch squarely into opening slot.
5. Finished laminated pouch will exit through rear of machine.
6. When you are finished laminating, press the power button to turn off.
If it has recently been used for hot lamination, allow the rollers to
be cooled down about 20~30 minutes.
8
NB-1900N
COLOR FOIL LAMINATING
Your laminator has ability to add color by using color foil to documents copied
or printed by laser printer using toner.
**PAPER CARRIER is required**
1. Press the power button to turn laminator on.
2. Find FOIL setting, using
3. Machine is ready when red LED stops blinking and the buzzer rings.
4. Position color foil where you want on the document and insert it into the
paper carrier.
5. Insert the paper carrier squarely into the opening slot.
6. Finished foil laminated paper will exit through rear of machine.
7. When you are finished laminating, press the power button to turn machine off.
'***USEFUL INFORMATION***
The document, which has been foil laminated, is hot and easily
bent. Try not to touch the document until it has cooled down.
* When you do laminating several colors, use high temperature tape
to hold color foils in place.
* For high quality lamination, choose FUNC depending on thickness of material
and PAPER CARRIER.
(Foil laminating temperature is set for a bond paper.)
9
NB-1900N
MOUNTING BOARD LAMINATING
**You can laminate photographs or pictures on a mounting board,
less than 2mm (1/12") thick without any tension adjustment.**
1. Press the power button to turn the machine on.
2. Set FOIL setting with
3. When the LED light stops blinking and buzzer rings, the laminator is ready.
4. Place material on Mounting board.
5. Insert Mounting board squarely into opening slot.
6. Finished Mounting board will exit through rear of machine.
7. When you are finished laminating, press the power button to turn machine off.
'***USEFUL INFORMATION***
* The document, which has been mounting board laminated, is
pretty hot and easily bent. Try not to touch the document until
it has cooled down.
* When laminating to mounting board, pressure adjustment is
needed for good quality lamination.
'***LAMINATION PRESSURE ADJUSTMENT***
* When you do laminating several colors, use high temperature tape
to hold color foils in place.
1. Unplug the machine and unscrew the 8 screws on bottom of laminator,
set machine upright and lift off the cover.
2. Locate each end of left and right pressure spring on the upper part as shown.
3. Reassemble top cover with 8 retaining screws and do lamination.
•
* For general lamination, set pressure springs to lower position.
10
NB-1900N
CLEANING ROLLERS AND REMOVING FILM JAMMED
OR STUCK TO ROLLERS
1. Cleaning rollers with a clean and thick paper
1) If film adhesive apears on the laminated pouch surface, Insert a sheet of
clean, thick paper (about 0.5mm(1/50") thickness) into the machine 2~3
times on "FUNC 4" setting. The paper will attract the excess adhesive
from the roller.
2. Cleaning rollers with cleaning solvent.
1) When rollers are hot, turn on and
set "COLD" mode to cool them down.
2) Press the power button to turn off.
3) Loosen 8 retaining screws on bottom
and lift off the cover.
4) Use a recommended silicon roller
cleaning solvent such as Laminex
Poly-Off or equivalent, on a lint-free
cloth to clean residue of laminate
adhesive on exposed roller surface.
Prevent any liquid from spilling into
the unit.
5) Re-assemble the unit in reverse-order
of disassembling.
* Do not turn the unit on until the rollers are completely dry.
Wet rollers could cause serious harm.
Be careful not to allow to damage temperature sensor, as damaged
sensor could cause serious harm.
11
NB-1900N
IMPORTANT SAFETY CONCERNS
1. Be sure that neckties, necklaces, long hair and loose clothing are
kept away while the laminator is in operation.
2. Prevent children from accessing the machine.
3. Place the machine on a sturdy, flat work surface to prevent damage.
4. Make certain that the machine is connected to an adequate power source.
5. Do not use for any other purpose, other than laminating.
MAINTENANCE
1. Width of upper and lower side of film should be same in order not to
allow melted adhesive to stick to the roller.
2. Routine roller cleaning is required to prevent adhesive build-up.
3. Always keep the machine clean.
To remove dust, finger prints, etc. on housing, use diluted alcohol on
lint-free cloth. Prevent any liquids from getting into the laminator.
(Do not use strong alcohol or petroleum-based cleaning solvents
or abrasives.)
ASSEMBLY PARTS
Owner's manual : 1EA
TROUBLESHOOTING
Symptom
*Motor doesn't work.
*Film is not laminated.
*Lamination
is not clear.
Cause
Check point
1.Power cord may not be 1.Check the power cord.
plugged in
2.Power switch in
2.Check that switch is on
OFF mod
1.Cold mode is set.
1.Change the setting to
hot laminatio
1.Setting is too low.
1.Increase setting.
12
NB-1900N
SPECIFICATIONS
DESCRIPTION
NB-1900N
Dimensions(w x d x h)
680x225x127mm (26.8"x10"x5")
Max. Laminating Width
445mm (17.5")
Max. Laminating Thickness
2mm (1/12")
Film Thickness
75~125(micron)
Transport Type
Four Roller (no carrier)
Heat Source
Hot roller
Pre-Heating Time
4~5 min
Temp. Operating Range
8 SETTINGS
Cooling Fan Type
DC FAN
Motor Type
AC motor
Max. Laminating Speed
520mm (20.5") per min.
Weight
11Kg (24 lbs.)
Voltage/Cycle
AC 100V 50/60Hz,
AC 120V 60Hz ,
AC 220-240V 50/60Hz
Power Consumption
1000 W
13
CORPORATE HEADQUARTERS
Royal Sovereign International Inc.
2 Volvo Drive, Rockleigh, NJ 07647 U.S.A.
TEL : +1 ) 800-397-1025
FAX : +1 ) 201-750-1022
E-mail : [email protected]
RS Holland B.V.
Royal Sovereign Inc.
Industrieweg 6K, 4104AR, Culemborg, The Netherlands
TEL : +31 (0)345 473 097
FAX : +31 (0)345 519 811
E-mail : [email protected]
1001, World Meridian II, 426-5, Gasan-dong,
Geumcheon-gu, Seoul, 153-759, KOREA
TEL : +82)2-2025-8800 FAX : +82)2-2025-8830
E-mail : [email protected]
RS Canada Inc.
RS International Australia PTY. LTD.
1025 Westport Crescent, Mississauga On L5T 1E8 CANADA
TEL : +1) 905-461-1095
FAX : +1) 905-461-1096 TF: +1) 866 961-6673
E-mail : [email protected]
30 Prime Drive, Seven Hills, NSW 2147, Australia
TEL : +61) 2-9674-2127
FAX : +61) 2-9674-2027
E-mail : [email protected]
www.royalsovereign.com
<Oversea Sales Office>