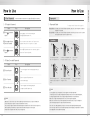
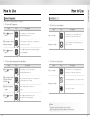
1
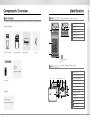
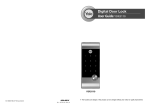
User Guide YDR4110
YDR4110
※ The functions and design of this product can be changed without prior notice for quality improvement.
ISL-1161-62 Rev.0
INTRO
Thank you for choosing a YALE product.
CONTENTS
Getting Started
We welcome you to this new door solution world of YALE that is the leading brand in the
world digital door lock industry.
Please find comfort and security in yourself through perfectly combined digital and analog
Directions
Safety Cautions
4
Product Features
5
Quick Instruction
6
Components Overview
8
technologies presented by YALE .
Identification
9
This user manual enables you to operate the product more convenient and safer.
How to Use
10
Password
Fingerprint Guide
Normal Mode: Use Fingerprint
Security Mode: Use Fingerprint
Remove Fingerprint
Lock Door
Open Door from Inside
Be sure to read this completely before using it.
Settings
17
Manual Lock Mode Alarm•Volume
Auto / Manual Locking•Voice / Melody
Fingerprint Mode Change
Forced Lock
Safety Feature
21
Alarm Function
3-minute Lock•Open Door with fake PIN code
Extra Features
Option
24
Remote Control Module
Remote Control
2
Emergency Power
26
Specifications
27
3
Must Read This!!!
Product Features
Please read this carefully for your own safety.
1⃞ One-touch Fingerprint Verification Method (Easy Scan)
Do not install the unit in outdoor
environment.
Do not attempt to disassemble
the unit by yourself. That can
cause an electronic shock and
product damage.
An infant and some users who
have unusual fingerprints (those
which are difficult to register) may
not be registered for fingerprint
verification.
Easy Scan technology has been applied to conveniently read a fingerprint in one
shot without the need to open or close the cover to enter a fingerprint.
Getting Started
Safety Cautions
2⃞ Smart Pad Feature
※ Scan-type fingerprint modules do
not recognize fingerprints with
water or foreign materials.
Do not use force with a tool onto
the product.
Please keep your Password
safely.
Make sure to lock the door tight
when you go out.
A separate lighting method where each keypad number has been separately designed is
applied so that users may examine intuitively how the selected function is operated and
if they are run normally.
3⃞ Verification with the palm
The security code is verified by palm touching to randomize any
fingerprint residues on the keypad so protect from exposing it.
4⃞ Voice Guide Feature
As the voice guide is offered that lets you know the operation status and
how to set each feature and mode for easier and more convenient use.
Do not spray water directly to the
product or wipe it with chemical
substances such as benzene,
thinner, or alcohol when cleaning
the product.
Caution
4
Keep foreign materials away from
the fingerprint sensor to maintain
it cleanly and do not use it with
wet fingers.
5⃞ Networking System (Option)
You can use the remote control by installing the applicable remote control module.
This option may not be available depending on your country or local dealer.
Make sure to follow the above instructions to avoid any injuries or damages on the properties .
5
Quick Instruction
1⃞ Register Password
➞
Press
button
Enter number
1 button
(Registration)
➞
➞
Enter Password
(4 to 12 digits)
Press
button
(Registration)
5⃞ Register Fingerprints
➞
Press
button
(Registration)
➞
Enter number
2 button
➞
❶ Enter the Password
❷ Press button
➞
Sweep your
finger through
the fingerprint
sensor 3 times
to register
Press
button
(Registration)
Directions
Components Overview
8
Identification
9
How to Use
3⃞ Locking the Door from the outside
① The automatic Lock Sensor detects the door
closing and locks the door within 5 seconds,
or
② Touch the keypad with the palm
5⃞ Locking / Unlocking the Door from
the inside
① Press open / close Button
4⃞ Unlocking the Door from the outside
① Sweep a registered fingerprint through the
fingerprint sensor, or
② Wake up the lock with the palm touch,
enter the security code and retouch the lock
with the palm.
6⃞ Set Auto/ Manual Lock Mode
Be the Auto/Manual Lock
Setting button released in
the back body to set Auto
Auto Set
② Turn the Manual thumb turn
to lock / unlock
Manual thumb turn
6
Settings
Be the Auto/Manual Lock
Setting button pressed in the
back body to set Manual
Manual Set
17
Manual Lock Mode Alarm•Volume
Auto / Manual Locking•Voice / Melody
Fingerprint Mode Change
Forced Lock
Safety Feature
open/close Button
10
Password
Fingerprint Guide
Normal Mode: Use Fingerprint
Security Mode: Use Fingerprint
Remove Fingerprint
Lock Door
Open Door from Inside
Alarm Function
3-minute Lock•Open Door with fake PIN code
21
Identification
Basic Contents
Front
(Front Body, install on the outside of the door)
The contents of this product may be subject to change without notice for performance or quality improvement.
》 Basic Contents
❹
❺
❶
❶
Fingerprint Operation Lamp
❷
Keypad (10-Key)
❸
Reset button
❹
Fingerprint Cover
❺
Fingerprint Sensor
❻
Emergency Power Supply Terminal
Directions
Components Overview
❷
Front (Front Body)
Back (Main Body)
Main Bracket
Strike
❸
❻
9V Emergency battery
(Optional)
Batteries
Screws
Installation Template
Back
❶
(Back Body, install on the inside of the door)
❷
❸ ❹ ❺ ❻ ❼
❽
Users Guide
❾
》 Option
❿
•Remote control
•Remote control module
❶
Battery Cover
❷
Remote Control Module Slot (Option)
❸
1.5V AA Alkaline Batteries
❹
Volume Control Switch
❺
Auto / Manual Lock Button
❻
Open / Close button
❼
Manual Thumb Turn
❽
Forced Lock Switch
❾
Dead Bolt
❿
Edge Bolt (Auto Lock Sensor)
Registration Button
Menu Button
Low Battery Indicator
8
9
To Use Password
How to Use
Passwords should be selected from 6 to 12 digits. [*] and [#] are not allowed.
》 To Register Password
Order
1⃞ Press
button
Play
(Registration)
》 Fingerprint Guide
Description
Open the battery cover in the back body and
press Ⓘ (Registration) button once.
2⃞ Press number 1 button
➞ Enter the Password
Press the number 1 button and then the Password on the
keypad according to the voice guide. (4 to 12 digits)
3⃞ Press
button
Press the Ⓘ (Registration) button in the back body again to
complete the Password registration.
(Registration)
Play
Description
1⃞ Touch with palm
Touch the keypad of the front body gently with your
palm.
2⃞ Enter Password
Enter the registered Password in the
exterior number plate.
3⃞ Touch with palm
Touch the keypad of the front body gently with
your palm or press [*] button to end.
Note
•Make sure to leave the door open when registering a Password because you may accidentally lock
a door while trying to register or change a Password the first time.
•The previously registered Password will automatically be deleted when the new Password is registered.
•When registering a Password, the registered Password will be displayed on the keypad
(Smart Pad) in sequential order and, then, be disappeared.
10
To change modes: Please refer to page 19.
Normal Mode : It enables you to make individual registration, and open a door through the registered
fingerprint or Password.
Security Mode : It enables you to make individual registration and deletion, and open a door only when
the fingerprint number and the fingerprint match.
Operations
1⃞
2⃞
➞
Press and lift up the Guide
Bar on the fingerprint cover.
》 To Open Door with Password
Order
Fingerprint
Directions
How to Use
4⃞
➞
You will see the fingerprint cover
being raised and start to open.
5⃞
➞
When the fingerprint cover is
completely open, the lamp will
be on.
3⃞
Start sweeping your fingerprint
through the sensor.
Open the cover
completely
6⃞
➞
Complete your fingerprint
recognition.
Note
•You may register up to 20 fingerprints. (The same applies to Normal/Security Mode)
※ Note that you may not register 20 fingerprints depending on the state of the registered fingerprints.
•Scan-type fingerprint modules do not recognize fingerprints with water or foreign materials.
•Make sure to register a Password just for the case you fail to register a fingerprint.
•Make sure to leave the door open when registering a Password because you may accidentally lock
a door while trying to register or change a Password the first time.
•If an error occurs during registration, the process reverts back the beginning (entering fingerprint).
•If no more input is made for 20 seconds after registering at least 1 fingerprint, the registration is completed.
•Same fingerprints can be registered repeatedly.
11
How to Use
Normal Mode: Use Fingerprint
Security Mode: Use Fingerprint
It enables you to make individual registration, and open a door through the registered fingerprint or Password.
It enables you to make individual registration and deletion, and open a door only when the fingerprint number and the fingerprint match.
》 To Register Fingerprint
》 To Register Fingerprint
Order
1⃞ Press
button
Play
Description
(Registration)
Order
Play
Description
Open the battery cover in the back body and
press Ⓘ (Registration) button once.
1⃞ Press
button
2⃞ Press number 2 button
➞ Enter the Password
➞ Enter button
Press the number 2 button according to the voice guide.
Press the Password and then the [#] button on the keypad.
2⃞ Press number 2 button
➞ Enter the Password
➞ Enter button
Press the number 2 button according to the voice guide.
Press the Password and then the [#] button on the keypad.
3⃞ Register fingerprint
- 3 times
After the operation lamp is on, sweep your fingerprint
3 times through the fingerprint sensor according to
the voice guide.
3⃞ Press fingerprint
number
Enter 4-digit fingerprint number to register.
4⃞ Register fingerprint
- 3 times
After the operation lamp is on, sweep your fingerprint 3 times
through the fingerprint sensor according to the voice guide
4⃞ Press
button
Press the Ⓘ (Registration) button in the back body again to complete
the fingerprint registration.
(Registration)
( Press [#] button to continue the additional fingerprint registration.)
5⃞ Press
button
》 To Open Door with Fingerprint
Order
Play
Open the battery cover in the back body and
press Ⓘ (Registration) button once.
(Registration)
Press the Ⓘ (Registration) button in the back body again to
complete the fingerprint registration.
(Registration)
( Press [#] button to continue the fingerprint registration process.)
》 To Open Door with Fingerprint
Description
Order
Play
Description
1⃞ Lift the fingerprint
cover open
Lift open the fingerprint cover and wait for the operation
lamp to light on.
1⃞ Touch with palm
Touch the keypad of the front body gently
with your palm.
2⃞ Enter fingerprint
Sweep the registered fingerprint through the fingerprint
sensor in the front body.
2⃞ Press fingerprint
number
Enter the registered fingerprint number in the keypad.
3⃞ Enter fingerprint
Sweep the registered fingerprint through the
exterior fingerprint sensor.
Check if a door opens!
12
Please refer to the page 19 to change the mode
Directions
How to Use
Make sure to examine if the door opens normally with the
registered Password or fingerprint after the registration is
complete.
13
How to Use
Remove Fingerprint
Lock Door
You may only delete each fingerprint separately in the Security Mode.
》 To Delete All Fingerprints
Order
1⃞ Press
button
Play
》 To Close Door from Outside
Description
Order
Open the battery cover in the back body and
press Ⓘ (Registration) button once.
Auto Lock status
2⃞ Press number 3 button
➞ Enter the Password
Press the number 3 according to the voice guide and then,
the Password on the keypad.
Manual Lock status
3⃞ Press
button
Press the Ⓘ (Registration) button in the back body again
to delete all fingerprints.
(Registration)
(Registration)
》 To Delete Each Fingerprint (Security Mode)
Order
1⃞ Press
button
(Registration)
Play
Directions
How to Use
Description
Open the battery cover in the back body and
press Ⓘ (Registration) button once.
2⃞ Press number 4 button
➞ Enter the Password
➞ Enter the
Press the number 4 according to the voice guide and then,
the Password and [#] on the keypad.
3⃞ Registered fingerprint
number
Enter the fingerprint number to delete on the
keypad.
4⃞ Press
button
Press the Ⓘ (Registration) button in the back
body again to delete a single fingerprint.
Play
5 Sec
Description
The built-in Auto Lock sensor automatically locks
a door within 5 seconds after closing the door.
Touch the keypad in the front body gently with your
palm to lock a door.
》 To Close Door from Inside
Order
Auto Lock status
Play
5 Sec
Description
The built-in Auto Lock sensor automatically locks
a door within 5 seconds after closing the door.
Turn the Manual thumb turn to Close side to lock a door.
Manual Lock status
(Registration)
Press Open/Close button
Note
•Even after a door was locked by the Auto Lock function,
please check again if the door was completely closed and locked.
14
15
Settings
Open Door from Inside
Manual Lock Mode Alarm
In the default setting, manual lock mode does not ring off the alarm when it unlocked
by manual thumb turn.
However, the users can change it for their own security need.
》 Press Open/Close button
Directions
How to Use
》 Toggling the Manual Lock Mode Alarm Setting
Order
Play
Description
➞
Press Open/Close button
1⃞ Press
(Closed)
button
Press
Button inside of battery cover
(Open)
2⃞ Press 0, 8 button
Press 0, 8 button on the keypad
3⃞ Press
Press
Button inside of battery cover to
change the setting
button
》 Using Manual thumb turn in Emergency
Turn manual thumb turn to
➞
Unlock to open the lock.
Volume Setting
(Closed)
(Open)
It enables you adjust the volume of various sounds from the product.
》 Volume Setting
Order
To set volume switch
Play
Description
The operation sound loudness is adjusted according to
the Volume Switch Setting.
(2 : Louder / 1: Lower / 0 : Mute )
Note
•Even when the operation sound is set as‘Mute,’the error and alarm sounds will go off.
16
17
Settings
Automatic / Manual Lock Setting
Fingerprint Mode Change
Auto Lock setting locks a door within 5 seconds after the door is closed.
The default setting is Normal Mode.
》 To Set Auto/Manual Feature
》 Fingerprint Mode Setting
Order
Play
Order
Description
Auto Lock Setting
Be the back body Auto/Manual Setting button
released to set Auto
Manual Lock Setting
Be the back body Auto/Manual Setting
button pressed to set Manual
1⃞ Press
button
Play
Directions
Settings
Description
Press
Button inside of battery cover
Security Mode Setting
Press number 1 and 1 button
➞ Enter the Password
Press the number 1 and then, 1 again on the keypad.
Enter the registered Password.
Normal Mode Setting
Press number 1 and 3 button
➞ Enter the Password
Voice / Melody Feature
Press the number 1 and then, 3 again on the keypad.
Enter the registered Password.
You may select the operation sound that is set off when a door is open and closed.
2⃞ Press
》 To Set Voice/Melody Feature
Order
1⃞ Press
button
Play
Press
Button inside of battery cover to
change the setting
Description
Press
Button inside of battery cover
2⃞ Press 2, 2 button
Enter the number 2 and then, 2 again on the keypad.
3⃞ Press
Press
Button inside of battery cover to
change the setting
button
button
Note
Note
•Even after a door was locked by the Auto Lock function, please check again
if the door was completely locked.
18
•It is advised to keep the fingerprint exclusive number(4 digits) as a separate list just in case for a separate
fingerprint deletion at Security Mode.
•If more than 1 fingerprint is registered after the Security Mode is set, you may not open a door only with a Password.
(If the fingerprint module is broken, you may use a Password.)
19
Safety Feature
Forced Lock
Alarm Feature
》 Outside Forced Lock Setting - Fingerprint
Order
Play
Description
Enter the registered fingerprint on the fingerprint sensor
when the operation lamp(LED) is on.
1⃞ Enter fingerprint
Press the [#] button for 5 seconds.
(A beeping sound sets off for 3 times.)
2⃞ Press button for
5 seconds
The alarm sound continues for 30 minutes or until it is disarmed.
》 Break-in / Damage Alarm
Break-in: When someone tries to Break-in by opening
a door when it is locked, the alarm will go off.
Damage: When the front body was damaged
due to forced separation or drilling,
the alarm will go off.
Release Trespass/Damage Alarm
》 Outside Forced Lock Setting - Password
Order
Play
Enter the registered Password in the
exterior number plate.
2⃞ Enter Password
Press the [#] button for 5 seconds.
(A beeping sound sets off for 3 times.)
3⃞ Press
button for
5 seconds
》 High Temperature Alarm
•When there’
s fire, it detects the temperature of the inside.
It not only goes off an alarm but also releases the lock
status automatically.
•Even when the Inside Forced Lock mode is set,
the High Temperature Alarm releases the lock status
automatically.
Release High Temperature Alarm
》 Inside Forced Lock Setting
Order
Set / Release Inside
Forced Lock Switch
Play
Method ❶ Enter the registered Password.
Method ❷ Enter the registered Fingerprint.
Method ❸ Press the interior Ⓘ button for 5 seconds.
Description
When the door is closed, move the Inside Forced Lock
Switch to LOCK position so that a red sticker can be seen.
Note
•If you try to open a door with the Manual thumb turn from inside when the Outside Forced Lock is set, the alarm goes off.
•If the Inside Forced Lock is set, any attempt to open a door from outside whether it’d be a fingerprint or a Password won’t work.
•When setting the Outside/Inside Forced Lock, enter the number on the keypad (Smart Pad) and
the numbers will flicker from left to right and repeat twice.
20
Method ❶ Enter the registered Password.
Method ❷ Enter the registered Fingerprint.
Method ❸ Press the interior Ⓘ button for 5 seconds.
Description
Touch the keypad of the front body gently with your
palm.
1⃞ Touch with palm
Directions
Settings
Note
•If a door is open when the Auto Lock is not properly operated, the Trespass Alarm might go off.
•If the Back body is exposed to direct sunlight for a long time, the temperature sensor may operate and
go off an alarm.
•Even when the Inside Forced Lock mode is set, the lock status will automatically be released if the High
Temperature Alarm goes off.
•If the alarm goes off due to damage, fire, or trespass, the numbers on the keypad will light up clockwise.
(It repeats the status for 30 minutes with alarm sound.)
21
Safety Feature
3-minute Lock Feature
At 3-minute Lock mode, no button, besides those in the back body, will work.
》 3-minute Lock Mode Display
•If a Password or a Fingerprint that is yet
to be registered is entered for 5
consecutive times, 3-minute Lock mode
is on and nothing will work for 3 minutes.
2 minute
passes.
1 minute
passes.
To Release 3-minute Lock
Method ❶ Press the Open/Close button.
Method ❷ Press the Back body Ⓘ button.
3 minute Lock starts.
2 minutes left.
1 minutes left.
The number [3]
lights up.
The number [2]
lights up.
The number [1]
lights up.
Open Door with fake Password
Extra Features
It is the most effective feature when you are concerned about your Password being accidentally exposed
when you have company or in the similar situations.
Option
》 To Open Door with fake Password
24
Remote Control Module
Order
Play
Description
1⃞ Touch with a palm
Touch the keypad with your palm gently.
2⃞ Enter the fake Password
and a Password
Method ❶ Enter the fake Password ➞ Password
Method ❷ Enter the Password ➞ fake Password
3⃞ Touch with a palm
Touch the keypad with your palm gently or
press [ ] button to end.
Note
•3-minute Lock mode won’t affect any alarm and is sustained even after the product is rebooted.
•Once 3-minute Lock mode is on, the fake Password mode won’t work until the next normal verification
(Fingerprint verification, normal Password, open door from inside). In this case, please open a door with your correct Password.
22
Remote Control
Emergency Power
26
Specifications
27
Option
Remote Control Module
Remote Control(Option)
Buy the Remote control Module and install it to link the remote control.
Not only FSK method but also the wireless encryption algorithm has been applied.
Extra Features
Option
》 To Register Remote Control
Order
1⃞ Press
Remote control Module
》 Install Remote Control Module
1⃞ Remove batteries
2⃞ Install Remote Control Module
Open the battery cover
in the back body
and remove
all batteries.
Equip the Remote control Module
to the slot.
Play
Open the battery cover in the back body.
Press
button.
button
2⃞ Enter number 0 and
5 on the keypad
Enter the number 0 and then, 5 button on the
keypad.
3⃞ Register Remote Control
4⃞ Press
Description
Press the SET button of the remote control
Press the
button in the back body again to
complete the procedure.
button
》 To Release Remote Control
3⃞ Insert batteries
4⃞ Confirm the installation
Insert all the batteries by
checking the [⊕, ⊖]
connector.
If you hear a‘ting-a-ling’
sound, the Remote control
Module has been installed
correctly. Close the
battery cover.
Ting-a-ling
Note
•The operation status may only be examined through the remote control.
24
Order
1⃞ Press
button
Play
Description
Open the battery cover in the back body.
Press
button.
2⃞ Enter number 7, 5
on the keypad
Enter the number 7, 5 on the keypad.
4⃞ Press
Press the
button in the back body again to
complete the procedure.
button
Note
•The wireless encryption algorithm resorts to the floating ID technology where the wireless
Password is changed every time the remote control is operated.
25
Specifications
Emergency Power Supply for Discharged Batteries
Specifications
You may open a door by contacting the 9V battery
》 To Supply Emergency Power
Order
Parts
Play
Description
1⃞ Contact the
9V battery
Open the emergency cover. Keep contacting the 9V
battery onto the emergency power supply terminal.
2⃞ Touch with palm
Touch the keypad of the front body gently with your palm.
registered Password.
4⃞ Press
Front (Front Body)
19(D)×64.6(W)×160.2(H)
Zinc die-casting
Back (Main Body)
36(D)×85(W)×158(H)
Fiber-glass plastic
Battery
Option
3⃞ Enter the
button
Enter the registered Password.
Press the
button.
(Please maintain the 9V battery contact until the motor activation is completed)
Specifications
Remote Control
Extra Features
Emergency Power
Remarks
Operating temperature :
-15~55℃ (5~131˚F)
4EA 1.5V AA alkaline batteries
(Operating voltage: 4.5 ~ 6 V)
Last up to 1 year
(10 times used a day)
Wireless
Optional
※ Battery life may vary depending on temperature, moisture levels,
frequency of use and the quality of the batteries.
※ Please make sure that all parts are included when purchasing the product.
※ Optional products may not be available depending on your country or local dealer.
》 To Replace Battery
1⃞ Expiry Period
The product uses four 1.5V(LR6) alkaline AA batteries.
They may sustain 1 year if used 10 times a day.
(Users are advised to use authentic alkaline batteries.)
2⃞ Low Battery Alarm
One-on-one real-life size
1.5V(LR6) alkaline AA battery
Low Battery Lamp (red)
You must replace all 4 batteries for the following cases:
* The Low Battery Lamp on the back body flickers red
* The voice guide sounds( "Low battery" )
RISK OF EXPLOSION IF BATTERY IS REPLACED BY AN
INCORRECT TYPE. DISPOSE OF USED BATTERIES ACCODING
TO THE NATIONAL CODE OR RECYCLING PROGRAM.
back body
Note
•The battery life varies in the temperature, humidity, the number of use, and the quality of the battery.
26
27
Note
28
Note
29
Note
30
Note
31