1
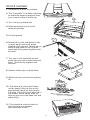
®
#AW1000
PERFECT TEMP
CARE & USE MANUAL
Thank you for purchasing the Salter® Perfect Temp. Your new
Perfect Temp offers features not found on any other unit,
including high priced, built in warming drawers!
Please read this instruction manual completely before
operating your new appliance. It is critical that you read all
sections and become familiar with the content to understand
the full benefits of this product. Used in accordance with these
instructions, it will give you years of reliable service.
Your new Salter® Perfect Temp has been manufactured with great care and is
designed to meet the highest quality standards. Should you have a problem,
however, please check the TROUBLESHOOTING section of this manual for
possible solutions. If you cannot readily find the solution, please contact our
Salter® Customer Service department.
Web site: www.salterhousewares.com
Customer Service: 1-866-843-3905
Or write us at:
Salter Housewares
2220 Entrada del Sol, Suite A
Las Cruces, New Mexico 88001
Thank you for bringing Salter® into your home. We are certain that your
Perfect Temp will bring years of outstanding performance for you and your
family.
Table of Contents……………………………………………………….....
2
Safety……………………………………………………………………......
3
Important Safety Instructions…………………………….......
3
Electrical Requirements…………………………………….....
4
Perfect Temp Use and Operation……………………….....
5
Before Using .......................…………………………..............
5
Proper Assembly……………………………………………….
6
Control Panel…………………………………………………....
7
Moist-Crisp Venting System………………………………….
7
Preheating ....................….........………………………………
7
Positioning the Rack ………………………………………….
7
Warming of Serving Bowls, Plates and Containers……….............
8
USDA Recommended Minimum Internal Cooking Temperature Chart.. 8
Perfect Temp Recommended Food Settings Chart………………..
9
Proofing Bread …………………………………………………………….. 9
Moving your Perfect Temp unit………………….......…………..........
10
Before You Go…………………………………………………….
10
Use In Transit……………………………………………………..
10
Use as a Warming Tray…………………………………………………...
10
Automatic Shut-Off Feature……………………………………………….
10
Proper Disassembly Procedure…………………………………………..
11
Care and Cleaning…………………………………………………………
11
Control Panel……………………………………………………..
11
Interior……………………………………………………………..
11
Exterior…………………………………………………………….
11
Base………………………………………………………………..
11
Handle……………………………………………………………..
11
Door………………………………………………………………..
11
Rack………………………………………………………………..
11
Perfect Temp unit Storage …………..................…………………….
12
Troubleshooting…………………………………………………………….
12
Warranty Information………………………………………………………
13
2
IMPORTANT SAFETY INSTRUCTIONS
WARNING: To reduce the risk of fire, electrical shock, injury to
persons, or damage when using the Perfect Temp, follow basic
precautions, including the following:
?
·Read all instructions thoroughly.
?
·Never use the Perfect Temp for warming or heating a room.
?
·Do not leave children unattended – children should not be left alone or
unattended in the area where the Perfect Tempunit is in use. They should never
be allowed to stand or sit near or on any part of the Perfect Temp.
?
·Do not wear loose-fitting or hanging garments while using the Perfect Temp.
?
·Do not store combustible or flammable materials in the Perfect Temp.
?
·Do not repair or replace any part of the Perfect Temp. All servicing needs should
be referred to Salter® Customer Service.
?
·Use only dry potholders and oven mitts. Moist or damp potholders or oven mitts
on a hot surface could result in burns from steam. Do not use a towel or other
bulky cloth.
?
·Use care when opening the door. Let hot air or steam escape before removing or
replacing food into the Perfect Temp.
?
·Do not heat unopened food containers. Build up of pressure may cause container
to burst and result in injury.
?
·IMPORTANT – Do not attempt to operate the Perfect Temp during a power
failure. If the power fails, unplug the unit. If the Perfect Temp is not unplugged
and the power resumes, the unit may begin to operate again. Food left
unattended could spoil.
?
·Placement of unit rack – always place rack in the desired location while the unit is
cool. If the rack must be moved while the unit is hot, use a potholder and do not
let the potholder contact the heating base.
?
·DO NOT TOUCH HOT SURFACES OR INTERIOR SURFACES OF THE FOOD
WARMER, Use handles or knobs. Interior surfaces of the Perfect Temp
become hot enough to cause burns. During and after use, do not touch or let
clothing or other flammable materials contact the interior surfaces of the Perfect
Temp until they have had sufficient time to cool. Do not touch the area around
the vent openings during use as steam and heat escaping from the vent may
cause burns.
?
·Do not operate any appliance with a damaged cord or plug or after the appliance
malfunctions or has been damaged in any manner. Contact customer service for
repair or replacement.
?
·Do not use accessories or attachments from other manufacturers. This may
cause injuries or damage to your Perfect Temp.
?
·Do not use the Perfect Temp for other than intended use. Do not use to warm
towels.
?
·To reduce risk of electric shock, do not use over a sink.
?
·This product is designed for household use only. Do not use outdoors.
?
·Do not use water on grease fires – smother fire or flame or use dry chemical or
foam-type extinguisher designed for grease fires.
?
·Do not use aluminum foil to line Perfect Temp bottom. Any use of protective liners
may result in poor performance or damage to the unit. Only use aluminum foil as
recommended for cooking and baking if used as a cover placed on food.
?
·Do not use oven cleaners, abrasive or caustic cleaners or detergents on the
Perfect Temp as they may result in damage to the unit. Do not use aerosol
cleaners, as these may be flammable or cause permanent damage to the
surfaces.
3
IMPORTANT SAFETY INSTRUCTIONS
?
·Do not place more than 8 pounds on the adjustable rack, unless it is in the very
lowest position. When the rack is in the lowest position, you may place up to 30
pounds in the Perfect Temp.
?
To protect against electrical shock do not immerse cord, plugs, or the base unit in
water or other liquid.
?
Unplug from outlet when not in use and before cleaning. Allow to cool before
putting on or taking off parts.
?
Do not let cord hang over edge of table or counter, or touch hot surfaces.
?
Do not place on or near a hot gas or electric burner, or in a heated oven.
?
Extreme caution must be used when moving an appliance containing hot oil or
other hot liquids.
?
Always attach plug to the proper socket of the appliance first, then plug cord into
the wall outlet or lighter in your vehicle. To disconnect, turn any control to “off”,
then remove plug from wall outlet or lighter.
?
HOUSEHOLD USE ONLY.
?
DO NOT IMMERSE IN WATER.
IMPORTANT ELECTRICAL REQUIREMENTS
To reduce the risk of electrical shock:
?
·Plug into a grounded 3 prong outlet only. This plug will fit into an outlet only one
way. If the plug does not fit fully in the outlet, contact a qualified electrician.
?
·DO NOT MODIFY THE PLUG IN ANY WAY.
?
·Do not remove ground prong.
?
·Do not use an adaptor.
?
·Do not use an extension cord.
?
·Failure to follow these instructions can result in death, fire, or electrical shock.
It is important to be sure you have the proper electrical connection:
A 120 volt, 60 Hz. electrical supply, (standard U.S. wall outlet) properly grounded in
accordance with the National Electrical Code and local codes and ordinances, is
required.
For portable use, only use the AC adaptor provided by Salter. Use of any other
adaptor may cause permanent damage.
NOTE: Save these important safety instructions
for future reference.
4
The purpose of your Salter® Perfect Temp is to keep pre-cooked foods at serving
temperature. Always start with hot, cooked food. It is not recommended to warm
cold or frozen food in the Perfect Temp. Use the Perfect Temp to keep foods
warm and ready for serving, such as: vegetables, gravies, meats, casseroles,
biscuits, pizza, rolls, pastries, eggs and heated dinner plates.
BEFORE USING
1. Remove all packaging, wrapping, stickers and labels except the rating label and
caution label that adhered on the appliance. Then wipe down with a damp cloth,
using a mild detergent. Wipe soapy surface with a clean, damp sponge or cloth,
then dry completely before using.
2. Read all instructions thoroughly.
PARTS DESCRIPTION
Storage
Bag
Top
of Unit
Power
Cords
Side
Panel
Back
Panel
Wire Rack
Base Unit
Door
Control Panel
5
Side
Panel
PROPER ASSEMBLY
1. Set base on a level, dry surface.
2. The Thinsulate™ Insulation will help
to shield the warming element from
your counter, table or buffet top.
3. Turn unit top upside-down
4. Slide back panel out to its full
extended position.
5. Lift side panels.
6. Match tab on first side panel to clip
on back panel and firmly press
together until secured. Match tab on
second side panel to clip on back
panel and firmly press together until
secured.
7. Turn top of unit right-side up and
place into grooves on base side and
back. Press firmly together until
secured.
8. Secure safety clips on both sides.
9. Slide front door out and swing down
90°.
10. Test secure fit of top and bottom
unit by gently lifting up the unit by
placing both hands on side panels.
If the top of the unit is not secured to
the bottom, check safety clips, realign to grooves in the base unit and
press firmly.
11. Plug electrical cord into back of
base unit and into properly
grounded wall socket.
6
CONTROL PANEL
The control panel has one temperature control button, and a power indicator light.
?
When the unit is plugged in, the power light will illuminate and stay lit as long as
the unit is plugged in. This light does NOT indicate that the unit is WARMING.
?
Press the button one time for LOW setting (140°F). The word LOW will light up in
blue.
?
Press again for MEDIUM setting (175°F). The word MED will light up in blue.
?
Press again for HIGH setting (200°F). The word HIGH will light up in blue.
?
Press a fourth time to shut the Perfect Temp off. None of the words will be lit up
but the power indicator light will stay lit.
?
For best results, always preheat your Perfect Temp; see “Preheating the Perfect
Temp” section below.
MOIST TO CRISP VENTING SYSTEM
?
The Perfect Temp has two distinct modes. One, the MOIST setting, seals the
food's moisture in the warming chamber, helping maintain the juiciness of the
food. The CRISP setting allows moisture to vent out of the chamber, keeping
foods crisp.
?
The MOIST TO CRISP slide opens and closes vents located on the top of the
upper unit.
?
When warming a combination of crisp and moist food, position the slide to the
middle of the range for optimal results.
?
DO NOT BLOCK the vents on the top of the unit.
?
Use caution when moving the slide to the crisp setting as any internal moisture
will be released as steam via the vents and could cause burns or discomfort.
PREHEATING
?
For best results, always preheat your Perfect Temp. Preheat times vary for LOW
to HIGH settings. Slide the vent to the MOIST setting for more efficient
preheating.
Preheating times:
• Low = 5 minutes
• Medium = 10 minutes
• High = 15 minutes
?
Keep the number of times the door is opened to a minimum to maintain the
temperature in the Perfect Temp.
POSITIONING THE RACK
?
There are 4 rack positions in the Perfect Temp.
?
The chamber can be divided equally in half by using the middle position.
?
Adjust to fit taller or shorter dishes by placing the rack in the upper or lower slots.
?
Place the rack in the lowest position when using deep dishes, when warming
empty plates, or when placing plastic items in the unit to insure they do not come
into contact with the warming base.
?
The interior is 17¾” X 15¾” X 7”. With the use of the included wire rack for
stacking, the capacity can include 4 dinner plates with food, or two 14” pizzas,
two 2 qt. casserole dishes, two 9” X 13” casserole dishes, or two 12” X 16” meat
platters. Without the wire rack, larger plates of food can be accommodated such
as a roast or chicken.
?
CAUTION: When using plastic containers, DO NOT place them directly on the
Perfect Temp base. Always use the rack in the lowest position for plastic and
always use the LOW setting.
7
WARMING OF SERVING BOWLS, PLATES AND CONTAINERS
?
Carefully place empty dishes and containers in the chamber with the rack in the
lowest position, closest to the base. This will allow the heat to generate more
quickly to the empty dishes, yet still allow air to flow below the dishes.
?
Before using any delicate dinnerware in the Perfect Temp, check with the
manufacturer for maximum heat tolerance.
?
DO NOT place empty containers directly on the base of the Perfect Temp, always
use the rack in the lowest position when warming containers and dishes.
?
DO NOT warm empty plastic containers.
MINIMUM INTERNAL COOKING TEMPERATURES AS
RECOMMENDED BY THE USDA*
IMPORTANT! These are the minimum INTERNAL temperatures that food must
reach to be considered safe to eat, no matter how you prepare them. We
recommend the following guide lines but personal taste temperatures may be
different from the below:
Fresh ground beef, veal, pork ........... 160ºF / 72ºC
Beef, veal, Lamb - roast, steaks, chops
*Rare ................................................. 140ºF / 60ºC
Medium Rare ..................................... 145ºF / 63ºC
Medium.............................................. 160ºF / 72ºC
Well Done .......................................... 170ºF / 77ºC
Fresh Pork - roast, steaks, chops
Medium.............................................. 160ºF / 72ºC
Well Done .......................................... 170ºF / 77ºC
Ham
Fresh (Raw)......................................... 160ºF / 72ºC
Precooked (to reheat)..........................140ºF / 60ºC
Poultry
Ground Chicken, Turkey .....................165ºF / 74ºC
Whole Chicken, Turkey .......................165ºF / 74ºC
Breast, Roasts .................................... 165ºF / 74ºC
Thighs and wings .............................. 165ºF / 74ºC
Fish - cook until opaque and flakes easily with fork.. 145ºF / 63ºC
Stuffing - cooked alone or in bird .......... ........ 165ºF / 74ºC
Egg dishes ........................................... 160ºF / 72ºC
Leftovers, Casseroles ......................... 165ºF / 74ºC
*The USDA does NOT recommend RARE 140ºF as a safe eating temperature.
8
FOOD WARMRING RECOMMENDED SETTINGS
Food
Temperature
Crisp or Moist
Bacon
Breakfast Sausage
Beef – rare
Beef – medium
Beef – well done
Beef – ground beef
Bread/Rolls – hard
Bread/Rolls – soft
Bread proofing
Cake/Coffee Cake
Casseroles
Cooked Cereal
Dinners
Eggs
Empty Plates/Containers
Enchiladas
Fish/Seafood – no breading
Fish/Seafood – breaded
Fried Foods
Fruit
Gravy, Sauces
Ham
Hors D' Oeuvres
Lamb
Pancakes
Pastries
Pies – one crust
Pies – two crust
Pizza
Pork
Potatoes – baked
Potatoes – mashed
Poultry
Vegetables
High
High
Low
Medium
Medium or High
High
Medium
Medium
Low
Medium
Medium
Medium
Medium
Medium
Low
Medium
High
High
High
Medium
Medium
Medium or High
Medium
Medium or High
High
Medium
Medium
Medium
High
Medium or High
High
Medium
High
Medium
Crisp
Center
Moist
Moist
Moist
Moist
Crisp
Moist
Moist
Moist
Moist
Moist
Moist
Moist
Moist
Moist
Moist
Crisp
Crisp
Moist
Moist
Moist
Crisp
Moist
Moist
Center
Moist
Crisp
Center
Moist
Center
Moist
Moist
Moist
PROOFING BREAD
?
Proofing bread prepares dough for baking by activating the yeast. The
recommended time to keep bread dough in the Perfect Temp is about 45-60
minutes. Be sure, however, to follow the recipe's recommended times. Check
dough periodically for progress. To proof:
?
Un-risen bread dough should be placed in a large oven-proof bowl since the
dough will nearly double in volume.
?
Place the rack in the lowest position.
?
Before placing the dough in the Perfect Temp, cover the oven-proof bowl with a
moist cloth or wax paper that has been coated with a non-stick type cooking
spray.
?
Place the oven-proof bowl into the unit and set the temperature to LOW.
?
Slide the vent to the MOIST position.
?
Verify doneness by pressing 2 fingers ½” into the dough. If the indentation
remains, the dough is ready.
?
For second proofing of dough, repeat steps.
9
MOVING YOUR PERFECT TEMP BEFORE YOU GO!
?
Preheat the Perfect Temp indoors using the standard electrical cord and outlet.
?
Place the rack in the desired position.
?
Place hot, cooked food into the chamber.
?
Be sure door is firmly closed.
?
Unplug the unit and remove the cord.
?
Grasp the unit on both sides using the built in side handles.
?
Be sure to always carry the Perfect Temp level and away from your body to avoid
burns from food spillage or steam.
USE IN TRANSIT
?
Place the unit on a flat, stable surface in the back of your vehicle.
?
Using the 6 foot AC adaptor, plug the proper end of the cord into the Perfect
Temp and the adaptor end into the lighter in your vehicle.
?
The protective lining will help insulate the warming element from the surface of
your vehicle.
?
The food will stay hot for up to 3 hours.
?
When transporting items with sauces, gravy or other liquids, be aware that sharp
turns, stops and starts will cause the liquid to splash around in the container.
Use a container with a lid for proper sealing.
Never use the Perfect Temp as a warming tray only, while in transit. The surface
?
of the base is hot and can exceed 200°F. If using the Perfect Temp in transit,
always use with the top of the unit attached. Use caution when handling the base
without the top of the unit attached.
?
If you are transporting the Perfect Temp and wish to use it as a warming tray,
transport it with the top of the unit attached and only remove the top of the unit
inside when you have reached your destination. Remove the top with caution,
using oven mitts as the base will be very hot. Do not place unprotected hands on
the base to remove the unit’s top
USE AS A WARMING TRAY
?
CAUTION: Base surface is HOT and can exceed 200°F. Use caution when
handling base without the top of the unit attached.
?
Set up the base unit as described above and do not assemble or attach the top
of the Perfect Temp.
AUTOMATIC SHUT-OFF FEATURE
?
The Salter® Perfect Temp is built with an auto shut-off feature for safety
purposes. If you accidently forget to shut the unit off, it will turn itself off in 3
hours. The element will stop warming the unit and the LOW, MEDIUM, HIGH
light will turn off, but the power indicator light will remain lit. The means the unit is
plugged in but not warming.
?
To over ride the auto shut-off feature, simply turn the unit back on after the unit
turns itself off. It will remain on for an additional 3 hours.
?
It is not recommended to keep food in the Perfect Temp for more than the initial 3
hours as bacteria can begin to develop in certain foods.
10
PROPER DISASSEMBLY PROCEDURE
?
Be sure the temperature button is pushed to off. The temperature lights on the
control panel will be off.
?
Unplug the unit from the wall socket.
?
Remove the electrical cord from the base of the unit and place in storage bag.
?
Allow the Perfect Temp to cool to room temperature.
?
Clean the unit as instructed in this manual.
?
Lift the door up 90° and slide in under the top of the unit.
?
Disengage safety clips.
?
Place one hand on the interior (cooled) base and firmly grasp one side panel with
the other hand to lift out of base grooves. Repeat the process on the second
side and on the back.
?
After cleaning and disassembling, turn top of the unit up-side down.
?
Push back panel away from side panels to the flat position.
?
Slide back panel into the unit.
?
Fold side panels in.
?
Place on top of base unit that also has been properly cleaned.
?
Place both top and base along with cords into the storage bag.
CARE AND CLEANING
CAUTION: NEVER IMMERSE THE BASE UNIT IN WATER
• Control Panel – wipe clean with a damp sponge or cloth. Use a solution of mild
detergent and hot water.
¤ For difficult foods, use only a non-abrasive cleaner with a damp cloth or
sponge to clean the control panel.
• Top Unit Interior & Exterior – the entire top portion and inside of your Perfect
Temp is dishwasher safe. Once you have removed it from the base, place it on
the top rack of your dishwasher.
¤ You may also wipe clean with a damp sponge or cloth or use a solution
of mild detergent and hot water and immerse it in the sink. Wipe dry
immediately with a soft, lint-free cloth and fold for storage.
¤ DO NOT use abrasive scouring powders on the brushed stainless steel
surface as it will permanently damage the finish.
• Base – wipe clean with a damp sponge or cloth. It is ok to use a solution of mild
detergent and hot water to clean the base surface. DO NOT use abrasive
scouring powders, steel wool or chemical oven cleaners as they will scratch and
permanently damage the surface. Wipe dry immediately with a soft, lint-free
cloth. CAUTION: NEVER IMMERSE THE BASE UNIT IN WATER.
• Handle – wipe clean with a damp sponge or cloth. Use a solution of mild
detergent and hot water.
• Window panel – wipe clean with a damp sponge or cloth. Use a solution of mild
detergent and hot water. Use a mild glass cleaner to remove fingerprints or
smears. Dry completely with a soft, lint-free cloth. Do not use abrasives as they
may scratch the glass.
• Rack – wipe clean with a damp sponge or cloth. Use a solution of mild detergent
and hot water, or placed in the dishwasher. The rack may be immersed in water.
For stubborn foods use a steel wool or other scrubber. Wipe dry immediately
with a soft, lint-free cloth.
• Any other servicing should be performed by an authorized service.
11
PERFECT TEMP STORAGE
?
Follow the disassembly steps outlined above.
?
Use the soft, storage bag by placing the folded top of the unit onto the base and
inserting into the bag, handle side in. Place the base of the unit in the other
compartment so that the door handle rests inward on top of the base in the bag.
Place cords in bag for easy retrieval.
?
Place the bag in your cabinet, cupboard or pantry in a dry area. Do not allow the
unit to be stored in a damp pantry or on a surface that may become wet or damp.
?
Store your Perfect Temp in the cabinet in the flat position to prevent damage from
the unit tipping over.
TROUBLESHOOTING
The Perfect Temp will not operate.
?
Has a household fuse blown, or has a circuit breaker tripped?
?
Is the power supply cord properly seated in the unit and the outlet?
?
Has the cord been damaged in some way? If so, DO NOT USE THE PERFECT
TEMP. Contact Customer Service for replacement information.
?
Has the 3 hour auto-shut off feature activated?
The Perfect Temp will not heat properly.
?
Is the unit securely positioned in the grooves on the base? If not, turn off the
unit, allow the unit to cool and reposition the top of the unit into the grooves on
the base.
?
Has the Perfect Temp been overloaded? The weight inside the unit should not
exceed 30 pounds.
There is excessive moisture in the Perfect Temp.
?
Is the slide properly positioned to the MOIST or CRISP setting?
?
Did you preheat the Perfect Temp before using?
The door will not slide into the unit when opened.
?
Is there food or a container blocking the ability of the door to slide in?
Warming results are not what I expected.
?
Is the correct temperature setting in use?
?
Is the vent set to MOIST or CRISP properly?
12
WARRANTY INFORMATION
Salter® warrants this product to be free from defects in material or workmanship for
one (1) year for the original purchaser from date of retail purchase. It does not
cover damages or wear resulting from accident, misuse, abuse, commercial use, or
unauthorized adjustment and/or repair. If service is required, do not return to
retailer. Should this product require service (or replacement at our option), please
contact Salter® customer service at 1-866-843-3905. There are no expressed
warranties except as listed above. This warranty gives you specific legal rights, and
you may have other rights which vary from state to state.
If you need replacement parts:
?
Use only Salter specified parts. These specified parts will fit right and work right
because they are made with the same precision used to build every new Salter
appliance.
?
To obtain Salter additional racks, cords, handles call us at 1-866-843-3905.
?
Keep this book and your sales slip together for future reference. You must
provide proof of purchase for warranty purposes.
13
For additional product information, or warranty information in Canada or elsewhere
outside the USA, please contact us at www.salterhousewares.com.
© 2008 Salter Housewares and its affiliated companies, all rights reserved. Salter®
and Perfect Temp are registered trademarks of Salter Housewares and its affiliated
companies. All rights reserved.
Made to our exact specifications in China.
www.salterhousewares.com
Thinsulate is a trademark of 3M. All rights reserved.
CPAW1000 - 08.08
14