1
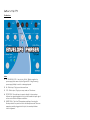
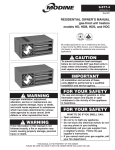
Pigtronix
tm
Envelope Phaser II
User’s Guide
All contents © Absara Audio LLC 2009
Index:
Welcome…………………………………………………………
Anatomy of the EP2……………………………………..…….
Getting Started…..………………….………………………….
Guided Tour…………..………………………….………………
Limited Warranty……………………………………….…….…
Safety Precautions………………………….,.…………….…..
Welcome!
Thank you for entering the realm of Pigtronix. The Envelope Phaser you
now possess is a thorough re-design of the original Pigtronix pedal, the
ridiculously funky EP-1. The upgrades to the EP2 are more than just
additional features fit into a smaller package. Working with effects genius,
Howard Davis, we have created a completely new phasing architecture
that is not found in any other pedal or effects processor to date.
The EP2 sweeps through and accentuates the harmonic content of any
musical source. The motion of the phase shifter can be controlled either
by Envelope, LFO or a combination of both modulation sources.
The new envelope follower section of the EP2 can sweep the phase shifter
either up or down and features the new “staccato” function for rapid fire
playing. This new feature quickly discharges the envelope when you
mute, allowing the envelope to “pop” on every note.
The new LFO has adjustable Depth and Center knobs for tailoring the
sweep to the exact frequency range desired. In addition, we have also
added an “LFO smooth” switch that automatically reduces the resonance
setting when the LFO is in use. This allows the musician to toggle between
a funky FAT envelope with lots of resonance and a creamy Uni-Vibe tone,
just by pressing the left footswitch.
In keeping with Pigtronix tradition, the controls on the EP2 have been
tuned to provide the fattest possible tone and the widest range of musical
possibilities. The EP2 was born out of a passion for versatile, expressive
musical effects; it is built to last and designed to inspire.
We hope that the EP2 will provide you with years of creative satisfaction.
Pigtronix
Anatomy of the EP2:
The Interface:
Jacks:
1.
DC POWER 18-VOLTS – Use only the 18-Volt, 300mA, negative tip
power supply that came with your Pigtronix EP2. Using the wrong
power supply is likely to result in a damaged pedal.
2.
IN – Effect input, Plug in your instrument here.
3.
OUT – Effect output, Plug in your amp, mixer, or DI box here.
4.
EF TRIGGER – This audio input connects directly to the envelope
follower. Any signal plugged into this jack will override the input signal
as the source for the envelope modulation.
5.
SWEEP PEDAL - This is the TRS expression pedal input for using the
Envelope side of the pedal as a foot controlled phase-wah. When an
expression pedal is plugged into this jack, the envelope follower
circuit is bypassed.
6.
SPEED PEDAL - This is the TRS expression pedal input for controlling the
rate of the LFO. When an expression pedal is plugged into this jack,
the onboard speed knob is bypassed.
Footswitches:
7.
ENGAGE – This footswitch turns the entire EP2 on and off. When the
engage light is turned off, the EP2 is true bypassed.
8.
EF / LFO – This footswitch selects between Envelope (EF) and Rotary
(LFO) modulation of the phaser. Both lights are activated when you
are in BLEND mode, indicating that both modulation sources are
active.
Knobs:
9.
SENSITIVITY – This dial determines the amount of signal it takes to open
the envelope. It should be used to determine how much the
envelope opens in response to picking dynamics. This control has a
wide range of adjustment to accommodate signal levels ranging
from wimpy single coil pickups up through active basses and line level
recording equipment.
10. DEPTH / BLEND – This controls the amount of LFO modulation. When
the BLEND mode is activated, the DEPTH controls acts as a mix knob
between the EF and LFO modulation sources. Turning the BLEND
control clockwise will enable more LFO modulation and turning the
BLEND control counter clockwise will enable more EF modulation.
11. CENTER – This control determines where in the audio spectrum the LFO
is sweeping. When the DEPTH control is up all the way, the CENTER
control has no effect on the sound, because the LFO is sweeping the
entire audio range of the EP2. With the Depth control at 12:00, the
center control will make the tone brighter when turned clockwise and
darker when turned counter clockwise.
12. SPEED – This dial controls the rate of the LFO
13. RESONANCE – This dial controls the amount of feedback in the circuit,
accentuating the harmonics and vocal qualities of the EP2.
Toggle Switches:
14. STACCATO – This switch turns on the intelligent mode of the envelope
follower. This circuit watches the input signal and quickly closes the
envelope when there is a pause between notes. Staccato is
extremely helpful for making the envelope POP on every note with a
slap bass or when using a high speed picking technique. Use this
function in conjunction with the SENSITIVITY control to achieve the
ultimate envelope response for your instrument.
15. EF SWEEP – This switch determines the direction of the envelope
movement.
16. BLEND – This switch turns on the BLEND mode causing the phase shifter
to be modulated by a combination of the Envelope (EF) and Rotary
(LFO). When the BLEND mode is activated, you can still use the left
footswitch to change between pure Envelope mode and BLEND
mode.
17. LFO SMOOTH – This switch automatically turns down the RESONANCE
control in LFO mode only.
18. INVERT – This switch determines the polarity of the phase shifting. The +
setting has an overall Low Pass effect and will enhance bass. The –
side has an overall High Pass effect and will cut bass response.
Getting Started:
Basic Hook Up
1.
Unpack your EP2 and place it on a flat, stable surface.
2.
Make sure you are using the 18-Volt DC (negative center) power
supply that came with your Pigtronix EP2.
3.
Plug the power cord into the 18VDC jack on the back of the EP2 and
then plug the power adaptor into an electrical socket.
The EP2 is now powered up. To turn the device off, unplug it from the
wall or turn off the power going to the 18VDC supply.
We recommend that you do not leave your EP2 powered up for long
periods of time when it is not in use.
4.
Plug your instrument into the “IN” jack and plug your Amplifier into the
“OUT” jack.
Guided Tour:
The following steps guide you through the sonic palette of the EP2 and
show you how to get at the full range of tones it has to offer.
Envelope (EF) Controls
1.
Set all of the controls fully counter-clockwise and set all of the toggle
switches to the left. The EF LED should be lit, and all the other LEDs
should be off. The EP2 is in bypass mode. Be sure to turn the volume
knob on your guitar all the way up. Play your instrument and make
sure a clean sound is passing through.
2.
Turn up the SENSITIVITY control all the way (fully clockwise) and turn up
the resonance control to 12:00. Now ENGAGE the pedal by pushing
the right footswitch. Play you instrument; you should hear the phaser
sweeping up in response to your picking. Adjust the SENSITIVITY control
to adjust how much signal it takes to open the envelope.
3.
Turn up the RESONANCE control all the way to get a really in-yourface envelope tone happening. Turn the RESONANCE control down
to get a much more subtle tone. Experiment with the range of this
knob and then leave the RESONANCE control at 3:00 as we move on.
4.
Put the STACATTO switch in the ON position and play some notes with
space between them. Notice how the LED in the center of the pedal
goes instantly dark when you mute the string instead of gradually
fading out. The STACATTO mode is recommended for fast picking and
slap bass styles.
5.
Put the EF SWEEP toggle switch in the DOWN position and experiment
with this sound. You may find that a slightly different SENSITIVITY setting
may be desirable to achieve your ideal downward sweeping sound.
Experiment to find your personal tone.
6.
Put the INVERT switch in the negative (–) position. You will notice that
this sound has less bass compared with the positive (+) mode. Listen to
and compare both modes and then leave the switch in the + position
as we move on.
Rotary (LFO) Controls:
7.
Push the left footswitch to turn on the LFO. The green LED should now
come on. Turn the DEPTH control all the way up and set the CENTER
and SPEED controls to 12:00.
8.
Adjust the SPEED control to get a feel for the range of this knob.
Notice that when you turn the SPEED dial all the way down (fully
counter-clockwise), the LFO will come to a full stop. Leave the SPEED
control at 12:00 as we move on.
9.
Turn the RESONANCE control down all the way. Notice how the rotary
sound becomes much smoother as the resonance is decreased.
Explore the range of this control and then bring the RESOANCE dial
back to 3:00. Turn on the LFO SMOOTH toggle switch. Notice how this
sounds the same as turning the RESONANCE knob all the way down.
Since most players prefer the creamy, low resonance setting for the
LFO mode and a more spiky, high resonance setting in the EF mode,
this switch allows the LFO mode to be automatically set to the ideal
tone. The LFO SMOOTH switch has no effect on the RESONANCE
setting in the EF mode. Turn the LFO SMOOTH switch off and set the
RESONANCE control to 12:00 as we move on.
10. Turn the DEPTH control down to 12:00. Now explore the range of the
CENTER control. When the DEPTH control is up all the way, the CENTER
control has no effect on the sound because the phaser is sweeping
the full range that is possible with this device. As you decrease the
DEPTH setting, the CENTER control comes into play, adjusting the
frequency of the phaser sweep up or down. The interplay between
the DEPTH and CENTER controls is crucial for dialing in the exact rotary
tone to suit your instrument and amp rig. Put the DEPTH and CENTER
controls at 12:00 as we move on.
11. Check out both the + and – setting of the INVERT switch in LFO mode.
BLEND:
12. Turn the BLEND toggle switch to the ON position. Both the EF and LFO
lights should be lit. In BLEND mode, the DEPTH control will act as a
BLEND knob that mixes between EF and LFO modulation of the Phaser.
Turning the DEPTH knob counter-clockwise will introduce more EF
modulation and turning the DEPTH knob clockwise will introduce more
LFO modulation. In the BLEND mode, you can use all of the controls to
conjure some far out tones and uniquely expressive textures that are
unmatched by any other pedal. Notice that the CENTER control is
disabled in the BLEND mode.
13. Push the left footswitch to bring you back to pure EF mode.
14. ENJOY!!!
Limited Warranty:
Your Pigtronix effect pedal comes with a 1 year limited warranty on parts
and workmanship. During the warranty period we will repair or replace, at
our option, defective parts or pedals free of charge, and return them to
the owner. Warranty service does not include damaged, modified, or
misused pedals and such pedals will be subject to a standard repair
charge.
What you must do: First, contact us directly via email and describe the
problem to us. If the problem cannot be resolved we will have you send
your pedal directly to us for servicing.
How to contact us for warranty service:
Email: [email protected]
Warranty Limitations: This warranty does not cover defects resulting from
improper or unreasonable use, accident, unauthorized tampering or
modifications; and, warranty shall be considered void if EP2 chassis has
been opened. Please consult the instructions and warnings in this manual
for proper use. Warranty is only valid if your EP2 has been properly
registered within 30 days of original purchase date, and upon warranty
registration, will be valid for 12 months from original purchase.
To validate your 1-year, limited
warranty, please register your EP2,
within 30 days of purchase, on the
web at:
www.pigtronix.com/warranty
Safety Precautions:
The safety precautions listed below are intended to ensure your safety
whenever you use the EP2.
NEVER OPEN THE CASE – Never try to separate the two pieces of the
chassis from one another and/or modify the equipment. Opening this
device will effectively void the warranty.
STOP USE IN CASE OF PROBLEM – Stop using the equipment if ever you
should notice smoke or a strange odor coming from it.
Contact [email protected] for service.
AVOID HIGH TEMPERATURES & HEAT BUILD UP – Never cover the power
supply with cloth or other objects. Built up heat creates a danger of
equipment deformation and fire. Do not expose the EP2 to direct sunlight,
heating devices, or other extreme temperatures.
USE SPECIFIED POWER ADAPTOR ONLY – Be sure to use only the 18-Volt DC
300mA Adapter that came with your Pigtronix EP2.
DO NOT EXPOSE TO WATER/BEER – To reduce the risk of fire or electric
shock, do not expose your EP2 to rain or moisture. If water gets inside the
unit, turn off the power.
Final Notes:
Years of work have gone into making the EP2 Pedal possible. We would
like to thank the following people for their help along the way:
Howard Davis, Lisa Rickmers, the Bethke and Koltai families, Craig
Brodhead, Matt Smith, Doug Johns, Bakithi Kumalo, Paul Schwartz at
Peekamoose Guitars, Colston Ballew, Soulive & Lettuce, Greg Tobler,
Dave Burnett, Nate Mars, Aaron Reed, Dan Pavone, Kevin Tobler, Ben
Artes and B-Dawg.
Howard “Mick” Davis and David Koltai designed the Pigtronix EP2 during
2008 & 2009 in Brooklyn, Yonkers and Port Jefferson, NY.
We hope you enjoy your new EP2 pedal! Please check our website,
www.pigtronix.com or contact us at (631) 331-PIGS (7447) for the latest
information on new Pigtronix gear.
Dave Koltai & Brian Bethke
Pigtronix