1
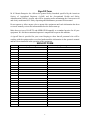
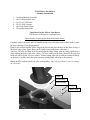
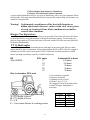
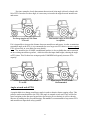
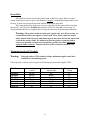
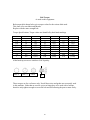
Snowblowers Owners Manual Parts List for 87D (87” Double Auger) Snowblower M K Martin Enterprise 3950 Steffler Rd Elmira Ont N3B 2Z3 (519) tel 664-2752 / fax 664-3695 E-mail: [email protected] rev:12-1 87D Meteor Snowblower Table of Contents 1. Registration and Warranty 2. Safety Introduction 3. Safety 4. Decal Location 5. Sign Off Form 6. Assembly Information 7. Operation 8. Installing manual Chute Rotator 9. Installing Hydraulic Chute Rotator 10. Main Parts 11. Chute Rotator Parts 12. Gearbox Parts 13. Comer PTO Parts 14. Canimex PTO Instructions 15. Bolt Torque 16. Maintenance – Lubrication - Storage – Notes 1 Welcome to our lineup of Meteor Snowblowers M K Martin Enterprise Inc has been building the Meteor Snowblowers since 1985. With proper care and maintenance the Meteor Snowblower will give you years of reliable service. The most common damage to a Snowblower is from foreign objects. Please ensure that the area to be cleared of snow has been cleared of articles before the first snow falls. This gives you peace of mind and the assurance that you won’t get damaging objects into your blower. Please read this manual to become familiar with the Meteor Snowblower and the safe operation of the Meteor Snowblower. Warranty and Limitation Of Liability All equipment is sold subject to mutual agreement that it is warranted by M K Martin Enterprise Inc. (hereafter called the company) to be free of any defects of material and workmanship. But the company shall not be liable for special, indirect or consequential, damages of any kind under this contract or otherwise. The company’s liability shall be limited exclusively to replacing or repairing without charge, at it’s factory or elsewhere, at it’s discretion, any material, or workmanship defects, which becomes apparent within one year from the date of purchase. The company will have no liability for damages of any kind. The buyer by the acceptance of the equipment will assume all liability for any damages, which may result from the use or misuse by his employees or others. Warranty coverage is null and void unless the Warranty Registration form has been completely filled in and is on file at M K Martin Enterprise Inc 3950 Steffler Road Elmira Ont. Ca. N3B 2Z3 For your record Purchase Date Y20__ M___ Model #__________ Serial # ___________ Please cut at dotted line and return this registration form to the company via Mail, Fax (519-664-3695) or e-mail-- [email protected] _______________________________________________________________________________ M K Martin Inc 3950 Steffler Road Elmira Ont. Ca. N3B 2Z3 Meteor Buyers Purchase Date Y20__ M___ Model #__________ Name ___________________ Address___________________ Serial # ___________ __________________________ Postal Code_______________ 2 Safety Take Note! This safety symbol is found throughout this manual to call your attention to instructions involving yourself and others working around the machine. • Failure to follow these instructions can result in injury or death! This symbol means --Attention! --Become Alert! --Your Safety is involved! Signal words are used in this book. Caution: Indicates a potentially hazardous situation that may result injury. Warning: Indicates a potentially hazardous situation that could result in serious injury or death. Danger: Indicates a hazardous situation that needs to be avoided. It is you the operator that needs to be aware of these dangers. If you have any questions not answered in this manual, please contact your dealer or M K Martin Enterprise Inc. 3950 Steffler Rd Tel; 519-664-2752 Elmira On Ca Fax; 519-664-3695 N3B 2Z3 e-mail; [email protected] 3 Safety – It’s in your interest. Safety Guidelines. Safety of the operator is one of our main concerns, however it is up to the operator to practice caution. To avoid personal injury, study the following precautions and insist that those working with you to follow them. The Meteor Snowblower has only 2 shields, one shield is the PTO drive shield and the other is a shield for the power hood turner if used. Do not use the blower with the auger drive cover removed, as this is part of the blower frame. Replace any decals that may be missing or not readable. Location of decals are indicated elsewhere in this manual. Do not use this machine while under the influence of drugs or alcohol. Review the safety instructions with all users annually. This equipment should not be operated by children: or those unfamiliar with the operation of the Meteor® Blower. Do not allow persons to operate this machine until they have read this manual and/or were instructed by a qualified person. Do not paint over, remove or deface any safety signs or warning decals on the Meteor® Blower. Observe all safety signs and practice the instructions on them. Do not use this machine to push snow as this can result in the augers to be broken or bent. Please be careful with the extra weight on the back of the tractor. It may be necessary to add weights on the front of the tractor to keep it balanced properly. When changing shearpins or removing ice or snow from the machine Please stop the engine and remove the key on the tractor! This will reduce the possibility of the blower to be started and cause personal injury. 4 Sign-Off Form M. K. Martin Enterprise Inc. follows the general Safety Standards specified by the American Society of Agricultural Engineers (ASAE) and the Occupational Health and Safety Administration (OSHA). Anyone who will be operating and/or maintaining the Cutter must read and clearly understand ALL Safety Operating and Maintenance presented in his manual. Do not operate or allow anyone else to operate this equipment until such information has been reviewed. annually review this information before the season start-up. Make these reviews of SAFETY and OPERATION annually as a standard practice for all your equipment. We feel that an untrained operator is unqualified to operate this machine. A sign-off sheet is provided for your record keeping to show that all personnel who will be working with the equipment have read and understood the information in the operator's manual and have been instructed in the operation of the equipment. SIGN-OFF FORM Date Employees Signature Employers Signature 5 75-108 Meteor Snowblower Assembly Information 1. 2. 3. 4. 5. 6. 2 set Hood Bearing Assembly 4 pc 5/8 Wavewasher (thin) 2 pc 5/8 x 2 UNF Bolts 2 pc 5/8 UNF Locknut 1 pc 2 hole Chute Clamp 1 Assembly Instructions Upon Receiving the Meteor Snowblower The blowers are shipped in a packaged state These blowers are packaged without hood turner device. Carefully remove the chute and PTO shaft from the area of the auger and set them aside. Locate the bag or package of small components. Remove the ties that hold the Plastic ring on the blower and place the base of the chute on top of the plastic ring. (Note: Plastic Ring can be lightly coated with grease at this time.) Take two 5/8 bolts and drop them down through the chute clamp, turn the clamp upside down while holding the bolts in the holes. place a 5/8 wave washer on the bolts, then a 5/8 bearing and finish off with a second 5/8 wave washer. Turn the clamp right side up with the washers bearings on the bolts. Carefully insert the bolts into the mounting holes and secure with locknuts. Install the PTO with the shear bolt yoke at the gearbox. This will provide more space to change the shear bolt. Chute Plastic Ring Wave Washer 5/8 Bolt Chute Clamp 6 75-108 Installing the Hand Crank The Crank package consists of Bolts 2 pc 3/8x1 2pc 3/8 Lockwasher 2pc 5/8 x 2 1/4 UNF Bolt to replace 5/8 x 2 Tail Bracket --- (1) Upper Bracket- (2) Worm Gear ---- (3) Crank ----------- (4) Spring Pin ------ (5) Set Screws ----- (6) Bolts ------------ (7) 4 3 7 2 5 7 6 1 First remove the 2 nuts and bolts (as indicated), and insert the Crank Tail bracket[1] and reinstall with 5/8 x 2 1/4 bolts (supplied) and Locknuts. Insert the bottom end of the worm gear [3] into the Tail Bracket, slide the top bracket [2] into place and secure with bolts [7]. Install spring pin [5] Slide Crank [4] into tube as shown and secure with the Set Screws [6], Please note! When the blower is raised, the Crank will be closer to the tractor and could damage the cab or cause injury to the operator! 7 Hydraulic Rotator (Accessory) The hydraulic chute rotator uses a hydraulic motor, controlled by the tractor hydraulics to rotate the chute. The kit includes a safety shield that also keeps the snow and ice form building up on top of the gears. The motor kit is bolted to the base with 2, 1/2-20 UNF bolts. The shield is mounted with 4, 5/16 bolts as shown. When installing the hydraulic elbows, turn them in "not more than 4 rounds" then tighten the jamnut to secure the elbow in the direction that you want the hoses to go, as shown. The relief valve is factory preset to 900 PSI. Route the hoses and tie them to the top "A" frame support, away from moving equipment. Ensure that the hoses do not get too tight or rub on the frame when the blower is raised or lowered. Shield Bolts Shield Bolts Shield Elbow Motor Top "A" Frame Support 8 87D Meteor® Snowblower This Blower is ideal for tractors 60 HP Cat #2 3PH. Attaching the Meteor® Blower for the first time. Set the blower on a level surface and back the tractor up to it. Place the lower 3PH arms of the tractor between the lower hitch plates on the blower and insert the hitch pins that came with the blower, secure these with the Lynch Pins. Next swing the top link into place and adjust the length so the top link pin can be inserted. You will have to supply the top link pin. With the top link set at this length the blower will be flat or parallel to the ground. Do not fasten the PTO shaft to the tractor. 1. Slowly lift the blower until the gearbox shaft is at the same height as the PTO output on the tractor. 2. Push (or collapse the telescopic part of the PTO completely). If you cannot collapse it far enough to slide get it on the tractor then it has to be shortened. 3. Measure the amount that the shaft is too long. Remove it from the blower and pull it apart. 4. Take a hacksaw and cut ½ of the measurement from each end, cut both the plastic tube and the metal core. 5. Use a file to remove the burrs from the cut parts, wipe any filings from the surfaces and slide the shaft together to be sure that it slides freely. 6. Make sure the plastic shield is free to rotate on the shaft before installing on the machine. 7. Reinstall the PTO on the blower and fasten it to the tractor pushing the springloaded pin in and sliding the yoke onto the tractor spline until the pin snaps into place. 8. Next lift the 3PH arms to the highest point, determine the overlap on the PTO shaft. It should be at least 3” if it is too short then the PTO will jam rather then collapse. This will put severe strain on the shaft and gearbox. It may come apart and this will allow a spinning PTO to become an uncontrolled weapon and could severely injure or kill someone! 10. After it has been determined that the PTO is OK and will not jam or come apart, make sure any bystanders are well away from the machine. 11. Lower the blower to ground level, engage the PTO and slowly start the blower. Make sure that everything is turning freely. 12. Slowly increase the speed until you have reached 540 RPM on the PTO. This is the speed that this blower was designed for. If it turns faster the fan could be going dangerously fast. If it turns slower it will not perform very well as the snow will not get blown very far. 9. Snowblower performance will vary greatly due to ambient temperature and type of snow. 9 Operating the Meteor® Snowblower This blower is on the back of the tractor facing toward the rear. While blowing snow the tractor has to be backed into the snow. Stay in the seat of the tractor all the time that the blower is running. Make sure the area is clear of people while blowing snow. Do not direct discharged snow toward people, cars or buildings as stones or bits of ice can go a long distance. When you get to the place that you want clear snow, lower the blower to the ground and turn the chute to discharge the snow in the direction you want the snow to go. Engage the PTO and slowly bring the blower up to operating speed. After the blower is running use reverse gear and start backing up. The chute can be rotated from the tractor seat while blowing snow. If your drive is paved then you may need to lengthen the top 3PH link to tilt the blower ahead so it will scrape the hard surface better. If your drive is gravel then you may want to shorten the top 3PH link to tilt the blower back so it will not dig into the loose gravel. In colder climates where the bare ground is frozen during most of the winter the blower can be adjusted to scrape the snow off the frozen drive after freeze-up. In areas where the gravel is not frozen most of the time we have skid shoes available to bolt on the end plates to raise the blower a few inches above the gravel. This blower is designed to blow snow, but will blow loose gravel if care is not taken. After the job is finished: Disengage the PTO to stop the blower before driving away or getting off the tractor. The auger is protected with a safety shear bolt that will shear off if the auger becomes jammed. The fan is also protected with a shear bolt in the PTO shaft universal joint if the fan becomes jammed. When replacing the shear bolts STOP the engine before attempting to replace them! There is a hydraulic hood turner available that couples into the tractor hydraulic remotes if your tractor is so equipped. This will allow you to rotate the hood without reaching back to the blower especially if you have a cab on your tractor. 10 87D Meteor Parts Item No 1 2 3 4 5 6 7 8 9 10 11 87D Meteor Snowblower Description Main Body Fan Hexbolt 5/8x1 1/2 #2 c/w lw Chute Deflector Hinge Pin Cotter Pin 1/8x1 Hair Pin 5/32 Adjuster Adjuster Pin Antifriction Ring Part No 519-8711505D 519-87115208 OL 519-87116009 519-87115608 519-87115808 OL OL 519-871155 519-871154 519-871161 11 Req 1 1 1 1 1 1 1 2 1 1 1 45 46 47 48 87D Meteor Snowblower Description 3 Hole Chute Clamp 2 Hole Chute Clamp Hexbolt 1/2x2 unf c/w ln 5/8 Wave Washer 5/8 Bearing Auger Auger Sprocket Complete Bearing Bearing Insert Only Cast Flange Only Hexbolt 1/2x1 1/2 c/w n, lw Hexbolt 1/2x1 1/2 c/w n, lw Auger Drive Chain Hexbolt 5/8x4 c/w n, lw Flatwasher 3/4" Spacer Idler Sprocket Cross Shaft Auger Shear Sprocket Flangette Bearing 5/16x1 1/4 c/w ln Hexbolt 3/8x1 c/w n,lw Cross Shaft Shield Hexbolt 3/8x1 c/w n, lw Fan Key 3/8 sq x 3 5/8 Gearbox PTO Assembly Hexbolt 1/2x1 c/w lw Hitch Pin Lynch Pin 3/8x1 Carriage bolt c/w ln, lw Fan Plate Chute Front Rubber Latch Pin Cotter Pin 1/16x1/2 Chute Stop Nut Hexbolt 1/2x1 1/2 c/w lw OP Manual Tube RH 1/4x1 screw c/w ln Part No 519-87116209 519-87116309 OL 519-871702 519-870711 519-871164D 519-871165 519-871169 519-871170 519-871171 OL OL 519-871026D OL OL 519-871028 519-872029 519-871184 519-873025 519-871174 519-871175 OL OL 519-871055D OL 519-871062 519-871186 519-871187 OL 519-8720965 OL OL 519-20906 519-20883 519-099-460 519-099-012 OL 519-5117009 OL DJA70111 OL 49 50 51 Option Skid Shoe 1/2" Bent Pin 1/8" Hair Pin 519-21539 OL OL Item No 12 13 14 15 16 17 18 19 20 21 22 23 24 25 26 27 28 29 30 31 32 33 34 35 36 37 38 39 40 41 42 43 44 12 Req 1 1 5 10 5 2 2 4 4 4 8 16 1 1 3 1 1 1 1 2 1 1 3 1 4 1 1 1 8 2 2 5 1 1 1 1 1 1 1 1 2 2 2 2 87-97 Meteor Chute Rotator Manual Chute Rotator 2010 Item No 1 2 3 4 5 6 7 8 Manual Rotator Description Crank Tail Bracket Upper Hand Crank Bracket Crank Crank Worm 5/16x1 1/2 Spring Pin 5/16x3/4 sq h Setscrew 5/8-11x2 1/2 Bolt c/w ln 3/8x1 1/4 Bolt c/w n, lw 13 Part No 519-87719109 519-87109009 519-68109109 519-68719209 OL OL OL OL Req 1 1 1 1 2 2 2 Hydraulic Chute Rotator 2010 Item No 1 2 3 4 5 6 7 8 9 10 11 12 13 14 Hydraulic Rotator Description Motor Bracket Motor O Ring 3/32x.755id Crossover Relief Valve Socket Head Cap Screw 5/16x1 1/2 Small Gear Right Shield Left Shield Elbow Hose Hexbolt 3/8x1 c/w lw Hexbolt 1/2-20x2 UNF c/w n, lw Hexbolt 5/16x1 1/2 c/w lw Hexbolt 5/16x1 c/w n, lw 14 Part No 519-511703 519-511704 OL 519-511705 OL 519-511706 519-87170709 519-87170809 519-9515-10-6 519-871709 OL OL OL Ol Req 1 1 2 1 4 1 1 1 2 2 4 2 2 2 75 – 87 – 87D - 97 Meteor Snowblower Main Gearbox Item 1 2 3 4 5 6 7 8 9 10 11 12 13 14 15 16 17 18 19 20 21 T 27D Gearbox Description Part # Double Lip Seal 40x80x12 519-87100748 Snap Ring 519-85200030 Bearing 30208 519-80900024 Shim 515 519-02447500 Gear Z18 M6.15 519-01325002 Gear Z18 M6.15 519-02675000 Plug 519-86500006 Cover 519-02671300 Bolt M10 x 14 519-81101031 Shim 79.7 519-01107500 Shaft (Thru) 519-02674221 Snap Ring 40 UN17435 519-85100029 Bearing 30207 519-80900026 Snap Ring 72 17437 519-85200131 Spacer 519-02677100 Bearing 6207 519-80100025 Snap Ring UN17435 519-85100005 Double Lip Seal 35x72x10 519-87100152 Shaft 519-02672000 Shim 48.0 519-02597500 Casing 519-02670301 15 Req 2 2 2 1 1 1 2 1 4 1 1 1 1 1 1 1 1 1 1 2 1 Comer T50 PTO 40 Item # 1 2 30 31 33 37 38 40 61 71 72 73 200 Description Complete Collar Yoke Cross Journal Assy Complete Shear Yoke Guard Retaining Collar for Outer Tube Special Plastic Bolt Guard Retaining Collar of Inner Tube Safety Chain Complete Guard with Instruction Manual Special Grease Nipple Bolt & Nut M10x55 cl. 8.8 Grease Fitting Bolt & Nut M12x1.25x70 cl. 8.8 Collar Kit for 1 3/8" Yoke Danger Label for Outer Tube Danger Label for Outer Guard Tube PTO Instruction Manual 16 Part# 141.025.363.1 180.015.130 143.250.016.1 8180.015.288 8180.014.240 8180.015.289 180.016.025 142.250.372.7521 8180.012.418 165.000.511 190.000.020 165.000.525 165.000.628 190.000.216 190.000.215 190.000.371 Req 1 2 1 1 6 11 2 1 3 1 1 2 1 1 1 1 PTO Installation Instructions for Snowblower 17 PTO Installation Instructions for Snowblower For Better PTO Shaft and Gearbox Operation A proper initial installation will give you years of satisfactory service on your equipment. Please read carefully, following instructions which have been specially made to help you and make you satisfied of your purchase. Warning! Unfortunately, snowblowers will be faced with forgotten or hidden objects under the snow, such as: chain, tires, stones, pieces of wood, etc. Inspite of all our efforts, machines are not built to resist all those conditions. Danger: Too big tractors It is dangerous to use a that is too big or too powerful. The tractor will always be able to overload the blower, even if the machine is already at maximum capacity. Tractor being very high, too large angles at PTO universal joints will result, and the life of the universal joints will be shortened dramatically. P T O Shaft angles PTO shafts are made to transmit power with angle at universal joints. However these angles should be kept to a minimum. Larger angles shorten the life of PTO. Take for example a snowblower sold for a tractor horse-power of 60-75 HP which would be attached to a 60HP tractor operating at maximum capacity of (60HP continuous). HP 60@540 RPM PTO angles 5° 10° 15° 20° 25° Estimated life in hours 450 hours 195 hours 90 hours 40 hours 20 hours How to determine PTO angle 1) Lower blower on ground 2) Measure A,B and L 3) Subtract B of A (A-B=C) 4) Divide L by C (L/C=F 50 Compare F Factor in the table below to find PTO angle. (Interpolate if necessary) A =PTO height at tractor B= PTO height at blower C= A-B L = Cross center distance in working position 18 F Factor 6 3.75 2.75 2.15 1.75 Angle 10° 15° 20° 25° 30° Previous examples clearly demonstrate that universal joint angle is directly related with life of PTO. In order to reduce angle, it is necessary to increase the angle between snowblower and tractor. Too Large Angles at PTO Joints To Avoid Reasonable Angles at PTO Joints Acceptable If it is impossible to increase the distance between snowblower and tractor, in order to maintain a reasonable angle at the PTO, it is recommended to use a larger size PTO that is a greater capacity PTO. (please refer to your dealer for more details). For snowblowers of 100HP, an additional gearbox is also available that can be mounted on the existing snowblower gearbox , which increases the input shaft height, reducing the angle at PTO joints. This Gearbox has an input speed of 1000RPM wich greatly increases PTO capacity. Non-Equal Angles at PTO Joints To Avoid Equal Angles At PTO Joints Recommended Angles at each end of PTO A popular habit is to change snowblower angle in order to obtain a better scraping effect. This practice can become harmful to the PTO if the angle is unequal at each end, There will be fan speed variation (as the fan speed up and slow down twice per revolution) as well as a drastic increase of loading on the cross and bearings. To avoid it is recommended to keep tractor PTO and snowblower input shaft awlays parallel. 19 Shear Bolts Shear bolts are built to break under shock loads on the fan or auger. However under certain circumstances this security is not adequate. Example: a sudden high impact shock on the fan may, in some cases break the fan shaft without breaking the shear bolt. If the shear bolt breaks, make sure to always replace it with the same grade of category bolt (grade 5 for PTO series 20-40-50-60, and grade 8 for PTO series 80) it is necessary to always maintain this bolt very tight in order to keep the efficiency of the shearing mechanism. Warning: The gearbox shafts are made with special alloy steel. However they are case hardened to increase capacity to shock load. These shafts cannot be broken under normal loads. However undesirable objects may enter the fan and either bend or break the gearbox shaft. It is understood that the gearbox cannot be built to resist every possable overload and consequently, gearbox fan shafts will not be replaced under warranty. Therefore the user of the snowblower must be very careful. Maximum length of PTO shaft Warning: Telescopic tubes of PTO should overlap a minimum length to meet ideal conditions for transmitting power. Following table could be used as a guide to find maximum permissible length of PTO. PTO Description T20-056P T40-056P T50-071P T60-071P T80-066P T80-076P T90-071P Over-all length Closed 29 3/4" 30 1/2" 36 1/2" 37 3/4" 36" 40 1/2" 39" Over-all length Opened Max 41" 40 1/2" 51 1/4" 511/4" 47 1/4" 53" 51" 20 Telescopic tube overlap 5" 6" 7" 7" 7" 8" 8" Effective PTO Drive Shaft Maintenance 21 Avoidable Damage Quick-disconnect yoke Quick-disconnect pin tight or completely seized Quick-disconnect pin damaged (broken or bent) Quick-disconnect pin damaged in locking position Possible Causes Quick-disconnect pin dirty (insufficient maintenance) Quick-disconnect pin defective (forced into place, incorrect handling. Excessive shaft length Axial load too high Corrective Actions Clean, oil and follow service instruction Replace Quickdisconnect pin Shorten shaft length (cut both telescopic tubes as well as shield, remove burrs) Replace Quickdisconnect pin Clean and grease telescopic tubes. Replace both tubes if necessary Note: newer PTO shafts may have a locking collar. (Damages Causes and corrective actions will still be similar. Avoidable Damage Possible Causes Corrective Actions Deformed Yoke Excessive shaft length Shorten shaft length (cut Yoke both telescopic tubes as well as shield, remove burrs) Replace defective yokes Axial load too high Clean and grease telescopic tubes. Replace both tubes if necessary Replace defective yokes Excessive working angle and torque Verify compatibility between shaft and working conditions (torque vs. angle) Disengage tractor PTO during lifting or lowering the implement. Change to a larger PTO size Distorted Yoke Overload caused by high starting and peak torque Worn or pounded Yoke Excessive working angle 22 Engage PTO more carefully Use appropriate safety device Replace defective yoke Avoid excessive angle Replace defective yokes Avoidable Damages Cross Kit Possible Causes Cross Arms broken Corrective Actions Extreme torque peak or shock load Use appropriate safety device Change to a larger PTO size Axial loads too large Shorten PTO shaft Replace defective cross bearings Bearing caps turning in their cross journal Excessive continuous torque and/or excessive working angle Verify compatibility between shaft and working conditions Overheated bearing caps Inadequate greasing Carefully follow greasing instructions Accelerated wear of cross kit Excessive continuous torque and/or excessive working angle Inadequate greasing Replace defective cross bearings Verify compatibility between shaft and working conditions Carefully follow greasing instructions Replace defective cross bearings Note: Cross bearings must be greased every 8 working hours Avoidable Damages Telescopic tube Possible Causes Telescopic tube failure or twisting Accelerated wear of telescopic tubes Corrective Actions Excessive torque or shock load Use appropriate safety device Change to a larger PTO size Short tube engagement (overlap) Replace the PTO drive shaft with one of adequate length Replace defective tubes Change to a PTO with coated tube Extreme load when sliding Short tube engagement Replace the PTO drive shaft with one having proper length Inadequate greasing Carefully follow greasing instructions Conditions (sand etc) Replace defective tubes Note: Telescopic tubes must be cleaned and greased every 16 working hours 23 Avoidable Damages Shield Excessive wear of shield bearings Possible Causes Corrective Actions Insufficient lubrication Shield interfering with implement Follow lubrication instructions Mount chain to allow maximum angularity Avoid shield contact with machine or tractor Replace shield bearings Avoid shield contact with machine or tractor Incorrect chain mounting Mount chain to allow for maximum angularity Incorrect chain mounting Shield interfering with implement Chain failure Replace defective parts Guard cone damaged Guard cone in contact with implement or tractor Excessive angularity Eliminate interference between guard cone and any part of implement or tractor Avoid excessive angles Replace damaged guard cone Guard tubes damaged (deformed and split at one side) Guards are in contact with tractor or implement Eliminate interference between guard cone and any part of implement or tractor Guard tube overlap too short or no overlap with PTO tube extended Replace damaged tubes Note: Shield bearing must be greased every 8 working hours 24 Adjust guard tube length with longer tubes Bolt Torque As used on this equipment Bolt torque table shown below gives torque values for the various bolts used. This chart is for non-lubricated threads. Replace with the same strength bolt. Torque Specifications. Torque values are identified by their head markings Diameter “A” 1/4 5/16 3/8 7/16 1/2 5/8 3/4 1 SAE 2 Lb-ft 6 10 20 30 45 95 165 225 N.m (8) (13) (27) (41) (61) (128) (225) (345) SAE 5 Lb-ft 9 19 33 53 80 160 290 630 N.m (12) (25) (45) (72) (110) (215) (390) (850) SAE 8 Lb-ft 12 27 45 75 115 220 400 970 N.m (17) (36) (63) (100) (155) (305) (540) (1320) Allen head cap screws are similar to SAE 8 quality. SAE -2 SAE - 5 SAE-8 A These torques are for a reference only. Not all these sizes and grades are necessarily used in this machine. Bolts that are used as a pivot or hinge have to be used with a locknut, therefore only tighten enough to secure the bolt and still allowing the part to rotate freely. 25 87D Meteor Snowblower Maintenance • PTO Shearbolt – M10x50 - - 8.8 • Auger Shearbolt – 5/16 x 1 1/4” Gr #2 • Auger Drive Chain Tightener – tighten chain allowing ¼” sag in the bottom span of chain (between drive and driven sprocket). Lubrication • Gearbox- check oil level every 50 hours. Fill to oil level plug (middle of gearbox) with SAE 90 gear oil. SAE 80W90 gear oil may also be used. • Auger and Shear Sprocket Bearing – grease sparingly every 50 hours. (By using too much grease you will push the seals off the bearing). • PTO Shaft – grease every 10 hours. Pull apart and apply grease to he sliding members. Grease the yoke bearings at this time as well. • Auger Chain – apply oil on a regular basis especially after using the snowblower. Storing the Meteor Snowblower in the off season At the end of the season lubricate the Bearings, PTO shaft and Auger chain before storing it. Notes Part numbers – Abbreviations O/L – obtain locally N --- Nut LW- Lockwasher All fasteners are Grade #2 unless otherwise specified. Customer supplies hydraulic cylinders. 26