1
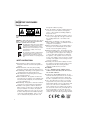
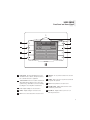
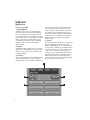
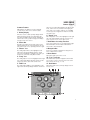
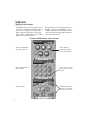
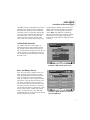
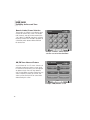
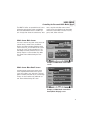
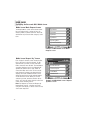
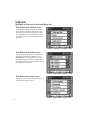
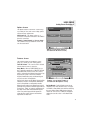
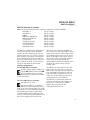
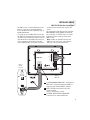
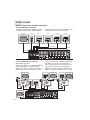
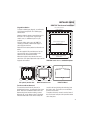
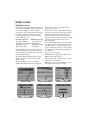
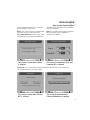
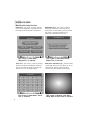
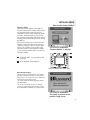
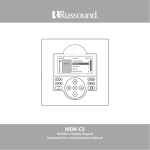
UNO-TS2 Touchscreen
Instruction Manual
IMPORTANT SAFEGUARDS
Safety Instructions
“WARNING” “ TO REDUCE THE RISK OF FIRE OR ELECTRIC
SHOCK, DO NOT EXPOSE THIS APPLIANCE TO RAIN OR MOISTURE.”
“CAUTION” “ TO REDUCE THE RISK OF ELECTRIC SHOCK, DO NOT
REMOVE COVER. NO USER - SERVICEABLE PARTS INSIDE. REFER
SERVICING TO QUALIFIED SERVICE PERSONNEL.
The lightning flash with arrowhead symbol, within an
equilateral triangle, is intended to alert the user to
the presence of uninsulated “dangerous voltage”
within the products enclosure that may be of sufficient magnitude to constitute a risk of electric
shock to persons.
The exclamation point within an equilateral triangle
is intended to alert the user to the presence of
important operating and maintenance (servicing)
instructions in the literature accompanying the appliance.
SAFETY INSTRUCTIONS
1. Read Instructions - All the safety and operating
instructions should be read before the appliance is
operated.
2. Retain Instructions - The safety and operating
instructions should be retained for future reference.
3. Heed Warnings - All warnings on the appliance in the
operating instructions should be adhered to.
4. Follow Instructions - All operating and user instructions should be followed.
5. Water and Moisture - The appliance should not be
used near water; for example, near a bathtub, washbowl, kitchen sink, laundry tub, in a wet basement,
or near a swimming pool.
6. Wall Mounting - The appliance should be mounted to
a wall only as recommended by the manufacturer.
7. Ventilation - The appliance should be situated so
that its location or position does not interfere with
its proper ventilation. For example, the appliance
should not be situated on a bed, sofa, rug, or similar surface that may block the ventilation openings,
or placed in a built-in installation, such as a bookcase or cabinet that may impede the flow of air
2
through the ventilation openings.
8. Heat - The appliance should be situated away from
heat sources such as radiators, heat registers,
stoves, or other appliances (including amplifiers)
that produce heat.
9. Power Sources - The appliance should be connected to a power supply only of the type described in
the operating instructions or as marked on the
appliance.
10.Grounding or Polarization - Precaution should be
taken so that the grounding or polarization means of
an appliance is not defeated.
11.Object and Liquid Entry - Care should be taken so
that objects do not fall and liquids are not spilled
into the enclosure through the openings.
12.Damage Requiring Service - The appliance should
be serviced by qualified service personnel when: the
power supply cord or the plug has been damaged;
or objects have fallen, liquid has been spilled into
the appliance; or the appliance has been exposed
to rain; or the appliance does not appear to operate
normally; or the appliance has been dropped or the
enclosure is damaged.
13.Servicing - The user should not attempt to service
the appliance beyond that described in the operating instructions. All other servicing should be
referred to qualified service personnel.
Precautions:
1. Power – WARNING: BEFORE TURNING ON THE
POWER FOR THE FIRST TIME, READ THE FOLLOWING SECTION CAREFULLY.
2. Do Not Touch The Unit With Wet Hands – Do not
handle the unit when your hands are wet or damp. If
water or any other liquid enters the cabinet, take
the unit to a qualified service person for inspection.
3. Care – The unit touchscreen area is covered by a
polyester film on top of the touch panel and LCD
(liquid crystal display) screen. It is important to take
proper care of the screen to maintain the best
image contrast and color viewing for the product’s
life. To clean the touchscreen, periodically wipe off
the front panel with a soft, dry cloth. Do not use
rough material, thinners, alcohol or other chemical
solvents or cloths since this may damage the finish.
TABLE OF CONTENTS
User Guide
Introduction ........................................................................................................4
Front Panel and Home Screen ............................................................................5-6
Source Screens Common Features ......................................................................7
Source Screen Examples ......................................................................................8
Controlling the Russound Tuner ........................................................................9-10
Controlling the Russound SMS3 Media Server ................................................11-12
Controlling an iPod using the Russound IBridge Dock ......................................13-14
Setting Room Preferences ............................................................................15-16
Installer Guide
UNO-TS2 Overview ............................................................................................17
Connections ......................................................................................................18
IR Receiver Connection ......................................................................................19
Controller Connections ......................................................................................20
Installation ........................................................................................................21
Configuring Sources ..........................................................................................22
Installer Setup Functions
About ............................................................................................................23
Zone and Controller ID ....................................................................................23
Factory Initialization ........................................................................................23
Diagnostics ....................................................................................................24
Firmware Update ............................................................................................25
Technical Specifications......................................................................................26
Warranty............................................................................................................27
Note: The following minimum firmware revisions are required for use with the UNO-TS2:
CAV6.6 Rev. 3
CAV6.6 Rev. 4
CAM6.6
CAM Internal AM/FM Tuner
CAM Internal XM Module
ST2 Dual Tuner
ST2-XM (ST2 Chassis)
ST2-XM (XM Module)
ST2S Tuner (Sirius)
SMS3 Media Server
2.01.16
3.01.10
1.01.05
1.01.01
2.00.05
3.00.10
3.00.10
2.00.05
1.00.10
2.00.07
or
or
or
or
or
or
or
or
or
or
higher
higher
higher
higher
higher
higher
higher
higher
higher
higher
3
INTRODUCTION
Stylish to look at, a joy to use. The UNO-TS2 Touchscreen is a full-featured color touchscreen that
provides a powerful user interface for Russound multi-source, multi-zone A/V systems. The user can
easily access, control and enjoy music and video from anywhere in the home. Housed in an attractive bezel, the UNO-TS2 features beautifully rendered screens and elegantly simple displays.
The UNO-TS2 offers touch-sensitive screen templates for defined source controls, and responsive
hard buttons for most-often used commands. It is designed to operate in the same manner as the
Russound UNO-S2 keypad, but with audible feedback and a more detailed display of source functions. It also features IR reception for use with remote control.
The UNO-TS2 is designed to complement a Russound RNET audio distribution system such as the
CAV6.6 and the CAM6.6. It controls the newest Russound components: the SMS3 Smart Media
Server, iBridge™ Dock, and the ST2 Tuner with AM/FM and satellite radio. The touchscreen provides
the user with valuable information such as Channel, Artist, Song Title, Genre and more, all in real
time. It supports custom names for presets, banks, themes and sources for a truly personal touch.
The UNO-TS2 makes a great addition to an existing RNET system, as it can be installed into an existing double-gang junction box.
Touchscreen Overview
Main Screen
The main or “home” screen is the starting point for using the UNO-TS2. The installer has configured
the touchscreen to match the source and system setup completed for the CAV6.6 or CAM6.6
system.
Source Screens
Each system component is controlled through screens designed specifically for that source. Control
choices may be found on the source screens, and additional functions may be available through the
hard buttons.
Options Screens
Zone preferences can be set through the Options screens. These include Do Not Disturb, sound level
adjustments, and screen brightness. Options for the installer are also located here.
Hard Buttons
There are eight hard buttons that frame the touchscreen, each of which performs a basic function.
The right-hand side buttons are disabled when the main screen is showing, but have secondary uses
for some sources. These extra functions are indicated by an arrow and function name on source
screens next to the hard buttons.
IR Receiver
The IR receiver is hidden behind a tinted window at the top of the bezel and transmits IR signals from
a remote control back to the controller to control the sources.
4
USER GUIDE
Front Panel and Home Screen
1
2
10
3
9
4
8
5
7
6
1
IR RECEIVER - Receives IR signals from source
and SRC2 remote controls, and passes them to
the controller and source equipment
2
TOUCHSCREEN - Full color resistive touchscreen
with multi-sound feedback. Screen can be programmed to go blank after a period of inactivity.
touching the screen anywhere reactivates it.
3
PLUS - Adjust setting for selected source
4
MINUS - Adjust setting for selected source
5
NEXT - Go to next selection for selected source
6
PREVIOUS - Go to previous selection for selected
source
7 POWER - Turn room power on/off. Press and hold
for system all on/all off
8 PAUSE - Pause/mute for selected source
9 VOLUME DOWN - Adjust volume down for room
controlled by touchscreen
10 VOLUME UP - Adjust volume up for room controlled by touchscreen
5
USER GUIDE
Home Screen
Home Screen Fields
1. Display Window
At the top of the screen, the display window
shows the active source name and peripheral
info. A red bar reflects the volume level in the
room the touchscreen is controlling. The small
boxes with “master,” “party,” “shared” and “DND”
reflect system status of shared source, party
mode and master keypad, and do not disturb
settings. These are accessed through the
Options button.
the screen and a “harp” sound is heard. These
presets can be selected at any time to recall
source selection, volume, favorite channel, disc,
etc. Before storing a favorite preset, select a
source to be stored, choose the desired station,
channel or disc, and adjust the room settings.
Return to the home screen by pressing the
“Home” button.
4. Sources
The six buttons in the middle of the screen show
the six assigned names of the sources in the
CAV6.6 or CAM6.6 system. As each source button is pressed, a different screen appears that is
customized to the source. These source screens
come in “sets”; there may be more than one
screen per source that provides source information and selection options. In addition, the hard
buttons on the right side of the touchscreen
have secondary functions that are indicated with
text on the specific source screens.
2. Options
The Options button provides access to screens
where room sound adjustments are made, and
features are accessed. It also provides access
to installer settings.
3. Favorites
The F1 and F2 buttons are user favorite presets.
Press and hold either F1 or F2; the preset is
confirmed when F1 or F2 SAVED is displayed on
1
6
3
2
4
4
USER GUIDE
Source Screens
Common Features
and source is in the Do Not Disturb mode. When in this
mode, other rooms are prevented from changing the
state of the source (change channels, etc.). The DND
icon also appears on keypads for all other rooms that
select this source.
Although there are different screens for different
sources, they do share some common features.
1. Primary Display
All source screens contain a primary display window
which generally shows the same information that
appears in the UNO-S2 keypad display, including the
current source name, system messages and display
messages from some sources.
6. "Shared" Icon
2. Volume Bar
7. Hard Button Secondary Functions
This thin red rectangle runs along the bottom of the
Primary Display. The size of the bar indicates the current volume for the room, expanding from left to right.
Some source functions are accessed through the righthand hard buttons and are indicated with text and
arrows next to the hard buttons.
3. "Master" Icon
8. Navigation Bar
The small graphic “M” becomes highlighted on the
right side of the Primary Display when the current
room is the Party Master, controlling zones in the system that are on and have Party Mode enabled.
Each screen contains a navigation bar along the bottom to switch between screens.
4. "Party" Icon
10. "X of Y" Indicator
The small graphic “P” becomes highlighted on the right
side of the Primary Display when the system is in the
Party mode and it is active in the current room.
This middle button provides navigation between multiple screens in a source set. Each press moves to the
next screen in the set (e.g., 2 of 3).
5. "DND" Icon
11. Back Button
The small graphic “DND” becomes highlighted on the
right side of the Primary Display when the current zone
This button returns to the previously displayed screen
in most cases.
The small graphic “S” becomes highlighted on the right
side of the Primary Display when the selected source
is also selected on one or more other rooms.
9. Home Button
This button returns to the home screen.
3
1
5
4
6
CD Changer
2
7
8
1 of 2
11
10
9
7
USER GUIDE
Source Screen Examples
The UNO-TS2 offers up a new screen for each
source that is configured in the RNET system. A
source can be a CD Player or Changer, DVD
Player or Changer, iBridge Dock, VCR, Cable,
Tuner, Satellite, Satellite Radio, Russound SMS3
Media Server or Russound Tuner.
After the installer has configured the sources in
the RNET system and in the UNO-TS2, you will
be able to control the source through its custom
screen and through the applicable hard buttons
on the sides of the screen.
Example of DVD Changer Source Screens
DVD Changer
Screen “buttons” control the selected
source when pressed
Source control buttons:
stop, play, pause, etc.
1 of 3
DVD Changer
Screen “X” of “Y” indicator - press to change
screens
Direct numeric entry of
disc or chapter
2 of 3
DVD Changer
Menu navigation
Secondary hard button
functions - may change
from screen to screen
3 of 3
8
USER GUIDE
Controlling the Russound Tuner
The UNO-TS2 offers an expanded view of source
information and selections when used with the
Russound Tuner. The tuner screens show bank
and preset names in a single view, with the ability to save a preset right from the touchscreen.
For satellite radio, a main screen shows the
channel name plus the artist and song in the
same screen. You can also search for music by
Satellite Radio Navigation
The satellite radio main screen displays an
expanded one-glance view of listening information, showing current channel, artist and song
title. The hard button secondary functions let you
change channels or scroll through memory presets for that bank without leaving the main satellite radio screen.
channel category. Another screen allows you to
directly enter a station’s frequency or perform a
station seek or scan function from the touchscreen. Note: If the UNO-TS2 is powered on
before the Russound Tuner is turned on, existing
preset names may not appear until after the
tuner’s boot up procedure is complete (less than
a minute).
XM Radio
70:Real Jazz
Stan Getz
Blue Skies
1 of 4
Example of XM satellite main screen
Banks and Memory Presets
Up to six presets can be stored for each of six
banks per tuner. Select the bank by scrolling
using the forward/back arrow next to the bank
name. The bank name shows in the window.
Using the “channel” or “tune” up/down hard button functions, select the desired channel or station. Press and hold one of the six buttons to
save the preset. When you hear the harp sound
from the touchscreen, the preset is saved. The
preset name then appears on the buttons. These
may be custom names, satellite radio channel
names, or frequencies (e.g., 107.1 MHz FM,
22:MIX). New presets can be saved over existing
presets using the same method.
XM Radio
Dad’s Music
Top 20
Nashville
The Groove
Real Jazz
Bluesville
The 90s
2 of 4
Example of Bank and Preset screen for
Russound XM Tuner
9
USER GUIDE
Controlling the Russound Tuner
Numeric Station/Channel Selection
Tuner stations or channels can be directly selected from the numeric entry screen. For satellite
radio channels, enter the channel number (from
1 to 3 digits). For AM/FM, enter the 3- or 4-digit
frequency number. Press the AM or FM button to
conveniently switch between AM and FM from
the touchscreen.
Tuner 2
2 of 3
Example of numeric station/channel
selection screen for Russound Tuner
AM/FM Tuner Advanced Features
The AM/FM tuner advanced controls are
accessed from the “3 of 3” screen. Select Local
or Distant reception and stereo or mono signal.
For Seek and Scan functions, press the appropriate button to begin. Press the Stop button to
end. The hard button secondary function lets you
select a frequency by tuning up or down, and
select a preset memory from the current bank
without leaving this screen.
107.1 MHz FM
3 of 3
Example of AM/FM tuner screen
10
USER GUIDE
Controlling the Russound SMS3 Media Server
The UNO-TS2 offers an expanded view of source
information and selections when used with the
Russound SMS3 Media Server in an RNET system. A single view shows the active theme, artist
Media Server Main Screen
The main screen for the media server shows the
current Stream, current Theme, and What’s
Playing now. When navigating within the media
server screen set, you can return to this screen
by pressing “main” on the navigation bar. The
hard button secondary functions let you scroll
through Themes or select another song within
the current Theme without leaving the main
screen.
name, song title and album name. Linked
screens show more detailed song information
and lead to search fields to choose music by
genre, artist, album and more.
His Music
Relax at Night
B.B. King
Why I Sing The Blues
Chains and Things
Example of SMS3 Media Server Main
screen
Media Server More Detail Screen
The More Detail screen for the media server
shows expanded information for the current
song: artist, album, song, and genre. The hard
button secondary functions let you scroll through
Themes or select another song within the current Theme without leaving the screen.
His Music
B.B. King
Why I Sing The Blues
Chains and Things
Electric Blues
main
Example of SMS3 Media Server More
Detail (What’s Playing) screen
11
USER GUIDE
Controlling the Russound SMS3 Media Server
Media Server Music Request Screen
The Request Music screen for the media server
lets you request music a variety of ways: by
Artist, by Album, by Genre and more. Press the
desired item to proceed to that category’s selections.
by Theme
by Genre
by Artist
by Album
by Song Title
by Internet Radio
main
Example of SMS3 Media Server Music
Request screen
Media Server Request “by” Screen
Each “request” selection screen shows the first
four or five items in the list selected. To drill
down the item you want, use the “enter text”
field to enter the name desired. The hard button
secondary functions let you scroll through the
alphabet to spell the name, using “letter” to
choose the letter and “cursor” to move to the
next character. As letters are entered, the list
displays the results. Additional results can be
viewed by pressing the scroll up/down buttons
on the left of the screen. When you see the
selection you want, touch the selection bar to
play it, or if choosing artist, advance to the next
screen in the selection process.
Note: For Request by Theme and Request by
Internet Radio screens, selections are made
using the scroll arrows, as these screens do not
show a text entry field.
12
Stream 1
[J]
1.Jack Johnson
2.James Taylor
3.Jeff Beck
4.Jethro Tull
main
Example of SMS3 Media Server “Request
by Artist” screen
USER GUIDE
Controlling an iPod using the Russound iBridge Dock
The UNO-TS2 offers an expanded view of iPod
song information and selection when used with
the Russound iBridge Dock to control an iPod. A
single view shows the active playlist, artist name,
song title and album name. Linked screens show
more detailed song information and lead to
search fields to choose music by genre, artist,
album and more.
iPod (iBridge Dock) Main Screen
The main screen for the iPod shows the current
playlist, artist, song and album. When navigating
within the iPod screen set, you can return to this
screen by pressing “main” on the navigation bar.
The hard button secondary functions let you scroll
through playlists or select another song within the
current playlist without leaving this main screen.
Note: When the Current Playlist window shows the
iPod’s name (assigned through iTunes), the iPod is
in All Songs mode.
Shuffle Button
The Shuffle button puts the iPod into shuffle mode.
In this mode, the iPod chooses songs or albums
to play in a random order. Press the button to
select between Songs, Albums or Off.
Example of iBridge Dock Main screen
iPod (iBridge Dock) Request Screen
The Request screen for the iPod lets you request
music a variety of ways: by Playlist, Genre, Artist,
Album and Song Title. Press the desired item to
proceed to that category’s selections.
Example of iBridge Dock Request screen
13
USER GUIDE
Controlling an iPod using the Russound iBridge Dock
iPod (iBridge Dock) Selection Screen
Each “request” selection screen shows the first
four or five items in the list selected. The scroll
up/down arrows on the left of the screen allow
search through the list. The hard button secondary function also lets you scroll through the displayed list.
Example of iBridge Dock Playlist screen
iPod (iBridge Dock) Options Screen
Once a selection is made, you can drill down the
selection even further in the “Options” screen
(Playlist Options screen shown). Here you can
view albums, artists and songs associated with
your primary selection. Or you can choose to play
the selection in the “Play” box.
Example of iBridge Dock Options screen
iPod (iBridge Dock) Songs Screen
When you see the selection you want, touch the
selection bar or arrow to play it.
Example of iBridge Dock Songs screen
14
USER GUIDE
Setting Room Preferences
Options Screen
Options
The Options button on the home screen brings
up a variety of room and screen setting options
and touchscreen adjustments.
CAV front A/V - This button selects as a
source the component connected to the CAV6.6
front A/V connection.
Features, Sound Control and Screen Setup These buttons bring up additional screens and
are discussed below.
Options screen (when Options is
selected from the home screen)
Features Screen
The Features button on the Options screen
brings up a variety of room setting options.
Turn On Volume - This sets the room’s default
volume when the room is turned on.
Party Mode - When in “PARTY MODE” the system is primarily controlled by a “MASTER” Keypad.
Party Mode links all rooms to the same source
which is selected by the Master Keypad room. Any
keypad in the system can become a Master
Keypad (if enabled) but only one Master Keypad
may exist at a time in Party Mode.
Volume level changes at the Master Keypad will be
reflected in all rooms in Party Mode. Non-Master
zones in Party Mode can temporarily override
Master Keypad volume level adjustments for their
particular room preference. Master Keypad will not
change Bass, Treble, or Loudness adjustments for
any other rooms other than the Master Keypad
room. Every other keypad will still operate its
respective bass, treble, balance and loudness
adjustments for that room.
Stream 3
Party Mode Off
Features screen (when Features is
selected from the Options screen)
Do Not Disturb - Do Not Disturb means do not
disturb this room and selected source. This stops
an “All Off" or Party Mode command from affecting
this room. When another UNO Systems Keypad
selects the same source, a DND icon will appear
alerting the user the source is in Do Not Disturb
mode.
15
USER GUIDE
Setting Room Preferences
Sound Control Screen
Treble:+2
The Sound Control button on the Options screen
brings up a variety of room setting options.
Bass - Adjust the bass level for the room
Balance - Adjust the left-to-right speaker
balance for the room
Treble - Adjust the treble for the room
Loudness - Turn loudness (more bass, fuller
sound at “low” volumes) on or off for the room.
A checkmark appears to indicate “Loudness”
activation.
Sound Control screen (when Sound
Control is selected from the Options
screen)
Screen Setup Screen
The Screen Setup button on the Options screen
brings up a variety of touchscreen setting
options.
Contrast - Adjust the touchscreen contrast
Brightness - Adjust the touchscreen brightness
Screen Blank (min) - The screen blanker darkens the screen after a period of inactivity. A
touch to the screen reactivates it. Adjust the
time (from 0 to 255 minutes) it takes for the
touchscreen to activate its screen-saving darkening feature after the last use. A value of 0 (zero)
disables the screen blank feature.
Save - Press to save settings. You will hear a
harp tone for audible confirmation of “Save.”
Installers Setup - Installer-only functions
16
Screen Setup
13
10
3
Screen Setup screen (when Screen
Setup is selected from the Options
screen)
INSTALLER GUIDE
UNO-TS2 Overview
UNO-TS2 Overview for Installers
Note: The following minimum firmware revisions are required for use with the UNO-TS2:
CAV6.6 Rev. 3
CAV6.6 Rev. 4
CAM6.6
CAM Internal AM/FM Tuner
CAM Internal XM Module
ST2 Dual Tuner
ST2-XM (ST2 Chassis)
ST2-XM (XM Module)
ST2S Tuner (Sirius)
SMS3 Media Server
2.01.16
3.01.10
1.01.05
1.01.01
2.00.05
3.00.10
3.00.10
2.00.05
1.00.10
2.00.07
The UNO-TS2 is an RNET-system enabled touchscreen that functions similarly to the UNO-S2
keypad. It fits into a double-gang 32ci low voltage PVC junction box, uses a CAT-5 110 punchdown connection, and supports one external IR
receiver. Active system status icons appear on
the screen (shared, master, party and do not disturb). An “All On” or “All Off” can be performed
by pressing and holding the power button.
Controller Configurations
For One UNO-TS2 per Controller
An RNET controller (CAV6.6, CAM6.6) can
support ONE UNO-TS2 touchscreen AND
up to five UNO keypads per controller,
connected directly to the controller via the UNO
System Keypad Ports.
For 2 to 6 UNO-TS2s per Controller
(One UNO-TS2 per Zone)
After the first UNO-TS2, any additional
UNO-TS2s must be connected to the controller via an SA-ZX3 Keypad Splitter. The SA-ZX3
is powered by a 1 amp 1201A power supply with
an RJ45 CAT-5 patch cable to connect to the
controller’s UNO Keypad Port. UNO-S1/S2 keypads can share the SA-ZX3 with an UNO-TS2, but
they must be configured for the same zone.
or
or
or
or
or
or
or
or
or
or
higher
higher
higher
higher
higher
higher
higher
higher
higher
higher
After sources are configured in the RNET system, they must be set up in the UNO-TS2 using a
simple onscreen process under Installers Setup.
The configured source names (up to 6 sources)
appear on the UNO-TS2 main screen, and unassigned source buttons remain blank. Standard
source names are assigned through the
CAV6.6/CAM6.6. PC Power Tool programming is
needed for any custom naming of sources,
including “iPod.”
The UNO-TS2 uses pre-configured source templates. Due to the unique source screens, the
UNO-TS2 does not support the key mapping features of the UNO-S1/S2 keypads. Custom key
configuration (Key Configuration menu of controller) is not recommended and may result in
unexpected behavior by the UNO-TS2.
The UNO-TS2 may require future updates for
screens and for firmware. These updates are
performed in a similar fashion as UNO-S2
updates, with a programming cable
(P/N 2500-121036) and a PC.
17
INSTALLER GUIDE
UNO-TS2 Touchscreen Connections
CAT-5 Connection
The UNO-TS2 Touchscreen uses a 110-punchdown
terminal to provide a simple installation and strong
connection for CAT-5 cable’s eight conductors.
Punchdown terminals require the use of a punchdown
tool. Attach the CAT-5 cable to the 110-punchdown
terminal on the UNO-TS2 touchscreen as shown,
matching the conductor colors to the connection
color guide. The keypad will not operate properly if
the terminations deviate from the required connection
order.
Caution
RJ-45 Connections
The CAT-5 T568A wiring standard is used for RJ-45 terminations.
Take care when using an impact 110 punchdown tool,
as this may overspread the contact points. Use of the
impact tool may propel stray bits of wire and jacket into
the keypad’s chassis and possibly cause a short in the
circuitry. Gently shake or blow air through the keypad
chassis to remove stray wire before the keypad is
installed into the junction box.
Installation Considerations
The best infrared remote performance is achieved with
the touchscreen away from any direct sunlight, plasma
TV, and low voltage lighting controls. Also consider convenience when choosing a location.
Keypad Wiring
For the UNO touchscreen, the following connections
are used to terminate the CAT-5 wire to the RNET 110
punchdown on the touchscreen:
CAT-5 WIRE COLOR
TYPE
Brown ......................................................+12V
Brown/White ............................................+12V
Green ..................................................Ground
Green/White ......................................Status In
Orange ................................................Ground
Orange/White ........................................IR Out
Blue ......................................................COM A
Blue/White ............................................COM B
18
• The maximum recommended wire run length is 250
feet for each UNO touchscreen.
• Make sure that the entire wire path between keypads and the controller is clear and not obstructed by
a floor ceiling joist, or masonry wall which can’t be
drilled through.
• Confirm ahead of time that you can drill an outlet
hole easily and in an unobtrusive spot to connect
wires with the controller.
• Label wires with keypad and room location. This
simplifies connections once the keypads and speakers are installed.
INSTALLER GUIDE
UNO-TS2 IR Receiver Connection
The UNO-TS2 has an External IR Receiver In terminal for connecting an external IR Receiver
such as the Russound 858, SaphIR 862 Eye, or
SaphIR 860 Phantom.
receiver model’s manual for the specific wire
needs.
Use 2 twisted pair wire with one pair connecting
GND (GROUND) and IR (SIGNAL) and the other
pair connecting ST (STATUS) and V+ (+12VDC).
Connect the shield or drain to ground at the
UNO-TS2 only.
Note: Installing an external IR receiver and
UNO-TS2 in the same room, with visibility to
both may cause poor IR performance.
If you plan to use an additional IR receiver with
the UNO-TS2, first determine the location of the
IR receiver, then measure the distance from the
intended location to the UNO touchscreen location. Incorporating optional IR receivers will
require additional wire. Consult the selected IR
RNET
NEWMARKET, NH USA
UNO-TS2
+12V
BR
+12V
BR/W
GND
GR
STATUS IN
GR/W
GND
OR
IR OUT
OR/W
COM A
COM B
BL
BL/W
RESET
STATUS
GND
SIGNAL
Back of
858 IR
Receiver
+12V
EXTERNAL IR
RECEIVER IN
1
2
DESIGNED IN USA MADE IN KOREA
3
Back of
UNO-TS2
1
110 PUNCHDOWN CONNECTOR - Termination for
RNET CAT-5 connection between the UNO-TS2
Keypad and the CAV6.6/CAM6.6 controller
2
RESET BUTTON - Reset touchscreen after
firmware updates
(same as reset button on front)
3
EXTERNAL IR RECEIVER IN CONNECTOR Connection for an external IR Receiver
19
INSTALLER GUIDE
UNO-TS2 Touchscreen Controller Connections
For One UNO-TS2 per Controller
An RNET controller (CAV6.6, CAM6.6) supports
one UNO-TS2 and up to five UNO keypads per
UNO-TS2
UNO-S1
controller, directly connected to the UNO System
Keypad Ports located on the rear panel.
UNO-S2
UNO-S2
UNO-S2
UNO-S2
102.5
CAT-5 Cable
CAV6.6
CAT-5 Cable
For 2 to 6 UNO-TS2s per Controller
(One UNO-TS2 per Zone)
After the first UNO-TS2, any additional UNO-TS2s
must be connected to an SA-ZX3 Keypad
Splitter. The SA-ZX3 is powered by a 1201A 1A
power supply and uses an RJ-45 CAT-5 patch
UNO-TS2
cable to connect to the controller’s Keypad Port.
The UNO-TS2 connects to the SA-ZX3 with a
CAT-5 110 punchdown on the touchscreen end
and an RJ-45 connection on the SA-ZX3 end.
UNO-S1/S2 keypads sharing the SA-ZX3 with an
UNO-TS2 must be configured for the same zone.
UNO-TS2
UNO-S2
UNO-TS2
UNO-S2
102.5
SA-ZX3
CAT-5 Cable
UNO-S1
UNO-S2
SA-ZX3
SA-ZX3
CAT-5 Cable
CAT-5 Cable
CAV6.6
UNO-TS2
20
INSTALLER GUIDE
UNO-TS2 Touchscreen Installation
Keypad Installation
Size of UNO-TS2 bezel
6.0” W x 4.875” H
To install a double-gang keypad, you will need a
UL/CSA approved plastic 32ci double-gang
electrical box.
Note the minimal clearance around the box for
the bezel. This is larger than a typical light
switch cover, so additional space may be
required.
Size of standard 2-gang box
4.0” W x 3.81” H
For best viewing and usage, the UNO-TS2
should be mounted at thermostat height, or
about 59” from the floor.
Route CAT-5 wire to the junction box from the controller.
Use the supplied 110 punchdown tool to connect each wire to its corresponding color
labeled on the punchdown terminal.
Mount the keypad in the electrical box and
attach the cover plate. Repeat the steps until all
keypads are installed.
32ci plastic junction box
Width
Width
difference
0.72”
Size of standard 2-gang wallplate
4.56” W x 4.5” H
difference
0.72”
UNO-TS2 bezel size vs. standard wallplate
UNO-TS2 touchscreen
UNO-TS2 Bezel
Touchscreen Bezel Removal
To remove the bezel from the front of an
installed touchscreen, you will need a flat screwdriver. Place the screwdriver blade in the slot
between the bezel and the molding, located
below the “R” on the bottom edge of the bezel.
Twist the blade until a loud click is heard; this
sound is the bezel locking tabs releasing from
the frame catch. The bezel can now be lifted
from the touchscreen
To replace the bezel, center it over the front of
the touchscreen and press firmly until the bezel
clicks into place.
21
INSTALLER GUIDE
Configuring Sources
After sources have been configured and named
in the CAV6.6 or CAM6.6 system, they must also
be set up in the UNO-TS2. This procedure
assigns the correct screens for each source type.
For proper operation, Russound components
must be given the correct Source Type in the
Source Setup process.
Russound Component
UNO-TS2 Source Type
ST2 Tuner, CAM6.6T
ST2-XM(2), ST2S, CAM6.6X
SMS3 Media Server
iBridge Dock (iPod)
Russsound Tuner
Satellite Radio
SMS3 Media Server
iPod (Bridge)
1. The UNO-TS2 must be connected to the controller and both must be powered on. Wait 20
seconds after being powered before beginning
the configuration process.
2. Press the “Options” button on the home screen.
3. Press the “Screen Set Up” button on the
Options screen.
4. Press and hold (for 3 or more seconds) the
“Installers Setup” button on the Screen Setup screen.
5. Press the “Source Setup” button on the
Installer Setup screen.
6. Press the “Source 1” button. When entering
the Source Setup menu for the first time after a
controller has been programmed, the Source
Name may take a few seconds to appear correctly in the Source Setup screen display. Simply
wait a few seconds and the correct Source
Name will appear.
7. Press the left/right arrows next to the source
type field on the screen until the proper source
type name appears. This type must match the
source connected to source 1 on the controller.
The Name field is automatically configured from
the controller.
8. Press the “back” button.
9. Repeat the last 3 steps for up to 5 more sources.
10. Press the “home” button.
11. Confirm that all configured sources appear
on the main screen buttons.
12. Press each of the source buttons and confirm that the correct screen is loaded.
Screen Setup
Options
13
10
13
Options button
Installers Setup
Screen Setup button
Installers Setup button
Source Setup
Source 1 Setup
CD
CD Changer
Source Setup button
22
Source # button
Source type
INSTALLER GUIDE
Other Installer Setup Functions
Several installer-level functions are accessible
from the Installers Setup screen.
controlling and the ID number of the controller to
which it is connected.
About - This screen shows the current firmware
and screen versions on this touchscreen.
Note: The controller must be power cycled after
the Zone Number and/or Controller ID is
changed on the UNO-TS2.
Zone and Controller ID - On this screen, enter
the touchscreen’s zone number the UNO-TS2 is
About this keypad
Firmware Version: X.XX
Screens Version: X.XX.XX
This screen is shown when “About”
is selected
Zone and Controller IDs
6
1
This screen is shown when “Zone and
Controller ID” is selected
Factory Init - This screen allows a factory initialization to be performed on the touchscreen.
This sets the unit back to its factory settings.
Factory Init
Are you sure?
Factory Init
Factory Init complete
This will Factory Init the touch-screen only
This screen is shown when “Factory
Init” is selected
This screen is shown when the
Factory Initialization is complete
23
INSTALLER GUIDE
Other Installer Setup Functions
Diagnostics - This series of screens provides
access to the diagnostics to provide some simple testing of the touchscreen’s performance.
Diagnostics
This screen is shown when
“Diagnostics” is selected
Touch Test - This screen is a tool for checking
the touch sensitivity and calibration of the keypad. As each letter or number is pressed, the
touchscreen “says” the letter/number.
Hard Button Test - This screen is a tool for
testing the hard buttons on the sides of the
touchscreen. As each button is pressed, the button's name is spoken by the keypad, e.g.,
Volume Up, Volume Down, Pause, etc.
Hard Button Test
This screen is shown when “Hard
Button Test“ is selected
White, Blue and Red Screen - Turns the entire
screen white, blue or red. This allows you to see
any bad pixels. Returns to the Diagnostics
screen if you touch anywhere on the display.
Touch Test
This screen is shown when “Touch
Test” is selected
24
This screen is shown in color when
White, Blue or Red Screen is selected
INSTALLER GUIDE
Other Installer Setup Functions
Firmware Update
There may be future updates to the UNO-TS2
firmware. Updates will be available online through
the Document Center at www.russound.com,
under RNET Systems. Before starting the update
procedure, download updates to a PC and connect the Programming Cable (P/N 2500-121036)
from the PC to the OS update port on the front of
the UNO-TS2.
The Firmware Update page is reached from the
Installers Setup screen. When ready, press the
“Update my software” button to start the update
process. The controller must be power cycled
after the firmware has been updated. If multiple
screens are being updated, power cycle after all
have been updated.
1
OS UPDATE PORT - For programming cable
connection
2
RESET BUTTON - Resets UNO-TS2
Firmware Update
This screen is shown when
“Firmware Update” is selected
1
2
UNO-TS2 without front cover plate
Russound Information
The Russound Information page is accessed by
pressing on the Russound logo on the Installers
Setup screen. You can also press the “UNO” logo
on the touchscreen Home screen.
The screen shows the Russound phone number
and web address.
This screen can also be used as a “cleaning”
screen, as nearly all its inactive surface can be
firmly wiped without initiating any control actions.
Russound Information
This screen is shown when
“Russound” is pressed on the
Installers Setup screen
25
TECHNICAL SPECIFICATIONS
Technical Specifications
Power Requirements:
CAT-5 Connection:
Dimensions:
Weight:
26
12VDC @ 350mA
110 punchdown
Inside J-Box
3.675"W x 1.150"D x 2.850"H
(9.3 x 2.9 x 7.2 cm)
Front Panel
5.750”W x 1.0”D x 4.650”H
(14.6 x 2.5 x 11.8 cm)
Fits UL/CSA Approved Double-gang Junction Box
1 lb 2.5 oz. (524 g)
WARRANTY
Warranty Repair
The Russound UNO-TS2 is fully guaranteed against all defects in materials and workmanship for two (2) years
from the date of purchase. During this period, Russound will replace any defective parts and correct any defect in
workmanship without charge for either parts or labor.
For this warranty to apply, the unit must be installed and used according to its written instructions. If service is
necessary, it must be performed by Russound. The unit must be returned to Russound at the owner's expense
and with prior written permission. Accidental damage and shipping damage are not considered defects, nor is
damage resulting from abuse or from servicing by an agency or person not specifically authorized in writing by
Russound.
This Warranty does not cover:
• Damage caused by abuse, accident, misuse, negligence,
or improper installation or operation
• Power surges and lightning strikes
• Normal wear and maintenance
• Products that have been altered or modified
• Any product whose identifying number, decal, serial number, etc.
has been altered, defaced or removed
Russound sells products only through authorized Dealers and Distributors to ensure that customers obtain proper
support and service. Any Russound product purchased from an unauthorized dealer or other source, including
retailers, mail order sellers and online sellers will not be honored or serviced under existing Russound warranty
policy. Any sale of products by an unauthorized source or other manner not authorized by Russound shall void the
warranty on the applicable product. Damage to or destruction of components due to application of excessive
power voids the warranty on those parts. In these cases, repairs will be made on the basis or the retail value of
the parts and labor. To return for repairs, the unit must be shipped to Russound at the owner's expense, along
with a note explaining the nature of service required. Be sure to pack the unit in a corrugated container with at
least three (3) inches of resilient material to protect the unit from damage in transit.
Before returning a unit for repair, call Russound at (603) 659-5170 for a Return Authorization number. Write this
number on the shipping label and ship to: Russound, ATTN: Service, 5 Forbes Road, Newmarket, NH 03857
Due to continual efforts to improve product quality as new technology and techniques become available,
Russound/FMP, Inc. reserves the right to revise system specifications without notice.
27
UNO-TS2 Touchscreen
Instruction Manual
Russound
5 Forbes Road
Newmarket, NH 03857
tel 603.659.5170
fax 603.659.5388
e-mail: [email protected]
www.russound.com
Copyright © 2006 Russound® All rights reserved.
iPod is a trademark of Apple Computer, Inc.,
registered in the U.S. and other countries.
All trademarks are property of their respective owners.
Russound is not responsible for typographical errors or omissions.
28-1163
Rev. 3 04/03/06