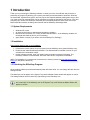
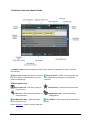
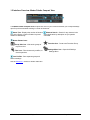
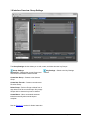
1
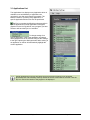
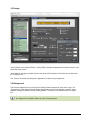
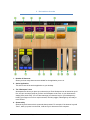
KillerKeys® Pro User Guide Windows Edition For KillerKeys Pro software version 2.1 and later 1 Introduction ........................................................................................................................... 3 1.1 System Requirements .................................................................................................... 3 1.2 Installation ...................................................................................................................... 3 1.3 Launching the KillerKeys Program ............................................................................... 3 1.4 Interface Overview: Master Palette ............................................................................... 4 1.5 Interface Overview: Master Palette Compact View ...................................................... 5 1.6 Interface Overview: Floating Palette ............................................................................. 6 1.7 Interface Overview: Settings ......................................................................................... 7 1.8 Interface Overview: Group Settings .............................................................................. 8 2 Interface ................................................................................................................................. 9 2.1 Master Palette and Floating Palettes ............................................................................ 9 2.2 Favorites Groups...........................................................................................................11 2.3 Shortcut Search ............................................................................................................12 2.4 Hiding Keys ...................................................................................................................13 2.5 Hiding Groups ...............................................................................................................13 2.6 Filters .............................................................................................................................14 2.7 Resizing/Moving/Docking the Master Palette ..............................................................15 2.8 Profiles ...........................................................................................................................16 3 Settings.................................................................................................................................17 3.1 Applications List ...........................................................................................................18 3.2 Preview Window ............................................................................................................19 3.3 Key Size .........................................................................................................................19 3.4 Mouse-Over (Hover Text) ..............................................................................................19 3.5 Design ............................................................................................................................20 3.6 Background ...................................................................................................................20 3.7 Transitions (Applied Globally)......................................................................................21 3.8 Group Settings ..............................................................................................................21 3.9 Creating a Macro ...........................................................................................................22 3.10 Licensing Menu ...........................................................................................................23 3.11 File Menu .....................................................................................................................24 3.12 Help Menu ....................................................................................................................24 3.13 Exiting the Program ....................................................................................................25 3.14 Advanced Licensing ...................................................................................................26 4 KillerKeys Pro iPad App ......................................................................................................40 5 Additional Information .........................................................................................................39 5.1 Obtaining Technical Support........................................................................................40 1 Introduction Thank you for purchasing the KillerKeys software. It allows you to be more efficient and productive in practically any program by allowing you to quickly and easily access thousands of shortcuts. Shortcuts are searchable, organized into groups, and can pop-out into separate windows making them easy to find. Your most commonly used shortcuts can be organized into groups of favorites for fast access. You'll find everything you need to use KillerKeys confidently and successfully within this User Guide and on the Bella Corporation website, including video tutorials and the KillerKeys Knowledge Base. 1.1 System Requirements Windows XP or later An internet connection to download and activate the software Microsoft .Net Framework 3.5 or later (Included with Windows 7; or the KillerKeys installer will download and install the file for you if necessary.) Apple iPad 2 or newer (if you wish to use the KillerKeys Pro iPad app) 1.2 Installation Three simple steps to set up your software 1. Purchase the license options for your program from the KillerKeys store (www.KillerKeys.com). 2. Download and install the KillerKeys software. The download will be available via a link on your emailed order confirmation receipt. 3. On the activation window, enter your serial number and other requested information. The KillerKeys software is now activated; follow the instructions to complete the installation. (Note: For installation on computers not connected to the internet, please visit www.killerkeys.com/nointernet for activation instructions) 1.3 Launching the KillerKeys Program Once installed, KillerKeys will load automatically when Windows starts. You can change this later from the Settings window. The KillerKeys icon will appear in the System Tray and the Master Palette window will appear on-screen. The Settings window can be launched by right-clicking on the KillerKeys icon. If the KillerKeys Master Palette does not appear on-screen it may have been minimized the last time it was open. If the KillerKeys icon in the System Tray is left-clicked the Master Palette will appear on-screen. © Bella Corporation 2011, All Rights Reserved Page 3 1.4 Interface Overview: Master Palette The Master Palette contains all KillerKeys shortcut keys, which are organized into Groups, and is the main interface. Status Text - Displays the number of shortcut Shortcut Search - Search for any shortcut in the keys in the Group, number of hidden keys and active Application by description or by keystroke number of filtered keys. command. Master Palette Icons: Group Hide Icon - Hide entire groups of keys from view. Favorites Icon - Create new Favorites Group. Filter Icon - Filter shortcuts by modifier, or direct keystrokes. Settings Menu Icon - Open the KillerKeys Settings Menu. Edit Mode/Hide Keys – Hide and unhide individual shortcut keys. User Profiles - Save separate group and shortcut settings. See the Section 2.1 section for further instruction. © Bella Corporation 2011, All Rights Reserved Page 4 1.5 Interface Overview: Master Palette Compact View The Master Palette Compact View occupies less room on your screen and allows you to keep KillerKeys open for quick access while working in a clean environment. Status Text - Displays the number of shortcut Shortcut Search - Search for any shortcut in the keys in the Group, number of hidden keys and active Application by description or by keystroke number of filtered keys. command. Master Palette Icons: Group Hide Icon - Hide entire groups of keys from view. Favorites Icon - Create new Favorites Group. Filter Icon - Filter shortcuts by modifier, or direct keystrokes. Settings Menu Icon - Open the KillerKeys Settings Menu. User Profiles - Save separate group and shortcut settings. See the Section 2.1 section for further instruction. © Bella Corporation 2011, All Rights Reserved Page 5 1.6 Interface Overview: Floating Palette A Floating Palette is useful for keeping your most commonly used shortcuts on-screen. Movement Bar – Click and drag to move the Floating Palette. Shortcut Key – Click any shortcut key to execute the shortcut command. Close Floating Palette – Click this to close the Floating Palette and send it back into the Master Palette. Resize Triangle – Click and drag to resize the Floating Palette. See the Section 2.1 section for further instruction. © Bella Corporation 2011, All Rights Reserved Page 6 1.7 Interface Overview: Settings The Settings window is where you can change the appearance of your shortcut keys. Applications List – Displays available KillerKeys program settings. Global Settings – Adjust KillerKeys startup and Hide/Show shortcut settings. Key Settings: Preview Area – Previews the current shortcut keys configuration. Transitions – Adjust floating palette appearance settings. (Global, applies to all programs.) Key Size – Adjust size settings. Restore/Save/Quit: Restore Defaults Button – Restore default settings for current or all applications. Mouse-Over – Toggle hints to display on mouseover. Save and Close Button – Exits the Settings window and returns to the KillerKeys program with settings Design – Select key design style. saved. Background – Adjust key background settings. Save and Quit Button – Exits the KillerKeys program entirely with settings saved. Group Settings – Switch to the Group Settings window. See the Section 3.8 section for further instruction. Key Size, Mouse-Over, Design, and Background all can be changed according to the specific program running. Transitions are global settings and apply to all programs. © Bella Corporation 2011, All Rights Reserved Page 7 1.8 Interface Overview: Group Settings The Group Settings window allows you to edit, create, and delete shortcut key Groups. Group Settings: Group Area – Displays the current Groups and acts similar to the Master Palette window. Key Settings – Switch to the Key Settings window. Create New Group – Creates a new shortcut Group. Create New Favorite – Creates a new shortcut Favorites Group. Delete Group – Select a Group to delete from a drop-down list of the current Groups. Only empty Groups with no shortcut keys can be deleted. Create Macro – Macro commands automate tasks that normally take several steps to complete. . See the Section 3.8 section for further instruction. © Bella Corporation 2013, All Rights Reserved Page 8 2 Interface 2.1 Master Palette and Floating Palettes All shortcut keys are stored in the Master Palette and organized within Groups. To display the contents of a Group, click the triangle to the left of the Group name. (Master Palette with all Groups collapsed) To use a shortcut click the key. (Master Palette with one Group expanded) The number of shortcut keys for the current Application, how many are hidden and how many are filtered in the Master Palette and the Group are displayed in the Status Text. This is displayed at the top of the Master Palette, after the current Application name, and after every Group name. If the Master Palette window is not wide enough the Status Text may be hidden. © Bella Corporation 2013, All Rights Reserved Page 9 Groups can be moved out of the Master Palette and onto the screen. Click and drag the group name, then place it where you would like onscreen. This Floating Palette can be closed either by clicking and dragging back into the Master Palette area, or clicking the “X” in the upper righthand corner. Floating Palettes are useful for keeping your most important shortcuts close at hand. These windows are typically smaller than the Master Palette and can stay on-screen even when the Master Palette is minimized. Floating Palettes can also be moved anywhere on-screen. To hide all Floating Palettes and shortcut keys, use the KillerKeys Hide shortcut, which by default is Ctrl + Spacebar. The default shortcut can be changed in the Settings Panel. © Bella Corporation 2013, All Rights Reserved Page 10 2.2 Favorites Groups Favorites Groups store commonly used shortcuts. They have certain special characteristics different from regular Groups: • Keys from multiple Groups can be placed into the same Favorites Group. • Search Results can become a Favorites Group by clicking the “Create Fav” link. • If shortcuts are removed from a Favorites Group they remain in their original Group and can still be used. • Shortcut keys in the Master Palette or other Floating Palettes can be dragged into a Favorites group, even if it is a Floating Palette on the Desktop. Click the Star Icon in the top right corner of the Master Palette to create a new Favorites group. Enter a name for the new Favorites Group, then click OK. Click and drag shortcut keys into the Favorites Group. Shortcut keys are copied from the original group and are not deleted. Every application has a sample Favorites Group that displays some of the most commonly used shortcuts for that application. © Bella Corporation 2013, All Rights Reserved Page 11 2.3 Shortcut Search The Shortcut Search box searches for shortcuts by description or keyword command. Type the search query into the box and hit enter or click on the Magnifying Glass. The Search Results Group will display all shortcuts which match the query. It's not necessary to type an entire word to find shortcut keys. Typing “Opac” instead of the full “Opacity” will still return all opacity shortcuts. The search box searches both short and long descriptions, both the text written on the shortcut key and the description that appears when mousing-over the button. To search by Keystroke, such as Ctrl or Q, click on the arrow to the right of the Search Bar and select Keystroke. It's simple to search for all shortcut keys of the same type. To find all shortcut keys for Opacity in Adobe Photoshop type “Opacity” into the Shortcut Search box while Adobe Photoshop is the current application. The Search results will display every shortcut for opacity. © Bella Corporation 2013, All Rights Reserved Page 12 2.4 Hiding Keys There may be shortcuts you already know within the KillerKeys shortcut Groups or shortcuts which aren't necessary to your project. To Hide individual keys, click “Edit” on the right side of the group header. Click a key to hide it. The key's appearance will change to a checkerboard background to indicate it is hidden. To Unhide a key click it again. Click “Done” to finish editing. Hiding keys in a Favorites Group will remove them from the Favorites Group permanently. Hiding a key in a regular Group will also delete the key from any Favorites Groups containing that key. Status Text will display the number of hidden keys in a Group or in the Master Palette. All Hide settings for shortcut keys and Groups are Profile specific. Switching between Profiles 1, 2, and 3 can all apply different settings. 2.5 Hiding Groups If there is an entire Group of shortcut keys you do not need, click the Hide Group icon at the top of the Master Palette. Click “Edit”, and click on a group name to hide/unhide it. Click “Done” to finish editing. The Hide Group icon will turn Blue to indicate there are one or more hidden groups. © Bella Corporation 2013, All Rights Reserved Page 13 2.6 Filters Filters are useful for quickly hiding all shortcut keys of a certain type. Shortcut keys can be filtered by Direct keystrokes, keystrokes that use the Ctrl modifier, the Shift modifier, the Alt modifier, or the Windows Key modifier. Most applications have commonly used shortcuts activated by a Direct keystroke or with the Ctrl key modifier. If you already know these simple shortcuts or do not need them, a Filter can hide them from view an make the shortcut keys you do need more accessible. Filtering a modifier key will hide all shortcut keys that use that keystroke, even if they also use other modifier keys. Filtering the Ctrl modifier would also hide a keystroke such as “Ctrl + Shift + S”. To access the Filter, click the Filter Icon at the top of the Master Palette. Click the box next to the Modifier Key to filter. By Default all keys are selected. Click “Apply Filter” to apply and exit Filter mode. The Filter Icon will turn green to indicate that a Filter is applied. To remove a filter, click the Filter Icon again and click on “Remove Filter”. © Bella Corporation 2013, All Rights Reserved Page 14 2.7 Resizing/Moving/Docking the Master Palette To resize the Master Palette, click and drag the bottom right corner. Click the Shrink/Restore icon at the top of the Master Palette to shrink the window to its smallest possible size or restore it to its original size. Click and drag the Program name to move the Master Palette. If the Master Palette is clicked and dragged to an edge of the screen, the docking key will appear. Click the docking key to hide the Master Palette window. Clicking the docking key again will unhide the Master Palette. Clicking on the Minimize icon at the top of the Master Palette will also hide the Master Palette completely from view. Floating Palettes will remain on screen. To restore the Master Palette, click the KillerKeys program icon in the notification area. When the Master Palette is hidden, Floating Palettes will remain on-screen. This is useful for saving space on your screen. In Windows Vista and Windows 7, a large number of notification area icons will be put into an expanded view box. Click on the ‘Customize…’ link in this box to select which icons should remain in view at all times, for example KillerKeys. © Bella Corporation 2013, All Rights Reserved Page 15 2.8 Profiles Profiles save specific group arrangements and on-screen shortcuts, allowing different shortcut settings for a single application. Many applications have different modes for different tasks. By switching between Profiles, new shortcuts can be displayed depending on the current task. Profiles also allow more than one user to choose their preferred layout. To create a Profile, click on one of the three Profile options at the bottom of the Master Palette, and begin arranging keys. The Profile will be saved in the background. To create another profile, click on another Profile option key. To rename a Profile, double click on the Profile key. Profiles can be Imported and Exported through the File menu under the Settings window. There will be two options: “Import Profile” and “Export Profile”. “Import Profile” imports a single Profile for the application from which the Profile was exported. When importing a Profile you will be given the option to choose which of the three Profiles to overwrite. The Profile you choose to overwrite will be erased. “Export Profile” exports a single Profile for the currently selected application. If you choose to have the Master Palette hidden or docked, you can also select a profile by right clicking on the KillerKeys program icon in the bottom right notification area of your computer. When Exporting a Profile, the version number of your KillerKeys program will be added to the name of the file; for example “Word 2010_v1.0.kpf”. Only profile file versions equal to or prior to the installed version of KillerKeys can be installed. Profiles that come from a new version of KillerKeys than you’re running cannot be installed. Your KillerKeys version number can be found in the Settings Window, under the Help menu, by clicking the option “About KillerKeys”. © Bella Corporation 2013, All Rights Reserved Page 16 3 Settings To customize the look of KillerKeys, click on the Gear icon at the top of the Master Palette or right click the program icon in the notification area. The KillerKeys Settings are split into two tabs, Key Settings and Group Settings. On the left is the Applications List. © Bella Corporation 2013, All Rights Reserved Page 17 3.1 Applications List The Applications List displays every Application which is available to use with KillerKeys. Applications are unlocked for use after each license(s) purchase. The Master Collection, containing every application, or specific Application Editions can also be purchased. The Eye icon toggles the KillerKeys shortcuts while in specific applications. Locked Applications will appear grayed out in the list. By default, every program you have access to will have the Eye icon activated. To change settings for a specific Application, confirm the application is selected and highlighted blue in the list then configure the Settings to the right. Opening the Settings window while working in an application on the list will automatically highlight the current application. Certain applications in the list have both current and previous versions, such as Adobe Photoshop CS5 and Photoshop CS4. By default the current version will be selected. Click the Eye icon next to the version of the program to be displayed. © Bella Corporation 2013, All Rights Reserved Page 18 3.2 Preview Window The Preview Window displays an example key set and will update when changes are made to the settings below. 3.3 Key Size Choose “Two Lines of Text” to display shortcut names on two lines. Choose “Single Line of Text” to display shortcut names on one line. Shortcut keys will be smaller and long shortcut names will not be completely displayed. “Show Keystroke on Line Two” will display the shortcut name on the top line and the keyboard command, such as “Ctrl+S”, on the second line of the shortcut key. 3.4 Mouse-Over (Hover Text) Hover Text appears when the mouse cursor stops over a shortcut key. Long Description displays the entire shortcut’s information upon mouseover. The shortcut description, keystroke, and group name are displayed. Keystroke displays only the keystroke for the selected shortcut and Group Name displays only the name of its group. © Bella Corporation 2013, All Rights Reserved Page 19 3.5 Design “3D Key Effect” is the default selection. “2D Key Effect” changes the appearance of shortcut keys to a flat button with a thin outline. “Drop Shadow” will apply a shadow effect to both 3D and 2D Key Effects. This effect can be edited with the “Configure” link. The “Texture” drop down list changes the appearance of shortcut key backgrounds. 3.6 Background The first slider adjusts the color of Group and Floating Palette backgrounds, from black to grey. The “Transparency” slider adjusts Floating Palette background colors from see-through to opaque. “Drop Shadow” will apply a shadow effect to Floating Palettes. This effect can be edited with the “Configure” link. “Transparency” and “Drop Shadow” will not appear within the Master Palette, only when Groups are dragged from the Master Palette to make a Floating Palette. © Bella Corporation 2013, All Rights Reserved Page 20 3.7 Transitions (Applied Globally) This setting adjusts how Floating Palettes appear. “None – Instant” and “Fade In” make Floating Palettes appear instantly or fade from transparent, respectively. “Turn In” makes Floating Palettes appear to open and expand from a single point. The length of these effects can be adjusted under “Effect Duration”. These settings are applied globally and affect the KillerKeys appearance in every program. 3.8 Group Settings Many of the same adjustments performed in the Master Palette can be performed in the Group Settings window. In addition, new Groups can be created, Groups can be deleted, and Macros can be created. The “Create New Group” button will open a window asking to name the new group. Enter the name and click “OK” to add the new group. To change the group and shortcut keys color, double-click the color box to the left of the group name. To delete a Group, first remove all shortcut keys within the Group by clicking and dragging all keys into other Groups. Click the “Delete Group” button and choose the Group to be deleted from the drop down list. © Bella Corporation 2013, All Rights Reserved Page 21 3.9 Creating a Macro Macro commands automate tasks that normally take several steps to complete. The “Create Macro” button will open the Macro Settings window. To add a keystroke or keystroke combination, click the box to the left of the “Add Keystroke” button, press the keystroke on your keyboard, and then click the “Add Keystroke” button. To add a pause, click the box to the left of the “Add Pause(ms)” button, type in the number of milliseconds for the macro to pause (1000ms = 1 second), and then click the “Add Pause” button. To remove a keystroke or pause, click on it within the list, and then click the “Remove” button. “Short Description” will be the description of the macro written on the corresponding shortcut key. “Long Description” will appear on mouse-over of the macro shortcut key. If this is the first Macro for the selected application, a new Group called Macros will be created. Also, all Macro keys will have an “m” in the upper right corner to denote that it is a macro. To modify a Macro, click on the Macro in the Group Settings window and the Macro Settings window will appear. To delete a Macro, click the blue “Edit” link to the right of the Macros Group name and click the shortcut key for the Macro. The “Show Keystroke on Line 2” setting does not apply to Macro shortcut keys. The description of the Macro will be displayed. © Bella Corporation 2013, All Rights Reserved Page 22 3.10 Licensing Menu The Licensing Menu displays information about your KillerKeys license and allows you change your licensing options. This menu can be found in the Settings window, under the Help menu. “Licensed Editions” lists which editions you have purchased for KillerKeys. Purchased editions will have a check to the left of their name, while un-purchased editions will be unchecked and unavailable for use. Click “Purchase Editions” to be taken to the KillerKeys online store**. “Updates” displays until what date you will continue to receive updated shortcut key files for your KillerKeys purchased editions. If Updates are valid, you may also install any newer versions of the KillerKeys application free of charge. To renew and purchase further updates, click the “Renew Updates” key**. The “Refresh” button will look to the KillerKeys server to present you with the most up to date licensing information. A refresh command is sent automatically each time you start KillerKeys. If you recently purchased a new Edition and it hasn’t yet displayed under the Licensed Editions section, running a Refresh will update that for you and unlock the proper application shortcuts**. The “De-Authorize This Computer” button will remove your KillerKeys license from the current computer and allow you to install KillerKeys with your current license on another computer**. To Re-Authorize a computer that has previously been De-Authorized, please refer to the Advanced Licensing section (3.14). **(Internet Connection Required) © Bella Corporation 2013, All Rights Reserved Page 23 3.11 File Menu “Restore All Defaults” restores the default KillerKeys settings for every application in the list. ”Restore Application Defaults” will restore the default settings for only the Application currently selected. “Import Profile” imports a single Profile for the application from which the Profile was exported. When importing a Profile you will be given the option to choose which of the three Profiles to overwrite. The Profile you choose to overwrite will be erased. “Export Profile” exports a single Profile for the currently selected application. “Import Application” imports all 3 Profiles for the currently selected application. “Export Application” exports all 3 Profiles for the currently selected application. “Quit” exits the KillerKeys program completely. 3.12 Help Menu “User Guide” opens the KillerKeys User Guide, this document. “Video Tutorials” opens the KillerKeys Video Tutorials page on the KillerKeys website. “Support” opens the KillerKeys Support page on the KillerKeys website. The Support page contains various links to any support related question/concern you might have. “Licensing” opens the Licensing Menu, as is described in section 3.10 of this User Guide. “Check for Updates” lets you know if there is a newer version of the KillerKeys program than you are currently running. This check automatically happens during each startup of the program as well. If you are unable to download and install the latest updates, you may need to renew your yearly Updates on the KillerKeys store. “About KillerKeys” displays basic program information, the program version and copyright info. “Provide Feedback” opens a feedback form for KillerKeys. Here you can contact Bella Corporation with your suggestions, comments or requests. © Bella Corporation 2013, All Rights Reserved Page 24 3.13 Exiting the Program “Save and Close” saves all changes and closes the KillerKeys Settings window but does not close the KillerKeys application. “Save and Quit” saves all changes and closes the KillerKeys application completely. The “Quit” selection under the File menu performs the same action. Clicking the red “X” at the top of the window displays the option to either close the settings window or close the KillerKeys application completely. Outside of the Settings window, right-clicking the KillerKeys program icon in the bottom right corner of your screen will display a number of options, including closing the KillerKeys program completely. © Bella Corporation 2013, All Rights Reserved Page 25 3.14 Advanced Licensing Certain licensing features are available via a special launch method of the KillerKeys application. If KillerKeys is already running, please quit the program before attempting this method. Start by selecting your KillerKeys.exe from within your Program Files folder. Next, hold down both the Shift Key and the Windows (OS) Key simultaneously, and then proceed to launch the KillerKeys.exe application by double-clicking it. Continue holding the Shift+OS Key until startup is finished, you should notice that a new Licensing Options window is presented to you. The License Options window will have several tabs that you can cycle through via the arrows on the top right, they include: Remote Reset Release License Restore License Refresh Features Feature Passwords Activation Data Block License Unless otherwise instructed by a Bella Corporation employee, the only tab you should focus on would be the Restore License option. In the event that you’ve De-Authorized your computer, this is the only method in which you’re able to ReAuthorize it, by way of the Restore License tab. Once you’re on the Restore License tab, you’ll see some text, as well as a couple buttons below. Click the “OK” button to restore your license to that computer. Once you restore the license, it will no longer be available to use on a different system. Also, you cannot restore a license if you’ve already activated that license on a different system. CAUTION: Clicking on any of the options from the other tabs may permanently lock the KillerKeys application from running on your computer. Never click on any other options in the License Options window without verbal or written instruction from Bella Corporation. © Bella Corporation 2013, All Rights Reserved Page 26 4 KillerKeys Pro iPad App I. Getting Started The KillerKeys Pro iPad App works in unison with the KillerKeys Pro desktop application for Windows to give you control of your computer using a WiFi connection. The iPad App displays shortcuts within Workspaces as shortcut buttons or on a virtual (VR) keyboard on the iPad, and includes a track pad, customizable widgets, Quick Launch and Active App switching for complete control of your computer. Connecting your iPad to KillerKeys After installing the KillerKeys software and entering the licensing information on your computer, follow these steps to connect your iPad to your computer. 1) The connection from the iPad to your computer uses WiFi: make sure the Wifi signal that you are connecting to is on the same network as the computer you have installed the KillerKeys software. 2) You will need to know the IP of the computer that KillerKeys is installed on and enter it on the iPad. You can find the IP from the KillerKeys desktop application by doing the following: a) Find the KillerKeys Pro icon in the notifications area. b) Right-click on the icon and select “Launch KillerKeys Pro Settings”. c) Under Global Settings, click the radio button for Tablet Mode. d) Select the Tablet tab, where you will find the IP for your computer. e) Enter the IP on the iPad and press “Connect”. f) Select “Save and Close” on the KillerKeys desktop application. g) After the initial sync on the iPad, you should be good to go. Important Note: Do not close the KillerKeys Pro iPad app during the Sync process. Do not switch to another iPad app during the Sync process. If the (up to 10 minute) Sync process fails to execute properly, you will need to uninstall and re-install the KillerKeys Pro iPad app. © Bella Corporation 2013, All Rights Reserved Page 27 II. The Interface: Overview 1. Number of Shortcuts Shows you how many shortcuts are available for the application you are in. 2. Active Application This is the name of the active application on your desktop. 3. The “Workspace” Area Workspaces are where you place your shortcut keys. Each Workspace can be named as you'd like, and you can simply swipe to get from one Workspace to the next, so your shortcuts are always just a touch away. You can also rearrange your shortcut keys on your workspace by holding your finger on one for a couple seconds, until they wiggle, indicating they are ready to move around. 4. Shortcut Key Shortcut Keys will execute their command when pressed. For example, if the shortcut key said “Save”, when you press it on the iPad, it will save your document on the computer. © Bella Corporation 2013, All Rights Reserved Page 28 5. Additional Key Information Pressing the circular plus icon on the bottom-right of the shortcut key will bring up a new window with additional shortcut information. This is also how you can remove a key from your Workspace. 6. Active Apps The Active Apps side bar area shows you the icons of any applications that are currently running on your desktop. To switch from one application to the next, press the icon of the application. 7. Multimedia Widget The multimedia widget provides a number of predefined features depending on the application that you are in. You are also able to customize the multimedia widget buttons yourself for any application. See the Multimedia Widget section for more details. 8. Left-Click Button The left-click button performs a mouse left click when using the trackpad. 9. Trackpad The trackpad provides mouse control over your computer and supports pinch-to-zoom (application dependent). 10. Right-Click Button The right-click button performs a mouse right click when using the trackpad. 11. Scroll Area Moving your finger up and down the scroll area will scroll documents or web pages accordingly. 12. Volume Control The volume control allows you to control the system volume. 13. Zoom Control The zoom control allows you to easily zoom in and out of web pages and other supported documents. 14. Quick Launch You can drag applications that you use most frequently into the Quick Launch side bar. © Bella Corporation 2013, All Rights Reserved Page 29 III. The Interface: Option Icons 1. Vertical Workspace Slider When using your iPad with a half workspace view on top / half widgets view on bottom (default setup), this button will vertically scroll your workspace view up or down. This is helpful when you wish to use more shortcuts on a single workspace than will fit in half view. Note: When using a full workspace view of shortcuts (no Trackpad or widgets below), this button will disappear, as you’re already seeing the entire workspace (top and bottom) in view. 2. VR Keyboard Display This button will send the VR Keyboard onto your iPad. You can press it multiple times to move the keyboard to the top or bottom half of the interface. You can press it again to send the keyboard out of view completely. 3. Add Keys Button This button will take you to the Add Keys interface view, where you can add new shortcut keys onto your workspace(s). 4. Settings Menu This button brings up all the various KillerKeys Pro iPad app settings you’re able to modify. This includes changing the look of the shortcut keys or background, turning widgets on or off, with the ability to re-arrange them on screen, as well as a Quick Launch configurator. Each individual item will be explained more thoroughly below. 5. Search Pressing the search button will take you into the Add Keys menu, and activate the Search function. Here you can type any portion of a shortcut name, and it will display it for you, which you can then add to your workspace. 6. Additional Info Toggle This will toggle the Additional Info option for the shortcut keys on or off. 7. Current Workspaces This section lists your current workspace. When touched, it allows you to quickly switch between workspaces, rename them, or add new ones. © Bella Corporation 2013, All Rights Reserved Page 30 IV. The Interface: VR Keyboard Initially, the VR Keyboard will display in Standard (non-VR) mode. It will have the look of a standard computer keyboard, giving you access to keys such as F keys, Home and End, Page Up and Down etc. When the keyboard is switched into VR mode, shortcuts for the application you are in will be displayed on the keyboard. © Bella Corporation 2013, All Rights Reserved Page 31 Note: You must have a recognized application running and in the foreground (the active application) for the shortcuts to be displayed. If an application is not recognized, “No Application” will be displayed in place of the application name. 1. Modifier Locked You can lock down a modifier key, such as the Control or Command key. This can be useful for applications such as Microsoft Word or Excel that have few direct keystrokes but many Control or Command keystrokes. When the modifier is locked, the key turns dark gray and the lock symbol is closed. To lock or un-lock a modifier key, press the lock symbol. 2. Modifier Un-Locked This is an example of an un-locked modifier key. 3. Shortcut Name When the keyboard is in VR mode, the top portion of the key will display the shortcut name and the key will be colored according to the group of shortcuts that it is associated with. 4. Key ID The bottom portion of a key shows the key that is normally displayed on the keyboard. 5. VR Mode - Active The VR Mode button toggles the VR mode of the keyboard on and off. In this view the VR mode is on (the key is green); once VR mode is turned off, the button will turn gray. 6. Multiple Shortcut Notification Many applications assign more than one shortcut to the same key (or key combination), so the meaning of the shortcut changes based upon which mode of the application you are in. For example, in Premiere Pro, the "O" key has both "Mark Out" and "Rotate" assigned to it. Keys that have multiple shortcuts assigned have a dotted separation bar (rather than solid). To switch the name on the key to what you use most, simply press and hold the key and a selector window will appear. © Bella Corporation 2013, All Rights Reserved Page 32 V. Multimedia Controller The multimedia controller will activate various shortcuts depending on the application you are working in. Some applications will not yet have multimedia controller shortcuts assigned. You have the ability to change/add any shortcuts you’d like into any of the multimedia buttons. Below are a list of the buttons and common functions that are mapped to them. Note: When no shortcut has yet been assigned, the buttons will appear grey, as shown above. Once a shortcut is assigned, the color will change, and you will see the shortcut name printed on the button. 1. In video editing applications, this is typically assigned as Mark In. Simply hold your finger on the button for a couple seconds to activate a new pop-up window that will allow you to change the shortcut assigned. © Bella Corporation 2013, All Rights Reserved Page 33 2. In video editing applications, this is typically assigned as Mark Out. Simply hold your finger on the button for a couple seconds to activate a new pop-up window that will allow you to change the shortcut assigned. 3. In video editing applications, this is typically assigned as Clear Mark In. Simply hold your finger on the button for a couple seconds to activate a new pop-up window that will allow you to change the shortcut assigned. 4. In video editing applications, this is typically assigned as Clear Mark Out. Simply hold your finger on the button for a couple seconds to activate a new pop-up window that will allow you to change the shortcut assigned. 5. Jog Wheel Spin the wheel left or right to activate the shortcuts indicated below. In video editing applications, this is typically assigned as 1 Frame Back and 1 Frame Forward. Simply hold your finger on the button for a couple seconds to activate a new pop-up window, that will allow you to change the shortcut assigned. . 6. Jog Left Simply hold your finger on the “Jog Left” text for a couple seconds to activate a new pop-up window that will allow you to change the shortcut assigned. The shortcut name will be written directly beneath “Jog Left”, and will activate when you spin the Jog Wheel counter-clockwise. 7. Jog Right Simply hold your finger on the “Jog Right” text for a couple seconds to activate a new pop-up window that will allow you to change the shortcut assigned. The shortcut name will be written directly beneath “Jog Right”, and will activate when you spin the Jog Wheel clockwise. 8. In video editing applications, this is typically assigned as Reverse Play, with each successive press increasing the speed. Simply hold your finger on the button for a couple seconds to activate a new pop-up window that will allow you to change the shortcut assigned. 9. In video editing applications, this is typically assigned as Stop or Pause. Simply hold your finger on the button for a couple seconds to activate a new pop-up window that will allow you to change the shortcut assigned. For many audio and video applications, this will stop playback of the media. 10. In video editing applications, this is typically assigned as Forward Play, with each successive press increasing the speed. Simply hold your finger on the button for a couple seconds to activate a new pop-up window that will allow you to change the shortcut assigned. © Bella Corporation 2013, All Rights Reserved Page 34 VI. Adding Shortcut Keys The Add Keys interface allows you to add new shortcut keys onto your workspace(s). The top portion of the screen displays your active workspace, while the bottom portion displays all shortcut keys for you active application. The shortcut keys are arranged in groups, as shown on the bottom left. Clicking on a group will display those group’s shortcut keys on the right. You can swipe up or down to display more © Bella Corporation 2013, All Rights Reserved Page 35 groups. Once you find a shortcut you wish to add to your workspace, simply touch the key from below, and drag it to the workspace above. If you don’t want to look through the groups to find your shortcut, you can also press the “Search Groups” button, and it will initiate the Search feature. Here you can type the shortcut you’re looking for, and it will bring up all relevant results. Once you are done adding new keys to your workspace, click “Done”. You can also quickly initiate a shortcut Search from the main interface view, by simply pressing the Search button on the top row of icons. VII. Settings Menu Key Looks: The first settings option you’ll find is for the look of the shortcut keys. You can choose between 8 different pre-determined options. Simply press the key look you prefer, and it will update your © Bella Corporation 2013, All Rights Reserved Page 36 workspaces. The color of the shortcut key is determined by the color of the group from which that shortcut belongs; choosing a Key Look has no relation to the key’s color. In the Key Looks section, you also have the option to toggle “Show Keystroke on Line Three” On or Off. This will show you what keystroke is used to execute the shortcut, such as “Ctrl+S” for “Save”. If you are trying to learn the shortcuts yourselves, we recommend having this option On. Background: The second settings option is for the Background image. This image will be shown behind the shortcut keys and widgets area. You have the option to choose between one of nine pre-determined backgrounds, or you can choose to use any solid color, by selecting the “Solid Color” option. © Bella Corporation 2013, All Rights Reserved Page 37 Widgets: The Widgets settings area lets you configure which widgets you see on screen, where they’re placed, various Trackpad options, and the ability to turn off the Widget section completely. To re-arrange the widgets, simple press and hold on one of them for a couple seconds, and a pop-up menu will appear letting you know where you can place it. A widget can only be placed in an empty, available location. If the location is already occupied, you can’t place the widget there; you must first remove the widget from the space by choosing the “Remove” option from the pop-up window. If there is no available space to place the widget, it will let you know in the pop-up window. You have a couple Trackpad options to choose from, one of which is to turn the Trackpad off completely, and the other is to show or hide the Mouse Buttons. If you turn the Trackpad off completely, you gain more room for widgets. If you turn the Mouse Buttons off, you’ll have more room for your finger when using the Trackpad. Every time you turn the Trackpad On or Off, the widgets will reset and you will need to re-position them where you want. If you decide to turn Widgets off completely, your workspace will become a full page of shortcuts. © Bella Corporation 2013, All Rights Reserved Page 38 Quick Launch: Upon entering the Quick Launch settings, KillerKeys will scan your computer for installed applications and display them in the “All Applications” column. If an application is missing after the scan finishes, please launch the application on your computer and then press “Refresh”. If it still doesn’t show up, close the Quick Launch settings window and re-open it by pressing the Settings button. To add applications to the Quick Launch side bar, press and hold the application from the “All Applications” list until it turns blue, then drag the application to the “Quick Launch Applications” column. To remove items from the Quick Launch Applications list, swipe right on the application name and a “Delete” button will appear. © Bella Corporation 2013, All Rights Reserved Page 39 5 Additional Information 1. Shortcut keys are derived from their respective programs’ default shortcuts. If you have changed the default shortcuts in your program some of the KillerKeys shortcuts may not function properly. Example: By default in Premiere Pro “J” is the shortcut for Rewind. If you have changed the shortcut for Rewind to “R”, the KillerKeys shortcut for Rewind will not function. KillerKeys is sending the default “J” command. 2. Some shortcut keys are mode specific and will not work in every area of the target program. Example: “O” is the shortcut for Mark Out in the Timeline area of most editing applications. However if your focus is on the Bin area, not the Timeline, clicking the KillerKeys shortcut for Mark Out will not function. 3. Some KillerKeys shortcut keys may appear to be duplicates. Some programs have multiple keyboard shortcuts for the same action. If the “Show Keystroke on Line Two” setting in the KillerKeys Setting window is enabled these shortcut keys will display the same description but different keystrokes. Example: In Internet Explorer the shortcut keystroke for “Close Tab” is both Control+W and Control+F4. 4. Some shortcuts may not function or be missing in the KillerKeys database. KillerKeys shortcuts are created from the programs themselves and as such discrepancies in the shortcuts displayed in a program, and the shortcuts which actually exist, can affect KillerKeys shortcut keys. If you notice missing or non-working shortcuts please contact Bella Corporation so the shortcut keys can be adjusted in future updates. 5.1 Obtaining Technical Support We are confident that our product will provide you with many years of trouble free service, however should you need assistance, we have provided you with a number of resources. The support section of our web site ( www.KillerKeys.com/support ) is the best source for the latest information and support on all our products. Please check the KillerKeys FAQs and Video Tutorials prior to contacting us for technical support, as this will provide you with immediate answers to the most common issues or concerns. On our site you will also find: Software Updates Settings Files Instructional Videos FAQs (Frequently Asked Questions) Latest Product Information www.KillerKeys.com © Bella Corporation 2013, All Rights Reserved Page 40