1
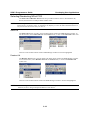
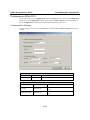
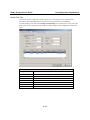
NPort PCG SDK 2 Programmer’s Guide
Third Edition, July 2006
www.moxa.com/product
MOXA Technologies Co., Ltd.
Tel:
+886-2-8919-1230
Fax: +886-2-8919-1231
Web: www.moxa.com
MOXA Technical Support
[email protected]
Worldwide:
NPort PCG SDK 2 Programmer’s Guide
The software described in this manual is furnished under a license agreement and may be used only in
accordance with the terms of that agreement.
Copyright Notice
Copyright © 2006 MOXA Technologies Co., Ltd.
All rights reserved.
Reproduction without permission is prohibited.
Trademarks
MOXA is a registered trademark of The Moxa Group.
All other trademarks or registered marks in this manual belong to their respective manufacturers.
Disclaimer
Information in this document is subject to change without notice and does not represent a commitment on the
part of Moxa.
Moxa provides this document “as is,” without warranty of any kind, either expressed or implied, including, but
not limited to, the particular purpose. Moxa reserves the right to make improvements and/or changes to this
manual or the product(s) and/or program(s) described herein at any time.
Information provided in this manual is intended to be accurate and reliable. However, Moxa Technologies
assumes no responsibility for its use, or for any infringements on the rights of third parties which may result
from its use.
This manual could include unintentional technical or typographical errors. Changes are periodically made to the
information herein, with the changes incorporated into new editions of the publication.
MOXA Internet Services
Customer satisfaction is our number one concern. To ensure that customers receive the full benefit of our
products, Moxa Internet Services has been set up to provide technical support, driver updates, product information,
and user’s manual updates.
The following services are provided:
E-mail for technical support
address:
[email protected].......................................(Worldwide)
[email protected] ................................(the Americas)
World Wide Web (WWW) site for product information
address:
http://www.moxa.com
or
http://www.moxa.com.tw
Table of Contents
Chapter 1
Introduction..................................................................................................1-1
Moxa OS Ver. 2.x .................................................................................................................... 1-1
PCG SDK 2 ............................................................................................................................. 1-1
SDK Function Group Overview .............................................................................................. 1-2
Chapter 2
Installing SDK...............................................................................................2-1
System Requirements .............................................................................................................. 2-1
Installing PCG SDK2 .............................................................................................................. 2-1
Desktop Icon .................................................................................................................. 2-1
PCG SDK2 Directories and Files................................................................................... 2-2
Installing Turbo C.................................................................................................................... 2-3
Turbo C Directories and Files ........................................................................................ 2-3
Setting up Environment Variables.................................................................................. 2-3
Chapter 3
Developing User Applications ....................................................................3-1
Application Development Flow............................................................................................... 3-2
Development System............................................................................................................... 3-3
Source Code Editing................................................................................................................ 3-3
Compiling and Linking your Application................................................................................ 3-4
Creating a Make File...................................................................................................... 3-4
Generating an EXE file .................................................................................................. 3-4
Using EXE2AP........................................................................................................................ 3-5
Protect Your Software with Private Key ........................................................................ 3-5
Embedding a Private Key in your Application............................................................... 3-5
Embedding a Private Key from the Command Line ...................................................... 3-6
Using SDK Manager ............................................................................................................... 3-6
Searching for NPort PCGs ............................................................................................. 3-6
Selecting/Deselecting NPort PCG ............................................................................... 3-10
Configuring an NPort PCG ...........................................................................................3-11
Application Download ................................................................................................. 3-16
Run Application / Debug ............................................................................................. 3-17
Example Programs................................................................................................................. 3-20
Chapter 4
Application Deployment..............................................................................4-1
Creating System Firmware—EXE2FRM ................................................................................ 4-1
Command Line Usage.................................................................................................... 4-2
Field Utility.................................................................................................................... 4-2
Developing an NPort PCG Utility ........................................................................................... 4-3
PCGCI Library............................................................................................................... 4-3
AP ID ............................................................................................................................. 4-3
AP Version ..................................................................................................................... 4-3
Chapter 5
Programming Notes ....................................................................................5-1
Flash ROM Access .................................................................................................................. 5-2
Flash ROM Structure ..................................................................................................... 5-2
Writing Data................................................................................................................... 5-3
Reading Data.................................................................................................................. 5-3
Erasing Data................................................................................................................... 5-3
Serial I/O Buffer ...................................................................................................................... 5-3
Chapter 6
FAQ ...............................................................................................................6-1
1
Ch apt er 1
Introduction
NPort Programmable Communication Gateway SDK 2 is designed for users who would like to run
their own proprietary application on NPort 5200-P Programmable Communication Gateway. PCG
SDK 2 comes with a Moxa embedded OS (Moxa OS), TCP/IP communication stack, and Software
Development Kit (SDK) and Windows utility that allow system integrators to create their own
proprietary solution that doesn’t use traditional PCs.
MOXA OS Ver. 2.x
Moxa PCG SDK 2 has an embedded, small footprint OS developed by Moxa Technologies Co.,
Ltd. It was developed originally for TCP/IP-based Terminal Server products starting in 1993. It is
a powerful and reliable software platform with a user-friendly SDK. The major features of Moxa
OS Ver. 2.0 are:
¾
¾
¾
¾
¾
16-bit, Unix-like embedded operating system
Small footprint (< 300 KB, including the TCP/IP protocol stack)
Non-preemptive multi-thread system
Stream I/O
Standard BSD Sockets for TCP/IP programming with multi-TCP session support
PCG SDK 2
To assist in the development of PCG applications, Moxa provides a comprehensive and
easy-to-use SDK (Software Development Kit), designed for use on Windows
95/98/Me/NT/2000/XP platforms. The main features of PCG SDK 2 are:
¾
¾
¾
¾
¾
¾
Borland™ Turbo C 2.01 compiler
SDK libraries with more than 100 function calls
SDK Manager and EXE2AP utilities for software download and troubleshooting
PComm Terminal Emulator
More than 20 example programs
Documentation
PCG SDK V2 has the following programming features:
¾
¾
Up to 192 KB of user program space (large mode in Turbo C)
Up to 160 KB of flash memory access space
Other advanced features include:
¾
¾
EXE2FRM utility for advanced application deployment
PCGCI library for utility development
SDK 2 Programmer’s Guide
Introduction
SDK Function Group Overview
The SDK Library contains several groups of function calls. The following table lists the function
call groups along with their primary function.
SDK Library Function Group Overview
Function Call Group
Description
Serial I/O API
Serial communication function calls that follow the
same style as PComm Library. This API includes
communication parameters, character read/write, block
read/write, I/O control, break generation, and more.
BSD Socket API
Standard BSD Socket API for TCP/IP programming.
Supports TCP and UDP communication.
Simplified Socket API
Simplified TCP/IP programming. Supports TCP and
UDP communication.
System Control API
Overall system control for NPort Module, including
system configuration, system restart, system timeout
counter.
Flash ROM Access API
Read, write, erase user storage space on flash.
Debug API
Sending messages to the debug window in SDK
Manager.
Thread Control API
Multi-thread functions to control thread open, close,
suspend, resume, and get thread status.
Time Server API
Set and retrieve time server, time zone, and time zone
index.
Memory Management
API
Allocate and free system memory dynamically.
Refer to “NPort PCG SDK 2 API Reference” for detailed information on how to use each of these
functions.
1-2
2
Chapter 2
Installing SDK
This chapter covers the following items:
¾ System Requirements
¾ How to install PCG SDK2 utilities and Library
¾ How to install the Turbo C compiler and environmental variables
¾ The location of Libraries and Example Files
System Requirements
You will need to have the following items available to use SDK’s development tools:
¾ Windows 9x, NT, Me, 2000, or XP operating system
¾ At least 64 MB of RAM
¾ At least 15 MB of hard disk space
Installing PCG SDK2
To install PCG SDK 2 on a Windows system, insert the software CD-ROM included with the
product into your computer’s CD-ROM drive, and then run the installation program:
CDROM:\Programmable version\SDK\setup.exe
and then follow the onscreen instructions to complete the installation.
Desktop Icon
The SDK Manager installation program gives
you the option of placing the icon shown at the
right, which serves as a shortcut to SDK
Manager, on your desktop. Simply double click
on the icon to start SDK Manager.
SDK 2 Programmer’s Guide
Installing SDK
PCG SDK2 Directories and Files
The installation program installs the following files on your computer’s hard drive:
Directory
…\PCGSDK2
Sub Directory\Files
Description
\Example\
SDK example files
\INCLUDE\
Contains all header files
\INCLUDE\SDKCONF.H
System Configuration API and Time Server API
declarations
\INCLUDE\SDKDBG.H
Debug symbol API declarations
\INCLUDE\SDKFLASH.H
Flash access API declarations
\INCLUDE\SDKNET.H
Simplified Sockets API declarations
\INCLUDE\SDKSIO.H
Serial I/O API declarations
\INCLUDE\SDKSOCK.H
BSD socket API declarations
\INCLUDE\SDKSYS.H
System API declarations
\INCLUDE\SDKTASK.H
Thread Control API declarations
\LIBRARY\
Contains the SDK Library files
\LIBRARY\C0SDK.OBJ
Object code for all APIs
\LIBRARY\MOXA_SDK.LIB API library for SDK
\Utility\
Contains SDK Manager, EXE2AP, EXE2FRM,
MoxaTerm utilities, along with corresponding help
files
\Pcgcilib\LIBRARY\
Contains the library for utility development under
Windows
DLL file for PCGCI (Programmable
\Pcgcilib\LIBRARY\PCGCI.dll Communication Gateway Configuration Interface)
API
\Pcgcilib\LIBRARY\pcgci.h
Declaration file for PCGCI API
\Pcgcilib\LIBRARY\Pcgci.lib
Library file for PCGCI API
\Pcgcilib\LIBRARY\pcgcib.lib Library file for PCGCI API
\Pcgcilib\LIBRARY\pcgci.chm PCGCI help file
\Pcgcilib\EXAMPLE\
Example programs for PCGCI
2-2
SDK 2 Programmer’s Guide
Installing SDK
Installing Turbo C
To install Turbo C on a Windows system, run the installation program:
CD ROM:\Programmable version\TurboC\tcsetup.exe
and then follow the onscreen instructions to complete the installation.
Turbo C Directories and Files
The installation program installs the following files on your computer’s hard drive:
Directory
\TC
Sub Directory\Files
Description
TCC.EXE
Turbo C 2.01 compiler
TLINK.EXE
Turbo C 2.01 linker
\INCLUDE\
Include file for Turbo C.
\LIB\
Library file for Turbo C
Setting up Environment Variables
During the installation procedure, the TC setup program (tcsetup.exe) automatically sets up your
environment variables for the Turbo C compiler. You may also set up the environment variables
manually from Control panel Æ System, or you can add a command line to autoexec.bat.
Assuming that SDK manager was installed in the directory C:\PCGSDK2 and Turbo C was
installed in C:\TC, the command lines are as follows:
path=c:\tc;%path%
set INCLUDE=c:\tc\include
set LIB=c:\tc\lib
2-3
3
Ch apt er 3
Developing User Applications
In this chapter, we cover the following items:
¾ Application Development Flow
¾ Software tools required for application development
¾ Software key protection
¾ Application deployment
In order to give you a better understanding of the development flow, we’ll use the example
program PRG.C to illustrate.
SDK 2 Programmer’s Guide
Developing User Applications
Application Development Flow
The following flowchart illustrates the standard process for developing your applications.
PRG.C
Compile
tcc.exe (large mode)
Other OBJ from TC
(e.g., math, string, …)
PRG..OBJ
C0SDK.OBJ
MOXA_SDK.LIB
Link
tlink.exe
PRG.EXE
S/W protection
EXE2AP.EXE
PRG.AP
SDK
Manager
Download & Run
PRG.AP
3-2
Private
Key
SDK 2 Programmer’s Guide
Developing User Applications
Development System
Before getting started on application development, you need to make sure that all of the required
equipment is set up and ready to go. Take NPort 5200-P as an example. The basic configuration
needed for application development is as follows:
¾ Windows 95/98/Me/NT/2000/XP computer with SDK installed
¾ NPort 5200-P with power adapter
¾ Ethernet hub/switch (or use a cross-over Ethernet cable to link the computer and NPort
directly)
¾ Two Ethernet cables
The basic wiring needed to set up a development system is as shown below.
Ethernet
Hub/Switch
Windows
Computer
Ethernet
V-
V+
12-30V
Ethernet
RESET
10/100M
Ethernet
Ready
Link
P1
P2
5210-P
5210
Industrial RS-232 Device Server
Port 1
RS-232
Port 2
RS-232
NPort 5200-P
Source Code Editing
Since the Turbo C compiler and linker work under the traditional DOS environment or windows
command prompt, we recommend using \TC\TC.EXE to edit your source code, or simply type
“edit” on the command line and then hit Enter to start Windows’ built-in editor.
You may also use “notepad” or any other text editor to write and edit source code. Turbo C’s IDE
environment is another good option. However, the environment variables need to be manually
configured since NPort SDK works mainly from command line mode.
For example, to edit the file SDKser23.c, first open a Command Prompt, use the cd (change
directory) command to open the folder C:\PCGSDK2\Example\Serial , and then type edit
SDKser23.c. You should now be able to view and edit the file SDKser23.c.
3-3
SDK 2 Programmer’s Guide
Developing User Applications
Compiling and Linking your Application
Under PCG SDK, compiling and linking is done from DOS command mode. Because of this, you
will need to create a make file before compiling and linking a program.
Creating a Make File
For tcc.exe, the following parameters should be enabled or properly assigned.
-I – assign include files directory.
-L – assign library files directory.
-O – optimize jumps.
-Z – maximum register usage.
-1 – 80186/286 instructions.
-ml– large mode
-c – compile only
-w – enable all warnings
For tlink.exe, the following parameters should be enabled or properly assigned.
-s – detailed map of segment.
For instance, the make file for C:\PCGSDK2\Example\Serial\SDKser23.c is as follows.
C:\PCGSDK2\Example\Serial> type sdkser23.bat
tcc
-I..\..\include -L..\..\library -O -Z -1 -ml -c -w SDKser23.c
tlink /s ..\..\library\C0sdk+SDKser23,SDKser23,SDKser23,..\..\library\moxa_sdk
*1. Please note that C0sdk.obj must be placed in the first position when linking object codes. If not,
the entry point of the program will be incorrect.
Generating an EXE file
You should be able to generate an EXE file after compiling and linking a program without
receiving any error messages. For example, after you run the make file, SDKser23.bat, in
C:\PCGSDK2\Example\Serial, the file SDKser23.exe is generated in the same directory.
3-4
SDK 2 Programmer’s Guide
Developing User Applications
Using EXE2AP
After successfully generating an EXE file, you will need to use Exe2ap.exe to convert the EXE
file into an AP file that has an embedded “Private Key.” This must be done before downloading
the AP file to the NPort.
Protect Your Software with Private Key
System integrators often provide their proprietary knowledge to solve particular problems for their
customers. Once you start providing NPort PCG as a platform for other users, you will need to
manage and protect your intellectual property that is embedded in the NPort PCG. For this reason,
Moxa PCG provides a private key that you can embed into your application (AP). The target PCG
should have the same private key, which can be set up with SDK Manager. The Moxa OS
automatically checks to make sure that the private key in the AP and kernel match.
Embedding a Private Key in your Application
To embed a private key in the target AP (e.g., sdkser23.exe) first run the program Exe2ap.
Next, take the following steps to complete the process of embedding a private key:
1.
Type the private key in the “Private Key” field. E.g., you could choose “23ji5rj34g” as the
private key.
2.
Click on the folder icon to the right of EXE file and then navigate to the EXE file you would
like to convert (e.g., SDKSER23.EXE).
3.
The name of the target AP file (SDKSER23.AP, for this example) will appear in the
Protected User Application text input box. If desired, you can change the file name, or click
on the folder icon and navigate to a different folder in which you would like to store the
resulting AP file.
4.
Prior to downloading and running the AP file, use SDK Manager to set up the same private
key for the NPort. Refer to next section for more details.
3-5
SDK 2 Programmer’s Guide
Developing User Applications
Embedding a Private Key from the Command Line
To give program developers a convenient alternative for producing an AP, EXE2AP can also be
activated from the Windows command Prompt. Enter the command in the following format:
EXE2AP –Kxxxxxxx –Syyyyyyyy.yyy –Dzzzzzzzz
Argument description
-K
Private key. Select a key with at most 15 characters or numbers (e.g., you could
choose private key = 23ji5rj34g).
-S
Source file. The source EXE file.
-D
AP file. Note that you should not type the file extension name since it is
predefined as “AP”.
For example, to generate the AP file from the command line, add the following line after tlink in
the batch file.
C:\PCGSDK2\UTILITY\Exe2ap>Exe2ap -K23ji5rj34g
-Sc:\pcgsdk2\example\serial\sdks
er23.exe -Dc:\pcgsdk2\example\serial\sdkser23
Using SDK Manager
After the application has been successfully compiled and linked, it time to use SDK Manager.
SDK Manager is a utility that provides the following functions.
¾ Search and locate NPort PCGs.
¾ Change the IP, Netmask, Gateway, default serial comm parameters, and private key for PCG.
¾ AP download
¾ Debug window
Searching for NPort PCGs
The Search Menu provides two different methods to search the network for an NPort PCG.
Broadcast Search is used to locate all NPort PCGs connected to the same LAN as the host, and
Search by IP is used to locate a specific NPort PCG, particularly if it is located outside the LAN
and can only be accessed by going through a router. The Search Menu also provides the Locate
Gateway function that can be used to identify a particular NPort PCG.
3-6
SDK 2 Programmer’s Guide
Developing User Applications
Broadcast Search
To access this function, select Broadcast Search under the Search menu, or click on the
Broadcast Search toolbar icon.
The Broadcast window will display the progress of the search.
Once the search is complete, the Model Name, Serial No., Server Name, AP ID, MAC Address,
IP Address, Subnet Mask, and OP Mode of each NPort that was located will be displayed in the
SDK Manager window.
3-7
SDK 2 Programmer’s Guide
NOTE
Developing User Applications
The default IP address of an NPort PCG 5200-P series product is 192.168.127.254, with subnet
mask set to 255.255.255.0.
Search by IP
To access this function, select Search by IP under the Search menu, or click on the Search by IP
toolbar icon.
When the Search by IP Address window opens, type the IP address in the text input box, and
then click OK.
The Search by IP window will display the progress of the search.
NOTE
If you receive the Specified device not found error message, as shown above, and the NPort PCG is
located on the same LAN as the host, try using Broadcast Search, or change the host computer’s IP
address and/or Netmask so that the computer and NPort PCG are on the same subnet.
3-8
SDK 2 Programmer’s Guide
Developing User Applications
If the search is successful, the Model Name, Serial No., Module Name, AP ID, MAC Address,
IP Address, Subnet Mask, and OP Mode of the NPort will be displayed in the SDK Manager
window.
Locate Gateway
The Locate Gateway function is used to find the physical location of a PCG unit when there are
multiple NPort PCGs on the same network. To use this function, first click on the device you
would like to locate to highlight the device’s information, and then select Locate Gateway under
the Search menu, or click on the Locate Gateway toolbar icon.
If the Locate Result is OK, then the Ready light on the located NPort PCG unit will blink steadily,
and the buzzer will beep once per second, allowing you to identify the NPort PCG and IP Address.
Click on OK to cause the NPort PCG unit’s Ready light to stop blinking.
3-9
SDK 2 Programmer’s Guide
Developing User Applications
Selecting/Deselecting NPort PCG
The Select All and Deselect All functions are provided to make it easier to download the AP,
Kernel, and Firmware to multiple NPort 5200-P series.
NOTE
SDK Manager includes a multi-selection capability. Hold down the Ctrl key to select multiple NPort
PCGs that are not listed in order, or hold down the Shift key to select all NPort PCG listed between
the first and last NPort PCG that you click on.
Select All
The Select All function is used to select all NPort PCGs listed in the SDK Manager window. To
use this function, select Select All under the Actions menu, or click on the Select All toolbar icon.
This will cause all NPort PCGs listed in SDK Manager window to become highlighted.
Deselect All
The Deselect All function is used to deselect all NPort PCGs listed in the SDK Manager window.
To use this function, select Deselect All under the Actions menu, or click on the Deselect All
toolbar icon.
This will cause all NPort PCGs listed in the SDK Manager window to become unhighlighted.
NOTE
When working with more than one NPort PCG 5200-P Series product connected to the same
network, be sure to assign a unique IP address to each device.
3-10
SDK 2 Programmer’s Guide
Developing User Applications
Configuring an NPort PCG
To use this function, select Configuration under the Actions menu, or click on the Configuration
toolbar icon. The Configuration window opens with the Comm. Gateway tab selected. Each of
the six Configuration window tabs is discussed in the following subsections.
Communication Gateway
To make changes, first click in the Gateway box, and then modify Gateway Name and network
settings.
Server Settings
Comments
Setting
Options
Module Name
Alphanumeric Determined by user.
Setting
Password Settings
Options
Comments
Password
Alphanumeric
Maximum number of characters allowed
is 16.
Confirm Password
Alphanumeric
Retype the Password entered in the first
box.
3-11
SDK 2 Programmer’s Guide
IP Address
Netmask
Gateway
Developing User Applications
Ethernet Port
Available with multi-selection
When multiple target NPort PCGs are
xxx.xxx.xxx.xxx
selected, they will all be configured with
the same IP address.
Available with multi-selection
Define a range of IPs by inputting Start
and End values. These IP addresses will be
xxx.xxx.xxx.xxx
assigned in sequence to selected NPort, in
order of their appearance in the Manager
window.
xxx.xxx.xxx.xxx
Static IP
DHCP
IP Config
DHCP+BOOTP
BOOTP
User defined IP address
Use Pre-defined IP address in “IP
Address”
Use DHCP protocol requests for IP
address
The DHCP Server assigns the IP address,
Netmask, Gateway, DNS, and Time
Server. If the DHCP Server does not
respond, the BOOTP Server assigns the IP
address.
Use BOOTP protocol requests for IP
address
3-12
SDK 2 Programmer’s Guide
Developing User Applications
Serial Port Tab
This section of the Configuration window allows you to modify the serial communication
parameters. The modified parameters will be saved in the NPort PCG’s flash ROM.
To make changes, first click in the Change Serial Settings box, and then click on the port in the
display area in the bottom part of the window to make changes to the configuration of the serial
ports.
Serial Port Settings
Setting
Options
Interface
Speed
Flow Control
FIFO Mode
Data Bits
Parity
Stop Bits
RS-232, RS-422 (including 4-wire RS-485) or 2-wire RS-485
50 to 230.4kbps
None, HW Flow Control, SW Flow Control
Enable, Disable
5, 6, 7, 8
None, Even, Odd, Space, Mark
1, 2
3-13
SDK 2 Programmer’s Guide
Developing User Applications
Private Key Tab
As mentioned above, a private key is required for both the AP and the NPort PCG. To embed the
private key in the NPort PCG, first click in the Change Private Key box, and then enter the
Private Key in the Private Key input box. Finally, enter the same Private Key in the Confirm
box.
Setting
Private Key Settings
Options
Comments
Private Key Input
Alphanumeric
Maximum number of alphanumeric
characters allowed is 15.
Retype the Private Key entered in the
first box.
Confirm Private Key Alphanumeric
3-14
SDK 2 Programmer’s Guide
Developing User Applications
Auto IP Report
In a dynamic IP environment (DHCP, BOOTP), the NPort PCG’s IP address changes from time to
time, making it hard for the host computer to locate the NPort PCG. To solve this problem, NPort
PCG automatically reports its location to a remote host computer. The Location Report section of
the Configuration window allows you to set up the IP address corresponding to a specified UDP
port for a host computer. The Report Frequency (Sec) setting determines how frequently the
location report is issued. You can use the PCGCI library to develop software that learns the
location of a remote NPort. Refer to the PCGCI Library help file,
C:\PCGSDK2\Pcgcilib\LIBRARY \pcgci.chm, for more details.
To make changes, first click in the Auto IP Report tab, and then enter Host IP, UDP Port, and
Report Frequency (Sec).
Setting
Location Report Settings
Options
Comments
Host IP
xxx.xxx.xxx.xxx
IP of a remote host computer. Leave this
field blank to disable this function.
Listen Port
0 to 65535
Host computer’s UDP listen port.
Report Frequency
(Sec)
0 to 60 sec
Set to 0 to disable this function.
3-15
SDK 2 Programmer’s Guide
Developing User Applications
Application Download
Up to this point, we have only discussed how to configure the NPort PCG’s network and other
parameters. The next thing to do is download the prepared application (AP) to the NPort PCG
testing.
Download AP
To download the AP, first select Download AP from the Actions menu, or click on the Download
AP toolbar icon.
Use the Open button to navigate to the folder that contains the AP file, or just type the AP
filename directly in the Filename input box. Click OK to start downloading the AP. The following
window appears when the AP has finished downloading.
Download Kernel
The kernel for NPort PCG is preloaded before shipment. When you receive an updated kernel
from Moxa, you can use the Download Kernel function to update the kernel yourself. To
download the kernel to the NPort PCG, first select Download Kernel from the Actions menu, or
click on the Download Kernel toolbar icon.
3-16
SDK 2 Programmer’s Guide
Developing User Applications
Use the Open button to navigate to the
folder that contains the kernel file, or just
type the kernel filename directly in the
Filename input box. Click OK to start
downloading the kernel. The following
window appears when the kernel has
finished downloading.
Run Application / Debug
You should now be ready to run your application, but first we need to discuss the two NPort PCG
operation modes.
Choose Running Mode or Developing Mode
NPort 5200-P provides two operation modes, which are selected by jumper (jumper JP4 for NPort
5210; jumper JP2 for NPort 5230). The jumpers are located on NPort 5200-P’s circuit board, so to
select between the two modes, first remove the outer cover.
Developing Mode
NPort 5210: Short jumper JP4
NPort 5230: Short jumper JP2
When set for Developing Mode, the PCG will not start running the application automatically after
the system is rebooted. To start the application, select Run Application / Debug from the Actions
menu, or click on the Run Application / Debug toolbar icon. We suggest setting the operation
mode to Developing Mode when going through the debugging process.
Running Mode
NPort 5210: Do NOT short jumper JP4
NPort 5230: Do NOT short jumper JP2
When set for Running Mode, the PCG automatically executes the application after the system
boots up. However, you can stop the application from within SDK Manager. This mode is suitable
for regular shipment.
NOTE
NPort PCG 5200-P servers are set to Running Mode by default.
NPort PCG 5200-ST servers are set to Developing Mode by default.
3-17
SDK 2 Programmer’s Guide
Developing User Applications
Start Application
To start an application loaded in the NPort PCG, first select Run Application /Debug from the
Actions menu, or click on the Run Application /Debug toolbar icon.
3-18
SDK 2 Programmer’s Guide
Developing User Applications
Gateway Info Area
The NPort PCG’s basic configuration settings are
shown in the Comm. Gateway Info area. The
information includes the following:
y Server Info—includes Model Name, Serial
No., Server Name, Firmware Version, number
of Serial Ports, number of Ethernet Ports,
Watchdog Mode, and OP Mode.
y AP Info—includes latest AP Name and file
location, Version, Date, and Size.
y Ethernet Info—includes MAC address, IP
address, Netmask, and Gateway.
y Serial Info—includes serial communication
parameters.
Status Info Area
The Status Info area shows NPort PCG’s online operation status.
There are two main items.
y Ethernet—NPort PCG support up to ten user programmable
TCP sessions. To monitor the usage of these TCP sessions
from SDK Debugger, you can see Remote IP, Remote Port,
Local IP, Local Port, Socket Type, and Connect Status.
y Serial—you can see the total Tx and Rx counts starting from
when the SDK Debugger was activated. In addition, you can
see line status, including RTS, DTR, CTS, DSR, and DCD.
Debug
The main debug approach for NPort PCG is to put the
debug API in your source code as a debug symbol. The
debug message will be sent to SDK’s debug window via
the Ethernet console. The “single step” and “break
point” debug methods are currently not supported.
3-19
SDK 2 Programmer’s Guide
Developing User Applications
Example Programs
NPort PCG’s SDK is a comprehensive utility designed to match a programmer’s basic intuition.
We’ve prepared several examples to let you quickly build up your first application. All of the
example programs are in the folder \PCGSDK2\Example.
3-20
4
Ch apt er 4
Application Deployment
After your application has been tested and is ready to go, it’s time to deliver the NPort PCG with
your software. In this chapter, we offer several useful tips and tools that let you organize the
production process efficiently.
Creating System Firmware—EXE2FRM
In general, the AP file is downloaded to the
NPort PCG separate from the kernel.
However, PCG SDK provides you with
another advanced tool, EXE2FRM, that is
used to merge the kernel and AP file into a
system firmware file. In this way, product
delivery is made easier, and furthermore, the
quality of the software is assured.
The EXE2FRM program can be found in
the C:\PCGSDK2\UTILITY\Exe2frm
directory. For easy access, simply create a
shortcut on your desktop to the EXE2FRM
program. After starting the EXE2FRM
program, the window shown at the right will
appear.
To generate a system firmware file, you will need to input the Private Key, original EXE file, and
Kernel file. The kernel file can be found in the Kernel folder on the CD-ROM, or can be
downloaded from Moxa’s web site at www.moxa.com. After entering the above information, enter
a file name for the generated System Firmware file. To download the System Firmware, open
SDK Manager and locate the target NPort PCG, and then select Download System Firmware
under the Actions menu, or click on the Download System Firmware toolbar icon.
SDK 2 Programmer’s Guide
Application Deployment
Command Line Usage
To speed up program development, EXE2FRM can also be activated from the DOS command line,
as shown below. Simply type:
EXE2FRM –Kxxx –Syyyyyyyy.yyy –Fyyyyyyyy.yyy –Dzzzzzzzz
Argument description
Private key. Select a key with at most 15 characters or numbers (e.g., you could
choose private key = 23ji5rj34g).
-S
Source file. The source EXE file.
-F
The file name for the kernel.
-D
FRM file. Note that you should not type the file extension name since it is
predefined as “AP”.
-K
For example, to generate an FRM file from the command line, add the following line after tlink in
the batch file.
C:\PCGSDK2\UTILITY\Exe2frm>exe2frm -K23ji5rj34g
-SC:\PCGSDK2\Example\Serial\SDKSER23.EXE
-FD:\Kernel\NP5200P_2.3.rom
-DC:\ PCGSDK2\NP5200P_2.3
Field Utility
SDK Manager is the main field utility for configuration and troubleshooting, but NPort PCG’s
SDK also provides you with a PCGCI Library that can be used for developing your own
proprietary utility. For more information, please refer to next section.
4-2
SDK 2 Programmer’s Guide
Application Deployment
Developing an NPort PCG Utility
NPort PCG SDK provides the NPort PCG Control Interface (PCGCI) Library for customers who
want to develop their own utility for use on a Windows computer.
PCGCI Library
PCGCI (NPort PCG Configuration Interface) is a set of APIs that run on a Windows
95/98/Me/NT/2000/XP systems to search, locate, and config the NPort PCG over the network. The
PCGCI library can be found in the folder C:\PCGSDK2\Pcgcilib\LIBRARY. For more
information, refer to document neci.chm in that directory. Examples are located in
C:\PCGSDK2\Pcgcilib\EXAMPLE.
AP ID
NPort PCG has a special parameter, called “AP ID,” that is of particular interest to PCG SDK
programmers who intend to repackage NPort PCG with their own application, new product name,
and new model number. The AP ID can be used to distinguish between different application
programs.
You can develop several versions of an application for use with different projects. In this case, it is
necessary for the host utility to identify which application is running on the NPort PCG. NPort
PCG uses the AP ID to identify which module is associated with which PCGCI API. The AP ID is
stored in the System Parameter Block within the firmware.
To set up the AP ID, you will need to insert the following code at the beginning of your own
source code (refer to the SDK Library System Control API).
void sys_Set_RegisterID( unsigned long id);
The AP ID can be read by SDK Manager, as well as by your own management utility created with
PCGCI Library.
AP Version
To modify the AP version of your application, add the following code in the c file.
char Ver[ ] = "SDK User AP V1.2";
You may also use Exe2ap or Exe2frm to modify the AP version directly, as illustrated in the
following figures:
4-3
SDK 2 Programmer’s Guide
Application Deployment
The AP version shows up in SDK Manager window.
4-4
5
Chapter 5
Programming Notes
This chapter provides a more in-depth explanation of the following topics.
¾ Flash ROM Access
¾ Serial I/O Buffer
SDK 2 Programmer’s Guide
Programming Notes
Flash ROM Access
NPort PCG contains a block of flash memory that is available for data buffering, or to store a
small amount of data. To make the operating system more efficient, there is no file system.
Flash ROM Structure
The flash ROM structure is illustrated below.
Block mode
API
Offset address
Bank mode
API
Offset address
Offset
Bank:Offset
0x00 –
0x00:0x00 –
0x00:0x7fff
0x01:0x00 –
0x00:0x7fff
0x02:0x00 –
0x00:0x7fff
0x03:0x00 –
0x00:0x7fff
0x04:0x00 –
0x00:0x7fff
0x27fff
NPort 5200-P Flash
ROM system
Bank 0
32k Bytes
Bank 1
Bank 2
160k Bytes
Bank 3
Bank 4
* Flash ROM structure for
System Area
Nport PCG
User Area
NPort 5200-P have 160 KB of user program space. There are two modes for accessing data stored
in the flash ROM.
1.
Block mode
The API “flash_xxxx( )” runs in block mode. The entire user area is treated as a block, with
sequential addresses used for each byte of data. The location of data in the flash is specified
by an offset address.
2.
Bank mode
The API “sys_flashxxx( )” runs in bank mode. Each bank contains 32 KB of flash memory.
The location of data in the flash is specified by a combination of bank and offset addresses.
5-2
SDK 2 Programmer’s Guide
Programming Notes
Writing Data
Data is written sequentially into the flash according to your program’s instructions. Each time data
is written, the offset address automatically moves to the next writing point. For example, if the
original offset address is 0x0100, and 20 bytes of data are stored, then the API moves the offset
address to 0x0121.
The API “flash_length( )” gets the length of the data currently stored in the flash. The return code
“-2” indicates that the bank is full. To reuse this bank, you first need to copy the data currently in
the bank to another bank. After the bank is cleared by the API, you can again write data, starting at
beginning of the bank.
Reading Data
You may use the offset address in block mode or bank:offset in bank mode to retrieve any of the
data in the flash memory.
Erasing Data
Due to the characteristic of flash, each byte in the flash can only be written once. To re-write the
same byte, you need to erase the entire bank.
Serial I/O Buffer
The internal buffer for serial I/O is located in the kernel. There are 2 KB of buffer space for
receiving data, and 4 KB for sending data.
5-3
6
Chapter 6
FAQ
In this chapter, we present a short list of Questions and Answers to assist you in solving frequently
encountered problems.
Question 1
Why is SDK Manager unable to configure or start debugging the NPort PCG after searching
for the NPort over a network?
Answer 1
SDK Manager uses UDP (which broadcasts packets over the network) to search for NPort
PCGs installed on the network. The configuration and debugging functions use TCP
communication. A typical error code from SDK Manager is “timeout”, “-2”. The following
reasons could cause TCP communication in SDK Manager to fail, whereas UDP works fine.
-
IP conflict
Netmask setting
Default gateway
The fastest solution is to reset the IP, netmask configuration to the same IP class for both PC
and NPort PCG. In this case, also remove the default gateway.
Question 2
What is the difference between “Download AP” and “Download Firmware?”
Anwer 2
1.
“Download AP” is for downloading the Application Program to the NPort PCG, but
“Download Firmware” involves downloading a file that combines the Application
Program and “Kernel.”
2.
The Firmware contains both the NPort PCG’s application program and kernel. This is
convenient for developers when distributing the final software package to end users.
Question 3
Why is SDK Manager unable to download an AP to the NPort PCG, and you see error code
“-5”?
Anwer 3
The error code “-5” occurs when the Private Key on the NPort PCG and the AP are
mismatched. The solution is to use SDK Manager to reset the Private Key of the NPort PCG to
correct value.