1
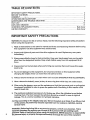
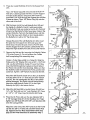
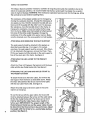
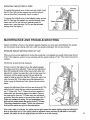
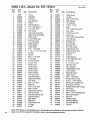
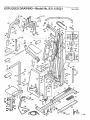
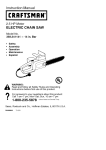
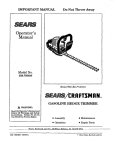
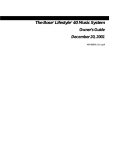
TM
C
R
O
S
S
TR
A
ININ
SE_/AJRS
i ¸
G
S
Y
TE
M
0 WNER 'S MAN UA L
Model No. 831.159231
Serial No.
The serial number can be found in the
IotaS'onshown below. Write the serial
number in the space above,
Serial Number
Decal
CAUTIONh
Read all safety
precautions and
instructions in this
owner's manual before
using this equipment.
Save this owner's
manual in a safe place
for future reference.
PATENT
PENDING
SEARS,
ROEBUCK
AND CO., NOFFMAN
ESTATES,
IL 60179
TABLE OE CONTENTS
IMPORTANT
SAFETY
PRECAUTIONS
................................................
2
BEFORE YOU BEGIN .... . .........................................................
ASSEMBLY,
.... ,_.,_,.. ..........................................................
OPERATION
AND ADJUSTMENT,
<_.:
MAINTENANCE
AND TROUBLE-SHOOTING
PART LIST , :.,, ...'
..........
,. ..................................................
EXPLODED
DRAWING .............................................................
3
4
.7
9
10
11
ORDERING REPLACEMENT
PARTS ..........................................
LIMITED WARRANTY .......................................................
Back Cover
Back Cover
IMPORTANT SAFETY PRECAUTIONS
WARNING: To reduce the risk
before using this equipment.
of serious
Injury, read the following
Important
safety precautions
1.
Read all instructions in this owner's manual and in the accompanying
this equipment.
Use this equipment
only as described.
2.
Inspect and tighten
immediately.
3.
Always wear athletic shoes for foot protection.
other than the designated
handles.
Keep small
times.
4.
Always stand on the foot plate when
ment to tip.
5.
To prevent damage to this equipment,
do not put any tension
on this equipment
changing the weight. Never use more than one cable at a time.
6. Always
7.
all parts
each time this equipment
performing
remove the lat bar and chain when
Never release the butterfly
is used. Replace
literature
before
using
any worn parts
Keep your hands away from moving parts
children away from this equipment
at all
any exercise
that could cause
not in use (see OPERATION
this equip-
while
AND ADJUSTMENT).
arms, lat bar, ab arm or leg lever while they are under tension.
8. When using the stepper, never set the resistance so high that you must push or pull against
the stepper handlebar in order to press the pedals down. Exercising in this manner could
result in heart risk.
9. The resistance
cylinders
touching them. The floor
leakage.
become
beneath
This is a normal condition
very hot during use. Allow the cylinders to cool before
the cylinders should be covered In case of slight oil
for hydraulic
cylinders.
10. When exercislng on the stepper, keep y0tJrfeet
on the pedals at all times: If you lift your feet
off the pedals, the pedals may become separated from the resistance cylinders, causing
serious injury.
"
WARNING: Before beginning this or any exercise program, consult your physician. This is
especially Important for persons over the age of 35 or persons with pre-existing health
problems. Read all instructions before using this equipment. SEARS assumes no responsibility
•for personal injury or property damage sustained by or through the use of this equipment.
BEFORE YOU BEGIN
Congratulations
for seiecting
the SEARS
® LIFESTYLER
SYSTEM
50 ERS cross training
system.
The
unique LIFESTYLER
SYSTEM 50 ERS is a total body conditioning system, offering both weight
traihing and aerobic exercises. M0v_ng from station to station on the LIFESTYLER
SYSTEM 50 ERS is
quick and easy, and the digital hand control allows you to change weight with the touch of a button.
Whether you want to build dramatic muscle size and strength, shape and tone your body, increase your
endurance and flexibility or develop your heart and lur_s, the LIFESTY'LER SYSTEM 50 ERS will help
you to achieve your goals in the privacy and comfort of your home.
This manual
is provided
to help you understand
the assembly,
adjustment
and operation
of the system.
For your safety and benefit, read thls manual carefully before using the system. If you have
additional questions, please call our Customer Service Department toll-free at 1-800-999-3756,
Monday through Friday, 6 a.m. until 6 p.m. Mountain Time (excluding holidays). To help us assist you,
please note your product model number and serial number before calling. The model number is listed
on the front cover of this manual. The serial number can be found on a decal attached to the system
(see the front cover of this manual).
Before reading further,
labeled.
please
review the drawing
below and familiarize
yourself
with the parts that are
Upper Cable
Lat Bar
Cable Hook
Butterfly
Arm
Frame
I
Ab Arm
Backrest;
Side Shield
Seat
Hand Control
Ab Seat
Pedal
Leg Lever
control
Lower Cable
St_
Chain
Foot Plate •
ASSEMBLY
Place all parts in a cleared area and remove the packing materials. Do not dispose of the packing
materials until assembly is completed.
Read all steps carefully before beginning. See the PART I.D.
CHART accompanying
this manual for a drawing of each small part used In assembly
list of the tools needed. The assistance of a second person is recommended.
Press the four 2" x 2" Outer Caps (13) onto the
,
,
Bolts (87) up through
the Stabilizer
Remove the 3/8" x 3/4" Bolt (35), the Cable Hook "(48),
the extra washer (A), and the 3/8" Nylock Nut (6)
which secure the Lower Cable (76) to the Frame (1)
as shown in the inset. Do not release the Cable until
completing
this assembly
J_"88
as shown.
13 Bracket_.._!/.
.............
step. The 3/8" x 3/4" Bolt
(35) and the 3/8" Nylock Nut (6) will be used in
assembly step 3 below. The Cable Hook will be used
later. The extra washer should be discarded.
Lower Cable (76) under the Pulley. Attach the Pulley
to the Stabilizer (2) with a 3/8" x 1 3/4" Bolt (18) and
3/8" Nylock Nut (6) as shown. Do not overtighten
the
Nut. The Pulley should turn freely.
.
Attach the Foot Plate (34) to the Frame (1) with the
two 3/8" x 3/4" Bolts (35) and two 3/8" Nylock Nuts (6).
.
Press the Backrest
Post (63) at the lower end of the
Backrest (36) into the Frame (1) as shown. Attach the
upper end of the Backrest to the Frame with the 1/4" x
2 1/2" Bolt (37) and a 1/4" Lock Washer
(7).
-
"_,
87
'
2
,,
@-89 13-t_
"
Place the Frame (1) over the two indicated 3/8" x
2 1/2" Carriage Bolts (87) as shown. Finger tighten
two 3/8" Nuts (89) with 3/8" Lock Washers (88) onto
the Carriage Bolts.
.
'
;.
Stabilizer (2). Turn the Stabilizer so the indicated
bracket is on top. Insert the four 3/8" x 2 1/2" Carriage
and for a
I
i
/ 7e',
%
.
Press four Large Bushings
(671.
(15) into the Support Arm
5
24
Tap a 1/2" Dome Cap (24) onto one end of the 9 1/4"
Axle (71). Liberally grease the Axle, Turn the Support
Arm(67) so the decal is away from the Frame (1):,
Insert the 9 1;_4"Axle through the Support Arm and the
Frame as Shown, Tap a 1/2" Dome Cap (24) onto the
other end of the Axle.
6
Wet the lower end of the Left Butterfly Arm (65) and
the inside of a Butterfly Pad (61) with soapy water.
(The Butterfly Pads are similar to the Ab Arm Pad [not "
shown], but the Butterfly Pads have larger holes in the
center.) Slide the Pad onto the Butterfly Arm until it is
6" from the lower end. Attach an Arm Handle (62) to
the Butterfly Arm with a 3/4" Tap Screw (64).
Grease the post of the Left Butterfly Arm (65). Insert
the post into the Support Arm (67) and tap a 3/4"
Dome Cap (14) onto the post. Insert a Pull Pin (68)
into the Support Arm (67) and the Left Butterfly Arm.
Attach the Right Butterfly Arm (66) in the same manner.
,
-66
--1
Remove the Bolt and Nut securing the Butterfly Cables
(77) to the Frame (1). Do not release the Cables
until completing
this assembly
step.
|
Center a pulley Sleeve (69) in a Pulley (5). Slide the
Pulley and a 3/8" Washer (51) onto a 3/8" x 1 3/4" Bolt
(18). Lay the left Butterfly Cable (77) over the Pulley.
Insert the Bolt through the bracket on the left side of
the Frame (1) (see the inset drawing). Make sure that
the Butterfly Cable is between the Pulley and the indicated tab. "13ghten a 3/8" Nylock Nut (6) onto the Bolt.
Attach the left Butterfly Cable (77) to the Left
Arm (65) with a 5/16" x 1" Bolt (53) and 5/16"
Nut (45). Do not overtighten
the Nut or the
will be damaged.
The Cable should swivel
Butterfly
Nylock
Cable
freely.
Attach the right Butterfly Cable (77) to the Right
Butterfly Arm (66) in the same manner.
.
9,
Attach the Ab Seat (20) to the Ab Frame (3) with four
1/4" x 3/4" Bolts (8) and 1/4" Lock Washers (7). Press
a I 1/2" x 1 1/2" Inner Cap (19) into the Ab Frame.
Place the Ab Frame (3) over the two indicated 3/8" x
2 1/2" Carriage Bolts (87) in theStabilizer
(2). Finger
.tighten two 3/8" Nuts (89) with 3/8" Lock Washers (88)
onto the Carriage Bolts.
Attach the other end of the AI_ Frame
9
3
"
3
"'
(
1
(3) to the Frame
(1) with two 3/8" x 3" Bolts (38) and 3/8" Nylock Nuts
(6). Tighten the four Nuts described
In this step
and the two Nuts described
in assembly
step 1.
\
..5_-
10. Press a 1 1/2" x 1 1/2" Inner Cap (19) into the Ab Arm
(21). Wet the upper end of the Ab Arm and the inside
of the Ab Arm Pad (25) with soapy water. Slide the
Pad onto the Ab Arm.
lO
N
Tap a 1/2" Dome Cap (24) onto one end of the 3" "D"Axle (23). liberally grease the Axle. Align the Ab Arm
(21) with the bracket on the Ab Frame (3). Insert the 3"
"D"-Axle into the Ab Frame and the Ab Arm. Tap a 1/2"
Dome Cap (24) onto the other end of the Axle.
-22
Attach the Lower Cable (76) to the Ab Arm (21) with
the 3/8" x 2 1/4" Bolt (22) and a 3/8" Nylock Nut (6).
Do not overtighten
Nut. The cable should swivel
freely.
1I. Liberally grease the axle on the Stabilizer (2), Slide a
Pedal Spacer (16) onto the left axle, with the open
side of the Spacer turned toward the Stabilizer. Make
sure there are two Large Bushings (15) in the Left
Pedal (10). Slide the Left Pedal onto the left axle. if the
Left Pedal is on correctly, the Pedal Cover (12) will be
-on top and the slotted bracket will be turned toward
the Stabilizer. Tap a 3/4" Dome Cap (14) onto the axle.
Assemble
_,_
_""
GJ'ease
8racket_
15--L_.o__14
the Right Pedal (11) in the same manner.
12. Liberally grease the axle on the Frame (1). Slide a
Cylinder Spacer (42) and a Resistance Cylinder (39)
onlo the right axle. Tap a 5/8" Dome CaD (40) onto the
axle. Attach the other Resistance Cylinder in the same
manner.
0
_'_
""b
• -39
Rest the Left and Right Pedals (10, 11) orithe
brackets at the lower ends of the Resistance Cylinders
(39). Make sure the brackets are in the same slots in
both Pedals.
13. Press a 1 1/2" x 1 1/2" Inner Cap (19) into the Seat
Support (4). Liberally grease the 1/2" x 2 3/4" Axle
w/Hat Cap (59). Attach the Leg Lever (58) to the Seat
Support
(4) with the Axle and the 1/2" Hat Cap (60).
Center one Pad Tube (56) in the Seat Support (4) and
one in the Leg Lever (58). Wet the ends of the Pad
Tubes and the insides of the Small Foam Pads (57)
with soapy water. Slide the Pads onto the Pad Tubes.
14.Attach
the Seat (54) to the seat support
(4) with two
1/4" x 3/4" Bolts (8) and two 1/4" Lock Washers
(7).
Insert the 1/2" x 2 3/4" Clevis Pin (55) into either the
high or low hole in the Frame (1). Insert the Hairpin
6
Cotter (90) into the Clevis Pin. Slide the Seat Support
(4) onto the Clevis Pin.
..........
,,, ,_,
15. Separate
the ends of the Conirol
Stand (29) and slide
15
the Plastic Sleeve (30) onto one end. Bring the ends
tOgether and _enter the Plastic Sleeve between them.
Plug one end of the Control Cord (27) into the Hand
Control (28). Plug the other end of the Cord into the
Wire Adapter
27
(74) at the front of the system.
Attach the Hand Control (28) to the Control Stand (29)
with the two 1/2" Tap Screws
(31).
Plug the Power Cord (26) into the socket at the backof the system.
OPERATION AND ADJUSTMENT
Plug the transformer on the power cord into a 120-vott outlet. Keep the power cord away from
walkways and heated surfaces. Turn on the power when using the system, or the system could
damaged. When you are finished using the system, always unplug the transformer.
DIAGRAM
OF THE HAND CONTROL
I,
1.
Low/High
Range IndicatornShows
set at minimum
or maximum
2.
Weight Display--Displays
3.
Power Button--Turns
4.
Weight Decrease
5.
Weight Increase
TURNING
when the system is
weight.
ON THE POWER
CHANGING
!'''L
"UII
5
4--
the weight.
AND RESE'n'ING
IMPORTANT:
2
3--
the weight.
THE SYSTEM
Each time the power
before the weight can be changed. The weight
press the weight increase or decrease
buttons
(minimum
setting.
the power on and off.
Button--Increases
I-'1
I
l iJ._3 t" m l
1
the current weight
Button--Decreases
Press the power button.
or "L30"
be
is turned
on, the system
display will read "E--."
until the display
reads
must be reset
To reset the system,
"H250" (maximum
weight)
weight).
THE WEIGHT
The weight can be changed
SETTING
OF THE SYSTEM
from a minimum
of 30 pounds,
up (0 a maximum
of 250 pbunds,
in incre-
ments of 1 pound. To increase the weight, press the weight increase button. To decrease the weight,
press the weight decrease button. The buttons can be held down to change the weight quickly.
IMPORTANT: To prevent damage to the system, do not put any tension on the system while
changing the weight. Do not push onthe butterfly
arms, ab arm or leg lever, if the lat bar is
attached to the system, it may be helpful to support the weight of the lat bar with one hand.
system motor will emit a sound to alert you while the weight Is being changed.
The
USING THE STEPPER
The stepper
features
precision
resistance
cylinder s for long life and trouble-free
nature of resistance cylinders, it is recommended
that the floor underneath
case of slight oil leakage. WARNING:
The resistance
cylinders
become
the cylinders
to cool before touching
them.
operation;
due _tothe
the stepper be covered in
very hot during use. Allow
The resistance of the stepper pedals can be changed by
moving the resistance brackets. Change the resistance of
one pedal at a time. Hold the resistance bracket with one
hand, and lift the pedal with the other hand. To decrease
the resistance, move the bracket closer to the frame; to
increase the resistance, move the bracket farther away
from the frame. Make sure the bracket is fully Inserted
into one of the slots under the pedal. Change the
resistance of the other pedal in the same manner. Make
sure the brackets are in the same position on both pedals.
ATTACHING
AND REMOVING
The seat support
THE SEAT SUPPORT
should be attached
to the system
as
described assembly step 14 on page 6. For certain
exercises, the seat support must be removed. If the Chain
(47) is attached to the leg lever, remove the Chain. Then,
lift the seat support until the bracket on the seat support is
flee of the clevis pin in the frame. See figure 2.
ATTACHING
SYSTEM
THE LEG LEVER
TO THE WEIGHT
Attach the Chain (47) between the leg lever and the lower
cable with the two Cable Hooks (48). See figure 2.
ATTACHING
THE WEIGHT
THE LAT BAR AND ANKLE
STRAP
TO
SYSTEM
To attach the lat bar to the lower cable, first remove the
seat support from the frame as described above. Attach
the Chain (47) between the lat bar and the lower cable
with the two Cable Hooks (48). See figure 3.
Attach the ankle strap to the lower cable in the same
manner as the lat bar.
To use the lat bar with the upper cable, the Chain (47)
must be attached between the lat bar and the cable using
the the two Cable Hooks (48). The Chain can be shortened by attaching the Cable Hooks closer together or
farther apart. IMPORTANT: The proper length of the
Chain between °theiat bar and the upper cable should
be determined
by the exercise to be performed.
Adjust
the length dr_til the lat bar is in a comfortable
starting
posit on.
Se .figure
4'
Resistance
Brackets
OPERATING
THE BUTTERFLY
ARMS
Storage
To operate the butterfly arms in the press arm mode, insert
the Pull Pins (68) into the support arm and the butterfly
arms as described
in assembly
To operate the butterfly
step 6 on page 5.
arms in the butterfly mode, remove
the Pull Pins from the support arm and the butterfly arms.
Insert one Pull Pin into the frame extension and the
Frame Extension,
support arm. Insert the other Pull Pin into the indicated
storage hole. See figure 5.
MAINTENANCE
AND TROUBLE-SHOOTING
Inspect and tighten all parts of the system regularly. Replace any worn parts immed;'ately. The system
can be cleaned using a damp cloth and a mild non-abrasive
detergent. Do not use solvents.
PROBLEM:
WEIGHT
SETTING
STICKS
AT "L30"
When you tirst use the digital hand control after assembly is completed, the weight setting may stick at
• "L30." If this happens, perform a few exercises with the weight setting at "L30." This should correct the
• problem.
n,-,,-,_,
,--,,. ,-.............
=.__
CASLES
=.
If there is slack in the cables before the weight engages
the cables need to be adjusted. There are two Adjustment
7O
Nuts (70) located at the top of the frame which allow fine
adjustment. Lobsen the upper Nut, and turn the lower Nut
clockwise until the cables are tight. Do not allow the
cable to twist as you turn the Nut. Tighten the upper Nut
onto the lower Nut. If the cable cannot be tightened any
further using the Adjustment
Nuts, follow the instructions
below.
Loosen the Adjustment
Nuts until they are at the end of the
cable threads. Locate the two pulleys connected by the
two "l"-Plates (46). The "l"-Plates have three adjustment
holes which can be used to tighten the cables. Remove
the upper pulley from the "l"-Plates using two adjustable
wrenches. Move the pulley to the next lower hole in the "l"-
L
Plates and reattach the pulley. Do not overtighten the
bolt and nut which attach the pulley tO the 'T'-Plates.
The pulley should turn freely_ Tighten the Adjustment
Nutsuntil the cables are tight as described above.
I! the motor stalls or hesitates,
the cables are too tight; loosen the cables slightly using the Adjustment
Nuts as described above. If the cable cannot be adjusted [urther and there is still slack in the weight
system, the cables should be replaced (see the back cover of this manual).
PART LIST--Model
Key
Part
No.
No.
Qty.
1
2
3
4
5
6
7
8
NSP
109864
108861
108834
111175
012108
014O62
013456
9
10
11
12
13
14
15
16
17
18
19
20
013322
109865
1O9866
106872
105723
103735
109867
109868
107048
013564
103833
108729
21
22
23
24
109869
013574
109870
103903
26
27
28
29
101067
106786
105922
36
37
38
39
4O
41
42
43
44
45
_,6
47
_10
108982
108673
103860
109794
109795
108832
105134
110266
013341
013519
109871
100151
109872
109873
107367
105142
012082
1O9875
105315
Rev. 3/93
Key
Part
Description
No.
No.
Qty.
1
1
1
Frame
Stabilizer
Ab Frame
48
49
50
103087
105311
104049
2
1
3
Cable Hook
Lat Bar
3/8" x 3 1/2" B01t
1
9
Seat Support
Pulley
51
52
lO5495
109877
5
1
3/8" Washer
"U"-E_racket
17
7
6
10
3/8"
1/4"
1/4"
3/4"
Nylock Nut
Lock Washer
x 3/4" Bolt
Screw
53
54
55
56
013303
105376
110450
108726
2
1
1
2
5/16" x 1" Bolt
Seat
1/2" x 2 3/4" Clevis Pin
Pad Tube
1
1
Left Pedal Assembly
Right Pedal Assembly
57
58
103805
109878
4
1
Small Foam Pad
Leg Lever
2
4
4
8
2
Pedal Cover
2" x 2" Outer Cap
3/4" Dome Cap
Large Bushing
Pedal Spacer
59
60
61
62
63
107653
100150
108860
109412
110265
1
1
2
2
1
1/2" x 2 3/4" Axle w/Cap
1/2" Hat Cap
Butterfly Pad
Arm Handle
Backrest Post
1
7
3
1
1
Ankle Strap
3/8"x 1 3/4" Bolt
1 112" x 1 1/2" Inner Cap
Ab Seat
Ab Arm
64
65
66
67
68
107428
108851
108858
109879
108739
2
1
1
1
2
3/4" Tap Screw
Left Butterfly Arm
Right Butterfly Arm
Support Arm
Pull Pin
1
3/8" x 2 1/4" Bolt
69
111470
9
Pulley Sleeve
1
4
1
3" "D"-Axle
1/2" Dome Cap
_,_
, ,_u
At,,, ,-,,,.
^.-n.,,,J
Power Cord
70
71
i_
_""*
73
101138
109880
I .....
uOOOI
109890
2
1
I
1
5/16" Adjustment
9 1/4" Axle
2"X ......
(IIIIIIdl"
Oal._l
Wire Harness
1
1
1
Control Cord
Hand Control
Control Stand
74
75
.76
106982
109886
109882
1
1
1
Wire Adapter
Weight Mechanism
Lower Ca.ble
1
2
1
Plastic Sleeve
1/2" Tap Screw
Left Side Shield
77
78
79
109883
109884
013580
2
1
1
Butterfly Cable
Upper Cable
3/8" x 1 3/4" Bolt
1
1
Right Side Shield
Foot Plate
80
81
108153
014131
1
1
Plastic Washer Set
5/16" x I 1/2" Washer
2
1
3/8" x 3/4" Bolt
Backrest
82
83
108150
108151
1
1
Mechanism Spacer Set
Extension Arm Set
1
3
1/4" x 2 1/2" Bolt
3/8" x 3" Bolt
84
85
108192
108149
1
3
Weight Mechanism
Clevis Pin
2
2
Resistance Cylinder
5/8" Dome Cap
86
87
105496
108674
3
4
Push Washer
3/8" x 2 1/2" Carriage
88
89
90
#
110468
012159
105866
111068
4
4
1
1.o
3/8" Lock Washer
3/8" Nut
Hairpin Cotter
Owner's Manual
111069
104838-.
1
1
Exercise
Grease
•_
3O
31
32
33
34
35
No. 831.159231
2
2
• 2
2
Cylinder Bushing
Cylinder Spacer
. Gas Shock
Ball Joint
4
2
1
5/16" Nylock Nut
"l"-Plate
.
Chain
Set
#
#
Note: "#" indicates a non-ittust!ated part. Specifications
are subject to change
back cover of this manual for information about ordering replacement parts.
Description
without
Nut
Pulley
Bolt
Manual
notice.
See the
EXPLODED DRAWING--Model
No. 831.159231
Rev. 3193
6
78
17
57
!
19
24
2176
20
12
2
19
13
10
i
"O-14
ORDERING
Each SYSTEM
requesting
REPLACEMENT
has its own .MODEL
service
NUMBER.
PARTS
Always mention this MODEL
when
or repair parts for your SYSTEM.
All parts listed her_.in may be ordered through
most SEARS RETAIL STORES.
SEARS, ROEBUCK
AND CO. SERVICE
tf parts you need are not stocked locally, your order will be transmitted
DISTRIBUTION
CENTER for handling.
WHEN ORDERING
NUMBER
REPAIR
1. The MODEl_ NUMBER
PARTS, ALWAYS GIVE THE FOLLOWING
and
PARTS
INFORMATION:
of the product (831.159231).
2.
The NAME of the product
3.
The PART NUMBER
4.
The DESCRIPTION
Your Sears merchandise
to a SEARS
CENTERS
(SEARS * LIFESTYLER
SYSTEM
50 ERS).
of the part(s), from page 10 of this manual.
of the part(s), from page 10 of this manual.
has added value when you consider that Sears has service units nationwide,
staffed with Sears trained technicians specifically trained on Sears products, having the parts, tools
and equipment to ensure that we meet our pledge to you: "We service what we sell."
FULL 90 DAY WARRANTY
For 90 days from the date of purchase, when proper assembly and maintenance procedures
detailed in the Owner's Manual are followed, SEARS will, free of charge, repair or replace and
install a replacement
This warranty
part for any defective
part, when this system
is used in a normal manner.
does not apply when this system is used for commercial
SERVICE IS AVAILABLE
CENTER/DEPARTMENT
SIMPLY BY CONTACTING
IN THE UNITED STATES.
This warranty gives you specific
from state to state.
YOUR NEAREST
or rental purposes.
SEARS
SERVICE
legal rights, and you may also have other rights which vary
SEARS, ROEBUCK AND CO, DEPT, 817WA,
3333 BEVERLY ROAD, HOFFMAN ESTATES, IL 60179
•Part N'o. 111068 3/9.3 © 1993 Sears, Roebuckand Co.
Printed in U.S.A,