1
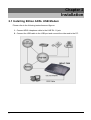
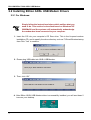
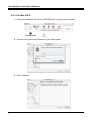
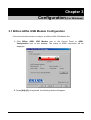
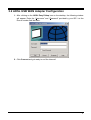
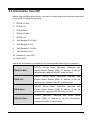
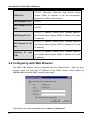
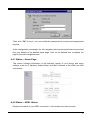
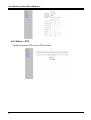
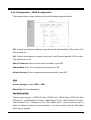
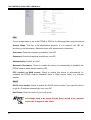
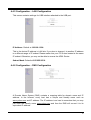
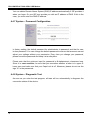
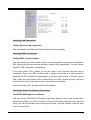
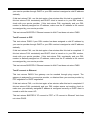
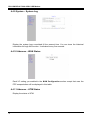
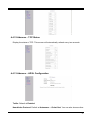
BIPAC 7000
ADSL USB Modem
User’s Manual
Table of Contents
Chapter 1 ............................................................................................1
Introduction .................................................................................................... 1
1.1 Billion ADSL USB Modem Features.................................................................... 1
1.2 Package Contents ........................................................................................... 1
1.3 The Front Panel LEDs...................................................................................... 2
1.4 Information from ISP ........................................................................................ 2
Chapter 2 ............................................................................................3
Installation ...................................................................................................... 3
2.1 Installing Billion ADSL USB Modem .................................................................... 3
2.2 Installing Billion ADSL USB Modem Drivers ......................................................... 4
2.2.1 For Windows: ...........................................................................................................4
2.2.2 For Mac OS 9...........................................................................................................5
2.2.3 For Mac OS X .........................................................................................................6
2.2.4 For Linux Redhat 7.1/7.2/8.0/9.0:.............................................................................8
Chapter 3 ............................................................................................9
Configuration (For Windows)........................................................................ 9
3.1 Billion ADSL USB Modem Configuration ............................................................. 9
3.2 ADSL USB WAN Adapter Configuration ............................................................ 11
Chapter 4 ..........................................................................................12
Configuration(For Mac & Linux) ................................................................. 12
4.1 Configuring the Network Properties .................................................................. 12
4.2 Factory Default Settings ................................................................................. 12
4.3 Information from ISP ...................................................................................... 13
4.4 Configuring with Web Browser ......................................................................... 14
4.4.1 Status – Home Page ..............................................................................................15
4.4.2 Status – ADSL Status.............................................................................................15
4.4.3 Status – PPP..........................................................................................................16
4.4.4 Configuration – WAN Configuration .......................................................................17
4.4.5 Configuration – LAN Configuration.........................................................................19
4.4.6 Configuration – DNS Configuration ........................................................................19
4.4.7 System – Password Configuration .........................................................................20
4.4.8 System – Diagnostic Test.......................................................................................20
4.4.9 System – System Log ............................................................................................24
4.4.10 Advance – WAN Status........................................................................................24
i
BILLION BIPAC-7000 ADSL USB Modem
4.4.11 Advance – ATM Status.........................................................................................24
4.4.12 Advance – TCP Status .........................................................................................25
4.4.13 Advance – ADSL Configuration............................................................................25
4.4.14 Save Settings .......................................................................................................26
APPENDIX A.....................................................................................27
Product Support........................................................................................... 27
ii
Chapter 1
Introduction
1.1 Billion ADSL USB Modem Features
Billion ADSL USB Modem provides the following features:
♦ Bus-powered USB modem for broadband ADSL.
♦ Downstream data rate up to 8 Mbps and upstream up to 1 Mbps.
♦ No external power supply is required.
♦ Hot Plug and Play for Microsoft Windows 98 (SE), 2000, Me, and XP.
♦ Supports NDIS interface for RAS and Dial-Up Networking.
♦ Software upgradable.
♦ Supports multiple data encapsulation formats, including PPPoE, PPPoA, IPoA, and
RFC1483 bridged or routed.
♦ Friendly GUI Configuration Program.
1.2 Package Contents
The product package comes with the following accessories:
1. One Billion BIPAC-7000 ADSL USB Modem
2. One installation CD with drivers and online manual
3. One RJ-11 ADSL telephone cable
4. One USB cable
5. One Quick Start Guide
1
BILLION BIPAC-7000 ADSL USB Modem
1.3 The Front Panel LEDs
LED
Meaning
USB
When this LED is lit, it indicates that the USB port is
connected to the PC and working properly.
DATA
When this LED is flashing constantly, it indicates the
BIPAC-7000 is transmitting/receiving data.
ADSL
When lit, it indicates that the ADSL (Line) port is
connected to the DSLAM and working properly.
1.4 Information from ISP
Before start installing this device, you have to check with your ISP on what kind of service
(connection method) is provided such as PPPoE, PPPoA, RFC1483 bridged or routed,
IPoA.
Gather the information as illustrated in the following table and keep it for reference.
PPPoE
VPI/VCI,
VC-based/LLC-based
multiplexing,
Username, Password, Service Name, and Domain
Name System (DNS) IP address (it can be
automatically assigned from ISP or be set fixed).
VPI/VCI, VC-based/LLC-based
PPPoA
multiplexing, Username,
Password, and Domain Name System (DNS) IP address (it
can be automatically assigned from ISP or be set fixed).
RFC1483
Bridged
RFC1483
Routed
VPI/VCI, VC-based/LLC-based multiplexing
VPI/VCI, VC-based/LLC-based multiplexing, IP address,
Subnet mask, Gateway address, and Domain Name
System (DNS) IP address (it is fixed IP address).
VPI/VCI, IP address, Subnet mask, Gateway address, and
IPoA
Domain Name System (DNS) IP address (it is fixed IP
address).
2
Chapter 2
Installation
2.1 Installing Billion ADSL USB Modem
Please refer to the following instructions and figures:
1. Connect ADSL telephone cable to the LINE RJ-11 jack.
2. Connect the USB cable to the USB port and connect the other end to the PC.
3
BILLION BIPAC-7000 ADSL USB Modem
2.2 Installing Billion ADSL USB Modem Drivers
2.2.1 For Windows:
Simply follow the instructions below which outline what you
need to do. This section is described based on Windows XP/
2000/Me/98 and the systems will automatically acknowledge
the modem has been connected to your computer.
1. Insert the CD into your computer’s CD Rom drive. This is the hi-speed modem
installation CD, and to specify the driver directory such as F:\Driver\Windows\setup,
than Click “Yes” to continue.
2. Please plug USB cable into ADSL USB Modem.
3. Then, click “OK”.
4. After Billion ADSL USB Modem driver is successfully installed, you will see these 2
icons on your desktop.
4
5. The Status Task Bar will appear on the System Tray.
2.2.2 For Mac OS 9
If you connect the ADSL Modem/Router through USB port, for the first time the USB cable is
connected to the PC, the host PC OS will automatically detect the device. Follow the steps to
install the USB driver.
1. When PC tells you that the new device has been detected, insert the installation CD into
the CD-ROM drive. Click the driver installer. The following directory will be created.
2. Click “Install”.
3. Click “Restart” to end the installtion.
5
BILLION BIPAC-7000 ADSL USB Modem
2.2.3 For Mac OS X
1. Insert the installation CD into the CD-ROM drive, click the driver installer.
2. Input the user name and password of your Mac system.
3. Click “Continue”.
6
4. Select a destination to install the driver, choose Mac X.
5. Click “Continue”.
6. Click “Continue Installation” to end the installation.
7
BILLION BIPAC-7000 ADSL USB Modem
2.2.4 For Linux Redhat 7.1/7.2/8.0/9.0:
1. Install the driver
(Redhat 7.1)
#rpm –ivh BIPAC-7000-REDHAT-7.1.i386.rpm
(Redhat 7.2)
#rpm –ivh BIPAC-7000-REDHAT-7.2.i386.rpm
(Redhat 8.0)
#rpm –ivh BIPAC-7000-REDHAT-8.0.i386.rpm
(Redhat 9.0)
#rpm –ivh BIPAC-7000-REDHAT-9.0.i386.rpm
2. Launch the driver
#cd /usr/local/e2
#insmod e2.o
#ifconfig hsb0 up(Note: run this command after the READY LED blinks)
#dhcpcd hsb0 (Note: run this command after the READY LED blinks)
3. Uninstall the driver
#rpm –e USBENDPOINT
After your installation, please edit this file /etc/rc.d/rc.local to append four
commands.
cd /usr/local/e2
insmod e2.o
ifconfig hsb0 up
./dhcpcd hsb0
Then PC will get an IP address after reboot from ADSL USB device automatically.
8
Chapter 3
Configuration (For Windows)
3.1 Billion ADSL USB Modem Configuration
Follow the instructions below to configure your Billion ADSL USB Modem first.
1. Click Billion ADSL USB Modem icon in the Control Panel or ADSL
Configuration icon on the desktop. The status of ADSL connection will be
displayed.
2. Press [Alt]+[P] on keyboard, the following widow will appear.
9
BILLION BIPAC-7000 ADSL USB Modem
3. Select the Protocol Setup tag, please set the value of “VPI”, “VCI” and
“Encapsulation Mode”. Then, click “OK”.
(Note:Be sure to use the correct VPI and VCI numbers supplied by your
telephone company.)
10
3.2 ADSL USB WAN Adapter Configuration
1. After clicking on the ADSL Easy Dialup icon on the desktop, the following window
will appear. Enter the “Username” and “Password” provided by your ISP. Let the
Phone number field be blank.
2. Click Connect and get ready to surf the Internet!
11
Chapter 4
Configuration(For Mac & Linux)
4.1 Configuring the Network Properties
The ADSL USB Modem can be configured with your web browser, the default IP
address of the ADSL USB Modem is 192.168.1.254 and subnet mask is
255.255.255.0.
The ADSL USB Modem uses “Emulate USB port to Ethernet”
technology to emulate the USB port to Ethernet port, the
terminology “LAN” described in the paragraph below is equal to
“USB”.
Any TCP/IP capable workstation can be used to communicate with
or through the ADSL Modem/Router. To configure other types of
workstations, please consult the manufacturer’s documentation.
4.2 Factory Default Settings
Before you configure this device, you need to know the following default settings.
1. Web Configurator
User Name
Password
admin
password
Administrator
2. Device IP Network settings in LAN site
IP Address: 192.168.1.254
Subnet Mask: 255.255.255.0
3. ISP setting in WAN site
Virtual Circuit 0: 1483 Bridged IP LLC
12
4.3 Information from ISP
Before start configuring this device, you have to check what kind of service is provided
by your ISP, including the following:
1.
PPPoE VC-Mux
2.
PPPoE LLC
3.
PPPoE None
4.
PPPoA VC-Mux
5.
PPPoA LLC
6.
1483 Bridged IP VC-Mux
7.
1483 Bridged IP LLC
8.
1483 Routed IP VC-Mux
9.
1483 Routed IP LLC
10. Classical IP over ATM
11. Native ATM
Gather the information as illustrated in the following table and keep it for reference.
VPI/VCI, Service Name, Username, Password, and
PPPoE VC-Mux
Domain Name System (DNS) IP address (it can be
automatically assigned from ISP or be set fixed).
VPI/VCI, Service Name, Username, Password, and
PPPoE LLC
Domain Name System (DNS) IP address (it can be
automatically assigned from ISP or be set fixed).
VPI/VCI, Service Name, Username, Password, and
PPPoE None
Domain Name System (DNS) IP address (it can be
automatically assigned from ISP or be set fixed).
VPI/VCI, Username, Password, and Domain Name
PPPoA VC-Mux
System (DNS) IP address (it can be automatically
assigned from ISP or be set fixed).
13
BILLION BIPAC-7000 ADSL USB Modem
VPI/VCI, Username, Password, and Domain Name
PPPoA LLC
System (DNS) IP address (it can be automatically
assigned from ISP or be set fixed).
1483 Bridged IP LLC
1483 Bridged IP VCMux
VPI/VCI
VPI/VCI
VPI/VCI, IP address, Subnet mask, Gateway address,
1483 Routed IP LLC
and Domain Name System (DNS) IP address (it is fixed
IP address).
1483 Routed IP VCMux
Classical
ATM
VPI/VCI, IP address, Subnet mask, Gateway address,
and Domain Name System (DNS) IP address (it is fixed
IP address).
IP
over
VPI/VCI, IP address, Subnet mask, Gateway address,
and Domain Name System (DNS) IP address (it is fixed
IP address).
4.4 Configuring with Web Browser
The ADSL USB Modem can be configured with your Web browser. Open the web
browser, enter the local port IP address of the ADSL Router, which default at
192.168.1.254, and click “Go” to get the login page.
The default user name and password are admin and password.
14
Then, click “OK” to log in. You can modify the passwords for security and management
purpose.
At the configuration homepage, the left navigation pane where bookmarks are provided
links you directly to the desired setup page. Click on the desired item to expand the
page in the main navigation pane.
4.4.1 Status – Home Page
This screen contains information of the software version of your device and some
settings, such as IP Address, Subnet Mask, and MAC Address of the WAN and LAN
connections.
4.4.2 Status – ADSL Status
Displays the status of your ADSL connection. It will refresh every two seconds.
15
BILLION BIPAC-7000 ADSL USB Modem
4.4.3 Status – PPP
Displays the status PPP for each PPP interface.
16
4.4.4 Configuration – WAN Configuration
The screens below contain settings for the WAN interface toward Internet.
VPI: Consult the telephone company to get the Virtual Path Identifier (VPI) number. The
default value is 8.
VCI: Consult the telephone company to get the Virtual Channel Identifier (VCI) number.
The default value is 35.
Static IP Address: Enter the information provided by your ISP.
Subnet Mask: Enter the information provided by your ISP.
Default Gateway: Enter the gateway address provided by your ISP.
ATM
Service Category: Select UBR or CBR.
Bandwidth: Enter the bandwidth.
ENCAPSULATION
There are eleven ways ─ PPPoE VC-Mux, PPPoE LLC, PPPoE None, PPPoA VC-Mux,
PPPoA LLC, 1483 Bridged IP VC-Mux, 1483 Bridged IP LLC, 1483 Routed IP VC-Mux,
1483 Routed IP LLC, Classical IP over ATM, Native ATM ─ for the device to have a
public IP address and then to access Internet. You have to check with your ISP about
which way is adopted.
17
BILLION BIPAC-7000 ADSL USB Modem
PPP
If your encapsulation is set to be PPPoE or PPPoA, the following fields must be entered.
Service Name: This item is for identification purpose. If it is required, your ISP will
provide you the information. Maximum input is 31 alphanumeric characters.
Username: Enter the username provided by your ISP.
Password: Enter the password provided by your ISP.
Authentication: Default at “Auto”.
Automatic Reconnect: Check to enable this device to automatically re-establish the
PPPoE session when disconnected by ISP.
PPP connect on WAN access: Check to enable this device to automatically reestablish the PPPoE session whenever there is WAN access traffic, e.g. Internet
access.
DHCP
DHCP client enable: Check to enable the DHCP client function if you want the device
to get an IP address automatically from your ISP.
Host Name: Enter the name of your work group.
All settings need to be saved and the device needs to be rebooted
before the changes to take effect.
18
4.4.5 Configuration – LAN Configuration
This screen contains settings for USB interface attached to the USB port.
IP Address: Default at 192.168.1.254.
This is the device IP address in LAN site. If you plan to change it to another IP address
to a different range of IP subnet. Please make sure your PC is also located at the same
IP subnet. Otherwise, you may not be able to access the ADSL Router.
Subnet Mask: Default at 255.255.255.0.
4.4.6 Configuration – DNS Configuration
A Domain Name System (DNS) contains a mapping table for domain name and IP
address. In the Internet, every host has a unique and friendly name such as
www.yahoo.com and IP address. The IP address is so hard to remember that you may
just enter the friendly name www.yahoo.com and then the DNS will convert it to its
equivalent IP address.
19
BILLION BIPAC-7000 ADSL USB Modem
You can obtain Domain Name System (DNS) IP address automatically if ISP provides it
when you logon. Or your ISP may provide you with an IP address of DNS. If this is the
case, you must enter the DNS IP address.
4.4.7 System – Password Configuration
In factory setting, the default password for administrator is password, and that for user
is also password. You can change the default password to ensure that someone cannot
adjust your settings without your permission. Every time you change your password,
please record the password and keep it at a safe place.
Please note that the minimum input for password is 8 alphanumeric characters long.
Since it is case sensitive, be sure that you remember whether a letter is in upper or
lower case and make sure that your Caps Lock is off. Moreover, please do not use the
sign “&” in the passwords.
4.4.8 System – Diagnostic Test
As soon as you enter the test program, all tests will run automatically to diagnose the
connection status of the device.
20
Checking LAN Connection
Testing Ethernet LAN connection
This test passes if the Ethernet LAN interface is working properly.
Checking ADSL Connection
Testing ADSL Synchronization
This test checks your DSL modem to see if it can successfully negotiate and establish a
DSL connection with your service provider's central office equipments. The test returns
PASS if a DSL connection is established.
If this test returns FAIL, please try the test again a few minutes after this test is
completed. Since your DSL modem need a couple of seconds to a few minutes to
establish the DSL connection depending on your phone line quality. If this test returns
FAIL, make sure your phone line is connected to your DSL modem securely, and also
check with your service provider to see if your service is activated.
If this test returns FAIL, all other tests will be skipped.
Checking Circuit 0 for Network Connection
Test ATM OAM Segment Loop Back
This test sends ATM OAM F5 Segment loop back request cells to the central office
equipments through your DSL connection. This test will pass if response cell is received.
Since your service provider might not support this test, your DSL modem could still work
even if this test fails.
21
BILLION BIPAC-7000 ADSL USB Modem
If this test fails consistently and your DSL modem seems not working, check to make
sure the VPI and VCI are configured correctly.
This test returns FAIL if the DSL synchronization test failed.
Test ATM OAM End-to-End Loop Back
This test sends ATM OAM F5 End-to-End loop back request cells to the central office
equipments through your DSL connection. This test returns PASS if response cell is
received. Since your service provider might not support this test, your DSL modem
could still work even if this test fails.
If this test return FAIL consistently and your DSL modem seems not working, check to
make sure the VPI and VCI are configured correctly.
This test returns SKIPPED if the DSL synchronization test failed.
Test Ethernet connect to ATM
This test returns PASS if the ATM AAL5 module is loaded correctly in your DSL modem.
If this test returns FAIL, an internal error has occurred.
This test returns SKIPPED if the DSL synchronization does not return PASS.
Test PPPoE connection
This test returns PASS if your login name and password have passed authentication
with your service provider.
If this test returns FAIL, run this test again a few minutes after this test is completed,
especially if your PPP connection has just been improperly disconnected. If this test
consistently fails, first make sure your login name and password are correct. Remember
that login name and password are case sensitive.
This test returns SKIPPED if “PPPPOE connect to Ethernet” test does not return PASS
and your DSL modem is configured as PPPOE encapsulation.
This test also returns SKIPPED if “Ethernet connect to AAL5” test does not return
PASS and your DSL modem is configured as PPPOA encapsulation.
Test PPP Layer connection
This test returns PASS if your DSL modem has been assigned a valid IP address by
22
your service provider through DHCP or your DSL modem is assigned a valid IP address
statically.
If this test returns FAIL, run this test again a few minutes after this test is completed. If
this test returns FAIL consistently and DHCP client is turned on in your DSL modem,
check with your service provider. If this test returns FAIL consistently and your DSL
modem is statically assigned an IP address, make sure the IP address is the correct
one assigned by your service provider.
This test returns SKIPPED if “Ethernet connect to AAL5” test does not return PASS.
Test IP connect to PPP
This test returns PASS if your DSL modem has been assigned a valid IP address by
your service provider through DHCP or your DSL modem is assigned a valid IP address
statically.
If this test returns FAIL, run this test again a few minutes after this test is completed. If
this test returns FAIL consistently and DHCP client is turned on in your DSL modem,
check with your service provider. If this test returns FAIL consistently and your DSL
modem is statically assigned an IP address, make sure the IP address is the correct
one assigned by your service provider.
This test returns SKIPPED if “Ethernet connect to AAL5” test does not return PASS.
Test IP connect to Ethernet
This test returns PASS if the gateway can be reached through ping request. The
gateway is assigned by your service provider, or obtained from your service provider by
PPP negotiation or DHCP negotiation.
If this test returns FAIL, run this test again a few minutes after this test is completed. If
this test returns FAIL consistently and your DSL modem seems not working, check to
make sure your statically assigned IP address is configured correctly or DHCP client is
turned on with the current VC.
This test returns SKIPPED if "IP connect to PPP" or "IP connect to Ethernet" test does
not return PASS.
23
BILLION BIPAC-7000 ADSL USB Modem
4.4.9 System – System Log
Display the system logs cumulated till the present time. You can trace the historical
information through this function. It refreshes every five seconds.
4.4.10 Advance – WAN Status
Each VC setting you enabled in the WAN Configuration section except that uses the
PPP encapsulation will be displayed in this table.
4.4.11 Advance – ATM Status
Display the status of ATM.
24
4.4.12 Advance – TCP Status
Display the status of TCP. This screen will automatically refresh every two seconds.
4.4.13 Advance – ADSL Configuration
Trellis: Default at Enabled.
Handshake Protocol: Default at Autosense – G.dmt first. You can also choose other
25
BILLION BIPAC-7000 ADSL USB Modem
protocols, such as Autosense – T1.413 first, G.dmt/G.lite, T1.413, G.dmt, G.lite.
Wiring Selection: Default at Tip/Ring. Select Auto or A/A1 if necessary.
4.4.14 Save Settings
Click the Submit button to write settings to flash. Then, the system will reboot for
changes to take effect.
26
APPENDIX A
Product Support
Most problems can be solved by referring to the Troubleshooting section of this
manual. If you cannot resolve the problem with the Troubleshooting chapter,
please contact the dealer where you purchased this product.
Contact Billion
WORLDWIDE
http://www.billion.com/
27