1
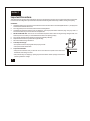
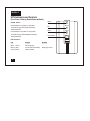
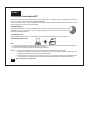
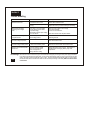
TABLE OF CONTENTS
Uninterrupted Power Supply
Congratulations on selecting Microtek
Uninterrupted Power Supply (UPS).
Before installation of this UPS,
please read this manual carefully to
familiarize yourself with all its features,
indicators and safety precautions.
1.
Introduction
2
2.
Feature Highlights/Backup Table
3
3.
Important Precautions
4
4.
Product Package
6
5.
UPS Indicators & Controls
7
6.
Connections of the equipment
9
6.
Installation
10
7.
Operation & Alarms
11
8.
Troubleshooting
12
9.
UPS Storage
12
10. Battery & Replacing the Battery
13
11. Technical Information
14
Enjoy the Complete Peace of Mind !
1
Section 1
Introduction
These UPS are specially designed to suit Indian conditions where the voltage can fluctuate to as low as 150 volts & as high as 290
volts. Keeping this in view, these UPS have the "extended" input voltage range of 135~300 volts, so that the UPS gives you the
corrected line voltage output of 230 volts ± 9% and doesn't switch the UPS to "Battery Backup mode" like most other UPS. In the
event even when the voltage is available excessively high or too low, most other UPS will give the output on Battery Backup and finally
shut down after 10/20 minutes. With these UPS you will enjoy "complete peace of mind " even when the voltage is too low or too high.
Do not forget that the UPS has to work for voltage correction for 20 to 22 hours a day while the backup on battery may only be
necessary for 1 to 2 hours in different slots of time during the day.
These UPS will help you to protect your sensitive equipment like computers and telecommunication equipment against
malfunctioning due to non-reliable or distorted mains supply.
These UPS protect the connected equipment against surges, sags, spikes, etc. by means of an internal filter that works all the time.
During electrical power failures, the units employ their internal maintenance-free battery to supply backup power without any
interruption. These UPS are equipped with many features that will make your equipment to operate more reliably.
These UPS are manufactured under ISO 9001:2000 certified quality management process. Reliability is built into rugged design
by carefully selecting the best components and incorporating advanced technology that offers rock-steady output. Each UPS
subassembly is tested for each and every component used by a state-of-the-art automatic computerised in-circuit-tester (ICT) for
value and tolerance of components. Automated manufacturing technology and the strict quality controls are the foundations for the
reliability and consistency common to all our products.
Heritage
2
, Heritage Gold, Bravo & 2Battery Double Power
: Two Years Warranty on UPS Electronics & One Year Warranty on Battery.
Section 2
Feature Highlights
*Extended Input Voltage Range of 135~300 volts : When the voltage fluctuates to as low as 150 volts & as high as 290 volts, these UPS
give you the corrected line voltage output of 230 volts ± 9% and don't switch the UPS to "Battery Backup mode" like most other UPS.
Smart Boost function for Low Input Voltage : When the mains voltage is low, the smart boost will correct it back to its normal range
without draining the internal battery.
Smart Buck function for High Input Voltage : When the mains voltage is high, the AVR or smart buck will correct it back to its normal
range without draining the internal battery.
Over Voltage Protection: The UPS will switch to backup mode & offers power from its internal battery when the mains voltage is too high.
No Load Shutdown: In case No load is connected to the UPS, it will sense the load condition and automatically Shut Down after 3
minutes to protect unnecessary discharge of the battery. (This feature in Heritage Gold and Bravo model only)
Over Load / Short Circuit Protection : If the UPS is excessively overloaded in backup mode or encounters a short circuit, it will go into
protection mode. The output will be shut down in this case.
Battery Deep Discharge / Over Charge Protection : The UPS has in-built electronic protection circuit which protects the batteries from
getting deep discharged or over charged.
Battery Backup/Rating Table
Model
Battery Rating
Approx. Backup Time
HERITAGE
/ HERITAGE GOLD / BRAVO
2BATTERY DOUBLE POWER
12V, 7.2AH/7AH
12V, 7.2AH/7AH x 2
10~20 Min. (1PC)
25~50 Min. (1PC)
*In Heritage+ , Heritage Gold and Bravo Models the Input Voltage Range is 145~300V.
3
Section 3
Important Precautions
These UPS have been engineered and manufactured to assure your personal safety, but improper use can result in electrical shock or fire hazard.
In order to achieve the safeguards incorporated in these UPS, observe the following basic rules of safety, installation, cleaning and repacking.
ON SAFETY
1.
Operate the UPS only from a power source mentioned in the technical information of this manual(Refer Section-7). The equipment
must be earthed at all times while in use.
2.
Do not plug UPS's power cord into itself, which will result in a safety hazard.
3
Overloaded AC outlets and extension cords are dangerous, so are frayed power cables and broken plugs. They may result in a
shock or fire hazard, call your service technician for replacement.
4.
DO NOT OPEN THE UPS : There are no user serviceable components inside. There are dangerous high voltages inside, even
when the power is off. Contact your authorised dealer if the UPS is not operating properly.
5.
Do not put the UPS under the Sun directly for avoiding any possibility of damage.
6.
Replace batteries and fuse only with the same type and rating.
7.
Disconnect batteries during maintenance.
8.
To avoid personal injury :
* Do not place the UPS on a sloping shelf unless properly secured.
* Use a perfect stand to hold the UPS.
9.
To prevent fire Hazards :
* Always turn the UPS OFF, when you leave the room for more than a short period of time. Never leave
the UPS ON, when leaving the house.
* Keep children away from dropping or pushing objects into the UPS's cabinet openings. Some internal
parts carry hazardous voltages.
4
* This UPS is designed for computer, printer and fax only. Connecting other equipments may cause the UPS to behave abnormally.
* Do not add equipment that have not been designed for these UPS.
* During a lightning storm, unplug the UPS from the wall outlet.
ON INSTALLATION
1.
Do not allow anything to rest on the power cord and do not place the UPS
where the power cord is subject to damage.
2.
Do not use this UPS near water such as near a bathtub, washbowl, kitchen sink, laundry tub, in
a wet basement, or near a swimming pool.
3.
These UPS are provided with ventilation openings in the cabinet to allow the release of
heat generated during operation. If these openings are blocked built up heat
can cause failures which may result in a fire hazard.
Therefore, NEVER :
1.
2.
3.
4.
Block the bottom ventilation slots by placing the UPS on a bed, sofa, rug, etc.
Place the UPS in a built in enclosure unless proper ventilation is provided.
Cover the openings with cloth or other material.
Place the UPS near or over a radiator or heat source.
ON CLEANING
1. Unplug and Switch Off the UPS before cleaning the outer surface.
2. Use a slightly damp (not wet) cloth.
ON RE-PACKING
1. Do not throw away the carton and packing materials. They make an ideal container in which to pack and transport the unit, when
shifting the unit to another location.
5
Section 4
Product Package
Your Microtek UPS package includes the following items.
1. The Microtek UPS with flying in power cable.
2. AC Fuse 8Amp 20mm Fast Blow Type (for spares)
3. User's Manual
Note: After unpacking, inspect the UPS for any damage or any missing item. If you find any damaged or missing item,
immediately notify to the carrier and/or to the dealer.
6
Section 5
UPS Indicators and Controls
(Front Panel - Heritage , Heritage Gold & Bravo Models)
POWER Switch :
Press the Power Switch to Switch ‘ON’ the UPS.
Press the Power Switch again to Switch ‘OFF’ the UPS.
POWER
SWITCH
POWER
LED Indications :
The LED will light up Greenindicating that the UPS is ‘ON’ and is in Mains Mode.
The LED Blinks Green in Heritage Gold and Bravo models,
when UPS is Off and the Battery is Charging.
LED
The LED will light up Amber/Redindicating that the UPS is ‘ON’ and is in Backup Mode.
The LED Blinks Red when Battery is Low.
LED
Green Blinking
Green Continuous
Red/Amber Continuous
Red/Amber Blinking
STATUS
Mains ON, Battery Charging.
(Heritage Gold / Bravo models only)
Mains OK.
Battery Mode.
Battery Low.
BUZZER
-
HERITAGE
HERITAGE GOLD
BRAVO
1 Beep every 8 sec.
1 Beep every second. (Heritage+)
2 Beeps every 3 seconds. (Heritage Gold / Bravo)
No Load (Heritage Gold/Bravo model) 2 Beep every 3sec. for 2 min. before UPS Shutdown.
7
Section 5
UPS Indicators and Controls
(Front Panel - 2Battery DoublePower
Model)
GREEN
ON/OFF Switch :
Press this button to "I" position i.e. ON position.
The OUTPUT green LED will light up indicating
that the UPS is ON.
Press this button to 'O' position i.e. OFF position.
The OUTPUT green LED will disappear indicating
that the UPS is OFF.
RED
BACKUP
GREEN
OUTPUT
OFF
ON / OFF SWITCH
LED Indications :
LED
Mains
BUZZER
AVR & Charging
-
Backup (Red)
Inverter Output from battery.
Beeping per 20 sec.
Output (Green)
Output available.
-
8
o
I
ON
STATUS
(Green)
MAINS
Section 6
Connection of the equipment to UPS (Rear Panel)
Power Cord : For connecting UPS to Mains. Ensure
that the UPS is supplied Power from a Grounded
Socket Only.
UPS Outlet : There are three pieces of standard 5
pin outlet for connecting the AC power cord of the
computer.
A.C. Fuse:
This is for protecting the UPS & computer connected
to the UPS, in case excess current is drawn from AC
input. If the AC fuse is found defective, please be sure
that it is replaced only by a compatible fuse of the
same type & size. Fuse rating is mentioned below.
A. C. FUSE
F8AL-250V
A. C. FUSE
Recommended AC Fuse Rating :
- 8Amp(size 5x20mm)
Fast Blow Type
HERITAGE
/
HERITAGE GOLD /
BRAVO
2 BATTERY DOUBLE POWER
UPS
9
Section 7
Installation-Connecting the UPS
These UPS are equipped to work with power supply with wide voltage range 135 ~ 300V AC, 50Hz ± 5%. Plug the UPS into a two pole,
three wire, AC wall socket outlet equipped with an earth connection.
* Do not use extension cords. * Do not plug appliances such as electric heaters, toasters and vacuum cleaners into the UPS. * Do not
plug/unplug the input cord when the UPS is switched ON.
Charging the Battery
Before initial start/first time use it is recommended that the UPS may be connected to mains and battery should be
charged for 6 ~ 8 hours for optimum use. The UPS charges its battery whenever it is connected to mains. For best
results charge the battery before use.
Connecting the Loads
Plug the loads through the output socket of the UPS. Now, you can switch ON the loads/devices as per your requirement.
UPS suitable for the best load.
*
Note :
1. Do not connect a laser printer to the UPS. A laser printer periodically draws significantly more power than when idle and will over load the UPS.
2. The UPS output can be used only for electronic loads such as : computers.
3. In case of fuse blown out please replace the fuse with same type and rating only.
Caution : 1. Never touch the contents of fuse or sockets when the mains plug is connected OR the UPS is Switched ON.
2. These UPSs are designed to operate from 230V, 50Hz, Sinewave Power Supply available from Electricity Boards. No Powerconditioning device like Stabilizer/CVT should be connected with the UPS.
3. Abnormal voltages may appear at the output of UPS if it is driven from non-sinusoidal source like Inverter/Portable Generator
etc. These voltages may be potentially harmful for the loads, other than Computers/SMPSs, connected to the output of UPS.
10
*May not work with certain configurations.
Section 8
Operation
* Switch ON the UPS by POWER Switch (After the input cable is plugged into the wall socket).
* After the UPS is ON and the LED will become (light Green in case of Heritage+, Heritage Gold & Bravo models or output LED will glow Green
incase of MDP800+ model) indicating that the UPS is on Mains and the output is available.
* Now, you can switch ON the computer system without worrying about any kind of power interruptions.
* If you wish to test the UPS, you may pull-out the UPS power cord(from wall socket) or switch OFF the ON/OFF switch(of the wall socket). And, if
the computer doesn't shutdown and the LED lights up (Amber in case of Heritage+, Heritage Gold & Bravo models or backup LED will glow
Light Red incase of MDP800+ model) and the buzzer starts producing beep sound at an interval of 8/20 sec., It means that the UPS is working in
normal condition.
* After doing the above test, please ensure to plug-in the power cord to the wall socket (if removed).
Cold Start :
When the UPS is "OFF" and there is no mains power, it is possible to power-on the essential equipment connected to the UPS outlets. Make sure
that only the most needed equipment is connected to the UPS at this time.
* Press the POWER switch to ON position.
* If there is no output and UPS does not go to backup mode then reset the UPS by switching ‘OFF’ the POWER switch to OFF position. Then
switch off the unwanted loads connected to the UPS, now switch ‘ON’ the UPS. Complete whatever you want to do with the powered equipment,
before the UPS battery is discharged.
NOTE: This Feature may not work with certain type of loads having high inrush current.
Alarms
Battery Backup : During battery backup (on battery) operation, the LED turns Amber in case of Heritage+, Heritage Gold & Bravo models or
backup LED(Red) will Light up incase of MDP800+ model) and the UPS gives an audible alarm consisting of one beep repeated after every 8/20
seconds. This alarm stops when the UPS returns to on-line operation.
Battery Low : When the UPS is connected to backup mode and the battery goes low or the UPS is overloaded, the UPS gives a continuous audible
alarm (beep). The alarm remains on until the overload is removed. Disconnect non-essential load equipments from the UPS to eliminate the
overload. If, after removing the overload the alarm still remains on, it indicates that the battery is low i.e. charging is required.
11
Section 9
Trouble Shooting
Problem
Possible Cause
UPS does not turn ON.
Remedy
The ON/OFF switch is OFF.
Switch ON the ON/OFF switch.
UPS input circuit Fuse open or
missing.
Remove the load on UPS, Switch Off the UPS & Insert /
replace the fuse by one of the same type and rating.
UPS operates on battery
even though line voltage
exists.
* Very high or very low voltage
(input voltage must be within
specified range).
* Distorted / Improper input voltage.
* AC Fuse Blown.
Test if the input voltage is out of range
of the specified AVR.
or has too much distortion.
Also Check the AC Fuse. Replace if Blown.
UPS beeps intermittently
at regular intervals.
Normal UPS operation but no
mains voltage present.
None, the UPS is
protecting the load.
UPS buzzer has constant tone,
and mains voltage is present.
UPS overloaded.
Remove the excessive load. Switch OFF power knob.
Then switch ON the UPS.
UPS buzzer has constant tone,
and mains voltage is not present.
UPS is overloaded
or short circuit in battery mode.
Remove mains power cord. Switch OFF power knob.
Remove the excess load & switch ON the UPS .
UPS does not provide expected
backup time.
The UPS 's battery is weak
due to recent usage and a
short recharge time or
battery lifetime is ending.
Charge the battery for 8~12 hours. If the backup is
insufficient after recharging, Battery may need
replacement.
UPS Storage : When the UPS is not to be used for a long time, the UPS should be charged by connecting to mains power supply for at least 4-5
12
hours. Disconnect the UPS from mains power, cover & store the UPS keeping upright in a cool, dry place. During long time
storage, the battery must be charged after every 3 months. Store the UPS covered and placed upright in a cool, dry place.
Disconnect all the cables connected to the UPS to avoid unnecessary discharge of the battery. Make sure that the UPS is
switched OFF.
Section 10
Battery & Replacing the Battery
The battery is the most critical part of the UPS, as it has to supply the backup. Hence, the battery must be replaced as soon as you notice that the "
battery needs replacement ". Before replacing the battery ensure the following steps :
1. The UPS is plugged on, in a live wall socket. 2. Charge the UPS for at least 8 ~ 10 hours.
3. Turn the UPS OFF and then back ON.
Note : This UPS contains potentially hazardous voltages. Do not attempt to open the UPS when it is connected to the mains. Please be sure that
all the inlet & outlet cables are disconnected and the ON/OFF switch is in OFF position. This unit contains no user serviceable parts. Repairs are to
be performed by trained service personnel only.
Dispose off the old battery properly. The battery contains lead and poses a hazard to the environment and human health if not disposed off
properly. See the instructions with the new battery for more information.
Battery Replacement: The UPS has an easy to replace battery system.
For Heritage
/ Heritage Gold / Bravo Models
1. Lay the UPS on its Top side down to get access for opening the Set.
Remove/unscrew the 4 nos. of screws that secure the UPS Cabinet
and open the cover.
2. Disconnect the two wires connecting the battery to the UPS.
Loosen the wire by wiggling them while pulling straight back
from the battery connector.
3. Gently pull the battery out.
4. Place the new battery in the UPS carefully, avoid punching the wires.
5. Connect the new battery in place of the old.
Red wire - to Red terminal.
Black wire - to Black terminal.
For MDP800+ Model
1. Lay the UPS on its right side down to get access for opening the left
side cover. Remove/unscrew the 6 nos. of screws that secure the
left side cover and open the cover.
2. Gently pull the battery out.
3. Disconnect the two wires connecting the battery to the UPS.
Loosen the wire by wiggling them while pulling straight back from
the battery connector.
4. Connect the new battery in place of the old.
Red wire - to red terminal.
Black wire - to black terminal.
Note : Small sparks at the battery connections are normal during connection.
Note : Small sparks at the battery connections are normal during connection.
5. Place the new battery in the UPS carefully avoid punching the
wires.
6. Close the Set and tighten the screws.
6. Close the left side cover and tighten the screws.
13
Section 11 Technical Specifications
MODEL
Heritage
Input
Range / Frequency(50Hz+5%)
Output
Voltage / Transfer Time
Protection
Unit Input / Noise /
Automatic Voltage Regulation / Pulse Width Modulation
Fuse Protection / Noise Filter
Type / Recharge Time
Fuse Protection / Pulse to Pulse Electronic active Protection
SMF / 2~8 Hrs. (depending on the status of Battery)
Backup Time/ Batery Rating
Refer Backup Table in Section 2
Battery Backup (Sound beeping)
per 8 sec. (Approx.)
Battery Low
LED Display
Mains mode operation / AVR Working
Inverter output from battery
Size (L x W x H)
Weight (Approx.):
per 20 sec. (Approx.)
Sound beeping long
Green
Red
Physical
135~300V AC
230V+9% AC / <6ms
Short Circuit (Line) / Short Circuit (Inverter)
Alarm
(300x90x145)mm
Heritage
(350x125x170)mm
/ Heritage Gold / Bravo : 6Kg.
Environment
Operating Temperature / Rel. Humidity
Noise
Audible Noise level
0
0
MDP800
0
: 11Kg.
0
0 C ~ 48 C ; 32 F ~ 120 F / 0 to 90% non-condensing
<35dB, distance 1 meter from UPS
* Above specifications are measured under computer load. * Specifications are subject to change without notice.
14
MDP800
145~300V AC
Regulator on Mains / Regulator on Battery
Battery
/ Heritage Gold / Bravo
In case of any “Customer Support” requirement kindly ring up or write to Microtek
Branch/Service Centre, indicating following details:
(i)
(ii)
(iii)
Model Number & Serial Number of the product.
Name & phone no. of the contact person with Location/full Address where the
product is available and e-mail ID if any.
Reported problem/description of complaint.
Note:- (a) Refer all servicing queries to Microtek Service Centres only.
(b) Please take care that Serial Number is kept intact and that the product is
not allowed to be fiddled (opened) by any unauthorised person;
otherwise the warranty will be void.
Service H.O. Tel: 011-42733333 Service E-mail for UPS: [email protected]
*All disputes subject to Delhi jurisdiction only.
H-57, Udyog Nagar, Rohtak Road, New Delhi-110041.