1
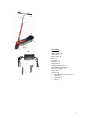
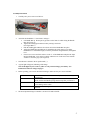
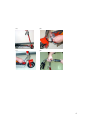
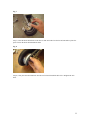
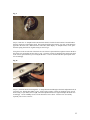
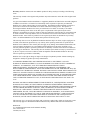
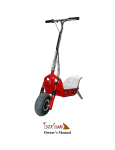
Owner’s Manual
Important Note To Parents About Safe Riding
Your child's safety will depend on your commitment to always provide a safe riding environment
and a properly maintained vehicle. As with any moving vehicle there are possible safety risks; be
sure to heed to the following precautions.
1. Always equip your child with suitable protective gear and riding apparel. Be sure he or
she always wears a helmet, over-the-ankle footwear, eye protection, long pants, and a
long-sleeved shirt while riding.
2. Never allow your child to carry a passenger. This scooter is designed for an OPERATOR
ONLY.
3. This scooter is designed to be operated only on flat, paved surfaces, never operate offroad.
4. This scooter was not designed for racing or performing tricks.
5. Always obey local laws and regulations for operating scooters.
6. You, the parent (and most likely “riding instructor/mechanic” as well), must be familiar
with scooter controls and maintenance requirements plus riding techniques. Read and
understand the owner’s manual provided with the scooter. Review all instructions and
warnings with your child.
7. You must determine your child’s readiness to ride this scooter. Your child should
already be familiar with scooter controls (location and function) and basic riding
techniques. Your child should also be physically large enough, and strong enough to be
able to hold up the scooter, plus be able to pick it up if it is on its side.
8. Your child’s safety depends in part on the good mechanical condition of the scooter. Be
sure to follow the maintenance and adjustment requirements contained in this manual.
Be sure your child understands the importance of checking all items thoroughly before
riding the scooter. Also, familiarity with the scooter is important should a problem occur
far fro m help.
9. Do not allow your child to ride unsupervised. He or she should always ride in the
company of an experienced adult.
10. Encourage your child not to ride beyond his or her skill level or faster than conditions
safely allow. Have them practice advanced riding maneuvers under controlled
conditions.
11. Make sure that your child tells someone where they are planning on riding and when they
intend to return. Discuss the ride with your child before you leave so he or she will know
in advance what riding techniques may be necessary to navigate safely.
2
Safety Precautions
1.
2.
3.
4.
5.
Review all the instructions carefully before operations.
Follow all rules and regulations in your area for operating an electric scooter.
Do not allow others to use the scooter without proper instructions.
Ride only in good weather and on smooth surfaces.
Remember to always operate your scooter with the proper safety gear and helmet.
Operating Points
1.
2.
Turn the power switch to the ON ( | ) position before starting the scooter.
Push starting the scooter will prolong the life of motor and battery. Always push start the scooter
before applying accelerating.
3. Release the throttle before braking.
4. Your scooter is outfitted with an electrical braking system. This means when you engage the
brake the throttle is inoperative.
5. Do not ride the brake.
6. The scooter works best on level ground; use caution while going up an incline, excess climbing
will limit the life of the battery.
7. Charge the battery at least once every 90 days. To prolong the life of the battery discharge the
battery every 90 days.
8. Do not leave your scooter in direct sunlight for extended period of time.
9. Operate your scooter only in good weather; using your scooter in rain, snow, or other precipitation
may result in damaging your scooter.
10. Do not jump curbs, do tricks, or ride on one wheel.
11. Obey the laws in the city that you are operating your scooter in.
12. You assume all responsibility while operating your scooter; the seller will assume no liability for
misuse or operator negligence.
Technical Specifications
Material:
Dimensions:
Gross Weight:
Net Weight:
Maximum Speed:
Average travel distance:
Power-driven max. Load capacity:
Brake:
Fiber glass deck and steel body
40.4 L x 18.2 W x 30.2 H Inches
60 LBS
50 LBS
*12-14 MPH
*12 Miles
220 LBS
Handle control to rear wheel by drum brake
Model No.
CWT-024C
Input
100 V ~ 1.2 A
Output
24.0 V = 1.0A
Charging Time
6~8 Hours
Model No.
XYD-24
Rate Voltage
DC24V
Current Rate
15.5A
Motor Size
300W
Lead Acid Storage Battery
Nominal
Capacity
12 AH
Voltage
Weight
24V
(2x12V)
17 LBS = 8
kg
Charging
Cycle
≥ 250
Cycles
* The maximum speed and travel distance will depend upon the weight of the rider.
3
M.
List of Parts
Throttle - A
Brake Handle - B
Airless Tires - C
Brake Cable - D
Deck - E
Front Fork - F
Hub/Rim - G
Kickstand - H
Folding Quick Release – I
Handle Bar Quick Release - J
Rear Tire Assembly - K
Switch Box - L
Tool Kit - M
1. Allen Wrench (3 different sizes)
2. Wrench (2)
3. Screw Driver
4. Charge
4
Assembly Instructions
1.
Carefully take your scooter out of the box.
2.
Assemble the Handle Bar. ** See Photo’s on Page 6
a. Lift Handle Bar up. Do not put any pressure on the front tire while raising the Handle
Bar. (See Figure A)
b. Tighten the Folding Quick Release bolt by turning it clockwise.
(See Figure B & C)
c. Push the Folding Quick Release lever down to lock the Handle Bar into place.
d. Adjust the Handle Bar Quick Release by unlatching the quick release lever; adjust
Handle Bar to a comfortable height; secure the pin into the designated holes; and tighten
lever.
e. Unscrew star screws and lock washers on the ‘T’ of the Handle Bar and place the Grips
into the Handle Bar. Line up the two holes, and then screw in the star screws and lock
washers to secure the grips. (See Figure D)
3.
Turn the Power Switch to the on position ON ( | ).
4.
A green light will appear, indicating a full charge.
Note: If the light on your scooter is yellow or red, you must charge your battery. See
instructions on how to charge on page 6.
5.
Before operating your scooter check the following to make sure they are secure and intact:
Tires
Throttle
Handle Bar Cables
Front Fork
6.
Check for wear, that the bolts are securely fastened, and that they are
in alignment.
While the scooter is Off (O) apply the Throttle and release; check to
make sure that the Throttle springs back to stop after you release it.
Check to make sure that all cables are intact and that there is not
visual damage to the cables.
Check for visual damage; make sure that all bolts are securely
fastened.
The most important thing to remember is to have FUN and be SAFE!
5
(a)
(b)
(c)
(d)
6
Charging
1.
2.
3.
4.
5.
Turn Power Switch in the ‘off’ position.
Do not plug the charger into the outlet first, for safety reasons plug the charger cord into the
scooter first, then into a 110 V outlet.
Charge your scooter for 6-8 hours. The LED will be red during charging and once it is fully
complete the LED will turn to green.
Do not overcharge you battery this may limit the life of your battery. Unplug after 8 hours to
avoid overheating.
Charge unit when a yellow or red light appears and every 90 days.
Battery Instructions
1.
2.
3.
4.
Do not touch the battery liquid solution, if you come in contact with the solution flush the
effected area with water. If you must come in contact with battery wear gloves.
Change the battery if there are any leaks, visible breaks or cracks.
Dispose of the battery according to your state and local laws.
Periodically check your battery with a voltage meter. Each battery should read 26-24V.
Fold Handle Bars Down
1.
2.
3.
Lift the Folding Quick Release lever and unscrew the Folding Quick Release bolt. Position
yourself in front of your scooter and lift up on the base of the deck; the Handle Bar will fold
down.
Lay the Handle Bar down on top of the deck and tighten the Folding Quick Release bolt.
To protect the Grips from potential damage unscrew the star screws and lock washers on the
‘T’ of the Handle Bar and lay the Grips down. Make sure not to lose the screws and washers.
Adjust the Height of the Handle Bar
1.
2.
3.
Unclamp the Handle Bar Quick Release.
Lift the Handle Bar up or down, as needed so that the Handle Bar is at waist height; or adjust
to the height that you feel comfortable and are in best control of your scooter.
Secure the pin into designated hole and clamp the Handle Bar Quick Release to secure the
Handle Bar into place.
Maintenance
1.
2.
Brake
Throttle
Drive Belt
Tires
Inspect your scooter before every use; check the brake, throttle, drive belt, and tires. Make
sure that all parts are in working order and are not damaged.
Clean your scooter regularly by wiping it down with a damp rag. This scooter is electric;
exposure to water may permanently damage your scooter.
Squeeze Brake Handle on Left Controller and push the scooters to see if it rolls
easily. If so you will need to tighten the brake. Tighten bolt until the scooter will
not move with the brakes applied; if not see instructions on how to adjust the brake
on page 11, figure 10.
While the scooter is Off (O) apply the Throttle and release; check to make sure that
the Throttle springs back to stop after you release it.
The drive belt is located on the right side of the rear tire. Check to make sure that
there is no visual damage and that the belt is aligned on the sprocket attached to
rear tire.
Check for wear, that the bolts are securely fastened, and that they are in alignment.
7
Procedure for changing rear tire of ZZ Cruiser
•
Tools Required:
- Phillips screwdriver
- 8mm wrench
- 2 x 16mm wrench
Ensure power switch is in the "off" position before beginning any work on the scooter.
Fig. 1
Step 1) Remove the 3 screws from the deck, use the Medium size Allen wrench to remove screws as shown
in Figure 1. Lift the deck.
Fig. 2
Step 2) Remove screw holding brake shield in place (see fig. 2) located next to the left side of the rear tire.
This bolt connects the brake shield to the frame.
8
Fig. 3
Step 3.) Remove the axle nut located on the right side of the rear tire as seen in Fig 3.
Fig. 4
Step 4.) Loosen the brake adjustment bolt as seen in Fig 4. Do not completely remove this bolt. It should
loosen to the point where the line traveling through the “brake spring” can be removed. Next remove the
drive belt from the tire sprocket. Once this has been completed, the rear tire and hub can be removed from
the scooter.
9
Fig. 5
Step 5.) Remove the axle bolt from the rear wheel; take not of where the spacers are located.
Fig. 6
Step 6.) Remove the Allen bolts from the rim of the tire; you must first cut ½” off of the medium size
Allen wrench (use hack saw). The rim will split into 2 pieces. Once apart, replace the old tire with the
brand new tire you have just received. Reassemble the rim back onto the tire.
10
Fig. 7
Step 7.) Place the brake shield back on the wheel’s slide axle brake into the tire and remember to place the
pacer between the brake shield and brake drum.
Fig. 8
Step 8.) Next place the wheel hub back into the rear fork and reinstall the drive belt. Retighten the axle
bolts.
11
Fig. 9
Step 9.) Insert the “L”-shaped bracket onto the brake shield. The hole for this bracket is located farthest
from the wheel axle on the bracket itself. The bracket should be placed on the “tire-side” of the shield (as
opposed to the outer side). (Wheel shown as removed to better display “L”-shaped bracket). Next, place
the brake spring back into its original setting as seen in Fig 9.
Using the two bolts on each side of the back tire (one of them is pictured below) tighten or loosen the drive
belt so that it is taut and has no more that ¼” play. Using the wire that is attached to the spring at the back
of the scooter (pictured below) you can adjust the brake. Unscrew the bolt and either pull or push on the
wire accordingly.
Fig. 10
Step 10.) Insert the brake line through the “L”-shaped bracket and through to the brake adjustment bolt (as
seen in Fig 10). Pull the line tighter to get a “stiffer” brake response. Please test the brake at low speeds
before using. If your brakes are too tight, loosen the adjustment bolt once again and adjust the brake wire
accordingly. Use the 4 Phillips screws to bolt down the scooter’s deck. You have now successfully
replaced your scooter’s rear tire!
12
Troubleshooting Chart
Problem
The power light by the on/off
switch does not light up
when the scooter is turned on.
1.
2.
Cause
Battery is discharged.
Loose connection inside the
scooter.
1.
2.
Solution
Recharge your
scooter.
Remove (3) screws
that hold the deck on
and remove the deck.
Visually inspect all
wire connections
making sure there are
no loose wires,
reconnecting those
that are.
Replace the Throttle
Handle. Call
Customer Service at
(800) 498-8455 to
order a new Throttle.
The power lights by the
on/off switch light up but
scooter still does not work.
1.
The Throttle handle is not
operating properly.
1.
Clicking noise coming from
motor.
1.
Brush in Motor has come
loose.
1.
Replace Motor. Call
Customer Service at
(800) 498-8455 to
order a new 300 W
Motor.
When the Brake Lever is
squeezed my scooter does not
stop.
1.
The brakes have not been
adjusted properly.
1.
Adjust the Brake by
loosening the bolt on
the rear brake wheel
and pull the cable and
retightening the bolt.
My scooter is going slower,
and slower, and slower. What
is going on?
1.
2.
Low Battery
Battery is defective
1.
Recharge your
Battery for 6-8
Hours.
Replace Battery. Call
Customer Service at
(800) 498-8455 to
order a new 24.0V
(2x12V) Battery.
2.
13
List of Parts
Throttle (1)
Small Star Screws (2)
Lock Washers (2)
Drive Belt (1)
Controller (1)
Brake Handle (1)
Airless Tires (2)
Valve Extension (1)
Brake Cable (1)
Deck (1)
Front Fork (1)
Front Tire Assembly (1)
Hub/Rim (2)
Kickstand (1)
Motor 300 Watt (1)
Folding Quick Release (1)
Handle Bar Quick Release (1)
Rear Tire Assembly (1)
Switch Box (1)
Tool Kit (1)
1. Allen Wrench (3 different sizes)
2. Wrench (2)
3. Screw Driver (1)
4. Charger (1)
14
YOUR INSURANCE POLICIES MAY NOT PROVIDE COVERAGE FOR ACCIDENTS
INVOLVING THE USE OF THIS SCOOTER. TO DETERMINE IF COVERAGE IS PROVIDED,
YOU SHOULD CONTACT YOUR INSURANCE COMPANY OR AGENT
15
Warranty. Rad2Go warrants each new Rad2Go product for thirty (30) days according to the following
terms.
This warranty extends to the original retail purchaser only and commences on the date of the original retail
purchase.
Any part of the Rad2Go Product manufacture or supplied by Rad2Go and found in the reasonable judgment
of Rad2Go to be defective in material or workmanship will be repaired or replaced by an authorized
Rad2Go service dealer without charge for parts and labor. The Rad2Go Product including any defective
parts must be returned to an authorized service dealer within the warranty period. The expense of
delivering the Rad2Go Product to the factory or authorized service dealer for warranty work and the
expense of returning it back to the owner after repair or replacement will be paid for by the owner.
Rad2Go’s responsibility in respects to claims is limited to making the required repairs or replacements and
no claim of breach of warranty shall be cause for cancellation or rescission of the contract of sale of any
Rad2Go Product. Proof of date of purchase will be required by the dealer to substantiate any warranty
claim. An authorized Rad2Go service dealer must perform all warranty work.
This warranty does not cover any Rad2Go Product that has been subject to misuse, neglect, negligence or
accident, or that has been operated in any way contrary to the operating instructions as specified in the
Rad2Go Owner’s Manual. This warranty does not apply to any damage to the Rad2Go Product that is the
result of improper maintenance or to any Rad2Go Product that has been altered or modified so as to
adversely affect the product’s operation, performance or durability or that has been altered or modified so
as to change its intended use. This warranty does not extend to repairs made necessary by normal wear or
by the use of parts or accessories which are either incompatible with the Rad2Go Product or adversely
affect its operation, performance or durability.
Rad2Go reserves the right to change or improve the design of any Ra2Go product without assuming any
obligation to modify any product previously manufactured.
ALL IMPLIED WARRANTIES ARE LIMITED DURATION TO THE THIRTY (30) DAYS
WARRANTY PERIOD OR THIRTY (30) DAYS FOR PRODUCTS USED FOR ANY COMMERCIAL
PURPOSE. ACCORDINGLY, ANY SUCH IMPLIED WARRANTIES INCLUDING
MERCHANTABILITY, FITNESS FOR A PARTICULAR PURPOSE, OR OTHERWISE, ARE
DISCLAIMED IN THEIR ENTIRETY AFTER THE EXPIRATION OF THE APPROPRIATE thirty days
OR THIRTY DAY WARRANTY PERIOD. RAD2GO’S OBLIGATION UNDER THIS WARRANTY IS
STRICTLY AND EXCLUSIVELY LIMITED TO THE REPAIR OR REPLACEMENT OF DEFECTIVE
PARTS AND RAD2GO DOES NOT ASSUME OR AUTHORIZE ANYONE TO ASSUME FOR THEM
ANY OTHER OBLIGATION. SOME STATES DO NOT ALLOW ANY LIMITATIONS ON HOW
LONG AN IMPLIED WARRANTY LAST, SO THE ABOVE LIMITATION MAY NOT APPLY TO
YOU.
RAD2GO ASSUMES NO RESPONSIBILITY FOR INCIDENTAL, CONSEQUENTIAL OR OTHER
DAMAGES INCLUDING, BUT NOT LIMITED TO EXPENSE OF RETURNING THE RAD2GO
PRODUCT TO AN AUTHORIZED SERVICE DEALERS AND EXPENSE OF DELIVERING IT BACK
TO THE OWNER, MECHANIC’S TRAVEL, TIME, TELEPHONE, OR TELEGRAPH CHARGES,
RENTAL OF A LIKE PRODUCT DURING THE TIME WARRANTY SERVICE IS BEING
PREFORMED, TRAVEL, LOSS OR DAMAGE TO PERSONAL PROPERTY, LOSS OF REVENUE,
LOSS OF USE OF THE PRODUCT, LOSS OF TIME, OR INCONVENIENCE. SOME STATES DO
NOT ALLOW THE EXCLUSION OR LIMITATION OF INCIDENTAL OR CONSEQUENTIAL
DAMAGES, SO THE ABOVE LIMITATION OR EXCLUSION MAY NOT APPLY TO YOU.
This warranty gives you specific legal rights, and you also have other rights, which vary from state to state.
This warranty applies to all Rad2Go Products manufactured by Rad2Go and sold in the United States.
Rad2Go Inc.
U.S. and International Patents and Trademarks Pending
6231 Yarrow Drive
Carlsbad, CA 92122
16
Rad2Go Electric Scooter Warranty
This Warranty Registration is to be completed by the dealer or customer at the time of purchase and
submitted to Rad2Go, Inc., within 10 days of the date of purchase for warranty entitlement.
This warranty is void if the serial number or the safety warning labels on your Rad2Go Electric Scooter are
altered, defaced, or removed. Modifications to your Rad2Go Electric Scooter or its components shall void
this warranty.
Model: __________________________
Serial Number: _______________________
Date of Purchase: ________________
Dealer Name: ________________________
Purchaser’s Name: _______________________________________________________
Address:________________________________________________________________
City: __________________________ State: __________
Phone Number: (
Zip Code: _____________
)____-________
Definition: Normal operating conditions require routine care and maintenance by the purchaser of the
Rad2Go Electric Scooter. Proper use means the vehicle is to be used only in the manner intended for
personal transportation of a single rider with proper safety equipment as described in the Owner’s Manual.
Rad2Go Electric Scooters are intended for use only on safe, dry, smoothly paved or hard packed surfaces in
accordance with local regulations, during daylight hours.
Purchaser’s Responsibilities:
1.
Read and understand the Owner’s Manual and all product warnings before operating your Rad2Go
Electric Scooter. Serious injury or death may result from improper operation or failure to observe
warnings and safety instructions on any motorized scooter or vehicle.
2.
Perform routine care and maintenance of your Rad2Go Electric Scooter as detailed in the Owner’s
Manual.
3.
Modification of the Rad2Go Electric Scooter or its components voids this warranty.
4.
The rider is responsible for learning and obeying all federal, state, and local laws governing the
operations of Electric Scooters.
5.
Always wear a helmet, knee and elbow shields, goggles, appropriate shoes and all other
appropriate safety equipment when operating a motorized scooter.
6.
The purchaser is responsible for all shipping charges incurred to facilitate repair of the scooter.
Manufacture’s Warranty:
1.
Rad2Go, Inc., (HEREINAFTER REFERRED TO AS Rad2Go) expressly warrants that each of its
products is free from defects in material and workmanship under normal operating conditions and
according to proper use for a period of 30 days from the date of purchase.
2.
In express consideration for purchaser’s execution of the limited warranty and liability agreement,
Rad2Go will repair or replace any part or component other that the tires of the Rad2Go Electric
Scooter free of charge to the original purchaser who registers his/her Rad2Go Electric Scooter
under the terms of the warrantee programs.
17
3.
This warranty does not apply to tire wear, operation under abnormal circumstances or contrary to
the requirements described in the owner’s manual or damage to the vehicle brought on by
improper use. Racing or competitive use shall void this warranty.
4.
Warranty services may be obtained by contracting Rad2Go via telephone at (760) 929-1500, or by
mail at 6231 Yarrow Drive, Suite C, Carlsbad, CA 92009; or via email at [email protected].
State the specific nature and any circumstances leading to the problem. A service technician will
contact you with specific instructions to ensure that you receive the best service for your scooter in
the most economical way.
5.
Purchaser herewith acknowledges:
6.
a.
That Rad2Go assumes not liability for any misuse or improper operation of Rad2Go
Electric Scooters or Vehicles.
b.
Under this limited warranty and liability agreement, Rad2Go shall have no obligation and
the purchaser shall have no remedy against Rad2Go and its officers, agents or assigns for
any damages, including but not limited to incidental, consequential, special, punitive
damages arising form direct or indirect injury to person or property, or any other loss,
whether or not occasioned by negligence or otherwise on the part of Rad2Go.
c.
Purchaser acknowledges that there is an inherent risk in the operation of motorcycle,
bicycles, mopeds, scooter, go-carts and all other Rad2Go products, and herewith assumes
no risk of any injury arising from operation of any Rad2Go products.
Original owner as documented on the dealer warranty registration form will indemnify and hold
Rad2Go harmless and take full responsibility for conveying all safety warnings, instructions and
limited warranty if the unit is sold lent or otherwise transferred to other persons, and will
indemnify Rad2Go from any claims against it for original owner’s failure to do so.
THE EXPRESS LIMITED WARRANTY DESCRIBES HEREIN SHALL BE EXCLUSIVE AND
THERE IS NO OTHER WARRANTY OR LIABILITY, EXPRESS OR IMPLIED, ARISING BY
LAW OR OTHERWISE AND WHETHER OR NOT OCCASIONED BY SELLER’S
NEGLIGENCE. THERE IS NO IMPLIED WARRANTY OF MERCHANT ABILITY OR FITNESS
FOR A PARTICULAR PURPOSE. THERE ARE NO WARRANTIES, WHICH EXTEND BEYOND
THOSE EXPRESSLY STATED HEREIN.
If any provision in this agreement is held by an arbitrator or court of competment jurisdiction to be
invalid, void, or unenforceable, the remaining provisions shall nevertheless continue in full force
without being impaired or invalidated in any way.
PLEASE ACKNOWLEDGE THAT YOU HAVE READ AND UNDERSTAND EACH WARNING
BY PLACING YOUR INITIALS IN THE SPACE PROVIDED BESIDES EACH ITEM.
_________ This devise does not conform to federal motor vehicle safety standards and is not intended
for operation on public roads or highways.
_________ Safety helmet, knee, and elbow pads, goggle and gloves, appropriate shoes and brightcolored clothing should be worn while operating a Rad2Go Electric Scooter to reduce the risk of
potential injury.
_________ Do not operate the Rad2Go Electric Scooter in traffic or on wet, frozen, oily, pitted or
rough surfaces. Avoid potholes, surface cracks, obstacles, and riding at night.
_________ Prior to each use the rider must check the tire pressure, brakes, and battery function.
_________ Never use alcohol or drugs before operating a Rad2Go Electric Scooter. Not only will
alcohol slow your reaction time and impair judgment, but in many jurisdiction rad2Go Electric Scooter
are subject to the same laws governing driving under the influence as automobiles.
_________ This product should not be used by minors without adult supervision.
_________ High speed, jumping and trick maneuver are dangerous and may result in damage to or loss
of control of the Rad2Go Electric Scooter, or other accidents.
18
_________ Never permit a guest to ride your Rad2Go Electric Scooter without reading the Owner’s
Manual and all labels.
_________ Rad2Go Electric Scooters should not be used by persons unwilling or unable to take
responsibility for their actions.
_________ Read all additional warnings and product instructions in the Owner’s Manual and on safety
labels before operating the Rad2Go Electric Scooter.
_________ Modifications or alterations to the manufacture’s original product or its components void
all warranties.
We stand behind our products: All Rad2Go products are fully warranted to be free from defects in both
parts and workmanship for a period of 30 days from the time of purchase.
NOTICE:
BY SIGNING BELOW YOU ARE AGREEING TO HAVE ANY DISPUTES ARISING OUT OF
THE MATTER INCLUDING IN THE “ARBITRATION OF DISPUTES” PROVISION DECIDED
BY NEUTRAL, BINDING ARBITRATION AS PROVIDED BY CALIFORNIA LAW, AND THAT
YOU ARE GIVING UP THE RIGHTS YOU MIGHT POSSESS TO HAVE THE DISPUTE
LITIGATED IN A COURT OR JURY TRIAL. BY SIGNING BELOW YOU ARE GIVING UP
YOUR JUDICIAL RIGHTS TO DISCOVERY AND APPEAL, UNLESS THOSE RIGHTS ARE
SPECIFICALLY INCLUDED IN THE “ARBITRATION OF DISPUTES” PROVISION. IF YOU
REFUSE TO SUBMIT TO ARBITRATION AFTER AGREEING TO THIS PROVISION, YOU
MAY BE COMPELLED TO ARBITRATE UNDER THE AUTHORITY OF THE CALIFORNIA
CODE OF CIVIL PROCEDURE. YOUR AGREEMENT TO THIS ARBITRATION PROVISION IS
VOLUNTARY.
You should feel free to consult an attorney before signing this limited warranty and liability agreement.
I have read and understood and agree to be bound by the limited warranty and liability agreement
above and agree to submit disputes arising out matters included in the “Arbitration of Disputes”
provision to neutral arbitration.
X__________________________ Purchaser’s Signature
Date: _____/_____/_______
19