1
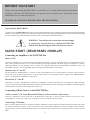
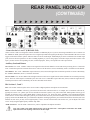
OWNER’S MANUAL
KJM-7900 PRO
PROFESSIONAL SERIES
DIGITAL KARAOKE MIXER
IMPORTANT INFORMATION: Thank
you for purchasing the KJM-7900 PRO .
To make full and effective use of this unit,
please read this Owner ’s Manual
carefully before operating.
GENERAL WARNING
CAUTION
RISK OF ELECTRIC SHOCK
DO NOT OPEN
CAUTION: TO REDUCE RISK OF ELECTRIC
SHOCK, DO NOT REMOVE COVER
(OR BACK). NO USER-SERVICABLE
PARTS INSIDE. REFER SERVICING TO
QUALIFED SERVICE PERSONNEL
The lightning flash with arrowhead symbol, within an equilateral
triangle is intended to alert the user to the presence of uninsulated
“dangerous voltage” within the product’s enclosure that may be of sufficient
magnitude to constitute a risk of electric shock to persons.
The exclaimation point within an equilateral triangel, is intended to alert
the user to the presence of important operating and maintenance
(servicing) instructions in the literature accompanying the appliance.
TABLE OF CONTENTS
Congratulations! And thank you for purchasing the Vocopro JKM-7900 PRO.
This unit has been designed with the professional KJ and DJ in mind to assist in
providing the highest quality Karaoke entertainment available. With proper care
and handling, this unit will continue to operate optimally for years. Please read
this manual carefully before getting started. Note: This unit requires an external
amplifier to operate.
Table of Contents ................................................................... 1
Before You Start ..................................................................... 2
Quick Start (REAR PANEL HOOK-UP)
2
Connecting an Amplifier ..........................................................
Connecting a Music Source ....................................................
Connecting a TV Monitor ... ....................................................
Rear Panel Hook-up (Cont.)....................................................
2
2
2
3
Parts And Functions (Microphone Input Module) ..................
Parts and Functions (Music Module) ....................................
Parts and Functions (Master Control Module) .......................
Expandability Module ..............................................................
Specifications................................................... .......................
4
5
6
7
7
1
BEFORE YOU START
Thank you for purchasing the KJM-7900 Pro. At VocoPro we care about product quality and customer
satisfaction. We know the KJM-7900 Pro will provide years of quality service and reliable music
entertainment for you when used properly.
PEASE READ CAREFULLY BEFORE USING THE KJM-7900 PRO
Unpacking the KJM-7900 Pro
Carefully remove the KJM-7900 Pro digital mixer from its packaging and operate per manual instructions before discarding the packaging
materials. If it should become necessary to return the unit for any reason the original packaging materials are best suited for transporting
the unit to minimize any potential damage which may not be covered under the standard warranty.
WARNING: To avoid shock or serious injury do not attempt
to connect any external devices or cablesto the KJM-7900
without first disconnecting the unit from all power sources.
QUICK START (REAR PANEL HOOK-UP)
Connecting an Amplifier to the KJM-7900 Pro
Master 1 Out
Locate the “MASTER 1 OUT” section on the back of the KJM-7900 and the “L” and “R” audio input jacks on your amplification source.
Note: you may need a special “RCA to 1/4”” connector cable if you are using an amplifier with “RCA” type jacks. Connect the “L” and “R”
audio input connectors of your amplifier to the “L” and “R” 1/4” ouput jacks on the back of the unit, labeled “MASTER 1 OUT”. The
“MASTER 1 OUTPUT” section of the KJM-7900 is controled by the “MASTER 1” slide control.
Monoitor Out “L” and “R”
You can connect the “MONITOR OUT, “L and “R” section of the KJM-7900 Pro to a powered monitor, to achieve a seperate monitor
mix for your vocals, by connecting them to the “L” and “R” input connectors of your external “monitor” amplifier. The “MONITOR OUT”
section is controled by the “MASTER 2” slide control.
Record Out “L” and “R”
Connect the “L” and “R” “RECORD OUT” jacks to the left and right ” record in” channels on your recording device. When recording,
set your record levels from the KJM-7900 individual channel controls. The master volume will only give an “audible” volume through your
external speakers and will have no bearing on the record levels.
Connecting a Music Source to the KJM-7900 Pro
“Source section 3” CD, Laser Disc and DVD Players (with or without a video source)
Locate the “AUDIO IN” section on the back of the KJM-7900. Connect the “L” and “R” output connectors of your player to the
corresponding “L” and “R” RCA input jacks on the back of the unit. (example: CD, LD or DVD).
Connecting a TV Monitor
If there is a video output connector on your player, locate the “VIDEO IN” section on the back of the KJM-7900 (to the right of the “audio
in” section) and connect your player’s video out connector to the corresponding “VIDEO IN” connector (example: CD, LD or DVD).
Then connect the video line out from the KJM-7900 to your TV monitor’s line in connector. If it is a television be sure to switch it to video
mode.
2
REAR PANEL HOOK-UP
(CONTINUED)
MONITOR OUT
RECORD OUT
STEREO RETURN
AUDIO IN
AUDIO IN
VIDEO IN
VIDEO IN
VIDEO OUT
“Source Section’s 1 and 2” (PHONO/LINE)
Source sections 1 and 2 are designed to connect turntables or additional players. If you are connecting a turntable be sure to connect it to
the “PHONO L and R” jacks.These jacks have a lower signal output and are designed speciffically to connect turntables. Be sure to set the
toggle switch on the board to “phono” otherwise there will be no sound output. Additional players can be connected to the “LINE” input
jacks, however the line inputs have no video switching capability. If you are using a player with video output, and wish to use the video
input you must use the corresponding CD, LD, or DVD input jacks, as they correspond to the video input section.
Auxiliary Send and Return
Aux 1 Send: The “AUX 1 SEND” sends a mono signal from the selected channel to an external mono processing device. Connect the
AUX 1 send to the input of an extrernal effects device. The level for the AUX 1 send is controlled by AUX 1 send fader on each channel.
Aux 1 Return: The “AUX 1 RETURN” input connectors (stereo) returns the signal fron an external special device and is controlled by
the “STEREO RETURN (AUX 1)” located on the board.
Aux 2 L and R: The “AUX 2 SEND” left and right connectors send a stereo signal from the selected channel to an external processing
device. The level at this output is controlled by the AUX The “AUX 1 RETURN” input connectors (stereo) returns the signal from an
external special device and is controlled by the AUX 2 Send fader on the board.
Mic Sections 1, 2 and 3
Line: The “LINE” connector jacks can be used to connect a high impedence microphone or an instrument.
Insert: To use the “INSERT” effectively you will need an insert cable. The insert cable or “Y” adaptor, as it is sometimes referred to as,
typically has a stereo 1/4” “phone” jack on one end and two mono RCA jacks or 1/4” jacks on the other. Most apadtors of this type are
available at electronics stores, such as Radio Shack. Connect the stereo 1/4” phone jack to the “INSERT” jack on the KJM-7900 then
connect the two “mono” ends to the signal jacks on you external effects unit (see your owners manual). Once your external effects unit is
properly connected to the KJM-7900, you will be able to adjust the incoming signal from your external effects unit (as described your users
manual). In some cases you may receive high frequency “noise” from an external effects unit. In this case, you can adjust some of the
“noise” out by using the high frequency channel “EQ” fader.
“XLR” Connector: Use the “XLR” connector for your low impedence microphone and cable.
Note: The “LINE” and “XLR” inputs will not work at the same time. A microphone connected to the “XLR”
input will cancel out anything connected to the line input.
3
PARTS AND FUNCTIONS
(MIC INPUT MODULE)
1
2
3
1. Gain: This controls the input level for the “LINE” and “XLR” microphone
inputs for the channel. It can be adjusted from 20dB to 60 dB.
2. High EQ: This controls the level for a preset high frequency range. Use this
control to boost ro reduce the high end frequencies in the microphone signal.
Note: Feedback can be eliminated or reduced by lowering the amount of high
frequencies in the channel.
3. Mid EQ: This controls the level for a preset mid frequency range. Use this
control to boost ro reduce the mid frequencies in the microphone signal.
4
4. Low EQ: This controls the level for a preset low frequency range. Use this
control to boost or reduce the low frequencies in the microphone signal.
5
5. Aux 1: This control works in conjunction with the “master” Aux1 Send on
the Master module panel. It controls the level of “effect” (whatever external
device is connect to the Aux 1) for that individual channel. It is Pre EQ.
6
7
8
9
6. Aux 2: This control works in conjunction with the “master” Aux 2 Send on
the Master module panel. It controls the level of the built-in digial echo effect
or whatever external device is connect to the Aux 2 for that individual channel.
It is Post EQ.
7. Pan: This control pans or “balances” the microphone to the left or right for
that individual channel.
8. Cue: This button monitiors the input signal from the board to the headphones.
Press this button to hear only that channel through the headphones. Note: if
you have pressed more than one channel cue, those channels will be audible as
well.
9. Channel Fader: The fader raises or lowers the microphone volume of that
particular channel.
10
12
11
13
10. Talkover Attenuation: This control is part of the “talkover” feature. It
allows the user to set the amount of music to surpress while the
announcer is speaking, thus being able to “talk over” the music.
11. Talkover Hold Time: This control is part of the “talkover” feature. It
allows the user to set the amount of time it takes to return the music to normal
volume once the announcer has finished speaking. This feature works in the
“Auto” mode only.+
12. Talkover Aggisn: This control is part of the “talkover” feature. It
allows the announcer to select the channel he/she wishes to “talk over” on.
13. Auto Off On: This control is part of the “talkover” feature. It
allows the user to use the talkover feature automatically or by choice. Note:
The talkover feature will only work when the music source is set to
“Master 1”
4
PARTS AND FUNCTIONS
(MUSIC MODULE)
3
1. Source Selector: Channels 1 and 2 allow the user to connect two players
without video output. The source selector switch makes it possible to switch
easily between players by “toggleing” it to the desired position.
2. Source Selector: Channel 3 allows the user to connect up to three players
with video output. The source selector switch makes it possible to switch
easily between players by “toggleing” it to the desired position.
3. Gain: This controls the input level for players connected to the
corresponding channel. It can be adjusted from 20dB to 60 dB.
4
4. High EQ: This controls the level for a preset high frequency range. Use this
control to boost ro reduce the high end frequencies in the music signal.
5
5. Mid EQ: This controls the level for a preset mid frequency range. Use this
control to boost ro reduce the mid frequencies in the music signal.
6
6. Low EQ: This controls the level for a preset low frequency range. Use this
control to boost or reduce the low frequencies in the music signal.
1
2
7
8
9
10
11
12
7. Aux 1: This control works in conjunction with the “master” Aux1 Send on
the Master module panel. It controls the level of “effect” (whatever external
device is connect to the Aux 1) for that individual channel. It is Pre EQ.
8. Balance: This control “balances” the music signal between the left and right
channels.
9. Aux 2 On /Off Switch: This control works in conjunction with the “Master”
Aux 2” Send and the built in digital echo effect on the Master module panel.
In the up position Aux 2 is bypassed.
10. Cue: This button monitiors the input signal from the board to the headphones.
Press this button to hear only that channel through the headphones. Note: if
you have pressed more than one channel cue, those channels will be audible as
well.
11. Channel Fader: The fader raises or lowers the music volume of that
particular channel.
14
13
12. Master 1 / Master 2 & Key Control Switch: This switches the music
between the Master 1 channel and the Master 2/Key Control channel.
Important: In order to use the key control feature the switch must
be in the down position.
13. Crossfader Assign Toggles: These toggles work in conjunction with the
crossfader slide control. They allow the user to select the channels to be
included in the “cross fade”.
14. Cross Fader Slide Control: The slide control allows the user to fade the
music out from one source and fade in to another source to creating a
“blending” effect of the music.
5
PARTS AND FUNCTIONS
(MASTER CONTROL MODULE)
and expandability module...
1
2
17
3
5. Delay: Adjusts the length of each interval. The amount of delay for
each mic channel is controlled by the Aux 2 (post) fader.
4
6. Repeat: Adjusts the interval repetition of the echo effect. The amount
of repeat for each mic channel is controlled by the Aux 2 (post) fader.
5
6
16
7
15
4. Digital Key Control & Multiplex: The digital key control feature
works in the Master 2 mode. Press the Master 2/Key Control button
on the desired channel (to the down position) then adjust the key
control up or down to raise or lower the “key” of the music.
The Multiplex feature works only with discs recorded in the
“multiplex” format. It will delete the vocal tract on multiplex CD’s
or tapes.
8
9
7. Echo: Adjusts the echo parameter (-5 - +5) for the overall amount of
digital effect on the mic channels. The amount of echo for each mic
channel is controlled by the Aux 2 (post) fader.
8. Echo On/Off Switch: The digital “effects” (echo, repeat and delay)
can be set to the desired levels and switched off when not in use by
pressing the switch to the down position.
9. Master 1/Master 2: This allows the user to select between the
Master 1 mode or Master 2 mode. Note: This must be set in theMaster
2 position in order to send the key control signal to a monitor.
10. Master/Cue Headphone Switch: Switches the LED level meter
between the entire mix or “cue” signals from individual channels.
11. Cue Level: This sets the level within the headphones.
10
12. Headphone Jack
11
13. Master 2 Fader (Monitor Output): This raises or lowers the
volume for the Master 2 output jacks. Note:
14. Master 1 Fader: This raises or lowers the volume for the master 1
output jack.
12
14
13
1. DC 12V Lamp Connector
2. Power On/Off
3. LED Level Meter: Displays sound or cue levels
from the music sources.
15. Aux 1 Send Master Contol: Sets the master level for the signal being
sent to an external effects unit through the Aux 1 Send jack. Note: The
key control feature is by-passed through this send.
16. Aux 2 Send Master Control: Sets the master level for the signal
being sent to an external effects unit through the Aux 2 jacks. Note:
The Aux 2 On/Off switch(s) on the music module must be set in the
down position to work with the Aux 2 Send Master Control. Note:
The key control feature is by-passed through this send.
17. Stereo Return (Aux 1) Master Control: Controls the signal being
received from an external effects unit.
6
EXPANDABILITY MODULE
AND SPECIFICATIONS
EXPANDABILITY
MODULE
The KJM-7900 Pro Expandability
Module (KJ-Module) can be purchased
separately through your authorized
VocoPro dealer. One KJ-Module can be
used to add three additional mic channels
OR three additional music channels to
your KJM-7900 mixer..
KJM-7900 SPECIFICATIONS
Module C2
Mic Input
Connector…………………XLR Jack/balanced
Input Impedance………….1.5kΩ
Maximum Input Level…….+20dBu
Line Input
Connector…………………1/4” Jack/balanced
Input Impedance………….10kΩ
Maximum Input Level…….+20dBu
T.H.D……………………….<0.05%
Noise……………………….80dB
Tone
High/Mid/Low……………..+/-12dB
Talkover
Hold time…………………..up to 6S
Attenuation…………………-4dB - -20dB
Module P2
Phono Input
Connector……………….RCA Jack
Input Impedance………..47kΩ
Nominal Input Level……3mV
RIAA……………………..+/-1dB
Line Input
Connector……………….RCAJack
Input Impedance………..30kΩ
Maximum Input Level…...+20dBu
T.H.D…………………………<0.05%
Noise…………………………80dB
Tone
High/Mid/Low……………+/-12dB
Module A5
Aux 1 & Aux 2 Stereo Return Input
Connector…………………...RCA & 1/4” Jack
Input Impedance……………18kΩ
Maximum Input Level………+20dBu
Master Outputs
Connector……………………RCA Jack
Maximum Output……………Level+22dBu
T.H.D…………………………..<0.05%
Noise…………………………..80dB
Headphone……………………30mW/16 Ohms
Metering……………………….12 Segment LED Bargraph
Echo Delay Time……………..Up to 300mS
7