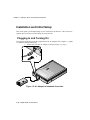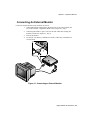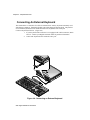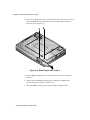
1
Digital HiNote VP 500 Series User's Guide Part Number: ER-PB1WF-UA. A01 Digital Equipment Corporation July 1996 The information in this document is subject to change without notice and should not be construed as a commitment by Digital Equipment Corporation. Digital Equipment Corporation assumes no responsibility for any errors that might appear in this document. The software described in this document is furnished under a license and may be used or copied only in accordance with the terms of such license. No responsibility is assumed for the use or reliability of software or equipment that is not supplied by Digital Equipment Corporation or its affiliated companies. Restricted Rights: Use, duplication, or disclosure by the U.S. Government is subject to restrictions as set forth in subparagraph (c) (1) (ii) of the Rights in Technical Data and Computer Software clause at DFARS 252.227-7013. © Digital Equipment Corporation 1996. All Rights Reserved. DEC, ThinWire, and the Digital logo are trademarks of Digital Equipment Corporation. Digital HiNote VP is a registered trademark of Digital Equipment Corporation. ESS is a registered trademark of ESS Corp. Pentium is a registered trademark of Intel Corporation. MS-DOS and Windowsare registered trademarks of Microsoft Corporation. Sound Blaster is a registered trademark of Creative Labs Corporation The ENERGY STAR emblem does not represent EPA endorsement of any product or service. All other trademarks and registered trademarks are the property of their respective holders. Preface The FCC wants you to know... This equipment has been tested and found to comply with the limits for a Class B digital device, pursuant to Part 15 of the FCC rules. These limits are designed to provide reasonable protection against harmful interference in a residential installation. Any changes or modifications made to this equipment may void the user's authority to operate this equipment. This equipment generates, uses, and can radiate radio frequency energy and, if not installed and used in accordance with the instructions, may cause harmful interference to radio communications. However, there is no guarantee that interference will not occur in a particular installation. If this equipment does cause harmful interference to radio or television reception, which can be determined by turning the equipment off and on, the user is encouraged to try to correct the interference by one or more of the following measures: • Reorient or relocate the receiving antenna. • Increase the separation between the equipment and receiver. • Connect the equipment into an outlet on a circuit different from that to which the receiver is connected. • Consult the dealer or an experienced radio/TV technician for help. All external cables connecting to this basic unit must be shielded. For cables connecting to PCMCIA cards, see the option manual or installation instructions. Canadian DOC Statement This Class B digital apparatus meets all requirements of the Canadian Interference-Causing Equipment Regulations. Cet appareil numérique de la classe B respecte toutes les exigences du Règlement sur le matériel brouilleur du Canada. Table of Contents 1 Getting to Know Your Notebook Features-------------------------------- -------------------------------- -------------------------------- -1–1 Components, Controls and Indicators-------------------------------- ---------------------------- 1–4 Front and Side Components (Panel Closed) -----------------------------------------------------1–4 Rear View --------------------------------------------------------------------------------------------1–5 Left and Side Components -------------------------------------------------------------------------1–6 Right Front View (Panel Open) -------------------------------------------------------------------1–8 Installation and Initial Setup-------------------------------- -------------------------------- ----- 1–10 Plugging In and Turning On --------------------------------------------------------------------- 1–10 Controlling Power --------------------------------------------------------------------------------- 1–14 Battery Charge Gauge (in LCD Status Display) ---------------------------------------------- 1–15 LCD Status Display ------------------------------------------------------------------------------- 1–16 Keyboard Hot Keys ------------------------------------------------------------------------------- 1–17 Using the Touch Pad ------------------------------------------------------------------------------ 1–18 Optional Expansion Devices-------------------------------- -------------------------------- ------ 1–21 2 Power and Your Computer General Battery Information -------------------------------- -------------------------------- ------2–2 Nickel Metal Hydride Battery Care---------------------------------------------------------------2–2 Memory Effect ---------------------------------------------------------------------------------2–2 NiMH Battery Life -----------------------------------------------------------------------2–2 Forming a Battery ------------------------------------------------------------------------2–3 LiIon Battery -----------------------------------------------------------------------------------------2–4 Greater Life Span and No Memory Effect -------------------------------------------------2–4 Preface The Main Battery Pack -------------------------------- -------------------------------- ------------- 2–5 Installing the Main Battery-------------------------------------------------------------------------2–6 Removing the Main Battery Pack-----------------------------------------------------------------2–8 Charging the Battery Pack ----------------------------------------------------------------------- 2–10 System LEDs --------------------------------------------------------------------------------- 2–12 Low Battery Activity ------------------------------------------------------------------------ 2–12 Replacing and Disposing of Batteries ---------------------------------------------------------- 2–12 Power Management -------------------------------- -------------------------------- ---------------- 2–13 Good Power Management Habits --------------------------------------------------------------- 2–13 The Standby/Resume Feature -------------------------------------------------------------- 2–13 The Suspend/Resume Feature -------------------------------------------------------------- 2–13 Screen Brightness ---------------------------------------------------------------------------- 2–14 The Floppy Disk/CD-ROM Drive --------------------------------------------------------- 2–14 PC Cards--------------------------------------------------------------------------------------- 2–14 The Serial/ Infrared Port -------------------------------------------------------------------- 2–14 AC Power ------------------------------------------------------------------------------------- 2–14 Power Management Modes ---------------------------------------------------------------------- 2–15 Standby Mode -------------------------------------------------------------------------------- 2–15 Suspend Mode -------------------------------------------------------------------------------- 2–15 A Power Management Example----------------------------------------------------------------- 2–16 Power Management Summary------------------------------------------------------------------- 2–18 3 The BIOS Setup Program Introduction-------------------------------- -------------------------------- ---------------------------- 3–1 Navigating through the BIOS Setup Program-------------------------------- ------------------ 3–2 Accessing the BIOS Setup Program --------------------------------------------------------------3–3 Menu Bar----------------------------------------------------------------------------------------3–3 Item Specific Help -----------------------------------------------------------------------------3–3 Legend Bar--------------------------------------------------------------------------------------3–4 Launching Submenus -------------------------------------------------------------------------------3–5 General Help -----------------------------------------------------------------------------------------3–5 The Main Menu -------------------------------- -------------------------------- ----------------------- 3–6 The Peripherals Menu -------------------------------- -------------------------------- --------------- 3–8 Integrated Peripherals (Peripherals submenu)-------------------------------- --------------- 3–10 ii Preface The Security Menu -------------------------------- -------------------------------- ----------------- 3–13 Setting Admin. Password------------------------------------------------------------------------- 3–14 Changing Admin. Password --------------------------------------------------------------------- 3–14 Disabling Admin. Password --------------------------------------------------------------------- 3–14 The Power Menu-------------------------------- -------------------------------- -------------------- 3–16 The Exit Menu -------------------------------- -------------------------------- ---------------------- 3–18 4 Peripheral Devices Peripheral Equipment -------------------------------- -------------------------------- --------------- 4-1 External Monitor ------------------------------------------------------------------------------- 4-2 Parallel Device --------------------------------------------------------------------------------- 4-2 Serial Device------------------------------------------------------------------------------------ 4-2 Serial Infrared Port----------------------------------------------------------------------------- 4-2 External Keyboard or PS/2 Mouse ---------------------------------------------------------- 4-2 External Mic and Speaker Out (selected models only) ----------------------------------- 4-2 Connecting An External Monitor ----------------------------------------------------------------- 4-3 Connecting a Printer to the Parallel Port--------------------------------------------------------- 4-4 Parallel Port Data Transfers ------------------------------------------------------------- 4-5 Connecting a Serial Mouse ------------------------------------------------------------------------ 4-5 Connecting An External Keyboard --------------------------------------------------------------- 4-6 Connecting a PS/2 Mouse -------------------------------------------------------------------------- 4-7 The Infrared Port (Selected models only) -------------------------------- ----------------------- 4-8 5 PC Cards Using Win 95 PC Card Support ------------------------------------------------------------------- 5-1 Using Workgroups PC Card Support ------------------------------------------------------------- 5-2 Windows NT ----------------------------------------------------------------------------------------- 5-2 Inserting and Ejecting PC Cards ------------------------------------------------------------------ 5-2 6 Expansion and Option Devices System Memory Expansion-------------------------------- -------------------------------- --------- 6-1 Memory Configuration ----------------------------------------------------------------------------- 6-2 Installing Memory Cards -------------------------------- -------------------------------- ----------- 6-2 iii Preface Installing and Removing Modules-------------------------------- -------------------------------- - 6-5 Module Swapping ------------------------------------------------------------------------------ 6-5 Removing the Modules ----------------------------------------------------------------------------- 6-5 Installing FDD and Optional Modules ----------------------------------------------------------- 6-8 The CD-ROM Module (Standard on selected models) ---------------------------------------- 6-9 Installing a CD-ROM Module---------------------------------------------------------------- 6-9 Loading a Disc into the CD-ROM Module------------------------------------------------6-10 Removing and Installing HDD -------------------------------------------------------------------6-11 Partitioning the Hard Disk -------------------------------------------------------------------6-13 PHDISK Auto Partitioning -------------------------------------------------------------6-14 PHDISK Customized Partitioning-----------------------------------------------------6-14 Optional Devices -------------------------------- -------------------------------- --------------------- 6-15 The External Battery Charger --------------------------------------------------------------------6-15 The Car Adapter-------------------------------------------------------------------------------6-17 Adding the Minidock Port Replicator-------------------------------- --------------------------- 6-18 Identifying the Ports and Connectors ------------------------------------------------------------6-18 Connecting the AC Adapter ----------------------------------------------------------------------6-19 Hot-Plug Peripheral Devices----------------------------------------------------------------------6-19 The External Monitor-------------------------------------------------------------------------6-19 The Printer -------------------------------------------------------------------------------------6-19 The MIDI---------------------------------------------------------------------------------------6-19 Serial Mouse Connection --------------------------------------------------------------------6-20 The Keyboard----------------------------------------------------------------------------------6-20 Other Peripheral Devices--------------------------------------------------------------------------6-20 Mouse (PS/2) Connection--------------------------------------------------------------------6-20 The Audio-In Connection -------------------------------------------------------------------------6-20 Connecting the Notebook -------------------------------------------------------------------------6-21 Removing the Notebook---------------------------------------------------------------------------6-24 7 Caring for Your Notebook General Maintenance -------------------------------- -------------------------------- ---------------- 7-1 Cleaning The Notebook -------------------------------- -------------------------------- ------------- 7-1 Cleaning The Case ---------------------------------------------------------------------------------- 7-1 Cleaning The LCD Display ------------------------------------------------------------------------ 7-2 Caring for Diskettes --------------------------------------------------------------------------------- 7-2 iv Preface System Window Patterns --------------------------------------------------------------------------- 7-3 Standard Accessories ------------------------------------------------------------------------------- 7-3 A Troubleshooting The Power System---------------------------------------------------------------------------------- A-1 LCD Status Display -------------------------------------------------------------------------------- A-2 Battery ------------------------------------------------------------------------------------------ A-2 The LCD Display----------------------------------------------------------------------------------- A-2 Keyboard -------------------------------------------------------------------------------------------- A-2 I/O Connections-------------------------------- -------------------------------- ---------------------- A-3 External Monitor ----------------------------------------------------------------------------------- A-3 v About This Guide This guide describes how to operate, configure, and troubleshoot the Digital HiNote VP 500 Series notebook computer. This guide, along with the on-line help in the Windows 95 Digital Folder, should familiarize you with all aspects of the notebook computer. Audience This guide is written specifically for anyone using or configuring the Digital HiNote VP 500 Series notebook computer. Organization This guide contains the following: • Chapter 1: Getting to Know Your Computer – This chapter identifies the Notebook’s external components, overviews the various advanced features and provides a quick reference to the Notebook functions. • Chapter 2: Power and Your Computer – This chapter provides information on operating the notebook on AC and battery power. It also covers some of the advanced power management features designed to increase battery run time . • Chapter 3: The BIOS Setup Program – This section introduces the Setup Program, discusses how to navigate in the Program, as well as how to specify and save your new settings. A detailed list of the optional settings is also provided. • Chapter 4: Peripheral Devices – This chapter overviews the peripherals that can be connected and instructions on how to connect these devices to your notebook. • Chapter 5: PC Cards – This chapter provides information on how to use PC Cards under different operating environments. • Chapter 6: Expansion and Option Devices – This chapter describes the optional equipment that can be added to the basic Notebook system. Also covered in this chapter is step by step information on installing and removing the optional modules that can be inserted in the notebook’s expansion bay. • Chapter 7: Caring for Your Notebook - This section overviews some general maintenance and cleaning techniques. • Appendix A: Technical Specifications – This appendix lists your notebook notebook’s operating specifications. Preface • Appendix B: Troubleshooting – In a questions and answer format, this section provides you with solutions to possible problems that may arise. Abbreviations Abbreviation BIOS CMOS DIMM DMA DRAM FDD HDD IDE IR ISA K KB LCD MB MS-DOS MIDI PC Card (PCMCIA) POST ROM VGA SVGA viii Meaning Basic Input/Output System Complementary Metal Oxide Semiconductor Dual In-line Memory Module Direct Memory Access Dynamic Random Access Memory Floppy Disk Drive Hard Disk Drive Integrated Drive Electronics (internal hard disk drive interface) Infrared Industry Standard Architecture 1K = 1024 bytes Kilobyte Liquid Crystal Display Megabyte Microsoft Disk Operating System Musical Instrument Digital Interface Personal Computer Memory Card International Association Power On Self-Test Read Only Memory Video Graphics Array Super Video Graphics Array Preface Special Notices Three kinds of special notices are used in this guide to emphasize specific information. ___________________________ WARNING ___________________________ Warning: Indicates the presence of a hazard that can cause personal injury if the hazard is not avoided. ________________________________________________________________ ____________________________ Caution ____________________________ Caution: Indicates the presence of a hazard that might cause damage to hardware or that might corrupt data. ________________________________________________________________ ______________________________Note _____________________________ Note: Provides additional information. ________________________________________________________________ ix Preface Related Documentation A Quick Setup Guide is available as a supplement to the information provided in this User's Guide. A When You Travel Card is available as a supplement to the information provided in this User's Guide. x 1 Getting to Know Your Notebook Congratulations on your purchase of the Digital HiNote VP 500 series notebook computer. The HiNote VP 500 series notebooks feature innovative advances in portable computing technology. Their ergonomic design and sophisticated architecture provide you with a portable computer that is compact, powerful and easy to use. The notebook’s modular design provides maximum expandability without compromising portability. Your HiNote VP 500 series notebook has a Floppy Disk Drive (FDD) module located in the expansion bay. It can be easily removed from its housing and replaced with a CD-ROM giving you access to a greater variety of graphics and multimedia software. The expansion bay also supports an optional light-weight lithium-ion secondary battery pack providing you with additional battery run time while away from AC power. A high performance Pentium CPU and IDE hard drive provide you with the extra processing power needed to handle complex graphics and large sound files. Two PC Card (PCMCIA) slots give you the ability to use standard PC Cards, such as fax/modem, hard drive, memory, and network interface cards. This chapter identifies and describes the features, components, controls, and indicators of your Digital notebook computer. Also provided is an overview of your notebook’s expansion options. Features Your HiNote VP 500 series notebook is a high-performance portable computer designed for the mobile professional; the notebook is equipped with the following features. Chapter 1: Getting to Know Your Notebook Computer CPU The central processing unit (CPU) performs all computing functions and directs the actions of the system. Your notebook’s architecture supports the Intel Pentium family of CPUs which operates at 3.3 volts or less. This family of CPUs consumes less energy, for maximum battery life. Hard Drive Your notebook comes supplied with a user-upgradable Hard Disk Drive (HDD) with a data capacity of 1.08 GB or higher. RAM Your Digital notebook is equipped with 8 MB of on-board low power consuming 3.3V EDO memory, expandable up to 40MB. Please contact you Digital notebook dealer for information on purchasing optional memory dual in-line memory modules (DIMMs). Floppy Drive The Floppy Disk Drive (FDD) module can be removed from the notebook’s expansion bayand replaced with a CD-ROM module or the optional secondary lithium-ion (Li-Ion) battery module. CD-ROM The 6x CD-ROM module is a standard device on selected models. It can be removed from the notebook’s expansion bay and replaced with the FDD or optional Li-Ion secondary battery module. The 6x CD-ROM module can also be purchased separately as an optional device. Please contact your Digital notebook dealer for purchasing information. LCD Display Depending on which model you purchased, your notebook’s display is one of the following types: • 256-color DSTN LCD with a 800x600 SVGA back-lit display • 64K-color TFT LCD with a 800x600 SVGA back-lit display Advanced Power Management With Advanced Power Management, you will be able to customize the notebook’s power consumption based on your individual work needs. 1–2 Digital HiNote VP 500 Series Chapter 1: Getting to Know Your Notebook Computer Win95 Enhanced Keyboard Your notebook’s keyboard emulates a full-size desktop 101-key keyboard, featuring special function keys and an embedded numeric keypad. Take advantage of some of the time-saving features of Windows 95 keys within the Win95 environment. These keys have no function within other Microsoft Windows operating systems. PC Card Interface Your notebook’s PC Card socket supports two Type I or Type II cards, or one Type III card. Infrared (IR) Interface (selected models only) The IR Port allows wireless data transfer between the notebook and other IR equipped devices such as a printer or another computer. Video Chip Your notebook is equipped with a NeoMagic video chip that supports: • PCI Local Bus • Simultaneous display of LCD and external monitor • 256 colors at a resolution of 1024x768 on the external monitor • 1 MB Video RAM Audio (selected models only) Your notebook’s audio system includes the following features. • Two built-in speakers, stereo or mono • Built-in microphone • Two audio ports for input/output stereo interface • 16-bit stereo FM sound generator • ESS and SoundBlaster compatible Digital HiNote VP 500 Series 1–3 Chapter 1: Getting to Know Your Notebook Computer Components, Controls and Indicators This section shows the locations and provides a description of the different components, controls, and indicators on your Digital notebook computer. Front and Side Components (Panel Closed) Component ➊ Removable Hard Drive ➋ Lid Release ➌ Main Battery Module ➍ Expansion bay Description Easily removable and upgradable. Slide the two latches located on either side of the notebook toward you to open the LCD panel. Removable battery module that can be replaced with a charged battery. Supports the FDD, CD-ROM and optional lithiumion secondary battery module. Figure 1-1: Right Front View (Panel Closed) 1–4 Digital HiNote VP 500 Series Chapter 1: Getting to Know Your Notebook Computer Rear View Component Description ➊ Infrared Interface Allows wireless data transfer between the notebook and other IR devices. (Selected models only) A serial device connects to this port. ➋ Serial (COM) Port ➌ Parallel LPT Port A parallel device, such as a printer , connects to this port. ➍ Reset Button Using a pen or paper clip, press this button to reboot the system. All unsaved data will be lost. An external VGA or SVGA monitor connects to this port. ➎ VGA Display Port ➏ Minidock Port ➐ External Keyboard or PS/2 Mouse Port This 240-pin port allows you to connect the notebook to the Minidock Port Replicator. An external keyboard or PS/2 mouse connects to this port. Figure 1-2: Rear View Digital HiNote VP 500 Series 1–5 Chapter 1: Getting to Know Your Notebook Computer Left and Side Components Component ➊ Speaker-out Port Description External speakers or headphones connect to this port. (Selected models only) ➋ External Mic Port An external microphone connects to the notebook. (Selected models only) ➌ PC Card Lower Socket Eject Button ➏ AC Power Port Ejects a PC Card Type I or Type II from the lower socket. Insert PC Card Type I, Type II or Type III cards into this socket. Ejects a PC Card Type I or Type II from the upper socket or to eject a Type III card. The AC Adapter power cord connects to this port. ➐ Kensington Lock Port A Kensington Lock cable connects to this port. Eject Button ➍ PC Card Socket ➎ PC Card Upper Socket AC Power LED Lights green when the notebook is operating on AC power. Battery Charger LED Lights amber when the battery is being charged. When the battery is fully charged the amber LED turns off. 1–6 Digital HiNote VP 500 Series Chapter 1: Getting to Know Your Notebook Computer Figure 1-3: Left Front View (Panel Closed) Digital HiNote VP 500 Series 1–7 Chapter 1: Getting to Know Your Notebook Computer Right Front View (Panel Open) Component ➊ Internal Microphone Description Used to record music, voice and sound files. (Selected models only) DSTN or TFT Super VGA back-lit display. ➋ LCD Display Provides system operating status. ➌ LCD Status Display ➍ Suspend/Resume Button Turns the notebook on and toggles between the ➎ Suspend Lid Switch ➏ Internal Stereo Speakers Touch pad 1–8 Digital HiNote VP 500 Series suspend/resume mode. Press the [fn + Suspend/Resume] to turn off the notebook. Close the notebook’s LCD lid to suspend the system. Pressing the Suspend/ Resume button again will resume the system. Used to hear sound files and system sounds through stereo speakers. (Selected models only) A touch sensitive pointing device providing all the functions of a two-button mouse. Chapter 1: Getting to Know Your Notebook Computer Figure 1-4: Right Front View (Panel open) Digital HiNote VP 500 Series 1–9 Chapter 1: Getting to Know Your Notebook Computer Installation and Initial Setup This section guides you through turning on your notebook for the first time. This section also explains what you need to do after turning on your notebook. Plugging In and Turning On To power the notebook by using the supplied Universal AC Adapter, refer to Figure 1-5, Figure 1-6 and the following instructions: 1. Connect the Universal AC Adapter to this port (Figure 1-5, step 1). Figure 1-5: AC Adapter to Notebook Connection 1–10 Digital HiNote VP 500 Series Chapter 1: Getting to Know Your Notebook Computer 2. Connect the power cord to the port on the AC Adapter (Figure 1-6, step 2). 3. Plug the power cord into an electrical outlet. The green LED on the AC Adapter will light (Figure 1-6, step 3). Figure 1-6: The Notebook to AC Power Connection 4. After you have plugged the notebook into its power source, open the LCD lid and press the Suspend/Resume (Power) button to turn the notebook on (Figure 1-7). Digital HiNote VP 500 Series 1–11 Chapter 1: Getting to Know Your Notebook Computer Figure 1-7: Turning On the Notebook 5. If the notebook does not power up, check the AC Adapter to the notebook connections. If the notebook still does not power up, please refer to Appendix B, Troubleshooting. 6. While holding down the [fn] key, press the Suspend/Resume button for approximately two seconds to turn off the notebook. ______________________________Note _____________________________ You can purchase the optional Car Adapter which plugs into your car’s cigarette lighter. ________________________________________________________________ 1–12 Digital HiNote VP 500 Series Chapter 1: Getting to Know Your Notebook Computer ___________________________ WARNING ___________________________ Do not use an AC Adapter other than the one provided by Digital Equipment Corporation. To avoid personal injury and/or equipment damage, do not open the case of the International AC Adapter. There are no customerserviceable parts. ________________________________________________________________ Windows Software Your notebook computer comes supplied with a Microsoft Windowsoperating system installation software and numerous applications. The first time you turn on your notebook, the system will begin the installation process. You will be prompted for your Certification of Authenticity, which you can find with your Windows documentation. Backup Diskettes It is recommended that you make a backup copy of the factory installed software. You will need the backup copy of the software in case it is inadvertently deleted or if you need to reinstall any of the factory installed software. The number of disks required to create a backup copy is indicated by the Create Application Disks in the Digital program folder. The Microsoft Windows Create System Disks (MSCSD) application allows you to make only one set of Windows backup installation disks. Be sure to prepare an adequate supply of 1.44MB, formatted quality diskettes. Under the Windows 95 environment, during installation of a new piece of hardware, you may be prompted for a specific system disk. In the event that you have not yet created the system disk backup, you may change the indicated path from A: to C: by typing C:\Windows\Options\Cabs. Digital HiNote VP 500 Series 1–13 Chapter 1: Getting to Know Your Notebook Computer Controlling Power Unique to Digital notebook’s, the suspend/resume button not only enables you to take advantage of the built-in power saving features but also turns the notebook on and off. Goal On Action Suspend Press this button to place your system in Suspend mode. Resume If you want to resume normal operation from the Suspend mode, press the Suspend/Resume button. Off To completely shut off your notebook, press and hold [fn + suspend/resume] button until a system beep sounds, indicating that the system has been successfully turned off. Closing the LCD lid will also enter the notebook into Suspend mode. Suspend Lid Switch Press the Suspend/Resume button to turn the system on. 1–14 Digital HiNote VP 500 Series Chapter 1: Getting to Know Your Notebook Computer Battery Charge Gauge (in LCD Status Display) Icon When Displayed, Indicates… 76% to 100% battery operating time remaining. When the lines within this icon are rotating, it indicates that the battery is being charged. When the rotating stops, the battery is fully charged. 51% to 75% battery operating time remaining. 26% to 50% battery operating time remaining. Low battery to 25% battery operating time remaining. The system’s warning beep will sound. Save your work, replace the low battery with a fully charged one or use an AC power source to run the notebook. The [fn + F7] keys shut off the warning beep. It also mutes all audio. System has ceased charging the battery. The core of the battery has reached its maximum temperature, indicating that charging has stopped. Digital HiNote VP 500 Series 1–15 Chapter 1: Getting to Know Your Notebook Computer LCD Status Display Icon When Displayed Indicates... Embedded Numeric Keypad is enabled by hot keycombination. If blinking, the system is prompting you to enter your resume from suspend password. Scroll Lock is enabled by a hot key combination. Num Lock is enabled by a hot key combination. Caps Lock is enabled. Hard Disk Drive/CD-ROM is being accessed by the system. Floppy Disk Drive is being accessed by the system. The external monitor (CRT) or Simul mode is enabled. If blinking, the system is in Save to RAM mode. 1–16 Digital HiNote VP 500 Series Chapter 1: Getting to Know Your Notebook Computer Keyboard Hot Keys Hot keys are activated by holding down the [fn] key (located in the lower left corner of the keyboard) and pressing the desired function key. [fn] + [fn + esc] [fn + F1] [fn + F2] [fn + F4] [fn + F5] [fn + F6] [fn + F7] [fn + F8] [fn + F9] [fn + F10] [fn + home/pause] [fn + end/break] [fn + PrScr/ SysReq] [fn + ↑] [fn + ↓] Function Places the computer in Standby Mode. Decreases brightness level. Increases brightness level. Enables and disables the notebook’s external display port and the LCD display. There are three display modes: • LCD Display • LCD Display and External Monitor (Simul scan) • External Monitor only Each time you press this hot key the computer changes to the next display setting. Decreases the display contrast (DSTN screens only). Increases the display contrast (DSTN screens only). Enables or disables audio/speaker output including system beep indicating low battery. Enables and disables the keyboards embedded key pad. This hot key is used in conjunction with the [F9] hot key to control the embedded keypad. Toggles Num Lock on and off. This hot key is used in conjunction with the [F8] hot key to control the embedded keypad. Toggles Scroll Lock on and off. The state of the Scroll Lock feature is shown in the LCD Status Display. Pauses the display output. Pressing any other key on the keyboard causes the display output to resume. If Break is enabled, pressing this hot key sends a system break. Determined by application software. Increases the audio volume. Decreases the audio volume. Digital HiNote VP 500 Series 1–17 Chapter 1: Getting to Know Your Notebook Computer Using the Touch Pad The touch pad is a touch-sensitive pointing device that provides all the features of a mouse. Although its operation differs from a mouse, its function is the same; to move the cursor around the screen. Your notebook’s touch pad is equipped with many advanced feature options. To customize any of these settings, double-click on the touch pad icon in the Control Panel. Please refer to Figure 1-8 and the following explanation on how to use the touch pad. Figure 1-8: The Touch Pad 1. With your fingers on the keyboard in the normal typing position, the touch pad is easily accessible by moving either your left or right thumb off the space bar and down on to the pad. 1–18 Digital HiNote VP 500 Series Chapter 1: Getting to Know Your Notebook Computer 2. 3. Gently move your thumb across the touch pad in the direction you want the cursor to move. The touch pad’s lower button is equivalent to the left button on a conventional two-button mouse. The touch pad’s upper button is equivalent to the right mouse button on a conventional two-button mouse. The Touch Pad and the Mouse Double-clicking on the left mouse button is a common technique for selecting objects or launching programs from icons. The touch pad also supports this feature. Once you have moved the pointer over the object you wish to select, then rapidly double-click the touch pad’s lower button. Double-tapping is selection technique that is unique to the touch pad. Double tapping allows you to select objects or execute applications. Instead of double-clicking on a mouse button, double-tap on the touch sensitive touch pad to make the selection. When you double-tap the touch pad’s button, the system will prompt the software to perform the related operation. Creating a Comfortable Working Environment The following tips can help minimize eye strain and body fatigue when using your notebook computer: • • • Adjust your chair so that: − Your feet are flat on the floor–use a footrest if needed. − Your legs form a right angle to the floor. − The backs of your knees are free from the chair seat. − Your body weight rests on your spine while supporting the lower back region. Adjust your notebook computer so that: − Your wrists are straight and supported. − Keyboard and touch pad or external keyboard and mouse are at elbow height. − Your elbows are close to your sides with your upper arms perpendicular to the floor. − You maintain a neutral neck posture with the top of the display no higher than eye level. Adjust your display and lighting so that: Digital HiNote VP 500 Series 1–19 Chapter 1: Getting to Know Your Notebook Computer − Light is directed away from the screen to reduce glare. Look away to distant objects frequently. Use the tilt and swivel capabilities of your LCD or external monitor to place it in the most comfortable position. − The screen is the correct distance for your vision. ___________________________ Important ___________________________ If you experience pain or discomfort while using your notebook computer, take a rest break. Review the information in this section. If the pain or discomfort continues after resuming use, stop and report the condition to your job supervisor or physician. ________________________________________________________________ Figure 1-9: A Comfortable Working Environment 1–20 Digital HiNote VP 500 Series Chapter 1: Getting to Know Your Notebook Computer Optional Expansion Devices A variety of optional expansion devices are available to increase the already superb performance and versatility of your notebook computer. Please contact your Digital notebook dealer for purchasing information. Products Portable and Powerful Minidock Port Replicator The HiNote VP 500 series notebooks can be used as a full office PC by connecting it to the Minidock Port Replicator. Also available with built in network interface card, the Minidock is equipped with two stereo speakers, a serial, parallel, monitor, audio-in, audio-out, Midi, PS/2 mouse and keyboard port. There is never the problem of disconnecting and reconnecting several desktop devices each time you move your notebook on or off your desk. CD-ROM Take advantage of many software packages on today’s market with the Digital CD-ROM module. It is equipped with a high performance, 6x CD-ROM drive employing sophisticated laser and drive technology. Digital HiNote VP 500 Series 1–21 Chapter 1: Getting to Know Your Notebook Computer Products Portable and Powerful HDD The Digital HiNote VP 500 series has upgradable hard disk drives for easy expansion and investment protection. Secondary Battery The Digital lithium-ion optional secondary battery pack provides the convenience of extended battery at a reasonable cost. So light weight, that it’s the perfect traveling companion. External Battery Charger The optional Battery Charger provides a way to charge a battery pack without installing the battery pack in the notebook. This is helpful for charging spare battery packs or for charging a battery quickly while the notebook is in use. 1–22 Digital HiNote VP 500 Series Chapter 1: Getting to Know Your Notebook Computer Products Portable and Powerful Car Adapter The Car Adapter provides power to the HiNote VP 500 series notebooks by utilizing the DC power from a car’s cigarette lighter. It can also be used with the external battery charger. Additional EDO Memory With today’s demanding applications and operating systems, eventually you may find it necessary to increase your system’s base memory. Your Digital HiNote VP 500 series notebook was designed to make memory upgrading easy. The Digital HiNote VP 500 uses the fast speed EDO (Extended Data Out) RAM modules. Digital HiNote VP 500 Series 1–23 2 Power and Your Computer Your Digital notebook computer can be powered by: • Battery only • International AC Adapter only ______________________________Note _____________________________ If the notebook is operating on AC power and a battery pack (main battery, secondary battery, or both) is in the notebook, the battery(ies) will continue to charge until full. ________________________________________________________________ Your notebook’s main battery is a Nickel Metal Hydride (NiMH) Smart Battery. To get the most out of your notebook computer and its battery, you need to: • Know how to use and care for the Battery Pack • Understand the Power Management features of the computer and how to configure them Chapter 2: Power and Your Computer General Battery Information All batteries have limited life span. A battery’s life span is measured by the number of charging and draining cycles it can undergo before it can no longer be charged. The amount of time that your system can be operated by battery power before the battery is drained is referred to as battery run time. Nickel Metal Hydride Battery Care Your notebook’s main battery is an Enhanced Nickel-Metal Hydride. Nickel-Metal Hydride (NiMH) batteries are extremely common in many types of portable systems, such as cellular phones and portable computing devices. Memory Effect A NiMH battery in poor condition may begin to exhibit characteristics of “memory effect.” A memory effect will occur when a user does not allow the battery to fully drain before charging it again. For example, if you use the battery for 20 minutes at a time and then recharge it, the battery will tend to “remember” that it only needs to operate 20 minutes per charge. As a result, during the charging process, the declining battery will only receive a portion of its charge capacity. NiMH Battery Life The memory effect has a direct impact on the battery’s life span. NiMH batteries have a typical life (charge/drain cycles) of up to 800 cycles. If the battery is used an average of 30 minutes per cycle, you can expect a total life of 400 hours. If you use the battery 3 hours per cycle, you can expect a total life of 2,400 hours. Therefore, it is advantageous to use the battery as much as possible during each cycle. However, in attempts to prevent the memory effect, it may not always be practical to continuously use your notebook until the batterydrains to its minimum level. As a solution, Digital recommends that users periodically “form” or condition the battery. When a battery is formed, it is put through a series of charging and draining cycles. A battery which is formed will perform better and last longer than a battery which has not been formed. 2–2 Digital HiNote VP 500 Series Chapter 2: Power and Your Computer Forming a Battery Action Forming a battery Instructions and Information 1. 2. 3. 4. Draining the battery • • When to form a battery • • • • Battery forming required time • • • Charge it to its full capacity. The battery charge LED will turn off. Use the notebook until the battery is completely drained. Charge the battery to full capacity a second time and drain it again. Charge the battery to full capacity. The battery is now formed. Software is available to assist in the draining process. Please consult your Digital notebook dealer for information about the kinds of software available. Lacking software: to expedite the draining process, enter the BIOS setup program and disable all power management functions. Increase the screen brightness to its highest setting. Form all new batteries, including the one which came with you system. Form batteries which do not provide as much run time as they used to. Form a battery to achieve maximum battery life. Form the battery if you are receiving questionable readings from the battery icon gauge in the LCD Status Display. Assuming it takes 3 hours to fully drain the battery, forming a batteries requires approximately 10.5 hours. To charge a battery with the system off requires approximately 1.5 hours. To fully charge a battery with the system on requires approximately 4 hours. Depending upon your power management settings, to fully drain a battery requires approximately 3 hours. Digital HiNote VP 500 Series 2–3 Chapter 2: Power and Your Computer LiIon Battery An optional Lithium-ion (LiIon) secondary battery pack can be installed into the expansion bay, where the FDD is located. A fully charged battery will last three hours depending on your usage of the computer and its power management settings. LiIon batteries are lighter than NiMH batteries. Greater Life Span and No Memory Effect Lithium-ion batteries have a longer life span than NiMH batteries, averaging 1,000 complete charge/discharge cycles. In actual use, the number is larger due to the fact that most users will not fully discharge the battery. Unlike the nickel-metal hydride battery, there is no need to be concerned with fully discharging the battery before charging it again since lithium-ion technology is not susceptible to memory effect. ______________________________Note _____________________________ There is no need to form a lithium-ion battery. ________________________________________________________________ If your system will not be in use for more than 30 days, Digital recommends that the LiIon Battery Pack be removed from the system. When a lithium-ion battery is removed from the system, it has a shelf life of approximately 90 days before a charge cycle is required. ___________________________ WARNING ___________________________ When transporting the battery pack, make sure that the four metal terminals on the battery pack do not come in contact with other metal surfaces (such as loose coins, paper clips, etc.). An electrical discharge can occur which may cause injury or damage. ________________________________________________________________ 2–4 Digital HiNote VP 500 Series Chapter 2: Power and Your Computer The Main Battery Pack Your notebook’s main battery pack incorporates Enhanced NiMH Smart Battery technology. There are 5 LEDs on the outer casing of the battery module that indicate how much battery run time is remaining. Locate the word “Push” on the battery’s casing and press the colored circle below it. If all five LEDs light, the battery is charged to full capacity. Each LED represents approximately 20% battery charge. There is 80% battery life remaining if four LEDs are lit. If no LEDs are lit, the battery is drained and needs to be charged. 1. Push this button. 2. The corresponding LED lights, indicating the battery charge. Figure 2-1: The Main Battery Module Digital HiNote VP 500 Series 2–5 Chapter 2: Power and Your Computer Installing the Main Battery Insert the charged main battery pack into the notebook as follows. 1. Holding the main battery so the LEDs are facing up, slide the on-battery lock/release clip to its down position. (Figure 2-2, step 1). Figure 2-2: Installing the Main Battery (step 1) 2. Slide the battery into the battery bay housing (Figure 2-2, step 2). When the battery has been installed properly, it fits flush with the side panel of the notebook. 2–6 Digital HiNote VP 500 Series Chapter 2: Power and Your Computer 3. Slide the main battery lock/release clip upward to its locked position (Figure 2-3, step 3). Figure 2-3: Installing the Main Battery (step 2) Digital HiNote VP 500 Series 2–7 Chapter 2: Power and Your Computer Removing the Main Battery Pack Before removing the main battery pack save your data, close all applications and turn off the notebook. To remove the main battery pack, perform the Installing the Battery Pack procedure in reverse order. Figure 2-4 and Figure 2-5 for provide illustrated instructions. Figure 2-4: Removing the Main Battery (step 1) 2–8 Digital HiNote VP 500 Series Chapter 2: Power and Your Computer Figure 2-5: Removing the Main Battery Pack (step 2) Digital HiNote VP 500 Series 2–9 Chapter 2: Power and Your Computer Charging the Battery Pack The Battery Pack charges automatically whenever your Digital notebook computer is connected to AC power. The following table describes how the system charges the battery and draws power in different situations. Battery Main Battery is Installed System Power System Action System is being powered by AC power. System is being accessed by the User in full operation mode. Battery charges automatically. Fully charging a completely drained battery requires approximately 4 hours Battery charges automatically. Fully charging a completely drained battery requires approximately 3 hours. Main battery is the first to be charged to full capacity. Once the main battery is fully charged, the secondary battery charges. The system first draws from the secondary battery. After the secondary battery is drained, the system draws power from the main battery. Main Battery is Installed AC Adapter is connected to the system. The system is in either suspend or power off mode. Main and Secondary Batteries are Installed Both the main battery and secondary battery module (in the battery bay) are installed. ______________________________Note _____________________________ Digital recommends that you form the new Enhanced NiMH battery before using it. If your purchased the optional LiIon secondary, Digital recommends that you fully charge the new battery before using it. ________________________________________________________________ 2–10 Digital HiNote VP 500 Series Chapter 2: Power and Your Computer System LEDs Two System LEDs, on the right side of the notebook's front panel help provide the system’s power status. The AC Power LED lights green when the notebook is being powered by its AC Adapter. The Battery Charger LED lights amber when the batteries are being charged. When the amber LED is off, the batteries are completely charged. Low Battery Activity When the battery reaches low battery charge level, a warning beep sounds to remind you to save your data immediately. Although there is a safety margin of approximately ten minutes, it is always better to save right away. Pressing the [fn + F7] hot key combination turns off the system warning beep. After saving your data, power the notebook using the AC Adapter. If AC power is not available, turn off the notebook and change the weakened battery will a fully charged one. To extend battery power, we recommend you make full use of the Notebook’s built-in power saving features. Replacing and Disposing of Batteries When replacing batteries, use only Digital supplied batteries that are compatible with the notebook computer’s electrical requirements and charging circuitry. Before recycling or disposing of a battery, protect it against accidentally short circuiting by placing non-conductive tape across the terminals or conductive surfaces of the battery. If the battery is not marked, or if you require information about the batteries and their disposal, consult your nearest Digital Service Center. Digital HiNote VP 500 Series 2–11 Chapter 2: Power and Your Computer ___________________________ WARNING ___________________________ Batteries must be replaced with the same type recommended by the manufacturer. Please see your authorized Digital notebook dealer for details. These batteries must be disposed of in accordance with local ordinances and regulations. ________________________________________________________________ Power Management Your Digital notebook computer comes equipped with power management features designed to reduce system energy consumption. By understanding these features and utilizing good power management techniques, you will obtain the longest possible battery run time. Good Power Management Habits If you often operate the notebook on battery power, it is important to develop good power saving habits to maximize battery life. The Standby/Resume Feature If you need to momentarily stop using the notebook, immediately press the [fn + esc] Standby hot key combination. The system will turn off the LCD screen and spin down the hard disk drive (HDD) to conserve some battery power. Touch pad, external mouse or keyboard activity resumes the system to normal operation. The Suspend/Resume Feature If you need to temporarily step away from the notebook, press the Suspend/Resume button or enter the system into suspend mode by closing the LCD lid. The system will suspend, conserving battery power and increasing battery run time . In suspend mode, all the high power consuming devices (LCD, HDD and CPU) are turned off. Press the Suspend/Resume button to restore the system to the point where you stopped. 2–12 Digital HiNote VP 500 Series Chapter 2: Power and Your Computer Screen Brightness The brighter the LCD display screen, the shorter the battery run time. Avoid setting the screen brightness higher than necessary. This will extend battery run time. The Floppy Disk/CD-ROM Drive The floppy disk drive (FDD) and CD-ROM drives consume a large amount of battery power. In order to maximize battery run time , use the FDD/CD-ROM only when necessary. PC Cards PC (PCMCIA) Cards will also tax your battery power significantly reducing run time. When operating the notebook on battery power, use PC Cards as little as possible. When you finished using your PC Card, eject it from the PC Card slot. This extends battery run time . The Serial/ Infrared Port The computer serial ports will draw some power if Enabled, even though no serial device is connected. If you are not using a serial device, you can turn the COM port off through the BIOS program. This will assist in conserving battery power. Please see Chapter 3 for a complete discussion on enabling and disabling the notebook’s ports. AC Power The most obvious way to conserve batterypower is to avoid using the battery when there is an available AC power source. The AC Adapter is lightweight and compact, so it is very convenient to bring while traveling. By using the AC Adapter as much as possible, you can ensure you will have a charged battery whenever you really need it. Digital HiNote VP 500 Series 2–13 Chapter 2: Power and Your Computer Power Management Modes Your notebook computer is factory-configured with preset power management values. If you are not an advanced user, start by using the factory-configured power management settings. If you find that the factory settings do not fit your specific needs, enter the BIOS Setup Program and make the needed changes. If you choose to set your own power saving features, you should understand how it affects battery run time and system performance before changing a setting. The power management features are designed to conserve as much electricity as possible by putting the notebook’s components into a low power consumption mode as often as possible. These low power modes are referred to as Standby and Suspend. Standby Mode In this mode, user components such as the HDD, FDD or CD-ROM drive and the LCD back-lit display are powered off and the CPU speed is reduced. Other components, transparent to the user, are put in their lowest active states. Standby Mode is entered: • Automatically when the system remains idle for the specified time set in the Standby Time-out field of the BIOS Setup Program. • Manually by pressing the [fn + esc] key combination. Standby Mode is exited by any of the following actions: • Pressing any key on the keyboard • Touch pad or externally connected mouse activity • Serial or parallel port activity • PC Card activity Suspend Mode There are actually two levels of Suspend: Suspend (to RAM) Time-out and Suspend-to-Disk. Suspend to RAM saves power by cutting power to the DMA clocks, suspending the math coprocessor, turning the video off, and turning off all controllable peripheral devices. Suspend-to-Disk provides the greatest power saving capabilities by essentially turning off the system. Suspend-to-Disk can be configured by entering the BIOS Setup Program. In this mode, all system logic (except for the battery charger) is turned off. During the Suspend-toDisk mode, the DRAM and video memory are saved to the hard disk and are restored when the system is resumed. Suspend Mode is exited as follows. • Pressing the Suspend/Resume button. 2–14 Digital HiNote VP 500 Series Chapter 2: Power and Your Computer • When the clock time specified in the Alarm Resume Time field has arrived. When the system suspends, the following events take place: • A system beep notifies you that suspend mode has been entered. • The CRT icon in the LCD Status Display begins to blink, indicating the system has entered Suspend. Suspend Mode is entered as follows: • Pressing the Suspend/Resume button • Closing the LCD display lid • When the specified time in the Suspend Time-out field in the BIOS is reached • Automatically when the battery reaches a crit ically low power level If the AC Power Save field in the BIOS is set to Off, all power management will be disabled when running off AC power. A Power Management Example It may be helpful to enter the BIOS Setup Program (pressing F2 key during bootup), and open the Power Menu for a visual reference as you read through this section. The time-out settings for Standby, Suspend (to RAM) Time-out and the Suspend-to-Disk Timeout specify the amount of time the system must be inactive before the next power management level is enabled. The following example demonstrates this functionality. In this example: • Standby Time-out is set to 5 minutes • Suspend (to RAM) Time-out is set to 5 minutes • Suspend-to-Disk Time-out is set to 10 minutes Digital HiNote VP 500 Series 2–15 Chapter 2: Power and Your Computer The following power management events take place: After 5 minutes of system inactivity, the notebook enters Standby. After 5 additional minutes (a total of 10 minutes of inactivity), the system enters Suspend (to RAM) Time-out. After the system resides in Suspend (to RAM) for 10 minutes, it Suspends-to-Disk. 2–16 Digital HiNote VP 500 Series Chapter 2: Power and Your Computer Power Management Summary The following table summarizes the Notebook’s power-saving features: Power Mode Standby Suspend (to RAM) Time-out Suspend-to-Disk How to Enter Mode How to Resume Automatically when system has been inactive for the specified period of time in Standby field in the BIOS Setup. • • Closing the LCD display lid. When the specified time in the Suspend Time-out field in the BIOS Setup Program has been reached. Transits automatically when system has been inactive for the specified period of time in Suspend Time-out field in the BIOS Setup. Press Suspend/Resume Button • • Automatically when system has been inactive for the specified period of time in Suspend-to-Disk field in the BIOS Setup. Critical-battery condition Press the Suspend/resume button. • • • Press any key Serial or parallel port activity PCMCIA activity Touch pad entry or a PS/2 mouse activity if one is connected. Opening LCD panel. Press Suspend/ Resume button When the clock time specified in the Alarm Resume Time field has arrived. Digital HiNote VP 500 Series 2–17 3 The BIOS Setup Program Introduction The BIOS (Basic Input and Output System) Setup program is a menu driven utility that enables you to make changes to the system configuration and tailor the operation of your Notebook to suit your individual work needs. It is a ROM-based (Read only Memory) configuration utility that displays the system’s configuration status and provides you with a tool to set system parameters. These parameters are stored in non-volatile battery backed-up CMOS RAM, which saves this information even when the power is turned off. CMOS chips are extremely low power consuming. When the system is turned back on, the system is configured with the values found in CMOS. ______________________________Note _____________________________ The CMOS battery receives a charge when the system is being operated on AC power. If the system is off for more than one year, the CMOS battery will drain and the ROM data will be lost. ________________________________________________________________ By using easy-to-configure menus, you can configure such items as: • Hard drives, diskette drives and peripherals • Password protection from unauthorized use • Power Management Features Chapter 3: The BIOS Setup Program The settings made in the Setup program affect how the notebook performs. It is important, to try to understand all the Setup options, and second, to make settings appropriate for the way you use the notebook. Navigating through the BIOS Setup Program When turning on the Notebook for the first time you may get a message prompting you to run the BIOS Setup program. A warning message may appear on the screen if the hardware configuration is changed or the Power On Self Test (POST) fails. This message will inform you of any errors or invalid settings and prompt you to run the Setup program to correct the problem. Even if you are not prompted by a message instructing you to use the Setup program, at some time in the future you may want to change the configuration of your computer. For example, you may want to make changes to the power management settings, or for security purposes, enable the Notebook’s password function. It will then be necessary to reconfigure your system using the Setup program so that the computer can re cognize these changes. A few examples of why you may want or need to run the BIOS setup program follow. • You want to redefine the communication ports to prevent any conflicts. • You want to make changes to the Power Management configuration. • You want to change the password or make other changes to the security setup. 3–2 Digital HiNote VP 500 Series Chapter 3: The BIOS Setup Program Accessing the BIOS Setup Program To access the BIOS Setup program, press the F2 key when prompted during bootup. There are three essential elements to the BIOS screens: Menu Bar, Item Specific Help Window and Legend Bar. Menu Bar The top of the screen has a menu bar with the following selections : Changes to the basic system configuration are Main made from within this menu. Use this menu to enable and make changes to the Peripherals system port addresses and modes. Sets System and Boot/Resume password. Security From within this menu, you will be able to Power configure and enables Power Management features. Use this menu to save changes, set factory defaults Exit and exit the Setup program. Item Specific Help Note that on the right side of each BIOS Setup screen, there is a section labeled Item Specific Help. While moving through the Setup program, note that explanations for the currently highlighted field appear in the Item Specific Help window. Digital HiNote VP 500 Series 3–3 Chapter 3: The BIOS Setup Program Legend Bar At the bottom of the BIOS Setup screen you will notice a legend bar. The keys in the legend bar allow you to navigate through individual setup menus. The following table lists the keys found in the Legend Bar with their corresponding alternates and functions. Legend Key F1 ESC Alternate Key Function Alt + H Displays the General Help window. Exits the current menu and returns you to the previous screen. Selects a different menu bar items. Moves the cursor up and down between fields. Cycles the cursor forward through the particular highlighted field. If the field has only one value, the Tab key will move the selection cell down to the next field. Cycles the cursor backward through the particular highlighted field . If the field has only one value, the [Tab + Shift] key combination will move the selection cell up to the previous field. Scrolls backwards through the values for the highlighted field. Scrolls forward through the values for the highlighted field. Sets the fields for the current active menu to their default values. Sets the fields for the current active menu to their previous values. Executes commands or selects a submenu. ← or → ↑ or ↓ <Tab> <Shift + Tab> - minus key + plus key F9 F5 F6 F10 <Enter> 3–4 Digital HiNote VP 500 Series Chapter 3: The BIOS Setup Program Launching Submenus Notice that a pointer symbol appears next to selected fields in the menu screens. For example, open the Peripherals Menu and you will see a pointer that resembles a triangle on its side next to the Integrated Peripherals field. This symbol indicates that a submenu can be launched from this field. A submenu contains additional options. To enter a submenu: 1. Move the highlighted cell to the desired Menu Bar item and press <Enter>. 2. Use the legend keys to navigate around the screen and make the needed configuration changes. 3. When you finish, press the [esc] key to exit the submenu and return to the main screen. General Help In addition to the Item Specific Help window, the BIOS setup program also provides a General Help screen. This screen can be called up from any menu by simply pressing the function key, F1 or the [Alt + H] combination. The General Help screen lists the le gend keys with their corresponding alternates and fun ctions. When a scroll bar appears to the right of a help window, this indicates that there is more information to be displayed that will not fit in the window. Use the PgUp and PgDn keys or the up and down arrow keys (↑ ↓)to scroll through the entire help document. Press <Home> to display the first page, press <End> to go to the last page. To exit the help window, press <Enter> or the <Esc> key. Digital HiNote VP 500 Series 3–5 Chapter 3: The BIOS Setup Program The Main Menu The following settings are available in the Main Menu screen of the BIOS Setup Program. Field Settings Description Date Enter current date: month, day, year format Enter current time: hour, minute, second format Display only field Sets the system to specified date. Time Diskette A Hard Disk Drive Boot Sequence Total Memory Video Memory Display only field • Diskette First * • Hard Disk Only Display only field Display only field * Default value. 3–6 Digital HiNote VP 500 Series Sets the system to specified time. Indicates the presence and size of the FDD. Indicates the size of your notebook’s hard drive. Instructs the system where to look at boot up. The system will attempt to boot from drive A. If the drive is empty or a non-system disk is present, the system will attempt to boot from drive C. The system will attempt to boot from the hard disk, drive C, only. Indicates the amount of total (RAM) memory. Indicates the amount of system video memory. Chapter 3: The BIOS Setup Program Figure 3-1: The BIOS Setup Main Menu Digital HiNote VP 500 Series 3–7 Chapter 3: The BIOS Setup Program The Peripherals Menu Notice the pointer icon next to the words Integrated Peripherals . This indicates the presence of a submenu. The following settings are available in the Peripherals Menu screen of the BIOS Setup Program. Field Integrated Peripherals Video Mode Touch Pad Settings Description Submenu Sets the following port addresses and modes: • Serial Port • Infrared Port • Parallel Mode Sets the Video mode Allows simultaneous viewing of externally connected monitor (CRT) and the notebook’s LCD display. • Simul Mode * • LCD Mode • • • CRT Mode Enabled * Disabled * Default value. 3–8 Digital HiNote VP 500 Series Allows viewing of the notebook’s LCD only. Allows viewing of the CRT only. Connecting a mouse to the serial port will disable the Touch Pad. Chapter 3: The BIOS Setup Program Figure 3-2: The BIOS Setup Peripherals Menu Digital HiNote VP 500 Series 3–9 Chapter 3: The BIOS Setup Program Integrated Peripherals (Peripherals submenu) Move the highlighted cell to this field and press <Enter> to open the submenu. The following settings are available in the Integrated Peripherals Menu screen of the BIOS Setup Program. Field Settings Description Serial Port • • • • • • • • • • • • • • Auto Disabled COM 1 (3F8h - IRQ4) * COM 2 (2F8h - IRQ3) COM 3 (3E8h - IRQ4) COM 4 (2E8h - IRQ3) Auto Disabled* COM 1 (3F8h - IRQ4) COM 2 (2F8h - IRQ3) COM 3 (3E8h - IRQ4) COM 4 (2E8h - IRQ3) Disabled Normal Enables, configures or disables the serial port. Set the serial port to disable to increase the battery run time. • Bi-Directional * • EPP Mode (Extended Parallel Port ) ECP (Extended Capabilities) Infrared Parallel Mode • * Default value. 3–10 Digital HiNote VP 500 Series Enables, configures or disables the infrared port . Set the infrared port to disable to increase the battery run time. Disables the parallel port. Parallel port is set for data-out mode only. Parallel port permits both data output and data input. Operates only with EPP aware peripherals. Operates only with ECP aware peripherals. See your parallel device user’s guide. Chapter 3: The BIOS Setup Program Figure 3-3: The BIOS Setup Integrated Peripherals Menu Digital HiNote VP 500 Series 3–11 Chapter 3: The BIOS Setup Program The Security Menu Select Security from the menu bar to display the following menu. Figure 3-4: The BIOS Setup Security Menu Field Admin. Password : Settings Description [Press Enter] Backup Password Password on Boot [Execute] Setting the Admin. Password will limit unauthorized access to the notebook, including the BIOS Setup Program.. Backs up Admin. password to diskette. • • Enabled Disabled * When enabled, the system will require the Admin. Password during system boot Password on Resume • • Enabled Disabled * When enabled, the system will required the Admin. Password when resuming from suspend. The keypad icon in the LCD Status Display will blink, prompting for the Password. * Default value. 3–12 Digital HiNote VP 500 Series Chapter 3: The BIOS Setup Program Setting Admin. Password To set the Admin. Password, move the highlighted cell to the Admin. Password field and press <Enter>. The following dialogue box will appear: Set Admin. Password Enter new password: [ ] Confirm new password: [ ] 1. Type in your password and press <Enter>. The password can be up to seven alphanumeric characters. Symbols and other keys are ignored. 2. Type the password in a second time to confirm. Press <Enter> a second time. The System Password is now set. Changing Admin. Password To change the Admin. Password, move the highlighted cell to the Admin. Password field and press <Enter>. When the Admin. Password dialogue box appears, enter the new password. Enter it a second time to confirm. The new password is now set. Disabling Admin. Password To disable the Admin. Password: 1. Open the Admin. Password dialogue box. 2. Continue to press the <space bar> until the cursor moves to the end of the Confirm new password field. 3. Continue to press the <back space> key until the cursor returns to the beginning of the Enter New Password field. Press <Enter>. This erases the password. 4. Complete the same steps in the New Password field to confirm the task. The old password is erased and Admin. Password is disabled. Digital HiNote VP 500 Series 3–13 Chapter 3: The BIOS Setup Program The Power Menu The Power Menu allows you to enable and adjust the notebook’s power saving features. Enabling these features will extend the battery run time. Figure 3-5: The BIOS Setup Power Menu Field Power Savings Settings • • Off Customize * Maximum Performance • Maximum Battery Life Description Sets the Power Management Mode. Disables all Power Management Allows you to customize the Power Management fields (Standby, Suspend, Suspend to Disk, Hard Disk Time-out) to suit your individual work needs. Power Management fields will be set with pre-defined values to provide best system performance with some power conservation. Power Management fields will be set with pre-defined values to ensure maximum battery run time. * Default value. Field AC Power Settings Description • When enabled all system power On * 3–14 Digital HiNote VP 500 Series Chapter 3: The BIOS Setup Program Save • Off Standby Time-out • • • • • • • • • • • • • • Disabled 1 Min. 2 Min. 3 Min. * 5 10, 15, 30 Min. Disabled 1 Min. 2 Min. 3 Min. * 5, 10, 15, 30 Min. Disabled 1, 2, 3, 5 Min. 10 Min. * 15, 20, 30 Min. Suspend Time-out Suspend-toDisk Time-out Hard Disk Time-Out DIM Mode Time-out Alarm Resume Alarm Resume Time • Disabled • 1 Min. • 2 Min. * • 3 Min. • 5, 10, 15, 20 Min. • Disabled • 15 Sec. • 30 Sec. * • 60 Sec. • Off * • On Enter time in a 24 hour format. 13:00 = 1:00 p.m. management is enabled, when operating on AC power. If disabled, all system power management is disabled when operating on AC power. Indicates the amount of time the system needs to be idle before entering Standby mode. In order to make customized changes to this field, Power Savings must be set to Customize. Indicates the amount of time the system needs to be idle before entering Suspend (to RAM) mode. Power Savings must be Customize to change these values. Indicates the amount of time the system needs to be idle before entering Suspend-to-Disk mode. In order to make customized changes to this field, Power Savings must be set to Customize. Indicates the amount of time the hard disk needs to be inactive before it is turned off. In order to make customized changes to this field, Power Savings must be set to Customize. Indicates the amount of time the keyboard needs to be inactive before LCD panel brightness is gradually decreased. Enables or Disables Alarm Resume Time Allows you to specify the time the system will resume. * Default value. Digital HiNote VP 500 Series 3–15 Chapter 3: The BIOS Setup Program The Exit Menu Enter the Exit Menu to save changes, set factory defaults or exit the Setup program. Field Save Changes & Exit Discard Changes & Exit Action <Enter> Get Default Values <Enter> Load Previous Values <Enter> Saves Changes <Enter> <Enter> 3–16 Digital HiNote VP 500 Series Description Saves the current changes and exits the BIOS Setup Program. Discards the current changes and exits the BIOS Setup Program. Loads the factory default values for each of the fields in the BIOS Setup Program. To keep default values and exit the BIOS Setup Program, you must move the highlighted cell to the Save Changes & Exit field and press the <Enter> key. Discards any changes made during the current BIOS configuration session, and loads the prior sessions values. You cannot exit the BIOS through this field. Saves the changes made during the current BIOS configuration session. You cannot exit the BIOS through this field. Chapter 3: The BIOS Setup Program Figure 3-6: The BIOS Setup Exit Menu Digital HiNote VP 500 Series 3–17 4 Peripheral Devices Your notebook computer is equipped with several ports for connecting a number of peripheral devices such as a printer, a modem, or an external monitor . There are also two PC Card (also known as PCMCIA) sockets for connecting industry standard PC Cards. Selected models are equipped with two stereo jacks for connecting external input/output audio equipment. Peripheral Equipment Before attempting to connect a peripheral device to the computer, make sure you are familiar with the notebook’s various I/O ports. Refer to the diagrams included in Chapter 1 to identify the following I/O ports. • An external monitor connector • One parallel port • One serial port • An external keyboard/ mouse (PS/2) connector • Two PC Card sockets, supporting two Type I or II or one Type III PC Cards • An external microphone connector (Selected models only) • A speaker out connector (Selected models only) • Serial Infrared Port (Selected models only) • Built-in Microphone (Selected models only) Chapter 4: Peripheral Devices External Monitor The notebook has a port for connecting an external VGA or higher resolution monitor. The port is a standard 15-pin analog connector commonly used with these monitors. Your Digital notebook supports three display modes: LCD only, CRT only and Simul scan (simultaneous view of CRT and LCD). Parallel Device This parallel port uses a 25-pin connector, allowing you to attach any parallel equipment compatible with this connector standard. This port is most commonly used for connecting a printer. Most printers have a parallel inte rface. These include dot matrix, ink-jet and laser printers. The parallel port supports Bi-directional, Normal, EPP and ECP modes. Serial Device This is a standard 9-pin serial port . Any device that uses this standard can be connected to the notebook. For example, most pointing devices such as a mouse or graphic tablet can be directly connected to this port. If you have any doubt about the cables required for equipment you plan to purchase, consult your authorized Digital notebook dealer. Serial Infrared Port The Serial Infrared (IR ) port allows the wireless transfer of data (data input and output) between your Digital notebook and another Infrared equipped computer device, such as a printer or another notebook. External Keyboard or PS/2 Mouse This port allows you to attach a full size enhanced keyboard to the notebook. You can use any standard desktop computer 101/102-key enhanced keyboard. This port also allows you to attach any standard PS/2 compatible mouse. When using the PS/2 mouse, you’ll need to make the connection before powering on the notebook. This will prevent recognition failure. External Mic and Speaker Out (selected models only) Two audio jacks, an External Mic and a Speaker Out, are located above the AC Adapter port on the left side panel of the notebook. The external microphone jack is used for connecting an external audio-in device, such as a microphone. Connect external stereo spea kers or headphones to the Speaker Out port. 4-2 Digital HiNote VP 500 Series Chapter 4: Peripheral Devices Connecting An External Monitor Connect an external monitor to the notebook as follows. 1. Connect the monitor signal cable to the notebook’s VGA port located on the rear of the notebook. Tighten the thumb screws (Figure 4-1, step 1). 2. Connecting the monitor’s power cord to a the wall outlet after ensuring the monitor is turned off. (Figure 4-1, step 2). 3. Turn on the monitor. 4. Use the [fn + F4] hot key combination to achieve CRT only or simultaneous viewing mode. Figure 4-1: Connecting an External Monitor Digital HiNote VP 500 Series 4-3 Chapter 4: Peripheral Devices Connecting a Printer to the Parallel Port To connect a parallel device to the notebook, you need the standard 25-pin connector parallel cable mentioned earlier. Check the documentation that came with the equipment to see if you need to make any adjustments to the equipment before using it. Connect a printer to the notebook as follows. 1. Connect the printer signal cable to the parallel port on the rear of the notebook. Tighten the thumb screws (Figure 4-2, step 1). 2. Connect the printer ’s power cord to a wall outlet after ensuring the printer is turned off (Figure 4-2, step 2). 3. Turn on the printer . Figure 4-2: Connecting a Printer 4-4 Digital HiNote VP 500 Series Chapter 4: Peripheral Devices Parallel Port Data Transfers When using Puma TranXit 2.0 to conduct parallel port data transfers under Windows for Workgroups, you must enter the BIOS Setup Program and configure the Parallel Port to EPP mode. For detailed information on changing the Parallel Port mode, please refer to Chapter 3, Integrated Peripherals . Connecting a Serial Mouse The notebook has one Serial Port. Its address can be set through the BIOS Setup program (refer to Chapter 3 for information on BIOS Setup). Connect a serial mouse as follows. (Figure 4-3) Connect the mouse cable to the notebook’s serial port located on the rear of the notebook. Tighten the thumb screws. Figure 4-3: Connecting a Serial Mouse Digital HiNote VP 500 Series 4-5 Chapter 4: Peripheral Devices Connecting An External Keyboard The notebook has a connection for a full-size enhanced 101/102-key keyboard commonly used with desktop computers. External keyboards can be hot plugged to the notebook. The presence of an external keyboard does not disable the notebook’s keyboard or the touch pad. Connect a keyboard as follows. (Figure 4-4) 1. If your keyboard cable connector is not equipped with a PS/2 connector, attach one to it. Contact your Digital notebook dealer for purchase information. 2. Connect the keyboard to the notebook’s PS/2 port. Figure 4-4: Connecting an External Keyboard 4-6 Digital HiNote VP 500 Series Chapter 4: Peripheral Devices Connecting a PS/2 Mouse Your notebook does not support hot connecting for a PS/2 mouse. In order for the system to detect the presence of the PS/2 mouse, you must reboot your notebook. Connecting a PS/2 mouse will disable the on-board touch pad. Connect a PS/2 mouse as follows. 1. Save your data, close all applications and turn off the notebook. 2. Locate the PS/2 mouse port on the rear of the notebook and connect the PS/2 mouse cable to it. 3. Turn on the system. The Infrared Port (Selected models only) The notebook is equipped with an Infrared (IR) port, on the rear panel (Figure 4-5). The Infrared port consists of one Light Emitting Diode (LED) and one photo sensor. The operation of the Infrared port is similar to the operation of a television remote control device. The LED functions as a transmitter and the photo sensor acts as a receiver. The transmitter emits a signal stream of data in the form of pulses of infrared light. The receiver picks up pulses of i nfrared light transmitted by other IR modules. Depending on the model purchased, the Infrared factory installed software is either Puma TranXit or LapLink. Please refer to your software documentation for detailed instructions on Infrared data transfers. Figure 4-5: An Infrared Data Transfer Digital HiNote VP 500 Series 4-7 Chapter 4: Peripheral Devices When conducting an Infrared (IR ) data transfer: • Make sure the IR field in the BIOS Setup Program is configured with the correct address. • Ensure that the notebook’s IR module is properly lined up with the other device’s IR module. The IR baud rate can reach 115,200 at a distance of one meter and bias angle of 15°. The transmission distance can be further lengt hened by reducing the baud rate or by perfectly aligning the two devices. • There should be a clear, unobstructed path between the two SIR modules; otherwise the optical signal will be distorted. • Do not move either the notebook or the other device during data transmission. Moving either device during transmission distorts the optical signal resulting in loss of data or a system crash. ______________________________ Note ______________________________ An error can occur in IR transmission if subjected to an environment with high levels of noise. To avoid transmission error do not transmit IR signals near equipment with compressors, such as refrigerators or air conditioners. _________________________________________________________________ 4-8 Digital HiNote VP 500 Series 5 PC Cards Your Digital notebook is equipped with two PC Card sockets. They accommodate two 3.3V/5V Type I or Type II PC Cards or one Type III PC Card. The PC Card feature allows you to allows you to expand and customize your notebook to meet a wide range of computing needs without sacrificing portability. PC Cards accommodate a number of expansion options: hard disks, fax/modems and network (LAN) cards are just a small sample of the PC Card products available on today’s market. Your Digital notebook computer comes from the factory with a Microsoft operating system installed. The drivers needed for most of the PC Card s are included on your system. If a compatible driver is not available, refer to your operating system’s PC Card On-line help or the PC Card manufacturer’s documentation. Using Win 95 PC Card Support Windows 95 provides On-line help for configuring and troubleshooting PC Cards. The On-line help can be accessed from the Windows 95 Start menu. If Windows 95 cannot configure your PC Card, it will attempt to substitute an existing device driver. The following topics are covered: • Enabling and disabling support for PC Card s • Removing PC Card support • Specifying the number of PC Card slots • Setting up the PC Card socket • Installing support for SRAM memory cards • Displaying the PC Card status indicator • Troubleshooting Chapter 5: PC Cards Using Workgroups PC Card Support Windows for Workgroups also offers configuring and troubleshooting support for PC Cards. To access support open the CardWizard application located in the main Windows directory. The PC Card drivers available in Windows for Workgroups are not as extensive as the number of drivers in Windows 95. Windows NT In order to use a PC Card under the Windows NT operating environment, that card’s driver must be written specifically to run under Win NT. Please refer to your PC Card’s documentation for more details. Inserting and Ejecting PC Cards Many PC Cards available today are plug-and-play devices, i.e. they can be inserted into the PC Card expansion sockets while the computer is powered on. Refer to the documentation that came with your PC Card for detailed information on PC Card configuring and operation. Insert a PC Card as follows. (Figure 5-1) 1. If your PC Card or operating system does not support hot-plugging, save your data and turn off the notebook before inserting the PC Card. 2. Hold the PC Card with the connector side toward the socket. 3. Align the card connectors with the appropriate socket and carefully slide the card into the socket until it locks into place. 5-2 Digital HiNote VP 500 Series Chapter 5: PC Cards Figure 5-1: Inserting a PCMCIA Card _____________________________Caution _____________________________ When inserting a Type III PC card, make sure the connector is inserted in the lower socket. Before ejecting a PC Card, ensure that it is not being accessed by the system. Memorycard users must never change a card’s write protect switch while the card is inserted into a PC Card socket. To change the switch setting, (a) eject the card, (b) change the switch setting, and (c) re-insert the card. _________________________________________________________________ 1. 2. To remove a PC card simply push the respective eject button. The left eject button will eject a Type I or Type II PC Card from the lower socket or a Type III PC Card from the socket. The right eject button will eject a Type I or Type II card from the upper socket. Remove the card and store it properly. Digital HiNote VP 500 Series 5-3 6 Expansion and Option Devices This chapter describes the optional and expansion equipment that can be added to the basic notebook system. Expansion devices are ones which are installed inside the computer rather than external equipment such as a printer that can be connected to the computer’s I/O ports. For example: • Add more system memory to improve performance. • Remove the FDD module and replace it with the CD-ROM module (standard on selected models) or the optional secondary battery pack. • Connect your Digital notebook to the optional Minidock Port Replicator to increase expandability. Two Minidock models are available: one with Network interface and one without. System Memory Expansion Your Digital notebook comes equipped with 8MB of on-board EDO memory. While this memory is sufficient for most circumstances, you may find that in some cases additional memory is required. The notebook provides two expansion slots for installing two optional Dual In-line Memory Modules (DIMMs). Contact your Digital notebook representative for purchasing information. Chapter 6: Expansion and Option Devices Memory Configuration Your notebook’s system memoryis expandable to 40MB. Additional DIMMs must be installed in pairs of equal size. For example, it is possible to install two 4 MB DIMMs, two 8 MB DIMMs, or two 16MB DIMMs. It is not possible to install one 8MB and one 16MB DIMM. Installing Memory Cards Static electricity will permanently damage your computer’s internal components. It is therefore important to discharge the static electricity from your body before handling the DIMMs. Discharge your body’s electricity by touching the metal shielding around the ports on the rear of the notebook computer for approximately five seconds. If you regularly work on your notebook, it may be beneficial to purchase an anti-static mat or wrist band. Contact your Digital notebook dealer for anti-static device purchase information. You may find it helpful to refer to Figure 6-1 and Figure 6-2 while reading the following directions. 1. Save all data files and close any applications which are open. Turn off the notebook. 2. The memory door is located on the underside of the notebook. It is secured to the notebook by two Philips head screws. Remove the screws and the memory door to reveal the DIMM slots. (Figure 6-1) 6-2 Digital HiNote VP 500 Series Chapter 6: Expansion and Option Devices Figure 6-1: Removing Memory Door Digital HiNote VP 500 Series 6-3 Chapter 6: Expansion and Option Devices 3. Insert the DIMM into the memory slot at a 45º angle. (Figure 6-2) 4. Gently, but firmly push the DIMM until it locks in place in the memory slot. Press down on the module until it snaps into place, laying horizontally in its slot. 5. Replace the memory door. Figure 6-2: Inserting DIMMs 6-4 Digital HiNote VP 500 Series Chapter 6: Expansion and Option Devices Installing and Removing Modules Your notebook has the added feature of being capable of supporting three hardware expansion modules: a CD-ROM module (standard on selected models), secondary battery module and Floppy Disk module. The addition of these modules increases your notebook’s already superb versatility and performance. All modules are installed in the notebook’s expansion bay. Most likely your FDD is currently in the expansion bay. For information about removing and replacing modules, please refer to the following table. Module Swapping The following table details the action needed when swapping modules. Removing Module... FDD Inserting Module... Secondary Battery FDD CD-ROM CD-ROM Secondary Battery CD-ROM FDD Secondary Battery CD-ROM Secondary Battery FDD Action Close the notebook’s display lid, putting the notebook in suspend, before swapping. Power off system and close the display panel. System needs to reboot to recognize CD-ROM Close the notebook’s display lid, putting the notebook in suspend, before swapping. Close the notebook’s display lid, putting the notebook in suspend, before swapping. Power off system and close the display panel. System needs to reboot to recognize CD-ROM Close the notebook’s display lid, putting the notebook in suspend, before swapping. Removing the Modules For step by step information on removing any one of the modules from the expansion bay, please refer to the following: Digital HiNote VP 500 Series 6-5 Chapter 6: Expansion and Option Devices 1. Slide the locking button in the direction of the arrow shown in step 1 of Figure 6-3. This will unlock the Module Release latch. 2. Slide and hold the Module Release latch in the direction of the arrow shown in step 2 of Figure 6-3. 3. Holding the Module Release latch in this position, slide the FDD module out of the expansion bay. Please see step 3 in Figure 6-3. 4. Install the desired module. Move the locking button back to its original position. 6-6 Digital HiNote VP 500 Series Chapter 6: Expansion and Option Devices Figure 6-3: Removing the FDD Module Digital HiNote VP 500 Series 6-7 Chapter 6: Expansion and Option Devices Installing FDD and Optional Modules Figure 6-4: Installing the FDD Module Figure 6-5: Installing the Optional Secondary Battery 6-8 Digital HiNote VP 500 Series Chapter 6: Expansion and Option Devices The CD-ROM Module (Standard on selected models) If your system did not come with the 6x CD-ROM module, you can still install a CD-ROM in order to take advantage of many of the graphics and educational software packages on today’s market. Please see your Digital notebook dealer for purchase information. Installing a CD-ROM Module Figure 6-6: Installing the CD-ROM Module Digital HiNote VP 500 Series 6-9 Chapter 6: Expansion and Option Devices Loading a Disc into the CD-ROM Module To load a disk into the CD-ROM module, please refer to Figure 6-7 and the following instructions. Figure 6-7: Manually Ejecting the CD-ROM Tray 1. 2. 3. Press the eject button. The tray ejects from the drive. (Figure 6-7) Place the disc into the tray with the CD’s label facing up. (Figure 6-8) Push the tray to slide it back into the drive. 6-10 Digital HiNote VP 500 Series Chapter 6: Expansion and Option Devices Figure 6-8: Loading a CD into the Module _____________________________Caution _____________________________ Do not insert any foreign objects into the disc tray. Do not force the tray to open or close manually. When not in use, keep the tray closed to prevent dust or dirt from entering the drive unit. The CD-ROM module uses 5¼” CDs, it is not able to support 3” CDs. _________________________________________________________________ Removing and Installing HDD Eventually you may find that your notebook’s HDDspace is limiting. Upgrade to a larger capacity HDD to provide additional hard disk space. The installation of an additional HDD is relatively simple. Please refer to Figure 6-9 and Figure 6-10. _____________________________Caution _____________________________ Before removing the HDD from your notebook, you should perform a full image disk backup to a data storage device such as an external parallel port hard drive, Type III PC Card hard disk card, etc. _________________________________________________________________ 1. Turn off the notebook and disconnect the AC cord and any connected peripherals. Digital HiNote VP 500 Series 6-11 Chapter 6: Expansion and Option Devices 2. There are two Philips head screws located on the bottom of the notebook. They secure the HDD into the unit and prevent it from being damaged. Remove these two screws. (Figure 6-9) Figure 6-9: Removing the HDD (step 1) 3. Slide the HDD module plastic cover in the direction of the arrows shown in Figure 6-9. 4. Gently remove the HDD from its housing, by pulling on its handle in the direction of the arrows shown in Figure 6-10. 5. Store your HDD in a safe, dry place away from direct sunlight or heat. 6-12 Digital HiNote VP 500 Series Chapter 6: Expansion and Option Devices Figure 6-10: Removing the HDD (step 2) Partitioning the Hard Disk Your notebook’s factory installed hard drive was formatted with a 42MB non-DOS partition. Without this special partition, you would not be able to take advantage of the notebook’s battery conserving Suspend to Disk Time-out feature (see Chapter 2 for more information). A PHDISK Utility has been installed on your hard drive. Use this utility if you feel that a 42MB partition is not adequate for your needs, and you want to enlarge the partition size. Other reasons why you may want to use the PHDISK utility is if you purchase a new hard drive, you have increased the amount of system memory (RAM) or you are reformatting a hard drive. When partitioning a Disk, you can either allow the PHDISK utility to automatically allocate the amount of disk space required for the partition or specify an amount yourself. If you wish to customize the partition size, Digital recommends a partition size of at least 42 MB. Digital HiNote VP 500 Series 6-13 Chapter 6: Expansion and Option Devices ______________________________ Note ______________________________ Run the PHDISK Utility from the DOS command line after booting your system. You cannot run PHDISK by shelling out to a DOS window from within the Microsoft Windows environment. Suspend to Disk partition must be created before others areas of the hard disk are partitioned. _________________________________________________________________ PHDISK Auto Partitioning To use the PHDISK automatic create feature type PHDISK /CREATE at the DOS command prompt. The PHDISK utility will allocate a sufficient amount of disk space required for the Suspend to Disk Time-out partition. PHDISK Customized Partitioning To determine the amount of space required for the Suspend to Disk Time-out partition use the following equation. Partition Size = [System memory (on board + DIMMs) + 2MB] * 1024 If your notebook is equipped with 40MB of memory, the correct partition size would be 43008 bytes; represented in equation form as (40MB + 2MB) * 1024. To create a partition, for a system with 40MB of RAM, go to the DOS prompt and type the command line: PHDISK /Create 43008 /Partition 6-14 Digital HiNote VP 500 Series Chapter 6: Expansion and Option Devices Optional Devices Optional devices are available to increase your notebook’s performance and versatility. Your Digital notebook representative will be able to provide you with detailed technical and purchase information on any of the optional devices. The External Battery Charger There are two tabs located on either side of the Battery Charger unit. Push these tabs in the direction of the arrows shown in step 1 of Figure 6-11. Slide back the casing to reveal the battery connecting port, as shown in step 2 of Figure 6-11. Figure 6-11: The External Battery Charger Digital HiNote VP 500 Series 6-15 Chapter 6: Expansion and Option Devices Figure 6-12: Charging a Battery with the External Charger 1. 2. 3. 4. 5. 6. Connect the battery to the External Battery Charger. (Figure 6-12) Connect the AC Adapter to the External Battery Charger Then connect the power cord to the AC Adapter. Insert the power cord into a power source, such as a wall outlet. The LED on the battery charger turns on, indicating that the battery is being charged. If it does not light, the battery is either already fully charged or there is something wrong. Check all connections. The battery will take approximately 3.0 hours to charge. After the battery has been fully charged the external charger will automatically cease charging the battery and the LED will turn off. 6-16 Digital HiNote VP 500 Series Chapter 6: Expansion and Option Devices The Car Adapter The Car Adapter provides for extended versatility while on the road. The Car Adapter also operates with the battery charger. In order to take advantage of this flexible feature, follow the same procedures as stated above, except substitute the car lighter adapter cord for the AC power cord. Figure 6-13: Optional Car Adapter Digital HiNote VP 500 Series 6-17 Chapter 6: Expansion and Option Devices Adding the Minidock Port Replicator The optional Minidock Port Replicator features innovative advances in notebook personal computing technology. Much consideration has gone into the design of the Minidock in order to meet your requirements for versatility as well as quality. Identifying the Ports and Connectors Before attempting to connect your notebook to any modules, peripheral devices, or serial devices, make sure you are familiar with the Minidock’s various I/O ports and controls. The function of each port is indicated by its icon. A description of each icon is listed below. Icon Description Connect a PS/2 mouse to this port. Connect an external keyboard to this port. Connect a MIDI device to this port. Connect a serial device to this port. Connect a parallel device, such as a printer , to this port. Connect an external monitor to this port. Connect a pair of stereo speakers to this port. Connect an external microphone to this port. Connect an audio-in device, such as a CD player to this port. Connect the AC Adapter to this port. Connect network cabling to this port. Connecting the AC Adapter 1. 2. Connect the AC Adapter cable to the Minidock’s AC port. Connect the power cord to the AC Adapter. Plug the power cable into a wall outlet. 6-18 Digital HiNote VP 500 Series Chapter 6: Expansion and Option Devices Hot-Plug Peripheral Devices Your Minidock Port Replicator supports hot-plug connections. Digital recommends if you are connecting a device which utilizes speakers or are connecting speakers themselves, that you turn off the power to the device or speakers before making the connection to the Replicator. This will ensure that your speakers will not be damaged from any static discharges. The External Monitor 1. 2. 3. Locate the VGA port on the back of the Minidock and connect the monitor signal cable to it. Tighten the thumb screws on the signal cable to secure the connection. Ensure that the monitor is turned off. Connect the monitor’s power cord to a wall outlet. The Printer 1. 2. 3. Connect the printer signal cable to the Minidock’s parallel port located on the rear of the notebook. Tighten the thumb screws to secure the connection. Ensure that the printer is turned off. Connect the printer’s power cord to a wall outlet. The MIDI To connect a MIDI device to the MiniDock, please refer to the following: 1. Depending on the type of connector your MIDI has, you may or may not need an adapter. 2. Connect the MIDI signal cable to the port. Tighten the thumb screws to secure the connection. Digital HiNote VP 500 Series 6-19 Chapter 6: Expansion and Option Devices Serial Mouse Connection 1. 2. Locate the serial port on the back of your Port Replicator. Connect the serial mouse to the serial port and tighten the thumb screws. The Keyboard Hot plug an external keyboard into the Minidock, while at the same time being able to take advantage of the notebook’s keyboard and touch pad. 1. Locate the port on the back of your Port Replicator. 2. Gently push the 6-pin connector into the port. Do not try to force it in as you may bend the pins on the keyboard’s cable head Other Peripheral Devices In order for the system to detect the presence of a newly installed serial mouse or PS/2 mouse you must reboot the notebook. Mouse (PS/2) Connection 1. 2. Locate the port on the back of your Port Replicator. Gently push the 6-pin connector into the port. Do not try to force it in as you may bend the pins on the mouse’s cable head The Audio-In Connection The procedure for connecting an audio-out, audio-in and external Mic to the Minidock are essentially the same. The only difference is when connecting speakers to the audio-out port to first disconnect your speakers from their power source before connecting the device to the Minidock. This will save your speakers from being damaged by any sudden electrical discharges created from the connection. ______________________________ Note ______________________________ If your notebook is not equipped with audio capabilities, your system will not be able to utilize the Port Replicator’s Audio-out and External Mic features. _________________________________________________________________ 6-20 Digital HiNote VP 500 Series Chapter 6: Expansion and Option Devices 1. 2. 3. Locate the audio-in port on the rear side of the Replicator. Depending on the signal cable which you are using, you may or may not need an adapter. Insert the round cable connector into the audio-in port. Connecting the Notebook By inserting your notebook into the Minidock Port Replicator, and by connecting peripheral devices (a keyboard, mouse, monitor, printer, etc.) to the Minidock’s rear side, your Digital HiNote VP 500 series notebook turns into a fully functional desk-top PC. Your notebook can be hot-plugged into the Minidock. This means that you do not have to turn off the notebook before connecting it to the Minidock. _____________________________Caution _____________________________ Although you may be able to insert other notebook computers into the Minidock, it is strongly recommended you do not use the Minidock with any other notebooks before checking with your Digital notebook dealer. This could result in severe electrical damage to the Minidock and your notebook. _________________________________________________________________ You may want to refer to Figure 6-14 and Figure 6-15 as you read these instructions for a visual guide to connecting the notebook to the Minidock. Before connecting the notebook, you may find it more convenient to first connect the desired peripheral devices to the Minidock and then connect it to AC power. If no peripheral devices are connected to the notebook, there is no need to turn off the notebook since it can be hot-plugged into the Minidock. However, it is recommended that you save your data and close the LCD lid. Digital HiNote VP 500 Series 6-21 Chapter 6: Expansion and Option Devices Figure 6-14: Connecting the Notebook to the Minidock 1. Locate the Minidock’s 240-pin port found on the front left side of the Minidock. Find the 240-pinned connector on the rear side of the notebook. It is concealed by a plastic door. Slide the door to the left until it clicks into its open position. (Figure 6-14, step 1) 2. Raise the long rectangular-shaped Release latch on the Minidock in the direction of the arrow (Figure 6-14, step 2). 3. Notice that there is one rail on the left of the docking platform and one on the right. These rails correspond with two grooves on the bottom side of the notebook computer. Place the notebook on the Minidock’s docking platform, aligning the rails with the grooves (Figure 6-14, step 3). 4. Gently slide the notebook along the rails on the docking platform until the notebook’s 240-pinned connector makes form connection with the 240-pinned port on the Replicator. Forcing a connection between the two can seriously damage either or both the port and the connector. Realign the grooves to the rails and try again. 6-22 Digital HiNote VP 500 Series Chapter 6: Expansion and Option Devices Figure 6-15: Securing the Notebook to the Minidock 5. Once you are confident that you have a firm connection, lower the Release latch back to its original position. This will secure the Minidock to notebook connection. (Figure 6-15) 6. Open the notebook’s LCD cover and resume normal operation. Digital HiNote VP 500 Series 6-23 Chapter 6: Expansion and Option Devices Removing the Notebook If the notebook’s battery has ample charge, you do not need to turn off the notebook before removing it from the Minidock. 1. Raise the Release latch in the direction of the arrow shown. (Figure 6-16, step 1) 2. Slide the notebook away from the Minidock. (Figure 6-16, step 2) 3. Secure the Minidock’s Release latch back to its original position. Figure 6-16: Removing the Notebook from the Minidock 6-24 Digital HiNote VP 500 Series 7 Caring for Your Notebook General Maintenance The best maintenance you can perform yourself is preventive. Try to keep the notebook as clean as possible. Avoid using the notebook in dirty or dusty environments if possible. Be careful to avoid getting dirt and dust in the floppy disk drive. Use a clean carrying bag when you transport the notebook. Your Digital notebook dealer will be able to provide purchasing information on the optional Digital notebook carrying case. Try to keep the keyboard as clean as possible. Avoid spilling liquids on it. You can clean the keyboard with a small computer vacuum to remove dust buildup that can impede key motion. Always keep the port covers closed when you’re not using the ports. This will prevent dust from getting into the connector ports and possibly affecting electrical contacts when you attach a device to the computer. You can occasionally use a vacuum to clean the ports. Cleaning The Notebook Cleaning The Case If the computer case gets soiled you can clean it. Always make sure that the computer is turned off and the AC adapter is disconnected before you do anything else. Clean the case with a soft, preferably lint-free, cloth. If necessary you can use a mild detergent. Avoid any cleaner that has abrasives in it and DO NOT use cleaning solvents or isopropyl alcohol-based products. Never spray anything directly onto the notebook. Always spray onto a cloth and then wipe the computer with that. Cleaning The LCD Display Clean the LCD the way you would clean a computer monitor screen. Use a lint free cloth and if necessary some commercially available screen or glass cleaner. It is better to avoid ammonia- Chapter 7: Caring for Your Notebook based cleaners, however. If you use a cleaner, be sure to spray the cleaner on the cloth first, rather than spraying directly onto the screen. Caring for Diskettes Under normal conditions a diskette’s rigid plastic case will protect it from damage. However, data stored on floppy diskettes are easily corrupted. Follow the protective measures listed below to preserve the integrity of data stored on floppy diskettes. Never touch the magnetic surface of the disk. When handling diskettes, take care that you don’t drop them. Never turn off, reboot, or reset the computer when a diskette is in the drive and the drive activity light is on. Do not transport the co mputer with diskettes inserted in the drive. Do not expose diskettes to extreme temperatures. Keep diskettes away from magnetic fields generated by power supplies, monitors, magnets, etc. Don’t smoke in the same room where diskettes are used or stored. Particles from cigarette smoke are large enough to scratch the surface of the disk. Store diskettes in a dry, dust-free environment. 7-2 Digital HiNote VP 500 Series A Specifications CPU • Intel Pentium SYSTEM MEMORY • On board 8MB DRAM for system memory • Upgradable configuration sizes are 16MB by installing 2 additional 4MB DIMMs, 24 MB by installing two 8MB DIMMs or 40MB by installing two 16MB DIMMs. HARD DISK DRIVE Easily upgradable 2.5 inch, 1.08 GB or higher hard disk FLOPPY DISK DRIVE • 3.5” 1.44MB floppy disk drive CD-ROM • 6x CD-ROM removable module DISPLAY • 256-color DSTN LCD with a 800x600 SVGA back-lit display • 64K-color TFT LCD with a 800x600 SVGA back-lit display Appendix A: Specifications BATTERY • Main Battery: nickel-metal hydride • Secondary Battery: lithium-ion KEYBOARD • Enhanced PC/AT compatible keyboard with embedded numeric keypad and special hot key functions. EXTERNAL INTERFACES • One 9-pin serial port • One 25 pin parallel port (Standard, bi-directional, ECP, and EPP modes) • One 15 pin CRT port • One 6-pin external keyboard or PS/2 mouse port • One Audio Mic port and one speaker-out port (Selected models only) • Built-in microphone (Selected models only) • Built-in IRDA Infrared transmitter/receiver (Selected models only) • 240-pin Connector supporting the Minidock Port Replicator • One 3-pin AC adapter jack • Two PC Card sockets supporting two Type II or Type I PC Cards or One Type III PC Card • Two built-in mono speakers Selected models are equipped with two built-in stereo speakers AC ADAPTER A-2 • Universal AC Adapter • Supports 100-240 volt, 50-60 cycle power supply Appendix A: Specifications System Window Patterns SYSTEM ICONS • Battery Status • FDD in use • HDD/ CD-ROM in use • CRT/LCD/Simul • Key Pad • Scroll Lock • NumLock • Caps Lock LEDS • AC In • Charging Indicator Standard Accessories • AC adapter and AC cables BATTERY • One Rechargeable Enhanced NiMH battery pack • 2 operation hours with PMU disabled (depending on operating temperature, battery condition, and power management features.) • 3.5 hours charge when power is on, 2 hours when off (May vary depending on operating temperature, battery condition, and power management features). A-3 Appendix A: Specifications O/S SOFTWARE Factory installed with either: • Microsoft Win95 operating system A-4 • Microsoft Windows for Workgroups operating system • Microsoft Windows NT operating system B Troubleshooting This chapter will try to anticipate potential problems that you may encounter in the day-to-day use of your notebook. Included in this chapter is information that should help to solve these problems for you. This section is organized into categories based on the hardware. The Power System Question: Answer: When I turn on the notebook, nothing happens. What’s the matter? 1. If your system is running off battery power, the batteries are probably completely drained. Attach the AC adapter and recharge the batteries. 2. If you are running off the adapter, check to make sure that it is plugged into a live power source. If the power LED is on, it indicates that the power source is good and that the adapter is functioning properly. 3. If there is a battery in the computer, turn off the system, remove the battery, and then turn on the computer. If there is still no response, consult your dealer for an appraisal of the problem. Question: The computer keeps beeping at me. Have I done something wrong? 1. The computer is most likely trying to tell you that battery power is low. Save your work, close your applications and connect the AC Adapter. 2. If AC power is not available, turn off the notebook and replace the battery. Answer: Appendix B: Troubleshooting LCD Status Display Question: Answer: I am receiving questionable readings from the battery gas gauge. Is it broken? Most likely the battery is in poor condition and needs to be formed. Please see Chapter 2 for detailed information on forming the battery. Battery Question: Answer: I used to get better battery run time. My operating habits have not changed, is it time to buy a new battery? The battery is probably showing signs of memory effect and needs to be formed. Please see Chapter 2 for detailed information. The LCD Display Question: Answer: I know the notebook is on, but the LCD screen is blank. Is it broken? 1. Check your brightness and contrast adjustments. 2. Use the hot key combination [fn + F4] to ensure that the video mode is not set to CRT. 3. The system may have entered the Standby or Suspend mode. Press the space bar first to see if the computer is in Standby. If the screen image doesn’t come back, press the Suspend/ Resume button. 4. If the blinking numeric keypad icon appears in the LCD Status Display, the system is in suspend and a password on resume has been set. Type in the password. If the screen remains blank consult your Digital dealer for technical support. Keyboard Question: Answer: I can’t get the embedded numeric keypad to work. Use the [fn + F8] hot key combination. Question: When I type, I get numbers when I should get letters. What’s wrong? The numeric keypad is enabled. Disable it by pressing the [fn + F9] hot key combination. Answer: B-2 Appendix B: Troubleshooting I/O Connections External Monitor Question: Answer: I connected an external monitor, but it is not working. 1. Check all cable connections, including AC power. 2. The notebook’s video mode may be in LCD only. Use the [fn + F4] key combination to switch to CRT or Simul (simultaneously viewing both LCD and CRT) mode. B-3 Index A D AC Adapter, v, 1–6, 1–10, 1–11, 1–12, 1–13, 2–1, 2–11, 2–12, 4-2, 6-16, 6-19, 7-1, 1 AC Power Port, 1–6 Admin. Password, iii, 3–12, 3–13 Advanced Power Management, 1–3 Audio, v, 1–3, 6-20, 2 DIMM, viii, 6-2, 6-4 DIMMs, 6-2, 6-4, 6-14, 1 B Battery, i, ii, v, vi, vii, 1–1, 1–2, 1–4, 1–15, 1– 17, 1–21, 1–22, 2–1, 2–2, 2–4, 2–5, 2–6, 2–7, 2–8, 2–9, 2–10, 2–11, 2–12, 2–13, 2–14, 2–15, 2–16, 3–1, 3–10, 3–14, 6-1, 6-5, 6-8, 6-13, 615, 6-16, 6-17, 6-24, 3, 1, 2 Battery Life, ii, 1–2, 2–4, 2–6, 2–13, 3–14 battery run time, vii, 1–1, 2–2, 2–6, 2–13, 2– 14, 2–15, 3–10, 3–14, 2 BIOS Setup Program, iii, vii, 2–15, 2–16, 2–18, 3–2, 3–3, 3–6, 3–8, 3–10, 3–12, 3–16, 4-5, 4-8 C CD-ROM, ii, iv, 1–1, 1–2, 1–4, 1–16, 1–20, 2– 14, 2–15, 6-1, 6-5, 6-9, 6-10, 6-11, 3 Charging the Battery, ii, 1–15, 2–11 CPU, 1–1, 1–2, 2–15, 1 CRT/LCD/Simul, 3 E Exit Menu, iii, 3–16, 3–17 expansion bay, 1–1, 1–2, 2–5, 6-6 External Battery Charger, v, 1–21, 1–22, 6-15, 6-16 External Keyboard, iv, 1–5, 4-1, 4-2, 4-6, 6-18, 6-20, 2 external mic, 1–6, 4-1, 4-2, 6-18 External Monitor, iii, iv, v, vi, 1–3, 1–17, 4-1, 4-2, 4-3, 6-18, 6-19, 3 F FDD, iv, viii, 1–1, 1–2, 1–4, 2–5, 2–14, 2–15, 3–6, 6-1, 6-5, 6-6, 6-7, 6-8, 3 Floppy Disk, ii, viii, 1–1, 1–2, 1–16, 2–14, 6-5, 7-1, 7-2, 1 Floppy Disk Drive, viii, 1–1, 1–2, 1–16, 2–14, 7-1, 1 Index-1 Index Floppy Drive, 1–2 Forming, ii, 2–4, 2 H Hard Disk, v, viii, 1–2, 1–16, 1–21, 2–13, 2– 16, 3–6, 3–14, 3–15, 5-1, 6-11, 6-12, 6-13, 614, 1 Hard Disk Drive, viii, 1–2, 1–16, 1–21, 2–13, 3–6, 1 Hard Drive, 1–2, 1–4 HDD, iv, viii, 1–2, 1–21, 2–13, 2–15, 6-11, 612, 6-13, 3 Hot Key, i, 1–16, 1–17, 2–12, 2–13, 4-3, 2 I Infrared Port, ii, iv, 2–14, 3–8, 3–10, 4-2, 4-7 Integrated Peripherals, iii, 3–5, 3–8, 3–10, 3– 11, 4-5 Internal Mic, 1–8 Internal Microphone, 1–8 IR, viii, 1–3, 1–5, 4-2, 4-7, 4-8 IR Port, 1–3 K Keyboard, 7-1, 2 L LCD Display, vi, 1–2, 1–8, 1–17, 7-2, 2 LCD Status Display, i, vi, 1–8, 1–15, 1–16, 1– 17, 2–4, 2–16, 2 Legend Bar, iii, 3–3, 3–4 Low Battery Activity, ii, 2–12 M Main Menu, iii, 3–6, 3–7 Index-2 Digital HiNote VP Memory, ii, iv, viii, 1–1, 1–2, 1–22, 2–2, 2–5, 2–16, 3–1, 3–6, 5-3, 6-1, 6-2, 6-3, 6-4, 6-13, 614, 1, 2 Minidock, v, 1–5, 1–20, 6-1, 6-18, 6-19, 6-20, 6-21, 6-22, 6-23, 6-24, 2 Minidock Port Replicator, v, 1–5, 1–20, 6-1, 618, 6-19, 6-21, 2 N NiMH, ii, 2–1, 2–2, 2–5, 2–6, 2–11, 3 O Operating System, viii Optional Expansion Devices, i, 1–20 Optional Secondary Battery, 6-8 P Parallel Port, iv, 2–15, 2–18, 3–10, 4-1, 4-2, 44, 4-5, 6-12, 6-19, 2 Password, iii, 3–1, 3–12, 3–13 Password on Boot, 3–12 Password on Resume, 3–12, 2 PC Card, ii, iv, vii, viii, 1–1, 1–3, 1–6, 2–14, 2–15, 4-1, 5-2, 5-3, 6-12, 2 Peripherals Menu, iii, 3–5, 3–8, 3–9, 3–10, 3– 11 Port Replicator, v, 1–5, 1–20, 6-1, 6-18, 6-19, 6-20, 6-21, 2 Power Menu, iii, 2–16, 3–14 Printer, iv, v, 1–3, 1–5, 4-1, 4-2, 4-4, 6-1, 6-18, 6-19, 6-21 R RAM, 1–2, 1–3, 2–15, 2–16, 2–17, 2–18, 3–1, 3–15, 6-13 Index S secondary battery, 1–1, 1–2, 2–1, 2–5, 2–11, 61 Security Menu, iii, 3–12 serial port, 2–14, 3–8, 3–10, 4-1, 4-2, 4-5, 6-20, 2 Speaker-out, 1–6 Standby, ii, 1–17, 2–13, 2–15, 2–16, 2–17, 2– 18, 3–14, 3–15, 2 Suspend, ii, 1–8, 1–11, 1–12, 1–14, 2–13, 2– 15, 2–16, 2–17, 2–18, 3–14, 3–15, 6-13, 6-14, 2 Suspend Lid Switch, 1–8 Suspend Time-out, 2–16, 2–18, 3–15 Suspend to Disk Time-out, 6-13, 6-14 Suspend/Resume, ii, 1–8, 1–11, 1–12, 1–14, 2– 13, 2–16, 2–18 System Memory, iv, 6-1, 1 T Touch Pad, i, 1–18, 1–19, 2–13, 2–15, 2–18, 46, 4-7, 6-20 V Video Chip, 1–3 W Windows, 2, iv, vii, 1–3, 1–13, 4-5, 5-1, 5-2, 614, 4 Digital HiNote VP Index-3