1
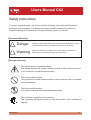
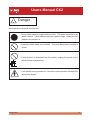
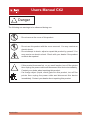
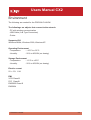
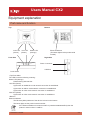
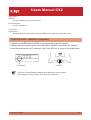
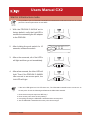
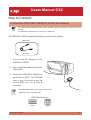
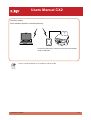
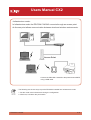
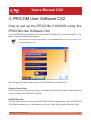
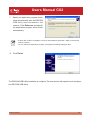
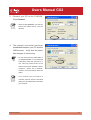
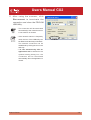
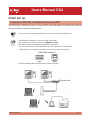
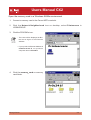
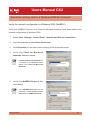
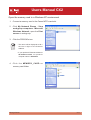
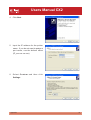
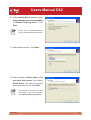
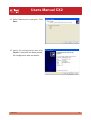
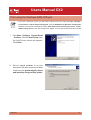
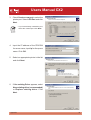
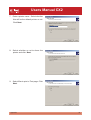
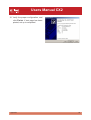
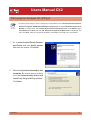
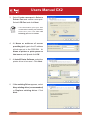
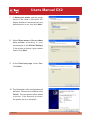
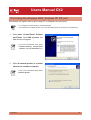
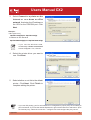
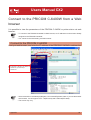
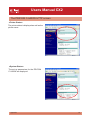
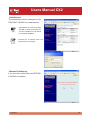
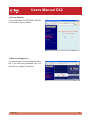
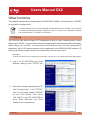
WA01040XA
ENG_200501
Users Manual CX2
Users Manual SX2
Contents
1, Introduction ............................................................................................1-1
Safety Instructions ........................................................................................1-3
2, PRICOM C-6400W ...................................................................................2-1
Emission Notice ...........................................................................................2-2
Environment .................................................................................................2-3
Equipment explanation .................................................................................2-4
Part name and function ............................................................................2-4
The PRICOM C-6400W is initialized.........................................................2-5
Start in Infrastructure mode ......................................................................2-6
How to Connect ............................................................................................2-7
Connect the PRICOM C-6400W to Printer and Network ..........................2-7
Other Functions ............................................................................................2-9
Function ....................................................................................................2-9
Specification ...............................................................................................2-11
Hardware specification ...........................................................................2-11
Software Specification ............................................................................2-12
Using Wireless Communication ..............................................................2-13
3, PRICOM User Software CX2 ..................................................................3-1
How to set up the PRICOM C-6400W using
the PRICOM User Software CX2 .................................................................3-1
How to Communicate to the PRICOM C-6400W .........................................3-3
Procedure for initial communication with the PRICOM C-6400W.............3-3
Set up using the PRICOM Setup Utility ....................................................3-4
Users Manual SX2
4, Scanner Server .......................................................................................4-1
Initial set up ..................................................................................................4-2
Connect the PRICOM C-6400W and USB scanner..................................4-2
Use the Scanner Server ...............................................................................4-3
Install the PRICOM USB Utility .................................................................4-3
Use the PRICOM USB Utility ....................................................................4-6
The PRICOM USB Utility..............................................................................4-9
The PRICOM USB Utility screen ..............................................................4-9
The Option Dialog ...................................................................................4-10
5, Storage Server ........................................................................................5-1
Initial set up ..................................................................................................5-2
Install the PRICOM C-6400W and Canon MFP........................................5-2
Share the Memory Card Via the Network ....................................................5-3
Share the memory card in a Windows98/Me Environment.......................5-3
Verify the network configuration in Windows 98/Me (NetBEUI)................5-3
Verify the network configuration in Windows 98/Me
(NetBIOS over TCP/IP) ............................................................................5-4
Open the memory card in a Windows 98/Me environment .......................5-5
Share the memory card in a Windows 2000 Environment .......................5-6
Verify the network configuration in Windows 2000(NetBEUI) ..................5-6
Verify the network configuration in Windows 2000
(NetBIOS over TCP/IP) ............................................................................5-7
Open the memory card in a Windows 2000 environment .........................5-8
Share the memory card in a Windows XP Environment ...........................5-9
Verify the network configuration in Windows XP ......................................5-9
Open the memory card in a Windows XP environment ..........................5-11
Users Manual SX2
6, Q&A .........................................................................................................6-1
The main menu does not start after Inserting the CD-ROM .....................6-1
The PRICOM C-6400W is not found in the configuration utility ................6-1
I cannot print. ............................................................................................6-2
Occasionally I cannot print .......................................................................6-3
I cannot print in LPR .................................................................................6-3
How can I return to factory default? ..........................................................6-3
I cannot use the BJ print monitor ..............................................................6-3
I cannot configure in the AdHoc mode .....................................................6-3
I cannot use Memory card via network .....................................................6-4
I cannot use the scanner ..........................................................................6-4
Appendix ........................................................................................................ 1
How to use USB memory ................................................................................ 1
Save the wireless and TCP/IP settings
for the PRICOM C-6400W to use USB memory .......................................... 1
Write configuration information using an editor. .............................................. 9
Using a standard OS print client ................................................................... 11
Print using the Windows 2000, Windows XP Standard TCP/IP port ......... 12
Print using the Windows 2000 LPR port .................................................... 17
Print using the Windows XP LPR port ....................................................... 21
Print using the Windows 2000, Windows XP IPP port ............................... 24
Connect to the PRICOM C-6400W form a Web browser .............................. 26
Connect to the PRICOM C-6400W ............................................................ 26
The PRICOM C-6400W HTTP screen ....................................................... 27
Other functions .............................................................................................. 30
IP filtering ................................................................................................... 30
TELNET ........................................................................................................ 31
Check and Verification of the PRICOM C-6400W ......................................... 36
Setting the PRICOM C-6400W parameters ............................................... 36
User Registration .......................................................................................... 1
Users Manual CX2
1, Introduction
Thank you for purchasing this product. This manual provides information on how to configure
and use the PRICOM C-6400W.
Make sure to read all safety instructions carefully and fully understand them before starting to
use the PRICOM C-6400W.
The PRICOM C-6400W is a mini Print/Scanner/Storage wireless server. It allows sharing a
printer, scanner and storage across a network. The PRICOM C-6400W will also support the
status monitor in the Canon printer driver. This allows monitoring the printer status (Ink level,
paper empty, etc) from a PC.
PRICOM C-6400W
Wireless USB Interface mini print/scan/storage server
Network Interface
Device Interface
Supported Protocol
Supported OS
:IEEE 802.11b (1M/2M/5.5M/11Mbps Auto configuration)
:USB2.0 Full Speed* (Type A)
:TCP/IP, NetBEUI/NetBIOS**
:Windows 98/Me,Windows 2000,Windows XP
*Equivalent to USB1.1 performance.
**NetBEUI/NetBIOS is used for sharing the storage and not for printing.
Introduction
1-1
Users Manual CX2
[About this Manual]
- Copying all or part of this manual without our permission is forbidden.
- The contents of this manual may be changed without advance notice.
- If you have any question about this manual or our products, please contact our customer
support.
- This manual has been edited very carefully. However, silex technology, Inc. is not
responsible for any mistakes included in this manual or any damages, direct or indirect,
arising from the use of this manual.
- Copyright © 2005 silex technology, Inc.
- Canon is a registered trademark of Canon Inc., Bubble Jet is a trademark of Canon Inc.
- Microsoft, Windows, Windows NT etc. are registered trademarks of Microsoft Corporation
in the U.S. and other countries.
- Other brand or product names are registered trademarks or trademarks of their respective
companies.
Symbols used in this manual
This manual uses the following symbols to point out specific information. The information
after the symbols should always be observed. Refer to “Safety Instructions” for the product
safety information.
- This symbol indicates important information that needs to be observed when using this product.
Make sure to read this information for safe and proper use.
- This symbol indicates useful information that will help operating this product.
If you experience difficulties operating this product, please refer to this information first.
Introduction
1-2
Users Manual CX2
Safety Instructions
To ensure safe and proper use, please read the following information carefully before
starting to use our product. The safety instructions include important information on
the safe handling of the product and on general safety issues for the user.
[Expression Meaning]
Danger
"Danger" indicates the existence of a hazard that could result in death
or serious bodily injury if the safety instruction is not observed.
Warning
"Warning" indicates the existence of a hazard that could result in
bodily injury if the safety instruction is not observed.
[Example of picture]
- This symbol warns of possible danger.
- The danger symbol will contain another symbol or have a picture near it.
(Left: this warns of possible electrocution)
- This is the prohibit symbol.
- This symbol will include another symbol or have a picture near it to indicate
what is prohibited.
- This is the prohibit symbol.
- This symbol indicates what is prohibited specifically.
- This indicates a regulation by its contents.
- The regulation will appear inside or near this symbol. (Left: indicates to
unplug).
Introduction
1-3
Users Manual CX2
Danger
Warnings about physical connections
- Do not allow a power surge into this product. This could cause fire or an
electric shock. If this product receives a power surge, unplug the AC
adapter and contact us.
- Keep the cables away from children. They may be injured or receive a
shock.
- If this product is detached from the printer, unplug the power to the
printer before reconnecting.
- If the printer has a ground wire, it must be used to prevent electrocution
and power surges.
Introduction
1-4
Users Manual CX2
Danger
The following are warnings to be observed during use.
- Do not remove the cover of this product.
- Do not use this product with the cover removed. You may receive an
electric shock.
- Do not attempt to check, adjust or repair this product by yourself. You
may receive an electric shock. Check with your dealer if the product
needs to be repaired.
- If this product becomes hot, or you smell smoke, turn off the printer
then unplug the power cable and disconnect this device immediately.
Contact your dealer about repairing this product.
- If a foreign object (liquid, metal) gets into this product, turn off the
printer then unplug the power cable and disconnect this device
immediately. Contact your dealer about repairing this product.
Introduction
1-5
Users Manual CX2
Warning
Notice about physical installation.
- Do not use this product with the cover removed. You may receive an
electric shock.When unplugging this product do not pull on the cord.
The cord may break resulting fire and/or electric shock. Pull on the plug
only.
- Do not put this product on an unstable location. The product may fall
causing injury or damage the product.
- Do not put this product in a humid or dusty place. Fire or electric shock
may occur.
- When moving this product, disconnect the power and printer cables.
Fire or electric shock may occur.
Introduction
1-6
Users Manual CX2
Warning
Observe the following instructions while using this product.
- When the product will not be used for an extended time, disconnect and
unplug the power cable.
- Verify all cables are connected properly before using this product.
Introduction
1-7
Users Manual CX2
2, PRICOM C-6400W
The PRICOM C-6400W is mini wireless print server/scanner server/storage server with a
USB connection for Canon. This product supports Canon bubble jet printer, CAPT
monochrome/color laser printer and MFP. You can monitor the print job status, printer status
in Canon printer driver status monitor.
- For the latest compatibility information, refer to our web page (http://www.silex.jp/) or contact
customer support.
When used correctly, the PRICOM C-6400W should not affect a radio or TV. However if you
experience interference try the following.
- Move the PRICOM C-6400W far away from the radio and TV.
- Connect the PRICOM C-6400W and radio/TV to a different outlet.
PRICOM C-6400W
2-1
Users Manual CX2
Emission Notice
PRICOM C-6400W
This equipment has been tested and found to comply with the limits for a Class B digital
device, pursuant to Part 15 of the FCC Rules. These limits are designed to provide reasonable
protection against harmful interference in a residential installation. This equipment generates,
uses, and can radiate radio frequency energy and, if not installed and used in accordance
with the instructions, may cause harmful interference to radio communications. However,
there is no guarantee that interference will not occur in a particular installation. If this equipment
does cause harmful interference to radio or television reception, which can be determined by
turning the equipment off and on, the user is encouraged to try to correct the interference by
one or more of the following measures:
- Reorient or relocate the receiving antenna.
- Increase the separation between the equipment and receiver.
- Connect the equipment into an outlet on a circuit, different from that to which the receiver
is connected.
- Consult the dealer or an experienced radio/TV technician for help.
This device complies with Part 15 of the FCC Rules. Operation is subject to the following two
conditions: (1) This device may not cause harmful interference, and (2) this device must
accept any interference received, including interference that may cause undesired operation.
EN55022 Class-B
EN55024
PRICOM C-6400W
2-2
Users Manual CX2
Environment
The following are needed for the PRICOM C-6400W.
The followings are objects that connect to the network.
- PC with wireless communication
- USB Cable (A-B Type Connectors)
- Printer
Supported OS
Windows 98/Me, Windows 2000, Windows XP
Operating Environment
- Temperature
: +10°C to +35°C
- Humidity
: 20% to 80%RH (no dewing)
Storage Environment
- Temperature
: -10°C to +50°C
- Humidity
: 20% to 90%RH (no dewing)
Electric current
5V +- 5% 1.0A
EMI
VCCI Class-B
FCC Class-B
EN55022 Class-B
EN55024
PRICOM C-6400W
2-3
Users Manual CX2
Equipment explanation
Part name and function
Bottom
Top
Infra LED Link LED
(Green)
(Green)
Status LED
(Orange)
Ethernet Address
(The last 6 digits are the product serial
number)
Right Side
Front Side
Power Connector
USB Port
Push Switch
<Top/Front Side>
The LED’s have the following meaning:
Status LED (Orange)
Flashes during data transfer.
Link LED (Green)
Lights when an OldAdHoc mode network connection is established.
Lights when an AdHoc mode network connection is established.
Lights when an Infra mode network connection is established.
Infra LED (Green)
Lights when an Infra mode network connection is established.
<Bottom>
Ethernet Address
The Ethernet (MAC) Address of the device is found on the bottom.
The last 6 digits are the product’s serial number.
- If the Ethernet Address is 00:80:92:18:0E:1A (noted as 008092180E1A) then the
product’s serial number is 180E1A.
PRICOM C-6400W
2-4
Users Manual CX2
<Right Side>
USB Port
Connect a USB Cable (A Type connector)
Power Connector
Connect AC adapter
<Front Side>
Push Switch
The push switch is used to restore Factory Defaults and change to Infrastructure mode.
The PRICOM C-6400W is initialized.
1. Make sure that PRICOM C-6400W is not connected to the AC adapter.
2. While pushing the push switch of the PRICOM C-6400W, connect the AC Adapter.
3. Hold the push switch for 15 seconds. Only if Link LED is on, let go of the push switch.
Push Switch
Link LED
- Do not turn off the PRICOM C-6400W while initializing to factory default.
- After restoring to factory default, do not push the push switch.
PRICOM C-6400W
2-5
Users Manual CX2
Start in Infrastructure mode
- It is possible to put the PRICOM C-6400W into Infrastructure mode and connect to an access
point if the access point does not use WEP.
1.
With the PRICOM C-6400W set to
factory default, verify the Link LED is
on after the connecting the AC adapter
to the PRICOM.
2.
After holding the push switch for 15
seconds, release the switch.
3.
After a few seconds, all of the LED’s
will light and then go out immediately.
4.
After a few seconds, the Infra. LED will
light. Then if the PRICOM C-6400W
can connect to an access point, the
Link LED will light.
- If the Infra LED lights but Link LED does not, The PRICOM C-6400W cannot connect to an
access point. Check the following and Reboot the PRICOM C-6400W.
1. Does the access point require a WEP key?
2. Does access point use a security setting?
3. Is anything blocking the PRICOM C-6400W and the access point?
4. Are the PRICOM C-6400W and Access point close enough?
PRICOM C-6400W
2-6
Users Manual CX2
How to Connect
Connect the PRICOM C-6400W to Printer and Network
- If the PRICOM C-6400W has been used in another network environment, restore to factory
default.
- The PRICOM C-6400W cannot connect to a USB hub.
The PRICOM C-6400W needs the following to connect to a network.
USB Cable
A-B Type
1.
Connect the AC Adapter to the
PRICOM C-6400W.
2.
Plug in the Power cable to the printer/
Canon MFP.
3.
Connect the PRICOM C-6400W to a
printer/Canon MFP. The PRICOM
uses a type A connector and the
printer/MFP will use a type B
connector.
- The USB Cable will have two types of connecters.
Make sure of the connector type.
PRICOM C-6400W
2-7
Users Manual CX2
4. Make sure that printer is working and turned on.
-
Using an AC adapter other than the one provided with the PRICOM C-6400W can cause damage.
Connect only to a printer/Canon MFP.
Wait for 2 or more seconds after connecting/disconnecting the USB cable.
Do not disconnect the USB cable during printing, scanning or reading/writing from a memory
card.
- After turning on the PRICOM C-6400W or connecting the USB cable, printing will proceed
according to priority.
PRICOM C-6400W
2-8
Users Manual CX2
Other Functions
The other functions of the PRICOM C-6400W are shown below.
Function
Assign the IP address automatically using DHCP, BOOTP and RARP
- DHCP/BOOTP
If a DHCP/BOOTP server is working on your network, the DHCP/BOOTP protocol of the PRICOM C-6400W will
assign the IP address to the PRICOM C-6400W.
- The PRICOM’s DHCP protocol is compatible with RFC2131/2132.
- If you use the DHCP function of the PRICOM C-6400W, talk to your administrator.
- RARP
If a RARP server is working on your network, the RARP protocol of the PRICOM C-6400W will assign the IP
address to the PRICOM C-6400W.
- If you use the RARP function of the PRICOM C-6400W, talk to your administrator.
- IPP(TCP/IP)
The PRICOM C-6400W supports [Internet Printing Protocol] (IPP Ver.1.0) which can print via the internet. If you
use IPP, you can easily print out to a remote place using Web access in HTTP.
- If you print out to a remote place using the IPP function, you should assign a global IP address
to the PRICOM C-6400W. Talk to an administrator for details.
- Web Brower functionality
The PRICOM C-6400W supports HTTP. You can configure the PRICOM C-6400W and check its status via a
Web browser. If you have Internet access, you link to the PRICOM C-6400W’s support information.
- We recommend using Internet Explorer 4.0 or Netscape Navigator 4.0 or newer. The Web
browser must support HTTP 1.0(RFC1945) and HTML 2.0(RFC1866).
- If you use the Web browser function, you should configure the IP address of the PRICOM C6400W and enable the TCP/IP protocol.
- An IP address must be assigned prior to using the Web browser.
PRICOM C-6400W
2-9
Users Manual CX2
- IP Filter
The PRICOM C-6400W allows to accept/deny the communication from a pre-registered IP address scope. IP
filtering can protect illegal access from unexpected network client users.
- When a DHCP server is assigning the IP address for the PRICOM C-6400W, the designated IP
addresses must be within a reachable scope by the DHCP server.
- You can register up to 4 IP addresses scope with the PRICOM C-6400W.
- Scanner server
If you use a Canon MFP the PRICOM C-6400W will allow you to share the Canon MFP scanner via the
bundled the PRICOM USB Utility.
- The PRICOM USB Utility is compatible with Windows 2000/Windows XP.
- The PRICOM C-6400W can connect to one Canon MFP.
- Storage server
The PRICOM C-6400W supports the NetBEUI/NetBIOS protocol, which will allow you to share the card slot in
a Canon MFP.
- The PRICOM C-6400W does not support printing with the NetBEUI/NetBIOS protocol.
- The PRICOM C-6400W can connect to one Canon MFP.
PRICOM C-6400W
2-10
Users Manual CX2
Specification
Hardware specification
CPU
V850 CPU (40MHz)
Memory
RAM
Flash ROM
:8MByte
:1MByte
Network Interface
IEEE802.11b compatible CF card
USB Interface
Type A port
Other
Push switch
LED
PRICOM C-6400W
:1 button
:Status(Orange), Link(Green), Infra(Green)
2-11
Users Manual CX2
Software Specification
Support Protocol
TCP/IP,NetBEUI/NetBIOS
TCP/IP
Network layer
Transport layer
Presentation layer
Application layer
:ARP, RARP, ICMP, IP
:TCP, UDP
:WINS
:LPR, TELNET, BOOTP, SNMP, HTTP, DHCP, IPP, #9100,
NetBIOS over TCP
- You can assign IP address via our original utility.
NetBEUI/NetBIOS
SMB, NetBIOS
- If you connect a CAPT printer, you cannot use the Windows standard LPR/IPP/FTP protocols.You
should use the PRICOM-Print CX2.
PRICOM C-6400W
2-12
Users Manual CX2
Using Wireless Communication
This product operates at 2.4GHz
No radio license is required to use this product. Take note of the following points.
Do not use next to the following.
The following equipment may use the same band. If you use this product near this equipment,
the radio waves from the PRICOM C-6400W and the following devices may interfere with
each other.
- Microwave, scientific instruments, pacemaker or other medical equipment.
- Licensed radio station in a factory.
- Small power radio station (a none licensed radio station).
You should not use this product near cellular phone, TV, Radio.
- A cellular phone, TV, and radio use a different radio band than our product. Generally if
they are used near our product, it will not cause a problem. However, when they
approximate this product, sound or image noise can happen.
If there is reinforced concrete/metal between wireless devices, they may not connect.
- This product can connect through wood or glass, but can have trouble communicating
through reinforced concrete/metal.
PRICOM C-6400W
2-13
Users Manual CX2
Wireless Equipment for 2.4GHz band
This band of equipment is used by the microwave, industry, science, medical equipment
and licensed in room or low power (non licensed) radio stations.
- Before you use this equipment, verify that it will not interfere with other broadcasting.
- If interference happens, stop using the equipment or change the band. Contact us to
discuss ways of avoiding interference (example: create the wall).
PRICOM C-6400W
2-14
Users Manual CX2
<Ad hoc mode>
Each wireless product connects directory.
Connect the PRICOM C-6400W to the printer/scanner/MFP
using a USB cable.
- The PC connects directly to our product in Ad hoc mode.
PRICOM C-6400W
2-15
Users Manual CX2
<Infrastructure mode>
In Infrastructure mode the PRICOM C-6400W connects through an access point.
An Access point allows communication between wired and wireless environments.
Access Point
Connect the PRICOM C-6400W to the printer/scanner/MFP
using a USB cable.
- The following are the two ways to put the PRICOM C-6400W into Infrastructure mode.
1. Set the mode to be Infrastructure during the configuration.
2. After boot, hold down the push switch.
PRICOM C-6400W
2-16
Users Manual CX2
3, PRICOM User Software CX2
How to set up the PRICOM C-6400W using the
PRICOM User Software CX2
Load the PRICOM User Software CX2 CD into the CD-ROM drive of your Windows PC. The
Menu screen will automatically appear.
- If the screen does not appear automatically, execute Autorun.exe from the CD (D:\Autorun.exe
if the CD-ROM drive is D).
The following will explain each menu of the PRICOM User Software CX2.
(1)Quick Setup Guide
This will give an introduction on how to configure the PRICOM C-6400W. Please read this
prior to setting up the PRICOM C-6400W.
(2)PRICOM Setup
This will explain how to configure the PRICOM C-6400W’s parameters. Once the PRICOM
C-6400W has been set up, it will continue on to the Printer Utility and the Scanner Utility.
PRICOM User Software CX2
3-1
Users Manual CX2
(3)Print Utility Setup
Set up the PRICOM-Print CX2 utility to use the print server function.
(4)Scan Utility Setup
Set up the PRICOM USB Utility to use the scanner function.
Online manual
View the PRICOM C-6400W's online manual.
If your PC does not have Adobe Acrobat Reader, the Adobe Acrobat Reader will be installed
automatically.
PRICOM User Software CX2
3-2
Users Manual CX2
How to Communicate to the PRICOM C-6400W
Procedure for initial communication with the PRICOM C-6400W
The following explains how to initially communicate with the PRICOM C-6400W until the
wireless parameters are configured.
- 802.11 Ad hoc mode
The PC's wireless parameters must match the PRICOM C-6400W's.
Change the PC's wireless settings to match the default settings of the PRICOM C-6400W
which are:
Mode
SSID
Channel
WEP
: AdHoc mode (802.11 Ad hoc mode)
: GROUP
: 11
: (none)
- Infrastructure mode
The PRICOM C-6400W's wireless mode can be changed to Infrastructure by using the push
button. The PC's wireless settings and an access point will still need to match the default
settings of the PRICOM C-6400W.
- If you configure to infrastructure mode, do not use WEP in your access point.
- If you cannot connect to the PRICOM C-6400W, initialize to factory default and try again.
- Refer to 2, PRICOM C-6400W - Start in Infrastructure mode for instructions on how to change
to infrastructure mode.
PRICOM User Software CX2
3-3
Users Manual CX2
Set up using the PRICOM Setup Utility
To configure the parameters in Windows 2000 / Windows XP you must login as Administrator.
Also before configuring the PRICOM C-6400W, it is recommended that you connect the
PRICOM C-6400W to a printer.
Refer 2, PRICOM C-6400W - How to Connect for information on how to connect the PRICOM
C-6400W to Printer.
- For conducting the initial set up in Windows XP SP2 environment, be sure to disable the Windows
embedded firewall feature temporarily during the PRICOM configuration. Select: Start . Control
Panel . Security Center to disable firewall feature temporarily. Please remember to enable the
firewall feature, if desired, after completing the PRICOM set up.
1.
Put into the CD included with the
PRICOM C-6400W into your Windows
PC.Click PRICOM Setup.
- If the screen dose not appear
automatically, execute Autorun .exe
from the CD-ROM.
2.
Select Setup PRICOM from PC by
wireless LAN. Click Next.
PRICOM User Software CX2
3-4
Users Manual CX2
3.
Click Yes if you agree to the
SOFTWARE LICENSE
AGREEMENT.
- If you do not agree to the
license agreement, you
cannot use our products.
4.
Verify the PC's wireless settings
match those on the PRICOM C6400W. Then click Next.
- The displayed parameters are the
PRICOM C-6400W's factory
defaults. If the PRICOM C-6400W
and the PC has different wireless
parameters, they cannot
communicate. If needed, change
the PC's wireless parameters to
match the PRICOM C-6400W.
5.
Select the PRICOM C-6400W in
search list. Then click Next.
- If you cannot find the PRICOM C6400W in search list, click Search.
- If you have more than one PRICOM
C-6400W in search list, use the
Ethernet address of product to
determine which to select.
PRICOM User Software CX2
3-5
Users Manual CX2
6.
Configure the address for the PRICOM
C-6400W. Then click Next.
- We recommend assigning a static IP
address.
- To assign the address using a DHCP/
BOOTP server, select Get IP
Address Automatically.
7.
Change the wireless parameters to
match that of your network
environment. Click Next.
- The WEP key can be entered as a
pass phrase or the actual key. When
using the pass phrase the key will
be created automatically for you.
8.
Verify the parameters for the PRICOM
C-6400W. Then click Execute.
- The PRICOM will receive the
parameters via the network and the
PRICOM C-6400W will restart.
PRICOM User Software CX2
3-6
Users Manual CX2
The PRICOM C-6400W configuration is now complete.
You can continue to install "PRICOM-Print CX2" print utility and/or the "PRICOM USB Utility"
scanner utility.
If you have already installed these applications, remove check marks from the PRICOMPrint CX2 and/or PRICOM USB Utility and quit the set up wizard. To continue to install the
print utility, go to step 9.
- If you click Cancel and quit the install wizard, after you can install the print utility directly from
the first menu.
9.
Check PRICOM-Print CX2, and click
Next.
- If you check PRICOM USB Utility,
you can install the scanner utility after
PRICOM-Print CX2 has finished
install. Refer to 4, Scanner Server
for more information.
10. Click Next.
PRICOM User Software CX2
3-7
Users Manual CX2
11. Select a folder to install to, and then
click Next.
- The default folder is "c:\Program
Files\silex technology\PRICOM CX2"
- Choose Browse to select a different
folder.
12. Select a GROUP name and click Next.
- The default name is PRICOM-Print
CX2. You can use any name you
want.
13. Click Start to start installing the
PRICOM-Print CX2.
PRICOM User Software CX2
3-8
Users Manual CX2
14. Select the printer driver for the printer
connected to the PRICOM C-6400W.
Click Next.
- If you cannot find the printer driver
you want to use in the list, you do not
have to install a printer driver right
now.
- Select Do not select the printer if
you did not wish to install a printer
driver.
- You can configure the port after you
install the printer driver.
15. Click Finish.
16. Click Finish.
The PRICOM C-6400W and PC have been set up.
After rebooting the PC, print a test page and verify it printed correctly.
PRICOM User Software CX2
3-9
Users Manual CX2
4, Scanner Server
This section explains how to use the PRICOM C-6400W's scanner server function.
A Canon MFP's scanner function can be shared across the network using the PRICOM C6400W.
- The PRICOM USB Utility is compatible with Windows 2000, Windows XP.
- The PRICOM C-6400W can connect to ONE Canon MFP.
- Refer to 3, PRICOM User Software CX2 about how to set up the product.
Scanner Server
4-1
Users Manual CX2
Initial set up
Connect the PRICOM C-6400W and USB scanner
Connect the PRICOM C-6400W and the USB scanners to allow scanning across the Network.
- Do not disconnect the USB Cable during scanning.
- The PRICOM C-6400W will support the scanner function of the Canon MFP.
- The PRICOM C-6400W can connect to ONE Canon MFP.
- The PRICOM C-6400W does not need to be powered off to connect or disconnect a USB
device.
- Verify that the USB cable has the correct connectors.
- Connect the PRICOM C-6400W's USB Port directory to a Canon MFP.
Ethernet Hub
Access Point
C-6400W
Scanner Server
Canon MFP
4-2
Users Manual CX2
Use the Scanner Server
If you want to use the Canon MFP scanner function via a network, install the PRICOM USB
Utility. The PRICOM USB Utility can connect a PC to the PRICOM C-6400W, allowing the
PC to recognize the scanner function. The scanner can then be used the same as if it were
connected directly to the PC.
Install the PRICOM USB Utility
1.
Load the PRICOM User Software CX2
into the CD-ROM drive of your
Windows PC. Click Scan Utility
Setup.
- If the screen does not appear
automatically, execute Autorun.exe.
2.
Click Next.
3.
Click Yes, if you agree to the
SOFTWARE
LICENSE
AGREEMENT.
- If you do not agree to the license
agreement, you cannot use our
products.
Scanner Server
4-3
Users Manual CX2
4.
Verify the installation folder, click Next.
- The default installation folder is
"c:\Program Files\silex technology\
PRICOM USB Utility". Choose
Browse, to select another folder.
5.
Verify the GROUP name and click
Next.
- The Default is PRICOM USB
Utility.You can use any name you
want.
6.
Click Start.
Scanner Server
4-4
Users Manual CX2
7.
Specify an application program which
starts automatically after the PRICOM
USB Utility has connected to the
scanner. Click Reference and specify
the application program which starts
automatically.
- If Canon MP Toolbox is installed, a name of executable file (extension ".exe”) of Canon MP
Toolbox is shown.
- You can select the application program in the [Optional Setting] dialog box also.
8.
Click Finish.
The PRICOM USB Utility installation is complete. The next section will explain how to configure
the PRICOM USB Utility.
Scanner Server
4-5
Users Manual CX2
Use the PRICOM USB Utility
Start the PRICOM USB Utility and configure it to use scanner via the network.
1.
Click start - All Programs - PRICOM
USB Utility - PRICOM USB Utility.
When using the PRICOM USB Utility
for the first time, the screen to the right
is displayed. Click Yes.
- When clicking No in the screen
shown above, the server registration
screen needs to be opened manually.
Click Register when the main screen
to the right is opened.
2.
Click Search to display the C-6400W
on the network. Find the C-6400W to
be registered. Then click Register.
- The registered server name can be
changed. The default is IP address.
Scanner Server
Click Search.
4-6
Users Manual CX2
3.
Connect your PC to the C-6400W.
Click Connect.
- When clicking Connect, your PC can
detect the USB scanner over the
network.
4.
The network connection has been
established between your PC and the
USB scanner. Verify that the status
has changed to connecting.
- Do not disconnect the USB cable or
click Disconnect in the PRICOM
USB Utility while the scanner is in
use. This may cause the PC or the
scanner to become unstable. If either
happens, restart the C-6400W,
scanner, and PC and then use them
again.
- Your scanner can be used as a
network scanner with the bundled
utility such as TWAIN that comes with
your scanner.
Scanner Server
4-7
Users Manual CX2
5.
After using the scanner, click
Disconnect to terminate the
connection and close the PRICOM
USB Utility.
- The connection will be terminated
automatically if the network scanner
is not used for 10 minutes.
- If the network scanner is frequently
used, the icon of the USB utility can
be added to the task tray in Windows.
The network connection can be
established by clicking the icon in the
task tray.
- If It cuts automatically after an
application end is selected in the
optional setting dialog box, the
connection will be terminated
automatically when the application is
closed.
Scanner Server
4-8
Users Manual CX2
The PRICOM USB Utility
This section will explain the options available in the PRICOM USB Utility
The PRICOM USB Utility screen
When starting the PRICOM USB Utility, the main screen will appear.
<Main Screen>
Server to be connected
<Delete Screen>
Server name registered
Display the product to use.
Register button
Register a new PRICOM.
Delete button
Un- register a PRICOM C-6400W.
The delete screen will appear and allow you to select the product you want to
delete.
Server Status Selected
Display the selected server's current status.
Refresh button
Refresh the status information.
Main buttons
Disconnect/Connect button
Disconnect/Connect your PC to the PRICOM C6400W.
Option button
Bring up the option configuration screen.
Exit button
Exit the PRICOM USB Utility.
Scanner Server
4-9
Users Manual CX2
The Option Dialog
Click Option on the main screen to bring
up the Options screen.
<General>
Window configuration
Register at Startup
Register the USB Utility at startup (Default: OFF)
Start without Window
Minimize the USB Utility when started (Default: OFF). Minimized icon is displayed in
task bar.
Always display in front
Make the USB Utility the top window (Default: OFF). Another window with the same
setting could displace it from being on top.
Status refresh interval
Configure the status update interval time.(Default:10 seconds)
Option
Activate selected application when connected (Default: OFF).
Once connected, the USB Utility will automatically start the selected application.
It cuts automatically after an application end (Default: OFF).
When the selected application is closed the connection will automatically be closed.
- If you assign an application to be used with the scanner, all you will need to do is start the
application.
- If you assign an application to start automatically during the installation, the parameter options
will default to ON.
Scanner Server
4-10
Users Manual CX2
<Notification>
Notification
When the status of the scanner server changes, the PRICOM USB Utility can notify you by
message and/or by sound (Default: Message ON/Sound OFF).
"When changing mode from waiting to connecting"
Notify you when the PC connects to the scanner server.
"When changing mode from connecting to waiting"
Notify you when the PC disconnects from the scanner server.
"When changing mode from waiting to other users engaged"
Notify you when the scanner server is connected to another user.
"When changing mode from other users engaged to waiting"
Notify you when another user disconnects form the scanner server.
"When Communication error"
Notify you when the PC and the scanner server have a communication problem.
Display message
Check this for each message that you would like to receive.
Sound is used
Check this to activate the sound for the selected change in status.
You can select your favorite sound.
Scanner Server
4-11
Users Manual CX2
5, Storage Server
This section explains how to share a memory card in a Canon MFP's slot using NetBEUI and
NetBIOS over TCP/IP.
- Refer to the Canon MFP manual for information about compatible memory cards and how to
attach the card.
- The PRICOM C-6400W can connect to ONE Canon MFP.
Storage Server
5-1
Users Manual CX2
Initial set up
Install the PRICOM C-6400W and Canon MFP
The PRICOM C-6400W connect to a Canon MFP via a USB cable. The PRICOM C-6400W
communicates in a network environment.
- Do not disconnect the USB cable/Memory Card while accessing storage device.
-
The PRICOM C-6400W can connect to ONE Canon MFP.
Use a password to control access to the MEMORY_CARD.
File data in storage was assigned by NetBIOS of source PC.
You do not have to turn off the PRICOM to connect or disconnect a USB device.
A USB cable has 2 connector forms. Before connecting, make sure the form.
- Connect the PRICOM's USB Port directly to the Canon MFP.
Ethernet Hub
Access Point
C-6400W
Storage Server
Canon MFP
5-2
Users Manual CX2
Share the Memory Card Via the Network
In order to read/write to a memory card in a Canon MFP via the network, NetBEUI and Client
for Microsoft Networks must be on your PC.
Share the memory card in a Windows98/Me Environment
Verify the network configuration in Windows 98/Me (NetBEUI)
NetBEUI and Client for Microsoft Networks will need to be installed, if they are not already
installed.
1.
Select Start - Settings - Control Panel.
2.
Click Network icon of Control Panel.
3.
If NetBEUI and Client for Microsoft
Networks are not installed, click Add
to add them.
- If current network component list does not have NetBEUI protocol, click Add - Protocol Microsoft - NetBEUI.
- If current network component list does not have Client for Microsoft Networks, click Add Client - Microsoft - Client for Microsoft Networks.
Storage Server
5-3
Users Manual CX2
Verify the network configuration in Windows 98/Me (NetBIOS over TCP/IP)
Verify that Client for Microsoft Networks and TCP/IP are added in the Network configuration
on Windows 98/Me and NetBIOS over TCP/IP is enabled in TCP/IP in property.
1.
Select Start - Settings - Control Panel.
2.
Click Network icon of Control Panel.
3.
Verify that Client for Microsoft Networks and TCP/IP are added in Network
configuration.
- If the current network component list does not have TCP/IP protocol, click Add - Protocol Microsoft - TCP/IP.
- If current network component list does not have Client for Microsoft Networks, click the Add
- Client - Microsoft - Client for Microsoft Networks.
4.
Open TCP/IP properties, then select NetBIOS, then verify if I want to enable NetBIOS
over TCP/IP is checked.
- Generally, the default state is enabled.
Storage Server
5-4
Users Manual CX2
Open the memory card in a Windows 98/Me environment
1.
Connect a memory card to the Canon MFP's card slot.
2.
Click the Network Neighborhood icon on desktop, select Printservers in
WORKGROUP.
3.
Click the PRICOM's icon.
- The name will be displayed as Pr +
the last 6 digits of the Ethernet
Address.
- If your product's Ethernet Address is
00:80:92:0c:34:1f, our product's
computer name is Pr0c341f.
4.
Click the memory_card on memory
card folder.
Storage Server
5-5
Users Manual CX2
Share the memory card in a Windows 2000 Environment
Verify the network configuration in Windows 2000 (NetBEUI)
Verify that "NetBEUI Protocol" and "Client for Microsoft Networks" have been added in the
network configuration of Windows 2000.
1.
Select Start - Settings - Control Panel - Network and Dial-up Connections.
2.
View the properties of Local Area Connection.
3.
Click Properties on the main screen to bring up the properties screen.
4.
Verify that Client for Microsoft
Networks has been added.
- If Client for Microsoft Networks was
not displayed, click install and select
client - then Client for Microsoft
Networks.
5.
Verify that NetBEUI Protocol has
been added.
- If the NetBEUI Protocol was not
displayed, click the Install and select
Protocol then NetBEUI Protocol.
Storage Server
5-6
Users Manual CX2
Verify the network configuration in Windows 2000 (NetBIOS over TCP/IP)
Verify that Network - Internet Protocol(TCP/IP) - Client for Microsoft Networks has been
added as well as NetBIOS Internet Protocol(TCP/IP).
1.
Select Start - Settings - Control Panel - Network and Dial-up Connections.
2.
Open the properties of Local Area Connection.
3.
Click Properties on the main screen to bring up the Properties screen.
4.
Verify that Client for Microsoft Networks has been added.
- If you cannot find Client for Microsoft Networks in the list, click Install then select Client Client for Microsoft Networks.
5.
Verify that Internet protocol (TCP/IP) has been installed.
- If you cannot find Internet protocol (TCP/IP) in the list, click Install then select Protocol Internet Protocol(TCP/IP).
6.
Open Internet Protocol (TCP/IP) - Properties - Advanced - WINS tab, and make sure
the Enable NetBIOS over TCP/IP is selected.
- When receiving the TCP/IP settings automatically from DHCP, verify that the Use NetBIOS
setting from the DHCP server is selected.
Storage Server
5-7
Users Manual CX2
Open the memory card in a Windows 2000 environment
1.
Connect a memory card to the Canon MFP's card slot.
2.
Click My Network Places - Entire
Network, and open the Printservers
in workgroup.
3.
Click the PRICOM's icon.
- The name will be displayed as Pr +
the last 6 digits of the Ethernet
Address.
- If your product's Ethernet Address is
00:80:92:0c:34:1f, our product's
computer name is Pr0c341f.
4.
Click the MEMORY_CARD on
memory card folder.
Storage Server
5-8
Users Manual CX2
Share the memory card in a Windows XP environment
Verify the network configuration in Windows XP
Verify that NetBIOS in Internet Protocol (TCP/IP) on Windows XP, and Client for Microsoft
Networks have been added.
1.
Select start - Control Panel - Network
Connections.
2.
Open the properties of Local Area
Connection.
- If "Internet protocol(TCP/IP)" is not in
the list, click Install and add it from
protocol.
3.
Click Internet Protocol(TCP/IP), then
Properties, then Advanced, then WINS
and verify Default or Enable NetBIOS
over TCP/IP is selected for NetBIOS
configuration.
- When receiving the TCP/IP settings
automatically from DHCP, verify that
the Default is selected.
Storage Server
5-9
Users Manual CX2
4.
Make sure Client for Microsoft
Networks has been added.
- If you cannot find Client for
Microsoft Networks in the list, click
Install then select Client - Client for
Microsoft Networks.
- If you use NetBIOS over TCP/IP
protocol in Windows XP, uncheck
Protect my computer and .... in
Local Area Connection Properties
- detail setting.
Storage Server
5-10
Users Manual CX2
Open the memory card in a Windows XP environment
1.
Connect a memory card to the Canon MFP's card slot.
2.
Click My Network Places - View
workgroup computers - Microsoft
Windows Network, open the Print
servers in workgroup.
3.
Click the PRICOM's icon.
- The name will be displayed as Pr +
the last 6 digits of the Ethernet
Address.
- If your product's Ethernet Address is
00:80:92:01:04:34, our product's
computer name is Pr010434.
4.
Click the MEMORY_CARD on
memory card folder.
Storage Server
5-11
Users Manual CX2
6, Q&A
This section contains some Frequently Ask Questions (FAQ) and the corresponding answers.
For a more detailed and up to date FAQ refer to our web page: http://www.silex.jp/.
The main menu does not start after inserting the CD-ROM
1.
If your computer does not support Autorun, the menu will not start automatically. Execute
Autorun.exe in the root directory of the CD-ROM.
The PRICOM C-6400W is not found in the configuration utility
1. Check the following and retry.
- Verify that the PRICOM C-6400W is powered up. If the PIRCOM C-6400W Status LED is
not on, review the Hardware Installation section of this manual.
- Verify the Link LED is on.
- Verify the wireless settings are correct.
- If using more than one network interface card, disable the card not connected on the same
LAN segment as the PRICOM.
- Print the PRICOM self test then verify the IP address is compatible with the one on the PC.
2.
Restore factory defaults.
3.
For conducting the initial set up in Windows XP SP2 environment, be sure to disable the
Windows embedded firewall feature temporarily during the PRICOM configuration.
Select: Start . Control Panel . Security Center to disable firewall feature temporarily.
Please remember to enable the firewall feature, if desired, after completing the PRICOM
set up.
Q&A
6-1
Users Manual CX2
I cannot print
1.
Make sure the Link LED of the PRICOM C-6400W is on. If not, verify the following
settings.
- Does the PRICOM C-6400W turn on?
- Is the USB cable connected correctly?
[Infrastructure Mode]
- Are the SSID, Channel and WEP key correct ?
- Are the network cables for your PC and access point connected correctly?
- Are network cables for your PC and access point damaged ?
- Are the Link LED's for your PC and access point lighting ?
- Is the Ethernet HUB working correctly?
- If you can use the TCP/IP protocol, use the ping command to verify the proper response
from the IP address assigned to the PRICOM C-6400W. If the PRICOM C-6400W does
not respond, it is possible the IP address is incorrect. Restore factory defaults in the
PRICOM C-6400W and configure the IP address again.
Example) Execute the ping on MS-DOS of Windows 98
To execute the ping XXX.XXX.XXX.XXX command click Start - Program - MS-DOS
prompt, then enter the ping command (XXX.XXX.XXX.XXX is IP address for the PRICOM).
<Response from ping>
Reply from XXX.XXX.XXX.XXX:bytes=32 time=58ms TTL=253
Reply from XXX.XXX.XXX.XXX:bytes=32 time=58ms TTL=253
Reply from XXX.XXX.XXX.XXX:bytes=32 time=58ms TTL=253
Reply from XXX.XXX.XXX.XXX:bytes=32 time=58ms TTL=253
<Response from ping>
Request timed out.
Request timed out.
Request timed out.
Request timed out.
2.
3.
4.
Try to login using telnet. If you cannot login to the PRICOM C-6400W, you may not
have assigned the IP address correctly. Verify the desired IP address for the PRICOM
C-6400W and change the configuration.
If the PC and the PRICOM C-6400W are not on the same segment, you should configure
the subnet mask and gateway address in the PRICOM C-6400W. This can be done
using the PRICOM User Software CX2.
Make sure that the printer port name of the PRICOM C-6400W is displayed behind
PRICOM -Print CX2 TCP Port.
Q&A
6-2
Users Manual CX2
Occasionally I cannot print
1.
If a DHCP/BOOTP server or RARP server resides on the network, the IP addresses
are assigned automatically, which may rewrite the IP address that you have manually
assigned to the PRICOM C-6400W. To avoid this problem, tick off Use DHCP/BOOTP
check box and configure the IP address again.
I cannot print in LPR
1.
LPR printing cannot be used with the Canon printer. Refer to our web page in more
information.
How can I return to factory default?
1.
Factory default is restored by holding down the push-button switch for 15 seconds while
powering up.
I cannot use the BJ print monitor
1.
2.
3.
4.
If you can use the LPR function of Windows 2000, Windows XP you cannot use the
monitor function of Canon print driver.
Old Canon printer drivers may not have BJ status monitor function, download the latest
Canon driver from Canon web page.
The PRICOM C-6400W may not support to BJ status monitor, refer to our web page.
If you can use BJ status monitor click Start - Program - BJ laser printer - BJ Printer
Monitor in Windows and select manual, or automatic mode.
I cannot configure in the AdHoc mode
1.
You can change to infrastructure mode by using the push-button switch.
If you want to change to infrastructure mode, refer to 2, PRICOM C-6400W - Start in
Infrastructure mode.
Q&A
6-3
Users Manual CX2
I cannot use Memory card via network
1. Check the following and retry.
- Can you use the card in another Canon MFP?
- Is the memory card supported in the Canon MFP?
- Is the memory card attached to the card slot in the Canon MFP?
- Did you finish the PRICOM C-6400W configuration?
- Is memory card locked?
- Does the memory card have space to write?
- If you need a password to open the folder, did you put in the correct password?
I cannot use the scanner
1. Check the following and retry.
- Is the PRICOM C-6400W turned on?
- Is the PRICOM USB Utility installed?
- One the PRICOM USB Utility connects to the PRICOM C-6400W?
- Is the scanner driver installed?
Q&A
6-4
Users Manual CX2
Appendix
How to use USB memory
This section will explain how to configure the PRICOM C-6400W by using USB memory.
By connecting USB memory to the PRICOM C-6400W, the wireless and TCP/IP settings
saved on the USB memory will configure the PRICOM C-6400W.
Save the wireless and TCP/IP settings for the PRICOM C-6400W to
use USB memory
Once the settings are saved to USB memory, the USB memory can be used to configure the
PRICOM.
- To configure the PRICOM C-6400W in Windows 2000, Windows XP you must have Administrator
rights.
- This functionality requires software version 1.2.0 or newer.
1.
Start the PRICOM User Software CX2.
- If the screen dose not appear
automatically, execute Autorun .exe
from the CD-ROM.
2.
Click PRICOM Setup. The screen on
the right will appear. Check Setup
PRICOM by USB memory then click
Next.
Appendix
1
Users Manual CX2
3.
Click Yes, if you agree to the
SOFTWARE LICENSE AGREEMENT.
- If you do not agree to the license
agreement, you cannot use our
products.
4.
Connect the USB memory to the PC,
click Next.
- Refer the USB memory documentation.
5.
Select the USB memory drive, click
Next.
6.
Configure the TCP/IP parameters, click
Next.
Appendix
2
Users Manual CX2
7.
Configure the wireless parameters,
click Next.
8.
Verify each parameter. Click Execute.
The parameters will be saved to the
USB memory.
9.
Remove the USB memory from your
PC. Click Next.
10 Disconnect the AC adapter from the
PRICOM C-6400W. Attach the
Memory card to the USB port of the
PRICOM C-6400W.
Appendix
3
Users Manual CX2
11. Connect the USB memory to the
PRICOM C-6400W, and boot the
PRICOM C-6400W. Click Next.
- The PRICOM C-6400W will read the
configuration saved on USB memory
and then will reboot. The PRICOM C6400W will take about 15 seconds to
reboot. Do not disconnect the USB
memory while rebooting.
12. Check the LED status. Click Next.
- The LED status will depend on the
configuration. Verify the correct
configuration.
The PRICOM C-6400W configuration is complete. You can continue to install the PRICOMPrint CX2. Or, the PRICOM USB Utility. If you are done, click Finish to quit the wizard.If you
reinstall the PRICOM-Print CX2, to a PC which has already installed the PRICOM-Print
CX2, you can use the printer port, which you have already created.
If you continue to install Print application, follow step 13.
- If you select Cancel and quit the wizard, you can install the print application later directly form
the menu screen.
Appendix
4
Users Manual CX2
13. Click Next.
- If you check PRICOM USB Utility,
you can install the PRICOM USB
Utility after installing the PRICOMPrint CX2. Refer to 4. Scanner
Server for instructions on how to
install the PRICOM USB Utility.
14. Click Next.
15. Verify the install folder. Click Next.
- The default folder is "c:\Program
Files\silex technology\PRICOM-Print
CX2". To select a another folder click
the Browse button.
Appendix
5
Users Manual CX2
16. Verify the group name, click Next.
- The default group name is the
PRICOM- Print CX2. You can change
the name to anything you want.
17. Click Start.
18. After the set up preparations are
finished, click Finish.
Appendix
6
Users Manual CX2
19. The PRICOM-Print CX2 for print
configuration starts, click Next.
20. Select the PRICOM, that you want to
set up, and click Next.
21. Assign the printer port name and click
Next.
22. I n t h e n e x t s t e p , t h e s e l e c t e d
configuration will be displayed for you
to check. If the configuration is correct,
click Finish to implement it.
Appendix
7
Users Manual CX2
23. Select the printer driver for the printer
attached to the PRICOM C-6400W.
Click Next.
- If you have not yet installed the printer
driver, select Do not select printer,
click Next. It is possible to install the
printer driver later and create the
printing port.
24. Click Finish.
25. Click Finish.
The PRICOM C-6400W configuration is complete. Restart your PC, and try a TEST print.
If you set up another PC, you do not need to configure the PRICOM C-6400W. Select [(3)Print
Utility Setup] on menu screen and install the PRICOM- Print CX2.
Appendix
8
Users Manual CX2
Write configuration information using an editor.
1. Connect the USB memory your PC.
2. Description of configure file.
You can create a description file in Windows notepad.
The following is a description of the format.
Format
---------------------------------------------------------------silex
Wireless Mode = 1
SSID = GROUP
Channel = 11
USE WEP = 0
WEP Key = 00000000000000000000000000
DHCP/BOOTP = 1
RARP = 1
IP Address = 0.0.0.0
Subnet Mask = 0.0.0.0
Default Gateway = 0.0.0.0
---------------------------------------------------------------- You should write silex in first line of the file.
- A file edited incorrectly in notepad may be not supported.
- Each parameter is specified by parameter name = parameter and enter.
Configure
Name
Wireless Mode
SSID
Wireless Channel
USE WEP
WEP Key
DHCP/BOOTP
RARP
TCP/IP IP Address
Subnet Musk
Default Gateway
Parameter
0:OldAdHoc, 1:AdHoc, 2:Infra
1--14
0:NONE, 1: 64bit, 2:128bit
10 or 26 line hex(0-9, a-f)
0:Desable, 1:Enable
0:Desable, 1:Enable
0.0.0.0-255.255.255.255
0.0.0.0-255.255.255.255
0.0.0.0-255.255.255.255
- The function is limited in using USB memory.
Appendix
9
Users Manual CX2
3. File name
If you create the configuration file using an editor, save as [config.txt] or cfgxxxxxx.txt. (xxxxxx
is last 6 digits of the Ethernet Address for the PRICOM C-6400W).
Example for saving the configure file
1. Save [config.txt].
2. If this product’s MAC address is [00:80:92:34:c0:19], your file name is [cfg34c019.txt].
- If you have a lot of PRICOM C-6400W on your network, you create several files using the
[cfgxxxxxx.txt] format in an editor to save time.
- When both a config.txt file and a cfgxxxxxx.txt file exist in USB memory, the second file that
includes the Ethernet address will be the selected file.
4. Saved file
Save to file in the root directory of USB memory.
5. Refer to the section 3-4 page 10-12 for instructions on how to configure the PRICOM
C-6400W.
6. Select [(3)Print Utility Setup] from the User Software CX2, and refer to section 5-8 page
14-24 for more details.
Appendix
10
Users Manual CX2
Using a standard OS print client
This section explains how to print using the Windows print function.
- If you use the Windows printing function, you cannot use the Canon printer driver monitor
function.
- To configure the PRICOM C-6400W in Windows 2000, Windows XP you must have Administrator
rights.
Appendix
11
Users Manual CX2
Print using the Windows 2000, Windows XP Standard TCP/IP port
- The following example used Windows XP. If you use Windows 2000, the screens will be different.
- To configure the PRICOM, you must be Administrator.
1.
Click start - Control Panel - Printers
and Faxes - Add a printer to start the
wizard to add a printer. Then click
Next.
- If you use Windows 2000, Click Start
- Settings - Control Panel - Printers.
Then click the Add Printer icon.
2.
Select Local printer attached to this
computer. Be sure to remove a check
mark from the Automatically detect
and install my Plug and Play printer.
Click Next.
- If you use the Windows 2000, select
Local Printer. And be sure to remove
a check mark from the Automatically
detect and install my Plug and Play
printer.
3.
Check the Create a new port, and
select Standard TCP/IP Port. Click
Next.
Appendix
12
Users Manual CX2
4.
Click Next.
5.
Input the IP address for the printer
name . If you do not want to assign a
port name, use the default name
(IP_xxx.xxx.xxx.xxx).
6.
Select Custom and then click
Settings.
Appendix
13
Users Manual CX2
7.
Select LPR, check the LPR and input
lp in Queue name and check LPR
Byte Counting Enabled. Click OK.
- The OK will return you to number 6.
Click Next.
8.
Click Finish.
9.
Select the printer driver. Click Next.
Appendix
14
Users Manual CX2
10. If Use existing Driver appears, select
Keep existing driver (recommended)
or Replace existing driver. Click
Next.
- If you have not installed the latest
driver, select Replace existing driver.
11. Select default printer. Click Next.
12. Select whether to Share name or Do
not share this printer. If you select
Share name, you can type printer
name you want to use. Click Next.
- If the printer is shared with other
computers in the same network,
select Do not share this product.
Appendix
15
Users Manual CX2
13. Select Yes to print a test print. Click
Next.
14. Verify the configuration and click
Finish. If test print has been printed,
the configuration was successful.
Appendix
16
Users Manual CX2
Print using the Windows 2000 LPR port
- If you use a LPR port to print, you will need to add the LPR Port. Open the start - Settings Control Panel - Add or Remove Programs. Click the Add/Remove Windows Components.
Windows components are displayed, select other Network file and Printing service - Detail UNIX printing service, and click the OK. Click finish. The LPR port software has been added.
1.
Click Start - Settings - Control Panel
- Printers. Click the Add Printer icon.
the Add Printer wizard will appear.
Click Next.
2.
Select Local printer in printer
connection. Be sure to remove a check
mark from the Automatically detect
and install my Plug and Play printer.
Appendix
17
Users Manual CX2
3.
Check Create a new port in select the
printer port. Select LPR Port and click
Next.
- If you have already created the port,
select the created port. Click Next.
4.
Input the IP address of the PRICOM
for server name, input lp for the queue
name. Click OK.
5.
Select an appropriate printer in the list
and click Next.
6.
If Use existing Driver appears, select
Keep existing driver (recommended)
or Replace existing driver. Click
Next.
Appendix
18
Users Manual CX2
7.
Enter a printer name. Select whether
this will be the default printer or not.
Click Next.
8.
Select whether or not to share the
printer and click Next.
9.
Select Yes to print a Test page. Click
Next.
Appendix
19
Users Manual CX2
10. Verify the proper configuration, and
click Finish. If test page has been
printed, set up is completed.
Appendix
20
Users Manual CX2
Print using the Windows XP LPR port
- In order to print using a LPR, the LPR port must be added. Go to start-Control Panel-Add or
Remove Programs-Add/Remove Windows Components and open Windows Components
Wizard. In Components, select Other Network File and Print Services, click Details, select
Print Services for Unix and click OK. Windows Components Wizard will be displayed, and
then click Next. After the component is added, click Finish. The LPR port is now added.
1.
Go to start-Control Panel-Printers
and Faxes and click Add a printer
and start the wizard. Click Next.
2.
Select Local printer attached to this
computer. Be sure to remove a check
from the Automatically detect and
install my Plug and Play printer.
Click Next.
Appendix
21
Users Manual CX2
3.
Select Create a new port in Select a
Printer Port and create a new port.
Select LPR Port and click Next.
- If the destination print port was
created when installing the PRICOM,
select the port from Use the
following port and click Next.
4.
At Name or address of server
providing lpd, type in the IP address
which was set to the PRICOM. At
Name of printer or print queue on
that server, add lp and click OK.
5.
At Install Printer Software, select the
printer driver to be used. Click Next.
6.
If Use existing Driver appears, select
Keep existing driver (recommended)
or Replace existing driver. Click
Next.
Appendix
22
Users Manual CX2
7.
At Name your printer, add the printer
name to be used in Windows XP.
Select whether to use this printer as a
default printer or not, then click Next .
8.
Select Share name or Do not share
this printer according to your
environment on the Printer Sharing.
If the printer is shared, type a share
name. Click Next.
9.
At the Print test page, select Yes.
Click Next.
10. The information of the configuration will
be listed. If there are no mistakes, click
Finish. The new printer will be added
to the list. If the test print is correct,
the printer set up is complete.
Appendix
23
Users Manual CX2
Print Using the Windows 2000, Windows XP IPP port
This section will explain how to print using IPP in Windows environments.
- To configure you shouted log in as Administrator.
- The example is for Windows XP. If you use Windows 2000, the screens may be different.
1.
Select start - Control Panel - Printers
and Faxes. Click Add a printer. the
add wizard will appear.
- If you use the Windows 2000, Open
the Start - Settings - Control Panel
- Printers. Click the Add Printer icon.
2.
Select A network printer, or a printer
attached to another computer.
- If you use the Windows 2000, Select
Network printer.
Appendix
24
Users Manual CX2
3.
Select Connect to a printer on the
Internet or on a home or office
network. And enter the IP address or
the URL for the PRICOM port. Click
Next.
Example:
URL is [abc.com]
http://abc.com/ipp/lp else http://abc.com/ipp
IP address is 192.168.85.55
http://192.168.85.55/ipp/lp else http://192.168.85.55/ipp
- If you use the Windows 2000,
Occasionally a Printer connections
screen will appear. If so, click OK.
4.
Select the printer driver you want to
use. Click Next.
5.
Select whether or not this is the default
printer. Click Next. Click Finish to
complete adding the printer.
- If you use IPP printing, your PC will needed to be configured for proper proxy server setting to
print via internet. If you use the Internet Explorer4/5, right click the internet in start menu. Open
the Internet proxy, select the connection - configure LAN. And configure the proxy server.
Appendix
25
Users Manual CX2
Connect to the PRICOM C-6400W from a Web
browser
It is possible to view the parameters of the PRICOM C-6400W or printer status via web
browser.
- To connect to the PRICOM C-6400W via Web browser, An IP address must have been already
assigned to the PRICOM C-6400W.
- You cannot do the initial setting via Web browser.
Connect to the PRICOM C-6400W
Load your web browser, and enter the IP address of the PRICOM C-6400W in address bar.
If the PRICOM C-6400W’s IP address is
192.168.85.55, input the http://
192.168.85.55/.
- We recommend to use Netscape Navigator 4.0 or InternetExplorer4.0 later. If you use the another
web browser, it must support HTTP 1.0(RFC1945) and HTML2.0(RFC1866).
- The screen may vary.
Appendix
26
Users Manual CX2
The PRICOM C-6400W HTTP screen
<Printer Status>
The printer status is displayed as well as the
printer name.
<System Status>
The set up parameters for the PRICOM
C-6400W are displayed.
Appendix
27
Users Manual CX2
<PrintServer>
The parameters can be changed for the
PRICOM C-6400W from web browser.
- Input root for the username then
click OK, or enter the password if
you have created one. The default
is no password (Blank).
- Restart the C-6400W when the
parameters are changed.
<Restart PrintServer>
If you are done, select Yes, the PRICOM
C-6400W is restarted.
Appendix
28
Users Manual CX2
<Factory Default>
If you select Yes, the PRICOM C-6400W
is restored to factory default.
<silex technology,Inc.>
You can access to our web page from the
link. If you have any questions, visit our
web site for support information.
Appendix
29
Users Manual CX2
Other functions
This chapter explains other functions about the PRICOM C-6400W. A web browser or TELNET
is required for configuration.
- For further details on how to use the PRICOM C-6400W Web browser, TELNET or the procedure
to change the PRICOM C-6400W configuration, refer to "Connect to the PRICOM C-6400W
from a Web browser" or "TELNET" in this section.
IP filtering
The PRICOM can define scopes of IP addresses to allow or deny communication. When
setting up for "DENY", communications from the designated IP address scope will be prohibited.
When setting up "ALLOW", communication will be allowed only from the designated IP
addresses. Up to 4 IP address scopes can be registered for the DENY/ALLOW functions. IP
filtering can protect illegal access from unexpected network client users.
(Example)
To allow access from the IP address scope between 192.168.20.1-192.168.20.50 using a web browser;
1.
Log in to the PRICOM via a web
browser, then go to the "TCP/IP" tab.
2.
Enter the necessary parameters at "IP
filter Configuration" in the "TCP/IP"
item. For this case, enable "ALLOW"
at the Filter Mode, then enter
192.168.20.1 and 192.168.20.50 for
both "Start Address" and "End
Address" area respectively.
Appendix
30
Users Manual CX2
TELNET
After the IP address has been configured, you can configure the TCP/IP, SNMP parameters in the PRICOM C6400W using TELNET. You can configure the PRICOM C-6400W using a command line. The following is
example for each menu.
- The default login name = root, Password = (none))
- The following is an example of TELNET.
PRICOM C-6400W Ver x.x.x TELNET server.
Copyright (C) 2003 silex technology, Inc.
login: root
'root' user needs password to login.
password:
User 'root' logged in.
No. Item
Value
(level.1)
---------------------------------------------------------------------1 : Configure General
2 : Configure TCP/IP
3 : Configure NetBEUI/NetBIOS
4 : Configure SNMP
96 : Display Status
97 : Reset Settings to Defaults
98 : Restart Print Server
99 : Exit
Please select(1 - 99)?
Appendix
31
Users Manual CX2
- An example of Configure General menu[1]
No. Item
Value
(level.2)
---------------------------------------------------------------------1: Change root Password : "*******"
2: Local Time Zone
: "+9:00"
3 : Configure Wireless LAN
99 : Back to prior menu
Please select(1 - 99)?
- An example of Configure Wireless LAN menu[2]
No. Item
Value
(level.3)
---------------------------------------------------------------------1 : Wireless Mode
: Infra.
2 : SSID
: "GROUP"
3 : Channel
: 11
4 : Use WEP
: None
5 : WEP Key
: "**************************"
99 : Back to prior menu
Please select(1 - 99)?
- An example of Configure TCP/IP[3]
No. Item
Value
(level.2)
---------------------------------------------------------------------1 : DHCP/BOOTP
: ENABLE
2 : RARP
: ENABLE
3 : IP Address
: 0.0.0.0
4 : Subnet Mask
: 0.0.0.0
5 : Default Gateway
: 0.0.0.0
6 : WINS
7 : IP Filter Config
99 : Back to prior menu
Please select(1 - 99)?
Appendix
32
Users Manual CX2
- An example of WINS[4]
No. Item
Value
(level.3)
---------------------------------------------------------------------1 : Primary Server
: 0.0.0.0
2 : Secondary Server
: 0.0.0.0
3 : Scope ID
: ""
99 : Back to prior menu
Please select(1 - 99)?
- An example of IP Filter Config[5]
No. Item
Value
(level.3)
---------------------------------------------------------------------1 : Filter Mode
: DENY
2 : Filter #0 Start Address : 0.0.0.0
3 : Filter #0 End Address
: 0.0.0.0
4 : Filter #1 Start Address : 0.0.0.0
5 : Filter #1 End Address
: 0.0.0.0
6 : Filter #2 Start Address : 0.0.0.0
7 : Filter #2 End Address
: 0.0.0.0
8 : Filter #3 Start Address : 0.0.0.0
9 : Filter #3 End Address
: 0.0.0.0
99 : Back to prior menu
Please select(1 - 99)?
- An example of Configure NetBEUI/NetBIOS[6]
No. Item
Value
(level.2)
---------------------------------------------------------------------1 : NetBEUI Protocol
: ENABLE
2 : NetBIOS over TCP
: ENABLE
3 : Computer Name
: "PR0016BB"
4 : Workgroup
: "PRINTSERVERS"
5 : Comment
: "PRICOM C-6400W"
6 : Browse Master
: ENABLE
99 : Back to prior menu
Please select(1 - 99)?
Appendix
33
Users Manual CX2
- An example of Configure SNMP[7]
No. Item
Value
(level.2)
---------------------------------------------------------------------1 : Authentic Community
: "***************"
2 : Trap Community
: "public"
3 : Trap Address(IP)
: 0.0.0.0
4 : SysContact
: ""
5 : SysName
: ""
6 : SysLocation
: ""
7 : EnableAuthenTrap
:2
99 : Back to prior menu
Please select(1 - 99)?
- An example of Display Status[96]
Display Status
1 : prn1
2 : system
99 : Back to prior menu
Please select(1 - 99)?
- An example of executing prn1[96-1]
prn1:
Ready
- An example of executing system[96-2]
C-6400W Version x.x.x
TCP/IP status
IP address
: 0.0.0.0
Subnet Mask
: 0.0.0.0
Gateway addr
: 0.0.0.0
Wireless LAN status
: AP connected
Current SSID
: GROUP
Current BSSID
: 00:60:B3:6F:C0:FD
Current Channel
: 11
Appendix
34
Users Manual CX2
- An example of executeing Reset Settings to Defaults[97]
Reset Settings to Defaults
1 : YES
2 : NO
Please select(1 - 2)?
- An example of restarting Print Server Settings[98]
Restart Print Server
1 : YES
2 : NO
Please select(1 - 2)?
- An example of exiting [99]
Exit
1 : Save and Restart
2 : Save and Exit
3 : Exit without Saving
99 : Back to prior menu
Appendix
35
Users Manual CX2
Check and Verification of the PRICOM C-6400W
Setting the PRICOM C-6400W parameters
This section explains the parameters in the PRICOM C-6400W.
- General parameter
Topic
Change root Password
Local Time Zone
AdHoc
Explain
Please enter the password(in ASCII TEXT). This password
will be used for configuration changes via Telnet, Web page
and Set up Tools
Local Time Zone is specified.
Ad hoc is called 802.11Ad hoc. Generally, it used PC to PC
communication. When they connect, they use SSID
Wireless Mode
Wireless LAN
none
+9:00
AdHoc
OldAdHoc
Infra
SSID
Channel
Use WEP
WEP Key
Appendix
Factory Default
When they connect, they use SSID
Connection mode via access point
SSID is ID to connect to each device
Channel is band to communication each device
Enable/Disable WEP operations. WEP is the one of
encryption.
64/128bit
GROUP
11
None
00000000000000000000000000
36
Users Manual CX2
- TCP/IP parameter
Topic
DHCP/BOOTP
RARP
IP Address
SubnetMask
Default Gateway
Primary Server
W INS
Secondary Server
Scope ID
Filter Mode
IP Filter Config
Filter #0 Start address
Filter #0 end address
Filter #1 Start address
Filter #1 end address
Filter #2 Start address
Filter #2 end address
Filter #3 Start address
Filter #3 end address
Explain
Enable/Disable DHCP/BOOTP protocol operations.
DHCP/BOOTP is a protocol, via which IP address gets
assigned by the BOOTP server or DHCP server. If you
use
DHCP/BOOTP server, the DHCP/BOOTP server must
be in the same segment as the print server. This print
server detects DHCP and BOOTP automatically. If
more than 1 address get returned, the IP address
which is returned first will be used.
Enable/Disable RARP protocol operations. RARP is a
protocol, via which IP address gets assigned by the
RARP server. If you use RARP server, the RARP
server must be in the same segment as the print
server.
Setting the Print Server IP address. The IP address
must be 4 numbers, each between 0-255 (eg.
192.168.100.10).
Setting the print server subnet mask. The subnet mask
must be 4 numbers, each between 0-255 (eg.
255.255.255.0). However, entering 0.0.0.0 would not be
valid, and the subnet mask corresponding to the IP
address would be used automatically.
Setting the default gateway address. The default
gateway address must be 4 numbers, each between 0255 (eg. 192.168.100.240). If you use a gateway, the
gateway must be in the same segment as the print
server. However, entering 0.0.0.0 would not be valid.
Setting the W INS server (primary) address. W INS
server will resolve the IP address from the host name.
Therefore you can use a hostname instead of the IP
address when printing. The values must be 4 numbers,
each between 0-255 (eg. 192.168.100.10).
Setting the W INS server (secondary) address. W INS
server will resolve the IP address from the host name.
Therefore you can use a hostname instead of the IP
address when printing. The values must be 4 numbers,
each between 0-255 (eg. 192.168.100.10).
The scoop ID defines the computer group that
recognized the registered host name.
Setting of IP filter operations. Available options are
"allow" and "deny". If you select "allow", only the data
from the set IP address range are accepted. If you
select "deny", the data from the set IP address range
cannot be received.
Setting IP filter range. IP addresses to be filtered can be
set to maximum 4 address ranges. If address range
setting is not required, please enter the address range
from "0.0.0.0" to "0.0.0.0".
Factory Default
ENABLE
ENABLE
0.0.0.0
0.0.0.0
0.0.0.0
0.0.0.0
0.0.0.0
none
DENY
0.0.0.0
0.0.0.0
0.0.0.0
0.0.0.0
0.0.0.0
0.0.0.0
0.0.0.0
0.0.0.0
- Communication from a designated range of IP addresses can be blocked when Filter Mode is set
to “DENY.” On the other hand, when Filter Mode is set to “ALLOW,” communication from only a
designated range of IP addresses can be enabled.
Appendix
37
Users Manual CX2
- NetBEUI/NetBIOS parameter
Topic
Explain
Factory Default
NetBEUI Protocol Enable/Disable NetBEUI protocol operations
ENABLE
NetBIOS over TCP Enable/Disable NetBIOS over TCP protocol operations
ENABLE
Specify a computer name. The name set here is shown
PRxxxxxx
Computer Name as a computer in W indows Explorer. The name must
xxxxxx is lower 6 digits
be different from those of other computers.
of Ethernet Address
Specify the workgroup that this print server belongs to.
Enter the default workgroup name or an existing
W orkgroup
PRINTSERVERS
workgroup name. A new workgroup name that does not
exit in the network is not shown as W orkgroup.
Set the description of the print server. The information
Comment
set here is shown as the description of the print server
PRICOM C-6400W
in W indows Explorer.
Brower Master
Enable/Disable Brower Master operations
ENABLE
- SNMP parameter
Topic
Explain
Specify the authentication community name of SNMP.
Authentic Community This community name is authenticated when an SNMP
set request is received.
Specify the trap community of SNMP. This community
Trap Community
name is used when the print server send a trap.
Specify the destination IP address of the SNMP trap.
The value is a four-part series of numbers separated by
Trap Address(IP) decimal points. Such as "xxx.xxx.xxx.xxx". When the
value is "0.0.0.0"(default), this item is disabled and a
trap will not be generated in any case.
Specify the SysContact of the MIB-2 object. The e-mail
SysContact
address of the network administrator is used.
Specify the SysName of the MIB-2 object. The host
SysName
name or domain name of the print server is used.
Specify the SysLocation of the MIB-2 object. The
SysLocation
location of the print server is used.
Select whether to allow or disallow the "Enable Authen
Trap" of the MIB-2 object. If a violation for the
Enable Authen Trap
community occurs "allow" is the setting, the SNMP trap
is sent to the IP address specified in "TRAP Address"
Appendix
Factory Default
public
public
0.0.0.0
none
none
none
2
38
Users Manual CX2
User Registration
For future technical support, we recommend you to register with us as a user on-line at:
Global Site;
USA Site;
EU Site;
User Registration
http://www.silex.jp/register/
http://www.silexamerica.com/us/regist/index.html
http://www.silexeurope.de/euro/regist/index.html
1