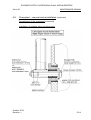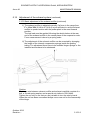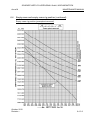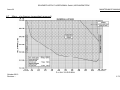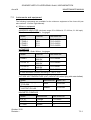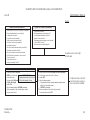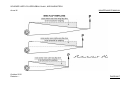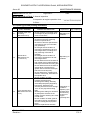
1
SCHEMPP-HIRTH FLUGZEUGBAU GmbH., KIRCHHEIM/TECK
MAINTENANCE
MANUAL
for powered sailplane model
ARCUS M
Edition:
October 2012
Registr.-No.:
Serial-No:
Manufacturer:
Schempp-Hirth
Flugzeugbau GmbH.
73230 Kirchheim/Teck
Owner:
The translation of this manual has been done using best knowledge and judgment.
In any case of doubt the original text in German language is authoritative
SCHEMPP-HIRTH FLUGZEUGBAU GmbH., KIRCHHEIM/TECK
Arcus M
WARTUNGSHANDBUCH Ausgabe Oktober 2012
MAINTENANCE MANUAL issue October 2012
0.1 Erfassung der Berichtigungen / Record of Revisions
Lfd.Nr.
Rev.No.
Benennung
Reference
Seite
Page
Datum
Date
MB: Modification Bulletin – Änderungsblatt
TN: Technical Note – Technische Mitteilung
Hinweis:
Note:
Nicht eingefügte Berichtigungen sind zu streichen.
Das Verzeichnis der Seiten ist gegebenenfalls handschriftlich zu aktualisieren
Cross out revisions which are not included.
The list of effective pages must be amended by hand if necessary.
0.1.1
SCHEMPP-HIRTH FLUGZEUGBAU GmbH, KIRCHHEIM/TECK
Arcus M
WARTUNGSHANDBUCH / MAINTENANCE MANUAL
0.2 Verzeichnis der Seiten / List of effective pages
Seite / Page
Datum / Date
Bezug / Reference
0.1.1
0.2.1
0.2.2
0.2.3
0.2.4
0.2.5
0.3.1
0.3.2
0.3.3
October 2012
October 2012
October 2012
1.1
1.2.1
1.2.2
1.2.3
1.2.4
1.3
1.4
October 2012
October 2012
October 2012
October 2012
October 2012
October 2012
October 2012
2.1.1
2.1.2
2.2.1
2.2.2
2.2.3
2.2.4
2.3
2.4
October 2012
October 2012
October 2012
October 2012
October 2012
October 2012
October 2012
October 2012
ÄB/MB: Änderungsblatt – Modification Bulletin
TM/TN: Technische Mitteilung – Technical Note
0.2.1
SCHEMPP-HIRTH FLUGZEUGBAU GmbH, KIRCHHEIM/TECK
Arcus M
WARTUNGSHANDBUCH / MAINTENANCE MANUAL
0.2 Verzeichnis der Seiten / List of effective pages
Seite / Page
Datum / Date
3.1.1
3.1.2
3.1.3
3.2.1
3.2.2
3.2.3
3.2.4
3.2.5
3.3.1
October 2012
October 2012
October 2012
October 2012
October 2012
October 2012
October 2012
October 2012
October 2012
4.1
4.2.1
4.2.2
4.2.3.1
4.2.3.2
4.3.1
4.4.1
4.4.2
October 2012
October 2012
October 2012
October 2012
October 2012
October 2012
October 2012
October 2012
5.1.1
5.1.2
5.2.1
5.2.2
5.3
5.4.1
5.4.2
5.4.3
October 2012
October 2012
October 2012
October 2012
October 2012
October 2012
October 2012
October 2012
Bezug / Reference
ÄB/MB: Änderungsblatt – Modification Bulletin
TM/TN: Technische Mitteilung – Technical Note
0.2.2
SCHEMPP-HIRTH FLUGZEUGBAU GmbH, KIRCHHEIM/TECK
Arcus M
WARTUNGSHANDBUCH / MAINTENANCE MANUAL
0.2 Verzeichnis der Seiten / List of effective pages
Seite / Page
Datum / Date
5.5.1.1
5.5.2.1
5.5.2.2
5.5.3.1
5.5.4.1
5.5.5.1
5.5.5.2
5.5.5.3
5.5.6.1
5.5.6.2
5.5.6.3
5.5.6.4
5.5.6.5
5.5.6.6
5.5.7.1
5.5.8.1
5.5.8.2
5.6.1.1
5.6.1.2
5.6.2.1
5.7
5.8.1
5.8.2
5.8.3
5.8.4
5.8.5
5.9.1
5.9.2
5.9.3
5.9.4
5.10.1
5.10.2
5.10.3
October 2012
October 2012
October 2012
October 2012
October 2012
October 2012
October 2012
October 2012
October 2012
October 2012
October 2012
October 2012
October 2012
October 2012
October 2012
October 2012
October 2012
October 2012
October 2012
October 2012
October 2012
October 2012
October 2012
October 2012
October 2012
October 2012
October 2012
October 2012
October 2012
October 2012
October 2012
October 2012
October 2012
Bezug / Reference
ÄB/MB: Änderungsblatt – Modification Bulletin
TM/TN: Technische Mitteilung – Technical Note
0.2.3
SCHEMPP-HIRTH FLUGZEUGBAU GmbH, KIRCHHEIM/TECK
Arcus M
WARTUNGSHANDBUCH / MAINTENANCE MANUAL
0.2 Verzeichnis der Seiten / List of effective pages
Seite / Page
Datum / Date
5.11.1.1
5.11.2.1
5.11.3.1
5.11.3.2
5.11.3.3
5.12.1
5.12.2
5.12.3
5.12.4
5.13.1
5.14.1.1
5.14.2.1
5.14.2.2
5.15.1.1
5.15.2.1
5.15.2.2
October 2012
October 2012
October 2012
October 2012
October 2012
October 2012
October 2012
October 2012
October 2012
October 2012
October 2012
October 2012
October 2012
October 2012
October 2012
October 2012
6.1
6.2.1
6.2.2
6.3
6.4.1
6.4.2.1
6.4.2.2
6.4.3.1
6.4.3.2
6.5
6.6.1
6.6.2
6.7.1
6.7.2
6.8
6.9
October 2012
October 2012
October 2012
October 2012
October 2012
October 2012
October 2012
October 2012
October 2012
October 2012
October 2012
October 2012
October 2012
October 2012
October 2012
October 2012
Bezug / Reference
ÄB/MB: Änderungsblatt – Modification Bulletin
TM/TN: Technische Mitteilung – Technical Note
0.2.4
SCHEMPP-HIRTH FLUGZEUGBAU GmbH, KIRCHHEIM/TECK
Arcus M
WARTUNGSHANDBUCH / MAINTENANCE MANUAL
0.2 Verzeichnis der Seiten / List of effective pages
Seite / Page
Datum / Date
7.1
7.2.1
7.2.2
7.2.3
7.2.4
7.2.5
7.2.6
October 2012
October 2012
October 2012
October 2012
October 2012
October 2012
October 2012
8.1
8.2
8.3
8.4
8.5
8.6
8.7
8.8
October 2012
October 2012
October 2012
October 2012
October 2012
October 2012
October 2012
October 2012
9
October 2012
10
October 2012
11
October 2012
12
October 2012
Bezug / Reference
ÄB/MB: Änderungsblatt – Modification Bulletin
TM/TN: Technische Mitteilung – Technical Note
0.2.5
SCHEMPP-HIRTH FLUGZEUGBAU GmbH, KIRCHHEIM/TECK
Arcus M
0.3
Table of contents
1.
Description of the components and systems
1.1
1.2
1.3
1.4
1.5
Airframe
Control system
Powerplant system
Electrical system
Oxygen system
2.
Rigging, Derigging / Rigging data
2.0
2.1
2.2
2.3
2.4
2.5
Rigging, derigging
Rigging data and control surface deflections
Weight and static moment of control surfaces
Play in the control circuits
Play in the wing attachment fittings
Play in tailplane attachment bracket
3.
Inspections
3.1
3.2
3.3
Prescribed inspections of the airframe
Annual inspection
Special inspections of the airframe
4.
Maintenance
4.1
4.2
4.2.1
4.2.2
4.2.3
4.3
4.4
Airframe maintenance
Powerplant maintenance
Propeller
Engine
Powerplant accessories
Damage
Screw locking
October 2012
Revision --
MAINTENANCE MANUAL
0.3.1
SCHEMPP-HIRTH FLUGZEUGBAU GmbH, KIRCHHEIM/TECK
Arcus M
MAINTENANCE MANUAL
0.3
Table of contents (continued)
5.
Instructions for assembly and maintenance work
5.1
5.6
5.7
5.8
5.9
5.10
5.11
5.12
5.13
5.14
5.15
Rudder, removal and reinstallation
Fin tank water dump valve (if installed)
Tow release(s), removal and reinstallation
Replacing the wing locating bearing bush
Main wheel with hydraulic disc brake
Maintenance of manual and automatic propeller brake
(Adjustment of proximity switches for automatic propeller brake)
Pylon arresting wire for the powerplant
Adjusting pylon limit switches and engine bay doors
Removal and reinstallation of the fuel tanks
Powerplant – removal and reinstallation
Removal and installation of the V-belt set
Measuring the V-belt tension
Adjustment of the drive belt tension
Spindle drive overload safety device
Removal and filling the coolant liquid
Adjustment of the exhaust system
6.
Determination of center of gravity and payload
6.1
6.2
6.3
6.4
6.5
6.6
6.7
6.8
6.9
Introduction
Weighing procedures
Weighing record
Empty mass and empty mass c/g position
Mass of the non lifting parts
Payload
Mass-CG diagram
Operation with powerplant removed
Operation with nose skid (optional)
7.
List of approved equipment
7.1
7.2
Safety belts
Instruments and equipment
8.
Placards and pictograms
9.
Maintenance instructions
10.
Logging of service time and take-offs
11.
List of special tools
5.2
5.3
5.4
5.5
October 2012
Revision --
0.3.2
SCHEMPP-HIRTH FLUGZEUGBAU GmbH, KIRCHHEIM/TECK
Arcus M
MAINTENANCE MANUAL
0.3
Table of contents (continued)
12.
Spare-parts list
Diagrams:
1
2
3a
3a
4
5
6a
6b
7
8
9
10
11
12
13
14
15
Fuselage controls
Rudder control in the fuselage
Wing controls - inboard
Wing controls - outboard
Undercarriage with retraction linkage and hydraulic wheel brake
Steerable tail wheel in rudder
Inspection opening in the fin (steerable tail wheel)
Inspection opening in the fin (Option: Fixed tail wheel)
Wing flap templates
Powerplant installation
Wiring diagram Avionic
Wiring diagram Powerplant
Wiring diagram ILEC MCU II Operating unit
Connector Engine to Airframe
Pin assignment ILEC MCU II Control unit
Pin assignment Trijekt – T101 – Regular engine control system
Pin assignment Redundancy engine control system
Colour markings Arcus M
Oct.
Oct.
Oct.
Oct.
Oct.
Oct.
Oct.
Oct.
Oct.
Oct.
Oct.
Oct.
Oct.
Oct.
Oct.
Oct.
Oct.
2012
2012
2012
2012
2012
2012
2012
2012
2012
2012
2012
2012
2012
2012
2012
2012
2012
Oct. 2012
Inspection lists:
1.
2.
3.
4.
Powerplant unit
Engine propeller pylon and pivoting mechanism
Fuel system
Electrical system powerplant, engine test run
Inspection instructions for flexible wing fuel tanks model HFK-TLF
Oct.
Oct.
Oct.
Oct.
2012
2012
2012
2012
Oct. 2012
Supplement:
1. Repair manual Arcus M
Oct. 2012
2. Repair Instructions for Schempp-Hirth Sailplanes and Powered
Sailplanes constructed from Fiber Reinforced Plastic
Sept. 1991
October 2012
Revision --
0.3.3
SCHEMPP-HIRTH FLUGZEUGBAU GmbH, KIRCHHEIM/TECK
Arcus M
1.
MAINTENANCE MANUAL
Description of the components and systems
Notice:
Additional descriptions are provided in the flight manual, sections 1.4, 1.5 and
1.1
7.
Airframe
The Arcus M is a self launching two seater high performance powered sailplane
made from fibre reinforced plastics, with flaps and a dampened T horizontal
tailplane.
Wings:
The wing shell is a CFRP-foam-sandwich with a spar made out of carbon fibre
rovings and GFRP/foam sandwich shear-web.
Fuselage:
The CFRP fuselage includes a reinforced cockpit area using aramid fibre for high
impact absorption.
Horizontal tail:
The horizontal tail consists of a stabilizer and elevator.
The stabilizer is constructed from GFRP and CFRP with a foam-sandwich, the
elevator has a pure CFRP shell.
Vertical tail:
The fin and the rudder are both made out of GRFP-foam-sandwich.
October 2012
Revision --
1.1
SCHEMPP-HIRTH FLUGZEUGBAU GmbH, KIRCHHEIM/TECK
Arcus M
1.2
MAINTENANCE MANUAL
Control system
Elevator control system
Steel push-pull tubes lead from the control stick to an aluminium bell crank at the
base of the fin, then to the steel elevator actuating bracket (also serving as the rear
mount for the horizontal tailplane) at the top of the fin – see diagram 1.
Elevator deflection stops are on the control stick mounting frames.
Elevator trim
The elevator trim is situated for either seat at the seat pan mounting flanges in the
left and is gradually adjustable.
Tensioning springs connect the trim to the elevator push-pull tube – see diagram 1.
Rudder control circuit
The adjustable rudder pedals are connected directly to the rudder lever by means of
steel cables – see diagram 2.
Deflection stops are on the lower hinge on the fin.
October 2012
Revision --
1.2.1
SCHEMPP-HIRTH FLUGZEUGBAU GmbH, KIRCHHEIM/TECK
Arcus M
1.2
MAINTENANCE MANUAL
Control system (continued)
Aileron control system
Steel push rods connect the control sticks via a bell crank and an interconnecting
lever to the aileron differential levers, which are supported by the flap actuating
levers. Short actuating rods then connect the differential levers to the funnels of the
automatic hook-up system - see diagram 1.
In the inner wing panel, the steel push rods lead from the automatic control hookups
in the root rib to the aileron actuating levers - see diagram 3a and 3b.
The outer most aileron on the wing tip extension is spring loaded and hooks up to
the inboard aileron by a coupling overlap.
Aileron deflection stops are at the base of the control sticks.
October 2012
Revision --
1.2.2
SCHEMPP-HIRTH FLUGZEUGBAU GmbH, KIRCHHEIM/TECK
Arcus M
1.2
MAINTENANCE MANUAL
Control system (continued)
Flap control system
Steel push rods lead from the operating handles in the cockpit via an
interconnecting lever to the flap actuating levers in the fuselage centre. From there,
short connecting push rods lead to the funnels for the automatic hook-up system.
The flap actuating levers also support the differential levers for the aileron, so that a
symmetrical deflection of the latter is achieved on moving the flaps.
To support the force of the flap, a torsion spring is attached to the interconnecting
lever.
For flaps "fully negative", a deflection stop is provided at the front end of the
operating rod in the cockpit - for "fully positive", the stop is at the flap
interconnecting lever mounted on the centre frame.
October 2012
Revision --
1.2.3
SCHEMPP-HIRTH FLUGZEUGBAU GmbH, KIRCHHEIM/TECK
Arcus M
1.2
MAINTENANCE MANUAL
Control system (continued)
Airbrake control system
Steel push rods connect the operating handles in the cockpit via a bell crank and
overcentering levers to the funnels of the automatic hook-up system - see diagram
1.
The deflection stop for closed airbrakes and the deflection stop for extended
airbrakes are provided at the central steel frame. Additional rubber stops for
extended airbrakes are provided in each airbrake box.
Inside each wing panel, steel push rods lead from the angular lever on the root rib
to the two actuating arms of the Schempp-Hirth type airbrakes, see diagram 3a.
Undercarriage with wheel brake
Steel push rods connect the u/c operating handles in the cockpit (which are guided
in a connecting link) to the actuating arm on the rear pivot shaft of the u/c assembly.
A gas strut on the u/c assists in retracting the wheel.
For "wheel up", the travel of the u/c operating rod in the cockpit is restricted by the
actuating arm resting against the steel tube centre frame; for "wheel down", the
extension stop is the over centre on the rear u/c struts.
Additionally the travel of the u/c operating rod in the cockpit is restricted by the gate
guiding the front operating handle.
The hydraulic wheel disc brake is actuated by steel cables (running in a bowden
conduit), connecting the stick mounted brake handles to the wheel brake master
cylinder.
A view of the undercarriage is provided in diagram 4.
Water ballast system(s)
For a description of the water ballast system(s) refer to section 7.9 of the Flight
Manual.
October 2012
Revision --
1.2.4
SCHEMPP-HIRTH FLUGZEUGBAU GmbH, KIRCHHEIM/TECK
Arcus M
1.3
MAINTENANCE MANUAL
Powerplant system
A description of the powerplant system is provided on pages 1.4.2 and 7.10 of the
Flight Manual.
For specifications on the engine and propeller, refer to the manual(s) provided by
their manufacturer.
The arrangement of the powerplant system is shown in diagram 8.
The powerplant is controlled by a multi-function powerplant operating unit, which is
installed in the instrument panel. For a description of this unit, refer to section 7.3 of
the Flight Manual.
Fuel system
For a description of the fuel system, refer to section 7.11 of the Flight Manual.
October 2012
Revision --
1.3
SCHEMPP-HIRTH FLUGZEUGBAU GmbH, KIRCHHEIM/TECK
Arcus M
1.4
MAINTENANCE MANUAL
Electrical System
For a description of the electrical system, refer to section 7.12 of the Flight Manual.
The electrical installation of all components for the powerplant system can be seen
on the wiring diagrams 9 to 15 .
1.5
Oxygen System
For a description of the oxygen system, refer to page 7.13.1 of the Flight Manual.
October 2012
Revision --
1.4
SCHEMPP-HIRTH FLUGZEUGBAU GmbH, KIRCHHEIM/TECK
Arcus M
2.
Rigging, Derigging / Rigging data
2.0
Rigging, derigging
MAINTENANCE MANUAL
See description in section 4.2.1 of the Flight Manual
2.1
Rigging data and control surface deflections
Rigging data and control surface deflections are shown on page 2.1.2.
After any repair it must be ensured that these data are within the permitted
tolerances.
October 2012
Revision --
2.1.1
SCHEMPP-HIRTH FLUGZEUGBAU GmbH, KIRCHHEIM/TECK
Arcus M
October 2012
Revision --
MAINTENANCE MANUAL
2.1.2
SCHEMPP-HIRTH FLUGZEUGBAU GmbH, KIRCHHEIM/TECK
Arcus M
2.2
MAINTENANCE MANUAL
Weights and static moments of control surfaces
After repair work or repainting, the hinge moments of a component must not and its
weight should not exceed the following values:
Component
with steerable
tail wheel *
Weight
5.80 - 7.80kg
12.76 - 17.16lb
Rudder with
Mass balance without steerable
tail wheel
4.80
10.58
1 Elevator half without
bracket
0.80
1.76
Wing flaps:
Inner wing inboard
Static moment
- 5.90kg
- 13.01 lb
-
1.00kg
2.20 lb
(-10.0) (-0.723) -
(-7.00)cmkg
(-0.506) ftlb
3.65
0.264
-
4.50 cmkg
0.325 ftlb
2.21
4.87
2.35
5.18
-
3.07kg 10.48
6.73 lb 0.758
3.05kg 6.52
6.73 lb 0.472
-
16.22 cmkg
1.173 ftlb
10.16 cmkg
0.735 ftlb
Inner wing outboard
0.90
1.98
-
1.29kg
2.84 lb
3.44
0.249
-
4.95 cmkg
0.358 ftlb
Wing extension
0.39
0.86
-
0.56kg
1.23 lb
1.02
0.0738 -
1.46 cmkg
0.106 ftlb
Inner wing centre
with mass balance
*
The determination of the weight of the rudder has to be done without
tailwheel and tailwheel axle. For the determination of the static moment,
the rudder drive bracket has to be installed.
If the values shown in the table above are exceeded, it will be necessary to add an
additional balance weight in front of the hinge axis as follows:
1.
After repair in the area of the repair.
2.
After complete repainting distributed along the whole length of the
component (if there was no mass balance attached) or near to or next to
existing mass balance.
Exceeding the weight limits listed in the table above because of additional mass
balance is permissible up to 15%, provided the static moment is then within the
proper range.
October 2012
Revision --
2.2.1
SCHEMPP-HIRTH FLUGZEUGBAU GmbH, KIRCHHEIM/TECK
Arcus M
2.2
MAINTENANCE MANUAL
Weights and static moments of control surfaces (continued)
For all control surfaces the mass balance (i. e. strips of lead or steel) should be
screwed or bonded with a premade carbon fibre bracket to the leading edge in front
of the hinge line (max. length of a single piece: 0.5 m /19.7 in).
If the additional mass balance is glued to the control surface, each piece has to be
secured with at least 2 locking sleeves (Ø2 x 12, DIN 1481). The distance between
the locking sleeves may not be greater than 100 mm.
Middle flap of the inner wing
Rudder without tail wheel
October 2012
Revision --
2.2.2
SCHEMPP-HIRTH FLUGZEUGBAU GmbH, KIRCHHEIM/TECK
Arcus M
2.2
MAINTENANCE MANUAL
Weights and hinge moments of control surfaces (continued)
Rudder with tail wheel
October 2012
Revision --
2.2.3
SCHEMPP-HIRTH FLUGZEUGBAU GmbH, KIRCHHEIM/TECK
Arcus M
2.2
MAINTENANCE MANUAL
Weights and static moments of control surfaces (continued)
Determination of the static moment:
For the determination of the static moment of the different surfaces the flap / rudder
have to be removed.
The flap / rudder have to be mounted frictionless in their rotational axis for the
determination. The force “P” can be measured with a spring scale or a letter
balance.
For the measurement the control surface has to be in its flight attitude, i.e. the airfoil
chord has to be horizontal.
For the alignment of the control surfaces of the wing there are templates shown in
diagram 7:
The static moment “M” of the flap / rudder is then obtained from the measured force
“P” and the distance “r” between the measuring point and the rotational axis:
M=Pxr
October 2012
Revision --
2.2.4
SCHEMPP-HIRTH FLUGZEUGBAU GmbH, KIRCHHEIM/TECK
Arcus M
2.3
MAINTENANCE MANUAL
Play in the control circuits
With the cockpit controls fixed, the play at the control surfaces must not exceed the
following values:
Inner wing:
Inner wing flap:
Between inner and
centre wing flap:
Between centre and
outer wing flap:
Elevator:
+/- 3 mm, measured 149 mm behind the hinge axis
(+/-0.12 in.)
(5.87 in.)
+/- 3 mm, measured 143 mm behind the hinge axis
(+/-0.12 in.)
(5.63 in.)
+/- 2 mm, measured 115 mm behind the hinge axis
(+/-0.08 in.)
(4.53 in.)
+/- 3 mm, measured 170 mm behind the hinge axis
(+/-0.12 in.)
(6.69 in.)
If there is excessive play in the hinge bearings and/or linkages, they must be
replaced or the manufacturer should be contacted regarding possible measures to
reduce the play.
The rudder control circuit is an open circuit, operated directly by control cables and
is therefore not subject to play.
The outermost flap on the wing tip extension is pressed onto the coupling overlap to
the inboard flap by a torsional spring and therefore is not subject to play.
October 2012
Revision --
2.3
SCHEMPP-HIRTH FLUGZEUGBAU GmbH, KIRCHHEIM/TECK
Arcus M
2.4
MAINTENANCE MANUAL
Play in the wing attachment fittings
Tangential play (forth and aft movement) can occur through wear in the shims on
the wing locating pins.
If the wing tips are free to move more than +/- 15 mm (0.59 in.) or if play of the tip
extensions is observed, further shims of a thickness of between 0.3 and 0.5 mm
(0.01 to 0.02 in.) with an internal diameter of
17.95 mm (0.71 in.) for the wing panels
and
9.95 mm (0.39 in.) for the tip extensions
should be added progressively up to the point where the panels (or tip extensions)
still rig easily, but the play has been eliminated.
2.5
Play in the tailplane attachment bracket
If an excessive vertical play is found at the tips of the horizontal stabilizer, then the
adjustable bushings of the elevator actuating bracket should be tightened (using a 4
mm Allen key) such that the tailplane will just slide onto its locating pins.
October 2012
Revision --
2.4
SCHEMPP-HIRTH FLUGZEUGBAU GmbH, KIRCHHEIM/TECK
Arcus M
3.
MAINTENANCE MANUAL
Inspections
NOTE:
To ensure the airworthiness of the powered sailplane the following inspections and
maintenance should be conducted according to - section 3, 4 and 9 of the
Maintenance Manual.
3.1
Prescribed inspections of the airframe
3.1.1 Rudder cables
Every 200 flying hours and at every annual inspection, the rudder cables are to be
inspected according to FAA AC 43.13-1A § 198 at the point where they feed
through the S-shaped guides to the pedals and wherever accessible. Check also
position and condition of the plastic tube inside the S-shaped guides (front and rear
seat)
If the cables are damaged, worn or corroded, they must be replaced.
permissible for individual strands of the cables to be worn up to 25 %.
Making cable connections
manufacturer’s instructions.
October 2012
Revision --
and
checking
them
must
conform
It
to
is
the
3.1.1
October 2012
Revision --
Wire rope 1,8 mm
DIN 3053 stainless
3
4
Control cable A 2,4
mm, construction 7 x
19
(3/32“ MIL-W-1511 A
or MIL-W-83420D)
Control cable A 1,6
mm, construction 7 x 7
(1/16“ MIL-W-1511 A or
MIL-W-83420 D)
2
1
871-17-J
18-1-C
or
28-1-C
Galvanised
A2.0 DIN 65457
18-1-C
or
28-1-C
871-17-J
18-2-G
or
28-2-G
18-3-M
or
28-3-M
(Nicopress)
---
Galvanised
A2.0 DIN 65457
---
Hot-galvanised
A2.5 DIN 6899
Hot-galvanised
A3.5 DIN 6899
Thimble
1
1
51-MJ
3-MJ
2
2
51-C-887
32-VC
1
1
2
3-MJ
51-MJ
32-VC
2
2
51-C-887
51-C-887
1
3
3
51-G-887
51-MJ
51-M-850
(Nicopress)
Number
of
crimps
Arcus M
Wheel brake
For use with
stop sleeves
Rudder pedal
adjustment, fin water
tank , propeller brake
cable, throttle cable
For use with
stop sleeve
Tow hook(s),
back rest adjustment
Rudder cable,
(powerplant)-arresting
wire
Application
Pressing
tool
3.1
Control cable B 3,2
mm,
construction 7 x 19
(1/8“ MIL-W-1511 A or
MIL-W-83420 D)
Designation
Sleeve
SCHEMPP-HIRTH FLUGZEUGBAU GmbH, KIRCHHEIM/TECK
MAINTENANCE MANUAL
Prescribed inspections of the airframe (continued)
3.1.2 Wire ropes
When replacing wire ropes the following ropes shall be used:
3.1.2
SCHEMPP-HIRTH FLUGZEUGBAU GmbH, KIRCHHEIM/TECK
Arcus M
3.1
MAINTENANCE MANUAL
Prescribed inspections of the airframe (continued)
3.1.2 Wire ropes (continued)
The cable connections of all control cables have to be done according to the
following manual:
“Aircraft Inspection and Repair FAA AC 43.13-1A”
3.1.3 Tow release mechanism(s)
Inspections should be carried out in accordance with the “Operating & Maintenance
Instructions for the TOST tow Release Mechanism(s)” - see also section 9 “Service
Instructions”.
3.1.4 Gas springs
In the fuselage (undercarriage, instrument panel) pull-type and push-type gas
springs are installed.
The piston rods of the gas springs must always be perfectly clean and must not be
damaged in any way whatsoever.
If oil escapes through the sealing for the piston rod, the gas spring must be
replaced.
3.1.5 Instruments
In the case of all installed instruments and equipment, the instructions of the
relevant manufacturer should be followed.
3.1.6 Safety harness
At present the service time of the webbing on the restraint systems available is
limited to twelve (12) years since the date of manufacture of the harnesses.
See also the service instructions provided by the relevant manufacturer.
October 2012
Revision --
3.1.3
SCHEMPP-HIRTH FLUGZEUGBAU GmbH, KIRCHHEIM/TECK
Arcus M
3.2
MAINTENANCE MANUAL
Annual inspection
In the course of the annual inspection the following checks are to be carried out:
Note: The required maintenance work is described by individual sections.
The details for maintenance of the powerplant can be found in
section 4.2.
Access to the control circuits is as follows (see also diagram 1 through 5):
∎
Wing control circuits
The wing flap actuators inside the wing panels are accessible through
inspection openings on the lower wing surface.
The airbrake actuators are accessible in the airbrake box.
∎
Fuselage control circuits / Water ballast system(s)
The control circuits in the fuselage including the actuating mechanism for the
water ballast dump valves are accessible after removing both seat pans and
the rear seat back rest.
∎
Elevator control
The elevator actuating bracket is accessible with the horizontal tailplane
removed.
If required for the inspection of the bell crank at the base of the fin, an
opening may be cut into the skin as shown in diagram 6a/b.
∎
Rudder drive
At the rudder drive bracket.
∎
Spindle drive for extending and retracting the powerplant
The spindle drive is accessible after removing the rear head rest and opening
the engine bay doors.
October 2012
Revision --
3.2.1
SCHEMPP-HIRTH FLUGZEUGBAU GmbH, KIRCHHEIM/TECK
Arcus M
3.2
MAINTENANCE MANUAL
Annual inspection (continued)
After cleaning the entire aircraft, the following checks and maintenance should be
made:
∎ Check the aircraft externally for damage such as cracks, holes, scratches,
buckling and delamination.
If the outer layers of a component, constructed as a sandwich, have been
damaged, then the inner skin must be checked as well.
It is recommended to call upon expert assistance.
∎ All fittings which are mounted on GFRP / CFRP structures must be checked for
tight attachment.
Also check the CFRP / GFRP structure at the fittings for cracks, white spots and
delamination.
∎ Check all accessible metal parts and bearings for damage.
If repairs are necessary, request manufacturer’s instructions.
∎ Check all accessible metal parts such as fittings, control rods (push rods) and
actuating levers for corrosion.
If necessary, remove the rust, clean thoroughly and apply a new corrosion
protective coating.
The special primer and paint for this surface protection may be obtained from
Schempp-Hirth Flugzeugbau GmbH.
∎ Locking and mounting of the canopy
Check the linkages for locking/opening (left side) and attaching/detaching (right
side) the canopy for any damage. Check locking device of the front and rear
linkage for attaching/detaching the canopy.
Check the guides for the locking rod on the canopy frame, the locating pins on
the fuselage for delamination/cracks.
Check the front CFRP hinge for delamination/cracks and the rear hinge for
deformation.
October 2012
Revision --
3.2.2
SCHEMPP-HIRTH FLUGZEUGBAU GmbH, KIRCHHEIM/TECK
Arcus M
3.2
MAINTENANCE MANUAL
Annual inspection (continued)
∎
If there is suspicion or proof of leaking water tanks, the manufacturer shall
be contacted.
∎
Check the wing water dump valves for their effective valve lift - the difference
in maximum valve lift between the left and the right tank should not be more
than 10 mm (0.39 in.).
∎
Fin ballast tank (optional)
Check the valve and its actuating mechanism for proper function. If the dump
valve leaks, it is accessible after removing the rudder, see section 5.1.
Check that all tank spill holes are clear.
∎
Recommended lubrication
The aircraft should be lubricated with acid-free grease and oil customary in
trade.
Fuselage:
(see diagram 1, 4 and powerplant overview diagram 8)
Lubricate all accessible control circuits
(bearings with a sealed grease filling do not require any service).
It is recommended that the guide tubes for the rudder pedal adjustment and
the cables in the area of the S-shaped guides on the pedals are treated with
VASELINE to ensure a smooth pedal adjustment.
Also lubricate the linkages locking/opening the canopy and the mechanism
attaching/detaching it.
Lubricate the telescoping tube of the powerplant pylon spindle drive and the
pylon bearings.
Lubricate the attachment points of the spindle drive and the propeller pylon.
Horizontal and vertical tailplane surfaces:
Lubricate the accessible rudder and elevator hinges.
Wing panels (see diagram 3):
Lubricate all accessible connecting points in the flap/aileron actuators and
airbrake control circuits and their hinges as well as the attachment points of
the airbrake covers.
October 2012
Revision --
3.2.3
SCHEMPP-HIRTH FLUGZEUGBAU GmbH, KIRCHHEIM/TECK
Arcus M
3.2
MAINTENANCE MANUAL
Annual inspection (continued)
∎
Undercarriage
Check that the main wheel axle runs true, that no u/c struts are bent or
damaged and that their mountings on the steel tube centre frame are not
damaged. Check the wheel hub for side play.
Check the main wheel tire pressure:
4.0 bar / 57 psi
Check the effectiveness of wheel brake.
Instructions on how to remove the main wheel for cleaning, lubricating and
for maintenance work on the brake system are given in section 5.4.
∎
Tail skid (if installed)
Check the tail skid for wear and damage.
∎
Fixed and steerable Tail wheel (if installed)
Check the skin around the axle for delamination and check the tire pressure
of the tail wheel (3.0 bar / 44 psi).
If a steerable tail wheel is installed, remove the tail wheel (see page 5.1.1) to
do the checks. Furthermore check the 4 mounting bolts at the lower rudder
mounting for corrosion resp. damage.
∎
Lower Rudder bracket (if steerable tail wheel is installed)
Remove rudder (see page 5.1.1), then check lower rudder bracket for cracks
and damages, especially in the welding seams.
∎
Nose wheel (if installed)
Check for delamination on the wheel housing and check the tire pressure of
the nose wheel: 3.0 bar / 44 psi.
∎
Nose skid (if installed)
Check for delamination in the area of the nose skid.
∎
Check the STATIC and PITOT pressure ports and all instrument tubes for
blockage or leakage including all tube connectors.
Check that the glass in the instruments is not loose.
∎
Check the equipment wiring including batteries for chafing marks and proper
attachment of plugs and switches.
Check for loose bolts and safe connections.
October 2012
Revision --
3.2.4
SCHEMPP-HIRTH FLUGZEUGBAU GmbH, KIRCHHEIM/TECK
Arcus M
3.2
MAINTENANCE MANUAL
Annual inspection (continued)
∎
The harness straps should be checked regularly for any damage or stains.
The metal fittings of the harnesses should be checked regularly for corrosion.
∎
With the aircraft rigged, check the deflections of the control surfaces with the
help of an assistant (see section 2.1) and also check the control circuits and
the tow release mechanism(s) for proper function (for removal and
reinstallation of the tow releases refer to section 5.2).
Check that the gap between the wing flaps is in the worst case at least 1.5
mm (0.06 in.).
Check that the gap between the inner flap and the wing-fuselage fairing is at
least 2.0 mm (0.079 in).
Check that the gap between the inner edge of the airbrake covers and the
cutout in the wing is at least 1.5 mm (0.06 in).
Check the wing attachment fittings and control connections for excessive
play (see section 2.3 through 2.5).
Bearings with excessive radial play must be replaced.
October 2012
Revision --
3.2.5
SCHEMPP-HIRTH FLUGZEUGBAU GmbH, KIRCHHEIM/TECK
Arcus M
3.3
MAINTENANCE MANUAL
Special inspections of the airframe
Inspection program for the extension of the service time
1.
General
The results of fatigue tests subsequently carried out on wing spar sections
have demonstrated that the service time of GFRP/CFRP sailplanes and
powered sailplanes may be extended to 12.000 hours, if for each individual
aircraft (in addition to the mandatory annual inspection and continuous
maintenance) the airworthiness is demonstrated according to a special multistep inspection program, particularly with regard to the service life.
2.
Time limits
When the sailplane (or the powered sailplane) has reached a service time of
maximum 6000 hours, a special inspection of the aircraft must be done in
accordance with the inspection program for the extension of the permitted
service time.
If the results of this inspection are satisfactory and if any defects found have
been duly repaired, the service time of the sailplane (or powered sailplane) is
extended by another 3000 hours to a maximum of 9000 hours (first step).
The afore-mentioned inspection program must be repeated at intervals not
exceeding 1000 h service time.
If the results of these inspections are satisfactory and if any detected defects
are properly repaired, the permissible service time can be gradually extend
by 1000 hours to a maximum of 12000 hours.
3.
The currently valid inspection program for the extension of the permitted
service time must be purchased individually for each serial number and for
each step of service time extension from Schempp-Hirth Flugzeugbau
GmbH.
The results of the inspections have to be listed in an inspection report; every
measure has to be stated.
A copy of the inspection report has to be sent to the airworthiness office at
Schempp-Hirth Flugzeugbau GmbH.
Only when a written confirmation of Schempp-Hirth Flugzeugbau GmbH is
present that the above mentioned inspection report was obtained, the
permissible service life time may be increased.
4.
The inspections may only be accomplished by a certified maintenance
organisation.
October 2012
Revision --
3.3.1
SCHEMPP-HIRTH FLUGZEUGBAU GmbH, KIRCHHEIM/TECK
Arcus M
4.
Maintenance
4.1
Airframe maintenance
MAINTENANCE MANUAL
Under normal operating conditions no airframe maintenance work is required
between the annual inspections, except for the routine greasing of the spigots and
bearings of the wing and tailplane attachment fittings – see section 4.2 of the
Flight Manual.
Should the control system become heavy to operate, then lubricate those places in
the fuselage and in the wing panels where plain bearings are used (e.g. airbrake
linkage, elevator trim).
Cleaning and greasing the wheel(s) and the tow release(s) depends on the
accumulation of dirt.
October 2012
Revision --
4.1
SCHEMPP-HIRTH FLUGZEUGBAU GmbH, KIRCHHEIM/TECK
Arcus M
4.2
MAINTENANCE MANUAL
Powerplant maintenance
4.2.1 Propeller
Maintenance work on the propeller has to be conducted according to the manual
of the propeller, see section 9.
CAUTION:
For permissible operating times, mandatory regular inspections and special
inspections refer to the propeller manual (see section 9).
October 2012
Revision --
4.2.1
SCHEMPP-HIRTH FLUGZEUGBAU GmbH, KIRCHHEIM/TECK
Arcus M
4.2
MAINTENANCE MANUAL
Powerplant maintenance (continued)
4.2.2 Engine
Maintenance work on the engine is required after every 25 hours of engine
operation time or at least once every year and must comply with the instructions
given in the maintenance manual, see section 5, and the engine manual, see
section 9.
CAUTION:
For permissible operating times, mandatory regular inspections and special
inspections refer to the engine manual (see section 9).
October 2012
Revision --
4.2.2
SCHEMPP-HIRTH FLUGZEUGBAU GmbH, KIRCHHEIM/TECK
Arcus M
4.2
MAINTENANCE MANUAL
Powerplant maintenance (continued)
4.2.3 Powerplant accessories
For maintenance work and inspections on propeller and engine refer to
page 4.2.1 and 4.2.2.
a) Check of V-belt-tension
After the installation of a new V-belt set shorter inspection intervals for checking
the V-Belt tension have to be observed due to increased wear during the runningin period.
Special
inspection
No.
Due date of inspection
(Engine operating time after
installation of new V-belt set)
1
1h ± 25%
2
5 h ± 10%
Actions to be implemented
Check V-belt tension and adjust it if
necessary, so that the V-belt tension
is in the upper area of the normal
operating range (see section 5.11)
Check V-belt tension and adjust it, so
that the V-belt tension is in the normal
operating range (see section 5.11)
The implementation of the above mentioned inspections has to be documented
together with the respective engine operating time in the aircraft logbook.
After the implementation of special inspection No. 2 the inspection interval for the
following regular inspections of the V-belt can be switched to every 25 hours of
engine operating time or at least once very year.
b) 25 hour / anual inspection
For all other components of the power plant (e.g. engine pylon,
extension/retraction mechanism, fuel system etc.) maintenance work is to be
accomplished after every 25 hours of engine operating time or at least once every
year.
Check lists for accomplishing this work are found in the appendix,
see P-1 and the following.
October 2012
Revision --
4.2.3.1
SCHEMPP-HIRTH FLUGZEUGBAU GmbH, KIRCHHEIM/TECK
Arcus M
4.2
MAINTENANCE MANUAL
Powerplant maintenance (continued)
4.2.3 Powerplant accessories (continued)
c) Parts of powerplant system with limited operation life
Description
V-belt set
Powerplant arresting
cable
Fuel filter
Wing fuel tank HFK-TLF
(optional)
including arresting ropes
Replacement after first
installation of part
engine
calendar time
operating time
remark
50h
5 years
---
50h
---
---
25h
5 years
---
---
10 years
---
Fuel lines made of NBR
---
5 years
---
Fuel lines made of
FPM/ECO
---
5 years
---
Fuel lines made of PUR
No limitation.
Replacement according
condition.
---
For parts with limited operation and calendar time, the limitation that is reached first
has to be considered for the replacement.
All other parts of the powerplant system, that are not listed in section 4.2.1 or 4.2.2,
are to be checked and maintained according to the instructions given in section 3.
October 2012
Revision --
4.2.3.2
SCHEMPP-HIRTH FLUGZEUGBAU GmbH, KIRCHHEIM/TECK
Arcus M
4.3
MAINTENANCE MANUAL
Damage
Check for any sign of change in the condition of the aircraft, such as cracks in the
surface, holes, delamination in the CFRP / GFRP structure etc.
If there is any uncertainty regarding the significance of damage discovered, the
aircraft should always be inspected by certifying staff.
There is no objection to minor damage – which does not affect the airworthiness in
any way – being repaired on site, e.g. damage to the gelcoat, the under-carriage
doors or the trailing edge of a control surface (the mass and the static moment of
the latter must not increase), or scratches and small cracks in the plexiglas
canopy.
Major damage to the main structure – which includes nearly all components of the
aircraft – may only be repaired by a certified repair station having an appropriate
authorization.
Repair instructions are found in the appendix.
When replacing the Plexiglas of the canopy, the following colors are permitted:
•
•
•
clear (Plexiglas GS 245)
green (slightly tinted, Plexiglas GS 245)
blue (slightly tinted, Plexiglas GS 245)
For protection against fire and moisture, use the following compounds for the
engine compartment:
- Pyroplast HW-100 (2 coats)
according to technical data sheets of Rütgers Organics
In addition as moisture protection:
Waterproof top coat, 4232-0303 colorless
with respective hardener
i.e. Standox PUR 2-K Gelcoat
These products have to be obtained from Schempp-Hirth Flugzeugbau GmbH.
October 2012
Revision --
4.3.1
SCHEMPP-HIRTH FLUGZEUGBAU GmbH, KIRCHHEIM/TECK
Arcus M
MAINTENANCE MANUAL
4.4 Screw locking
If not specified otherwise at the appropriate places in the Maintenance Manual, the
following methods of securing bolt connections against unintentional loosening have
to be used:
a) Tightening torque for bolt connections
For all bolt connections on the powerplant that are not secured by self-locking
nuts against loosening, the following tightening torques according to the Engine
Manuel of manufacturer SOLO are valid (1 NM = 0.738 lbf ft):
Designation
Tightening
torque
Nuts and bolts M6
Nuts and bolts M8
Nuts and bolts M10
12 Nm
20 Nm
40 Nm
Source
Manual for
engine SOLO
Typ 2625 02i
Other defines tightening torques for the powerplant:
Designation of connection
(Bolt dimensions)
Attachment bolts for propeller
(6 x M8)
Attachment bolts for excentric
propeller axle (4 x M12)
Attachment bolts of engine at engine
pylon (4 x M8; 2 x M10)
Magneto on crankshaft
Belt pulley on crankshaft
Coolant liquid temperature probe
Allen screw at rear cylinder head
(M10x1)
Bolt connection propeller pylon to
fuselage mounting
Attachment bolts of forward spindle
drive mounting (4 x M6)
Nuts for the attachment of proximity
switches for the propeller positioning
system
Tightening
torque
Source
20-25 Nm
„Operation and Installation
Manual“
of manufacturer
TECHNOFLUG / Binder
50 Nm
MM, S. 4.4.1
M8: 28 Nm
MM, S. 4.4.1
M10: 55 Nm
Manual for engine
80 Nm
MOTOR SOLO
100 Nm
Typ 2625 02i
20 Nm
Manufacturer information
20 Nm
MM, S. 5.14.1
20 Nm
MM, S. 5.9.4
12 Nm
MM, S. 4.4.1
8 Nm
+2
-0
MM, S. 5.5.6.6
The connections listed under a) are additionally secured with screw locking
adhesive (see section 4.4 d).
October 2012
Revision --
4.4.1
SCHEMPP-HIRTH FLUGZEUGBAU GmbH, KIRCHHEIM/TECK
Arcus M
MAINTENANCE MANUAL
4.4 Screw locking (continued)
b) Self locking nuts:
• At the airframe attachment devices according to the following specification are
used:
Self-locking hexagon-head nut:
DIN 985-8 respectively DIN EN ISO 10511-8
SSN 003
o
o
• Furthermore special attachment devices are used on specific locations at the
engine. These devices are described in the respective manuals of the
manufacturer of the engine.
c) Locking wire:
To secure attachment bolts, hose connections, etc. locking wire with different
diameters is used:
• Fa. Goodridge, Stainless Steel Lockwire, Grade 302
Size
0.024” (0,62 mm)
0.032” (0,81 mm)
0.040” (1,01 mm)
Application
Securing of propeller attachment bolts, Bowden outer,
turnbuckles
Securing of fuel hoses
Beringer main wheel (option): Securing of brake disc
d) Screw locking adhesives
For securing bolt connections medium strength screw locking adhesives (Loctite
243) is used. The manufacturers processing and storage guidelines have to be
observed.
Locked screws have to be marked with red securing paint: Line from screw head
to component.
Previous applied securing paint has to be removed before loosening the screw.
October 2012
Revision --
4.4.2
SCHEMPP-HIRTH FLUGZEUGBAU GmbH, KIRCHHEIM/TECK
Arcus M
5.
Instructions for assembly and maintenance work
5.1
Rudder – removal and reinstallation
MAINTENANCE MANUAL
Rudder with fixed tail wheel:
Remove lock nut from the lower rudder hinge and disconnect control cables.
Prior to disconnecting the control cables from the rudder horn, relieve their tension
by pulling them back.
Next the plate, fairing on the right side of the balancing horn, must be removed.
Finally deflect rudder slightly to the left side and lift it free of the fin.
Preceding steps must be reversed for re-installing the rudder using new lock nuts.
Lock nut for the lower rudder hinge M8: Torque 10 Nm (7.2 lbf ft).
Rudder with steerable tail wheel: (see diagram 5)
Deflect the rudder fully to the right and to the left and disconnected the rudder
cables from the drive bracket.
Then remove the tail wheel. To do so, loosen the screw connection of the axle with
two Allen keys and pull out the axle. Push the tail wheel downwards and remove it.
Then unscrew the 4 M6-bolts in the wheel housing. To do so, you have to hold the
other end of the M6-bolts on the upper side of the drive bracket.
Afterwards move the rudder slightly to the rear and withdraw the rudder
downwards.
The reinstallation of the rudder has to be carried out in reversed order.
Mounting torque for the bolts of the rudder drive bracket:
M6: 8 Nm (5.90 lbf ft)
October 2012
Revision --
5.1.1
SCHEMPP-HIRTH FLUGZEUGBAU GmbH, KIRCHHEIM/TECK
Arcus M
MAINTENANCE MANUAL
Fin tank water dump valve (if installed)
For inspection of the fin tank water dump valve the rudder has to be removed. For
necessary maintenance work on the fin tank water dump valve or on its actuating
mechanism refer to the sketch shown below.
The operating cable for the water ballast can be adjusted with the aid of the
clamped thread end of the operating cable, which is directly connected to the
operating lever below the support for the front seat pan on the right side of the
cockpit. If you adjust the operating cable for the tail tank, you also have to adjust the
operating cable of the wing tanks. This is done in the same way at the torsioncontrol rod for the water ballast of the wing, on the right side behind the seat pan of
the rear pilot.
For the adjustment of the fin tank pull the rubber boot (2) from the dump valve and
set the operating lever in the cockpit to “closed”. Adjust the operating cable so that
the operating cable has no tension (max. backlash10 mm / 0.39 in).
Thereafter check the valve for proper function as follows:
With the operating lever in the cockpit at “open”, the spring-loaded valve tube (1)
must have moved up such that its water outlet is clear.
If so, re-attach the rubber boot, close the valve and fill the tank.
Finally check the valve for leaks and proper dumping.
October 2012
Revision --
5.1.2
SCHEMPP-HIRTH FLUGZEUGBAU GmbH, KIRCHHEIM/TECK
Arcus M
5.2
MAINTENANCE MANUAL
Tow release(s) – removal and reinstallation
Nose tow release mechanism
The nose tow release is located in the fuselage nose cone.
It must be checked regularly for damage and also be cleaned and greased.
To remove the nose tow release proceed as follows:
-
Fold up the front instrument panel.
-
Remove the nose access panel by removing its six bolts. The nose tow
release is now accessible.
-
Disconnect the release cable from the actuating segment (pay attention to
the large washers), remove the four mounting bolts and pull the tow release
clear to the rear.
Be sure that the electrical ground wire is reattached when reinstalling the nose tow
release mechanism (see sketch below).
Torque:
October 2012
Revision --
M4: 2 Nm (1.4 lbf ft)
M5: 5 Nm (3.6 lbf ft)
5.2.1
SCHEMPP-HIRTH FLUGZEUGBAU GmbH, KIRCHHEIM/TECK
Arcus M
5.2
MAINTENANCE MANUAL
Tow release(s) – removal and reinstallation (continued)
C/G tow release mechanism (Option)
Being situated on the underside of the fuselage, the c/g tow release mechanism is
vulnerable to the infiltration of dirt.
Therefore, it must be checked regularly for damage and also be cleaned and
greased.
With the rear seat pan removed, the c/g tow release mechanism is easily removed
by disconnecting the release cable from the actuating segment and removing the
three mounting bolts (pay attention to the large washers).
Take care that the proper mounting angle is achieved when reinstalling the c/g tow
release (the correct drill holes (1, 3, 5) for its mounting bolts are easily identified
with the aid of the sketch below).
Torque:
October 2012
Revision --
M6: 10 Nm (7.2 lbf ft)
5.2.2
SCHEMPP-HIRTH FLUGZEUGBAU GmbH, KIRCHHEIM/TECK
Arcus M
5.3
MAINTENANCE MANUAL
Replacing the wing locating bearing bush
The main wing panels locate in four bearing bushings on the fuselage. These
bearing bushings should be checked for damage (cracks) after heavy landings.
The procedure for replacing them, if necessary, is as follows:
a)
Front wing connection:
Remove bearing bushings with the aid of an extracting tool.
b)
Rear wing connection:
Drive out the bearing bush from the opposite side with a steel tube (15 to
18 mm / 0,59 to 0,70 in diameter)
Install new bearing bush with Loctite (i.e. 603).
The new bearing(s) should be punched in three positions on the outer edge to lock
it in place.
Rig the aircraft and check for play at the wing tip.
If the play is excessive (i.e. more than 30 mm / 1.18 in. at the tip of the wing), then
follow the instructions given in section 2.4.
October 2012
Revision --
5.3
SCHEMPP-HIRTH FLUGZEUGBAU GmbH, KIRCHHEIM/TECK
Arcus M
5.4
MAINTENANCE MANUAL
Main wheel with hydraulic disc brake
Removal of main wheel TOST:
When removing the main wheel to clean and grease it, first remove the two bolts
attaching the brake back plate to the brake cylinder, then remove the brake calliper
(hydraulic pressure hose remains attached). Disassemble the attachment bolt of the
brake shield on the inner side of the swinging arm.
Next remove the cotter pin and castle nut from one side of the wheel axle and
withdraw the latter. Take out the spacer on the right side of the wheel and remove
the wheel,
Take care that no washers, spacers or bushings get lost. Prior to re-assembly,
clean all parts and lubricate bearings, bushings and the axle.
Observe the instructions provided by the supplier of the wheel, TOST company,
Munich, Germany.
Removal of main wheel BERINGER (Option):
Observe the instructions provided by the supplier of the wheel, BERINGER /
company, Chǎtelneuf, France.
Note:
Do not disconnect the hydraulic pressure hose from the brake cylinder and do not
actuate the wheel brake while the brake caliper is removed from the brake disc.
The hydraulic wheel brake may be actuated by the handles provided at the control
sticks, see diagram 4.
Wheel-brake handle in the front seat:
The Bowden cable is directly connected with the actuating segment of the brake
master cylinder.
Wheel-brake handle in the rear seat:
The Bowden cable is connected to the front attachment face of the brake master
cylinder. The outer tube of the Bowden cable fits against the actuating segment of
the brake master cylinder and moves the actuating segment forward when the rear
wheel brake is applied.
When reduced effectiveness of the wheel brake is observed, see page 5.4.2.
October 2012
Revision --
5.4.1
SCHEMPP-HIRTH FLUGZEUGBAU GmbH, KIRCHHEIM/TECK
Arcus M
5.4
MAINTENANCE MANUAL
Main wheel with hydraulic disc brake (continued)
In case of reduced effectiveness of the wheel brake
1.
Check brake pads:
If the thickness of the brake pads is less then 1.5 to 2mm, replace brake
pads. In this case both parts of the brake calliper have to be removed.
2.
Check that there are no leaks in the hydraulic-system.
3.
Check brake fluid:
4.
a)
Remove the front seat pan.
b)
Remove the cover of brake fluid-container.
c)
If necessary refill the missing brake fluid and bleed the braking system
as described on page 5.4.3.
d)
Check the effectiveness of the wheel brake. Afterwards reassemble
the parts.
Readjustment of the Bowden cables:
a)
The Bowden cables may be readjusted at the adjustment point at each
control stick only until the gap between the actuating segment on the
brake master cylinder and the cylinder case is no more than 1.0 mm
(0.04 in) when the wheel brake is relieved.
To check the readjustment pull the brake handle several times. With
relieved wheel brake:
i)
the wheel can still be rotated by hand
ii)
it should to be possible to push the brake caliper in towards the
wheel by hand
b) Check the function of the wheel brake again after installing the seat pan.
Note:
Normally the brake system must be bled if the fuselage has been stored inverted!
If the brake handle is fixed in the pulled position during the inverted storage of the
fuselage, the bleeding of the brake system is usually not necessary.
October 2012
Revision --
5.4.2
SCHEMPP-HIRTH FLUGZEUGBAU GmbH, KIRCHHEIM/TECK
Arcus M
5.4
MAINTENANCE MANUAL
Main wheel with hydraulic disc brake (continued)
Bleeding the brake system
1.
Pressure bleeding via separate wheel cylinder bleeder valve
a)
b)
c)
d)
e)
f)
g)
h)
2.
Connect a hose (having a suitable fitting) of a pressurized hydraulic
fluid service unit to the wheel cylinder bleeder screw and open the
valve of the service unit.
Remove the filler cap from hydraulic fluid reservoir.
Open the bleeder screw slightly (approx. ½ turn).
Feed fluid into the brake system until the reservoir is full. Check the
fluid is clear of air bubbles. If necessary, remove fluid by suction and
continue filling.
Tighten the bleeder screw on the wheel cylinder and close the valve of
the service unit.
Install the filler cap onto the hydraulic fluid reservoir.
Disconnect the hose of the service unit from the wheel cylinder
bleeder screw.
Check the wheel brake effectiveness.
Bleeding (without hydraulic pressure pot)
a)
b)
c)
d)
e)
f)
g)
Connect a transparent hose to the wheel cylinder bleeder screw at the
brake caliper – immerse its open end in a hydraulic fluid container.
Remove the filler cap from the hydraulic fluid reservoir and fill it (see
marking).
Build up pressure by moving the actuating segment on the brake
master cylinder repeatedly, then open the wheel cylinder bleeder
screw until brake fluid escapes.
Continue pumping (move actuating segment such that it contacts the
cylinder case) until escaping fluid is clear of air bubbles.
Tighten the wheel cylinder bleeder screw.
If necessary, fill in more brake fluid, then reinstall the filler cap of the
hydraulic fluid reservoir.
Check the wheel brake effectiveness.
CAUTION:
Use only approved brake fluids complying with SAESPECIFICATION J 1703 or US-SPECIFICATION FMVVS 116, DOT
3 through DOT 5, based on glycol.
CAUTION:
DO N O T SPILL ANY BRAKE FLUID!
October 2012
Revision --
5.4.3
SCHEMPP-HIRTH FLUGZEUGBAU GmbH, KIRCHHEIM/TECK
Arcus M
5.5
MAINTENANCE MANUAL
Maintenance of manual and automatic propeller brake
5.5.1 Description
The propeller is decelerated and hold in proper retracting position by a
mechanical propeller brake. The position of the propeller is detected by
contact-free proximity switches. These proximity switches are located at
the upper pulley of the belt transmission.
The brake lever of the propeller brake is mounted at the lower end of
the propeller pylon and is operated by Bowden cables. The brake lever
is equipped with a brake pad which acts on a brake drum. The restoring
force for releasing the brake is generated by a compression spring
located on the brake lever.
The brake drum is mounted on the crankshaft of the engine in front of
the lower pulley of the belt transmission.
The brake lever can be actuated by two independent systems. For this
reason, two Bowden cables engage the brake lever:
• Bowden cable to the brake handle of the manual propeller brake in
both cockpits. The Bowden cable is attached to the brake lever at
the outer station, combined with the brake lever return spring.
• Bowden cable to the electro-magnetic servo in the engine
compartment (automatic propeller brake). The Bowden cable is
attached to the brake lever at the inner station.
Note:
Adjusting the Bowden cable of the propeller brake can be done with
partly retracted powerplant. On the basis of experience gained so far
the position of the powerplant has no influence on the function of the
propeller brake.
Nevertheless a functional test with fully extended powerplant should be
made before operating the powerplant.
October 2012
Revision --
5.5.1.1
SCHEMPP-HIRTH FLUGZEUGBAU GmbH, KIRCHHEIM/TECK
Arcus M
5.5
MAINTENANCE MANUAL
Maintenance of manual and automatic propeller brake (continued)
5.5.2 Basic setting of propeller brake lever
After replacement / modification of the guiding slot for the brake lever,
the mounting of the brake lever, the brake drum or other essential
components the basic setting of the propeller brake lever has to be
verified according to the following procedure:
a)
If possible install new brake pad to the brake lever and wear it in
(see section 5.5.8 c))
b)
The limit stop for the released position of the propeller brake
lever is at the upper end of the guiding slot. If the brake lever is
pressed manually to the upper limit stop at the guiding slot
(position brake released), the clearance between the brake pad
and the brake drum has to be within the following tolerances (see
sketch on following page):
No. Condition brake pad
Allowable
clearance “a”
+0.5 mm
1
New installed brake pad
0.5 mm -0 mm
+0.020 in
0.020 in - 0 in
2
Normal operating range
(Used brake pad, but
wear limit of brake pad
not yet reached)
0.5 mm to 1.5 mm
(0.020 in to 0,059 in)
If the clearance “a” is beyond the specified range, the Bowden cable
has to be readjusted resp. the brake pad has to be replaced. If the
guiding slot shows signs of wear which might hinder the reset of the
brake lever the guiding slot has to be replaced.
Oktober 2012
Revision --
5.5.2.1
SCHEMPP-HIRTH FLUGZEUGBAU GmbH, KIRCHHEIM/TECK
Arcus M
5.5
MAINTENANCE MANUAL
Maintenance of manual and automatic propeller brake (continued)
5.5.2 Basic setting of propeller brake lever (continued)
c) The brake pad has to be replaced, when it reaches its wear limit:
No. Condition of the brake pad
3
Oktober 2012
Revision --
Wear limit of brake pad
reached
minimum thickness of
brake pad “b”
1.0mm (0.0394 in)
5.5.2.2
SCHEMPP-HIRTH FLUGZEUGBAU GmbH, KIRCHHEIM/TECK
Arcus M
5.5
MAINTENANCE MANUAL
Maintenance of manual and automatic propeller brake (continued)
5.5.3 Adjustment of manual propeller brake
a) Establish initial position of the brake lever according to section 5.5.2
(Position brake open). If the manual propeller brake is not actuated,
the handles of the manual propeller brake in the cockpit are not
allowed to touch the Bowden outer, but at room temperature the
clearance has to be at least 2 mm to 3 mm (0,079 in to 0.118 in). The
adjustment of the clearance can be done with:
i)
the adjustment screw on the Bowden outer at the
propeller pylon directly in front of the brake lever
(preferred measure).
ii)
the clamping connection for the brake cable at the brake
lever.
b) After the handle for the manual propeller brake in the cockpit has
been pulled and released again, the compression spring has to be
able to push the brake lever back into its initial position (Position
brake released and free of brake drum).
Otherwise check the Bowden cable of the manual propeller brake for
damages or other reasons for increased friction. Check also the
condition of the compression spring. Any defects have to be
corrected before next flight with powerplant operation.
Note:
Make sure that the brake lever of the manual propeller brake is at the
front limit stop (Position brake released) before starting the adjustment.
The brake lever on the brake servo can be moved by hand for this.
Oktober 2012
Revision --
5.5.3.1
SCHEMPP-HIRTH FLUGZEUGBAU GmbH, KIRCHHEIM/TECK
Arcus M
5.5
MAINTENANCE MANUAL
Maintenance of manual and automatic propeller brake (continued)
5.5.4 Adjustment of brake servo for automatic propeller brake
a) After adjusting/checking the manual propeller brake according to
section 5.5.3 establish again the initial position of the brake lever
according to section 5.5.2 (Position brake released).
b) Position the drive lever of the brake servo in the engine compartment
according to sketch below:
Nominal dimension “c” = 5 mm ± 1mm (0.197 in ± (0.0394 in)
Adjust the length of the Bowden cable at room temperature so that
the clevis can be mounted on the drive lever of the brake servo and
the brake lever is still in the completely released position according to
section 5.5.2
The adjustment of the appropriate length of the Bowden cable for
the brake servo is possible by
i) Adjustable clevis (if adjustable clevis is installed, preferred
measure).
ii) Adjusting screw for the Bowden outer at the propeller pylon
resp. at the mounting of the brake servo.
iii) Moving of clamp connection of Bowden cable at the brake
lever.
c) Check limit stop for the drive lever on engine compartment wall for
tight fit.
Caution:
Repeated loosening and tightening of the clamp connection for the
Bowden cables will damage the inner wire of the Bowden cable. If the
adjustment of the clamp connection is necessary the condition of the
inner wire has to be checked carefully. If in doubt, replace the Bowden
cable!
Oktober 2012
Revision --
5.5.4.1
SCHEMPP-HIRTH FLUGZEUGBAU GmbH, KIRCHHEIM/TECK
Arcus M
5.5
MAINTENANCE MANUAL
Maintenance of manual and automatic propeller brake (continued)
5.5.5 Basic setting of proximity switches for automatic propeller brake
a) Determination of propeller position:
The area of the propeller position for the automatic retraction of the
powerplant is defined by two proximity switches.
Both proximity switches are located on a combined attachment
directly below the upper belt pulley. Together with two sensor plates,
which are located at opposing positions on the upper belt pulley, they
are used to determine the position of the propeller during the
automatic propeller positioning process.
View opposite to direction of flight (without propeller). Shown is the
arrangement with propeller in retracting position.
Oktober 2012
Revision --
5.5.5.1
SCHEMPP-HIRTH FLUGZEUGBAU GmbH, KIRCHHEIM/TECK
Arcus M
5.5
MAINTENANCE MANUAL
Maintenance of manual and automatic propeller brake (continued)
5.5.5 Basic setting of proximity switches for automatic propeller brake
(continued)
b) Reasons for checking the proximity switches
The function and the adjustment of the proximity switches must be
checked and corrected if necessary if:
- error messages on the powerplant operating unit point to a
malfunction of the proximity switches (see FM section 7.3).
- centering the propeller in the retracting position no longer works
reliable.
- the tension of the V-belt set was readjusted (-> Position of upper
belt pulley to proximity switches has changed).
- one or both proximity switches or the attachment for the proximity
switches have been replaced.
- one or both sensor plates (pick up) at the upper belt pulley have
been altered by replacement / repair.
- other activities or events occurred that could affect the system for
the determination of the propeller position.
Note:
For the functional test of the proximity switches the Master switch
and the circuit breaker for the powerplant control system have to be
turned on.
Oktober 2012
Revision --
5.5.5.2
SCHEMPP-HIRTH FLUGZEUGBAU GmbH, KIRCHHEIM/TECK
Arcus M
5.5
MAINTENANCE MANUAL
Maintenance of manual and automatic propeller brake (continued)
5.5.5 Basic setting of proximity switches for automatic propeller brake
(continued)
c)
Functional test of proximity switches
The proximity switches are equipped with an LED at the bottom of their
housing where the connection cable emerges from the housing. Both
proximity switches are connected so that this LED is off when an
electrically conductive object approaches the upper end of the proximity
switch.
The proximity switch is functional when the LED reacts to the approach
of the sensor plate or any other electrically conductive object.
Note:
Due to their light intensity by daylight the LED is difficult to detect.
Under such conditions it is necessary to dim out the LED with i.e. your
hand, to be able to observe the switching of the LED.
d)
Basis setting of distance of proximity switches
To adjust the distance of the proximity switches, the propeller has to be
turned into the retracting position (center position) by hand. The two
proximity switches must then be directly opposite to the sensor plates.
If this requirement is not met with centered propeller, both proximity
switches have to be moved in their holes resp. the mounting plate of the
proximity switches has to be moved. The objective is that the central
axes of the proximity switches and sensor plates coincide.
If the lateral alignment is done, the distance of the proximity switches
can be set:
Nominal dimension d = 2mm ± 0.2mm (0,079 in ± 0.008 in)
(see sketch page 5.5.5.1).
Thereafter don’t tighten the screw connection of the proximity switches
to their mounting plate yet, because they might have to be loosened
again during the further adjustment process.
Caution:
The correct distance between the proximity switches and the sensor
plate has to be checked in both retracting positions of the propeller.
In case of asymmetry the sensor plates have to be checked for
damages and carefully corrected.
Oktober 2012
Revision --
5.5.5.3
SCHEMPP-HIRTH FLUGZEUGBAU GmbH, KIRCHHEIM/TECK
Arcus M
5.5
MAINTENANCE MANUAL
Maintenance of manual and automatic propeller brake (continued)
5.5.6 Adjusting the operating range of proximity switches for the automatic
propeller brake
a)
Test Mode
The powerplant control system facilitates the adjustment of the
proximity switches when it is switched for this purpose into the “Test
Mode”.
Only in this “Test Mode” the automatic retraction process of the
propeller pylon will be continued when the propeller is moved back into
its retracting area manually after this position was lost before. The “Test
Mode” will only be left when the powerplant control system is switched
off and on again.
Switching into the “Test Mode”:
i)
Ignition OFF and extract the powerplant completely with manual
operating switch.
ii)
Turn the propeller manually against the direction of rotation out of
the retracting position.
iii)
Press and hold the MENU-button for 5 s.
To cancel the “Test Mode” the powerplant control system must be
switched off and on again.
b)
Adjusting the operating range of the proximity switches –
forward limit of the retracting area
i)
Ignition OFF and extract the powerplant completely with manual
operating switch.
ii)
Turn the propeller manually against the direction of rotation out of
the retracting position.
iii)
Switch Ignition ON and OFF again.
iv)
Confirm the “BRAKE?”-message on the operating unit with the
MENU-button.
v)
Turn the propeller slowly by hand into the retracting position.
vi)
First position detection occurs when the sensor plate arrives at
the proximity switch “Pos1”. Then the brake servo engages.
Oktober 2012
Revision --
5.5.6.1
SCHEMPP-HIRTH FLUGZEUGBAU GmbH, KIRCHHEIM/TECK
Arcus M
5.5
MAINTENANCE MANUAL
Maintenance of manual and automatic propeller brake (continued)
5.5.6 Adjusting the operating range of proximity switches for the automatic
propeller brake (continued)
b)
Adjusting the operating range of the proximity switches –
front limit of the retracting area (continued)
vii)
As soon as the brake servo has automatically opened again
continue to turn the propeller slowly. The movement of the
propeller is then delayed by a pulsed braking of the brake servo.
viii) Move the propeller slowly by hand to the front limit of the
retracting area. Check with the aid of the LEDs on the proximity
switches which proximity switch reacts first (LED turns off).
When the LEDs on both proximity switches have turned off, the
powerplant will retract automatically after a short break.
If necessary, check the breaking force of the brake servo on the
propeller during the retraction process, see section 5.5.7.
ix)
Stop the automatic retraction process shortly before reaching the
cut out for the engine compartment by pressing the manual
operation switch. Then carefully continue retraction of the powerplant with the manual operation switch and check the clearance
between the critical rear propeller blade and the cut out for the
engine compartment:
-
Oktober 2012
Revision --
The propeller blade must not touch the cut out of the
engine compartment.
The clearance between the propeller and the engine
compartment cut out should not be more than 10 mm
(0.394 in), to avoid needless reduction of the retracting
area.
5.5.6.2
SCHEMPP-HIRTH FLUGZEUGBAU GmbH, KIRCHHEIM/TECK
Arcus M
5.5
MAINTENANCE MANUAL
Maintenance of manual and automatic propeller brake (continued)
5.5.6 Adjusting the operating range of proximity switches for the automatic
propeller brake (continued)
b)
Adjusting the operating range of the proximity switches –
front limit of the retracting area (continued)
x)
If the distance between the propeller and parts of the fuselage
doesn’t correspond with the nominal dimensions, proceed as
follows:
No. I) Propeller is stopped too early (propeller trailing edge
touches the engine compartment cut out)
Operating sequence of proximity
switch POS1 and POS2 (LED off)
Pos1 reacts before Pos2
Pos2 reacts before Pos1
Pos1 and Pos2 react
simultaneously
Measure
Move the proximity switch
that reacts first into the
direction of rotation of the
propeller.
Move entire attachment into
the direction of rotation of the
propeller.
No. II) Propeller is stopped too late (propeller trailing edge has
large clearance to the engine compartment cut out)
Operating sequence of proximity
switch POS1 and POS2 (LED off)
Pos1 reacts before Pos2
Pos2 reacts before Pos1
Pos1 and Pos2 react
simultaneously
Measure
Move the proximity switch
that reacts last into the
direction of rotation of the
propeller.
Move entire attachment
against the direction of
rotation of the propeller.
Note:
If the adjusting range of the single proximity switches in their mounting
is no longer sufficient, the complete attachment bracket has to be
moved. Only when this option is no longer sufficient, the holes in the
attachment can be expanded.
Caution:
The correct adjustment of the retracting area front limit must be checked in
both retracting positions of the propeller (displaced by 180°).
Oktober 2012
Revision --
5.5.6.3
SCHEMPP-HIRTH FLUGZEUGBAU GmbH, KIRCHHEIM/TECK
Arcus M
5.5
MAINTENANCE MANUAL
Maintenance of manual and automatic propeller brake (continued)
5.5.6 Adjusting the operating range of proximity switches for the automatic
propeller brake (continued)
c)
Adjusting the operating range of the proximity switches –
rear limit of the retracting area
i)
At first follow the same procedure as described in section 5.5.6
b) i) to vii).
ii)
When the propeller has reached the retracting area (brake servo
brakes permanently after pulse breaking) increase the manual
force on the propeller further until the propeller slips despite the
applied propeller brake. Slowly move the propeller to the rear
limit of the currently selected retracting area.
The started automatic retraction process will be stopped, when
the rear limit of the retracting area is exceeded (LED lights up
again).
Then move the propeller slowly backwards against the direction
of rotation until the automatic retraction process is started again
(both LEDs off).
iii)
Then proceed as described in section 5.5.6 b) ix) for the
evaluation of current setting of the rear limit of the retracting
area.
Oktober 2012
Revision --
5.5.6.4
SCHEMPP-HIRTH FLUGZEUGBAU GmbH, KIRCHHEIM/TECK
Arcus M
5.5
MAINTENANCE MANUAL
Maintenance of manual and automatic propeller brake (continued)
5.5.6 Adjusting the operating range of proximity switches for the automatic
propeller brake (continued)
c)
Adjusting the operating range of the proximity switches –
rear limit of the retracting area (continued)
Iv)
If the distance between the propeller and parts of the fuselage
doesn’t correspond with the nominal dimensions, proceed as
follows:
No. III)
Propeller pivots too far (propeller leading edge
touches the engine compartment cut out)
Operating sequence of proximity
Measure
switch POS1 and POS2 (LED on)
Move the proximity
Pos1 reacts before Pos2
switch that reacts last
against the direction of
Pos2 reacts before Pos1
rotation of the propeller.
Move entire attachment
Pos1 and Pos2 react
against the direction of
simultaneously
rotation of the propeller.
No. IV)
Retracting area is not utilised (propeller leading
edge has large clearance to the engine
compartment cut out)
Operating sequence of proximity
Measure
switch POS1 and POS2 (LED on)
Move the proximity
Pos1 reacts before Pos2
switch that reacts first
into the direction of
Pos2 reacts before Pos1
rotation of the propeller.
Move entire attachment
Pos1 and Pos2 react
into the direction of
simultaneously
rotation of the propeller.
Note:
If the adjusting range of the single proximity switches in their mounting
is no longer sufficient, the complete attachment bracket has to be
moved. Only when this option is no longer sufficient, the holes in the
attachment can be expanded.
Caution:
The correct setting of the rear limit for the retracting area must be checked in
both retracting positions of the propeller (displaced by 180°).
Oktober 2012
Revision -5.5.6.5
SCHEMPP-HIRTH FLUGZEUGBAU GmbH, KIRCHHEIM/TECK
Arcus M
5.5
MAINTENANCE MANUAL
Maintenance of manual and automatic propeller brake (continued)
5.5.6 Adjusting the operating range of proximity switches for the automatic
propeller brake (continued)
d)
Completion of adjusting the operating range of the proximity switches
After completing the adjustments, tighten the screw connection of both
proximity switches and of their attachment.
Secure both connections with Loctite.
Caution:
The maximum tightening torque for screwing the nuts on the proximity
switches is 10 Nm (7.38 lbf ft).
If this torque is significantly exceeded the proximity switches will be
damaged!
Oktober 2012
Revision --
5.5.6.6
SCHEMPP-HIRTH FLUGZEUGBAU GmbH, KIRCHHEIM/TECK
Arcus M
5.5
MAINTENANCE MANUAL
Maintenance of manual and automatic propeller brake (continued)
5.5.7 Checking the brake efficiency of the automatic propeller brake
The brake efficiency of the automatic propeller brake can be checked on the
ground according to the following procedure:
a)
b)
c)
d)
e)
f)
Requirements:
Battery of the powerplant system must be completely charged.
Keep at hand spring scale or similar device for force
measurement (working range up to min. 100 N [22.481 lbf],
resolution at least 5 N [1.124 lbf])
Attach a narrow tape loop or something similar to one propeller
tip. (distance of the measuring point to the rotation axis of the
propeller about 760 mm [29.921 in])
Switch ignition OFF and completely extend powerplant. Turn the
propeller by hand about 20° against the direction of rotation out of the
retraction area, so that both sensor plates at the upper belt pulley are
completely outside the proximity switches.
Attach the spring scale to the intended position at the propeller tip.
Switch ignition ON. Then switch Ignition OFF again and press the
MENU-button to start the automatic retraction process.
Carefully apply test force perpendicular to the propeller blade in the
propeller plane and move the propeller over the pulse brake area to the
retracting area until the automatic retracting starts.
During the automatic retraction process the brake servo operates with
maximum power. Increase the test force on the propeller blade carefully
during this process until the propeller starts to slip. Required force on
the propeller when the brake just starts to slip: at least 40 N (8.993 lbf).
Caution:
g)
The automatic retraction process will be stopped not
before the retraction area rear limit is exceeded!
If the minimum force is not met, the following points have to be checked
first before any further action is taken:
Check condition of brake pad and brake drum (contamination,
damage)
Check adjustment of drive lever at brake servo according to
section 5.5.4.
Bowden cable of brake servo clear and not damaged?
If brake servo was removed / replaced: Check correct polarity of
brake servo ports (→ direction reversing!).
Check electrical connections of the brake servo:
Check plug contact to electrical series resistor in engine
compartment for proper contact.
Check contact resistance of the power supply to the brake servo.
Oktober 2012
Revision --
5.5.7.1
SCHEMPP-HIRTH FLUGZEUGBAU GmbH, KIRCHHEIM/TECK
Arcus M
5.5
MAINTENANCE MANUAL
Maintenance of manual and automatic propeller brake (continued)
5.5.8 Other settings, wear limits and play
a) Readjustment of manual propeller brake
b)
-
If the specifications for the basic adjustment given in section
5.5.3 are met, the readjusting of the manual propeller brake is
not required.
-
The Bowden cable must be replaced if wear of the cable is
visible.
Readjustment of automatic propeller brake
To rate the automatic propeller brake first move the brake lever
in the position described in section 5.5.2. Readjusting the
automatic propeller brake is required as soon as the gap
between the brake pad and the brake drum is outside the
allowable range (dimension “a” in diagram on page 5.5.2.2).
In case of suspected poor brake efficiency, proceed as described
in section 5.5.7.
The Bowden cable must be replaced if wear of the cable is
visible.
c)
Wear of brake pad
Regardless the gap between brake pad and brake drum
determined as described in 5.5.2 b) the remaining thickness of the
brake pad must be above the specified minimum value (dimension “b”
in diagram on page 5.5.2.2). Otherwise the brake pad has to be
replaced.
Small breaks on the edges of the brake pad are tolerable.
In case of poor brake efficiency and suspected overheating or strong
contamination of the brake pad, the brake pad has to be replaced.
Oktober 2012
Revision --
5.5.8.1
SCHEMPP-HIRTH FLUGZEUGBAU GmbH, KIRCHHEIM/TECK
Arcus M
5.5
MAINTENANCE MANUAL
Maintenance of manual and automatic propeller brake (continued)
5.5.8 Other settings, wear limits and play (continued)
c)
Wear of brake pad: (continued)
Caution:
If a new brake pad is installed, it is recommended to prepare the brake
pad before adjusting the propeller brake system as follows.
For the preparation install the new brake pad at the brake lever and
check that the brake pad is clear of the brake drum.
Then start the engine and with engine idling pull gently the manual
propeller brake handle for about 2s and release the propeller brake
again.
The procedure is finished when the contact surface on the brake pad is
about 10 mm to 15 mm wide.
Oktober 2012
Revision --
5.5.8.2
SCHEMPP-HIRTH FLUGZEUGBAU GmbH, KIRCHHEIM/TECK
Arcus M
5.6
MAINTENANCE MANUAL
Pylon arresting wire for the powerplant
5.6.1 Replacing the pylon arresting wire
a) Disassemble arresting wire from the propeller pylon.
b) Remove bolts attaching cable guide to rear wall of engine compartment.
c) Pull arresting wire (with its guide) forward until attached rubber cord
becomes visible.
d) Loosen the knot with the rubber cord and fix the rubber cord in place.
If the rubber cord has to be replaced:
1.) Pull the old rubber cord clear to the rear (towards top of the fin)
2.) Connect a thin wire (or the like) with a length of approx. 4000 mm
(157 in.) with the new rubber cord. Secure the end of the rubber
cord with a knot. Then insert the wire from the rear into the guide
tube in the fuselage and pull rubber cord into position. Tie front end
of rubber cord to thimble on arresting wire (see item e) below).
3.) Adjusting the tension of the rubber cord:
Retract powerplant with arresting wire released. Pull rubber cord to
the rear until arresting wire is just straight. Then secure rubber cord
in place (2 opposing knots) and cut off excessive length.
e) Prepare new arresting wire with additional length. Then connect the new
arresting wire with the rubber cord as shown in the sketch below.
Connect rubber cord to the thimble with 2 opposing knots and let it slide
into the fuselage.
October 2012
Revision --
5.6.1.1
SCHEMPP-HIRTH FLUGZEUGBAU GmbH, KIRCHHEIM/TECK
Arcus M
5.6
MAINTENANCE MANUAL
Pylon arresting wire for the powerplant (continued)
5.6.1 Replacing the pylon arresting wire (continued)
f)
Reinstall cable guide for the arresting wire in the engine compartment and
connect the arresting wire to the propeller pylon as follows:
Extend the propeller pylon completely using the Manual Operation switch.
When the spindle drive has been cut off automatically by the limit switch
check the following items:
- dimension “A” shown in the sketch below must be fulfilled
- the arresting wire must have left about 10-15 mm (0.394 in-0.591
in) way before its stop rests against the fuselage bulkhead.
If these requirements are not fulfilled the limit switch attached to the
spindle drive has to be readjusted (see section 5.7).
g) Guide the arresting wire through the eyelet of the mounting bolt and
connect it with the thimble and the Nicopress sleeve as shown in the
sketch below:
October 2012
Revision --
5.6.1.2
SCHEMPP-HIRTH FLUGZEUGBAU GmbH, KIRCHHEIM/TECK
Arcus M
5.6
MAINTENANCE MANUAL
Pylon arresting wire for the powerplant (continued)
5.6.2 Installation of arresting wire
As arresting wire for the powerplant a closed wire rope is used (see
section 3.1.2).
If the mounting bolt of the arresting wire at the propeller pylon is
loosened and reinstalled afterwards, it must be ensured that after the
installation to the propeller hub the arresting wire is not twisted compared
to the loosened state.
Otherwise the service life of the arresting wire can be decreased and the
sliding of the arresting wire into the fuselage while retracting the
powerplant can be hindered.
To avoid this situation it is necessary to twist the mounting bolt for the
arresting wire before it is screwed to the propeller hub: Turn the arresting
wire with the same number of turns against the direction of the thread as
it will be turned while screwing in.
For this purpose take a note with the number of turns when the mounting
bolt for the arresting wire is removed.
October 2012
Revision --
5.6.2.1
SCHEMPP-HIRTH FLUGZEUGBAU GmbH, KIRCHHEIM/TECK
Arcus M
5.7
MAINTENANCE MANUAL
Adjusting propeller pylon limit switches and engine bay doors
1. Configuration “Powerplant extended”
(Limit switch mounted to spindle drive)
- Carefully extend propeller pylon with the emergency switch (see Flight
Manual section 7.3) until the spindle drive just comes to its stop (see
section 5.13).
- Then retract propeller pylon again until the arresting wire is loose by 10
to 15 mm (0.394 – 0.591 in.). Propeller pylon position must follow the
data from section 5.6)
- If the green LED on the operating unit does not come with the pylon
positioned as described above loosen the limit switch mount on the
spindle drive and move limit switch so that the green LED signal
“extended” on the operating unit just comes on. Then tighten limit switch
mount and secure it in position using Silicone.
Note:
With this adjustment the thrust of the prop will pull the arresting wire tight,
while the spindle drive is softly supported by rubber vibration isolators.
2. Configuration “Powerplant retracted”
(Limit switch on the rear bulkhead inside the engine bay)
- Disconnect actuating rod from doors of engine bay.
- Retract propeller pylon until it rests firmly against the rubber stop inside
the engine bay.
Warning:
First check basic adjustment of the limit switch. To avoid damage it
must not be fully depressed to the internal stop!
- The limit switch “powerplant retracted” is accessible through an opening
in the bulkhead mentioned above. It is vertically adjustable by turning in
or out the two lock nuts such that with propeller pylon resting against the
stop, the tappet of the limit switch is tripped but not fully depressed. The
green LED signal “retracted” will then come on.
- Reconnect rod actuating the engine bay doors.
3. Adjusting doors of engine compartment
(if necessary)
- Lengthen turnbuckles on door actuating cables such that retracted
propeller pylon rests against the rubber stop inside the engine bay (see
afore-mentioned “limit switch adjustment”).
- Thereafter adjust each turnbuckle so that the cables close the doors
equally tight.
- Finally secure turnbuckles.
October 2012
Revision ---
5.7
SCHEMPP-HIRTH FLUGZEUGBAU GmbH, KIRCHHEIM/TECK
Arcus M
5.8
MAINTENANCE MANUAL
Removal and reinstallation of fuel tanks
a) Removal and reinstallation of the fuselage fuel tank
Proceeding for removal of the fuselage fuel tank:
1. Drain all fuel via the drain valve.
2. Remove the rear seat back rest and the panel above the spar stubs.
3. Remove spindle drive including front attachment bracket from the fuselage.
4. Detach the three fuel lines attached to the top of the fuselage fuel tank: Two
lines attached at the rear right hand side and one on the left hand side
attached to the ball valve, see also Flight Manual section 7.11).
5. Detach fuel line to the drain valve in front of the T-fitting. (left hand side of the
landing gear box)
6. Remove fuel line to the fuel cock (located on the fuselage shell on the right
hand side below the cut-out for the spar stub).
7. If wing fuel tank(s) is (are) installed:
Disconnect the attachment for the fuel line(s) to the wing fuel tank(s).
8. Remove wiring of the fuel level meter.
9. Remove the four bolts attaching the fuel tank to the landing gear box and the
front engine bay bulkhead. Take care of the spacers (aluminium) and the
ground connection cable installed.
10. Move fuel tank backward and upward. Then rotate fuel tank to the front und
pull it out from the fuselage upside down. Take care of the fuel lines still
attached to the fuel tank.
Proceeding for reinstallation of the fuselage fuel tank
Reverse the steps for removal of the fuselage fuel tank given on page 5.8.1
when reinstalling the fuel tank. In addition take care of the following items:
Item 5, 6: Fuel lines to the fuel cock and the drain valve must carefully be routed
in the original way. Check for sufficient clearance to the controls.
Item 9:
October 2012
Revision --
Take care of the correct installation of the spacers! Do not forget the
connection of the ground strap!
5.8.1
SCHEMPP-HIRTH FLUGZEUGBAU GmbH, KIRCHHEIM/TECK
Arcus M
5.8
MAINTENANCE MANUAL
Removal and reinstallation of fuel tanks (continued)
b) Removal and reinstallation of the wing fuel tank model HFK-TLF
(see also sketch on page 5.8.5)
Proceeding for removal of the wing fuel tank:
1. At the root rib:
- Ventilation line: Remove heat shrink tubing and securing wire from the
fitting and remove the short ventilation line with plug nipple.
- Fuel line: Unscrew the male coupling and the bush of the fuel line fitting.
- Loosen nut of the fittings using a socket wrench.
- Install an extension tubing (e.g. instrument tubing) with a length of about
2.5m (8.2 ft) to the fittings (tie a knot on the free end). To attach the
extension tubing to the fuel line fitting a different size of tubing is required
than for the ventilation line. Remove the nuts.
2. Turn wing panel upside down:
- Remove access plate for the wing fuel tank compartment.
3. Release attachment of the wing fuel tank inside the wing:
- Remove nut, washer and ground strap from the suspension bolt located on
the rear side of the wing fuel tank and lift off fuel tank from the suspension
bolt.
- Detach fuel tank attachment rope from the eyelet on the lower wing shell.
4. Removal of the wing fuel tank:
- Fold tank in spanwise direction while pulling it out through the access
opening.
- Let attachment rope uncoil into the wing panel while fuel tank is pulled out.
Simultaneously feed extension tubing through root rib.
5. When the fuel tank is replaced:
- Detach extension tubing and attachment rope from the inboard end of the
fuel tank and tape loose ends to the wing shell.
- Fix opposite end of the attachment rope to the fuel tank retaining eyelet.
6. If required inspect fuel tank according to „Inspection instruction for flexible
fuel tanks model HFK-TLF“ (section 9).
7. Inspect accessible wing fuel tank compartment of the wing panel for damage.
October 2012
Revision --
5.8.2
SCHEMPP-HIRTH FLUGZEUGBAU GmbH, KIRCHHEIM/TECK
Arcus M
5.8
MAINTENANCE MANUAL
Removal and reinstallation of fuel tanks (continued)
b) Removal and reinstallation of the wing fuel tank model HFK-TLF (continued)
Proceeding for installation of the wing fuel tank:
If the wing fuel tank is to be replaced by a new fuel tank first prepare the
fittings of the new fuel tank:
-
Connect fuel line to wing fuel tank. Take care of tight and strong connection.
Use securing wire and heat shrink tubing to secure the fuel line attachment.
-
Connect ventilation line with the extension nipple. Take care of tight and firm
connection. Use securing wire and heat shrink tubing to secure the fuel line
attachment.
Reverse the steps for removal of the wing fuel tank given on page 5.8.2 when
reinstalling a (new) wing fuel tank. In addition take care of the following items:
1. When pulling the tank back home, make sure that the instrument tubing on
fuel line, ventilation line and the attachment rope do not become entangled –
route them parallel.
2. Make sure that the O-ring sealing on the fittings in the root rib is on place and
that they are slightly lubricated (use acid free grease or Vaseline).
3. If a new wing fuel tank is installed:
- Connect attachment rope to the grommets on the corners of the fuel tank
(Attachment rope is guided twice through the grommet and tied with a
square knot. Secure knots using instant adhesive)
- If the extension tubing has been removed: Attach extension tubing to the
fittings.
4. When inserting the fuel tank:
- Pull fuel tank home by the attachment rope. Simultaneously pull out
extension tubing through root rib.
- Pull spanwise folded fuel tank through the access opening.
5. Unfold the fuel tank to it’s true size when it has passed the access opening. It
must lay flat when pulled fully home so that finally the wing water ballast
guide tube is between fuel tank and wing shell.
6. Fuel tank attachment when the fuel tank has been fully pulled home:
- Hook up fuel tank grommet to the retaining stud in the wing shell.
- Reinstall ground strap, washer and nut. Tighten nut with care.
October 2012
Revision --
5.8.3
SCHEMPP-HIRTH FLUGZEUGBAU GmbH, KIRCHHEIM/TECK
Arcus M
5.8
MAINTENANCE MANUAL
Removal and reinstallation of fuel tanks (continued)
b) Removal and reinstallation of the wing fuel tank model HFK-TLF (continued)
7. Tighten fuel tank attachment rope carefully and secure it to the eyelet on the
lower wing shell (fix attachment rope following description from page 5.8.3).
Roll up free end of the rope and fix it to the eyelet, too.
8. After Installation of the fuel tank compartment access plate:
- Mask screw heads and the edges of the access plate with tape.
9. Installation of fuel line and ventilation line at the root rib:
- Feed hose nipples through their openings in the root rib and install
retaining nut.
- Make sure that fuel line and ventilation line are not routed below the wing
water ballast guide tube. If necessary rotate hose nipple to alter position.
- Detach extension tubing from nipples. Tighten retaining nut and secure
with Loctite 243.
- Attachment of the fuel line (backward fitting):
Install the bush and the male coupling of the fuel line fitting. Tighten and
secure screwing using Loctite 243.
- Attachment of the ventilation line (forward fitting):
Feed heat shrink tube on the short ventilation line with plug nipple and
secure ventilation line on the fitting with securing wire.
- Use a fan heater to tighten the heat shrink tubing.
Caution:
Only use stainless securing wire for the attachment of the wing fuel tank lines to
the fittings (see section 4.4).
The access panel may be bolted to the wing panel only with stainless bolts
(M5x16 DIN 965 A2).
October 2012
Revision --
5.8.4
SCHEMPP-HIRTH FLUGZEUGBAU GmbH., KIRCHHEIM/TECK
Arcus M
October 2012
Revision --
MAINTENANCE MANUAL
5.8.5
SCHEMPP-HIRTH FLUGZEUGBAU GmbH, KIRCHHEIM/TECK
Arcus M
5.9
MAINTENANCE MANUAL
Powerplant – removal and reinstallation
Removal of the powerplant
1. Extend powerplant
- Remove propeller
- Dismantle engine bay doors
- Disconnect tensile spring for the exhaust muffler at the lower end
- Remove axis (bolt) at the hinge between exhaust manifold and muffler
- Remove exhaust muffler from the fuselage
- Close the tubes of the exhaust muffler suspension (otherwise internal
compression springs might get lost)
2. Disconnect the throttle cable at the butterfly valve axis (screwed nipple).
Remove securing wire from the adjustable Bowden outer suspension and
release Bowden outer.
3. Disconnect cables for the propeller brake actuation from the propeller
brake lever (screwed nipples). Remove securing wire from the adjustable
Bowden outer support and release Bowden outer. Take care of the return
spring. Alternative method (screwed nipples need not to be opened):
Remove brake lever at the hinge point. Unscrew guiding slot and support
for the Bowden outer from the propeller pylon.
4. Disconnect mounting bolt of the powerplant arresting wire from the
propeller pylon.
5. With powerplant master switch OFF disconnect positive terminal of
starter motor and insulate it carefully.
6. Disconnect the ground strap by removing the bolt attaching the starter
motor mounting flange.
7. Powerplant master switch ON. Retract the engine until it is positioned
almost in horizontal position. Then put a wooden bloc as suspension on
the engine bay bracket and continue retraction of the powerplant until it
rests on the wooden bloc
8. Switch powerplant master switch OFF and disconnect plug for the
powerplant wiring (bayonet coupling) from the front end engine bay
bulkhead.
9. Disconnect the quick-acting coupling for the fuel lines from the front end
engine bay bulkhead.
10. Remove attachment bolt between spindle drive and propeller pylon from
the propeller pylon and turn in telescopic tube until fully home.
October 2012
Revision --5.9.1
SCHEMPP-HIRTH FLUGZEUGBAU GmbH, KIRCHHEIM/TECK
Arcus M
5.9
MAINTENANCE MANUAL
Powerplant – removal and reinstallation (continued)
Removal of the powerplant (continued)
11. Loosen both pylon mounting bolts (see drawing on page 5.9.4).
12. Attach a hoist to the propeller pylon (at the spindle attachment point),
remove pylon mounting bolts (by extracting them inwards – watch for
bushings) and lift the powerplant out from fuselage.
The hoist for lifting the propeller pylon alternatively may be attached
directly to the propeller pylon at the position of the ignition boxes.
If the Arcus M shall be operated after with engine removed the following
measures have to be accomplished before:
13. Removal of the following parts:
-Welded attachment bracket for the exhaust muffler
14. Fix loose wiring and parts. Take special care of:
-
Spindel drive
Actuation rod for the engine bay doors
Loose propeller brake lever and bowden cables
Wiring of the starter motor
Powerplant arresting wire
15. Reinstall the engine bay doors. Close and seal the engine bay doors
(e.g. using white tape, width 19mm / 0.75 in.)
16. Remove large powerplant battery from the fuselage steel frame between
front and rear cockpit. Insulate and fix wiring of the battery.
17. Drain all fuel.
18. Check empty mass C/G position and revise loading charts before the
next flight (see section 6.8)
Install required trim ballast according to the results from the C/G
calculations. The following locations are available for the installation of
trim ballast in the tail:
a) Bolt a lead ballast plate to the rib at the top of the fin.
b) Install an additional battery in the fin battery compartment.
c) Use a tail wheel hub with additional weight (ZRB181, available from
Schempp-Hirth).
October 2012
Revision ---
5.9.2
SCHEMPP-HIRTH FLUGZEUGBAU GmbH, KIRCHHEIM/TECK
Arcus M
5.9
MAINTENANCE MANUAL
Powerplant – removal and reinstallation (continued)
Reinstallation of the powerplant
Reverse the steps for removal of the powerplant given on page 5.9.1 and
5.9.2 when reinstalling the powerplant.
Caution:
a) When reinstalling the powerplant use Loctite 243 to secure the
following components:
- Attachment bolts for the powerplant
- Attachment bolts for the starter motor
- Bolt for the arresting wire (mind section 5.6.2)
b) Correctly attach the wiring of the starter motor to the propeller pylon.
c) Take care of tight connection and proper installation of the fuel hoses.
d) Ensure correct connection of the electrical wiring without folding and
chafing.
e) Connect the throttle cable to the throttle push rod on the left hand side
of the fuselage below the cut out for the spar stubs. Connect the
linkage only with the powerplant fully extended!
f)
Check adjustment of the throttle control: With the powerplant fully
extended the butterfly valves must freely reach the mechanical stops
for idle and full throttle at the fuel injection system.
g) When the axis for the hinge between exhaust manifold and exhaust
muffler is installed make sure that the hinge is easily moveable and
does not jam. For adjustment and inspection of the exhaust system
see section 5.15.
h) Reinstall components of the propeller brake systems. For adjustment
and inspection of the propeller brake system see section 5.5.
Additional requirements:
- Conduct an engine test run (see inspection list in the appendix)
- Have the engine reinstallation reviewed and signed in the aircraft’s log
book by certified review staff.
Note:
The applicable regulations issued by the national aviation authority where
the glider is registered are not affected by this instruction.
October 2012
Revision ---
5.9.3
SCHEMPP-HIRTH FLUGZEUGBAU GmbH, KIRCHHEIM/TECK
Arcus M
5.9
MAINTENANCE MANUAL
Powerplant – removal and reinstallation (continued)
Reinstallation of the powerplant (continued)
Installation of propeller pylon mounting bolts
October 2012
Revision ---
5.9.4
SCHEMPP-HIRTH FLUGZEUGBAU GmbH, KIRCHHEIM/TECK
Arcus M
5.10
MAINTENANCE MANUAL
Removal and installation of the V-belt set
5.10.1 General
Do not handle the V-belt with brute force!
Installation with tools like screw driver or crowbar cause external and internal
damage to the V-belt. This strongly affects the service life of the drive belt.
Caution:
The drive belt of the Arcus M consists of a set of five single V-belts.
It is not possible to replace single V-belts. If necessary the V-belts must
always be replaced as a complete set.
October 2012
Revision ---
5.10.1
SCHEMPP-HIRTH FLUGZEUGBAU GmbH, KIRCHHEIM/TECK
Arcus M
5.10
MAINTENANCE MANUAL
Removal and installation of the V-belt set (continued)
5.10.2 Removal of the V-belt set
1) Remove propeller. For this purpose first rotate propeller into horizontal
position to avoid collision of the proximity switches and the respective
sensor plates on the upper belt pulley during disassembly.
2) Remove the attachment bolt for the arresting wire from the propeller pylon.
3) Remove lever of the propeller brake at the hinge.
4) If you intend to install the same V-belt set afterwards again it is helpful to
mark the present position of the eccentric propeller hub on the propeller
pylon. In this way it is very simple to restore the original adjustment.
For this purpose it is recommended to copy one of the marks from the rear
side of the propeller hub to the propeller pylon.
5) Attach belt adjusting disc (s. section 5.12 and section 11) with bolt M14 at
the designated place on the rear side of the propeller hub.
6) Remove attachment bolts of the propeller hub (4 x M12).
7) Release V-belt set tension completely. To accomplish this turn the
eccentric propeller hub to the minimum position (with position „-“ on top,
see section 5.12 resp. Section 11) with means of the M14 bolt head of the
belt adjusting disc. Then remove belt adjusting disc and press out the
propeller hub from the propeller pylon to the front.
Caution:
When removing the propeller hub take care of the sensor plates for the
propeller proximity switches attached to the rear side of the drive pulley.
The sensor plates must not be damaged!
8) Pull upper belt pulley from the propeller pylon to the front and downward to
release the V-belt set from the pulley.
9) Remove V-belt set from the small (lower) belt pulley.
October 2012
Revision ---
5.10.2
SCHEMPP-HIRTH FLUGZEUGBAU GmbH, KIRCHHEIM/TECK
Arcus M
5.10
MAINTENANCE MANUAL
Removal and installation of the V-belt set (continued)
5.10.3 Installation of the V-belt set
For the installation of the V-belt set reverse the steps for removal:
1) Route the V-belt set around the small (lower) drive belt pulley.
2) Route V-belt set around the large (upper) belt pulley and insert
propeller hub into the propeller pylon. Make sure that the tension of the
drive belt is minimum (mark “-“ must be positioned on top, see section
5.12).
Provisionally secure the installation of the large (upper) belt pulley and the
propeller hub in the propeller pylon with the belt adjusting disc (see section
5.12).
3) Measurement and adjustment of the V-belt set tension see section 5.11
and 5.12.
4) When the adjustment of the V-belt set is completed tighten and secure
the four bolts M12 of the propeller hub (required torque see section 4.4).
Dismantle the belt adjusting disc.
5) Screw bolt for the arresting wire into the propeller hub (see section
5.6.2), secure and tighten lock nut.
6) Install brake lever for the propeller brake. For adjustment of the propeller
brake see section 5.5.
7) Install propeller, mind the correct position! (see section 5.10.1). Secure
propeller bolts with securing wire (Required torque see section 4.4).
8) Check the adjustment of the proximity switches for the automatic
propeller brake. If necessary correct the adjustment, see section 5.5.
Caution:
After installation of a new V-belt set there is a increased wear of the
transmission gear in the initial operation time.
For this reason in the beginning the V-belt tension has to be inspected in
reduced time intervals (see section 4.2.3).
October 2012
Revision ---
5.10.3
SCHEMPP-HIRTH FLUGZEUGBAU GmbH, KIRCHHEIM/TECK
Arcus M
5.11
MAINTENANCE MANUAL
Measuring the V-belt tension
5.11.1 General
For safe operation of the engine and the transmission gear the drive belt
tension always has to be within the permissible range.
For this reason a periodic inspection of the drive belt tension has to be
accomplished. When a new drive belt has been installed the inspection
interval is reduced at first (see section 4.2.3)
There are two procedures available to check the drive belt tension. Both
procedures are described on the following pages.
If the procedure for adjustment of the drive belt from section 5.12 is not
sufficient to adjust a proper belt tension within the permissible limits contact
the manufacturer for further advice.
October 2012
Revision ---
5.11.1.1
SCHEMPP-HIRTH FLUGZEUGBAU GmbH, KIRCHHEIM/TECK
Arcus M
5.11
MAINTENANCE MANUAL
Measuring the V-belt tension (continued)
5.11.2 Procedure 1: Investigation of the V-belt tension by deformation
measurement
a) Requirements for the investigation
- The device for measuring the V-belt tension must be available (s.
section 11).
- Spring scale with an effective range up to 100N (22.481 lbf).
- Powerplant must have a temperature of about room temperature (1823°C) (64.4-73.4°F).
- Before the measuring is started turn the propeller several times by
hand.
- Check the drive pulleys and each single V-belt for visible damage.
- The measuring of the V-belt tension is done on the left hand side of the
V-belt set between the track-supporting rollers.
b) Measuring method
1) Extend powerplant completely.
2) Turn propeller against rotational direction to have access to V-belts.
3) Place measuring device on the V-belt set in the middle between the
track-supporting rollers. All single V-belts must be included in the
measurement.
Apply test load of 100N (22.481 lbf) in the middle of the device
perpendicular to the plane of the V-belt set. Measure the position of the
V-belt set first at rest and then when the test load is applied. The
determined deformation must be within the following limits:
Determined deformation
9 mm
(0.354 in.)
9 mm > …> 6 mm
(0.354 in.- 0.236 in.)
6 mm
(0.236 in.)
October 2012
Revision ---
Remark
Lower limit of the V-belt tension in
operation
(Readjustment strongly recommended).
Normal operation range after run-in
phase (see section 4.2.3)
Upper limit of the V-belt tension in
operation (Adjustment of a new V-belt
set before first operation because of
increased wear during run-in phase)
5.11.2.1
SCHEMPP-HIRTH FLUGZEUGBAU GmbH, KIRCHHEIM/TECK
Arcus M
5.11
MAINTENANCE MANUAL
Measuring the V-belt tension (continued)
5.11.3 Procedure 2: Investigation of the V-belt tension with use of a
frequency meter
a) Requirements for the investigation
- Frequency meter must be available (s. section 11)
- Powerplant must have a temperature of about room temperature (1823°C) (64.4-73.4°F)
- Before the measuring is started turn the propeller several times by
hand.
- Check the belt pulleys and each single v-belt for visible damage.
- Make sure that all single V-belts are correctly supported by the tracksupporting rollers.
- The measuring of the natural frequency of the V-belts is done on the left
hand side of the V-belt set between the track-supporting rollers.
b) Measuring method
1) Extend powerplant completely.
2) Turn propeller against rotational direction to have access to the V-belts.
The propeller may not be turned further before the measurement is
completed to avoid any falsification of the measuring.
3) Proceeding:
Bring the microphone of the frequency meter close to the single V-belt
you want to investigate. Make the V-belt oscillate by picking it with the
finger or another suitable device. Make sure that always only one of the
single V-belts is oscillating. If necessary the single V-belts may be
separated from each other for a small amount before the measurement
is started.
4) Measuring the belt tension on a single V-belt
Make in series three measurements per every single V-belt and note
the natural frequency determined by the frequency meter. The
measurement is reliable when the deviation of the highest and lowest
frequency does not differ more than 1Hz from the arithmetic average. If
the difference is larger the measurement for this specific single V-belt
must be repeated.
October 2012
Revision ---
5.11.3.1
SCHEMPP-HIRTH FLUGZEUGBAU GmbH, KIRCHHEIM/TECK
Arcus M
5.11
MAINTENANCE MANUAL
Measuring the V-belt tension (continued)
5.11.3 Procedure 2: Investigation of the V-belt tension with use of a
frequency meter (continued)
5) Averaging the natural frequency for a complete set of single V-belts
The natural frequency of every single V-belts determined according to
4) may not deviate more than ± 5Hz from the arithmetic average of all
single V-belts. If the difference is larger check again if the single V-belts
fulfil the requirements from a). Especially check the single V-belts and
the drive pulleys for any significant wear.
The arithmetic average of the natural frequencies of all single V-belts
may not exceed the following limits:
Arithmetic average of
the determined natural
frequencies of the
single V-belts
80 Hz
approx. 85 - 90Hz
95 Hz
Remark
Lower limit of the V-belt tension in
operation
(Readjustment strongly recommended).
Normal operation range after the run-in
phase (see section 4.2.3)
Upper limit of the V-belt tension in
operation (Adjustment of a new V-belt
set before first operation because of
increased wear during run-in phase)
Caution:
The propeller may not be turned before the measurement of the natural
frequency of all single V-belts is completed. Otherwise the measuring might
be falsified.
Note:
The limits for the V-belt tension mentioned in section 5.11.3 have been
determined with the frequency meter listed in the table in section 11. There is
no experience available with frequency meters of other types.
October 2012
Revision ---
5.11.3.2
SCHEMPP-HIRTH FLUGZEUGBAU GmbH, KIRCHHEIM/TECK
Arcus M
5.11
MAINTENANCE MANUAL
Measuring the V-belt tension (continued)
5.11.3 Procedure 2: Investigation of the V-belt tension with use of a
frequency meter (continued)
6) V-belt natural frequency measurement report (Example)
Arcus M, serial no.:
Date:
Registration:
Reason for measuring of
the V-belt set:
Total engine operation
time / since the drive Vbelt set has been installed:
Determined natural
frequency per individual
Single Vmeasurement [Hz]
belt no.
1)
2)
3)
/
Arithmetic
average per
single V-belt
[Hz]
Arithmetic
average for
the set of
single Vbelts
[Hz]
1 (front)
2
3
4
5
October 2012
Revision ---
5.11.3.3
SCHEMPP-HIRTH FLUGZEUGBAU GmbH, KIRCHHEIM/TECK
Arcus M
5.12
MAINTENANCE MANUAL
Adjustment of the V-belt tension
5.12.1 General
The tension of the V-belts may be adjusted by turning the eccentric hub of
the large belt pulley (propeller hub).
To indicate the position of the eccentric hub the rear of the hub shows the
following punched-in markings:
Mark
0
+
Position of the eccentric hub, when the respective
mark is positioned on top
Minimum distance between the belt pulleys
Mid of the adjustment range
Maximum distance between the belt pulleys
Range of adjustment of the eccentric hub: 8 settings (22.5°), from (-) to (+).
Start with the (-) marking being at the top of the hub (minimum V-belt tension
or V-belt even loose).
The propeller hub is attached to the propeller pylon by 4 bolts M12.
The V-belt tension is to be measured following the procedures given in
section 5.11.
For the adjustment of the V-belt tension it is recommended to provide the
“belt adjusting disc” (s. section 5.12.4 and section 11).
October 2012
Revision --
5.12.1
SCHEMPP-HIRTH FLUGZEUGBAU GmbH, KIRCHHEIM/TECK
Arcus M
5.12
MAINTENANCE MANUAL
Adjustment of the V-belt tension (continued)
5.12.2 Increase of the V-belt tension
To increase the V-belt tension proceed as follows:
1. Remove the bolt for the arresting wire from the rear side of the propeller
hub.
2. Attach “belt adjusting disc” (dimensions shown on page 5.12.4) on the
rear side of the propeller hub (using a bolt M14).
3. Remove the bolts (4 x M12) attaching the propeller hub.
4. Turn hub with bolt M14 from the “belt adjusting disc” clockwise to the next
lug. Then reinstall and tighten bolts of the propeller hub and measure Vbelt tension (see section 5.11).
5. Repeat procedure until tension is within the prescribed limits (see section
5.11).
6. When the adjustment procedure is finished secure and tighten the four
bolts attaching the propeller hub (see section 4.4).
7. Reinstall, secure and tighten the bolt for the arresting wire (see section
5.6.2)
Warning:
Raise the tension of the V-belt only in small steps.
If the V-belt is overloaded this might cause permanent deformation and both
the V-belt and the engine might be damaged!
Caution:
If the proper belt tension cannot be reached, contact the manufacturer for
further advice.
Caution:
When the propeller hub has been readjusted always check and if necessary
correct the position of the proximity switches for the automatic propeller
brake (see section 5.5).
October 2012
Revision --
5.12.2
SCHEMPP-HIRTH FLUGZEUGBAU GmbH, KIRCHHEIM/TECK
Arcus M
5.12
MAINTENANCE MANUAL
Adjustment of the V-belt tension (continued)
5.12.3 Decrease of the V-belt tension
To reduce the V-belt tension proceed as follows:
1. Remove the bolt for the arresting wire from the rear side of the propeller
hub.
2. Attach “belt adjusting disc” (dimensions shown on page 5.12.4) on the
rear side of the propeller hub (using a bolt M14 and a counter nut M14).
The counter nut must be located between “belt adjusting disc” and bolt
head.
3. Tighten counter nut.
4. Remove the bolts (4 x M12) attaching the propeller hub.
5. Turn hub with bolt M14 counter clockwise to the next lug. Then reinstall
and tighten bolts of the propeller hub and measure belt tension.
6. Repeat procedure until tension is within the prescribed limits (see section
5.11).
7. If the adjustment procedure is finished secure and tighten the four bolts
attaching the hub (see section 4.4).
8. Reinstall, secure and tighten the bolt for the arresting wire (see section
5.6.2).
Caution:
If the proper belt tension cannot be reached, contact the manufacturer for
further advice.
Caution:
When the propeller hub has been readjusted always check and if necessary
correct the position of the proximity switches for the automatic propeller
brake (see section 5.5).
October 2012
Revision --
5.12.3
SCHEMPP-HIRTH FLUGZEUGBAU GmbH, KIRCHHEIM/TECK
Arcus M
5.12
MAINTENANCE MANUAL
Adjustment of the V-belt tension (continued)
5.12.4 Use of the belt adjusting disc
Hilfsscheibe
zumadjusting
Spannendisc
belt
des Zahnriemens
∅ 55
∅ 14
∅ 30
SK-Schraube
M14
x 25
bolt M14x25
DIN933
(DIN 933)
belt
adjusting disc
Hilfsscheibe
(material:
(Stahl odersteel
Alu)or aluminium)
2
12
October 2012
Revision --
5.12.4
SCHEMPP-HIRTH FLUGZEUGBAU GmbH, KIRCHHEIM/TECK
Arcus M
5.13
MAINTENANCE MANUAL
Spindle drive overload safety device
When extending the power plant, the telescopic tube of the spindle drive is
retracted until the latter is cut off by the limit switch “prop extended”.
The overload safety device becomes effective either in the case of a
defective limit switch or when the propeller pylon is extended via the
emergency switch (the limit switch “prop extended” is then overridden).
With the overload safety device resting against the protecting tube, the circuit
breaker will trip, thus preventing damage to the spindle drive or other parts.
Thereafter the plastic sleeve is to be inspected for proper position or defects.
The overload safety device consists of a 2-piece plastic sleeve attached to
the telescopic tube by means of two tie wraps. Dimensions and adjustment of
the overload safety device are defined by the following requirements:
-
When the propeller pylon is extended with the emergency switch and the
circuit breaker has tripped the propeller pylon arresting wire (adjusted
according to the instructions from section 5.6) may be just tight
respectively loose for max. 3 mm (0.118 in).
-
In normal operation the overload safety device must not rest against the
protecting tube with the spindle drive cut off by the limit switch (required
clearance see sketch below).
ty wrap
(Polyamid 4.7 mm)
telescopic
tube
overload safety device
protection
tube
clearance to be 0.5 to 1 mm
with spindle drive cut off
by limit switch
October 2012
Revision --
5.13.1
SCHEMPP-HIRTH FLUGZEUGBAU GmbH, KIRCHHEIM/TECK
Arcus M
5.14
MAINTENANCE MANUAL
Removal and filling the coolant liquid
5.14.1 Removal of the coolant liquid
1. Fully extend the powerplant, engine must be cold.
2. a) Remove transparent hose for visual indication of the coolant level from
the filler cap and plug the hose.
b) Dismantle the transparent hose from the propeller pylon down to the
connection to the aluminium coolant manifold on top of the engine.
3. Route the transparent hose into a container (min. 2 litre contents) placed
at the bottom of the engine compartment and remove the plug. For best
draining retract the powerplant as far as possible.
4. To drain the coolant system completely:
a) Extend the powerplant again.
b) Remove the M10x1 Allen head screw with sealing from left hand side of
the aft cylinder head. Mount a suitable nipple M10x1 with
connected hose.
c) Retract the powerplant as far as possible and drain the remaining
coolant liquid.
d) When all coolant liquid has been drained:
Open the red protecting cap of the emergency system (then the coolant
pump is in permanent operation, s. FM page 7.3.8 et seq.). Operate the
coolant pump for a short period of time (!) to dump the leftover coolant
liquid.
October 2012
Revision --
5.14.1.1
SCHEMPP-HIRTH FLUGZEUGBAU GmbH, KIRCHHEIM/TECK
Arcus M
5.14
MAINTENANCE MANUAL
Removal and filling the coolant liquid (continued)
5.14.2 Filling the coolant liquid
1. Coolant liquid
Approximately 1,8 litre (0.476 US Gal. / 0.396 UK Gal.) of coolant liquid is
required.
The coolant liquid used is a mixture from antifreeze fluid and water:
Name
Mixing ratio
(volume per cent)
Standard antifreeze fluid
(e.g. Glysantin BASF G48)
40
Demineralised water
or tap water
(Water hardness 0-20°dH)
60
Example: Mixture as listed above with Glysantin BASF G48 and tap water
provides antifreeze protection to approx. -25°C (-13°F).
Caution:
The coolant liquid used must be suitable for engines built from aluminium.
It is advised not to use distilled water.
Caution:
The given value for the antifreeze protection has proved to be useful in
flight operation. In case of longer parking and depending on the expected
environmental conditions it might be necessary to adjust a stronger
antifreeze protection.
A high percentage of antifreeze liquid reduces the cooling efficiency of the
coolant liquid. For this reason it can be helpful to reduce the amount of
antifreeze fluid in the coolant liquid if the engine is operated for a longer
period of time at high outside air temperatures.
October 2012
Revision --
5.14.2.1
SCHEMPP-HIRTH FLUGZEUGBAU GmbH, KIRCHHEIM/TECK
Arcus M
5.14
MAINTENANCE MANUAL
Removal and filling the coolant liquid (continued)
5.14.2 Filling the coolant liquid (continued)
2. Fully extend the powerplant.
3. If the coolant liquid has been drained before according to the procedure
described in section 5.14.1:
a) Reinstall M10x1 Allen head screw with sealing ring on left hand side of
the aft cylinder head (Torque 20Nm / 14.4lbft).
b) Reinstall and attach the transparent hose. Refer to item 2.a) und 2.b)
from section 5.14.1.
4. Remove the screw cap from the radiator and fill in the coolant liquid until
the radiator is completely filled.
5. a) Pull circuit breaker for the spindle drive.
b) To run the water pump lift the red protection cap of the emergency
switch (permanent operation of the water pump!).
c) Check the visible amount of coolant liquid. The coolant liquid level
should be approx. 10mm above the upper end of the radiator cooling
fins. If necessary top up the radiator.
d) Close the radiator cap.
6. a) Perform a ground run (see appendix, inspection lists)
b) Allow the engine to cool down.
c) Check the level of the coolant liquid. If necessary fill in coolant liquid up
to the specified level.
October 2012
Revision --
5.14.2.2
SCHEMPP-HIRTH FLUGZEUGBAU GmbH, KIRCHHEIM/TECK
Arcus M
5.15
MAINTENANCE MANUAL
Adjustment of the exhaust system
5.15.1 Description
During extension and retraction of the powerplant the exhaust system is
folded at a hinge located between exhaust manifold and exhaust muffler.
The suspension rods of the exhaust muffler are spring-loaded bedded for
adjustment purposes and to reduce the vibration loading on the system.
With the engine extended the sealing of the coupling is provided by a ball
socket connection. The spring loaded exhaust muffler coupling additionally
helps to seal the connection.
The engine performance strongly depends on the sealing between exhaust
muffler and exhaust manifold. For this reason a particular arrangement and
initial load of the coupling is required to guarantee sufficient sealing of the
connection during engine operation.
October 2012
Revision --
5.15.1.1
SCHEMPP-HIRTH FLUGZEUGBAU GmbH, KIRCHHEIM/TECK
Arcus M
5.15
MAINTENANCE MANUAL
Adjustment of the exhaust system (continued)
5.15.2 Basic adjustment of the exhaust muffler
1) First the fully extended position of the power plant must be established
correctly before the adjustment of the exhaust muffler can be estimated.
For this purpose first check and if necessary correct the adjustment of
the arresting wire and the limit switch for the extended position according
to the instructions from section 5.6.and 5.7.
2) With the powerplant fully extended press forward (in direction of flight)
the propeller pylon at the upper end by hand until the arresting wire is
tight. For the following checks the powerplant always must be fixed in this
most forward position.
i) The exhaust muffler is adjusted correctly if it can be moved up and
down for at least 20mm (0.787in) with the power plant in the most
forward position. When the exhaust muffler is moved within the given
range the following characteristics must be fulfilled:
- there may be no visible movement of the ball-socket connection
between exhaust manifold and exhaust muffler and
- the travel of the exhaust muffler may not be blocked by jamming or
a limit stop.
Especially mind the free movement of the suspension rods in their
guiding tubing. Also the hinge between exhaust muffler and exhaust
manifold may not jam. Also check the hinge axis for excessive wear.
October 2012
Revision --
5.15.2.1
SCHEMPP-HIRTH FLUGZEUGBAU GmbH, KIRCHHEIM/TECK
Arcus M
5.15
MAINTENANCE MANUAL
Adjustment of the exhaust system (continued)
5.15.2 Basic adjustment of the exhaust muffler (continued)
ii) The exhaust muffler is adjusted correctly if a force in the range from
F = 10 to 30N (2.248 to 6.744 lb f) is just sufficient to set the exhaust
muffler in upward motion with the power plant in the most forward
position.
The test load must be applied following the sketch below at the rear
end of the exhaust muffler in the centre plane of the suspension rods.
Force measurement is done by a spring scale.
iii) The adjustment of the exhaust muffler can be corrected by changing
the length of the internal compression springs inside the guiding
tubing. For adjustment there have to be installed longer springs or the
installed springs have to be shortened.
Caution:
The hinge axis between exhaust muffler and exhaust manifold consists of a
bolt, a curved spring washer and a special nut similar to DIN 14440.
Tighten the nut only so far that you are just able to turn the axis by hand.
When the nut has been unscrewed always use a new nut for the reassembly
of the hinge.
October 2012
Revision --
5.15.2.2
SCHEMPP-HIRTH FLUGZEUGBAU GmbH, KIRCHHEIM/TECK
Arcus M
6.
Determination of centre of gravity and payload
6.1
Introduction
MAINTENANCE MANUAL
This section contains procedures for determining the aircraft’s empty weight (mass)
and empty weight c/g position.
Furthermore it provides procedures for the determination of the c/g position in flight
and the permitted payload.
A comprehensive list of all equipment available is found in section 7.
October 2012
Revision - 6.1
SCHEMPP-HIRTH FLUGZEUGBAU GmbH, KIRCHHEIM/TECK
Arcus M
6.2
MAINTENANCE MANUAL
Weighing procedures
To determine the c/g position of the aircraft main wheel and tail wheel (or skid) are
placed on a scale and jacked up such that the attitude shown below is achieved.
The weight on main wheel (W 1 ) and tail wheel (W 2) is read with the wings held
level.
The distances “a” and “b” shall be measured with the aid of a plumb line.
Alternatively they can be extracted from the last weight and balance report or from
the information provided on the next page.
6.2.1 Empty weight and empty weight c/g position
The empty weight W= W1 + W 2 of the aircraft is determined by weighing.
The empty weight weighing should be accomplished with the complete aircraft
without crew, without parachute(s), without fuel and without water ballast, but
including all of its fixed equipment. For the weighing the canopy should be closed
and the powerplant should be retracted.
For the weighing procedure, the nose wheel must always be installed. If the
optional nose skid is installed it must be replaced by the nose wheel for weighing.
Datum plane: Wing leading edge at root rib
October 2012
Revision - 6.2.1
SCHEMPP-HIRTH FLUGZEUGBAU GmbH, KIRCHHEIM/TECK
Arcus M
6.2
MAINTENANCE MANUAL
Weighing procedures (continued)
Datum plane:
Wing leading edge at root rib
Aircraft attitude:
The tail should be jacked up so that a
100:4.5 wedge placed on top of the tail
boom is horizontal along its upper edge.
Distance datum to main wheel:
a = - 20 mm (- 0.79 in.)
Fixed tail wheel/skid (if installed):
Distance tail wheel to main wheel:
b = 5322 mm (209.53 in.)
Steerable tail wheel (if installed):
Distance tail wheel to main wheel:
Empty mass C/G position:
x=
b = 5577 mm (219.57 in.)
W2 × b
+a
W
6.2.1 Flight mass and C/G position in flight:
(Given only in case the “c/g position in flight” is to be determined by weighing rather
than by computing it on the basis of the empty mass c/g position)
For the flight mass weighing the aircraft is to be weighed fully equipped (crew with
parachute(s) and complete equipment incl. barograph, cushions, cameras, fuel,
water ballast, etc.). Rudder pedals and seat back rest should be correctly adjusted
for this purpose.
C/G position in flight:
x inFlight =
W2,loaded × b
W + W payload
+a
Where
= Empty weight
W
W2, loaded = Measured weight on the tailwheel/skid when weighing with flight mass
Wpayload = Weight of crew with parachutes, all non-fixed equipment, fuel,
water ballast
October 2012
Revision - 6.2.2
SCHEMPP-HIRTH FLUGZEUGBAU GmbH, KIRCHHEIM/TECK
Arcus M
6.3
MAINTENANCE MANUAL
Weighing record
It is always necessary to establish the empty mass and the empty mass c/g position
of the aircraft on the following occasions:
-
after installation of additional fixed equipment
after repainting
after repairs
after any modification which could possibly affect the weight of the aircraft
An authorized inspector has to fill in the empty mass, the empty mass c/g position
and all loading data derived from these values on the loading chart. Notes should
be made of the equipment installed when the weight of the aircraft is determined –
see valid equipment list of the aircraft and Flight Manual page 6.2.3 resp. 6.2.4.
October 2012
Revision - 6.3
SCHEMPP-HIRTH FLUGZEUGBAU GmbH, KIRCHHEIM/TECK
Arcus M
6.4
MAINTENANCE MANUAL
Empty mass and empty mass c/g position
a)
Empty mass
The empty mass of the aircraft is the aircraft
-
without crew and without removable trim ballast
without parachute(s)
without water ballast
without fuel
but including all of its fixed equipment.
b)
Empty mass centre of gravity
It must always be ensured that the empty mass centre of gravity remains within
the permitted range. If necessary fixed trim ballast must be installed.
If the empty mass c/g limits and the load limits on the seats are complied with,
the centre of gravity in flight will remain within the permitted range.
For empty mass c/g limits see diagram on page 6.4.3.1 and 6.4.3.2.
The empty mass c/g ranges shown in the diagrams on page 6.4.3.1
(powerplant installed) and on page 6.4.3.2 (powerplant removed) are derived
from the following seat loads:
Forward c/g limits:
With a maximum seat load of 115 kg (253.6 lb) on each
seat and with maximum permitted water ballast
Reward c/g limits:
With various minimum loads on the front seat
(allowance for fuel already made)
October 2012
Revision - 6.4.1
SCHEMPP-HIRTH FLUGZEUGBAU GmbH, KIRCHHEIM/TECK
Arcus M
6.4
MAINTENANCE MANUAL
Empty mass and empty mass c/g position (continued)
To facilitate the checking of the empty mass centre of gravity, the table below
shows – at different empty mass values – the maximum permissible load on the tail
wheel, with various loads on the front seat and in relation to the most rearward c/g
position.
The actual load on the tail wheel is determined with the aircraft in weighing attitude,
i.e. main wheel on the ground and tail jacked up to flight attitude as described on
page 6.2.1.
If the load on the tail wheel is below the value in the table, the empty mass centre of
gravity is in front of the rearmost allowed limit for the corresponding minimum
cockpit load and empty mass.
There are two different tables depending on the type of tail wheel installed.
a) Table for fixed tail wheel/skid:
Load on fixed tail wheel/skid with a minimum seat load of:
Empty mass
kg
lb
70
kg
154
lb
75
kg
165
lb
80
kg
176
lb
85
kg
187
lb
90
kg
198
lb
450
992
48.8
107.6
50.5
111.2
52.1
114.9
53.8
118.5
55.4
122.2
460
1014
49.4
108.9
51.0
112.5
52.7
116.2
54.3
119.8
56.0
123.5
470
1036
50.0
110.2
51.6
113.8
53.3
117.5
54.9
121.1
56.6
124.7
480
1058
50.6
111.5
52.2
115.1
53.9
118.7
55.5
122.4
57.2
126.0
490
1080
51.1
112.7
52.8
116.4
54.4
120.0
56.1
123.7
57.7
127.3
500
1102
51.7
114.0
53.4
117.7
55.0
121.3
56.7
124.9
58.3
128.6
510
1124
52.3
115.3
54.0
119.0
55.6
122.6
57.3
126.2
58.9
129.9
520
1146
52.9
116.6
54.5
120.2
56.2
123.9
57.8
127.5
59.5
131.2
530
1168
53.5
117.9
55.1
121.5
56.8
125.2
58.4
128.8
60.1
132.4
540
1190
54.1
119.2
55.7
122.8
57.4
126.4
59.0
130.1
60.7
133.7
550
1213
54.6
120.4
56.3
124.1
57.9
127.7
59.6
131.4
61.2
135.0
560
1235
55.2
121.7
56.9
125.4
58.5
129.0
60.2
132.7
61.8
136.3
570
1257
55.8
123.0
57.4
126.7
59.1
130.3
60.8
133.9
62.4
137.6
580
1279
56.4
124.3
58.0
127.9
59.7
131.6
61.3
135.2
63.0
138.9
590
1301
57.0
125.6
58.6
129.2
60.3
132.9
61.9
136.5
63.6
140.1
October 2012
Revision - 6.4.2.1
SCHEMPP-HIRTH FLUGZEUGBAU GmbH, KIRCHHEIM/TECK
Arcus M
6.4
MAINTENANCE MANUAL
Empty mass and empty mass c/g position (continued)
b) Table for steerable tail wheel:
Load on steerable tail wheel with a minimum seat load of:
Empty mass
kg
lb
70
kg
154
lb
75
kg
165
lb
80
kg
176
lb
85
kg
187
lb
90
kg
198
lb
450
992
46.6
102.7
48.2
106.2
49.7
109.6
51.3
113.1
52.9
116.6
460
1014
47.1
103.9
48.7
107.4
50.3
110.9
51.9
114.3
53.4
117.8
470
1036
47.7
105.1
49.3
108.6
50.8
112.1
52.4
115.6
54.0
119.0
480
1058
48.2
106.4
49.8
109.8
51.4
113.3
53.0
116.8
54.5
120.3
490
1080
48.8
107.6
50.4
111.1
52.0
114.5
53.5
118.0
55.1
121.5
500
1102
49.4
108.8
50.9
112.3
52.5
115.8
54.1
119.2
55.7
122.7
510
1124
49.9
110.0
51.5
113.5
53.1
117.0
54.6
120.5
56.2
123.9
520
1146
50.5
111.3
52.0
114.7
53.6
118.2
55.2
121.7
56.8
125.2
530
1168
51.0
112.5
52.6
116.0
54.2
119.4
55.8
122.9
57.3
126.4
540
1190
51.6
113.7
53.2
117.2
54.7
120.7
56.3
124.1
57.9
127.6
550
1213
52.1
114.9
53.7
118.4
55.3
121.9
56.9
125.4
58.4
128.8
560
1235
52.7
116.2
54.3
119.6
55.8
123.1
57.4
126.6
59.0
130.1
570
1257
53.2
117.4
54.8
120.9
56.4
124.3
58.0
127.8
59.6
131.3
580
1279
53.8
118.6
55.4
122.1
57.0
125.6
58.5
129.0
60.1
132.5
590
1301
54.4
119.8
55.9
123.3
57.5
126.8
59.1
130.3
60.7
133.7
October 2012
Revision - 6.4.2.2
SCHEMPP-HIRTH FLUGZEUGBAU GmbH, KIRCHHEIM/TECK
Arcus M
6.4
MAINTENANCE MANUAL
Empty mass and empty mass c/g position (continued)
Empty mass c/g position (powerplant installed)
October 2012
Revision - 6.4.3.1
SCHEMPP-HIRTH FLUGZEUGBAU GmbH, KIRCHHEIM/TECK
Arcus M
6.4
MAINTENANCE MANUAL
Empty mass and empty mass c/g position (continued)
Empty mass c/g position (powerplant removed)
October 2012
Revision - 6.4.3.2
SCHEMPP-HIRTH FLUGZEUGBAU GmbH, KIRCHHEIM/TECK
Arcus M
6.5
MAINTENANCE MANUAL
Mass of the non lifting parts
The non lifting parts of the aircraft consist of the fuselage including the installed
equipment and the payload, rudder and horizontal tailplane.
The maximum permitted mass of the non-lifting parts is
Powerplant installed:
550 kg
(1213 lb)
Powerplant removed:
530 kg
(1169 lb)
See also Flight Manual, page 2.6.
October 2012
Revision - 6.5
SCHEMPP-HIRTH FLUGZEUGBAU GmbH, KIRCHHEIM/TECK
Arcus M
6.6
MAINTENANCE MANUAL
Payload
Load on the seats
Depending on its equipment and the installation of fixed trim ballast, the actual
minimum and/or maximum seat loads of this particular Arcus M (to which this
manual refers) may differ from the typical weights listed above.
The placards in the cockpit must always show the actual weights, which are also to
be entered in the loading chart – see flight manual, page 6.2.3 or 6.2.4.
Determining the maximum permitted load on the seats:
The maximum load in the front seat and the maximum load in the rear seat are
always 115 kg (253.6 lb).
With powerplant installed:
The maximum cockpit load with completely filled fuselage fuel tank,
considering 11 kg /24.3 lbs. of fuel, must be set so that the maximum mass of the
non-lifting parts and the maximum take off and landing mass are not exceeded (see
Flight Manual page 2.6).
With powerplant removed and empty fuselage fuel tank:
The maximum cockpit load must be set in the same way as above but without
considering the content of the fuselage fuel tank.
Depending on the circumstances, the maximum cockpit load can be less than
230kg (507 lbs). If this is the case, the maximum load in each seat may not be fully
used simultaneously.
October 2012
Revision - 6.6.1
SCHEMPP-HIRTH FLUGZEUGBAU GmbH, KIRCHHEIM/TECK
Arcus M
6.6
MAINTENANCE MANUAL
Payload (continued)
For establishing a „Weight & Balance Report“ the following lever arms are to be used:
Center of gravity in relation to datum
Trim ballast under front instrument 2153 mm forward of datum
panel
84.76 in.
Trim ballast on right hand side of 1953 mm forward of datum
front control stick mounting frame 76.89 in.
Pilot, front seat (with parachute or 1468 mm forward of datum
back cushion)
57.80 in.
Engine battery at
transverse frame
Battery at rear
mounting frame
steel
tube 978 mm forward of datum
38.50 in.
control
stick 708 mm forward of datum
27.87 in.
Pilot, rear seat (with parachute or 308 mm forward of datum
back cushion)
12.13 in.
Main wheel
20 mm forward of datum
0.79 in
Water ballast, wings
17 mm forward of datum
0.67 in.
Wing fuel tank
145 mm aft of datum
5.7 in
Fuel tank in the fuselage
492 mm aft of datum
19.37 in.
Power plant, retracted
1170 mm aft of datum
(engine with propeller, muffler,
46.06 in.
spindle drive)
5302 mm aft of datum
Fixed tail wheel / skid
208.74 in.
Steerable tail wheel
5557 mm aft of datum
218.78 in.
Battery fin
5277mm aft of datum
207.76 in.
Water ballast, fin
5292 mm aft of datum
208.35 in.
October 2012
Revision - 6.6.2
SCHEMPP-HIRTH FLUGZEUGBAU GmbH, KIRCHHEIM/TECK
Arcus M
6.7
Mass – c/g diagram (powerplant installed)
October 2012
Revision - MAINTENANCE MANUAL
6.7.1
SCHEMPP-HIRTH FLUGZEUGBAU GmbH, KIRCHHEIM/TECK
Arcus M
6.7
Mass – c/g diagram (powerplant removed)
October 2012
Revision - MAINTENANCE MANUAL
6.7.2
SCHEMPP-HIRTH FLUGZEUGBAU GmbH, KIRCHHEIM/TECK
Arcus M
6.8
MAINTENANCE MANUAL
Operation with powerplant removed
To operate the motorglider as pure sailplane or for maintenance purposes, the
powerplant can be removed.
When the powerplant is removed the influence of the powerplant on the
empty mass and c/g position must be determined by reweighing. A pure
calculation of the c/g position is not precise enough.
After the reinstallation of the complete powerplant it is not necessary to establish a
new weighing record if the latest weighing record with the complete powerplant
installed is still applicable.
In any case after the conversion the effective data for empty mass and c/g position
of the aircraft have to be entered into the loading chart in the Flight Manual (see
section 6.2.4 – powerplant removed resp. section 6.2.3 powerplant installed) by an
authorized inspector.
The powerplant can be removed as specified in section 5.9 of the maintenance
manual. By removing the powerplant (complete propeller pylon including exhaust
manifold and spindle drive) the empty weight is reduced by approx. 62 kg (136.7
lb). In order to estimate the effect of the removed powerplant on the empty mass
c/g position the following values can be taken into account:
1) With powerplant removed the load on the tail wheel is reduced:
- with fixed tail wheel / skid by
- with steerable tail wheel by
ΔW 2 = approx. -13.9 kg / -30.7 lb
ΔW 2 = approx. -13.3 kg / -29.3 lb
2) This nose-heavy moment can be reduced by removing the not needed battery
for the powerplant at the steel tube transverse frame (Hawker Odyssey PC680,
12V/17 Ah, mass approx. 6.8 kg / 15.0 lb).
Thus the load on the tail wheel is increased:
- with fixed tail wheel / skid by
- with steerable tail wheel by
ΔW 2 = approx. 1.22 kg / 2.70 lb
ΔW 2 = approx. 1.17 kg / 2.58 lb
3) The remaining nose-heavy moment due to the removed powerplant and the
removed engine battery can be compensated further with the following actions:
1. Removal of one Avionic-battery in front of the rear control stick mounting
frame (if a second Avionic-battery is installed).
2. Installation of a correspondingly shaped trim weight for the top of the
vertical tail (approx. 1.6 to 1.8 kg / 3.53 to 3.97 lb)
3. Installation of tail wheel with brass hub (add. mass approx. 2.5 kg / 5.5 lb).
With this information the new empty mass c/g position and the load on the seats
can be estimated.
October 2012
Revision - 6.8
SCHEMPP-HIRTH FLUGZEUGBAU GmbH, KIRCHHEIM/TECK
Arcus M
6.9
MAINTENANCE MANUAL
Operation with nose skid (optional)
The motorglider Arcus M can be operated with a nose skid instead of a nose
wheel.
When operating with the nose skid instead of the nose wheel, the minimum
cockpit load in the front seat increases by 2 kg (4.4 lb).
With nose skid:
Minimum cockpit load increases
by 2 kg (4.4 lb).
The placard shown above shall be placed in the cockpit near the cockpit
load placards, see also Flight Manual page 2.15.
October 2012
Revision - 6.9
SCHEMPP-HIRTH FLUGZEUGBAU GmbH, KIRCHHEIM/TECK
Arcus M
MAINTENANCE MANUAL
7.
List of approved equipment
7.1
Safety belts
Two four-piece symmetrical safety harnesses are required.
The following restraint system may be used:
Lap belts
Type
Manufacturer
Data-Sheet No.
Bagu 5202
Gadringer
40.070/32
4-01-1256
Schroth
40.073/11
Type
Manufacturer
Data-Sheet No.
Schugu 2700
Gadringer
40.071/05
4-01-1256
Schroth
40.073/11
Shoulder straps
October 2012
Revision --
7.1
SCHEMPP-HIRTH FLUGZEUGBAU GmbH, KIRCHHEIM/TECK
Arcus M
7.2
MAINTENANCE MANUAL
Instruments and equipment
The following instruments are available for the minimum equipment of the Arcus M (see
also section 2.12 of the Flight Manual):
a) Minimum equipment
AIRSPEED INDICATOR (minimum range: 50 to 300 km/h, 27–162 kts, 31–186 mph)
Manufacturer: Gebr. Winter, Jungingen
Model
Code No.
Data-Sheet No.
6 FMS 4
7 FMS 4
6 FMS 5
7 FMS 5
6421
7421
6511
7511
TS 10.210/15
TS 10.210/19
TS 10.210/16
TS 10.210/20
ALTIMETER
Manufacturer: Gebr. Winter, Jungingen
Model
Code No.
Data-Sheet No.
4060 (m)
TS 10.220/44
4200 (ft)
4110 (m)
4 FGH 10
TS 10.220/46
4320 (ft)
4220 (m)
4 FGH 20
TS 10.220/47
4440 (ft)
4 FGH 40
4550 (ft)
TS 10.220/48
or other altimeter certified according to TSO C 10 b
4 HM 6
OUTSIDE AIR TEMPERATURE (OAT) INDICATOR (when flying with water ballast)
Model
Manufacturer
Temperature gauge
Störk
TF 00-59K
Remote temperature probe
Kobold
Y-LE-TNF /-20 +60
Specif.-No.
01 59 042
01 59 042
MAGNETIC COMPASS
Model
Manufacturer
Data-Sheet No.
FK 16
C 2300
C 2400
Ludolph
Airpath
Airpath
L-10.410/3
-----
October 2012
Revision --
7.2.1
SCHEMPP-HIRTH FLUGZEUGBAU GmbH, KIRCHHEIM/TECK
Arcus M
7.2
MAINTENANCE MANUAL
Instruments and equipment (continued)
a) Minimum equipment (continued)
POWERPLANT CONTROL SYSTEM
with integrated tachometer and fuel gauge
Model
Manufacturer
Specif.-No.
Powerplant operating unit
MCU II BG
Powerplant control unit
MCU II SG
ILEC GmbH
Bayreuth
MCU II
b) Additional Equipment
VARIOMETER
Manufacturer: Gebr. Winter, Jungingen
Model
Code No.
Data-Sheet No.
5 St VL
5 St VLM
5 St V
5 St VM
all code numbers
approved
TS 10.230/11
TS 10.230/12
TS 10.230/13
TS 10.230/14
TURN & BANK INDICATOR with slip ball
Model
WZ 402/31
IFR 51-12-2
Manufacturer
Data-Sheet No.
Apparatebau
Gauting
Instruments and Flight
Research, Wichita/USA
10-241/8
TSO C 3 b
OXYGEN SYSTEM
Model
Höhenatmer
HLa 758
Miniregler
Miniregler
October 2012
Revision --
Manufacturer Code-No.
Data-Sheet No.
Dräger
E 20088
40.110/1
Dräger
Dräger
E 24902
E 24903
40.110/19
40.110/19
7.2.2
SCHEMPP-HIRTH FLUGZEUGBAU GmbH, KIRCHHEIM/TECK
Arcus M
7.2
MAINTENANCE MANUAL
Instruments and equipment (continued)
b) Additional Equipment (continued)
VHF-TRANSCEIVERS
Model
Manufacturer
Data-Sheet No.
FSG 40 S
W. Dittel GmbH.
10.911/45
FSG 50
W. Dittel GmbH.
10.911/71
FSG 60
W. Dittel GmbH.
10.911/72
FSG 70
W. Dittel GmbH.
10.911/81
FSG 71 M
W. Dittel GmbH.
10.911/81
FSG 90, 90H1 W. Dittel GmbH.
10.911/98JTS
FSG 2T
W. Dittel GmbH.
10.911/103JTSO
ATR 720
Avionic Dittel
10.911/70
ATR 720 A
Filser Electronic GmbH. 10.911/74
ATR 720 B
Filser Electronic GmbH. 10.911/80
ATR 720 C
Filser Electronic GmbH. 10.911/83
ATR 500
Filser Electronic GmbH. O.10.911/113JTSO
ATR 600
Filser Electronic GmbH. O.10.911/106JTSO
ATR 600R01
Filser Electronic GmbH. O.10.911/115JTSO
ATR 833
Filser Electronic GmbH. EASA.21O.0193
M760
Microair
CAA LA301068
AR 3201
Becker
10.911/76
AR 3201-( )
Becker
10.911/76
AR 4201
Becker
10.911/87
AR 6201
Becker
EASA.21O.1249
or other VHF-Transceivers, certified according to TSO, JTSO or ETSO
for the use in airplanes
EMERGENCY LOCATOR TRANSMITTER
Model
Manufacturer
Data-Sheet No.
EB-2 B (CD)
ELT 10
ELT 8.1
3000
ACK E01
ACK E04
ME 406 ELT
AK-451-() ELT
Mar Tech Division
Narco Avionics
Dorne & Margolin Inc.
Pointer
ACK Technologies Inc.
ACK Technologies Inc.
Artex Aircraft Supplies Inc.
Ameri-King Corporation
10.915/2
10.915/3
10.915/5
10.915/6
10.915/9
EASA.IM.21O.10028407
EASA.IM.21O.416
EASA.IM.21O.1102
October 2012
Revision --
7.2.3
SCHEMPP-HIRTH FLUGZEUGBAU GmbH, KIRCHHEIM/TECK
Arcus M
7.2
MAINTENANCE MANUAL
Instruments and equipment (continued)
b) Additional Equipment (continued)
TRANSPONDER MODE A/C
Model
ATC 2000-(3)-R(XX)
(ATC 3401-1-R, CU 3400-1-(XX),
CU 5401-1-(XXX))
ATC 4401
(ATC4401-1-175, ATC4401-2-175,
ATC441-1-250, ATC4401-2-250)
T2000
Manufacturer
Data-Sheet No.
Becker
LBA.0.10.930/54 JTSO
Becker
LBA.0.10.930/062 JTSO
Microair
LBA.10.930/066 JTSO
ACK
TSO C-88a
Technologies
or other Transponder, certified according to TSO, JTSO or ETSO for the use in
airplanes
ACK A-30
TRANSPONDER MODE S
Model
Manufacturer
Data-Sheet No.
Becker
EASA.21O.322
Becker
ACK
Technologies
EASA.21O.001174
BXP 6401-1-(01)+ BXP 6402-1R-(01)
BXP 6401-2-(01)+ BXP 6402-2R-(01)
AM 6400-1-(01) Address modul
CU 6401-1-(01) Control unit
BE 6 400-01-(01) Blind Encoder
ACK A-30
TRT 600
TRT 800
TRT-800H
VT-0101
VT-0102-070
VT-01
VT-0102-125
VT-0103-1
TSO C-88a
Filser
10.930/063 NTS
EASA.21O.045
EASA.21O.269
Garrecht
EASA.21O.384
VT-01 Ultra Compact Rev. A
or other Transponder, certified according to TSO, JTSO or ETSO for the use in
airplanes
October 2012
Revision --
7.2.4
SCHEMPP-HIRTH FLUGZEUGBAU GmbH, KIRCHHEIM/TECK
Arcus M
7.2
MAINTENANCE MANUAL
Instruments and equipment (continued)
Note for the installation of additional equipment*:
Additional equipment as listed under 7.2 b) and further additional equipment that is
not mentioned under 7.2 b)* can be installed under the following requirements:
-
It must be ensured that the equipment in itself or its effect upon the airplane
does not constitute a hazard to safe operation.
-
It must be ensured that the equipment is safely fixed under all operating
conditions and does not constrain the operation of the airplane. Furthermore, it
must be ensured that the equipment does not cause a hazard in a crash.
-
The mass of the equipped instrument panel must not exceed the allowed
maximum mass. If no allowed maximum mass is mentioned in the flight- or
maintenance manual, the maximum weight of the equipped instrument panel is
limited to 10 kg / 22 lb.
-
The electric installation of the additional equipment has to conform to the
information given in the maintenance manual and the wiring diagram in the flight
manual.
-
The instructions of the manufacturer of the particular equipment for the
installation must be followed.
-
The equipment list of the affected airplane has to be updated and if necessary a
new weight and balance report has to be provided.
-
The measures taken and their inspections have to be conducted in compliance
with the applicable national rules.
-
Documents associated with the equipment provided by its manufacturer or, if
applicable, by the supplier should be included in the documentation of the
airplane.
*
such as variometer, final glide computer, flight logger, navigation computer,
turn point camera, TEK-Probes, bug wipers etc.
October 2012
Revision --
7.2.5
SCHEMPP-HIRTH FLUGZEUGBAU GmbH, KIRCHHEIM/TECK
Arcus M
7.2
MAINTENANCE MANUAL
Instruments and equipment (continued)
Electrical power supply
For the electrical power supply the following battery-types might be used:
a) For the power supply of the powerplant system and optionally also the Avionc
(see diagram 10, Position 1) the following battery-types might be used:
Sealed Lead-Acid-Battery Hawker Odyssey PC 680 (12V, 17Ah)
or similar type with at least 16 Ah capacity and the applicable housing
dimensions.
b) As optional batteries which are only used as power supply for the Avionic (see
diagram 9, position 2a to 2c) the following battery-types might be used:
Sealed Lead-Acid-Battery Panasonic LC-R127R2PG 12V 7.2 Ah
resp. LC-RA1212PG1 12V 12 Ah
or similar type with at least 5.7 Ah capacity and applicable housing
conditions.
Lithium-Iron-Phosphate-Battery Airbatt Energiepower LiFePO4 12V 8 Ah
resp. LiFePO4 12V 15 Ah
or similar type with at least 5.7 Ah capacity and applicable housing
conditions.
Nickel-Metal Hydride-Battery Airbatt NIMH 12V 14AH G
or similar type with at least 5.7 Ah capacity and applicable housing
conditions.
If solar panels are installed (optional, see diagram 9) only lead-acid batteries or
lithium-iron-phosphate batteries are to be used.
October 2012
Revision --
7.2.6
SCHEMPP-HIRTH FLUGZEUGBAU GmbH., KIRCHHEIM/TECK
Arcus M
8.
MAINTENANCE MANUAL
Placing:
Placards and pictograms
Hersteller:
IDENTIFICATION PLATE
(fire resistant)
SCHEMPP-HIRTH
Flugzeugbau GmbH
Baumuster:
Werk-Nr./Bj:
Geräte-Nr.:
Arcus M
/
EASA.A.532
Hersteller:
SCHEMPP-HIRTH
Flugzeugbau GmbH
Baureihe:
Variant 1
Variant 2
Arcus M
(Variant)
Werk-Nr. / Bj:
(Ser.no / Mfrd.)
Geräte-Nr.:
(TCDS)
PERMITTED ALL-UP MASS:
800 kg / 1764 lb
MAXIMUM PERMITTED SPEEDS (IAS): km/h
Flap setting 0, -1, -2, S
Flap setting +2, +1, L
Rough air speed
Maneuvering speed
Aerotowing speed
Winch launching speed
Landing gear operating speed
For power plant extension/retraction
Power plant extended speed
PERMISSIBLE MINIMUM SPEED (IAS):
For power plant extension/retraction
kt
mph
280
180
180
180
180
150
180
120
180
151
97
97
97
97
81
97
65
97
174
112
112
112
112
93
112
74
112
90
49
56
WEAK LINK FOR TOWING
for Aerotow:
max. 850 daN (1910 lb)
for Winch launch: max. 1000 daN (2248 lb)
TIRE PRESSURE
Nose wheel:
Main wheel:
Tail wheel:
3.0 bar (43 psi)
4.0 bar (57 psi)
3.0 bar (43 psi)
Cockpit inner skin on the right
in the rear
EASA.A.532
Max. permitted speed
Altitude
VNE(IAS)
[m]
km/h kt mph
0
280 151 174
1000
2000
280 151 174
280 151 174
3000
4000
280 151 174
263 142 163
5000
6000
245 132 152
232 125 144
7000
8000
220 119 137
207 112 129
9000
10000
195 105 121
182 98 113
OPERATING LIMITS
Cockpit inner skin on the left
for both seats
OPERATING LIMITS
Cockpit inner skin on the left
in the rear
A E R O B A T I C S
ONLY WITHOUT WATER BALLAST IN THE WINGS, UP TO
AN ALL-UP MASS OF 690 kg (1521 lb), WITH RETRACTED OR
REMOVED POWER PLANT AND WITH FLAP POSITION "0"
THE FOLLOWING AEROBATIC MANEUVERS ARE PERMITTED:
(A)
Inside loops
(C)
Lazy eight
(B)
Stalled turns
(D)
Spins
Cockpit inner skin on the right
for both seats
Operating Conditions: See Flight Manual
October 2012
Revision --
8.1
SCHEMPP-HIRTH FLUGZEUGBAU GmbH., KIRCHHEIM/TECK
Arcus M
MAINTENANCE MANUAL
Placing:
LOAD ON THE SEATS
(crew incl. parachutes)
SEAT
LOAD
ONE PERSON
min.
max.
TWO PERSONS
min.
max.
front
seat load
70* kg
154* lb
rear
seat load
at
choice
115
254
115
254
kg
lb
kg
lb
70* kg
154* lb
115 kg
254 lb
valid for the following battery location(s):
1 batt.
2 batt.**
1 batt.**
engine battery (E)
in front of rear stick mounting frame (C1, C2)**
in fin (F1)**
Maximum load in the cockpit when
the fuel tank is completely filled ***
kg
lb
Ltr.
11 24.3 14.5
*)
US. Gal.
3.8
WHEN FLOWN SOLO, THE PLACARDED
MINIMUM FRONT SEAT LOAD MAY BE
REDUCED BY UP TO:
IMP. Gal.
3.2
***) With removed powerplant the amendment "when
fuel tank is completely filled" must be crossed out.
NUMBER OF LEAD
PLATES REQUIRED
(if installed)
1
- 10 kg (22 lb)
2
- 15 kg (33 lb)
3
BAGGAGE COMPARTMENT
October 2012
Revision --
Values as an example, the actually applicable
values - see Flight Manual loading chart section 6.2 must be entered.
**) Enter number of batteries installed at weighing
and enlisted in equipment list.
- 05 kg (11 lb)
Max. load: 2.0 kg (4.4 lb)
Cockpit inner skin on the right
for both seats
232* kg / 512* lb
The maximum load in the cockpit (load on both seats
+ baggage + trim ballast) must not be exceeded.
If the front seat load is below the minimum front seat load:
see instructions in the flight manual - section 6.2.
Maximum
fuel
OPERATING LIMITS
Cockpit inner skin on the right
(front seat only)
Cockpit inner skin on the right
in the rear
8.2
SCHEMPP-HIRTH FLUGZEUGBAU GmbH., KIRCHHEIM/TECK
Arcus M
MAINTENANCE MANUAL
Placing:
CHECK LIST BEFORE TAKE-OFF
O
O
O
O
O
O
O
O
O
O
O
Water ballast in fin tank correctly filled (if installed) ?
Dump all water ballast in case of doubt !
Loading chart checked ?
Parachute securely fastened ?
Safety harness secured and tight ?
Seat back, head rest and pedals in
comfortable position ?
All controls and instruments easily accessible ?
Airbrakes checked and locked ?
All control surfaces checked with assistant
for full and free movement in correct sense ?
Trim correctly set ?
Flaps set for take-off ?
Canopy closed and locked ?
CHECK LIST FOR SELF-LAUNCHING
O
O
O
O
O
O
O
Fuel quantity checked ?
Warning messages of operating unit ?
Coolant liquid temperature checked ?
Ignition circuits checked ?
Redundancy system engine control checked ?
Take-off RPM checked ?
Rear-view mirror properly adjusted ?
Cockpit inner skin on the right
for both seats
POWERPLANT EXTENSION / STARTING PROCEDURE
O
O
O
O
O
O
O
Power plant master switch ON
OPEN fuel shut-off valve
ON THE GROUND:
Set throttle to idle
O Apply wheel brake, pull stick back
Set speed to 95-100 km/h O Check that propeller is clear
(51-54kt, 59-62 mph)
Ignition ON
Only in manual operation: EXTEND powerplant
When powerplant is fully extended (green signal):
Depress starter button
October 2012
Revision --
STOPPING ENGINE / RETRACTING POWERPLANT
O
O
O
O
O
Reduce speed to about 95-100 km/h (51-54 kt, 59-62 mph)
Cooling down power setting 20% (1 minute)
Ignition OFF
Only in manual operation:
- Stop propeller with the manually operated propeller brake
and fix it in the vertical position
- RETRACT powerplant
When powerplant is fully retracted (green signal):
Power plantmaster switch OFF
Cockpit inner skin on the left
- for front seat only (unless a
2nd control unit is installed)
8.3
SCHEMPP-HIRTH FLUGZEUGBAU GmbH., KIRCHHEIM/TECK
Arcus M
MAINTENANCE MANUAL
Placing:
WITH NOSE SKID:
Minimum load increases
by 2 kg / 4.4 lb!
Operating limits
Cockpit inner skin on the left - for
front seat only (unless a 2nd
control unit is installed)
Change of minimum load (optional)
Next to loading chart
Front and rear cockpit
Battery selector switch (OPTION)
E - Engine battery
Front instrument panel
C1 - Batt. in front of rear seat on the left
C2 - Batt. in front of rear seat on the right
F1 - Batt. in fin
T.E.
STAT
PC-Interface
engine control
(Trijekt)
October 2012
Revision --
Pneumatic switch for
TE-compensation probe (optional)
Front instrument panel
PC-Interface engine control (Trijekt)
on rear back cover right
8.4
SCHEMPP-HIRTH FLUGZEUGBAU GmbH., KIRCHHEIM/TECK
Arcus M
MAINTENANCE MANUAL
Placing:
PROP BRAKE
Manual propeller brake
Front and rear seat on
manual propeller brake handle
Electrical refueling system
Bulkhead behind rear seat on
the left, next to ON/OFF switch
Fuel vent
Right side behind
landing gear cut-out
Tank label
Label on cockpit inner skin on
the right in the rear and next to
ON/OFF switch of electrical
refueling system
Optimum airspeeds
(for various flap settings)
Cockpit inner skin on
the left for either seat
Optimum airspeeds
(for various flap settings)
Cockpit inner skin on
the left for either seat
ON
FUEL
OFF
FUEL VENT
DO NOT TAPE CLOSED !
AVGAS 100 LL OR UNLEADED PREMIUM GASOLINE - EN 228 (MIN. RON 95)
GASOLINE/OIL MIXING PROPORTION 1:50
with TWO-STROKE OIL: CASTROL ACT>EVO, CASTROL SUPER TWO-STROKE
or alternative oils according to JASO FC or FD
Liter
CAPACITY 14.5
OF
14.5
14.5
14.0
USABLE
14.0
FUEL
14.0
TANK IN
FUSELAGE
U.S.Gal. IMP.Gal.
3.80
3.20
3.80
3.20
3.80
3.20
3.70
3.10
3.70
3.10
3.70
3.10
TANK IN RIGHT
INBD. WING (optional)
Liter U.S.Gal. IMP.Gal.
13.0 3.43
2.86
13.0 3.43
2.86
12.5 3.30
2.75
12.5 3.30
2.75
TANK IN LEFT
INBD. WING (optional)
Liter U.S.Gal. IMP.Gal.
13.0 3.43
2.86
12.5 3.30
2.75
Liter
14.5
27.5
40.5
14.0
26.5
39.0
TOTAL
CAPACITY
U.S.Gal. IMP.Gal.
3.80
3.20
7.23
6.06
10.60
9.00
3.70
3.10
7.00
5.85
10.30
8.50
FUSELAGE TANK IS FILLED UP VIA WING TANKS
Use of flaps
for
flaps
at
Low speed
flight
L
+2
+1
Best L/D
Flying between
thermals and high
speed flying
Use of flaps
for
OPTIMUM AIRSPEED in km/h
AUW = 625 kg
AUW = 800 kg
- 83 km/h
83 - 90 km/h
90 - 105 km/h
- 94 km/h
94 - 100 km/h
100 - 120 km/h
0
105 - 130 km/h
120 - 150 km/h
-1
-2
S
130 - 155 km/h
155 - 175 km/h
175 - 280 km/h
150 - 180 km/h
180 - 195 km/h
195 - 280 km/h
flaps
OPTIMUM AIRSPEED in knots
at AUW=625 kg/1378 lb AUW=800 kg/1764 lb
Use of flaps
for
flaps
OPTIMUM AIRSPEED in mph
at AUW=625 kg/1378 lb AUW=800 kg/1764 lb
Low speed
flight
L
+2
+1
- 45 kt
45 - 49 kt
49 - 57 kt
- 51 kt
51 - 54 kt
54 - 65 kt
Low speed
flight
L
+2
+1
- 52 mph
52 - 56 mph
56 - 65 mph
- 58 mph
58 - 62 mph
62 - 75 mph
Best L/D
0
57 - 70 kt
65 - 81 kt
Best L/D
0
65 - 81 mph
75 - 93 mph
Flying between
thermals and high
speed flying
-1
-2
S
70 - 84 kt
84 - 94 kt
94 - 151 kt
81 - 97 kt
97 - 105 kt
105 - 151 kt
Flying between
thermals and high
speed flying
-1
-2
S
81 - 96 mph
96 - 109 mph
109 - 174 mph
93 - 112 mph
112 - 121 mph
121 - 174 mph
October 2012
Revision --
8.5
SCHEMPP-HIRTH FLUGZEUGBAU GmbH., KIRCHHEIM/TECK
Arcus M
MAINTENANCE MANUAL
Placing:
Undercarriage
Above guide slot for operating handle
on the right for both seats
Elevator trim
Next to guide slot in seat pan mounting
flange on the left for both seats
Pedal adjustment
Front seat: At the base of the control
stick on the right
Rear seat: Next to the pedal locking ring
Tow release
Front seat: At the base of the control
stick on the left
Rear seat: On the left of the instrument
panel
Airbrakes
Next to operating handle on cockpit
inner skin on the left for both seats
Fuel shut-off valve
Above guide slot on cockpit inner skin
on the right for both seats
FUEL
October 2012
Revision --
8.6
SCHEMPP-HIRTH FLUGZEUGBAU GmbH., KIRCHHEIM/TECK
Arcus M
MAINTENANCE MANUAL
Placing:
CANOPY
BALLAST IN FIN TANK IS DUMPTED
SIMULTANEOUSLY WITH WING TANKS
Canopy locking
mechanism black
Below red locking lever
on cockpit inner skin on the left
for both seats
Canopy locking
mechanism red
On red locking lever on the left
for both seats
Canopy attachment/
detachment
Next to operating handle
on cockpit inner skin on the right
for both seats
Operating knob for
dumping ballast from
wing tanks
Front seat above guide slot for operating
knob on cockpit inner skin on the right
Ventilation
At the operating knob protruding from
front instrument panel
Ventilation adjustment
Beside adjustable bull-eye-type ventilator
on the right for both seats
(if installed)
Flap settings
L
October 2012
Revision --
+2
+1
0
-1
-2
S
Front and rear seat along
notched plate
8.7
SCHEMPP-HIRTH FLUGZEUGBAU GmbH., KIRCHHEIM/TECK
Arcus M
October 2012
Revision --
MAINTENANCE MANUAL
8.8
SCHEMPP-HIRTH FLUGZEUGBAU GmbH, KIRCHHEIM/TECK
Arcus M
9.
MAINTENANCE MANUAL
Maintenance instructions
a) Airframe
“Repair Instructions for Arcus M”, valid issue as appropriate
b) Tow releases
1. Operating Manual for the TOST nose tow release mechanism model
„E 85“, Issue of March 1989, LBA-approved
2. Operating Manual for the TOST safety tow release mechanism model
„EUROPA G 88“, Issue of February 1989, LBA-approved
c) Engine
1. Operating Manual for the SOLO engine type 2625-02i,
valid issue as appropriate
2. Maintenance Manual for the SOLO engine type 2625-02i,
valid issue as appropriate
d) Propellers (Manufacturer “Technoflug“ or “Binder”)
Operating and Maintenance Manual No. P3 for Fixed Pitch Two-Blade
Composite Propeller KS 1G ()()(), KS 1 C ()()(), latest approved issue
or
Use and maintenance instructions for fixed propeller made of fibre composite,
Propeller type BM, issue 21. October 2007 or later approved revision
e) Wing fuel tank(s) (if installed)
“Instructions for the Inspection of the Flexible Fuel Tanks Typ HFK-TLF”,
latest applicable issue
f) Diluter demand oxygen system (if installed)
1. Operating Instructions No. 1/601 for DRÄGER regulator model „HLa 758“
2. Installation Instructions for DRÄGER high altitude diluter demand oxygen
system and Maintenance and Operating Proposals,
2nd Edition of June 1978
g) VHF-Transceivers
Maintenance Instructions for the models listed in section 7.2
h) For further equipment installed refer to the „Instructions to the Operator“
issued by the manufacturer of the relevant instrument, especially for
equipment listed in section 7.
Note:
Further information for the maintenance of the powered sailplane are provided in
sections 1.4, 1.5, 4.2, and 7 of the Flight Manual.
October 2012
Revision --
9
SCHEMPP-HIRTH FLUGZEUGBAU GmbH, KIRCHHEIM/TECK
Arcus M
10.
MAINTENANCE MANUAL
Logging of service time and take-offs
a) Airframe
The time in service of this aircraft and any take-offs are to be entered in its log
book.
b) Engine
The time in service of the engine of this aircraft can be read from the powerplant
operating unit and are to be entered in the aircrafts log book.
October 2012
Revision --
10
SCHEMPP-HIRTH FLUGZEUGBAU GmbH, KIRCHHEIM/TECK
Arcus M
11.
MAINTENANCE MANUAL
List of special tools
Rigging and derigging of the aircraft
Application
Description
Art.-No.
Rigging and derigging of Mounting bolt for
horizontal tail
horizontal tail (ZRB 177)
B40-0708
Rigging and derigging of Mounting tool, variant „Duo
inner wing panels
Discus“ (ZFB 107)
B40-1540
Rigging and derigging of
Mounting aid (ZRB 155)
outer wing panels
B40-0749
Powerplant maintenance
Application
Description
Tensioning of V-belts
(s. MM section 5.12)
Belt adjusting disc
Bolt M14x60-DIN 931-8.8 vz
Nut M14-8 DIN 934-8 vz
Art.-No.
B40-3329
L01-1292
L01-1293
Pull off device, driving side *)
Removal of small pulley Part 1: Pull off device, drive side
with starter ring gear from
Part 2: Screw M12x50
crankshaft
Part 3: ram
Pull off device, ignition side*)
Removal of ignition system Part 1: Pull off device Ducati
rotor from crankshaft on
the rear side of the engine Part 2: Screw M12x50
Part 3: Screw M8x40 (3 Stk.)
SOLO 00 80 585
SOLO 00 10 140
SOLO 00 80 588
SOLO 00 80 530
SOLO 00 10 140
SOLO 00 10 150
Determination of drive belt
SOLO 23 00 909
tension with use of a Frequency meter
frequency meter
Determination of drive belt
Device for measuring drive belt
tension by deformation
B40-3338
tension
measurement
*) Designated parts originate from the accessories list of the engine manufacturer
and are supplied with the aircraft (see „Parts catalogue aircraft engine SOLO
2625-02i” from the engine manufacturer)
October 2012
Revision --
11
SCHEMPP-HIRTH FLUGZEUGBAU GmbH, KIRCHHEIM/TECK
Arcus M
12.
MAINTENANCE MANUAL
Spare-parts list
INTENTIONALLY LEFT BLANK
October 2012
Revision ---
12
SCHEMPP-HIRTH FLUGZEUGBAU GmbH., KIRCHHEIM/TECK
Arcus M
October 2012
Revision --
MAINTENANCE MANUAL
DIAGRAM 1
SCHEMPP-HIRTH FLUGZEUGBAU GmbH., KIRCHHEIM/TECK
Arcus M
October 2012
Revision --
MAINTENANCE MANUAL
DIAGRAM 2
SCHEMPP-HIRTH FLUGZEUGBAU GmbH., KIRCHHEIM/TECK
Arcus M
October 2012
Revision --
MAINTENANCE MANUAL
DIAGRAM 3a
SCHEMPP-HIRTH FLUGZEUGBAU GmbH., KIRCHHEIM/TECK
Arcus M
October 2012
Revision --
MAINTENANCE MANUAL
DIAGRAM 3b
SCHEMPP-HIRTH FLUGZEUGBAU GmbH., KIRCHHEIM/TECK
Arcus M
October 2012
Revision --
MAINTENANCE MANUAL
DIAGRAM 4
SCHEMPP-HIRTH FLUGZEUGBAU GmbH., KIRCHHEIM/TECK
Arcus M
October 2012
Revision --
MAINTENANCE MANUAL
DIAGRAM 5
SCHEMPP-HIRTH FLUGZEUGBAU GmbH., KIRCHHEIM/TECK
Arcus M
October 2012
Revision --
MAINTENANCE MANUAL
DIAGRAM 6a
SCHEMPP-HIRTH FLUGZEUGBAU GmbH., KIRCHHEIM/TECK
Arcus M
October 2012
Revision --
MAINTENANCE MANUAL
DIAGRAM 6b
SCHEMPP-HIRTH FLUGZEUGBAU GmbH., KIRCHHEIM/TECK
Arcus M
October 2012
Revision --
MAINTENANCE MANUAL
DIAGRAM 7
SCHEMPP-HIRTH FLUGZEUGBAU GmbH., KIRCHHEIM/TECK
Arcus M
October 2012
Revision --
MAINTENANCE MANUAL
DIAGRAM 8
SCHEMPP-HIRTH FLUGZEUGBAU GmbH, KIRCHHEIM/TECK
Arcus M
MAINTENANCE MANUAL
Pin Assignment – Trijekt T101– Regular Engine control system
Pin
Description
Pin
Description
Pin
1
2
3
4
5
6
7
8
9
10
11
12
13
14
15
16
17
18
19
Throttle position sensor - GND
Throttle position sensor – signal
Coolant temperature – signal
CAN L
PC Interface Rxd
Relay fuel pump
Injection valve 1 (Ignition side)
Steady Plus Battery
-
20
21
22
23
24
25
26
27
28
29
30
31
32
33
34
35
36
37
Throttle position sensor +5V
Air temperature signal
CAN H
PC Interface Txd
Injection valve 2 (driving side)
Power GND
Switched +12V
38
39
40
41
42
43
44
45
46
47
48
49
50
51
52
53
54
55
October 2012
Revision --
Description
Ignition coil 1
Ignition coil 2
RPM Sensor (inductive)
RPM Sensor GND
Switched +12V
DIAGRAMM 14
SCHEMPP-HIRTH FLUGZEUGBAU GmbH, KIRCHHEIM/TECK
Arcus M
MAINTENANCE MANUAL
Pin Assignment – Redundancy engine control system:
7
8
4
1
9
5
2
6
3
Redundancy engine control system, plug „68“
Type: AMP Universal MATE-N-LOK 9-pin, female
Pin
1
2
3
4
5
6
7
8
9
October 2012
Revision --
Description
Redundancy system +12 V
RPM Sensor Redundancy system (inductive)
Ignition coil 2 Redundancy system
Injection valve 1 + 2 Redundancy system 12V
Fuel pump Redundancy system + 12V
GND
Redundancy system GND
RPM Sensor Redundancy system GND
Ignition coil 1 Redundancy system
DIAGRAMM 15
SCHEMPP-HIRTH FLUGZEUGBAU GmbH., KIRCHHEIM/TECK
Arcus M
October 2012
Revision --
MAINTENANCE MANUAL
SCHEMPP-HIRTH FLUGZEUGBAU GmbH, KIRCHHEIM/TECK
Arcus M
MAINTENANCE MANUAL
CHECK LIST for Ser.-No....................… Registration: ......................... Date:……………....
MAINTENANCE ACTION: O Annual inspection
O Inspection at engine operation time: .................../.......................
Total time / since last inspection
O Other:…………………………………………….
I. Powerplant unit
INSPECTION ITEMS
(LINK, REMARK)
INSPECTION MEASURE
O Check whether due inspections or
maintenance according to the
1.0.1 Inspection of engine
current issue of the “Manual for the
engine SOLO Type 2625-02i” were
conducted
O Check whether due inspections and
maintenance according to the
current issue of the maintenance
1.0.2 Inspection of propeller
documentation for the propeller were
conducted.
Pay particular attention to damages at:
O Starter motor, ignition boxes,
Cooling water distribution box;
Mounting of cooler and cooling water
General visual
pump
inspection of
O Cooling water pump and -hoses
1.1
powerplant unit in
O Cooling water quantity
engine compartment O Fuel hoses and associated
connectors and couplings
O Injection system
O Exhaust system
O Engine and propeller mounting
Connection,
O Check all accessible connections,
1.2
attachments, joints
attachments, joints and locks (screw,
(MM section 4.4)
nut, hose- and cable connections)
O Check for damages/cracks
Propeller pylon
O Check tight fit of propeller pylon
1.3
(MM section 5.9)
mounting and the attachment of the
spindle drive at the propeller pylon
O Check locking wire of propeller
mounting bolts
O Check play of propeller mounting:
Move propeller tip fore and aft. If
1.4
Propeller mount
play is noticeable, contact
manufacturer for advice
O Check the propeller mounting for
easy movement around its axis of
rotation (upper belt pulley)
O Check V-belt set and belt pulleys for
V-belt set of drive
wear and damages
O Check belt tension
transmission
1.5
(MM section 4.2.3 and O Check ball bearings of belt guide
5.11)
rollers for free movement
O Observe replacement interval.
October 2012
Revision --
Maintenance /
Replacement
Findings
(Sign. Inspector)
for details see
engine manual
for details see
propeller
manual
Depending on
condition
Depending on
condition
Depending on
condition
Depending on
condition
Depending on
condition of Vbelt set
every 5 years
or 50 h engine
operation time
P-1.1
SCHEMPP-HIRTH FLUGZEUGBAU GmbH, KIRCHHEIM/TECK
Arcus M
MAINTENANCE MANUAL
CHECK LIST for Ser.-No....................… Registration: ......................... Date:……………....
MAINTENANCE ACTION: O Annual inspection
O Inspection at engine operation time: .................../.......................
Total time / since last inspection
O Other:…………………………………………….
I. Powerplant unit (continued)
INSPECTION ITEMS
(LINK, REMARK)
Manual propeller
1.6.1 brake
(MM section 5.5)
Automatic propeller
brake (brake servo)
1.6.2
(MM section 5.5)
1.7
Throttle control
1.8
Air intake filter
1.9
Exhaust system
(MM section 5.15)
October 2012
Revision --
INSPECTION MEASURE
O Check effectiveness and function.
O Check brake lever and Bowden
cable for damage and ease of
movement.
O Compression spring has to move
brake lever to upper stop of the
guiding slot.
O If brake handle is release, the gap
between brake drum and brake pad
has to be at least 0,5 mm.
O Observe condition and sufficient
residual thickness of brake pad.
O Check effectiveness and function.
O Check brake servo and Bowden
cable for damage and ease of
movement.
O With brake completely released the
gap between brake drum and brake
pad has to be at least 0,5 mm.
O Check if full throttle and idle
position of throttle is achieved
properly.
O Check mounting of throttle cable at
throttle axis.
O Check for damages
O Check correct mounting
O Clean dirty air intake filter with
gasoline
O Check muffler and exhaust
manifold for cracks
O Check setting of muffler
O Check operation and ease of
movement of guide mechanism
while extending and retracting the
powerplant.
O Check joint between muffler and
exhaust manifold for free
movement and wear.
Maintenance /
Replacement
Findings
(Sign. Inspector)
Depending on
condition
Depending on
condition
Depending on
condition
Depending on
condition
Depending on
condition
P-1.2
SCHEMPP-HIRTH FLUGZEUGBAU GmbH, KIRCHHEIM/TECK
Arcus M
MAINTENANCE MANUAL
CHECK LIST for Ser.-No....................… Registration: ......................... Date:……………....
MAINTENANCE ACTION: O Annual inspection
O Inspection at engine operation time: .................../.......................
Total time / since last inspection
O Other:…………………………………………….
2. Propeller pylon and pivoting mechanism
INSPECTION ITEMS
(LINK, REMARK)
2.1
2.2
2.3
Propeller pylon and
mounting
(MM section 5.9)
Spindle drive
(MM sections 4.4,
5.7 and 5.13)
Pylon arresting wire
(MM section 5.6 and
4.2.3)
Oktober 2012
Revision --
INSPECTION MEASURE
O Check mounting of propeller pylon
in fuselage for play and tight fit of
screw connections
O Check function of spindle drive.
O Check front and rear mounting
bracket of spindle drive.
O Check front and rear spindle drive
mounting for play (no noticeable
play permitted).
O Check tight fit and condition of
mounting of spindle drive at front
mounting bracket, including zeroplay mounting of bracket at
fuselage.
O Check tight fit and condition of
mounting of spindle drive at rear
mounting bracket.
O Check attachment and condition of
both lateral locking plates between
telescopic tube and connecting fork.
O Check attachment and condition of
spindle drive overload device
(plastic sleeve between telescopic
tube and connecting fork).
O Check attachment, condition and
funktion of limit stop „Extended“ at
the spindle drive.
O Check condition of gaiter.
O Check conditions of arresting wire
including clamped joints.
O Arresting wire setting: With fully
extended powerplant (stopped by
limit switch „Extended“) the
arresting wire has to have still app.
10 to 15 mm play before being
tight.
O Arresting wire setting for retraction
of powerplant: because of the
rubber cord the arresting wire must
not fall loose.
O Check condition of cable guide at
rear wall of engine compartment
and of mounting bolt at propeller
pylon.
O Observe replacement intervals.
Maintenance /
Replacement
Findings
(Sign. Inspector)
Depending on
condition
Depending on
condition
Depending on
condition.
Replace pylon
arresting wire
at least every
50 hours of
engine
operating time
P-2.1
SCHEMPP-HIRTH FLUGZEUGBAU GmbH, KIRCHHEIM/TECK
Arcus M
MAINTENANCE MANUAL
CHECK LIST for Ser.-No....................… Registration: ......................... Date:……………....
MAINTENANCE ACTION: O Annual inspection
O Inspection at engine operation time: .................../.......................
Total time / since last inspection
O Other:…………………………………………….
2. Propeller pylon and pivoting mechanism (continued)
INSPECTION ITEMS
(LINK, REMARK)
INSPECTION MEASURE
Maintenance /
Replacement
2.4
O Propeller pylon rests in retracted
position on intended stop on engine
compartment bulkhead.
O All attached parts of the propeller
Limit stop of propeller
Depending on
pylon remain clear of the muffler in
pylon in fuselage
condition
retracted position.
O Check attachment, condition and
function of limit switch, including its
mounting.
2.5
Mechanics of engine
bay doors
2.6
O Check hinges for damages.
O Check fit of engine bay doors in
retracted position.
O Check tight fit of deflector at right
engine bay door.
O Check side guides for retracted
Hinges of engine bay
Depending on
propeller in engine compartment
doors
O Check condition and loose length of condition
(MM section 5.7)
rubber band that holds down
engine bay doors:
Rubber band has to be so short
that, with retracted propeller pylon,
it can only be lifted with noticeable
tension over the tip of the propeller.
2.7
General
Oktober 2012
Revision --
O Check for free movement of rods
and low friction in system.
O Check clearance of cables and
hoses during extension and
retraction of propeller pylon.
O Check clearance to airframe of
propeller pylon and attached parts
during extension and retraction of
propeller pylon.
O Check fire protection paint, heat
insulation and fire protection foil in
engine compartment for damages
and signs of excessive heat.
Findings
(Sign. Inspector)
Depending on
condition
Depending on
condition
P-2.2
SCHEMPP-HIRTH FLUGZEUGBAU GmbH, KIRCHHEIM/TECK
Arcus M
MAINTENANCE MANUAL
CHECK LIST for Ser.-No....................… Registration: ......................... Date:……………....
MAINTENANCE ACTION: O Annual inspection
O Inspection at engine operation time: .................../.......................
Total time / since last inspection
O Other:…………………………………………….
3. Fuel system
INSPECTION ITEMS
(LINK, REMARK)
3.1.1
Fuel tank in fuselage
(MM section 5.8)
INSPECTION MEASURE
Maintenance /
Replacement
Findings
(Sign. Inspector)
O Check fuselage tank for external
damages and leak tightness
Depending on
O Check hose mountings at fuselage
condition
tank for leak tightness.
O Check electrical ground connection.
O Check hoses and coupling at
fuselage and wing for damages and
leak tightness.
O Check wing fuel tanks according to
Wing fuel tank(s)
“Test instruction for flexible fuel
(optional)
3.1.2
tanks of type HFK-TLF” (see
(MM section 4.2.3 and
Appendix of MM). Test carried out
5.8)
according
O method A)
O method B)
O Respect replacement interval.
Depending on
condition.
Replace wing
fuel tank at
least every 10
years.
O Check hoses for flexibility, any
brittleness and leak tightness.
Fuel and vent lines in O Check lines for leak tightness,
fuselage
sufficient fixation and any chafe
3.2.1
(MM section 4.2.3,
marks.
FM Page 7.11.3)
O Check functionality of drain valve
O Check reservoir for visible leakage.
O Respect replacement intervals.
See MM
Section 4.2.3.
O Check that outlet opening of vent
and overflow line from fuselage is
clean
Vent and overflow of
O Fill the fuselage tank with installed
fuselage tank
refuelling pump until fuel is leaking
(FM page 7.11.3)
into the reservoir. Check that fuel
Depending on
3.2.2 (Combine check with
leaks only via the upper vent line
condition
control of fuel level
into the reservoir.
indication according to
O With refuelling pump turned off, the
4.2)
reservoir has to empty automatically
when fuel from fuselage tank is
taken.
Oktober 2012
Revision --
P-3.1
SCHEMPP-HIRTH FLUGZEUGBAU GmbH, KIRCHHEIM/TECK
Arcus M
MAINTENANCE MANUAL
CHECK LIST for Ser.-No....................… Registration: ......................... Date:……………....
MAINTENANCE ACTION: O Annual inspection
O Inspection at engine operation time: .................../.......................
Total time / since last inspection
O Other:…………………………………………….
3. Fuel system (continued)
INSPECTION ITEMS
(LINK, REMARK)
INSPECTION MEASURE
Maintenance /
Replacement
Fuel cock
O Check function.
O Check tight attachment of limit
switch at fuel cock.
Depending on
condition
3.4
Fuel filter in front of
electrical fuel pumps
(MM section 4.2.3,
FM page 7.11.3)
O Check for visible leakages,
damages to the housings and
secure attachment.
O Only use approved fuel filter
O Respect replacement intervals.
Depending on
condition.
Replacement
at least every
5 years or 25
hours engine
operating time
3.5
Electrical fuel pumps
of regular and
redundancy system
O Check function, attachment,
condition and leak tightness of
hoses and connections
Depending on
condition
O Only use approved fuel filter
(No paper filter!).
O Check fuel filter for visible
contamination (Replacement is
recommended if contamination is
visible).
O Respect replacement intervals
Depending on
condition,
Replacement
at least every
5 years or 25
hours engine
operating time
O Check function, attachment,
condition and leak tightness of
hoses and connections
Depending on
condition
3.3
Fuel filter in front of
electrical refuelling
3.6.1 pump
(MM section 4.2.3,
FM page 7.11.3)
3.6.2
Electrical refuelling
pump
Oktober 2012
Revision --
Findings
(Sign. Inspector)
P-3.2
SCHEMPP-HIRTH FLUGZEUGBAU GmbH, KIRCHHEIM/TECK
Arcus M
MAINTENANCE MANUAL
CHECK LIST for Ser.-No....................… Registration: ......................... Date:……………....
MAINTENANCE ACTION: O Annual inspection
O Inspection at engine operation time: .................../.......................
Total time / since last inspection
O Other:…………………………………………….
4. Electrical system powerplant, engine test run
INSPECTION ITEMS
(LINK, REMARK)
4.1
4.2
INSPECTION MEASURE
O Check all accessible cables,
connectors, switches, screw
connections and attachments for
chafe marks and tight attachment
O Check complete extension and
retraction of powerplant with
ignition switch, manual operation
switch and emergency switch.
O Check function of fire warning light
(self-test, when powerplant
operating system is switched on)
O Check function of Fuel cock
warning
O Test of fuel level indication of
fuselage tank:
a) Set aircraft in calibration position
Powerplant control
for fuselage tank (s. FM section
system
4.2.2) and fill fuselage tank
(FM section 4.2.2 and
completely (fuselage tank is full
7.3, MM section 5.5)
as soon as fuel leaks into the
reservoir)
b) Fuel indication on operating unit
hast to show 14 liters with
completely filled fuselage tank.
Otherwise recalibrate.
c) If the recalibration is not
successful, contact the
manufacturer
O Check function of propeller
positioning system and automatic
retraction system.
Cables and
accessories
Oktober 2012
Revision --
Maintenance /
Replacement
Findings
(Sign. Inspector)
Depending on
condition
Depending on
condition
P-4.1
SCHEMPP-HIRTH FLUGZEUGBAU GmbH, KIRCHHEIM/TECK
Arcus M
MAINTENANCE MANUAL
CHECK LIST for Ser.-No....................… Registration: ......................... Date:……………....
MAINTENANCE ACTION: O Annual inspection
O Inspection at engine operation time: .................../.......................
Total time / since last inspection
O Other:…………………………………………….
4. Electrical system powerplant, engine test run (continued)
INSPECTION ITEMS
(LINK, REMARK)
INSPECTION MEASURE
Maintenance /
Replacement
Findings
(Sign. Inspector)
O Generator charging control LED has
to go out as soon as the engine is
running.
O Warm up the engine (app. 40°C
cooling water temperature).
Outside temperature: ________ °C
Atmospheric pressure: _____hPa
O Check stationary idle rpm with warm
engine (app. 2200 - 2500 rpm,
engine has to run smooth):
Cooling water temperature:___ °C
Idle RPM:________RPM
O Check stationary full throttle rpm
with warm engine (min. app. 5600 5800 RPM):
4.3
Engine test run
(FM section 7.3 and
7.11)
Cooling water temperature:___ °C Depending on
condition
Full throttle RPM:________ RPM
O Indicated max. cooling water
temperature has to stay within the
permissible range
O Engine accelerates steadily, even at
brisk acceleration
O Ignition circuits check at 4000 RPM,
max. drop 300 RPM.
O Check of redundancy system:
At 4000 RPM switch to redundancy
system. Engine continues to run
stable after a short drop in RPM.
O Return to regular system works
properly.
O Check function of powerplant
control: All operating indicators listed
in FM page 7.3.18 and 7.3.19
display stable and plausible values.
O No error messages by the operating
unit at engine test run.
O Check function of ignition switch
Oktober 2012
Revision --
P-4.2
SCHEMPP-HIRTH FLUGZEUGBAU GmbH, KIRCHHEIM/TECK
Arcus M
Inspection instructions for flexible wing fuel tanks model HFK-TLF
The flexible wing fuel tanks model HFK-TLF are built from a two-layer design:
• The internal bag contains the fuel.
• The external cover protects the fuel bag from electrostatic charge. For this
reason the external cover needs not to be impermeable to liquid.
The wing fuel tanks must be checked regularly for tightness. These inspections partly
can be accomplished with the fuel tank installed in the wing. The selected inspection
method affects the inspection intervals to be applied:
Selected
inspection method
A) Inspection
basically with the
fuel tank installed
in the wing
Inspection interval applicable
for the internal bag
• Annual: Inspection according
to inspection instruction 1).
• Latest 5 years after
installation / the latest
inspection of the wing fuel
tank according to inspection
instruction 2) this inspection
must be repeated. *)
Service life
see MM
section 4.2.3
• Latest 2 years after
installation / the latest
inspection of the wing fuel
tank according to inspection
instruction 2) the inspection
must be repeated. *)
*)
The first time limit to be fulfilled is mandatory
B) Inspection only
with the fuel tank
removed from the
wing
The inspection instructions mentioned in the table above are listed on the following
pages.
For the fuel lines and ventilation lines attached to the wing fuel tank and connected to
the fuselage fuel system the inspection intervals and service life from MM section
4.2.3 are applicable.
October 2012
Revision ---
page 1 from 4
SCHEMPP-HIRTH FLUGZEUGBAU GmbH, KIRCHHEIM/TECK
Arcus M
Inspection instructions for flexible wing fuel tanks model HFK-TLF
(continued)
Inspection instruction 1): Inspection of the wing fuel tank installed in the wing
(see picture 1)
1. Drain all fuel from the wing fuel tank.
2. Inspection of the pressure relief valve:
- Connect counter piece of the fuel line plug-in-coupling with manometer
and rubber bellow (see picture 1).
- Slowly fill the fuel tank with air.
- When the test load in the internal bag has reached 0,1 bar ± 0,02
(1.450 psi ± 0.290) the pressure relief valve must open (pressure can
not be raised further, there is a remarkable airflow through the
ventilation line).
If the test load is reduced the pressure relief valve must close again at a
pressure within the given limits.
3. Pressure test of the internal bag:
-
Close ventilation line with counter piece.
Connect counter piece of the fuel line plug-in-coupling with
manometer and rubber bellow.
Slowly fill the fuel tank with air to a pressure of 0,25 bar (3.626 psi).
The internal bag of the wing fuel tank is supposed to be tight if the
pressure does not drop within a period of 30min.
Note:
When the inspection of the internal bag has been successfully completed it is
recommended to remove the remaining air to a large extend from the internal
bag. Removing the air significantly facilitates further refueling and draining of
the wing fuel tank in operation.
This can be accomplished for example by carefully refueling the wing fuel tank
to its maximum and then drop all fuel again.
October 2012
Revision ---
page 2 from 4
SCHEMPP-HIRTH FLUGZEUGBAU GmbH, KIRCHHEIM/TECK
Arcus M
Inspection instructions for flexible wing fuel tanks model HFK-TLF
(continued)
Inspection instruction 2): Inspection of the wing fuel tank removed from the
wing /
1. Drain all fuel from the wing fuel tank and remove it from the wing (see
MM section 5.8).
2. Inspection of the relief pressure valve: see inspection instruction 1).
3. Pressure test of the internal bag:
-
Close ventilation line with counter piece.
Connect counter piece of the fuel line plug-in-coupling with
manometer and rubber bellow.
Slowly fill the fuel tank with air to a pressure of 0,40 bar (5.801 psi).
The internal bag of the wing fuel tank is supposed to be tight if the
pressure does not drop within a period of 5min.
4. When the inspection of the internal bag has been successfully
completed or the after the fuel tank has been repaired reinstall the wing
fuel tank in the wing (see MM section 5.8).
5. After the wing fuel tank has been reinstalled in the wing repeat pressure
test according to inspection instruction 1) to check the tightness of the
recently installed hose connections.
Warning:
The required pressure test load required in inspection instruction 2) may be
applied only with the wing fuel tank removed from the wing! Otherwise there
is the risk to damage the wing structure!
In case of reasonable suspicion for leakage of a wing fuel tank the fuel line of
the defect wing fuel tank may not be connected to the fuselage fuel system
any more. Otherwise there might be uncontrolled fuel flow to the wing fuel
tank and loss of fuel from the fuselage fuel tank.
October 2012
Revision ---
page 3 from 4
SCHEMPP-HIRTH FLUGZEUGBAU GmbH, KIRCHHEIM/TECK
Arcus M
Inspection instructions for flexible wing fuel tanks model HFK-TLF
(continued)
Picture 1: Pressure test of a wing fuel tank installed in the wing (Ventus)
October 2012
Revision ---
page 4 from 4
SCHEMPP-HIRTH FLUGZEUGBAU GmbH., KIRCHHEIM/TECK
Arcus M
REPAIR INSTRUCTIONS
Repair Instructions for Arcus M
The components of this aircraft are constructed as follows:
1. Wings
Inner wing
CFRP-foam-sandwich, with HEREX C 70.55,
thickness 8 mm (0.31 in.) resp. 6 mm (0.24 in.)
Wing tip extension
CFRP-foam-sandwich,
with HEREX C 70.55, thickness 6 mm (0.24 in.)
with winglets
Pure CFRP-shell
2. Wing flaps:
Both inner wing flaps:
CFRP-foam-sandwich, with HEREX C
70.55, thickness 4 mm (0.16 in.)
Both outer wing flaps:
GFRP/CFRP-shell
3. Fuselage
Forward section:
Aft section:
Pure CFRP/Kevlar/GFRP-shell
Pure CFRP-shell
4. Fin
GFRP/foam-sandwich
with HEREX C 70.55, thickness 4 mm (0.24 in.)
5. Rudder
GFRP/foam-sandwich
with HEREX C 70.55, thickness 4 mm (0.24 in.)
6. Horizontal stabilizer
GFRP/foam-sandwich
with HEREX C 70.55, thickness 6 mm (0.24 in.)
7. Elevator
Pure CFRP/Kevlar/GFRP-shell
October 2012
Revision --
1 from 4
SCHEMPP-HIRTH FLUGZEUGBAU GmbH., KIRCHHEIM/TECK
Arcus M
REPAIR INSTRUCTIONS
The first stage in carrying out repairs on components constructed from fiber
reinforced plastic (FRP) is to examine the construction of the component at the
location in question and to proceed in accordance with the latest applicable issue
of the
„REPAIR INSTRUCTIONS FOR SCHEMPP-HIRTH SAILPLANES AND
POWERED SAILPLANES CONSTRUCTED FROM FIBER REINFORCED
PLASTIC“
General Notes:
For repairs only the following resin systems may be used:
werden:
1. For AFK/CFK/GFK-components
Resin
L 285
L 335
Mixing proportion
(by weight)
Momentive Speciality Chemicals
Hardener
H 285
H 286
H 287
H 335
H 340
100 : 38
Curing
15 h at 55°C (122°F)
Sika
Biresin
CR 122
Biresin
CH 122-3
CH 122-5
CH 122-9
100 : 40
according to product
datasheet for
achieving LBA-RHV
minimum requirements
Information on the latest applicable product data sheets are to be observed.
2. For engine compartment of SOLO 2625-02i
Resin
L 20
Mixing proportion
(by weight)
Momentive Speciality Chemicals
Laromine C260
100 : 34
SL
Hardener
Curing
15 h at 90°C
Information on the latest applicable product data sheets are to be observed.
October 2012
Revision --
2 from 4
SCHEMPP-HIRTH FLUGZEUGBAU GmbH., KIRCHHEIM/TECK
Arcus M
REPAIR INSTRUCTIONS
Materials (and suppliers) for the repair of CFRP-components
Resin system: See page 2
Glass fibre cloth:
47 g/m² bzw. 105 g/m²
(e.g.Quality 02037 resp. 91111 from P-D Interglas Technologies)
Carbon fiber cloth:
(Yarn DIN 65184 CC 200 f 3000-F)
Cloth 1/1 (warp equal weft)
a) Weight 200 g/m²:
quality e.g.:
Sigratex KDL 8003 from SGL Carbon Group, Meitingen
Style 450 from C. Cramer & Co., Heek-Nienborg
b) Weight 285 g/m²:
quality e.g.:
Style 475T from C. Cramer & Co., Heek-Nienborg
c) Weight 240 g/m² 245 g/m² or 250 g/m²:
quality e.g.:
Style 262 resp. 460 from ECC
KDU 8049/8043 from SGL Carbon Group, Meitingen
d) Weight 200 g/m²: M40J of Yarn DIN 65184
– fiber class L through P
quality e.g.:
KDK 8040/T from SGL Carbon Group, Meitingen
Style 887 from C. Cramer & Co., Heek-Nienborg
Unidirectional carbon fiber cloth:
Weight 140 g/m²
(carbon fiber 120 g/m², glass fiber 20 g/m²),
quality e.g.:
Style 763 from C. Cramer & Co., Heek-Nienborg
MDL 9001 from SGL Carbon Group, Meitingen
Carbon fiber tape:
(Yarn DIN 65184)
quality e.g.:
Sigratex KDU/NF6, 39-7.5 (Sigratex KDU 1024)
SGL Carbon Group, Meitingen
October 2012
Revision --
3 from 4
SCHEMPP-HIRTH FLUGZEUGBAU GmbH., KIRCHHEIM/TECK
Arcus M
REPAIR INSTRUCTIONS
Carbon fiber / Aramidfiber (Kevlar) cloth:
(CF: Yarn DIN 65184 CC 200 f 3000-F,
AF: Yarn DIN 65427)
Linen cloth 1/1 (warp equal weft)
Weight 205 g/m²
quality e.g.:
98355, P-D INTERGLAS TECHNOLOGIES
Carbon fiber rovings:
(Yarn DIN 65184 CC 800 f 12000-F)
Tenax HTA 5131 800tex f 12000to, Tenax-Fibers, Wuppertal
Surface coating (from MOMENTIVE, Esslingen):
UP-Vorgelat, white,
UP-Hardener
UP-Thinner
T 35
SF 10
SF
Mixing proportion by weight:
100 parts UP-Vorgelat
to
10 parts hardener
T 35
SF 10
2K-Acryl-Mix-coat system MIPA (from MIPA AG, Essensbach):
MIPA 2K-Acryl-Mix-coat
MIPA 2K-HS-Hardener
MIPA 2K-Thinner
Mixing proportion by weight:
100 parts coat to
50 parts hardener
Other comparable coating systems can be used, provided they do not attack the fibrecomposite structure. Follow the respective manufacturer's instructions!
October 2012
Revision --
4 from 4
SCHEMPP-HIRTH
Flugzeugbau GmbH.
73230 Kirchheim/Teck
R E P A I R I N S T R U C T I O N S for
Sailplanes and Powered Sailplanes constructed from
Fiber Reinforced Plastic (FRP)
Repair Instructions for Sailplanes and Powered Sailplanes
constructed from Fiber Reinforced Plastic (FRP),
manufactured by
Schempp-Hirth, Flugzeugbau GmbH, Kirchheim/Teck
1.
Table of contents
2.
General
3.
Materials
4.
Kinds of construction
5.
Repair procedures for components constructed from
Fiber Reinforced Plastic (FRP)
6.
Repairing metal fittings
7.
Working with gel coat
8.
Lengths of scarf joints (spliced) for various fabrics
Record of revision
Rev. No. Date of issue
Page affected Date inserted
1
5.3.1
December 1999
Issue :September 1991
Page:
1.1