1
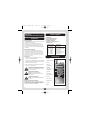
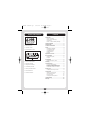
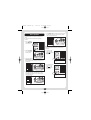
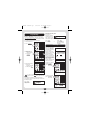
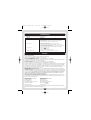
UBC61 scanner Qk
3/12/02 11:22 AM Page 1
UBC
61XLT
Programmable
Hand-HeldScanner
OWNER’S
MANUAL
Printed in the Philippines
UBZZ01296FZ
UBC61 scanner Qk
3/12/02 11:22 AM Page 2
UBC 61 XLT
Programmable Hand-Held Scanner
Feature Highlights
•
•
•
•
•
•
Introduction
What is Scanning?
The UBC61XLT scans programmed channels until
it finds an active frequency.
Scanning stops on an active frequency and
remains on that channel as long as the transmission continues. When the transmission ends, the
scanning cycle resumes until another transmission
is received.
0
What is Chain Searching?
You can program five different search bands.
Simply select a chain search location, define the
search range, and begin your search. You can set
your scanner to search up to all five chain search
bands at once, or you can turn off those search
bands you don’t want.
80 Channels
Priority Channel Scanning
Manual Channel Access
1 Hr Memory Backup
Preset Two-second scan Delay
LCD Back-Light
Frequency Range
Transmission
66
137
144
148
406
420
450
470
VHF low band
Land mobile
2 meter amateur band
VHF high band
Land mobile
70 cm amateur band
UHF standard band
Land mobile
- 88 MHz
- 144 MHz
- 148 MHz
- 174 MHz
- 420MHz
- 450MHz
- 470MHz
- 512MHz
Function Keys
General Use
• Turn the scanner off before disconnecting the
power or replacing the batteries.
1. Display
• If memory is lost, simply reprogram each channel.
The display shows 000.0000 in all channels when
there had been a memory loss.
2. Numeric keypad
• Always write down the programmed frequencies
in the case of memory loss.
4. Priority
WARNING
WARNING
WARNING
3. Enter
5. Lockout/Skip
Uniden does not represent this unit to be
waterproof. To reduce the risk of fire or
electrical shock, do not expose this unit
to rain or moisture.
1
6. Weather
Not functional in
New Zealand or
Australia.
7. Speaker
General Battery Warning!
Do not short-circuit any battery.
Do not discard batteries in a fire; they
may explode.
8. Scan Mode
9. Manual Mode
Alkaline Battery Warning
Do not recharge alkaline batteries in this
product.
10. Search
11. Search Hold
Nickel-Cadmium Battery Warning!
Do not charge nickel-cadmium batteries with any
charger other than the one supplied by Uniden as
an option. Using another charger may damage the
batteries, or cause them to explode.
12. Keypad Lock
13. Select
14. Light
2
8
9
10
11
12
13
14
2
3
4
5
6
7
UBC61 scanner Qk
3/12/02 11:22 AM Page 3
Controls and Indicators
15
16
17
Contents
18
Introduction . . . . . . . . . . . . . . . . . . . . . . . . . .2
What is Scanning? . . . . . . . . . . . . . . . . . . .2
What is Chain Searching? . . . . . . . . . . . . . .2
General Use . . . . . . . . . . . . . . . . . . . . . . . .2
Nickel - Cadmium Battery Warning! . . . . . .2
Feature Highlights . . . . . . . . . . . . . . . . . . . . .2
Function Keys . . . . . . . . . . . . . . . . . . . . . . . . .2
Controls and Indicators . . . . . . . . . . . . . . . . .3
15. Antenna Connector
16. Ear Phone Jack
17. Squelch Control
Setup . . . . . . . . . . . . . . . . . . . . . . . . . . . . . . . .4
Installing the Batteries . . . . . . . . . . . . . . . . .4
AC Adapter/Charger . . . . . . . . . . . . . . . . . .4
Charging Warning . . . . . . . . . . . . . . . . . . . .4
Flexible Antenna . . . . . . . . . . . . . . . . . . . . .4
Belt Clip . . . . . . . . . . . . . . . . . . . . . . . . . . .4
Optional Accessories . . . . . . . . . . . . . . . . . . .4
18. On/Off Volume Control
20
19
CHAIN
21
1 2 3 4 5
BATT
SCAN HOLD PRI L/O WX
23 24
22
Basic Operation . . . . . . . . . . . . . . . . . . . . . . .5
Setting the Squelch . . . . . . . . . . . . . . . . . .5
Keylock . . . . . . . . . . . . . . . . . . . . . . . . . . . .5
MHz
SEARCH
Programming . . . . . . . . . . . . . . . . . . . . . . . . .6
Duplicate Frequency Alert . . . . . . . . . . . . . .6
25
19. Chain Search Indicator
Scanning . . . . . . . . . . . . . . . . . . . . . . . . . . . . .6
Channel Lockout . . . . . . . . . . . . . . . . . . . . . .7
Lockout in Manual Mode . . . . . . . . . . . . . .7
Locking a Channel While Scanning . . . . . . .7
Restore a Locked Out Channel . . . . . . . . . .7
Restore All Locked-out Channels . . . . . . . .8
20. Frequency Display
21. Keypad Lock Indicator
22. Low Battery Indicator
23. Priority Channel Indicator
Priority Scan . . . . . . . . . . . . . . . . . . . . . . . . . .8
Changing the Priority Channel . . . . . . . . . . .8
24. Channel Indicator
Chain Search . . . . . . . . . . . . . . . . . . . . . . . . .9
Setting a Search Range . . . . . . . . . . . . . . .9
Search Hold Feature . . . . . . . . . . . . . . . . .10
Frequency Skip . . . . . . . . . . . . . . . . . . . . .10
Storing Search Frequencies . . . . . . . . . . .11
25. Function Indicators
Troubleshooting . . . . . . . . . . . . . . . . . . . . . .12
Warranty . . . . . . . . . . . . . . . . . . . . . . . . . . . .12
3
UBC61 scanner Qk
3/12/02 11:22 AM Page 4
Charging Warning
Do not charge alkaline batteries in this scanner.
Doing so may cause serious damage to the product and void the warranty. Before attempting to
recharge batteries, make sure you have installed
four rechargeable nickel-cadmium batteries and the
selector switch is set to Ni-Cd BATT.
SETUP
Installing the Batteries
1.Open the cover
Lift
Press in
Flexible Antenna
Attach the flexible
antenna to the BNC
connector.
2.Insert Batteries
Ni.-Cd.
BATT.
REG.
ALK.
BATT.
Belt Clip
Do not tighten the
screws too tight. You
can damage the case
or clip.
Inside
of top
cover
Note: If you are installing alkaline batteries, set the
switch to REG. ALK.BATT. If installing nickelcadmium batteries, set the switch to Ni-Cd
BATT.
3.Replace cover and press down
until it clicks into place.
WARNING
Optional Accessories
Do not mix alkaline
batteries with Ni-Cd
batteries. Be sure to
install four batteries
of the same type.
AC Adapter / Charger
Cigarette Lighter Lead
AC Adapter/Charger
Use the optional AC adapter/charger to power the
UBC61XLT from an AC outlet.
Use only the optional AC adapter.
4
UBC61 scanner Qk
3/12/02 11:22 AM Page 5
5. Turn SQUELCH back counter-clockwise just until
the hiss stops. Now the “Squelch Gate” allows
only strong signals through.
Basic Operation
Setting the Squelch
To set the squelch, you must be in the manual
mode.
No signal should be present when adjusting
squelch.
Strong Signals
Medium Signals
Weak Signals
1. Press • MANUAL
until you do not
hear a signal.
• SCAN
• MANUAL
SRCH
SLCT
HOLD
LIGHT
1
2
3
4
5
6
7
8
9
•
0
E
WX
SKIP
L/O
PRI
Noise
Keylock
Keylock prevents accidental key entries during
scanning.
CLEAR
1. To lock the key
pad, press and
hold
until the
key symbol
appears.
2. Adjust VOLUME
to a comfortable
listening level.
• SCAN
1
2
3
• MANUAL
4
5
6
7
8
9
•
0
E
WX
SKIP
L/O
PRI
SRCH
SLCT
HOLD
LIGHT
3. Think of Squelch Control as a gate. Turn
SQUELCH fully counter-clockwise. This raises
the “Squelch-Gate” so high that no signals can
get through.
4
CLEAR
460.4250 MH
Z
SCAN
Strong Signals
2. To unlock the key
pad press and
hold
until
the key symbol
disappears.
Medium Signals
Weak Signals
Noise
• SCAN
1
2
3
• MANUAL
4
5
6
7
8
9
•
0
E
WX
SKIP
L/O
PRI
SRCH
SLCT
HOLD
4. Turn SQUELCH fully clockwise until you hear a
hiss. This lowers the “Squelch-Gate” so that
everything gets through - noise, weak signals,
and strong signals.
LIGHT
4
Strong Signals
460.4250 MH
SCAN
Medium Signals
Weak Signals
Noise
5
CLEAR
Z
UBC61 scanner Qk
3/12/02 11:22 AM Page 6
Duplicate Frequency Alert
If you enter a
frequency stored in
CH 10
2
another channel, you
HOLD
L/O
hear a beep and the
other channel appears in the display.
Programming
Before the UBC61XLT can receive radio broadcasts, you must program a frequency into at least
one channel before scanning, repeat this procedure
for each channel you program.
Up to 80 channels may be programmed
1. Select frequencies
2. Press
• MANUAL
• SCAN
1
2
3
• MANUAL
4
5
6
7
8
9
SRCH
SLCT
LIGHT
• MANUAL
0
E
SKIP
L/O
PRI
• SCAN
1
2
3
4
5
6
7
8
9
•
0
E
WX
SKIP
L/O
PRI
SLCT
LIGHT
2
When you turn on the
power, the UBC61XLT
automatically starts in
the scan mode.
During normal scanning the scanner skips
unprogrammed or
locked out channels.
When a transmission is
received, the scanner
stops on that channel.
When the transmission
ends, scanning
resumes automatically
after two seconds.
000.0000 MH
Z
HOLD
1
2
3
• MANUAL
4
5
6
7
8
9
•
0
E
WX
SKIP
L/O
PRI
SRCH
SLCT
HOLD
To stop on a channel
during scanning,
press • MANUAL
SCAN
88
SCAN
SCAN
CHANNELS
1 2 3 4 5 6 7 8 9 10
Frequency
locked out
(L/O)
2
460.3750 MH
Z
• SCAN
1
2
3
• MANUAL
4
5
6
7
8
9
•
0
E
WX
SKIP
L/O
PRI
SRCH
SLCT
CLEAR
LIGHT
HOLD
LIGHT
460.3750 MH
Z
2
HOLD
Frequency
not entered
SCAN
L/O
• SCAN
2
Scanning
CLEAR
HOLD
4. Enter the frequency.
a) Enter the
frequency number
b) Then press E
•
WX
• MANUAL
SRCH
Press E
again to store the
frequency in both
channels.
or
CLEAR
HOLD
3. Select a channel
a) Enter the
channel number
b) Then press
Press .
to start again
CLEAR
460.4250 MH
Z
HOLD
To clear a mistake while entering the
frequency, press . twice, and start over.
To resume scanning
press • SCAN
If the frequency entered is outside the frequency
range of the scanner, a distinctive beep sounds. (See
the table on page 2).
• SCAN
1
2
3
• MANUAL
4
5
6
7
8
9
•
0
E
WX
SKIP
L/O
PRI
SRCH
SLCT
HOLD
.
Press
and go back to
step 4.
2
ERROR
HOLD
LIGHT
CLEAR
L/O
88
SCAN
6
SCAN
UBC61 scanner Qk
3/12/02 11:22 AM Page 7
Locking a Channel While Scanning
If the scanner keeps stopping on a particular
channel due to noise or too frequent transmissions,
you may want to keep that channel from scanning.
Channel Lockout
You can lockout any channel so it is not reviewed
during normal scanning. You can restore the channel to scanning whenever you wish.
Lockout in Manual Mode
1. Press • MANUAL
• SCAN
1
2
3
• MANUAL
4
5
6
SRCH
SLCT
8
2. Then press
•
9
LIGHT
WX
0
3. The scanner
immediately
resumes scanning
because the
locked out channel
is no longer in the
scanning
sequence.
E
SKIP
L/O
PRI
460.3750 MH
Z
HOLD
2. Select a channel
a) Enter the
channel
number
b) Then press
• SCAN
1
2
3
• MANUAL
4
5
6
7
8
9
SRCH
• MANUAL
SLCT
460.0750 MH
again.
LIGHT
• SCAN
1
2
3
• MANUAL
4
5
6
7
8
9
•
0
E
WX
SKIP
L/O
PRI
SRCH
SLCT
CLEAR
HOLD
LIGHT
SCAN
88
SCAN
Restore a Locked Out Channel
1. Press • MANUAL
•
0
E
WX
SKIP
L/O
PRI
460.3750 MH
• SCAN
1
2
3
• MANUAL
4
5
6
7
8
9
•
0
E
WX
SKIP
L/O
PRI
SRCH
SLCT
Z
CLEAR
HOLD
HOLD
3. Press L/O
to lockout the
channel.
Z
SCAN
CLEAR
HOLD
8
5
L/O
CLEAR
HOLD
8
7
1. Wait until the
scanner stops at
the channel.
LIGHT
• SCAN
1
2
3
• MANUAL
4
5
6
7
8
9
10
460.2250 MH
Z
HOLD
SRCH
SLCT
CLEAR
HOLD
LIGHT
8
•
0
E
WX
SKIP
L/O
PRI
460.3750 MH
HOLD
2. Select a locked
out channel.
a) Enter the
channel
number
b) Then press
Z
L/O
• SCAN
1
2
3
• MANUAL
4
5
6
7
8
9
•
0
E
WX
SKIP
L/O
PRI
SRCH
SLCT
CLEAR
HOLD
• MANUAL
again.
LIGHT
2
460.3750 MH
HOLD
7
L/O
Z
UBC61 scanner Qk
3. Press L/O
unlock the
channel.
to
3/12/02 11:22 AM Page 8
• SCAN
1
2
3
• MANUAL
4
5
6
7
SRCH
SLCT
9
0
E
WX
SKIP
L/O
PRI
CLEAR
HOLD
LIGHT
2
8
•
If you have
locked out
the priority channel,
this message
appears when you select
priority mode.
460.3750 MH
2. Press PRI again
at anytime to
deactivate priority
scan.
Z
HOLD
1
2
3
• MANUAL
4
5
6
PRI
2
3
4
5
6
7
8
9
•
0
E
WX
SKIP
L/O
PRI
7
8
9
•
0
E
WX
SKIP
L/O
PRI
• SCAN
1
2
3
• MANUAL
4
5
6
7
8
9
•
0
E
WX
SKIP
L/O
PRI
SLCT
CLEAR
HOLD
LIGHT
SLCT
• MANUAL
SRCH
SLCT
SRCH
LIGHT
HOLD
LIGHT
11
• SCAN
1
2
3
• MANUAL
4
5
6
7
SLCT
2. Select a new
priority channel.
a) Enter the
channel
number
b) Then press
5
8
9
•
0
E
WX
SKIP
L/O
PRI
6
CLEAR
460.4750 MH
8
9
•
0
E
LIGHT
WX
SKIP
L/O
PRI
• SCAN
1
2
3
4
5
6
7
8
9
•
0
E
WX
SKIP
L/O
PRI
SRCH
SLCT
HOLD
CLEAR
again.
LIGHT
4
SCAN
88
Z
• MANUAL
• MANUAL
CLEAR
HOLD
P
4
7
HOLD
460.4250 MH
HOLD
SCAN
SLCT
CLEAR
HOLD
SRCH
CLEAR
Changing the Priority Channel
You cannot eliminate the priority channel, but you
can change it to any other of the 80 available
channels.
1. Press • MANUAL
• SCAN
1 2 3
When priority scan is turned on, your scanner checks
the priority channel every two seconds for activity. If a
signal is present on the priority channel, your scanner
monitors the channel until the transmission ends, then
resumes normal scanning. You can designate any one
of the 80 available channels as your priority channel.
1. Press
1
LIGHT
Priority Scan
To activate priority
scan (in either
manual or scan
mode):
• SCAN
• MANUAL
HOLD
• SCAN
SRCH
HOLD
SRCH
Restore All Locked-out Channels
1. Press • MANUAL
You must
be in
manual
mode before
restoring all lockedout channels.
2. Press and hold
L/O for about
two seconds.
You will hear two
beeps when all the
channels have been
restored.
Empty channels cannot
be deleted
and are always
locked out
P ch Loc Out
PRI
8
Z
UBC61 scanner Qk
3. Press and hold
PRI for two
seconds to designate this channel
as your new
priority channel.
3/12/02 11:22 AM Page 9
• SCAN
1
2
3
• MANUAL
4
5
6
7
SRCH
SLCT
9
0
E
WX
SKIP
L/O
PRI
CLEAR
HOLD
Two beeps indicate
that the priority
channel is changed.
8
•
2. Enter lower limit
of the search
band.
a) Enter the
frequency
number.
b) Then press
E
LIGHT
CHAIN 2
000.0000 MH
• SCAN
1
2
3
• MANUAL
4
5
6
7
8
9
•
0
E
WX
SKIP
L/O
PRI
SRCH
SLCT
CLEAR
HOLD
P4
460.4250 MH
HOLD
Z
PRI
LIGHT
Chain Search
The display
alternates
between the upper
and lower ranges.
Use chain search to find active frequencies in your
area. You can search up to all five personal bands
or turn off those bands you don’t want to hear. This
gives you flexibility of searching for any channel
between 66 and 512 MHz, as long as they are within the 8 frequency bands covered by the
UBC61XLT.
See the table on page 2
Z
SEARCH
CHAIN 2
460.0000 MH
Z
SEARCH
CHAIN 2
460.0000 MH
Z
SEARCH
and
CHAIN 2
000.0000 MH
Z
SEARCH
Setting a Search Range
An error message
CHAIN 2
displays when SRCH
ERROR MHZ
2
is pressed and you
SEARCH
have not either
specified a search range in at least one chain
search band.
3. Enter upper limit
of the search
band.
a) Enter the
frequency
number
b) Then press
-OR-
• SCAN
1
2
3
• MANUAL
4
5
6
7
8
9
•
0
E
WX
SKIP
L/O
PRI
SRCH
SLCT
HOLD
E
LIGHT
If you attempt to turn off all personal chain search
bands.
The error message turns off automatically and
chain 1 is selected
CHAIN 1
when all search
000.0000 MHZ
1
locations are empty.
SEARCH
Press
SLCT
CLEAR
CHAIN 2
460.0000 MH
The display
alternates
between the upper
and lower ranges. If
you program the
wrong limit press
o and E then
press o and E
again to erase the
error and reset the
limits to zero.
Then begin again.
to return to manual mode, or press
to select the band you want to program.
• MANUAL
To program a frequency range into one of
the five personal chain
search bands, follow
these steps:
• SCAN
1
2
3
• MANUAL
4
5
6
7
SRCH
1. Press SLCT until
the search location
you want appears in
the display.
SLCT
HOLD
LIGHT
8
9
•
0
E
WX
SKIP
L/O
PRI
Z
SEARCH
CLEAR
9
CHAIN 2
460.0000 MH
Z
SEARCH
and
CHAIN 2
460.5000 MH
SEARCH
Z
UBC61 scanner Qk
4. Either press SRCH
to begin your
search.
3/12/02 11:22 AM Page 10
• SCAN
1
2
3
• MANUAL
4
5
6
7
8
9
•
0
E
WX
SKIP
L/O
PRI
SRCH
SLCT
-OR(See step 3)
CLEAR
HOLD
LIGHT
CHAIN
2. Press
to move
the next higher
frequency
460.1750 MH
1
2
3
4
5
6
7
8
9
•
0
E
WX
SKIP
L/O
PRI
• SCAN
1
2
3
• MANUAL
4
5
6
7
8
9
•
0
E
WX
SKIP
L/O
PRI
• SCAN
1
2
3
• MANUAL
4
5
6
7
8
9
•
0
E
WX
SKIP
L/O
PRI
SRCH
SLCT
CLEAR
HOLD
LIGHT
3. Press
to move
down to the
previous
frequency.
2
1
• SCAN
• MANUAL
Z
SEARCH
Your scanner searches each selected chain
search band. The display flashes the
number of the band while it’s searched.
Other bands which are programmed and selected
are displayed but do not flash
SRCH
SLCT
HOLD
LIGHT
CLEAR
CHAIN 3
-OR-
000.0000 MH
4. Press SRCH to
resume searching.
Z
SEARCH
Press SLCT to move
to the next chain location.
You can press the chain search band number, followed by SLCT , to access the
location directly.
5. To turn off a chain
search band
during searching,
press its location
number.
• MANUAL
SLCT
HOLD
LIGHT
Search Hold
Feature
Press
or
at
anytime to stop the
search.
SLCT
HOLD
LIGHT
• SCAN
SRCH
For example, (a) if
chain search
locations 1,2 and 3
are selected, (b)
press 3
to turn
off band three so
that it’s not scanned
during your search.
SRCH
1
2
CLEAR
3
4
5
7
8
9
•
0
E
WX
SKIP
L/O
PRI
The search continues toward either the
upper or lower search limit, depending
on which direction key (
or
) was
pressed last.
6
CLEAR
Frequency Skip
If a particular frequency continues to interrupt
searching, it is possible to set your scanner to skip
the frequency.
CHAIN 1 2 3
1
a
460.4250MH
Z
SEARCH
CHAIN 1 2
1
b
460.4375MH
Z
SEARCH
If you scanner stops
while searching,
press SKIP to lockout the frequency
from the search
range.
• SCAN
1
2
3
• MANUAL
4
5
6
7
8
9
•
0
E
WX
SKIP
L/O
PRI
SRCH
SLCT
HOLD
LIGHT
• SCAN
1
2
3
• MANUAL
4
5
6
7
SRCH
SLCT
HOLD
LIGHT
8
9
•
0
E
WX
SKIP
L/O
PRI
CLEAR
You can program 10 skip frequencies. The
11th skip frequency entered causes the 1st
skip frequency to unlock.
CLEAR
To unlock all skip frequencies at once, follow the
next steps:
10
UBC61 scanner Qk
1. Press either
or
during a search.
You must be
in search hold
before restoring all
skipped frequencies.
3/12/02 11:22 AM Page 11
• SCAN
1
2
3
• MANUAL
4
5
6
7
8
9
•
0
E
WX
SKIP
L/O
PRI
• SCAN
1
2
3
• MANUAL
4
5
6
SRCH
SLCT
For example,
select CHAIN 2.
LIGHT
4. Press
2. Press and hold
SKIP for about
two seconds. You
will hear two
beeps when all the
frequencies have
been restored.
460.0000 MH
SRCH
CHAIN 2
460.5000 MH
SLCT
7
8
• SCAN
1
2
3
• MANUAL
4
5
6
7
8
9
•
0
E
WX
SKIP
L/O
PRI
9
SLCT
HOLD
CLEAR
HOLD
•
0
E
WX
SKIP
L/O
PRI
LIGHT
LIGHT
Z
SEARCH
SRCH
SRCH
Z
SEARCH
These
frequencies
were used during
“setting a search
range” on page 9.
CLEAR
HOLD
CHAIN 2
CLEAR
CHAIN 1 2
Storing Search Frequencies
You can quickly store any frequency you find during
search.
You must select the channel in which you
will store the frequency before entering the
CAUTION search mode. Otherwise, you may erase a
stored frequency that you want to keep.
1. Press
• MANUAL
• SCAN
1
2
3
• MANUAL
4
5
6
7
8
9
•
0
E
WX
SKIP
L/O
PRI
• SCAN
1
2
3
• MANUAL
4
5
6
7
8
9
•
0
E
WX
SKIP
L/O
PRI
SRCH
SLCT
HOLD
LIGHT
2. Select a channel.
a) Enter the
channel number.
b) Then press
• MANUAL
SRCH
again.
SLCT
HOLD
LIGHT
5. When the scanner
stops at the
frequency you
want, press
either
or
Z
SEARCH
• SCAN
1
2
3
• MANUAL
4
5
6
7
8
9
•
0
E
WX
SKIP
L/O
PRI
SRCH
After this
step you
are in search hold
mode.
Press SRCH to
resume searching.
CLEAR
CLEAR
460.3875 MH
22
CLEAR
HOLD
LIGHT
CHAIN 1 2
460.3625 MH
22
Z
SEARCH
HOLD
6. Press E to
store the
frequen cy in the
channel you
selected.
• SCAN
1
2
3
• MANUAL
4
5
6
7
8
9
•
0
E
WX
SKIP
L/O
PRI
SRCH
SLCT
HOLD
CHAIN 1 2
LIGHT
CLEAR
460.3875 MH
22
3. Select one or more
of the personal
search bands.
SLCT
Z
SEARCH
• SCAN
1
2
3
• MANUAL
4
5
6
7
8
9
SRCH
SLCT
HOLD
LIGHT
After this
step you are
in manual mode.
22
460.3625 MH
HOLD
CLEAR
•
0
E
WX
SKIP
L/O
PRI
Repeat steps 2 through 6 for all the search
frequencies you want to store.
11
Z
UBC61 scanner Qk
3/12/02 11:22 AM Page 12
Troubleshooting
If your UBC61XLT is not performing properly, try the following steps.
Problem
Suggestion
Improper reception
1. Check the antenna connection or move and reposition the antenna.
2. Move the scanner
3. You may be in a remote area which could require an optional multiband
antenna. Check with your dealer or local electronics store.
Scan won’t stop
1. Adjust squelch threshold - refer to page 5, setting the squelch.
2. Check the antenna connection.
3. Check to see if many of the channels are locked-out. If so, the scanner has
less chance of finding an active channel.
4. Review each channel’s frequency to see if it is still stored in memory and is correct.
5. It’s possible that none of the programmed frequencies are currently active.
Scan won’t start.
1. Press the SCAN key again.
2. Adjust the SQELCH control.
3. Check to see if all channels are locked out.
Weather Scan won’t work
1. Weather Scan is not functional in New Zealand or Australia.
Warranty
One Year Limited Warranty
Important: Evidence of original purchase is required for warranty service.
Warrantor: Uniden Australia Pty Limited A.B.N. 58 001 865 498
Uniden New Zealand Limited
ELEMENT OF WARRANTY: Uniden warrants to the original retail owner for the duration
of this warranty, its UBC 61XLT (herein after referred to as the Product), to be free from defects in materials and craftsmanship with only the limitations or exclusions set out below.
WARRANTY DURATION: This warranty to the original retail owner only, shall terminate
and be of no further effect 12 months after the date of original retail sale. This warranty will
be deemed invalid if the product is; (A) Damaged or not maintained as reasonable and necessary, (B) Modified, altered or
used as part of any conversion kits, subassemblies, or any configurations not sold by Uniden, (C) Improperly installed,
(D) Repaired by someone other than an authorised Uniden Repair Agent for a defect or malfunction covered by this warranty, (E) Used in conjunction with any equipment or parts or as part of a system not manufactured by Uniden, (F)
Warranty is only valid in original country of purchase.
PARTS COVERED: This warranty covers for one (1) year, the Base Unit and Handset only. All accessories (AC Adaptor,
Belt Clip etc)are covered for 90 days only.
STATEMENT OF REMEDY: In the event that the product does not conform to this warranty at any time while this warranty
is in effect, the warrantor at its discretion, will repair the defect or replace the product and return it to you without charge
for parts or service. THIS WARRANTY DOES NOT COVER OR PROVIDE FOR THE REIMBURSEMENT OR PAYMENT OF
INCIDENTAL OR CONSEQUENTIAL DAMAGES. THIS GUARANTEE IS IN ADDITION TO AND DOES NOT IN ANY WAY
AFFECT YOUR RIGHTS UNDER THE CONSUMER GUARANTEE ACT.
PROCEDURE FOR OBTAINING PERFORMANCE OR WARRANTY: In the event that the product does not conform to this
warranty, the Product should be shipped or delivered, freight pre-paid, with evidence of original purchase (eg. a copy of
the sales docket), to the warrantor at:
UNIDEN AUSTRALIA PTY LIMITED
SERVICE DIVISION
345 Princes Highway,
Rockdale NSW 2216
Ph (02) 9599 3355 Fx (02) 9599 3278
Toll Free 1300 366 895
UNIDEN NEW ZEALAND LIMITED
SERVICE DIVISION
150 Harris Road,
East Tamaki, Auckland
Ph (9) 273 8383 Fx (9) 274 4253
Toll Free 0800 4 UNIDEN
4 864 336
www.uniden.com.au
www.uniden.co.nz
Customers in other States should ship or deliver the Product freight pre-paid to their nearest Uniden Authorised Repair
Centre (Contact Uniden for the nearest Warranty Agent to you)
12