1
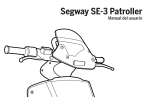
Segway SE-3 Patroller
User Manual
WARNING
®
•
Whenever you ride the Segway SE-3 Patroller you risk death or serious injury from loss of control, collisions, and falls. It is your responsibility
to learn how to safely ride the SE-3 Patroller in order to reduce these risks. To ride safely you must follow all instructions in the user materials,
including the User Manual and Safety Video. These materials are available at www.segwaysafety.com.
•
Always wear a helmet when riding the SE-3 Patroller. Use an approved bicycle or skateboard helmet that fits properly with the chin strap in
place, and provides protection for the back of your head.
•
Never place anything on the Rider Detect Mat except your feet. Doing so could interfere with the Rider Detection system and may allow the
SE-3 Patroller to travel on its own, risking running into a person or property and causing injury or damage.
•
Avoid obstacles and slippery surfaces that could result in a loss of balance or traction and cause a fall.
•
Pay attention to all Warnings and Faults from the SE-3 Patroller. You must learn about and understand the Warnings described in the User
Manual and respond as instructed.
•
Never step off of the SE-3 Patroller when it is in DRIVE mode. If you step off of the SE-3 Patroller while in DRIVE mode, you risk injury to others
and damage to the SE-3 Patroller.
•
Never restart and ride the SE-3 Patroller after it has indicated an empty charge level. You risk damaging the Battery Module, resulting in
reduced battery life and capacity.
•
Although the SE-3 Patroller is designed to be as stable as possible for a design that utilizes three wheels, it is possible to “override” the
vehicle and tip over when riding too fast for the conditions. Always be aware of the riding surface and environmental conditions while riding.
•
Do not insert the power cord if the Charge Port is wet.
•
Use a surge protector when charging the SE-3 Patroller to help protect it from damage due to power surges and voltage spikes.
•
Always shut down the SE-3 Patroller and unplug the AC Power Cord before performing any maintenance or installing any part or accessory.
•
Use only Segway approved parts and accessories. Do not modify the SE-3 Patroller. Modifications to the SE-3 Patroller could interfere with
the operation of the SE-3 Patroller, could result in serious injury and/or damage, and could void the Segway SE-3 Patroller Limited Warranty.
•
Theft detection systems, such as the type used in some libraries and retail stores, can interfere with the SE-3 Patroller’s electronics and/or
cause the SE-3 Patroller to malfunction. Do not ride within 5 ft. (1.5 m) of any theft detection system.
Info
SE-3
Setup
Operate
Riding
Tips
Segway® SE-3 Patroller
Battery
User Manual
Maintain
T-shoot
Warn
Contact
Index
Schedule
24324-00001 aa
1
Copyright, Trademarks, Patent, and Contact Information
Copyright © 2014 Segway Inc. All rights reserved.
Trademarks
Segway Inc. ("Segway") owns a number of trademarks including, but not limited to, Segway and the Segway "Rider Design" logo that have been
registered in the United States and in other countries. Those trademarks followed by ® are registered trademarks of Segway. All other marks are
trademarks or common law marks of Segway. Failure of a mark to appear in this manual does not mean that Segway does not use the mark, nor
does it mean that the product is not actively marketed or is not significant within its relevant market. Segway reserves all rights in its trademarks.
All other trademarks are the property of their respective companies.
Segway Inc. Patent Information
The Segway SE-3 Patroller is covered by U.S. and foreign patents. For more information go to http://www.segway.com/patents.pdf.
Contact Information
For support, please contact the company from which you bought the product. For a listing of Authorized Segway Dealers and Distributors, visit
the Segway website at: http://www.segway.com.
Segway Customer Care: 1-866-4SEGWAY (1-866-473-4929)
Fax: 1-603-222-6001
E-mail: [email protected]
Website: http://www.segway.com
2
2
3
6
6
6
6
7
7
9
9
15
18
21
21
26
27
28
29
30
31
33
34
35
36
37
38
SE-3
Setup
Operate
Riding
Tips
Battery
Maintain
T-shoot
Warn
Contact
Index
Schedule
Copyright, Trademarks, Patent, and Contact Information
Table of Contents
Introduction
About This Manual
The Risk of Injury
Before You Begin
Related User Materials
Safety Messaging
The Segway SE-3 Patroller
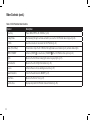
SE-3 Patroller Components and Subsystems
Segway SE-3 Patroller Specifications
Segway SE-3 Patroller Operating Limits
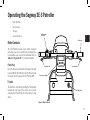
Operating the Segway SE-3 Patroller
Rider Controls
User Interface/Display
Storage
Accessory Power
Riding the Segway SE-3 Patroller
Riding Position
Avoiding Hazards
Riding: Stepping On/Stepping Off
Riding: Power On/Accelerating
Riding: Turning the SE-3 Patroller
Riding: Slowing/Stopping the SE-3 Patroller
Riding: Engaging Reverse Mode
Riding: Parking/Power Off
Info
Table of Contents
3
Table of Contents
Riding Techniques
Riding Tips and Safety Guidelines Recap
Report All Incidents
Segway SE-3 Patroller Battery Module
Battery Safety
The Battery Module
Installing the Battery Module
Removing the Battery Module
Charging the Battery Module
Unplugging the SE-3 Patroller
Battery Discharge Indicator (BDI)
How Temperature Affects Performance
Battery Module Transportation, Shipping, and Disposal
Maintaining and Servicing the Segway SE-3 Patroller
Securing the SE-3 Patroller for Transport
Tires and Wheels
Brakes
Cleaning the Segway SE-3 Patroller
Storing the Segway SE-3 Patroller
Replacing Parts
Troubleshooting
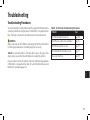
Troubleshooting Procedures
Warnings and Faults
Warnings
Faults
Accessory Outlet Fuse
4
39
41
44
45
45
46
48
49
50
51
51
55
56
57
58
59
64
66
67
68
69
69
73
73
75
76
77
77
77
77
77
78
78
80
82
82
83
85
86
88
SE-3
Setup
Operate
Riding
Tips
Battery
Maintain
Contact and Legal Information
Report All Incidents
How to Reach Us
California Warning
Obey All Laws and Regulations
Limited Warranty/Guarantee
Regulatory Compliance Information
Radio Frequency Interference
Product Life and Recycling
Patent Information
Index
Notes:
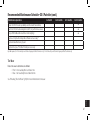
Recommended Maintenance Schedule–SE-3 Patroller
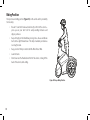
Your Segway SE-3 Patroller
Info
Table of Contents
T-shoot
Warn
Contact
Index
Schedule
5
Introduction
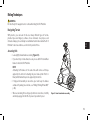
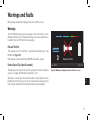
Congratulations on the purchase of the Segway SE-3 Patroller. The Segway SE-3 Patroller provides a means of clean, efficient transportation
for law enforcement and security personnel both indoors and outdoors to facilitate area patrolling. In addition to being able to quickly patrol
large areas, the SE-3 Patroller gives officers a greater security presence, increased viewing height, and auditory and visual aids to gain and hold
pedestrians' attention.
About This Manual
The SE-3 Patroller has been designed to be as stable as possible for a three wheel design. However, to learn to ride the SE-3 Patroller safely, you
must read and follow all instructions and warnings in the User Manual and watch the Safety Video. It is important that you follow all safety
warnings and cautions that appear throughout the User Manual and that you use good judgment when riding your SE-3 Patroller. Remember
to pass on this User Manual and the Safety Video if you ever resell your SE-3 Patroller. If you have questions, or need another copy of the User
Manual or Safety Video, contact an Authorized Segway Dealer or Distributor, or Segway Inc. before you attempt to use your SE-3 Patroller. For a
list of Authorized Segway Dealers and Distributors, call 1-866-473-4929 or visit http://www.segway.com.
Check our website regularly for updates to SE-3 Patroller User Materials: http://www.segway.com
The Risk of Injury
WARNING
Whenever you ride the Segway SE-3 Patroller, you risk death or serious injury from loss of control, collisions, and falls. To reduce risk of injury,
you must read and follow all instructions and warnings in the user materials.
Before You Begin
Before you begin, the Battery Module must be charged for at least 12 hours. You should thoroughly read and understand the instructions in this
manual before you attempt to operate the SE-3 Patroller.
6
Info
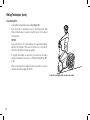
Related User Materials
Safety Video. A Safety Video is available online. It provides important information on how to use your Segway SE-3 Patroller. To reduce
the risk of injury, you must watch and follow all instructions and warnings in the Safety Video before you ride. To view the Safety Video,
go to www.segwaysafety.com.
Operate
•
Setup
User Manual. This User Manual provides information to help you learn to safely operate and ride your Segway SE-3 Patroller. To reduce
risk of injury, you must read and follow all instructions and warnings in the User Manual.
SE-3
•
If you need assistance reading the User Manual or viewing the Safety Video, contact your Segway dealer as soon as possible.
Riding
Safety Messaging
Tips
Segway takes all aspects of safety very seriously. Our publications and documentation provide clear, consistent safety messaging designed to
offer instructions and procedural information that help avoid physical injury or damage to the SE-3 Patroller.
Battery
Maintain
Of course, it is impossible to predict and warn against every possible harm or hazard that exists. Thus, users must also use their own intuition
and common sense to help avoid physical injury or damage to your SE-3 Patroller.
The following safety messaging conventions are used throughout this guide:
NOTICE
Indicates information considered important, but not related to personal injury. Examples include
messages regarding possible damage to the SE-3 Patroller or other property, or usage tips.
Index
Warns you about actions that could result in minor or moderate injury.
Contact
CAUTION
Warn
Warns you about actions that could result in death or serious injury.
T-shoot
WARNING
Schedule
7
Notes:
8
•
SE-3 Patroller specifications
•
SE-3 Patroller operating limits
Setup
SE-3 Patroller components and subsystems
SE-3
•
Info
The Segway SE-3 Patroller
Operate
SE-3 Patroller Components and Subsystems
Riding
WARNING
All Segway SE-3 Patroller parts must be approved by Segway, and properly installed. Do not modify the Segway SE-3 Patroller. Modifications
to the SE-3 Patroller could interfere with its operation, could result in serious injury and/or damage, and could void the Segway SE-3 Patroller
Limited Warranty/Guarantee.
Tips
Battery
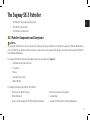
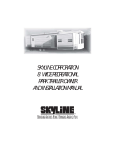
The Segway SE-3 Patroller includes the following components and subsystems (Figure 1):
Handlebar/Controls/User Interface
Maintain
•
• Tires/wheels
•
Drive/Electrical System
•
Battery Module
Warn
Chassis
T-shoot
•
• Battery Module (1)
• User Materials
• Power cord (for charging the SE-3 Patroller Battery Module)
• Segway SE-3 Patroller Limited Warranty/Guarantee
Schedule
• Rear wheel nut key (socket adapter)
Index
• Power Keys (2); Glovebox key (1)
Contact
The following items/parts ship with the SE-3 Patroller:
9
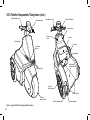
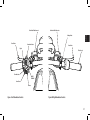
SE-3 Patroller Components/Subsystems (cont.)
Right Handlebar Controls
Front Running Light
Left Handlebar Controls
User Interface/Display
Power Key Switch
12 V Accessory
Outlet
Glovebox
Emergency Light
Storage Bin
Turn/Hazard
Indicator
Battery Module
Rider Platform/
Rider Detect Mat
Emergency Lights
Rear Tire/
Wheel Assembly
Emergency Lights
Front Tire/
Wheel Assembly
Figure 1: Segway SE-3 Patroller Components/Subsystems
10
Brake/Rear Running Light
Turn/Hazard Indicator
Info
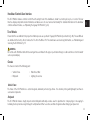
Handlebar/Controls/User Interface
SE-3
The SE-3 Patroller features controls on both the left and right side of the handlebars, similar to a motorcycle, bicycle, or scooter. The User
Interface displays important vehicle information, and allows users to select various functionality. For detailed information on the handlebar
controls and User Interface, see "Operating the Segway SE-3 Patroller" (p. 21).
Setup
Tires/Wheels
Operate
Ensure that Tires are inflated to the proper tire inflation pressure as specified in "Segway SE-3 Patroller Specifications" (p. 16). Tires and Wheels
are installed at the factory. Do not remove the Tire from the Wheel. For Tire maintenance and servicing information, see "Maintaining and
Servicing the SE-3 Patroller," p. 57.
Riding
Tips
WARNING
Do not ride a SE-3 Patroller without first ensuring all tires are inflated to the proper specification. Doing so could result in loss of control and/or
serious personal injury.
Battery
Chassis
Maintain
The chassis consists of the following parts:
• Rider Detect Mat
• Bodywork
• Lighting Accessories
T-shoot
• Vehicle Frame
Warn
Contact
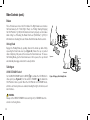
Vehicle Frame
The frame of the SE-3 Patroller is a custom designed, aluminum perimeter-type frame. It is extremely strong and lightweight, and has no
serviceable components.
Index
Bodywork
Schedule
The SE-3 Patroller features tough, impact-resistant bodywork with ample surface area for department or company logos or messaging. A
lockable glove box provides enough storage for a clipboard and other necessities, and two storage bins allow strategic gear placement.
11
SE-3 Patroller Components/Subsystems (cont.)
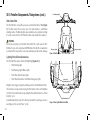
Front Running Light
Rider Detect Mat
The SE-3 Patroller comes with a pressure-sensitive Rider Detect Mat (Figure
3). The Mat detects the presence of a rider and provides a comfortable
standing surface. The Mat should be clean and fastened securely before riding.
If no rider is detected, the SE-3 Patroller's Drive System will not be enabled.
WARNING
Do not place any objects on the Rider Detect Mat. This could cause the SE-3
Patroller to move on its own when in DRIVE Mode if the throttle is inadvertently activated. This may result in serious personal injury and/or vehicle damage.
Turn/
Hazard Indicators
Emergency Lights
Emergency Lights
Figure 2: Front Lights
Lighting/Horn & Siren/Accessories
The SE-3 Patroller features efficient LED lighting (Figures 2, 3):
•
Front Running Light
•
Rear Running Lights/Brake Lights
•
Front/Rear Turn Indicator Lights
•
Front/Rear/Side Amber or Red/Blue Emergency Lights
Rider Detect Mat
Brake/Rear
Running Lights
All lights can be toggled using the switchgear on the Left Handlebar Control.
The horn/siren can be activated using the Horn switch on the Left Handlebar
control. For more information on operating the Handlebar Controls see "Rider
Controls," p. 21.
A standard automotive-style 12 V outlet is provided for operating accessories
and duty gear ("Accessory Power," p. 28).
12
Emergency Lights
Turn/Hazard Indicators
Figure 3: Rear Lights/Rider Detect Mat
SE-3
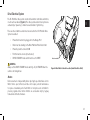
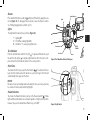
The SE-3 Patroller drive system consists of dual motor controllers and motors,
one for each rear wheel (Figure 4). The drive system and electrical system are
activated by a "power key," similar to an automobile's "ignition" key.
Info
Drive/Electrical System
Motors
Setup
Power Cord must not be plugged in to the Charge Port
•
Rider must be standing on the Rider Platform/Rider Detect Mat
•
Power Key must be turned to ON
Riding
•
Operate
There are five conditions a rider must ensure before the SE-3 Patroller Drive
System is enabled:
Tips
• Throttle must be at zero (not activated)
DRIVE/STANDBY mode switch must be set to DRIVE
Motor Controllers
Maintain
Figure 4: Motor/Motor Controller Location (Under Rider Detect Mat)
T-shoot
WARNING
Always set the DRIVE/STANDBY mode switch (p. 24) to STANDBY when the
vehicle is not being driven.
Battery
•
Motors
Warn
Contact
Each rear wheel is independently driven by a high-speed brushless electric
Motor that is quiet, efficient, and does not require periodic maintenance
to replace consumable parts. Each Motor is microprocessor controlled to
precisely regulate drive motion. Motors are serviceable only by Segway
trained and certified technicians.
Index
Schedule
13
SE-3 Patroller Components/Subsystems (cont.)
Electronics
The SE-3 Patroller electrical system consists of the following subsystems:
•
User Interface/Display
•
Power/Interface PCB Assembly
•
Motor Controllers (2)
These components are serviceable only by Segway trained and certified
technicians. If your SE-3 Patroller requires service, please contact Segway
(1-866-4SEGWAY, www.segway.com).
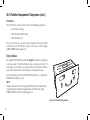
Battery Module
The Segway SE-3 Patroller Battery Module (Figure 5) contains a rechargeable
Li-ion power pack. The Battery Module features automatic protection for
over-charge, over-discharge, over-current, and over-temperature conditions,
and requires no maintenance other than proper charging and storage.
For more information on the SE-3 Patroller Battery Module, see "Segway SE-3
Patroller Battery Module" (p. 45).
NOTE:
A replacement power cord for charging the Battery Module is available from
Segway. Contact an Authorized Segway Dealer or Distributor by calling
1-866-473-4929 or visit http://www.segway.com.
Figure 5: SE-3 Patroller Battery Module
14
Info
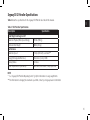
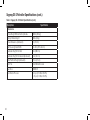
Segway SE-3 Patroller Specifications
SE-3
Table 1 shows the specifications for the Segway SE-3 Patroller described in this manual.
Table 1: SE-3 Patroller Specifications
Setup
Description
Specification
350 lbs (159 kg)
Minimum Rider Weight
100 lbs (45 kg)
Riding
Maximum Payload (Rider plus all Cargo)
Operate
Rider Weight and Cargo Limits*
Performance
Lithium Ion (Li-ion); 1 kWh
Turning Radius
42 inches
Power Requirements (Worldwide)
100 - 240 V; 50 or 60 Hz; 3 Amp input max
Maintain
Energy (Rechargeable Batteries)
Battery
15 mph (24 km/h); selectable**
Tips
Maximum Speed
T-shoot
Warn
NOTE:
* See "Segway SE-3 Patroller Operating Limits" (p. 18) for information on cargo weight limits.
**For information on changing the maximum speed limit, contact your Segway dealer or distributor.
Contact
Index
Schedule
15
Segway SE-3 Patroller Specifications (cont.)
Table 1: Segway SE-3 Patroller Specifications (cont.)
Description
Specification
Dimensions
16
Vehicle Weight Without Battery Module
360 lbs (163 kg)
Battery Module Weight
40 lbs (18 kg)
Ground Clearance (Unloaded)
3 in (7.6 cm)
Machine Length and Width
61 x 32 in (155 x 81 cm)
Handlebar Height from Mat
42 in (106 cm)
Handlebar Height from Ground (Unloaded)
52 in (132 cm)
Rider Platform Height (Unloaded)
9.75 in (25 cm)
Front Tire
18 x 8.50 Multi-terrain
Rear Tires
120/60-17
Tire Inflation Pressure
F: 22 psi (1.52 Bar; 152 kPa)
R: 25 psi (1.72 Bar; 172 kPa)
Info
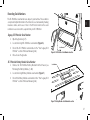
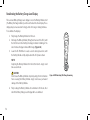
Recording Serial Numbers
SE-3
The SE-3 Patroller serial numbers are unique to your machine. These numbers
can provide helpful information in the future for asset and warranty tracking,
insurance claims, and in case of loss or theft. Record and store the serial
numbers in a secure location, separate from your SE-3 Patroller.
Setup
1.
Operate
Segway SE-3 Patroller Serial Number
Open the glovebox (p. 27).
Serial Number
Tips
3. Record the SE-3 Patroller serial number in the "Your Segway SE-3
Patroller" section of this User Manual (p. 88).
Riding
2. Locate the 12-digit SE-3 Patroller serial number (Figure 6).
Figure 6: SE-3 Patroller Serial Number Location
Battery
4. Close/secure the glovebox.
SE-3 Patroller Battery Module Serial Number
Remove the SE-3 Patroller Battery Module from the Chassis (see
"Removing the Battery Module," p. 49).
Serial Number
Maintain
1.
T-shoot
2. Locate the 12-digit Battery Module serial number (Figure 7).
Warn
3. Record the Battery Module serial number in the "Your Segway SE-3
Patroller" section of this User Manual (p. 88).
Contact
Index
Schedule
Figure 7: Battery Module Serial Number Location
17
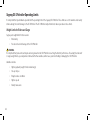
Segway SE-3 Patroller Operating Limits
It is important that you familiarize yourself with the operating limits of the Segway SE-3 Patroller. These limits are set to maximize rider safety
while reducing the risk of damage to the SE-3 Patroller. The SE-3 Patroller will perform better when you observe these limits.
Weight Limits for Riders and Cargo
Segway sets weight limits for two reasons:
•
Rider safety
• To reduce the risk of damage to the SE-3 Patroller
WARNING
It is important that you learn to anticipate and recognize when the SE-3 Patroller is reaching the limits of performance. Exceeding the rider and/
or cargo weight limits, especially when combined with other variables, will increase your risk of falling or damaging the SE-3 Patroller.
Variables include:
18
•
Higher payloads (weight of rider and all cargo)
•
Steeper slopes
•
Rough surface conditions
•
Higher speeds
•
Abrupt maneuvers
Info
Minimum Rider Weight
SE-3
The rider’s weight must not be less than 100 lbs (45 kg). If the rider is below the minimum rider weight, he/she may not sufficiently activate the
rider detect system.
Setup
Handlebar Cargo
The total weight of any handlebar payload plus any other attachments hanging from the handlebar must not exceed 10 lbs (4.5 kg).
Operate
Structural Weight Limits (Maximum Payload)
•
Payload (weight of the rider and all cargo)
•
Surface condition (obstacle height, etc.)
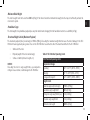
SE-3 Patroller Operating Limits
Temperature Ranges
14° F – 122° F (-10° C – 50° C)
charging:
32° F – 113° F (0° C – 45° C)
storage and transport:
-4° F – 140° F (-20° C – 60° C)
T-shoot
operating:
Maintain
NOTICE
Exceeding the rider or cargo weight limits, especially when
riding on uneven terrain, could damage the SE-3 Patroller.
Table 2: SE-3 Patroller Operating Limits
Battery
Skill level of the rider
Tips
•
Riding
The maximum payload (rider plus all cargo) is 350 lbs (159 kg). Exceeding the maximum weight limit increases the risk of damage to the SE-3
Patroller. Heavier payloads place greater stress on the SE-3 Patroller. Several factors affect the loads transmitted to the SE-3 Patroller
Warn
Weight Limits
10 lbs (4.5 kg)
Storage bin cargo weight limit (ea.):
5 lbs (2.26 kg)
Glovebox cargo weight limit
5 lbs (2.26 kg)
Minimum rider weight
100 lbs (45 kg)
Schedule
Handlebar cargo weight limit:
Index
350 lbs (159 kg)
Contact
Maximum payload (rider/cargo):
19
Segway SE-3 Patroller Operating Limits (cont.)
Maximizing Range
The range of the SE-3 Patroller is affected by many variables, including:
• Terrain: Riding on smooth, flat terrain improves range, and riding on hilly terrain and unpaved surfaces reduces range.
• Speed and Riding Style: Riding at a consistent, moderate speed (~8 mph) will increase range. Frequent starting, stopping, acceleration,
and deceleration reduces range.
• Tire Inflation Pressure: Riding with tire pressures below the specified limit reduces range and can result in premature tire wear.
• Rider Weight and Cargo: Lighter riders with less cargo experience better range than heavier riders with more cargo.
• Temperature: Storing, charging, and riding in temperatures close to the median of the recommended temperature range improves
range. Riding in colder temperatures reduces range significantly.
• Battery Condition: Properly charged and maintained batteries provide greater range. Old, cold, heavily used, or poorly maintained
batteries provide less range (see "How Temperature Affects Performance," p. 55).
• Wind: Riding with a tailwind increases range. Riding against a headwind reduces range.
20
User Interface
•
Storage
•
Accessory Power
Left handlebar
switchgear
Operate
•
Setup
Rider Controls
SE-3
•
Info
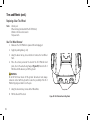
Operating the Segway SE-3 Patroller
Throttle grip
Riding
Rider Controls
Front Brake lever
Maintain
Rear Brake lever
T-shoot
Insert the Power key and turn it all the way to the right
to power ON the SE-3 Patroller. Turn the Power Key all
the way to the left to power the SE-3 Patroller OFF.
Battery
Power Key
Tips
The SE-3 Patroller features rider controls designed
with safety, ease of use, and efficiency in mind and are
located within easy reach on the handlebar. Refer to
Table 3 and Figures 8-10 for control functionality.
User Interface/Display
Warn
Throttle
Contact
The throttle is controlled by twisting the Throttle Grip
towards the rider (rear of the vehicle) to accelerate,
and away from the rider (front of the vehicle) to slow
down.
Power Key Switch
Index
Schedule
Figure 8: Rider Controls
21
Rider Controls (cont.)
Table 3: SE-3 Patroller Rider Controls
22
Control
Description
Power Key
Powers ON or OFF the SE-3 Patroller (p. 21).
Parking Brake
Mechanically (through rear brake activation) secures the SE-3 Patroller when stopped (p. 24).
Throttle
Used to accelerate or decelerate the SE-3 Patroller (p. 21).
Brakes (Front/Rear)
Slows down or stops the SE-3 Patroller through brake lever activation (p. 24), activates brake lights.
DRIVE/STANDBY
Activates (DRIVE
Lights
Operates the Front/Rear running lights and emergency lights (p. 25).
Turn Indicators
Operates the Left or Right Turn Indicators (p. 25).
Reverse
Activates Reverse mode, enabling reverse drive (p. 37).
Hazard Indicators
Turns the Hazard indicators ON/OFF (p. 25).
Horn/Siren
Operates the Horn or Siren (p. 25).
User Interface
Displays important SE-3 Patroller status information (p. 26).
) or deactivates (STANDBY
) the SE-3 Patroller drive system (p. 24).
Info
SE-3
Setup
Front Brake Fluid Reservoir
Rear Brake Fluid Reservoir
Hazard Indicators
Riding
Front Brake
Operate
Parking Brake
Rear Brake
Lights
Tips
Throttle grip
Battery
Maintain
T-shoot
Turn Indicators
DRIVE/
STANDBY
Warn
Horn/Siren
Index
Figure 9: Left Handlebar Controls
Contact
Reverse
Figure 10: Right Handlebar Controls
Schedule
23
Rider Controls (cont.)
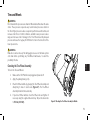
Brakes
The Left brake lever actives the Front brake. The Right brake lever activates
the Rear brakes (Left = Front, Right = Rear). See "Riding: Slowing/Stopping
the SE-3 Patroller" (p. 36) for information on how to properly use the brakes
while riding. See "Checking the Brake Fluid Level (Front/Rear)" (p. 65) for
information on checking the level of brake fluid in the brake fluid reservoirs.
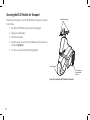
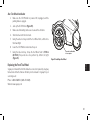
Parking Brake
Engage the Parking Brake by pushing down on the metal cap while firmly
squeezing the Rear brake lever (see Figure 11). Ensure the cap is pushed
down completely, fully seated, then release the Rear brake lever. To release
the Parking Brake, give the Rear brake lever a firm squeeze; the cap should
automatically disengage and return to a level position.
Squeeze...
Switchgear
DRIVE/STANDBY Switch
Set the DRIVE/STANDBY switch to DRIVE ( ) to activate the SE-3 Patroller's
drive system (see Figure 12). Set the switch to STANDBY ( ) to disable the
SE-3 Patroller's drive system. When the SE-3 Patroller is in STANDBY mode,
all other electrical systems are enabled, including the lights, horn/siren, and
User Interface.
WARNING
Always set the DRIVE/STANDBY mode switch (p. 24) to STANDBY when the
vehicle is not being driven.
24
...then push.
Figure 11: Engage the Parking Brake
Info
Reverse
Hazard Indicators
Press and hold the Reverse switch ( ) with your left thumb to engage Reverse
mode (Figure 12). To disengage Reverse mode, release the Reverse switch.
See "Riding: Engaging Reverse Mode" (p. 37).
Lights
SE-3
Setup
Lights
The Light switch features three positions (Figure 13):
Operate
• = lighting OFF
DRIVE/
STANDBY
Turn Indicators
Horn/Siren
Tips
Turn Indicators
Reverse
Battery
Push the Turn Indicator switch to the left ( ) to signal a left-hand turn, push
the switch to the right ( ) to signal a right-hand turn. After the turn is completed, return the Turn Indicator switch to the center position.
Riding
1 = Front/Rear running lights ON
2 = Condition "1" + emergency lights active
Figure 12: Left Handlebar Controls Switchgear
Maintain
Horn/Siren
T-shoot
To activate the Horn, tap or push the Horn switch (
). To activate the Siren,
keep the Horn switch pushed for about one second or longer. The Horn will
sound initially, then segue into the Siren.
Warn
NOTICE:
Be aware of your surroundings when activating the siren, as some people may
be sensitive to loud sounds and/or bright lights.
Contact
Schedule
To activate the Hazard Indicators, pull up on the Hazard switch ( ). Brake
lights and Hazard Indicators are enabled regardless of Light switch position;
however, they are not enabled when Power Key is set to OFF.
Index
Hazard Indicators
Figure 13: Light Switch
25
User Interface/Display
User Interface Buttons
Display
The User Interface (Figure 14) features an LCD with three buttons at the
bottom of the display surround. On vehicle power-up, an initialization screen
displays, then turns into a virtual "dashboard." The Display button ( )
cycles through three display brightness levels. The Left button ( ) cycles
between kilometers and miles display units. The Right button ( ) performs
a "tripmeter" function: press the button to reset trip distance to zero. Note
that the buttons are deactivated when the vehicle is travelling over 3 mph.
WARNING
Do not become distracted by, or attempt to interact with, the User Interface
Display while riding. Doing so could result in serious personal injury and/or
vehicle damage.
Left
button
Right
button
Display button
Figure 14: User Interface/Display
Torque gauge
User Interface Display
The User Interface "dashboard" (Figure 15) displays the following information
to the rider:
Rider
Present
Indicator
• Battery charge level/charge screen (p. 52)
RIDER PRESENT
• Various messages/warnings (p. 73)
• Rider Present indication
• Drive mode: "D" = DRIVE, "N" = Neutral (STANDBY) , "R" = REVERSE
• Torque gauge
• Speedometer/Odometer/Tripmeter
26
Drive
Mode
Indicator
RND
OD 99999.9
Odometer
15
Battery
Charge
MPH
Speedometer
Figure 15: User Interface Dashboard
TRIP 999.9
Tripmeter
Info
Storage
Knob/Lock
Glovebox
Storage bins
SE-3
Glovebox
Setup
Glove Box latching (knob) and locking (key) are separate functions. The key
can be removed in any state. Keep the glove box door (Figure 16) latched
when closed to prevent accidental opening.
Riding
Figure 16: Glove Box and Storage Bins
Tips
See "SE-3 Patroller Operating Limits" (Table 2, p. 19) for the maximum allowable Glovebox cargo weight.
Operate
To latch, turn the knob clockwise 90 degrees. To unlatch, turn the knob
counter clockwise 90 degrees. To lock, latch the door, insert the key, and turn
counter clockwise 180 degrees. To unlock, insert the key and turn clockwise
180 degrees, then unlatch the door to open.
Battery
Storage Bins
Maintain
There are two storage bins (Figure 16), one on each side of the Rider Platform.
See "SE-3 Patroller Operating Limits" (Table 2, p. 19) for the maximum allowable Storage Bin cargo weight.
T-shoot
Warn
Contact
Index
Schedule
Figure 17: Turn the key to the left to lock, to the right to unlock.
27
Accessory Power
12 V Outlet
A standard automotive-style 12 V outlet is provided for operating accessories
and duty gear (Figure 18). The outlet provides power for accessories only
while the SE-3 Patroller is powered ON.
NOTICE:
Limit any current draw from accessories to 2 A or less. If the accessory outlet
stops working, check the fuse ("Accessory Outlet Fuse," p. 76).
12 V Outlet
Figure 18: 12 V Outlet
28
Info
Riding the Segway SE-3 Patroller
SE-3
• Riding Instructions
• Avoiding Hazards, Riding Tips, Safety Guidelines
Setup
• Report All Incidents
Contact
• Do not attempt to tow anything with the SE-3 Patroller.
Warn
• Be aware when using the emergency lights that a very small percentage of individuals may experience epileptic seizures or blackouts
when exposed to certain light patterns or flashing lights.
T-shoot
• The SE-3 Patroller is for one rider only. Do not ride double or carry any passengers. Do not carry a child in your arms or in a child carrier
while riding. Expectant mothers should not ride the SE-3 Patroller.
Maintain
) and engage the Parking Brake when the vehicle is not being driven.
Battery
• Always set the DRIVE/STANDBY mode switch to STANDBY (
Tips
• Always wear a helmet when riding the SE-3 Patroller.
Riding
WARNING
• Whenever you ride the Segway SE-3 Patroller, you risk death or serious injury from loss of control, collisions, and falls. To reduce risk of
injury, you must read and follow all instructions and warnings in the user materials.
Operate
Follow the instructions in this section to learn how to safely ride the SE-3 Patroller. Practice riding in a controlled, familiar environment until you
are comfortable operating the SE-3 Patroller. Before riding, make sure the SE-3 Patroller has been pre-ride inspected and the battery module is
charged. See "Pre-Ride Checklist" (on the inside back cover of this manual), and "Charging the Battery Module" (p. 50). Do not ride if any part
is loose, damaged, or if the Tires are not properly inflated. See "Maintaining and Servicing the SE-3 Patroller" (p. 57). Do not wear loose clothing
or jewelry that could get caught in any of the controls.
Index
Schedule
29
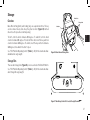
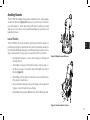
Riding Position
Your posture and riding position (Figure 19) on the vehicle affect your ability
to ride safely:
• Be alert. Scan both far ahead and directly in front of the vehicle—
your eyes are your best tool for safely avoiding obstacles and
slippery surfaces.
• Keep a firm grip on the Handlebar, your legs loose, knees and elbows
bent, with a slight forward lean. This helps maintain your balance
over rough terrain.
• Keep your feet firmly in contact with the Rider Detect Mat.
• Lean into turns.
• Do not lean over the Handlebar or front of the vehicle, or hang off the
back of the vehicle, while riding.
Figure 19: Proper Riding Position
30
Info
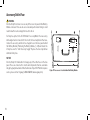
Avoiding Hazards
SE-3
The SE-3 Patroller is highly maneuverable and allows you to easily navigate
around most obstacles (Figure 20). However, to prevent the loss of traction,
you must always be careful when riding and learn to identify and avoid
slippery, icy, or wet surfaces, loose materials (sand/gravel), steep slopes, and
hazardous obstacles.
Setup
Operate
Loss of Traction
Tips
Figure 20: Navigate Around Obstacles
Battery
• Avoid abrupt maneuvers, such as fast stopping or starting, and
turning too hard.
Riding
The SE-3 Patroller Tires must be able to grip the ground for the machine to
perform properly. Slips occur when tires lose traction, potentially causing loss
of control and a fall. Abrupt maneuvers, and riding over slippery surfaces, loose
objects and materials, or steep slopes can cause the tires to lose traction.
Maintain
T-shoot
• Avoid riding on slippery or low-traction surfaces such as snow, ice,
wet floors, wet grass, or any other surface that might cause loss of
traction (Figure 21).
Warn
• Avoid riding over loose objects or materials such as small branches,
litter, gravel, or small stones.
Contact
• Use caution when riding over any terrain change such as pavement
to grass, or over a threshold or speed bump.
Index
• Avoid riding on steep slopes. Maintain Tire contact with the ground.
Schedule
Figure 21: Avoid Low-Traction Surfaces
31
Avoiding Hazards (cont.)
Impacts
Impacts occur when the SE-3 Patroller Wheels or chassis encounter an
obstacle or terrain that prevents it from moving, bringing it to an abrupt stop
and potentially causing a fall or tip-over (Figure 22).
• Avoid holes, curbs, steps, and other obstacles.
• Use caution when riding over any terrain change such as pavement
to grass, or over a threshold or speed bump where the bottom of the
SE-3 Patroller may strike any object.
Tip-Overs
You are responsible for maintaining proper vehicle/rider balance by leaning
into turns and uphill on slopes (Figure 23). If you fail to actively maintain
vehicle/rider balance, the SE-3 Patroller can tip sideways and fall over. If a
tip-over occurs, do not attempt to ride the SE-3 Patroller until it has been
thoroughly inspected by a Segway Certified Technician.
Figure 22: Avoid holes, curbs, steps, and other obstacles
• Avoid riding across steep slopes.
• Lean into turns and lean uphill when riding across gentle slopes.
• Avoid turning on slopes or ramps.
• Never let go of the Handlebar when riding across a slope. The SE-3
Patroller could turn downhill and you could lose your balance.
• Stay centered on narrow sidewalks or elevated paths. Make sure that
one Wheel does not drop off a curb.
• Ride slowly over bumpy terrain.
32
Figure 23: Lean uphill when riding across slopes
Info
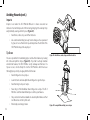
Riding: Stepping On/Stepping Off
SE-3
WARNING
Read and understand the SE-3 Patroller User Manual before attempting to
ride. Always wear a helmet when riding the SE-3 Patroller.
Setup
Operate
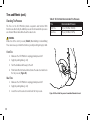
Stepping On
Riding
1. Ensure the Segway SE-3 Patroller is unplugged and the Parking
Brake is engaged (p. 38).
2. Ensure the Power key is OFF.
).
Figure 24: ALWAYS Wear a Helmet!
Tips
3. Ensure the DRIVE/STANDBY switch is set to STANDBY (
4. Step onto the Rider Detect Mat (Figure 25).
Battery
Stepping Off
Maintain
1. Ensure the SE-3 Patroller is at a complete stop and on level ground
when possible.
T-shoot
2. Switch to STANDBY mode (
).
Warn
3. Engage the Parking Brake (p. 38).
4. Turn the Power key OFF.
Contact
5. Step off the Rider Detect Mat (Figure 25).
Index
Schedule
Figure 25: Stepping On/Stepping Off
33
Riding: Power On/Accelerating
WARNING
Read and understand the SE-3 Patroller User Manual before attempting to
ride. Always wear a helmet when riding the SE-3 Patroller.
1. Step onto the SE-3 Patroller (p. 33).
2. Ensure the lights are in the desired mode (p. 25).
3. Insert and turn the Power key ON.
4. Make sure there are no warnings or faults being displayed on the
User Interface (p. 73).
5. Switch to DRIVE mode (
).
6. Disable the Parking Brake.
7. Smoothly engage the throttle by twisting the throttle grip toward
the rear (towards the rider). Avoid making sharp, jerky movements
of the throttle grip, and lean forward when accelerating to assist in
maintaining proper balance and ride position.
8. To slow down or stop, disengage the throttle by twisting the throttle
grip toward the front of the machine (away from the rider), and
simultaneously squeezing both the Front and Rear brake levers.
34
Figure 26: Maintain proper riding position and situational awareness
Info
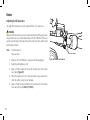
Riding: Turning the SE-3 Patroller
SE-3
The SE-3 Patroller is inherently stable. However, you are responsible for
maintaining proper vehicle/rider balance by leaning into turns (Figure 27).
If you fail to actively maintain vehicle/rider balance, the SE-3 Patroller can tip
sideways and fall over.
Setup
Operate
WARNING
The ability to turn is dependent on front wheel traction; do not overpower the
front wheel with the front brake while turning. Doing so may result in traction
loss and turning ability. Over-aggressive braking while turning may result in a
tip-over.
Riding
Tips
Adhere to the following guidelines while turning the SE-3 Patroller:
Battery
• Always turn slowly and with caution.
Maintain
• Always lean into turns.
Figure 27: Lean into turns
Warn
• Do not attempt a turn or other maneuver if you are unsure of your
ability to safely nagivate the maneuver.
T-shoot
• Look through the turn, to where you want to go. Do not stare directly
ahead of the vehicle or at the ground.
Contact
The SE-3 Patroller features yaw control, which will reduce motor power if an
unsafe turning speed is detected. However, if you are coasting through a turn,
yaw control has no effect since the motors are not driving the wheels. Thus,
while the yaw control functionality can prevent a rider from accelerating too
fast in a turn, it cannot prevent a tip-over as a result of too fast a turning speed.
Index
Schedule
35
Riding: Slowing/Stopping the SE-3 Patroller
WARNING
Read and understand the SE-3 Patroller User Manual before attempting to
ride. Always wear a helmet when riding the SE-3 Patroller.
Front brake lever
Rear brake lever
1. To slow or stop the SE-3 Patroller, always use both Front and Rear
brakes (p. 24).
NOTE
Activating both brakes at the same time will remove all torque
applied by the motors. Activating only one brake (either Front or
Rear) will still allow torque to be applied by the motors.
2. Activate the brakes smoothly and evenly by squeezing the levers,
adjusting the braking pressure as needed for the braking situation
(Figure 28). Shorter, more aggressive stops require more lever
pressure, longer, slower stops require less lever pressure.
Figure 28: Use BOTH brakes when braking
3. Keep brake pressure applied until you have slowed to the desired
speed or come to a stop.
WARNING
Do not brake too aggressively for the surface you are riding on. The tires may
lose traction, increasing the risk of an accident. Over-aggressive braking while
turning may result in a tip-over.
Figure 29: Over-aggressive braking can increase risk of traction loss
36
Info
Riding: Engaging Reverse Mode
SE-3
WARNING
Read and understand the SE-3 Patroller User Manual before attempting to
ride. Always wear a helmet when riding the SE-3 Patroller.
Setup
1. Ensure the SE-3 Patroller is at a complete stop.
Operate
2. Press and hold the Reverse switch ( ) on the Left Handlebar Control
with your left thumb (Figure 30).
Riding
Tips
3. While looking in the direction you want to travel, smoothly engage
the throttle while keeping the Reverse switch held down. Avoid
making sharp, jerky movements of the throttle grip.
Maintain
5. Forward drive motion is now enabled.
Battery
4. When you are finished reversing, bring the SE-3 Patroller to a
complete stop, then release the Reverse switch.
Figure 30: Press and hold the Reverse switch while backing up
T-shoot
WARNING
Braking too aggressively on a high-traction surface while travelling in reverse
may result in a backwards tip-over.
Warn
Contact
NOTE:
The SE-3 Patroller features a back-up beeper for safety while the vehicle is
driving in Reverse.
The Reverse switch is inactive if the SE-3 Patroller is being driven at speeds
higher than 2 mph.
The SE-3 Patroller is limited to 2 mph in reverse.
Index
Schedule
37
Riding: Parking/Power Off
WARNING
Read and understand the SE-3 Patroller User Manual before attempting to
ride. Always wear a helmet when riding the SE-3 Patroller.
1. Use common sense when parking the SE-3 Patroller. Do not park
in areas that would hinder pedestrian or vehicular traffic, or risk
damage to the SE-3 Patroller.
2. Bring the SE-3 Patroller to a complete stop.
3. Switch to STANDBY mode (
).
4. Engage the Parking Brake (Figure 31).
5. Ensure the light switch is in the desired mode.
6. Turn the Power key OFF.
Squeeze...
7. Step off the Rider Detect Mat.
8. If the SE-3 Patroller will not be operated again within 24 hours, plug
in the Power Cord and charge the Battery Module (p. 50).
Parking on Inclines
If you must park on an incline be sure to set the Parking Brake, and chock the
wheels for an added measure of safety.
38
...then push.
Figure 31: Engage the Parking Brake
Info
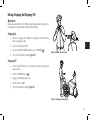
Riding Techniques
SE-3
WARNING
Do not attempt to navigate stairs or curbs while riding the SE-3 Patroller.
Setup
Navigating Terrain
Operate
With practice, you can learn to ride over many different types of terrain,
provided you avoid slippery surfaces, loose materials, steep slopes, and
obstacles. Always proceed slowly over unfamiliar terrain. Never allow the SE-3
Patroller to become airborne, even for short periods of time.
Riding
Tips
Ascending Hills
• Lean slightly forward when ascending (Figure 32).
Battery
Maintain
• If you must stop or slow down, be sure you use both Front and Rear
brakes to slow the SE-3 Patroller.
T-shoot
NOTE
Activating both brakes at the same time will remove all torque
applied by the motors. Activating only one brake (either Front or
Rear) will still allow torque to be applied by the motors.
Warn
Figure 32: Lean forward when ascending
Index
• When accelerating from a stopped position on an incline, smoothly
and slowly engage the throttle to prevent a possible tip-over.
Contact
• If stopped momentarily on an incline, you must keep the brakes
activated. If parking on an incline, see "Riding: Parking/Power Off,"
p. 38).
Schedule
39
Riding Techniques (cont.)
Descending Hills
• Lean slightly backward when descending (Figure 33).
• If you must stop or slow down, be sure to smoothly activate both
Front and Rear brakes to prevent a possible tip-over or the wheels
losing traction.
NOTICE
Keep in mind there is no "engine braking" or "regenerative braking"
with the SE-3 Patroller. This means the vehicle is in a "free-wheel"
mode when no throttle or brakes are applied.
• If stopped momentarily on an incline, you must keep the brakes
activated. If parking on an incline, see "Riding: Parking/Power Off,"
p. 38).
• When accelerating from a stopped position on an incline, be sure to
smoothly and slowly engage the throttle.
Figure 33: Lean slightly to the rear when descending
40
Info
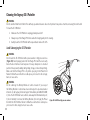
Riding Indoors
SE-3
Riding the SE-3 Patroller indoors presents different environmental conditions
than you may be used to. Keep the following in mind:
Setup
• You are taller than you think. Be aware of the added height that the
SE-3 Patroller (and your helmet) gives you and use caution when
riding indoors or in the vicinity of doorways, archways, branches,
signs, or other low overhead obstacles.
Operate
Riding
• Be sure to leave enough wheel clearance when riding through
doorways or other space-restricted areas.
Tips
• Be aware of the riding surface; indoor surfaces can be slippery (tile,
polished concrete) or give excess traction (carpet).
Battery
• Keep people away from the vehicle, especially the wheels, when
riding in crowded environments.
Index
Schedule
• Do not place any objects on the Rider Detect Mat. This could cause the SE-3 Patroller to move on its own when in DRIVE Mode if the
throttle is inadvertently activated. This may result in serious personal injury and/or vehicle damage.
41
Contact
• Conduct a pre-ride inspection before each use (see "Pre-Ride Checklist" on the inside back cover of this manual). Do not use if any part
is loose or damaged. If you discover any loose or damaged part, see "Troubleshooting Procedures" (p. 69).
Warn
The Segway SE-3 Patroller's ease of use and stable platform may lead you to become overconfident. If you exceed the handling envelope of
the SE-3 Patroller, such as by riding over obstacles, uneven terrain, slippery surfaces, loose materials, steep slopes, or riding too fast for the
conditions, you can very quickly lose control, leading to collisions, falls, and injury. As with any other transportation device, using a SE-3 Patroller
exposes you to risk of injury. You can reduce the risk by following all the instructions and warnings in this Manual, but you cannot completely
eliminate the risk.
T-shoot
Riding Tips and Safety Guidelines Recap
Maintain
Figure 34: Be aware of your height while riding.
Riding Tips and Safety Guidelines Recap (cont.)
• Do not allow any person to use the SE-3 Patroller unless that person has carefully read this Manual and watched the Safety Video.
• Do not use the SE-3 Patroller in hazardous atmospheres. The SE-3 Patroller has not been certified for use in hazardous atmospheres
as defined in NFPA 70, National Electric Code. Hazardous atmospheres are locations where fire or explosion hazards may exist due to
flammable gases, vapors, liquids, dust, or fibers.
• Wear a helmet. Whenever you ride the SE-3 Patroller wear a helmet that fits properly with the chin strap in place. Use an approved
bicycle or skateboard helmet that provides protection for the back of your head. Depending on riding conditions and your riding
experience, consider using additional protective equipment such as gloves, eye protection, wrist guards, and knee pads. Wear footwear
that protects your feet and provides adequate support and comfort.
• The safety of new riders is your responsibility. Do not let new riders operate the SE-3 Patroller outside of your direct supervision
unless they have read this Manual and watched the Safety Video.
• To ride safely, you must be able to clearly see what is in front of you and you must be clearly visible to others, in all environmental
conditions.
• Avoid slippery surfaces, loose materials, steep slopes, and obstacles. Be especially careful when riding in confined spaces or near
obstructions.
• Use caution on slopes. Use caution when ascending, descending, or crossing slopes. Do not attempt to ride across any slopes with
loose material or slippery surfaces. When riding across any slope, lean uphill to maintain balance.
• Watch those turns! Always turn slowly and with caution. Fast turns can lead to loss of control and falls. Lean into turns.
• Do not take risks. When you encounter a slope, uneven terrain, or other terrain feature with which you are not experienced or that
makes you at all concerned about your safety, do not risk riding over it.
• You are taller than you think. Be aware of the added height that the SE-3 Patroller (and your helmet) gives you and use caution when
riding indoors or in the vicinity of doorways, archways, branches, signs, or other low overhead obstacles.
42
Warn
Contact
Index
Schedule
• Riding on the road. The SE-3 Patroller is not intended or recommended for primary use on roads. If you must ride on the road, or must
cross the road, be extremely careful. Ride as far away from traffic as possible. Allow plenty of time for crossing roads. Check to make
sure that riding on the road is allowed by law.
43
T-shoot
• Do not ride backward, except to maneuver in and out of tight spaces or around obstacles. There is a difference between maneuvering
backward and riding backward, similar to the difference between stepping back and walking backward. Maneuver backward only when
necessary to reverse direction or back away from an obstacle. Avoid turning sharply while maneuvering backward.
Maintain
• When riding, keep both hands on the Handlebar and both feet on the Rider Detect Mat. Be relaxed. Ride in a relaxed position with your
knees and elbows slightly bent and head up.
Battery
• Be prepared to stop. Be especially careful when approaching or crossing intersections, driveways, corners, doorways, and other areas
where you may need to slow down or stop to avoid motor vehicles, bicyclists, or pedestrians.
Tips
• Be alert. As with any other transportation device, you must be mentally alert and physically able to safely ride a SE-3 Patroller. Do not
attempt to ride if you are ill, fatigued, or if you cannot comply fully with the instructions and warnings in this Manual. Do not ride under
the influence of alcohol or drugs. Avoid distractions. Do not use a mobile phone or smart device, listen to headphones, or engage in any
other activity that might distract you or interfere with your ability to monitor your surroundings while riding.
Riding
• Do not step off a moving SE-3 Patroller. Always come to a complete stop before stepping off.
Operate
• Never attempt to ride on stairs or through revolving doors. Riding on stairs is extremely dangerous, as is riding on escalators and
through revolving doors.
Setup
• Do not exceed the maximum weight limit (rider and all cargo) specified in this Manual. If you exceed the maximum weight limit, you are
at greater risk of falling and injury, and damage to the SE-3 Patroller. Also, the rider's weight must not be less than the minimum rider
weight limit specified in this Manual. If you are below the minimum rider weight limit, you may not be able to ride safely because the
Rider Detect functionality may not operate properly. For additional information on weight limits, see "Operating Limits" (p. 18).
SE-3
• No passengers. The SE-3 Patroller is for one rider only. Do not ride double or carry any passengers. Do not carry a child in your arms or
in a child carrier while riding. Expectant mothers should not ride the SE-3 Patroller.
Info
• Do not wear loose clothing that could catch on the controls and prevent proper operation.
Riding Tips and Safety Guidelines Recap (cont.)
• Do not attempt to carry any object in your hand(s). To carry cargo, use the cargo bins, glove box, or a cargo accessory that is
recommended by Segway or a securely attached backpack with both shoulder straps in place. For cargo weight limits, see "SE-3
Patroller Operating Limits," (Table 2, p. 19).
• Do not ride the SE-3 Patroller if you suffer any impairment to balance.
• The SE-3 Patroller has not been designed, tested, or approved as a medical device. You must be able to step on and off the SE-3 Patroller
unassisted, which requires physical abilities similar to ascending and descending stairs without assistance and without holding the
handrail.
• The SE-3 Patroller is not to be used by persons (including children) with reduced physical, sensory, or mental capabilities, or lack of
experience or knowledge. Children should be supervised to ensure that they do not play or interact with the SE-3 Patroller.
• All riders must be at least 18 years old.
Report All Incidents
If you or any other user of the SE-3 Patroller is involved in an accident, or if the SE-3 Patroller performs in a way that you do not intend or in a way
that it is not supposed to, contact Segway Technical Support.
Phone: 1-866-4SEGWAY (1-866-473-4929)
Fax: 1-603-222-6001
Email: [email protected]
Website: www.segway.com
44
• Battery Module/Specifications
• Charging the Segway SE-3 Patroller Battery Module
SE-3
• Battery Safety
Info
Segway SE-3 Patroller Battery Module
Setup
Battery Safety
Index
Schedule
45
Contact
• Do not wash the Segway SE-3 Patroller with a power washer or high pressure hose. Avoid getting water into the Charge Port. Avoid
exposure to heavy downpours or extended periods of heavy rain (including during riding, storage, or while being transported). Clean
with soap and water and a soft cloth. Make sure that the Charge Port is dry before you plug in the Power Cord. Failure to follow these
instructions could expose you to electric shock, injury, burns, or cause a fire.
Warn
• Use only charging devices approved by Segway and never attempt to bypass or override their charging protection circuits.
T-shoot
• Failure to charge the Battery Module could result in permanent damage to the Battery Module. Left unplugged, the Battery Module
could fully discharge over time, causing permanent damage.
Maintain
• Observe and follow all safety information on the warning label found on the Battery Module.
Battery
• The cells within the Battery Module contain toxic substances. Do not attempt to open the Battery Module. Do not insert any object into
the Battery Module or use any device to pry at the Battery Module casing. If you insert an object into any of the Battery Module ports
or openings you could suffer electric shock, injury, burns, or cause a fire. Attempting to open the Battery Module casing will damage
the casing and could release toxic and harmful substances, and will render the Battery Module unusable.
Tips
• Unplug or disconnect the SE-3 Patroller from AC power before removing or attaching the Battery Module or performing any service.
Never work on any part of the SE-3 Patroller when it is plugged into AC power. You risk serious bodily injury from electric shock as well
as damage to the SE-3 Patroller.
Riding
• Keep out of reach of children and pets. Exposure to Battery voltage could result in death or serious injury.
Operate
WARNING
• Do not use a Battery Module if the casing is broken or if the Battery Module emits an unusual odor, smoke, or excessive heat or leaks
any substance. Avoid contact with any substance seeping from the Battery Module.
Battery Safety (cont.)
• Do not submerge the Battery Module or vehicle in water. If you suspect the Battery Module or vehicle has been submerged or
experienced water intrusion, call Segway Technical Support immediately at 1-866-473-4929, prompt #2. Until you receive further
instructions, store the SE-3 Patroller upright, outdoors, and away from flammable objects. Do not attempt to remove the Battery
Module. Do not plug the Power Cord into the SE-3 Patroller. Failure to follow these instructions could expose you to electric shock,
injury, burns, or cause a fire.
• As with all rechargeable batteries, do not charge the Battery Module near flammable materials.
The Battery Module
The SE-3 Patroller Battery Module is a rechargeable Li-ion power pack. The Battery Module features automatic protection for over-charge, overdischarge, and over-temperature conditions.
With normal usage and proper vehicle maintenance, the Battery Module should last thousands of cycles. As the Battery Module nears the end
of its useful life, it may need more frequent charging and the SE-3 Patroller's range may be reduced. To order a replacement Battery Module,
contact an Authorized Segway Dealer or Distributor.
Keep in mind, in order to maintain the best performance from the SE-3 Patroller Battery Module, you must keep the Battery Module charging
when not operating the SE-3 Patroller, and you must fully charge the Battery Module for at least 12 hours once a month, or once every 12 hours
of operation—whichever comes first. Remember to charge the Battery Module only when it is within the specified charging temperature range
(see "Battery Module Specifications," p. 47).
NOTE:
A replacement power cord for charging the Battery Module is available from Segway. Contact an Authorized Segway Dealer or Distributor by
calling 1-866-473-4929 or visit http://www.segway.com.
CAUTION
• Failure to charge the Battery Module could result in damage to the Battery Module. Left unplugged, the Battery Module could fully
discharge, causing permanent damage to the Battery Module. Use only charging devices approved by Segway.
• If the SE-3 will not be operated within 24 hours after being ridden, plug in the Power Cord and charge the Battery Module (p. 50).
46
Info
Charging times vary depending on the following:
• Battery Module Charge Level—The lower the charge level is, the longer it will take to complete the charging process.
Operate
Riding
Battery Module Specifications
Setup
• If storage temperature is below 32° F/0° C, do not charge your batteries. Instead, bring them into a warm (above 50° F/10° C)
environment for charging. Doing so will ensure optimal battery life and performance.
SE-3
• Battery Module Temperature—Battery Modules that are too hot or too cold may not charge or may take much longer to charge. Battery
Modules charge most efficiently when they are close to the center of the recommended charging temperature range. See "Battery
Module Specifications."
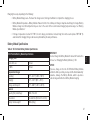
Table 4: SE-3 Patroller Battery Module Specifications
12 hours
to 90%:
~5 hours
charging:
32° F – 113° F (0° C – 45° C)
storage and transport:
-4° F – 140° F (-20° C – 60° C)
Contact
14° F – 122° F (-10° C – 50° C)
General
dimensions:
18 x 8.8 x 9 in (45.6 x 22.5 x 23 cm)
battery module weight:
40 lbs (18 kg)
Schedule
20 Ah, 51.2 volts
Index
capacity (Ah) and voltage:
Warn
operating:
T-shoot
Temperature Ranges
NOTICE:
If you use, charge, or store the SE-3 Patroller Battery Module
outside the limits specified, you may void the limited warranty/
guarantee, damage the Battery Module, and/or experience
reduced range and ineffective Battery Module charging.
Maintain
before first use:
Battery
Charging Time
IMPORTANT:
You must charge the Battery Module for at least 12 hours before
first use. See "Charging the Battery Module," p. 50.
Tips
SE-3 Patroller Battery Module Specifications
47
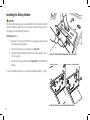
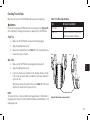
Installing the Battery Module
CAUTION
The Battery Module weighs approximately 40 lbs. Do not attempt to install or
remove the Battery Module if you are incapable of safely lifting an object of
this weight. Use standard lifting techniques.
Tool Required: None
1. Make sure the Segway SE-3 Patroller is unplugged, powered off, and
the parking brake is engaged.
2. Make sure the latches are configured as in Figure 35.
3. Holding the Battery Module by both front and top handles, slide it
into the opening.
4. Twist the latches and fold them back (Figure 36) to lock the Battery
Module.
Figure 35: Slide the Battery Module into the SE-3 Patroller
Twist latches outward
Close latches to lock Battery Module
To remove the Battery Module, see "Removing the Battery Module," (p. 49).
Figure 36: Twist and close the Battery Module Latches
48
Flip latches out
Info
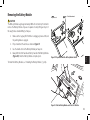
Removing the Battery Module
Twist latches inward
SE-3
CAUTION
The Battery Module weighs approximately 40 lbs. Do not attempt to install or
remove the Battery Module if you are incapable of safely lifting an object of
this weight. Use standard lifting techniques.
Setup
Operate
1. Make sure the Segway SE-3 Patroller is unplugged, powered off, and
the parking brake is engaged.
Riding
2. Flip out and twist the latches as shown in Figure 37.
3. Use the handle to slide the Battery Module part way out.
Tips
Figure 37: Flip out and twist the Battery Module Latches
Battery
4. Grasp both the front handle and the top handle of the Battery Module
(Figure 38). Slide the Battery Module completely out.
To install the Battery Module, see "Installing the Battery Module," (p. 48).
Maintain
T-shoot
Warn
Contact
Index
Schedule
Figure 38: Slide the Battery Module out of the SE-3 Patroller
49
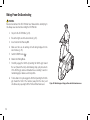
Charging the Battery Module
Charge Port
WARNING
Do not insert the Power Cord plug if the Charge Port, Power Cord, or AC Power
outlet is wet.
To charge the Battery Module:
1. Park the SE-3 Patroller in a clean, dry place, within the recommended
charging temperature range (p. 47).
2. Verify that the Charge Port, Power Cord, and AC Power outlet are
clean, dry, and free of debris (Figure 39).
3. Plug one end of the Power Cord (provided with the vehicle) into a
grounded AC outlet (100V–240V; 50Hz–60Hz). The Power Cord
should be properly grounded (Figure 40).
Figure 39: Verify the Charge Port is clean, dry, and free of debris
4. Plug the other end of the Power Cord into the Charge Port.
5. Verify that the Battery Discharge Indicator (BDI) lights confirm the
Battery Module is charging (see Table 5). For more information on
the BDI lights, see p. 51.
IMPORTANT:
You must keep the SE-3 Patroller plugged into a grounded AC outlet when it
is not in use. If you do not plan to use it for an extended time, visit the vehicle
every month and remove and reinsert the power cord to ensure the charging
system is working properly.
Figure 40: Plug into a properly grounded AC outlet
50
Battery Module at 70%
Battery Module at 40%
SE-3
When you are ready to operate the SE-3 Patroller, remove the Power Cord:
Info
Unplugging the SE-3 Patroller
1. Disconnect the Power Cord from the Charge Port.
Setup
2. Disconnect the Power Cord from the grounded AC outlet.
Operate
3. Store the Power Cord.
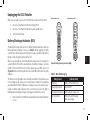
Battery Discharge Indicator (BDI)
Riding
T-shoot
Table 5: BDI LED Messaging
Charge Level
Indicator LEDs
All LEDs OFF
Discharge/normal use
LEDs indicate charge level
Error Condition
Bottom Red LED flashing
while discharging
Schedule
Charging Complete
Index
LEDs scroll bottom to top
Contact
Charging
Warn
1. Power down the SE-3 Patroller and allow time for the Battery Module
to cool.
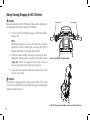
Figure 41: Battery Discharge Indicator (BDI)
Maintain
The bottom-most light blinks red for warnings and faults. It may blink because
of over-voltage, under-voltage, or over-temperature conditions. The light may
also blink while the Battery Module is charging because of temporary overvoltage conditions while balancing; this is normal. If you notice this light is
blinking while discharging (charger not plugged in), follow these steps:
Battery
When in use the lights are solid, indicating the charge level. For example, the
seventh LED from the bottom would indicate the battery module is currently
at 70%. The fourth LED from the bottom would represent 40%, and so on
(Figure 41). When the Battery Module is less than 20% full, the last two lights
will flash.
Tips
The Battery Discharge Indicator on the Battery Module illuminates when the
Battery Module is charging or in use (see Table 5). When charging, the lights
scroll from the bottom upward indicating the charge level. When the Battery
Module is fully charged the lights will turn off.
51
Battery Discharge Indicator (BDI) (cont.)
2. If the Battery Module is empty, Bring the SE-3 Patroller indoors
or someplace where the temperature is within the recommended
range (Table 4, p. 47).
3. Charge the SE-3 Patroller for 12 hours.
If the bottom LED continues to blink red while discharging (charger not
plugged in), contact Segway Technical Support.
Charging Failures
If a failure is detected during charging, all charging will stop and the BDI LEDs
will turn off. Note that the LEDs also turn off when the Battery Module is fully
charged. If the Battery Module fails to charge when it is low or empty, it may
need to be replaced. To order a replacement Battery Module, contact an
Authorized Segway Dealer or Distributor.
RIDER PRESENT
RND
OD 99999.9
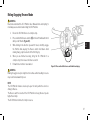
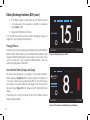
If the battery icon is red, do not attempt to ride the SE-3 Patroller. Instead,
charge the Battery Module.
MPH
TRIP 999.9
Figure 42: Battery Charge Level at 75%
User Interface Battery Charge Level Gauge
The User Interface Display uses a grey battery icon to indicate the Battery
Module charge level (Figure 42). As the charge level depletes, the battery icon
"level" reduces. If the charge level drops below 15%, the color of the battery
icon changes to red, and "Low Battery" will display on the left hand side of
the User Interface (Figure 43). If the charge level is 0%, Empty Battery" will
display.
15
WARNING
LOW POWER
RIDER PRESENT
RND
OD 99999.9
8
MPH
TRIP 999.9
Figure 43: User Interface Low Battery Charge Level Warning
52
Riding
Tips
Battery
CAUTION
If left uncharged, an empty Battery Module could become permanently damaged. Always charge Battery Modules when not in use and always
immediately charge a Battery Module that has been depleted.
Operate
When not in use the Battery Module will continue to discharge at a low rate, slowly draining the Battery Module. Over time this could result in a
low or empty Battery Module. For this reason, Battery Modules should always be plugged in and charging when stored for extended periods of
time.
Setup
Self Discharge
SE-3
Whenever you do not fully charge the SE-3’s Battery Module, partial charge may affect the accuracy of the Battery Module charge level display,
causing it to show a higher charge level than actually exists. After you power on, check the Battery Module charge level display and then operate
the SE-3 Patroller for some time. Check the Battery Module charge level display again. If the Battery Module charge level display shows rapid
charge depletion during this time, the Battery Module has received only a partial charge. If necessary, plug the SE-3 back in and recharge.
Info
Partial Charge
Maintain
T-shoot
Warn
Contact
Index
Schedule
53
Recalibrating the Battery Charge Level Display
There are two Battery Charge Level displays: one on the Battery Module itself
(the Battery Discharge Indicator), and one on the User Interface Display. These
displays may be inaccurate after long periods of storage or during initial use.
To recalibrate the displays:
1. Fully charge the Battery Module for 12 hours.
2. Discharge the Battery Module (through normal use of the SE-3) until
the bottom bar on the Battery Discharge Indicator is blinking or the
User Interface Display indicates 10% charge (Figure 44).
3. Leave the SE-3 Patroller in a safe, secure location, powered on, until
the Battery Module is fully depleted and the SE-3 powers down.
NOTE:
Depleting the Battery Module from the bottom bar to empty could
take several hours.
CAUTION
Do not leave the Battery Module completely empty for more than two
hours. Leaving the Battery Module empty could cause permanent
damage to the Battery Module.
4. Fully recharge the Battery Module for a minimum of 12 hours, after
which the Battery Charge Level Display will be recalibrated.
54
Figure 44: BDI Indicating 10% Charge Remaining
Info
How Temperature Affects Performance
SE-3
The Battery Module is usually significantly warmer than the air temperature
due to heating that occurs as electricity is delivered from it (while riding) and
to it (while charging).
Setup
Riding in Hot or Cold Temperatures
MPH
T-shoot
OD 99999.9
8
Maintain
RND
Battery
RIDER PRESENT
Tips
TRIP 999.9
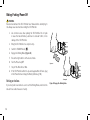
Figure 45: High Temperature Battery Warning
Warn
If performance is poor because of cold weather (below 32° F/0° C), try
warming up your SE-3 Patroller by bringing it into a warm environment for at
least 30 minutes.
WARNING
HIGH TEMPERATURE
BATTERY
Riding
If the Battery Module on the SE-3 Patroller becomes too hot while riding, the
SE-3 may activate a High Temperature Battery warning (Figure 45). Drive
the vehicle in a less demanding manner, or shut down the vehicle, to let the
Battery Module cool (see "Warnings and Faults," p. 73). Reduce performance
may be experienced while the High Temperature warning is active.
Operate
The Battery Module will run at the highest efficiency when you operate it
nearest the center of the recommended operating temperature range. As with
all batteries, less energy is available at low battery temperatures. You may not
be able to travel the same distance when the Battery Module is cold as when
the Battery Module is nearer to room temperature.
Contact
Charging in Hot or Cold Temperatures
Index
The Battery Module should be within the recommended charging temperature
range prior to and during charging. For the recommended charging
temperature range, see "Battery Module Specifications" (p. 47).
Schedule
If the Battery Module is too hot or too cold, it may take longer to charge, or
may not charge at all.
55
Battery Module Transportation, Shipping, and Disposal
If you are transporting the SE-3 Patroller, protect the Battery Module to avoid damage. Do not expose the Battery Module to direct heat or moisture, and avoid heavy vibration during transportation.
WARNING
Do not use or transport the Battery Module if the casing breaks open, leaks any substance, becomes excessively hot, or if you detect an unusual
odor. Do not handle a damaged or leaking Battery Module unless you are wearing disposable rubber gloves, eye protection, and are in a wellventilated area. Dispose of the rubber gloves and damaged Battery Module properly in accordance with regulations governing disposal of toxic
materials.
Shipping Li-ion Batteries
Li-ion Batteries are regulated as "Hazardous Materials" by the U.S. Department of Transportation. For information on shipping Li-ion Batteries,
contact the U.S. Department of Transportation at www.phmsa.dot.gov/hazmat/regs or call 1-800-467-4922.
If you need to arrange air shipment of your SE-3 Patroller and/or Li-ion Battery Module, contact an authorized Segway Dealer or Distributor for
assistance.
You must comply with all local, federal, and individual country laws when transporting Segway Li-ion Battery Modules.
Battery Disposal
The Li-ion Batteries used in the Battery Module can be recycled. Recycle or dispose of Batteries in accordance with local environmental
regulations. Do no place in fire or incinerate. For more information, contact Segway at 1-866-4SEGWAY (1-866-473-4929) or visit our website at
www.segway.com.
56
Info
Maintaining and Servicing the Segway SE-3 Patroller
SE-3
• General maintenance and servicing procedures related to the SE-3 Patroller
• Important operating tips
Maintain
T-shoot
Warn
• Use only Segway-approved parts, fasteners, and accessories.
Battery
• Do not attempt to lift the SE-3 Patroller by hand. The vehicle is too heavy and unwieldy to lift safely without proper equipment and
training.
Tips
• Adhere to torque specifications when tightening fasteners. Over tightened or under tightened fasteners could malfunction, leading to
damage or serious injury.
Riding
• Do not attempt to access the Electronics, Motors, or Gearboxes. There are no user-serviceable parts inside. By accessing these components you risk electric shock injury. Also, you could void your limited warranty/guarantee, damage the SE-3 Patroller, and render it
unsafe to operate.
Operate
WARNING
• Always shut down the Segway SE-3 Patroller, unplug the AC Power Cord, and set the Parking Brake before performing any maintenance
or installing any part or accessory. It is not safe to perform these procedures while the SE-3 Patroller is powered on or charging.
Setup
The Segway SE-3 Patroller is designed to be virtually maintenance free. Make sure it is clean, all parts are installed and functioning properly, the
Battery Module is charged, and Tires are properly inflated prior to riding. Never attempt to access the Electronics, Motors, or Gearboxes. These
are not user-serviceable parts.
Contact
• Wear safety glasses. Failure to do so could result in serious injury.
Index
Schedule
57
Securing the SE-3 Patroller for Transport
Attach tie-downs here
Follow these instructions to secure the SE-3 Patroller for transport on a pickup
truck or trailer.
1. Ensure the SE-3 Patroller is powered off and unplugged.
2. Engage the parking brake.
3. Chock the front wheel.
4. Attach tie-downs to each end of the handlebars and to at least one
rear wheel (Figure 46).
5. Secure the tie-downs to the transporting platform.
Chock front wheel
Secure at least one
rear wheel with a
tie-down
Figure 46: Securing the SE-3 Patroller for Transport
58
Info
Tires and Wheels
SE-3
WARNING
Recommended tire pressures are shown on Wheel labels affixed near the valve
stems. These pressures supersede any recommended pressures stated on
the Tires. Higher pressure reduces suspension performance and traction, and
increases risk of loss of control, collisions, and falls. Lower pressure reduces
range and increases risk of damage to the Tire/ Wheel Assembly. Unequal
pressure will cause the Segway SE-3 Patroller to turn in the direction of the
lower pressure tire.
Setup
Operate
Riding
Tips
WARNING
Brake discs can become very hot during aggressive use. Let the brake system
cool down before performing any Tire/Wheel maintenance, to avoid the
possibility of burns.
Battery
Maintain
Checking the Tire/Wheel Assembly
T-shoot
To check the Tires and Wheels:
1. Make sure the SE-3 Patroller is unplugged and powered off.
Warn
2. Apply the parking brake (p. 24).
Index
Schedule
4. If you detect Wheel wobble, check the Wheel nuts and tighten if
necessary using the supplied wheel nut key. Torque the wheel nuts
to 55 N-m (40 ft-lbf).
Contact
3. Check for Wheel wobble by grasping the Tire/Wheel Assembly and
attempting to move it side-to-side (Figure 47). The Tire/Wheel
Assembly should not move laterally.
Figure 47: Checking the Tire/Wheel Assembly for Wobble
59
Tires and Wheels (cont.)
Checking Tire Pressure
The Tires on the SE-3 Patroller provide suspension and traction. Both
functions are affected by tire inflation pressure. Recommended tire pressures
are shown on Wheel labels affixed near the valve stems.
Table 6: SE-3 Patroller Recommended Tire Pressures
Tire
Recommended Pressure
Front Tire
22 psi (1.52 Bar; 152 kPa)
Rear Tires
25 psi (1.72 Bar; 172 kPa)
WARNING
Inflate tires to the correct pressure (Table 6). Overinflating or underinflating
Tires can increase your risk of traction loss, possibly resulting in injury or falls.
Front Tire
1. Make sure the SE-3 Patroller is unplugged and powered off.
2. Apply the parking brake (p. 24).
3. Turn the handlebar all the way to the left.
4. From behind the front wheel shroud, locate the valve stem and check
the tire pressure (Figure 48).
Rear Tires
1. Make sure the SE-3 Patroller is unplugged and powered off.
2. Apply the parking brake (p. 24).
3. Locate the rear tire valve stem and check the tire pressure.
60
Figure 48: Check front tire pressure from behind the wheel shroud
Over time, the tires on the SE-3 Patroller will wear and need replacing.
Table 7: Tire Wear Specifications
Front Tire
2 mm
Rear Tires
3.8 mm (or when the tread is flush
with the tread wear indicators)
Front Tire
Operate
Minimum Tread Depth
Setup
Tire
SE-3
WARNING
Do not ride the Segway SE-3 Patroller with excessively worn tires (Figure 49).
A tire could burst, causing personal injury or damage to the SE-3 Patroller.
Info
Checking Tires for Wear
1. Make sure the SE-3 Patroller is powered off and unplugged.
Riding
2. Apply the parking brake (p. 24).
Front
Tips
3. Measure the depth of the treads (Table 7). If the tread depth is at or
below 2 mm, replace the tire.
Rear
Battery
Rear Tires
Maintain
1. Make sure the SE-3 Patroller is unplugged and powered off.
2. Apply the parking brake (p. 24).
T-shoot
3. Locate the tread wear indicators in the landings between treads.
If the treads are worn down level with the tread wear indicators,
replace the tire.
Warn
Excessive tread wear
Index
Figure 49: Do not drive on worn out tires
Schedule
NOTE
To replace the tires, contact an Authorized Segway Dealer or Distributor, or
Segway Customer Care. For a list of Authorized Dealers and Distributors, visit
www.segway.com.
Contact
Alternately, measure the depth of the treads (Table 7). If the tread
depth is at or below 3.8 mm, replace the tire.
61
Tires and Wheels (cont.)
Replacing a Rear Tire/Wheel
Tools:
Vehicle jack
Wheel nut key (included with the SE-3 Patroller)
19 mm or 21 mm socket wrench
Torque wrench
Rear Tire/Wheel Removal
1. Make sure the SE-3 Patroller is powered off and unplugged.
2. Apply the parking brake (p. 24).
3. Using the wheel nut key, loosen but do not remove the four Wheel
Nuts.
4. Place the vehicle jack under the back of the SE-3 Patroller skid
plate, close to the wheel being changed (Figure 50). Raise the SE-3
Patroller until the wheel is just off the ground.
WARNING
Do not lift both rear wheels off the ground. Two wheels must always
remain in contact with the ground to reduce the possibility of the SE-3
Patroller tipping over while it is on the jack.
5. Using the wheel nut key, remove all four Wheel Nuts.
6. Pull the wheel off the studs.
62
Place jack here
Figure 50: SE-3 Patroller Rear Lifting Points
Info
Rear Tire/Wheel Installation
SE-3
1. Make sure the SE-3 Patroller is powered off, unplugged, and the
parking brake is engaged.
2. Jack up the SE-3 Patroller (Figure 50).
Setup
3. Make sure all mounting surfaces are clean and free of debris.
Operate
4. Slide the wheel onto the four studs.
Riding
5. Using the wheel nut key, install the four Wheel Nuts, a little more
than hand tight.
6. Lower the SE-3 Patroller and remove the jack.
Torque the four Wheel Nuts
in a cross pattern
Tips
Battery
7. Using the wheel nut key, torque the four Wheel Nuts to 55 N-m
(40 ft-lbf). Torque nuts in a cross pattern: top, bottom, left, right
(Figure 51).
Figure 51: Installing a Rear Wheel
Maintain
Replacing the Front Tire/Wheel
T-shoot
Segway recommends the front tire/wheel be serviced or replaced by a Segway
trained and certified technician. Contact your local dealer or Segway for your
servicing needs:
Warn
Phone: 1-866-4SEGWAY (1-866-473-4929)
Website: www.segway.com
Contact
Index
Schedule
63
Brakes
Adjusting the Brake Levers
The angle of the brake levers can be adjusted for the user's preference.
WARNING
Make sure the brake levers are easy to reach and are fastened to the appropriate
torque. Brakes are an essential safety feature of the SE-3 Patroller. If the user
cannot reach the brakes they may not be able to stop the vehicle, which could
lead to injury or death.
Tools:
5 mm hex wrench
Torque wrench
1. Make sure the SE-3 Patroller is is powered off and unplugged.
2. Apply the parking brake (p. 24).
3. Using a 5 mm hex wrench, loosen the two fasteners on the brake
lever clamp (Figure 52).
4. Rotate the brake lever to the desired position, being careful not to
pinch the cables on any chassis hardware.
5. Using a 5 mm hex wrench, tighten the two fasteners on the brake
lever clamp. Torque to 10 N-m (7.3 ft-lbf).
64
Brake lever fasteners
Figure 52: Brake Lever Fasteners
Info
Checking the Brake Fluid Level (Front/Rear)
WARNING
Do not operate the SE-3 Patroller if the brake fluid level is low. The brakes may
not activate properly and the vehicle may not stop as intended.
SE-3
Screws
Setup
1. Make sure the SE-3 Patroller is powered off and unplugged.
Operate
2. Apply the parking brake (p. 24).
LOWER
Low mark
Maintain
Phillips head screwdriver
Torque wrench
Battery
Tools:
Tips
4. Inspect the sight glass and determine if fluid is below the "low" mark
(Figure 53). If fluid is below the "low" mark, brake fluid needs to be
added.
Adding Brake Fluid (Front/Rear)
Riding
3. Make sure the brake fluid reservoir is level.
Figure 53: Checking the Brake Fluid Level
T-shoot
1. Use a Phillips head screwdriver to remove the two screws on top of
the brake fluid reservoir.
4. Replace the gasket and the reservoir cap.
Index
5. Use a Phillips head screwdriver to install the two screws on top of the
brake fluid reservoir. Torque to 1.5 N-m (14 in-lbf).
NOTICE
Use only fresh DOT 4 brake fluid from a new container. Avoid
getting any brake fluid on hands, clothing, or painted parts.
Immediately wipe up any spilled fluid.
Contact
3. Add DOT 4 brake fluid; do not overfill the reservoir.
Warn
2. Remove the reservoir cap and gasket.
Schedule
65
Cleaning the Segway SE-3 Patroller
WARNING
Do not clean the Rider Detect Mat or Tires with any specialized cleaners. Use of such products may reduce traction, increasing the risk of a fall.
To clean the SE-3 Patroller:
1. Make sure the SE-3 Patroller is unplugged and powered off.
2. Always inspect the Charge Port before and after charging and prior to cleaning.
3. Gently clean the SE-3 Patroller with soap and water and a soft cloth.
Avoid Submerging the SE-3 Patroller
WARNING
Do not wash the SE-3 Patroller with a power washer or high pressure hose
(Figure 54). Avoid spraying water into the Charge Port and the neck cavity
below the User Interface. Avoid exposure to heavy downpours or extended
periods of heavy rain (including during riding, storage, or when transporting).
Make sure that the Charge Port is dry before you plug in the Power Cord.
Failure to follow these instructions could expose you to electric shock, injury,
burns, or cause a fire.
WARNING
Do not submerge the Battery Module or vehicle in water. If you suspect
the Battery Module or vehicle have been submerged or experienced water
intrusion: 1) call Segway Technical Support immediately at 1-866-473-4929;
2) store the SE-3 Patroller level, outdoors, and away from flammable objects;
3) do not attempt to remove the Battery Module; 4) do not plug the Power
Cord into the SE-3 Patroller. Failure to follow these instructions could expose
you to electric shock, injury, burns, or cause a fire.
66
Figure 54: Do NOT use high pressure washers
Info
Storing the Segway SE-3 Patroller
• Clean the SE-3 Patroller.
Riding
• Inflate the tires to the proper pressure (p. 60).
Operate
• Store the SE-3 Patroller (and its Battery Module) indoors, in a place that is free of moisture and humidity, with an ambient temperature
of at least -4° F/-20° C or above.
Setup
SE-3 Patroller
SE-3
To store the Segway SE-3 Patroller for Winter or long periods of time, do the following to ensure it will always be ready to supply you with
maximum performance:
• You may want to cover the SE-3 Patroller to prevent dust accumulation.
Tips
• If storing the SE-3 Patroller longer than 1 month, remove the batteries—but be sure to charge them at least every 2 months.
Contact
Index
CAUTION
Failure to charge the Battery Module could result in permanent damage. Left unplugged, the Battery Module could fully discharge over time,
causing permanent damage. Use only the built-in SE-3 Patroller charger or charging devices approved by Segway.
Warn
• If storage temperature is below 32° F/0° C, do not charge the Battery Module. Instead, bring it into a warm (above 50° F/10° C is
optimal) environment for charging. Doing so will ensure optimal battery life and performance.
T-shoot
• Even if you will not be using the SE-3 Patroller for an extended period of time, you should leave it plugged into AC power. Otherwise the
Battery Module could fully discharge over time, causing permanent damage.
Maintain
• Fully charge the Battery Module for at least 12 hours once a month, or after every 12 hours of operation—whichever comes first. Charge
the Battery Module only when it is within the specified charging temperature range (p. 47).
Battery
SE-3 Patroller Battery Module
Schedule
67
Replacing Parts
If a part breaks or needs replacement, or if you have a question about SE-3 Patroller replacement parts, contact an Authorized Segway Dealer or
Distributor. For a list of Dealers and Distributors, visit www.segway.com. See the SE-3 Patroller Limited Warranty/Guarantee for a list of ownerreplaceable parts.
Use only Segway-provided replacement parts and fasteners.
Torque Specifications
CAUTION
Adhere to torque specifications when tightening fasteners. Over-tightening or under-tightening fasteners can result in damage or malfunction.
Accessories
If you are interested in adding accessories to your SE-3 Patroller, please contact an Authorized Segway Dealer or Distributor or visit Segway's
website at www.segway.com to learn what accessories are available.
Use only Segway-approved accessories.
68
Info
Troubleshooting
page 70
Tire/Wheel assembly is loose/wobbles.
page 71
SE-3 Patroller pulls to one side.
page 72
Tire is flat/will not maintain pressure.
page 72
Accessory outlet fuse
page 76
Battery
SE-3 Patroller will not power on.
Tips
See:
Riding
Table 8 lists potential problems. This table directs you to the page in this
chapter where you can find more information on resolving the problem.
Problem:
Operate
WARNING
Always shut down the SE-3 Patroller and unplug the AC Power Cord before
performing any maintenance or installing any part or accessory.
Table 8: SE-3 Patroller Troubleshooting Procedures
Setup
You can troubleshoot certain problems with the Segway SE-3 Patroller before
contacting an Authorized Segway Dealer or Distributor, or Segway Customer
Care. This chapter provides lists of problems and recommended actions.
SE-3
Troubleshooting Procedures
Maintain
If you are unable to resolve the problem, contact an Authorized Segway Dealer
or Distributor, or Segway Customer Care. For a list of Authorized Dealers and
Distributors, visit www.segway.com.
T-shoot
Warn
Contact
Index
Schedule
69
Troubleshooting Procedures (cont.)
SE-3 Patroller Will Not Power On
Problem:
Your Segway SE-3 Patroller will not power on when you insert and turn the power key.
Review the following procedures prior to troubleshooting this problem:
• “Removing the Battery Module” (p. 49)
• “Installing the Battery Module” (p. 48)
Recommended Action:
1. Make sure the SE-3 Patroller's Battery Module is charged.
2. If a Warning/Fault message appears on the User Display when attempting to power on, see “Warnings and Faults," (p. 73).
3. If the SE-3 Patroller still will not power on, remove the Battery Module and then re-install it.
70
Info
Tire/Wheel Assembly is Loose and/or Wobbles
SE-3
Problem:
The Tire/Wheel assembly is not secure. It appears to be loose and/or wobbles.
Review the following procedure prior to troubleshooting this problem:
Setup
• “Checking the Tire/Wheel Assembly” (p. 59)
Operate
• "Replacing a Rear Tire/Wheel" (p. 62)
Recommended Action:
Riding
1. Make sure the Segway SE-3 Patroller is unplugged and powered off.
Tips
2. Tighten the Wheel Nuts. Torque to 55 N-m (40 ft-lbf).
Battery
3. If the Tire/Wheel Assembly is still loose or wobbles, remove, clean, and reseat the Tire/Wheel Assembly to the hub on which the Tire/
Wheel Assembly mounts.
Maintain
T-shoot
Warn
Contact
Index
Schedule
71
Troubleshooting Procedures (cont.)
Segway SE-3 Patroller Pulls to One Side When Riding
Problem:
Your Segway SE-3 Patroller pulls to one side when you are riding.
Review the following procedures prior to troubleshooting this problem:
• “Checking the Tire/Wheel Assembly” (p. 59)
• “Checking Tire Pressure” (p. 60)
Recommended Action:
1. Check to make sure Rear Tire inflation pressure is equal, and set to recommended specifications (see “Checking Tire Pressure,” p. 60).
2. If either Rear Tire is not set at the proper tire inflation pressure, inflate the Tire or Tires until both are at equal and correct pressure.
Tire is Flat or Will Not Maintain Pressure
Problem:
One of the Tires on your Segway SE-3 Patroller is flat or will not hold air.
Review the following procedure prior to troubleshooting this problem.
• "Checking Tire Pressure" (p. 60)
Recommended Action:
1. Check for Tire damage. If the Tire is damaged, contact an Authorized Segway Dealer or Distributor to order a replacement Tire/Wheel
Assembly.
2. If there is no visible Tire damage, check to make sure the Tire valve stem core is tight. Tighten the valve stem if necessary.
3. Inflate the Tire and check for leaks. If the Tire goes flat or will not maintain pressure, contact your Segway Dealer.
72
Info
Warnings and Faults
SE-3
Both warnings and faults are displayed on the User Interface screen.
Setup
Warnings
TRIP 999.9
Figure 55: Warnings are Displayed on the User Interface Screen
T-shoot
This warning occurs any time the vehicle is going faster than the maximum
speed. See "Segway SE-3 Patroller Specifications," p. 15.
OD 99999.9
Release Throttle
Maintain
Reduce Speed (Top Speed Exceeded)
RND
Battery
If this happens, release the throttle and DRIVE mode will be enabled.
RIDER PRESENT
Tips
This warning occurs if the throttle is activated while attempting to enter
DRIVE mode (Figure 55).
Riding
Release Throttle
Operate
The SE-3 Patroller displays various warnings on the User Interface screen.
Warnings inform the user of situations that may cause reduced performance,
but will not stop the SE-3 Patroller from operating.
Warn
When this occurs the rider should use the brakes to safely slow the vehicle.
Driving faster than the top speed is not recommended and could expose the
rider to unsafe situations that could lead to to falls and personal injury.
Contact
Index
Schedule
73
Warnings (cont.)
CAUTION
Charge an empty or low Battery Module immediately. Leaving a Battery Module empty for long periods of time could result in permanent
damage to the Battery Module.
Low Battery
This warning occurs when the Battery Module level of charge is below 15% or when there is low battery voltage. In the case of low battery voltage,
vehicle performance will be reduced. Drive to a secure location and charge your Battery Module.
Empty Battery
This warning occurs when the Battery Module is completely empty. The SE-3 Patroller may power off at any moment. Charge your Battery
Module immediately.
High Temperature (Drive/Motor/Battery)
These warnings occur when the components reach high temperatures. Vehicle performance is reduced. As the temperature gets higher, performance is reduced further.
Power off the SE-3 Patroller. Let it cool to within the recommended operating range. See "Segway SE-3 Patroller Operating Limits," page 19.
UI Hardware Fault
This is a fault on the User Interface Board. A variety of problems could cause this warning, including loss of communication between the board
and other components. Under most circumstances the SE-3 Patroller will continue to operate as normal.
Contact an Authorized Segway Dealer or Distributor, or contact Segway Customer Care. For a list of Authorized Dealers and Distributors, visit
www.segway.com.
74
Info
Faults
SE-3
When a Fault occurs, the default User Interface screen is replaced by the Fault
Screen (Figure 56) which displays a warning triangle and a short description
of the fault. The fault message will be displayed until the SE-3 Patroller powers
off. For all faults, the motor drives are disabled but power is still available.
Setup
Rider Detect Fault
Tips
Figure 56: Rider Detect Fault
Battery
Maintain
Remove any objects from on top of the Rider Detect Mat. Power the SE-3
Patroller off and then on again (p. 34, 38). Make sure the rider is within the
recommended weight range and standing centered on the Rider Detect Mat
(see "Segway SE-3 Patroller Specifications," p. 15). If the fault reoccurs,
contact an Authorized Segway Dealer or Distributor for service.
Riding
If you see either of these fault messages displayed, there could be a problem
with the rider detect mat. The redundant rider detection sensor outputs do
not match each other. This can occur if light pressure is applied to the rider
detect mat such that one sensor is engaged and the other is not.
Operate
Rider Detect Mismatch/Drive Enable Hardware Fault
T-shoot
Warn
Most faults indicate that the SE-3 Patroller needs to be serviced. Power cycling the vehicle (turning it OFF then ON) will clear the fault, but it will
reappear if the fault condition still exists. If a fault occurs, do not attempt to drive the SE-3 Patroller. Contact an Authorized Segway Dealer or
Distributor, or contact Segway Customer Care. For a list of Authorized Dealers and Distributors, visit www.segway.com.
Contact
Index
Schedule
75
Accessory Outlet Fuse
WARNING
Do not attempt to remove or access any of the covers or panels in the Battery
Module enclosure. There are no user serviceable parts inside. Doing so could
result in death or serious injury from electric shock.
A 2 Amp fuse protects the SE-3 Patroller's Accessory Outlet. If an accessory
with a larger load is connected to the circuit, the fuse may blow. In that case,
remove the accessory and do not use it again. Access the fuse panel behind
the Battery Module ("Removing the Battery Module," p. 49) and locate the
2 Amp fuse next to "+12V Accessory Supply." Replace the fuse only with an
identical 2 Amp fuse.
NOTICE:
Do not attempt to troubleshoot or change any of the other fuses in the fuse
panel. These are connected to circuits and components that are servicable
only by Segway trained and certified technicians. If your SE-3 Patroller requires
service, please contact Segway (1-866-4SEGWAY, www.segway.com).
76
Figure 57: Fuse access is located behind the Battery Module
Info
Contact and Legal Information
SE-3
Report All Incidents
If you or any other user of your Segway SE-3 Patroller is involved in an accident, or if your SE-3 Patroller performs in a way that you do not intend
or in a way that it is not supposed to, contact Segway Customer Care.
Setup
How to Reach Us
Operate
Riding
Telephone: (English-language only) 1-866-4SEGWAY (1-866-473-4929)
E-mail: (English-language only) [email protected]
Tips
An Authorized Segway Dealer or Distributor can answer questions about your SE-3 Patroller via the web, email, or phone. For a list of Dealers
and Distributors, visit www.segway.com.
Battery
California Warning
Maintain
This product contains chemicals, including lead, known to the State of California to cause cancer, birth defects, or other reproductive harm.
Warn
The use of the SE-3 Patroller on roads and walkways may be regulated by governmental authorities. In addition to other requirements, these
laws and regulations may prescribe minimum ages for SE-3 Patroller users and may set speed limits and mandate protective gear for riders. You
should consult local authorities to become familiar with applicable laws and regulations.
T-shoot
Obey All Laws and Regulations
Contact
Index
Schedule
77
Limited Warranty/Guarantee
(United States Only)
Segway provides with each Segway SE-3 Patroller a “Segway® SE-3 Patroller Limited Warranty/Guarantee.” This is the only warranty applicable
to the Segway SE-3 Patroller. Consult the “Segway® SE-3 Patroller Limited Warranty/Guarantee” delivered with your Segway SE-3 Patroller for
the specific terms of limited warranty coverage.
Regulatory Compliance Information
European Directives
The Segway SE-3 Patroller complies with the requirements of the following European Directives:
•
•
•
•
•
•
2004/108/EC, Electromagnetic Compatibility Directive
2006/95/EC, Low Voltage Directive
2006/42/EC, Machinery Directive
2011/65/EC, Restriction of the use of certain Hazardous Substances in Electrical and Electronic Equipment (RoHS)
2012/19/EC, Directive on Waste Electrical and Electronic Equipment (WEEE)
2006/1907/EC, Directive on Registration, Evaluation, Authorization and Restriction of Chemical Substances (REACH)
Other Standards
The Segway SE-3 Patroller also complies under the applicable sections of the following:
• UL 60335-1 Issue: 2011/10/31 Ed: 5 UL Standard for Safety of Household and Similar Electrical Appliances, Part 1: General Requirements
• CSA C22.2 #60335-1 Issue: 2011/10/31 Safety of Household and Similar Electrical, Part 1: General Requirements
• CENELEC EN 60335-1 Issued: 2002/10/01 Household and similar electrical appliances Safety Part 1: General requirements-Includes
amendments A11:2004, A1:2004; A2:2006 and A12:2006 IEC 60335-1:2002 + 1:2004, modified
78
Info
Regulatory Compliance Information (cont.)
• IEC 60335-1 Issue: 2010/12/10 Ed: 5 Household and similar electrical appliances Safety Part 1: General requirements; COR No.1:
2010/07/28
SE-3
• IEC 60529 Issued: 2001/02/01 Ed: 2.1 Degrees of Protection Provided by Enclosures (IP Code); COR. No. 1:2003; COR. No.2:2007;
COR. No.3:2009
Setup
Operate
• CEN EN ISO 12100 Issue: 2010/11/15 Safety Of Machinery – General Principals For Design – Risk Assessment And Risk Reduction
• FCC 47 CFR Part 15, Subpart a (General), b (Unintentional Radiators), Class B
Riding
• ICES-003 Interference-Causing Equipment Standard – Digital Apparatus, Class B
Battery
• EN 55022 Information technology equipment – Radio disturbance characteristics, Class B
Tips
• EN 55011 Industrial, scientific and medical (ISM) radio-frequency equipment – Electromagnetic disturbance characteristics, Group I
Class B
• EN 61000-3-2 Harmonic current emissions
Maintain
• EN 61000-3-3 Voltage changes, voltage fluctuations and flicker
T-shoot
• EN 61000-4-2 Electrostatic discharge immunity
• EN 61000-4-3 Radiated, radio-frequency, electromagnetic field immunity
Warn
• EN 61000-4-4 Electrical fast transient/burst immunity
Contact
• EN 61000-4-5 Surge immunity
• EN 61000-4-6 Immunity to conducted disturbances, induced by radio-frequency fields
Index
• EN 61000-4-8 Power frequency magnetic field immunity
Schedule
• EN 61000-4-11 Voltage dips, short interruptions and voltage variations immunity
• EN 61000-6-1 Electromagnetic compatibility (EMC) – Immunity for residential, commercial and light-industrial environments
79
Regulatory Compliance Information (cont.)
• EN 61000-6-2 Electromagnetic compatibility (EMC) – Immunity for industrial environments
• EN 61000-6-3 Electromagnetic compatibility (EMC) – Emission standard for residential, commercial, & light-industrial environments
• EN 61000-6-4 Electromagnetic compatibility (EMC) –Emission standard for industrial environments
• UL 1012/CAN/CSA-C22.2 NO. 107.2 – Battery Chargers/Power Supplies Other than Class 2
• EN 60335-2-29/IEC 60335-2-29 Issued: 1994/01/01 Ed: 3 Safety of Household and Similar Electrical Appliances Part 2: Particular
Requirements for Battery Chargers
• IEC 62133 Secondary cells and batteries containing alkaline or other non-acid electrolytes – Safety requirements for portable sealed
secondary cells, and for batteries made from them, for use in portable applications
• UL 1642, UL Standard for Safety for Lithium Batteries
Radio Frequency Interference
United States FCC Part 15 Class B Radio Frequency Interference (RFI) Statement
The Segway SE-3 Patroller has been tested and found to comply with the limits for Class B digital devices pursuant to Part 15 of the FCC rules.
These limits are designed to provide reasonable protection against harmful interference in a residential environment. The Segway SE-3 Patroller
generates, uses, and can radiate radio frequency energy, and, if not installed and used in accordance with the User Materials may cause harmful
interference to radio communications.
However, there is no guarantee that interference will not occur in a particular installation. If the SE-3 Patroller does cause harmful interference
to radio or television reception, which can be determined by turning the SE-3 Patroller off and on, the user is encouraged to try and correct the
interference by one or more of the following measures:
• Reorient or relocate the receiving antenna.
• Increase the distance between the SE-3 Patroller and the receiver.
80
Info
Radio Frequency Interference (cont.)
SE-3
• Connect the SE-3 Patroller into an outlet on a circuit different from that to which the receiver is connected.
• Consult the dealer or an experienced radio/TV technician for help.
Setup
• Operation is subject to the following two conditions:
1. This device may not cause harmful interference
2. This device must accept any interference received, including interference that may cause undesired operation
Operate
Riding
This product complies with FCC radiation exposure limits set forth for an uncontrolled environment.
Tips
Modifications: Modifications not expressly approved by Segway may void the user's authority to operate this device under FCC regulations and
must not be made.
Maintain
The Segway SE-3 Patroller is a Class B digital apparatus that complies with Canadian CAN ICES-3 B/NMB-3B. Cet appareil numérique de la
classe b est conforme à la norme CAN ICES-3 B/NMB-3B du Canada.
Battery
Canadian ICES-003
T-shoot
Warn
Contact
Index
Schedule
81
Product Life and Recycling
This product should be recycled at the end of its useful life. All Segway SE-3
Patroller models can be returned to the location at which they were purchased,
or to Segway Inc. at:
Segway Inc.
Attn: Product Recycling
14 Technology Dr.
Bedford, NH 03110 USA
To find the nearest Segway dealer or distributor go to http://www.segway.com/dealer-locator/.
Segway SE-3 Patroller Li-ion Batteries
Transportation and Shipping
Lithium-ion Batteries are regulated as “Hazardous Materials” by the U.S. Department of Transportation. For more information, contact the U.S.
Department of Transportation at www.phmsa.dot.gov/hazmat/regs or call 1-800-467-4922.
Disposal
The Li-ion Batteries used in the Segway SE-3 Patroller can be recycled. Recycle or dispose of Batteries in accordance with local environmental
regulations. Do not place in fire or incinerate. For more information, contact Segway at 1-866-4SEGWAY (1-866-473-4929), or visit our website
at www.segway.com.
Patent Information
The Segway SE-3 Patroller is covered by US and foreign patents.
For patent information go to http://www.segway.com/patents.pdf.
82
Contact
Index
P
Parking brake 24
Warn
O
Operating limits 18
Operating the SE-3 21
Outlet, 12 V 28
T-shoot
H
Handlebar
cargo weight, maximum 19
controls 21
Hazards, avoiding 31
Horn 25
Maintain
G
Glove box 27
Battery
F
Faults 75
Fuse, Accessory Outlet 76
R
Radio Frequency Interference 80
Range, maximizing 20
Recalibrating the BDI 54
Recycling 56, 82
Regulatory information 78
Replacing parts 68
Reverse Mode 25, 37
Rider Controls 21-25
Rider Detect Mat 12
Riding the SE-3 29
Riding Position 30
Riding Tips/Safety Guidelines 41
Tips
M
Maintaining the SE-3 57
Maintenance schedule 86
Mat, Rider Detect 12
Maximizing Range 20
Maximum speed 15
Maximum payload 15, 19
Minimum rider weight 19
Motors 13
Riding
D
Display, User Interface 26
DRIVE/STANDBY switch 24
Drive system 13
L
Laws and regulations 77
Lights 25
Partial charge 53
Parts, replacement 68
Patent information 82
Performance/Temperature 55
Power key 21, 22, 34
Pre-ride checklist IBC
Product Life 82
Operate
I
Impacts 32
Incidents, reporting 44
Indoors, riding 41
Setup
Schedule
B
Battery Discharge Indicator 51
Battery Module 14, 17, 45
charging 50
disposal 56
install 48
remove 49
shipping/transporting 56
specifications 47
Battery safety 45
Brakes 24, 36
adding brake fluid 65
adjusting the brake levers 64
checking brake fluid 65
C
Cargo 15, 18, 19
Charge level gauge 52
Charge, partial 53
Charge Port 50
Charging the Battery Module 50
Charging failures 52
Cleaning the SE-3 66
Components 9
Contact Information 77
Controllers, Motor 13
Controls, Rider 21-25
SE-3
A
Accessories 12, 28, 68
Accessory Outlet fuse 76
Accessory Power 28
Avoiding Hazards 31
Info
Index
83
Index (cont.)
S
Safety messaging 7
Segway SE-3
components, subsystems 9
operating limits 18, 19
serial numbers 17
specifications 15, 16
Serial numbers 17
Servicing the SE-3 57
Shipping Li-ion Batteries 56
Siren 25
Specifications 15, 16
Speed, maximum 15
Storage 27
84
Storage Bins 27
Storing the SE-3 67
Structural Weight limits 19
Subsystems 9
Switchgear 24
T
Table of Contents 3
Temperature
effect on performance 55
Terrain, navigating 39
Throttle 21, 34
Tip-overs 32
Tire pressure 16, 60
Tire Wear 61
Tire/Wheel
checking 59
install, rear 63
remove, rear 62
Traction, loss of 31
Transporting and shipping
Battery Module 56
SE-3 Patroller 58
Troubleshooting 69
flat tire 72
pulls to one side 72
tire/wheel wobble 71
will not power on 70
Turn Indicators 25
U
Unplugging the SE-3 51
User Interface 26
W
Warnings 73
Empty Battery 74
High Temperature 74
Low Battery 74
Release Throttle 73
Reduce Speed 73
UI Hardware Fault 74
Warranty/Guarantee 78
Weight limits 15, 18
Info
Notes:
SE-3
Setup
Operate
Riding
Tips
Battery
Maintain
T-shoot
Warn
Contact
Index
Schedule
85
Recommended Maintenance Schedule–SE-3 Patroller
Maintenance procedure:
1x/month
1x/4 months
1x/6 months
1x/12 months
Check tire pressure: Front = 22 psi; Rear = 25 psi
Check tire wear (tread depth): Front = 2 mm; Rear = 3.8 mm
Ensure rider mat is intact, secure, and free of debris
Inspect rider controls for proper installation
Inspect charge port for condition/functionality
Battery Connector: free of corrosion and/or debris (Service Manual)
Ensure all lights are functional (Service Manual)
Inspect bodywork/fenders for cracks/obstructions/debris
Check fastener torque: Rear wheel nuts = 55 N-m (40 ft-lbf)
Windshield: clean with a dry, lint-free cloth
Check for play in steering: Apply front brake, pull forward and backward; if play is felt vehicle needs service. 3
Brake lever pivot: no binding or sticky action
Check brake discs for wear: 3.2 mm wear limit 2
Check brake pad wear: replace if less than 1 mm pad material 2
Key: = required, 2 = Performed by Level 2 trained Segway Certified Technician only, 3 = Performed by Level 3 trained Segway Certified Technician only
86
Maintenance procedure:
1x/month
1x/4 months
Info
Recommended Maintenance Schedule–SE-3 Patroller (cont.)
1x/6 months
1x/12 months
Test ride SE-3, note wheel alignment, drift, or performance issues
Inspect Motor/Gearbox elastomer and coupling 2
Setup
SE-3
Power on SE-3. Ensure operability and document hours/miles
Operate
Replace components and update software as necessary 3
Riding
Replace brake fluid every 2 years
Replace tires (see "Tire Wear" below) as necessary
Tips
Key: = required; 2 = Performed by Level 2 trained Segway Certified Technician only; 3 = Performed by Level 3 trained Segway Certified Technician only
Battery
Tire Wear
Maintain
Excess tire wear is determined as follows:
T-shoot
• Front – tire tread depth is less than 2 mm
• Rear – tire tread depth is less than 3.8 mm
Warn
See "Checking Tires for Wear" (p. 61) for more information on tire wear.
Contact
Index
Schedule
87
Your Segway SE-3 Patroller
Write down the important information below for quick access if needed.
Serial Numbers
SE-3 Patroller Serial Number
Battery Module Serial Number
Dealer Name
Dealer Contact
Dealer Address
Dealer Web/Email/Phone
Owner Name
Owner Address
Owner Email/Phone
88
Pre-Ride Checklist – SE3 Patroller
Perform the following checks on the SE-3 Patroller before each ride:
Check tire pressure
Front – 22 psi (1.52 Bar; 152 kPa)
Rear – 25 psi (1.72 Bar; 172 kPa)
Check for tire wear
Front – tire tread depth is less than 2 mm
Rear – 3.8 mm (or when the tread is flush with the tread wear indicators)
Ensure there is no visible damage to the SE-3 Patroller or loose bodywork.
Ensure the Rider Detect Mat is intact, secure, and free of debris.
Verify the brake levers are firm when squeezed and the brake fluid level is above the “low” mark.
Right – Rear brake fluid reservoir
Left – Front brake fluid reservoir
ProTIP: Copy and post this page near your SE-3 Patroller parking area – check the boxes off as you go down the list.
24324-00001 aa