1
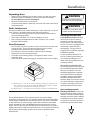
Owner's Manual Contents Model Identification .......................... 2 PRECAUTIONS TO AVOID POSSIBLE Heavy Duty Commercial Compact [0.6 Cubic Foot] Microwave Oven Keep these instructions for future reference. If the oven changes ownership, this manual must accompany oven. EXPOSURE TO EXCESSIVE MICROWAVE ENERGY .................. 3 IMPORTANT SAFETY INSTRUCTIONS .. 3 Earthing Instructions ......................... 5 Installation ........................................ 5 Display and Features ........................ 6 Using the Oven Control .................... 8 Programming the Oven Control ........ 9 User Options ...................................10 Care and Cleaning ..........................12 Before Calling for Service ................ 13 Model Identification Complete enclosed registration card and promptly return. If registration card is missing, call Consumer Affairs Department at 1-800-843-0304 inside U.S.A. 1-319-622-5511 outside U.S.A. Any questions or to locate an authorized servicer, call 1-800-843-0304 inside U.S.A. 1-319-622-5511 outside U.S.A. If an automated telephone system is reached, select Commercial Microwave Ovens category. Warranty service must be performed by an authorized servicer. Amana also recommends contacting an authorized servicer if service is required after warranty expires. When contacting Amana, provide product information. Product information is located on oven serial plate. Record the following information: Model Number: ____________________________ Manufacturing Number: ______________________ Serial or S/N Number: _______________________ Date of purchase: __________________________ Dealer’s name and address: __________________ ________________________________________ ________________________________________ 2 IMPORTANT SAFETY INSTRUCTIONS Recognize this symbol as a SAFETY message ! WARNING When using electrical equipment, basic safety precautions should be followed to reduce the risk of burns, electrical shock, fire, or injury to persons. 1. READ all instructions before using equipment. 9. DO NOT heat baby bottles in oven. 2. READ AND FOLLOW the specific “PRECAUTIONS TO AVOID POSSIBLE EXPOSURE TO EXCESSIVE MICROWAVE ENERGY” on this page. 10. Baby food jars shall be open when heated and contents stirred or shaken before consumption, in order to avoid burns. 11 DO NOT operate this equipment if it has a damaged cord or plug, if it is not working properly, or if it has been damaged or dropped. 3. This equipment MUST BE GROUNDED. Connect only to properly GROUNDED outlet. See “GROUNDING INSTRUCTIONS” on page 5. 12. This equipment, including power cord, must be serviced ONLY by qualified service personnel. Special tools are required to service equipment. Contact nearest authorized service facility for examination, repair, or adjustment. 4. Install or locate this equipment ONLY in accordance with the installation instructions in this manual. 5. Some products such as whole eggs and sealed containers—for example, closed glass jars—are able to explode and SHOULD NOT be HEATED in this oven. 13. DO NOT cover or block filter or other openings on equipment. 14. DO NOT store this equipment outdoors. DO NOT use this product near water – for example, near a kitchen sink, in a wet basement, a swimming pool, or a similar location. 6. Use this equipment ONLY for its intended use as described in this manual. Do not use corrosive chemicals or vapors in this equipment. This type of oven is specifically designed to heat, cook, or dry food. It is not designed for industrial or laboratory use. 15. DO NOT immerse cord or plug in water. 16. Keep cord AWAY from HEATED surfaces. 7. As with any equipment, CLOSE SUPERVISION is necessary when used by CHILDREN. 17. DO NOT let cord hang over edge of table or counter. 8. See door cleaning instructions on page 11 of this product safety manual. 18. For commercial use only. PRECAUTIONS TO AVOID POSSIBLE EXPOSURE TO EXCESSIVE MICROWAVE ENERGY A. DO NOT attempt to operate this oven with the door open since open door operation can result in harmful exposure to microwave energy. It is important not to defeat or tamper with the safety interlocks. B. DO NOT place any object between the oven front face and the door to allow soil or cleaner residue to accumulate on sealing surfaces. C. DO NOT operate the oven if it is damaged. It is particularly important that the oven door close properly and that there is no damage to the: 1. door (bent) 2. hinges and latches (broken or loosened) 3. door seals and sealing surfaces. D. The oven should not be adjusted or repaired by anyone except properly qualified service personnel. SAVE THESE INSTRUCTIONS 3 IMPORTANT SAFETY INSTRUCTIONS ! WARNING ! WARNING Liquids such as water, coffee, or tea are able to be overheated beyond the boiling point without appearing to be boiling due to surface tension of the liquid. Visible bubbling or boiling when the container is removed from the microwave oven is not always present. THIS COULD RESULT IN VERY HOT LIQUIDS SUDDENLY BOILING OVER WHEN A SPOON OR OTHER UTENSIL IS INSERTED INTO THE LIQUID. To reduce the risk of injury to persons: To avoid risk of fire in the oven cavity: a. DO NOT overcook food. Carefully attend oven when paper, plastic, or other combustible materials are placed inside the oven to facilitate cooking. b. Remove wire twist-ties from paper or plastic bags before placing bag in oven. c. If materials inside the oven ignite, keep oven door CLOSED, turn oven off and disconnect the power cord, or shut off power at the fuse or circuit breaker panel. i) ii) Do not overheat the liquid. Stir the liquid both before and halfway through heating it. iii) Do not use straight-sided containers with narrow necks. iv) After heating, allow the container to stand in the microwave oven for a short time before removing the container. v) Use extreme care when inserting a spoon or other utensil into the container. d. DO NOT use the cavity for storage. DO NOT leave paper products, cooking utensils, or food in the cavity when not in use. ! CAUTION To avoid personal injury or property damage, observe the following: 1. Do not deep fat fry in oven. Fat could overheat and be hazardous to handle. 7. Do not use metal utensils in oven. 8. Never use paper, plastic, or other combustible materials that are not intended for cooking. 2. Do not cook or reheat eggs in shell or with an unbroken yolk using microwave energy. Pressure may build up and erupt. Pierce yolk with fork or knife before cooking. 9. When cooking with paper, plastic, or other combustible materials, follow manufacturer's recommendations on product use. 3. Pierce skin of potatoes, tomatoes, and similar foods before cooking with microwave energy. When skin is pierced, steam escapes evenly. 10. Do not use paper towels which contain nylon or other synthetic fibers. Heated synthetics could melt and cause paper to ignite. 4. Do not operate equipment without load or food in oven cavity. 11. Do not heat sealed containers or plastic bags in oven. Food or liquid could expand quickly and cause container or bag to break. Pierce or open container or bag before heating. 5. Use only popcorn in packages designed and labeled for microwave use. Popping time varies depending on oven wattage. Do not continue to heat after popping has stopped. Popcorn will scorch or burn. Do not leave oven unattended. 12. To avoid pacemaker malfunction, consult physician or pacemaker manufacturer about effects of microwave energy on pacemaker. 13. An authorized servicer MUST inspect equipment annually. Record all inspections and repairs for future use. 6. Do not use regular cooking thermometers in oven. Most cooking thermometers contain mercury and may cause an electrical arc, malfunction, or damage to oven. SAVE THESE INSTRUCTIONS 4 Installation Unpacking Oven • • • • Inspect oven for damage such as dents in door or inside oven cavity. Report any dents or breakage to source of purchase immediately. Do not attempt to use oven if damaged. Remove all materials from oven interior. If oven has been stored in extremely cold area, wait a few hours before connecting power. Radio Interference Microwave operation may cause interference to radio, television, or a similar oven. Reduce or eliminate interference by doing the following: • Clean door and sealing surfaces of oven according to instructions in Care and Cleaning section. • Place radio, television, etc. as far as possible from oven. • Use a properly installed antenna on radio, television, etc. to obtain stronger signal reception. Oven Placement • • • • • Do not install oven next to or above source of heat, such as pizza oven or deep fat fryer. This could cause microwave oven to operate improperly and could shorten life of electrical parts. Do not block or obstruct oven filter. Allow access for cleaning. Install oven on level countertop surface. If provided, place warning label in a conspicuous place close to microwave oven. Outlet should be located so that plug is accessible when oven is in place. A A B A—Allow at least 7 " (17.8 cm) of clearance around top and sides of oven. Proper air flow around oven cools electrical components. With restricted air flow, oven may not operate properly and life of electrical parts is reduced. B—Allow at least 7 " (17.8 cm) between air discharge on back of oven and back wall. Oven Clearances The switching operation of this microwave oven can cause voltage fluctuations on the supply line. The operation of this oven under unfavorable voltage supply conditions can have adverse effects. This device is intended for the connection to a power supply system with a maximum permissible system impedance Zmax of 0.31 Ohm at the interface point of the user’s supply. The user has to ensure that this device is connected only to a power supply system which fulfills the requirement above. If necessary, the user can ask the public power supply company for the system impedance at the interface point. 5 ! WARNING To avoid risk of electrical shock or death, this oven must be grounded. ! WARNING To avoid risk of electrical shock or death, do not alter the plug. Earthing Instructions Oven MUST be earthed. Earthing reduces risk of electric shock by providing an escape wire for the electric current, if an electrical short occurs. This oven is equipped with a cord having a earth wire with a earthing plug. The plug must be plugged into an outlet that is properly installed and earthed. Consult a qualified electrician or servicer if earthing instructions are not completely understood, or if doubt exists as to whether the oven is properly earthed. Do not use an extension cord. If the product power cord is too short, have a qualified electrician install a three-slot receptacle. This oven should be plugged into a separate circuit with the electrical rating as provided in product specifications (available on Amana’s wavelink website). When a microwave oven is on a circuit with other equipment, an increase in cooking times may be required and fuses can be blown. External Equipotential Earthing Terminal (export only) Equipment has secondary earthing terminal. Terminal provides external earthing connection used in addition to earthing prong on plug. Located on outside of oven back, terminal is marked with symbol shown below. Display and Features X Single Pad Programming Start Pad The start pad is used to begin a manual time entry cooking cycle. It is also used to save any changes to programming sequences or user options. This feature enables each numbered pad to be programmed for a specific use, such as cooking a certain number of potatoes or defrosting and then cooking vegetables or other frozen foods. To use this feature, simply program the pad to the desired length of time and power level. To use this feature, press the pad once and the microwave will begin cooking. Double Pad Programming STOP/RESET pad The STOP/RESET pad stops a cooking sequence in progress, clears out any remaining time, and also ends a programming or user option cycle. When the STOP/RESET pad is used to end a programming or option change, the changes are discarded. This feature enables 100 programmed entries to be made. Each entry will be assigned a double digit number, for example 01, 05, or 20. When using the double pad programming, two pads must be pressed to start the cooking cycle. Manual Time Entry In addition to programmable pads, this microwave also accepts specific time entry by using the TIME ENTRY pad. Using manual time entry does not affect the programmed buttons. X X2 Pad The X2 Pad increases a preset cooking time by a percentage of the original cooking time. The user specifies the percentage and it can be changed for individual cooking sequences. This feature is very useful for cooking multiple servings of foods such as potatoes or slices of pizza. P:--1 Stage Cooking Stage cooking is a cooking sequence with specific power stage changes. The user can program up to four different power level changes and the specific amount of cooking time at each power level. Each power level/ cooking time combination is known as a stage. Up to four stages can be programmed. OP:-- User Options This microwave can be set for specific user preferences. Options such as beep volume, maximum cooking time, and the number of programmable pads can be changed. To change different options, see User Options in this manual. 6 Display and Features Cooking Display DISPLAYS DESCRIPTION READY READY displays when oven control will accept entries. 00:00 Displays cooking time. If stage cooking is programmed, total cooking time is displayed. COOK LEVEL The display is used for many COOK LEVEL displays while oven is operating. different models of The cooking level is displayed above as a number 1 microwaves. Depending on the model, through 9. If no number is displayed, the oven is certain words or symbols may never be cooking at full power. highlighted or become visible. POWER is displayed while the oven is generating microwave energy during a cooking cycle. POWER There are words in the display that never actually display. Programming Display DISPLAYS DESCRIPTION Displays when oven is in programming mode for single pad memory only. P:0 P: OP: -CF: Displays when oven is in programming mode for double pad memory. Displays when oven is in user option mode. User options can then be set or specified. Displays with a numerical cooking factor when the X2 pad is pressed. Displays briefly when programming a specific cooking stage. Number (1 through 4) indicates the stage that is being programmed. P:--1 Stainless Steel Outer Case Oven Display Oven Control Pads Oven Door Window (Some Models) Removeable Splatter Shield (Not Shown) Rear Air Vents (Some Models) Door Handle (Pull to open) Self-sealing Base 7 5' 6" Power Cord Oven Cavity Light (Some Models) Using the Oven Control Interrupting Operation Open oven door or press STOP/RESET pad to interrupt operation. Display continues to show countdown time. Close door and press START pad to resume oven operation. Canceling Mistakes • If oven is not cooking, press STOP/RESET pad to clear display. If oven is cooking, press STOP/RESET pad once to stop oven, then again to clear display. If oven door is open and time shows in display, close oven door and press STOP/RESET pad to clear display. • • X X2 Pad To increase cooking time when cooking more than one serving. 1. Open oven door and place food in oven. Close door. • READY displays. Fan and light will turn on. 2. Press X2 pad. • Amount of time added is a percentage of the original preprogrammed cooking time. • The percentage can be changed. See Programming section in this manual. 3. Press desired preprogrammed pad. 4. Oven begins cooking. Displayed cooking time is the total of original cooking time and added X2 time. Manual Time Entry To cook food using a specific entered time and power level. 1. Open oven door and place food in oven. Close door. • READY displays. Fan and light will turn on. 2. Press TIME ENTRY pad. • READY and 0000 display. • If pad does not work, open and close oven door and try again. 3. Enter cooking time by using the numbered pads. 4. Press POWER LEVEL pad to change power level. • COOK LEVEL displays with the power setting. • If a number is not displayed with COOK LEVEL the microwave is set to full power. • Press a number pad to adjust power level to desired setting. 5. If stage cooking is desired, press TIME ENTRY and repeat steps 3 and 4. • Display changes to cook time and power level for the next stage. • To add another cooking stage press TIME ENTRY pad again. • Up to four different stages can be programmed. 6. Press START pad. • Oven operates and time counts down. • POWER, COOK LEVEL and cooking time display. 7. At end of cooking cycle oven beeps and shuts off. Preprogrammed Pads To cook food using pads preprogrammed with cooking sequences. 1. Open oven door and place food in oven. Close door. • READY displays. Fan and light will turn on. 2. Press desired pad. • For single pad entry, press only one pad. • For double pad entry, press the two pads, in order, of the double digit number for the desired cooking sequence. • To change single or double pad entry option see User Options section in this manual. 3. Oven begins to cook. • POWER, COOK LEVEL and total cooking time display. • For additional cooking time, press preprogrammed pad again to begin cooking sequence again. 4. At end of cooking cycle oven beeps and shuts off. Factory Settings Pad Time Pad Time 1 10 sec. 6 1:30 min. 2 20 sec. 7 2 min. 3 30 sec. 8 3 min. 4 45 sec. 9 4 min. 5 1 min. 0 5 min. 8 Programming the Oven Control Programming Pads Oven is shipped from the factory for single pad programming. To change the oven default to allow double pad programming, see User Options. To change the amount of time or the power level for a preset pad: 1. Open oven door. • READY displays. • If door is closed or RESET pad is pressed before programming is complete, changes are discarded and microwave exits programming mode. 2. Press and hold pad 1 for approximately 5 seconds. • This begins programming mode. • Microwave will beep and P:0 displays. Oven is in programming mode. 3. Press pad to be reprogrammed. • Press two pads if reprogramming a double pad program. • COOK LEVEL and cooking time display. • A number displays with COOK LEVEL if it is less than full power. 4. Enter cooking time by using the number pads. 5. Press POWER LEVEL pad to change power level if desired. • Use the number pads to change power level to a lower power setting. 6. Press START pad to set new programming to the pad. • If START is not pressed, changes will not be saved. • P:0 displays 7. Press STOP/RESET pad or close oven door to exit programming mode. Programming Multiple Stages Stage cooking allows consecutive cooking cycles without interruption. Up to four different cooking cycles can be programmed into a memory pad. To use stage cooking: 1. Follow steps 1 through 5 above. 6. Press TIME ENTRY pad. • Display briefly shows the pad number that is being programmed and the stage number to the upper right. • Display changes to cook time and power level for the next stage. 7. Enter cook time and power level as in steps 4 and 5. • To enter another cooking stage for that pad, press TIME ENTRY pad again. • Up to four different stages can be programmed. 8. Press START pad to set new programming changes to the pad. 9 X X2 Programming This feature allows a preset percentage of original cook time, called a cooking factor, to be added to a cook sequence. To change the cooking factor: 1. Open oven door. 2. Press and hold pad 1 for approximately 5 seconds. 3. Press pad to be reprogrammed. 4. Press the X2 pad. 5. Press a numbered pad to change the cooking factor. • Pad 5 would change the cooking factor to 50%. • Pad 3 would change the cooking factor to 30%. 6. Press START pad to save changes. User Options Didn’t like an option? Changing user options Factory settings are marked in bold. To change the oven back to the factory setting, simply select the option that is marked in bold. Options such as single or double pad programming, beep volume, and maximum cooking time can be changed to suit individual preferences. To change options: My changes weren’t saved. In order for any changes to be saved, the START pad must be pressed after selecting an option. Shutting the oven door or pressing the STOP/RESET pad will not save changes. Numbered Pads 1 End of Cycle Beep 2 Speaker Volume 1. Open oven door. • If door is closed or RESET pad is pressed before programming is complete, changes are discarded and microwave exits programming mode. 2. Press and hold pad 2 for approximately 5 seconds. • This begins options mode. • Microwave will beep and 0P: displays. Microwave is now in programming mode. 3. Press number pad that controls option to be changed. • See table below for options. • Current option will display. 4. Press number pad again to change the option. • Each time pad is pressed, option will change. • Match code displayed with code for desired option. 5. Press START pad to save changes. • To change additional options, repeat steps 3 and 4. • Changes appear after door is closed or STOP/RESET pad is pressed. Display Options (Factory Settings in Bold) OP:10 3 second continuous beep. OP:11 Continuous beep until door is opened. OP:12 5 beeps bursts until door is opened. OP:20 Eliminates beep. OP:21 Sets volume to low. OP:22 Sets volume to medium. OP:23 Sets volume to high. 3 OP:30 Prevents beep when pad is pressed. Key Beep OP:31 Allows beep when pad is pressed. OP:40 15 seconds after oven door is opened, keyboard disabled. 4 Keyboard Enable Window 5 Add Time During Heating OP:41 30 seconds after oven door is opened, keyboard disabled. OP:42 1 minute after oven door is opened, keyboard disabled. OP:43 2 minutes after oven door is opened, keyboard disabled. OP:50 Prevents adding heating time while oven is heating. OP:51 Allows heating time to be changed while oven is heating when a memory pad is pressed. Allows oven to resume heating time countdown after door is opened during cycle. 6 OP:60 Reset Door Open OP:61 Cancels heating time count down after door is opened during cycle. 7 OP:70 Allows 60 minutes of heating time. Maximum Heating Time OP:71 Allows 10 minutes of heating time. 8 OP:80 Allows use of preprogrammed pads only. Manual Operation OP:81 Allows use of manual time entry and preprogrammed pads. 9 OP:90 Allows 10 (0-9) preprogrammed pads. Double Digit Operation OP:91 Allows 100 (00-99) preprogrammed pads. 10 Care and Cleaning Replacing Oven Light 1. Disconnect electrical supply. 2. Remove screw from side of oven. 3. While wearing protective gloves, turn light bulb counterclockwise to remove. 4. Replace light bulb with 230-volt, 25-watt appliance bulb. Do not over-tighten bulb. Over-tightening may make bulb difficult to remove later. 5. Replace light bulb cover before use. 6. Reconnect power supply. ! WARNING To avoid electrical shock which can cause severe personal injury or death, unplug power cord or open circuit breaker to oven before cleaning or removing light bulb. Removing Splatter Shield Splatter shield keeps top of microwave oven cavity and antenna from becoming soiled. Clean soil from shield with damp cloth or clean with mild detergent and water. Splatter shield can be removed for easier cleaning. 1. Unplug oven to stop antenna from rotating. 2. Place fingers behind shield, pull forward, and then down. • DO NOT bend antenna. • If a gap for fingers behind splatter shield does not exist, push up on splatter shield front. Splatter shield may not be installed fully and cannot be removed until splatter shield front is properly installed. 3. Reinstall splatter shield by placing front tabs over lip at top of oven cavity front. Lift back of shield until shield snaps into place. 4. Reconnect power to oven. PART Shield up side down Shield in correctly CARE AND CLEANING RECOMMENDATION Interior, Exterior, and Door Clean microwave oven with mild detergent in warm water using soft sponge or cloth. Wring sponge or cloth to remove excess water before wiping equipment. If desired, boil a cup of water in microwave oven to loosen soil before cleaning. Important: • • • Do not use abrasive cleansers or cleaners containing ammonia or citrus. These could damage finish. Never pour water into microwave oven bottom. Do not use water pressure type cleaning systems. Discharge Air Vents Check monthly for a buildup of cooking vapors along intake and discharge louvers on bottom and back of oven. Clean air vents with damp cloth to ensure proper airflow. Dry thoroughly. Air Intake Filter Filter is located below oven door. Clean air intake filter weekly for proper airflow. Wash filter in hot water and mild detergent. Do not use oven without filter in place. Remove filter to clean. Important: To avoid overheating and oven damage, clean air filter regularly. 1. Grasp filter tab and pull forward. Filter will release from retaining clips. 2. To reinstall, place bottom of filter in clips and push top of filter into position. Control Panel Open oven door to deactivate oven timer. Clean with mild detergent in warm water using soft sponge or cloth. 11 Before Calling for Service ! WARNING To avoid electrical shock which can cause severe personal injury or death, do not remove outer case at any time. Only an authorized servicer should remove outer case. An authorized servicer MUST inspect equipment annually. Record all inspections and repair for future reference. Problem Possible Cause Confirm oven is plugged into dedicated circuit. Oven does not operate. Confirm oven is on grounded and polarized circuit. (Contact electrician to confirm) Check fuse or circuit breaker. Oven operates intermittently. Check air filter and discharge areas for obstructions. If oven does not accept entries when pad is pressed. Make sure oven is on. Open and close oven door. Press pad again. If oven malfunctions or shows F with a number: Oven control is equipped with a self-diagnostic system. Self-diagnostic system alerts you if there is a error or problem. When electronic control signals a problem, follow steps listed below. 1. Record number shown. 2. Unplug oven, wait for 1 minute, and plug in oven. • Oven operates but does not heat food. Part No. 12695301 Printed in U.S.A. 12/01 Disconnecting electrical supply may eliminate service code. If failure continues, contact an authorized Amana servicer. Place one cup of water in oven. Run for one minute at full power (100%). If temperature does not rise, oven is not operating correctly. Contact authorized Amana servicer. For full product documentation visit: ™ www.amanacommercial.com/wavelink 12 2001 Amana Appliances Amana, Iowa 52204