1
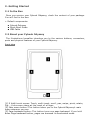
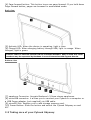
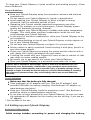
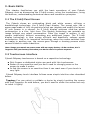
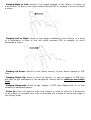
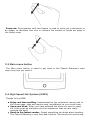
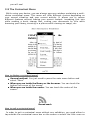
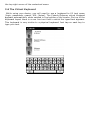
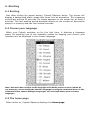
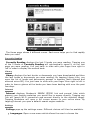
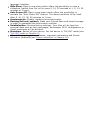
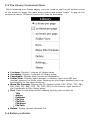
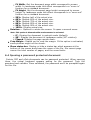
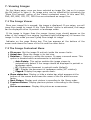
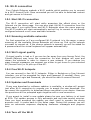
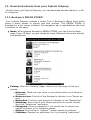
Cybook Odyssey User's Manual
Touch | Wi-Fi | E Ink® Pearl screen
Copyright © 2011 Bookeen. All rights reserved.
Cybook Odyssey
User's Manual
Information in this document is provided “as is” without warranty of any kind
and is subject to change without notice. Reproduction in any manner
whatsoever without the written permission of Bookeen is strictly forbidden. All
brand and product names are trademarks or registered trademarks of their
respective companies.
Version 1
© 2011 Bookeen. All rights reserved
1. Introduction
1.1 Welcome
Congratulations on purchasing a Cybook Odyssey, the electronic book (eBook)
reader based on E Ink® technology. Cybook Odyssey allows you to keep all
your digital books close at hand and read them anywhere in a wide range of
lighting conditions, including direct sunlight. The Cybook Odyssey screen
possesses a paper-like high contrast appearance. It definitively gives you the
experience of reading from paper.
1.2 About this Manual
This manual contains comprehensive information about your Cybook Odyssey
to help you operate the device. Throughout the manual, the following
conventions are used to distinguish elements of text.
Note: Text set off in this manner indicates important information that requires special
attention or helps you make better use of your Cybook Odyssey.
Caution: Text set off in this manner identifies important information that, if not followed,
may result in loss of data or damage to your device.
Any name of menu, command, icon or button that you can see on the screen
is shown in a bold typeset. For example : "Font size…".
1.3 Where to Find Information
Quick Start Guide: The Quick Start Guide is a paper document present in
the box. It explains briefly how to start using your Cybook Odyssey.
Help about your Cybook Odyssey: This “User’s Manual” is present by
default on your Cybook Odyssey. This “User’s Manual” appears in the
Cybook Odyssey's home, inside the Library section. If you want you can
also print the PDF version of this document.
The latest on Cybook Odyssey device: Visit Bookeen web site at
www.bookeen.com and choose the F.A.Q. section.
2. Getting Started
2.1 In the Box
Once you receive your Cybook Odyssey, check the content of your package.
You will find in the box:
> Default components:
Cybook Odyssey
Quick Start Guide
USB Cable
2.2 About your Cybook Odyssey
The illustrations hereafter introduce you to the various buttons, connectors,
ports and physical features of your Cybook Odyssey.
Front view
[1] E Ink® touch screen: Touch, multi-touch, scroll, pan, swipe, pinch, rotate,
flip... Your screen obeys at the touch of a finger.
[2] Main menu button: This button takes you to the Cybook Odyssey's main
menu wherever you are.
[3] Page backward button: This button turns one page backward. If you hold
down Page backward button, pages are browsed in accelerated mode.
[4] Page forward button: This button turns one page forward. If you hold down
Page forward button, pages are browsed in accelerated mode.
Back view
[5] Activaty LED: When the device is operating, light is blue.
[6] Charge LED: When charging battery through USB, light is orange. When
charged, light is green.
Caution: Label on the back indicates Serial and Model Numbers. Keep in mind that serial
numbers may be requested by Bookeen in case of interaction with support Service.
Bottom view
[7] earphone Connector: Accepts Bookeen's 3,5mm stereo earphones.
[8] microUSB connector: it allows you to connect your Cybook to a computer or
a USB Power adapter (not supplied) via USB cable.
[9] microSD Slot: Enables you to add storage memory card.
[10] Power Button: Slide the button and switch the Cybook Odyssey on and
off.
2.3 Taking care of your Cybook Odyssey
To keep your Cybook Odyssey in good condition and working properly, follow
these Guidelines.
General Guidelines
Keep your Cybook Odyssey away from excessive moisture and extreme
temperatures.
Do not expose your Cybook Odyssey to liquids or precipitation.
Avoid exposing your Cybook Odyssey to direct sunlight or strong
ultraviolet light for extended periods of time.
Operating your Cybook outside supported temperature may alter
usability. For example in a cold environment, Cybook Odyssey screen
quality will decrease (ghosting, dimmed).
Do not subject your Cybook Odyssey to sudden and severe temperature
changes. This could cause moisture condensation inside the unit that
could damage your Cybook Odyssey.
In the event of moisture condensation, allow your Cybook Odyssey to dry
out completely.
Do not place anything on top of your Cybook Odyssey or drop objects on
top of your Cybook Odyssey.
Do not drop your Cybook Odyssey or subject it to severe shock.
Screen surface is easily scratched. Avoid touching it with pens, pencils or
any other sharp objects.
Clean your Cybook Odyssey by wiping the screen and the exterior with a
soft, damp cloth lightly moistened only with water.
Touching the screen with your fingers will leave a trace of natural oil that
may alter on screen reading comfort.
Be careful not to get sand or dirt inside your Cybook Odyssey.
Store your Cybook Odyssey in a protective cover when not in use.
Caution: Never attempt to disassemble, repair or make any modifications to your
Cybook Odyssey. Disassembly, modification or any attempt at repair could cause
damage to your Cybook Odyssey and even bodily injury or property damage. Never
attempt to repair or modify the Cybook Odyssey yourself. Disassembling it, including
the removal of external screws, may cause damage that is not covered under the
warranty.
Travel Guidelines
Make sure that the battery is fully charged.
Take preferably an AC adapter with you. Use the AC adapter* with
provided USB cable for battery charging. See Bookeen's AC adapter on
www.bookeen.com/store/
Keep your Cybook Odyssey inside its protective cover*. See Bookeen's
protective covers on www.bookeen.com/store/
If you plan to travel abroad with your Cybook Odyssey, be sure you have
the appropriate AC adapter for the country you are visiting, if you use an
AC adapter.
* Not included in the box
2.4 Setting up your Cybook Odyssey
Performing initial startup
Initial startup includes connecting to power and charging the battery,
switching on and off the Cybook Odyssey.
Connecting to power and charging the battery
The Cybook Odyssey has an internal rechargeable Li-Polymer battery. It
allows a large battery lifetime (around 25,000 continuous pages turned). When
the battery is empty the status LED flashes when starting the device. It can
happen that there is not enough battery to let the LED flash. Before the first
use, you must charge completly the battery.
If you have a USB power adapter, plug it into a wall AC power outlet and
connect the appropriate end of the USB cable to the AC adapter.
If you have no USB power adapter, connect the appropriate end of the
USB cable to your computer USB connector.
Connect the other end of the USB cable to the bottom of your Cybook
Odyssey.
Charging time
3 hours : 85%
5 hours : 100%
While charging the Cybook Odyssey left LED indicator emits an orange light.
When the battery is fully charged, charging stops automatically (the battery
will not overcharge).
Caution: An image can remain on the screen even if the battery is completely
discharged (see below for further instruction).
Switching the Cybook Odyssey on and off
To turn your Cybook Odyssey on and off, use the bottom switch button.
Turn Off: Cybook Odyssey has 2 different Off modes.
1. "Full Off" mode: Cybook Odyssey screen is white with an icon displayed
in the top right corner of the screen. In this mode the power consumption
is very close to zero, your device is completely switched off. To reach this
state, go on the Home Page, then Settings, then Shutdown. Answer yes
to the dialog, the screen will flash until reaching the white page with the
top right corner icon.
2. "Screensaver" mode: Cybook Odyssey screen displays a random image
or your personal image previously loaded (don't forget E Ink® screen can
maintain an image without power consumption). In this mode the power
consumption is very low but not nil. To reach this state, just slide the
button or wait for the device to reach this state after a timeout. This
state is equivalent to sleep or hibernate modes for a computer or a cell
phone.
Turn On
1. Turn On after "Full Off" mode: To turn your Cybook Odyssey on, slide
the power button and hold it for at least 1 second. The screen will display
a background static image that turns into an animation. This sequence
should last around 20 seconds.
2. Turn on after "Screensaver" mode: Slide the power button. The device
will switch on in less than one second and come back to the same
position as you left it.
The left indicator emits a green and orange light at the same time as switching on the
Cybook Odyssey while charging. The LED indicator stops emitting a green light after one
second of inactivity.
Note: When you unbox your Cybook Odyssey, your device should be in "Full Off" mode.
Follow the procedure to switch on your product (e.g. slide the power button and hold it
for at least two seconds).
3. Basic Skills
This chapter familiarizes you with the basic operations of your Cybook
Odyssey such as discovering the E Ink® screen, using the touchscreen, using
the buttons, understanding contextual menu and connection principles.
3.1 The E Ink® Pearl Screen
The Cybook shows an outstanding black and white screen, utilizing a
breakthrough technology: the E Ink® Pearl display. The screen acts like a
paper page made of tiny ink particles which can migrate and modify the layout
of your screen in a second. An E Ink® display achieves ultra-low power
consumption in a thin, light form. This display technology can maintain an
image without any power consumption. Once the image is written, it will
remain indefinitely without consuming any additional power. The E Ink®
display technology is thus energy efficient and drastically reduces power
consumption. Due to its innovative technology, when the screen switches from
an image to another one, the screen goes through a clearing process which
causes a black to white transition.
Note: Image can remain on screen even with an empty battery. So be cautious, don't
forget to refill your battery first when your device doesn't operate anymore.
3.2 Touchscreen interface
Cybook Odyssey touchscreen is based on a capacitive technology:
Only fingers or dedicated stylus can work with this touchscreen.
Screen is very sensitive and you don't need to strongly press on the
screen to make it works.
In fact the screen is so sensitive than it can react even if your touch is
very light.
Cybook Odyssey touch interface follows some simple intuitive rules described
below.
Tapping: You can select or validate a choice by simply touching the screen
with your fingertip. As said before, you don't need to strike the screen but only
to touch it lightly.
Swiping Right to Left: Used to turn pages forward in the library, in a book or
a document, to pan to the right inside zoomed PDF or Images, to scroll forward
a menu.
Swiping Left to Right: Used to turn pages backward in the library, in a book
or a document, to pan to the left inside zoomed PDF or Images, to scroll
backward a menu.
Swiping Up Down: Used to scroll down menus, to pan down images or PDF
files.
Swiping Down Up: Used to scroll up menus, to pan up images or PDF files
but also to get backward in the navigation history and to climb up one folder
level.
Swiping Diagonally: Used to pan images or PDF files diagionally, or to turn
forward or backward pages.
Zoom In: Pinch out gesture with two fingers is used to zoom in a document
or an image, to increase font size or decrease the number of books per page in
the library view.
Zoom out: Pinch gesture with two fingers is used to zoom out a document or
an image, to decrease font size or increase the number of books per page in
the library view.
3.3 Main menu button
The Main menu button is used to get back to the Cybook Odyssey's main
menu any time you need it.
3.4 High Speed Ink System (HSIS)
Thanks to the HSIS:
Enjoy real-time scrolling: Implemented to the contextual menus and to
the home page, tabs and menus react immediately as you touch them.
Open your book: When you have selected the book you want to read,
the cover pops-up and gives you the impression that you are really
opening the book.
Read on the fastest reader: Forget everything you know about readers,
The Cybook Odyssey is very fast and intuitive. Just touch the screen and
you will see!
3.5 The Contextual Menu
While using your device, you can always pop-up a window containing a multichoice contextual menu. This menu will offer different choices depending on
your current situation and your current activity. It allows you to access
different features without leaving your current context: increasing font size
while reading a book, change font, sorting your documents by title while
browsing your library, zooming in a picture while viewing an image, etc.
How to display a contextual menu?
General method: You just need to press the main menu button and
select "Menu"
When you are inside the library or the browser: You can touch the
bottom left corner of the screen.
When you are inside the reader: You can touch the center of the
screen.
Round mark
How to quit a contextual menu?
In order to quit a contextual menu without any validation, you need either to
tap outside the contextual menu box on the screen or select the little cross on
the top right corner of the contextual menu.
3.6 The Virtual Keyboard
While using your device, you will need to use a keyboard to fill text areas
(login, passwords, search, URL, Notes). The Cybook Odyssey virtual Keyboad
appears automatically when needed in the bottom of the screen. On top of the
keyboard layout there is a one line text field in which the typed text appears.
This keyboard is very similar to a physical keyboard. Just tap on each key to
type your text.
4. Starting
4.1 Booting
Just after sliding the power button, Cybook Odyssey boots. The screen will
display a background static image that turns into an animation. This sequence
should last around 20 seconds. An image appears on the screen for at least 2
seconds. This last waiting period depends mainly on the number of documents
present in memory and can last several seconds.
4.2 Choose your language
When your Cybook switches on for the first time, it displays a language
menu. By choosing one of the available entries by tapping your choice, your
interface will be displayed in the chosen language.
Note: This menu has no effect on the language of the books present in your Cybook. At
any moment, you can modify the interface language by using the contextual menu. In the
contextual menu, choose Settings>Languages. You can swipe down/up to see more
languages.
4.3 The home page
After switch on, Cybook Odyssey displays the Home page.
The Home page shows 4 different zones. Each zone helps you to find rapidly
data you need.
Currently Reading
Currently Reading displays the last 5 books you were reading. Tapping one
of the 5 books of Currently Reading will automatically opens it on the last
page you were reading. You just have to slide with your finger from right to
left in order to display the second book.
Library
Library displays the last books or documents you have downloaded and then
the last books or documents you were reading. By tapping Library title, you
open the list of books and documents present in memory (both internal and
external micro-SD). You just have to slide with your finger from right to left in
order to have a glance at the books you have been dealing with over the past
few days.
Internet
Internet displays Bookeen's EBOOK STORE link and several links which
present your favorite websites you would like to access directly. Tapping any
link will launch Wi-Fi connection and connect directly to the selected target.
Tapping Bookstore will open a full screen access to your online store. By
tapping Internet you open a default search engine website.
Settings
Settings pops up the settings menu. Different choices will then be available:
Languages: Open a new menu which allows the user to choose the
language interface.
Slide Show: Open a new menu which offers the possibility to start a
slideshow (switch from file to file every 5, 10, 30 seconds or 1, 5, 10, 30
minutes or 1 hour).
Auto Power Off: Open a new menu which offers the possibility to
activate the "Auto Power Off" feature. The device switches off by itself
after 5, 10, 15, 30, 45 minutes or 1 hour.
Accelerometer: Enable, disable the accelerometer.
Flashing Refresh (optimal): Make your Cybook flash and clean the page
in order to guarantee the best screen contrast
Reinitialization: Restore factory settings. Your files will be kept but
personal data such as last read pages, bookmarks, Wi-Fi configuration or
visual prefrences will be deleted.
Shutdown: Switch off your device. Put the device in "Full Off" mode (see
"Full Off" mode in Chapter 2)
About: Display hardware, software, copyright information and Device
Activation (AdobeID)(see Device activation in Chapter 12).
5. The Library
The Cybook Odyssey can contain a lot of digital items (Books, Documents,
Images). You must first select your digital item from the list present in your
device. This list is displayed in the Library page.
5.1 Browsing your library and selecting an item
To browse your content, you swipe the screen to switch from page to page.
To open a document or a folder, you just need to tap on it once. Some digital
document like heavy PDF or ePub files can take several seconds to open. Some
folders can also take several seconds to open for the first time if they contain
tens of new books. Your view can be arranged by "per 1 column", "per 2
column" or "per thumbnails" books (in portrait mode) which allows you to see
several items per page.
5.2 Managing your folders
Each of these items corresponds to a file in Cybook Odyssey memory (and
microSD card memory while plugged in). These files are arranged in different
folders that you can create or manage through USB connection to your
computer. You have the option to activate or deactivate folder view in the
library menu. When folder view is activated, items don't appear in a flat way
but through folders. All folders appear in first positions when navigating in
Library. tapping on a folder, opens it and displays its content. Leaving a folder
and going one step back in the folder tree can be done either by tapping the
first element, of the first page of your library view or by swiping up your finger
on the screen.
5.3 The Library Contextual Menu
While browsing your library pages, you just need to tap the left bottom corner
of the screen or press the main menu button and select "menu" to pop-up the
contextual menu. Different choices will then be available:
1 column: Display 1 column of library items
2 columns: Display 2 columns of library items
Thumbnails: Display book covers as thumbnails
Folder View: Display items present in memory (both microSD and
internal memory) in folder view. Swiping up your finger enables you to go
back quickly to the upper directory.
Show File Formats: Display the file format (ePub, PDF, HTML, TXT, FB2,
JPG, PNG, GIF, BMP, ICO, TIF, PSD, MP3) in the bottom right corner of
the thumbnails on the library page.
Sort: Open a new menu which enables sorting your content by
Title
Author
Publisher
File Size
File Date
File Name
File Path
Delete: Delete current selected file.
5.4 Battery indicator
Inside the home and inside the library, the battery indicator is present in the
bottom right corner. This 10 levels battery indicator gives an estimation (0%
to 100%) of the current battery status. If the power consumption is very low,
battery discharge normally at low pace rate (approximately 2 months, reading
30 minutes a day).
Note: Battery indicator is not updated in real time. It may not display updated battery
level especially if Cybook remains on Library page for several hours.
6. Reading
On the library page, once you have selected an item, tap it once to open it.
To identify which type (Book, PDF Document, Image) of items are present in
your library, you can activate the "Show File Formats" option of the Library
contextual menu.
6.1 Supported File Formats
An eBook file is considered to be a digital document. It can be a book, a
newspaper, a user's manual, etc. These documents are differentiated by their
file type or file format. Several file formats can be read on your device.
ePub eBook file
PDF eBook file
HTML eBook file
TXT eBook file
FB2 eBook file
6.2 Reading an eBook
Once your eBook file is opened, the first page of your document is displayed.
The first page may be a cover page.
To go through your document, swipe (right to left) or press the right button to
go forward in the document (turn a page forward) or swipe (left to right) or
press the left button to go backward (turn a page backward). When you reach
the beginning of your document you can’t go backward and when you reach the
end of your document you can’t go forward.
If you hold down the page forward button, you will start browsing the
document in an accelerated mode. This feature works also in backward
direction.
Some pages contain hyperlinks which allow you to jump directly to a certain
reference inside the current eBook file. To select the hyperlinks, tap directly
the hyperlink. To leave the hyperlink selection mode, turn a page forward or
backward. In general Hyperlinks are underlined.
After a jump from an hyperlink, you can go back to your original location, by
swiping up.
6.3 The Reading Environment
The page does not show only text or image but also some extra information
(like page number, battery consumption or book title) in reserved areas of the
screen.
While reading you just need to tap the middle of the screen or press the main
menu button to pop-up the Reading contextual menu. Different choices will
then be available depending on the file format of the document you are
reading.
Certain formats don’t propose the same features. For example, you can’t
change the font size of a PDF file; you can just zoom in or zoom out.
The reading environment depends on the format of opened document.
Reading Environment for ePub/FB2/HTML/TXT files (Reflowable content)
Page areas
The header of the page displays the title of your document. For HTML and TXT
document, it's the filename. The Footer of the page displays the current page
on the total number of pages of the document. The header and footer areas
can be hidden or shown via contextual menu
Note: The number of pages is claculated according to an average number of characters
per paper page. Thus the total number of pages is not attached to the number of
screens you will need to display to read the entire book. In general you have several
screens per page. A direct consequence is that the number of pages doesn't vary with
the characters size.
Contextual menu
Table of content: Find the chapter you are looking for in the table of
content.
Go To…: Allow you to jump directly to certain parts of the document. It
opens a second menu.
First Page: Go to first page of the document.
Last Page: Go to last page of the document.
Page…: Open a small numeric keypad on the screen to enter
directly the number of the page (use navigation button to choose
your numbers).
XXXXX: Go to XXXXX entry of the TOC. XXXXX will depend on the
Table Of Contents of your document. All the entries of your TOC will
appear here.
Font Size...: Allow you to change the size of your text font. It opens a
second menu with a choice between 20 diferent sizes.
Font Family...: Allow you to change the font of your text. It opens a
second menu.
Layout…: Allow you to modify the layout of the book. It opens a second
menu.
Publisher Styles: Option to ignore publisher’s original styles
(allows full customization of the publication and also faster
processing of complex editions).
Hyphenation: Select “Hyphenation” and you will hyphenate text for
better typographic white space.
Ligatures: Make ligatures between letters in order to improve the
quality of the text.
Justified Text: Force the text to be justified (aligned both to the
right and left borders).
Emboldened Text: Emboldened the text (make the font bold).
Night Mode: Select “Night Mode” and your text will switch to white
text on black background.
Show Header: Show or hide the title of the book in the header
part of the page.
Show Pageometer/Footer: Show or hide pageometer (current
page vs total number of pages).
In order to annotate or highlight your text you just have to select the word or
the paragraph that you like by moving your finger on it. Use the same
procedure if you want to look up a word in the French dictionnary "Le Nouveau
Littré".
Look up: In order to look up a word in the French dictionnary "Le
Nouveau Littré".
Annotations: Allow you to annotate and personalise the text you are
reading just like a sheet of paper.
Bookmarks: In order to mark an important page of your book.
Add bookmarks: Just select “Add bookmarks” and you will see that
a little flag will appear on the right.
Remove bookmarks: Select “Remove bookmarks” and you will
delete your last bookmark on that page.
Remove all bookmarks: Select “Remove all bookmarks” and you
will delete all the bookmarks you have made on that page.
First: Select “First” and you will immediately go to your first
bookmark in this book.
Last: Select “Remove all bookmarks” and you will delete all the
bookmarks you have made on that page.
Previous: Select “Previous” and you will immediately go to the
previous bookmark you have made in this book.
Next: Select “Next” and you will immediately go to the next
bookmark you have made in this book.
Highlights: In order to highlight an important quote of your page.
Add highlights: After that you just have to pass your finger on the
sentences you want to highlights. You will see that a little pen
appears on the right.
Remove highlights: Select “Remove highlights” and you will delete
your last highlight on that page.
Remove all highlights: Select “Remove all highlights” and you will
delete all the highlights you have made on that page.
First: Select “First” and you will immediately go to your first
highlight in this book.
Last: Select “Last” and you will immediately go to your last
highlight in this book.
Previous: Select “Previous” and you will immediately go to the
previous highlight you have made in this book.
Next: Select “Next” and you will immediately go to the next
highlight you have made in this book.
Notes: In order to enrich your text with your own thoughts and remember
it.
Add note: After that you just have to pass your finger on the
sentences you want to annotate and the digital keyboard appears.
Then you just have to type the text you want to associate with this
quote. You will see that a little document appears on the right.
Edit note: You select the note’s pictogram you want to modify. The
note contextual menu will appear. You are now allowed to select
“Edit note”. The digital keyboard will show up and you can type a
new note.
Remove note: Select “Remove note” and you will delete your last
note on that page.
Remove all notes: Select “Remove all notes” and you will delete all
the notes you have made on that page.
First: Select “First” and you will immediately go to your first note in
this book.
Last: Select “Last” and you will immediately go to your last note in
this book.
Previous: Select “Previous” and you will immediately go to the
previous highlight you have made in this book.
Next: Select “Next” and you will immediately go to the next note
you have made in this book.
Remove all annotations: Select “Remove all annotations” and confirm
your decision by answering “yes” to the question “Do you want to remove
all annotations?” Once you have removed all the annotations, all marks
will disappear on your text.
Add bookmarks: A shortcut in order to add a bookmark in a click.
Remove boomark: A shortcut in order to remove a bookmark in a click.
Tapping directly on the Page Header is a shortcut for Go To…. Tapping
directly on the Page Footer is a shortcut for Go To…>Page….
Reading Environment for PDF files (Non reflowable)
Page areas
The footer of the page is a status bar which displays the title of your
document, your position in the document (current page/total number of pages)
and your level of zoom in %. The footer areas can be hidden or shown via
contextual menu.
Contextual menu
Go To…: Allow you to jump directly to certain parts of the document. It
opens a second menu.
First Page: Go to first page of the document.
Last Page: Go to last page of the document.
Page…: Open a small numeric keypad on the screen to enter
directly the number of the page (use navigation button to choose
your numbers).
Zoom...: Allow you to zoom in and out in the page. It opens a second
menu..
Fit Page: Get the document page fit entirely inside the screen
limits.
Note: in landscape mode this effect corresponds to a "zoom out" function for
a standard document.
Fit Width: Get the document page width correspond to screen
width. In landscape mode this effect corresponds to a "zoom in"
function for a standard document.
Fit Height: Get the document page height correspond to screen
height. In landscape mode this effect corresponds to a "zoom out"
function for a standard document.
50%: Display half of the actual size.
60%: Display 60% of the actual size.
70%: Display 70% of the actual size.
80%: Display 80% of the actual size.
90%: Display 90% of the actual size.
100%: Display actual size.
Rotation...: Options to rotate the screen. It opens a second menu.
Note: This option is dimmed while accelerometer is activated.
0°: Display the document in portrait mode (default).
90°: Display the document in landscape mode (90° rotation).
Flipped: Display the page upside down.
Crop Margin : Enable you to crop the margin. If this option is activated,
some pictures might not be shown.
Show status bar: Display or hide a status bar which appears at the
bottom of the screen and shows the name of the file, the current page
versus the total number of pages, and the zoom factor.
6.4 Opening a password protected document
Certain PDF and ePub documents can be password protected. When opening
them, the virtual keyboard appears asking for the password. Type the
password and validate. Once validated, the password won't be prompted again
for this file.
7. Viewing Images
On the library page, once you have selected an image file, tap on it or press
the OK button to open it. An image entry can be identified by activating the
"Show File Formats" option of the Library contextual menu. In this case JPG,
PNG, GIF, BMP, ICO, TIF, PSD files are considered as image files.
7.1 The Image Viewer
Once your image file is opened, the image is displayed. If you swipe, you will
jump from image to image. If the "Auto Rotate" option is activated, the image
can be displayed either in portrait or landscape mode.
If the image is bigger than the screen (arrow icons should appear on the
sides of the images) use swiping (up/dwon/right/left/diagonal) to browse the
image. In this mode you won’t jump from image to image.
Indicator on the page Status bar: This bar appears at the bottom of the
screen and shows the name of the file and the zoom factor.
7.2 The Image Contextual Menu
Fit screen: Get the image fit entirely inside the screen limits.
Actual size: Show the image in its real size.
Rotation...: Options to rotate the screen. It opens a second menu. This
option is dimmed while accelerometer is activated.
Auto Rotate: This option enables the image viewer to
automatically detect if the image should be displayed in portrait or
landscape mode.
0°: Display the document in portrait mode (default).
90°: Display the document in landscape mode (90° rotation).
Flipped: Display the page upside down.
Show status bar: Display or hide a status bar which appears at the
bottom of the screen and shows the name of the file and the zoom
factor.
Next Picture: Display next picture in according to the library order.
Previous Picture: Display previous picture in according to the library
order.
Set as screensaver: Display this picture as screensaver.
8. Listening music
On the library page, once you have selected an audio file, tap on it to open it.
Only mp3 files are considered as music files.
8.1 Play music
Once your file is open you just have to select "play" to listen to your music
while reading or enjoy audio books. Then just select "stop" in order to stop the
listening.
9. The Accelerometer
Your Cybook Odyssey embeds an accelerometer which enables you to switch
automatically the screen orientation (Portrait, Landscape) only by turning
around the device. The layout will automatically follow(0°, 90°, 180°, 270°).
You can disable the accelerometer via Settings menu.
10. Wi-Fi connection
Your Cybook Odyssey embeds a Wi-Fi module which enables you to connect
to a Wi-Fi Access Point. Once connected you will be able to download content
and get access to Internet.
10.1 Start Wi-Fi connection
The Wi-Fi connection will start while accessing the eBook store or the
Internet via the Home page. You can also start the Wi-Fi connection from the
Home page if you select Menu and Wi-Fi Networks when the menu pops-up.
The Wi-Fi module will start automatically and will try to connect to an already
configured network or will scan available networks.
10.2 Scanning available networks
For first connection or if any configured Wi-Fi network is in the range, a menu
scanning all the available Access Networks will show up. Pick up the network
you want to connect at. If the chosen network is secured, you will be asked for
a password and the virtual keyboard will appear automatically.
10.3 Wi-Fi signal quality
If signal quality is bad or if you are too far away from your Access Point, the
Cybook Odyssey may loose the connection. An alert window will open and
rescan the networks in order to choose a new network. If you observe too
many timeout messages, we suggest you either to get closer to your selected
AP (Access Point) or to pick up a new AP.
10.4 Free Wi-Fi hotspots
You can connect to free Wi-Fi hotspots. Either in Bookstore or Free Internet
interface, you wil be prompted for Login and Password (if needed). Once, you
have type your Login and Password, you should be able to access Internet.
10.5 Updates and Downloads
If any new download or software updates is available, a window will prompt
just after Wi-fi connection to propose you to accept the new download. You
can cancel the possibility to download these new data to your device. However
the questions will be prompted again together with a new connection.
If you accept to install a new update please be sure your battery is at least
at 60%. The update process is fully automatic and can take several minutes.
Once you have accepted the update you don't need to operate the device
anymore until it comes back to the Home page. During this process you will
have an automatic sequence displaying numerous messages and progress
bars.
10.6 Turn off the Wi-Fi
If you want to turn off the Wi-Fi, you have to go to the Home page and select
Menu. When the menu pops-up, you touch Wi-Fi Networks and select Wi-Fi off.
11. Download ebooks from your Cybook Odyssey
Directly from your Cybook Odyssey, you can download ebooks thanks to a WiFi connection.
11.1 Bookeen's EBOOK STORE*
Your Cybook Odyssey embeds a direct link to Bookeen's eBook store which
offers a direct access to paying and free content. This EBOOK STORE is
displayed in a full screen interface. No navigation bar or web address edit field
is present on the page.
News: After opening Bookeen's EBOOK STORE, you can find the News
page. Every 15 days, you get literature news, Bookeen’s favourite ebooks
and bestsellers.
Catalog: With the “Catalog” page, choose your own way to find your
ebooks.
Releases: Check out new titles in your ebook store, by clicking on
“Releases”.
Books we love: Find all of the Bookeen’s choices in our “Books we
love”.
Bestsellers: Find the most popular 10 ebooks in our “Bestsellers”.
Selections: Have look at your ebook selection on current events.
Just click “Selections” and enjoy.
Categories: Choose categories if you would like to search your
ebooks by topics or by literature genres.
Authors: By clicking on “authors”, search ebooks by authors.
Publishers: Browse our publishers list, by choosing “publishers”.
Price range: Our “Price range” will help you classify ebooks by
prices.
Following: Click on following and you will receive all the news and
updates on your authors, categories and favourite publishers.
Account: With your account you can easily modify options of your ebook
store. Moreover, you can follow the list of all ebooks that you have
downloaded.
Basket: In your basket, finalize your order and download your ebooks.
Buy an ebook:
1.Select the ebook you want to buy.
2.Confirm that you want to buy this ebook.
3.Select the format you want to purchase.
4.If you download from Bookeen’s ebook store for the first
time, dial your credit card number in order to be able to buy
on line and select “checkout”.Then when you get back to the
library your new ebook is waiting for you and you can start
reading right away!
11.2 Bookstores
Bookeen chose an "open" model. Not only can you download ebooks with the
Bookeen bookstore, but also you can use other bookstore without any
difficulties. You just have to choose and type your bookstore name in the edit
field with the virtual keyboard.
11.3 Bookstore contextual menu
You just need to tap the left bottom corner of the screen to pop-up the
contextual menu. The contextual menu:
Page refresh: Reload current page
Back: Back to previous page in navigation history
Forward: Go to next page in navigation history
Home: Go back to Home page (quit teh bookstore)
11.4 Typing text
In certain conditions, you may be asked to type text in an edit field (Login,
search area, etc.). Just tap in the edit field and the virtual keyboard (see
Virtual Keyboard) will appear automatically in the bottom part of the screen.
11.5 Quitting bookstore
Open Bookstore contextual menu and tap Home.
11.6 Zoom in/Zoom out
Use the zoom in/zoom out gestures (see touch gestures) to zoom in or out
the page.
11.7 Moving into the page (panning)
If your page is bigger than the screen, you will need to move into the page.
Use the sliding gestures (up, down, right, left, diagonals) to move your
viewing window.
11.8 Downloading files
Once you have selected download option a message box will open with a
download message. Once the message box is closed, your file is fully
downloaded in memory.
IMPORTANT NOTE: All new files are automatically downloaded through wireless in Digital
Editions folder. The new files appear automatically in first position of Library section of
Cybook Odyssey Home page.
*France and Germany are countries concerned by Bookeen's EBOOK STORE
12. Internet access
Your Cybook Odyssey embeds a direct link to free Internet and favorite
websites. The favorite websites are available directly through Home page
under Internet section.
12.1 Internet interface
The Internet interface is very close to Internet browser interface on computer.
You have a navigation bar on the top of the page. This bar is made of an URL
edit field and three shortcut buttons: Back, Forward, favorite and Home. To
enter a new URL, you just need to tap into the Navigation Bar Edit field, the
virtual keyboard will appear automatically. Tapping "Enter" key will validate
the typed URL.
12.2 Internet contextual menu
You just need to tap the left bottom corner of the screen or press the central
button to pop-up the contextual menu. The contextual menu:
Start page: Go back to start page of Internet browser
Open: Type an URL address
Page refresh: Reload current page
Back: Go back to previous page in navigation history
Forward: Go to next page in navigation history
12.3 Typing text
In certain conditions, you may be asked to type text in an edit field (Login,
search area, etc.). Just tap in the edit field and the virtual keyboard (see
Virtual Keyboard) will appear automatically in the bottom part of the screen.
12.4 Add/delete favorites
If you want to add as favorite the page you are browsing on Internet, you
just have to tap the little star on the top of the screen. The Internet menu
pops up and you select "Add favorite". The vitual keyboard shows up and you
can give a special name to this favorite. Once you have confirmed your
changes, the favorite appears in the list. If you want to delete it, you just
have to tap the bin and confirm that you really mean to delete this favorite.
12.5 Quitting Internet
Open Internet contextual menu and tap Home.
12.6 Zoom in/Zoom out
Use the zoom in/zoom out gestures (see touch gestures) to zoom in or out
the page.
12.7 Moving into the page (panning)
If your page is bigger than the screen, you will need to move into the page.
Use either the sliding gestures (up, down, right, left, diagonals) to move your
viewing window or use the arrow keys.
12.8 Downloading file
Once you have selected download option a message box will open with a
download message. Once the message box is closed, your file is fully
downloaded in memory.
IMPORTANT NOTE: All new files are automatically downloaded through wireless in Digital
Editions folder. The new files appear automatically in first position of Library section of
Cybook Odyssey Home page.
13. Authentication/Device activation in order to download
from a Cybook Odyssey
In order to download paid content, you will need to authenticate your Cybook
Odyssey.
The authentication process takes place when you try to reach the EBOOK
STORE. After tapping the EBOOK STORE link on the Home page and getting
connected via Wi-Fi, you will be asked to create an account. This account
creation process will authenticate your device and enable you to buy encrypted
(DRM protected) content. This process will bind your device to a unique ID
called Adobe ID.
13.1 DRM principle
DRM (Digital Right Management) is a software protection which encrypts
downloaded file with a unique identifier (ID). This ID is attached to your
device. To summarize, Files downloaded from your Odyssey can be read only
on your Odyssey and in any other peripheral with the same ID (AdobeID).
13.2 Adobe ID/Adobe DRM
The DRM system used by the Cybook Odyssey EBOOK STORE and also when
you download from you computer has been developed by Adobe (ACS4: Adobe
Content Server 4). The ID used to authenticate your device is thus called
Adobe ID. Adobe ID is in fact an email/password that you provide during
Account creation at Bookeen.
13.3 Account creation
While creating your account, you will have two options.
Option 1: You don't have any Adobe ID. Adobe ID is thus created
automatically based on your email and password given for the Cybook
Odyssey Account Creation.
Option 2: You already have an Adobe ID, thus you will be prompted to
enter it separately from your Odyssey Account information.
Note: Once your account has been created and your device activated, the creation page
won't appear again. In order to authenticate your device with another account, please
contact Bookeen customer service.
13.4 Is my device already activated?
You can see if your device is already activated by tapping Settings>About. If
activated, Adobe ID is displayed in this messagebox.
14. Authentication/Device activation in order to download
from a computer
You can also download ebooks from your computer and put them on your
Cybook Odyssey via the USB cable.
14.1 Install ADE on your computer
First of all, you have to plug your Cybook Odyssey to your computer. In order
to get your Adobe login (Adobe ID), you have to get connected to this
website:
https://www.adobe.com/cfusion/membership/index.cfm?nf=1&nl=1
Then you just have to download and install ADE
14.2 Open Adobe Digital Edition (ADE)
You have to enter your Abobe ID and allow the computer access. This is
necessary in order to use the Cybook with ADE.
14.3 Use ADE
Open the software and connect the Cybook to the computer. During the first
Cybook connection, ADE wants to activate it. If you don't activate your device,
you will not be able to read encrypted (DRM protected) content. The Cybook
icon will appear on the left, this indicates that it has been recognised by ADE.
14.4 Shift ebooks from ADE to your Cybook Odyssey
When you download a book from ADE, it is integrated to the software library.
Open ADE and connect the Cybook Odyssey to your computer.
ADE recognises the device and an icon appears on the left of the libary.
Select the ebook you want to transfer and slip it to the Cybook icon. The
ebook will be automatically store inside the "digital edition" folder in the
Cybook Odyssey.
15. Managing your Cybook
15.1 Managing Power
> Charging the battery
To charge your Cybook connect it via USB to a host computer or to the USB
charger provided by Bookeen.
Whenever possible, keep your Cybook Odyssey connected to AC power. Doing
so keeps the battery charged. When the battery is fully charged, charging
stops automatically (the battery will not overcharge).
> Power saving tips
To maximize battery’s operating time, particularly when you are relying solely
on the battery power for extended time periods:
Switch off the Cybook Odyssey when not in use, even for short periods of
time.
We strongly recommend activating the "Auto Power Off" option which
preserves very efficiently your battery.
15.2 Managing Memory
Additional storage memory
Use a microSD card to increase storage memory or to transfer large files
between the Cybook Odyssey and other devices. MicroSD HC (High Capacity)
cards are supported.
15.3 Performing a Reset
Occasionally, you may need to reset your Cybook Odyssey. Resetting your
Cybook Odyssey is similar to restarting your desktop computer. It stops all
running applications, stops the operating system but does not erase any data.
Reset using ON/OFF button
Slide for 2 seconds the ON/OFF button until your Cybook Odyssey's screen
starts to flash. Slide the ON/OFF button again and the Cybook Odyssey will
restart.
16. Technical Specifications
Size: 6.5" x 4.7" x 0.4" (166 x 120 x 9 mm)
Weight: 6.87 oz , i.e. 195 g (battery included)
Screen:
6" E Ink® Pearl screen
Daylight readable
Resolution: 600 x 800 pixels (167 dpi)
16 grey levels
Multi-touch capacitive touchscreen (finger or adapted stylus only)
Storage Memory: 2 GB
(accessible capacity may vary, some space is reserved for the system)
Processor: Cortex A8 TI OMAP3611 800MHz
Communication Ports:
USB Client (v2.0) - Micro USB connector,
microSD card slot
Wi-Fi b/g/n
Battery:
Rechargeable built-in Li-Polymer battery (1650 mAh)
Peripherals: USB synchronization cable
Operating System: Linux embedded version
Software Suite:
BooReader - Bookeen multi-format eBook reader
Adobe® Reader® Ver 9.2 (or more)
Supported text based file formats: ePub, PDF, HTML, TXT, FB2
Supported image formats: JPG, GIF, PNG, BMP, ICO, TIF, PSD
Supported music formats: MP3
17. Additional information
17.1 Accessories
Please contact your dealer or visit the www.bookeen.com web site for the
availability of accessories for your Cybook Odyssey.
The use of unadapted accessories will void your warranty. For detailed
information on using the accessories, see the instructions supplied with the
accessories.
Contacting Bookeen www.bookeen.com
Adobe and Reader are trademarks of Adobe Systems Inc.