1
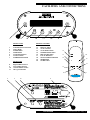
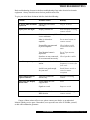
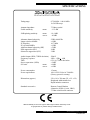
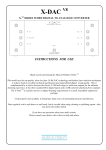
INTRODUCTION
FM TUNER with Remote Control and RDS
INSTRUCTIONS FOR USE
Thank you for purchasing the Musical Fidelity
X-PLORA FM tuner with remote control and RDS.
Used properly and carefully, it should give you many
years of outstanding musical reproduction.
The X-PLORA is fitted with the latest Radio Data
System (RDS) circuitry allowing station names to be
displayed. This function only works if the tuned station
supports RDS. Special noise reduction techniques are used
to achieve both an excellent technical specification and
unparalleled sound quality.
Aesthetically, the X-PLORA is a perfect match for the
X-RAY CD player, X-A1 or X-A100R integrated
amplifiers or the X-P100/X-AS100 Pre/Power amplifier
combination. Together these components form one of the
finest hi-fi systems available.
Dust regularly with a soft duster or soft brush but be
careful when using cleaning or polishing agents - they may
harm the surface finish.
If you have any questions about anything in your
audio system, please consult your dealer who is there to
help and advise you.
X-PLORA
Instructions
Instructions For
For Use.
Use. Page
Page 11
SAFETY INFORMATION
IMPORTANT!
This unit is supplied in the UK with a mains lead fitted with a moulded 13 amp plug. If, for any
reason, you need to cut off this plug, please observe the following safety precautions.
Please dispose of the cut off plug safely. It must not be plugged into a mains power supply.
The wires in the mains lead supplied with this appliance are coloured in accordance with the
following code:
Green and yellow..............Earth
Blue...............................Neutral
Brown................................Live
WARNING - This appliance must be earthed
As the colours of the wires of the mains lead of this appliance may not correspond with the
coloured markings identifying the terminals in your plug, proceed as follows:
• The wire which is coloured green-and-yellow must be connected to the terminal in the plug
which is marked with the letter E or coloured green or green-and-yellow, or by the earth symbol
.
• The wire which is coloured brown must be connected to the terminal which is marked with the
letter L or coloured red.
• The wire which is coloured blue must be connected to the terminal which is marked with the
letter N or coloured black.
• If connecting to a BS1363 plug, a 10 amp fuse must be used.
WARNING - Radio Frequency Interference (RFI)
This Hi-Fi product has been tested to ensure that its operation will not be adversely affected
by normal background levels of R.F.I. (Radio Frequency Interference). It is possible that if
the unit is subjected to abnormally high levels of R.F.I. the unit may not perform as specified.
In the unlikely event of this happening, please contact Musical Fidelity's service department.
The unit has also been tested to ensure that it does not radiate excessive levels of RFI that
could affect other pieces of electronic or electrical equipment.
The electronics in modern hi-fi equipment is complex and hence may be damaged by lightning. It is possible that during electrical storms the operation of some equipment may be
adversely affected. For complete protection of your hi-fi system during such storms, mains
plugs should be removed and aerial leads disconnected.
Do not remove any covers, the X-PLORA will not be covered under warranty if it has been
tampered with. There are no user adjustments within. Please refer all service work to an
authorised Musical Fidelity agent.
Always ensure that when disconnecting and reconnecting your hi-fi equipment the mains
supply is switched off.
X-PLORA
Instructions For Use. Page 2
SAFETY INFORMATION
To comply with North American regulations this equipment has been tested and found to
comply with the limits for a Class B digital device, pursuant to part 15 of the FCC rules.
These limits are designed to provide reasonable protection against harmful interference in a
residential installation.
WARNING - ANY MODIFICATIONS OR CHANGES TO THIS UNIT
NOT EXPRESSLY APPROVED BY MUSICAL FIDELITY WHO ARE
THE PARTY RESPONSIBLE FOR COMPLIANCE COULD VOID THE
USER'S AUTHORITY TO OPERATE THIS EQUIPMENT
This equipment generates, uses and can radiate radio frequency energy and, if not installed
and used in accordance with the instructions, may cause harmful interference to radio
communications. As it cannot be guaranteed that interference will not occur in a particular
installation the user is encouraged to try to correct any interference experienced, to radio or
TV broadcasts, by one or more of the following measures:-
•
Identify the source of interference, turn off each unit in turn, check whether the
interference disappears.
•
Re-orientate or relocate the receiving aerial.
•
Increase the separation between the affected units.
•
Connect the units into mains outlets on different circuits.
•
Consult a dealer or experienced TV/radio technician for help.
X-PLORA
Instructions For Use. Page 3
FACILITIES AND CONNECTIONS
1
1
2
3
4
5
6
7
2
3
5
6
FRONT PANEL
REMOTE CONTROL
POWER mains on/off switch
Tuner display
STORE button
MODE button
TUNE DOWN button
TUNE UP button
STEREO/MONO button
12
13
14
15
16
17
18
19
20
REAR PANEL
8
9
10
11
4
7
DISPLAY button
TUNE UP button
TUNE DOWN button
STEREO/MONO button
RDS ON/OFF button
LOCAL/DX button
SIGNAL STRENGTH button
MODE button
STORE button
12
20
13
14
19
18
Right AUDIO OUTPUT
Left AUDIO OUTPUT
75 ohm AERIAL Socket
IEC type mains inlet
15
16
8
9
10
17
11
X-PLORA
Instructions For Use. Page 4
GENERAL ADVICE
INSTALLATION PRECAUTIONS
Your new X-PLORA is designed and built to provide trouble-free performance but it is
sensible to observe a few precautions. Please ensure that you have complied with them
before you connect any AC power to your system. Retain this guide for future reference.
þ Heed all warnings on
the back of the unit.
ý
Do not use near water.
ý Do not place the
X-PLORA near direct heat
sources such as radiators or
other equipment that produces heat.
þ Only connect the unit
to a power supply of the
type marked on the back of
the unit.
þ Position the power
supply lead and signal interconnect leads where
they are not likely to be
walked on or trapped by
items placed on them.
ý Do not remove any
covers or try to gain access
to the inside. The warranty
will be invalid if the unit has
been tampered with. There
are no user adjustments
within. Refer all service work
to an authorised Musical
Fidelity agent.
The remote control enables you to activate the main functions of the tuner from the comfort of
your armchair. Several of the functions described in this manual are only available on the
remote handset. Identical inscriptions on the remote control and tuner denote identical functions. The following should be noted when operating the tuner using the remote control.
- Point the remote control (transmitter) towards the display on the tuner.
- Visual contact must exist between the transmitter and receiver.
- If the range of the remote control decreases dramatically, replace the batteries
with new ones.
Before Switching on the Stereo System
Please read carefully the instructions on the following pages. The functional arrangement of
the controls makes the stereo system fairly easy to operate. You should nevertheless study
these instructions carefully.
Important! Unauthorised opening of the equipment will invalidate any warranty
claims.
Note: To help your dealer identify your tuner if after-sales service is required, please quote the
serial number printed on the rear panel of the unit.
X-PLORA
Instructions For Use. Page 5
INSTALLATION
INTRODUCTION
INSTALLATION
Congratulations on your purchase of an
X-PLORA FM tuner with RDS function
and remote control.
Place your tuner on a stable, horizontal surface where there is no risk of it falling over.
Avoid placing your tuner next to radiators or
in direct sunlight.
The X-PLORA tuner has been designed to deliver no compromise FM
performance. To that end great attention has been paid to the internal
layout to ensure that each significant
discreet circuit section is in a different physical plane to any other which
it might effect.
Protect your tuner from humidity. Avoid placing it under a window. Do not place any containers filled with water on the unit e.g. flower
vases or potted plants. If water does enter
the tuner, immediately pull out the mains plug
from the wall socket and inform your dealer,
who should then check the set before you use
it again.
Additionally the X-PLORA has been
designed to deliver excellent performance on a wide range of signals.
At Musical Fidelity we understand
that most audiophiles do not have
perfect FM signals and have designed
the X-PLORA with this in mind.
The distortion is very low. This is
achieved with minimal feedback.
- Liquid entering the tuner could cause
dangerous short-circuits which, in the
worst case, could cause a fire.
If you move your tuner from a cold place to a
warm place, leave it switched off for a few
hours before using it again. Condensation
could form inside the unit and must be allowed
to evaporate.
CLEANING
Before cleaning the tuner always switch off
the main switch and remove the mains plug
from the wall outlet. Clean the housing and
the remote control unit using a moist cloth.
We do not advise that you use any solvents,
white spirits, thinners, etc. as they could
damage the surface finish of the unit.
The X-PLORA’s output impedance is
low but more importantly its high
frequency spuriae are extremely low
with the direct result that the
X-PLORA will not upset any amplifier to which its connected.
The resultant performance achieved
by the X-PLORA is one of the best in
the world. It has fabulous noise ratios, low distortion, wide bandwidth,
huge dynamic range and extraordinary
resolution of fine detail.
AUDIO CONNECTION
The tuner should be connected to an amplifier (Tuner or Aux input) by an interconnect
cable with RCA/phono type connectors. This
is connected to the Left and Right AUDIO
OUTPUT sockets on the rear panel of the
unit.
X-PLORA
Instructions For Use. Page 6
BASIC OPERATION
BEFORE YOU SWITCH ON
AERIAL CONSIDERATIONS
Follow this routine before you listen
for the first time, and each time you
change any connections.
Before you will be able to extract the
maximum performance from any tuner,
it will be necessary to install a good
aerial system. This does not inevitably
mean an expensive aerial, as the type
needed by most households in order to
receive the stations within a given
service area can be quite simple.
However, do not expect to receive a
good signal with minimum background
noise if you are only using a T-shaped
ribbon. We suggest that you contact a
local approved contractor, who should
be familiar with the reception
conditions in your area.
1 Check all the connections to the XPLORA and your audio system.
2 Then check again.
3 Turn the volume control of your amplifier
to zero (Fully anticlockwise).
4 Select “tuner” input via your amplifier. ( if
you do not have a dedicated tuner input,
any auxiliary line level input will be OK)
5 Now you can switch on the power, tune
your X-PLORA tuner to the required
broadcast and carefully advance the volume control of your amplifier to the level
you desire.
6 Enjoy the music.
OPERATION
POWER BUTTON
Press this button to turn the power ON. Press
again to turn the power OFF.
Note: Whenever the power is turned ON,
the station you were listening to last will be
received automatically, while the frequency of
the station or the station name (if RDS selected) appears in the display.
All the previous settings, i.e.. stored stations,
LOCAL/DX, STEREO/MONO will all be
retained in memory while the unit is turned
off.
X-PLORA
Instructions For Use. Page 7
SPECIAL FEATURES
STORE BUTTON
To enter a station in the preset memory please
proceed as follows:1 Tune to the station required.
2 Press STORE button once. The memory
indicator on the display will flash, and the
next free memory location will be displayed. Press the STORE button again
to accept this location. If a different location is required use the TUNE up and
down keys to select the desired memory
location and then press STORE button
again.
3 There are 20 available memory locations.
If when you press the STORE button, the
MEMORY legend (on the display) flashes
and two parallel lines appear instead of a
number, all 20 locations are full. You can
still store your required frequency but only
by over-writing an existing location.
3 seconds and then revert to normal.
To change the method, press the MODE button twice. Each time the MODE button is
pressed twice the method will change to the
next one of the three i.e. MANUAL,
SEARCH or PRESET.
MANUAL MODE
In this mode the “TUNE UP ” and
“TUNE DOWN ” buttons are used to
increase or decrease the tuned frequency
as required to manually tune the XPLORA.
SEARCH MODE
In this mode the press either the “TUNE
UP ” or “TUNE DOWN ” button momentarily and the X-PLORA will search,
automatically, and stop at the next station
it finds. To repeat this searching process
simply by press the “TUNE UP ” or
“TUNE DOWN ” button again and XPLORA will carry on searching to the next
station.
4 To overwrite an existing location, press the
STORE button, the MEMORY legend
(on the display) flashes and two parallel
lines appear instead of a number, use the
TUNE up and down keys to select the
location you want to overwite with the new
station and then press STORE button
again.
Please Note: The stations the X-PLORA
stops at will be dependant on the setting of
the LOCAL/DX facility. (Please refer to
page 10)
PRESET MODE
MODE BUTTON
The MODE button is used to select one of
the three methods, MANUAL, SEARCH, or
PRESET, of selecting stations. Press the
MODE button once and the display will indicate the current method selected. The display will show this method for approximately
X-PLORA
In this mode the “TUNE UP ” and
“TUNE DOWN ” buttons are used to
select one of twenty preset memory locations.
For details of how to preset these memory
locations please see "STORE BUTTON"
section.
Instructions For Use. Page 8
SPECIAL FEATURES
MONO/STEREO BUTTON
RDS ON/OFF BUTTON
When receiving a stereo station the STEREO
indicator in the right side of the display will
light, denoting stereo operation. If mono
operation is required, then press this button
once. The indicator will turn off, your XPLORA is now in MONO mode. To return
to STEREO mode, press the button once
more. The indicator in the display will turn
on, your X-PLORA is now in STEREO
mode.
Radio Data System (RDS) is a system that
allows the radio station name to be displayed
on the display. The tuned radio station must
support this system for the name to be displayed. RDS display is activated by the RDS
ON/OFF button.
Note: Mono operation should be selected
in areas of weak signal strength to reduce
background noise.
Press this button once and the tuner display
will show RDS status, either RDS ON or RDS
OFF. After a few seconds the display will
revert back to its previous state. If RDS was
ON, it will display the tuned station's name.
(As long as that station supports RDS) If RDS
was OFF, the display will revert back to the
tuned frequency. Press the button twice to
change RDS status.
LOCAL/DX BUTTON
REMOTE CONTROL
FUNCTIONS
Any buttons on the remote control labelled
the same as a button on the front panel
operates in exactly the same way. See below
for additional functions that are controlled just
from the remote control.
DISPLAY BUTTON
Pushing the button once switches the display
off. Pushing the button a second time brings
the display back on, but dimmed. A third
press returns the display to full brightness.
When in display off mode, pressing any button will cause the display to return for 2-3
seconds to confirm the new settings, before
again switching off.
Set the tuner to LOCAL before tuning if you
only want to search stations with strong signal strengths. When the tuner is set to
LOCAL, the search facility will ignore stations with weaker signals. To search for stations with weaker signals ensure the tuner is
set to DX.
Press the LOCAL/DX BUTTON once and
the tuner display will indicate which mode is
set, either LOCAL or DX. After a few seconds the display will revert back to its previous state. Pressing the button again while
LOCAL or DX is displayed will toggle between the two modes of operation.
SIGNAL STRENGTH BUTTON
Press this button once and the tuner display
will indicate the signal strength being received
from the aerial. Please note, the indicated
signal strength will depend on the setting of
LOCAL/DX.
X-PLORA
Instructions For Use. Page 9
TROUBLESHOOTING
Basic troubleshooting of a tuner is similar to troubleshooting of any other electrical or electronic
equipment. Always check the most obvious possible causes first.
To give you a few ideas of what to look for, check the following:
Problem
Probable Cause
Remedy
No power when POWER
is pressed
Mains plug not inserted
correctly.
Plug in securely.
Display does not light
Display switched off.
Switch display on using
remote control.
No sound
Volume control on amplifier
is set to minimum.
Turn up the volume.
Mute is selected on
amplifier.
Press mute button on
remote control.
Preamplifier not connected
to power amplifier.
Check phono cable
connection between
units.
Tape Monitor button is
depressed.
Press Tape monitor
button.
Speakers are not connected, Check speaker cables.
or are connected incorrectly.
Sound is very noisy
Tuner is not tuned to local
station.
Ensure that tuned
frequency is correct for
your area.
Aerial is not good enough
for your area.
Install better aerial or
switch to mono
reception.
Tuner will not stop on
required stations
Tuner set to find local
stations only.
Switch to DX using
remote.
Tuner does not display
station name
Tuned station does not
support RDS.
None.
Signal too weak.
Improve aerial.
Tuner not switched to
RDS function.
Switch to RDS using
remote control.
If none of these actions effect a cure, please contact your dealer, or an authorised
Musical Fidelity service agent. Remember, never open the case of the X-PLORA yourself,
as this will invalidate the guarantee.
X-PLORA
Instructions For Use. Page 10
SPECIFICATIONS
FM TUNER with Remote Control and RDS
Tuning range
87.50 MHz - 108.00 MHz
In 50 KHz steps
Antenna impedance
Usable sensitivity
-mono
75 Ohm, coaxial
-13.5 dBf
-mono
-stereo
-19.9 dBf
-42 dBf
50dB quieting sensitivity
Alternate channel selectivity
Image rejection 98MHz
IF frequency
IF rejection 98MHz
Adjacent channel selectivity (IHF)
Pilot suppression (IEC)
Subcarrier suppression (IEC)
55dB ±400 KHz
>92dB
10.7 MHz
>95dB
>52dB
30dB
32dB
Audio Output (1KHz, 75KHz deviation)
Frequency response
THD
Stereo separation (1KHz)
S/N ratio
-mono
-stereo
500mV
30Hz - 15Hz + 1dB
0.5% @ 75 KHz deviation
>38dB
>68dB
>65dB
Power consumption
Power requirements
15 watts
100/115/230 Volts AC 50/60Hz
(Factory preset for country)
Dimensions (approx.)
230 x 110 x 320 mm (W x H x D)
Height and width include feet
Depth includes connectors
Standard accessories
Remote Control Handset
4 batteries (SUM-4, AAA, LR03)
75 Ohm coaxial aerial connector
Musical Fidelity reserves the right to make improvements which may result
in specification or feature changes without notice.
X-PLORA
Instructions For Use. Page 11
X-PLORA 99-1