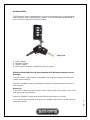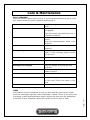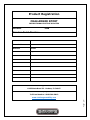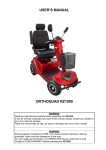
1
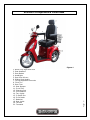
USER’S MANUAL CHALLENGER SPORT RECREATIONAL ELECTRIC SCOOTER MODEL: J55 Please read this manual completely before riding your scooter www.challengermobility.com - Page 1 - Table of Contents I. Introduction II. Safety Notices III. Scooter Components Overview 7 IV. Handlebar Display 8 V. Operation VI. Batteries & Charger 16-17 VII. Care & Maintenance 18-19 4-6 9-15 20 IX. Technical Specifications 21-22 X. Limited Warranty 23-24 XI. Product Registration 25 - Page 2 - VIII. Basic Troubleshooting 3 Introduction Thank you for investing in a Challenger Sport recreational scooter. This scooter is the latest innovation in electric mobility providing absolute safety; for both its rider and the environment. This scooter features a sleek design while maintaining safety standards that are required of any mobility product. Its internal components have been designed to provide optimal performance while maintaining high-efficiency. The Challenger Sport also includes multiple features that increase overall functionality, yet simple to manage. These include: lights, turn signals, and alarm system, horn, and easily accessible charging port and much more. In order to get the most of your Challenger Sport, please read and follow all instructions, warnings, and notes in this owner’s manual and all other accompanying literature before using it for the first time. Improper use of the scooter could result in harm, or traffic accidents. The manufacturer disclaims all responsibilities for any personal injury or property damage which may occur as a result of improper or unsafe use of this product. This owner’s manual includes operation instructions for every aspect of the scooter including assembly, safety instructions, as well as instructions for how to deal with possible accidents. If there is any information in this manual which you do not understand, or if you require additional assistance for setup or operation, please contact your authorized dealer. By accepting delivery of this product, you promise that you will not change, alter, or modify this product or remove or render inoperable or unsafe any guards, shields, or other safety features of this product; fail, refuse, or neglect to install any retrofit kits from time to time provided by Challenger Mobility to enhance or preserve the safe use of this product. Please keep this owner’s manual in a proper place or on the scooter. If other people use the scooter, please be sure to provide this copy. - Page 3 - NOTICE: This owner’s manual is compiled from the latest specifications and product information available at the time of publication. We reserve the right to make changes as they become necessary. As designs change, some illustrations and pictures in the manual may not correspond to the scooter that you purchased. Any changes to our products may cause slight variations between the illustrations and explanations in this manual and the product you have purchased. The latest/current version of this manual is available on this website: www.ChallengerMobility.com Safety Notices Read the Owner’s Manual Do not operate your Challenger Sport Scooter for the first time without completely reading and understanding this owner’s manual. The user should be familiar with the operation of this scooter, and keep the safety notices in mind. The same traffic rules for pedestrians apply to the use of this scooter. This product does not conform to Federal Motor Vehicle Standards and is not intended for operation on public streets, roads or highways. For your safety, please follow the rules that apply to pedestrians. 1. Ride on sidewalks or pedestrian areas only. 2. At the end of a sidewalk, be aware of the cars on the road. 3. Be extremely cautious when driving your scooter around heavy traffic streets or shopping malls. 4. Always obey pedestrian traffic signals. Practice operating your scooter Until you are familiar with the operation of your scooter, please practice in a wide and open area, like a park. To prevent the possibility of falling off your scooter while driving, bear in mind the scooters driving motion, such as whether it is accelerating, stopping, turning, reversing, or going up or down inclines. 1. Please set the speed dial to the lowest speed initially. 2. Be sure someone is accompanying you and watches for traffic while you are driving on the road for the first time. 3. Be sure you are able to control and operate your scooter safely and confidently before changing to a higher speed. Passenger Limitation Do not carry any passengers on your scooter (including children). Do not use this scooter to carry or transport goods. Stay within the specified weight capacity of your scooter. Exceeding the weight capacity voids your warranty. Pre-Ride Safety Check Please carry out daily inspections. Refer to Section “Care & Maintenance” for inspection procedures. Always make sure your scooter’s batteries are fully charged before operating. Make sure the throttle lever is secure before turning on your scooter and check for proper tire inflation. Wear approved Gear While wearing a helmet is not required, it is still advised for safety precaution. Always wear shoes when riding your scooter. - Do not stretch your body out on the scooter Such action may cause you to lose your balance or be injured. Also, pay attention to loose clothing that could get tangled in the wheels. Page 4 - Do not use a mobile phone or other wireless communication device while driving. Also, do not charge a mobile phone or other electrical devices from your scooter. Do not use your scooter under any of these circumstances: The road is muddy or has loose gravel The road is bumpy, narrow, or snow covered The road is beside a canal or waterway without fencing or hedges Do not drive your scooter after consuming alcohol or when fatigued Do not drive your scooter at night or in inclement weather Additionally, avoid holes in the road where your wheels may get stuck. Do not make sudden turns. Do not ride on an escalator or in elevators. Be careful driving on or near ramps and inclines Be careful while driving up a steep incline. In order to avoid damage or injury to the scooter the driver should not lean against or pull on the operating lever while going up or down an incline. When climbing up an incline, please drive slowly. You can set the speed dial to a higher speed. When going down an incline, never reverse your scooter. Set the speed dial to the lowest speed setting. Do not drive through any holes in the road. Do not pass through water covering the road unless the water is less than 1 in. deep. Please drive slowly on roads with drops or dips. Do not make sudden turns while drive on gravel roads or ramps. Maximum Weight Limitation Refer to “Maximum Weight Capacity” in the “SPECIFICATIONS” section for details. Overloading your scooter will lead to damage to, or malfunction of, your scooter. This could cause the scooter to become a safety hazard. The warranty does not cover damage from overloading. Do not set the scooter in freewheel mode when driving on an incline or decline. Always keep your feet on the scooter platform when moving. Never carry or wear anything which obstructs your vision, or your complete control of the scooter. Never ride your scooter while under the influence of alcohol or other drugs. Persons without excellent vision, balance, coordination, reflex, muscle and bone strength and good decision-making capabilities should not use this product. Avoid riding in bad weather, when visibility is obscured, at dusk or in the dark, or when you are very tired. Each of these conditions increases the risk of accident. Always maintain a comfortable stopping distance from all other riders, vehicles and objects. Minors without adult supervision should not use this product. Persons unwilling or unable to take responsibility for their own actions should not use this product. - Page 5 - WARNINGS: EMI Warning This scooters may be susceptible to electromagnetic interference (EMI), which is a kind of interfering electromagnetic energy (EM) emitted from sources such as radio stations, TV stations, amateur radio (HAM) transmitters, two-way radio, and cellular phones. The interference (from radio wave sources) can cause the scooter to release its brakes, move by itself, or move in unintended directions. It can also permanently damage the scooter’s control system. The sources of radiated EMI can be broadly classified into three types: 1. Hand-held portable transceivers (transmitters-receivers) with the antenna mounted directly on the transmitting unit. Examples include: citizens band (CB) radios, “walkie-talkie”, security, fire and police transceivers, cellular telephones, and other personal communication devices. NOTE! Some cellular telephones and similar devices transmit signals while they are ON, even when not being used. 2. Medium-range mobile transceivers, such as those used in police cars, fire trucks, ambulances, and taxis. These usually have the antenna mounted on the outside of the vehicle. 3. Long-range transmitters and transceivers, such as commercial broadcast transmitters (radio and TV broadcast antenna towers) and amateur (HAM) radios. NOTE! Other types of hand-held devices, such as cordless phones, laptop computers, AM/FM radios, TV sets, CD players, and cassette players, and small appliances, such as electric shavers and hair dryers, so far as we know, are not likely to cause problems to the scooter. Scooter Electromagnetic Interference (EMI) Because EM energy rapidly becomes more intense as one moves closer to the transmitting antenna (source), the EM fields from hand-held radio sources (transceivers) are of special concern. It is possible to unintentionally bring high levels of EM energy very close to the scooter’s control system while using these devices. This can affect scooter movement and braking. Therefore, the warnings listed below are recommended to prevent possible interference with the control system of the scooter. - NOTE! There is no easy way to evaluate the overall immunity of the scooter. Report all incidents of unintended movement or braking to Challenger Mobility, and note whether there are sources of EMI nearby. Page 6 - WARNINGS: 1. Do not operate hand-held transceivers (transmitters-receivers), such as citizens band (CB) radios, or turn ON personal communication devices, such as cellular phones, while the scooter is turned ON. 2. Be aware of nearby transmitters, such as radio or TV stations, and try to avoid coming close to them. 3. If unintended movement or brake release occurs, turn the scooter OFF as soon as it is safe. 4. Be aware that adding accessories or components, or modifying the scooter may make it more susceptible to EMI. Scooter Components Overview - 1. Black Vinyl High Back Seat 2. Seat Headrest 3. Rear Basket 4. Headlights 5. Rear View Mirrors 6. Sliding Seat Handle 7. Flip-Up Adjustable Armrests 8. Front Tire 9. Rear Tires 10. Rear Bumper 11. Front Tiller 12. Charging Port 13. Foot Platform 14. Turn Lights 15. 3-Spoke Rim 16. Front Brake 17. Batteries 18. Rear Lights 19. Throttle 20. Transaxle Page 7 - Figure 1 Handlebar Display Figure 2 - Page 8 - 1. Power Mode (Low/High) Switch 2. Speed Control Knob (Turtle/Rabbit) 3. Forward Gear Switch 4. Reverse Gear Switch 5. Turn “off” the Lights 6. Turn “on” the Speed Meter Light and Rear Lights 7. Turn “on” the Headlight, Speed Meter Light and Rear Lights 8. Headlight High Beam Position 9. Headlight Low Beam Position 10. Right Turn Signal 11. Left Turn Signal 12. Horn 13. Handle Brake Lever Lock 14. Throttle 15. Battery gauge Indicator 16. Power Indicator 17. Headlight Indicator 18. Right Signal Indicator 19. Left Signal Indicator 20. Speedometer Operation HOW TO OPERATE YOUR SCOOTER When you receive the scooter, please try to turn on the power switch first POWER SWITCH Turn the key switch to power ON or OFF. Figure 3 Scooter power switch: 1. 2. 3. 4. turn “on” the power turn “off” the power Locks the steering mechanism Key with spare CIRCUIT BREAKER - Figure 4 Page 9 - If the battery gauge indicator does not light up; using the ignition key, unlock the seat from the back, locate the circuit breaker and switch it from “off” to “on”. MOVING AND STOPPING The driving speed of the scooter is set via the speed control knob located on the control panel. When the knob is turned to a position, the scooter will drive only at the speed indicated by the knob. The scooter will travel faster the farther the knob is turned clockwise. The Power Mode switch increases the maximum speed of the scooter from 9 to 15 mph. Press the Button once for Low speed; Press the button twice for High Speed mode. Figure 5 1. Throttle 2. Speed Control Knob (Turtle/Rabbit) 3. Power Mode (Low/High) Switch Riding Your Scooter - Page 10 - 1. Make sure the seat is installed properly. 2. Turn the key switch to “ON”. 3. Check battery gauge to see whether there is enough power for your trips. If you have doubts about the remaining power, please charge the batteries before departure. 4. Set to the proper speed by the speed dial. 5. Set the Speed Mode on Low 6. Turn gently the throttle lever to move 7. Make sure the electromagnetic brake is working properly by releasing the throttle. WARNINGS: Do not turn the power switch to OFF while driving, as this will lead to a sudden, potentially dangerous stop Do not set to the highest speed while driving indoors. Do not adjust the speed dial while driving, the sudden change in speed may endanger you and cause your scooter to malfunction. Do not place magnetic devices near the area of the operation handle; this could affect the safe operation of your scooter. Be careful while driving in heavy traffic or in crowded areas. While reversing the scooter, be aware of people or objects behind you. CLIMBING RAMPS The stability of your scooter is governed by several factors such as the seating position, the angle of the slope and your height and weight. When approaching an incline, do so directly and not at an angle and where ever possible avoid making turns. When going down a ramp or slope keep the speed settings on slow. This will ensure there is a safe controlled descent. When the hand throttle is released the scooter will slowly stop. STOPPING THE SCOOTER ELECTROMAGNETIC BRAKE Release the throttle while going forwards or backwards, and the electromagnetic brake in the motor will be activated, stopping the scooter naturally. EMERGENCY BRAKE This scooter is equipped with a manual front brake. It can be engaged in extreme situations, by squeezing the handbrake lever located at the left side of your tiller to further reduce the stopping distance. It can be used as an additional parking brake. BRAKING WARNING: The stopping distance will vary with your forward/reverse speed. Please begin braking as early as possible. TURN SIGNAL LIGHT SWITCH The turn signal front and rear lights will flash when you press the left or right hand turn signal switch. HORN BUTTON The warning horn will be activated when you push the button, release the button and the horn will stop. - Page 11 - REMOVING THE KEYS Turn the key switch to [OFF]. Then pull out the key (only after stopping). SLIDING CAPTAIN SEAT The scooter seat will slide forward or backward with a gentle push, by pulling the handle under the front right hand side of the seat. It will lock in place once you push the handle back. Be sure the seat is locked before driving. The seat back is reclining to different positions. It can folded down completely, with a simple release of the right side lever. The armrests are removable and fully adjustable. Figure 6 1. 2. 3. 4. 5. Reclining seat lever Sliding seat handle Sliding seat base Armrest tightening knob Flip up removable armrest 1. Anti-tip wheels 2. Rear Bumper 3. Rear Pneumatic Tires - Figure 7 Page 12 - ANTI-TIP WHEELS The anti-tip wheels are located at the rear of the scooter frame. The scooter should not be used unless the anti-tipping wheels are in place. BATTERY GAUGE When the power switch is turned on, the battery gauge indicator needle will move up from “L” to “H” to indicate the power remaining in the batteries. The “H” green area indicates a full charge from the batteries. The “L” orange and red area indicates it is time to recharge. The remaining power indicated by the battery gauge will vary based on the actual driving time and how you drive. Repeated starting, stopping or climbing will consume the power more quickly. - Page 13 - Suggestions: 1. It is recommended that you charge the batteries immediately when the battery gauge is in the red area. 2. After charging or replacing new batteries, drive the scooter for 2-3 minutes to make sure the batteries capacity is enough. 3. In the wintertime, the batteries may respond more slowly and the distance you can travel may also be shortened. 4. When driving on an incline, the battery gauge light might move from green to red, this is a normal phenomenon, please do not worry. 5. Even if the batteries are used properly, it is natural that the batteries capability will decay as time passes. This results in a shortening of travel distance compared to brand new batteries. Therefore, when you find the travel distance is about only 50% of brand new batteries traveling distance, it is time for replacement of batteries. Please go to your dealer and ask for new batteries. If you continue to use the old batteries when its capacity has decreased, it could lead to a decrease in travel distance. 6. Travel distance will be shortened when driving frequently on an incline or slope, as this leads to a larger consumption of the power. ACCESSING THE REAR COMPARTMENT In order to access the rear compartment area, move first the scooter seat forward. Then using the ignition key open the rear compartment lock and flip the seat up. You can turn there the circuit breaker “on” or “off”, or you can replace the batteries. Figure 8 1. 2. 3. 4. 5. 6. 7. 8. Rear compartment lock Circuit breaker Seat base Alarm Scooter serial number plate Rear basket bracket Armrest knob Seat lock bracket - Page 14 - Figure 9 1. Circuit breaker 2. First Battery 3. Second Battery FREEWHEEL MODE The drive freewheel lever (yellow lever) is located at the rear section of the scooter; and can be reached through the right rear tire. This lever allows you to disengage the drive mechanism (neutral) and push the scooter while in freewheel mode. To disengage the drive mechanism (neutral), push the lever up (Figure 10). To reengage the drive mechanism, push the lever down (Figure 11). Figure 10 Figure 11 1. Freewheel Mode: Lift the lever up completely to move the scooter manually 2. Drive Mode: Push lever down completely to drive the scooter by motor power WARNINGS - Page 15 - 1. The scooter will not operate while the freewheel lever is in the neutral position. The scooter must be turned off, lever pushed downward and then turned on in order to reset the circuits. 2. The electromagnetic brake will not function in the freewheel mode. 3. When going down an incline, NEVER set to the freewheel mode. 4. Always re-engage the freewheel lever after use. Failure to do so may result in injury. ALARM SYSTEM The Challenger Sport is equipped with a sensor that can detect any slight vibration and movement, and it automatically produces a 110 decibel warning sound that is sure to catch the attention of anyone nearby. Figure 12 1. 2. 3. 4. “LOCK” button “UNLOCK” button “ALARM” button Power ignition and rear compartment key plus spare Vibration Activated Security Alarm System with Wireless Remote Control Settings: Click the "LOCK" control button, the speaker will send out a sound, and then your scooter enters security. Press the "UNLOCK" button, the speaker will send out a double sound, and then it quits security. Alarm Lift: in the state of alarming Just click the “LOCK” control button for a second, then it will stop alarm and enter security. - If you can't find your scooter, just press the "ALARM" button then you will hear the continuous sound. Page 16 - Press the "UNLOCK" button with double sound, then the alarm is lifted. Batteries and Charger CHARGING THE BATTERIES Be sure to follow the procedures below accordingly. 1. Turn the scooter key switch to “OFF”. 2. Open the charging socket cap on the scooter’s cover then connect the charger’s plug to the charging socket. 3. Plug the power cable into your power outlet. 4. Turn on the switch to the charger. 5. The charger’s red light will be on at the beginning of a charge. The charging duration is at least 6-8 hours, but can last up to 10 hours, based on the status of the batteries and temperature. 6. The charger light will turn to green when the charging is complete. 7. Turn off the charger, disconnect the cord and remove the plug from the charge socket. - Figure 14 Page 17 - Figure 13 Suggestions: 1. Do not disconnect the charger cord if the charging is not complete. The battery life will be shortened if the batteries are repeatedly used without being fully charged. Therefore, be sure to charge the batteries fully every time. 2. Continue to charge until the green light is on. NEVER stop charging before it is complete. 3. While finishing charging, the electric power will still slowly discharge if the cord is not disconnected. 4. Your scooter should be charged at least every two weeks to keep the batteries at full status, even when not being used. 5. Charging time will be affected by the ambient temperature so it takes longer in the wintertime. WARNINGS Please follow the rules below to avoid accidents while charging. 1. Please use the Challenger Sport scooter’s charger only and charge the batteries completely every time. The batteries might be damaged if you use a charger which is not compatible. 2. Never disassemble or modify the charger. 3. Charge in a well-ventilated space. 4. Do not charge in a space that is directly exposed to sunlight. Do not charge in a space where it is humid or subject to rainfall or morning dew. 5. Do not cover the scooter with any waterproof cloth or other objects while charging. 6. Do not charge in temperatures lower than 14○F or higher than 122○F, the charger may not work properly and the battery may be damaged. 7. Do not open the battery seal cap at any time. CLEANING THE BATTERIES - Suggestions: 1. Make sure the terminals are installed properly and the cover back on. 2. Do not use the batteries to charge any other equipment. 3. Battery capability will vary with outside conditions; the driving distances will be shorter in the winter. If the scooter is not used for a long time, please charge the battery at least once every two weeks. 4. Please replace both batteries at the same time. Do not replace only one battery or use a different brand battery for your scooter. Page 18 - If a battery is contaminated by dirty water, battery acid, dust or other garbage, the battery will discharge quickly. Therefore, please follow the following steps to clean the battery. 1. Turn the scooter power switch to OFF. 2. Open the scooter rear compartment under the seat. 3. Use a clean cloth to wipe off the soiled area. 4. Take out the battery. 5. Clean the battery with a clean cloth. If the terminal is covered by white powder, please clean it by using warm water. Care & Maintenance DAILY CHECKING Check the following items before driving. If you find anything abnormal, go to or call your scooter dealer for further inspection before using it. Speed Dial Throttle Lever Motor Freewheel Mode Lever Battery Gauge Can it be adjusted freely and function well? Does the scooter move when the lever is engaged? Does the scooter stop when the lever is released completely? Is there any abnormal noise from the motor? Does the electromagnetic brake work properly? Does the free wheel mode lever work properly? Does the light come on when switched “ON”? Is the remaining power enough for your trip? Horn Button Does the horn work? Turn signals Does the turn signals work? Headlight and Taillight Does the taillight and headlight work properly? Is the seat on properly? Can the seat slides smoothly? Are they tight? Seat Rearview Mirrors Tires Other Are there any cracks or other damage to the tires? Check the tread on the tires. Is there any abnormal noise? - Page 19 - TIRES The condition of the tires depends on how you drive and use your scooter. Please check the tread depth regularly. When tread depth is below 0.5mm, it can easily lead to slippage, making braking distance longer. Replace the tires when the tread depth is less than 0.5mm. Regularly inspect your scooter’s tires for signs of wear. MAINTENANCE 1. You must maintain the scooter frequently if you drive on grass, sand, or gravel roads. 2. Do not use water, oil or other chemical solutions to clean your scooter. Be sure NOT to spray the scooter with water to prevent damaging the electronic components and printed circuit board. 3. Please take the scooter to authorized dealers for repairs and adjustments. Improper adjustments could lead to accidents and scooter malfunction. 4. Please use soft and dry clothes to keep your scooter tidy. Please use moderate or mild detergent to clean the scooter. WARNINGS When conducting maintenance of your scooter, please turn the key switch “OFF” and remove the charger cord. Do not splash water directly onto your scooter, as this could lead to a malfunction of the electric system. Do not use gasoline, solvents or vaporizing solution, as the shroud may be deformed or damaged. Do not use wax. LUBRICATION At six-month intervals, you should lubricate the following parts with a light oil or similar lubricant: • Seat pivot post • Seat release lever pinion • Wheel bearings • Axle of scooter Caution Do not use WD40 to lubricate parts. Do not lubricate transaxle/gear box. In the event of any difficulties, please consult your provider. STORAGE When storing your scooter: • Make sure the seat is set in the “Forward” position • Make sure the key switch is turned to “OFF” - Page 20 - Suggestion: Please store the scooter in a location where it is out of direct sunlight, rain, or dew. When storing for long periods of time, please charge the batteries fully and then disconnect the batteries at the terminals. Basic Troubleshooting CIRCUIT BREAKER Your scooter is fitted with the latest in electronic controls that are programmed to protect the electrical system from abnormal overloads. Fitted for extra protection is a circuit breaker, should there be a situation that your scooter stops for no apparent reason please check that the circuit breaker has not popped out. The circuit breaker can be found under the rear chassis cover accessible through a port hole under the seat. Using the ignition key, open the rear storage compartment located under the seat. Locate the circuit breaker and switch it from “OFF” to “ON”. CHECK LIST If your scooter fails to operate, please check the following: Unit is switched on. All plugs and connectors are firmly fixed. Battery level shows full charge. The charger is not connected to an outlet or the charge socket Freewheeling device is in the drive position. If the free wheel device has been operated with the scooter left switched on, then the scooter will not operate until the ignition key has been switched off and then on again. Please consult your authorized dealer if your scooter does not run after checking - Page 21 - these points. Technical Specifications Model Name Challenger Sport Model Number J55 Maximum Weight Capacity 330 LBS. Maximum Speed * 15 MPH Maximum Range/Charge * 30 Miles Turning Radius 58” Max Recommended Climbing Angle 10º Ground Clearance of Mid Frame 4.5” Overall Length 60” Overall Width 26” Height with Seat folded 42” Seat-to-Ground Height Range 27”-28.5” Seat-to-Deck Height Range 19.5” Wheelbase for Auto lifts 23” wide, 52” long Tire Type Pneumatic 16” front & 16” rear (Kenda) Tire Size 16 x 2.50 (64-305) front & rear Rim Type Tri Spoke Aluminum Max PSI Min 35 / Max 40 Seat Type Captain High Back with Headrest, Semi-reclining Back Seat Size Seat Color 18” Width 20” Depth 30” Height Black Vinyl Seat Mechanism Slides forwards and backwards 13” Battery Type Sealed Lead Acid Battery Power (Two Required) Group 22NF 12V x 55AH Battery charger 24 Volt 5 Amp, off-board Charging time 6 - 8 hours Motor 950W Sealed Transaxle - Leg room Page 22 - Fully foldable Seat back to the front 1.28 Horsepower Drive System Rear Wheel Drive Brakes Electromagnetic with emergency drum brake Reverse Yes Freewheel Mode Yes Suspension Front & Rear Lights Hi/Low Beam Headlight, Brake lights, Independent Right & Left turn signals Total weight (with batteries) 243 lbs. Gross Shipping Weight 278 lbs. Controller Curtis 120A Package size 60.6" X 28.7" X 43.7" Standard Body Colors Red, Blue, Silver Basket Type & Weight Capacity Wire Rear Seat Mounted & 20 lbs. Warranty 3-Year limited on frame 1-Year on transaxle 1-Year limited on electronics 6-Months limited on batteries *Disclaimer: - Page 23 - 1. The information contained herein is correct at the time of publication; we reserve the right to alter specifications without prior notice. 2. Speed & range vary with user weight, terrain type, battery charge, battery condition and tire pressure. 3. The above data was calculated using a standard weight of 150 lbs. on a flat smooth surface. 4. Due to manufacturing tolerances and continued product improvement, this specification is subject to a variance of +/- 3% Limited Warranty THREE-YEAR LIMITED WARRANTY Three (3) years from the date of purchase on all structural frame components; including platform, seat post, and frame. ONE-YEAR LIMITED WARRANTY One (1) year from the date of purchase, if any part or electronic component of the Scooter is found upon examination to be defective in material and or workmanship, it will be repaired or replaced, at Challenger Mobility option, without charge. LABOR AND SERVICE CALL CHARGES ARE NOT INCLUDED The purchaser is responsible for the delivery to the authorized repair facility. Satisfactory proof of purchase and the date of purchase are always required. For warranty service, please contact the dealer/company from whom you purchased your scooter. SHIPPING - DOMESTIC: All warranty items will be shipped via FedEx Ground. Requested expedited shipping will be at the expense of the purchaser. SHIPPING - INTERNATIONAL: Parts will be provided under warranty at no charge, but shipping to any offshore and/or international location will be the responsibility of the purchaser. International and offshore end-users must contact the dealer/distributor directly to initiate the warranty process. ONE-YEAR WARRANTY EXCEPTIONS: MOTOR: In cases where there is an increase in the operational noise level, the warranty does not apply. (An increase in operational noise level usually occurs due to abusive and excessive strain on the scooter). - SERVICE: Warranty service can be performed by an authorized service facility. Do not return faulty parts without prior consent. A request for a Return Authorization is required prior to returning items. All transportation costs and shipping damage incurred while submitting units and/or parts for repair or replacement are the responsibility of the original purchaser. Page 24 - The batteries are warranted for 6 months after the purchase of the Unit. WARRANTY EXCLUSIONS: This warranty is only given to the original purchaser of the Scooter. This Warranty excludes: Consumable items which may need replacing due to normal wear and tear (tires, tubes, belts, bulbs, upholstery and seating, throttle, brakes, motor brushes, fuses, plastic shrouds and footrest covers, etc.) Damaged caused by: battery fluid spillage or leakage, abuse, misuse, accident, or negligence, improper operation, excessive loading, maintenance, or storage, commercial use or use other than normal. Used other than for the purpose of the purchaser’s mobility. Repairs and/or modifications made to any part of the scooter without specific and prior consent from Top Mobility. Labor, service calls, shipping, and other charges incurred for repair of the product not approved by Challenger Mobility. Batteries: Batteries carry a limited warranty which is subject to a stringent wear and tear clause. Any battery faults due to a defect in the original manufacture will normally become obvious within the first two months of use. Any gradual deterioration in performance after this period is normally associated with fair wear and tear, misuse or accidental damage and as such is not covered by the manufacturer’s warranty. There is no other express warranty. Implied warranties, including those of merchantability and fitness for a particular purpose, are limited to one (1) year from the date of the original purchase and to the extent permitted by law. Any and all implied warranties are excluded. This is the exclusive remedy. Liabilities for consequential damages under any and all warranties are excluded. Some states do not allow limitations on how long an implied warranty lasts or do not allow the exclusion of limitation of incidental or consequential damages. So, the - Page 25 - above limitation or exclusion may not apply to you. Product Registration CHALLENGER SPORT RECREATIONAL ELECTRIC SCOOTER J55 MODEL Scooter Serial Number Date Purchased Owner’s Name Address Street: City: State: ZIP: Phone: E-mail Address: Dealer’s Name Dealer’s Phone Comments Mailing address 8135 State Road 52 - Hudson, FL 34667 Fax Number (727) 597-8454 Toll Free Number 1-888-364-3813 - Page 26 - www.challengermobility.com - Page 27 -