1
SAMSUNG
ELECTRONICS
AMERICA,
SERVICEDIVISION
400 Valley Road, Suite 201
Mount Arlington, NJ 07856
1-800-SAMSUNG (1-800-726-7864)
www.samsunc .com
INC.
Instruction Manual
Safety Warnings
LASSE 1 LASER PRODUKT
LUOKAN
1 LASER LAITE
KLASS 1 LASER APPARAT
CLASS 1 LASER PRODUCT
I
PRODUCTO
LASER CLASE 1
Precautions
Note to CATV system installer :
This reminder is provided to call the CATV system
installer's attention to Section 820~40 of the NEC
which provides guidelines for proper grounding
and,
in particular, specifies that the cable ground shall be
[ connected to the grounding system of the building,
as close to the point of cable entry as practical
Ensure that the AC power supply in your house complies with the identification
sticker located on the back of your player
Install your
player horizontally, on a suitable base (furniture), with enough space around it for ventilation (3~4inches)
Make sure the ventilation
slots are not covered Do not stack anything on top of the player Do not place the player on amplifiers or other equipment which may
CLASS 1 LASER PRODUCT
become hot
Before moving the player, ensure the Disc Insert Hole is empty This player is designed for continuous
the Home Theater to the stand-by mode does not disconnect
the electrical supply. In order to disconnect
power supply, remove the main plug from the wall outlet, especially
CAUTION:
TO REDUCE THE RISK OF ELECTRIC
SHOCK, DO NOT REMOVE REAR COVER.
NO USER SERVICEABLE PARTS INSIDE.
REFER SERVICING TO QUALIFIED
SERVICE PERSONNEL.
use Switching
the player completely
off
from the
when left unused for a long period of time
This Compact Disc player is classified as a CLASS !
LASER product.
Use of controls, adjustments or performance of
procedures other than those specified herein may result
in hazardous radiation exposure.
CAUTION-INVISIBLE LASER RADIATION WHEN OPEN
AND INTERLOCKS DEFEATED, AVOID
EXPOSURE TO BEAM.
During thunderstorms,
walI outlet
disconnect
AC main plug from the
Voltage peaks due to lightning could damage the unit
Do not expose the unit to direct sunlight or other heat
Sources
This could lead to overheating
and malfunction
of the unit.
This symbol indicates that dangerous voltage which can cause electric shock is present inside
this unit.
/
This symbol alerts you to important operating and maintenance instructions accompanying
the unit.
WARNING: To reduce the risk of fire or electric shock, do not expose this appliance to rain or moisture
CAUTION: TO PREVENT ELECTRIC SHOCK, MATCH WIDE BLADE OF PLUG TO WIDE SLOT, FULLY
INSERT.
Protectthe playerfrommolsture(Le,
vases), andexcessheat
(e.g.tlreplace)
or equipmentcreatingstrongmagneticor electricfields
(Le.speakers...).
Disconnect
the powercablefromthe ACsupplyif the
playermalfunctions.
YourplayerIsnot intendedfor Industrialuse.
Useof thisproductis for personaluseonly.
Condensation
mayoccurIt yourplayeror dischasbeenstoredin cold
temperatures.
It transporting
the playerduringthe winter,waltapproximately
2 hours
untilthe unithasreachedroomtemperature
beforeusing.
The batteries used with this product contain chemicals
that are harmful to the environment
Do not dispose of batteries in the general household
trash
SafetyInstructions
READ
INSTRUCTIONS
CLEANING
Al! the safety and operating instructions
read before the appliance is operated.
RETAIN
should be
before cleaning. Do not use liquid cleaners
or aerosol cleaners. Use a damp cloth for cleaning.
INSTRUCTIONS
The safety and operating instructions
retained for future reference.
should
be
LIGHTNING
For added protection
HEED WARNINGS
Al! warnfngs on the appliance and in the operating
instructions should be adhered to.
FOLLOW INSTRUCTIONS
Al! operating and use instructions should be
fo_!owed.
WATER AND MOISTURE
Do not use this video product near waterfor example, near a bathtub, wash bowl,
kitchen sink, or laundry tub, in a wet basement,
or near a swimming pool, and the like.
OVERLOADING
Do not overload wall outlets and extension
this can result in the risk of fire
or electric shock.
POWER LINES
An outside antenna system should not be located in
the vicinity of overhead power lines or other electric
light or power circuits,
or where it can fair into such power tines
or circuits. When installing an outside antenna system, extreme care should be taken to keep from
touching such power lines or circuits as contact witt_
them might be fatal.
Unplug this video product from the wall out)et
cords as
of this video product
receiver during a lightning storm, or when
it is left unattended and unused for long
periods of time, unptug it from the wal_ outlet
POLARIZATION
This video product is equipped with a polarized
alternating current line plug (a plug having one
blade wider than the other.) This plug wil! tit into the
power outlet only one way.
This is a safety feature. If you are unable
to insert the plug fully into the outlet, try reversing the
ptug. if the plug should still fail to fit, contact your
electrician to replace your obsolete outlet. Do not
defeat the safety purpose of the polarized plug.
and disconnect the antenna or cable system.
This will prevent damage to the video product
due to lightning and power-line surges
OBJECT
AND LIQUID
ENTRY
Never push objects of any kind into this
product through openJngs as they may touch
dangerous voltage points or short-out parts
that could result in a fire or electric shock.
Never spil! liquid of any kind on the video
product.
OUTDOOR ANTENNA
• If an outside antenna
ACCESSORIES
VENTILATION
Slots and openings in the cabinet are provided
for ventilation and to ensure reliable operation of the
video product and to protect it from overheating
these openings must not be blocked or covered.
The openings should never be blocked
by pJaeing the video product on a bed, sofa, rug, or
other similar surface. This video product
should never be placed near or over a radiator or
heat register.
This video product should not be placed
in a built-in installation such as a bookcase
or rack unless proper ventilation is provided
or the manufacturer's
instructions have been followed.
POWER
CORD
PROTECTION
Power-supply cords should be routed so that
they are not likely to be walked on or pinched
by items placed upon or against them paying
particular attention to cords at plugs,
convenience
receptacles, and the point where
they exit from the appliance
antenna
Do not place this video product on an unstable
stand, tripod, bracket, or table.
The video product may fal!, causing serious
a child or adult, and serious damage
to the appliance.
Use only with a cart, stand, tripod, bracket,
cart,
injury to
terminal,
Electrical Code, ANSl/NFPA No. 70-1984,
provides information with respect to proper
of the appliance should foI{ow the manufacturer's
instructions and should use a mounting accessory
recommended
by the manufacturer
conductors,
CART
An appliance and cart combination should be moved
with care. Quick stops, excessive force, and uneven
surfaces may cause the appliance and cart
combination to overturn.
SOURCES
only from the
type of power source indicated
on the marking label. If you are not sure
of the type of supply to your home, consult your
apptiance dealer or local power company.
For video products intended to be operated
tery power, or other sources, refer
to the operating instructions.
system
charges.
• In the U.S.A section 810 of the National
grounding
This video product should be operated
be sure the antenna
is grounded so as to provide some protection
against voltage surges and built-up static
or table recommended
by the manufacturer,
or sold with the video product. Any mounting
POWER
GROUNDING
is connected to the
from bat-
of the mast and supporting
structure, grounding o1 the lead-in wire
to an antenna discharge unit, size of grounding
location of antenna
discharge
unit,
connection to grounding electrodes, and
requirements for the grounding electrode.
See the figure below
ATTACHMENTS
Do not use attachments
not recommended
by the video product manufacturer
cause hazards.
as they may
SERVICING
• Do not attempt to service this product yourself
as opening or removing covers may expose
you to dangerous
REPLACEMENT
PARTS
When replacement pars are required, be sure the
service technician has used replacement parts specified by the manufacturer or having the same characteristics as the original part. Unauthorized
substitutions may result in fire, electric shock or other hazards.
....I
LEAS_,W'R
E
GROUND
CL_MP
_//"
:
ANTENNA
ANTENNA
DISCHARGE UNIT
_._
tNEC SECTION. 810-20}
(NECSECT!ON 8!Q_21)
GROUND CLAMPS
GROUNDINGCONSUCTORS
R SERViCS GROUNDING
ELECTRODE
_NEC
ART
SYSTEM
_.,5_,
PART
_)
SAFETY CHECK
Upon completion of any service or repairs
to this video product, ask the service technician to
perform safety checks to determine that the video
product is in proper operating condition.
DAMAGE
REQUIRING
SERVICE
Unplug this video product from the wall outlet and
refer servicing to qualified service personnel under
the following conditions.
a. When the power-supply cord or plug is damaged.
b If liquid has been spilled, or objects have
fallen into the video product.
c. If the video product has been exposed to rain
or water
d. If the video product does not operate normally
by following the operating instructions.
Adjust only those controls that are covered
by the operating instructions as an improper
adjustment of other controls may result
in damage and wil! often require extensive
work by a qualified technician to restore
the video product to its normal operation.
e If the video product has been dropped
or the cabinet has been damaged.
f When the video product exhibits a distinct
change in performance
- this indicates
a need for service.
vottage or other hazards.
• Refer all servicing to qualified service personnel.
HEAT
This video unit should be situated away from heat
sources such as radiators, stoves, or other products
(including amplifiers) that produce heat.
Features
Con
C Multi-Disc Playback & FM Tuner
The HT-QIO0 combines the convenience of multi-disc playback capability, including
DVD-AUDIO, DVD-VIDEO, CD, MP3-CD, WMA-CD, DivX, CD-RIRW, and DVD-PJRW,
O PREPARATION
.........43
..................45
with a sophisticated FM tuner, all in a single player.
.........................
iii DVD-Audio compatible
48
.........................49
Noteson Discs...:...:
Experience the super high-quality audio performance of DVD-Audio_
The on-board 24-bit/192kHz DAC enables this player to deliver exceptional sound quality in
Descdptign.il
47
.,..i:.. i.
terms of dynamic range, low-level resolution and high-frequency detail.
OTV Screen Saver
...............
The HT-QIO0 automatically
after 3 minutes in the stop
The HT-QIO0
after 20 minutes
.............................................
55
57
mote Control ...................
.61
Storing Discs
63
64
Products .............................
The HT-QIO0
@Customized
65
66
TV
The HT-QIO0 allows you
and set it as your
age during JPEG
@HDMI
...... 36
36
HDMI transmits DVD video and audio signals simultaneously,
ture.
Group /
Selecting Audio/Subtitle
L.angu_gel
i
ii ............
38
Playing Media Files using the USB HOST feature ............. 39
(_AV 8YNC Function
Videomaylag behindthe audioif the unit is connectedto a digitalTV.
Tocompensateforthis, you can adjustthe audiodelaytime to syncupwith the video.
Moving Directly to a Scene/Song .......................................
41
Using Disc Menu ................................................................
42
Using the Title Menu ...........................................................
42
Notes on Discs
DVD (Digital Versatile Disc) offers fantasticaudio andvideo, thanksto DolbyDigitalsur_==_==_Ao,:>,o_v,_)_o
round soundand MPEG-2video compressiontechnology.Now you can enjoy these realistic
effects inthe home,as if you were ina movietheateror concerthall.
C:[_This product does not support
Secure (DRM) Media files.
CD-R Discs
~_
VD players and the discs are coded by region. These regional codes must match in order
for the disc to play. If the codes do not match, the disc will not play•
• Some CD-R discs may not be playable depending on the disc recording device (CD-Recorder or PC) and the condition of the disc.
The Region Number for this player is given on the rear panel of the player•
(YourDVDpIayerwillonIyplayDVDsthatare labeledwithidenticalregioncodes)
• Use a 650MB/74 minute CD-R disc.
Do not use CD-R disc over 790MB/80 minute as it may not be play back.
• Some CD-RW (Rewritable) media may not be playable.
• Only CD-Rs that are properly "closed" can be fully played, tf the session is closed but the disc is left open, you may
not be able to fully play the disc.
Disc Type
DVD
Mark (Logo)
L_
AUDIO,VID
Recorded
Signals
Disc
Size
Audio + Video
3 1/2"
O
AUDIO-CD
Audio
DivX
MPEG4
MP3
Max. PlayingTime
Approx 240 rain (single-sided)
Approx.480 rnin (double-sided)
Approx.80 rain (single-sided)
Approx.160 min (double-sided)
74 min
CD-R
MP3 Discs
• Only CD-R discs with MP3 files in tSO 9660 or Joliet format can be played.
• MP3 file names should be 8 characters or less in length and contain no blank spaces or special characters (. / = +).
• Use discs recorded with a compression/decompression data rate greater than 128Kbps.
• Only flies with the ".rap3" and ".MP3" extensions can be played.
3 1/2"
20 min
• Only a consecutively written Multisession disc can be played, tf there is a blank segment in the Multisession disc,
the disc can be played onIy up to the blank segment.
5 _
74 rnin.
• If the disc is not closed, it will take longer to begin playback and not all of the recorded files may be played.
3 1/2"
20 min.
• For files encoded in Variable Bit Rate (VBR) format, i.e. flies encoded in both low bit rate and high bit rate
(e.g., 32Kbps _ 320Kbpsk the sound may skip during playback.
• A maximum of 500 tracks can be played per CD
• A maximum of 300 folders can be played per CD.
CD-R
JPEG
Discs
• Only flies with the ".jpeg" and ".JPEG" extensions can be played.
• LD, OD-G, CD-I, OD-ROM and DVD-ROM discs cannot be played on this player.
If such discs are played, a "WRONG DISC FORMAT" message appears on the TV screen.
• DVD discs purchased abroad may not play on this player.
If such discs are played, a "WRONG REGION CODE" message appears on the TV screen.
• If the disc is not closed, it will take longer to start playing and not all of the recorded files may be played.
• Only CD-R discs with JPEG files in ISO 9660 or Joliet format can be played.
• JPEG file names should be 8 characters or less in length and contain no blank spaces or special characters (. / = +).
• Only a consecutively written multisession disc can be played, tf there is a blank segment in the multisession disc,
the disc can be played only up to the blank segment.
• A maximum of 9,999 images can be stored on a single CD
• When playing a Kodak/Fuji Picture CD, only the JPEG files in the picture folder can be played.
• Picture discs other than Kodak/Fuji Picture CDs may take longer to start playing or may not play at all.
• Many DVD discs are encoded with copy protection. Because of this, you should only connect
your DVD player directly to your TV, not to a VCR. Connecting
to a VCR results in a distorted
picture from copy-protected
DVD discs.
• This product incorporates copyright protection technology that is protected by methods claims of certain
U.S. patents and other intellectual property rights owned by Macrovision Corporation and other rights
owners• Use of this copyright protection technology must be authorized by Macrovision Corporation_ and
is intended for home and other limited viewing uses only unless otherwise authorized by Macrovision
Corporation• Reverse engineering or disassembly is prohibited•
CD-R/RW DivX Discs
• Since this product only provides encoding formats authorized by DivX Networks, Inc., a DivX file created by the
user might not be played.
• Software update for unsupported formats is not supported.
(Example: QPEL, GMC resolution higher than 720 x 480 pixels etc.)
• Sections with high frame rate might not be played while playing a DivX file.
• For more information about the formats authorized by DivX Networks, Inc., visit "www.divxnetworks.net".
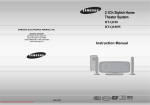
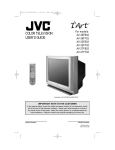
Description
--Front Panel-Eject button
Disc Insert Hole
Power (_/I)
Display
button
ConnecttheTV'svideoinputjacks
Function button
Volume control
button
(VIDEOIN)totheVIDEOOUTconnector.
External Dig tal Optical
Input Connector
Usethis toconnectexternalequipment
capableof digitaloutput,_
fj
/ J
I
_
% I
/
I
I
/
_
/
'_il
!1
!
_
_
/
I
/
/
_'_II I
_ _/I I
_I_USB
'_'Jll I
(_
if:
..
I{/ liJ_
L,omponem vtoeo umput _%t_l,_
Connectors
I// _
c0nnectaT Vwithc°mp°nentvide°
\\ 'i_
iepu!S!°!hesejacks
_,._q
=,,v4 _ button
_Play/Pause ( _, ) button
\\1 It/
ill
!t I
[--_--__
I
I
Headph°ne
Jack
ExternalAudio
ill
III
!nputConnectors
port
HDMI OUT Po_
Antenna
C°n°_c!Q!
Stop (11) button
Tuning up & Skip (_)
button
Tuning down & Skip (_<) button
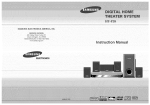
--Rear Panel-2.1 Channel Speaker
Output Terminals
@
0
oO
CoolingFan
o
ntrol
(AH59-01643J)
Video Cable
(AH39-40001V)
FM Antenna
(AH42-00017A)
User's Manual
(AH68-01851R)
10
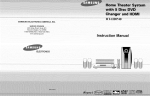
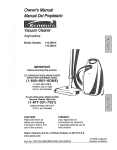
Description
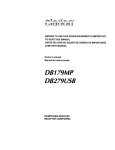
--Remote Control--
TV button
1 Remove the battery
DVD Receiver button
EJECT button
POWR
POWER button
_TVNIDEO
button
cover in the direction of
the arrow.
4_
/
insert two 1.5V AAA
batteries, paying attention to the correct
3
Replace
cover.
the battery
polarities (+ and -).
Number(0~9) buttons
REMAIN button
STEP button -SEARCH buttons --
_CANCEL
button
-REPEAT button
-_
VOLUME button --
--
Play/Pause
button _m_Stopbutton
TUNING/CH button
MUTE button
RETURN button
MENU button
[_T3r[tt_
Follow these precautions to avoid leaking or cracking ceils:
• Place batteries in the remote control so they match the polarity:(+) to (+)and (-)to (-).
• Use the correct type of batteries.Batteries that look similar may differ in voltage.
• Always replace both batteries at the same time.
• Do not expose batteries to heat or flame.
Cursor/Enter button
e of Operationof the RemoteControl
INFO buttonSLIDE MODE button -DIGEST button
TUNER MEMORY button
SLEEP button
SLOW, MO/ST button -DIMMER button
11
AUDIO button
--SUB
TITLE button
--V-SOUND/V-H/P
button
_ZOOM
button
_LOGO
button
_SD/HD
button
_EZ
_HDMI
The remote control can be used up to approximately 23 feet/7 meters in a straight line. It can also be
operated at a horizontal angle of up to 30° from the remote control sensor.
VIEW button
AUDIO, SELECT button
12
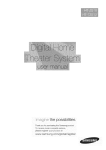
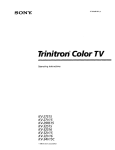
BeforeConnecting
theSpeakers
(L)
Front Speaker (R)
Subwoofer
II Speaker Packages
Pleaseconfirmthat all the followingcontentsare includedin the package.
k_'_..4e
ra.l_._..:
r4m,.a
t _.
@
1 Press down the terminal
tab on the back of the
speaker.
Fro.tSpeoker
(2EA}
Front
Stand (2EA)
Subwoofer
Speaker
II To mount the speaker on the wall
Speaker
Cabte
2
Insert the black wire into the
black terminal (-) and the red
wire into the red (+) terminal,
and then release the tab.
• Make sure the colors of the speaker terminals
match the colors of the connecting
plugs
(3EA}
• Do not let children play with or near the speakers•
They could get hurt if a speaker falls•
• When connecting the speaker wires to the speakers,
make sure that the polarity (+/-) is correct•
13
30onnect
the connecting plugs to the back
of the Home Theater•
• If you place a speaker near your TV set,
screen color may be distorted because of
the magnetic field generated by the speaker. If this occurs, place the speaker away
from your TV set.
14
Installing the DVD player
Connectingthe VideoOutto TV
Choose one of the three methods for connecting to a TV.
TV
M_D_:
Composite
Video
....... (Good
Quality)
- Connect the supplied video cable from the VIDEO OUT jack on the back panel of the system
to the VIDEO IN jack on your TV.
Component
....... (Better
Quality)
- If your television is equipped with Component Video inputs, connect a component video cable
(not supplied) from the Pr, Pb and Y jacks on the side panel of the system to the corresponding
jacks on your TV.
HDMI ....... (Best Quality)
- Connect the HDMI out to the HDM! input on your TV.
, This product operates in Progressive scan mode(480p Only ) for Component Output•
• If the TV only supports a resolution of 576i(480i), the screen may be divided into 2 screens, or display nothing•
• After making the video connection, set the Video input source on your TV to match the corresponding Video output (HDMt, Component or Composite) on your Home theater• See your TV
owner's manual for more information on how to select the TV's Video Input source
15
16
HDMI Function
II Resolution Selection
• This function allows the user to select screen resolution for HDMI output.
This device transmits DVD video signal digitally withoutthe process of convertingto analog.
You can get sharper digital pictures by connectingthe video to your TV using an HDMI connection cable.
i,lii!i!i!i::,
iiii:,:,i ii
II HDMI Audio ON/OFF function
r ii!i!J ?i_!ilD_!iliiiii!iii_i
• The audio signals transmitted over the HDMI Cable can be toggled
ON/OFF•
i
•
Since this product has an embedded Video Upscaler function with
Faroudja DODi technology, it can enhance a 5761(480i)DVD resolution output to 480p/720p/10801.
i,
: (
r
17
i=
The default setting value of this product is HDMI AUDIO OFF.
• You do not have to make separate adjustments, since the Home
Theater and TV will be automatically adjust themselves to the optimal resolution and aspect ratio if connected to HDMI. (If the TV is
an HDTV and has an HDMI Input jack, output is automatically converted to !0801 resolution (if supported by the TV).)
• HDMI AUDIO is automatically down-mixed to 2ch for TV speakers.
• For component video output, only 480P is supported
• If you turn the unit off and on, or switch functions when the HDMt
AUDIO is set to ON, the HDMI AUDIO is automatically set to OFF.
• When both HDMI and COMPONENT jacks are connected, COMPONENT video is not displayed.
i_:i'i!!i!i_i!i!'i_ii_
• .....
i
• See your TV owner's manual for more information on how to select
the TV's Video Input source.
i_},ll AUOlO
18
ConnectingExternalComponents
Connecting
theFMAntenna
Example: Digital signal components such as a Set-Top Box or CD Recorder.
Analog signal components such as a VCR.
COAXIAL
FM Antenna (supplied)
Audio Cable
[
Optical Cable
(not supplied)
(not supplied)
If the external analog component has only one Audio Out
connect either left or right.
,..
J
1 Connect the FM antenna supplied to the FM 750 COAXIAL terminal.
1 Connect the Digital Input (OPTICAL) to the Digital Output on the external digital component.
2
Connect AUX (Audio) In on the HomeTheater to Audio Out on the external analog component.
• Be sure to match connector colors.
3
2 Slowly move the antenna wire around until you find a location where reception is good, then fasten it to a watt or other rigid surface.
Press AUX on the remote control to select 'D.IN/AUX' input.
• Each time the button is pressed, the selection changes as follows: D,LX -* AUX
• You can also use the FUNCTION button on the main unit.
The mode switches as follows: DVD -* D,]i'4 -* AI_TX-_ USB -* FM
• You can connect the Video Output jack on your VCR to the TV, and connect the Audio
Output jacks on the VCR to this product.
19
cooling Fan
The cooling fan suppliescool air to the unit to preventoverheating.
Please observe the following cautions for your safety.
• Makesurethe unit is well-ventitated.Itthe unithas poorventilation,the temperatureinsidethe unitcould rise
and maydamageit
• Do not obstructthe coolingtan or ventilationholes (It the coolingtan or ventilationholes arecoveredwith a
newspaperor cloth,heat maybuild upinsidethe unit andfire may result)
" This unit does not receive AM broadcasts.
BeforeUsingYourHomeTheater
Your Home Theater is capable of playing DVD, CD, MP3/WMA and JPEG discs.Depending on the disc you are
using, these instructions may vary slightly. Read the instructions carefully before using.
POWER
• Buttons Enabled for TV Operation: POWER, CHANNEL, VOLUME, TVNIDEO, and Numeric (0-9) buttons.
• By default, the remote control is set to work with Samsung TVs.
See page 59 for more information about remote control operation with other manufacturer's TVs.
BeforeUsingYourHomeTheater
Disc Playback
Groups and tracks (DVD-AUDIO)
• DVD-audio is divided into several large sections called "groups" and
smaller sections called "tracks". Numbers are allotted to these sections.
These numbers are called "group numbers" and "track numbers".
GROUP
1
Titles and chapters
,,
GROUP
2
iiiiiiii!i!il)
iiiiil;ii!i!iiiiii
;_!i;i!iiiiiiiiii
I
(DVD-VIDEO)
• DVD-video is divided intoseveral large sections called "titles" and smaller
sections called "chapters". Numbers are allotted to these sections.
These numbers are called "title numbers" and "chapter numbers"
OO
®
,
•.
Tracks
T TLE
(Video
1
. •
T TLE
2
.
• Playback starts automatically.
and music CDs)
• Video and music CDs are divided into sections called "tracks"
Numbers are allotted to these sections. These numbers are called
"track numbers".
, Depending on the content of the disc, the initial screen may appear different
Files (DivX)
• DivX is divided into sections called "files".
[,,,_tB']'il
Numbers are allotted to these sections. These numbers are called
"file numbers".
FILE
_.
1
, ,
FILE
2
_.
In this manual, the instructions marked with "DVD
to DVD-VlDEO, DVD-AUDIO, and DVD-R/RW discs.
Where a particular
DVD type is mentioned,
(
),,are
it is indicated separately.
• Dependingon thecontentof the disc,the initialscreenmayappeardifferent
applicable
• Avoid getting fingerprints on the writing surface of a disc.
It may cause the disc to not read properly.
\
MP3/WMA-CD Playback
DisplayingDisc Information
Data CDs (CD-ROM, CD-R, CD-RW) encoded in MP3/WMA format can be played.
The MP3tWMA menu screen will appear
and playback will start.
The appearance of the menu depends on
the MP3/WMA disc.
WMA-DRM files cannot be played.
You can view disc playback information
• Use ,_,v
to select the track.
O
on the TV screen.
o
iiiiii
co
0
O
]-he information Display disap-
The information Display disap-
pears from the screen
pears from the screen
• {_
The information Dispiay disappears from the screen
i!!i!!i!!i!i
I_
(;
_:ii{!!!!!;:
Depending on the recording mode, some MP3/WMA-CDs may not play.
Table of contents of a MP3-CD varies depending on the MP3/WMA track format recorded on the disc.
i•
What is a Group?
A section of tracks contained in a DVD-AUDIO disc.
What is a Title?
A movie contained in a DVD-VIDEO disc.
information display may appear different.
t_r_
i
on the TV screen!
• Depending on the disc the disc
• To select another album and track,
repeat Steps 2 and 3 above.
..........................................
_;i:i;!i(;
appears
if this symbolappears on the TV screenwhitebuttonsare being operated,
that operationis not possiblewith the disccurrentlybeing played.
O
@
0
• Depending on the disc you can
also select DOLBY DIGITAL,
or PRO LOGIC.
What is a Chapter?
Each title on a DVD disc is divided into several smaller sections called
"chapters".
What is a Track (File)?
A section of video or a music file recorded on a DVD-AUDIO, CD, or MP3-
on
II To play a file icon in the screen,
Press the _l _ _, '_' button when it is in stop
status and select a desired icon from the top
part of the menu.
• To play music files only, select the _
Icon.
• To view image files only, select the _
icon.
• To view movie files only, select the _
Icon.
• To select all files select the _
Icon.
TITLE display
....._
• Music File Icon
_
Image FiIe Icon
................
IT"
I
2_'-'""]_;
.....
_;'i;'_i_'_
_
Movie File Icon
All File Icon
_B:
O
ELAPSEDTIMEdsplay
GROUPdisplay
CD display
_]
Q
_
TRACK(FILE)display
LR
rlq_
.......
_v& CHAPTERd]splay
_AV
ovo-Auolo
d,spls
_l
AUDIO
LANGUAGE
dispay
SUBTITLEdisplay
t_
STERE0(dR}display
DOLBY
DIGITALdisplay
ANGLEdlsplay
JPEG File Playbacke,
Images captured with a digital camera or camcorder, or JPEG files on a PC can be stored on a CD and then
played back with this Home Theater•
II Digest Function
You can view 9 JPEG images on the TV screen.
II Slide Mode
• JPEG files will be shown in
9 windows.
Cii!iLil, i_i'i_i_!_i_iiiiiiii_
i?ii,i!i_iiii,!_!ii_ii
i;;ii!ii!!i iii!]i_ii_, _:!i]ii]i_i
_'•!!i!!!•_
¸¸_¸_
• The selected image is played for 5 seconds before moving
to the next image.
EJECT
_,_0
@
" _iiii!!iii_
g:"
" _iiiiiiiiii_
the previous or next image with 9 windows, pressi_,_l i,€,,i
II Rotate/Flip Function
• Playback starts automatically.
• Each time the button is pressed, the image makes the transition as follows:
From top to bottom
From bottom to top
e
e
e
Rectangular
shape in the center
,oVertical blinds effect
Each time a new image is displayed, slide modes
(1 ~11) will be applied randomly and automatically.
Cancels the slide mode
i!!!i!ii!!!!ii
,:iiiiiiiii
iiiiiiiiiii
,_ button: Rotate 90
Oounterclockwise
button: Rotate 900 Clockwise
Original Image
v bullon: Flip Horizontally
1"4"4_
to skip to the next slide.
• Each time the button is pressed, the slide moves backward or forward.
• The maximum resolutions supported by this product are 5120 x 3480 (or 19.0 MPixel) for
standard JPEG files and 2048 x 1536 (or 3.0 MPixel) for progressive image files.
[ DivX Playback
I1Subtitle Display
The functions on this page apply to DIVX disc playback.
II Skip Forward/Back
• Each time you press the button, your selection will toggle between "SUBTITLE (1/1 t/2 ...)" and "S[ BTITLE OFF '_.
• if the disc has only one subtitle file, it will be played automatically.
• Below for more details concerning Subtitle usage with DIVX discs.
IIAudio Display
• tf there are multiple audio tracks on a disc you can toggle between them.
II Fast playback
• Each time you press the button, your selection will toggle between "AUDIO (1/1, 1/2 ...)" and "IIl_ ".
_r
_,
rF
_
is displayed when there is one supported language in the disc.
DivX(Digital
internet video eXpress)
DivX is a video file format developed by Microsoft and is based on MPEG4 compression technology
to provide audio and video data over the Internet in real-time.
MPEG4 is used for video encoding and MP3 for audio encoding so that the users can watch a movie
at near DVD-quality video and audio.
1. Supported Formats
II 5 Minute Skip function
_'ii;
.....
• This product only supports the following media formats.# both video and audio formats are not supported, the user may experience problems such as broken images or no sound.
• Supported Video Formats
\)_
.......
t Forgo,
t AV, WMV
t
/;
Supported
•
Versions
Supported Audio
IS
II Zoom Function
Format
Bit Rate
ampling Frequency
DivX3 !!
_ 5.1
V!/V2/V3/V7
Formats
MP3
80_384kbps
t
WMA
56N128kbps
44.1khz
AC3
128N384kbps
44.1/48khz
• Aspect Ratio: Although default DivX resolution is 640*480 pixels (4:3) this product supports up to
720*480 pixels (t6:9). TV screen resolutions higher than 800 will not be supported.
• When you play a disc whose sampling frequency is higher than 48khz or 320kbps, you may experience shaking on the screen during playback.
2. Caption Function
• Each time you press the button,
your selection will toggle between
"ZOOM X2" and "ZOOM OFF".
DIVX file can be zoomed only in ZOOM X2 mode.
• DivX files have .Avi file extensions, however, not all .Avi files are DivX
and may not be playable in this unit.
i
• You must have some experience with video extraction and editing in order to use this feature properly.
• To use the caption function, save the caption file (*.smi) in the same file name as that of the DivX
media file (*.avi) within the same folder.
Example. Root
Samsung 007CDl.avi
Samsung 007CDl.smi
• Up to 60 alphanumeric characters or 30 East Asian characters (2 byte characters such as Korean and
Chinese) for the file name.
Checkingthe RemainingTime
Fast/Slow Playback
II Fast Playback
___
II Slow Playback
...... ..........
0
Each time the REMAIN button is pressed
0
.=.
4_
,0,
® _•_•'
t•_•¸¸_t'
® ii
€,
L._
• During fast playback of a CD or MP3-CD, sound is
heard only at 2x speed, and not at 4x, 8x, and 32x
speeds.
• : _
O
,0,
/4%• • •
, No sound isheard during stow playback and step motion playback
, Reverse slow playback does not
work with DivX.
Skipping Scenes/Songs
O
O
O
Repeat Playback
A-B Repeat Playback
Repeat playback allows you to repeatedly play a chapter, title, track (song), or directory (MP3 file)•
You can repeatedly play back a designated section of a DVD.
0000
O
c
oO
o
°
CHAPTER
Repeatedly plays the selected chapter.
o
o
00
0
TITLE
o
Repeatedly plays the selected title.
o
GROUP
o
Repeatedlyplaystheselectedgroup•
°
RANDOM
°
o
o
Plays tracks in random order•
(A track that has already been played may be
played again.)
o
r<
r
:1
) :
i}}:: :,,:::
:i): _,}::,
::i,
i
i);:
RE_EA
z
÷
TRACK
Repeatedly plays the selected track.
÷
DIR
÷
Repeatedly plays all tracks in the selected folder.
• When ENTER button is pressed,
the selected position will be stored
in memory.
41,
÷
÷
÷
DISC
•The specified segment will be
played repeatedly.
REPEAT
÷
OFF
o
Cancels Repeat Playback.
A
B
O
Repeatedly plays the entire disc.
REPEA3
:A
a Repeat Playback Mode in the Disc Information Screen
1
2
Press INFO button twice.
.................................................................................
i
Press Cursor _ button to move to
REPEAT PLAYBACK ((_)) display.
3 desired
Press Cursor "_"button to select the
Repeat Playback mode.
4
to normal playback, press Cursor A _,
to select (_;) OFF.
0
Press ENTER button,
O
• The A-B Repeat function does not operate with MP3, OD or JPEG discs.
e#A_TRACK
* For MP3 and JPEG discs, you cannot select Repeat
Play from the information display screen.
_)
*
DISC
Step Function
Zoom (Screen Enlarge)Function
This function allows you to enlarge a particular area of the displayed image.
O
• No sound is heard during slow playback and step motion
playback.
• Each time the button is pressed, the
zoom level changes as follows:
4_
Angle Function
4_
This function allows you to view the same scene in different angles.
L.__
i!} ,
,j:}
• When a DivX disc is being played, only the 2:1 zoom-in is available.
EZ VIEW Function
• Each time the button is pressed, the zoom function will switch between On
and Off.
• When a movie is played in Widescreen format black bars at the top and bottom of the TV screen can be removed by pressing the EZ VIEW button•
• Each time the button is pressed, the angle changes as follows:
@
!)
):
zww
ii
• The Angle function works only with discs
angles have been recorded•
on
which multiple
• This function will not work if the DVD is recorded with multi-camera angle format.
• Black bars may not disappear because some DVD discs have a built-in horizontal to vertical ratio•
• This feature is not supported for DivX discs.
BonusGroup/ NavigatingPages
II Bonus Group
SelectingAudio/Subtitle
Language
II AudioLanguage
Selection
Function
CCCCCCCCCZ;:_'_
!_!d!!i
i;
i
ii!!_ii!ii
Some DVD-Audio discs have an extra bonus' group that requires a 4-digit key
number to access. See the disc packaging for details and the-key number.
i!
Dependingon the number of languageson
a DVD disc, a different audio language
(ENGLISH. SPANISH,FRENCH,etc.) is
selected each time the button is pressed.
®®@
®®®
®®®
,_!!iiiii!i_:,
® _ii!!i!iiii_,
'!ii!!i!'
i_i_'
_ii!i,;
i!!
i
........
II SubtitleLanguage
Selection
Function
• If you eject the disc, switch the power off, or unplug the player, you will need to re-enter
the key number.
II Navigating Pages
Ci
ili
i_i!iii¸¸) _iiiii
_!!i!i_ _c,¸¸¸ _,
_-:_:
iiiii
I_
!!!!!
• You can select the desired image from a DVD-Audio disc containing still images•
• With some discs, you may not be able to select images•
[] s_0:,o,|
[]
FR (_q 03 |
[] oF__.j
• To operate this function, you can also
press the SelectAUDIO or Select SUBTITLE buttonson the remote control.
• Depending on the disc, the Subtitle
and Audio Language functions may
not be available.
Playing
Media
Files
using
theUSB
HOST
feature
Youcan enjoymediafilessuchaspictures,moviesand musicsavedinan MP3player,USBmemoryor digitalcamerain high
quality video with 5.1 channel home theater sound by connecting the storage device to the USB port of the home theater.
ii il;i!ili iiiiii_!ii!iiiill
i i!!i!i!i_iiii!!ii
1. USB devices that support USB Mass Storage vl.0.
(USB devices that operate as a removable disk in Windows
(2000 or later) without additional driver installation.)
2. MP3 Player: HDD and flash type MP3 players.
3. Digital camera: Cameras that support USB Mass Storage vl.0.
• Cameras that operate as a removable disk in Windows (2000 or later) without additional driver installation.
.....
"[;£B" appears on the display screen
and then disappears.
USB MENU screen appears on the TV
screen and the saved file is played.
4. USB HDD and USB Flash Drive: Devices that support USB2.0 or USBI.1.
• You may experience a difference in playback quality when you connect a USB1.1 device.
• For a USB HDD make sure to connect an auxiliary power cord to the USB HDD for proper operation.
5. USB card Reader: One slot USB card reader and Multi slot USB card reader
• Depending on the manufacturer, the USB card reader may not be supported.
• If you install multiple memory devices into a multi card reader, you may experience problems.
6. If you use a USB extension cable, the USB device might not be recognized.
eSupported Formats
JPG
I To stop playback, press the STOP (11) button.
Safe USB Removal
To prevent damage to the memory stored in the USB device, perform safe removal
before disconnecting the USB cable.
................................................
MP3
JPG
JPEG
-
640*480
-
MP3
80~384kbps
WMA
WMA
56~I 28kbps
WMV
WMV
4Mbps
Vl.V2.V3.V7
720*480
44 1KHz~48KHz
4Mbps
DivX3 t1~DivX5.1,Xvid
720*480
44 1KHz~48KHz
DivX
AVl, ASF
-
44 lkHz
V8
44 lkHz
(1) Press the Stop button twice in a row.
The display will show REMOVE --*USB.
• CBI (Control/Bulk/Interrupt)is not supported.
(2) Removethe USB cable.
• Digital Camerasthat use PTP protocol or require additional program installation
when connected to a PC are not supported.
II Skip Forward/Back
• A device using NTFSfile system is not supported.
(Only FAT 16/32 (FileAllocation Table 16/32)file system is supported.)
• Some MP3 players,when connectedto this product,maynot operate depending
on the sector size of their file system.
• The USB HOST function is not supported if a product that transfers media files by
its manufacturer-specificprogramis connected.
II Fast playback
• Does not operatewith Janus enabled MTP(MediaTransfer Protocol)devices.
• The USB host function of this product does not support all USB devices.
For informationon the supported devices, see pages 65.
Moving Directlyto a Scene/Song
_ Using Disc Menu
You can use the menus for the audio language, subtitle language, profile, etc.
DVD menu contents differ from disc to disc.
00
• Whenyou selectDiscMenuandit is not
st.lpported
by the disc the "Thisr_lenuis not sv
ported"messageappearson the screen,
• PressENTER
button.
. Disc menu display may be different depending on the disc
Using the Title Menu
'ii!
For DVDs containing multiple titles, you can view the title of each movie.
Depending on the disc, the availability of this feature may vary.
OO
• The selected file will be played.
• When playing an MP3 or JPEG disc, you
cannot use A ,V to move to a folder.
To move a folder, press • (Stop) and
then press ,_ ,V.
• You can press I_ _
on the
remote control to move directly to the
desired title, chapter, or track.
• Depending on the disc you may not
be able to move to the selected title
or time.
• The title menu appears.
ss MENU button to exit the setup screen.
• Title menu display may be different
depending
on the disc
Settingthe Language
OSD (On-Screen Display) language is set to English by default•
i!iiiiii!!_s
¸¸¸¸
• Oncethesetupiscomplete,
theOSDwillbe
EnglishifEnglish
hasbeenselected
aslanguage.
RETURN button to return to the previous level.
MENU button to exit the setup screen.
SettingTV Screentype
Depending on your TV type (Wide Screen or conventional 4:3), you can select the TV's aspect ratio.
The horizontal to vertical screen size ratio of conventional TVs is 4:3, while that of widescreen and high
definition TVs is 16:9. This ratio is called the aspect ratio. When playing DVDs recorded in different
screen sizes, you should adjust the aspect ratio to fit your TV or monitor.
• For a standard TV, select either "4:3LB" or "4:3PS" option according to personal preference.
Select "16:9" if you have a widescreen TV.
: Select this to view a 16:9 picture in the full-screen
mode on your widescreen TV.
• Youcan enjoy the widescreenaspect.
: Select this to play a 16:9 picture in the letter box
mode on a conventional TV.
• Black barswill appearat the top and bottomof the screen.
: Select this to play a 16:9 picture in the pan & scan
mode on a conventional TV.
, Once the setup is complete, you will
be taken to the previous screen.
• Youcan see the centralportionof the screen only (withthe
sidesof the 16:9picture cutoff).
i
• tf a DVD is in the 4:3 ratio, you cannot view it in widescreen.
• Since DVD discs are recorded in various image formats, they will look different depending on
the software, the type of TV, and the TV aspect ratio setting.
Setting
Parental
Controls
(Rating
Level)
Use this to restrict playback of adult or violent DVDs you do not want children to view.
Settingthe Password
You can set the
i
i
MENU
_EU
_assword for the Parental (rating level) setting.
....
ii _,/ ii
RETURN
RETURN
"?
.........
• Enter the old password, a new password,and confirm new password.
• The setting is complete,
• If you have selected Level 6, you cannot view DVDs with Level 7 or higher.
• The higher the level, the closer the
content is to violent or adult material,
• The passwordis set to "7890" by default.
• Once the setup is complete, you will be
taken to the previous screen.
. The password is set to "7890" by default.
• This function works only if a DVD disc contains the rating level information.
If you have forgotten the rating level password, do the following:
• While the player is in the no disc mode, Reid the main unit's •
RETURN button to return to the previous level.
on the display and all settings will return to the default vatues.
• Press the POWER button.
Using the RESET function will erase all stored settings.
Do not use this unless necessary.
MENU button to exit the setup screen.
button for longer than 5 seconds. 'INITIALIZE"
appears
Settingthe Wallpaper
While watching
a DVD or JPEG CD, you can set the image you tike as background
wa!lpaper
II Setting the Wallpaper
II To select one of the 3 wallpaper settings you've made
• 'CO£¥ LOGO DATA" will be displayed on the TV screen.
!*
...... @
• The selected wallpaper will be
displayed.
• You can select up to 3 wallpaper
settings.
• This selects one of the 3 wallpaper screens
DVD PlaybackMode
Setting
theDRC(Dynamic
Range
Compressio
Some DVD-Audio discs contain DVD-Video as well as DVD-Audio.
This feature
To play back the DVD-Video portion of the DVD-Audio disc, set the unit to DVD-Video mode.
You can use this function
MEnU
balances the range between
movies at low volume
at night.
RETUrn
When the Cursor,_ buttonis pressed,
the effect is greater,end when the
Cursor,r button is pressed,the effect is
smaller.
switch to DVD AUDIO Play mode.
'_
,iilhi_!i_
_, ,_,_,._
the loudest and quietest sounds.
to enjoy Dolby Digital sound when watching
S_I
._¢_S _! _'_J ;r°'_'! ¸ •;:s.i•_
i i
', i
'_ i ,,_,ri ( • i
_,_'_U,_ _,_
• Set steps 1 _ 4 again if you want to
i ;
who°
Se,ec,,°g
ovoP,°y
Mode:
• DVD Play mode is set to DVD Audio as
factory defaultsetting•
• Powering offthe main unitwill automatically
switchto the DVDAudio mode.
• DVD VIDEO: set to play the DVD video
contents contained on a DVD
audio disc
• DVD AUDIO:setaudio•tO
play the default DVD
RETURN button to return to the previous level.
II DivX (R) registration
• Please use the Registration code to register
this player with the DivX (R) video on demand
format• To learn more, go to www.divx.com/vod.
MENU button to exit the setup screen.
AV SYNC Setup
Listening to Radio
Video may look slower than the audio if it is connected to a digital TV.
tf this occurs, adjust the audio delay time to to match the video.
_ iiiii!Zi
¸ ii_iii!i!ilD_i
ii_
¸
• Setup menu appears.
::
Wheni,_ _-_is pressed,a
presetbroadcast stationis
selected.
k
_
ress andhold TUNING/CHto
automaticallysearchfor active
broadcastingstations.
_
BrieflypressTUNINGtCHto
increaseor decreasethe
?
frequencyincrementally.
and 300 me. Set it to the optimal status.
• You can set the audio detay time between 0 ms
_
ress the STOP (I)
button to select
PRESET and then press _
button to select the preset station.
and then press and hold _
button to eutometice@ search the band.
_
ress STOP (I) to select
MANUAL and then briefly
press I._t_ 1_1_t to tune in to a lower or
higher frequency.
PresettingStations
Example: Presetting FM 89.1 in the memory
• Refer to Step 2 on page 54 to automatically
or manually tune in to a station.
• You can select between 1 and 15 presets•
• Press the TUNER MEMORY button before
'number' disappears from the display.
• 'number' disappears from the display and the
station is stored in memory.
• This unit does not receive AM broadcasts.
• "1" flashes in the display•
ConvenientFunctions
II Sleep Timer Function
You can set the time that the Home Theater will shut itself off.
V-SOUND(Virtual Sound)
The 2-channe} sounds can be tistenedwith virtual effects for prodttcJngmuch more reaJisfJcsounds as in 5.1 channels.
• " (_ "will be displayed. Each time the button is pressed, the preset
time changes as follows: 10 -+ 20 -+ 30 _ 60 _ 90 -+ 120 -* ]50 _ OFF.
• Each time the button is pressed, the selection changes as follows:
"v'IRqZUAk SOLND ONE -_ VIRq[UAL SO1JND TWO -_ VIRTUAL
SOUND
p timer setting, press SLEEP button.
• The remaining time before the Home Theater will shut itself off is displayed.
°Pressing the button again changes the sleep time from what you have set earlier.
OFF.
Virtual Headphone Function
Use headphone_ (not supptied)for private _isteningpleasu're.
You can enjoy dynamic sound effects similar to that of 5.1 channel surround sound using
conve_tionsl stereo headphones.
the sleep timer, press SLEEP button until
OFF appears on the display.
Adjusting Display Brightness
• You can p_rchase headphones from most Electronics stores.
Youcan adjust the brightnessof the displayon tile main unitso it won't interfere
with yourmovie viewing,
• Each time the button is pressed, the brightness changes as follows:
DARK -_ BRIGHT.
Mute Function
This is useful when answer}ng a doorbell or te}ephone call
• Each time the button is pressed, the selection alternates between
V.HP and OFF
• "LHP(VIRTUAL HEADPHONE ON) : Select to enjoy a 5.1-channe_
surround sound that gives the feeling of being in a baseball park or
concert hall.
• OFF(VIRTUAL HEADPHONE OFF) : Select to listen to a standard
2-channel stereo sound•
• _OOappears in the display•
• To restore the sound, press the button again•
• Do not listen at extremely high volume Ievels when using headphones.
Extended, high-volume listen}rig can lead to permanent hearing lose.
Operating
aTVwiththeRemote
Control
1
3
56 57 58
44
MTC
18
A Mark
01 15
45
NEC
1811820 40 59 60
Anam
0102, 08 84,08 06 0T 88,89 10,
46
Nikei
83
1112,13 14
47
Onking
03
01, t8 44 t48
48
O_wa
03
87 58 81
49
Panasonic
06,07 08 09 54,66 87, 73,74
Admiral
(M.Wards)
AOC
Bell & Howell
(M Wards)
e
Brocsbt_i¢
89 60
50
Penney
18
7
Candle
18
51
Philco
08 15 17,18 48 84 59 62 68 98
8
Cetronic
08
52
Philips
15 17 18 48 48 84 62,7_
9
Citizen
03 18 28
53
Pioneer
83 88 80 91
10
Cinema
97
54
portlal_d
15 18,89
11
Classic
08
55
P_toll
48
12
Concerto
18
5e
Quasar
06 66 87
13
Oontec
48
57
Radio Shack
17,48 86 60 81 78
14
Coronado
18
58
RCA/P_scan
18,8967, 76 77,78 92,83,94
15
Craig
03 03,6_ 82,88 84
58
Realistic
03 19
16
Croslex
82
60
Sampo
r7
C¢ow_1
18
Curtis
el
88 81 83
Mates
C_C
88
6_2
Sanyr_
18 61,_5
2o
Daewoo
%03 04!5 !6 !7 1819_,2t 22_ %25 262829
63
scott
03¸40¸80¸61
30323435_64859¸90
64
Sears
15 18,18
40
65
Sharp
15 57,84
08
66
03 t8 40 4658 81 84 82,88,84 85
67
Sony
58,81 52,53 55
68
Soundesign
03 40
08
69
Spectricon
81
• if there is more than one code listed 1oryour TV in the table,
enter one at a time to determine which code works.
08
70
SSS
18
_6,40 _ _ 66 6_ 88
71
Sylvania
_840, 48 _, 5_ 60 82
40
72
Symphonic
61 95,86
_
Tatu_g
06
48
74
Techwood
56 58 67, 86
75
15 _850 _%03.9
• Youcan use theTV POWER,VOLUME,CHANNEL,and Numeric
buttons(0_9).
control
may not work on some brands
on your
remote
witt work on a Samsung
brand
of TVs. Also,
some
operations
may not
control
of TV.
with the
TV by default.
code for your
brand
of TV, the remote
control
TekIika
18
83 15 1_25
1840
70
76
TMK
59, 61 87, 88
77
Tushiba
83,18 40
78
Vidtech
18
79
Videch
596069
1957 63 71
18
80
Wards
15 17 18 40 48 54 60,64
18
81
Yamaha
18
18 54 56 89, 60 62 63 68 71
82
15 17,18 48, 54 59, 60 62, 72 89
83
Yupiteru
40 54
84
Zenffh
54
85
Zonda
01
18 40
86
Du_,_gyaeg
03 54
15 16 !7 37 98 39,45 41 42 43 44
1840596075
depending
• ff you do not set the
87
19 6.5
8
be possible
Signature 2000(M W_s)
• If the code matches the TV's code, the TV will be turned off.
15, 16,17and 40.
• The remote
48
03, t5 16,t7 4(/,43 46,47 48, 49,_, 8_
19
Example: For a Samsung TV
WNte holding down POWER, use the number buttons to enter 00,
m
eamsung
York
40
03
BeforeCallingfor Service
Refer to the chart below when this unit does not function properly, tf the problem you are experiencing is not listed below or
if the instruction below does not help, turn off the unit, disconnect the power cord, and contact the nearest authorized dealer or Samsung Electronics Service Center.
I cannotejectthedisc,
Playbackdoesnotstart.
Playbackdoesnotstart
immediatelywhenthe
Play/Pause
button is
_ressed.
Soundisnotproduced,
, Discis rotatingbutnopic-I
tureis produced.
, Picturequalityis poorand I
pictureis shaking,
i
Audiolanguageand subti.
tiesdo notwork.
• Is the power cord plugged securely into the outlet?
• Turn off the power and then turn it back on.
ing them. And depending on the disc, they may work differently,
• Check the region number of the DVD.
DVD discs purchased from abroad may not be playable.
• OD-ROMs and DVD-ROMs cannot be played on this Home
Theater.
Menu
screen
does
notappear
even •
when
themenu
function
isselected,
• Make sure that the rating level is correct
Aspectratiocannotbe
changed.
• Are you using a deformed
the surface?
• Wipe the disc clean.
disc or a disc with scratches
on
Can'treceiveradiobroadcast,
, Themainunitis notworking.
• No sound is heard during fast playback, slow playback, and step
motion playback.
• Are the speakers connected properly? Is the speaker setup correctly customized?
• is the disc severely damaged?
• Is the TV power on?
• Are the video cables connected properly?
• Is the disc dirty or damaged?
• A poorly manufactured disc may not be playable.
• Is the remote control being operated within its operation range ot
Theremotecontroldoes
notwork,
• Audio language and subtitles will not work for DVDs not contain-
angle and distance?
• Are the batteries exhausted?
• Have you selected the mode(TV/DVD) functions of the remote
control (TV or DVD) correctly?
(Example:
Thepower
goesoutor
strange noise is heard.)
Are you using a disc that does not contain menus?
• You can play 16:9 DVDs in 16:9 WIDE mode, 4:3 LETTER BOX
mode, or 4:3 PAN SCAN mode, but 4:3 DVDs can be seen in 4:3
ratio only. Refer to the DVD disc jacket and then select the
appropriate function.
• Is the antenna connected properly?
• If the antenna's input signal is weak, install an external
FM antenna in an area with good reception.
• Turn off the power and hold the • button on the main unit for
longer than 5 seconds.
, TheHomeTheateris not
workingnormally,
Using the RESET function will erase all stored settings.
Do not use this unless necessary.
Thepassword
for rating
levelhasbeenforgotten.
* While _NODISC" message appears on the display of main unit, hold
the main unit's • buttonfor longer than 5 seconds. "INITIALIZE"
appears on the display and all settings wi})return to the default values.
• Press the POWER button.
Using the RESETfunction will erase all storedsettings.
Do not use this unless necessary,
Cautions
onHandling
andStoring
Discs
Languag Code List
Enter the appropriate code number for the initial settings "Disc Audio", 'Disc Subtitle"
and/or "Disc Menu" (See page 43).
Small scratches on the disc may reduce sound and picture quality or cause skipping.
Be especia_Iy careful not to scratch discs when handling them.
O Handling
discs .................................................................................................................................................
Do not touch the playback side of the disc. Hold
Abkhazian
the disc by the edges so that fingerprints will
]_
Afar
Afrikaans
not get on the surface.
Amharic
Do not stick paper or tape on the disc.
1044
Arabic
O Disc Storage
Keep
lated
in a cool
area
Do not arrow the discs to become
• Do not load cracked or scratched
I
@ Handling
and Storing
venti-
contaminated
discs
Keep in a clean
Protection
jacket.
Store vertically.
with dirt.
1345
1334
1347
1194
Irish
Frisian
Scots
Gaelic
Galician
1509
Samoan
Slovenian
Shone
Somali
1198
Guarani
1350
Malayalam
1349
Malagasy
Latvian,
Lettish
Maeri
Macedonian
1507
1506
1508
1511
Albanian
1045
Assamese
1203
Gajarati
1352
Monqolian
1512
Serbian
1051
Aymara
1209
Nausa
1353
Moldavian
1513
Siswati
1052
Azerbaijani
1217
Hindi
1356
Marathi
1514
Sesotho
1053
Bashkir
1226
Croatian
1357
Malay
1515
Sundanese
1057
Byelorussian
1229
Hungarian
1358
Maltese
1516
Swedish
1233
Armenian
1363
Burmese
1517
Swahili
Nauru
1521
Tamil
1525
Teguiu
......................................................................................................................................................
1059
Bulgarian
Do not keep in
direct sunlight
1183
1181
1186
1080
Bihari
1235
h_terlingua
t385
1069
Bislama
1239
Interlingue
1369
1066
Bengali_ Bangle
Inupiak
1376
Dutch
1527
Tajik
1067
Tibetan
1248
Indonesian
1379
Norwegian
1528
Thai
1070
Breton
1253
icelandic
1393
Occitan
1529
Tigrinya
1079
Catalan
1254
Italian
1403
(Afan) Creme
1531
Turkmen
1093
Corsican
1097
Czech
1261
1103
Welsh
1105
Danish
1109
1130
1245
Hebrew
1408
Oriya
1532
Tagatog
Japanese
1417
Punjabi
1534
Setswana
1269
Yiddish
1428
Polish
1535
Tonga
1283
Javanese
1435
Pashto, Pushto
1538
Turkish
German
1287
Georgian
1436
Portuguese
1539
Tsonga
Bhutani
1297
Kazakh
1463
Quechua
1540
Tatar
1142
Greek
1298
Greentandic
1481
Rhaeto-Remance
1543
Twi
1144
English
1299
Cambodian
1482
Kirundi
1557
Ukrainian
1145
Discs .......................................................................................................
1257
N_pali
Esperanto
1300
Kannada
1483
Romanian
1584
Urdu
When you get fingerprints or dirt on the disc, clean it
with a mild detergent diluted in water and wipe with a
soft cloth.
1149
Spanish
1301
Korean
1489
Russian
1572
Uzbek
1150
Estonian
1305
Kashmiri
1491
Kinyarwanda
1581
Vietnamese
115t
Bas£ue
1307
Kurdish
1495
Sanskrit
1587
Volapuk
• When cleaning,
1157
Persian
1311
Kirghiz
1498
Sindhi
1613
Wolef
1165
Finnish
1313
Latin
1501
Sangro
1632
Xhosa
1166
Fiii
1326
Lingala
1502
Serbo-Croatian
!665
Yoruba
f f 71
Faeroese
1327
Laothian
1503
Singhalese
1684
Chinese
1174
French
1332
Lithuanian
Slovak
1697
Zulu
wipe gently from the inside to the outside of the disc•
!==
• Condensation
may form if warm air comes into contact with cold parts
inside the player• When condensation
forms inside the player, the player may not operate correctly• If this occurs, remove the disc and let the
player stand for 1 or 2 hours with the power on.
1505
L
USBHostFeature
Supported
Products
I uso
Flash Disk
I Digital Camera
F{neptx AS40
FU[_
Digital Camera
FinepJx F810
Fuii
Digital Camera
Quzer Micro
Cruzer Mini
Finepix E610
Fuii
Digital Camera
Cruzer Mini
Finepix f450
Fu_
Digital Dame_a
SON_( Micro V_lt
Fine,ix
$7000
Fu/_
Di0ital Camera
FLEX DRIVE
Selotecl_
USB 2 0 32M6
Fi,_e_
Agl0
XD 310Z
AnyO ive
A L tech
USB 2 0 128MB
LG
Iomeg_
USB 2 0 128M
USB 2 O 128M
Drgita_ Camera
Digital Camera
iFlash
Finecam SSR
Kyocera
Pigital Camera
Finer_am Xt
K_e_c_r_
Ot_Lt&_C&mera
LG
RiDATA
Dimage X21
_
USB 2 0 64M6
E3igitalCamera
Kyocera
D_l'_0e Z1
US6 2 0 256M
Digital Camera
Kyoc_ra
D_mage Z1
Sandisk
Sony
USB 2 0 US6 Flash Drive 128M
USB 2 0 128M
Ful_
Finecam SL400R
SLO6VjR
Sandisk
Sandisk
Ko_i_a
XTICK
M_cto _ini
_ecam
Minolta
Digital Camera
MinoJia
L3J0Jt
al Camera
Minolia
Digital Camera
Imalion
[JSB 2 0 64M
XTICK(M)
EZDrive
IJS6 2 0 64M
USB 2 0 64M
Die alive
128 MB MP3 Player
Iriver
20G HDD MP3 Playel
Sam_ung
20G HDD MP3 Playe_
Digital Camera
Ni_n
_0_1
mix
2200
Nikon
Digital Camera
m_x
3500
Nikon
Digital Camera
OTeative MuV_ NX128M
mix
3700
Nikon
Digital Camera
kivel H320
Ni_n
Digital Camera
YH 920
MP_ Player
_
% A
N),_n
D)0)_) Camera
Y£ T7
Olympus
Digital Camera
YP MT6
MP0 Player
300 _0_t_
QIVmpus
Digital Camera
YP T6
MP0 Player
D300
O_ympus
Dig_al C_mera
YP 5_
MP3 Player
X 350
Olympus
Digital C_lmera
YP ST5
MP0 Player
Coc4#_x5200
_ylus
410 digital
C 700
Olympus
Digital C_mera
YF T5
C 5060
Olympus
Digital C_mera
YP 60
MP0 Player
YF 780
MP0 Player
U mini
O_),m_us
Di0i_ C_mera
YP 35
ME3 Player
Lumi× FZ20
Pana_onic
Digital Camera
YP 5S
MP0 Player
DMD EX7GD
Pana_onic
Digital Camera
iAUOiO U2
MP_ Player
Lumi× LC33
Pana_onic
Digital Camera
iAUOIO G3
LUMIX DMC F _
Panasonic
Di0_
iA_d_ M3
C_r_
Optic S40
Pentax
Di0ital Camera
SI MB00L
Optic $50
Pentax
Digital Camera
HI0
Optic _3LF
Pentax
Digital Damera
Oo_o M×
Pe_ax
_1
Samsung
D_gta_ D_me_a
Digimax 400
Samsung
D_gta[ Camera
So_ PD_T30
Toshiba
D_gtal Camera
Coolpix 5900
Ni_n
Digital Damera
Coolpix $1
Ni_n
Di0ital Damera
_x
Nikon
Digital Damera
DMD FX7
Panasonic
Dgtal Camera
D_maqe Xt
7600
Mi_lol_
O_it_l C_llel>z
AZ 1
Olympus
Digital Camera
MP3 Player
HDD MP3 Playe_ __
256MB MPS PlayeF
MP3 Player
MP3 Player
Camera
Digimax 420
R
.....
60dB
.....
0.5%
........
I MP3 Player
Ni_n
m_x4300
C_r
iOdB
T
U
F
i
Coolpix4200
Coolpix 4100
Specifications
256M_ MP0 P_ay_F
I Multi Card Reader
I USB External HDD
:
Front speaker output
lO0W x 2(30)
Subwooferspeaker output
tO0W(3_) .......
Frequency range
S/N Ratio
2OHz_20KHz .......
E 1%:i_i Channel separation
Inputsensitivity
R
_ss_re I'eve!
70dB
60dB
......
......
.......
(AUX)400mV
:8_BrW/N
SAIVISUNG
Memo
Home Theater
This SAMSUNG brand product, as supplied and distributed by Samsung Electronics America. Inc (SAMSUNG) and deINered new, in the odginal
carton to the original consumer purchaser, is warranted by SAMSUNG against manufacturing defects in materials and workmanship for a limited
warranty period of:
One (1) Year Parts and Labor*
(*90 Days Parts and Labor for Commercial Use)
This limited warranty begins on the obginal date of purchase, and is valid only on products purchased and used in the United States
warranty service, the purchaser must contact SAMSUNG for problem determination and service procedures
formed by a SAMSUNG authorized service center
SUNG or SAMSUNG's authorized service center
chaser
To receive
Warranty service can only be per-
The original dated bill of sale must be presented upon request as proof of purchase to SAMTransportation of the product to and from the service center is the responsibility of the pur-
SAMSUNG will repair or replace this product, at oar option and at no charge as stipulated herein, with new or reconditioned parts or products if
found to be defective during the limited warranty period specified above
must be returned to SAMSUNG
All replaced parts and products become the property of SAMSUNG and
Replacement parts and products assume the remaining original warranty, or ninety (90) days, whichever is
longer
SAMSUNG's obligations with respect to software products distributed by SAMSUNG under the SAMSUNG brand name are set forth in the
applicable end user license agreement
Non-SAMSUNG hardware and software products, if provided, are on an "AS IS" basis
Non-SAMSUNG
manufacturers, suppliers, publishers, and service providers may provide their own warranties
This limited warranty covers manufacturing defects in materials and workmanship encountered in normal, and except to the extent otherwise
expressly provided for in this statement, noncommercial use of this product, and shall not apply to the following, including, but not limited to:
damage which occurs in shipment; delivery and installation: applications and uses for which this product was not intended; altered product or serial numbers: cosmetic damage or exterior finish; accidents, abuse, neglect, tire. waten lightning or other acts of nature; use of products, equipment, systems, utilities, services, parts, supplies, accessories, applications, installations, repairs, external wiring or connectors not supplied and
authorized by SAMSUNG, or which damage this product or result in service problems; incorrect electrical line voltage, fluctuations and surges;
customer adjustments and failure to follow operating instructions, cleaning, maintenance and environmental instructions that are covered and
prescribed in the instruction book; product removal or reinstallation; reception problems and distortion related to norse, echo, interference or other
signal transmission and delivery problems
SAMSUNG does not warrant uninterrupted or error-free operation of the product
THERE ARE NO EXPRESS WARRANTIES OTHER THAN THOSE LISTED AND DESCRIBED ABOVE, AND NO WARRANTIES WHETHER
EXPRESS OR IMPLIED, iNCLUDING, BUT NOT LiMiTED TO, ANY IMPLIED WARRANTIES OF MERCHANTABILITY
OR FITNESS FOR A
PARTICULAR PURPOSE, SHALL APPLY AFTER THE EXPRESS WARRANTY PERIODS STATED ABOVE, AND NO OTHER EXPRESS WARRANTY OR GUARANTY GIVEN BY ANY PERSON, FIRM OR CORPORATION WITH RESPECT TO THiS PRODUCT SHALL BE BINDING ON
SAMSUNG. SAMSUNG SHALL NOT BE LIABLE FOR LOSS OF REVENUE OR PROFITS. FAILURE TO REALIZE SAVINGS OR OTHER BENEFITS, OR ANY OTHER SPECIAL, iNCIDENTAL OR CONSEQUENTIAL
DAMAGES CAUSED BY THE USE, MISUSE OR INABILITY TO USE
THIS PRODUCT. REGARDLESS OF THE LEGAL THEORY ON WHICH THE CLAIM IS BASED, AND EVEN iF SAMSUNG HAS BEEN
ADVISED OF THE POSSIBILITY OF SUCH DAMAGES. NOR SHALL RECOVERY OF ANY KiND AGAINST SAMSUNG BE GREATER IN
AMOUNT THAN THE PURCHASE PRICE OF THE PRODUCT SOLD BY SAMSUNG AND CAUSING THE ALLEGED DAMAGE
LIMITING THE FOREGOING.
WITHOUT
PURCHASER ASSUMES ALL RISK AND LIABILITY FOR LOSS. DAMAGE OR INJURY TO PURCHASER AND
PURCHASER'S PROPERTY AND TO OTHERS AND THEIR PROPERTY ARISING OUT OF THE USE, MISUSE OR INABILITY TO USE THiS
PRODUCT SOLD BY SAMSUNG NOT CAUSED DIRECTLY BY THE NEGLIGENCE OF SAMSUNG
THiS LiMiTED WARRANTY SHALL NOT
EXTEND TO ANYONE OTHER THAN THE ORIGINAL PURCHASER OF THIS PRODUCT, iS NONTRANSFERABLE
AND STATES YOUR
EXCLUSIVE REMED_
Somestatesdo not allowlimitationson how longan impliedwarrantylasts,or the exclusionor limitationof incidentalor consequentialdamages,
so the above limitationsor exclusionsmay not applyto you This warrantygivesyou specificlegalrights,and youmay also haveother rights
which vary from stateto state
To obtain warranty hardware service, please contact SAMSDNG at:
SAMSUNG CUSTOMER CARE CENTER
400 Valley Road, Suite 201, Mt. Arlington. NJ 07856
1-90O-SAMSUNG (1400-726-7864)
and www.samsung.com