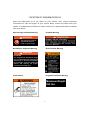
1
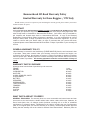
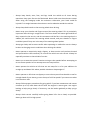
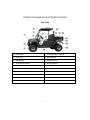
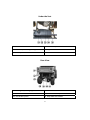
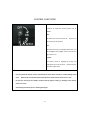
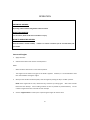
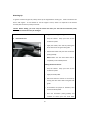
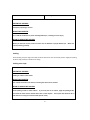
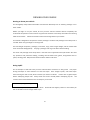
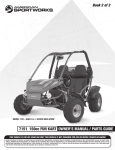
HAMMERHEAD
R-150
2013 Owner’s Manual
WELCOME INTRODUCTION
Thank you for purchasing Hammerhead R 150 Utility Vehicle (UTV). We hope you
will enjoy it. Before you start to operate the vehicle, please read through this owner’s
manual carefully as it contains important safety and maintenance information. Failure
to follow the warnings contained in this manual can result in serious injuries in juries or
death
Be sure to follow the recommended maintenance schedule and service your vehicle
accordingly. Preventive maintenance is extremely important to the longevity of your
vehicle.
We hope you will have a pleasant experience with our product and thank you again for
choosing Hammerhead Products.
1
CONTENTS WELCOME INTRODUCTION ............................................................................................................................ 1 Warranty Information .................................................................................................................................... 2 IMPORTANT MANUAL INFORMATION ........................................................................................................... 3 LOCATION OF WARNING DECALS ................................................................................................................... 4 SAFETY INFORMATION ................................................................................................................................... 6 DESCRIPTION AND VEHICLE IDENTIFICATION ................................................................................................. 9 CONTROL FUNCTIONS .................................................................................................................................. 12 PRE‐OPERATING CHECKS .............................................................................................................................. 20 OPERATION ................................................................................................................................................... 25 DRIVING YOUR VEHICLE ............................................................................................................................... 29 PERIODIC MAINTENANCE AND ADJUSTMENT .............................................................................................. 31 Troubleshooting ........................................................................................................................................... 42 Cleaning and Storage .................................................................................................................................... 43 Specifications ................................................................................................................................................ 46 2 Geason Enterprises, LLC dba Geason Powersports
Emission Control System Warranty Statement
YOUR WARRANTY RIGHTS AND OBLIGATIONS
The U.S. Environmental Protection Agency and Geason Enterprises, LLC dba Geason Powersports
(hereinafter “Geason Powersports”) are pleased to explain the emission control system warranty on your
2013 Off-Road ATV. New off-road motor vehicles must be designed, built and equipped to meet U.S. EPA
Federal anti-smog standards. Geason Powersports must warrant the emission control system on your
vehicle for 5,000 km, or at least 30 months, whichever comes first, provided that there has been no abuse,
neglect or improper maintenance of your vehicle. This ATV was designed to meet the emission standards
for 10,000 km, or five years, whichever comes first.
Your emission control system may include parts such as the carburetor or fuel injection system, the ignition
system, catalytic converter and engine computer, if it is equipped. Also included may be hoses, belts,
connectors and other emission-related assemblies.
Where a warrantable condition exists, Geason Powersports will repair your vehicle at no cost to you,
including diagnosis, parts and labor.
If an emission-related part on your vehicle is defective, the part will be repaired or replaced by Geason
Powersports. This is your emission control system DEFECTS WARRANTY.
NOTICE! Use of any Geason Powersports vehicle in any type of competitive event completely and
absolutely voids this and all other warranties offered by Geason Powersports.
OWNER’S WARRANTY RESPONSIBILITIES
As the vehicle owner, you are responsible for the performance of the required maintenance listed in your
owner’s manual. Geason Powersports recommend that you retain all receipts covering maintenance on
your vehicle, but Geason Powersports cannot deny warranty solely for the lack of receipts or for your failure
to ensure the performance of all scheduled maintenance.
You are responsible for presenting your vehicle to the Geason Powersports dealer as soon as a problem
exists. The warranty repairs should be completed in a reasonable amount of time, not to exceed 30 days.
As the vehicle owner, you should be aware that Geason Powersports may deny your warranty coverage if
your vehicle or a part has failed due to abuse, neglect, improper maintenance or unapproved modifications.
If you use your vehicle in any type of competitive event, this warranty is immediately and completely void.
If you have any questions regarding your warranty rights and responsibilities, you should contact Geason
Enterprises, LLC dba Geason Powersports, 1200 Lakeside Parkway #400, Flower Mound, TX 75028,
Phone: 214-513-1700 or the U.S. Environmental Protection Agency, 2000 Traverwood Drive, Ann Arbor, MI
48105.
Geason Enterprises, LLC dba Geason Powersports
Limited Warranty on Emission Control System
YOUR WARRANTY RIGHTS AND OBLIGATIONS
Geason Enterprises, LLC dba Geason Powersports (hereinafter “Geason Powersports”) warrants that each
new 2013 and later Geason Powersports off-road vehicle:
A.
is designed, built and equipped so as to conform at the time of initial retail purchase with all
applicable regulations of the United States Environmental Protection Agency, and;
B.
is free from defects in material and workmanship which cause such vehicle to fail to conform to
applicable regulations of the United States Environmental Protection Agency for the periods
specified above.
I.
Coverage.
Warranty defects shall be remedied during customary business hours at any
authorized Geason Powersports dealer located within the United States of America in compliance
with the Clean Air Act and applicable regulations of the United States Environmental Protection
Agency. Any part or parts replaced under this warranty shall become the property of Geason
Powersports.
II.
Limitations
A.
Repair or replacement as a result of
(1)
accident,
(2)
misuse,
(3)
repairs improperly performed or replacements improperly installed,
(4)
use of replacement parts or accessories not conforming to
specifications set forth by Geason Powersports, which adversely affect
performance and/or
(5)
use in competitive racing or related events.
B.
Inspections, replacement of parts and other services and adjustments required for required
maintenance.
Any vehicle equipped with an odometer or hour meter on which the odometer mileage or
hour meter reading has been changed so that actual mileage cannot be readily
determined.
C.
III.
This Emission Control System Warranty shall not cover any of the following:
Limited Liability
A.
The liability of Geason Powersports under this Emission Control System Warranty is
limited solely to the remedying of defects in material or workmanship by an authorized
Geason Powersports dealer at its place of business during customary business hours.
This warranty does not cover inconvenience or loss of use of the vehicle or transportation
of the vehicle to or from the Geason Powersports. Geason Powersports shall not be liable
for any other expenses, loss or damage, whether direct, indidental, consequential or
exemplary arising in connection with the sale or use of or inability to use the Geason
Powersports vehicle for any purpose. Some states do not allow the exclusion or limitation
of any incidental or consequential damages, so the above limitations may not apply to you.
Geason Enterprises, LLC dba Geason Powersports
Limited Warranty on Emission Control System
B.
No express emission control system warranty is given by Geason Powersports, except as
specifically set forth herein. Any emission control system warranty implied by law,
including any warranty of mechanability or fitness for a particular purpose, is limited to the
express emission control system warranty terms stated in this warranty. The foregoing
statements of warranty are exclusive and in lieu of all other remedies. Some states do not
allow limitations on how long an implied warranty lasts, so the above limitations may not
apply to you.
C.
No dealer is authorized to modify this Limited Emission Control System Warranty issued by
Geason Powersports.
IV. LEGAL RIGHTS. This warranty gives you specific legal rights, and you may also have other rights
which vary from state to state.
V.
This warranty is in addition to the Geason Powersports limited vehicle warranty.
VI.
ADDITIONAL INFORMATION. Any replacement part that is equivalent in performance and
durability may be used in the performance of any maintenance or repairs. However, Geason Powersports
are not liable for these parts. The owner is responsible for the performance of all required maintenance.
Such maintenance may be performed at a service establishment or by any individual. The warranty period
begins on the date the ATV is delivered to an ultimate purchaser.
Geason Enterprises, LLC
dba Geason Powersports
1200 Lakeside Parkway #400
Flower Mound, TX 75028
Phone: 214-513-1700
Fax: 214-513-1711
Hammerhead Off-Road Warranty Policy
Limited Warranty for Dune Buggies / UTV Only
Should warranty service be required on your unit during the warranty period, please contact your nearest
authorized dealer for repairs.
IMPORTANT!
ALL UNITS MUST BE REGISTERED WITHIN 14 DAYS OF PURCHASE OR WARRANTY IS VOID.
To register your product a copy of the Warranty Registration Card, Buyer Safety Agreement, and
sales receipt must be forwarded to Hammerhead Off-Road. Your dealer, with your assistance,
will complete and forward these items to Hammerhead Off-Road. A copy of the Warranty
Registration Card and Buyer Safety Agreement is attached. It is your responsibility to confirm
with your dealer within 14 days of purchase that your product has been registered. If you are
unable to confirm with your dealer within 14 days of purchase that your product has been
registered please contact Hammerhead Off-Road within 14 days of purchase or your warranty will
be void.
GENERAL WARRANTY POLICY
Labor Warranty is covered for the first 90 days (THREE MONTHS) from the end consumer’s date
of purchase. Most parts covered under your warranty, except for the frame and engine, are
covered for 30 or 90 days. Not all parts are covered. Contact your dealer for details or questions
about a specific part. Warranty Parts are covered according to the schedule below from the end
consumer’s date of purchase. All warranty paperwork must be received within 14 days of
repair.
WARRANTY PARTS COVERAGE
Warranty starts from the date of purchase by end consumer:
FRAME:
ENGINE:
CARBURETOR:
MUFFLER:
A-ARM, SPINDLES, AXLES:
ELECTRONICS:
BATTERY:
SPEAKERS:
SPEEDOMETER:
TIRES & WHEELS:
FENDERS:
BRAKES:
CLUTCH:
SEATS:
WHAT PARTS ARE NOT COVERED?
1 year
180 days
90 days
90 days
90 days
90 days
30 days
30 days
30 days
30 days
30 days
30 days
30 days
30 days
GENERAL EXCLUSION: The warranty does not cover consumable and normal wear and tear
items such as, but not limited to, throttle cables, brake cables, chains, bikini tops, fasteners, air
filters, brake pads, tires, oil changes, and/or problems occurring due to a lack of scheduled
maintenance or consumer abuse. Modification to the vehicle, including the use of performance
parts or non-original parts, will void the warranty in its entirety, unless express written approval
stating that the warranty will not be voided is obtained from Hammerhead. Defective parts are
subject to recall by Hammerhead Off-Road upon failure and are required to be held by the dealer
for 30 days from the time of the initial repair date.
The warranty does not cover damage or faults caused by misuse, negligence, alterations,
accidents or any abnormal use including the use of non genuine parts, renting or leasing,
competition or racing. This warranty does not cover loss of use of the unit or loss of time, or
inconvenience.
NOTICE:
All warranties are voided if the vehicle has been altered for use in racing or
competition, rented, used under abnormal conditions, or subject to abuse, misuse, neglect or
improper maintenance. Hammerhead Off-Road is not liable for any damage claim or liability
claim, personal or otherwise resulting from operation of the vehicle in any way. All warranty parts
nd
will be shipped using UPS or Fed Ex ground ONLY. If the warranty part needs to shipped 2 day
air or shipped overnight, the ordering dealership will be responsible for all shipping fees.
NOTICE: Hammerhead Off-Road reserves the right to change product specifications, designs,
and standard equipment without notice and without incurring obligation. These vehicles are not
designed or manufactured for racing or use on rental tracks, public streets, public roads,
highways, paved surfaces, or right-of-ways. Always wear an approved helmet and eye protection
when riding. Always secure loose clothing and long hair. Always utilize seatbelts. Please read
the operators manual before usage and go over the Buyer Safety Agreement.
FAQ’s:
1.
FOR WHAT REASONS CAN MY WARRANTY CLAIM BE DISPUTED OR DENIED?
Warranty can be denied because of an out of warranty date, the unit was not a Hammerhead
Off-Road unit or the Warranty Registration Card was not submitted to Hammerhead Off-Road
within 14 days of purchase. The warranty does not apply to any part, which in opinion of
seller was defective because of improper maintenance, improper assembly, alterations,
abuse, negligence, or accident. The warranty does not cover loss of use of the seller vehicle,
loss of time, inconvenience, or any other consequential damage which includes, but is not
limited to, loss or damage to person or property or any expense of returning any damaged
units to the seller, distributor, or its authorized dealer. Also, see above.
2.
DOES HAMMERHEAD OFF-ROAD OFFER AN EXTENDED WARRANTY?
No, Hammerhead Off-Road does not offer any type of extended warranty.
3. IS MY KART STILL UNDER WARRANTY IF
I HAVE OWNED IT FOR 1 YEAR BUT
PUT ONLY 6 HOURS OF DRIVING TIME ON IT?
Warranty is base on the exact date of purchase, not based on how many hours it has been
used.
Hammerhead Off-Road Warranty Registration Form
Registration Terms & Conditions:
In order to activate the warranty, please follow the instructions below:
1) Make a copy of the Bill of Sale
2) Make a copy of Pre-Delivery Checklist
3) Make a copy of Buyer-Safety Agreement
4) Fill out warranty card and send with all above documents to:
Hammerhead Off-Road
Attn: Warranty Registration
1200 Lakeside Parkway Ste. 325
Flower Mound, TX 75028
Or, Fax to 214-513-1738
Or, ON-LINE at www.hammerheadoffroad.com under dealer’s only section
Hammerhead Off-Road Warranty Registration Card
(Must be sent in with a copy of sales receipt and Buyers Safety Agreement)
VIN# _____________________________________Model: ______________
Dealer Name: __________________________________________________
Dealer Address: ________________________________________________
City: _________________________ State: ________ Zip:_______________
Customer Name: ________________________________________________
Customer Address: ______________________________________________
Customer City: __________________ State: __________________________
Customer Phone: ________________ Email: _________________________
Date of Purchase: ______________________________________________
I Certify that all information provided is true and correct to the best of my knowledge.
I understand the exceptions and limitations of the warranty coverage.
Customer Signature:_________________________ Date: _______________
Hammerhead Buyers Safety Agreement (1/2)
-
______Always read the owner’s manual carefully before riding and follow the operating
procedures described in the owner’s manual.
-
______Pay close attention to all warnings contained in the manual and on all labels.
-
______These vehicles are designed for riders of ages 5 through 8 for 50cc, 9 through 15 for
80cc, 16 and older for 150cc, 18 and older for 250cc, 400cc, 500cc.
-
______Both the parent and the child must fully understand everything in the owners manual
before riding.
-
______Always wear a helmet, face shield, boots, gloves, and protective clothing while riding.
-
______Beginners should receive training from a certified instructor.
-
______It is illegal to ride this vehicle on public roads or highways.
-
______Do not allow your child to ride without supervision.
-
______Do not ride under the influence of drugs or alcohol. They can affect your judgment
and slow your reaction time.
-
______Always maintain a safe distance between your vehicle and vehicles around you.
-
______Never ride this vehicle unless it has been properly adjusted and maintained.
-
______Never run the engine in closed areas. The exhaust gas contains poisonous carbon
monoxide.
-
______Do not touch any part of the engine, muffler, or the exhaust system during or
immediately after operation of the vehicle.
-
______Always check for obstacles before operating in a new area.
-
______It is highly recommended that this vehicle should not be driven at night or during dark
periods
- ______Never attempt to operate over large obstacles, such as large rocks, or fallen trees.
Always follow proper procedures when operating over obstacles as described in this manual.
Hammerhead Buyers Safety Agreement (2/2)
-
______Always be careful when skidding or sliding. On extremely slippery surfaces such as
ice, go slow and be very cautious in order to reduce the chance of skidding or sliding
out of control.
-
______Never do wheelies, jumps or any stunts.
-
______Never operate the vehicle in fast flowing water. Remember that wet brakes may
reduce your stopping ability. Test your brakes after leaving the water. If necessary,
apply those several times to let friction dry out the linings.
-
______Always use the size and type of tires specified in this manual.
proper
tire pressure as described in this manual.
-
______All modifications to this vehicle should be made by a qualified mechanic. Modification
to the vehicle, including the use of performance parts or non-original parts, will void the
warranty in its entirety, unless express written approval stating that the warranty will not be
voided is obtained from Hammerhead.
-
______When transporting the machine in another vehicle, be sure that it is kept upright and
that the fuel cock is in the “off” position. Otherwise, fuel may leak out of the
carburetor or the fuel tank.
-
______Always follow the break-in-period as described in the owner’s manual. Not following
the break-in period will void the engine warranty.
-
______Always clean the air filter as described in the owner’s manual. Improper maintenance
of the air filter will void the engine warranty.
Always maintain
Failure to follow all warnings and unsupervised or irresponsible operation can cause serious
injury or death. By initialing each item on the above checklist, I have indicated my complete
understanding of these points, and I acknowledge my responsibilities regarding the
contents. I also agree to explain the points on this checklist to anyone besides myself
who will be operating the vehicle now and/or in the future.
__________________________________
Dealer’s Signature
__________________________________
Print Store Name
_________________________________
Buyer’s Signature
_________________________________
Print Buyer’s Name
__________________________________
_________________________________
Date
Date
__________________________________
_________________________________
VIN Number
Model
IMPORTANT MANUAL INFORMATION Note: The operator, passenger, parents or guardian must read, study and understand all the items contained within this owners/operators manual before operating this vehicle. Failure to follow these instructions could endanger the personal safety of the operator, passenger and any Bystanders. FAILURE TO FOLLOW THE WARNINGS CONTAINED IN THIS MANUAL CAN RESULT IN SERIOUS INJURY OR DEATH. ! The safety alert symbol means ATTENTION! BECOME ALERT! YOUR SAFETY IS INVOLVED! ! WARNING Failure to follow WARNING instructions could result in severe injury or death to the vehicle operator, a bystander or a person inspecting or repairing the vehicle. CAUTION: A CAUTION indicates special precautions that must be taken to avoid damage to the vehicle.
NOTE: A NOTE provides key information to make procedures easier. 3 LOCATION OF WARNING DECALS Read and understand all of the labels on your vehicle. They contain important information for safe and proper of your vehicle. Never remove any labels from your vehicle. If a label becomes difficult to read or comes off, a replacement label is available from your dealer. Operator Age Limitation Warning Seat Belt Warning ! WARNING
UNDER
16
This vehicle is not to be
operated by anyone
under 16 years of age.
No Riding on Cargo Bed Warning Gear Selection Warning ! WARNING
NO RIDING
This cargo bed is intended for cargo
only, not exceeding the rated weight
load found in the Owner's Manual.
All occupants must be inside the
vehicle and wearing the proper
restraints and safety gear.
Pinch Hazard Cargo Bed Limitation Warning Maximum Weight:
250 Lbs
4 Pre‐Operation Warning ! WARNING
OBSERVE THE FOLLOWING INSTRUCTIONS
Failure to understand and follow Warnings and Instructions for the
safe use and maintenance of this product may result in Death or
Injury! This information is contained in the Warning Labels,
Owner's Manuals & Supplements, Safety Video, and Engine
Manual supplied with the product. Make sure that you understand
and follow all Warnings and Instructions in this material.
- Always wear a D.O.T. - approved motorcycle helmet, eye
protection, and protective clothing.
- Check tire pressures before operating. Refer to Owner's Manual
for proper operating pressure.
- Do NOT operate the vehicle without the brush bars securely in
place.
- Keep all covers and shields properly installed.
- Throttle and brake controls must work properly and freely before
starting the vehicle.
- Operator must be seated, safety belt must be fastened, and brake
applied before operating the vehicle.
- Never operate at speeds too fast for your skills or the conditions.
- Never attempt jumps or other stunts.
- Never ride after consuming alcohol, drugs, or other intoxicants.
5 SAFETY INFORMATION This off‐highway utility vehicle handles differently from other vehicles including cars and ATVs. Where INJURY OR DEATH can result if you do not follow these instructions: -
Read this manual and labels carefully and follow the operating procedures described. -
This vehicle is designed to carry the driver and one passenger. Never carry passengers in the cargo bed. -
Always be sure the driver and passenger are wearing seat belts. -
Never give a ride to a passenger who is too small to reach and hold the handgrip on the enclosure. -
Always avoid operating the vehicle on any paved surfaces, including sidewalks, driveways, parking Lots, and streets. -
Never operate this vehicle in any public street, road, or highway, even a dirt or gravel one. -
Never operate this vehicle without wearing an approved motorcycle helmet that fits properly. You should also wear eye protection (goggles or a face shield), gloves, over‐the‐ankle boots, long‐sleeved shirt or jacket, and long pants. -
Never consume alcohol or drugs before or while operating this vehicle. -
Never operate at speeds too fast for your skills or the conditions. Always go at a speed that is proper for the terrain, visibility, operating conditions, and your experience. -
Never attempt jumps or other stunts. -
Always inspect your vehicle each time you use it is in safe operating condition. Always follow the inspection and maintenance procedures and schedules described in this manual. 6 -
Always keep hands, arms, feet, and legs inside the vehicle at all times during operation. Keep your feet on the floorboard. Never hold onto the enclosure except when using the handgrip inside the enclosure. Otherwise, your hand could be injured if it is caught between the enclosure and an obstacle outside the vehicle. -
Always keep both hands on the steering wheel when driving. -
Never wrap your thumbs and fingers around the steering wheel. This is particularly important when driving in rough terrain. The front wheels will move right and left as they respond to the terrain, and this movement will be felt in the steering wheel. A sudden jolt could wrench the steering wheel around, and your thumbs or fingers could be injured if they are in the way of the steering wheel spokes. -
Always go slowly and be extra careful when operating on unfamiliar terrain. Always be alert to changing terrain conditions when driving the vehicle. -
Never operate on excessively rough, slippery, or loose terrain until you have learned and practiced the skills necessary to control the vehicle on such terrain. Always be especially cautious on these kinds of terrain. -
Never turn at excessive speed. Practice turning at slow speeds before attempting to turn at faster speeds. Do not attempt turns on steep inclines. -
Never operate the vehicle on hills that are too steep for it or for your abilities. Go straight up and down hills where possible. Maximum slope angle:15° -
Never operate on hills that are slippery or ones where you will not be able to see far enough ahead of you. Never go over the top of a hill at speed if you cannot see what is on the other side. -
Always follow proper procedures for going uphill. If you lose momentum and cannot continue up a hill, back down the hill with the engine in reverse gear. Use engine braking to help you go slowly. If necessary, use the brakes gradually to help you go slowly. -
Always check terrain carefully before going down hills. Go as slowly as possible. Never go down a hill at high speed. 7 -
Always check for obstacles before operating in a new area. -
Never operate the vehicle in fast flowing water or water deeper than the floorboards on this model. Remember that wet brakes may have reduced stopping ability. Test your brakes after leaving water. If necessary, apply them several times to let friction dry out the linings. -
Always be sure these are no obstacles or people behind you when you operate in reverse. When it is safe to proceed in reverse, go slowly. Do not brake abruptly when carrying loads in the cargo bed. -
Always use the size and type of tire specified in this manual. -
Always maintain proper tire pressure as described in this manual. Never exceed the stated load capacity. Cargo should be as far forward in the bed as possible, and distributed evenly from side to side. Be sure cargo is secured so that it cannot move around during operation. Reduce speed and follow instructions in thin manual for carrying cargo or pulling a trailer. Allow greater distance for braking. 8 DESCRIPTION AND VEHICLE IDENTIFICATION Side View 1. Head lights 2. Front ABS Plastic Bumper 3. Front Tire 4. Brush Guards 5. Side Mirrors 6. ABS Plastic Top 7. Transmission Shifter 8. Steering Wheel 9. Cup Holder 10. Parking Brake 11. Seat Bottom (fold to access gas tank) 12. Seatbelts 13. Dump Bed Handle 14. Dump Bed 15. Dump Bed Latch 16. Tail Gate 17. Rear Shock (adjustable) 18. Dump Bed Lever (to open dump bed) 19. Rear Fender 20. Rear Tires 9 Inside View 21. Shifter Lever (F/N/R) 22. LCD Indicator (Speedometer, Turn 23. Glove Compartment 24. Brake Pedal 25. Throttle Pedal 26. Key Ignition 27. Hazard Warning Lights 28. Head Lights 29. Horn / Turn Signals 30. Auxiliary12V Plug 10 Under the Seat 31. Vehicle Identification Plate 32. Gas Tank Cap 33. Gas Tank (unleaded gas only) 34. Engine 35. Battery Rear View 37. Taillights (Running Lights and Brake 38. Rear Axle 39. Electrical Box 40. Air Filter Assembly 41. Rear Brake System 42. Adjustable Rear Shocks 11 CONTROL FUNCTIONS Main Switch Functions of respective switch position are as follows: OFF: All electrical circuits are switch off. The key can be removed in this position. ON: All electrical circuits are supplied with power, and the headlights and taillights comes on when the light switch is on. Ignition: The electric starter is engaged by turning and holding the key in this position. Release the key when the engine starts. CAUTION: -
Do not operate the electric starter continuously for more than 5 seconds, or starter damage could occur. Wait at least 5 seconds between each operation of the electric starter to let it cool. -
Do not turn the key to the “START” position with the engine running, or damage to the electric starter can result -
See Starting instructions prior to starting the engine. 12 Indicator and warning lights. 1.
Speed indicator in MPH. 2.
Left turning light indicator 3.
Headlight Indicator 4.
Parking Brake Indicator 5.
Right turning light indicator 6.
Mileage odometer (miles) Control Panel 1.
Hazard Lights Switch 2.
Headlight switch (High/Low Beam) 3.
Turning Light switch 4.
Horn 5.
Auxiliary Power Plug (12 Volts) Caution: Do not use the headlights with the engine turned off for an extended period of time. The battery may discharge to the point that the starter motor will not operate properly. If this should happen, remove the battery and recharge it. 13 Accelerator Pedal Press the accelerator pedal down to increase engine speed. Spring pressure returns the pedal to the rest position when released. Always check that the accelerator pedal returns normally before starting the engine. 1. Accelerator Pedal Brake Pedal Press the brake pedal to slow or stop the vehicle. This vehicle is equipped with front and rear disc brakes press the brake pedal will apply pressure on each brake disc. 1. Brake Pedal Parking Brake Lever The parking brake lever is located in between the driver seat and passenger seat.. It will help hold the vehicle from moving while parked. To set the parking brake, press the release button and pull up on the lever. To release the parking brake, press the release button and release the 1. Parking Brake Lever lever. Spring pressure helps return the lever to the released position. Be sure to fully release the parking brake before starting out. Failure to do so may result in poor performance and premature wearing of the rear brake and Drive Belt. 14 Drive Select Lever The drive select lever is used to shift your vehicle into Forward, Neutral and Reverse position. (D,N,R). Always STOP the vehicle completely before select into a different drive. 1. Drive selector Reverse) (Forward, Neutral, NOTE: Sometimes it may be difficult to select into the drive that is because the gears might be locked up in the transmission. Try to move the vehicle with your weight to unlock the gears. Fuel tank cap The Fuel tank is located underneath the vehicle’s seat bottom. Pull vehicle’s seat bottom up to reveal the fuel tank. Remove the fuel tank cap by turning it counterclockwise. 1. Fuel tank cap Warning: Only use unleaded grade gasoline Seat Belts This vehicle is equipped with three‐point seat belts for both the operator and passenger. Always wear the seat belt while riding the vehicle. 1.
Hold the latch plate as you pull the belt across your lap and chest. Make sure the belt 1. Buckle is not twisted and is not caught on any 2. Latch Plate portion of the vehicle, your clothing, or any equipment you are carrying. 2.
Push the latch plate into the buckle until it clicks. Pull up on the latch plate to make sure it is secure. 3.
15 Put the lap portion of the belt low on your hips. Push down on the buckle end of the belt as you pull up on the shoulder part so the belt is snug across your hips. 4.
Position the shoulder belt over your shoulder and across your chest. The shoulder belt should fit against your chest. If it is loose, pull the belt out all the way and then let it 1. Buckle retract. 2. Release Button 5.
To release the buckle, firmly press the release button. WARNING POTENTIAL HAZARD Not wear the seatbelt, and wear the seat belt improperly. WHAT CAN HAPPEN There is increased risk of being killed or seriously injured in an accident. HOW TO AVOID THE HAZARD Always wear your seat belt when riding in the vehicle. Be sure the seat belt is close‐fitting across your hips and chest and is latched securely. 16 Glove Compartment To protect from damages, do not put metal products, like tools or sharply edged products directly in the glove compartment. If they must be stored, wrap them in appropriate cushion materials. Cargo Bed Cargo bed weight capacity is 250 Lbs. To open the tailgate, you need to unlatch two tailgate latches on either side of the tailgate. Do not put any extra weight on the tailgate as it might break the latches. Weight capacity is 30 Lbs. 1. Cargo Bed Release 2. Bed Handles 3. Tailgate Latch 4. Tailgate Cargo Bed Release To Lift Push the cargo bed release lever down, and then slowly lift up the cargo bed until it stops. To Lower Lower the cargo bed slowly to its original position by pressing on the side of the bed handles. Be 1. Cargo Bed Release sure it is locked into the place. The maximum 17 2. Bed Handles load capacity is 250 Lbs. 3. Tailgate Latch 4. Tailgate ! WARNING POTENTIAL HAZARD Pinch Points WHAT CAN HAPPEN You or someone else could be pinched between the cargo bed and the frame when the bed is being lowered. HOW TO AVOID THE HAZARD Before closing the bed, be sure others are standing away from the vehicle. Keep hands and fingers away from the pinch points between the bed and the frame. ! WARNING POTENTIAL HAZARD Overloading the cargo bed WHAT CAN HAPPEN Could cause changes in vehicle handling which could lead to an accident HOW TO AVOID THE HAZARD Never exceed the stated maximum load limit for the cargo bed. Cargo should be properly distributed and securely attached. Reduce speed when carrying cargo. Allow greater distance for braking. ! WARNING 18 POTENTIAL HAZARD Carrying a passenger in the cargo bed. WHAT CAN HAPPEN The passenger could fall, be thrown out, or be struck by objects in the cargo bed. HOW TO AVOID THE HAZARD Never carry a passenger in the cargo bed. The cargo bed is designed to carry cargo only. Rear shock absorber adjustment The spring preload can be adjusted to suit the operating conditions. You can reduce preload for a softer ride, or increase preload if frequent bottoming occurs. Adjust the spring preload as follows. 1. Spring preloaded adjusting ring -
2. Position indicator To increase the spring preload, turn the adjusting ring in direction of ”A”. -
To decrease the spring preload, turn the adjusting ring in direction “B” !WARNING Frequent or severe bottoming can cause increased wear or damage to the vehicle. 19 PRE‐OPERATING CHECKS Before using this Vehicle, check the following Items: ITEM ROUTINE Brakes Check operation, free play, fluid level and fluid leakage. Fill with DOT 4 brake fluid if necessary. Parking Brake Check for proper operation, condition and free play Fuel Check fuel level. Fill with fuel if necessary. Engine Oil Check oil Level Fill with oil if necessary. Coolant reservoir Check coolant level. Fill with coolant if necessary Final Gear Oil Check for leakage Accelerator Pedal Check for proper accelerator pedal operation. Seat belts Check for proper operation and belt wear. Steering Check for proper operations. Fitting and fasteners Check all fittings and fasteners. Lights and switches Check for proper operation. Wheels and tires Check tire pressure, wear and damage. Axle Boots Check for damage. ! WARNING POTENTIAL HAZARD: 20 Failure to inspect the vehicle before operating. Failure to properly maintain the vehicle. WHAT CAN HAPPEN: Increase the possibility of an accident or equipment damage. HOW TO AVOID THE HAZARD: Always inspect your vehicle each time you use it to make sure vehicle is in safe operating condition. Always follow the inspection and maintenance procedures and schedules described in the Owner’s Manual. BRAKE PEDAL Check for correct brake pedal free play. If the brake pedal free play is incorrect, have a dealer adjust it. Check the operation of the brake pedal. It should move smoothly and three should be a firm feeling when the brake are applied. If not, have the vehicle inspected by a dealer. Brake Fluid Level Check the brake fluid level. Add fluid if necessary. Recommended Brake Fluid: DOT 4. Brake Fluid Leakage Check to see if any brake fluid is leaking out of the pipe joints or the brake fluid reservoir. Apply the brakes firmly for one minute. IF there is any leakage, have the vehicle inspected by a dealer. Brake Operation Test the brakes at slow speed after starting out to make sure they are working properly. If the brakes do not provide proper braking performance, inspect the brake system. ! WARNING POTENTIAL HAZARD: 21 Driving with improperly operating brakes. WHAT CAN HAPPEN: You could lose braking ability, which could lead to an accident. HOW TO AVOID THE HAZARD: Always check the brakes at the start of every ride. Do not operate the vehicle if you find any problem with the brakes. If a problem cannot be corrected by the adjustment procedures provided in this manual, have the vehicle inspected by a dealer. Fuel Make sure there is sufficient gasoline in the tank. Recommended fuel: Unleaded Gasoline ONLY Fuel Tank Capacity: 10L or 2.6 US Gallon Your engine has been designed to use regular unleaded gasoline with a pump octane number of ([R+M]/2) 86 or higher, or research octane number of 91 or higher. If knocking or pinging occurs, use a different brand of gasoline or premium unleaded fuel. Unleaded fuel will give you longer spark plug life and reduced maintenance cost. ! WARNING POTENTIAL HAZARD: Improper case when refueling. WHAT CAN HAPPEN: Fuel can spill, which can cause a fire and severe injury. Fuel expands when it heats up. If the fuel tank is overfilled, fuel could spill put due to heat from the engine or the sun. HOW TO AVOID THE HAZARD: 22 Do not overfill the fuel tank. Be careful not to spill fuel, especially on the engine or exhaust pipe. Wipe up any spilled fuel immediately. Be sure the fuel tank cap is closed securely. Engine Oil Make sure the engine oil is at the specified level. Add oil as necessary. CAUTION: -
Make sure that no foreign material enters the crankcase. Accelerator Pedal Check to see that the accelerator pedal operates correctly. It must operate smoothly and fully spring back to the idle position when released. Have a dealer repair as necessary for the proper operation. Seat belts Make sure that both seat belts are not frayed or damaged. The seat belt must move smoothly when pulled out and retract on its own when released. The latch plate should click securely into the buckle and release when the release button is pushed firmly. Wash off any dirt or mud which could affect operation. Have a dealer repair as necessary for proper operations. Steering Pack on level ground. Turn the steering wheel right and left. Check for excessive free play, abnormal noise, or a rough feeling. Have a dealer repair as necessary for proper operation. Fittings and fasteners Always check the tightness of chassis fittings and fasteners before a ride. Take a vehicle to a dealer or refer to the service manual for correct tightening torque. 23 Lights Check the headlights and tail/brake lights to make sure they are in working condition. Repair as necessary for proper operation. Switches Check the operation of all switches. Have a dealer repair as necessary for proper operation. Tires ! WARNING POTENTIAL HAZARD: Operating this vehicle with improper tire, or with improper or uneven tire pressure. WHAT CAN HAPPEN: Use of improper tires on this vehicle, or operation of this vehicle with improper or uneven tire pressure, may cause loss of control, increasing your risk of accident. HOW TO AVOID THE HAZARD: 1.
Use Proper Tires: Front Tire: 20 x 8 ‐ 8 Rear Tire: 22 x 11 ‐ 10 2.
The tires should be set to the recommended pressure. Front 15 PSI Rear 15 PSI 24 OPERATION ! WARNING POTENTIAL HAZARD: Operating vehicle without being familiar with all controls WHAT CAN HAPPEN: Loss of control, which could cause an accident or injury. HOW TO AVOID THE HAZARD: Read the Owners manual carefully. If there is a control or function you do not understand, ask your dealer. Start a cold engine 1.
Apply the brake. 2.
Shift the drive select lever into the neutral position. NOTE: -
When the drive select lever is in the neutral position. -
The engine can be started in any gear if the brake is applied. However, it is recommended to shift into neutral before starting the engine. 3.
With your foot off the accelerator pedal, start the engine by turning the key to “START” position. NOTE: If the engine fails to start, release the key, and then try starting again. Wait a few seconds before the next attempt. Each cranking could be as short as possible to preserve battery. Do not crank the engine more than 5 seconds on each attempt. 4.
See the “Engine Brake In” section prior to operating the engine for the first time. 25 Warming Up To get the maximum engine life, always warm up the engine before starting off. Never accelerate hard with a cold engine! To see whether or not the engine is warm, check if it responds to the throttle normally with the starter (choke) turned off. Caution: Before shifting, you must stop the vehicle and take your foot off the accelerator pedal, otherwise the transmission may be damaged. 1.
Shifting: Neutral to High and High to Low 1.
Drive Select Lever Stop the vehicle. Keep your foot off the accelerator pedal. 2.
Apply the brakes, then shift by moving the drive select lever along the shift guide. 3.
Release the brakes and press the accelerator pedal gradually. NOTE: Make sure the drive select lever is completely in the shifted position. Shifting: Neutral to Reverse 1.
Stop the vehicle. Keep your foot off the accelerator pedal. 2.
Apply the brake pedal. 3.
Shift from neutral to reverse or vise verse by moving the drive select lever along the shift guide. 4.
Check behind for people or obstacles, then release the brake pedal. 5.
Press the accelerator pedal gradually and continue to watch your rear view while 26 backing. ! WARNING POTENTIAL HAZARD: Improperly operating in reverse WHAT CAN HAPPEN: You could hit an obstacle or person standing behind you, resulting in serious injury. HOW TO AVOID THE HAZARD: When you shift into reverse, make sure there are no obstacles or people behind you. When it is safe to proceed, go slowly. Parking When parking, stop the engine and shift the drive select lever into the neutral position. Apply the parking brake to help prevent the vehicle from rolling. Parking on a slope ! WARNING POTENTIAL HAZARD: Parking on a hill or other incline. WHAT CAN HAPPEN: The vehicle could roll out of control, increasing the chance of an accident. HOW TO AVOID THE HAZARD: Avoid parking on hills or other inclines. If you must park on an incline, apply the parking brake, and block the front and rear wheels with rocks or other objects. Do not park the vehicle at all on hills that are so steep you could not walk up them easily. 27 1.
Bring the vehicle to stop by applying the brakes. 2.
Stop the engine. 3.
With the brake applies, set parking brake by pulling up the parking brake lever. 28 DRIVING YOUR VEHICLE Getting to know your vehicle This off‐highway utility vehicle will handle and maneuver differently from an ordinary passenger car or other vehicle. Before you begin to use your vehicle, be sure you have read this Owner’s Manual completely and understand the operation of the controls. Pay particular attention to the safety information and warning labels on the vehicle. Please also read all caution and warning labels on your vehicle. This vehicle is designed for the operator and one passenger. The driver and passenger must always wear a seat belt. Never carry passengers in the cargo bed. The total weight of operator, passenger, accessories, cargo, trailer tongue weight, and the vehicle itself must not exceed 340 kg (750 lb). Carrying a passenger and cargo can affect vehicle handling. The driver and passenger must always wear a seat belt and an approved motorcycle helmet. Also wear eye protection and protective clothing, including over‐the‐ankle boots, gloves, along‐sleeved shirt or jacket, and long pants. Keep hands and feet inside the vehicle at all times. Going Uphill Do not attempt to climb hills until you have mastered basic maneuvers on flat ground. Use proper driving techniques to avoid overturns on hills and slopes. Drive straight up hills, and avoid slopes. Avoid crossing the side of a hill, which increases your chance of rollover. Practice first on gentle slopes before attempting steeper hills. Always check the terrain carefully before attempting any hill. Use common sense and avoid hills that are too steep for you to climb. Maximum slope angle: 15 Degrees Choose carefully which hills you attempt to climb. Avoid hills with slippery surfaces or ones where you will not be able to see far enough ahead of you. 29 Going Down Hill Check the terrain carefully before going down a hill. When possible, choose a path that lets you drive your vehicle straight downhill. Avoid sharp angles that could allow the vehicle to pitch or roll over. Carefully choose your path and drive no faster than you will able to react to obstacles that may appear. Riding over Rough Terrain Operating over rough terrain should be done with caution. Look for obstacles that could cause damage to the vehicle or could lead to a rollover or accident. Avoid jumping the vehicle as injury, loss of control, and damage to the vehicle could occur. Tip over warnings and recovery This vehicle CAN be rolled over in case of reckless driving, going too fast, jumping or making sharp turn. ! WARNING POTENTIAL HAZARD: Driving recklessly, going too fast, jumping vehicle or sharp turns. WHAT CAN HAPPEN: The vehicle could tip over and fall on driver or operators body parts. Injuries may lead to disfigurements and maimed bodies. HOW TO AVOID THE HAZARD: Avoid driving recklessly, going too fast, jumping vehicle or make sharp turns. IN CASE OF TURN OVER, keep all limbs inside the vehicle. DO NOT extend any body parts outside of the vehicle. Wait until the vehicle stops rolling, get out of the vehicle and call for HELP. 30 PERIODIC MAINTENANCE AND ADJUSTMENT Periodic inspection, adjustment and lubrication will keep your vehicle in the safest and most efficient condition possible. Safety is an obligation of the vehicle owner. The most important points of vehicle inspection, adjustment and lubrication are explained on the following pages. ! WARNING POTENTIAL HAZARD: Servicing an engine while its running WHAT CAN HAPPEN: Moving Parts can catch clothing or parts of the body, causing injury. Electrical components can cause shocks or can start fires. HOW TO AVOID THE HAZARD: Turn off the engine when performing maintenance unless otherwise specified. Have a dealer perform service if you are not familiar with vehicle services. 31 PERIODIC MAINTENANCE / LUBRICATION ITEM ROUTINE Which
INITIAL EVERY Month
1 3 6 6 12 KM 320 1200 2400 2400 4800 (MI) (200) (750) (1500) (1500) (3000) Hours 20 75 150 150 300 YES YES YES YES YES YES YES YES YES YES YES YES YES YES YES YES YES YES YES YES YES YES ever Comes First Valves Check vales clearance adjust if necessary Spark Plug Check condition Adjust gap and clean Replace if necessary Air Filter(engine and air Clean intake duct) Replace if necessary Carburetor Check idle speed/starter operation Adjust if necessary Crankcase system breather Check breather hose for cracks or damage Replace if necessary Exhaust System Check for leakage Replace gasket if necessary Tighten if necessary Sparks Arrester Clean 32 Fuel Line Check fuel hose for cracks or damage YES YES YES YES YES YES YES Replace if necessary Engine Oil Replace (warm engine before draining) Engine Oil Filter cartridge Replace YES YES YES Final Gear Oil Check oil level / oil leakage YES YES Front Brake Check operation / brake pad wear / YES YES YES YES YES fluid leakage Correct if necessary. Replace pads if worn to the limit. ITEM ROUTINE Which
INITIAL EVERY Month
1 3 6 6 12 KM 320 1200 2400 2400 4800 (MI) (200) (750) (1500) (1500) (3000) Hours 20 75 150 150 300 YES YES YES YES YES ever Comes First Rear Brake Check operation / brake pad wear / fluid leakage Correct if necessary. Replace pads if worn to the limit. Accelerator Pedal Check operation and free play YES YES YES YES YES V‐Belt Check operation YES YES YES Repair for wear, cracks, of damage 33 Wheels Check balance/damage/run out. Wheels bearing Check bearing assemblies for YES YES YES YES YES YES YES YES YES YES YES YES YES YES YES YES YES YES YES YES YES YES YES looseness/damage Replace if damaged. Front and Rear Check operation and for leakage Suspension Correct if necessary Steering System Check operation and for looseness/replace if necessary. Engine Mount Check for cracks or damage Check bolts tightness Fittings and Fasteners Check all chassis fittings and fasteners
Correct of necessary Items may require special tools, data and technical skills may require a dealer to perform the service. 34 Engine Oil and Oil Filter Cartridge The Engine oil level should be checked before each operation. In addition, the oil must be changed and oil filter cartridge replaced at the intervals specified in the periodic maintenance and lubrication chart. Service Engine Crankcase Oil This vehicle comes with external oil cooler for the engine. Make sure to replace the oil cooler with authentic filter from your dealer. You must change the oil in the crankcase after the first 5 hours of operating of your new engine and after 10 hours of use thereafter. This will ensure proper lubrication of the internal parts and prevent costly repairs due to excessive wear. 1) Remove the screen cap drain plug located forward of the engine oil fill plug on the bottom right side of the engine. Upon removal of the plug, a filter screen will be visible. Elevating the front of the vehicle slightly will help drain all of the oil out. 2) Empty all of the oil into a suitable container. 3) Remove and clean the oil screen 4) With the oil completely drained, replace the screen and drain plug, then tighten securely. 5) The external oil filter is located behind the 1.
Oil Cooler 2.
Oil Filter 3.
Oil Filter Gasket driver’s seat in front of the battery tray. The screw on the oil filter should be replaced when oil is changed. With the oil drained from the crankcase, unscrew the oil filter and replace with a new one. Ensure that the oil filter gasket is properly seated, lubricated with oil and in good 35 condition. Do not over tighten the oil filter. 6) Replace the vehicle back on a flat surface to level the engine, and refill the crankcase with 30 oz of SAE 10W40 motor oil. 7) Check the oil level using the dipstick attached to the oil plug cap. Be sure to the check oil level before each use of the vehicle. 8) Add oil when necessary to keep the oil level between then bottom of the dipstick and the “O” mark. Service Spark Plug 1) Remove the spark plug and inspect it each time you change the oil. (use a spark plug wrench). The electrodes should be kept clean and free of carbon. The presence of the carbon or excess oil will greatly reduce proper engine performance. If possible, check the spark plug gap (area between the electrodes) using a wire feeler gauge. This specification is 0.6‐0.7mm. 2) Before installing spark plug, coat threads lightly with graphite grease if possible to ensure easy removal next time the spark plug needs inspection. 3) It is advisable to replace the spark plug at least once a year to insure easy starting and good engine performance. 36 Chain Lubrication To increase the chain life, it should be lubricated with a spray on type chain lubricant. Chain Adjustment Check the chain adjustment after the first two hours of use. Readjust if it has more than 1/2” flex. 1) Loose Nut #1 2) Adjust Nut #2. Turn Nut #2 clockwise in 1/2 turn increments, then turn Nut #1 until tight. Follow this procedure until chain is at proper tension. 3) Repeat the above two steps until chain is adjusted to the desired fit. Adjustment of Front and Rear Shocks There are five adjustable positions on each shock. The default position is in the middle set by the manufacturer. Use a round nut wrench as you adjust the shock, the tension of the shock spring will increase as you screw to the left, decrease as you screw to the right. Adjust accordingly to the weight and riders. 37 Service Air Filter Service air filter every 20 hours of use 1) Remove cleaner cover by removing the Phillips head screws 2) Clean any excess dirt, oil or dust from the air cleaner box with a mild detergent and water 1.
Air filter cleaner cover 2.
Air filter element 3) Thoroughly dry the air box. 3.
Air filter right Cover 4) Replace the air cleaner element. solution 5) Carefully align the gasket between the air box halves during re‐assembly. Service Shifter Adjustment Your unit might require an occasional adjustment in the shifter cables due to physical stretch found during normal operation of the vehicle. To make shift adjustments, follow the below instructions. 1) Push the shifter lever to forward or “D” position 2) Check the shifter control disc found just behind the oil level dipstick to ensure that it has rotated forward all the way. Look for any slack in control cable 1. 3) Loosen adjustment nuts #1 and #2, pulling the housing to draw the cable tight until the cable is properly tensioned. 4) Shift the lever to the “R” position and check the control disc to ensure that it has rotated full towards the rear of the vehicle. 38 5) Loosen adjustment nut #3 and #4, pulling the cable housing to draw #2 control cable right. 6) Realign nut #2 and #4 when the cable is properly tensioned. Front Wheel Replacement Do not disassemble the castle nuts when you replace the front wheels. It is only necessary to remove the four lug nuts to remove the wheel. Tighten the nuts after replacing the wheels. Rear Wheel Replacement Do not disassemble the castle nuts when you replace the rear wheels and hub assembly. Remove the cotter pin and then 24mm nut. Then slide off wheel and hub assembly. It is only necessary to remove the four lug nuts to remove the wheels by itself. Front Wheel Alignment The front wheels should be set with a “toe‐in” from 1/4” to 3/8”. At the centerline of the tires, measure the Distance A and the Distance B. For proper toe adjustment, Dimension A should be 1/4” – 3/8” greater than Dimension B. 1) Loosen the lock nuts on both sides of Front Tie Rods. 2) Ensure the steering wheel is centered, and 39 adjust Dimension B by equally rotating the tie rods in or out with a 12mm wrench. 3) After adjusting to the desired length, tighten the lock nuts against the rod end. 4) Recheck the dimensions for proper alignment. Service Brake Fluid Level Insufficient brake fluid may let air enter the brake system, possibly causing the brakes to become ineffective. Before riding, check that the brake fluid is above the minimum level mark and replenish if necessary. A low brake fluid level may indicate worn brake pads or brake system leakage. IF the brake fluid level is low, be sure to check the brake pads for wear and the brake system for leakage. The brake fluid reservoir is located under the hood. Use only the recommended quality brake fluid. Otherwise, the rubber seals may deteriorate, causing leakage and poor braking performance. 1) Refill with the same brake fluid. Mixing fluids may result in a harmful chemical reaction and lead to poor braking performance. 2) Be careful water does not enter the brake fluid reservoir when refilling. Water will significantly lower the boiling point of the fluid and may result in vapor lock. 3) Brake fluid may deteriorate painted surfaces or plastic parts. Always clean up spilled fluid immediately. 40 4) Have a dealer inspect the brake system if the brake fluid level goes down. Brake fluid replacement Complete fluid replacement should be done by trained service personnel. Have a dealer replace the following components during periodic maintenance or when they are damaged or leaking. 5) Replace the oil seals every two years 6) Replace the brake hoses every four years. Battery The vehicle is equipped with a sealed type battery. Therefore it is not necessary to check the electrolyte or add distilled water in the battery. IF the battery seems to have discharged, consult a dealer. 1.
When vehicle is not used for a month or longer, remove the battery and store it in a cool, dark place. Completely recharge the battery before reinstallation. Warning: A special battery charger is required for recharging a sealed battery. Always make sure the connections are correct when putting the battery back in the vehicle. Fuse Replacement Your unit is equipped with inline fuses to protect the electrical system from excessive load conditions. Main fuse (15 amp) inline fuse is located inside the electrical box located on the drivers side, under the bed and on the top of the rear swing arm. Replace main fuse by removing the electrical cover and opening the fuse holder. A spare fuse is located inside the fuse holder. 41 TROUBLESHOOTING Although vehicles receive a rigid inspection before shipment from the factory, trouble may occur during operation. Any problem in the fuel, compression, or ignition system can cause poor starting and loss of power. The troubleshooting chart describes quick, easy procedures for making checks. If your vehicle requires any repair, take it to a dealer. Your skilled technician at a dealership has the tools, experience and know‐how to properly service your vehicle. Use only genuine parts on your vehicle. 42 CLEANING AND STORAGE A. CLEANING Frequent, thorough cleaning of your vehicle will not only enhance its appearance but will improve its general performance and extend the useful life of many components. 1. Before cleaning the vehicle: a. Block off the end of the exhaust pipe to prevent water entry. A plastic bag and strong rubber band may be used. b. Make sure the spark plug and all filler caps are properly installed. 2. If the engine case is excessively greasy, apply degreaser with a paint brush. Do not apply degreaser to the wheel axles. 3. Rinse the dirt and degreaser off with a garden hose. Use only enough pressure to do the job. CAUTION: Excessive water pressure may cause water seepage and deterioration of wheel bearings, brakes, transmission seals and electrical devices. Many expensive repair bills have resulted from improper high pressure detergent applications such as those available in coin‐operated car washers. 4. Once the majority of the dirt has been hosed off, wash all surfaces with warm water and mild, detergent‐type soap. An old toothbrush or bottle brush is handy for hard‐to‐get‐at places. 5. Rinse the vehicle off immediately with clean water and dry all surfaces with a chamois, clean towel or soft absorbent cloth. 6. Clean the seats with a vinyl upholstery cleaner to keep the cover pliable and glossy. 7. Automotive type wax may be applied to all painted and chrome plated surfaces. Avoid combination cleaver‐waxes. Many contain abrasives which may scratch the paint or protective finish. When finished, start the engine and let it idle for several minutes. 43 ! WARNING POTENTIAL HAZARD Operation with wet brakes after washing. WHAT CAN HAPPEN Wet brakes may have reduced stopping ability, increasing the chance of an accident.
B. STORAGE Long term storage (60 days or more) of your vehicle will require some preventive procedures to guard against deterioration. After thoroughly cleaning the vehicle, prepare for storage as follows: 1. Fill the fuel tank with fresh fuel and add the specified amount of Fuel Stabilizer and Conditioner or equivalent product. Operate the vehicle for at least 5 minutes to distribute treated fuel through the fuel system. 2. Drain the fuel from the carburetor float chamber into a clean container by loosening the drain dolt; this will help prevent fuel deposits from building up. Pour the drained fuel into the fuel tank. Specified amount: NOTE: Use of fuel stabilizer and conditioner eliminates the need to drain the fuel system. Consult a dealer if the fuel system needs to be drained instead. 3. Remove the spark plug, pour about one tablespoon of SAE 10W30 or 20W40 motor oil in the spark plug. Ground the spark plug wire and turn the engine over several times to coat the cylinder wall with oil. 4. Lubricate all control cables. 5. Block up the frame to raise all wheels off the ground. 44 6. Tie a plastic bag over the exhaust pipe outlet to prevent moisture from entering. 7. If storing in a humid or salt‐air atmosphere, coat all exposed metal surfaces with a light film of oil. Do not apply oil to any rubber parts pr the seat covers. 8. Remove the battery and charge it. Store it in a dry place and recharge it once a month. Do not store the battery in an excessively warm or cold place (less than 0℃ (30°F) or more than 30℃ (30°F)). NOTE: Make any necessary repairs before storing the vehicle. 45 SPECIFICATIONS Dimensions Overall length 91 inch
Overall width 51 inch Overall height 68 inch Wheel base 63 inch Ground clearance 8.6 inch Minimum turning radius 78 inch Basic weight 700 lbs. Engine Type Single cylinder oil & cooled 4 stroke Engine Displacement 150cc Bore x Stroke 57.4 x 57.8 Carburetor Deni Output Power 9.0 HP @ 7500 rpm 13 ft‐lbs @ 5500 rpm Starting Keyed Electric Ignition CDI Lubrication SAE 10W/40 Transmission CVT automatic with Neutral and Reverse Spark Plug / Gap C7HSA (NGK) / 0.6 – 0.7 mm Fuel Type Only use mid‐grade unleaded (89‐93 Octane) Chassis Front Tire 20 x 8 – 8 @ 15 psi
Rear Tire 22 x 11 – 10 @ 15 psi Front Brakes Hydraulic Disc Brake Rear Brake Hydraulic Disc Brake Front Suspension Dual A‐Arm with 1.8” of travel 46 Rear Suspension Spring over shock with 2.0” of travel Dry Weight 700 Lbs Capacities Maximum Bed Load
250 Lbs
Climbing Angle 15‐20 Degree Fuel Tank 10 L / 2.6 Gal Engine Oil 36 Oz Battery 12 V 9 AH Top Speed 25‐28 MPH Total Vehicle Weight Capacity (including passenger) 800 Lbs 47