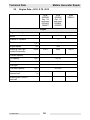
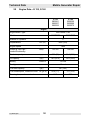
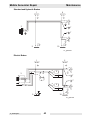
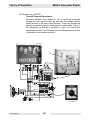
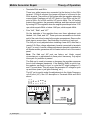
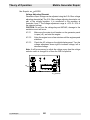
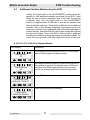
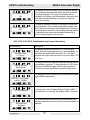
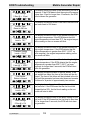
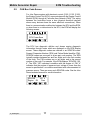
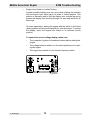
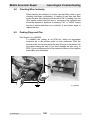
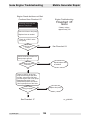
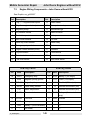
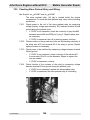
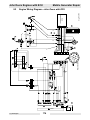
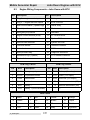
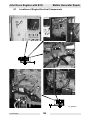
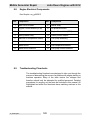
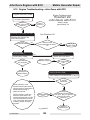
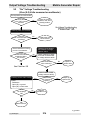
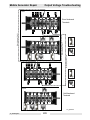
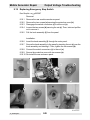
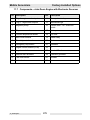
1
www.wackergroup.com
0160486en
001
1005
en
Mobile Generators
G 25
G 50
G 70
G 85
G 125
G 160
REPAIR MANUAL
0
1
6
0
4
8
6
E
N
Mobile Generator Repair
Foreword
This manual covers machines with Item Number:
0009258, 0009259, 0009260, 0009261, 0009305, 0009306, 0009310,
0009462, 0009463, 0009464, 0009465, 0009476, 0009477, 0009478
Operating / Parts Information
You must be familiar with the operation of this machine before you
attempt to troubleshoot or repair it. Basic operating and maintenance
procedures are described in the Operator’s Manual supplied with the
machine. Keep a copy of the Operator’s Manual with the machine at all
times. Use the separate Parts Book supplied with the machine to order
replacement parts. If you are missing either of the documents, please
contact Wacker Corporation to order a replacement.
Damage caused by misuse or neglect of the unit should be brought to
the attention of the operator, to prevent similar occurrences from
happening in the future.
This manual provides information and procedures to safely repair and
maintain the above Wacker model(s). For your own safety and
protection from injury, carefully read, understand, and observe all
instructions described in this manual. THE INFORMATION
CONTAINED IN THIS MANUAL IS BASED ON MACHINES
MANUFACTURED UP TO THE TIME OF PUBLICATION. WACKER
CORPORATION RESERVES THE RIGHT TO CHANGE ANY
PORTION OF THIS INFORMATION WITHOUT NOTICE.
wc_tx000420gb.fm
i
Foreword
Mobile Generator Repair
CALIFORNIA
Proposition 65 Warning:
Diesel engine exhaust, some of its constituents, and certain vehicle
components contain or emit chemicals known to the State of California
WARNING
to cause cancer and birth defects or other reproductive harm.
Laws Pertaining to Spark Arresters
Notice: State Health Safety Codes and Public Resources Codes
specify that in certain locations spark arresters be used on internal
combustion engines that use hydrocarbon fuels. A spark arrester is a
device designed to prevent accidental discharge of sparks or flames
from the engine exhaust. Spark arresters are qualified and rated by
the United States Forest Service for this purpose.
In order to comply with local laws regarding spark arresters, consult
the engine distributor or the local Health and Safety Administrator.
All rights, especially copying and distribution rights, are reserved.
Copyright 2005 by Wacker Corporation
No part of this publication may be reproduced in any form or by any
means, electronic or mechanical, including photocopying, without
express written permission from Wacker Corporation.
Any type of reproduction or distribution not authorized by Wacker
Corporation represents an infringement of valid copyrights and
violators will be prosecuted. We expressly reserve the right to make
technical modifications, even without due notice, which aim at
improving our machines or their safety standards.
wc_tx000420gb.fm
ii
Mobile Generator Repair
1.
Safety Information
1.1
1.2
1.3
1.4
1.5
1.6
1.7
1.8
2.
8
Operating Safety .................................................................................. 9
Service Safety .................................................................................... 10
Operator Safety while using Internal Combustion Engines ................ 12
Towing Safety ..................................................................................... 13
Reporting Trailer Safety Defects ........................................................ 13
Label Locations .................................................................................. 14
Safety and Operating Labels .............................................................. 16
Calling for Service .............................................................................. 21
Technical Data
2.1
2.2
2.3
2.4
2.5
2.6
2.7
2.8
2.9
2.10
2.11
2.12
2.13
2.14
3.
Table of Contents
23
Engine Data—G 25 ............................................................................ 23
Generator Data—G 25 ....................................................................... 24
Trailer and Skid Data—G 25 .............................................................. 25
Dimensions—G 25 ............................................................................. 25
Engine Data—G 50, G 70, G 85 ..................................................... 26
Generator Data—G 50, G 70, G 85 .................................................... 27
Trailer Technical Data—G 50, G 70, G 85 ......................................... 28
Dimensions—G 50, G 70, G 85 .......................................................... 29
Engine Data—G 125, G 160 .............................................................. 30
Generator Data—G 125, G 160 ......................................................... 31
Trailer Technical Data—G 125, G 160 ............................................... 32
Dimensions—G 125, G 160 ............................................................... 32
Isuzu Engine Performance Data ........................................................ 33
John Deere Engine Performance ....................................................... 34
Maintenance
3.1
3.2
3.3
3.4
3.5
3.6
3.7
3.8
36
Periodic Maintenance Schedule ......................................................... 36
Resetting the Periodic Maintenance Timer ........................................ 37
Air Cleaner ......................................................................................... 37
Engine Lubrication .............................................................................. 38
Engine Coolant ................................................................................... 39
Trailer Maintenance ............................................................................ 39
Trailer Wiring—G 25, G 50, G 70, G 85 ............................................. 40
Trailer Wiring—G 125, G 160 ............................................................. 42
wc_br0160486enTOC.fm
1
Table of Contents
4.
Theory of Operation
4.1
4.2
4.3
4.4
4.5
4.6
4.7
4.8
4.9
5.
45
Introduction ..........................................................................................45
Basic Generator Schematic .................................................................46
Generator Components .......................................................................47
Wiring Diagrams ..................................................................................48
Generator Systems .............................................................................52
Power Generation & Output ................................................................53
Voltage Regulation ..............................................................................57
Engine Start .........................................................................................61
ECM Monitoring System ......................................................................63
ECM Troubleshooting
5.1
5.2
5.3
5.4
5.5
5.6
5.7
5.8
5.9
5.10
5.11
5.12
5.13
5.14
6.
Mobile Generator Repair
66
Normal Boot-up Sequence ..................................................................66
Display Variables and Values ..............................................................69
ECM Display Screens—Start Switch in Remote Position ...................70
Additional Variables Monitored by the ECM ........................................71
CAN Bus Code Screen ........................................................................77
Voltage Display Errors .........................................................................78
ECM Automatic Engine Shutdown Conditions ....................................80
Sender Failures .................................................................................88
Recalibrating the ECM ........................................................................88
Removing and Installing the ECM .......................................................93
ECM Circuit Boards .............................................................................94
Control Wiring Numbering & Colors ....................................................95
Sender Resistance Graphs .................................................................98
Checking Magnetic Pickup ................................................................100
Isuzu Engine Troubleshooting
6.1
6.2
6.3
6.4
6.5
6.6
6.7
6.8
101
Isuzu Engine Background .................................................................101
Engine Wiring Diagram—Isuzu .........................................................102
Engine Wiring Components—Isuzu ..................................................103
Engine Electrical Component Locations—Isuzu ...............................104
Engine Electrical Components—Isuzu ..............................................105
Troubleshooting Flowcharts ..............................................................105
Engine Troubleshooting—Isuzu ........................................................106
Checking Wire Continuity ..................................................................109
wc_br0160486enTOC.fm
2
Mobile Generator Repair
6.9
6.10
6.11
6.12
6.13
6.14
6.15
6.16
6.17
6.18
6.19
6.20
6.21
6.22
6.23
6.24
6.25
6.26
6.27
6.28
6.29
7.
Table of Contents
Probing Plugs and Pins .................................................................... 109
Checking ECM Display and LEDs .................................................... 110
Checking Battery .............................................................................. 111
Checking Power to ECM .................................................................. 112
Checking Contacts of ECM Crank Relay ......................................... 114
Checking ECM 10A Fuse ................................................................. 115
Checking Coil of Starter Relay and Wiring ....................................... 116
Checking Diode Across Relay/Solenoid Coil .................................... 117
Checking Contacts of Starter Relay ................................................. 118
Engine Cranks But Does Not Start—Isuzu ....................................... 119
Checking Power to Glow Plugs ........................................................ 124
Checking Glow Plugs ....................................................................... 125
Checking Glow Plug Relay and Wiring ............................................. 126
Checking Contacts of ECM Preheat Relay ...................................... 127
Checking Power to and Operation of Fuel Pump ............................. 128
Isuzu Fuel Solenoid .......................................................................... 130
Checking Fuel Solenoid ................................................................... 132
Checking Coil of Fuel Pump Relay ................................................... 134
Checking Contacts of ECM Fuel Relay ............................................ 136
Checking Contacts of Fuel Pump Relay ........................................... 137
General Engine Troubleshooting—Isuzu ......................................... 138
John Deere Engines without ECU
7.1
7.2
7.3
7.4
7.5
7.6
7.7
7.8
7.9
7.10
7.11
7.12
7.13
7.14
7.15
7.16
7.17
143
John Deere Engine Background ...................................................... 143
Engine Wiring Diagram—John Deere without ECU ......................... 144
Engine Wiring Components—John Deere without ECU .................. 145
Locations of Engine Electrical Components ..................................... 146
Engine Electrical Components ......................................................... 147
Troubleshooting Flowcharts ............................................................. 147
Engine Troubleshooting—John Deere without ECU ........................ 148
Checking Wiring Continuity .............................................................. 151
Probing Plugs and Pins .................................................................... 151
Checking ECM Display and LEDs .................................................... 152
Checking Battery .............................................................................. 153
Checking Power to ECM .................................................................. 154
Checking Contacts of ECM Crank Relay ......................................... 156
Checking ECM 10A Fuse ................................................................. 157
Checking Diode Across Relay/Solenoid Coil .................................... 158
Checking Coil of Starter Relay and Wiring ....................................... 160
Checking Contacts of Starter Relay and Wiring ............................... 161
wc_br0160486enTOC.fm
3
Table of Contents
7.18
7.19
7.20
7.21
7.22
7.23
8.
Mobile Generator Repair
Engine Cranks But Does Not Start ....................................................162
Checking Contacts of ECM Preheat Relay .......................................165
Checking Slave Preheat Relay and Wiring .......................................166
Checking Manifold Heater .................................................................167
Checking Fuel Circuit ........................................................................168
General Engine Troubleshooting—John Deere ................................170
John Deere Engines with ECU
8.1
8.2
8.3
8.4
8.5
8.6
8.7
8.8
8.9
8.10
8.11
8.12
8.13
8.14
8.15
8.16
8.17
8.18
8.19
8.20
8.21
8.22
8.23
8.24
8.25
8.26
8.27
175
John Deere Engine Background .......................................................175
Engine Wiring Diagram—John Deere with ECU ...............................176
Engine Wiring Components—John Deere with ECU ........................177
ECU Wiring Diagram .......................................................................178
ECU Harness Connector ...................................................................179
Sensors and Components .................................................................179
Locations of Engine Electrical Components ......................................180
Engine Electrical Components ..........................................................181
Troubleshooting Flowcharts ..............................................................181
Engine Troubleshooting—John Deere with ECU ..............................182
Checking Wiring Continuity ...............................................................185
Probing Plugs and Pins .....................................................................185
Checking ECM Display and LEDs .....................................................186
Checking System 10A & 30A Fuses .................................................187
Checking Battery ...............................................................................187
Checking Power to ECM and Start Switch ........................................188
Checking Contacts of ECM Crank Relay ..........................................190
Checking ECM 10A Fuse ..................................................................191
Checking Relay Coil Diodes ..............................................................192
Checking Coil of Starter Relay and Wiring ........................................194
Checking Contacts of Starter Relay and Wiring ................................196
Engine Cranks But Does Not Start—John Deere with ECU ..............197
Checking Slave Preheat Relay and Wiring .......................................199
Checking Manifold Heater .................................................................200
Checking Contacts of ECM Fuel Relay .............................................201
Checking Power to ECU ....................................................................202
General Engine Troubleshooting—John Deere with ECU ................204
wc_br0160486enTOC.fm
4
Mobile Generator Repair
9.
Table of Contents
Output Voltage Troubleshooting
9.1
9.2
9.3
9.4
9.5
9.6
9.7
9.8
9.9
9.10
9.11
9.12
9.13
9.14
9.15
9.16
9.17
9.18
9.19
Wiring Diagrams ............................................................................... 208
“No” Voltage Troubleshooting .......................................................... 214
Checking Main Circuit Breaker ......................................................... 217
Checking Circuit Breaker and Function of Voltage Selector Switch . 218
Replacing Voltage Selector Switch (VSS) ........................................ 220
Checking Exciter Stator Winding ...................................................... 222
Accessing the Rotor Bearing, Diodes, and Rotor Winding ............... 223
Checking Generator/Excitation System ............................................ 224
Checking Lug Door Switch ............................................................... 228
Replacing and Resetting the Automatic Voltage Regulator (AVR) ... 230
Checking Exciter Rotor Winding ....................................................... 232
Checking Rectifier Diodes ................................................................ 233
Checking Main Rotor Winding .......................................................... 234
Replacing Rotor Bearing, Diode Ring, and Exciter Rotor ................. 236
Low* Voltage Troubleshooting ......................................................... 238
Verifying Voltage .............................................................................. 241
Checking Main Stator Winding ......................................................... 242
Generator Produces High Voltage Troubleshooting ......................... 243
Replacing Emergency Stop Switch .................................................. 245
10. Disassembly/Assembly Procedures
10.1
10.2
10.3
10.4
10.5
10.6
10.7
10.8
10.9
10.10
10.11
10.12
10.13
10.14
10.15
10.16
10.17
208
247
Tools ................................................................................................. 247
Ordering Parts .................................................................................. 247
Reference Numbers ( ) ..................................................................... 247
Weight Block .................................................................................... 247
Exhaust System Exploded View—G 25 ........................................... 248
Removing Exhaust System—G 25 ................................................... 249
Installing Exhaust System—G 25 ..................................................... 249
Exhaust System Exploded View—G 50, G 70, G 85 ........................ 250
Removing Exhaust System—G 50, G 70, G 85 ............................... 251
Installing Exhaust System—G 50, G 70, G 85 ................................. 252
Exhaust System Exploded View—G 125, G 160 ............................. 253
Removing Exhaust System—G 125, G 160 ..................................... 253
Installing Exhaust System—G 125, G 160 ....................................... 254
Preparing Unit for Generator Removal ............................................. 255
Removing Generator ........................................................................ 256
Installing Generator .......................................................................... 257
Removing Roof and Center Support Brackets ................................. 258
wc_br0160486enTOC.fm
5
Table of Contents
10.18
10.19
10.20
10.21
10.22
Mobile Generator Repair
Installing Roof and Center Support Brackets ....................................259
Preparing Unit for Engine/Generator Removal ..................................260
Removing Engine/Generator Assembly ............................................262
Installing Engine/Generator Assembly ..............................................263
Replacing Fuel Tank .........................................................................264
11. Factory-Installed Options
11.1
11.2
11.3
11.4
11.5
11.6
11.7
11.8
11.9
11.10
11.11
11.12
11.13
266
Block Heater ......................................................................................266
Fuel/Water Separator ........................................................................267
Electronic Governor ...........................................................................268
Schematic—Isuzu Engine with Electronic Governor .........................270
Components—Isuzu Engine with Electronic Governor ..................271
Schematic—John Deere Engine with Electronic Governor ...............272
Components—John Deere Engine with Electronic Governor ...........273
LCD Strip Heater ...............................................................................274
Low Coolant Shutdown .....................................................................275
Lube Level Maintainer .......................................................................276
Temperature-Activated Shutters .......................................................277
Schematic—Temperature-Activated Shutters ...................................278
Components—Temperature-Activated Shutters ...............................279
wc_br0160486enTOC.fm
6
Mobile Generator Repair
wc_br0160486enTOC.fm
Table of Contents
7
Safety Information
1.
Mobile Generator Repair
Safety Information
This manual contains DANGER, WARNING, CAUTION, and NOTE
callouts which must be followed to reduce the possibility of personal
injury, damage to the equipment, or improper service.
This is the safety alert symbol. It is used to alert you to potential
personal injury hazards. Obey all safety messages that follow this
symbol to avoid possible injury or death.
DANGER indicates an imminently hazardous situation which, if not
avoided, will result in death or serious injury.
DANGER
WARNING indicates a potentially hazardous situation which, if not
avoided, could result in death or serious injury.
WARNING
CAUTION indicates a potentially hazardous situation which, if not
avoided, may result in minor or moderate injury.
CAUTION
CAUTION: Used without the safety alert symbol, CAUTION indicates
a potentially hazardous situation which, if not avoided, may result in
property damage.
DANGER
wc_si000136gb.fm
Note: Contains additional information important to a procedure.
Danger of Electrocution!
Danger of electrocution or severe electrical shock is present
throughout the generator any time the engine is running! Read all
safety notes contained in this section before operating or servicing this
equipment.
No one except a trained electrician, familiar with this equipment,
should attempt repairs to the generator! Test procedures which require
that the generator be running must be performed using extreme
caution.
This machine is built with user safety in mind; however, like any
electrical device it can present serious hazards if improperly operated
and serviced. Follow instructions carefully! Should questions arise
during operation or service of this equipment, contact Wacker
Corporation.
8
Mobile Generator Repair
1.1
Operating Safety
WARNING
wc_si000136gb.fm
Safety Information
Familiarity and proper training are required for the safe operation of
equipment. Equipment operated improperly or by untrained personnel
can be dangerous. Read the operating instructions contained in both
this manual and the engine manual and familiarize yourself with the
location and proper use of all controls. Inexperienced operators should
receive instruction from someone familiar with the equipment before
being allowed to operate the machine.
1.1.1
NEVER operate generator when open containers of fuel, paint, or
other flammable liquids are near.
1.1.2
NEVER place flammable material or liquids near the generator.
1.1.3
NEVER operate generator, or tools attached to the generator, with wet
hands.
1.1.4
NEVER use worn electrical cords. Severe electrical shock and
equipment damage may result.
1.1.5
NEVER operate the machine indoors unless exhaust fumes can be
adequately ventilated.
1.1.6
NEVER overload generator. The total amperage of the tools and
equipment attached to the generator must not exceed the load rating
of the generator.
1.1.7
NEVER allow untrained personnel to operate or service the generator.
The generator set should be set up by a trained electrician.
1.1.8
NEVER operate generator in standing water.
1.1.9
NEVER touch the hot engine, exhaust, or generator components.
Burns will result.
1.1.10
NEVER start a unit in need of repair.
1.1.11
Use the emergency stop button only in an actual emergency. DO NOT
restart the engine until the cause of the trouble has been determined
and fixed.
1.1.12
ALWAYS wear hearing protection when operating equipment.
1.1.13
ALWAYS follow starting and stopping instructions described in this
manual. Know how to operate and stop generator before starting it.
1.1.14
ALWAYS make a walk-around inspection of the generator set before
starting it. Open side doors and visually inspect engine compartment
for obvious damage or the presence of foreign objects which might
affect operation.
1.1.15
ALWAYS keep machine at least one meter (three feet) away from
structures, buildings and other equipment during use.
1.1.16
ALWAYS store equipment properly when it is not being used.
Equipment should be stored in a clean, dry location out of the reach of
children.
9
Safety Information
1.1.17
ALWAYS keep the area immediately surrounding and underneath the
machine clean, neat, and free of debris and combustible materials.
Make sure that the area overhead is clear of debris that could fall onto
or into the machine or exhaust compartment.
1.1.18
ALWAYS be sure the machine is on a firm, level surface and will not
tip, roll, slide, or fall while operating.
1.1.19
ALWAYS remove all tools, cords, and other loose items from generator
before starting it.
1.1.20
ALWAYS make certain the machine is well-grounded and securely
fastened to a good earthen ground per national and local regulations.
DANGER
1.2
Mobile Generator Repair
BACKFEED FROM THE GENERATOR INTO THE PUBLIC POWER
DISTRIBUTION SYSTEM CAN CAUSE SERIOUS INJURY OR
DEATH TO UTILITY WORKERS!
Improper connection of generator to a building's electrical system can
allow electrical current from the generator to backfeed into utility lines.
This may result in electrocution of utility workers, fire, or explosion.
Connections to a building's electrical system must be made by a
qualified electrician and comply with all applicable laws and electrical
codes.
If connected to a building's electrical system the generator must meet
the power, voltage, and frequency requirements of the equipment in
the building. Differences in power, voltage, and frequency
requirements may exist and improper connection may lead to
equipment damage, fire, and personal injury or death.
Service Safety
Poorly maintained equipment can become a safety hazard! In order
for the equipment to operate safely and properly over a long period of
time, periodic maintenance and occasional repairs are necessary.
WARNING
1.2.1
wc_si000136gb.fm
NEVER perform even routine service (oil/filter changes, cleaning,
etc.) unless all electrical components are shut down. Before
servicing this machine, make sure the engine start switch is turned to
off “O”, the circuit breakers are open (off), the emergency stop switch
is closed (pushed in), and the negative terminal on battery is
disconnected. Attach a “DO NOT START” sign to the control panel.
This will notify everyone that the unit is being serviced and will reduce
the chance of someone inadvertently trying to start the unit. If the unit
is connected to a remote start or transfer switch, make sure the remote
switch is also off and tagged.
10
Mobile Generator Repair
1.2.2
Safety Information
Ground Connection
The generator must be connected to a good earthen ground for
proper operating safety!
A central “equipment ground” is provided at the customer connection
lugs. This point is connected directly to the generator set base. All
other system grounds are connected to this central point. Ground the
generator in accordance with the standards defined in national, state
and local regulations.
wc_si000136gb.fm
1.2.3
DO NOT attempt to open the radiator cap while the unit is running or
before the engine has cooled down. Severe burns may result!
1.2.4
DO NOT allow water to accumulate around the base of the machine.
If water is present, move the machine and allow the machine to dry
before servicing.
1.2.5
DO NOT service the machine if clothing or skin is wet.
1.2.6
DO NOT allow untrained personnel to service this equipment. Only
trained electrical technicians should be allowed to service the electrical
components of this equipment.
1.2.7
DO NOT modify the equipment without express written approval of the
manufacturer.
1.2.8
When cleaning the unit, DO NOT pressure wash the control panel,
generator end, or any other electrical components. Never allow water
to accumulate around the base of the generator set. If water is present,
DO NOT service!
1.2.9
ALWAYS replace the safety devices and guards after repairs and
maintenance.
1.2.10
ALWAYS let engine cool before transporting or servicing.
1.2.11
ALWAYS remain aware of moving parts and keep hands, feet, and
loose clothing away from moving parts of equipment.
1.2.12
ALWAYS replace all guards, fasten doors and make sure all safety
devices operate properly after making repairs or servicing the
equipment.
1.2.13
ALWAYS keep hands, feet, and loose clothing away from moving parts
on generator and engine.
1.2.14
ALWAYS keep the machine clean and labels legible. Replace all
missing and hard-to-read labels. Labels provide important operating
instructions and warn of dangers and hazards.
1.2.15
ALWAYS check and tighten all external fasteners at regular intervals.
1.2.16
ALWAYS make sure slings, chains, hooks, ramps, jacks and other
types of lifting devices are attached securely and have enough weightbearing capacity to lift or hold the machine safely. Always remain
aware of the location of other people around when lifting the machine.
11
Safety Information
1.3
Operator Safety while using Internal Combustion Engines
DANGER
wc_si000136gb.fm
Mobile Generator Repair
Internal combustion engines present special hazards during operation
and fueling. Read and follow the warning instructions in the engine
owner's manual and the safety guidelines below. Failure to follow the
warnings and safety guidelines could result in severe injury or death.
1.3.1
DO NOT run engine indoors or in an area with poor ventilation unless
exhaust hoses are used.
1.3.2
DO NOT fill or drain the fuel tank near an open flame, while smoking,
or while the engine is running.
1.3.3
DO NOT refuel a hot or running engine.
1.3.4
ALWAYS refill the fuel tank in a well-ventilated area.
1.3.5
DO NOT touch or lean against hot exhaust pipes.
1.3.6
ALWAYS replace the fuel tank cap after refueling.
1.3.7
DO NOT start engine if fuel has spilled or an odor of fuel is present.
Move generator away from the spill and wipe generator dry before
starting.
1.3.8
DO NOT remove radiator cap when the engine is hot. The radiator fluid
is hot and under pressure and may cause severe burns!
12
Mobile Generator Repair
1.4
Safety Information
Towing Safety
Towing a large trailer requires special care. Both the trailer and vehicle
must be in good condition and securely fastened to each other to
reduce the possibility of an accident.
WARNING
1.5
1.4.1
ALWAYS check that the hitch and coupling on the vehicle are rated
equal to, or greater than, the trailer's “gross vehicle weight rating”
(GVWR).
1.4.2
ALWAYS inspect the hitch and coupling for wear or damage. DO NOT
tow trailer using defective parts.
1.4.3
ALWAYS make sure the coupling is securely fastened to the vehicle.
1.4.4
ALWAYS check the tires on the trailer for tread wear, inflation, and
condition. Replace worn tires.
1.4.5
ALWAYS connect the safety chains.
1.4.6
ALWAYS connect breakaway cable safety hook to the bumper or rear
of the vehicle. DO NOT attach to hitch.
1.4.7
ALWAYS test surge brakes on trailer and the brakes on vehicle that
will be used for towing.
1.4.8
ALWAYS make sure directional and trailer lights are connected and
working properly.
1.4.9
ALWAYS check that the lug nuts holding the wheels are tight and that
none are missing.
Reporting Trailer Safety Defects
If you believe your trailer has a defect which could cause a crash or
could cause injury or death, you should immediately inform the
National Highway Traffic Safety Administration (NHTSA) in addition to
notifying WACKER Corporation.
If NHTSA receives similar complaints, it may open an investigation;
and if it finds that a safety defect exists in a group of vehicles, it may
order a recall and remedy campaign. However, NHTSA cannot
become involved in individual problems between you, your dealer, or
WACKER Corporation.
To contact NHTSA, you may either contact the Auto Safety Hotline tollfree at 1-800-424-9393 (or 366-0129 in Washington DC area),
www.nhtsa.com, or write to NHTSA, U.S. Department of
Transportation, Washington, DC 20590. You can also obtain other
information about motor vehicle safety from the Hotline.
wc_si000136gb.fm
13
Safety Information
1.6
wc_si000136gb.fm
Mobile Generator Repair
Label Locations
14
Mobile Generator Repair
wc_si000136gb.fm
Safety Information
15
Safety Information
Ref.
Safety and Operating Labels
Label
A
TOWING INSTRUCTIONS
1. READ OPERATOR'S MANUAL.
2. USE HITCH RATED FRO TRAILER'S
"GROSS VEHICLE WEIGHT RATING".
3. SECURELY ATTACH TRAILER TO TOW
VEHICLE.
4. ATTACH SAFETY CHAINS USING CROSS
PATTERN.
5. ATTACH BREAKDOWN CHAIN TO VEHICLE.
6. CHECK TRAILER LIGHTS.
Meaning
ABSCHLEPPINSTRUKTIONEN
1. BETRIEBSVORSCHRIFT LESEN.
2. ANHANGEVORRICHTUNG VERWENDEN,
DIE DER GESAMTBETRIEBSGEWICHTSKLASSE
ENTSPRICHT.
3. ANHANGER SICHER AM ZUGFAHRZEUG
BEFESTIGEN.
4. SICHERHEITSKETTEN KREUZWEISE ANBRINGEN.
5. ABREISSKETTE AM FAHRZEUG ANBRINGEN.
6. ANHANGERLEUCHTEN PRUFEN.
INSTRUCCIONES DE REMOLQUE
1. LEA EL MANUAL DEL OPERARIO.
2. UTILICE UN ACOPLE CORRECTAMENTE
CLASIFICADO PARA LA "CLASE DE PESO BUTO"
DEL VEHICULO DEL REMOLQUE.
3. ASEGURESE DE AMARRAR CORRECTAMENTE
EL REMOLQUE AL VEHICULO DE REMOLQUE.
4. FIJE EN CRUZ LAS CADENAS DE SEGURIDAD.
5. FIJE EN EL VEHICULO DE REMOLQUE LA CADENA
DE DESPRENDIMIENTO.
6. CONTROLE LAS LUCES DEL REMOLQUE.
INSTRUCTIONS DE REMORQUAGE
1. LIRE LA NOTICE D'EMPLOI.
2. UTILISER UN GROCHET D'ATTELAGE CONFORME AU
DEBIT NOMINAL DU POIDS BRUT DE VEHICULE DU
TRACTEUR.
3. ATTACHER LA REMORQUE FERMEMENT AU VEHICULE
TRACTEUR.
4. ATTACHER LES CHAINES DE SURETTE EN UTILISANT
UNE METHODE CROISEE.
5. ATTACHER LA CHAINE DE REMORQUAGE AU VEHICULE.
6. VERIFIER LES LAMPES DE LA REMORQUE.
114894
1.7
Mobile Generator Repair
B
WARNING!
Pressurized contents. Do not open when
hot!
C
WARNING!
Lock doors. Access can cause electric
shock or injury.
D
CAUTION!
Lifting point
E
CAUTION!
Never change switch position with engine
running. Results in damage to machine.
F
DANGER!
Asphyxiation hazard. Read the Operator’s Manual for instructions. No sparks,
flames, or burning objects near machine.
Stop the engine before adding fuel. Use
only diesel fuel.
wc_si000136gb.fm
16
Mobile Generator Repair
Ref.
Safety Information
Label
Meaning
G
Tie-down point
H
WARNING!
To prevent hearing loss, wear hearing
protection.
Hand injury if entangled in moving belt.
Rotating machinery! Do not reach inside
with engine running.
I
WARNING!
Hot surface!
J
Electrical ground.
K
WARNING!
Electric shock will cause serious injury or
death.
wc_si000136gb.fm
17
Safety Information
Ref.
Mobile Generator Repair
Label
Meaning
L
OPERATING INSTRUCTIONS
FOR MOBILE GENERATORS
BETRIEBSANLEITUNG
..
FUR MOBILEAGGREGATE
VOR DEM STARTEN
1. BETRIEBSVORSCHRIFT LESEN.
..
2. GERAT WAAGRECHT STELLEN.
..
3. RADER
BLOCKIEREN.
..
4. GERAT ERDEN.
..
..
5. STAND ALLER FLUSSIGKEITEN PRUFEN.
BEFORE STARTING
1. READ OPERATOR'S MANUAL.
2. LEVEL UNIT.
3. BLOCK WHEELS.
4. GROUND UNIT.
5. CHECK ALL FLUID LEVELS.
MANUAL STARTING
1. DISCONNECT ALL EXTERNAL LOADS.
2. SET VOLTAGE SELECTOR SWITCH.
3. LOCK VOLTAGE SELECTOR SWITCH.
4. TURN EMERGENCY STOP BUTTON TO "ON" POSITION.
5. PUSH ENGINE START SWITCH TO
"START/RUN" POSITION.
6. ENGINE WILL MAKE 3 ATTEMPTS TO START.
HANDSTARTEN
1. ALLE AUSSEREN BELASTUNGEN ABSCHALTEN.
2. SPANNUNGSWAHLSCHALTER SETZEN.
3. SPANNUNGSWAHLSCHALTER VERRIEGELN.
4. NOTSTOPKNOPF IN "ON" POSITION SETZEN.
5. MOTORSTARTSCHALTER
AUF POSITION "START/LAUF"
..
DRUCKEN.
6. MOTOR VOLLZIEHT 3 STARTVERSUCHE.
FERNSTART
1. SIEHE BETRIEBSVORSCHRIFT.
REMOTE START
1. SEE OPERATOR'S MANUAL.
STOPPING
1. DISCONNECT ALL EXTERNAL LOADS.
2. PUSH ENGINE START SWITCH TO "OFF" POSITION.
3. FILL FUEL TANK.
ABSCHALTEN
..
1. ALLE AUSSEREN BELASTUNGEN ABSCHALTEN.
2. MOTORSTARTSCHALTER
AUF POSITION "OFF"
..
DRUCKEN.
..
3. KRAFTSTOFFTANK FULLEN.
INSTRUCTIONS D'OPERATION
DU GENERATEUR MOBILE
INSTRUCCIONES PARA LA PUESTA EN MARCHA
DE GENERADORES MOVILES
AVANT LE DEMARRAGE
1. LIRE LA NOTICE D'EMPLOI.
2. NIVELER LA MACHINE.
3. BLOQUER LES ROUES AVEC CALES DE ROUES.
4. METTRE A TERRE LA MACHINE.
5. VERIFIER LE NIVEAU DE TOUS LES FLUIDES.
ANTES DEL ARRANQUE
1. LEA EL MANUAL DEL OPERARIO.
2. NIVELE LA UNIDAD.
3. COLOQUE CUNAS DEBAJO DE LAS RUEDAS.
4. CONECTE LA UNIDAD A TIERRA.
5. CONTROLE TODOS LOS LIQUIDOS.
ARRANQUE MANUAL
1. DESCONECTE TODAS LAS CARGAS EXTERNAS.
2. AJUSTE LA LLAVE SELECTORA DE VOLTAJE.
3. BLOQUEE LA LLAVE SELECTORA DE VOLTAJE.
4. GIRE A LA POSICION "ON" EL BOTON DE
PARADA DE EMERGENCIA.
5. OPRIMA A LA POSICION "ARRANQUE/MARCHA" EL
INTERRUPTOR DE ARRANQUE DEL MOTOR.
6. EL MOTOR INTENTARA ARRANCAR 3 VECES.
ARRANQUE REMOTO
1. VEA EL MANUAL DEL OPERARIO.
DEMARRAGE A LA MAIN
1. DECONNECTER TOUS LES REGIMES EXTERNES.
2. REGLER LE COMMUTATEUR DES TENSIONS
D'ALIMENTATION.
3. SERRER LE COMMUTATEUR DES TENSIONS
D'ALIMENTATION.
4. TOURNER LE BOUTON D'ARRET D'URGENCE
A LA POSITION "ON".
5. PRESSER L'INTERRUPTEUR DE DEMARRAGE
DU MOTEUR A LA POSITION "DEMARRAGE/MARCHE".
6. LE MOTEUR S'ESSAYERA DE DEMARRER 3 FOIS.
ARRET
1. DECONNECTER TOUS LES REGIMES EXTERNES.
2. PRESSER L'INTERRUPTEUR DE DEMARRAGE DU
MOTEUR A LA POSTION "OFF".
3. REMPLIR LE RESERVOIR A CARBURANT.
114902
DEMARRAGE A DISTANCE
1. LIRE LA NOTICE D'EMPLOI.
DETENCION DEL MOTOR
1. DESCONECTE TODAS LAS CARGAS EXTERNAS.
2. OPRIMA A LA POSICION "OFF" EL INTERRUPTOR
DE ARRANQUE DEL MOTOR.
3. LLENE EL TANQUE DE COMBUSTIBLE.
M
D IE
A N
W E
E R
S IC
Ö R
R A T
R E D
L A C
U A L
O U G
R IB
O R 'S
O N M
E M E N
C A N
H Y O
U T O R
B E T R IE B S
D E R M A S C
R D E N . Z U R
S A T Z B Ü C H
H B IT T E A N
T L IC H E N W
M A
A C
T O
B E
U R
.
N U A L
H IN E .
P E R A
O R D E
L O C A
V O R
H IN E
B E S
E R N
IH R
A C K
M U S T B E
T O R 'S
R E D
L W A C K E R
S C H R IF
A U F B E
T E L L U N
W E N D E
E N
E R H Ä N
T M
W A
G
N S
U S S
H R T
V O N
IE
D L E R .
N
wc_si000136gb.fm
E L
S E
C O
W A
P E
A D
L A
E T
C O
W A
P O
E X
R
M A N U
R E T
N T A C
C K E R
D IR U
IC IO N
N O
R E
N T
C K
U R
E M
A L D
E N ID
T E A
M A S
N E J E
A L .
T IC E D
M U N IE
A C T E R
E R L E
C O M M
P L A IR E
E O
O E
S U
C E
M P
'E M P
S U R
L E D
P L U S
A N D
S U P
P E R
N L A
D IS T
R C A
L A R
A C IO
M A Q
R IB U
N O P
L O I D O
L A M A
IS T R IB
P R O C
E R U N
P L E M E
N
D E B E
U IN A .
ID O R
A R A
IT
C H IN E .
U T E U R
H E
1 1 5 0 9 6
O P E
S T O
R E P
M A N
T H R
D IS T
N T A IR E .
DANGER!
Electric shock will cause serious injury or
death. Danger of asphyxiation!
18
Mobile Generator Repair
Ref.
Safety Information
Label
Meaning
O
WARNING!
Generator can automatically start which
can cause serious injury. Disconnect
battery before servicing.
P
WARNING!
Read and understand the supplied
Operator’s Manual before operating this
machine. Failure to do so increases the
risk of injury to yourself or others.
Q
WARNING!
To reduce the risk of electrical shock,
read operator’s manual. Improper
connection of generator to a building's
electrical system can allow electrical
current from the generator to backfeed
into utility lines. This may result in
electrocution of utility workers, fire or
explosion. Connections to a building's
electrical system must be made by a
qualified electrician and comply with all
applicable laws and electrical codes.
G 12
G 25
Remote start operation. Read operator’s
manual for instructions.
REMOTE START
FERNSTART
ARRANQUE REMOTO
DEMARRAGE A
DISTANCE
114897
R
S
wc_si000136gb.fm
19
Safety Information
Ref.
Mobile Generator Repair
Label
Meaning
T
WARNING!
Disconnect battery before servicing.
Read the Operator's Manual.
W A R N IN G
W A R N U N G
A D V E R T E N C IA
A D V E R T IS S E M E N T
ANHÄNGER-VERDRAHTUNG
TRAILER WIRING
G - RIGHT BRAKE LIGHT AND DIRECTIONAL
Y - LEFT BRAKE LIGHT AND DIRECTIONAL
Br -TAIL, SIDE AND LICENSE PLATE LIGHTS
W - GROUND
L - ELECTRIC BRAKES
B - BATTERY CHARGE
CANALISATION ELECTRICA
DE REMOLQUE
DISPOSITION DES CABLES
POUR REMORQUE
G - RECHTES BREMSLICHT UND BLINKER
Y - LINKES BREMSLICHT UND BLINKER
Br -SCHLUSS-, SEITEN- UND
KENNZEICHENLEUCHTE
W - ERDUNG
G - LUZ FRENO Y GIRO DERECHA
Y - LUZ FRENO Y GIRO IZQUIERDA
Br -LUZ TRASERA, LATERAL Y PLACA
DE MATRICULA
W - TIERRA
G - FEUX DE STOP ET DE DIRECTION D
Y - FEUX DE STOP ET DE DIRECTION G
Br -FEUX D'ARRIERE, DE POSITION ET
DE PLAQUE D'IMMATRICULATION
W - MISE A TERRE
L - ELEKTRISCHE BREMSE
B - BATTERIE-LADUNG
L - FRENOS ELECTRICOS
B - CARGA BATERIA
L - FREINS ELECTRIQUES
B - CHARGE DE LA BATTERIE
115681
U
A nameplate listing the model number,
item number, revision number, and serial
number is attached to each unit. Please
record the information found on this plate
so it will be available should the
nameplate become lost or damaged.
When ordering parts or requesting
service information, you will always be
asked to specify the model number, item
number, revision number, and serial
number of the unit.
Certification Label (VIN Number)
Also attached to each unit is a
Certification Label. This label specifies
that the trailer conforms with all Federal
Motor Vehicle Standards in effect at the
time of manufacture. The label includes
the Vehicle Identification Number (VIN)
for the trailer.
114893
Operating the main circuit breaker
supplies or interrupts power to the
customer connection lugs.
L 1
L 2
G 12
wc_si000136gb.fm
L1 L2 L3
G 25
20
Mobile Generator Repair
1.8
Safety Information
Calling for Service
When ordering parts or requesting service information, you will always
be asked to specify the model, item number, revision number, and
serial number of the unit. You will find this information on the
nameplate mounted on or near to the generator’s control panel.
A
Ø
20
15
12
8
Hz
REMOTE START
FERNSTART
ARRANQUE REMOTO
DEMARRAGE A
DISTANCE
INCHES
START/RUN
START/LAUF
ARRANQUE/MARCHA
DEMARRAGE/MARCHE
EMERGENCY STOP SWITCH
NOTAUSSCHALTER
INTERRUPTOR DE URGENCIA
INTERRUPTEUR D'URGENCE
L1 L2 L3
STOP
TERMINAL DOOR OPEN
KLEMMENABDECKUNG OFFEN
PUERTA DE BORNES ABIERTA
CACHE-BORNES OUVERT
WARNING ADVERTENCIA
WARNUNG AVERTISSEMENT
GENERATOR CAN AUTOMATICALLY START
RESULTING IN BODILY HARM.
DISCONNECT BATTERY BEFORE SERVICING.
AGGREGAT KANN AUTOMATISCH STARTEN
UND KORPERLICHE VERLETZUNG
VERURSACHEN.
VOR SERVICEARBEIT BATTERIE ABKLEMMEN.
GENERADOR PUEDE ARRANCAR
AUTOMATICAMENTE Y CAUSAR LESIONES
PERSONALES. DESCONECTE LA BATERIA
ANTES DE PRESTAR SERVICIO.
GENERATEUR PEUT DEMARRER
AUTOMATIQUEMENT RESULTANT EN DES
ACCIDENTS DEPERSONNE.
DECONNECTER BATTERIE AVANT TOUT
ENTRETIEN.
114901
V
On/I
Off/0
50A 20A 50A 20A 50A
L1 L2 L3 N
wc_gr002112
wc_si000136gb.fm
21
Safety Information
Mobile Generator Repair
Notes
wc_si000136gb.fm
22
Mobile Generator Repair
2.
Technical Data
Technical Data
2.1
Engine Data—G 25
G 25
0009258, 0009462
0009476
Engine
Engine make / type
Isuzu
Model
4LE1PV
Number of cylinders
4
Displacement
cm3 (in3)
Engine speed
rpm
2180 (133)
1800
Power @ 1800 rpm continuous/standby
kW/Hp
Coolant capacity
l (qts.)
11.3 (11.9)
Oil capacity
l (qts.)
8.0 (8.5)
Battery
25.7 (34.5)
Volts/CCa
12/650
Fuel type
Diesel
Fuel tank capacity
l (gal.)
216 (57)
Fuel consumption,
continuous load
l/hr (gal./
hr)
7.4 (1.95)
Running time,
continuous load
wc_td000147gb.fm
Hours
29
23
Technical Data
2.2
Mobile Generator Repair
Generator Data—G 25
G 25
0009258, 0009462
0009476
Generator
Make/Type
Marathon / Brushless
Model
Generator speed
282PSL1540
rpm
1800
Voltage selector switch
3 position
AC voltages available
120/240 zig-zag
120/208 low-wye
277/480 Hi-wye
Frequency
Power factor
60 Hz
1ø
3ø
1.0
0.8
Voltage regulation
±1.00%
Insulation class
Sound level at 7 m
(23 ft.)
H
dB(A)
69
AC receptacles
2 duplex, 2 twist-lock
1ø 120 GFI duplex
Amps
2-20
1ø 120/240 V twist lock
Amps
1-30 1-50
Standby Output
kW/kVA
20/25
Continuous Output
kW/kVA
18/23
wc_td000147gb.fm
24
Mobile Generator Repair
2.3
Technical Data
Trailer and Skid Data—G 25
G 25
0009258, 0009462
0009476
Trailer and Skid
Dry weight of skid
kg (lbs.)
816 (1800)
Operating weight of skid
kg (lbs.)
984 (2170)
Trailer weight
kg (lbs.)
181 (400)
GVWR
kg (lbs.)
1338 (2995)
Surge brakes
Tires
2.4
Fluid type
DOT3
size
ST205/75D-15C
Dimensions—G 25
in. (mm)
1956 (77)
889 (35)
1321
(52)
1905
(75)
3302 (130)
1448 (57)
wc_gr001647
wc_td000147gb.fm
25
Technical Data
2.5
Mobile Generator Repair
Engine Data—G 50, G 70, G 85
G 50
0009259
Rev. 114
and lower,
0009463,
0009477
G 70
0009260
Rev. 113
and lower,
0009464,
0009478
G 85
0009310
Engine
Engine make / type
John Deere / 4.5L
Model
4045DF150
Number of cylinders
4045TF150
4
Displacement
l (in3)
Engine speed
rpm
4.5 (274.6)
1800
Power @ 1800 rpm continuous/standby
kW/Hp
Coolant capacity
l (qts.)
22.7 (24)
Oil capacity
l (qts.)
13.5 (14)
Battery
52.9/71
Volts/CCa
Fuel consumption, continuous load
Running time, continuous load
wc_td000147gb.fm
90/99
102/113
12/720
Fuel type
Fuel tank capacity
4045TF250
Diesel
l (gal.)
l/hr (gal./
hr)
Hours
329.3 (87)
12.5 (3.3)
16.7 (4.4)
18.6 (4.9)
26.3
19.8
17.7
26
Mobile Generator Repair
2.6
Technical Data
Generator Data—G 50, G 70, G 85
G 50
0009259
Rev. 114
and lower,
0009463,
0009477
G 70
0009260
Rev. 113
and lower,
0009464,
0009478
G 85
0009310
Generator
Make/Type
Marathon/ Brushless
Model
Generator speed
361PSL1648
rpm
3 position
AC voltages available
120/240 zig-zag
120/208 low-wye
277/480 Hi-wye
Frequency
60 Hz
1ø
3ø
1.0
0.8
Voltage regulation
±1.00%
Insulation class
Sound level at 7 m
(23 ft.)
361PSL1649
1800
Voltage selector switch
Power factor
361PSL1647
H
dB(A)
71
AC receptacles
69
70
2 duplex, 3 twist-lock
1ø 120 GFI duplex
Amps
2-20
1ø 120/240 V twist lock
Amps
1-30A 2-50A
Standby Output
kW/kVA
43/54
62/78
72/90
Prime Output
kW/kVA
40/50
57/71
66/83
Main breaker
Amps
175
225
250
wc_td000147gb.fm
27
Technical Data
2.7
Mobile Generator Repair
Trailer Technical Data—G 50, G 70, G 85
G 50
0009259
Rev. 114
and lower,
0009463,
0009477
G 70
0009260
Rev. 113
and lower,
0009464,
0009478
G 85
0009310
Trailer and Skid
Dry weight of skid
kg (lbs.)
1550 (3418)
1583 (3490)
1622 (3576)
Operating weight of skid
kg (lbs.)
1745 (3848)
1778 (3920)
1817 (4006)
Trailer weight
kg (lbs.)
GVWR
Surge brakes
Tires
wc_td000147gb.fm
Single axle
442 (975)
Tandem axle
499 (1100)
kg (lbs.)
Single axle
2304 (5080)
Tandem axle
2722 (6000)
Fluid type
DOT3
size
ST225/75D-15D
28
Mobile Generator Repair
2.8
Technical Data
Dimensions—G 50, G 70, G 85
in. (mm)
965 (38)
2438 (96)
1562
(61.5)
2146
(84.5)
3988 (157)
1524 (60)
wc_gr001648
wc_td000147gb.fm
29
Technical Data
2.9
Mobile Generator Repair
Engine Data—G 125, G 160
G 125
0009261
0620067
0620068
G 160
0009306
0620069
0620070
Engine
Engine make / type
John Deere / 6.8L
Model
6068TF275
Number of cylinders
6068HF275
6
Displacement
cm3 (in3)
6800 (414)
Engine speed
rpm
Power @ 1800 rpm continuous/standby
kW/Hp
123/165
164/220
Coolant capacity
l (qts.)
37.8 (40)
24.2 (25.6)
Oil capacity
l (qts.)
18.9 (20.0)
32.0 (34.0)
Battery
Volts/CCa
1800
12/1000
Fuel type
Diesel
Fuel tank capacity
l (gal.)
Fuel consumption, continuous load
l/hr (gal./hr)
Running time, continuous load
Hours
wc_td000147gb.fm
30
927 (245)
29.0 (7.7)
37.1 (9.8)
31.9
25.0
Mobile Generator Repair
Technical Data
2.10 Generator Data—G 125, G 160
G 125
0009261
0620067
0620068
G 160
0009306
0620069
0620070
Generator
Make/Type
Marathon/ Brushless
Model
Generator speed
362 PSL 1650
363 PSL 1661
1800
rpm
Voltage selector switch
3 position
AC voltages available
120/240 zig-zag
120/208 low-wye
277/480 Hi-wye
Frequency
Power factor
60 Hz
1.0
0.8
1ø
3ø
Voltage regulation
±1.00%
Insulation class
Sound level at 7 m (23 ft.)
H
68
dB(A)
AC receptacles
69
2 duplex, 3 twist-lock
1ø 120 GFI duplex
Amps
2-20
1ø 120/240 V twist lock
Amps
1-30A 2-50A
Standby Output
kW/kVA
109/136
141/176
Prime Output
kW/kVA
98/122
128/160
Main breaker
Amps
400
500
wc_td000147gb.fm
31
Technical Data
Mobile Generator Repair
2.11 Trailer Technical Data—G 125, G 160
G 125
0009261
0620067
0620068
G 160
0009306
0620069
0620070
Trailer and Skid
Dry weight of skid
kg (lbs.)
2331 (5140)
2400 (5290)
Operating weight of skid
kg (lbs.)
3139 (6920)
3207 (7070)
Trailer weight
kg (lbs.)
649 (1430)
GVWR
kg (lbs.)
4082 (9000)
Surge brakes
Fluid type
Tires
size
DOT3
7.50x16
2.12 Dimensions—G 125, G 160
mm (inches)
3 1 7 5 (1 2 5 )
1 2 7 0 (5 0 )
1 6 2 6
(6 4 )
2 2 6 0
(8 9 )
4 9 5 3 (1 9 2 )
1 9 9 4 (7 9 )
wc_td000147gb.fm
32
w c _ g r0 0 0 9 2 9
Mobile Generator Repair
Technical Data
2.13 Isuzu Engine Performance Data
Performance data on Isuzu engines are measured at the following
standard conditions:
• 29.31 inches of mercury dry air pressure
• 600 feet altitude
• 0 % relative humidity
• 77°F air intake temperature
• 104°F fuel inlet temperature
Refer to the table to estimate the engine power decrease in percent,
as environmental factors vary from the standard conditions.
MODEL
G 12
G 25
wc_td000147gb.fm
FUEL TEMP RISE
of 1.8°F
AIR TEMP RISE
of 10°F
ALTITUDE RISE
of 305 m (1000 ft)
RELATIVE HUMIDITY
RISE of 10%
0.17
1.50
3.00
0.10
33
Technical Data
Mobile Generator Repair
2.14 John Deere Engine Performance
Performance data on John Deere engines are measured at the
following standard conditions:
• 29.31 inches of mercury dry air pressure
• 600 feet altitude
• 0 % relative humidity
• 77°F air intake temperature
• 104°F fuel inlet temperature
Refer to the table to estimate the engine power decrease in percent,
as environmental factors vary from the standard conditions.
wc_td000147gb.fm
34
Mobile Generator Repair
Technical Data
36
34
32
30
26
24
St
an
db
y
22
70
20
G
16
G
50
G
14
12
5,
G
16
0
18
85
G
10
85
Pr
im
e
12
St
an
db
y
70
Pr
im
e
Engine Power Deration (%)
28
G
G
8
6
4
2
0
5
(1,5)
6
(1,8)
7
(2,1)
8
(2,4)
9
(2,75)
10
(3,0)
11
(3,3)
12
(3,6)
13
(4,0)
14
(4,3)
15
(4,6)
16
(4,9)
17
(5,2)
wc_gr002863
Altitude x 1000 Feet (meter)
MODEL
FUEL TEMP
RISE of 1.8°F
AIR TEMP
RISE of 10°F
ALTITUDE
RISE of 305 m
(1000 ft)
RELATIVE
HUMIDITY
RISE of 10%
G 50
0.17
1.50
see chart
0.10
G 70
G 85
G 125
G 160
0.19
0.50
see chart
0.07
wc_td000147gb.fm
35
18
(5,5)
Maintenance
3.
Mobile Generator Repair
Maintenance
3.1
Periodic Maintenance Schedule
The Periodic Maintenance Schedule below lists basic maintenance
intervals for the engine and generator. For detailed maintenance
procedures on the engine, refer to the engine Operator's Manual.
Daily
Check engine oil and coolant level
•
Check engine air filter gauge & air cleaner
dust cap *
•
Visual walkaround inspection
•
Check tire inflation, tread wear and lug nuts
before towing
•
Check fuel filter
50 Hrs
or 2
weeks
250
Hrs
600
Hrs or
12 Mo
1200
Hrs or
24 Mo
2000
Hrs
Other
•
Service the battery
•
Change engine oil and replace oil filter**
•
Clean unit inside and out
•
Check air intake hoses, connections, and
system
•
Replace fuel filter element
•
Check automatic belt tensioner and belt wear
•
Check cooling system
•
Perform coolant solution analysis & add SCA's
•
Grease axle
•
Pressure test cooling system
•
Flush cooling system***
•
Check and adjust engine valve clearance
•
Check brake fluid level in trailer at least
monthly
•
Replace crankcase ventilation filter every 750
hours
•
*Replace the air filter cartridge when yellow indicator of the engine air filter gauge reaches the red line.
**Change the oil after the first 100 hours, then every 250 hours.
***If John Deere antifreeze is used, the flushing interval may be extended. See engine Operator’s Manual.
wc_tx000504gb.fm
36
Mobile Generator Repair
3.2
Maintenance
Resetting the Periodic Maintenance Timer
After maintenance has been performed on the generator, it is
necessary to reset the periodic maintenance timer.
• If the periodic maintenance timer is at zero, press the ENG. HRS
switch UP and hold for 10 seconds until the “TIME TO SERVICE”
resets to 250 hours.
• If the service time is greater than zero (maintenance was performed
prior to the timer running out) press and hold the ENG. HRS switch UP
and hold for 30 seconds. This will reset the “TIME TO SERVICE” to
250 hours.
3.3
Air Cleaner
See Graphic: wc_gr000511
Replace the air filter cartridge when yellow indicator of the engine air
filter gauge reaches the red line.
The air cleaner assembly contains a one-piece single element air filter
cartridge (c).
To replace the air filter cartridge:
• Remove the end cover (d), then discard the entire air filter cartridge.
• Insert a new air filter cartridge, then
• Re-install the end cover, making sure that the dust cap (e) is clean
and is pointing downward.
Periodically, make sure the inlet pipe (f) is free from obstructions.
Check all connections and make sure they are snug. An air leak at the
neck clamp, gauge connection, or intake pipe can quickly lead to
expensive engine repairs.
• Make sure that the intake piping (a) is fully engaged over the neck
of the filter to ensure a good seal.
• If the filter housing, gauge connection (b), neck, or inlet pipe are
crushed or damaged, replace them immediately.
a
c
b
e
f
wc_tx000504gb.fm
d
37
w c _ g r0 0 0 5 1 1
Maintenance
3.4
Mobile Generator Repair
Engine Lubrication
John Deere Engines:
Check engine oil daily before starting engine.
DO NOT operate engine if oil level is below ADD mark on dipstick.
Always keep oil level within the crosshatch pattern or “full” mark on
dipstick.
Change oil after first 100 hours of operation and every 250 hours
thereafter. Refer to the engine Operator’s Manual for lubrication
specifications.
Break-in Service
3.4.1
This engine is factory-filled with John Deere Engine Break-in Oil.
Operate the engine at heavy loads with minimal idling during the
break-in period. DO NOT exceed 100 hours of operation with break-in
oil.
3.4.2
If the engine has significant operating time at light load, or makeup oil
is required in the first 100 hour period, a longer break-in period may be
required. In these situations, an additional 100 hour break-in period is
recommended using a new change of John Deere Engine Break-In Oil
and a new John Deere oil filter.
CAUTION: DO NOT add makeup oil until the oil level is BELOW the
ADD mark on dipstick. John Deere Engine Break-In Oil (TY22041)
should be used to make up any oil consumed during the break-in
period.
3.4.3
During the first 20 hours, avoid prolonged periods of no load or
sustained maximum load operation. If engine is to run for longer than
5 minutes without a load, shut unit down.
3.4.4
After the first 100 hours, change engine oil and replace engine oil filter.
Fill crankcase with seasonal viscosity grade oil.
Isuzu Engines:
wc_tx000504gb.fm
3.4.5
Check engine oil daily before starting engine.
3.4.6
DO NOT operate engine if oil level is below ADD mark on dipstick.
Always keep oil level within the crosshatch pattern or “full” mark on
dipstick.
3.4.7
Change oil after first 50 hours of operation and every 250 hours
thereafter. Refer to the engine manufacturer’s Operator’s Manual for
lubrication specifications.
38
Mobile Generator Repair
3.5
Engine Coolant
WARNING
3.6
Maintenance
Check the coolant level of the radiator with the engine cold. After initial
filling of radiator to 3/4" below bottom of filler neck, maintain proper
level in overflow bottle daily.
NEVER remove radiator cap or drain plug while engine is hot!
Pressurized coolant can cause serious burns.
Shut off engine. Only remove radiator cap when it is cool enough to
touch with bare hands. Slowly loosen cap to relieve pressure first,
before removing it completely.
Solutions of antifreeze and supplemental coolant additives MUST be
used year-round. Automotive-type coolants do not contain the correct
coolant additives to protect heavy-duty diesel engines. They often
contain a high concentration of silicates which can damage the engine
and cooling system. Refer to engine Operator’s Manual for coolant
recommendations.
Trailer Maintenance
Tires - Keep tires inflated to the proper pressure as shown on the tire
sidewall, and check tread periodically for wear. Replace tires as
required.
Wheels - Check that lug nuts holding wheels are tight. Replace any
missing nuts immediately.
Axle Hubs - Grease axle hubs through grease fittings using a good
wheel bearing grease.
Brakes - Check operation of brakes before each trip.
Check level of brake fluid in actuator at front of trailer at regular
intervals. Fill to approximately 1" below top of reservoir using DOT-3
heavy-duty brake fluid. Tighten filler plug securely.
Note: If fluid level has fallen too low, bleed brake lines to remove any
air trapped in lines.
wc_tx000504gb.fm
39
Maintenance
3.7
Mobile Generator Repair
Trailer Wiring—G 25, G 50, G 70, G 85
Ref.
Description
1
Front right side amber light
2
Front left side amber light
3
Trailer plug
4
Battery
5
Brake solenoid
6
Right rear taillight
7
License plate holder lights
8
Left rear taillight
9
Rear right side red light
10
Rear left side red light
Ref.
Wire Colors
Rear Lights
Side Lights
Harness
B
BLACK
Ground
Ground
Battery charge
Br
BROWN
Taillight
L
BLUE
R
RED
Y
YELLOW
Left brake light and directional
G
GREEN
Right brake light and directional
W
WHITE
Ground
wc_tx000504gb.fm
Brake light
Tail, side and license plate
Power
40
Electric brakes
Mobile Generator Repair
Maintenance
Standard and Hydraulic Brakes
1
9
B r
B r
W
W
G
B r
W
3
G
W
6
7
B r
Y
B r
7
B r
Y
B r
2
W
1 0
B r
B r
W
8
W
w c _ g r0 0 0 5 2 2
Electric Brakes
1
9
Br W
Br W
W
R
R
3
R
G
Y
Br
W
R
+
G
Br
W
5
6
W
Br
7
Br
7
–
4
R
W
R
R
R
5
Y
Br
W
Br W
Br W
2
wc_tx000504gb.fm
8
10
41
wc_gr000523
Maintenance
3.8
Mobile Generator Repair
Trailer Wiring—G 125, G 160
Ref.
Description
1
Front right side amber light
2
Front left side amber light
3
Trailer plug
4
Battery
5
Brake solenoid
6
Right rear taillight
7
License plate holder lights
8
Left rear taillight
9
Rear right side red light
10
Rear left side red light
Ref.
Wire Colors
Rear Lights
Side Lights
Harness
B
BLACK
Ground
Ground
Battery charge
Br
BROWN
Taillight
L
BLUE
R
RED
Y
YELLOW
Left brake light and directional
G
GREEN
Right brake light and directional
W
WHITE
Ground
wc_tx000504gb.fm
Brake light
Tail, side and license plate
Power
42
Electric brakes
Mobile Generator Repair
Maintenance
Standard and Hydraulic Brakes
1
9
B r
B r
W
W
G
3
G
W
6
B r
W
7
B r
Y
B r
7
B r
Y
B r
2
W
B r
1 0
8
B r
W
W
w c _ g r0 0 0 5 2 2
Electric Brakes
1
2
W
B r
B r W
G
R
3
G
W
5
R
R
Y
R
W
+
B r
W
5
R
7
7
B r
W
R
R
5
Y
W
5
9
6
B r
4
R
B r
W
B r W
1 0
B r
B r
8
W
w c _ g r0 0 1 2 2 6
wc_tx000504gb.fm
43
Maintenance
Mobile Generator Repair
Notes
wc_tx000504gb.fm
44
Mobile Generator Repair
4.
Theory of Operation
Theory of Operation
4.1
Introduction
See Graphic: wc_gr002915
A generator set is a transducer, which means it converts energy from
one form (heat) into another (electrical). The two main components of
a generator set are the prime mover (engine) and the generator
assembly. The engine converts heat into rotating mechanical energy
which is then converted by the generator assembly into electrical
energy. The generator does so through the principle of
electromagnetic induction. This principle states that when a coil of wire
(also referred to as an armature), is passed through a magnetic field,
a voltage is induced in the coil of wire. The amount of voltage depends
on three factors: 1) the speed of the coil cutting through the magnetic
field (it does not matter which is moving—either the magnetic field or
the coil); 2) the strength of the magnetic field; and 3) the amount of
turns of wire in the coil. The principle also works in reverse; that is, if a
voltage and current is present in a coil of wire, a magnetic field is
produced. It is important to understand this basic theory to understand
how the generator functions.
The typical brushless generator assembly consists of a stator
(stationary), a rotor (rotating), a voltage regulator (voltage control
device), and a rectifier assembly (current control device). The rotor can
function as either the magnetic field or the coil. Likewise, the stator can
function as either the magnetic field or the coil, depending on
application. In Wacker generators, there are two such sets of stators
and rotors—the exciter and the main. The function of the exciter is to
supply a current for voltage to the main rotor windings. The current is
first rectified to direct current (DC) by the diodes in the rectifier
assembly. When supplied with the DC and voltage, the main rotor
windings become an electromagnet whose field sweeps through the
main stator windings as the engine rotates. The voltage and resulting
current induced in the main stator windings is used to supply power to
the receptacles and lugs.
wc_tx000505gb.fm
45
Theory of Operation
4.2
Mobile Generator Repair
Basic Generator Schematic
h
f
T1
L1
b
c
d
3-Phase AC out
DC in
T4
e
T7
T10
T12 T11
a
T8 T5
L2
T2
3-Phase
AC output
GND
DC in
B
T9
T6
R
T3
L3
g
B
N
F+
4
F-
3
DC out (exciter field)
B
Br
j
AC in (load sensing)
6
B
7
Br
i
W
k
l
wc_gr002915
Ref.
Component
Ref.
a
Exciter stator
g
Automatic voltage regulator (AVR)
b
Rotor assembly
h
Main circuit breaker
c
Exciter rotor
i
Switch, lug door
d
Rotating rectifier
j
Lug, T9
e
Main field (rotor)
k
Lug, T7
f
Main windings (stator)
l
Rheostat, voltage adjusting
wc_tx000505gb.fm
46
Component
Mobile Generator Repair
4.3
Theory of Operation
Generator Components
c
Cross section
d
e
b
f
a
i
h
g
Sample rotor assembly
a
e
d
g
f
i
wc_gr002916
Ref.
Component
Ref.
Component
a
Rotating rectifier
f
Drive disc
b
Main stator AC output
g
Exciter rotor (windings) (3 phase)
c
Main stator (windings)
h
Exciter stator (field)
d
Main rotor (field)
i
Bearing
e
Cooling fan
wc_tx000505gb.fm
47
Theory of Operation
4.4
Mobile Generator Repair
Wiring Diagrams
G 25
2
44
24
1
13
23
14
16 18
15 17
5
Br
6
6
11 13
10 12
12
Br
25 13
26
7
7
17
LL
LL
LL
G/Y
G/Y
LL
G/Y
G/Y
Br 3
19 T9
Br
T7
44
Br 6
10
8
B 23
B 24
X
G
7
B
B
Y
W
5
4
B
B
9
B 21
B 22
X
G
8
B
B
B
B
18
Y
(20)
W
11
4
CT-1 CT-2 CT-3
L0
T7
T9
L1
L2
L0
L3
B
T9
20
T4
B
12
B
1
2
5
6
9
17
13
10 14
18
25
21
22 26
4
41 L3
Or
2
43 L2
42 L1
Y
Br
1
39
36
38
37
3
1
4
4
5
2
6
CT3
CT0
CT2
CT1
Or
W
Y
Br
3
4
CT-3
CT-2
CT-1
16 20
23
27
24 28
16
F+ F-
T3
41
3
T4
T9T5
15
43
L3
3
T2
17
wc_tx000505gb.fm
7 11
12
8
15 19
T6
T8
T11
T10
T7
T1
T12
3
F+
F7
6
4
50Hz
60Hz
Br
B
B
W
B
Br
R
B
18
wc_gr002854
48
Mobile Generator Repair
Theory of Operation
Wire Colors
B
Black
R
Red
Y
Yellow
Or
Orange
G
Green
T
Tan
Br
Brown
Pr
Purple
L
Blue
V
Violet
Cl
Clear
Sh
Shield
P
Pink
W
White
Gr
Gray
LL
Light blue
See Graphic: wc_gr002854
Ref.
Description
Ref.
Description
1
Lug door switch
11
120/240V 30A receptacle
2
Mechanical lugs
12
Engine Control Module (ECM)
3
Plug 3 - current transformer inputs, ECM
13
Buss bar
4
Plug 4 - line voltage inputs, ECM
14
Main breaker
5
Shunt trip, main breaker
15
Voltage Selector Switch (VSS) (1 or 3
phase)
6
120V 20A GFI receptacle
16
Generator
7
20A breaker
17
Automatic Voltage Regulator (AVR) with 4A
fuse
8
50A breaker
18
Voltage adjustment rheostat (on panel)
9
30A breaker
19
Terminal lugs
10
120/240V 50A receptacle
20
Terminal block
wc_tx000505gb.fm
49
Theory of Operation
Mobile Generator Repair
G 50, G 70, G 85, G 125, G 160
2
44
24
1
13
23
14
16 18
6
6
11 13
9
15 17
5
Br
14
10 12
12
Br
25 13
26
7
7
17
LL
LL
LL
G/Y
G/Y
G/Y
LL
G/Y
G/Y
Br 3
19 T9
Br
T7
44
4
Br 6
10
8
B 23
B 24
X
G
7
B
B
Y
W
5
4
B
B
9
B 21
B 22
X
2
1
B
B
9
B 20
B 10
8
B
B
B
B
18
LL
Y
G
11 W
X
Y
(20)
G
11 W
CT-1 CT-2 CT-3
L0
T7
T9
L1
L2
L0
L3
B
T9
20
T4
B
12
B
1
2
5
6
9
17
13
10 14
18
25
21
22 26
4
3
41 L3
Or
2
43 L2
42 L1
Y
Br
1
39
36
38
37
1
4
4
5
2
6
CT3
CT0
CT2
CT1
Or
W
Y
Br
3
4
CT-3
CT-2
CT-1
16 20
23
27
24 28
16
F+ F-
T3
41
3
T4
T9T5
15
43
L3
3
T2
17
wc_tx000505gb.fm
7 11
12
8
15 19
T6
T8
T11
T10
T7
T1
T12
3
F+
F7
6
4
50Hz
60Hz
Br
B
B
W
B
Br
R
B
18
wc_gr002917
50
Mobile Generator Repair
Theory of Operation
Wire Colors
B
Black
R
Red
Y
Yellow
Or
Orange
G
Green
T
Tan
Br
Brown
Pr
Purple
L
Blue
V
Violet
Cl
Clear
Sh
Shield
P
Pink
W
White
Gr
Gray
LL
Light blue
See Graphic: wc_gr002917
Ref.
Description
Ref.
Description
1
Lug door switch
11
120/240V 30A receptacle
2
Mechanical lugs
12
Engine Control Module (ECM)
3
Plug 3 - current transformer inputs, ECM
13
Buss bar
4
Plug 4 - line voltage inputs, ECM
14
Main breaker
5
Shunt trip, main breaker
15
Voltage Selector Switch (VSS) (1 or 3
phase)
6
120V 20A GFI receptacle
16
Generator
7
20A breaker
17
Automatic Voltage Regulator (AVR) with 4A
fuse
8
50A breaker
18
Voltage adjustment rheostat (on panel)
9
30A breaker
19
Terminal lugs
10
120/240V 50A receptacle
20
Terminal block
wc_tx000505gb.fm
51
Theory of Operation
4.5
Mobile Generator Repair
Generator Systems
The generator can be divided into four basic systems:
1) Power Generation and Output. This system includes the generator,
voltage selector switch, receptacles, customer connect lugs and circuit
breakers.
2) Voltage Regulation. Consisting primarily of the voltage regulator and
exciter field winding, this system controls the voltage output of the
generator.
3) Engine Start. This system includes the relays and solenoids needed
to start the engine. This system is activated by the ECM.
4) ECM Monitoring System. This system monitors engine and
generator functions during operation. It includes the current
transformers and engine sensors. It responds to possible malfunctions
by closing the engine fuel valve to shut down the engine.
h
f
T1
L1
b
c
d
3-Phase AC out
DC in
e
T4
T7
T10
T12 T11
a
T8 T5
L2
T2
3-Phase
AC output
GND
DC in
B
T9
T6
R
T3
L3
g
B
N
4
F+
DC out (exciter field)
B
Br
6
B
3
7
Br
i
W
l
wc_tx000505gb.fm
j
AC in (load sensing)
F-
k
wc_gr002915
52
Mobile Generator Repair
4.6
Theory of Operation
Power Generation & Output
See Graphic: wc_gr002915
General Operation
The figure shows the basic configuration of the generator. This
configuration remains the same for all generator sizes and models.
The exciter stator (a) is designed to be the primary source of the
generator’s residual magnetism. When the machine’s engine is first
started, this residual magnetism induces a small AC voltage and
current in the exciter rotor (c) as it rotates inside the exciter stator. The
three-phase AC voltage and current generated in the exciter rotor is
rectified to DC by a three-phase full wave rotating rectifier (d) mounted
on the end of the rotor assembly. This rectified DC voltage and current
flow through the main rotor windings (e) and create the initial magnetic
field buildup (excitation) on the rotor.
As the main rotor field turns, a low residual voltage is induced in the
generator's main stator windings (f). This residual voltage and current
activate the automatic voltage regulator (g) via the sensing/power
wires (Br on 3 and 4) which are connected to a specific point(s) of the
main stator windings. The voltage regulator sends DC voltage and
current to the exciter stator (a) which increases the induced voltage
and current to the exciter rotor windings (c) thus allowing the generator
to build up to its rated voltage.
The voltage regulator senses the load on the generator via leads (Br
on 3 and 4) on the main stator. During operation, it continues to control
the input voltage to the exciter field through wires F- and F+. As the
load on the generator increases, the voltage regulator increases DC
voltage to the exciter field and thus maintains the desired output
voltage on the main stator windings.
Main Stator Connections
The main stator (f) consists of 6 windings with 12 output leads, labeled
T1 through T12. T7 (k) and T9 (j) are connected to a terminal block
inside the control box. These two wires provide power to the
convenience receptacles as well as power and sensing to the voltage
regulator. Refer to Generator and Receptacle Wiring diagrams.
wc_tx000505gb.fm
53
Theory of Operation
Mobile Generator Repair
See Graphic: wc_gr002767
Voltage Selector Switch (VSS)
The VSS changes connections between the six main windings to form
three different configurations:
•
High Wye (277/480V 3Ø)
•
Low Wye (120/208V 3Ø)
•
Zig-Zag (120/240V 1Ø)
The main stator windings connect to one side of the VSS at the
terminals. Output leads from the other side of the VSS are directed
through the current transformers and then to both the main circuit
breaker and the receptacles. With the breaker(s) closed, the
appropriate voltage is supplied to the main connection lugs or
receptacles.
During normal operation, each of the six windings on the main stator
will develop between 120–139VAC. The exact voltage depends on the
setting of the voltage selector switch and the voltage adjustment
rheostat. The ends of each winding are identified as: T1-T4, T2-T5,
T3-T6, T7-T10, T8-T11, T9-T12.
A voltage reading taken across any winding should measure between
120–139VAC.
The voltage selector switch connects the six main stator windings
together into the three configurations shown in the chart. (The same
chart is also found on the lug door.) Inter-winding connections are
made by internal switch contacts.
For example, in the 120/208V, 3-phase position, the switch will make
the following connections:
T1-T7=L1
T2-T8=L2
T3-T9=L3
T4-T5-T6-T10-T11-T12=L0
This connects the main windings into the Low Wye configuration
shown in the chart and provides 120VAC when measured line-toneutral and 208VAC measured line-to-line. Similar connections are
made for the other two positions of the selector switch.
wc_tx000505gb.fm
54
Mobile Generator Repair
Theory of Operation
G 25/50/70/85/125/160
L1
208
120
T1
T4
High Wye
480
277
T7
20A GFI
L1–L2 = 480V L1–N = 277V
L2–L3 = 480V L2–N = 277V
L3–L1 = 480V L3–N = 277V
N
T11
T12
T9
T8
T6
T5
T2
T3
L3
L1
T7
208
120
T1
Low Wye
T4
T10
N
T12
T9
L3
T6
480
277
L–L
T5
T8
L2
Zig Zag
208
120
T8
T12 T2
T3
T11
T10
T7
T4
T1
N
L3
L1
T5
T9
120V
120V
240V
*139/240V *139/240V
120V
120/208V
120/208V
or
or
or
*139V
*139/240V *139/240V
120V
120/240V
N-
L–N
T6
240
120
L1–L2 = 208V L1–N = 120V
L2–L3 = 208V L2–N = 120V
L3–L1 = 208V L3–N = 120V
T2
T11
T3
*139V
N-
L2
L–N
50A
Twist lock
240
120
L-L
T10
30A
Twist lock
480
277
120/240V
240
120
L1–L3 = 240V
L1–N = 120V
L2–N = ---L3–N = 120V
wc_gr002767
* Do not use GFI receptacles because GFI receptacles are only rated to 135V. Use care when using
generator with selector switch in this position; 139V may damage certain tools. If 3-phase load can
be operated at lower voltage, turn the voltage adjusting rheostat on control panel down—this will
lower the GFI and line to neutral voltage as well. For example, 480V turned to 460V also reduces
the GFI voltage from 139V to 133V.
wc_tx000505gb.fm
55
Theory of Operation
Mobile Generator Repair
See Graphic: wc_gr002775
Terminal Lugs and Receptacles
The main connection lugs, labeled L1, L2, L3, and N are connected
through the main circuit breaker (b) and then the voltage selector
switch (a) back to the main stator windings. These lugs provide the
primary connection points for attachment of outside loads. Power to
the receptacles (c and d) is provided by direct line connections
originating from the T7 and T9 leads from the VSS/generator and then
to individual circuit breakers (e and f).
b
f
c
e
f
e
b
f
d
a
wc_gr002774
wc_gr002775
wc_tx000505gb.fm
56
Mobile Generator Repair
4.7
Theory of Operation
Voltage Regulation
See Graphic: wc_gr002776 and wc_gr002777
The Automatic Voltage Regulator (AVR) (a) is an encapsulated
electronic control device that is rectangular in shape and located inside
the control box on the right side wall. Its function is to maintain constant
generator voltage over varying load conditions. The voltage regulator
controls generator voltage by sensing AC voltage from the main stator
winding at terminals 3 and 4. The voltage is passed through a full-wave
Silicon Controlled Rectifier (SCR) circuit to supply DC output at the
field terminals F+ and F-. The DC output controls the field strength of
the exciter stator winding. A 4-Amp, 250-Volt, 5 x 20 mm, slow-blow
fuse (b) protects the regulator. It is located on the regulator next to the
terminal strip. The regulator will not work if the fuse is bad or missing.
a
wc_gr002776
b
MARATHON
SE350
VOLT
STAB
U/F
60 Hz
50 Hz
4 Br
6 B
7 W
F- B
F+ B
3 Br
wc_gr002777
wc_tx000505gb.fm
57
Theory of Operation
Mobile Generator Repair
See Graphic: wc_gr0002778
Regulator Makeup
There are eight terminals on the regulator labeled 3, 4, F+, F-, 6, 7, 50
Hz, and 60 Hz.
Note: A new replacement regulator comes with a jumper across
terminals 6 and 7 which must be removed before the regulator is used.
•
Terminals 3 and 4
Brown stator wires T7 and T9 are connected to regulator terminals 3
and 4 respectively, for all voltage selector switch positions. Voltage on
terminals 3 and 4 will be either 208VAC or 240VAC depending on the
voltage selector position. This input AC voltage is used for the AVR
power supply and the regulator feedback information from the
generator’s output voltage. Wire T7 runs through the lug door interlock
switch in the output lug box before connecting to regulator terminal 3.
If the lug door is opened, power to the regulator is eliminated and only
residual voltage (30VAC) will remain from the generator.
Note: The lug door interlock switch will also open the main circuit
breaker disconnecting all the power to the lugs. However, the
receptacles will still have residual voltage.
•
Terminals F+ and FBlack exciter stator wires are connected to regulator terminals F+ and
F-. The regulator will supply between 10–73VDC to the stator exciter
windings as required to maintain the correct AC generator output
voltage.
•
Terminals 6 and 7
Black and white wires from the remote voltage adjustment rheostat
connect to terminals 6 and 7, respectively. The rheostat allows fine AC
generator output voltage adjustment from the front control panel.
Voltage adjustments must be made whenever the voltage selector
switch is changed from or to the 208-Volt position. The remote rheostat
must also be used if 240VAC 3-phase generator output is desired.
Note: If the line to line (L–L) voltage is increased, the line to neutral (L–
N) voltage increases also. If 208 Volts L–L is increased to 240 Volts L–
L, the 120 Volts L–N voltage will increase to 139 Volts L–N.
wc_tx000505gb.fm
58
Mobile Generator Repair
•
Theory of Operation
Terminals 50Hz and 60Hz
There is an white jumper wire connected (at the factory) to the 60Hz
terminal. If 50Hz is required, the jumper will have to be moved to the
50Hz terminal. The position of this jumper tells the regulator where the
coarse Under Frequency roll off (U/F) point is. On a 60Hz unit the U/F
point is 58Hz. On a 50Hz unit the U/F point is 48Hz. The U/F setting
protects the regulator, the generator windings, and the customer’s load
by turning OFF the regulator when the engine speed drops below 1740
rpm, which equals 58Hz or below 1440 rpm, which equals 48Hz.
•
Pots “Volt”, “Stab”, and “U/F”
7 W
F- B
F+ B
3 Br
60 Hz
50 Hz
4 Br
6 B
On the backside of the regulator there are three adjustment pots
labeled: Volt, Stab, and U/F. These pots are accessible via the side
wall of the control box located in the engine compartment. Remove the
black tape to access them. See illustration for position of each pot.
The Volt pot is only adjusted when installing a new AVR; after that, a
remote 2.5k Ohm voltage adjustment rheostat connected to terminals
6 and 7 is used. A remote voltage adjustment rheostat is standard on
all Wacker mobile generators and is located on the front of the control
panel.
Note: The Stab and U/F pots are factory set. Under normal
circumstances, no adjustments to these pots is necessary. Only adjust
these pots if a problem is present.
The Stab pot is used to increase or decrease the regulator response
time to load changes (transients). If the Stability (Stab) is set too low,
the regulator can begin to hunt, or cycle the DC output voltage to F+
and F- up and down. This will cause the generator AC voltage to cycle
up and down (seen in job lights flickering, etc.).
The U/F pot is used to make fine adjustments to the Under Frequency
roll off point (U/F). See U/F description in Terminals 50Hz and 60Hz
above.
U/F
STAB
VOLT
MARATHON
SE350
wc_gr002778
wc_tx000505gb.fm
59
Theory of Operation
Mobile Generator Repair
See Graphic: wc_gr002769
Voltage Adjusting Rheostat
Generator output voltage can be adjusted using the 2.5k Ohm voltage
adjusting rheostat (a). The 2.5k Ohm voltage adjusting rheostat is not
part of the voltage regulator. It is connected to the regulator at
terminals 6 and 7. The voltage adjustment range is +10% to -10% of
the selected voltage.
CAUTION: Do not turn the voltage beyond 490VAC; damage to the
excitation circuit will occur.
4.7.0.1
Make sure the main circuit breaker on the generator panel
is open (off), and start the engine.
4.7.0.2
Allow the engine to run a few minutes until the engine speed
stabilizes.
4.7.0.3
Check the AC voltage on the digital display panel. Turn the
voltage adjustment screw right to increase voltage, left to
decrease voltage.
Note: It will be necessary to adjust the voltage every time the voltage
selector switch is changed to or from the 208-Volt position.
a
wc_gr002769
wc_tx000505gb.fm
60
Mobile Generator Repair
4.8
Theory of Operation
Engine Start
Battery B+ wires provide 12VDC to the following locations on each
generator:
•
Isuzu-powered generators: starter motor, glow plug relay, starter
relay, and terminal strip.
•
John Deere without Engine Control Unit (ECU): starter motor,
starter relay, terminal strip, alternator, and preheat relay.
•
John Deere with ECU: ECU and terminal strip.
Engine Start Switch
In the START/RUN position the engine start switch supplies power to
the ECM through red #53 (B+) wire. This causes the module to go
through its boot-up sequence which includes self-diagnostic checks,
activation of the sensing circuits, and illumination of the display panel.
Engine Control Module (ECM) Relays
The engine control module contains a crank relay, a fuel relay, and a
preheat relay (not included on generators powered by John Deere
engines with ECU). Red wire #18 connected to plug 2, pin 5 on the
ECM provides 12VDC supply to contacts of the fuel and crank relays.
This circuit is protected by a 10A fuse. Red wire #17 connected to plug
2, pin 7 on the ECM provides 12VDC to the contacts of the preheat
relay.
When the start switch is in the START/RUN position, the ECM’s crank
relay is energized. On all models, the crank relay supplies 12VDC
through yellow wire #63 to energize the starter relay. When the starter
relay energizes, it supplies battery power to the engine starter motor
solenoid which engages the starter motor to crank the engine. The
crank relay on the control module remains energized for 10 seconds or
until either the magnetic pick-up on the engine flywheel signals 100
rpm or the AC voltage input reaches 100VAC signifying the engine has
started.
When the start switch is in the START/RUN position, the ECM’s fuel
relay is also energized. On Isuzu-powered generators, the ECM fuel
relay supplies 12VDC through violet wire #64/#34 to energize the fuel
pump relay. On John Deere (without ECU) powered generators, the
ECM fuel relay supplies 12VDC through violet wire #64/#34 to
energize the fuel solenoid. On John Deere (with ECU) powered
generators, the ECM fuel relay supplies 12VDC through violet wire
#64/#34 to power the ECU control circuits.
wc_tx000505gb.fm
61
Theory of Operation
Mobile Generator Repair
In the START/RUN position the ECM preheat relay will energize on the
first of the three cranking cycles if coolant temperature (fuel
temperature on John Deere powered generators) dictates. The ECM
preheat relay supplies 12VDC through gray wire #65 to the glow plug
relay on Isuzu-powered generators, intake air heater relay on John
Deere (without ECU) powered generators. On John Deere engines
with ECU, the ECU controls power to the intake air heater relay.
Alternator
On Isuzu-powered generators, the alternator is connected to the
battery at the B+ terminal of the starter motor. On John Deere powered
generators, the alternator is connected to the battery at the starter
relay. The alternator supplies charging current to the battery while the
engine is running.
wc_tx000505gb.fm
62
Mobile Generator Repair
4.9
Theory of Operation
ECM Monitoring System
Operation
The ECM contains a microprocessor that monitors engine safety
inputs. It protects the engine by automatically shutting it down in the
event of low oil pressure, high coolant temperature, high engine speed,
or low engine speed. The ECM is programmed at the factory and does
not require any adjustment. The ECM also receives voltage and
amperage input values from the generator and converts them to the
digital readout displayed on its LCD panel. The ECM also monitors the
current draw from the generator and will stop the engine if an overload
is detected.
Power Supply
When the engine start switch is switched to START/RUN or REMOTE
START, 12VDC is applied to the ECM through the red wire connected
to plug 1, pin 7. This is the main power supply to the ECM board.
Electrical ground to the ECM is located at pin 8, next to pin 7.
Oil Pressure
The ECM begins monitoring oil pressure 12 seconds after the engine
starts and continues to monitor pressure until the engine is shutdown.
The sensor is a variable resistor and the ECM monitors it via the white/
blue wire plug 1, pin 3. If oil pressure falls below 15 psi, the ECM will
recognize the fault and open the fuel relay circuit, stopping the engine.
Coolant Temperature
The ECM begins monitoring engine coolant temperature immediately
after it runs through its boot-up cycle. The sensor is a variable resistor
that the ECM monitors through the yellow wire connected to plug 1, pin
5. The ECM recognizes the fault condition and opens the fuel relay
when the engine temperature reaches 239°F (133°C) on John Deere
engines and 221°F (123°C) on Isuzu engines. The coolant
temperature sensor is located on the engine cylinder head near the
thermostat.
Underspeed / Overspeed
Engine under/overspeed protection is monitored from the frequency of
an AC voltage generated every time a flywheel tooth passes under the
magnetic pickup mounted to the engine flywheel housing. The
frequency signal is transmitted to the ECM through the shielded black
and clear wires connected to plug 1, pins 1 and 2.
wc_tx000505gb.fm
63
Theory of Operation
Mobile Generator Repair
The shutdown trip point is approximately 67Hz (2010 rpm) for
overspeed and 55Hz (1650 rpm) for underspeed. If engine speed
exceeds 67Hz or falls below 55Hz, the ECM opens the fuel relay circuit
and stops the engine.
Overcrank
The frequency signal is also used to determine an overcrank condition.
If the ECM does not notice an increase in engine speed after three
cycles of 10-seconds of crank followed by 10-seconds of rest, it
terminates the crank attempts and displays an OVERCRANK
message on the display panel. Placing the START/RUN switch to the
OFF position will reset the ECM.
Fuel Gauge
The sensor is a variable resistor that the ECM monitors through the
white/violet wire at Plug 1, pin 12. If the input resistance climbs too high
indicating a fuel level below 5%, the ECM opens the fuel relay circuit
which de-energizes the fuel solenoid and shuts down the engine.
Voltmeter
Line voltage values are transmitted to the ECM through the brown,
yellow, and orange wires connected to plug 4. These wires are
connected to the voltage selector switch.
wc_tx000505gb.fm
64
Mobile Generator Repair
Theory of Operation
See Graphic: wc_gr002779
Current Transformers
Load line current values are provided by three current transformers
(CT1, CT2, and CT3). Power lines to the main connection lugs and
receptacles run through the current transformers. The current
transformers sense line current and send an equivalent voltage to the
ECM through the brown, yellow, white, and orange wires connected to
plug 3. The ECM translates the incoming voltage into a digital readout
showing current values for each phase leg of the generator.
A current overload on any leg will be recognized as a fault and the
ECM will shut down the engine.
2
44
24
1
13
23
14
16 18
15 17
5
Br
6
6
11 13
10 12
12
Br
25 13
26
7
7
17
LL
LL
LL
G/Y
G/Y
LL
G/Y
G/Y
Br 3
19 T9
CTs
Br
44
T7
Br 6
10
B
B
8
B 23
B 24
X
G
7
Y
W
5
4
B
B
9
B 21
B 22
X
G
Y
W
8
B
B
B
B
18
(20)
11
4
CT-1 CT-2 CT-3
L0
T7
T9
L1
L2
L0
L3
B
T9
20
T4
B
12
B
1
2
5
6
9
17
13
10 14
18
25
21
22 26
4
3
1
4
2
4
1
5
2
6
41 L3
Or
43 L2
42 L1
Y
Br
39 CT3
36 CT0
38 CT2
37 CT1
Or
W
Y
Br
3
4
CT-3
CT-2
CT-1
L3
7 11
12
8
15 19
16 20
T6
T8
T11
T10
T7
T1
T12
23
27
24 28
16
F+ F-
15
43
T3
41
3
3
T4
T9T5
T2
17
3
F+
F7
6
4
50Hz
60Hz
Br
B
B
W
B
Br
R
B
18
wc_gr002779
wc_tx000505gb.fm
65
ECM Troubleshooting
5.
Mobile Generator Repair
ECM Troubleshooting
5.1
Normal Boot-up Sequence
During the boot-up sequence, the ECM scrolls through several
screens before it settles into displaying the run screen. There are two
different boot-up sequences depending on size of the generator and
options included on the generator. Both of the boot-up sequences are
listed below. When checking the boot-up sequence of your generator,
be sure you are checking the one that matches your generator.
G 25, G 50, G 70, G 85 (9310)
ECM Display
Description
Start of the boot-up sequence. The ECM shows that the
glow plugs are on. The LED near the stop icon also illuminates. Note that the glow plugs are only on during the
first of the three starting cycles.
Glow Plugs
On
Starting Engine
Time to Service
250
480 P2
71 75%
wc_tx000506gb.fm
0
87
61.5
12.7
The ECM displays this screen when the starter is cranking the engine.
The ECM displays the countdown time, in hours, until the
next scheduled service. The timer starts at 250 and
counts down to 0.
At this point, the ECM displays the running values of the
generator.
Note: The ECM display scrolls through each phase (P1,
P2, P3) if in the 3-phase mode, or L1, L3, and L1 + L3 if
in the single-phase mode.
66
Mobile Generator Repair
ECM Troubleshooting
G 85 (9305), G 125, G 160
ECM Display
Description
Start of the boot-up sequence. The ECM display reads
“Initializing” and shows the model of the generator. If the
model displayed does not match the model of the generator, call Wacker Service.
Initializing
G 85
Time to Service
250
Cranking 1 of 3
80
71
P2
75%
0
87
60.0
12.7
Under Frequency
Enabled
480 P2
71 75%
0
87
60.0
12.7
Engine Protection
Enabled
wc_tx000506gb.fm
The ECM displays the countdown time until the next
scheduled service. The timer starts at 250 and counts
down to 0.
The ECM displays this screen during the first cranking
cycle.
The ECM displays this screen as soon as the engine
starts. Note that some of the values such as voltage, may
not be up to their running values at this stage of the
sequence.
The ECM displays this screen to let the operator know
that the under frequency system (engine speed) has
been enabled.
At this point in the sequence, the ECM displays running
values.
The ECM displays this screen to let the operator know
that the engine protection system has been enabled.
67
ECM Troubleshooting
AC Configuration
Alt Protection
Enabled
Rated Volts L to L
480 P2
71 75%
0
87
60.0
12.7
Mobile Generator Repair
The ECM displays the AC configuration as determined
by the position of the voltage selector switch (VSS).
The ECM displays this screen to let the operator know
that the alternator protection system has been enabled.
The ECM displays the line-to-line voltage. (This screen is
shown for 3-phase VSS positions only.)
At this point, the ECM displays the run screen and the
values for the main generator variables: voltage, phase*
(leg), amperage, hertz (For generators with engines that
include ECUs, the Hz reading will be 60.0. For all others
the reading will be 61.5.) The ECM will also display the
values for the main engine variables: oil pressure, fuel
tank quantity, engine temperature, and battery voltage.
*Note: The ECM display scrolls through each phase (P1,
P2, P3) if in the 3-phase mode, or L1, L3, and L1 + L3 if
in the single-phase mode.
wc_tx000506gb.fm
68
Mobile Generator Repair
5.2
ECM Troubleshooting
Display Variables and Values
See Graphic: wc_gr002944
•
Generator Variables
The values shown in the top line of the ECM display are all variables
from the generator side of the machine. They are:
(1) voltage (V)
(2) phase (Ø) (or leg for single phase)
(3) amperage (A)
(4) frequency(Hz).
•
Engine Variables
The values shown in the lower line of the ECM display are all variables
from the engine side of the machine. They are:
(5) engine oil pressure (psi)
(6) fuel tank quantity (shown in percentage of capacity)
(7) engine temperature (°F)
(8) battery voltage (V)
•
Blinking Values
When a value on the ECM display blinks on and off, it signifies that the
variable (temperature, fuel capacity, etc.) is in a prealarm state. For
example, the value for the temperature reading will blink when the
temperature of the generator is below 23°C (74°F). This simply
signifies that the manifold heater (or glow plugs) will be energized to
aid in engine starting. The fuel capacity reading will blink when it is
below 25%. This tells the operator that the generator will be requiring
fuel soon. See Section Additional Variables Monitored by the ECM.
Note: If your generator has a block heater, the temperature reading
should not blink. If it does, check the block heater to make sure it is
functioning properly.
•
ND, 0, or Blank Values
When a value on the ECM display reads ND, 0, or is blank, it signifies
that there is no data available for the variable.
wc_tx000506gb.fm
69
ECM Troubleshooting
2
1
481
71
5
Mobile Generator Repair
3
P2
24%
4
0 60.0
87 12.7
6
7
8
wc_gr002944
5.3
ECM Display Screens—Start Switch in Remote Position
See Graphic: wc_gr002943
When the start switch is placed in the REMOTE position, the following
screens are displayed.
5.3.1
Initializing
The ECM display reads “Initializing” and shows the model of the
generator. If the model displayed does not match the model of the
generator, call Wacker Service.
5.3.2
Unit in Auto
The ECM displays “Unit in Auto” and the values for oil pressure,
percentage of fuel remaining, engine temperature, and voltage of the
battery.
1
2
Initializing
G85
0
Unit in Auto
50%
74 12.7
wc_gr002943
wc_tx000506gb.fm
70
Mobile Generator Repair
5.4
ECM Troubleshooting
Additional Variables Monitored by the ECM
Holding the toggle switch in the HOURS/RESET position allows the
operator to view additional variables monitored by the ECM. It also
allows the time-to-service countdown timer to be reset. To reset the
countdown timer, hold the toggle switch in the HOURS/RESET
position for approximately 30 seconds or until all the screens have
been scrolled through twice. There are three different sets of additional
variables. Each of the following categories of generators has its own
unique set: standard, those generators with cold weather packages or
custom features, and those with the John Deere engine that includes
the electronic Engine Control Unit (ECU). All three sets of additional
variables are listed below, along with typical no load values. Note: The
values from your generator may differ slightly from those shown here.
G 25, G 50, G 70, G 85 (9310) Standard Models
ECM Display
Running Time
0.6
Time to Service
250
Description
The display shows the amount of time, in 1/10 hour segments, that the engine has been running.
The display shows the amount of time left until service on
the machine is required. To reset the timer to 250 hours,
hold the Hours/Reset toggle switch in the up position
until all the screens have been scrolled through twice.
Some ECMs include this message.
FOR SALES AND
SERVICE CONTACT
Some ECMs include this message.
YOUR LOCAL
WACKER DEALER
wc_tx000506gb.fm
71
ECM Troubleshooting
Mobile Generator Repair
Oil Pressure Sender
OK
The display shows the status of the oil pressure sender.
If the oil pressure sender has failed, the time of the failure will be displayed. The time of the failure will be
included in the display until the generator has been shut
down and remains shutdown for a period of approximately two minutes.
Water Temp Sender
OK
The display shows the status of the engine coolant temperature sender. If the coolant temperature sender has
failed, the time of the failure will be displayed. The time of
the failure will be included in the display until the generator has been shut down and remains shutdown for a
period of approximately two minutes.
G 25, G 50, G 85 (9310) Cold Weather and Custom Generators
ECM Display
Running Time
0.1 Hours
Time to Service
250.0 Hours
SW Rev. x/x/x (date)
Job No. 123456
AC Configuration
Alt Protection
Enabled
wc_tx000506gb.fm
Description
The display shows the total time, in 1/10 hour increments, that the engine has been run. New machines, or
machines with new ECMs, will read 0.0 or “No Data”
because the engine has not been run for more than 1/10
of an hour.
The display shows the amount of time left until service on
the machine is required. To reset the timer to 250 hours,
hold the Hours/Reset toggle switch in the up position
until all the screens have been scrolled through twice.
The display shows the date and job number data regarding the ECM manufacture.
The display shows the AC configuration as determined
by the position of the Voltage Selector Switch (VSS). If
the machine is not running, the display reads “Unknown”.
The ECM displays this screen to let the operator know
that the alternator protection system has been enabled or
disabled.
72
Mobile Generator Repair
Speed Sender
Status is Normal
ECM Troubleshooting
The display shows the status of the speed sender. If the
speed sender has failed, the time of the failure will be
displayed. The time of the failure will be included in the
display until the generator has been shut down and
remains shutdown for a period of approximately two minutes. At that time the ECM clears itself.
60.0 Hz Nominal
No. Teeth = 142
The display shows the number of teeth on the flywheel
which are measured by the magnetic pickup. The number of teeth differs between Isuzu engines (136) and
John Deere engines (142).
Prealarm Setting
1 s @ < 55.0 Hz
The display shows the value of the prealarm setting for
under speed. If the ECM detects that the engine speed is
less than 55 Hz for longer than 1 second, the Hz reading
on the run screen will start to blink.
Fault Setting
15 s @ < 55.0 Hz
The display shows the value of the fault setting for under
speed. If the ECM detects that the engine speed is less
than 55 Hz for longer than 15 seconds, the ECM will shut
down the generator.
Fault Setting
1 s @ > 67.0 Hz
The display shows the value of the fault setting for over
speed. If the ECM detects that the engine speed is more
than 67 Hz for longer than 15 seconds, the ECM will shut
down the generator.
Oil Pres Sender
Status is Normal
Prealarm Setting
Level < 20 psi
wc_tx000506gb.fm
The display shows the status of the engine oil pressure
sender. If the oil pressure sender has failed, the time of
the failure will be displayed. The time of the failure will be
included in the display until the generator has been shut
down and remains shutdown for a period of approximately two minutes.
The display shows the value of the prealarm setting for
low oil pressure. If the ECM detects that the engine oil
pressure is less than 20 psi, the engine oil pressure reading on the run screen will start to blink.
73
ECM Troubleshooting
Fault Settings
5 Sec @ < 15 psi
Service Time
Reset to 250 Hrs
Prealarm Setting
Level < 70 F
Mobile Generator Repair
The display shows the value of the fault setting for low oil
pressure. If the ECM detects that the engine oil pressure
is less than 15 psi for longer than 15 seconds, the ECM
will shut down the generator.
The display shows this screen if the time to service timer
has been reset to 250 hours.
The display shows the value of the prealarm setting for
low engine temperature. If the ECM detects that the
engine temperature is less than 70°F, the engine temperature reading on the run screen will blink.
Prealarm Setting
Level > 234 F
The display shows the value of the prealarm setting for
high engine temperature. If the ECM detects that the
engine temperature is greater than 234°F (218°F on
Isuzu engines), the engine temperature reading on the
run screen will blink.
Fault Setting
5 sec @ > 234 F
The display shows the value of the fault setting for high
engine temperature. If the ECM detects that the engine
temperature is greater than 239°F (221°F on Isuzu
engines) for longer than 5 seconds, the ECM will shut
down the generator.
Fuel Sender
Status is Normal
The display shows the status of the fuel sender. If the
fuel sender has failed, the time of the failure will be displayed. The time of the failure will be included in the display until the generator has been shut down and remains
shutdown for a period of approximately two minutes.
Prealarm Setting
Level < 25%
The display shows the value of the prealarm setting for
low fuel level. If the ECM sees that the fuel level has
dropped below 25%, the fuel level reading on the run
screen will start to blink.
Fault Settings
5 Sec @ < 5%
The display shows the value of the alarm setting for low
fuel level. If the ECM sees that the fuel level is less than
5% for longer than 5 seconds, the ECM will shut down
the generator.
wc_tx000506gb.fm
74
Mobile Generator Repair
ECM Troubleshooting
12 Volt Battery
Status is Normal
The display shows the status of the battery. When the
battery voltage is within its “normal” range, 12 –15V, the
ECM displays the voltage value in 1/10V increments on
the run screen.
Prealarm Setting
Level < 12.0 V
The display shows the battery low-voltage prealarm setting. When the ECM detects that battery voltage is less
than 12V, the battery voltage reading on the run screen
will blink.
Prealarm Setting
Level > 15.0 V
The display shows the battery high-voltage prealarm setting. When the ECM detects that battery voltage is
greater than 15V, the battery voltage reading on the run
screen will blink.
G 85 (9305), G 125, G160 John Engines with ECU
ECM Display
SPN.FMI
Description
100.01
Engine Hours
1.9
Time to Service
250
Throttle
10%
wc_tx000506gb.fm
John Deere engine diagnostic codes.
SPN = Suspect Parameter Number
FMI = Failure Mode Identifier.
The ten most recent codes will be displayed from most
current to least current. See the John Deere engine manual for details.
The display shows total time, in 1/10 hour increments,
that the engine has been run. New machines, or
machines with new ECMs, will read “No Data” because
the engine has not been run for more than 1/10 of an
hour.
The display shows the amount of time left until service on
the machine is required. To reset the timer to 250 hours,
hold the Hours/Reset toggle switch in the up position
until all the screens have been scrolled through twice.
The display shows the amount the throttle is open at the
current point in time.
75
ECM Troubleshooting
Load @RPM
15%
Engine Torque
60%
Mobile Generator Repair
The display shows the present load on the engine. For
no load conditions (generator not powering any outside
tools or equipment) the display will read 15%.
The display shows the percentage of total engine torque
being used.
The display shows, in °F, the temperature of the fuel.
Fuel Temperature
86° F
The display shows, in psi, fuel pressure.
Fuel Pressure
147
Fuel Rate
0.9 GPH
Manifold Temp
95°F
wc_tx000506gb.fm
The display shows, in gallons per hour (GPH), the rate at
which fuel is being consumed.
The display shows, in °F, the temperature of the engine
intake manifold.
76
Mobile Generator Repair
5.5
ECM Troubleshooting
CAN Bus Code Screen
For John Deere engines with electronic control (G 85, G 125, G160),
the Engine Control Unit (ECU) communicates with the Engine Control
Module (ECM) through a Controller Area Network (CAN). The wiring
between the controllers forms a bus (physical electrical interface
where many devices share the same electrical connections). When
there is a communication malfunction between the ECU and the ECM,
or when there is no data stored in the ECU, the ECM will display the
following screen.
No CAN Bus Info
ECU Power Save
The ECU has diagnostic abilities and shares engine diagnostic
information through codes which are displayed on the ECM display
screen. These diagnostic codes are referred to as SPN/FMI codes:
Suspect Parameter Number (SPN) and Failure Mode Identifier (FMI).
SPN/FMI codes are conveyed in a two-part code number. The SPN
typically contains between two and four digits and is the first number
of the code. The FMI contains one or two digits and is the second
number of the code. For example, if the ECM displays “SPN/FMI 100.
4”, The SPN “100” indicates a condition with the engine oil. FMI “4”
indicates that the engine oil pressure input voltage is lower than the
sensor’s specification—a condition associated with a disconnected oil
pressure sensor. There are many such SPN/FMI codes. See the John
Deere technical manual for more information.
SPN.FMI
100. 4
Engine Oil
Pres
wc_tx000506gb.fm
77
ECM Troubleshooting
5.6
Mobile Generator Repair
Voltage Display Errors
See Graphic: wc_gr002770
•
Single Phase Display Mode
The ECM is programmed to display line-to-line voltage values for both
three-phase voltage selector switch positions. For example, if the
voltage selector switch is in the 277/480V position, voltage values will
read 480V on all three legs. However, when operating in the single
phase 120/240V position, line-to-line voltage will only be displayed for
leg 2 (240V). Legs 1 and 3 will display the line-to-neutral voltage of
120V. This is the normal single-phase display mode.
There are several conditions which can cause the ECM to switch to its
single-phase display mode. The two most common conditions are
described below. The voltage values displayed in this mode can lead
someone to conclude that the generator is not running correctly.
Always check that display values are reading correctly before
proceeding with more detailed troubleshooting procedures. If the
voltage value on the ECM display is suspect, measure voltage values
directly off the main connection lugs using a voltmeter. See section
Verifying Voltage.
•
Low Line Voltage in L2
If voltage in leg 2 (L2) drops below 50 Volts, the ECM will switch to its
single-phase display mode and remain there. Two common causes for
this are:
•
Starting the generator with the connection lug door open and
closing it afterward without turning off the engine.
•
Starting the generator in its single-phase 120/240V position and
switching to 120/208V or 277/480V three-phase without turning
the generator off first.
Neither of the above conditions are recommended and both will cause
the ECM to display a line-to-neutral voltage for legs 1 and 3. For
example, in the 277/480V position leg 2 will read 480V while legs 1 and
3 will read 277V.
To change the ECM back to the three-phase display, close the lug
door, then stop and restart engine.
wc_tx000506gb.fm
78
Mobile Generator Repair
•
ECM Troubleshooting
Engine Hour Switch in Locked Position
Another possible display error can occur when starting the machine
with the engine hour switch (a) in its down or locked position. This
position is normally used to lock the display onto a single leg and to
prevent the display from scrolling through volt and amp values for all
three legs.
On some generators, starting the engine with the switch in its locked
(down) position will reverse the display for volts and amps. To correct
the display, return the engine hour switch to its unlocked (scroll)
position.
To ensure the correct voltage display, make sure:
•
The connection lug door is closed and latched before starting the
engine.
•
The voltage selection switch is in its correct position prior to starting the engine.
•
The engine hour switch is in its unlocked (center) position.
a
wc_gr002770
wc_tx000506gb.fm
79
ECM Troubleshooting
5.7
Mobile Generator Repair
ECM Automatic Engine Shutdown Conditions
The engine protection system includes six automatic shutdown
conditions: low oil pressure, high coolant temperature, engine under/
overspeed, engine overcrank, low fuel. The ECM will also shut down
the engine if an over current condition exists.
When the ECM has shut down the unit due to one of the faults, the
ECM will display the fault and other pertinent information to aid you in
diagnosing the problem. RECORD ALL THE INFORMATION LISTED
on the display, then refer to the following sections to diagnose and
rectify the problem.
When the engine has shut down due to something outside the control
of the ECM, the ECM will display “ENGINE STOPPED”.
5.7.1
Low Oil Pressure Shutdown
FAULT LOW OIL
PRESSURE 14
See Graphic: wc_gr001980, wc_gr001981, wc_gr002082
When the ECM display reads “FAULT LOW OIL PRESSURE” or
similar, it signifies a problem with engine oil pressure. During such a
condition, the ECM will shut down the engine. If the ECM display reads
less than 15 psi at shutdown, a problem exists with the engine. If the
ECM message displays 15 psi or greater at shutdown, the problem lies
within the ECM program.
To diagnose and rectify the fault:
5.7.1.1 Check the engine oil level using the dipstick. Add oil if necessary.
5.7.1.2 Carefully inspect the engine for oil leaks. If leaks exist, repair them or
consult your Isuzu or John Deere dealer for repair work.
5.7.1.3 Remove and disconnect the oil pressure sender (a) from the engine.
In its place, install an engine pressure gauge.
Start the engine—shut down the engine immediately if the oil pressure
value does not read at least 15 psi.
Verify the oil pressure.
If the pressure gauge reads the same as the ECM did at shutdown,
there is a problem with the engine pressure. See an Isuzu or a John
Deere dealer for repair work.
wc_tx000506gb.fm
80
Mobile Generator Repair
ECM Troubleshooting
If the pressure gauge reads differently than the ECM, there is a
problem with the sender or the ECM.
5.7.1.4 With a multimeter, check the continuity of the wire between the sender
and the ECM. If the resistance measures “OL”, “OPEN”, or more than
1 Ohm, replace the wire.
5.7.1.5 Clean buildup from the end of the sender and check the sender’s
resistance. A functioning sender will measure 240±10 Ohms outside of
the engine.
If the sender does not measure 240±10 Ohms, replace it.
If the sender measures 240±10 Ohms, there may be a problem with
the ECM.
5.7.1.6 Check the function of the ECM by attaching one end of a resistance of
100 Ohms to the oil pressure sender wiring and the other end to
ground. This can be done by attaching a 100-Ohm resistor or
potentiometer (pot). If you do not have a 100-Ohm resistor or a pot, an
extra voltage adjustment rheostat similar to the one mounted on the
control panel may be used. Calibrate the rheostat by attaching the
leads of a multimeter to it and turning the rheostat’s adjusting knob.
Mark the position of the knob at varying resistances. With a load of 100
Ohms, the ECM display should read approximately 50±5 psi. If it does
not, replace the ECM or have it repaired. Contact Wacker for ECM
repair details.
Note: No testing of the oil pressure sensor can be done on John Deere
engines with ECUs.
wc_gr002082
wc_tx000506gb.fm
81
ECM Troubleshooting
5.7.2
Mobile Generator Repair
High Coolant Temperature Fault
FAULT HIGH ENGINE
TEMPERATURE 255
See Graphic: wc_gr001982, wc_gr001983, and wc_gr002083
When the ECM display reads “FAULT HIGH ENGINE
TEMPERATURE” or similar, it signifies that engine coolant
temperature has risen above safe levels. The temperature at which the
ECM will shut down the engine is 239°F (115°C) for John Deere
engines, 221°F (105°C) for Isuzu engines. If the ECM displays less
than 239°F (John Deere), 221°F (Isuzu) after shutdown, the problem
exists within the ECM program.
Note: Normal engine operating temperature is between 170°–200°F
(77°–93°C).
Note: The temperature sender must be fully immersed in liquid to
function properly.
To diagnose and rectify fault:
5.7.2.1 Allow the engine to cool to a safe temperature then inspect the coolant
level in the radiator. Add coolant as needed. Also inspect the coolant
hoses and the engine block for leaks. Check the fan belt and the water
pump.
5.7.2.2 With a multimeter, check the continuity of the wire between the sender
(a) and the ECM. If resistance measures “OL”, “OPEN”, or more than
1 Ohm, replace the wire.
5.7.2.3 Clean the immersed end of the sender. Check the sender’s resistance.
A functioning sender will measure 700–800 Ohms outside of the
engine at room temperature.
If the sender does not measure 700–800 Ohms, replace it.
If the sender measures 700–800 Ohms, there may be a problem with
the ECM.
wc_tx000506gb.fm
82
Mobile Generator Repair
ECM Troubleshooting
5.7.2.4 Check the function of the ECM by attaching varying loads of resistance
on one end of the temperature sender wiring and the other end to
ground. This can be done by attaching varying resistors or through a
potentiometer (an extra voltage adjustment rheostat similar to the one
mounted on the control panel may be used.) Calibrate the rheostat by
attaching the leads of a multimeter to it and turning the rheostat’s
adjusting knob. Mark the position of the knob at varying resistances.
With a load of 700–800 Ohms, the ECM display should read 72°F; 30–
40 Ohms=230°F; 175 Ohms=175°F. If the ECM does not respond
accordingly, replace it or have it repaired. Contact Wacker for ECM
repair details.
wc_tx000506gb.fm
83
ECM Troubleshooting
5.7.3
Mobile Generator Repair
Overspeed/Underspeed Shutdown Fault
FAULT
UNDERSPEED
FAULT
OVERSPEED
See Graphic: wc_gr001984 and wc_gr002780
When the ECM display reads “FAULT OVERSPEED” or similar, it
indicates that the engine speed exceeded approximately 2130 rpm
(118% of its rated speed of 1800 rpm) and the ECM has automatically
shut down the engine.
When the ECM display reads “FAULT UNDERSPEED” or similar, it
Indicates that the engine speed dropped below 55Hz (1650 rpm) for
more than 15 seconds and the ECM has automatically shut the engine
down.
To rectify an over- or under-speed condition:
5.7.3.1 For underspeed conditions check: system overload, condition of fuel
system, condition of air, fuel, and oil filters.
5.7.3.2 For overspeed conditions check: governor speed setpoint,
malfunctioning governor system and fuel supply entering air intake
system.
5.7.3.3 For both under- and over-speed conditions, recalibrate the ECM
frequency display. See Recalibrating the ECM.
5.7.3.4 Restart the engine and check the engine speed using a tachometer
(Wacker tach PN 0154500) or vibrotach.
5.7.3.5 If the speed is incorrect, reset the engine rpm to approximately 1850
rpm no load. (Note: rpm ÷ 30 = Hertz; Hertz x 30 = rpm. 1850 ÷ 30 =
61.6 thus, 1850 rpm = 61.6 Hertz)
To adjust engine speed:
On Isuzu engines, loosen the lock nut (a) and turn the adjusting screw
(b). On John Deere engines, adjust the low-speed adjusting screws (c)
and the throttle (d) as needed.
John Deere
d
c
wc_gr002780
wc_tx000506gb.fm
84
Mobile Generator Repair
5.7.4
ECM Troubleshooting
Overcrank Shutdown Fault
FAULT
OVERCRANK
To rectify an overcrank condition, carry out the engine troubleshooting
procedures found in this manual.
Note: An overcrank condition can occur even when the engine does
not crank. This happens if a failure in one of the relays prevents the
engine from cranking, allowing the ECM to time out. To reset the ECM,
turn the start switch to OFF, then back to START/RUN, and retry
starting the engine.
If the engine still does not start, refer to the engine manufacturer's
operator's manual or service manual for possible engine problems.
wc_tx000506gb.fm
85
ECM Troubleshooting
5.7.5
Mobile Generator Repair
Low Fuel Shutdown Fault
FAULT
LOW FUEL
See Graphic: wc_gr002084
A low fuel fault condition will be displayed when the fuel level drops to
5% of capacity and the ECM has shut down the engine. This fault
condition prevents the fuel lines from running completely dry and
avoids the need to bleed the lines when the tank is refilled.
To diagnose and rectify fault:
5.7.5.1 With a multimeter, check the continuity of the wire between the sender
and the ECM. If resistance measures “OL”, “OPEN”, or more than 1
Ohm, replace the wire.
5.7.5.2 Remove and clean the sender. Check its resistance. A functioning
sender will measure approximately 240 Ohms when the tank is empty;
33 Ohms when full.
If the sender does not measure 240±10% Ohms in the empty position
or 33±10% Ohms in the full position, replace it.
If the sender measures 240±10% Ohms in the empty position, 33±10%
Ohms in the full position and the ECM doesn’t respond accordingly,
there may be a problem with the ECM.
5.7.5.3 Check the function of the ECM by attaching varying loads of resistance
to the fuel sender wiring. This can be done by attaching varying
resistors or through a potentiometer. (An extra voltage adjustment
rheostat similar to the one mounted on the control panel may be used.)
Calibrate the rheostat by attaching the leads of a multimeter to it and
turning the rheostat’s adjusting knob. Mark the position of the knob at
varying resistances. Then, connect the fuel sender wiring to the
rheostat. With a load of 33 Ohms, the ECM display should read 104%;
at approximately 210 Ohms, 15%. If the ECM doesn’t respond
accordingly, replace it or have it repaired. Contact Wacker for ECM
repair details.
wc_tx000506gb.fm
86
Mobile Generator Repair
5.7.6
ECM Troubleshooting
Over Current Shutdown Fault
FAULT
OVERLOAD
Along with engine functions, the ECM continuously monitors the
current load in each leg. The values for current overload are
programmed into the ECM at the factory and are different for each
generator size.
When an overload condition is sensed in any leg, the engine will shut
down and the ECM displays “FAULT OVERLOAD” or similar.
Before restarting the generator, the cause of the overload should be
determined and eliminated. Review all loads attached to the generator
and make sure they do not exceed the power rating of the unit.
Note: Before any fault shutdown, the ECM display will show a
“flashing” value and the yellow prealarm warning LED will come on.
For example, during an overload condition the value of the amperage
will flash. To aid in troubleshooting, make note of these values when a
shutdown does occur.
wc_tx000506gb.fm
87
ECM Troubleshooting
5.8
Mobile Generator Repair
Sender Failures
Oil Sender
Failure
SPN PREALARM
Check Diagnostic
If one of the sensors should malfunction or become shorted to ground,
the ECM LCD will display a message similar to one of those shown
above. The yellow caution LED on the front of the control panel will
also illuminate. The value for the variable may go blank. Check the
wiring to the sensor and the sensor before using the generator.
5.9
Recalibrating the ECM
See Graphic: wc_gr002771
There are four display values on the ECM that may be recalibrated: AC
voltage, AC amperage, AC frequency, and DC battery voltage.
5.9.1
To recalibrate the ECM AC voltage display:
5.9.1.1 Place the voltage selector switch in the 120/208V, 3-phase position.
5.9.1.2 Start the generator and place one of the 50A receptacle circuit
breakers (a) in the ON position.
5.9.1.3 Observe the ECM display panel (b) as it cycles through the voltage
values for each leg. Place the hour meter switch (c) in the down
position when the ECM display is showing the leg 1 value.
5.9.1.4
Electric shock hazard. Use extreme care when checking voltage.
DANGER
Insert the probes of a multimeter into the 50A receptacle as shown.
The meter should read between 208–240V. Monitor the ECM display
panel as adjustments are made. Open the control panel to gain access
to the back of the ECM. Turn the voltage adjusting pot (d) clockwise to
increase voltage, counterclockwise to decrease voltage, until the
voltage on the ECM display matches that on your multimeter.
Note: Once completed for 208V, all other voltages will be reset as well;
no other recalibration for AC voltage will be necessary.
5.9.1.5 Return the hour meter switch to its center position.
wc_tx000506gb.fm
88
Mobile Generator Repair
ECM Troubleshooting
a
208 L1
b
c
d
wc_gr002771
wc_tx000506gb.fm
89
ECM Troubleshooting
Mobile Generator Repair
See Graphic: wc_gr002772
5.9.2
To recalibrate the ECM AC amperage display:
5.9.2.1 Start the generator and place one of the receptacle circuit breakers in
the ON position. Plug in a load of 10A or greater on G12 and G25
models; 20A or greater on G50 and larger models. Or, connect an
appropriately-sized load bank to the generator. Attach a clamp-type
ammeter to one of the load wires (not more than one load wire or your
readings will be inaccurate).
5.9.2.2 Observe the ECM display panel (a) as it cycles through the amperage
values for each leg. Place the hour meter switch (b) in the down
position when the ECM displays an amperage value.
5.9.2.3 Monitor the ECM display panel as adjustments are made. Open the
control panel to gain access to the ECM. Turn the amperage adjusting
pot (c) clockwise to increase, counterclockwise to decrease amperage
until the amperage on the ECM display matches that on your
multimeter amp clamp.
d
208 L1
a
wc_tx000506gb.fm
b
90
wc_gr002772
Mobile Generator Repair
ECM Troubleshooting
See Graphic: wc_gr002795
5.9.3
To recalibrate the ECM AC frequency (Hz) display:
Note: Recalibrate only if your unit is off by more than 5Hz.
5.9.3.1 Start the generator. Using a tachometer or vibrotach, adjust the engine
speed to 1800 rpm or 60Hz.
5.9.3.2 Open the control panel to gain access to the ECM. Monitor the ECM
display panel as adjustments are made.
5.9.3.3 Locate the AC frequency push button (a). Hold the push button in until
the ECM display reads 60Hz.
5.9.3.4 Set the engine speed back to 1850 rpm no load.
a
wc_gr002795
wc_tx000506gb.fm
91
ECM Troubleshooting
Mobile Generator Repair
See Graphic: wc_gr002796 and wc_gr002971
Isuzu and John Deere engines without ECU
5.9.4
To recalibrate ECM DC voltage (12V battery) display:
5.9.4.1 Start the generator. Open the control panel to gain access to the ECM.
Monitor the ECM display panel as adjustments are made.
5.9.4.2 Using a multimeter, measure the voltage across the 12V machine
battery. Adjust the DC voltage pot (a) by turning the adjusting screw so
that the ECM reads the same value as the multimeter.
Note: The pot is located on the lower ECM board. Access the pot
through the hole in the upper board.
b
a
wc_gr002796
wc_gr002971
John Deere engines with ECU
5.9.5
To recalibrate ECM DC voltage (12V battery) display:
5.9.6
Measure the battery voltage. This procedure works best when the
battery voltage is 12.6V.
5.9.6.1 Place the start switch in the REMOTE START position.
5.9.6.2 Open the control panel to gain access to the ECM.
5.9.6.3 Slide the number 2, Dual In-line Package (DIP) switch (b) to the ON
position then back to the OFF position. The voltage display is now
reset.
wc_tx000506gb.fm
92
Mobile Generator Repair
ECM Troubleshooting
5.10 Removing and Installing the ECM
See Graphic: wc_gr002797
Removal:
5.10.1
Remove the nut securing the hour meter switch (a) and the nut
securing the start switch (b) to the panel.
5.10.2
Remove the screws (c) securing the ECM to the panel.
5.10.3
Disconnect the four harness plugs (e).
5.10.4
Remove the three red wires (d) from the start switch. Remove the start
switch, hour meter switch, and the ECM from the panel.
Note: Replacement ECMs include start and hour meter switches.
Installation:
5.10.5
Secure the ECM to the panel with screws (c).
5.10.6
Secure the hour meter (a) and the start switch (b) to the control panel.
5.10.7
Reconnect the four harness plugs (e).
5.10.8
Reinstall the three red wires (d) to the start switch.
c
e
a
b
d
wc_gr002797
wc_tx000506gb.fm
93
ECM Troubleshooting
Mobile Generator Repair
5.11 ECM Circuit Boards
a
a
4 3
2 1
6 5 4
3 2 1
654
321
P3
b
b
P4 4 3
2 1
6 5 4
3 2 1
12 1110 9 8 7
6 5 4 3 2 1
43
21
12 1110 9
6 5 4 3 87
21
8 7 6 5
4 3 2 1
e
8765
43 2 1
c
P1
12 1110 9 8 7
6 5 4 3 2 1
8 7 6 5
4 3 2 1
d
P2
wc_gr002924
Note: Your machine’s ECM board may differ slightly from the one
pictured.
Ref.
wc_tx000506gb.fm
Description
a
AC board
b
Engine board
c
Crank relay
d
Fuel relay
e
Preheat relay
P1
Power and engine sensing
P2
Power to crank, fuel and fault prealarm closures
P3
AC Amps connection to current transformers
P4
AC Volts connection to voltage selector switch
94
Mobile Generator Repair
ECM Troubleshooting
5.12 Control Wiring Numbering & Colors
See Graphic: wc_gr002924
Generator and control wires are marked and color coded to assist in
tracing line connections and troubleshooting. The charts below list wire
labels and colors followed by a description of their use.
G 25 Control Module
Plug 1: Engine Sender Inputs (12-pin connector)
1
Black
Magnetic pickup
2
Clear, shield
Magnetic pickup
3
White/Blue
Oil pressure sender
5
Yellow
Water temperature sender
7
Red
Run/Off/Auto switch, +12V (positive)
8
Black
12VDC supply, - ground (negative)
10
Orange
Remote start contacts
11
Red
Emergency stop pushbutton
12
White/Violet
Fuel level sender
Plug 2: Engine Start Inputs/Outputs (8-pin connector)
1
Yellow/Red
Out; 12VDC to starter relay
2
Violet
Out; 12VDC to E-stop switch
5
Red
In; 12VDC from B+ through 10A fuse
7
Red
In; 12VDC from B+
8
Green
Out; 12VDC to glow plug relay
Plug 3: Current Transformer Inputs (6-pin connector)
1
White
Ammeter line input CT common
2
Brown
Ammeter line input CT1
4
Orange
Ammeter line input CT3
5
Yellow
Ammeter line input CT2
Plug 4: Line Voltage Inputs (4-pin connector)
2
Brown
wc_tx000506gb.fm
Voltage line input L1 at volt selector #3
95
ECM Troubleshooting
Mobile Generator Repair
3
Orange
Voltage line input L3 at volt selector #28
4
Yellow
Voltage line input L2 at volt selector #20
G 50/70/85 Control Module
Plug 1: Engine Sender Inputs (12-pin connector)
1
Black
Magnetic pickup
2
Clear, shield
Magnetic pickup
3
White/Black
Oil pressure sender
5
Yellow
Water temperature sender
7
Red
Run/Off/Auto switch, +12V (positive)
8
Black
12VDC supply, - ground (negative)
10
Orange
Remote start contacts
11
Green
Emergency stop pushbutton
12
White/Violet
Fuel level sender
Plug 2: Engine Start Input/Outputs (8-pin connector)
1
Yellow
Out; 12VDC to starter relay
2
Violet
Out; 12VDC to E-stop switch
5
Red
In; 12VDC from starter relay (B+) through
10A fuse
7
Red
In; 12VDC from starter relay (B+)
8
Green
Out; 12VDC to air intake heater relay
Plug 3: Current Transformer Inputs (6-pin connector)
1
White
Ammeter line input CT common
2
Brown
Ammeter line input CT1
4
Orange
Ammeter line input CT3
5
Yellow
Ammeter line input CT2
Plug 4: Line Voltage Inputs (4-pin connector)
2
Brown
Voltage line input L1 at volt selector #3
3
Orange
Voltage line input L3 at volt selector #28
4
Yellow
Voltage line input L2 at volt selector #20
wc_tx000506gb.fm
96
Mobile Generator Repair
ECM Troubleshooting
G 125/160 Control Module
Plug 1: Engine Sender Inputs (12-pin connector)
3
White/Blue
Crank delay, preheat
5
-
-
7
Red
Run/Off/Auto switch, +12V (positive)
8
Black
12VDC supply, - ground (negative)
9
Orange
Remote start contacts
10
Gray
Emergency stop pushbutton
12
White/Violet
Fuel level sender
Plug 2: Engine Start Input/Outputs (8-pin connector)
1
Yellow
Out; 12VDC to starter relay
2
Violet
Out; 12VDC to E-stop switch
5
Red
In; 12VDC from starter relay (B+) through
10A fuse
Plug 3: Current Transformer Inputs (6-pin connector)
1
White
Ammeter line input CT common
2
Brown
Ammeter line input CT1
4
Orange
Ammeter line input CT3
5
Yellow
Ammeter line input CT2
Plug 4: Line Voltage Inputs (4-pin connector)
2
Brown
Voltage line input L1 at volt selector #3
3
Orange
Voltage line input L3 at volt selector #28
4
Yellow
Voltage line input L2 at volt selector #20
wc_tx000506gb.fm
97
ECM Troubleshooting
Mobile Generator Repair
5.13 Sender Resistance Graphs
5.13.1
Fuel Sender
300
250
a
230
200
Ohm
150
100
33
50
b
0
0
20
40
60
80
100
5
120
104
Fuel Level %
wc_gr002081
a = shutdown point, 5%
b = full, 104%
5.13.2
Oil Sender
300
250
Ohm
200
a
175
150
b
100
50
0
0
20
40
15
60
80
PSI
a = shutdown point, 175 psi (12 bar)
b = normal operating pressure, 50 psi (3.4 bar)
wc_tx000506gb.fm
100
120
50
98
wc_gr002092
Mobile Generator Repair
5.13.3
ECM Troubleshooting
Temperature Sender
1000
800
Ohm
600
400
200
100
0
a
50
100
150
˚F
a = approximate normal operating temperature
b = approximate shut down temperature
wc_tx000506gb.fm
99
175
b
200
250
wc_gr002093
ECM Troubleshooting
Mobile Generator Repair
5.14 Checking Magnetic Pickup
See Graphic: wc_gr002114
The magnetic pickup is a magnet with a coil of wire wrapped around it.
It sends an AC signal to the ECM when the engine turns. The ECM
determines rpm by counting the AC voltage sine waves generated
every time a flywheel tooth passes underneath the magnetic pickup.
When the ECM sees that the engine has reached 100 rpm, the ECM
discontinues cranking the starter motor.
wc_tx000506gb.fm
5.14.1
Disconnect wiring (a) and remove the magnetic pickup (b) from the
engine.
5.14.2
Using a multimeter, check the magnetic pickup for resistance. A
functioning pickup will measure 650–700 Ohms.
5.14.3
When re-installing the magnetic pickup, thread the pickup in until it
touches the teeth of the flywheel (c). Then, back the magnetic pickup
out 1/2 turn, hold it in place, and secure it with the nut (d).
100
Mobile Generator Repair
6.
Isuzu Engine Troubleshooting
Isuzu Engine Troubleshooting
6.1
Isuzu Engine Background
See Graphic: wc_gr002003
The Isuzu engines use individual cylinder glow plugs as a starting aid.
An electric fuel lift pump and an electro-mechanical fuel solenoid are
used for engine run/stop control.
The glow plugs are located near the top of the engine, and protrude
into each cylinder, one per cylinder. The glow plugs warm the engine
cylinder and aid in fuel/air mixture ignition when the engine is cold.
They can reach temperatures up to 1200°F (649°C). After the start
switch is moved into the START/RUN position, the red LED near the
stop sign on the front of the control panel will be lit indicating the ECM
is attempting to energize the glow plugs. The ECM controls the
duration the glow plugs are energized based on the engine coolant
temperature. The colder the temperature, the longer the glow plugs are
energized. The glow plugs are energized only during the first of three
automatic starting attempts.
wc_tx000507gb.fm
101
Isuzu Engine Troubleshooting
6.2
Mobile Generator Repair
Engine Wiring Diagram—Isuzu
This schematic will be referred to throughout this chapter.
3
1
R
7
1
54
2
59
55
55
60
8
10
56
3
54
B
B
Cl
Sh
Or
W/L
7
55
61
11
4
53
4
26
5
12
57
Y
62
W/V
6
R
1
6
2
18
R
Y
18
5
35
B
B
34
31
14
R
B+
R
2
Or
+
20
R
SO
SI
CP
Y
34
14
22
17
59
-
25
CG
B
32
21
22
15
W/R
B+
20
19
13
21
13
27
86
12
65
R
14
R
85
R
R
60
V
Y
14
26
30
11
51
Gr
LL
15 87
30
B+
65
4
86
87
85
Y
13
64
3
8
27
48
R
12
10 11
16
V
R
R
24
63
17
7
Y
LL
L
B
28
49
R
B
29
R
Or
6G
Br
9
R
8
6
2
W
W
5
W
W/G
LL
B
45
46
2
Gr
46
Or
Y
79
79
24
25
L1
L2
L3
23
L0
L0
23
45
Y
24
B
W
wc_gr002833
W
Wire Colors
B
Black
R
Red
Y
Yellow
Or
Orange
G
Green
T
Tan
Br
Brown
Pr
Purple
L
Blue
V
Violet
Cl
Clear
Sh
Shield
P
Pink
W
White
Gr
Gray
LL
Light blue
wc_tx000507gb.fm
102
B
13
Mobile Generator Repair
6.3
Ref.
Isuzu Engine Troubleshooting
Engine Wiring Components—Isuzu
Component
Ref.
Component
1
Plug 1 — engine sender inputs
15
Fuel relay
2
Plug 2 — engine start outputs
16
Starter relay
3
Engine Control Module (ECM)
17
Emergency stop switch
4
Oil pressure sender
18
10A fuse #1
5
Water temperature sender
19
Remote start terminals
6
Remote Start - Off - Start/Run
switch
20
Battery
7
Magnetic pickup
21
Starter motor
8
Fuel pump
22
Alternator
9
Fuel solenoid
23
Mechanical lugs
10
10A fuse #2
24
Main circuit breaker — shunt trip
11
25A fuse
25
Lug door interlock switch
12
Glow plugs
26
Fuel level sender
13
B+ terminal block
27
Hour meter switch
14
Glow plug relay
-
---
ECM Plug 1 Wires
Pin
Wire
Description
7
R/53
1
ECM Plug 2 Wires
Pin
Wire
Description
Run/Off/Auto switch +12V
5
R/18
In; 12VDC from 10A fuse
B/54
Magnetic pickup ground
1
Y/63
Out; 12VDC to start relay
8
B/59
Battery (negative)
2
V/64
Out; 12VDC to E-stop
2
Cl,Sh/55
Magnetic pickup
7
R/17
In; 12VDC from B+
10
Or/60
Remote start
8
Gr/65
Out; 12VDC to glow plug
relay
3
W/L/56
Oil pressure sender
-
-
---
11
R/61
Emergency stop
-
-
---
5
Y/57
Water temperature sender
-
-
---
12
W/V/62
Fuel level sender
-
-
---
wc_tx000507gb.fm
103
Isuzu Engine Troubleshooting
6.4
Mobile Generator Repair
Engine Electrical Component Locations—Isuzu
11
19
5
4
8
3
10
7
6
9
2
12
18 17
13
15
wc_gr002834
wc_tx000507gb.fm
1
14
104
16
Mobile Generator Repair
6.5
Isuzu Engine Troubleshooting
Engine Electrical Components—Isuzu
See Graphic: wc_gr002834
Ref.
Component
Ref.
Component
1
Engine Control Module (ECM)
11
Starter relay
2
Oil pressure sender
12
Battery
3
Water temperature sender
13
Starter motor
4
Fuel pump
14
Alternator
5
Fuel solenoid
15
Main circuit breaker
6
10A fuse #2
16
Fuel level sender
7
25A fuse
17
10A fuse #1
8
Glow plugs
18
B+ terminal block
9
Glow plug relay
19
Magnetic pickup
10
Fuel relay
6.6
-
---
Troubleshooting Flowcharts
The troubleshooting flowcharts are designed to take you through the
process of determining the source of a problem with engine starting or
machine operation. Many of the tests involve live voltages and
therefore should only be attempted by qualified personnel. Detailed
procedures for carrying out the tests are included in this manual. All
highlighted text within the flowcharts have matching sections in this
manual.
wc_tx000507gb.fm
105
Isuzu Engine Troubleshooting
6.7
Mobile Generator Repair
Engine Troubleshooting—Isuzu
Engine Does Not Crank
Engine Troubleshooting
Check position of
emergency stop switch.
Is the
switch in the correct
position?
Flowchart 1A
Isuzu
Pull the
switch out.
No
* Battery voltage
approximately 12V
Yes
Checking ECM Display and LEDs
Place the start switch in the
START/RUN position.
Is the
ECM illuminated?
Yes
Does the ECM
boot up and are the LEDs
lit?
No
Repair or
replace ECM.
No
Yes
Checking Battery
See Flowchart 1B
Check battery voltage.
Is battery
fully charged?
No
Recharge or
replace battery.
Yes
Checking Power to ECM
Check continuity of
wiring to/from start switch.
Check function of start switch.
Repair/replace wiring or
switch as required.
Check voltage on red wire #53 pin 7, plug 1?
Is 12VDC*
measured?
No
Also check continuity of wiring
from start switch back to terminal
block, glow plug relay, starter
motor and battery. Repair
wiring as required.
Yes
Check
continuity of black wire
from pin 8, plug 1 to ground.
Does the wire have
continuity?
No
Repair/replace
wire.
Yes
wc_gr002837
Repair or
replace ECM.
wc_tx000507gb.fm
106
Mobile Generator Repair
Isuzu Engine Troubleshooting
Engine Troubleshooting
Flowchart 1B
Isuzu
Engine does not Crank
Continued from Flowchart 1A
* Battery voltage
approximately 12V
Checking contacts of ECM
crank relay
Check for 12VDC at red wire
#18 at ECM pin 5, plug 2.
Is there
12VDC* on red
wire #18?
Yes
No
Repair
or replace
ECM.
Check for 12VDC at yellow
wire #63 at ECM pin 1, plug 2.
No
Is there
12VDC* at pin 1,
plug 2?
Yes
See Flowchart 1C
Checking ECM 10A Fuse
Check condition of 10A fuse
to ECM.
Is fuse
OK?
No
Yes
Replace fuse.
Check continuity of red
wire #18 from ECM pin 5,
plug 2 to 10A fuse; then,
from fuse to terminal block.
Causes for a blown fuse
If fuse repeatedly blows, check:
• Wiring between ECM and starter relay
• Wiring between ECM and fuel relay
• Condition of starter relay coil
• Condition of fuel relay coil
Repair/replace wire.
wc_gr002847
wc_tx000507gb.fm
107
Isuzu Engine Troubleshooting
Mobile Generator Repair
Engine does not crank
Continued from Flowchart 1B
Engine Troubleshooting
Checking coil of starter relay and wiring
Flowchart 1C
Isuzu
* Battery voltage
approximately 12V
Place starter switch in the START/RUN
position. During cranking, check for
12VDC* at terminal 86 of starter relay.
Is 12VDC*
measured at terminal
86?
No
Check continuity of
yellow wire #63 between
ECM pin 1, plug 2 and
relay terminal 86.
Repair wire as required.
Yes
Check continuity of
black wire #14 from
starter relay terminal
85 to ground.
Does
black wire #14 have
continuity?
Yes
Checking contacts of starter relay
Check for 12VDC* on red wire at
starter relay terminal 30.
No
Repair/replace
wire as needed.
Is 12VDC*
measured at terminal
30?
No
Check continuity of
red wire from 30 to
B+ of glow plug relay.
Repair wire as
needed.
Yes
Check for 12VDC* on
terminal 87 of starter
relay during cranking cycle.
Is 12VDC*
measured at terminal
87?
No
Replace relay.
Yes
Check continuity of red wire
from starter relay terminal
87 to starter motor.
Repair wire as required.
If continuity checks OK and
engine still does not crank, consult
engine manufacturer's repair
manual for starter motor
replacement procedures.
wc_tx000507gb.fm
108
wc_gr002850
Mobile Generator Repair
6.8
Isuzu Engine Troubleshooting
Checking Wire Continuity
When checking the continuity of a wire, use the Ohms scale on your
checking instrument (multimeter). A reading of less than one Ohm
means the wire has continuity and should be OK. A reading over one
Ohm usually means that the wire or connectors are corroded and
should be repaired or replaced. A reading of “OL” or “OPEN” means
the wire is broken and there is no continuity. In such cases, repair or
replace the wire.
6.9
Probing Plugs and Pins
See Graphic: wc_gr002926
To measure the voltage at an ECM pin, attach an appropriate
extension (a) to the positive probe on your multimeter. Slide the
positive probe into the plug along the wire of the pin to be tested. Use
care when testing this way so you don’t damage the wire, plug, or
ECM. Find a suitable ground on the machine’s frame for the negative
probe (b) of your multimeter.
654
321
12 1110 9
6 5 4 3 87
21
43
21
8765
43 2 1
a
b
wc_gr002926
wc_tx000507gb.fm
109
Isuzu Engine Troubleshooting
Mobile Generator Repair
6.10 Checking ECM Display and LEDs
See Graphic: wc_gr002835
After placing the start switch in the START/RUN position, the ECM
goes through a boot-up sequence. On early machines the ECM
displays “Preheating”, then “Cranking”. Later model machines display
“Initializing...”, “Time to Service”, and then “Cranking _ of 3”. During the
preheat cycle (heater activation), the LED (b) near the stop sign
illuminates.
To check the general condition of the ECM, carry out the following
procedures:
6.10.1
Remove the three screws (a) securing the control panel and open the
panel.
6.10.2
Check the condition of all ECM connectors (plugs) and wiring. Make
sure wires are secure in the plugs and that the plugs are connected
securely to the ECM. Also look for burn marks, melting, and signs of
damage; repair or replace wiring/plugs as needed.
6.10.3
Place the start switch in the START/RUN position.
6.10.4
6.10.5
•
If the ECM display does not illuminate, check the battery. See
section Checking Battery.
•
If the ECM display does illuminate, continue.
Place the start switch in the START/RUN position and check that the
ECM display illuminates and that the boot-up sequence has started.
•
If the ECM does not go through the boot-up sequence, the ECM
may be malfunctioning. Repair or replace the ECM. Call Wacker
Service.
•
If the ECM goes through the boot-up sequence, continue.
Locate the two red LEDs (c) on the left side of the lower ECM circuit
board. Place the start switch in the OFF position then in the START/
RUN position. Check that the “FUEL” LED illuminates after the preheat
period has ended and stays lit for the entire cranking period. Also
check that the “CRANK” LED illuminates when the engine is
attempting to crank.
•
wc_tx000507gb.fm
If the LEDs do not illuminate as described above, the ECM may
be malfunctioning. Repair or replace the ECM. Call Wacker Service.
110
Mobile Generator Repair
Isuzu Engine Troubleshooting
b
a
c
wc_gr002835
6.11 Checking Battery
The ECM display may or may not be blank when battery voltage is less
than 12V. During such a condition, the battery may be charged enough
to light the display, but not enough to fully crank the starter.
wc_tx000507gb.fm
6.11.1
Check that battery cable connections are tight.
6.11.2
Check battery terminals for corrosion. Clean the terminals if
necessary. Corroded terminals and loose connections will result in
hard starting and insufficient battery charge.
6.11.3
Check battery for proper voltage: 11–13V.
6.11.4
Charge or replace the battery if needed.
CAUTION: Do not jump start the machine using a battery with greater
than 12–14V. Damage to the machine’s electrical system will occur.
111
Isuzu Engine Troubleshooting
Mobile Generator Repair
6.12 Checking Power to ECM
See Graphic: wc_gr002833 and wc_gr002836
6.12.1
6.12.2
6.12.3
6.12.4
6.12.5
6.12.6
6.12.7
6.12.8
wc_tx000507gb.fm
Place the start switch (6) in the START/RUN position and check for
12VDC (battery voltage approximately 12V) between red wire #53 at
ECM pin 7, plug 1 and ground.
•
If 12VDC is measured, the ECM is receiving power. Go to step 8.
•
If 12VDC is not measured, continue.
Place the start switch in the OFF position and check the continuity of
red wire #53 from pin 7, plug 1 to the start switch.
•
If the wire does not have continuity, repair or replace it.
•
If the wire has continuity, continue.
Check the start switch. Remove the red wires (a) and check the
terminals for continuity—outer terminals to center (only one pair of
terminals per switch position).
•
If the switch does not have continuity, repair or replace it.
•
If the switch has continuity, continue.
Check the continuity of red wire #49 between the start switch and the
terminal block (13) (b).
•
If the wire does not have continuity, repair or replace it.
•
If the wire has continuity, continue.
Check the continuity of red wire #51 between the terminal block and
the glow plug relay (14) (c).
•
If the wire does not have continuity, repair or replace it.
•
If the wire has continuity, continue.
Check the continuity of the red wire #32 (d) between the glow plug
relay and the starter motor (21).
•
If the wire does not have continuity, repair or replace it.
•
If the wire has continuity, continue.
Check the continuity of the red wire (e) between the starter motor and
the battery (20).
•
If the wire does not have continuity, repair or replace it.
•
If the wire has continuity, continue.
Check the continuity of the black wire #59 from pin 8, plug 1 to ground.
•
If the wire does not have continuity, repair or replace it.
•
If the wire has continuity and the ECM is receiving power, the
ECM should be functioning. If it is not, repair or replace it. Call
Wacker Service.
112
Mobile Generator Repair
6 5 4
3 2 1
P3
Isuzu Engine Troubleshooting
4 3
2 1
654
321
P4 4 3
2 1
6 5 4
3 2 1
12 1110 9 8 7
6 5 4 3 2 1
43
21
12 1110 9
6 5 4 3 87
21
8765
43 2 1
8 7 6 5
4 3 2 1
P1
12 1110 9 8 7
6 5 4 3 2 1
8 7 6 5
4 3 2 1
P2
b
a
c
e
d
wc_gr002836
wc_tx000507gb.fm
113
Isuzu Engine Troubleshooting
Mobile Generator Repair
6.13 Checking Contacts of ECM Crank Relay
See Graphic: wc_gr002833 and wc_gr002829
When the start switch is placed in the START/RUN position, the ECM
crank relay (c) energizes. The ECM crank relay supplies 12VDC
through yellow wire #63 to energize the starter relay (14).
6.13.1
6.13.2
6.13.3
6.13.4
6.13.5
Check for 12VDC (battery voltage approximately 12V) between red
wire #18 at pin 5, plug 2 and ground.
•
If 12VDC is measured, the ECM relay contact circuit is receiving
power. Go to step 5.
•
If 12VDC is not measured, continue.
Check the ECM 10A fuse (18)(a).
•
If the fuse is blown, see section Checking ECM 10A Fuse.
•
If the fuse is OK, continue.
Check continuity of red wire #18 from ECM pin 5, plug 2 to the 10A
fuse.
•
If the wire does not have continuity, repair or replace it.
•
If the wire has continuity, continue.
Check the continuity of red wire #48 from the 10A fuse to the B+
terminal strip (b).
•
If the wire does not have continuity, repair or replace it.
•
If the wire has continuity, continue.
Place the start switch in the START/RUN position and probe yellow
wire #63 at pin 1, plug 2 for 12VDC during the cranking cycle.
•
If 12VDC is measured, the ECM crank relay contact circuit is
functioning.
•
If 12VDC is not measured, the ECM is malfunctioning; repair or
replace it. Call Wacker Service.
b
654
321
12 1110 9
6 5 4 3 87
21
a
P1
43
21
8765
43 2 1
P2
c
wc_gr002829
wc_tx000507gb.fm
114
Mobile Generator Repair
Isuzu Engine Troubleshooting
6.14 Checking ECM 10A Fuse
See Graphic: wc_gr001987
The 10A fuse is found in the control compartment on G25 models (a).
It is found in the engine compartment on all other models (b). There is
12VDC fed through this fuse to the ECM fuel and crank relay contacts
via ECM pin 5, plug 2. If the fuse repeatedly blows, it is a sign that there
is a short in the wires to/from the ECM, a diode is faulty, or the fuel or
starter relay is shorted.
6.14.1
6.14.2
wc_tx000507gb.fm
Check the 10A fuse. If it is blown, check:
•
The condition of the wiring to/from the fuse. Repair or replace the
wiring as needed.
•
On Isuzu-powered generators, check the condition of the starter
relay coil (see section Checking Coil of Starter Relay and Wiring);
condition of the fuel relay coil (see section Checking Coil of Fuel
Pump Relay). Also check for failed diodes. See section Checking
Diode Across Relay/Solenoid Coil.
•
On Deere-powered generators, check the condition of the starter
relay coil (see section Checking Coil of Starter Relay and Wiring);
and the condition of the fuel solenoid (see section Checking Fuel
Solenoid). Also check for failed diodes. See section Checking
Diode Across Relay/Solenoid Coil).
Once the wiring, relay/solenoid coils, and diodes check OK, replace
the 10A fuse.
115
Isuzu Engine Troubleshooting
Mobile Generator Repair
6.15 Checking Coil of Starter Relay and Wiring
See Graphic: wc_gr002833 and wc_gr002848
6.15.1
6.15.2
6.15.3
Place the start switch in the START/RUN position. During the cranking
cycle, check for 12VDC (battery voltage approximately 12V) between
yellow wire #63 at terminal 86 of the starter relay (a) (16) and ground.
•
If 12VDC is measured, the starter relay is receiving power.
•
If 12VDC is not measured, continue.
Check the continuity of yellow wire #63 from ECM pin 1, plug 2 to
terminal 86 of starter relay.
•
If the wire does not have continuity, repair or replace it.
•
If the wire has continuity, continue.
If 12VDC is measured at terminal 86, continue checking the coil by
checking the continuity of black wire #14 between starter relay terminal
85 and ground. Repair the wire as needed.
a
654
321
12 1110 9
6 5 4 3 87
21
85
30
86
P1
43
21
8765
43 2 1
P2
87
wc_gr002848
wc_tx000507gb.fm
116
Mobile Generator Repair
Isuzu Engine Troubleshooting
6.16 Checking Diode Across Relay/Solenoid Coil
See Graphic: wc_gr002803
The glow plug relay (a) and the fuel solenoid (b) on Isuzu powered
generators, and the starter relay (c) (and fuel solenoid (d) on John
Deere engines without the Engine Control Unit (ECU)), all have a
diode (e) similar to the one pictured connected across the coil. The
diodes are encapsulated in rubber. They are installed in the circuit to
redirect a voltage spike to ground if one should occur during powering
down the relay’s coil. In order to check the diode, separate the diode
portion from the connector portion.
Note: Replacement diodes come with the connector portion and
wiring. It is permissible to remove and discard the replacement
connector portion and insert the replacement diode into the existing
connector and wiring.
6.16.1
Using the diode scale on a multimeter, check that the diode conducts
in only one direction and not in the other. The meter should read
0.450–0.550V in one direction and “OL” or “OPEN” in the other.
Replace the diode if necessary.
6.16.2
On “can style” relays (the glow plug relay on G 25, the starter relay on
all other generators), check that the yellow wire of the diode is attached
to the power terminal of the relay’s coil (labeled “CP” on the schematic)
and that the black wire is attached to the ground terminal of the relay’s
coil (labeled “CG” on the schematic). Correct the wiring as needed.
b
a
c
d
e
wc_gr002803
wc_tx000507gb.fm
117
Isuzu Engine Troubleshooting
Mobile Generator Repair
6.17 Checking Contacts of Starter Relay
See Graphic: wc_gr002922
The starter relay coil and its wiring must be functioning properly before
checking the starter relay contacts. See section Checking Coil of
Starter Relay and Wiring.
6.17.1
6.17.2
6.17.3
Check for 12VDC (battery voltage approximately 12V) between the red
wire at terminal 30 of the starter relay (a) and ground.
•
If 12VDC is not measured, check the continuity of red wire #11
from terminal B+ of the glow plug relay to terminal 30 of the
starter relay. If necessary, check the continuity of red wire #32
from terminal B+ of the glow plug relay to B+ terminal of starter
motor, then back to battery. Repair wiring as needed.
•
If 12VDC is measured at terminal 30, continue.
Place the start switch in the START/RUN position and during the
cranking cycle, check for 12VDC between terminal 87 of the starter
relay and ground.
•
If 12VDC is not measured at terminal 87 of the starter relay during the cranking cycle, replace the starter relay.
•
If 12VDC is measured at terminal 87 of the starter relay during
the cranking cycle, the starter relay is functioning.
Place the start switch in the START/RUN position and during the
cranking cycle check for 12VDC between red wire #25 at the starter
motor solenoid and ground.
•
If 12VDC is not measured, check the continuity of red wire #25.
Repair or replace the wire as needed.
•
If 12VDC is measured, and the engine still does not crank, check
the engine manufacturer’s service manual for starter motor
replacement procedures.
a
b
85
30
86
87
wc_gr002922
wc_tx000507gb.fm
118
Mobile Generator Repair
Isuzu Engine Troubleshooting
6.18 Engine Cranks But Does Not Start—Isuzu
Engine Cranks but
does not Start
Engine Troubleshooting
Flowchart 1D
Isuzu
Check fuel system: fuel supply,
filter, condition of tank, and hoses.
* Battery voltage
approximately 12V
Checking Power to Glow Plugs
Place start switch in START/RUN
position. Check red wire #12 for
12VDC* during preheat cycle.
Checking Glow Plugs
Is 12VDC*
measured?
Yes
Place start switch in the OFF
position. Remove the glow plugs
and check their ability to glow.
No
Replace glow
plugs.
No
Does each
glow plug work
properly?
Yes
See Flowchart 1E
Checking Glow Plug Relay
With the start switch in the START/RUN position, check
for 12VDC* between gray wire #65 at terminal CP of
glow plug relay and ground during the preheat cycle.
Is there
12VDC* at terminal
CP?
Check continuity of
gray wire #65 from CP
to ECM pin 8, plug 2.
Repair wire as required.
No
Yes
Checking contacts of ECM
preheat relay
Check continuity of black wire #13 from
glow plug relay terminal CG to ground.
Does black
wire #13 have
continuity?
Yes
Check for 12VDC* at ECM
pin 8, plug 2.
No
Repair/replace wire.
Is there
12VDC* at ECM pin 8,
plug 2?
No
Check for 12VDC* between terminal
SO and ground during preheat cycle.
Is
12VDC* measured?
No
Replace glow
plug relay.
Repair
or replace
ECM.
wc_gr002849
wc_tx000507gb.fm
119
Isuzu Engine Troubleshooting
Engine Cranks but does not Start
Continued from Flowchart 1D
Mobile Generator Repair
Engine Troubleshooting
Flowchart 1E
Isuzu
Checking fuel pump and
power to fuel pump
* Battery voltage
approximately 12V
Check 10A fuse to fuel pump.
Replace fuse as needed.
Check for 12VDC* at the
fuel pump.
Is there
12VDC*at fuel
pump?
No
See Flowchart 1H
Yes
Check continuity of black wire
from pump to ground.
Does
the black wire have
continuity?
No
Repair/replace wire
as needed.
Yes
If there is 12VDC* at the fuel
pump and the engine still does
not start, remove the fuel hose
from the engine side of fuel pump.
Place the start switch in the
START/RUN position and check
if fuel is pumped out of the hose.
Is fuel
being pumped?
No
Replace fuel pump.
Yes
See Flowchart 1F
wc_tx000507gb.fm
wc_gr002923
120
Mobile Generator Repair
Isuzu Engine Troubleshooting
Engine Troubleshooting
Flowchart 1F
Isuzu
Engine Cranks but does not Start
Continued from Flowchart 1E
* Battery voltage
approximately 12V
Checking solenoid hold-in
voltage.
Check 25A fuse to fuel pump.
Replace fuse as needed.
Disconnect the fuel solenoid at the
connector. Check for 12VDC* between
red wire #28 and ground during the
cranking cycle.
Is 12VDC*
measured?
Check continuity
of red wire #28.
Repair/replace wire
as needed.
No
Yes
Disconnect the fuel solenoid at the
connector. Check continuity of black
wire between connector and ground.
Does
black wire have
continuity?
No
Repair/replace wire
as needed.
Yes
Disconnect the fuel solenoid at the
connector. Check for 12VDC* between
white wire #24 and ground during the
cranking cycle.
Is 12VDC*
measured?
Check continuity
of red wire #24.
Repair/replace wire
as needed.
No
Yes
wc_gr002840
See Flowchart 1G
wc_tx000507gb.fm
121
Isuzu Engine Troubleshooting
Mobile Generator Repair
Engine Troubleshooting
Engine Cranks but does not Start
Continued from Flowchart 1F
Flowchart 1G
Isuzu
Checking fuel solenoid.
Place the start switch in the
OFF position. Allow the
machine to cool. Remove
the fuel solenoid from the
injection pump and perform
the following:
* Battery voltage
approximately 12V
Check for free plunger
movement by pushing the
plunger into the solenoid and
allowing it to spring back.
Does
the plunger spring
back?
No
Replace the solenoid.
Yes
Momentarily (10 seconds max.)
energize the white and black
solenoid wires with 12VDC*.
Does the
plunger snap into the
housing?
No
Replace the solenoid.
Yes
Energize the red and black
solenoid wires with 12VDC* and
manually push the plunger into
the housing until it hits bottom.
Does the
plunger stay in the
housing as long as 12VDC*
is applied?
No
Replace the solenoid.
Consult engine manufacturer
regarding fuel system problem.
wc_gr002853
wc_tx000507gb.fm
122
Mobile Generator Repair
Isuzu Engine Troubleshooting
Engine Troubleshooting
Flowchart 1H
Isuzu
Engine Cranks but does not Start
Continued from Flowchart 1E
* Battery voltage
approximately 12V
Checking coil of fuel pump relay
Check for 12VDC* during cranking
period on violet wire #34 at terminal
86 of the fuel pump relay.
Is 12VDC*
measured?
No
Check continuity of violet wires #64
and #34 from ECM pin 2, plug 2
through emergency stop switch to
terminal 86 of fuel pump relay.
Repair/replace wire or emergency
stop switch as needed.
Checking contacts of ECM fuel relay
Yes
Check for 12VDC* at pin 2, plug 2
during the cranking cycle.
Is 12VDC*
measured at pin 2,
plug 2?
No
Replace
ECM.
Yes
Call Wacker Service.
Check continuity of black wire
#35 from terminal 85 of fuel
pump relay to ground.
Does black
wire #35 have
continuity?
Yes
Checking contacts of fuel
pump relay
Check power to be switched.
No
Is there
12VDC* on red wire #31 to
terminal 30?
No
Repair/replace wire.
Yes
Check continuity
of red wire #27
from terminal 87
to the 10A fuse.
Repair/replace wire
as needed.
Check continuity
of red wire #31
from terminal 30
to B+ terminal of
glow plug relay.
Repair wire as
needed.
Place start switch in START/RUN
position and check for 12VDC*
on terminal 87 of fuel pump relay
during cranking.
Yes
Is there
12VDC* on terminal
87?
No
Replace fuel
pump relay.
wc_gr002851
wc_tx000507gb.fm
123
Isuzu Engine Troubleshooting
Mobile Generator Repair
6.19 Checking Power to Glow Plugs
See Graphic: wc_gr002833 and wc_gr002841
6.19.1
Place the start switch in the START/RUN position. Check for 12VDC
between red wire #12 (a) at the glow plug(s) (b) and ground during the
preheat cycle.
6.19.2
•
If 12VDC is measured, the glow plugs are receiving power; go to
step 3.
•
If 12VDC is not measured, continue.
Place the start switch in the OFF position. Check the continuity of red
wire #12 from terminal SO of the glow plug relay 14 to the glow plugs.
6.19.3
•
If the wire does not have continuity, repair or replace it.
•
If the wire has continuity, see section Checking Glow Plug Relay
and Wiring.
Remove the glow plugs and check their ability to glow. See section
Checking Glow Plugs.
B
29
R
R
24
L
B
28
b
12
10 11
27
16
86
87
85
Y
15 87
14
26
85
86
12
35
B
B
30
30
34
11
31
R
R
14
R
B+
65
CP
Y
+
-
59
20
25
a
SO
SI
CG
B
B
13
32
21
22
15
W/R
B+
W
W/G
wc_gr002841
B
2
46
Schematic wc_gr002833 detail
wc_tx000507gb.fm
124
Mobile Generator Repair
Isuzu Engine Troubleshooting
6.20 Checking Glow Plugs
See Graphic: wc_gr002033
6.20.1
WARNING
6.20.2
Remove the glow plug from the engine.
Burn hazard. Glow plugs can reach temperatures up to 1200°F
(649°C). Do not touch the element of the glow plug. Be extremely
careful when testing the glow plug.
Using 10-gauge wire, apply 12VDC to the glow plug—positive on the
upper portion and ground the base. If the glow plug does not heat
(glow) within five seconds, replace the glow plug.
Note: If any one of the glow plugs needs replacing, replace all of them.
wc_tx000507gb.fm
125
Isuzu Engine Troubleshooting
Mobile Generator Repair
6.21 Checking Glow Plug Relay and Wiring
See Graphic: wc_gr002833 and wc_gr002838
The glow plug relay (a) is the chrome “can-style” relay located inside
the engine compartment.
6.21.1
Check power to the coil of the relay by measuring voltage (battery
voltage approximately 12V) between terminal CP and ground during
the preheat cycle.
•
If 12VDC is not measured, check the continuity of gray wire #65
between terminal CP and ECM pin 8, plug 2. Repair/replace wire
as necessary. Also check condition of the ECM on-board preheat
relay. See section Checking Contacts of ECM Preheat Relay.
•
If 12VDC is measured, the coil of the relay is receiving power;
continue.
6.21.2
Check the ground wire of the relay coil by checking continuity of black
wire #13 from terminal CG to ground. Repair/replace the wire as
necessary.
6.21.3
Check the power to be switched by measuring voltage between
terminal SI and ground.
6.21.4
•
If 12VDC is not measured, check continuity of red wire #32 from
terminal SI to B+ terminal of the starter motor. Repair or replace
the wire as needed.
•
If 12VDC is measured, continue.
Check the operation of the contacts inside the relay by measuring the
voltage between terminal SO and ground during the preheat cycle.
•
If 12VDC is not measured, replace the preheat relay.
•
If 12VDC is measured, the glow plug relay is functioning.
12
R
Gr
B+
65
R
CP
32
a
R
B
SO
SI
Y
B
CG
13
wc_gr002838
wc_tx000507gb.fm
126
Mobile Generator Repair
Isuzu Engine Troubleshooting
6.22 Checking Contacts of ECM Preheat Relay
See Graphic: wc_gr002833 and wc_gr002936
The ECM includes an onboard preheat relay (a) which is located on on
the lower board, behind the crank and fuel relays. To test the function
of its contacts carry out the following procedure:
6.22.1
6.22.2
Probe ECM pin 7, plug 2 (b) at red wire #17 for 12VDC (battery voltage
approximately 12V). Measure between red wire #17 to pin 7, plug 2
and ground.
•
If 12VDC is not measured, check the continuity of red wire #17
from pin 7, plug 2 to the B+ terminal strip. Repair or replace the
wire as required.
•
If 12VDC is measured, continue.
Place the start switch in the START/RUN position and probe ECM pin
8, plug 2 at gray wire #65 for 12VDC. Measure between gray wire #65
and ground during the preheat cycle.
•
If 12VDC is measured, continue by checking the slave preheat
relay. See section Checking Slave Preheat Relay and Wiring.
•
If 12VDC is not measured, the ECM may be malfunctioning. Call
Wacker Service. Repair or replace the ECM.
6 5 4
3 2 1
P3
4 3
2 1
654
321
P4 4 3
2 1
6 5 4
3 2 1
12 1110 9 8 7
6 5 4 3 2 1
43
21
12 1110 9
6 5 4 3 87
21
8765
43 2 1
8 7 6 5
4 3 2 1
a
P1
12 1110 9 8 7
6 5 4 3 2 1
8 7 6 5
4 3 2 1
P2
wc_gr002936
b
wc_tx000507gb.fm
127
Isuzu Engine Troubleshooting
Mobile Generator Repair
6.23 Checking Power to and Operation of Fuel Pump
See Graphic: wc_gr002833 and wc_gr002842
The 12VDC fuel pump (8) (d) is shaped like a small in-line fuel filter and
is gold in color. It is located on the “clean” side of the fuel filter and
fastened to the side of the engine. The 12VDC fuel pump pulls fuel up
from the storage tank, through the fuel filter, and then pushes it into the
injection pump.
wc_tx000507gb.fm
6.23.1
Check the 10A fuse (10) (c) to the fuel pump (8) (d). Replace the fuse
if necessary.
6.23.2
Place the start switch in the START/RUN position and check for
12VDC between red wire #29 at the fuel pump and ground.
•
If 12VDC is not measured, check the continuity of red wires #29
and #27 to and from the 10A fuse and then to the fuel pump.
Repair/replace wiring as needed.
•
If 12VDC is measured, continue.
6.23.3
Check the continuity and connection of black wire from pump to
ground. Repair/replace the wire as required.
6.23.4
If 12VDC is present at the pump and the engine still does not start,
remove the hose from the engine side of the pump. Place the start
switch in the START/RUN position and check if fuel is being pumped
out of the hose.
•
If fuel is not being pumped out of the hose, check the fuel lines for
clogs and check the condition of the fuel filter. Repair the lines
and/or replace the filter as needed. Then, replace the fuel pump if
necessary.
•
If fuel is being pumped out of the hose, check the condition of the
fuel solenoid (9) (e). See section Checking Fuel Solenoid.
128
Mobile Generator Repair
Isuzu Engine Troubleshooting
e
a
d
c
b
wc_gr002842
wc_tx000507gb.fm
129
Isuzu Engine Troubleshooting
Mobile Generator Repair
6.24 Isuzu Fuel Solenoid
See Graphic: wc_gr002833, wc_gr002844, and wc_gr002031
The fuel solenoid (a) is a gold-colored, cylinder-shaped electromechanical device that moves a fuel control lever inside the injection
pump. It is fastened to the side of the injection pump housing. When
energized, the solenoid plunger overcomes a spring and is drawn into
the solenoid magnetically. With the fuel solenoid plunger pulled in, the
fuel control lever allows full flow of diesel fuel to the injectors. When the
solenoid is de-energized and the spring-loaded plunger returns to its
resting position, all fuel flow ceases and the engine stops quickly.
Inside the solenoid are two coils. The white wire feeds the high power
“pull-in” circuit and the red wire feeds the low power “hold-in” circuit via
a 25A fuse (11). If the solenoid has a fourth wire that is blue, it is not
used.
The solenoid’s white wire (“pull-in” circuit) is energized by the starter
relay (16). Twelve Volts DC is present as long as the starter motor (21)
is energized. Like the starter motor, the white wire circuit has a short
duty cycle and will be damaged if energized too long. The ECM
controls how long they are energized.
The solenoid’s red wire (“hold-in” circuit) is energized by the fuel pump
relay (15). Like the fuel pump (8), it has a long duty cycle and can be
energized as long as desired. The ECM stops the engine by deenergizing the fuel pump relay, thus removing power to the fuel pump
and the fuel solenoid “hold-in” circuit simultaneously.
wc_tx000507gb.fm
130
Mobile Generator Repair
Isuzu Engine Troubleshooting
a
wc_gr002844
wc_tx000507gb.fm
131
Isuzu Engine Troubleshooting
Mobile Generator Repair
6.25 Checking Fuel Solenoid
See Graphic: wc_gr002833 and wc_gr002852
6.25.1
Check the 25A fuse (11) (d). Replace the fuse if it is blown.
6.25.2
Place the start switch in the START/RUN position and check for
12VDC (battery voltage approximately 12V) between red wire #28 at
the fuel solenoid plug and ground. Also check the continuity of the
solenoid plug (f). Repair/replace the wiring or plug as needed.
6.25.3
Place the start switch in the START/RUN position and check for
12VDC (battery voltage approximately 12V) between white wire #24 at
the fuel solenoid plug and ground. Also check the continuity of the plug
(c). Repair/replace the wiring or plug as needed.
6.25.4
Check the continuity of the black wire of the solenoid plug to ground.
Repair/replace the wiring or plug as needed.
6.25.5
If the fuse blows again, check the function of the fuel solenoid diode
(g). See section Checking Diode Across Relay/Solenoid Coil. Replace
the diode if it is malfunctioning.
Burn hazard. The fuel solenoid may be very hot. Allow it to cool before
removing it. Handle the solenoid with care.
CAUTION
6.25.6
Remove the fuel solenoid from the injection pump housing and perform
the following checks:
6.25.7
Check for free solenoid plunger movement by pushing the plunger into
the solenoid and letting it spring back out.
6.25.8
6.25.9
•
If the plunger does not move freely, replace the solenoid.
•
If the plunger does move freely, continue.
Momentarily (one to two seconds) energize the white (+) and black
(–) solenoid wires with 12VDC.
•
If the plunger does not snap quickly into the solenoid housing
when 12VDC is present, replace the solenoid.
•
If the plunger does snap quickly into the solenoid housing, continue.
Energize the red (+) and black (–) solenoid wires and manually push
the plunger into the solenoid housing until it hits bottom.
•
If the plunger does not stay held into the solenoid when 12VDC is
present, replace the solenoid.
•
If the plunger does stay held into the solenoid, continue.
6.25.10 If the solenoid passed the previous tests, you may have an engine fuel
system problem. Consult a local Isuzu dealer for repair.
wc_tx000507gb.fm
132
Mobile Generator Repair
e
a
Isuzu Engine Troubleshooting
c
f
g
b
d
wc_gr002852
wc_tx000507gb.fm
133
Isuzu Engine Troubleshooting
Mobile Generator Repair
6.26 Checking Coil of Fuel Pump Relay
See Graphic: wc_gr002843
6.26.1
6.26.2
6.26.3
6.26.4
6.26.5
6.26.6
wc_tx000507gb.fm
Place the start switch in the START/RUN position and check for
12VDC (battery voltage approximately 12V) during the cranking cycle
between violet wire #34 at terminal 86 of the fuel pump relay (a) and
ground.
•
If 12VDC is not measured, go to step 3.
•
If 12VDC is measured, the coil of the fuel pump relay is receiving
power; continue.
Check the continuity of black wire #35 from terminal 85 of the fuel
pump relay to ground.
•
If the wire does not have continuity, repair or replace it.
•
If the wire has continuity, the coil of the fuel pump relay should be
functioning.
Place the start switch in the OFF position and check the continuity of
violet wire #64 from ECM pin 2, plug 2 (b), to terminal 86 of the fuel
pump relay.
•
If the wire does not have continuity, repair or replace it.
•
If the wire has continuity, continue.
Place the start switch in the OFF position and check the continuity of
the emergency stop switch (c).
•
If the emergency stop switch does not have continuity, replace it.
•
If the emergency stop switch has continuity, continue.
Place the start switch in the OFF position and check the continuity of
violet wire #64 between the emergency stop switch and terminal 86 of
the fuel pump relay.
•
If the wire does not have continuity, repair or replace it.
•
If the wire has continuity, continue.
Place the start switch in the OFF position and check the continuity of
violet wire #64 between the emergency stop switch and ECM pin 2,
plug 2.
•
If the wire does not have continuity, repair or replace it.
•
If the wire has continuity, there should be power to the coil of the
fuel pump relay.
134
Mobile Generator Repair
Isuzu Engine Troubleshooting
654
321
a
12 1110 9
6 5 4 3 87
21
85
30
86
P1
43
21
8765
43 2 1
P2
a
b
87
c
a
wc_gr002843
wc_tx000507gb.fm
135
Isuzu Engine Troubleshooting
Mobile Generator Repair
6.27 Checking Contacts of ECM Fuel Relay
See Graphic: wc_gr002833 and wc_gr002864
The ECM has an on-board fuel relay (a) which controls power to the
coil of the fuel pump relay (15) (b). When energized, the fuel pump
relay switches 12VDC through a 10A fuse (10) (c) to the fuel pump (d).
6.27.1
Place the start switch in the START/RUN position and probe pin 2,
plug 2 for 12VDC (battery voltage approximately 12V). Measure
between pin 2, plug 2 and ground.
•
If 12VDC is not measured, replace the ECM.
•
If 12VDC is measured, the ECM fuel relay is functioning.
b
654
321
12 1110 9
6 5 4 3 87
21
P1
c
d
43
21
8765
43 2 1
P2
a
wc_gr002864
wc_tx000507gb.fm
136
Mobile Generator Repair
Isuzu Engine Troubleshooting
6.28 Checking Contacts of Fuel Pump Relay
See Graphic: wc_gr002833 and wc_gr002842
6.28.1
6.28.2
Check for 12VDC (battery voltage approximately 12V) between
terminal 30 of the fuel pump relay (15) (a) and ground.
•
If 12VDC is not measured, check the continuity of red wire #31
from terminal 30 of the fuel pump relay to B+ terminal of the glow
plug relay (14) (b). Repair/replace the wire as needed.
•
If 12VDC is measured, the fuel pump relay is receiving power;
continue.
Place the start switch in the START/RUN position and check for
12VDC between terminal 87 of the fuel pump relay and ground during
cranking cycle.
•
If 12VDC is not measured, replace the fuel pump relay.
•
If 12VDC is measured, the fuel pump relay is functioning.
e
a
d
c
b
wc_gr002842
wc_tx000507gb.fm
137
Isuzu Engine Troubleshooting
Mobile Generator Repair
6.29 General Engine Troubleshooting—Isuzu
Symptom
Problem
Solution
Engine does not crank
Discharged battery
Recharge or replace battery.
Defective battery cable
connections
Replace or repair cables.
Defective starter and/or
wiring
Repair or replace starter
and wiring.
Exhaust restricted
Check and correct exhaust
restriction.
Fuel filter plugged or full of
water
Replace fuel filter or drain
water from filter.
Injection pump not getting
fuel or air in fuel system
Check fuel flow at supply
pump or bleed fuel system.
Faulty injection pump or
nozzles
Consult authorized diesel
repair shop for repair or
replacement.
No fuel
Check fuel tank and hoses.
Engine cranks but will not
start
wc_tx000507gb.fm
138
Mobile Generator Repair
Isuzu Engine Troubleshooting
Symptom
Problem
Solution
Engine hard to start or will
not start
Engine starting under load
Place all circuit breakers in
OFF positions.
No fuel
Check fuel tank and hoses.
Air in fuel line
Bleed fuel line.
Cold weather
Use cold weather starting
aids.
Crankcase oil too heavy
Use oil of proper viscosity.
Improper fuel type
Use proper fuel type for
operating conditions.
Water, dirt or air in fuel sys- Drain, flush, fill, and bleed
tem
fuel system.
Clogged fuel filter
Replace filter element.
Dirty or faulty injection noz- Have authorized service
zles
dealer or distributor check
injectors.
Engine knocks
wc_tx000507gb.fm
Defective injection pump
Have authorized service
dealer or distributor check
injection pump.
Defective glow plug(s)
Repair or replace glow
plugs.
Low engine oil level
Add oil to engine crankcase.
Injection pump out of time
See authorized service
dealer or distributor.
Low coolant temperature
Remove and check thermostat.
Engine overheating
See “Engine overheats”
symptom in this chart.
139
Isuzu Engine Troubleshooting
Mobile Generator Repair
Symptom
Problem
Solution
Engine runs irregularly or
stalls frequently
Low coolant temperature
Remove and check thermostat.
Clogged fuel filter
Replace fuel filter element.
Water, dirt, or air in fuel
system
Drain, flush, fill, and bleed
system.
Dirty or faulty injection nozzles
Have authorized servicing
dealer or engine distributor check injectors.
Engine overloaded
Reduce load.
Intake air restriction
Service air cleaner.
Clogged fuel filter
Replace filter elements.
Improper type of fuel
Use proper fuel.
Overheated engine
See “Engine Overheats”
symptom in this chart.
Below normal engine temperature
Remove and check thermostat.
Improper valve clearance
See authorized dealer or
distributor.
Dirty or faulty injection nozzles
Have authorized service
dealer or distributor check
injectors.
Injection pump out of time
See authorized dealer or
distributor.
Leaking exhaust manifold
gasket
See authorized dealer or
distributor.
Restricted fuel hose
Clean or replace fuel hose.
Improper fuel type
Use proper fuel.
Fuel mixed with water
Replace fuel.
Defective injection nozzles
See authorized dealer or
distributor.
Engine out of time
See authorized dealer or
distributor.
Lack of power
Engine emits white smoke
wc_tx000507gb.fm
140
Mobile Generator Repair
Isuzu Engine Troubleshooting
Symptom
Problem
Solution
Engine emits black smoke.
Improper fuel type
Use proper fuel.
Clogged or dirty air cleaner Service air cleaner.
Engine overheats
Engine overloaded
Reduce load.
Injection nozzles dirty
See authorized dealer or
distributor.
Engine out of time
See authorized dealer or
distributor.
Engine overloaded
Reduce load.
Low coolant level
Fill radiator to proper level.
Check radiator and hoses
for loose connections and
leaks.
Stretched fan belt or defec- Check automatic belt tentive belt tensioner
sioner and check belts for
stretching. Replace belts
as required.
wc_tx000507gb.fm
Low engine oil level
Check oil level. Add oil as
required.
Cooling system needs
flushing
Flush cooling system.
Defective thermostat
Remove and check thermostat.
Defective temperature
gauge or sender
Check water temperature
with thermometer and
replace temperature gauge
or sender as required.
Incorrect grade of fuel
Use correct grade of fuel.
141
Isuzu Engine Troubleshooting
Notes
wc_tx000507gb.fm
142
Mobile Generator Repair
Mobile Generator Repair
7.
John Deere Engines without ECU
John Deere Engines without ECU
7.1
John Deere Engine Background
See Graphic: wc_gr002004
The John Deere engines used on generator models G 50, G 70, and
G 85 (item 0009310) do not include an electronic Engine Control Unit
(ECU). These engines use a mechanical fuel pump, an intake air
heater as a starting aid, and an internal electric fuel valve for engine
run/stop control.
The intake air heater is in line with the air intake manifold located near
the top of the engine. It warms the air entering the engine cylinders and
aids in fuel/air mixture ignition when the engine is cold. After the start
switch is moved into the START/RUN position, the Engine Control
Module (ECM) goes through a boot-up sequence, checks inputs from
the various sensors, and sends power to the air intake heater if need
be. The ECM controls the duration the heater is energized based on
the engine coolant temperature. The colder the coolant temperature,
the longer the heater is energized. The heater is energized only during
the first cycle of three automatic starting attempts. When in this state,
the red LED near the stop sign on the front of the control panel will be
lit indicating the ECM is attempting to energize the heater.
wc_tx000508gb.fm
143
John Deere Engines without ECU
7.2
Mobile Generator Repair
Engine Wiring Diagram—John Deere without ECU
CP
SO
144
SI
19
2
LL
Y
V
Br
1
24
Or
6G
R
Y
LL
6
wc_tx000508gb.fm
CG
13
87
wc_gr002827
This schematic will be referred to throughout this chapter.
Mobile Generator Repair
7.3
John Deere Engines without ECU
Engine Wiring Components—John Deere without ECU
See Graphic: wc_gr002827
Ref.
Description
Ref.
Description
1
Plug 1 — engine sender inputs
13
Intake heater
2
Plug 2 — engine start outputs
14
Slave preheat relay
3
Magnetic pickup
15
Mechanical lugs
4
Oil pressure sender
16
Start/run switch
5
Coolant temperature sender
17
Battery
6
Main circuit breaker
18
10A fuse
7
Shunt trip, main breaker
19
Starter relay
8
Emergency stop switch
20
Starter
9
Engine Control Module (ECM)
21
Alternator
10
Lug door switch
22
Fuel solenoid
11
Remote start terminals
23
Terminal strip
12
Fuel level sender
24
Hour meter switch
ECM Plug 1 Wires
Pin
Wire
Description
10
Gr/61
1
ECM Plug 2 Wires
Pin
Wire
Description
Emergency stop
5
R/18
Battery + (for relays)
B/54
Magnetic pickup ground
1
Y/63
Crank (12V output)
2
Cl/Sh/55
Magnetic pickup sensing
2
V/64
Run/fuel (12V output)
3
W/l/56
Crank delay, preheat
3
73
Remote annunciator (NA)
5
Y/57
Water temperature
4
75
Remote annunciator (NA)
9
Or/60
Remote start
7
R/17
Battery + (for terminal
strip)
12
W/V/62
Fuel level
8
Gr/65
Preheat
8
B/59
Battery –
-
-
---
7
R/53
Battery + (for ECM board)
-
-
---
6
-
(not used)
-
-
---
wc_tx000508gb.fm
145
John Deere Engines without ECU
7.4
Mobile Generator Repair
Locations of Engine Electrical Components
22
16
15
23
21
20
25
19
7
6
5
11
24
14
wc_tx000508gb.fm
4
146
wc_gr002798
Mobile Generator Repair
7.5
John Deere Engines without ECU
Engine Electrical Components
See Graphic: wc_gr002798
Ref.
Component
Ref.
Component
4
Magnetic pickup
19
Battery
5
Oil pressure sender
20
10 A fuse
6
Coolant temperature sender
21
Starter relay
7
Main circuit breaker
22
Starter
11
Engine Control Module (ECM)
23
Alternator
14
Fuel level sender
24
Fuel solenoid
15
Intake manifold heater
25
Diodes
16
Slave preheat relay
7.6
-
---
Troubleshooting Flowcharts
The troubleshooting flowcharts are designed to take you through the
process of determining the source of a problem with engine starting or
machine operation. Many of the tests involve live voltages and
therefore should only be attempted by qualified personnel. Detailed
procedures for carrying out the tests are included in this manual. All
highlighted text within the flowcharts have matching sections in this
manual.
wc_tx000508gb.fm
147
John Deere Engines without ECU
7.7
Mobile Generator Repair
Engine Troubleshooting—John Deere without ECU
Engine does not Crank
Engine Troubleshooting
Check position of
emergency stop switch.
Is the
switch in the correct
position?
Pull the
switch out.
Flowchart 2A
John Deere without ECU
* Battery voltage;
approximately 12V.
Yes
Checking ECM Display and LEDs
Place the start switch in the
START/RUN position.
Is the
ECM illuminated?
Yes
Does the ECM
boot up and are the LEDs
lit?
No
Repair or
replace ECM.
No
Yes
Checking Battery
See Flowchart 1B
Check battery voltage.
Is battery
fully charged?
No
Recharge or
replace battery.
Yes
Check continuity of red
wire #53 to/from start switch.
Check function of start switch.
Repair/replace wiring or
switch as required.
Checking Start Switch and Power to ECM
Check voltage on red wire #53 pin 7, plug 1?
Is 12VDC*
measured?
No
Check continuity of red wire
#49 from switch back to B+
terminal strip and red wire #51
from terminal switch to starter
relay. Also check wiring back
to battery. Repair wiring as
required.
Yes
Check
continuity of black wire
from pin 8, plug 1 to ground.
Does the wire have
continuity?
No
Repair/replace
wire.
Yes
Repair or
replace ECM.
wc_tx000508gb.fm
wc_gr002811
148
Mobile Generator Repair
John Deere Engines without ECU
Engine Troubleshooting
Flowchart 2B
John Deere without ECU
Engine does not Crank
Continued from Flowchart 1A
* Battery voltage;
approximately 12V.
Checking contacts of ECM
crank relay
Check for 12VDC at red wire
#18 at ECM pin 5, plug 2.
Is there
12VDC* on red
wire #18?
Yes
No
Repair
or replace
ECM.
Check for 12VDC at yellow
wire #63 at ECM pin 1, plug 2.
Is there
12VDC* at pin 1,
plug 2?
No
Yes
See Flowchart 1C
Checking ECM 10A Fuse
Check condition of 10A fuse
to ECM.
Is fuse
OK?
No
Yes
Replace fuse.
Check continuity of red
wire #18 from ECM pin 5,
plug 2 to 10A fuse; then,
from fuse to terminal block.
Causes for blown fuse
If fuse repeatedly blows, check:
• Wiring between ECM and starter relay
• Wiring between ECM and fuel relay
• Condition of starter relay coil
• Condtion of fuel relay coil
Repair/replace wire.
wc_gr002831
wc_tx000508gb.fm
149
John Deere Engines without ECU
Continued from Flowchart 2B
Engine does not Crank
Checking coil of starter relay and wiring
Mobile Generator Repair
Engine Troubleshooting
Flowchart 2C
John Deere without ECU
Place starter switch in the START
position. During cranking, check for
12VDC* at terminal CP of starter relay.
Is 12VDC*
measured at terminal
CP?
No
* Battery voltage
approximately 12V
Check continuity of
yellow wire #63 between
ECM pin 1, plug 2 and
relay terminal "CP".
Repair wire as required.
Yes
Check continuity of
black wire #14 from
starter relay terminal
CG to ground.
Does
black wire #14 have
continuity?
Yes
Checking contacts of starter relay
Check for 12VDC* on red wire at
starter relay terminal SI.
No
Repair/replace
wire as needed.
Is 12VDC*
measured at terminal
SI?
No
Check continuity of
red wire from SI to
B+ of starter motor.
Repair wire as
needed.
Yes
Check for 12VDC* on
terminal "SO" of starter
relay during "Cranking" cycle.
Is 12VDC*
measured at terminal
SO?
No
Replace relay.
Yes
Check continuity of red wire
from starter relay terminal
SO to starter motor.
Repair wire as required.
If continuity checks OK and
engine still does not crank, consult
engine manufacturer's repair
manual for starter motor
replacement procedures.
wc_gr002918
wc_tx000508gb.fm
150
Mobile Generator Repair
7.8
John Deere Engines without ECU
Checking Wiring Continuity
When checking the continuity of a wire, use the Ohms scale on your
checking instrument (multimeter). A reading of less than one Ohm
means the wire has continuity and should be OK. A reading over one
Ohm usually means that the wire or connectors are corroded and
should be repaired or replaced. A reading of “OL” or “OPEN” means
the wire is broken and there is no continuity. In such cases, repair or
replace the wire.
7.9
Probing Plugs and Pins
See Graphic: wc_gr002926
To measure the voltage at an ECM pin, attach an appropriate
extension (a) to the positive probe on your multimeter. Slide the
positive probe into the plug along the wire of the pin to be tested. Use
care when testing this way so you don’t damage the wire, plug, or
ECM. Find a suitable ground on the machine’s frame for the negative
probe (b) of your multimeter.
654
321
12 1110 9
6 5 4 3 87
21
43
21
8765
43 2 1
a
b
wc_gr002926
wc_tx000508gb.fm
151
John Deere Engines without ECU
Mobile Generator Repair
7.10 Checking ECM Display and LEDs
See Graphic: wc_gr002799
After placing the start switch in the START/RUN position, the ECM
goes through a boot-up sequence. On early machines the ECM
displays “Preheating”, then “Cranking”. Later model machines display
“Initializing...”, “Time to Service”, and then “Cranking _ of 3”. During the
preheat cycle (heater activation), the LED (b) near the stop sign
illuminates.
To check the general condition of the ECM, carry out the following
procedures:
7.10.1
Remove the three screws (a) securing the control panel and open the
panel.
7.10.2
Check the condition of all ECM connectors (plugs) and wiring. Make
sure wires are secure in the plugs and that the plugs are connected
securely to the ECM. Also look for burn marks, melting, and signs of
damage; repair or replace wiring/plugs as needed.
7.10.3
Place the start switch in the START/RUN position.
7.10.4
7.10.5
•
If the ECM display does not illuminate, check the battery. See
section Checking Battery.
•
If the ECM display does illuminate, continue.
Place the start switch in the START/RUN position and check that the
ECM display illuminates and that the boot-up sequence has started.
•
If the ECM does not go through the boot-up sequence, the ECM
may be malfunctioning. Repair or replace the ECM. Call Wacker
Service.
•
If the ECM goes through the boot-up sequence, continue.
Locate the two red LEDs (c) on the left side of the lower ECM circuit
board. Place the start switch in the OFF position then in the START/
RUN position. Check that the “FUEL” LED illuminates after the preheat
period has ended and stays lit for the entire cranking period. Also
check that the “CRANK” LED illuminates when the engine is
attempting to crank.
•
wc_tx000508gb.fm
If the LEDs do not illuminate as described above, the ECM may
be malfunctioning. Repair or replace the ECM. Call Wacker Service.
152
Mobile Generator Repair
a
John Deere Engines without ECU
b
c
wc_gr002799
7.11 Checking Battery
The ECM display may or may not be blank when the battery voltage is
less than 12V. During such a condition, the battery may be charged
enough to light the display, but not enough to fully crank the starter.
7.11.1
Check that the battery cable connections are tight.
7.11.2
Check the battery terminals for corrosion. Clean the terminals if
necessary. Corroded terminals and loose connections will result in
hard starting and insufficient battery charge.
7.11.3
Check the battery for proper voltage: 11–13V.
7.11.4
Charge or replace the battery if needed.
CAUTION: Do not jump-start the machine using a battery or charging
system with greater than 12–14V. Damage to the machine’s electrical
system will occur.
CAUTION: Do not jump start the machine without a battery connected.
Damage to the machine’s electrical system will occur.
wc_tx000508gb.fm
153
John Deere Engines without ECU
Mobile Generator Repair
7.12 Checking Power to ECM
See Graphic: wc_gr002827 and wc_gr002800
7.12.1
7.12.2
7.12.3
7.12.4
7.12.5
7.12.6
7.12.7
7.12.8
wc_tx000508gb.fm
Place the start switch (16) in the START/RUN position and check for
12VDC (battery voltage approximately 12V) between red wire #53 at
pin 7, plug 1 and ground.
•
If 12VDC is measured, the ECM is receiving power. Go to step 8.
•
If 12VDC is not measured, continue.
Place the start switch in the OFF position and check the continuity of
red wire #53 from pin 7, plug 1 to the start switch.
•
If the wire does not have continuity, repair or replace it.
•
If the wire has continuity, continue.
Check the start switch. Remove the red wires (a) and check terminals
for continuity—outer terminals to center (only one pair of terminals per
switch position).
•
If the switch does not have continuity, repair or replace it.
•
If the switch has continuity, continue.
Check the continuity of red wire #49 between the start switch and the
terminal block (23) (b).
•
If the wire does not have continuity, repair or replace it.
•
If the wire has continuity, continue.
Check the continuity of red wire #51 between the terminal block and
the starter relay (19) (c).
•
If the wire does not have continuity, repair or replace it.
•
If the wire has continuity, continue.
Check the continuity of the red wire between the starter relay and the
starter motor (20) (d).
•
If the wire does not have continuity, repair or replace it.
•
If the wire has continuity, continue.
Check the continuity of the red wire between the starter motor and the
battery (17).
•
If the wire does not have continuity, repair or replace it.
•
If the wire has continuity, continue.
Check the continuity of black wire #59 from pin 8, plug 1 to ground.
•
If the wire does not have continuity, repair or replace it.
•
If the wire has continuity and the ECM is receiving power, the
ECM should be functioning. If it is not, repair or replace it. Call
Wacker Service.
154
Mobile Generator Repair
6 5 4
3 2 1
P3
John Deere Engines without ECU
4 3
2 1
654
321
P4 4 3
2 1
6 5 4
3 2 1
12 1110 9 8 7
6 5 4 3 2 1
12 1110 9
6 5 4 3 87
21
43
21
8765
43 2 1
8 7 6 5
4 3 2 1
P1
12 1110 9 8 7
6 5 4 3 2 1
8 7 6 5
4 3 2 1
P2
b
a
d
c
wc_gr002800
wc_tx000508gb.fm
155
John Deere Engines without ECU
Mobile Generator Repair
7.13 Checking Contacts of ECM Crank Relay
See Graphic: wc_gr002827 and wc_gr002829
When the start switch is placed in the START/RUN position, the ECM
crank relay (c) energizes. The ECM crank relay supplies 12VDC
through yellow wire #63 to energize the starter relay (14).
7.13.1
7.13.2
7.13.3
7.13.4
7.13.5
Check for 12VDC (battery voltage approximately 12V) between red
wire #18 at pin 5, plug 2 and ground.
•
If 12VDC is measured, the ECM relay contact circuit is receiving
power. Go to step 5.
•
If 12VDC is not measured, continue.
Check the ECM 10A fuse (18)(a).
•
If the fuse is blown, see section Checking ECM 10A Fuse.
•
If the fuse is OK, continue.
Check continuity of red wire #18 from ECM pin 5, plug 2 to the 10A
fuse.
•
If the wire does not have continuity, repair or replace it.
•
If the wire has continuity, continue.
Check the continuity of red wire #48 from the 10A fuse to the B+
terminal strip (b).
•
If the wire does not have continuity, repair or replace it.
•
If the wire has continuity, continue.
Place the start switch in the START/RUN position and probe yellow
wire #63 at pin 1, plug 2 for 12VDC during the cranking cycle.
•
If 12VDC is measured, the ECM crank relay contact circuit is
functioning.
•
If 12VDC is not measured, the ECM is malfunctioning; repair or
replace it. Call Wacker Service.
b
654
321
12 1110 9
6 5 4 3 87
21
a
P1
43
21
8765
43 2 1
P2
c
wc_gr002829
wc_tx000508gb.fm
156
Mobile Generator Repair
John Deere Engines without ECU
7.14 Checking ECM 10A Fuse
See Graphic: wc_gr002802
The 10A fuse is found in the control compartment on G25 models (a).
It is found in the engine compartment on all other models (b). There is
12VDC fed through this fuse to the ECM fuel and crank relay contacts
via ECM pin 5, plug 2. If the fuse repeatedly blows, it is a sign that there
is a short in the wires to/from the ECM, a diode is faulty, or the fuel or
starter relay is shorted.
7.14.1
7.14.2
Check the 10A fuse. If it is blown, check:
•
The condition of the wiring to/from the fuse. Repair or replace the
wiring as needed.
•
On Isuzu-powered generators, check the condition of the starter
relay coil (see section Checking Coil of Starter Relay and Wiring);
condition of the fuel relay coil (see section Checking Coil of Fuel
Pump Relay). Also check for failed diodes. See section Checking
Diode Across Relay/Solenoid Coil.
•
On Deere-powered generators, check the condition of the starter
relay coil (see section Checking Coil of Starter Relay and Wiring);
and the condition of the fuel solenoid (see section Checking Fuel
Solenoid). Also check for failed diodes. See section Checking
Diode Across Relay/Solenoid Coil).
Once the wiring, relay/solenoid coils, and diodes check OK, replace
the 10A fuse.
b
a
wc_gr002802
wc_tx000508gb.fm
157
John Deere Engines without ECU
Mobile Generator Repair
7.15 Checking Diode Across Relay/Solenoid Coil
See Graphic: wc_gr002803
The glow plug relay (a) and the fuel solenoid (b) on Isuzu powered
generators, and the starter relay (c) (and fuel solenoid (d) on John
Deere engines without the Engine Control Unit (ECU)), all have a
diode (e) similar to the one pictured connected across the coil. The
diodes are encapsulated in rubber. They are installed in the circuit to
redirect a voltage spike to ground if one should occur during powering
down the relay’s coil. In order to check the diode, separate the diode
portion from the connector portion.
Note: Replacement diodes come with the connector portion and
wiring. It is permissible to remove and discard the replacement
connector portion and insert the replacement diode into the existing
connector and wiring.
wc_tx000508gb.fm
7.15.1
Using the diode scale on a multimeter, check that the diode conducts
in only one direction and not in the other. The meter should read
0.450–0.550V in one direction and “OL” or “OPEN” in the other.
Replace the diode if necessary.
7.15.2
On “can style” relays (the glow plug relay on G 25, the starter relay on
all other generators), check that the yellow wire of the diode is attached
to the power terminal of the relay’s coil (labeled “CP” on the schematic)
and that the black wire is attached to the ground terminal of the relay’s
coil (labeled “CG” on the schematic). Correct the wiring as needed.
158
Mobile Generator Repair
John Deere Engines without ECU
b
a
c
d
e
wc_gr002803
wc_tx000508gb.fm
159
John Deere Engines without ECU
Mobile Generator Repair
7.16 Checking Coil of Starter Relay and Wiring
See Graphic: wc_gr002827 and wc_gr002865
7.16.1
Disconnect the wiring from the starter relay (16) terminals CP (a) and
CG (b) and check the resistance across terminals CP and CG.
7.16.2
6 5 4 3 87
21
P1
•
If 100±10% is measured, continue.
•
If 12VDC is measured, the coil of the starter relay is receiving
power. Go to step 4.
•
If 12VDC is not measured, continue.
Check the continuity of yellow wire #63 from ECM pin 1, plug 2 to
terminal CP of the starter relay.
7.16.4
12 1110 9
If 100±10% is not measured, replace the starter relay.
Reconnect the wiring to the starter relay terminals CP and CG. Place
the start switch in the START/RUN position. During the cranking cycle,
check for 12VDC (battery voltage approximately 12V) between
terminal CP and ground.
7.16.3
654
321
•
•
If the wire does not have continuity, repair or replace it.
•
If the wire has continuity, continue.
Check the continuity of black wire #14 between the starter relay
terminal CG and ground.
•
If the wire does not have continuity, repair or replace it.
•
If the wire has continuity, the starter relay’s coil should be functioning.
43
21
8765
43 2 1
b
P2
a
wc_gr002865
wc_tx000508gb.fm
160
Mobile Generator Repair
John Deere Engines without ECU
7.17 Checking Contacts of Starter Relay and Wiring
See Graphic: wc_gr002827 and wc_gr002805
The starter relay coil and its wiring must be functioning properly before
checking the starter relay contacts. See section Checking Starter
Relay Coil and Wiring.
7.17.1
7.17.2
7.17.3
Check for 12VDC (battery voltage approximately 12V) between the red
wire #51 at terminal B+ (SI) (a) of the starter relay and ground.
•
If 12VDC is not measured, check continuity of red wire #51 from
terminal B+ of the starter relay to terminal B+ of the starter motor.
Repair wiring as needed.
•
If 12VDC is measured at terminal B+ (SI), continue.
Place the start switch in the START/RUN position and during the ECM
cranking cycle check for 12VDC between terminal SO (b) of the starter
relay and ground.
•
If 12VDC is not measured at terminal SO of the starter relay during the cranking cycle, replace the starter relay.
•
If 12VDC is measured at terminal SO of the starter relay during
the cranking cycle, the starter relay is functioning.
Place the start switch in the START/RUN position and during the
cranking cycle check for 12VDC between red wire at the starter motor
solenoid (c) and ground.
•
If 12VDC is not measured, check continuity of red wire. Repair or
replace the wire as needed.
•
If 12VDC is measured, and the engine still doesn’t crank, check
the engine manufacturer’s service manual for starter motor
replacement procedures.
b
a
c
wc_gr002805
wc_tx000508gb.fm
161
John Deere Engines without ECU
Mobile Generator Repair
7.18 Engine Cranks But Does Not Start
Engine Cranks But
Does Not Start
Engine Troubleshooting
Flowchart 2D
John Deere without ECU
Check fuel system: fuel supply,
filter, condition of tank, and hoses.
* Battery voltage
approximately 12V
Checking contacts of ECM preheat relay
Check for 12VDC* on red wire #17 to
ECM pin 7, plug 2.
Is there
12VDC* on red wire #17
to ECM pin 7,
plug 2?
No
Check continuity
of red wire #17 from
pin 7, plug 2 to B+
terminal strip. Repair
wire as required.
Yes
Check for 12VDC* on ECM pin 8,
plug 2 during the preheat cycle.
Is there
12VDC* on ECM pin 8,
plug 2?
No
Repair or replace
the ECM.
Yes
See Flowchart 2E
wc_tx000508gb.fm
wc_gr002919
162
Mobile Generator Repair
John Deere Engines without ECU
Engine Troubleshooting
Flowchart 2E
John Deere without ECU
Engine Cranks but does not Start
Continued from Flowchart 2D
* Battery voltage
approximately 12V
Checking Slave Preheat Relay and Wiring
With the start switch in the START position, check for
12VDC* on gray wire #65 at terminal 86 of the slave
preheat relay during the preheat cycle.
Is there
12VDC* on gray wire
#65 at terminal
86?
Check continuity of
gray wire #65 from 86
to ECM pin 8, plug 2.
Repair wire as required.
No
Yes
Check continuity of black wire #13 from
preheat relay terminal 85 to ground.
Does black
wire #13 have
continuity?
No
Repair/replace wire.
Yes
Check for 12VDC*on
terminal 30 of preheat relay.
Is 12VDC*
measured at terminal
30?
Check continuity
of red wire #11 from
relay terminal 30 to
alternator, then back
to starter relay.
No
Repair/replace wire
as needed.
Yes
Check for 12VDC* on terminal
87 of preheat relay during
preheat cycle.
Is there
12VDC* on terminal
87?
Replace
preheat relay.
No
Yes
See Flowchart 2F
wc_tx000508gb.fm
wc_gr002832
163
John Deere Engines without ECU
Engine Cranks but does not Start
Continued from Flowchart 2E
Checking Manifold Heater
Mobile Generator Repair
Engine Troubleshooting
Flowchart 2F
John Deere without ECU
Place start switch in STOP
position. Remove red wire #12
from heater terminal. Check
resistance between heater
terminal and ground.
Does
the heater have
continuity?
No
* Battery voltage;
approximately 12V.
Replace the
manifold heater.
Yes
Checking Fuel Circuit
Repair or replace
the ECM.
Move the start switch to the
START position and check for
12VDC* on violet wire #34 at fuel
solenoid valve during cranking.
Is there
12VDC* on the violet
wire #34?
No
No
Check for 12VDC*
at ECM pin 2, plug 2
during cranking.
Is there
12VDC on ECM pin 2,
plug 2?
Yes
Yes
Check continuity of black
wire #35 from fuel valve
to ground.
Move the start switch to the
STOP position and check
the continuity of the violet
wire from ECM pin 2, plug 2
through the emergency stop
switch and then to the fuel
valve. Repair/replace wiring
or switch as required.
Does black
wire #35 have
continuity?
No
Repair or
replace wire.
Yes
If you are still having problems
with the fuel valve, consult the
John Deere Service Manual for
procedures on replacing fuel
valve.
wc_gr002921
wc_tx000508gb.fm
164
Mobile Generator Repair
John Deere Engines without ECU
7.19 Checking Contacts of ECM Preheat Relay
See Graphic: wc_gr002928
The ECM includes an onboard preheat relay (a) which is located on on
the lower board, behind the crank and fuel relays. To test the function
of its contacts carry out the following procedure:
7.19.1
7.19.2
Probe ECM pin 7, plug 2 (b) at red wire #17 for 12VDC (battery voltage
approximately 12V). Measure between red wire #17 to pin 7, plug 2
and ground.
•
If 12VDC is not measured, check the continuity of red wire #17
from pin 7, plug 2 to the B+ terminal strip. Repair or replace the
wire as required.
•
If 12VDC is measured, continue.
Place the start switch in the START/RUN position and probe ECM pin
8, plug 2 at gray wire #65 for 12VDC. Measure between gray wire #65
and ground during the preheat cycle.
•
If 12VDC is measured, continue by checking the slave preheat
relay. See section Checking Slave Preheat Relay and Wiring.
•
If 12VDC is not measured, the ECM may be malfunctioning. Call
Wacker Service. Repair or replace the ECM.
654
321
43
21
12 1110 9
6 5 4 3 87
21
b
8765
43 2 1
a
wc_gr002928
wc_tx000508gb.fm
165
John Deere Engines without ECU
Mobile Generator Repair
7.20 Checking Slave Preheat Relay and Wiring
See Graphic: wc_gr002827 and wc_gr002807
The slave preheat relay (14) (a) is located inside the engine
compartment. To check the slave preheat relay, carry out the following
procedures:
7.20.1
Check power to the coil of the slave preheat relay by measuring
voltage (battery voltage approximately 12V) between terminal 86 and
ground during the preheat cycle.
•
If 12VDC is not measured, check the continuity of gray wire #65
between terminal 86 and ECM pin 8, plug 2. Repair/replace wire
as necessary.
•
If 12VDC is measured, the coil is receiving power; continue.
7.20.2
Check condition of the ground wire to the coil by checking continuity of
the black wire #13 from terminal 85 of the relay to ground. Repair/
replace the wire as necessary.
7.20.3
Check power to be switched by measuring voltage between terminal
30 and ground.
7.20.4
•
If 12VDC is not measured, check continuity of the red wire #11
from terminal 30 to B+ on the alternator. Repair or replace the
wire as needed.
•
If 12VDC is measured, continue.
Check function of the contacts of the relay by measuring voltage
between terminal 87 and ground during the preheat cycle.
•
If 12VDC is not measured, replace the slave preheat relay.
•
If 12VDC is measured, the slave preheat relay is functioning.
a
wc_gr002807
wc_tx000508gb.fm
166
Mobile Generator Repair
John Deere Engines without ECU
7.21 Checking Manifold Heater
See Graphic: wc_gr002808
The manifold heater (e) is located in line with the intake air supply.
WARNING
7.21.1
Disconnect red wire #12 (c) from the manifold heater. Check the
continuity of red wire #12 between the manifold heater and terminal 87
of the slave preheat relay. Repair/replace the wire as needed.
7.21.2
With red wire #12 disconnected, check the resistance of the manifold
heater element by measuring between the heater terminal and the
base of the manifold heater.
•
If the manifold heater element is open (OL) or has no resistance
(0 Ohms), replace it.
•
If the manifold heater element has resistance, further test its
function by energizing it.
7.21.3
Loosen the hose clamp (a) and remove the air hose (b) from the
coupling.
Optional: Remove bolts (d) which secure the manifold heater to the
manifold and remove the manifold heater (e).
7.21.4
Burn hazard. The heater can reach temperatures up to 1000°F
(538°C). Do not touch the element of the manifold heater. Be
extremely careful when testing the manifold heater.
With the manifold heater base grounded, apply 12VDC to the manifold
heater (at the terminal) for 10 seconds.
•
If the manifold heater does not heat (glow) when 12VDC is
applied, replace it.
•
If the manifold heater glows, it is functioning.
b
a
d
c
e
e
wc_gr002808
wc_tx000508gb.fm
167
John Deere Engines without ECU
Mobile Generator Repair
7.22 Checking Fuel Circuit
See Graphic: wc_gr002827 and wc_gr002809
The fuel solenoid valve (22) (b) is located inside, near the top of the
injection pump. When it is energized, fuel flows to the injection nozzles;
when de-energized, fuel flow ceases and the engine stops quickly.
There is a single violet wire which supplies power to the fuel solenoid
valve. The wire runs from ECM pin 2, plug 2 (e) to the emergency stop
switch (8) (f) and then to the fuel solenoid valve.
7.22.1
7.22.2
7.22.3
7.22.4
7.22.5
wc_tx000508gb.fm
Place the start switch in the START/RUN position and check that the
fuel LED (a) is lit during the cranking period.
•
If the fuel LED does not light, see section Checking Power to
ECM and Function of Start Switch.
•
If the fuel LED does light, continue.
Remove violet wire #34 (d) at the fuel solenoid valve and check for
12VDC (battery voltage approximately 12V) between it and ground.
Also check continuity of the fuel solenoid valve ground wire #35 (c).
•
If 12VDC is present at violet wire #34 and the ground wire is OK,
then there is a problem with the fuel solenoid valve. Consult the
John Deere engine repair manual for checking and/or replacing
the fuel solenoid valve.
•
If 12VDC is not present at violet wire #34, continue.
Check for 12VDC between violet wire #64 at the emergency stop
switch and ground.
•
If 12VDC is not measured, check the continuity of violet wire #64.
If the wire has continuity, it should be receiving power. Probe
ECM pin 2, plug 2 for 12VDC. Repair or replace the ECM if
12VDC is not present at ECM pin 2, plug 2.
•
If 12VDC is measured, continue.
Move the start switch to the STOP position and check the continuity of
violet wire #34 from the emergency stop switch to the fuel solenoid
valve.
•
If the wire does not have continuity, repair or replace it.
•
If the wire has continuity, continue.
Check the function of the emergency stop switch. Repair/replace the
emergency stop switch as needed.
168
Mobile Generator Repair
John Deere Engines without ECU
c
d
b
a
654
321
12 1110 9
6 5 4 3 87
21
43
21
af
8765
43 2 1
e
a
wc_gr002809
13
87
wc_tx000508gb.fm
169
John Deere Engines without ECU
Mobile Generator Repair
7.23 General Engine Troubleshooting—John Deere
Symptom
Problem
Solution
Engine cranks but will not
start
Exhaust restricted
Check and correct exhaust
restriction.
Fuel filter plugged or full of
water
Replace fuel filter or drain
water from filter.
Injection pump not getting
fuel or air in fuel system
Check fuel flow at supply
pump or bleed fuel system.
Faulty injection pump or
nozzles
Consult authorized diesel
repair shop for repair or
replacement.
No fuel
Check fuel tank and hoses.
Engine starting under load
Place all circuit breakers in
OFF positions.
No fuel
Check fuel tank and hoses.
Air in fuel line
Bleed fuel line.
Cold weather
Use cold weather starting
aids.
Crankcase oil too heavy
Use oil of proper viscosity.
Improper fuel type
Use proper fuel type for
operating conditions.
Water, dirt or air in fuel
system
Drain, flush, fill, and bleed
fuel system.
Clogged fuel filter
Replace filter element.
Dirty or faulty injection nozzles
Have authorized service
dealer or distributor check
injectors.
Injection pump shut-off not
reset
Place start switch in OFF
position, then to START.
Engine hard to start or will
not start
wc_tx000508gb.fm
170
Mobile Generator Repair
John Deere Engines without ECU
Symptom
Problem
Solution
Engine knocks
Low engine oil level
Add oil to engine crankcase.
Injection pump out of time
See authorized service
dealer or distributor.
Low coolant temperature
Remove and check thermostat.
Engine overheating
See “Engine overheats”
symptom in this chart.
Low coolant temperature
Remove and check thermostat.
Clogged fuel filter
Replace fuel filter element.
Water, dirt, or air in fuel
system
Drain, flush, fill, and bleed
system.
Engine runs irregularly or
stalls frequently
Dirty or faulty injection noz- Have authorized servicing
zles
dealer or engine distributor check injectors.
Lack of power
Engine overloaded
Reduce load.
Intake air restriction
Service air cleaner.
Clogged fuel filter
Replace filter elements.
Improper type of fuel.
Use proper fuel.
Overheated engine.
See “Engine overheats”
symptom in this chart.
Below normal engine temperature.
Remove and check thermostat.
Improper valve clearance.
See authorized dealer or
distributor.
Dirty or faulty injection noz- Have authorized service
zles.
dealer or distributor check
injectors.
Injection pump out of time.
wc_tx000508gb.fm
171
See authorized dealer or
distributor.
John Deere Engines without ECU
Symptom
Engine emits white smoke
Engine emits black smoke
wc_tx000508gb.fm
Mobile Generator Repair
Problem
Solution
Turbo charger not functioning (Turbocharge engines
only).
See authorized dealer or
distributor.
Leaking exhaust manifold
gasket.
See authorized dealer or
distributor.
Defective aneroid control
line.
See authorized dealer or
distributor.
Restricted fuel hose
Clean or replace fuel hose.
Improper fuel type
Use proper fuel.
Low engine temperature
Warm up engine to normal
operating temperature.
Defective thermostat
Remove and check thermostat.
Defective injection nozzles
See authorized dealer or
distributor.
Engine out of time
See authorized dealer or
distributor.
Improper fuel type
Use proper fuel.
Clogged or dirty air cleaner
Service air cleaner.
Engine overloaded
Reduce load.
Injection nozzles dirty
See authorized dealer or
distributor.
Engine out of time
See authorized dealer or
distributor.
Turbocharger not functioning
See authorized dealer or
distributor.
172
Mobile Generator Repair
John Deere Engines without ECU
Symptom
Problem
Solution
Engine overheats
Engine overloaded
Reduce load.
Low coolant level
Fill radiator to proper level.
Check radiator and hoses
for loose connections and
leaks.
Faulty radiator cap
See authorized dealer or
distributor.
Stretched poly-vee belt or
defective belt tensioner
Check automatic belt tensioner and check belts for
stretching. Replace belts
as required.
Low engine oil level
Check oil level. Add oil as
required.
Cooling system needs
flushing
Flush cooling system.
Defective thermostat
Remove and check thermostat.
Defective temperature
gauge or sender
Check water temperature
with thermometer and
replace temperature gauge
or sender as required.
Incorrect grade of fuel
Use correct grade of fuel.
wc_tx000508gb.fm
173
John Deere Engines without ECU
Notes
wc_tx000508gb.fm
174
Mobile Generator Repair
Mobile Generator Repair
8.
John Deere Engines with ECU
John Deere Engines with ECU
8.1
John Deere Engine Background
The (tier II) John Deere engines with electronic control systems are
used on Wacker generator models G 85 (BOM 9305), G 125, and G
160. The electronic control system consists of:
•
Engine Control Unit (ECU); the computer which controls fuel, and
the ignition system.
•
The following sensors: oil pressure, coolant temperature, fuel
temperature, manifold air temperature, crank position and speed.
•
Fuel pump control solenoid.
•
Manifold air heater.
The electronic control system serves as a governor by controlling the
fuel to the engine. It does so by controlling the engine’s injection pump
control valve through a proportional solenoid. In doing so, fuel is
delivered according to engine conditions, in precise amounts, and at
the precise time in relation to piston position.
The ECU communicates with the Engine Control Module (ECM)
mounted to the generator’s control panel through a Controller Area
Network (CAN). The wiring between the controllers forms a bus
(physical electrical interface where many devices share the same
electrical connections). Diagnostic tools available from John Deere
can plug into the CAN bus to assist in troubleshooting the operation of
the engine. The ECM controls the engine up through engine start
(cranking). Once started, the ECU controls the running of the engine.
The ECU has diagnostic abilities and shares engine diagnostic
information through codes which are displayed on the ECM display
screen. These diagnostic codes are referred to as “SPN/FMI” codes:
Suspect Parameter Number (SPN) and Failure Mode Identifier (FMI).
SPN/FMI codes are conveyed in a two-part code number. The SPN
typically contains between two and four digits and is the first number
of the code. The FMI contains one or two digits and is the second
number of the code. For example, if the ECM displays “SPN/FMI 100.
4”, The SPN “100” indicates a condition with the engine oil. FMI “4”
indicates that the engine oil pressure input voltage is lower than the
sensor’s specification—a condition associated with a disconnected oil
pressure sensor. There are many such SPN/FMI codes. See the John
Deere service manual for more information
wc_tx000515gb.fm
175
176
ECM
LL
Y
V
26
23
R
Br
Or
6G
R
Y
LL
Wacker side
22
J
D
B
A
E
G
F
U
V
429
23
F
C
A
H
J
24
G
E D
SO
CG
SI
422
wc_tx000515gb.fm
B
050D
14
21
20
14
050
J3
K1 K2 K3
J1 J2
H1 H2 H3
G1 G2 G3
F1 F2 F3
E1 E2 E3
D1 D2 D3
C1 C2 C3
B1 B2 B3
A1 A2 A3
25
G1
F1
K3
G2
J2
K1
A2
wc_gr002816
JOHN DEERE
ECU
8.2
CP
87
John Deere Engines with ECU
Mobile Generator Repair
Engine Wiring Diagram—John Deere with ECU
082
412
Mobile Generator Repair
8.3
Ref.
John Deere Engines with ECU
Engine Wiring Components—John Deere with ECU
Description
Ref.
Description
1
Plug 1 — engine sender inputs
14
Battery
2
Plug 2 — engine start/run outputs
15
ECM 10A fuse
3
Main circuit breaker (3-phase lugs)
16
Starter relay
4
Shunt trip coil
17
Starter
5
Emergency stop switch
18
Alternator
6
Engine Control Module (ECM)
19
B+ Terminal block
7
Safety interlock switch
20
System 10A fuse
8
Remote start terminals
21
System 30A fuse
9
Fuel level sender
22
Harness connector
10
Intake heater
23
CAN bus connector
11
Slave preheat relay
24
Diagnostic connector
12
Mechanical lugs (3 phase)
25
ECU harness connector
13
Start switch
26
Hour meter switch
ECM Plug 1 Wires
Pin
Wire
Description
10
Gr/61
3
W/L/56
9
Or/60
12
ECM Plug 2 Wires
Pin
Wire
Description
Emergency stop
5
R/18
Battery + (for relays)
Oil pressure sender
1
Y/63
Crank (12V output)
Remote start
2
V/64
Run/Fuel (12V output)
W/V/62
Fuel level
3
73
Remote annunciator (NA)
8
B/59
Battery –
4
75
Remote annunciator (NA)
7
R/53
Battery + (for ECM board)
-
-
---
Wire Colors
B
Black
R
Red
Y
Yellow
Or
Orange
G
Green
T
Tan
Br
Brown
Pr
Purple
L
Blue
V
Violet
Cl
Clear
Sh
Shield
P
Pink
W
White
Gr
Gray
LL
Light blue
wc_tx000515gb.fm
177
wc_tx000515gb.fm
178
n
J3
K1 K2 K3
J1 J2
H1 H2 H3
G1 G2 G3
F1 F2 F3
E1 E2 E3
D1 D2 D3
C1 C2 C3
B1 B2 B3
A1 A2 A3
448
447
461
l
k
c
914D
428
412
914E
JOHN DEERE
ECU
h
d
914F
m
463
b
j
a
f
012C between A2 and G
022C to K1
911
467
914B
493
491
429
050G
012D
002D
g
022A to B
F
G
H
A
E D
082
e
C
J
B
D
B
A
E
G
050
F
+
U
V
wc_gr002817
–
8.4
i
418 N/A
J
John Deere Engines with ECU
Mobile Generator Repair
ECU Wiring Diagram
Mobile Generator Repair
8.5
John Deere Engines with ECU
ECU Harness Connector
See Graphic: wc_gr002817
Ref.
Wire Color/#
Destination
A1
---
---
A2
Red/012C
A3
Wire Color/#
Destination
F1
Green/905
CAN bus
Harness Connector
(HC) terminal G
F2
---
---
Orange/493
Fuel control solenoid
F3
Violet/467
Oil pressure sensor
B1
Brown/461
Colant temp sensor
G1
Yellow/904
CAN bus
B2
Violet/447
Engine crank sensor
G2
W/L / 474
ECM
B3
Gray/918
HC terminal N (N/A)
G3
Orange/473
HC terminal H (N/A)
C1
Violet/947
HC terminal R (N/A)
H1
---
---
C2
---
---
H2
---
---
C3
Gray/428
Fuel temp sensor
H3
---
---
D1
Orange/463
Manifold Air Temp
(MAT) sensor
J1
Gray/418
N/A
D2
Gray/448
Engine crank sensor
J2
Black/050C
Ground
D3
Yellow/914C
Sensor return
J3
---
---
E1
---
---
K1
Red/022
10A fuse
E2
Brown/911C
Sensor excitation 5V
K2
Brown/491
Fuel control solenoid
E3
White/439
HC terminal K (N/A)
K3
White/429
Air heater relay
8.6
Ref.
Sensors and Components
See Graphic: wc_gr002817
a
To fuel heater (N/A)
h
ECU
b
MAT sensor
i
Crank position sensor
c
Intake manifold heater
j
Oil pressure sensor
d
Alternator
k
Fuel pump control solenoid
e
Harness connector
l
Fuel temperature sensor
f
30A fuse
m
Engine coolant temperature sensor
g
10A fuse
n
ECU harness connector
wc_tx000515gb.fm
179
John Deere Engines with ECU
8.7
Mobile Generator Repair
Locations of Engine Electrical Components
3
1
2
4
5
6
14
7
15
8
16
13
9
10
11
12
wc_gr002812
wc_tx000515gb.fm
180
Mobile Generator Repair
8.8
John Deere Engines with ECU
Engine Electrical Components
See Graphic: wc_gr002812
Ref.
Component
Ref.
Component
1
Main circuit breaker
9
Starter relay
2
Engine Control Module (ECM)
10
Oil pressure sensor
3
Alternator
11
Engine Control Unit (ECU)
4
Slave preheat relay
12
Crank position sensor
5
Manifold air temperature sensor
13
Fuel pump assembly
6
Manifold heater
14
Coolant temperature sensor
7
Starter motor
15
Fuel temperature sensor
8
Starter motor solenoid
16
Fuel pump control solenoid
8.9
Troubleshooting Flowcharts
The troubleshooting flowcharts are designed to take you through the
process of determining the source of a problem with engine starting or
machine operation. Many of the tests involve live voltages and
therefore should only be attempted by qualified personnel. Detailed
procedures for carrying out the tests are included in this manual. All
highlighted text within the flowcharts have matching sections in this
manual.
wc_tx000515gb.fm
181
John Deere Engines with ECU
Mobile Generator Repair
8.10 Engine Troubleshooting—John Deere with ECU
Engine Does Not Crank
Engine Troubleshooting
Flowchart 2G
John Deere with ECU
Check position of
emergency stop switch.
Is the
switch in the correct
position?
* Battery voltage
approximately 12V
Pull the
switch out.
Yes
See Flowchart 1B
Checking ECM Display and LEDs
Place the start switch in the
START/RUN position.
Is the
ECM illuminated?
Yes
Yes
Does the ECM
boot up and are the LEDs
lit?
No
Repair or
replace ECM.
No
Checking Battery
Checking Fuses
Yes
Check battery voltage.
Is battery
fully charged?
Check 10A & 30A fuses.
No
Replace fuse(s).
Are
10A & 30A fuses
OK?
Yes
No
Recharge or
replace battery.
Checking Power to ECM
Check voltage on red wire #53 pin 7, plug 1?
No
Check continuity of red
wire #53 to/from start switch.
Check function of start switch.
Repair/replace wiring or
switch as required.
Check continuity of red wire
#49 from switch back to B+
terminal strip and red wire #51
from terminal switch to starter
relay. Also check wiring back
to battery. Repair wiring as
required.
Yes
Repair/replace
wire.
No
Check
continuity of black wire
from pin 8, plug 1 to ground.
Does the wire have
continuity?
Yes
wc_gr002819
wc_tx000515gb.fm
Is 12VDC*
measured?
182
Repair or
replace ECM.
Mobile Generator Repair
John Deere Engines with ECU
Engine Troubleshooting
Flowchart 2H
John Deere with ECU
Engine does not Crank
Continued from Flowchart 2G
* Battery voltage
approximately 12V
Checking contacts of ECM
crank relay
Check for 12VDC at red wire
#18 at ECM pin 5, plug 2.
Is there
12VDC* on red
wire #18?
Yes
No
Repair
or replace
ECM.
Check for 12VDC at yellow
wire #63 at ECM pin 1, plug 2.
No
Is there
12VDC* at pin 1,
plug 2?
Yes
See Flowchart 1C
Checking ECM 10A Fuse
Check condition of 10A fuse
to ECM.
Is fuse
OK?
No
Yes
Replace fuse.
Check continuity of red
wire #18 from ECM pin 5,
plug 2 to 10A fuse; then,
from fuse to terminal block.
Causes for a blown fuse
If fuse repeatedly blows, check:
• Wiring between ECM and starter relay
• Wiring between ECM and fuel relay
• Condition of starter relay coil
• Condition of fuel relay coil
Repair/replace wire.
wc_gr002823
wc_tx000515gb.fm
183
John Deere Engines with ECU
Mobile Generator Repair
Engine Troubleshooting
Engine does not Crank
Continued from Flowchart 2H
Flowchart 2I
John Deere with ECU
* Battery voltage
approximately 12V
Checking coil of starter relay and wiring
Place starter switch in the START/RUN
position. During cranking, check for
12VDC* at terminal CP of starter relay.
Is 12VDC*
measured at terminal
CP?
No
Yes
Check continuity of
black wire #14 from
starter relay terminal
CG to ground.
Does
black wire have
continuity?
Check continuity of
yellow wire #63 between
ECM pin 1, plug 2 and
terminal D of the Wacker
harness. Then check it
between terminal D of
John Deere harness and
terminal CP of starter relay.
Repair wire as required.
Checking contacts of starter
relay and wiring
Yes
Check for 12VDC* on
terminal SO of starter
relay during cranking cycle.
No
Repair wire
as required.
Is 12VDC*
measured at terminal
SO?
No
Replace starter
relay.
Yes
Check continuity of red wire
from starter relay terminal
SO to starter motor solenoid.
Repair wire as required.
If continuity checks OK and
engine still doesn't crank, consult
engine manufacturer's repair
manual for starter motor
replacement procedures.
wc_gr002824
wc_tx000515gb.fm
184
Mobile Generator Repair
John Deere Engines with ECU
8.11 Checking Wiring Continuity
When checking the continuity of a wire, use the Ohms scale on your
checking instrument (multimeter). A reading of less than one Ohm
means the wire has continuity and should be OK. A reading over one
Ohm usually means that the wire or connectors are corroded and
should be repaired or replaced. A reading of “OL” or “OPEN” means
the wire is broken and there is no continuity. In such cases, repair or
replace the wire.
8.12 Probing Plugs and Pins
See Graphic: wc_gr002926
To measure the voltage at an ECM pin, attach an appropriate
extension (a) to the positive probe on your multimeter. Slide the
positive probe into the plug along the wire of the pin to be tested. Use
care when testing this way so you don’t damage the wire, plug, or
ECM. Find a suitable ground on the machine’s frame for the negative
probe (b) of your multimeter.
654
321
12 1110 9
6 5 4 3 87
21
43
21
8765
43 2 1
a
b
wc_gr002926
wc_tx000515gb.fm
185
John Deere Engines with ECU
Mobile Generator Repair
8.13 Checking ECM Display and LEDs
See Graphic: wc_gr0002813
8.13.1
Remove the three screws (a) securing the control panel and open the
panel.
8.13.2
Check general condition of all ECM connectors (plugs) and wiring.
Look for burn marks, melting, and signs of damage; repair or replace
as necessary.
8.13.3
Place the start switch in the “START/RUN” position.
8.13.4
•
If the ECM display does not illuminate, check the battery and the
system’s 10A and 30A fuses.
•
If the ECM display does illuminate, continue.
Place the start switch in the “START/RUN” position. Check that the
display reads: “Initializing...”; “Time to Service”; “Cranking 1 of 3”; and
that the red LEDs (b) located on the edge of the ECM circuit board
illuminate when the display reads “Cranking __ of 3”.
a
b
wc_tx000515gb.fm
186
wc_gr002813
Mobile Generator Repair
John Deere Engines with ECU
8.14 Checking System 10A & 30A Fuses
See Graphic: wc_gr002820
There are two fuses in the wiring from the battery that protect the
electrical system. Both fuses are located near the ECU; the 30A fuse
(a) (21) is the first, the 10A fuse (b) (20) the second.
To check the fuses, remove the connector cover which protects the
fuse. Replace the fuse if it is blown. If the fuse repeatedly blows, it is a
sign of a short in the wiring. Repair or replace the wiring as necessary.
b
a
wc_gr002820
8.15 Checking Battery
The ECM display may or may not be blank when the battery voltage is
less than 12V. During such a condition, the battery may be charged
enough to light the display, but not enough to fully crank the starter.
8.15.1
Check that the battery cable connections are tight.
8.15.2
Check the battery terminals for corrosion. Clean the terminals if
necessary. Corroded terminals and loose connections will result in
hard starting and insufficient battery charge.
8.15.3
Check the battery for proper voltage: 11–13V.
8.15.4
Charge or replace the battery if needed.
CAUTION: Do not jump-start the machine using a battery or charging
system with greater than 12–14V. Damage to the machine’s electrical
system will occur.
CAUTION: Do not jump start the machine without a battery connected.
Damage to the machine’s electrical system will occur.
wc_tx000515gb.fm
187
John Deere Engines with ECU
Mobile Generator Repair
8.16 Checking Power to ECM and Start Switch
See Graphic: wc_gr002816 and wc_gr002814
8.16.1
8.16.2
8.16.3
8.16.4
8.16.5
8.16.6
8.16.7
wc_tx000515gb.fm
Disconnect plug 1 from the ECM. Place the start switch (13) in the
START/RUN position and check for 12VDC (battery voltage
approximately 12V) between red wire #53 at pin 7, plug 1 and ground.
•
If 12VDC is measured, the ECM is receiving power.
•
If 12VDC is not measured, continue.
Place the start switch in the OFF position and check the continuity of
red wire #53 from pin 7, plug 1 to the start switch.
•
If the wire does not have continuity, repair or replace it.
•
If the wire has continuity, continue.
Check the start switch. Remove the red wires (a) and check the
terminals for continuity—outer terminals to center (only one pair of
terminals per switch position.)
•
If the switch does not have continuity, repair or replace it.
•
If the switch has continuity, continue.
Check the continuity of red wire #49 between the start switch and the
terminal block (19) (b).
•
If the wire does not have continuity, repair or replace it.
•
If the wire has continuity, continue.
Separate the John Deere engine harness from the Wacker harness at
connector (c). Check the continuity of red wire #51 between the
terminal block and terminal B of the Wacker harness.
•
If the wire does not have continuity, repair or replace it.
•
If the wire has continuity, continue.
Check the continuity of red wire #022C between terminal B of the John
Deere engine harness and terminal K1 of the ECU harness connector
(d).
•
If the wire does not have continuity, repair or replace it.
•
If the wire has continuity, continue.
Check the continuity of black wire #59 from pin 8, plug 1 through
terminal E of each harness (John Deere and Wacker) to ground.
Repair/replace wire as required.
188
Mobile Generator Repair
654
321
John Deere Engines with ECU
43
21
12 1110 9
6 5 4 3 87
21
P1
8765
43 2 1
P2
a
A1 A2 A3
a
d
B1 B2 B3
C1 C2 C3
D1 D2 D3
E1 E2 E3
F1 F2 F3
G1 G2 G3
H1 H2 H3
J1 J2
b
J3
c
a
K1 K2 K3
a
B
a
B
a
E
a
E
WACKER side
JOHN DEERE side
wc_gr002814
wc_tx000515gb.fm
189
John Deere Engines with ECU
Mobile Generator Repair
8.17 Checking Contacts of ECM Crank Relay
See Graphic: wc_gr002816 and wc_gr002830
When the start switch is placed in the START/RUN position, the ECM
crank relay (c) energizes. The ECM crank relay supplies 12VDC
through yellow wire #63 to energize the starter relay (14).
8.17.1
8.17.2
8.17.3
8.17.4
8.17.5
Check for 12VDC (battery voltage approximately 12V) between red
wire #18 at pin 5, plug 2 and ground.
•
If 12VDC is measured, the ECM relay contact circuit is receiving
power. Go to step 5.
•
If 12VDC is not measured, continue.
Check the ECM 10A fuse (18)(a).
•
If the fuse is blown, see section Checking ECM 10A Fuse.
•
If the fuse is OK, continue.
Check continuity of red wire #18 from ECM pin 5, plug 2 to the 10A
fuse.
•
If the wire does not have continuity, repair or replace it.
•
If the wire has continuity, continue.
Check the continuity of red wire #48 from the 10A fuse to the B+
terminal strip (b).
•
If the wire does not have continuity, repair or replace it.
•
If the wire has continuity, continue.
Place the start switch in the START/RUN position and probe yellow
wire #63 at pin 1, plug 2 for 12VDC during the cranking cycle.
•
If 12VDC is measured, the ECM crank relay contact circuit is
functioning.
•
If 12VDC is not measured, the ECM is malfunctioning; repair or
replace it. Call Wacker Service.
a
654
321
43
21
12 1110 9
6 5 4 3 87
21
P1
8765
43 2 1
P2
wc_gr002830
wc_tx000515gb.fm
190
Mobile Generator Repair
John Deere Engines with ECU
8.18 Checking ECM 10A Fuse
See Graphic: wc_gr002802
The 10A fuse is found in the control compartment on G25 models (a).
It is found in the engine compartment on all other models (b). There is
12VDC fed through this fuse to the ECM fuel and crank relay contacts
via ECM pin 5, plug 2. If the fuse repeatedly blows, it is a sign that there
is a short in the wires to/from the ECM, a diode is faulty, or the fuel or
starter relay is shorted.
8.18.1
8.18.2
Check the 10A fuse. If it is blown, check:
•
The condition of the wiring to/from the fuse. Repair or replace the
wiring as needed.
•
On Isuzu-powered generators, check the condition of the starter
relay coil (see section Checking Coil of Starter Relay and Wiring);
condition of the fuel relay coil (see section Checking Coil of Fuel
Pump Relay). Also check for failed diodes. See section Checking
Diode Across Relay/Solenoid Coil.
•
On Deere-powered generators, check the condition of the starter
relay coil (see section Checking Coil of Starter Relay and Wiring);
and the condition of the fuel solenoid (see section Checking Fuel
Solenoid). Also check for failed diodes. See section Checking
Diode Across Relay/Solenoid Coil).
Once the wiring, relay/solenoid coils, and diodes check OK, replace
the 10A fuse.
b
a
wc_gr002802
wc_tx000515gb.fm
191
John Deere Engines with ECU
Mobile Generator Repair
8.19 Checking Relay Coil Diodes
See Graphic: wc_gr002803
The glow plug relay (a) and the fuel solenoid (b) on Isuzu powered
generators, and the starter relay (c) (and fuel solenoid (d) on John
Deere engines without the Engine Control Unit (ECU)), all have a
diode (e) similar to the one pictured connected across the coil. The
diodes are encapsulated in rubber. They are installed in the circuit to
redirect a voltage spike to ground if one should occur during powering
down the relay’s coil. In order to check the diode, separate the diode
portion from the connector portion.
Note: Replacement diodes come with the connector portion and
wiring. It is permissible to remove and discard the replacement
connector portion and insert the replacement diode into the existing
connector and wiring.
wc_tx000515gb.fm
8.19.1
Using the diode scale on a multimeter, check that the diode conducts
in only one direction and not in the other. The meter should read
0.450–0.550V in one direction and “OL” or “OPEN” in the other.
Replace the diode if necessary.
8.19.2
On “can style” relays (the glow plug relay on G 25, the starter relay on
all other generators), check that the yellow wire of the diode is attached
to the power terminal of the relay’s coil (labeled “CP” on the schematic)
and that the black wire is attached to the ground terminal of the relay’s
coil (labeled “CG” on the schematic). Correct the wiring as needed.
192
Mobile Generator Repair
John Deere Engines with ECU
b
a
c
d
e
wc_gr002803
wc_tx000515gb.fm
193
John Deere Engines with ECU
Mobile Generator Repair
8.20 Checking Coil of Starter Relay and Wiring
See Graphic: wc_gr0002816 and wc_gr002804
8.20.1
8.20.2
8.20.3
8.20.4
wc_tx000515gb.fm
Disconnect the wiring from the starter relay (16) terminals CP (a) and
CG (b) and check the resistance across terminals CP and CG.
•
If 100±10% Ohms is not measured, replace the starter relay.
•
If 100±10% Ohms is measured, continue.
Place the start switch in the START/RUN position. During the cranking
cycle, check for 12VDC between terminal CP (b) of the starter relay
(21) and ground.
•
If 12VDC is measured, the relay’s coil is receiving power; go to
step 4.
•
If 12VDC is not measured, continue.
Disconnect the John Deere engine harness from the Wacker harness
at the connector (d). Check the continuity of yellow wire #63 from ECM
pin 1, plug 2 to terminal D of the Wacker harness.
•
If the wire does not have continuity, repair or replace it.
•
If the wire has continuity, continue.
Check the continuity of the red wire from terminal D of the John Deere
engine harness to terminal CP of the starter relay.
•
If the wire does not have continuity, repair or replace it.
•
If the wire has continuity, continue.
8.20.5
Continue checking the circuit by checking the continuity of the black
wire on starter terminal CG (c) to ground. Repair wire as needed.
8.20.6
Reconnect all the wiring after tests are complete.
194
Mobile Generator Repair
John Deere Engines with ECU
654
321
c
a
43
21
12 1110 9
6 5 4 3 87
21
8765
43 2 1
a
b
a
P1
P2
a
d
a
D
a
D
JOHN DEERE side
WACKER side
wc_gr002804
wc_tx000515gb.fm
195
John Deere Engines with ECU
Mobile Generator Repair
8.21 Checking Contacts of Starter Relay and Wiring
See Graphic: wc_gr002805 and wc_gr002816
8.21.1
8.21.2
8.21.3
8.21.4
Check for 12VDC (battery voltage approximately 12V) between
terminal B+ SI (a) of the starter relay and ground.
•
If 12VDC is not measured, check the continuity of the red wire
from terminal B+ of the starter relay to terminal B+ of the starter
motor. Also check the continuity of the red wire from the starter
motor to the battery. Repair or replace the wiring as needed.
•
If 12VDC is measured, the relay is receiving power; continue.
Place the start switch in the START/RUN position and check for
12VDC between terminal SO (b) of the starter relay and ground during
the cranking cycle.
•
If 12VDC is not measured, the starter relay is malfunctioning;
replace the starter relay.
•
If 12VDC is measured, continue.
Check for 12VDC between the red wire (c) at the starter motor
solenoid and ground.
•
If 12VDC is measured and the engine still does not crank, check
the engine manufacturer’s service manual for starter motor
replacement procedures.
•
If 12VDC is not measured, continue.
Check the continuity of the red wire between terminal SO of the starter
relay and the starter motor solenoid.
•
If the wire does not have continuity, repair or replace it.
87
b
14
a
c
wc_gr002805
wc_tx000515gb.fm
196
SI
SO
CP
CG
14
Schematic wc_gr002816 detail
Mobile Generator Repair
John Deere Engines with ECU
8.22 Engine Cranks But Does Not Start—John Deere with ECU
Engine Cranks But Does Not Start
Engine Troubleshooting
Check fuel system: fuel supply,
filter, condition of tank, and hoses.
Flowchart 2J
John Deere with ECU
Checking Slave Preheat Relay and Wiring
* Battery voltage
approximately 12V
Preheat relay checks only apply when the generator is
cold: approximately 15˚C (60˚F) and lower.
With the start switch in the START/RUN position, check
for 12VDC* on gray wire #65 at terminal 86 of slave
preheat relay during the preheat (Air Intake Heater) cycle
Is there
12VDC* on gray wire
#65 at terminal
86?
Check continuity of gray
wire #65/white wire #429 between
relay terminal 86 and terminal K3
of the ECU harness connector.
Repair wire as required.
No
Yes
Check continuity of black wire #13 from
preheat relay terminal 85 to ground.
Does black
wire have continuity?
No
Repair/replace wire.
Yes
Check for 12VDC*on terminal
30 of preheat relay.
Is 12VDC*
measured at terminal
30?
Check continuity of
red wire #11 from relay
terminal 30 to alternator,
then back to starter relay.
No
Repair/replace wire
as needed.
Yes
Check for 12VDC* on terminal
87 of preheat relay during the
preheat cycle.
Is there
12VDC* on terminal
87?
No
Replace
preheat relay.
Yes
See Flowchart 2K
wc_tx000515gb.fm
wc_gr002821
197
John Deere Engines with ECU
Mobile Generator Repair
Engine Cranks but does not Start
Continued from Flowchart 2J
Engine Troubleshooting
Flowchart 2K
John Deere
Checking Manifold Heater
Place start switch in STOP
position. Remove red wire
from heater terminal. Check
resistance between heater
terminal and ground.
* Battery voltage
approximately 12V
Does
the heater have
resistance?
No
Replace the intake
manifold heater.
Repair or replace
the wire.
Yes
Disconnect the John
Deere harness from the
Wacker harness. Check
continuity of red wire
#012C between terminal
A of ECU harness and
terminal G on John
Deere harness.
Checking Power to ECU
Remove ECU Harness
Connector (HC). Move the
start switch to the REMOTE
START position. Check for
12VDC* between terminal
A2 of theECU harness
connector and ground.
Is there
12VDC* on terminal
A2?
No
Does the
wire have continuity?
Yes
Place the start switch in the
REMOTE START position.
Check terminal G on the Wacker
harness for 12VDC*.
No
Yes
Is there
12VDC* on terminal
G?
Check continuity of black wire
#050C between terminal J2
of ECU harness and ground.
Yes
No
Does the wire
have continuity?
No
Repair or
replace wire.
Move the start switch to the
OFF position and check the
continuity of the violet wire
#64 from ECM pin 2, plug 2
through the emergency stop
switch. Then, check continuity
of the violet wire #34 from the
emergency stop switch to
terminal G. Repair/replace
wiring or switch as required.
Yes
Consult the John Deere
service manual for
troubleshooting procedures on
the ECU.
If you are still having
problems, call Wacker
Service.
wc_gr002822
wc_tx000515gb.fm
198
Mobile Generator Repair
John Deere Engines with ECU
8.23 Checking Slave Preheat Relay and Wiring
See Graphic: wc_gr002816 and wc_gr002825
8.23.1
8.23.2
8.23.3
8.23.4
Place the start switch in the START/RUN position and check for
12VDC (battery voltage approximately 12V) between gray wire #65 at
slave preheat relay (a) terminal 86 and ground.
•
If 12VDC is not measured, check the continuity of gray wire #65,
which becomes white wire #429, between the slave preheat relay
and terminal K3 of the ECU harness connector (b).
•
If 12VDC is measured, continue.
Place the start switch in the OFF position and check the continuity of
black wire #13 between the slave preheat relay and ground.
•
If the wire does not have continuity, repair or replace it.
•
If the wire has continuity, continue.
Place the start switch in the START/RUN position and check for
12VDC between red wire #11and at the slave preheat relay and
ground.
•
If 12VDC is not measured, check the continuity of the red wire
#11 between the slave preheat relay and the alternator. Also
check the continuity of red wire #50 between the alternator and
the starter relay. And finally, check the continuity of the red wire
from the starter relay to the starter motor and back to the battery.
•
If 12VDC is measured, continue.
Check for 12VDC at terminal 87 of the slave preheat relay and ground.
Measure at the relay or at red wire #12 connected to the intake
manifold heater.
•
If 12VDC is not measured, replace the slave preheat relay.
•
If 12VDC is measured, the slave preheat relay is operating properly.
A1 A2 A3
B1 B2 B3
a
C1 C2 C3
D1 D2 D3
E1 E2 E3
a
b
F1 F2 F3
G1 G2 G3
H1 H2 H3
J1 J2
J3
K1 K2 K3
wc_gr002825
wc_tx000515gb.fm
199
John Deere Engines with ECU
Mobile Generator Repair
8.24 Checking Manifold Heater
See Graphic: wc_gr002808
The manifold heater (e) is located in line with the intake air supply.
WARNING
8.24.1
Disconnect red wire #12 (c) from the manifold heater. Check the
continuity of red wire #12 between the manifold heater and terminal 87
of the slave preheat relay. Repair/replace the wire as needed.
8.24.2
With red wire #12 disconnected, check the resistance of the manifold
heater element by measuring between the heater terminal and the
base of the manifold heater.
•
If the manifold heater element is open (OL) or has no resistance
(0 Ohms), replace it.
•
If the manifold heater element has resistance, further test its function by energizing it.
8.24.3
Loosen the hose clamp (a) and remove the air hose (b) from the
coupling.
Optional: Remove bolts (d) which secure the manifold heater to the
manifold and remove the manifold heater (e).
8.24.4
Burn hazard. The heater can reach temperatures up to 1000°F
(538°C). Do not touch the element of the manifold heater. Be
extremely careful when testing the manifold heater.
With the manifold heater base grounded, apply 12VDC to the manifold
heater (at the terminal) for 10 seconds.
•
If the manifold heater does not heat (glow) when 12VDC is
applied, replace it.
•
If the manifold heater glows, it is functioning.
b
a
d
c
e
e
wc_gr002808
wc_tx000515gb.fm
200
Mobile Generator Repair
John Deere Engines with ECU
8.25 Checking Contacts of ECM Fuel Relay
See Graphic: wc_gr002927
In order for the ECM fuel relay to energize, the ECM must be receiving
power. If the engine cranks, the ECM is receiving power. If the engine
does not crank, see section Checking ECM 10A Fuse.
The engine’s ECU receives control power through the ECM fuel relay.
ECM fuel relay relays 12VDC first to the ECU through violet wire #64
via the emergency stop switch, then through violet wire #34 to the
ECU. To check if the ECM fuel relay is functioning, carry out the
following procedure:
8.25.1
Place the start switch in the REMOTE START position.
8.25.2
Probe pin 2, plug 2 and measure for voltage (battery voltage
approximately 12). Measure between pin 2, plug 2 and ground.
•
If 12VDC is not measured, the ECM fuel relay is not functioning.
Replace the ECM.
•
If 12VDC is measured, the ECM fuel relay circuit is functioning.
654
321
12 1110 9
6 5 4 3 87
21
43
21
8765
43 2 1
a
wc_gr002927
wc_tx000515gb.fm
201
John Deere Engines with ECU
Mobile Generator Repair
8.26 Checking Power to ECU
See Graphic: wc_gr002816 and wc_gr002826
Be sure the ECM fuel relay contact circuit is functioning. See section
Checking Contacts of ECM Fuel Relay.
8.26.1
Remove the ECU harness connector (a).
8.26.2
Place the start switch in the REMOTE START position.
8.26.3
Check for 12VDC (battery voltage approximately 12V) between
terminal A2 of the ECU harness connector and ground.
8.26.4
8.26.5
8.26.6
•
If 12VDC is not measured, go to step 8.26.5.
•
If 12VDC is measured, continue.
Check the continuity of black wire #050C between terminal J2 of the
ECU harness and ground.
•
If the wire does not have continuity, repair or replace it.
•
If the wire has continuity, consult the John Deere Service Manual
for troubleshooting the ECU.
Place the start switch in the OFF position. Disconnect the John Deere
engine harness from the Wacker harness at connector (b). Check the
continuity of red wire #012C between terminal A2 of the ECU harness
connector and terminal G of the John Deere engine harness.
•
If the wire does not have continuity, repair or replace it.
•
If the wire has continuity, continue.
Place the start switch in the REMOTE START position. Check for
12VDC between terminal G on the Wacker harness and ground.
•
wc_tx000515gb.fm
If 12VDC is measured at terminal G and your unit will still not
start, the problem lies within the ECU. Consult the John Deere
service manual for troubleshooting the ECU. Call Wacker Service.
202
Mobile Generator Repair
John Deere Engines with ECU
A1 A2 A3
B1 B2 B3
a
b
C1 C2 C3
D1 D2 D3
E1 E2 E3
a
F1 F2 F3
G1 G2 G3
H1 H2 H3
J1 J2
J3
K1 K2 K3
a
G
a
G
JOHN DEERE side
WACKER side
a
d
c
a
wc_gr002826
wc_tx000515gb.fm
203
John Deere Engines with ECU
Mobile Generator Repair
8.27 General Engine Troubleshooting—John Deere with ECU
Symptom
Problem
Solution
Engine cranks but will not
start
Exhaust restricted
Check and correct exhaust
restriction.
Fuel filter plugged or full of
water
Replace fuel filter or drain
water from filter.
Injection pump not getting
fuel or air in fuel system
Check fuel flow at supply
pump or bleed fuel system.
Faulty injection pump or
nozzles
Consult authorized diesel
repair shop for repair or
replacement.
No fuel
Check fuel tank and hoses.
Engine starting under load
Place all circuit breakers in
OFF positions.
No fuel
Check fuel tank and hoses.
Air in fuel line
Bleed fuel line.
Cold weather
Use cold weather starting
aids.
Crankcase oil too heavy
Use oil of proper viscosity.
Improper fuel type
Use proper fuel type for
operating conditions.
Water, dirt or air in fuel system
Drain, flush, fill, and bleed
fuel system.
Clogged fuel filter
Replace filter element.
Dirty or faulty injection nozzles
Have authorized service
dealer or distributor check
injectors.
Injection pump shut-off not
reset
Place start switch in OFF
position, then to START.
Engine hard to start or will
not start
wc_tx000515gb.fm
204
Mobile Generator Repair
John Deere Engines with ECU
Symptom
Problem
Solution
Engine knocks
Low engine oil level
Add oil to engine crankcase.
Injection pump out of time
See authorized service
dealer or distributor.
Low coolant temperature
Remove and check thermostat.
Engine overheating
See “Engine overheats”
symptom in this chart.
Low coolant temperature
Remove and check thermostat.
Clogged fuel filter
Replace fuel filter element.
Water, dirt, or air in fuel
system
Drain, flush, fill, and bleed
system.
Engine runs irregularly or
stalls frequently
Dirty or faulty injection noz- Have authorized servicing
zles
dealer or engine distributor check injectors.
Lack of power
Engine overloaded
Reduce load.
Intake air restriction
Service air cleaner.
Clogged fuel filter
Replace filter elements.
Improper type of fuel.
Use proper fuel.
Overheated engine.
See “Engine overheats”
symptom in this chart.
Below normal engine temperature.
Remove and check thermostat.
Improper valve clearance.
See authorized dealer or
distributor.
Dirty or faulty injection noz- Have authorized service
zles.
dealer or distributor check
injectors.
Injection pump out of time.
wc_tx000515gb.fm
205
See authorized dealer or
distributor.
John Deere Engines with ECU
Symptom
Engine emits white smoke
Engine emits black smoke
wc_tx000515gb.fm
Mobile Generator Repair
Problem
Solution
Turbo charger not functioning (Turbocharge engines
only).
See authorized dealer or
distributor.
Leaking exhaust manifold
gasket.
See authorized dealer or
distributor.
Defective aneroid control
line.
See authorized dealer or
distributor.
Restricted fuel hose
Clean or replace fuel hose.
Improper fuel type
Use proper fuel.
Low engine temperature
Warm up engine to normal
operating temperature.
Defective thermostat
Remove and check thermostat.
Defective injection nozzles
See authorized dealer or
distributor.
Engine out of time
See authorized dealer or
distributor.
Improper fuel type
Use proper fuel.
Clogged or dirty air cleaner
Service air cleaner.
Engine overloaded
Reduce load.
Injection nozzles dirty
See authorized dealer or
distributor.
Engine out of time
See authorized dealer or
distributor.
Turbocharger not functioning
See authorized dealer or
distributor.
206
Mobile Generator Repair
John Deere Engines with ECU
Symptom
Problem
Solution
Engine overheats
Engine overloaded
Reduce load.
Low coolant level
Fill radiator to proper level.
Check radiator and hoses
for loose connections and
leaks.
Faulty radiator cap
See authorized dealer or
distributor.
Stretched poly-vee belt or
defective belt tensioner
Check automatic belt tensioner and check belts for
stretching. Replace belts
as required.
Low engine oil level
Check oil level. Add oil as
required.
Cooling system needs
flushing
Flush cooling system.
Defective thermostat
Remove and check thermostat.
Defective temperature
gauge or sender
Check water temperature
with thermometer and
replace temperature gauge
or sender as required.
Incorrect grade of fuel
Use correct grade of fuel.
wc_tx000515gb.fm
207
Output Voltage Troubleshooting
9.
Mobile Generator Repair
Output Voltage Troubleshooting
9.1
Wiring Diagrams
G 25
2
44
24
1
13
23
14
16 18
6
11 13
15 17
5
Br
6
10 12
12
Br
25 13
26
7
7
17
LL
LL
LL
G/Y
G/Y
LL
G/Y
G/Y
Br 3
19 T9
Br
44
T7
Br 6
7
B
B
5
4
B
B
8
B
B
B
B
18
10
8
B 23
B 24
X
G
Y
W
9
B 21
B 22
X
G
Y
(20)
W
11
4
CT-1 CT-2 CT-3
L0
T7
T9
L1
L2
L0
L3
B
T9
20
T4
B
12
B
1
2
5
6
9
17
13
10 14
18
25
21
22 26
4
41 L3
Or
2
43 L2
42 L1
Y
Br
1
39
36
38
37
3
1
4
4
5
2
6
CT3
CT0
CT2
CT1
Or
W
Y
Br
3
4
CT-3
CT-2
CT-1
L3
16 20
23
27
24 28
3
T4
T9T5
16
F+ F-
15
43
T3
41
3
T2
17
wc_tx000509gb.fm
7 11
12
8
15 19
T6
T8
T11
T10
T7
T1
T12
3
F+
F7
6
4
50Hz
60Hz
Br
B
B
W
B
Br
R
B
18
wc_gr002854
208
Mobile Generator Repair
Output Voltage Troubleshooting
See Graphic: wc_gr002854
Ref.
Description
Ref.
Description
1
Lug safety limit switch
11
240V 30A receptacle
2
Mechanical lugs
12
Engine Control Module (ECM)
3
Buss bar
13
Plug 4 - line voltage inputs
4
Main breaker
14
Plug 3 - current transformer inputs
5
Shunt
15
Voltage Selector Switch
6
120V 20A GFI receptacle
16
Generator
7
120V breaker
17
Voltage regulator with 4A fuse
8
240V 50A breaker
18
Voltage adjustment rheostat
9
240V 30A breaker
19
Terminal Block
10
240V 50A receptacle
20
Terminal Strip
ECM Plug 3 Wires
Pin
Wire
4
Or
39
1
ECM Plug 4 Wires
Description
Pin
Wire
Description
Ammeter line input CT3
3
Or
41
Voltage line input L3 at volt
selector #28
W
36
Ammeter input CT common
4
Y
43
Voltage line input L2 at volt
selector #20
5
Y
38
Ammeter line input CT2
2
Br
42
Voltage line input L1 at volt
selector #3
2
Br
37
Ammeter line input CT1
-
-
---
Wire Colors
B
Black
R
Red
Y
Yellow
Or
Orange
G
Green
T
Tan
Br
Brown
Pr
Purple
L
Blue
V
Violet
Cl
Clear
Sh
Shield
P
Pink
W
White
Gr
Gray
LL
Light blue
wc_tx000509gb.fm
209
Output Voltage Troubleshooting
Mobile Generator Repair
G 50, G 70, G 85, G 125
2
2 4
1
L 1
L 2
L 3
L 0
3
2 3
4
B r
6
6
5
7
7
B r
L L
L L
L L L L
L L
G /Y
G /Y
G /Y G /Y
G /Y
B r
1 9
B
B
B
L 0
1 0
B
B
9
B
B
B
89
B
C T -3
B
98
B
T 7
C T -2
B
B
B B
C T -1
1 0
B r
T 9
1 1
B
B
2 0
T 4
B
T 5
B
1 5
1 2
1 3
L 3
3
1
L 2
4
L 1
2
C T 3
C T
C T 2
C T 1
4
1
5
2
6
1
5
2
T 9
9
1 0
6
1 3
1 4
1 7
1 8
2 1
2 2
2 5
2 6
T 9
T 6
T 8
T 1 1
T 1 0
T 7
T 1
T 1 2
O
Y
B r
3
O
W
Y
B r
W
7
4
C T -3
8
1 1
1 2
1 5
1 6
1 9
2 0
2 3
2 4
1 6
F + FF-F +
2 7
2 8
C T -2
C T -1
L 3
T 3
3
1 4
T 2
1 7
3
F +
F 7
6
5 0 H Z
6 0 H Z
wc_tx000509gb.fm
4
B
B r
W
B
B
B r
F +
F -
1 8
w c _ g r0 0 0 5 2 4
210
Mobile Generator Repair
Output Voltage Troubleshooting
See Graphic: wc_gr000524
Ref.
Description
Ref.
Description
1.
Lug safety limit switch
11.
240V 30A receptacle
2.
Mechanical lugs
12.
Engine Control Module (ECM)
3.
Buss bar
13.
Plug 4 - line voltage inputs
4.
Main breaker
14.
Plug 3 - current transformer inputs
5.
Shunt
15.
Voltage selector switch
6.
120V 20A GFI receptacle
16.
Generator
7.
120V breaker
17.
Voltage regulator
8.
240V 50A breaker
18.
Voltage adjustment rheostat
9.
240V 30A breaker
19.
Terminal Block
10.
240V 50A receptacle
20.
Terminal Strip
ECM Plug 3 Wires
Pin
Wire
4
Or
1
ECM Plug 4 Wires
Description
Pin
Wire
Description
Ammeter line input CT3
3
Or
Voltage line input L3 at volt
selector #28
W
Ammeter input CT common
4
Y
Voltage line input L2 at volt
selector #20
5
Y
Ammeter line input CT2
2
Br
Voltage line input L1 at volt
selector #3
2
Br
Ammeter line input CT1
1
-
---
Wire Colors
B
Black
R
Red
Y
Yellow
Or
Orange
G
Green
T
Tan
Br
Brown
Pr
Purple
L
Blue
V
Violet
Cl
Clear
Sh
Shield
P
Pink
W
White
Gr
Gray
LL
Light blue
wc_tx000509gb.fm
211
Output Voltage Troubleshooting
G 160
wc_tx000509gb.fm
212
Mobile Generator Repair
Mobile Generator Repair
Output Voltage Troubleshooting
See Graphic: wc_gr000895
Ref.
Description
Ref.
Description
1
Lug safety limit switch
11
240V 30A receptacle
2
Mechanical lugs
12
Engine Control Module (ECM)
3
Buss bar
13
Plug 4 - line voltage inputs
4
Main breaker
14
Plug 3 - current transformer inputs
5
Shunt
15
Voltage selector switch
6
120V 20A GFI receptacle
16
Generator
7
120V breaker
17
Voltage regulator
8
240V 50A breaker
18
Voltage adjustment rheostat
9
240V 30A breaker
19
Terminal Block
10
240V 50A receptacle
20
Terminal Block
ECM Plug 3 Wires
Pin
Wire
4
Or
1
ECM Plug 4 Wires
Description
Pin
Wire
Description
Ammeter line input CT3
3
Or
Voltage line input L3 at volt
selector #28
W
Ammeter input CT common
4
Y
Voltage line input L2 at volt
selector #20
5
Y
Ammeter line input CT2
2
Br
Voltage line input L1 at volt
selector #3
2
Br
Ammeter line input CT1
1
-
---
Wire Colors
B
Black
R
Red
Y
Yellow
Or
Orange
G
Green
T
Tan
Br
Brown
Pr
Purple
L
Blue
V
Violet
Cl
Clear
Sh
Shield
P
Pink
W
White
Gr
Gray
LL
Light blue
wc_tx000509gb.fm
213
Output Voltage Troubleshooting
9.2
Mobile Generator Repair
“No” Voltage Troubleshooting
(Zero (0.0) Volts measured on multimeter)
Check position of circuit breaker.
Is
the circuit breaker
in the "ON" (closed)
position?
No
Place the circuit
breaker in the "ON"
(closed) position.
Yes
No Voltage Troubleshooting
Flowchart 3A
Checking main circuit breaker
Does the
main circuit breaker have
continuity?
No
Replace the main
circuit breaker.
Yes
Checking circuit breaker
and function of voltage
selector switch
Check resistance of wiring
to main circuit breaker.
Do all
3 wires have same
resistance (about
0.2 Ohms)?
No
Yes
Check continuity of wires
from main circuit breaker
to voltage selector switch.
Do the wires
have continuity?
No
Repair or
replace wires.
See Flowchart 3B
Yes
Check function of VSS
(voltage selector switch).
Checking exciter stator winding
Check:
· Resistance
· Open (OL) to ground
· Open (OL) to each other
Are
the windings
OK?
No
Yes
Is the
VSS functioning
properly ?
No
Repair or
replace VSS.
Replace
generator end.
Yes
Call
Wacker Service.
wc_gr002845
wc_tx000509gb.fm
214
Mobile Generator Repair
Output Voltage Troubleshooting
No Voltage Troubleshooting
Flowchart 3B
Continued from Flowchart 3A
Checking generator/excitation system
· Check function of lug door switch.
Do brown
wires at AVR have
continuity?
· Check continuity of wire at #3 from
AVR to lug door switch and then from
switch toT7 lug in control box.
No
· Check continuitywire at #4 to T9 lug
in control box.
Yes
· Check for 0.20 Ohms resistance
between T7 and T9 lugs in control
box.
Make all necessary
repairs then retry generator.
If there is still no voltage,
call Wacker Service.
Do exciter
stator wires at F+ and Fto regulator measure 23.0 Ohms
and open (OL) to
ground?
No
Yes
Check wires F+ and F- in VSS box.
Repair
or replace wires.
No
Are wires
OK?
Yes
See Flowchart 3C
Call Wacker Service.
On G50–G160 replace exciter stator.
On G25 replace generator.
wc_gr002846
wc_tx000509gb.fm
215
Output Voltage Troubleshooting
Mobile Generator Repair
No Voltage Troubleshooting
Flowchart 3C
Continued from Flowchart 3B
Excite generator with a 12V battery on
F+ and F-. Check for 240V (or more)
on brown wires 3 and 4.
Is 240V+
measured at terminals
3 and 4?
Yes
Replacing and Resetting the
Automatic Voltage Regulator
No
Reconnect the AVR and retry
generator.
Does
generator
work?
Checking condition of exciter rotor winding
Check condition of exciter rotor winding.
No
Do all 3
windings measure 0.2 Ohms
and open to ground?
No
Replace
exciter rotor.
Check AVR fuse.
Replace
AVR.
Yes
Yes
Is AVR
fuse OK?
No
Checking rectifier diodes
Check condition of rectifier diodes.
Checking main rotor windings
Check main rotor windings.
If any are bad,
replace entire ring
(all 6 diodes)
Replace AVR fuse
and retry.
If problems continue, call
Wacker Service.
If main rotor
windings are bad,
replace generator.
wc_gr002862
wc_tx000509gb.fm
216
Mobile Generator Repair
9.3
Output Voltage Troubleshooting
Checking Main Circuit Breaker
See Graphic: wc_gr002855
Electric shock hazard. Turn off the generator before conducting this
test.
WARNING
9.3.1
Open the control panel and place the main circuit breaker in the “ON”
(closed) position.
9.3.2
Check the main circuit breaker for continuity—on all three legs. If the
main circuit breaker has no continuity when in the “ON” position,
replace it.
wc_gr002855
wc_tx000509gb.fm
217
Output Voltage Troubleshooting
Mobile Generator Repair
9.4 Checking Circuit Breaker and Function of Voltage Selector
Switch
See Graphic: wc_gr002856
wc_tx000509gb.fm
9.4.1
Turn off the generator.
9.4.2
Place the voltage selector switch (VSS) in the 480V/277V position.
9.4.3
Open the control panel. Measure the resistance from each leg to
neutral: L1–N, L2–N, and L3–N. Do so by measuring resistance across
each wire connected to the top of the main circuit breaker to neutral
lug. All three resistance values should be equal—approximately 0.2
Ohms.
•
If there is an “open” reading, repair the broken wire to the VSS.
•
If there is a significant increase in one of the measurements,
check the wire connections on the voltage selector switch.
Tighten any loose wires.
9.4.4
If wires are OK, spray contacts of VSS with a contact cleaner and turn
the VSS knob back and forth several times to wipe clean the switch
contacts. Dry the VSS thoroughly with compressed air and retest the
resistance reading on each leg to neutral.
9.4.5
If a high resistance reading is still present, remove four wires off both
coils on the suspect leg (e.g., if L3–N, measures 10 Ohms, remove T6
from 26, T9 from 25, T12 from 7, and T3 from lug in VSS box. Check
resistance from wires T3 to T6, and from T9 to T12.
•
If a high resistance is measured on either coil, replace the stator.
•
If both coils measure 0.2 Ohms and are “open” to ground, then
check the resistance on VSS contacts 25 to 26. If high resistance
is measured on the VSS, clean it again, or replace it.
218
Mobile Generator Repair
Output Voltage Troubleshooting
2
1
3
4
6
6
5
7
7
1 9
1 0
8
1 0
8
Key:
T# = generator wire ends
# = VSS terminal
1 1
9
L1
B
T1
2 0
T4
1 2
1
2
1 3
T10
T3
1 4
T9
26
1 5
T11
18
13
T2
1 3
1 4
1 7
1 8
2 1
2 2
2 5
2 6
T 9
L2–N
8
1 1
1 2
1 5
1 6
1 9
2 0
2 3
2 4
1 6
F + FF-F +
2 7
2 8
T 3
L2
T 2
1 8
wc_gr002856
wc_tx000509gb.fm
7
4
16
1 7
1 0
6
3
T8
L3
L3–N
2
9
T 6
T 8
T 1 1
T 1 0
T 7
T 1
T 1 2
7 6
25
T 5
5
1
10
T12
T6
T 4
B
T7
B
L1–N
T 9
219
Output Voltage Troubleshooting
9.5
Mobile Generator Repair
Replacing Voltage Selector Switch (VSS)
See Graphic: wc_gr002123 and wc_gr002124
Removal:
9.5.1
Place the engine start switch in the “O” (OFF) position and push in the
emergency stop button.
9.5.2
Remove the rear enclosure panel to expose the generator. Remove
the cover of the voltage selector switch box.
9.5.3
Label if necessary, then remove all the wires connected to the voltage
selector switch.
9.5.4
Remove the screw (a) securing the selector knob (b) and remove the
knob. Also remove adapter (c).
9.5.5
Remove the face plate (d).
9.5.6
Remove the hardware (e) and remove the switch lock (f).
9.5.7
Remove the hardware (g) securing the rear of the switch and remove
the switch (h) from the box.
Installation:
9.5.8
Position the switch into the switch box so that even number terminals
are on the right and the serial number tag (i) faces up. Secure the
switch with hardware (g).
9.5.9
Secure the switch lock (f) using hardware (e).
9.5.10
Snap the face plate (d) back onto the lock.
9.5.11
Attach adapter (c) and selector knob (b) with screw (a).
9.5.12
Reconnect wiring and jumpers as shown. Jumpers (j2) are built-in to
switches used on G25.
9.5.13
Re-install switch box cover and sides. Also replace rear enclosure
panel.
g
i
h
f
e
d
c
e
wc_gr002124
wc_tx000509gb.fm
220
b
a
Mobile Generator Repair
Output Voltage Troubleshooting
Wires
T7
L0 T11 T10
2
6
T8
10
14
T6
18
22
26
Even Numbered
Terminals
4
8
12
20
T2
L2
24
28
L3
Or
Y
Jumpers
6
4
10
8
14
12
18
16
22
24
20
Wires
T9 T9
L0
T5
T4
25
21
17
13
9
5
1
27
23
19
15
11
7
3
T12
L1
26
28
j1
j2
Black jumper 20 to 15
2
Black jumper 12 to 17
Black jumper 10 to 21
T7
16
j1
T9
L2
Br
j2
Jumpers
25
21
17
13
9
5
1
27
23
19
15
11
7
3
Odd Numbered
Terminals
wc_gr002123
wc_tx000509gb.fm
221
Output Voltage Troubleshooting
9.6
Mobile Generator Repair
Checking Exciter Stator Winding
See Graphic: wc_gr002103
9.6.1
Remove exciter stator wires F+ and F- from the voltage regulator and
check continuity between wires. There should be approximately 23 (0.0 +0.5) Ohms resistance between F+ and F-, and infinite (open)
resistance from either wire to ground. If 23 Ohms is read, then the
exciter stator is OK.
9.6.2
If 23 Ohms was not measured, trace the F+ and F- wires into the
voltage selector switch box.
9.6.3
Remove the cover of the switch box and trace wires to red and black
wires (a) coming from generator. Remove the F- wire from the black
wire, and the F+ wire from the red wire.
9.6.4
Check both the F+ wire and the F- wire for continuity back to the
voltage regulator. If either wire has no continuity, replace it.
9.6.5
Check the exciter stator winding for continuity by measuring the
resistance across the red and the black cloth-covered generator wires.
There should be approximately 23 (-0.0 +0.5) Ohms resistance across
the wires. If you do not measure 23 Ohms, replace the exciter stator.
On G12 and G25 models, replace the complete generator assembly.
Also check for short to ground. Measure resistance from red wire to
ground, then black wire to ground. There should be infinite (open)
resistance from either wire to ground.
9.6.6
wc_tx000509gb.fm
•
If you measure a resistance less than 2.0 megohms, replace the
exciter stator winding. On G12 and G25 models, replace the
complete generator assembly.
•
If you measure between 2.0 and 999 megohms, dry the windings
off with a fan or hair dryer—humidity can reduce the reading.
An alternative test is to use a 500V megger. When using a 500V
megger, the minimum resistance value between the winding and
ground is 2 megohms. Replace the winding or generator if you read 2
megohms or less.
Note: On models G50–G160, the exciter stator comes off with removal
of generator bearing carrier. On models G12 and G25, the exciter is
pressed into the stator can assembly.
222
Mobile Generator Repair
Output Voltage Troubleshooting
G 25
a
G 50, G 70, G 85, G 125, & G 160
d
c
b
e
f
wc_gr002774
9.7
Accessing the Rotor Bearing, Diodes, and Rotor Winding
See Graphic: wc_gr002774
wc_tx000509gb.fm
9.7.1
On generators with Isuzu engines, remove screws (a) and nuts
securing support cover. Tap the cover with a hammer to open a gap
between the cover and the generator housing, then use a screwdriver
to pry the cover all the way off the housing.
9.7.2
On generators with John Deere engines, remove the screws (b)
securing the plastic vent cover (c) and remove the plastic cover. This
will allow minimal access to the diode ring (d).
9.7.3
For improved access, disconnect the F+ and F- wires in the VSS box.
Then, remove screws (e) and remove bearing carrier/exciter stator
assembly (f).
223
Output Voltage Troubleshooting
9.8
Mobile Generator Repair
Checking Generator/Excitation System
(Including Manual Excitation/Flashing)
See Graphic: wc_gr002857
Field testing of the voltage regulator requires special equipment and is
not practical or necessary. By removing the voltage regulator from the
circuit and testing the excitation system, one can determine by process
of elimination whether the problem lies within the regulator or the
excitation system.
Signs that the voltage regulator may be malfunctioning are:
•
Generator output voltage limited to approximately 30VAC.
•
Generator comes up to voltage when flashing the exciter stator, but
not when connected to the automatic voltage regulator (AVR).
9.8.1
With the engine off, check the condition of the AVR’s 4-Amp fuse (a).
Replace the fuse if blown. A blown fuse is a sign that F+ or F- may be
shorted to ground.
9.8.2
Remove black wires F+, F-, brown wires 3 and 4 from the AVR.
9.8.3
With the wires disconnected from the AVR, the generator output
voltage is reduced to a residual voltage of approximately 10–30VAC.
Note: During normal operation, the voltage inputs to the AVR will
measure approximately 240VAC on brown wires 3 and 4. The output
excitation from AVR terminals F+ and F- can go as high as 73VDC,
depending on the type of load on the generator.
9.8.4
Check the resistance across the F+ and F- wires. There should be
approximately 23±0.5 Ohms resistance across F+ and F-, and infinite
(open) resistance from either wire to ground. If unusual resistance is
measured across F+ and F-, trace the wires back to the voltage
selector switch box. The F+ wire is connected to the red wire leading
into the generator housing where it is connected to the exciter stator.
The F- wire is connected to the black wire of the exciter stator. Repair
or replace wires as needed. See section Checking Exciter Stator
Winding.
9.8.5
Check the resistance across brown wires 3 and 4. There should be
very low resistance measured, approximately 0.2 Ohms. And each
wire should have a path to ground.
Note: The interlock switch is part of this circuit. When the lug box door
is closed, the circuit is completed and there is continuity. When the
door is opened, there should be no continuity (meter reading of OL, or
Open) across 3 and 4. If your meter shows something different,
replace the interlock switch. See section Checking Safety Interlock
Switch.
wc_tx000509gb.fm
224
Mobile Generator Repair
Output Voltage Troubleshooting
1 2
1 4
1 3
If your meter shows no continuity between brown wires 3 and 4 with
the interlock switch closed, check the continuity of each wire
separately. To do so, open the interlock switch by removing screw (b).
Note the brown wire #3 (c) leading to AVR. Check it for continuity. Also
check the wire on the opposite side of the interlock switch (d) back to
the T7 lug (e) located inside control box, for continuity. Then, check
wiring from T7 lug back to voltage selector switch for continuity.
Finally, check brown wire #4 between AVR and T9 lug (f), and the
wires from T9 lug back to voltage selector switch, for continuity. Repair
or replace wires as needed.
1 7
B
F-
F+
B
1 8
L 0
L 3
4
B
b
1 5
a
1
3
2
4
T 4
3
5
6
7
8
9
1 0
1 1
1 2
T 5
1 4
1 5
1 6
1 3
2 0
1 7
1 8
1 9
8
2 2
9
8
2 1
2 3
2 4
2 5
2 6
2 7
2 8
c
T 9
d
T 6
T 8
T 1 1
T 1 0
T 7
T 1
T 1 2
T 3
T 9
F +
F + FF--
wc_tx000509gb.fm
225
1 6
wc_gr002857
1 0
f
1 1
2 0
e
Output Voltage Troubleshooting
Mobile Generator Repair
External battery excitation/flashing procedures
See Graphic: wc_gr001951
The exciter stator core is the main source of the generator's residual
magnetism. If it has been subjected to severe vibration during
shipping, it may have lost its residual magnetism. To restore residual
magnetism, flash the field as described below.
To flash the field:
9.8.6
With engine off, disconnect black wires F+ and F-, and brown wires 3
and 4, from the regulator.
9.8.7
Connect a multimeter to brown wires 3 and 4. Set the multimeter to a
voltage scale of minimum 300VAC or higher.
9.8.8
Explosion hazard. Escaping hydrogen gas from the battery can
explode. Beware of arcing when connecting leads to battery.
CAUTION
Connect the F+ and F- wires to a 9- or 12-Volt battery by using jumper
wires between them and the battery. The F+ and F- wires are the
exciter field leads. Be sure to connect F+ to positive and F- to negative
or residual magnetism will be lost again when the regulator is
reconnected. When connecting the wires, connect the jumper wires to
the battery first, then connect them to the F+ and F- wires away from
the battery—connect the F+ wire first, then the F- wire.
9.8.9
Start the engine and observe the voltage on the brown wires 3 &4 with
a multimeter. Using a 9-Volt battery, the generator should produce
approximately 180–200 Volts; with a 12-Volt battery, 240–300 Volts .
•
If voltage output on brown wires (3 &4) is very low, check: the
exciter rotor, the diode ring, and the main rotor.
•
If voltage is correct, the excitation system is functioning properly.
Run the generator for a few seconds to restore residual magnetism to
exciter stator core. Turn engine off, remove jumper wires and reconnect F+ and F-, and brown wires to voltage regulator.
•
If voltage is incorrect when automatic voltage regulator (AVR) is
reconnected, check the AVR fuse and replace it if necessary.
If the voltage is still incorrect or the fuse blows again, replace the AVR.
wc_tx000509gb.fm
226
Mobile Generator Repair
Output Voltage Troubleshooting
STAB
U/F
7 W
F- B
F+ B
3 Br
VOLT
60 Hz
50 Hz
4 Br
6 B
wc_gr001951
wc_tx000509gb.fm
227
Output Voltage Troubleshooting
9.9
Mobile Generator Repair
Checking Lug Door Switch
See Graphic: wc_gr002110
There are two sets of contacts in the door switch. The first set is
normally open. These contacts open the brown AVR wire #3 to turn off
the AVR when the door is opened.
The second set is normally closed. These contacts close the yellow
shut trip circuit breaker wires to 12V from battery, causing the breaker
to open when the door is opened.
Electric shock hazard. Turn off the generator before conducting this
test.
WARNING
wc_tx000509gb.fm
9.9.1
Open the hinged panel and defeat the interlock switch. To defeat the
interlock switch, remove “key” (latch) (a) from hinged panel and place
it in slot of interlock switch (b).
9.9.2
Open the switch by removing the screw (c).
9.9.3
Disconnect the wires leading to the switch (caution, the yellow wire
carries 12V.) Check the brown wire for continuity and the yellow wire
should be “open”.
Next, pull the “key” from the interlock switch. The brown wire’s contacts
should now be “open” and the yellow wire’s contacts closed. If the
interlock switch does not respond accordingly, replace the interlock
switch.
9.9.4
Re-install the key latch when test is completed.
228
Mobile Generator Repair
wc_tx000509gb.fm
Output Voltage Troubleshooting
229
Output Voltage Troubleshooting
Mobile Generator Repair
9.10 Replacing and Resetting the Automatic Voltage Regulator
(AVR)
See Graphic: wc_gr002858
Removal:
9.10.1
Place the engine start switch in the “O” (OFF) position and push in the
emergency stop button.
9.10.2
Label then disconnect the wires connected to the automatic voltage
regulator (AVR).
9.10.3
Remove the screws (a) and remove the AVR.
Installation:
9.10.4
Remove and discard the wire jumper connected to terminals #6 and #7
on the replacement AVR. This jumper enables the volt adjustment on
the AVR; however, it is not required because the remote voltage
adjusting rheostat mounted on the control panel door is wired in its
place.
9.10.5
Using screws, secure the replacement AVR to the panel.
9.10.6
Connect the wiring as shown. Be sure to connect white wire (b) to
60Hz terminal.
AVR setup:
9.10.7
Place the voltage selector switch (VSS) in the 120/208V position.
9.10.8
Set the voltage adjusting rheostat (c) on the door to approximately the
midway position (1-1/4 turns clockwise).
9.10.9
Start the engine and using the “volt” pot on the back of the AVR, set
AC output voltage to 208V as seen on the ECM display, or measured
with a multimeter connected to the lugs or the 50A twist-lock
receptacle.
9.10.10 Turn the voltage adjusting rheostat clockwise until the display voltage
reads 240V. If the voltage adjusting rheostat stops before reaching
240V, turn the voltage adjusting rheostat 1/8-turn counterclockwise
from its max point and turn the “volt” pot on the AVR until output is
240V. A properly set AVR and voltage adjusting rheostat will allow a
voltage adjustment range between 208–240V.
9.10.11 Once the AVR is set for the 208V position of the VSS, it is also set for
all VSS positions. Adjustments via the voltage adjusting rheostat will
allow an electrician to set up the generator for all rated applications.
9.10.12 Consult the factory if you encounter setup difficulties.
wc_tx000509gb.fm
230
Mobile Generator Repair
b
Output Voltage Troubleshooting
F-
F+
a
4
c
3
wc_gr002858
wc_tx000509gb.fm
231
Output Voltage Troubleshooting
Mobile Generator Repair
9.11 Checking Exciter Rotor Winding
See Graphic: wc_gr002106
Note: For clarity, the rotor is shown removed from generator housing.
wc_tx000509gb.fm
9.11.1
Disconnect the three black wires (a) fastened to the diode support
brackets. These black wires run to the exciter rotor winding. Arbitrarily
label the three black wires “1”, “2”, and “3”.
9.11.2
Measure the resistance across each combination of wires: 1–2, 2–3,
and 1–3. The resistance measurement for each combination should be
the same, approximately 0.2 Ohms. If each combination does not
measure 0.2 Ohms replace the exciter rotor winding. See section
Replacing Rotor Bearing, Diode Ring, and Exciter Rotor.
9.11.3
Also check each wire to ground. There should be no path to ground for
any of the three wires. If you measure a path to ground, replace the
exciter rotor winding.
An alternative test is to use a 500V megger. When using a 500V
megger, the minimum resistance value between the winding and
ground is 2 megohms.
232
Mobile Generator Repair
Output Voltage Troubleshooting
9.12 Checking Rectifier Diodes
See Graphic: wc_gr002104
Note: For clarity, the rotor is shown removed from generator housing.
wc_tx000509gb.fm
9.12.1
Locate the two threaded studs (b) on the diode ring and remove all
wires fastened to them.
9.12.2
Identify the leads from each diode (a).
9.12.3
Set the multimeter to the diode scale. Check that each diode conducts
one way and not the other. A functioning diode should read 0.500 ±
0.025 Volts one way and “open” the other.
9.12.4
Replace all six diodes if any of the diodes are found to be bad.
233
Output Voltage Troubleshooting
Mobile Generator Repair
9.13 Checking Main Rotor Winding
See Graphic: wc_gr002107
Note: For clarity, the rotor is shown removed from generator housing.
wc_tx000509gb.fm
9.13.1
Locate two threaded studs (b) on diode ring. Remove all wires
fastened to the studs.
9.13.2
Locate the two black wires with yellow insulators that run down motor
shaft (a).
9.13.3
Measure the resistance across the wires; it should equal 1.4±0.5
Ohms. If not, replace the generator assembly.
9.13.4
Also check each wire to ground. There should be no path to ground. If
you measure a path to ground, replace the generator assembly.
Note: Rotor assemblies are not available as replacement parts.
234
Mobile Generator Repair
wc_tx000509gb.fm
Output Voltage Troubleshooting
235
Output Voltage Troubleshooting
Mobile Generator Repair
9.14 Replacing Rotor Bearing, Diode Ring, and Exciter Rotor
See Graphic: wc_gr002105
Removal:
9.14.1
Using a puller, pull the bearing (a) from the shaft. Heat the bearing if
necessary but do not heat it more than 212°F (100°C).
9.14.2
Disconnect the black exciter rotor wires and the main rotor winding
wires (black with yellow insulator) from the diode ring (b).
9.14.3
Remove the screws securing the the ring to the collar (c) and remove
the ring.
9.14.4
Using a puller, pull the collar from the shaft. Heat the collar if
necessary.
9.14.5
Using a puller, pull the exciter rotor winding (d) from the shaft. Heat the
exciter rotor winding if necessary
Installation:
9.14.6
Align the exciter rotor winding so that the two main rotor winding wires
(e) (black with yellow insulator) can pass through the holes in the
exciter rotor winding and press the exciter rotor winding onto the rotor
shaft.
9.14.7
Align the diode ring collar so that, when the diode ring is installed, the
main rotor windings and the exciter rotor winding wires can be easily
attached to the diode ring. Once aligned, press the collar onto the rotor
shaft.
9.14.8
Attach the diode ring to the collar.
9.14.9
Connect the exciter and main rotor winding wires to the diode ring.
9.14.10 Press the bearing onto the rotor shaft. Heat the bearing race if
necessary but do not heat it more than 212°F (100°C).
wc_tx000509gb.fm
236
Mobile Generator Repair
wc_tx000509gb.fm
Output Voltage Troubleshooting
237
Output Voltage Troubleshooting
Mobile Generator Repair
9.15 Low* Voltage Troubleshooting
(*Greater than 1; usually 30–40)
Check position of voltage selector switch. Make sure it is in the correct position.
Check the lug door. Make sure it is shut tight.
Check the function of the door switch. If the switch is not functioning properly, replace it.
Verifying voltage
Verify voltage using a
multimeter or voltmeter.
Does the
ECM voltage match
the multimeter?
No
Recalibrate the
ECM voltmeter.
Low Voltage Troubleshooting
Flowchart 4A
Yes
Checking lug door switch
· Check function of door switch.
Checking generator/excitation
system
· Check wire at #3 from AVR to lug
door switch and then from switch to
T7 lug in control box.
Check the excitation circuit.
Do brown
wires at AVR have
continuity?
· Check wire at #4 to T9 lug in control
box.
No
· Check for 0.20 Ohms resistance
between T7 and T9 lugs in control
box.
Yes
Make all necessary
repairs then retry generator.
If there is still no voltage,
call Wacker Service.
Do exciter
stator wires at F+ and Fto regulator measure 23.0 Ohms
and open (OL) to
ground?
No
Check wires F+ and F- in VSS box.
Repair
or replace wires.
Yes
No
Are wires
OK?
Yes
Call Wacker Service.
On G50–G160 replace exciter stator.
On G25 replace generator.
See Flowchart 4B
wc_gr002859
wc_tx000509gb.fm
238
Mobile Generator Repair
Output Voltage Troubleshooting
Low Voltage Troubleshooting
Flowchart 4C
Continued from Flowchart 4B
Reconnect the AVR
and retry generator.
Does
generator
work?
No
Check the function
of the door rheostat.
Replace
the rheostat.
Is the
rheostat functioning
properly?
No
Yes
Replacing and resetting the
automatic voltage regulator
Adjust the "Volt" pot on the AVR.
Replace
the AVR.
No
Is the
voltage correct?
Yes
Check AVR fuse.
Is AVR
fuse OK?
Yes
Replace
AVR.
No
Replace
AVR fuse.
wc_gr002860
wc_tx000509gb.fm
239
Output Voltage Troubleshooting
Mobile Generator Repair
Low Voltage Troubleshooting
Flowchart 4B
Continued from Flowchart 4A
Checking generator/excitation system
Excite generator with a 12V battery on
F+ and F-. Check for 240V (or more)
on brown wires 3 and 4.
Is 240V+
measured at terminals
3 and 4?
Checking rectifier diodes
No
Check condition of
rectifier diodes.
Yes
Are the
diodes functioning
properly?
See Flowchart 4C
No
Replace
six-diode ring
assembly.
Yes
Checking exciter rotor winding
Check condition of exciter
rotor winding.
Check
condition of
main rotor and stator
windings. If either is bad,
replace generator.
Call Wacker
Service.
Do windings
measure 0.2 Ohms
resistance and open
to ground?
Yes
No
Replace
exciter rotor.
wc_gr003009
wc_tx000509gb.fm
240
Mobile Generator Repair
Output Voltage Troubleshooting
9.16 Verifying Voltage
See Graphic: wc_gr001979
Electric shock hazard. This test involves live voltages which can cause
severe injury or death. Only qualified personnel should conduct this
test.
WARNING
9.16.1
Shut off the generator.
9.16.2
Open the lug door and defeat the interlock switch. To defeat the
interlock switch, remove key latch from hinged door and place it in slot
of interlock switch. See section Checking Safety Interlock Switch.
9.16.3
Start the generator.
9.16.4
Place the main circuit breaker in the “ON” (closed) position.
9.16.5
Using a personal voltmeter set to the 500V scale, measure voltage Lug
1 to Lug 2; Lug 2 to Lug 3; Lug 3 to Lug 1. Your readings should match
those in the chart ±10%.
9.16.6
If necessary, adjust the rheostat accordingly so that your readings do
match.
9.16.7
Re-install the key latch when test is completed.
L1
T1
208
120
T4
L-L
T10
N
T12 T11
L1-L2 = 480V L1-N = 277V
L2-L3 = 480V L2-N = 277V
L3-L1 = 480V L3-N = 277V
T8
T6
L3
T5
L-N
T3
L2
N-
T2
208
120
L1
T1
T10
T4
L-N
208
120
T11 T10
T12 T2
T7
120V
240V
240
120
L1
T5
T9
120V
L3
L2
T8
T6
T3
L1-L2 = 208V L1-N = 120V
L2-L3 = 208V L2-N = 120V
L3-L1 = 208V L3-N = 120V
N-
T2
T11
L3
240
120
480
277
L-L
T7
T9
240
120
480
277
T7
L1-L3 = 240V
L1-N = 120V
L3-N = 120V
wc_gr001979
wc_tx000509gb.fm
241
Output Voltage Troubleshooting
Mobile Generator Repair
9.17 Checking Main Stator Winding
See Graphic: wc_gr002108
wc_tx000509gb.fm
9.17.1
Remove the generator’s rear enclosure panel.
9.17.2
Remove the top and rear covers of the voltage selector switch box.
9.17.3
Carefully label all wires (a) coming from inside the generator housing
that are connected to the voltage selector switch. Disconnect the wires
from the switch.
Note: These wires are recognizable by their cloth-type insulation. They
also have metal bands attached with the appropriate wire number
stamped on them.
9.17.4
There are six coils that makeup the main stator winding, which are
identified as: T1–T4, T2–T5, T3–T6, T7–T10, T8–T11, and T9–T12.
Check each coil for continuity by measuring resistance across the
appropriate wires disconnected in previous step. Each coil should
measure the same, approximately 0.2 Ohms. If any of the coils does
not measure 0.2 Ohms, replace the generator.
Also check continuity between coils and coils to ground. There should
be no path between coils. If you measure continuity between any coils,
the coils have shorted together, therefore, replace the generator. If a
reading to ground is less than 2 megohms, replace the generator.
9.17.5
Reconnect the wires if the main stator checks OK. Refer to the wiring
diagram.
242
Mobile Generator Repair
Output Voltage Troubleshooting
9.18 Generator Produces High Voltage Troubleshooting
Check position of voltage
selector switch.
Is the
voltage selector
switch (VSS) in the correct
position?
With engine
off, place switch in
correct position.
No
Yes
Verifying voltage
High Voltage Troubleshooting
Flowchart 5A
Verify voltage using a
multimeter or voltmeter.
Does the
ECM voltage match
the multimeter?
No
Recalibrate the
ECM display.
Yes
Adjust voltage
on door rheostat.
Is
voltage now
OK?
Measure the voltage
on each leg.
No
Does each
leg measure the
same high
voltage?
No
See Flowchart 5B
Yes
Check the function
of the door rheostat.
Replace
the rheostat.
No
Is the
rheostat functioning
properly?
Yes
Adjust the "Volt"
pot on the AVR.
Replace
the AVR.
No
Is the
voltage correct?
wc_gr002861
wc_tx000509gb.fm
243
Output Voltage Troubleshooting
Mobile Generator Repair
High Voltage Troubleshooting
Flowchart 5B
Continued from Flowchart 5A
With the engine off,
soak the VSS contacts
with quick dry type contact
cleaner. Turn switch knob
back and forth several
times to clean contacts.
Dry VSS with
compressed air.
Is
voltage now
OK?
No
Check function of
voltage selector switch.
Call
Wacker Service.
Yes
Is the
voltage selector
switch functioning
properly?
No
Replace
the voltage
selector switch.
wc_gr003010
wc_tx000509gb.fm
244
Mobile Generator Repair
Output Voltage Troubleshooting
9.19 Replacing Emergency Stop Switch
See Graphic: wc_gr002087
Removal:
9.19.1
Remove the rear machine enclosure panel.
9.19.2
Remove the two screws (a) securing the protective cover (b).
9.19.3
Disengage the switch connectors (c) from the nut (e).
9.19.4
Loosen the two screws (d) securing the nut (e). Then, twist and pull the
nut to remove it.
9.19.5
Pull the knob assembly (f) from the panel.
Installation:
9.19.6
Insert the knob assembly (f) through the outer panel.
9.19.7
Secure the knob assembly to the panel by inserting the nut (e) over the
knob assembly and twisting it. Then, tighten the two screws (d).
9.19.8
Connect the switch connectors (c) to the nut (e).
9.19.9
Secure the protective cover with two screws (a).
9.19.10 Re-install the rear enclosure panel.
wc_tx000509gb.fm
245
Output Voltage Troubleshooting
Notes
wc_tx000509gb.fm
246
Mobile Generator Repair
Mobile Generator Repair
Disassembly/Assembly Procedures
10. Disassembly/Assembly Procedures
10.1 Tools
Because all possible problems encountered while repairing the
equipment cannot be anticipated, it is up to the mechanic to use
common sense and good judgement in tool selection.
The use of any special tools is recommended only for those operations
where the use of conventional tools proves inadequate.
Before substituting another tool or procedure, you should be satisfied
that neither personal injury nor damage to the component will result.
10.2 Ordering Parts
The repair procedures contained in this manual do not include part
numbers. For parts replacement information, refer to the Parts Book
originally supplied with the unit.
If the original Parts Book has been lost, a replacement may be ordered
from Wacker Corporation. When ordering a replacement Parts Book,
please list the model number, item number, revision level, and serial
number of the machine. Parts Books are also available on the Wacker
Corporation Web site. See www.wackergroup.com. Enter the site as a
visitor.
10.3 Reference Numbers ( )
Repair procedures contain reference numbers enclosed in
parentheses ( ). These numbers refer to the item numbers shown on
the assembly drawings and other detailed drawings. They are included
to aid the mechanic in identifying parts and assembling components.
10.4 Weight Block
See Graphic: wc_gr000843
The weight block symbol gives an approximate weight measurement
to aid the mechanic when lifting/hoisting larger components.
250 kg
(550 lbs.)
wc_gr000843
wc_tx000510gb.fm
247
Disassembly/Assembly Procedures
Mobile Generator Repair
10.5 Exhaust System Exploded View—G 25
G25
5
7
8
6
2
7
1
3
4
1
7
5
G12
wc_gr002055
Ref.
Component
Ref.
Component
1
Horizontal exhaust pipe
5
M8 hardware
2
Top muffler bracket
6
Muffler
3
Bottom muffler bracket
7
Clamp
4
Rod
8
Exhaust tail pipe
wc_tx000510gb.fm
248
Mobile Generator Repair
Disassembly/Assembly Procedures
10.6 Removing Exhaust System—G 25
See Graphic: wc_gr002055
10.6.1
Shut down the machine and allow the the exhaust pipes to cool.
10.6.2
Remove the front panel.
10.6.3
Disconnect the horizontal exhaust pipe (1) from the engine manifold.
10.6.4
Loosen the clamp securing the horizontal exhaust pipe to the muffler
(6) and remove the horizontal exhaust pipe.
10.6.5
Remove the screws securing the muffler bracket (3) to the radiator
bulkhead and remove the bracket and the muffler as an assembly.
10.6.6
Loosen the U-bolts or clamps securing the muffler to the bracket and
remove the muffler from the bracket.
10.7 Installing Exhaust System—G 25
See Graphic: wc_gr002055
wc_tx000510gb.fm
10.7.1
Secure the muffler bracket to the radiator bulkhead.
10.7.2
Temporarily mount the muffler (6) to the muffler bracket using U-bolts
or rods. Do not tighten the hardware.
10.7.3
Insert the horizontal pipe (1) into the muffler but do not tighten the
clamp.
10.7.4
Secure the other end of the horizontal exhaust pipe to the engine
manifold.
10.7.5
Secure the horizontal exhaust pipe to the muffler by tightening the
clamp.
10.7.6
Attach the tail pipe (8) to the muffler before tightening the clamp.
Position the tail pipe so that exhaust is emitted up and out of the
enclosure.
10.7.7
Tighten the clamps securing the muffler to the muffler bracket.
10.7.8
Re-install the front panel.
249
Disassembly/Assembly Procedures
Mobile Generator Repair
10.8 Exhaust System Exploded View—G 50, G 70, G 85
7
9
7
6
8
10
7
1
2
5
4
3
wc_gr002041
Ref.
Component
Ref.
Component
1
Horizontal exhaust pipe
6
Muffler
2
Top muffler bracket
7
Clamp
3
Bottom muffler bracket
8
Exhaust tail pipe
4
Rod
9
Vertical exhaust pipe
5
M8 hardware
10
Heat wrap
wc_tx000510gb.fm
250
Mobile Generator Repair
Disassembly/Assembly Procedures
10.9 Removing Exhaust System—G 50, G 70, G 85
See Graphic: wc_gr002041 and wc_gr002042
wc_tx000510gb.fm
10.9.1
Shut down the machine and allow the exhaust pipes to cool.
10.9.2
Remove the front panel.
10.9.3
Remove the clamp (a) securing the horizontal exhaust pipe (b) to the
engine exhaust manifold.
10.9.4
Loosen the clamp (c) securing the horizontal exhaust pipe to the
vertical exhaust pipe (d).
10.9.5
Remove the M8 hardware (e) securing the muffler brackets and
remove the upper muffler bracket (f).
10.9.6
Rotate the muffler (g) to allow the exhaust pipes to be separated and
remove the horizontal exhaust pipe.
10.9.7
Loosen the clamp securing the vertical exhaust pipe (h) to the muffler
and remove the vertical pipe.
10.9.8
Remove the muffler and the exhaust tail pipe (i) as an assembly. Once
out of the generator, remove the exhaust tail pipe from the muffler.
251
Disassembly/Assembly Procedures
Mobile Generator Repair
10.10 Installing Exhaust System—G 50, G 70, G 85
See Graphic: wc_gr002042
10.10.1 Position the horizontal exhaust pipe (b) in the engine exhaust
manifold, then across the top of the engine and out the rear of the
enclosure.
10.10.2 Position the muffler (g) in the lower muffler bracket.
10.10.3 Slide the clamp over the vertical exhaust pipe and insert the vertical
exhaust pipe (h) into the horizontal exhaust pipe. Insert the opposite
end of the vertical exhaust pipe into the muffler.
10.10.4 Insert the exhaust tail pipe (i) into the muffler (g).
10.10.5 Rotate the muffler as necessary to position the exhaust tail pipe up and
out of the enclosure.
10.10.6 Secure the horizontal exhaust pipe with the clamp (a). Secure all other
exhaust pipes with the appropriate clamps.
10.10.7 Secure the muffler with the upper and lower muffler brackets using
rods and M8 hardware.
10.10.8 Re-install the front panel.
wc_tx000510gb.fm
252
Mobile Generator Repair
Disassembly/Assembly Procedures
10.11 Exhaust System Exploded View—G 125, G 160
4
3
5
3
1
3
2
wc_gr002056
Ref.
Component
Ref.
Component
1
Horizontal exhaust pipe
4
Exhaust tail pipe
2
Muffler
5
Vertical exhaust pipe
3
Clamp
10.12 Removing Exhaust System—G 125, G 160
See Graphic: wc_gr002056
10.12.1 Shut down the machine and allow the exhaust pipes to cool.
10.12.2 Remove the front panel.
10.12.3 Loosen the clamp securing the horizontal exhaust pipe (1) to the
exhaust manifold.
10.12.4 Loosen the clamp securing the horizontal exhaust pipe to the vertical
exhaust pipe (5) and remove the horizontal exhaust pipe.
10.12.5 Loosen the clamp securing the vertical exhaust pipe to the muffler (2)
and remove the vertical exhaust pipe.
10.12.6 Loosen the clamp securing the exhaust tail pipe (4) to the muffler and
remove the exhaust tail pipe.
10.12.7 Remove the hardware securing the muffler and remove the muffler.
wc_tx000510gb.fm
253
Disassembly/Assembly Procedures
Mobile Generator Repair
10.13 Installing Exhaust System—G 125, G 160
See Graphic: wc_gr002056
10.13.1 Position the muffler (2) in place but do not tighten the hardware.
10.13.2 Secure the exhaust tail pipe (4) to the muffler using the clamp.
10.13.3 Position the vertical exhaust pipe (5) and the clamp on the muffler but
do not tighten the clamp.
10.13.4 Secure the horizontal exhaust pipe (1) to the engine manifold.
10.13.5 Secure the horizontal exhaust pipe to the vertical exhaust pipe with the
clamp.
10.13.6 Tighten all clamps.
10.13.7 Secure the muffler to the unit.
10.13.8 Re-install the front panel.
wc_tx000510gb.fm
254
Mobile Generator Repair
Disassembly/Assembly Procedures
10.14 Preparing Unit for Generator Removal
See Graphic: wc_gr002043
10.14.1 Disconnect the battery.
10.14.2 Remove the doors. To remove the doors, simply pull up on the door at
the hinge.
10.14.3 Remove the screws securing the rear panel and remove the panel.
10.14.4 Remove the fill hose (a) and the vent hose (d) from inside the engine
compartment. Plug the fuel tank opening.
10.14.5 Remove the ground strap (b).
10.14.6 Remove the top of the voltage selector switch box and the rear panel.
10.14.7 Carefully label the terminals and the outgoing wires of the selector
switch, then remove the wires. Refer to the wiring schematic.
10.14.8 Support the engine using appropriate jacks (c).
10.14.9 Support the generator with a fork lift, engine stand, or other appropriate
lifting device.
wc_tx000510gb.fm
255
Disassembly/Assembly Procedures
Mobile Generator Repair
10.15 Removing Generator
See Graphic: wc_gr002044
10.15.1 On John Deere-powered machines, remove the nuts (a) securing the
generator to the two shock mounts. On Isuzu-powered machines,
remove the nuts (f) securing the generator to the mounting plate.
(Remove the mounting plate after the generator has been removed.)
10.15.2 Remove the fan guard (b).
10.15.3 Remove the bolts securing the rotor drive plates (c) to the engine
flywheel (d). The bolts are accessed through the fan exhaust opening
in the generator housing. It will be necessary to turn the engine
flywheel to access all of them.
10.15.4 Remove the bolts (e) securing the generator stator housing to the
engine adapter flange. It may be necessary to use an obstruction
(curved) wrench to access the bolts.
10.15.5 If necessary for clearance, remove the voltage selector switch knob.
10.15.6 Using an appropriate hoist or lifting device, carefully lift the generator
up and off the shock mounts and pull the generator from the rear of the
machine.
wc_tx000510gb.fm
256
Mobile Generator Repair
Disassembly/Assembly Procedures
10.16 Installing Generator
See Graphic: wc_gr002049
10.16.1 To aid in assembly, insert two M10 guide studs into two of the engine
adapter flange holes (a). Isuzu engines already have these studs (e).
10.16.2 Using an appropriate hoist or lifting device, carefully position the
generator on the guide studs and shock mounts (b).
10.16.3 Secure the rotor drive plates to the engine flywheel using six 3/8-inch
bolts. The bolts are accessed through the fan exhaust opening in the
generator housing. It will be necessary to turn the engine flywheel to
access all of them. Be sure the rotor drive plates are seated flush
inside the engine flywheel, then torque the bolts, in a star pattern, to 22
ft.lbs. (31 Nm).
10.16.4 Secure the generator housing to the engine using twelve M10 bolts (c).
Remove the M10 guide studs installed in step 1. It may be necessary
to use an obstruction (curved) wrench to access the bolts. Torque the
bolts to 36 ft.lbs. (49 Nm).
10.16.5 Re-install the fan guard (d).
10.16.6 Re-install the nuts securing the generator to the two shock mounts.
Torque the nuts per the torque specification chart.
10.16.7 Re-install all items removed or disconnected in section Preparing Unit
for Generator Removal.
wc_tx000510gb.fm
257
Disassembly/Assembly Procedures
Mobile Generator Repair
10.17 Removing Roof and Center Support Brackets
See Graphic: wc_gr002046
10.17.1 With an appropriate hoist or lifting device, support the roof of the
generator by the lifting eye.
10.17.2 Remove the bolts (a) securing the roof to the sides. Also remove the
bolts (b) securing the top to the radiator bulkhead.
10.17.3 Remove the bolts (c) securing the control panel (d) to the upright brace
(e).
10.17.4 Remove the bolts (f) securing the upright braces to the frame.
10.17.5 With the assistance of a partner, lift the roof and support brackets, as
an assembly, up and off the trailer frame.
250 kg
(550 lbs.)
wc_tx000510gb.fm
258
Mobile Generator Repair
Disassembly/Assembly Procedures
10.18 Installing Roof and Center Support Brackets
See Graphic: wc_gr002046
10.18.1 With an appropriate hoist or lifting device, support the roof of the
generator by the lifting eye.
10.18.2 With the assistance of a partner, position the top on the unit.
10.18.3 Install the bolts (f) securing the upright braces to the frame.
10.18.4 Install the bolts (c) securing the control panel (d) to the upright brace
(e).
10.18.5 Install the bolts (a) securing the top to the sides. Also install the bolts
(b) securing the top to the radiator bulkhead.
wc_tx000510gb.fm
259
Disassembly/Assembly Procedures
Mobile Generator Repair
10.19 Preparing Unit for Engine/Generator Removal
See Graphic: wc_gr002045
10.19.1 Disconnect the battery.
10.19.2 Remove the doors. To remove the doors, simply pull up on the door at
the hinge.
10.19.3 Remove the screws securing the front and rear panels and remove the
panels.
10.19.4 Remove the roof. See section Removing Roof.
10.19.5 Remove the horizontal exhaust pipe running from the exhaust manifold
to the rear of the unit. See section Removing Exhaust System.
10.19.6 Drain the coolant from the engine. Disconnect the hoses from between
the engine and the radiator.
10.19.7 Remove the fan guard (a).
10.19.8 Disconnect the bracket (b) holding the crankcase vent filter from the
horizontal support member.
10.19.9 Remove the fuel fill hose (c) and the tank vent hose (d) from inside the
engine compartment. Plug the fuel tank opening.
10.19.10Disconnect both the fuel supply hose (i) and the fuel return hose (j)
from the engine and plug the hoses.
10.19.11Check the engine for the lifting eyes (e or f). Add a lifting eye if
necessary.
10.19.12Remove the ground straps from the engine and the generator .
10.19.13Remove the top of the voltage selector switch box and the rear panel.
10.19.14Carefully label the terminals and the outgoing wires (g) of the selector
switch, then remove the wires. Refer to the wiring schematic.
10.19.15Disconnect the wiring harness (h) from the engine. Refer to the wiring
schematic. Check for any other wiring between the engine and the unit;
label the wiring and disconnect as necessary.
wc_tx000510gb.fm
260
Mobile Generator Repair
Disassembly/Assembly Procedures
a
c
b
d
f
e
j
i
g
h
wc_gr002045
wc_tx000510gb.fm
261
Disassembly/Assembly Procedures
Mobile Generator Repair
10.20 Removing Engine/Generator Assembly
See Graphic: wc_gr002047
10.20.1 Using chains attached to the lifting eyes of the engine (a) and the
generator (b), support the engine/generator assembly with an
appropriate hoist or lifting device.
10.20.2 Remove the screws (c) securing the engine to the engine mounts.
10.20.3 Remove the nuts (d) securing the generator to the shock mounts.
10.20.4 With the assistance of a partner, carefully lift the engine/generator
assembly up and out of the unit.
a
a
b
c
d
G12
G25
G50
G70
G85
G110
G125
G155
G160
lbs.
541
664
1420
1492
1578
1968
1968
2563
2563
kg
245
301
644
677
716
893
893
1163
1163
wc_gr002047
wc_tx000510gb.fm
262
Mobile Generator Repair
Disassembly/Assembly Procedures
10.21 Installing Engine/Generator Assembly
See Graphic: wc_gr002047
10.21.1 Using chains attached to the lifting eyes of the engine (a) and the
generator (b), support the engine/generator assembly with an
appropriate hoist or lifting device.
10.21.2 With the assistance of a partner, carefully position the engine/
generator assembly on the unit.
10.21.3 Secure the engine to the engine mounts using eight M12 bolts (c).
Torque bolts to 63 ft.lbs. (86 Nm).
10.21.4 Install the nuts (d) securing the generator to the shock mounts. Torque
the nuts per the torque specification chart.
10.21.5 Re-install all items removed or disconnected in section Preparing Unit
for Engine/Generator Removal.
wc_tx000510gb.fm
263
Disassembly/Assembly Procedures
Mobile Generator Repair
10.22 Replacing Fuel Tank
See Graphic: wc_gr002125
Removal:
10.22.1 Remove the four M16 bolts (a) and nuts securing the skid to the trailer.
Using an appropriate lift or hoist, lift the generator/fuel tank assembly
from the trailer.
10.22.2 Remove the front and rear enclosure panels for access to bolts.
Remove the M8 bolts (b) securing the drip pan (c) to the skid and
remove the pan. Set the generator/fuel tank assembly on 4 x 4 beams.
10.22.3 Disconnect the fuel hoses (d) and the the fuel sender wiring (e).
10.22.4 Remove the four M12 bolts (f) securing the fuel tank (g) to the skid
frame cross members. Using an appropriate lift or hoist, lift the
generator/fuel tank assembly from the trailer.
Installation:
10.22.5 Suspend the generator assembly over the tank (g), lower the
generator over the tank, and secure the tank to the skid frame with four
M12 bolts (f). Torque the bolts per the torque specification chart.
10.22.6 Raise the generator/fuel tank assembly. Secure the drip pan (c) to the
skid frame using the M8 bolts (b). Torque the bolts per the torque
specification chart.
10.22.7 Reconnect the fuel hoses (d) and the fuel sender wiring (e).
10.22.8 Secure the skid to the trailer using four M16 bolts (a) and nuts. Torque
the bolts per the torque specification chart.
wc_tx000510gb.fm
264
Mobile Generator Repair
wc_tx000510gb.fm
Disassembly/Assembly Procedures
265
Factory-Installed Options
Mobile Generators
11. Factory-Installed Options
This machine may be equipped with one or more of the following factory-installed
options. To verify if any of these options are installed on your machine, contact the
WACKER Corporation at 1-800-770-0957. A nameplate listing the Model Number, Item
Number, Revision, and Serial Number is attached to each unit. Please have this
information available when contacting WACKER Corporation.
11.1 Block Heater
See Graphic: wc_gr001709
The engine block heater option includes a block heater (a) with a cord
(b). The function of the block heater is to heat the engine coolant/
engine block to improve cold-weather engine starting. Plug the cord
into a 120V power supply.
wc_tx000524gb.fm
266
Mobile Generators
Factory-Installed Options
11.2 Fuel/Water Separator
See Graphic: wc_gr001705
The fuel/water separator separates water from the fuel on models with
Isuzu engines. Empty the separator water bowl (a) as needed by
opening the water bowl drain (b). The separator element should be
changed each time the fuel filter is changed—approximately every 600
hours of operation.
To change the element:
wc_tx000524gb.fm
11.2.1
Loosen the element retainer (d) and remove the retainer and element
(c) from the separator head.
11.2.2
Unscrew the water bowl from the element.
267
Factory-Installed Options
Mobile Generators
11.3 Electronic Governor
See Graphic: wc_gr001714, wc_gr001715, wc_gr001716, wc_gr001717
The electronic governor option consists of an electronic module (a or
b) and an electronic actuator (c or d). The module senses rotation of
the flywheel, then sends a signal to the electronic actuator that governs
the fuel injection system. The system is designed to precisely regulate
engine rpm, and thus frequency, to within approximately 0.25%. See
electronic governor manufacturer's literature for detailed information.
wc_tx000524gb.fm
268
Mobile Generators
wc_tx000524gb.fm
Factory-Installed Options
269
Factory-Installed Options
Mobile Generators
11.4 Schematic—Isuzu Engine with Electronic Governor
27
V
3
B
1
V
B/W
R
W
R
7
1
54
2
59
55
55
60
8
10
56
3
54
B
B
Cl
Sh
Or
W/L
7
4
53
4
12
57
Y
62
W/V
26
W
6
1
6
2
18
R
Y
18
27
16
86
12
35
B
B
34
31
14
R
B+
CP
Y
34
2
14
22
14
Or
+
20
R
SO
SI
65
V
17
25
59
-
13
21
13
19
32
21
22
15
W/R
B+
20
W
W/G
LL
B
45
2
Gr
46
Or
Y
79
79
24
25
L1
L2
L3
23
23
45
Y
24
B
W
wc_gr002938
wc_tx000524gb.fm
85
R
R
60
R
46
14
26
30
11
51
Gr
R
15 87
30
B+
65
4
86
87
85
Y
13
64
3
8
12
10 11
48
R
R
R
24
63
17
7
Y
LL
V
B
28
49
R
B
29
R
Or
6G
Br
R
5
R
8
6
2
COM
SPEED
SIGNAL
REMOTE
SPEED
28
5
5
ACTUATOR
55
61
11
1 2 3 4 5 6 7 8 9
BATTERY
270
W
L0
L0
CG
B
B
13
Mobile Generators
Factory-Installed Options
11.5 Components—Isuzu Engine with Electronic Governor
Ref.
Component
Ref.
Component
1
Plug 1 - engine sender inputs
15
Fuel relay
2
Plug 2 - engine start outputs
16
Starter relay
3
Engine control module
17
Emergency stop switch
4
Oil pressure sender
18
10A fuse #1
5
Water temperature sender
19
Remote start terminals
6
Remote Start - Off - Start/Run
switch
20
Battery
7
Magnetic pickup
21
Starter motor
8
Fuel pump
22
Alternator
9
---
23
Mechanical lugs
10
10A fuse #2
24
Main circuit breaker - shunt trip
11
10A fuse #3
25
Lug door interlock switch
12
Glow plugs
26
Fuel level sender
13
B+ terminal block
27
Actuator
14
Glow plug relay
28
Electronic governor
wc_tx000524gb.fm
271
Factory-Installed Options
Mobile Generators
25
CP
SO
1
2
272
SI
19
6
Cl
B Cl
wc_tx000524gb.fm
CG
13
87
24
wc_gr002939
B
BAT +
BAT –
ACT
ACT
MPU +
MPU –
MPU-SHIELD
B V
R V
B
Cl Cl
11.6 Schematic—John Deere Engine with Electronic Governor
Mobile Generators
Factory-Installed Options
11.7 Components—John Deere Engine with Electronic Governor
Ref.
Description
Ref.
Description
1
Plug 1 - engine sender inputs
14
Slave preheat relay
2
Plug 2 - engine start outputs
15
Mechanical lugs
3
Magnetic pickup
16
Remote Start - Off - Start/Run
switch
4
Oil pressure sender
17
Battery
5
Coolant temperature sender
18
10A fuse
6
Main circuit breaker
19
Starter relay
7
Shunt trip, main breaker
20
Starter
8
Emergency Stop switch
21
Alternator
9
Engine control module (ECM)
22
---
10
Lug door switch
23
Terminal Block
11
Remote start terminals
24
Electronic governor
12
Fuel level sender
25-
Actuator
13
Intake heater
26
---
wc_tx000524gb.fm
273
Factory-Installed Options
Mobile Generators
11.8 LCD Strip Heater
See Graphic: wc_gr001723, wc_gr001724
The LCD strip heater option includes a thermostat module (a) and a
clear heater strip that is bonded to the LCD (b) of the ECM. The
purpose of the strip heater is to prevent the LCD from being damaged
by extremely cold temperatures. The resistance of the coiled element
of the heater is sensed by the thermostat. The resistance of the
element changes with temperature. At approximately -30°C, the
resistance value triggers the thermostat to send power to the element.
The LED (c) of the thermostat module flashes during operation.
It is important to note that the LCD strip heater is always on and thus
draws power (a very small amount) from the battery even when the unit
is not running. If the battery should fail, the heater will also fail. Be sure
to keep the battery charged when the generator is not in use.
wc_tx000524gb.fm
274
Mobile Generators
Factory-Installed Options
11.9 Low Coolant Shutdown
See Graphic: wc_gr001708
The low-coolant shutdown system consists of an electronic sensor that
monitors coolant level. The sensor (a) is mounted to the radiator and
wired into the ECM. The sensor probe (b) is submerged in radiator
coolant. If the probe senses no coolant, it sends a signal to the ECM.
The ECM program includes a 10-second timer to protect from
nuisance shutdowns. If after the ten seconds coolant levels are still
sensed as being low, the ECM shuts down the engine. The ECM will
then display the “FAULT LOW WATER LEVEL”. Allow the engine to
cool before adding additional coolant.
WARNING
NEVER remove the radiator cap while the engine is hot! Pressurized
coolant can cause serious burns.
If it is necessary to open the radiator, only do so with the engine off,
and only when coolant is cool enough to touch with bare hands. Slowly
loosen the radiator cap to relieve pressure first, before removing it
completely.
Note: The sensor may be disabled by unplugging the wire harness.
This action will not shut down the machine.
wc_tx000524gb.fm
275
Factory-Installed Options
Mobile Generators
11.10 Lube Level Maintainer
See Graphic: wc_gr001711, wc_gr001712, wc_gr001713
The lube level maintainer system protects the engine from low oil
levels by providing an additional 6-quart oil reservoir. Oil from the
reservoir is gravity-fed from the oil reservoir (a) through the control
valve (b) and into the engine oil pan as needed. The valve includes a
sightglass (c) through which the oil level can be seen. This oil level is
the same as that measured by the engine dipstick. A float inside the
valve detects low oil levels and opens the valve to supply the needed
oil. The system is wired to the ECM and includes a low oil shutdown in
case the oil in the reservoir is depleted. If the engine shuts down due
to low oil, the ECM will display “FAULT LOW OIL LEVEL”. Fill the
engine and the additional oil reservoir with oil before placing the
generator back into service.
Note: On machines with the Isuzu engine, the reservoir is mounted to
the enclosure door.
CAUTION: To prevent overfilling the engine with oil, place the shutoff
valve (d) in the closed position when moving or towing the generator.
Once the generator is in position, open the valve.
wc_tx000524gb.fm
276
Mobile Generators
Factory-Installed Options
11.11 Temperature-Activated Shutters
See Graphic: wc_gr001706, wc_gr001707
The shutters (a) are mounted to the top of the generator enclosure.
The shutters are designed to keep the engine compartment warm, thus
increasing engine temperature during cold weather operation. The
shutters are activated through a wax-pellet actuator (b) that is
connected to the generator's cooling system. As radiator coolant
warms, the wax-pellet actuator engages a linkage (c) that opens the
shutters. As the coolant cools, the shutters close.
a
wc_gr001707
wc_tx000524gb.fm
277
Factory-Installed Options
Mobile Generators
11.12 Schematic—Temperature-Activated Shutters
1
Or
R
R
R
B
R
6
R
7
R
Bl
82
4
G
83
B
4
84
82
85
83
9
B
81
81
5
80
W
80
NC
C
NO
8
wc_gr003174
Wire Colors
B
Black
R
Red
Y
Yellow
Or
Orange
G
Green
T
Tan
Br
Brown
Pr
Purple
L
Blue
V
Violet
Cl
Clear
Sh
Shield
P
Pink
W
White
Gr
Gray
LL
Light blue
wc_tx000524gb.fm
278
Mobile Generators
Factory-Installed Options
11.13 Components—Temperature-Activated Shutters
See Graphic: wc_gr003174
Ref
Description
Ref
Description
1
Thermostat module
6
Auxiliary relay terminals
2
Terminal block
7
Plug 1, engine sensor inputs
3
1 Amp fuse
8
Electronic control board
4
Water level sensor
9
LCD heater
5
Lube level maintainer low level
switch
wc_tx000524gb.fm
279
Factory-Installed Options
wc_tx000524gb.fm
Mobile Generators
280
Threadlockers and Sealants
Threadlockers and Sealants
Threadlocking adhesives and sealants are specified throughout this
manual by a notation of “S” plus a number (S#) and should be used
where indicated. Threadlocking compounds normally break down at
temperatures above 175°C (350°F). If a screw or bolt is hard to
remove, heat it using a small propane torch to break down the sealant.
When applying sealants, follow instructions on container. The sealants
listed are recommended for use on Wacker equipment.
TYPE
( ) = Europe
Loctite 222
Hernon 420
Omnifit 1150 (50M)
COLOR USAGE
Purple Low strength, for locking threads smaller
than 6 mm (1/4”).
Hand tool removable.
Temp. range: -54 to 149°C (-65 to 300°F)
Blue
Medium strength, for locking threads
Loctite 243
Hernon 423
larger than 6 mm (1/4”).
Omnifit 1350 (100M)
Hand tool removable.
Temp. range: -54 to 149°C (-65 to 300°F)
Loctite 271/277
Red
High strength, for all threads up to 25 mm
Hernon 427
(1”).
Omnifit 1550 (220M)
Heat parts before disassembly.
Temp. range: -54 to 149°C (-65 to 300°F)
Loctite 290
Green Medium to high strength, for locking
Hernon 431
preassembled threads and for sealing
Omnifit 1710 (230LL)
weld porosity (wicking).
Gaps up to 0.13 mm (0.005”)
Temp. range: -54 to 149°C (-65 to 300°F)
Loctite 609
Green Medium strength retaining compound for
Hernon 822
slip or press fit of shafts, bearings, gears,
Omnifit 1730 (230L)
pulleys, etc.
Gaps up to 0.13 mm (0.005”)
Temp. range: -54 to 149°C (-65 to 300°F)
Loctite 545
Brown Hydraulic sealant
Hernon 947
Temp. range: -54 to 149°C (-65 to 300°F)
Omnifit 1150 (50M)
Loctite 592
White
Pipe sealant with Teflon for moderate
Hernon 920
pressures.
Omnifit 790
Temp. range: -54 to 149°C (-65 to 300°F)
Loctite 515
Purple Form-in-place gasket for flexible joints.
Hernon 910
Fills gaps up to 1.3 mm (0.05”)
Omnifit 10
Temp. range: -54 to 149°C (-65 to 300°F)
PART NO. –
SIZE
73287 - 10 ml
29311 - .5 ml
17380 - 50 ml
29312 - .5 ml
26685 - 10 ml
73285 - 50 ml
28824 - .5 ml
25316 - 10 ml
29314 - .5 ml
79356 - 50 ml
26695 - 6 ml
73289 - 50 ml
70735 - 50 ml
Threadlockers and Sealants
Threadlockers and Sealants (continued)
Threadlocking adhesives and sealants are specified throughout this
manual by a notation of “S” plus a number (S#) and should be used
where indicated. Threadlocking compounds normally break down at
temperatures above 175°C (350°F). If a screw or bolt is hard to
remove, heat it using a small propane torch to break down the sealant.
When applying sealants, follow instructions on container. The sealants
listed are recommended for use on Wacker equipment.
TYPE
( ) = Europe
COLOR USAGE
Loctite 496
Clear
Instant adhesive for bonding rubber, metal
Hernon 110
and plastics; general purpose.
Omnifit Sicomet 7000
For gaps up to 0.15 mm (0.006”)
Read caution instructions before using.
Temp. range: -54 to 82°C (-65 to 180°F)
Loctite Primer T
Aerosol Fast curing primer for threadlocking,
Hernon Primer 10
Spray
retaining and sealing compounds. Must
Omnifit VC Activator
be used with stainless steel hardware.
Recommended for use with gasket
sealants.
PART NO. –
SIZE
52676 - 1oz.
2006124-6 oz.
Torque Values
Torque Values
Metric Fasteners (DIN)
TORQUE VALUES (Based on Bolt Size and Hardness)
8.8
10.9
WRENCH SIZE
12.9
Size
Nm
ft.lb.
Nm
ft.lb.
Nm
ft.lb.
Metric
Inch
Metric
Inch
M3
1.2
*11
1.6
*14
2.1
*19
5.5
7/32
2.5
–
M4
2.9
*26
4.1
*36
4.9
*43
7
9/32
3
–
M5
6.0
*53
8.5
6
10
7
8
5/16
4
–
M6
10
7
14
10
17
13
10
–
5
–
M8
25
18
35
26
41
30
13
1/2
6
–
M10
49
36
69
51
83
61
17
11/16
8
–
M12
86
63
120
88
145
107
19
3/4
10
–
M14
135
99
190
140
230
169
22
7/8
12
–
M16
210
155
295
217
355
262
24
15/16
14
–
M18
290
214
405
298
485
357
27
1-1/16
14
–
M20
410
302
580
427
690
508
30
1-1/4
17
–
1 ft.lb. = 1.357 Nm
* = in.lb.
1 inch = 25.4 mm
Torque Values
Torque Values (continued)
Inch Fasteners (SAE)
Size
Nm
ft.lb.
Nm
ft.lb.
Nm
ft.lb.
Metric
Inch
Metric
Inch
No.4
0.7
*6
1.0
*14
1.4
*12
5.5
1/4
–
3/32
No.6
1.4
*12
1.9
*17
2.4
*21
8
5/16
–
7/64
No.8
2.5
*22
3.5
*31
4.7
*42
9
11/32
–
9/64
No.10
3.6
*32
5.1
*45
6.8
*60
–
3/8
–
5/32
1/4
8.1
6
12
9
16
12
–
7/16
–
3/32
5/16
18
13
26
19
33
24
13
1/2
–
1/4
3/8
31
23
45
33
58
43
–
9/16
–
5/16
7/16
50
37
71
52
94
69
16
5/8
–
3/8
1/2
77
57
109
80
142
105
19
3/4
–
3/8
9/16
111
82
156
115
214
158
–
13/16
–
–
5/8
152
112
216
159
265
195
24
15/16
–
1/2
3/4
271
200
383
282
479
353
–
1-1/8
–
5/8
1 ft.lb. = 1.357 Nm
* = in.lb.
1 inch = 25.4 mm
Wacker Construction Equipment AG
·
Preußenstraße 41
· D-80809 München
· Tel.: +49-(0)89-3 54 02 - 0 · Fax: +49 - (0)89-3 54 02-3 90
Wacker Corporation · P.O. Box 9007 · Menomonee Falls, WI 53052-9007 · Tel. : (262) 255-0500 · Fax: (262) 255-0550 · Tel. : (800) 770-0957
Wacker Asia Pacific Operations · Skyline Tower, Suite 2303, 23/F · 39 Wang Kwong Road, Kowloon Bay, Hong Kong · Tel. +852 2406 60 32 · Fax: +852 2406 60 21