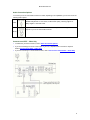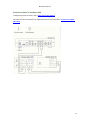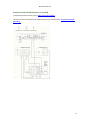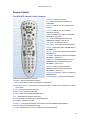
1
MTS HDTV Service Please click on the Table of Contents item you are interested in to go directly to the information. Connections and Devices .............................................................................................. 5 MTS HDTV Set-Top Box General Information and Maintenance ................................................................ 5 Connecting the MTS HDTV Set-Top Box .................................................................................................... 6 Video Connection Options ....................................................................................................................... 7 Audio Connection Options ....................................................................................................................... 8 Connect to an HDTV – Video Only .......................................................................................................... 8 Connect to an HDTV – Audio Only .......................................................................................................... 9 Connect to a Home Theatre Receiver – Audio Only ...............................................................................10 Connect to a Stereo TV ..........................................................................................................................11 Connect to a Stereo TV and Stereo VCR ...............................................................................................12 Connect to a Home Theatre Receiver, TV and VCR ..............................................................................13 Reset the MTS HDTV TV Set-Top Box ......................................................................................................14 The MTS HDTV Set-Top Box Will Not Power On.......................................................................................14 The MTS HDTV Set-Top Box is Making a Humming Noise .......................................................................14 MTS HDTV Set-Top Box is Warm to the Touch .........................................................................................14 MTS HDTV Service is Not Available ..........................................................................................................14 TV Streams ................................................................................................................................................15 Remote Control ............................................................................................................. 16 The MTS HDTV Remote Control Functions ...............................................................................................16 Using the MTS HDTV Remote Control.......................................................................................................17 Remote Control Functions in the Guide ..................................................................................................17 The Remote Control is Working Intermittently or Does Not Work ..............................................................17 Programming the Remote Control .............................................................................. 18 Install Batteries .......................................................................................................................................18 Control Other Devices.............................................................................................................................18 Section 1 – Program the Remote to Control Other Devices ............................................ 18 Section 2 – Set Volume, Channel and Power Options..................................................... 20 Section 3 – Change and Remove Codes ......................................................................... 22 Section 4 – Reset the Remote.......................................................................................... 22 Remote Control Codes...............................................................................................................................24 Audio and Picture ......................................................................................................... 27 There is No Audio when Viewing TV Channels..........................................................................................27 Mute and Connection..............................................................................................................................27 Secondary Audio ....................................................................................................................................27 Volume....................................................................................................................................................27 There is No Audio From the Centre and/or Surround Speakers of a Home Theatre Receiver Connected to the MTS HDTV Set-Top Box ......................................................................................................................27 Video or Audio is Choppy, Jerky, or of Poor Quality ..................................................................................28 Audio and Video are Out of Sync: Audio Lags Video or Video Lags Audio ................................................28 Program Guide and Menus are Available but No Video .............................................................................28 1 MTS HDTV Service PIPs are not Displayed in any Screens or Menus ......................................................................................28 Snowy Picture ............................................................................................................................................28 Picture is Distorted .....................................................................................................................................29 Changing TV Ratio .................................................................................................................................29 Incompatible Ratio Setting ......................................................................................................................29 Changing Secondary Audio (Descriptive Video) ........................................................................................30 Closed Captioning ......................................................................................................................................30 Turning System Sound Effects On and Off ................................................................................................30 The Guide ...................................................................................................................... 31 Program Guide has no Channel or Program Information ...........................................................................31 Channels are Missing in the Program Guide..............................................................................................31 Reset Channels to Original Settings...........................................................................................................32 Customize Channels in the Guide ..............................................................................................................32 Setup Favourites Channels ........................................................................................................................33 View Favourites..........................................................................................................................................33 Search Live TV (Title, Video On Demand, People) ....................................................................................34 Navigating the Guide..................................................................................................................................35 Menus and Screens ................................................................................................................................35 The Guide ...............................................................................................................................................35 The Menu................................................................................................................................................35 The Program Info Screen........................................................................................................................36 Picture-in-Picture ....................................................................................................................................36 MTS Weather Channel ...........................................................................................................................37 Using the PVR Service (Recorded TV) ........................................................................ 38 Record a Current Program Using the RECORD Button .............................................................................38 Record a Series from Live TV ....................................................................................................................39 Record Manually ........................................................................................................................................40 Record a Single Program from the Guide ..................................................................................................41 Change Record Settings for a Program Already Set to Record .................................................................41 Record a Series Using the Guide ...............................................................................................................41 View Recorded Program Lists ....................................................................................................................42 View Scheduled Recordings ...................................................................................................................42 View Series Recordings..........................................................................................................................42 View Recordings from the Guide ............................................................................................................42 Play Recorded Programs ...........................................................................................................................43 Cancel, Stop, Erase Recordings ................................................................................................................43 Cancel Recording from the Guide...........................................................................................................43 “STOP” Recording ..................................................................................................................................43 “RECORDED TV” Stop Recording..........................................................................................................44 Erase Existing Recording........................................................................................................................44 How to Store Recorded Programs..............................................................................................................44 Verify the Program is Recording ................................................................................................................45 2 MTS HDTV Service How to Determine the Program is Recording..........................................................................................45 Cannot Record a Program .........................................................................................................................45 Personal Video Recording (PVR) ...........................................................................................................45 Recording to an External Device like a VCR or DVD Recorder ..............................................................45 Program Scheduled to Record Does Not Record.......................................................................................46 A Different Program Recorded................................................................................................................46 Record Series Daily ................................................................................................................................46 Record Based On Time Slot (Not Program Name) .................................................................................46 Available Space for Recording................................................................................................................47 Check Disk Storage ................................................................................................................................47 Delete Recordings ..................................................................................................................................47 Unwanted Recordings are Listed on Recorded TV ....................................................................................48 Set Series Settings .................................................................................................................................48 Delete Recordings ..................................................................................................................................48 Resolving Recording Conflicts ...................................................................................................................49 Single Recording Conflict........................................................................................................................49 Series Recording Conflict .......................................................................................................................49 Recording or Clearing an Overridden Single Recording .........................................................................50 Recording or Clearing an Overridden Series Recording .........................................................................51 Cannot Record a Program While Watching Another Program ...................................................................52 Control Live TV ............................................................................................................. 53 MTS TV Video On Demand ........................................................................................... 53 MTS TV Video On Demand ........................................................................................... 54 Accessing MTS Video On Demand ............................................................................................................54 Access VOD using the VIDEO ON DEMAND Button..............................................................................54 Access VOD from the MENU..................................................................................................................55 Using the MTS VIDEO ON DEMAND Channel ..........................................................................................55 Play Video On Demand Programs .............................................................................................................55 Controlling Video On Demand Programs ...................................................................................................56 Stop Video On Demand Programs from Playing ........................................................................................56 What to do when a Video On Demand Program Finishes ..........................................................................56 You are Unsure of the Expiration Date for a Video ....................................................................................56 The Video Expires While Playing ...............................................................................................................56 A Rented Video On Demand Program is Not in the Current Rentals List...................................................57 Locking – VOD and Live TV ......................................................................................... 58 Parental Locking ........................................................................................................................................58 Rental Locking ...........................................................................................................................................59 Watching a Locked Program ......................................................................................................................59 Changing the PIN .......................................................................................................................................60 Forgot the Parental Control PINs ...............................................................................................................60 Lock Unrated Movies and TV .....................................................................................................................60 3 MTS HDTV Service Block Content for Sexual Content, Violent Content, or Offensive Language..............................................61 Movie and TV Rating Systems ...................................................................................................................63 Movie Ratings .........................................................................................................................................63 TV Parental Guidelines ...........................................................................................................................63 Rental Locking is in Effect Even When Parental Locking is Temporarily Turned Off .................................63 Set a Limit for Rentals and Purchases .......................................................................................................64 Cannot Prevent the Recording of Locked Content .....................................................................................64 Children Can View a Hidden Channel ........................................................................................................64 Unlock a Single Program............................................................................................................................65 Unlock a Program ...................................................................................................................................65 4 MTS HDTV Service Connections and Devices MTS HDTV Set-Top Box General Information and Maintenance The MTS HDTV set-top box features high-definition TV (HDTV), which provides up to twice the colour resolution and up to six times the sharpness of standard TV when connected to an HD-capable TV. The main TV’s set-top box contains a Personal Video Recorder (PVR). The MTS HDTV set-top box PVR can record standard-definition and high-definition programs on a hard drive. It also enables you to pause and rewind live programming. PVR functionality may be limited on some channels. Other TVs in your home are connected to a standard high-definition MTS HDTV set-top box. Set-top boxes with hard drives and those without hard drives have identical front panels and rear panel connectors; only the size varies. Set-top boxes with hard drives are physically larger than those without hard drives. Basic set-top box maintenance: Ensure the vents on the set-top box are not blocked. Do not place on a rug or bed as it may overheat. Do not stack equipment on it. Maintain at least two inches of free space above it. Never place near or on a heater or radiator. Ensure adequate ventilation. 5 MTS HDTV Service Connecting the MTS HDTV Set-Top Box Before moving or changing components, disconnect the power cord from the MTS HDTV set-top box and other components. Set-top boxes with hard drives and those without hard drives have identical front panels and rear panel connectors; only the size varies. Key Item Function 1 TO WALL (VIDEO IN) 2 HDMI 3 NETWORK 4 Y PB PR RCA-type component video outputs to an HDTV 5 S-VIDEO High quality video output to a VCR or TV that accepts SVideo. It carries video only; you must also connect to the TV or home theatre receiver for audio 6 OPTICAL S/PDIF audio output to a digital home theatre receiver 7 VIDEO OUT RCA-type video outputs to a TV, VCR, DVD recorder, or other device 8 AUDIO OUT L and R Left and right RCA-type stereo audio outputs 9 TO TV (VIDEO OUT) 10 USB 11 POWER + 12V DC Coaxial input for home video network (HPNA) Connects to a high-definition TV or home theatre receiver with an HDMI input (for a DVI input, use an HDMI-to-DVI adapter) Ethernet 10/100 Base-T RJ-45 port Coaxial output to a TV or VCR USB 2.0 connector Connector for the DC power adapter 6 MTS HDTV Service Video Connection Options The set-top box offers the following video outputs: HDTV Standard TV HDMI or Y Pb Pr (component video) S-Video, RCA-type, or RF coaxial To determine the available inputs on your TV, check the manual supplied with the TV or on the TV itself. When you are familiar with the available inputs on your TV, choose the optimal video connection based on the following guidelines. Connecting to an HDTV, use one of: HDMI offers higher quality than component video. If your HDTV has an HDMI input, use the HDMI connector. HDMI carries video and audio. If you connect your HDTV using HDMI, no additional audio connection to the TV are necessary. Best Video and audio Good Video only If your HDTV has DVI input, you can use an HDMI-to-DVI converter cable to connect to set-top box HDMI connector. Use a cable with an HDMI connector on one end and a DVI connector on the other end. We do not recommend using the HDMI-to-DVI or DVI-to-HDMI adapter. Because DVI does not carry audio, a separate audio connection is required for DVI TV. The Y Pb Pr connectors provide component video the most widely supported HDTV connection. If your HDTV only has Y Pb Pr inputs, use these connectors. Connecting to a standard TV, use one of: Best Very Good Good Video only Video only Video and audio This is the highest quality standard video output. If your standard TV has an SVideo input, connect it to the S-VIDEO output on your set-top box using the provided S-Video cable. If your standard TV does not have an S-Video input, connect it to the VIDEO OUT connector on your set-top box using the provided RCA-type video cable. If your TV only has a coaxial RF input, use the coaxial TO TV (VIDEO OUT) connector. 7 MTS HDTV Service Audio Connection Options To connect your TV or home theatre receiver for audio, depending on its capabilities, you can use one of the following audio options: Best If possible with your TV or home theatre receiver, use the OPTICAL output to deliver S/PDIF Dolby® audio. In most cases, it offers better quality, including support for Dolby Digital 5.1 surround sound. If your TV or home theatre receiver has no S/DIF input, use the RCA-type AUDIO outputs to your TV or home theatre receiver. Good Connect to an HDTV – Video Only To determine your best connection, refer to Video Connection Options. If you are connecting to a DVI or Y PbPr input on your TV, a separate audio connection is required. Refer to Connect to an HDTV – Audio Only. If your are connecting to a home theatre receiver, refer to Connect to a Home Theatre – Audio Only. 8 MTS HDTV Service Connect to an HDTV – Audio Only To determine your best connection, refer to Video Connection Options. 9 MTS HDTV Service Connect to a Home Theatre Receiver – Audio Only To determine your best connection, refer to Video Connection Options. 10 MTS HDTV Service Connect to a Stereo TV To determine the best connection, refer to Video Connection Options. This video connection method does not support HD video. For more information, see Connect an HDTV – Video Only. 11 MTS HDTV Service Connect to a Stereo TV and Stereo VCR To determine the best connection, refer to Video Connection Options. This video connection method does not support HD video. For more information, see Connect an HDTV – Video Only. 12 MTS HDTV Service Connect to a Home Theatre Receiver, TV and VCR To determine the best connection, refer to Video Connection Options. This video connection method does not support HD video. For more information, see Connect an HDTV – Video Only. 13 MTS HDTV Service Reset the MTS HDTV TV Set-Top Box Press the MENU button on the remote control. Use the RIGHT ARROW to move to <SETTINGS>. Use the DOWN ARROW to highlight RESTART SYSTEM and press OK. The message “Are you sure you want to restart your system?” is presented. Highlight RESTART and press OK. The screen goes blank, the message “No video signal” displays for a few moments. The MTS logo appears with the message “Please wait while system loads...” When the system completes the restart cycle Live TV resumes playing. The MTS HDTV Set-Top Box Will Not Power On Verify the power cord is securely connected to the set-top box and outlet. Unplug the set-top box from the outlet, plug it back in, and press the POWER button. If the set-top box is connected to a switched outlet on another device, such as a VCR or home theatre receiver, verify the unit is powered on. Unplug the set-top box from the outlet, plug it back in, and press POWER button. Press the POWER button on the set-top box front panel instead of the remote control The batteries in the remote control may be depleted. The MTS HDTV Set-Top Box is Making a Humming Noise The set-top box includes an integrated hard and a fan for cooling. During normal operation, it emits a low humming noise, similar to a personal computer. The noise varies in volume occasionally when the speed of the internal fan adjusts to changers in the temperature around the set-top box. Please note the hard drive will stay on even when the set-top box is turned off. MTS HDTV Set-Top Box is Warm to the Touch If the MTS HDTV set-top box is warm, check the following: Ensure the vents on the set-top box are not blocked. Do not place on a rug or bed as it may overheat. Do not stack equipment on it. Maintain at least two inches of free space above it. Never place near or on a heater or radiator. Ensure adequate ventilation. MTS HDTV Service is Not Available The TV displays no signal, and the following message appears “Television is not currently available. Choose Restart to try connecting again. If this problem continues, contact MTS customer service. Error#259” Record the error code that appears in the message. Select RESTART and press OK. If service is not restored, contact MTS at 204-225-5687. 14 MTS HDTV Service TV Streams MTS assigns three (3) unique ‘streams’ to your home at one time. Each stream can deliver a single program at a time to the set-top box in your home. Two (2) streams are High Definition Streams, and one (1) stream is a Standard Definition Stream. The High Definition Streams can be used to deliver High Definition Channels, Standard Definition Channels, or Video On Demand movies. Even though Video On Demand service is not delivered in an HD format, it does require the use of one of the HD streams. Using TV Streams You can watch three unique channels at once, each on a separate TV. You can record 1 channel to the PVR and watch two other channels. You must subscribe to PVR service. You can record 2 channels at once and watch a third channel. You must subscribe to PVR service You can record 3 channels at once. You must subscribe to PVR service – call MTS at 204-225-5687 to subscribe. Watching a previously recorded show from the PVR does not count as a stream as the program has already been delivered to and recorded on the PVR. If you try to use more streams than you have available, a conflict occurs, and you are prompted to resolve it. Stream Conflicts A “CONFLICT RESOLUTION” message will appear on your screen. This is the system warning you that it cannot deliver more than three unique streams at one time. You will be given options depending on how you are using your service. If more than three televisions are trying to access different channels, you will be given the following options. Highlight the option you want, and press OK. INTERRUPT A TV – This will turn off the stream that has been running the longest. This option will not interrupt a PVR recording or a VOD movie which is playing. STAY ON CHANNEL – This option will keep the TV on the channel it is currently watching. If the PVR is recording one or more streams and one or more TVs are watching live TV, then you will be given the following options. Highlight the option you want, and press OK. INTERRUPT A TV – This will turn off the stream on the TV that has been running the longest. It will not interrupt a PVR recording or a VOD movie which is playing. RECORDED TV – This option will take you to the current recordings screen of the PVR, allowing you to stop a recording to free up a stream for watching live TV. This option is only available at the PVR set-top box. STAY ON CHANNEL – This option will keep the TV on the channel it is currently watching. 15 MTS HDTV Service Remote Control The MTS HDTV Remote Control Functions 1. POWER - TURNS TV ON/OFF 2. TV - SETS THE REMOTE CONTROL TV FUNCTIONS 3. DVD - CAN BE SET UP TO CONTROL DVD PLAYER 4. AUX - CAN BE SET UP TO CONTROL AUXILIARY DEVICES 5. REW - REWINDS MTS VIDEO ON DEMAND, RECORDED*, OR LIVE TV * 6. FF - FAST FORWARDS MTS VIDEO ON DEMAND, RECORDED*, OR LIVE TV * 7. RECORD - TO RECORD LIVE TV * 8. TV VIDEO - TO CHANGE THE VIDEO INPUT 9. STOP - STOPS MTS VIDEO ON DEMAND OR RECORDED TV * 10. PLAY - PLAYS MTS VIDEO ON DEMAND OR RECORDED TV * 11. PAUSE - PAUSES MTS VIDEO ON DEMAND, RECORDED*, OR LIVE TV * 12. REPLAY - SKIPS BACKWARD IN SHORT SEGMENTS IN MTS VIDEO ON DEMAND, RECORDED *, OR LIVE TV * 13. FWD - SKIPS FORWARD IN SHORT SEGMENTS IN MTS VIDEO ON DEMAND, RECORDED *, OR LIVE TV * 14. VIDEO ON DEMAND - DISPLAYS VIDEO ON DEMAND MENU 15. RECORDED TV - DISPLAYS PROGRAMS YOU HAVE RECORDED ON YOUR PVR * 16. MENU - DISPLAYS INTERACTIVE MENU 17. BACK - RETURNS TO THE LAST SCREEN YOU WERE ON 18. ARROW BUTTONS - TO NAVIGATE THROUGH THE MENU, GUIDE, AND TO BRING UP PICTURE IN PICTURE 19. OK - ACTIVATES HIGHLIGHTED ITEM 20. EXIT - EXITS CURRENT FUNCTION 21. INFO - DISPLAYS PROGRAM INFORMATION 22. A - LAUNCHES THE SEARCH FUNCTION 23. GUIDE - DISPLAYS INTERACTIVE PROGRAM GUIDE 24. VOLUME - ADJUSTS VOLUME 25. CH/PG - TO CHANGE CHANNELS OR NAVIGATE THROUGH MENUS AND SCREENS. 26. MUTE - MUTES AND UNMUTES SOUND 27. LAST - RETURNS TO THE LAST CHANNEL YOU WERE WATCHING 16 MTS HDTV Service 28. NUMERIC KEYPAD - TO MANUALLY ENTER CHANNEL AND OTHER NUMBERS 29. DELETE - TO DELETE NUMBERS OR LETTERS * Note: Must subscribe to PVR service – call MTS at 204-225-5687 to subscribe. Using the MTS HDTV Remote Control Use the ARROW buttons and/or the CH|PG button to scroll through lists. Press OK to make selections. When in the Menu, Guide, Video On Demand, or Recorded TV screens: Use the ARROW buttons and/or CH|PG to highlight items in the screen. The highlighted item shows the selection. Press OK to activate the selection. Press BACK to return to the previous screen. Press EXIT to return to TV viewing. Remote Control Functions in the Guide Press GUIDE. Press the UP DOWN buttons or the CH|PG to scroll vertically through the Guide. Press and hold the CH|PG to go through a whole page of the Guide at a time. The REW or FF buttons will go ahead a day or back a day in the Guide. Press the RIGHT LEFT ARROW buttons to scroll vertically through the Guide to see what is playing at a later time. Highlight the program and press OK. If the program is currently available, it will begin playing. If the program is on at a later time, a Program Info screen appears with options to choose from. Press EXIT to return to TV viewing. The Remote Control is Working Intermittently or Does Not Work Verify the TV is on. Verify there are no obstructions between the remote control and the set-top box. Point the remote control directly at the set-top box front panel, not at the TV or VCR. The angle between the remote control and the set-top box may be too large. Stand in front of the set-top box and not too far to either side. Press and release operation keys one at a time, firmly and deliberately. Try changing the channels using the up and down arrow keys on the set-top box front panel. The light on the remote control should go on while you change the channel. Check the batteries in the remote control. Install new batteries if needed. 17 MTS HDTV Service Programming the Remote Control Install Batteries The remote control requires two AA size (1.5V) batteries to work. Alkaline batteries are required for the proper functioning of this remote. 1. On the back of the remote control, press the battery cover tab and remove the battery cover. 2. Insert two (2) AA-size batteries, matching the + and – symbols with the battery diagrams inside the battery compartment. 3. Close the battery compartment with the battery cover. Test the remote control by pressing the STB key. The STB key should light up to indicate that batteries are inserted properly. Control Other Devices In order to control other devices with your Motorola Remote Control you need to tell the remote control what types of devices you have. Section 1 brings you through the steps needed to do this. When you do this the volume and channels will always work on the Receiver no matter what mode you are in. Section 2 allows you to change POWER key to affect multiple devices. Sections 3 and 4 are optional if you want to reset any of the settings. Section 1 – Program the Remote to Control Other Devices To use the remote control for your other devices you will need to program the TV, DVD and AUX mode keys to control the devices (section A). Please refer to the Manufacture Code List, found in this manual, for a list of supported brands and models. If you have an integrated or combination unit, such as a TV/DVD unit, each component of the unit will normally be programmed separately. If your device is not supported you will need to use section B on “Using the Automatic Search”. Note: The AUX may be programmed to operate a VCR, Home Theatre In the Box (HTIB), receiver or amplifier. A. Manual Programming Use the following steps to program the TV, DVD or AUX mode keys: 1. Power on the device you want to program 2. Locate the 4-digit set up code for the device you want to program from the Manufacture Code List 3. Press and hold the appropriate mode key (TV, DVD or AUX) on the remote control 4. Without releasing the chosen mode key, press and hold the OK key simultaneously 5. Release both the mode key and the OK key – All the mode keys should flash twice 6. Enter the 4-digit set up code by pressing the number keys (0-9) on the remote control 7. 8. a. The mode key will flash three times indicating correct entry and return to normal operation b. When an invalid code is entered, the selected mode key will give a long flash to indicate that you have not entered the set up code correctly c. Should the remote control time-out before you complete the code setup, you will need to start over Point the remote control at the programmed device and press the POWER key once a. The device should turn off b. If it does not turn off, repeat steps 2 through 6 trying each code for your brand until you find the correct code Repeat steps 1 through 7 to program another device 18 MTS HDTV Service Now that your devices are programmed, you can press the appropriate mode key on the remote control to work with the selected device. To use the remote control for your Receiver again, press the STB mode key. B. Using the Automatic Search You can search the remote control memory for your 4 digit manufacture device code. Also use this function if the code for your device is not listed in the Manufacturer Code List. 1. Turn on the device you wish to program 2. Point the remote control at the device 3. Press and hold the mode key (i.e. TV, DVD or AUX) you want to program 4. Without releasing the selected mode key, press and hold the OK key simultaneously 5. Release both the mode key and the OK key – All mode keys will flash twice indicating programming mode 6. Enter 922 by pressing the number keys on the remote control a. The selected mode key will flash twice indicating correct entry (For AUX searching only, press and release the PLAY key then press: 1 for VCR 2 for Receiver/Tuner 3 for Amplifier 4 for Home Theatre In the Box (HTIB) The AUX mode keys will flash twice indicating correct entry 7. Press and hold PLAY key and wait until the device turns off, then release the PLAY key a. The REW key can be unitized to go back through the codes one at a time b. The FF key can be utilized to move forward through the codes one at a time 8. To save the code press the ENTER key on the remote control or press the EXIT key to return to normal operations - The selected mode key will flash three times and return to normal operations 9. If no valid code is found, the green backlight will flash 2 times and the remote control will return to normal operation. 10. Turn the device back on and use the remote to control you device. Now that your devices are programmed you can press the appropriate mode key on the remote control to work with the selected device. To use the remote control for your Receiver again, press the STB mode key. a. You may need to repeat steps 1 through 8 to find a code Note: If any other key is pressed except PLAY, ENTER, POWER, EXIT, REW, FF or number keys 1 to 4 the selected mode key will give a long red flash (error message) and the remote control will return to normal operation and you will need to start over. If you are interrupted while you are programming, the remote control may time-out before you complete the code setup and you will need to start over. This is indicated by two quick flashes of the green backlighting. 19 MTS HDTV Service Section 2 – Set Volume, Channel and Power Options The defaults for your power, volume and channel control are that they always send the codes to the Receiver not matter what mode you are in. Thus in DVD mode, the volume still controls the Receiver, etc. If you would like to change this follow these instructions: A. Volume Control Set Up Options The volume commands are always sent to the Receiver until the TV mode key is programmed. Then the volume commands are sent to the TV from all mode keys. If you’d like the volume commands to still be sent to just one device, but that it be different device (for example a home theatre setup) then follow the instructions in I. Volume Always Controls the Same Device. If you’d like the volume command sent to different devices depending on which mode you are in then go to II. Volume Control Depends on Device Selected. I. Volume Always Controls the Same Device 1. Press and hold the STB key on the remote control 2. Without releasing the STB key, press and hold the OK key simultaneously 3. Release both the STB key and the OK key – All the mode keys will flash twice indicating programming mode 4. Enter 955 by pressing the number keys on the remote control – The STB key will flash twice indicating correct entry 5. Press the mode key that you want to always receive the volume commands – The selected mode key will flash three times indicating successful assignment and return to normal operation The volume commands will now go to the selected device no matter what mode you are in. II. Volume Control Depends on Device Selected The volume setting can also be reconfigured to independently control the volume associate with each device. (E.g. In AUX mode the receiver controls the audio; In TV mode the TV controls the audio) 1. Press and hold the STB key on the remote control 2. Without releasing the STB key, press and hold the OK key simultaneously 3. Release both the STB key and the OK key – All the mode keys will flash twice indicating programming mode 4. Enter 955 by pressing the number keys on the remote control – The STB key will flash twice indicating correct entry 5. Press the ENTER key – The STB key will flash tree times indicating successful assignment and return to normal operations B. Channel Selection Set Up Option By default the remote control will always send channel commands to the Receiver no matter what mode you are in. This will prevent accidental TV channel changes while in TV, DVD or AUX modes. Channel selection can also be reconfigured to independently send channel commands to different devices depending on what mode you are in (e.g., In STB mode the remote sends channel command to the Receiver; In TV mode the remote sends channel commands to the television). To do this, follow these instructions: 1. Press and hold the STB key on the remote control 20 MTS HDTV Service 2. Without releasing the STB key, press and hold the OKkey simultaneously 3. Release both eh STB key and the OK key – All the mode keys will flash twice indicating programming mode 4. Enter 966 by pressing the number keys on the remote control – The STB key will flash twice indicating correct entry 5. Press the device mode key that you wish to provide channel control 6. Press the ENTER key – The STB key will flash three times indicating successful assignment and return to normal operation Note: if you press any key other than the mode keys or ENTER the STB key will give along red flash and the remote control will return to normal operation. Should the remote control time-out before you complete the procedure you will need to start over. C. Power Control Set Up Options By default, the POWER key only powers ON or places your Receiver in Standby mode. Unless you have programmed the TV mode key then the TV and Receiver will both be powered ON/OFF simultaneously. You also have the option to turn ON/OFF TV, DVD and AUX mode devices individually be pressing the applicable mode key then the POWER key. To Have Multiple Devices Power Off with the Power Key If you would like other devices to be powered ON/OFF simultaneously with the POWER key then follow these instruction for the additional devices (for a total of 4). 1. Press and hold the STB key on the remote control 2. Without releasing the STB key, press and hold the OK key simultaneously 3. Release both the STB key and the OK key – All the mode keys will flash twice indicating programming mode 4. Enter 977 by pressing the number keys on the remote control – The STB key will flash twice indicating correct entry 5. Press the STB key on the remote control – The STB key will flash twice indicating correct entry 6. Press the TV key on the remote control – The TV key will flash twice indicating correct entry 7. Press each additional mode key that you wish to include such as the DVD key or AUX key 8. a. The selected mode key will flash twice indicating correct entry b. If you want to include both mode keys repeat step 7 selecting thee other mode key Press the ENTER key to complete – The last mode key selected will flash tree times indicating successful assignment and return to normal operation Note: If you press any key other than the mode keys of ENTER the STB key will give a long red flash and the remote control will return to normal operation. Should the remote control time-out before you complete the procedure you will need to start over. If the devices that you have programmed to turn ON/OFF at the same time get out of sync so that some turn ON and others turn OFF you will need to manually turn OFF the out of sync devices and then press the POWER key to turn them all back ON. It is important to point the remote directly toward the devices for this to work properly. To change the number of devices controlled by the POWER key, you must start at Step 1 and continue until all desired devices have been programmed. 21 MTS HDTV Service Section 3 – Change and Remove Codes A. Mode Deactivation To deactivate a mode key, follow these steps: 1. Press and hold the appropriate mode key (TV, DVD or AUX) on the remote control 2. Without releasing the chose mode key, press and hold the OK key simultaneously 3. Release both the mode key and the OK key – All the mode keys should flash twice 4. Enter the appropriate 4-digit code from the list below depending on the mode you are deactivating: a. TV 1254 b. DVD 2254 c. AUX 3254 d. The mode key will flash three times indicating correct entry and return to normal operation e. When an invalid code is entered, the selected mode key will give a long flash to indicate that you have not entered the code correctly f. Should the remote control time-out before you complete the setup, you will need to start over B. Reassign the Mode Keys to Another Device The TV, DVD and AUX keys are already set up to control specific devices: TV key: TV & HDTV DVD key: DVD AUX key: VCR, Home Theatre In the Box (HTIB), Receivers and Amplifiers You may reassign these mode keys to operate another type of device. For example, you can control a second DVD player in AUX mode, the same way you control the first DVD player in DVD mode. 1. Press and hold the STB key on the remote control 2. Without releasing the STB key, press and hold the OK key simultaneously 3. Release both the STB key and the OK key – All the mode keys will flash twice indicating programming mode 4. Enter 944 by pressing the number keys on the remote control – All the mode keys will flash twice indicating correct entry 5. Press the mode key (i.e., TV, DVD or AUX) for the device you would like to reassign 6. Press the mode key you would like to reassign the device to – The selected mode key will flash three time indicating successful reassignment and return to normal operations Note: If any other key is pressed except the mode keys the STB key will give a long red flash and the remote control will return to normal operation. Should the remote control time-out before you complete the procedure you will need to start over. Section 4 – Reset the Remote A. To the Factory Default Settings 1. Press and hold the STB key on the remote control 2. Without releasing the STB key, press and hold the OK key 3. Release both the STB key and the OK key – All four mode keys will flash twice to indicate programming mode 22 MTS HDTV Service 4. Enter programming code 900 by pressing the number keys on the remote control – The STB key will flash three times indicating you have successfully entered the code and the remote has been reset to the factory default settings Note: If any other key is pressed except the number keys the STB key will give a long red flash and the remote control will return to normal operation. Should the remote control time-out before you complete the procedure you will need to start over. B. Rest the Volume, Channel and Power Programming 1. Press and hold the STB key on the remote control 2. Without releasing the STB key, press and hold the OK key 3. Release both he STB key and the OK key – All four mode keys will flash twice to indicate programming mode 4. Enter programming code 902 by pressing the number keys on the remote control. – The STB key will flash three times indicating you have successfully entered the code to set all of the mode keys as inactive and the remote will return to normal operation Note: If any other key is pressed except the number keys the STB key will give a long red flash and the remote control will return to normal operation. Should the remote control time-out before you complete the procedure you will need to start over. 23 MTS HDTV Service Remote Control Codes 24 MTS HDTV Service 25 MTS HDTV Service 26 MTS HDTV Service Audio and Picture There is No Audio when Viewing TV Channels Mute and Connection Verify the MUTE button on the remote control has not been pressed. Press MUTE on the remote control to restore sound. Verify the set-top box audio output is connected to the TV or home theatre receiver. If the set-top box audio output is connected to the TV, verify the MUTE button on the TV has not been pressed. If the set-top box audio output is connected to a home theatre receiver, verify the home theatre receiver is set to the appropriate input source and its MUTE button has not been pressed. Secondary Audio Ensure you are not trying to play secondary audio on a channel that does not support secondary audio. To check the secondary audio selection: • Press MENU. • Use the RIGHT ARROW to highlight <SETTINGS>. • With GENERAL already highlighted press OK. • Use the DOWN ARROW to highlight SECONDARY AUDIO and press OK. • Use the RIGHT ARROW to highlight USE PRIMARY AUDIO and press OK. • Use the ARROW BUTTON to highlight SAVE and press OK. • “Primary Audio Program Set” message appears. • Press EXIT to return to Live TV. Volume Ensure the volume on the TV is turned up. Control the volume by using the VOLUME button on the set-top box remote control, not the volume control on the TV remote control or on the TV set. However, on some TV sets, you may have to use the TV controls to set the volume to full or slightly less than full before using the set-top box remote control to control the volume. In this case, use the TV controls to turn the volume all the way up, and then use the VOLUME button on the set-top box remote control. There is No Audio From the Centre and/or Surround Speakers of a Home Theatre Receiver Connected to the MTS HDTV Set-Top Box Not all Dolby Digital programs feature full 5.1 Surround Sound. In some cases the programs may only contain left and right stereo audio. Verify the S/PDIF cable is firmly connected to the set-top box and the home theatre receiver. Verify the home theatre receiver is set to a surround sound audio mode (Dolby Digital, Dolby Pro Logic® II, Dolby Pro Logic). Verify the home theatre receiver is properly configured to work with all connected speakers. 27 MTS HDTV Service Video or Audio is Choppy, Jerky, or of Poor Quality The video or audio can be choppy, jerky, or otherwise of poor quality when the network is slow. Verify if anything is running on the same DSL connection, such as a graphics-intensive video game. If so, terminate it and see if the quality of video and audio improves. Restart the set-top box by unplugging it and plugging it back in. Pull the plug from the wall, not from the back of the set-top box. Audio and Video are Out of Sync: Audio Lags Video or Video Lags Audio Sometimes the audio and video feeds can get out of sync. Ordinarily this problem can be resolved by backing up the video and watching it again, or by refreshing the video. Point the remote control at the set-top box and press the REPLAY button on the set-top box remote control. Try this several times. Tune away from the current channel, and then tune back to it. Program Guide and Menus are Available but No Video Ensure the TV, the set-top box, and all other relevant pieces of equipment are plugged in, turned on, and properly connected. • Ensure the set-top box power switch is turned on. • Ensure that electric sockets are live. Test by plugging in a lamp or some other device known to work. Ensure that the DSL network connection is operational. Restart the set-top box by unplugging it and plugging it back in. Pull the plug from the wall, not from the back of the set-top box. PIPs are not Displayed in any Screens or Menus PIPs appear only for currently playing TV programs and for videos. PIPs do not appear for future programs or for recorded programs. For future programs, the PIP space shows how many minutes until the program starts. For recorded programs, the PIP space shows a graphic symbol. Snowy Picture Ensure the VCR is powered off. Check the TV physical connections. If the set-top box and TV are connected with a coax cable ensure that the RF output on the set-top box: • Press MENU. • RIGHT ARROW to <SETTINGS>. • With General already highlighted press OK. • DOWN ARROW to RF OUTPUT CHANNEL and press OK. • Ensure the number (3 or 4) is the same as the channel to which the TV is tuned. Ensure all cables are connected and are tight to the TV, VCR (if applicable) and set-top box. Ensure there is power to the set-top box. The green light ring around the POWER button should be light up. Ensure the set-top box is tightly plugged in at the back of the box and the plug is in a live electrical outlet. 28 MTS HDTV Service Picture is Distorted Changing TV Ratio Changing the screen aspect ratio changes the screen dimensions for the video image and for the TV screens. Press MENU. Press the RIGHT ARROW button to highlight <SETTINGS>. Highlight TELEVISION, and press OK. Highlight SCREEN ASPECT RATIO AND HIGH-DEFINITION, and press OK. • The Screen Aspect Ratio and High-Definition screen appears. Highlight the desired aspect ratio and resolution and press OK to activate. • 4:3 STANDARD-DEFINITION – Used for ordinary televisions. • WIDESCREEN STANDARD-DEFINITION – Used for wide-screen TVs (16:9 aspect ratio) that does not display in high-definition. • 720P ON HIGH-DEFINITION SCREENS – Used for wide-screen TVs that display images 720 pixels wide (this is sometimes called “enhanced definition”). • 1080I ON HIGH-DEFINITION SCREENS – Used for wide-screen TVs that displays high-definition images (1080 pixels wide). Highlight CONTINUE, and press OK. Select CANCEL CHANGES and press OK to exit from this screen without changing the aspect ratio. Incompatible Ratio Setting If the selected ratio setting is incompatible for the TV, a test screen appears with the following message: “Your TV may not be able to display (selected ratio i.e. 720p or 1080i on High-Definition Screens). To verify if this is the correct setting for your TV, choose Start test. If you don’t see anything during the test, wait 15 seconds and then choose another setting” Highlight Start Test and press OK or, • Highlight Cancel Changes to return to the Setting menu options. If the selected setting is not compatible the TV screen will be black (possibly with snow) for about 15 seconds. The Aspect Ratio and High Definition (Step 3) screen appears with the following message: “If you saw a black screen during the test, your TV may not be able to display High Definition video, or your TV may not be properly connected to your set-top box. Choose another setting or check your cable to ensure your HDTV is connected properly. If you saw an image during the test, choose Start Test Again.” Highlight I saw a black screen. Choose another setting., and press OK or select START TEST AGAIN if an image appeared. The Screen Aspect Ratio and High-Definition screen returns, choose from: • 4:3 STANDARD-DEFINITION • WIDESCREEN STANDARD-DEFINITION • 720P ON HIGH-DEFINITION SCREENS • 1080I ON HIGH-DEFINITION SCREENS Select a compatible aspect ratio, then highlight CONTINUE and press OK. The Settings <Television> menu screen appears. Press EXIT to return to Live TV. 29 MTS HDTV Service Changing Secondary Audio (Descriptive Video) Descriptive Video is a service that allows Visually Impaired Persons to access a second stream of audio (Secondary Audio Program – SAP), describing nonverbal actions in a program. Example: “Mary takes out a book and reads to John.” Press MENU. Use the RIGHT ARROW button to select <SETTINGS>. Highlight GENERAL and press OK. DOWN ARROW to SECONDARY AUDIO and press OK. ARROW to USE SECONDARY AUDIO IF AVAILABLE and press OK. ARROW to SAVE and press OK. Press EXIT to return to Live TV. Descriptive Video will only have audio if the show has Descriptive Video. Closed Captioning Enable closed captioning on the TV (refer to the TV manual). Press MENU. RIGHT ARROW to highlight Settings, then DOWN ARROW to highlight TELEVISION and press OK. Highlight CLOSED CAPTIONING, and press OK. Use the ARROW buttons to highlight CHANGE beside STANDARD CLOSED CAPTIONING and press OK. Use the ARROW buttons to highlight CLOSED CAPTION1 and press OK. Use the ARROW button to highlight SAVE and press OK. Use the ARROW button to highlight DONE and press OK. Press EXIT to view closed captioning displays on Live TV. Turning System Sound Effects On and Off Press MENU. Press the RIGHT ARROW button to highlight <SETTINGS>. With GENERAL already highlighted, and press OK. Highlight SYSTEM SOUND EFFECTS, and press OK. Highlight PLAY SOUND EFFECTS or MUTE SOUND EFFECTS, and press OK. Highlight SAVE, and press OK. Select DON’T SAVE and press OK to exit from this screen without changing the sound effects setting. 30 MTS HDTV Service The Guide Program Guide has no Channel or Program Information Occasionally, a delay occurs in the delivery of program Guide information. If the delay is more than a few minutes, press the GUIDE button to display the program Guide, and then wait for at least two minutes before taking further action. If cells in the program Guide are labelled "No Information," there may be a short delay in providing the program Guide listings information. Another possibility is, you may have scrolled past the days for which the program Guide has information, or no program Guide data exists for those services. Press EXIT to Live TV or MENU to leave the program Guide. Press GUIDE to return to the program guide and wait for at least two minutes. Channels are Missing in the Program Guide The program Guide appears on-screen correctly, but some channels in the program Guide are not there. Check the Customize Channels Settings screen to determine if channels have been selected to not appear. This feature effects only the TV it was setup on. Press MENU. Press the RIGHT ARROW button to highlight <SETTINGS>. Highlight TELEVISION, and press OK. Highlight CUSTOMIZE CHANNEL GUIDE, and press OK. Channels currently displayed in the Guide have a check mark in front of them. Channels that are not currently displayed in Guide do not have a check mark in front of them. Use the UP DOWN ARROW button or CH|PG to go through the list of channels. The following options are available: • To hide a channel currently in the Guide, highlight the channel, and press OK. The check mark disappears from the check box. • To make a hidden channel reappear in the Guide, highlight the channel, and press OK. A check mark appears in front of the channel. • To make all channels appear in the Guide, highlight CHECK ALL, and press OK. Check marks appear in all the check boxes. • To display only the unchecked boxes (hidden channels), highlight VIEW UNCHECKED, and press OK. The SHOW UNCHECKED option becomes SHOW ALL. • To restore the entire list, highlight SHOW ALL, and press OK. To save the settings, highlight SAVE, and press OK. Select DON’T SAVE to exit from the screen without saving the settings. 31 MTS HDTV Service Reset Channels to Original Settings Press MENU. Press the RIGHT ARROW button to highlight <SETTINGS>. Highlight TELEVISION, and press OK. Highlight CUSTOMIZE CHANNEL GUIDE, and press OK. Highlight CHECK ALL, and press OK. Check marks appear in all the check boxes. Highlight SAVE and press OK. Press EXIT to return to Live TV. All channels will display but only subscribed channels will play. Customize Channels in the Guide Channels 1001 DVR (Recorded TV) and 1003 VIDEO (Video On Demand) cannot be deleted from the Guide. Customized Guide only effects the TV it was setup on. Each TV needs to be customized Guide. Press MENU. Press the RIGHT ARROW button to highlight <SETTINGS>. Highlight TELEVISION, and press OK. Highlight CUSTOMIZE CHANNEL GUIDE, and press OK. Channels currently displayed in the Guide have a check mark in front of them. Channels that are not currently displayed in Guide do not have a check mark in front of them. Use the UP DOWN ARROW button or CH|PG to go through the list of channels. The following options are available: • To hide a channel currently in the Guide, highlight the channel, and press OK. The check mark disappears from the check box. • To make a hidden channel reappear in the Guide, highlight the channel, and press OK. A check mark appears in front of the channel. • To make all channels appear in the Guide, highlight CHECK ALL, and press OK. Check marks appear in all the check boxes. • To display only the unchecked boxes (hidden channels), highlight VIEW UNCHECKED, and press OK. The SHOW UNCHECKED option becomes SHOW ALL. • To restore the entire list, highlight SHOW ALL, and press OK. To save the settings, highlight SAVE, and press OK. Select DON’T SAVE to exit from the screen without saving the settings. 32 MTS HDTV Service Setup Favourites Channels Press MENU. RIGHT ARROW to SETTINGS, then DOWN ARROW to highlight TELEVISION and press OK. Highlight SETUP FAVOURITES, and press OK. Use the UP DOWN ARROW buttons or the CH|PG button to scroll through the list of channels. Press OK to select or deselect the checkmark beside the channel. • A checkmark includes the channel in the favourite list. • An empty check box removes the channel from the favourite list. From the menu on the left the following options are available: • To reset the favourite channels list, highlight UNCHECK ALL, and press OK. All the check boxes become unchecked. • To only show the channels in the favourite channels list, highlight VIEW CHECKED, and press OK. The VIEW CHECKED option becomes VIEW ALL. • To show the entire list of channels, highlight VIEW CHECKED, and press OK, then highlight VIEW ALL, and press OK. Press the LEFT ARROW to move to the left side of the screen, highlight SAVE and press OK. To cancel the changes highlight DON’T SAVE and press OK. Press BACK to return to the main menu and LEFT ARROW to LIVE TV. DOWN ARROW to FAVOURITES and press OK. Only the channels with checkmarks under SETUP FAVOURITES display. Highlight a program and press OK to view. View Favourites Press MENU. Under <LIVE TV>, highlight FAVOURITES and press OK. • See Setup Favourites to choose which channels are to appear in the Guide. The Favourite Guide appears showing all selected channels under SETUP FAVOURITES. Favourite channels are effective only on the TV they were setup on. 33 MTS HDTV Service Search Live TV (Title, Video On Demand, People) Press the A button, or; Press MENU and highlight SEARCH under <LIVE TV> or <EXTRAS>, and press OK. The Search screen appears with the following: • Select letters on the ALPHABETIC KEYPAD to search for the program or person. • Press to add a space between words. • Press to delete a letter/number. • Press 123 to activate the numeric keypad. • Press OPTIONS to apply the search filters, ALL RESULTS, TITLES, VIDEO ON DEMAND, PEOPLE. Begin the search; use the ARROW buttons to highlight the first letter or number and press OK. On the right side of the screen, a list of programs or names that contain the letter entered appear. To narrow the search, highlight OPTIONS and press OK. The following filters are available: • ALL RESULTS – Displays people, program titles, and Video On Demand programs. • TITLES – Titles from Live TV and VOD display (VIDEO indicate VOD titles) • VIDEO ON DEMAND – Only VOD programs display. • PEOPLE – Only programs with the person appear. Use the ARROW buttons to highlight the title or name from the list on the right, then press OK. • If the filter is set to TITLE, times when the program is playing displays along with program details at the bottom of the screen. • If the filter is set to PEOPLE, programs featuring that person appear along with program details at the bottom of the screen. • If the filter is set to VIDEO ON DEMAND, the Program Info Summary screen appears with program detail along with rental information. Press EXIT to return to Live TV. 34 MTS HDTV Service Navigating the Guide Menus and Screens Use the ARROW buttons and/or the CH|PG button to scroll through lists. Press OK to make selections. When in the Menu, Guide, MTS Video On Demand, or Recorded TV screens: Use the ARROW buttons and/or the CH|PG button to highlight items in the screen. The highlighted item shows the selection. Press OK to activate the selection. Press BACK to return to the previous screen. Press EXIT to return to TV viewing. The Guide The REW or FF buttons will go ahead a day or back a day in the Guide. Press GUIDE. Press the UP DOWN ARROWS or the CH|PG to scroll vertically through the Guide. Press and hold the CH|PG button to go through a whole page of the Guide at a time. Press the RIGHT LEFT ARROW buttons to scroll vertically through the Guide to see what is playing at a later time. Highlight the program and press OK. If the program is currently available, it will begin playing. • If the program is on at a later time, the Program Info screen appears with options to choose from. Press EXIT to return to TV viewing. The Menu The Menu screen provides access to the features. Press MENU. The Menu screen appears. Press the RIGHT LEFT ARROWS to highlight a heading, such as Live TV, on the horizontal menu bar. Press the UP DOWN ARROWS to highlight an item, such as Guide, under the heading. Press OK to select the item. Press EXIT to return to TV viewing. 35 MTS HDTV Service The Program Info Screen The Program Info screen displays information about all programs in the Guide, and provides access to a variety of options related to the program. Press GUIDE. Press the UP DOWN ARROWS or CH|PG to highlight the program. Press INFO and the Program Info screen appears. Under the Summary heading, highlight one of the following options and press OK. • WATCH – To tune to the program if it is currently on. • RECORD EPISODE – To record the program. This option appears on PVR boxes. • RECORD SERIES – To record the series for this program. This option appears on PVR boxes. • RENT – To rent the program. This option only appears in the Program Info screen for a Video On Demand movie. Press the RIGHT ARROW button to highlight RELATED INFO on the horizontal menu bar to find out additional details of the program. Picture-in-Picture While watching full-screen TV, use the ARROW buttons to see what is playing now, or later, on other channels without leaving the currently viewed program. Press any ARROW button to display the Picture-in-Picture (PIP). The PIP appears at the bottom of the screen while the TV remains tuned to the current program. Press the UP DOWN ARROW buttons to see what is currently playing on other channels. For each program, the PIP displays the title and other relevant information about the program. Press the RIGHT LEFT ARROW buttons to see what is playing at a later time on the channel selected in the PIP. Press OK to tune to the program shown in the PIP, if it is currently on, or to find out more about the program if it is playing at a later time. Press EXIT to close the PIP. 36 MTS HDTV Service MTS Weather Channel Menu Method Press MENU. RIGHT ARROW to <EXTRAS>, then DOWN ARROW to highlight LOCAL WEATHER and press OK. The weather channel 29 displays. Guide Method Press GUIDE. Use the UP DOWN ARROW or CH|PG buttons to scroll through the Guide to locate 29 WEATHER. Highlight THE WEATHER, a description displays at the bottom of the screen, press OK. The Weather Channel 29 displays. Remote Control Method Press 29 on the remote control. A thumbnail and description of the channel displays at the bottom of the screen, in about 8 seconds, this disappears and the Weather channel plays. 37 MTS HDTV Service Using the PVR Service (Recorded TV) Record a Current Program Using the RECORD Button While watching Live TV record the current program until its scheduled end time, or add extra time at the end to ensure that the whole program records. ■ ■ While watching Live TV, press RECORD. The message “Recording” appears briefly on the screen. The RECORD light on the set-top box turns on and remains on while the program is recording. To Change Record Settings: ■ While the program is recording press INFO. ■ Highlight RECORD SETTINGS, and press OK. The Record Settings screen appears. ■ Highlight the text under STOP RECORDING, and press OK. ■ Highlight one of the following options, and press OK: ● At Scheduled Time ● 5 Minutes After ● 15 Minutes After ● 30 Minutes After ● 1 Hour After ● 2 Hours After ● 3 Hours After Or, highlight DON'T CHANGE and press OK to keep your current setting. Highlight text under KEEP UNTIL, and press OK. Highlight one of the following options, and press OK. ● SPACE NEEDED – Automatically erases the program when space is needed for a new recording. ● I ERASE – Stores the program until it is erased manually. Or, highlight DON'T CHANGE and press OK to keep current setting. Use the ARROW BUTTONS to highlight SAVE CHANGES, and press OK. “Recording Updated” message appears for a few seconds Press EXIT to return to Live TV. 38 MTS HDTV Service Record a Series from Live TV Record recurring programs, such as episodes in a series. Once scheduled, a series recording occurs until cancelled. Scheduled recordings continue even when the TV and receiver are off. While watching the Live TV press INFO. The Program Info screen appears. Use the ARROW BUTTONS to highlight RECORD SERIES, and press OK. The Record Series screen appears. To change the time of recording, highlight the text under TIME, and press OK. Highlight one of the following options, and press OK: ● ANY DAY, AROUND XX:XX AM/PM – Records programs any day of the week, as long as they occur at or near the same time as the selected episode. ● ANY DAY, ANYTIME – Records programs any day of the week at any time. ● ANY DAY, ANYTIME, ONCE PER DAY – Records programs any day and time, but records only one episode per day. To change the type of recording, highlight the text under SHOW TYPE, and press OK. Highlight one of the following options, and press OK: ● FIRST RUN & RERUN – Records first-run and all subsequent reruns of this program. ● FIRST RUN ONLY – Records first-run episodes, but will not record reruns. ● To keep current settings highlight DON’T CHANGE and press OK. To add extra time to ensure the entire episode is recorded, highlight the text under STOP RECORDING, and press OK. Highlight one of the following options and press OK: ● At Scheduled Time ● 5 Minutes After ● 15 Minutes After ● 30 Minutes After ● 1 Hour After ● 2 Hours After ● 3 Hours After Or, highlight DON'T CHANGE and press OK to keep your current setting. To set how long the recording is to be stored highlight text under KEEP UNTIL, and press OK. ● Highlight one of the following options, and press OK. ● SPACE NEEDED – Automatically erases the program when space is needed for a new recording. ● I ERASE – Stores the program until it is erased manually. ● Or, highlight DON'T CHANGE and press OK to keep current setting. Use the ARROW BUTTONS to highlight RECORD, and press OK. The message Recording appears for a few seconds and Live TV plays. 39 MTS HDTV Service Record Manually Schedule a recording manually by specifying the channel, date, time, and duration. Only single programs (not series) can use the feature CREATE A MANUAL RECORDING WITH:. Press RECORDED TV. RIGHT ARROW to highlight <ADD RECORDING>. Highlight CHANNEL AND TIME, and press OK. The Manual Record screen appears. Highlight the text entry box under CHANNEL. Use the NUMERIC KEYPAD to enter the channel to record. Highlight the text entry box under DATE, and press OK. Highlight the date you want, press OK. DOWN ARROW to highlight MON/DATE | CHANGE under DATE and press OK to change the recording date. Highlight the text entry box under START. Use the NUMERIC KEYPAD to enter the time to start recording. RIGHT ARROW and press OK to change to AM or PM. Highlight the text entry box under STOP. Use the NUMERIC KEYPAD to enter the time to stop recording. RIGHT ARROW and press OK to change to AM or PM. To set how long the recording is to be stored, highlight the text under KEEP UNTIL, and press OK. Highlight one of the following options and press OK: ● SPACE NEEDED – Automatically erases the program when space is needed for a new recording. ● I ERASE – Stores the program until it is manually erased. Highlight RECORD and press OK. Or, highlight DON'T RECORD and press OK to cancel the recording. The message “Recording Scheduled” appears for a few seconds. Press EXIT to return to Live TV. 40 MTS HDTV Service Record a Single Program from the Guide Use the Guide to schedule a recording of a program that is currently showing or one that will be shown in the future. Press GUIDE. Use the ARROW BUTTONS or CH|PG to scroll through programs, and then highlight the program to record. Press RECORD. A red dot appears by the program to indicate the program is scheduled to record. Change Record Settings for a Program Already Set to Record Press GUIDE. Use the ARROW BUTTONS or CH|PG to the program recording (indicated by a red dot). Press INFO. The Program Info screen appears. Highlight RECORD SETTINGS, and press OK. The Record Settings screen appears. Use the ARROW BUTTONS to highlight the text under STOP RECORDING, and press OK. Highlight one of the following options, and press OK: ● At Scheduled Time ● 5 Minutes After ● 15 Minutes After ● 30 Minutes After ● 1 Hour After ● 2 Hours After ● 3 Hours After Or, highlight DON'T CHANGE and press OK to keep your current setting. Highlight text under KEEP UNTIL, and press OK. Highlight one of the following options, and press OK. ● SPACE NEEDED – Automatically erases the program when space is needed for a new recording. ● I ERASE – Stores the program until it is erased manually. Or, highlight DON'T CHANGE and press OK to keep current setting. Use the ARROW BUTTONS to highlight SAVE CHANGES, and press OK. RECORDING UPDATED message appears for a few seconds Highlight WATCH and press OK, to return to Live TV. Record a Series Using the Guide Once a recording is scheduled, it continues to record until cancelled. Pressing the RECORD button twice while highlighting a program in the Guide schedules a series recording, and three overlapping dots appear. Press GUIDE. Use the ARROW BUTTONS or CH|PG to scroll through programs, and then highlight the program to record. Press RECORD twice. A red dot appears on the first press, and three overlapping dots appear on the second press. This indicates that a series is recorded. This program will record at the same time on the same day each week for time shown in the Guide. 41 MTS HDTV Service View Recorded Program Lists View Scheduled Recordings Press RECORDED TV. The Recorded TV screen appears. Press the RIGHT ARROW button to highlight SCHEDULED on the horizontal menu bar. The Recorded TV screen now lists all upcoming recordings in the order in which they will be recorded. Use the ARROW BUTTONS or CH|PG to scroll through the list. View Series Recordings Press RECORDED TV. The Recorded TV screen appears. Use the RIGHT ARROW button to highlight SERIES on the horizontal menu bar. The Recorded TV screen lists the series scheduled to record. Use the ARROW BUTTONS or CH|PG to scroll through the list. View Recordings from the Guide Press GUIDE. Use the ARROW BUTTONS or CH|PG to scroll through the channels to locate the RECORDED TV channel, or press 1001 on the remote control. With RECORDED TV highlighted press OK. The Recorded TV screen appears with all recordings BY DATE, BY TITLE, SCHEDULED and SERIES. 42 MTS HDTV Service Play Recorded Programs Press RECORDED TV. The Recorded TV screen lists available recordings by date, from the most recently recorded programs to the oldest. Use the ARROW BUTTONS or CH|PG to scroll through recorded programs. Highlight a recorded show, and press OK. The Program Info screen appears: • Highlight PLAY, and press OK to play the recording from the beginning. • Note: If the recorded program is locked by parental locking, refer to Parental Locks. • If the recorded program is stopped, to continue watching, highlight RESUME PLAY, and press OK. • If the recorded program is stopped, to start watching the program from the beginning, highlight START OVER and press OK. After the program finishes playing the Finished screen appears with the following menu options: • START OVER – Watch the program again • ERASE – Erase the program • RECORDED TV – Returns to recorded programs for another selection • WATCH LIVE TV – Returns to live programming Cancel, Stop, Erase Recordings Cancel Recording from the Guide The easiest way to cancel a single or series recording is by using the Guide. Individually scheduled recordings are marked by a red dot, and series recordings are marked by three overlapping dots. Press GUIDE. Use the ARROW BUTTONS or CH|PG to scroll through programming, highlight the program (red dot(s) indicate recording) to be cancelled. Cancel Single Program • If the program is an individually scheduled recording (shown by a single red dot), press RECORD twice. • The first press changes the program to a series recording (three overlapping dots), and the second press cancels the recording (the dots disappear). • A “Recording Cancelled” message appears on the screen. Cancel Series • If the program is a series recording (three overlapping dots), press RECORD once. • This cancels the entire series recording, and the dots disappear from the Guide. • A “Recording Cancelled” message appears on the screen. “STOP” Recording While watching a program being recorded, press STOP. A message appears that enables you to stop or continue recording. Highlight STOP RECORDING, and press OK. The message Recording Stopped appears. Or, highlight KEEP RECORDING, and press OK. • If the program is stopped a message appears “Recording Stopped”. 43 MTS HDTV Service “RECORDED TV” Stop Recording Press RECORDED TV. Use the RIGHT ARROW button to highlight <SCHEDULED> or <SERIES>. Use the ARROW buttons or CH|PG to scroll through recorded programs. Press OK on the program recording to be stopped or cancelled. Highlight DON’T RECORD or CANCEL SERIES and press OK A confirmation message appears, CANCEL EPISODE or CANCEL SERIES or DON’T CANCEL. The Recorded TV screen returns. Press EXIT to return to Live TV. Erase Existing Recording Recorded programs remain until they are erased, or until the receiver erases old recordings to make space for new recordings (this can be set under CHANGING HOW LONG THE RECORDING WILL BE STORED) Press RECORDED TV. Use the ARROW BUTTONS or CH|PG to scroll through recorded programs. Highlight the recorded program to be erased, and press OK. The Program Info screen appears. Highlight ERASE, and press OK. A confirmation message appears. Highlight ERASE again, and press OK. The message “Recording Erased” appears, this erases the program permanently. Select DON’T ERASE to avoid erasing the program. The Recorded TV screen appears. Press EXIT to return to Live TV. How to Store Recorded Programs Press RECORDED TV. Use the ARROW BUTTONS or CH|PG to scroll through recorded programs. Highlight the program to change store settings, and press OK. Highlight KEEP UNTIL, and press OK. Highlight the text under KEEP UNTIL, and press OK. Highlight one of the following options, and press OK. • SPACE NEEDED – Automatically erases the program when space is needed for a new recording. • I ERASE – Stores the program until it is erased manually. Highlight SAVE CHANGES, and press OK. The message “Recording Updated” appears briefly. on your screen. Or, highlight DON'T CHANGE and press OK to keep current setting. 44 MTS HDTV Service Verify the Program is Recording When a program is recording a red light turns on the receiver under RECORD. Individually scheduled recordings are marked by a red dot, and series recordings are marked by three overlapping dots. Scheduled recordings continue even when the TV and receiver are off. This does not apply to an unscheduled recording started by pressing the RECORD button while watching Live TV. How to Determine the Program is Recording Tune to the program. Press INFO and the Program Info screen appears. If the program is recording, the Program Info screen displays a red dot. Press GUIDE and look for the red dot or dots beside the program name. Tune to a program and press PLAY. If the program is recording, the progress indicator that appears at the bottom of the screen has a red dot on the right. Tune to a program and press STOP. If the program is currently recording, a message appears that enables you to stop or continue the recording. Press RECORDED TV. This screen displays the title of a recorded program with a red dot as soon as it begins recording. Scroll to SCHEDULED to see programs that will be recorded. Cannot Record a Program Personal Video Recording (PVR) With the MTS PVR, you can record current shows, schedule future shows to be recorded, and watch the recorded shows at any time. You can record an individual show or a series of episodes that occur at regular intervals. Ensure the set-top box has PVR functionality and you are subscribed to the MTS PVR service. Movies and programs within the Video On Demand service are copy-written material and not able to be recorded. When a program is recording a red light turns on the receiver under RECORD. Individually scheduled recordings are marked by a red dot, and series recordings are marked by three overlapping dots. Scheduled recordings continue even when the TV and receiver are off. This does not apply to an unscheduled recording started by pressing the RECORD button while watching Live TV. Recording to an External Device like a VCR or DVD Recorder Verify the device is plugged in, turned on, and properly connected. Consult the documentation for the external device for information about proper connection of the external hard disk drive. Only the tuned channel will record using a VCR or DVD recorder. All actions using the remote control will record. To record up to three programs using the PVR, you must be subscribed to the MTS PVR service. Call MTS at 204-225-5687 to subscribe. 45 MTS HDTV Service Program Scheduled to Record Does Not Record Press RECORDED TV and scroll to the Recorded TV screen. If the program recorded, this screen lists the program. Do one of the following: • If the Recorded TV screen lists the program, select the program in the list and play it. o With the program highlighted press OK o Highlight PLAY and press OK If there is no indication the program recorded, continue with the following: A Different Program Recorded Press RECORDED TV, does the Recorded TV screen list a program that was recorded on the same day and at the same time as the program that you wanted to record. If so, another program was scheduled to record in that time slot and the resulting conflict was resolved in favour of the other program. Record Series Daily Press GUIDE. Highlight the program to record and press the RECORD button twice. One-touch recording schedules a series recording weekly. Use the Program Info screen to schedule a daily series recording. Press INFO. Highlight Series Settings and press OK Use the ARROW button to change the settings. Select TIME and choose from: • Any day, around HH:MM AM/PM • Any day, anytime • Any day, anytime, once per day Highlight SAVE CHANGES and press OK. Press EXIT to return to Live TV. Record Based On Time Slot (Not Program Name) Series recording is based completely on the time slot and not on the program name of the series. If a series is scheduled to record for 11:00 AM every day, it records whatever is on that channel at 11:00 AM every day. 46 MTS HDTV Service Available Space for Recording If the system has less than 25 MB of free disk space (which allows only a few minutes of playing time), the oldest program, based on the recording start date, is automatically deleted. To ensure important programs are recorded, monitor the disk usage and pre-emptively delete old recordings. Check Disk Storage Press MENU then use the RIGHT ARROW to select <SETTINGS>. Highlight GENERAL, and press OK. Select SYSTEM INFORMATION and press OK. RIGHT ARROW to select SYSTEM RESOURCES, press OK. The System Resources screen, displays total disk space and free disk space under DISK USAGE. Delete Recordings Recorded programs remain until they are erased, or until the receiver erases old recordings to make space for new recordings (this can be set under CHANGING HOW LONG THE RECORDING WILL BE STORED) Press RECORDED TV. Use the ARROW BUTTONS or CH|PG to scroll through recorded programs. Highlight the recorded program to be erased, and press OK. The Program Info screen appears. Highlight ERASE, and press OK. A confirmation message appears. Highlight ERASE again, and press OK. The message “Recording Erased” appears, this erases the program permanently. Select DON’T ERASE to avoid erasing the program. The Recorded TV screen appears. Press EXIT to return to Live TV. 47 MTS HDTV Service Unwanted Recordings are Listed on Recorded TV Unwanted recordings can appear on the Recorded TV screen when a series recording is scheduled. Series recordings record whatever is playing on the channel in the scheduled time slot, which may include programs not requested. For example, if the desired program occurs three weekdays per week, a daily series recording records those three programs plus whatever is in the time slot on the other two weekdays. Set Series Settings Press RECORDED TV. Use the RIGHT ARROW to highlight <SERIES>. Highlight the series name and press OK. The Series Info screen appears. The following can be changed, TIME, SHOW TYPE, and STOP RECORDING. Use the ARROW buttons to highlight selection and press OK. TIME • Any day, around HH:MM AM/PM • Any day, anytime • Any day, anytime, once per day SHOW TYPE • First Run & Rerun • First Run Only STOP RECORDING • At Scheduled Time • 5 Minutes After • 15 Minutes After • 30 Minutes After • 1 Hour After • 2 Hours After • 3 Hours After Highlight your choice and press OK. When choices have been selected, highlight SAVE CHANGES and press OK. The Series info screen appears. Press EXIT to return to Live TV. Delete Recordings Press RECORDED TV. Use the ARROW BUTTONS or CH|PG to scroll through recorded programs. Highlight the recorded program to be erased, and press OK. The Program Info screen appears. Highlight ERASE, and press OK. A confirmation message appears. Highlight ERASE again, and press OK. The message “Recording Erased” appears, this erases the program permanently. Select DON’T ERASE to avoid erasing the program. The Recorded TV screen appears. Press EXIT to return to Live TV. 48 MTS HDTV Service Resolving Recording Conflicts The receiver can record three programs at a time. Recording conflicts occur when additional recordings are attempted. Single Recording Conflict When individual recording conflicts with one or more previously scheduled recordings, a Recording Conflict screen alerts you to the problem. To cancel recording the program that caused the conflict, highlight DON'T RECORD (Program Name), and press OK. Highlight CANCEL RECORDING, and press OK. Or, highlight DON’T CANCEL and press OK if you do not want to cancel the recording. To resolve the conflict by changing which programs will be recorded, highlight RESOLVE CONFLICT, and press OK. Use the ARROW button to highlight which program to record and press OK, a red dot indicates the program is chosen for recording. The program beneath it will have the red dot removed. Highlight SAVE CHANGES and press OK, or CANCEL CHANGES to return to the Guide. Series Recording Conflict Record all episodes of the series and cancel recordings that conflict: Highlight RECORD ALL EPISODES OF SERIES CONFLICT: Series Name, and press OK. The recordings of episodes for this particular series will override and cancel any previously scheduled recordings that were conflicting. A conflict icon appears in the Guide by each overridden program. Record only episodes that do not conflict with previously scheduled recordings: Highlight RECORD THIS SERIES ONLY WHEN NO CONFLICT OCCURS. and press OK. Episodes that conflict with previously scheduled recordings are not recorded. The previously scheduled recordings occur as planned. Manually choose which episodes to record. Highlight CHOOSE WHICH SHOWS TO RECORD., and press OK. A list of conflicting episodes are displayed with an X in the dots. To record one of the conflicting episodes, highlight the program you want to record, and press OK. The Program Info screen appears with information on that program. Highlight RESOLVE CONFLICT, and press OK. The Recording Conflict screen appears, listing the conflicting recordings. Highlight the program to record, and press OK. The program or programs scheduled to be recorded are marked with a red dot. When one program is selected to record, the program(s) beneath it have the red dot(s) removed. Highlight SAVE CHANGES, and press OK. A “Series Recording Scheduled” message appears briefly on your screen. 49 MTS HDTV Service Recording or Clearing an Overridden Single Recording An individual conflict icon (the crossed-out red dot) in the Guide marks an individual recording that was cancelled in favour of another recording. Press GUIDE. Use the ARROW buttons or CH|PG to highlight the overridden program (indicated by a crossed-out red dot), and press OK. A Program Info screen appears. The following actions are available: • Leave it as is. • Cancel the recording - Highlight DON’T RECORD and press OK, select CANCEL RECORDING to clear the conflict and cancel the recording. Choose DON’T CANCEL, to return to the Program Info screen. • Override another recording to allow this recording - To override a different program and allow the current conflicting program to record, highlight RESOLVE CONFLICT, and press OK. Highlight the conflicting program and press OK, the red dot appears to the right of the program name. Highlight SAVE CHANGES and press OK. The message “Recording Scheduled” appears for a few seconds and the Program Info screen returns. The conflict icon reverts to a red dot. Press EXIT to return to Live TV. 50 MTS HDTV Service Recording or Clearing an Overridden Series Recording A series conflict icon (crossed-out, three overlapping red dots) in the Guide marks a series episode that was cancelled in favour of another recording. Press GUIDE. Use the ARROW buttons or CH|PG to highlight the overridden episode (indicated by crossed-out, three overlapping red dots), and press OK. A Program Info screen appears. The following actions are available: • Leave it as is. • Cancel the recording - Highlight DON’T RECORD and press OK, select CANCEL EPISODE to clear the conflict and cancel the entire series recording. Choose DON’T CANCEL, to return to the Program Info screen. • Override another recording to allow this recording - To override a different series episode and allow the current conflicting series to record, highlight RESOLVE CONFLICT, and press OK. Highlight the conflicting series and press OK, the red dot appears to the right of the program name. Highlight SAVE CHANGES and press OK. The message “Series Recording Scheduled” appears for a few seconds and the Program Info screen returns. The conflict icon reverts to overlapping dots. Press EXIT to return to Live TV. 51 MTS HDTV Service Cannot Record a Program While Watching Another Program While recording a program, you can watch that program, or watch another previously recorded program. You cannot watch another live TV channel or a video without stopping the recording in progress. If you try to tune away from the channel you are recording to a live TV channel or to a video, a message directs you to cancel or continue the recording in progress on the current channel. If you choose STOP RECORDING, the recording stops and tunes to the other channel. If you choose KEEP RECORDING, the recording continues and stays on the current channel. If you are tuned to a live TV channel or video when a program is about to record on another channel, a message tells you the system is changing channels to record the other program. Do one of the following: • Cancel the recording and continue watching the current channel. • Allow the system to tune to the other channel to execute the scheduled recording. 52 MTS HDTV Service Control Live TV Control Live TV using the same control buttons used to pause, fast-forward, and rewind MTS Video On Demand. Recording Live TV starts from the point at which RECORD is pressed, not from the beginning of the program. A PIN is not required to schedule recordings for programs that are locked by the parental locking feature; however the PIN is required to view the recording. While watching a live TV program: Press PAUSE to pause the program for up to <<90>> minutes. The image freezes. A progress indicator shows the following: • The time the program paused (shown as a vertical line with the time below it). • How much of the program has been recorded since paused (shown as the shaded area after the pause time). If paused longer than the maximum amount of time allowed, the program automatically begins to play from the point at which it was paused. Press PLAY to resume playing the program from the point at which it was paused. Press PLAY at any time while watching live TV to display the progress indicator. Press FF to fast forward through the program up to the point at which the program is live. Press FF once, twice, or three times to fast forward at increasing speeds. Press FWD to skip forward in short segments up to the point at which the program is live. Press REW to rewind the program to the point at which it was originally paused. Press REW once, twice, or three times to rewind at increasing speeds. Press REPLAY to skip backward in short segments up to the point at which you tuned to the channel. 53 MTS HDTV Service MTS TV Video On Demand A list of MTS Video On Demand movies and trailers are also available at mts.ca/nowplaying and from a Web browser capable MTS Mobility cellular phone. If the video is locked by parental or rental locking, enter a PIN to unlock the video. A video remains unlocked for four hours. Watch rented unlimited times within a 24-hour rental window. Capable of rewind, fast-forward, and pause. Accessing MTS Video On Demand Access VOD using the VIDEO ON DEMAND Button Press the VIDEO ON DEMAND button. Use the ARROW buttons to highlight a video category: • MOVIES & HOLLYWOOD – Displays subcategories, including genres • CURRENT RENTALS – Displays your current rentals, if any • MORE CHOICES – Displays specialty programming Use the DOWN ARROW to highlight a genre, subcategory or video and press OK. A Video On Demand screen appears and enables the following: • RENT FOR $ – To purchase a video rental. • WATCH TRAILER – If available, a trailer can be previewed. To rent the video, highlight, “Rent for $___”, and press OK. To confirm the selection, highlight RENT, and press OK The video begins to play immediately. A menu bar appears briefly at the top of the screen to indicate how long the rental is available. 54 MTS HDTV Service Access VOD from the MENU. Press MENU and RIGHT ARROW to VIDEO ON DEMAND. Use the DOWN ARROW to highlight a category and press OK. • MOVIES & HOLLYWOOD – Displays subcategories, including genres • CURRENT RENTALS – Displays your current rentals, if any • MORE CHOICES – Displays specialty programming Use the DOWN ARROW to highlight a genre or subcategory and press OK. A Program Info screen appears and enables the following: • Rent for $ – To purchase a video rental. • Watch Trailer – If available, a trailer can be previewed. To rent the video, highlight, “Rent for $___”, and press OK. To confirm the selection, highlight Rent, and press OK. The video begins to play immediately. A menu bar appears briefly at the top of the screen to indicate how long the rental is available. Using the MTS VIDEO ON DEMAND Channel Press GUIDE and scroll to the VIDEO ON DEMAND channel 1003 VIDEO or press 1003 on the remote control, then press OK. Use the ARROW buttons to highlight a video category: • MOVIES & HOLLYWOOD – Displays subcategories, including genres • CURRENT RENTALS – Displays your current rentals, if any • MORE CHOICES – Displays specialty programming Use the DOWN ARROW to highlight a genre, subcategory or video and press OK. A Video On Demand screen appears and enables the following: • RENT FOR $ – To purchase a video rental. • WATCH TRAILER – If available, a trailer can be previewed. To rent the video, highlight, “Rent for $___”, and press OK. To confirm the selection, highlight RENT, and press OK. The video begins to play immediately. A menu bar appears briefly at the top of the screen to indicate how long the rental is available. Play Video On Demand Programs Rented videos can be played anytime until it expires within the 24 hour rental window. Press VIDEO ON DEMAND. The Current Rentals screen appears. Highlight the video, and press OK. Highlight Play, and press OK. 55 MTS HDTV Service Controlling Video On Demand Programs If the video was previously paused or stopped before it was finished, the video resumes from where it left off. To restart the video from the beginning, press STOP, highlight START OVER, press OK. There are different results for some of the buttons depending on which button was pressed previously. Press PAUSE to freeze the video. Press PLAY to resume playing the video. Press STOP to stop the video. Press PLAY to start playing the video from the beginning. Press REW or FF to rewind or fast-forward through the video. Press REW or FF once, twice, or three times to rewind or fast forward at increasing speeds. Press PLAY to resume playing at normal speed. Press SKIP or REPLAY to skip forward or backward in short segments (about 30 seconds). Stop Video On Demand Programs from Playing Press STOP. Highlight one of the following options and press OK. Resume Play – The program begins playing from the point at which STOP was pressed. Video On Demand – Returns the main Video On Demand screen. Start Over – Replays the rented program from the beginning. Watch Live TV – Tunes to the last channel viewed before watching the rented program. What to do when a Video On Demand Program Finishes When a rented video finishes playing, the Finished Screen appears. Highlight one of the following options and press OK: Video On Demand – Returns the main Video On Demand screen. Start Over – Replays the rented program from the beginning. Watch Live TV – Tunes to the last channel viewed before watching the rented program. You are Unsure of the Expiration Date for a Video Watch rented unlimited times within a 24-hour rental window. Press VIDEO ON DEMAND. The Current Rentals screen lists the rented videos. Select the video and press OK. The expiration period for that video appears at the bottom of the screen. When a video expires, the system automatically deletes it from the Current Rentals screen. The Video Expires While Playing If a video expires while being played, it stops playing immediately. 56 MTS HDTV Service A Rented Video On Demand Program is Not in the Current Rentals List The video probably expired before viewing When a video expires, it is deleted from the Current Rentals screen. Access Rented Programs Press VIDEON ON DEMAND. The Current Rentals screen is presented with the available purchased programs. Select the program and press OK Select PLAY and press OK. 57 MTS HDTV Service Locking – VOD and Live TV MTS TV Parental Control locks are set at 18A. Locked channels and programs still appear in the Guide and they can be scheduled to record, however the PIN is required to watch recorded locked program. Each TV requires Parental Locking to be setup. Parental Locking Press MENU. Press the RIGHT ARROW button to highlight <SETTINGS>. Highlight PARENTAL CONTROLS, and press OK. Highlight PARENTAL LOCKING, and press OK. • A default PIN has been preset by MTS to 1234 to prevent access to Adult Content. • Use the NUMERIC KEYPAD to enter a four-digit PIN. • If PIN is entered incorrectly, press DELETE to erase. • If a PIN has already been set, enter the previously set PIN. To set ratings for Channels, Movie Ratings, TV Parental Guidelines, Unrated Content and Adult Programs use the ARROW button to highlight CHANGE and press OK. Channels (Lock specific channels) All channels are listed. Use the UP DOWN ARROW buttons to move through the list, press OK to lock or unlock a channel. Locked channels display a lock in the box to the left of channel. From the menu on the left the following options are available: To reset locked channels, highlight UNLOCK ALL, and press OK. All the lock icons are removed. To only show the locked channels, highlight VIEW LOCKED ONLY, and press OK. The VIEW LOCKED ONLY option becomes VIEW ALL CHANNELS. Highlight SAVE to keep changes, or DON’T SAVE to cancel changes. Movie Rating (Block movies based on ratings) All movie rating levels are displayed. Use the UP DOWN ARROW buttons to move through the list, press OK to lock or unlock a channel. Locked movie ratings display a lock in the box to the left of the rating. To reset locked channels, highlight UNLOCK ALL, and press OK. All the lock icons are removed. Highlight SAVE to keep changes, or DON’T SAVE to cancel changes TV Parental Guidelines (Block programming based on ratings) All rating levels are displayed. Use the UP DOWN ARROW buttons to move through the list, press OK to lock or unlock a channel. Locked ratings display a lock in the box to the left of the rating. To reset locked channels, highlight UNLOCK ALL, and press OK. All the lock icons are removed. Highlight SAVE to keep changes, or DON’T SAVE to cancel changes 58 MTS HDTV Service Lock Unrated The message “Lock Unrated Programming – Some programs, such as educational TV shows and movies released before 1960 are not rated.” Highlight the box and press OK to add or remove a lock. Highlight SAVE to keep changes, or DON’T SAVE to cancel changes Adult Programs When locked your 4-digit PIN will be required to view adult programs. Highlight the box and press OK to add or remove a lock. Highlight SAVE to keep changes, or DON’T SAVE to cancel changes Rental Locking Press MENU. Press the RIGHT ARROW button to highlight <SETTINGS>. Highlight PARENTAL CONTROLS, and press OK. Highlight RENTAL LOCKING, and press OK. • A default PIN has been preset by MTS to 1234. • Use the NUMERIC KEYPAD to enter a four-digit PIN. • If PIN is entered incorrectly, press DELETE to erase. • If a PIN has already been set, enter the previously set PIN. To lock rentals, press the RIGHT ARROW button to highlight RENTAL LOCKING, and press OK. RIGHT ARROW to highlight the checkmark LOCK RENTING selection box. Press OK and the lock renting icon appears in the box. To unlock rentals, press OK again to clear the lock icon. Highlight SAVE, and press OK, or select DON'T SAVE to exit from this screen without saving changes. Watching a Locked Program When scrolling through the Guide or channels on Live TV, locked programs display a lock image in the picture in picture tile. To access a locked program, select the channel and press OK. The screen fills with the lock image with the message “Press OK to Unlock”, press OK. The message “Enter your 4-digit PIN to unlock appears. Using the NUMERIC KEYPAD enter the four digit PIN. The option to DON’T UNLOCK and UNLOCK are displayed, highlight and press OK. 59 MTS HDTV Service Changing the PIN Press MENU. Press the RIGHT ARROW button to highlight <SETTINGS>. Highlight PARENTAL CONTROLS, and press OK. Highlight PARENTAL LOCKING, and press OK. Enter the four-digit PIN. Use the ARROW BUTTONS to highlight CHANGE PIN, and press OK. Use the NUMERIC KEYPAD to enter a four-digit PIN, and then enter the PIN again to confirm it. To change parental locking settings must specify a new PIN. Highlight LOCK, and press OK. Forgot the Parental Control PINs subscriber set the PIN and forgot it. First-time subscribers have PINs set to 1234. Check to ensure the correct PIN was used. For example, was a parental-control PIN used to rent a movie or was a rental PIN used to view adult content. Check with other members of the home if the PIN was reset. Has someone who is not supposed to have access to the PIN, set or reset the PIN. If the PIN must be reset contact MTS at 204-225-5687. Lock Unrated Movies and TV Press MENU. Press the RIGHT ARROW button to highlight <SETTINGS>. Highlight PARENTAL CONTROLS, and press OK. Highlight PARENTAL LOCKING, and press OK. Use the NUMERIC KEYPAD to enter a four-digit PIN. Use the ARROW button to highlight CHANGE and beside LOCK UNRATED and press OK. The message “Lock Unrated Programming – Some programs, such as educational TV shows and movies released before 1960 are not rated.” Highlight the box and press OK to add a lock. Highlight SAVE to keep changes, and press OK. Highlight LOCK to keep changes, and press OK. 60 MTS HDTV Service Block Content for Sexual Content, Violent Content, or Offensive Language You may not want to block an entire channel or an entire rating category. For example, you may want to allow children to watch movies with strong language but not with sexual scenes. Press MENU. Press the RIGHT ARROW button to highlight <SETTINGS>. Highlight PARENTAL CONTROLS, and press OK. Highlight PARENTAL LOCKING, and press OK. Use the NUMERIC KEYPAD to enter a four-digit PIN. Set Movie Ratings Use the ARROW button to highlight CHANGE and beside Movie Ratings and press OK. • A – Only adults may rent. Content is sexually explicit, or graphically and excessively violent. • R – Only adults 18 and over may view or rent. May contain many scenes of horror, violence, sexual activity or material that degrades individuals or groups. • 18A – Youth aged 14 – 17 must be accompanied by an adult when they view or rent. Parents strongly cautioned. Will likely contain explicit violence, frequent coarse language, sexual activity and/or horror. • 14A – Children under 14 must e accompanied by a parent or adult when they view or rent. Subject matter or language may be controversial or offensive. • PG – All may view or rent. However, parental guidance is advised. Most suitable for viewers over age 12. • G – General audiences. All ages admitted. • E – Exempt from rating. Includes news, sports, documentaries and other information programming, as well as talk shows, videos, music, and variety programming. Use the ARROW button to highlight a box beside the rating to be locked and press OK. All ratings higher than the one select are automatically locked. Highlight SAVE to keep changes, and press OK. Highlight LOCK to keep changes, and press OK. 61 MTS HDTV Service Set TV Parental Guidelines Use the ARROW button to highlight CHANGE and beside Movie Ratings and press OK. • A – Adult only. Content is sexually explicit, or graphically and excessively violent. • 18+ – Adult programming, intended for viewers 18 years and older. Might contain depictions of violence, graphic language or explicit sexual activity. • 14+ – Viewers 14 years and older. Parents strongly cautioned. Might contain intense scenes of violence, possible strong or frequent profanity, nudity and/or sexual activity. • PG – Parental guidance suggested. Might be unsuitable for children under 13 without supervision. Might contain limited and moderate violence, mile profanity and/or suggestive language, brief scenes of nudity and/or discreet sexual references. • G – General programming, suitable for all audiences. Minimal violence, no profanity. No sex/nudity. • C8+ – Acceptable for children 8 years and over to view without supervision. References to controversial these are subtle. Might include mild violence. No profanity, no sex/nudity. • C – Intended for all children, especially those under the age of 8. Depictions of aggressive behaviour are in infrequent and unrealistic. No offensive language, no sex/nudity. • E – Exempt from rating. Includes news, sports, documentaries and other information programming, as well as talk shows, videos, music, and variety programming. Use the ARROW button to highlight a box beside the rating to be locked and press OK. All ratings higher than the one select are automatically locked. Highlight SAVE to keep changes, and press OK. Highlight LOCK to keep changes, and press OK. Lock Adult Programs Use the ARROW button to highlight CHANGE and beside Lock Adult Programs and press OK. Use the ARROW button to highlight a box Lock Adult Programs and press OK. Highlight SAVE to keep changes, and press OK. Highlight LOCK to keep changes, and press OK. 62 MTS HDTV Service Movie and TV Rating Systems Movie Ratings A – Only adults may rent. Content is sexually explicit, or graphically and excessively violent. R – Only adults 18 and over may view or rent. May contain many scenes of horror, violence, sexual activity or material that degrades individuals or groups. 18A – Youth aged 14 – 17 must be accompanied by an adult when they view or rent. Parents strongly cautioned. Will likely contain explicit violence, frequent coarse language, sexual activity and/or horror. 14A – Children under 14 must e accompanied by a parent or adult when they view or rent. Subject matter or language may be controversial or offensive. PG – All may view or rent. However, parental guidance is advised. Most suitable for viewers over age 12. G – General audiences. All ages admitted. E – Exempt from rating. Includes news, sports, documentaries and other information programming, as well as talk shows, videos, music, and variety programming. TV Parental Guidelines A – Adult only. Content is sexually explicit, or graphically and excessively violent. 18+ – Adult programming, intended for viewers 18 years and older. Might contain depictions of violence, graphic language or explicit sexual activity. 14+ – Viewers 14 years and older. Parents strongly cautioned. Might contain intense scenes of violence, possible strong or frequent profanity, nudity and/or sexual activity. PG – Parental guidance suggested. Might be unsuitable for children under 13 without supervision. Might contain limited and moderate violence, mile profanity and/or suggestive language, brief scenes of nudity and/or discreet sexual references. G – General programming, suitable for all audiences. Minimal violence, no profanity. No sex/nudity. C8+ – Acceptable for children 8 years and over to view without supervision. References to controversial these are subtle. Might include mild violence. No profanity, no sex/nudity. C – Intended for all children, especially those under the age of 8. Depictions of aggressive behaviour are in infrequent and unrealistic. No offensive language, no sex/nudity. E – Exempt from rating. Includes news, sports, documentaries and other information programming, as well as talk shows, videos, music, and variety programming. Rental Locking is in Effect Even When Parental Locking is Temporarily Turned Off After Rental Locking is set up, it remains in effect even if Parental Locking is temporarily turned off. You can watch any program without entering a parental control PIN during the suspension period, but you must still enter a PIN to rent videos and other content. 63 MTS HDTV Service Set a Limit for Rentals and Purchases A monthly spending limit is set to $100 for MTS Video On Demand. To limit access to rental purchases, set Rental Locking: Press MENU. Press the RIGHT ARROW button to highlight <SETTINGS>. Highlight PARENTAL CONTROLS, and press OK. Highlight RENTAL LOCKING, and press OK. • A default PIN has been preset by MTS to 1234. • Use the NUMERIC KEYPAD to enter a four-digit PIN. • If PIN is entered incorrectly, press DELETE to erase. • If a PIN has already been set, enter the previously set PIN. To lock rentals, press the RIGHT ARROW button to highlight RENTAL LOCKING, and press OK. RIGHT ARROW to highlight the checkmark LOCK RENTING selection box. Press OK and the lock renting icon appears in the box. To unlock rentals, press OK again to clear the lock icon. Highlight SAVE, and press OK, or select DON'T SAVE to exit from this screen without saving changes. Cannot Prevent the Recording of Locked Content Locked content can be recorded without entering a PIN. However, a PIN is required to view recorded locked programs. Parental locking can be applied to recordings even after a program has been recorded. For example, if an R-rated movie is recorded before parental locking is in effect, and then a lock is applied to R-rated content, you cannot view the R-rated recording without entering the correct PIN. Children Can View a Hidden Channel Hiding a channel does not lock the channel. Hiding a channel by using the Customize Channels screen makes the channel invisible in the program Guide as well as when using the channel/page (CH | PAGE) button. The channel can be viewed if it is tuned to directly by entering the channel number. To lock a channel use the Parental Locking Settings. 64 MTS HDTV Service Unlock a Single Program Unlock a currently playing locked program by entering the correct parental control PIN. After tuning away from a locked program, if you attempt to return, the PIN needs to be re-entered. Unlocking a currently playing program does not unlock any other programs. Unlock a Program Locked programs display a lock image in the picture in picture tile. To access a locked program, select the channel and press OK. The screen fills with the lock image with the message “Press OK to Unlock”, press OK. The message “Enter your 4-digit PIN to unlock appears. Using the NUMERIC KEYPAD enter the four digit PIN. The option to DON’T UNLOCK and UNLOCK are displayed, highlight and press OK. 65