1
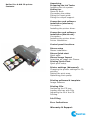
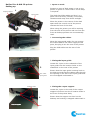
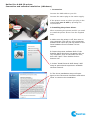
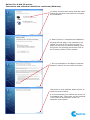
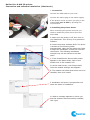
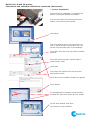
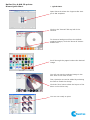
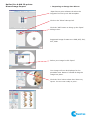
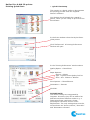
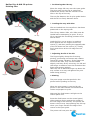
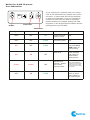
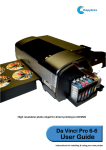
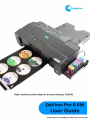
Version 1.0 26/09/2012 First Release JR Version 1.1 18/01/2013 Updated JR Version 1.2 20/02/2013 Updated JR Version 1.3 01/04/2014 Updated JR WARNING To avoid electrical shock hazard s, unit covers should only be removed by authorised personnel. © COPYRIGHT This document is the property of Copytrax Technologies UK Ltd and it may not be reproduced, copied or exhibited without permission from Copytrax. ENVIRONMENTAL PROTECTION Waste electrical products should not be thrown away with household waste. Please recycle where facilities exist or call us and we can arrange collection (Uk only) and disposal. Copytrax reserve the right to amend or modify the specifications and design criteria applying to these products. DaVinci Pro 6-6W CD printer. Contents. Unpacking. Preparing the ink Tanks. Installing the ink system. Setting up. Space to work. Connecting the cables. Fitting the input guide. Fitting the output support. Connection and software installation(windows). Connection. Installing the printer driver. Connection and software installation(Macintosh). Connection. Installing the printer driver. Printer installation. Control panel functions. Discus setup Discus installation. Discus Quick start Quick start. Discus Image Import Importing an image into Discus. Printing Quick Start Quick print setup. Printer settings (Advanced). Changing the printer settings for CD printing. Setting the print area. Optimizing print quality. Printing software & template. Image software. Printing CDs. Positioning the CD tray. Loading the tray with Cds. Adjusting the fit of the CD. Printing. Ink Filling Error Indications. Warranty & Support DaVinci Pro 6-6W CD printer. Unpacking. Input guide Printer Output support Bulk ink system (CISS)* Already fitted CD tray Packing checklist USB cable Mains cable User manual Printer driver Image software** Reset Utility 1. Unpacking. Prepare a clean area of desk space to unpack the printer parts. Check that all of the parts shown are included in the box. Note. *Ink system design may vary from picture. **Free bundled image software may vary, depending on stock at time of order/shipping. Do not discard the box but store it safely in case the printer should ever need to be returned for any reason. DaVinci Pro 6-6W CD printer. Ink System Installation. 1 2 Foam packaging removed ready for ink installation. 3 Carefully lift the supply bottles out of the cradle. 4 Remove the bubble wrap from the supply bottles. Peel off the packing tape from the top of the supply bottles . 5 6 7 8 Make sure all plugs are closed. Tip the supply bottles forward to fill the front compartment with ink . DaVinci Pro 6-6W CD printer. Ink System Installation continued. 9 10 The rear section of the supply bottles should now have a small air gap (necessary for normal operation). 11 Open the smaller plugs for each colour. 12 Insert the six supplied air filters. 13 Open the top lid of the printer and remove the packing tape from the top of the cartridges. 15 Place the supply bottles back into the cradle 14 Connect the power lead to the printer and press the power button on the keypad. DO NOT CONNECT THE USB CABLE YET. 16 The printer will start up and show an ‘ink out’ led indication. Press the ink button. DaVinci Pro 6-6W CD printer. Ink System Installation continued. 18 17 The cartridge carriage will stop in the ‘change cartridge’ position. Carefully lift the six cartridges. 20 19 Tip the six cartridges as shown above. Move the six cartridges to the left of the carriage and remove the two strips of packing material. 22 21 Refit the six cartridges into the carriage 23 When each cartridge is installed properly the clips are locked in place. Press down on each of the six cartridges until you hear a ‘click’ sound from each cartridge. 24 Press the ink button. The carriage should return to its home position and all ink lights will go out. Ink system installation is now complete DaVinci Pro 6-6W CD printer. Setting up. Output support 1. Space to work. Prepare an area of desk space to set up the printer. A space of 135cm wide x 62 cm deep is required. 1 Input guide The desk should be stable and level, in a place free from dust, humidity, movement, vibrations and away from direct sunlight. Place the printer in the centre of the desk space with the control end of the printer nearest the front of the desk. When using the printer you will be working from the side of the printer and not from the front as desktop printers are conventionally used. 2 2. Connecting the cables. Move the input guide aside. Do not connect the mains cable to the mains supply at this point, but plug it into the rear of the printer. Mains Plug the USB cable into the rear of the printer. USB 3. Fitting the input guide. 3 Pins under input guide input guide Locate the 2 pins on the underside of the input guide into the location holes on the metalwork on the rear of the printer. Ensure that the input guide is sitting level on the desk top and that the cables pass through the opening in the side of the input guide and are not trapped underneath it. 4. Fitting the output support. Location holes Locate the 2 pins on the end of the output support & fit them into the 2 location holes in the front of the printer body. 4 Output support Pins Ensure that the support sits level on the desktop and nothing is trapped underneath it. DaVinci Pro 6-6W CD printer. Connection and software installation .(Windows) 1. Connection. Connect the USB cable to your PC. Connect the mains plug to the mains supply. If the printer comes on when you plug in the mains cable turn it OFF by pressing the on/off button. ON/OFF 2. Installing the printer driver. After connecting the printer and PC you need to install the printer driver from the suppled DVD. A. Make sure the printer is off, then turn on your computer. Turn off any virus protection software and cancel any set-up wizard or the ‘New hardware found’ window if it has opened. B. Insert the printer software DVD. If the Installer dialog box does not appear click on ‘my computer’, click on the DVD rom icon, then click ‘open’. Then double-click on Autorun.exe. C. Select ‘Install Driver & WiFi Setup’. WiFi setup is optional and requires an available wireless network. D. The driver installation setup will open. Agree to the Terms and Conditions and select ‘Next’ to continue the installation. DaVinci Pro 6-6W CD printer. Connection and software installation continued (Windows). E. Only check the boxes for ‘Epson Driver and Utilities’ and ‘Epson Network Utilities’*. Uncheck all other options before selecting ‘Install’. F. The installation will now begin. If your PC is connected to the internet the latest driver will be found and downloaded. The time this process takes will depend on your network speeds. G. Select your desired connection type and select ‘Next’. The printer can be connected directly to the PC by USB cable, or wirelessly over your local network*. * Wireless network required. DaVinci Pro 6-6W CD printer. Connection and software installation continued (Windows). H. Select ‘Yes:First time setup’ and and ‘Next’. Follow the onscreen instructions to complete the installation. I. Select ‘Finish’ to complete the installation. Printing the test page is not necessary, but should you wish to do so place a piece of paper on the print tray before loading it into the printer. For printing instructions refer to the ‘Printing’ section of this manual. J. Do not participate in the Epson Customer Research. Select ‘Do not install’ and ‘Next’. The printer is now installed. Select ‘Finish’ to close the setup window. It is recommended you rename the printer to ‘PrintMaster Dali’. The printer can be renamed in the ‘Devices and Printers’ section of Windows control panel. DaVinci Pro 6-6W CD printer. Connection and software installation .(Macintosh) 1. Connection. Connect the USB cable to your mac. Connect the mains plug to the mains supply. ON/OFF If the printer comes on when you plug in the mains cable turn it OFF by pressing the on/off button. 2. Installing the printer driver. After connecting the printer and mac you need to install the printer driver from the DVD-ROM. A. Make sure the printer is off, then turn on your Macintosh. Turn off any virus protection software. B. Insert the printer software DVD. The driver is located in the following folder: Autoplay/MAC. Open the file within this folder to begin the installation. Follow the onscreen instructions. The following installation example may not be relevant to all MAC users. C. If the Install Printer Driver/Utility folder appears in the Epson folder, open it and double click on the installer icon. D. At the initial screen, click ‘Easy Install’. Then the installer dialogue box appears. E. The installer will show what items are to be installed, then click ‘install’. F. Installation will start. A progress bar will show the status of installation. G. When a message appears to inform you that the software was successfully installed, click ‘Quit’. DaVinci Pro 6-6W CD printer. Connection and software installation continued .(Macintosh) 3. Printer Installation. Once the driver installation is complete the printer connection window will appear. ON/OFF Turn on the printer by pressing the power button on the front of the printer. Click ‘Next’. The next window gives you instructions on how to add a printer to the printer list. The printer list should be open on the desktop. Click ‘Add’. This will open the printer browser window. From the printer browser window select ‘Stylus Photo 1500’ Click ‘Add’ The printer list window will now show the Stylus Photo 1500. Click ‘Next’ & the installer window will appear. Click ‘Install’ In the Applications software install window, uncheck the first three boxes & click ‘Install’ On the final window click ‘Exit’. Your printer is now installed. DaVinci Pro 6-6W CD printer. Control panel functions. On/Off button A. Used to turn the printer on and off. B. Used to clear the printers memory if pressed twice while the printer is on. Printer status indicator light. A. On solid GREEN when the printer is on but inactive. B. Flashing GREEN when the printer is active. WiFi button (for use with WPS push button compatible routers) Press the WPS push button on your router. Press and hold WiFi button for three seconds. It may take several minutes for the printer to connect to your network. When both WiFi lights come on the setup is complete. Info button Place a piece of paper on the print tray. Press and hold button for three seconds. An information page will be printed* containing the WPS-PIN code for network connectivity. *For instructions on printing see the Printing section of this user guide. WiFi Feed button / indicator light. A. On solid RED when the printer is ready for the CD tray, or paper tray, to be pushed in. (After spooling the image). B. On solid RED if the printer is jammed during printing. C. Feeds in the CD tray or paper tray. D. Ejects the CD tray or paper tray. Clean button / indicator light. A. Flashing RED when an ink cartridge level is low. B. On solid when an ink cartridge is empty. C. Cleans the print head when pressed for 3 seconds with the Feed/ink status light off and the CD tray out. D. Moves the print head to the cartridge change position when an ink cartridge is empty. DaVinci Pro 6-6W CD printer. Discus Setup. 1. Discus Installation. Windows. Insert the printer software DVD. (If the installer dialog box does not appear click on ‘my computer’, click on the DVD rom icon, then click ‘open’. Then double-click on autorun.exe). Select ‘Install Discus Label Software’. Quicktime is required to run Discus label software. If it is not already installed on your PC the installation for Quicktime will start. MAC. Discus label software (and Quicktime if required) is located in the following location on the software DVD: Autoplay/Programs/Discus v4.22 LE. When Discus is run for the first time It will prompt for a serial number. This number is made up of three sets of three digits. This number can be found on the DVD face. Enter the serial number to continue. Click choose layout to select the first template. In the ‘Choose a kind’ menu, select CD/DVD & in the ‘Choose a Layout’ menu select Copytrax Da Vinci pro 6-6W. You will see a thumbnail image of the 6 disc tray on the right. Click OK. You can now see the Print window showing the layout of the 6 disc’s. Each disc can be made Print or Non Print by double clicking on the tick box in the centre of each disc. At the bottom left you will see the adjustable sliders for the outside & inside diameters of the print mask. The four arrows allow for fine adjustment of the whole template printing position as due to manufacturing tolerances, each printer will differ slightly so some adjustment may be needed. These settings will be held for future printing & can be adjusted at any time. DaVinci Pro 6-6W CD printer. Discus Quick Start. 1. Quick Start. Open Discus & select the Copytrax Da Vinci pro 6-6W template. Click on the ‘Canvas’ Tab top left of the window. To choose a background from the default supplied images, click the ‘Show all’ button bottom left. Scroll through the pages & select the desired image. You will now see the selected image in the disc area of the main screen. Text, Symbols etc can be added by selecting the tabs to finish the design. Click the ‘Print’ tab to show the layout of the discs on the 6 disc tray. You are now ready to print. DaVinci Pro 6-6W CD printer. Discus Image Import. 1. Importing an Image into Discus. Open Discus print software & select the Copytrax Da Vinci pro 6-6W template. Click on the ‘Photo’ tab top left. Click the ‘Add’ button to bring up the ‘Open’ dialogue box. Supported image formats are: BMP, GIF, JPG, PCT, PNG. Select your image & click ‘Open’. Your image will now be displayed in the printable area. Resize if needed & drag the image into place. Click the ‘Print’ tab to show the 6 disc tray layout. You are now ready to print.. DaVinci Pro 6-6W CD printer. Printing Quick Start. 1. Quick Print Setup. This section is a Quick guide to demonstrate the printing process from the supplied Discus’s software. Your design should already be created in Discus, when you are ready to print click the Print button. In the Print window select the Stylus Photo 1500 printer. Click ‘Preferences’. A Printing Preferences window will open. In the ‘Printing Preferences’ window select: Quality Option = Best Photo Paper Options: Source = Sheet Type = Epson Photo Quality Ink Jet Size = A3+ 329mm x 483mm Print Options = PhotoEnhance Orientation = Portrait Click OK. PLEASE NOTE: The above settings are suggested by Copytrax. However, they can be altered as desired to achieve different results e.g. a faster print/lower resolution, slower print/higher resolution and for colour adjustments. The only settings that must be set as shown are ‘Source=Sheet’, ‘Size=A3+’ and ‘Orientation=Portrait’. DaVinci Pro 6-6W CD printer. Printer settings Windows (Advanced). 1. Changing the printer settings for CD printing. In the Windows control panel select Printers and Devices. Select the Epson Stylus Photo 1500, right click and select Printer Properties. In the window type ‘DaVinci Pro 6-6W’ and click OK. Select the DaVinci pro 6-6W and right click and select Printing preferences 2. Optimizing print quality. Enter the advanced section of the Printer preferences. Configure the necessary settings as follows: Paper & Quality Options Feed = Sheet Paper type = Epson Photo Quality Inkjet Resolution = Best Photo Paper size = A3+ 329 x 483 mm Orientation = Portrait Print Options High speed = Off (unchecked) To save this setup for future use select Save Settings... Give the setup a name and select Save. The drop down list to the left of Save Settings... will hold all saved custom setups you choose to create. Click OK to finish. PLEASE NOTE: The above settings are suggested by Copytrax. However, they can be altered as desired to achieve different results e.g. a faster print/lower resolution, slower print/higher resolution and for colour adjustments. The only settings that must be set as shown are ‘Source=Sheet’, ‘Size=A3+’ and ‘Orientation=Portrait’. DaVinci Pro 6-6W CD printer. Printing Software & Template. 1. Image software. Discus Discus is a high quality dedicated software package for printing CDs and Jewel case inserts etc. It is supplied with your printer. It is very easy to use and we offer telephone support should you need it. It is also possible to create images and print CDs using other graphics programmes. For example; Corel Draw, Adobe Photoshop, Adobe Illustrator etc. If you regularly use a graphics programme we recommend that you continue using it and make a template to the dimensions given. TOP 0 Template dimensions 61.4mm 191.4mm 118mm dia 38mm dia 321.4mm 420mm 89.5mm 0 225.5mm 300mm The dimensions are shown for a CD printing template, the dimensions will however, need to be fine tuned to accurately fit the output from your printer. DaVinci Pro 6-6W CD printer. Printing CDs. 1. Positioning the CD tray. Place the empty CD tray onto the input guide. The silver strip on the tray is positioned towards the printer and the cutouts for the CDs to the top of the tray. 1 The tray fits between the 6 nylon guide blocks and should run freely between them. 2. Loading the tray with CDs. Silver Strip CDs are loaded into the tray after it has been positioned on the input guide. The CD tray holds 6 CDs, all 6 CDs must be loaded before attempting to print. If only 1 CD is required the remaining positions must still be filled. CD Tray Load the CDs, one at a time, by pushing them against the two fingers in the tray cutout (1) and then pushing the opposite side of the CD down into the cutout (2). Finally, firmly push down all the CD edge into the cutout. 3. Adjusting the fit of the CD. 2 2 1 3 The fingers lightly clamp the CD during printing, preventing movement and rotation caused by printer vibration. If the fingers do not touch the CDs, they can be twisted slightly until they do by removing the CD and inserting a screwdriver into the slit behind the finger and twisting slightly. Take care not to bend the finger up above the tray surface as it may rub against the print head during printing. Fingers 4.Printing. The print image must be spooled to the printer before pushing in the tray. When the print image is received by the printer it will make certain movements and noises and prepare to print. Wait until the feed button red light on the control panel is lit. Press the feed button on the control panel whilst pushing firmly against the middle of the rear edge of the CD tray. The printer will draw in the CD tray. Stop pushing the CD tray when your finger reaches the edge of the cutout in the input guide. 4 The printer will now print the CDs. DaVinci Pro 6-6W CD printer. Ink Filling. Ink Filling 1 2 You will need: Copytrax CD printer refill ink (dye based). Protective gloves & goggles. 3 4 Remove the top from the refill bottle(1) & fit the supplied nozzle(2). Cut the top of the nozzle off with a sharp knife(3) to allow the ink to flow. Refilling can be done with the ink tank in its tray. Pull the front coloured stopper from its hole(4) & carefully refill with Copytrax CD printer ink(5). Refit the stopper before use. ALWAYS KEEP THE INK TANKS UPRIGHT. 5 WARNING..ONLY USE COPYTRAX CD PRINTER INK IN THIS PRINTER. DAMAGE CAUSED BY NON-COPYTRAX APPROVED INK WILL NOT BE COVERED UNDER WARRANTY. DaVinci Pro 6-6W CD printer. Error Indications. If you experience a problem with your printer refer to the table below to identify and resolve the issue. In most cases this will be sufficient to regain full operation. If you are not able to resolve the issue with the help on this page please contact your supplier quoting the LED sequence on the keypad and the status monitor message from your PC/MAC. WiFi Tray Feed Power Ink Status Tray Feed Ink Status Power OFF OFF ON Printer idle and ready to print N/A OFF OFF FLASH Processing data N/A Ready to print ON OFF FLASH Insert disc tray and press tray feed button to start printing Fatal error ON ON OFF Clean encoder and check for obstructions inside printer Maintenance request - Waste ink counter requires reset Visit “http://db.tt/sjRaZtRa” to download a third party reset program and reset the waste counter inside your printer Ink out error Reset CISS. Refer to quick start leaflet for full instructions FLASH FLASH OFF OFF ON FLASH Indication Solution DaVinci Pro 6-6W CD printer. Warranty & Support. COPYRIGHT © Copytrax Technologies UK Ltd. 2008. All rights reserved. This manual and the software described in it are copyrighted with all rights reserved. No part of this publication may be reproduced, transmitted, transcribed, stored in a retrieval system or translated into any language in any form by any means without the written permission of Copytrax Technologies UK Ltd. ENVIRONMENTAL Waste electrical products should not be thrown away with household waste. Please recycle where facilities exist or call us and we can arrange collection (UK only) and disposal. TRADEMARKS Copytrax is the registered trademark of Copytrax Technologies UK Ltd. Brand names and product names are trademarks or registered trademarks of their respective companies. LIMITED LIABILITY PRODUCT WARRANTY The Davinci Pro 6-6W is warrantied for 12 months from the date of purchase from Copytrax. Print heads & ink systems are limited to 3 months warranty. All warranties are limited to manufacturing defects only. Fair wear & tear or misuse of the printer or components are not covered by the warranty. Warranty on products purchased from an authorised Copytrax distributer are covered by the distributor & not by Copytrax direct. Copytrax will work with the distributor to resolve any issues quickly. Copytrax warranty is a return to base(Cambridge, UK). All returns must be assigned an RMA number before returning to Copytrax. No on-site service is provided by Copytrax. You must return the product to Copytrax or an authorised Copytrax dealer within the warranty period accompanied by proof of purchase. Copytrax DISCLAIMS ALL IMPLIED WARRANTIES ON THE PRODUCT, INCLUDING WITHOUT LIMITATION WARRANTIES OF MERCHANTABILITY, PERFORMANCE AND FITNESS FOR A PARTICULAR PURPOSE. Copytrax WILL NOT BE LIABLE FOR ANY BUG, ERROR, OMISSION, DEFECT, DEFICIENCY, OR NONCONFORMITY IN ITS HARDWARE. AS A RESULT THE HARDWARE IS SOLD “AS IS” AND THE PURCHASER ASSUMES THE ENTIRE RISK AS TO ITS QUALITY AND PERFORMANCE. Copytrax SHALL IN NO EVENT BE LIABLE FOR DIRECT, INDIRECT, SPECIAL, INCIDENTAL, CONTINGENT OR CONSEQUENTIAL DAMAGES RESULTING FROM ANY DEFECT IN THE HARDWARE OR ITS DOCUMENTATION INCLUDING DAMAGES FROM LOSS OF DATA, EVEN IF Copytrax OR AN AUTHORIZED Copytrax DEALER HAS BEEN ADVISED OF THE POSSIBILITY OF SUCH DAMAGES YOU AGREE THAT Copytrax’s LIABILITY ARISING OUT OF CONTRACT, NEGLIGENCE, STRICT LIABILITY OR TORT OR WARRANTY SHALL NOT EXCEED ANY AMOUNTS PAID BY YOU FOR THIS PRODUCT. any written or oral information or advice given by Copytrax dealers, distributers, agents or employees will in no way increase the scope of this warranty. Nor may you rely on such oral or written communication. Some states do not allow the exclusion or limitation of implied warranties or liability for incidental or consequential damages, so the above limitation or exclusion may not apply to you. This warranty gives you specific legal rights, and you may also have other rights which Copytrax Technologies UK Ltd. (manufacturer) 35 Dry Drayton Industries Scotland Road Dry Drayton Cambridge Cambridgeshire. CB23 8AT United Kingdom. Telephone UK: 0844 815 6225 International: +44 1954 212200 Fax UK: 01954 211950 International: +44 1954 211950 Web www.copytrax.com e-mail [email protected] Registered No. 6691594 VAT No. GB938 6097 79