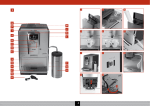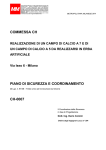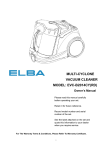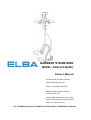
1
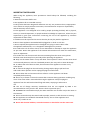
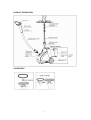
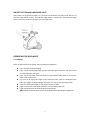
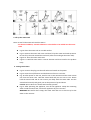
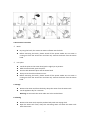
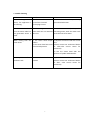
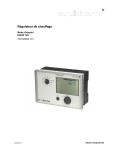
GARMENT STEAM IRON MODEL: EGSI-A1518(WH) Owner’s Manual Please read this manual carefully before operating your set. Retain it for future reference. Record model number and serial number of the set. See the label attached on the set and quote this information to your dealer when you require service. For The Warranty Terms & Conditions, Please Refer To Warranty Certificate. 1 IMPORTANT SAFEGUARDS When using this appliance, basic precautions should always be followed, including the following: 1. Read all instructions before use. 2. Use appliance for its intended use only. 3. This product has been designed for domestic use only. Any commercial use, inappropriate use or failure to comply with the instructions, the manufacturer accepts no responsibility and the warranty will not apply. 4. This appliance is not designed to be used by people (including children) with a physical, sensory or mental impairment, or people without knowledge or experience, unless they are supervised or given prior instructions concerning the use of the appliance by someone responsible for their safety. 5. Children must be supervised to ensure that they do not play with the appliance. 6. Do not leave appliance unattended while plugged in or while it is still hot. 7. Do not operate the appliance with a damaged cord, plug or steam tube or after the appliance malfunctions, or it is dropped or damaged in any manner. 8. To reduce the risk of electric shock, do not disassemble or attempt to repair the appliance on your own. Return the appliance to the nearest authorized service center for examination, repair or adjustment. 9. To reduce the risk of contact with hot steam emitting from the steam vents, please hold the steam head away from your body while operating the appliance. 10. Only use the steam head in an up and down vertical position. Never use the steam head in a horizontal position or tilt into a backward position; this may result in water discharge. 11. To reduce the risk of electric shock, do not immerse the appliance in water or any other liquids. 12. To remove the plug from the wall outlet, please grasp the plug to pull out from wall outlet. Never pull the cord to unplug the plug from wall outlet. 13. Do not allow the cord contact with hot surfaces. Let the appliance cool down completely before storing. 14. Do not try to fasten or loosen the steam tube connector during operation. Scalding may occur if the steam tube is removed while using the appliance. Always unplug the appliance from the wall outlet when filling with water, emptying or when not in use. 15. The use of foreign accessory attachments that are not supplied by ELBA is not recommended as it may result in fire, electric shock or personal injury. 16. WARNING! Be careful when empty the water tank after use as there may be hot water in the reservoir. 17. Do not contact directly the steam head to people, animals or cloth that one is wearing. 18. This appliance is intended for household use only. This is a floor appliance and never carry it while in use. 19. Never add chemical additive, scented substances or decalcifies into the water tank. 2 PRODUCT DESCRIPTION ACCESSORIES 3 ON/OFF BUTTON AND INDICATOR LIGHT After power on the garment steam iron, press the on/off button and the button will turn to red color (refer below picture). The indicator light will be in yellow color. If the indicator light turns to red color, please re-fill water into the water tank. OPERATING THE APPLIANCE 1. Installation Note: Do not switch on the power while installing the appliance. Fig 1: Remove all the packaging. Fig 2: Insert the telescopic pole into the telescopic pole connector and then install into the telescopic pole inlet. Fig 3: Fill up the water tank and install into the product body. Refer to “Fill up the water tank” instructions. Fig 4 and 5: To adjust the length of the telescopic tube, open the telescopic pole tube clips. Adjust to desired length and fasten the clips on the telescopic poles. Fig 6 & 7: Install the hanger on the head of telescopic pole. Fig 8: Connect the steam tube connector into the steam tube inlet. Fig 9: Place the steam head at the hook of the hanger. Note: Please install the brush to the steam head before operating the appliance. 4 2. Fill up the water tank Note: Do not fill the water tank with hot water! : No chemical additive, scented substances or decalcifies to be added into the water tank! Fig 10: Place the water tank on a stable surface. Fig 11: Remove the water tank cover and then fill up the water tank with tap water. Do not fill up the tank exceed the max level (refer the marking at the water tank). Figure 12: Close the water tank cover. Figure 13: Hold the water tank in reverse direction and then install to the product body. 3. Ironing instructions Fig 14: Connect the plug into the wall outlet and switch on the power. Fig 15: Press the on/off button and the button will turn to red color. Fig: 16: After power on the iron, wait for one or two minutes until the steam comes out from the steam vent. Hold the steam head and you can start to iron. Please hold the steam head and do not contact your body with the steam tube. Use the steam head vertically and gently iron at the position of up and down. Caution: Do not direct the steam head towards yourself. Fig 17: After operating the appliance, turn off the appliance. Dump the remaining water inside the water tank, and let the appliance dry for 5 minutes. WARNING! Be careful when empty the water tank after use as there may be hot water in the reservoir. 5 4. Accessories instruction Brush By using the brush, the steam can easier infiltrate into the cloth. Before removing the brush, please switch off the power. Make sure no steam is coming out from the steam vent and then only remove the brush from the steam head. Iron splint Install the splint to the steam head; push it tightly to its position. Hold the steam head, open the splint. Put the cloth between splint and the steam head. Clamp on to the collar and start to iron. Before removing the brush, please switch off the power. Make sure no steam is coming out from the steam vent and then only remove the brush from the steam head. 5. Storage Remove the water tank from the body; dump the water from the water tank. Let the appliance dry for 5 minutes. Warning: Do not touch the steam tube until it has cooled down. 6. Cleaning Remove the water tank; wipe the product body with wet wiping cloth. Open the water tank cover, dump the remaining water and wash the water tank with clean water. 6 7. Trouble shooting Problem After switching on the power, the appliance is not working. Possible Cause 1) Fault in one of the circuits. 2) The fuse is burned. 3) The plug is loose. Solution To be checked and repaired by specialized technician. A noise can be heard The remaining water in the Raise the water tank, dump the from the steam tube but water tank was not removed remaining water, wash the water tank the generated steam is after use. and refill with clean water. weak. Water leaking from the 1) The steam head maybe steam head. broken. 2) The steam head was used in horizontal position. Water spilled out from the water tank. 1) Replace the steam head with a new one. (Please contact our authorized dealer or after-sales service center for assistance) 2) Use the steam head with the position of upside and downside. Water tank is broken or Replace the water tank. cracked. (Please contact our authorized dealer or after- sales service center for assistance) 7 8