1
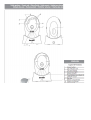
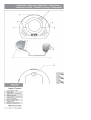
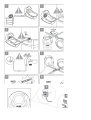
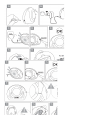
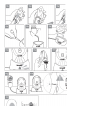
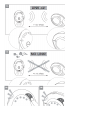
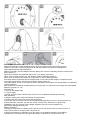
INSTRUCTIUNI DE UTILIZARE PENTRU BREVI - INTERFON DIGITAL BABY MONITOR
IMPORTANT INFORMATION
Please read this user’s manual carefully before using your baby monitor and keep it for future
reference. This baby monitor is designed as an aid and should not be used as a substitute for
responsible and proper adult supervision.
Make sure the baby unit and adapter cable are always out of reach of the baby (at least 1 meter/3 feet
away) (picture 1)
Never place the baby unit inside the baby’s bed, cot or playpen (picture 2)
Never cover the baby monitor (e.g. with clothes, towels or blankets) (picture 3)
Never place or use the baby monitor in moist places or close to water (picture 4)
If traveling abroad, make sure that the voltage shown on the mains power adapter corresponds to the
local mains power before connecting to the power supply (picture 5)
To prevent electric shock, do not open the case of the baby unit and parent unit (except battery compartment
covers) (picture 6)
Risk of explosion if batteries are replaced by an incorrect type. For the parent unit, always use rechargeable
batteries. (pictures 7a - 7b)
SETTING UP
1. SET UP THE BABY UNIT
1.1 Power supply
The baby unit uses either household AC current or four AA Alkaline batteries (pictures 8-9)
Main operations
a) Plug the mains power cable into the baby unit (picture 8a)
b) Connect the other end to the main power (picture 8b)
c) Once the main connection is done, the centralized night light will turn on for 1 second (picture 8c)
d) Push the button “ON-OFF” (pic.8d); the “Power” led and “Link” led will turn on (picture 8e)
WARNING: Use only the main power adapter supplied. Using an incorrect adapter may
permanently damage the baby unit.
Battery Operations
The baby unit also works on battery power, so that you can use it even when you are not near to a
mains power socket or during a power cut (picture 9)
a) Remove the battery compartment cover and insert 4 x AA Alkaline batteries into the battery
compartment on the baby unit and replace the battery compartment cover (picture 9a -9b)
b) The centralized night light will turn on for 1 second (picture 9c)
c) Push the button “ON-OFF” (picture 9d); the “Power” led and “Link” led will turn on (picture 9e)
NOTE 1: the recommended batteries are 4 x AA Alkaline
2: the baby unit will only work from the batteries if the mains power is disconnected
3: Battery low: The power indicator LED on baby unit blinks and the link indicator LED on Parent
Unit blinks red (picture 9f)
4: Please power off the baby unit before removing the main power or the batteries.
WARNING! Do not use common batteries, but use rechargeable batteries only.
Rechargeable batteries must be set up by respecting the polarity. Do not mix new and used rechargeable
batteries. Do not mix rechargeable batteries types. Use only rechargeable batteries of the
recommended type or similar type. Do not short-circuit battery terminals. Rechargeable batteries
should only be changed under adult supervision.
2. SET UP THE PARENT UNIT
2.1 Power supply
The parent unit uses either two AAA rechargeable batteries (picture 10)
Battery operations
a) Remove the battery compartment cover and insert 2 x AAA rechargeable batteries into the battery
compartment on the parent unit and replace the battery compartment cover as shown.
You should always ensure you have inserted batteries in the parent unit (pictureS 16a-16b-16c)
WARNING: Never use non-rechargeable batteries in your parent unit.
Use only the recommended type 2 x AAA rechargeable batteries – using other types
could permanently damage your unit (pictures 7a-7b).
b) Plug the charger for the parent unit into the main power socket (pictures 11a-11b)
WARNING: Use only the main power adapter supplied. Using an incorrect adapter may
permanently damage the charger.
c) Slot the parent unit into the charger (picture 11c); the charger light will stay red, even when batteries
are fully charged (picture 11d)
d) Push the button “ON-OFF” (picture 11e); the “Power” led and “Link” led will turn on. 11f)
NOTE 1: charge the parent unit for at least 8 hours before using the baby monitor for the first time
2: battery insertion or replacement is necessary if an unlit charger light
3: charging or battery replacement is necessary if the following occurs:
• The power indicator LED does not light.
• Battery low: The power indicator LED blinks (picture 11h)
4: the Parent Unit can still be used when it is in the charger.
5: Please power off the Parent Unit before removing the batteries.
2.2 Belt clip
For added convenience, use the belt clip (picture 12)
3. CHECK THE CONNECTION
When both units are switched on, the link lights on both units will turn green (picture 13a).
If the link between the units is broken at any time, the link lights on both units will turn red.
At the parent unit, you will also hear an alert signal to warn you that there is no communication
between the units. If this happens, check that the mains power is plugged in and switched on at the
baby unit (picture 13b).
Also check that the Units are within range of one another.
NOTE In the event of power failure, when the power is restored all your settings will remain unchanged.
USING THE BABY MONITOR
Position both units in the same room to test the connection. Make sure the baby unit is at least 1 meter /3
feet away from the parent unit (picture 13a).
NOTE If you place the parent and baby units too close together you will hear a high pitched noise, this
is normal. The units are designed to be located at a distance from one an other, e.g. in different
rooms (picture 13b).
4. USING THE BABY MONITOR
4.1 Adjust volume
At the parent or baby unit:
• There are 6 volume levels on each unit.
• Press + to increase or – to decrease the volume. Changing the volume setting on the baby unit
affects the volume when you use the talk back feature (picture 14a -14b).
4.2 Mute (voice operated switch) function
Pressing “Mute“ button you activate mute function that allows you to switch the volume off on the
parent unit (picture 15a).
However, you can still monitor your baby using the sound level lights. When sounds picked up at the
baby unit site reaches the pre-set value (sensitivity), the Mute function will be automatically switched off.
4.3 Microphone sensitivity level setting
To set the sensitivity level, follow these steps:
• Press “Mute“ on the parent unit (picture 15a).
• Set the sensitivity by pressing + or – within 3 seconds to select the sensitivity level required – level
1 for Low sensitivity, or level 5 for High sensitivity (standard setting is level 3) (picture 15b).
GB
WARNING! Batteries should not be recharged. Batteries or rechargeable batteries must be set up by
respecting the polarity. Do not mix new and used batteries or rechargeable batteries. Do not mix
battery types. Use only batteries or rechargeable batteries of the recommended type or similar type.
Remove used batteries or rechargeable batteries from the product. Do not short-circuit battery terminals.
Rechargeable batteries must be removed from the product before charging wherever possible.
Rechargeable batteries should only be changed under adult supervision.
4.4 Talk Back
You can use the talk back feature to comfort and reassure your baby.
Press and hold “Talk” on the parent unit to speak to the baby (picture 16a).
Release “Talk” to hear your baby again (picture 16b).
4.5 Night light
The night light provides a soft and comforting glow for your baby and allows you to check on baby
without having to turn on the main room light (picture 17b).
• Press the “Light” button on the baby unit. Press again to switch off (picture 17a).
4.6 Sound level lights
The sound level lights are the green and red lights locate at the top of the parent unit which illuminate
according to the level of sound in the baby’s room.
There are 8 sound levels: (picture 18)
• Level 0: 0 lights
• Level 1: 1 green light
• Level 2: 2 green lights
• Level 3: 3 green lights
• Level 4: 4 green lights
• Level 5: 5 green lights
• Level 6: 5 green lights and 1 red
• Level 7: 5 green lights e 2 red
GB
TROUBLE SOLVING QUICKIES
Power lights do not come on:
• If using the mains power adapters make sure they are plugged in and switched on.
• If using batteries, check they are correctly installed and not discharged.
Link light does not come on:
• Check that both the baby unit and parent units are switched on.
• If using batteries, check they are correctly installed and not discharged.
Link light is red:
• The link between your units is broken. You will also hear an alert to let you know there is no
communication between the units, If this happens, check that the main power (or batteries) is
correctly connected and that the units are within range of one another.
Parent unit remains silent or very quiet:
• The volume setting may be too low.
• You may have pressed the Mute button.
You can hear a high pitched noise:
• The units are too close to each other, or the volume setting is too high.
• Move the parent unit away from baby unit (at least 1 meter / 3 feet).
• Decrease volume on the parent unit.
--------------------------------------------------------------------------------------------------------------------------------------Detalii şi comenzi: http://www.bebelusultau.ro/detalii.php?cod=BV110 sau www.bebelusultau.ro sau 0722.307.588
Informaţiile de mai sus sunt oferite de către importatorul mărcii BREVI în România.
Conţinutul materialelor prezentate în site-ul www.bebelusultau.ro este strict informativ. Administratorul site-ului,
Just Ask Creativ S.R.L., nu îşi asumă nicio responsabilitate şi nu vă garantează acurateţea informaţiilor oferite.