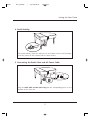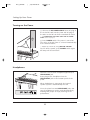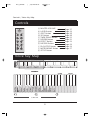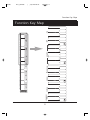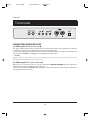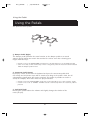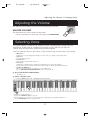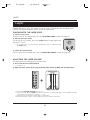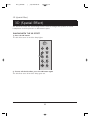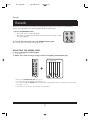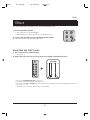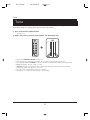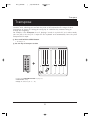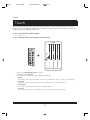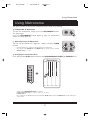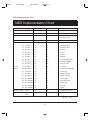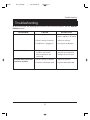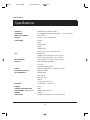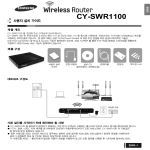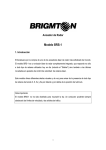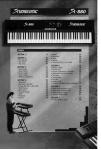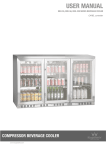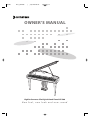
1
SGP500 영영 영영영 Rev1_SGP500 영영영 (영영).qxd 2012-05-23 영영 5:00 Page 38
OWNER'S MANUAL
High Performance Slim Digital Grand Piano SGP-500
New feel, new look and new sound
SGP500 영영 영영영 Rev1_SGP500 영영영 (영영).qxd 2012-05-23 영영 5:00 Page 1
Precaution
INSTRUCTIONS PERTAINING TO A RISK OF FIRE,
ELECTRIC SHOCK, OR INJURY TO PERSONS.
WARNING : TO REDUCE THE RISK OF FIRE OR ELECTRIC SHOCK, DO NOT
EXPOSE THIS APPLIANCE TO RAIN OR MOISTURE.
CAUTION
RISK OF ELECTRIC
SHOCK
CAUTION TO REDUCE THE RISK OF
ELECTRIC SHOCK
DO NOT REMOVE COVER (OR BACK)
NO USER SERVICEABLE PARTS INSIDE
REFER SERVICING TO QUALIFIED SERVICE
PERSONNEL
This Symbol is intended to alert the user to the presence of uninsulated dangerous
voltage within the product's enclosure that may be of sufficient magnitude to constitute
a risk of fire or electric shock.
This Symbol is intended to alert the user to the presence of important in the literature
accompanying this appliance.
All information should be read carefully to avoid misuse of product.
INFORMATION TO THE USER
This equipment has been tested and found to comply with the limits for a class B digital device, pursuant to
part 15 of the FCC Rules. These limits are designed to provide reasonable protection against harmful
interference in a residential installation.
This equipment generates, uses and can radiate radio frequency energy and, if not installed and used in
accordance with the instructions, may cause harmful interference.
If this equipment does cause harmful interference to radio or television reception, which can be determined by
turning the equipment off and on, the user is encouraged to try to correct the interference by one more of the
following measures :
- Reorient or relocate the receiving antenna.
- Increase the separation between the equipment and receiver.
- Connect the equipment into an outlet on a circuit different from that to which the receiver is connected.
- Consult the dealer or an experienced radio/TV technician for help.
FCC WARNING
Changes or modifications not expressly approved by the manufacturer could void the user's
authority to operate the equipment.
1
SGP500 영영 영영영 Rev1_SGP500 영영영 (영영).qxd 2012-05-23 영영 5:00 Page 2
Precaution
PLEASE READ CAREFULLY BEFORE PROCEEDING
Please keep these precautions in a safe place for future reference.
WARNING
Always follow the basic precautions listed below to avoid the possibility of serious injury or
even death from electrical shock, short-circuiting, damages, fire or other hazards. These
precautions include, but are not limited to, the following:
ㆍ Do not open the piano or attempt to
by it, immediately turn off power switch,
disconnect the electric plug from outlet, and have
the instrument inspected by qualified service
personnel.
disassemble the internal parts or modify in
anyway. The piano contains no user-serviceable
parts. If it should appear to be malfunctioning,
discontinue use immediately and have it
inspected by qualified service personnel.
ㆍOnly use the voltage specified as correct for
the piano. The required voltage is printed on
the name label of the piano.
ㆍDo not expose the piano to rain, use it near
water or damp or wet conditions, or place
containers on it containing liquids which
might spill into any openings.
ㆍBefore cleaning the piano, always remove the
electric plug from the outlet. Never insert or
remove an electric plug with wet hand.
ㆍIf the power cord or plug becomes frayed or
damaged, or if there is a sudden loss of sound
during use of the piano, or if any unusual
smells or smoke should appear to be caused
ㆍCheck the electric plug periodically and
remove any dirt or dust which may have
accumulated on it.
CAUTION
Always follow the basic precautions listed below to avoid the possibility of physical injury to
you or others, damage to the piano or other property. These precautions include, but are not
limited to, the following:
ㆍDo not place the power cord near heat sources
such as heaters or radiators, and do not
excessively bend or otherwise damage the
cord, place heavy object on it, or place it in a
position where anyone could walk on, trip over
or roll anything over it.
ㆍBefore connecting the piano to other electronic
components, turn off power for all components.
Before turning the power on or off for all
components, set all volume levels to minimum.
ㆍDo not expose the piano to excessive dust or
vibrations, or extreme cold or heat such as in
direct sunlight, near heater, or in the car during
the day to prevent the possibility of panel
disfiguration or damage to the internal
components.
ㆍWhen removing the electric plug from the
piano or an outlet, always hold the plug itself
and not the cord. Pulling by the cord can
damage it.
ㆍDo not connect the piano to an electrical
outlet using a multiple-connector. Doing so
can result in lower sound quality, or possibly
cause over-heating in the outlet.
ㆍRemove the electric plug from the outlet
when the piano is not to be used for extended
periods of time, or during electrical storms.
ㆍDo not use the piano near other electrical
products such as televisions, radios, or speakers,
since this might cause interference which can
affect proper operation of other products.
ㆍDo not place the piano in an unstable position
where it might accidentally fall over.
2
SGP500 영영 영영영 Rev1_SGP500 영영영 (영영).qxd 2012-05-23 영영 5:00 Page 3
Precaution
immediately turn off the power and remove
electric plug from outlet. Then have the
instrument inspected by qualified service
personnel.
ㆍBefore moving the piano, remove all connected
cables.
ㆍWhen cleaning the piano, use a soft, dry cloth.
Do not use paint thinners, solvent, cleaning
fluids or chemical-impregnated wiping cloths.
Also, do not place vinyl, plastic or rubber
object on the piano, since might discover the
panel or keyboard.
ㆍDo not place the piano against a wall (allow at
least 3 cm/one inch from the wall), since this can
cause inadequate air circulation, and possibly
result in the piano overheating.
ㆍRead carefully the 'SETTING UP YOUR PIANO'
section in this manual. Failure to assemble the
piano in the proper sequence might result in
damage to the piano or even injury.
ㆍDo not rest your weight or place heavy objects
on the piano.
ㆍDo not use excessive force on the buttons,
switches and connectors.
ㆍDo not operate the piano for a long period of
time at a high or uncomfortable volume level,
since this can cause permanent heating loss. If
you experience any hearing loss or ringing the
ears, consult a physician.
ㆍTake care that the key cover does not pinch
your fingers, and do not insert a finger or hand
in the key cover gap.
ㆍNever insert or drop paper or metallic or
liquids or other objects between the slits of the
key cover and keyboard. If this happens,
ㆍDuring thunderstorms, turn the product off and
disconnect the plug from the power.
3
SGP500 영영 영영영 Rev1_SGP500 영영영 (영영).qxd 2012-05-23 영영 5:00 Page 4
Welcome
Welcome
Thank you and congratulations on your purchase of the SLIM DIGITAL GRAND PIANO.
Your new SLIM DIGITAL GRAND PIANO is a state-of-the-art musical instrument which
incorporates the latest electronics technology to make its operation as easy as possible.
Your versatile DIGITAL PIANO is ideal for beginners or experienced musicians.
In order to enjoy the features and functions of this unit to their fullest, be sure to carefully
read this manual and follow the instructions contained herein.
4
SGP500 영영 영영영 Rev1_SGP500 영영영 (영영).qxd 2012-05-23 영영 5:00 Page 5
Contents
Contents
목
Precaution
1
Welcome
4
Contents
5
Care of Your Digital Piano
6
Unpacking
7
Setting Up Your Piano
8
External Appearance
11
Controls
12
Voice Key Map
12
Function Key Map
13
Terminals
14
Using the Pedals
16
Adjusting the Volume
17
Selecting Voice
17
Layer
18
Split
19
3D (Spatial Effect)
20
Twin Piano
21
Default All
21
Reverb
22
Effect
23
Tune
24
Transpose
25
Touch
26
Using Metronome
27
Recording
28
GM Voice & Drum Table
29
MIDI Implementation Chart
32
Troubleshooting
33
Specifications
34
5
SGP500 영영 영영영 Rev1_SGP500 영영영 (영영).qxd 2012-05-23 영영 5:00 Page 6
Care of your Digital Piano
Care of your Digital Piano
● Avoid heat, humidity or direct sunlight.
● Take care not to drop the unit and avoid
strong impact.
● Keep the unit free from liquids, dust, etc...
● Never attempt to modify any parts of the
unit.
● During thunderstorms, turn the product off
and disconnect the plug from the power.
6
SGP500 영영 영영영 Rev1_SGP500 영영영 (영영).qxd 2012-05-23 영영 5:00 Page 7
Unpacking
Unpacking
Carefully take out the Digital Piano and its accessories from the packing box. The Digital
Piano set consists of the following items.
Main Unit (a)
Owner’s Manual
Pedal (e)
2 Lyres (f)
Left Leg (b)
Right Leg (c)
Rear Leg (d)
Wrench for bolt
(leg and pedal)
16 Bolts
for leg and pedal (g)
PS ø10x30mm
7
8 Screws
for lyre (h)
ø3.5x25mm
AC Power Cable
SGP500 영영 영영영 Rev1_SGP500 영영영 (영영).qxd 2012-05-23 영영 5:00 Page 8
Setting Up Your Piano
Setting Up Your Piano
1. Attaching the Legs
Attach the Left Leg (b), Right Leg (c)
and Rear Leg (d) to Main Unit (a) by
using 12 Bolts for leg and pedal (g).
2. Attaching the Pedal
Attach the Pedal (e) to Main Unit (a)
by using 4 Bolts for leg and pedal (g).
3. Attaching the Lyres
Attach the Lyres (f) between Main
Unit (a) and Pedal (e) by using 8
Screws for lyre (h).
8
SGP500 영영 영영영 Rev1_SGP500 영영영 (영영).qxd 2012-05-23 영영 5:00 Page 9
Setting Up Your Piano
4. Pedal Stability
For pedal stability, rotate the adjusters on the bottom of the pedal assembly
unit they comes in firm, contact with the floor surface.
5. Connecting the Pedal Cable and AC Power Cable
Plug the Pedal Cable and AC Power Plug into the corresponding ports on the
bottom of the main unit.
9
SGP500 영영 영영영 Rev1_SGP500 영영영 (영영).qxd 2012-05-23 영영 5:00 Page 10
Setting Up Your Piano
Turning on the Power
① Connect the AC POWER CABLE. Insert AC plug at
the end of AC cord into the piano and AC plug at
the other end of AC cord into a standard AC outlet.
☞ See CONNECTING THE PEDAL CABLE AND AC POWER
CABLE section on page 9.
② Press POWER switch. The power is turned on.
The voice of Grand Piano is selected automatically
as the default volume.
☞ Adjust the volume by using MASTER VOLUME.
To turn off the power, press POWER switch again.
All lamps will be turned off.
Headphones
Connect a set of stereo headphones(optional) to
HEADPHONE jack.
Insert plug of the headphone into the
HEADPHONE jack on the bottom panel of the
piano.
When headphone is connected, the internal
speaker system is automatically shut off.
Since the piano has two HEADPHONE jacks, two
sets of headphones can be used simultaneously,
allowing two people to enjoy listening to the
performance.
10
SGP500 영영 영영영 Rev1_SGP500 영영영 (영영).qxd 2012-05-23 영영 5:00 Page 11
External Appearance
External Appearance
1
1.
2.
3.
4.
5.
Fall Board
Control Panel
Keyboard
Pedal
Leg
2
3
4
5
11
SGP500 영영 영영영 Rev1_SGP500 영영영 (영영).qxd 2012-05-23 영영 5:00 Page 12
Controls / Voice Key Map
Controls
ⓐ
ⓑ
ⓒ
ⓓ
ⓔ
ⓕ
ⓖ
ⓗ
ⓘ
ⓚ
ⓙ
ⓐ
ⓑ
ⓒ
ⓓ
ⓔ
ⓕ
ⓖ
ⓗ
ⓘ
ⓙ
ⓚ
MASTER VOLUME
LAYER Button
SPLIT Button
3D Button
TWIN PIANO Button
REVERB Button
EFFECT Button
RECORD Button
PLAY/STOP Button
METRONOME Button
SETUP Button
Voice Key Map
12
Page
Page
Page
Page
Page
Page
Page
Page
Page
Page
17
18
19
20
21
22
23
28
28
27
SGP500 영영 영영영 Rev1_SGP500 영영영 (영영).qxd 2012-05-23 영영 5:00 Page 13
Function Key Map
Function Key Map
13
SGP500 영영 영영영 Rev1_SGP500 영영영 (영영).qxd 2012-05-23 영영 5:00 Page 14
Terminals
Terminals
ⓐ
ⓑ
ⓒ
ⓓ
CONNECTING AUDIO DEVICES
ⓐ AUX in jacks(RCA jacks of L and R)
The stereo outputs from another instrument can be connected to these jacks, allowing the sound of
an external instrument to be reproduced via the instrument's speakers.
Connect the output jacks (LINE OUT etc.) of an external synthesizer or the tone generator module and
the instrument's AUX In 'L' and 'R' jacks using appropriate audio cables.
☞ CAUTION
When the sound of an external device is output to the instrument, first turn on the power to the external device, then to the
instrument. Reverse this order when you turn the power off.
ⓑ AUX out jacks (RCA jacks of L and R)
When these are connected, you can use the instrument's MASTER VOLUME control to adjust the
volume of the sound output to the external device.
Connect the instrument's AUX Out 'L' and 'R' jacks and the input jacks of a pair of powered speakers
using appropriate audio cables.
14
SGP500 영영 영영영 Rev1_SGP500 영영영 (영영).qxd 2012-05-23 영영 5:00 Page 15
Terminals
CONNECTING OTHER DEVICES
ⓒ Connecting the external MIDI devices (MIDI Terminals)
Use the built-in MIDI terminals and standard MIDI cables to connect external MIDI devices.
MIDI IN
Receives MIDI messages from an external MIDI device.
MIDI OUT Transmits MIDI messages generated by the instrument.
☞ What's MIDI?
MIDI(Musical Instrument Digital Interface) is the international standard for digital communication of electronic musical
instrument data.
This means that any equipment that has a MIDI terminal (such as electronic musical instruments or personal computers ) can easily
exchange digital data with other MIDI equipment without complicated conversions or connections.
ⓓ Connecting a computer (USB Terminal)
By connecting a computer to the USB, you can transfer data between the instrument and the
computer via MIDI, and take advantage of sophisticated computer music programs. Keep in mind
that you also need to install an appropriate USB MIDI driver.
The instructions below explain how to connect and use the terminals.
☞ CAUTION - Precautions when using the USB terminal.
When connecting the computer to the USB terminal, make sure to observe the following points. Failing to do so risks freezing
the computer and corrupting or losing data. If the computer or the instrument freezes, turn the power to the instrument off
and restart the computer.
Before connecting the computer to the USB terminal, exit from any power-saving mode of the computer (such as suspended,
sleep, standby), quit any open application software, and turns off the power to the instrument.
Execute the following before turning the power to the instrument off or unplugging the USB cable to/from the
instrument/computer.
- Quit any open application software on the computer.
- Make sure that data is not being transmitted from the instrument. (Data is transmitted only by playing notes on the
keyboard or playing back a song.)
- While a USB device is connected to the instrument, you should wait for six seconds or more between these operations:
When turning the power of the instrument off then on again, or when alternately connecting/disconnecting the USB cable.
THE LOCAL CONTROL ON/OFF
Local control refers to the fact that, normally, the piano keyboard controls its internal tone generator,
allowing the internal voices to be played directly from the keyboard.
This situation is called Local Control ON. When the local control is set to off, the keyboard and sound
source are separated and no sound is heard through the piano when playing the keyboard.
However, the data of the keyboard performance is output through MIDI. By setting local control to
off, you can play an external MIDI tone generator from the keyboard of the piano without sounding
the internal voices.
To enter the MIDI local control off mode, hold down the SETUP button and press C8 right end key
of the keyboard.
To release it, press again C8 key with the SETUP button.
15
SGP500 영영 영영영 Rev1_SGP500 영영영 (영영).qxd 2012-05-23 영영 5:00 Page 16
Using the Pedals
Using the Pedals
The piano has three pedals.
③
②
①
① Damper Pedal (Right)
The damper pedal performs the same function as the damper pedal on an actual
acoustic piano, letting you sustain the sound of the voices even after releasing your
fingers from the keys.
☞ Certain voices in the PERCUSSION sounds may not be affected by use of the damper pedal.
☞ Some voices may sound continuously or have a long decay after the notes have been released
while the damper pedal is held.
② Sostenuto Pedal (Center)
If you play a note or chord on the keyboard and press the sostenuto pedal while
the note(s) are held, those notes will be sustained as long as the pedal is held, but all
subsequently played notes will not be sustained. This makes it possible to sustain a
chord, for example, while other notes are played staccato.
☞ Certain voices in the PERCUSSION group may not be affected by use of the sostenuto pedal.
☞ Certain voices such as STRINGS or BRASS sustain continuously when the sostenuto pedal is
pressed.
③ Soft Pedal (Left)
Pressing this pedal reduces the volume and slightly changes the timbre of the
notes you play.
16
SGP500 영영 영영영 Rev1_SGP500 영영영 (영영).qxd 2012-05-23 영영 5:00 Page 17
Adjusting the Volume / Selecting Voice
Adjusting the Volume
The piano has one volume on the panel for adjusting the volume.
MASTER VOLUME
This determines the entire volume of the piano.
☞ This also determines the output level of the signal at the HEADPHONES.
Selecting Voice
The piano features a wealth of rich, authentic voices, including piano, strings and brass
instruments. It also features a keyboard percussion function that lets you play the
realistic drum and percussion sounds directly from keyboard.
There are 10 main voices, 2 split voices, 3 layered voices and 14 extra voices in this piano.
☞ Main Voice
Grand Piano 1, 2, Pipe Organ, Elec. Organ 1, 2, Elec. Piano 1, 2, Strings, Slow Strings, Choir
☞ Split Voice
Acoustic Bass, Elec. Bass
☞ Layered Voice
Acoustic Bass, Fingered Bass, Elec. Bass
☞ Extra Voice
Grand Piano 3, Detuned Piano, Harpsichord, Vibraphone, Accordion, Elec. Organ 3,
Square Wave, Sawtooth Wave, Synth Piano, Flute, Saxophone, Guitar, Synth brass, Drum set
☞ 128 General MIDI Voice
When connecting with PC, it's available to use 128 GM voices.
(See the GM VOICE CHART/DRUM TABLE section on page 29~31.)
① Press and hold the SETUP button.
☞ The lamp is on.
② Select a desired voice.
☞ Both the SETUP button and a voice key should be pressed.
☞ Default voice is Grand piano 1.
☞ Refer to the VOICE key map on page 12.
☞ When a split voice or a layer voice is selected, layer or split function automatically will be on.
See the LAYER/SPLIT section on page 18~19.
17
SGP500 영영 영영영 Rev1_SGP500 영영영 (영영).qxd 2012-05-23 영영 5:00 Page 18
LAYER
Layer
The layer mode of the piano allows you to select and play two different voices
simultaneously in a layer. This makes it easy to create exceptionally rich and thick tonal
textures. The volume balance can be set for the two voices.
PLAYING WITH THE LAYER VOICE
① Select a main voice.
Select a voice in the normal way. (See the SELECTING VOICE section on page 17.)
② Call up the layer mode.
To call up the layer mode, press the LAYER button. Lamp lights and
the layer is set on.
☞ If you select a layer voice, layer function automatically can be on without pressing
the LAYER button.
③ Select the layered voice.
Select a voice in the normal way. (See the SELECTING VOICES section on page 17.)
ADJUSTING THE LAYER VOLUME
This determines the volume of the layered voice.
① Press and hold the SETUP button.
☞ The lamp is on.
② Adjust the layer volume by pressing secondary voice volume up(D#4) and down(C#4) keys.
+
☞ Refer to the FUNCTION KEY MAP on page 13.
☞ If you press both UP and DOWN keys at the same time, it automatically returns to the default secondary
voice volume (11). The range of volume is 0 ~ 16.
☞ Hold the key for continuous decrementing or incrementing.
☞ Both split and layer volumes can be adjusted by using secondary volume keys.
18
SGP500 영영 영영영 Rev1_SGP500 영영영 (영영).qxd 2012-05-23 영영 5:00 Page 19
Split
Split
The split mode of the piano allows you to select and play two different voices with your left
and right hands. For example, play bass with the left and piano with the right.
PLAYING WITH THE SPLIT VOICE
① Select a main voice.
Select a voice in the normal way. (See the SELECTING VOICE section on page 17.)
② Call up the split mode.
To call up the split mode, press the SPLIT button. Lamp lights and
the split is set on.
☞ If you select a split voice, layer function automatically can be on without
pressing the SPLIT button.
③ Select the split voice.
Select a voice in the normal way. (See the SELECTING VOICE section on page 17.)
ADJUSTING THE SPLIT VOLUME
This determines the volume of the split voice.
① Press and hold the SETUP button.
☞ The lamp is on.
② Adjust the split volume by pressing secondary volume up(D#4) and down(C#4) keys.
☞ Refer to the FUNCTION KEY MAP on page 13.
☞ If you press both UP and DOWN keys at the same time, it automatically returns to the default secondary
voice Volume (11). The range of volume is 0 ~ 16.
☞ Hold the key for continuous decrementing or incrementing.
☞ Both split and layer volumes can be adjusted by using secondary volume keys.
CHANGING THE SPLIT POINT
You can set the point dividing the split voice and main voice ranges at any desired key position.
① Press and hold the SPLIT button.
② Press a desired key. The pressed key is assigned to new split point.
☞ Default value is F#3.
▼ Split point (F#3)
19
SGP500 영영 영영영 Rev1_SGP500 영영영 (영영).qxd 2012-05-23 영영 5:00 Page 20
3D (Spatial Effect)
3D (Spatial Effect)
The 3D effects widen the stereo image and the listener through two speakers or stereo
headphones feels like placed in 3 dimensional spaces.
PLAYING WITH THE 3D EFFECT
① Press the 3D button.
The 3D effect turns on and the lamp lights.
② To turn off the 3D effect, press the 3D button again.
The 3D effect turns off and the lamp goes out.
20
SGP500 영영 영영영 Rev1_SGP500 영영영 (영영).qxd 2012-05-23 영영 5:00 Page 21
Twin Piano / Default All
Twin Piano
Splitting the piano Keyboard into two sections for twin piano performance.
The keyboard can be divided into two separate sections, allowing two people to perform in
the same octave.
PLAYING WITH THE TWIN PIANO
① Press the TWIN PIANO button.
The keyboard splits two sections, which have same octave.
② To turn off the twin piano performance, press the TWIN PIANO button again.
The twin piano performance turns off and the lamp goes out.
☞ This function can not be used with the layer and split functions.
Default All
Press ad hold the SETUP button and press left-end key (A#0).
Following settings go to default values.
1) Secondary Voice volume (Default, 11 Range 0 ~ 16)
2) Reverb level (Default 11, Range 0 ~ 16)
3) Effect level (Default 11, Range 0 ~ 16)
4) Metronome beat (Default 4, Range 2 ~ 13)
5) Metronome tempo (Default 128, 40~250)
6) Transpose (Default C, Range G~C~F#)
7) Tune (Default A3 440Hz, Range -50 ~ 0 ~ 50 cents)
8) Touch (Default Normal, Range Off, Hard, Normal, Soft)
21
SGP500 영영 영영영 Rev1_SGP500 영영영 (영영).qxd 2012-05-23 영영 5:00 Page 22
Reverb
Reverb
Reverb is an effect that recreates the decaying reflections of a sound in a performance
space, and reproduces the special ambience of a concert hall.
① Press the REVERB button.
☞ The reverb turns on and lamp lights.
☞ The reverb is engaged automatically when the power is turned on with
the lamp lighting.
② To turn off the reverb, press the REVERB button again.
The reverb turns off and the lamp goes out.
ADJUSTING THE REVERB LEVEL
① Press and hold the SETUP button.
☞ The lamp is on.
② Adjust the reverb level by pressing reverb level up(G#4) and down(F#4) keys.
+
☞
☞
☞
☞
☞
Refer to the FUNCTION KEY MAP on page 13.
The reverb level can be adjusted, when reverb is on.
If you press both UP and DOWN keys at the same time, it automatically returns to the default reverb level (11).
The range is 0 ~ 16.
Hold the key for continuous decrementing or incrementing.
22
SGP500 영영 영영영 Rev1_SGP500 영영영 (영영).qxd 2012-05-23 영영 5:00 Page 23
Effect
Effect
The effect adds more breadth to the selected keyboard voice.
① Press the EFFECT button.
☞ The effect turns on and lamp lights.
☞ When turning on power, the effect is off. (Default is off.)
② To turn off the effect, press the EFFECT button again.
The effect turns off and the lamp goes out.
ADJUSTING THE EFFECT LEVEL
① Press and hold the SETUP button.
☞ The lamp is on.
② Adjust the effect level by pressing effect level up(D#5) and down(C#5) keys.
+
☞
☞
☞
☞
☞
Refer to the FUNCTION KEY MAP on page 13.
The effect level can be adjusted, when effect is on.
If you press both UP and DOWN keys at the same time, it automatically returns to the default effect level (11).
The range is 0 ~ 16.
Hold the key for continuous decrementing or incrementing.
23
SGP500 영영 영영영 Rev1_SGP500 영영영 (영영).qxd 2012-05-23 영영 5:00 Page 24
Tune
Tune
The Tune function lets you make fine adjustments to the pitch, allowing you to
accurately match the tuning with that of other instruments.
① Press and hold the SETUP button.
☞ The lamp is on.
② Adjust the pitch by pressing tune up(D#7) and down(C#7) keys.
+
☞
☞
☞
☞
☞
Refer to the FUNCTION KEY MAP on page 13.
When pressing up or down key, piano makes 'C' sound and you can hear the adjusted pitch.
If you press both UP and DOWN keys at the same time, it automatically returns to the default value.
Range A3 440Hz ± 50cents (1 step is 1 cent.)
Hz(Hertz) The pitch is measured in units of Hertz (abbreviated Hz), which represents the number
of times the sound wave vibrates in a second.
☞ The cent is unit of pitch, equal to 1/100 of a semitone.
☞ Hold the key for continuous decrementing or incrementing.
24
SGP500 영영 영영영 Rev1_SGP500 영영영 (영영).qxd 2012-05-23 영영 5:00 Page 25
Transpose
Transpose
The Transpose function makes it possible to shift the pitch of the keyboard in
semitone units, allowing you to match the pitch of the keyboard to the range of other
instruments or singers, or letting you easily play in a different key without having to
change your fingering.
For example, if the Transpose is set F, playing C results in a pitch of F, or in other words,
you can play in the key of C major on the keyboard and automatically have the pitch
transposed to F major.
① Press and hold the SETUP button.
☞ The lamp is on.
② Set new key of transpose section.
+
☞ Refer to the FUNCTION KEY MAP on page 13.
☞ Default value: C key
☞ Range: 12 semitones (G ~ C ~ F#)
25
SGP500 영영 영영영 Rev1_SGP500 영영영 (영영).qxd 2012-05-23 영영 5:00 Page 26
Touch
Touch
Touch determines how your playing strength (velocity) affects the volume of the voices.
Four types are available for tailoring the keyboard response to the selected voice, type of
song, or your own playing preference.
① Press and hold the SETUP button.
☞ The lamp is on.
② Set a desired touch by pressing one of touch keys.
+
☞ Refer to the FUNCTION KEY MAP on page 13.
☞ Default touch is Normal.
☞ There are 4 touch types in this piano - Off, Hard, Normal, Soft
Off (F7)
This setting produces the same degree of loudness, no matter how strongly or softly you play the keys.
Hard (F#7)
This setting requires you to play the keys quite strongly to produce maximum loudness.
Normal (G#7)
This setting is standard keyboard response. - Default setting
Soft (A#7)
This setting lets you produce a relatively loud sound even when playing the key softly.
26
SGP500 영영 영영영 Rev1_SGP500 영영영 (영영).qxd 2012-05-23 영영 5:00 Page 27
Using Metronome
Using Metronome
The piano features a convenient metronome that is ideal for practicing.
① START/STOP of Metronome
To start the metronome, simply press the METRONOME button.
The lamp lights.
Press the METRONOME button again to stop the metronome
sound. The lamp goes off.
② Adjusting Tempo of Metronome
You can set the tempo over range 40 ~ 250 by using the TEMPO
buttons.
☞ Hold the button for continuous decrementing or incrementing.
☞ If pressing both TEMPO UP and DOWN buttons, tempo goes to default.
☞ Default tempo ♩ = 128.
③ Changing the metronome Beat
Press and hold the SETUP button and press the METRONOME BEAT UP(G#5) or DOWN(F#5) key.
+
☞
☞
☞
☞
Refer to the FUNCTION KEY MAP on page 13.
Metronome beat range 2, 3, 4, 5, 6, 7, 8, 9, 10, 11, 12, 13
Default beat 4
If you want to set default beat, press and hold the SETUP button and press DEFAULT key in the metronome
beat section.
27
SGP500 영영 영영영 Rev1_SGP500 영영영 (영영).qxd 2012-05-23 영영 5:00 Page 28
Recording
Recording
This piano is equipped with a real time recorder, able to store a song or performance. It will
record all notes as they are played.
① Select Record mode.
Press the RECORD button. The button lights.
② Start recording
Start playing the keyboard or press the PLAY/STOP button.
The record button flashes and the play/stop button lights.
③ Stop recording
Stop playing the keyboard and press the PLAY/STOP button.
Both record and play/stop buttons light.
④ Playback the recorded song
Press the PLAY/STOP button again in the record mode.
The recorded song is played.
The play/stop button flashes and the record button lights.
☞ To delete the recorded song, press and hold the RECORD button for
2~3 seconds.
☞ If there is no recorded song in the memory, the record lamp lights
and the play/stop lamp is off.
☞ If there is a recorded song in the memory, both the record lamp and
the play/stop lamps light.
☞ Even if the power is turned off, the song memory remains.
⑤ Return to the normal mode
Press the RECORD button. The record button light is turned off.
28
SGP500 영영 영영영 Rev1_SGP500 영영영 (영영).qxd 2012-05-23 영영 5:00 Page 29
GM Voice & Drum Table
GM Voice & Drum Table
GM #
0
0
0
0
0
0
0
0
0
0
0
0
0
0
0
0
0
0
0
0
0
0
0
0
0
0
0
0
0
0
0
0
0
0
0
0
0
0
0
0
0
0
0
0
0
0
0
0
0
0
0
0
0
0
0
0
0
0
0
0
0
0
0
0
0
0
0
0
0
0
0
0
0
1
1
1
1
1
1
1
1
1
1
2
2
2
2
2
2
2
2
2
2
3
3
3
3
3
3
3
3
3
3
4
4
4
4
4
4
4
4
4
4
5
5
5
5
5
5
5
5
5
5
6
6
6
6
6
1
2
3
4
5
6
7
8
9
0
1
2
3
4
5
6
7
8
9
0
1
2
3
4
5
6
7
8
9
0
1
2
3
4
5
6
7
8
9
0
1
2
3
4
5
6
7
8
9
0
1
2
3
4
5
6
7
8
9
0
1
2
3
4
Voice
GM #
Voice
Piano1
Piano2
Piano3
Honky Tonk
Electric Piano 1
Electric Piano 2
Harpsichord
Clavinet
Celesta
Glockenspiel
Music Box
Vibraphone
Marimba
Xylophone
Tubular Bell
Dulcimer
Electric Organ
Jazz Organ
Rock Organ
Pipe Organ
Reed Organ
Accordion
Harmonica
Bandonion
Nylon Guitar
Steel Guitar
Jazz Guitar
Clean Guitar
Muted Guitar
Drive Guitar
Lead Guitar
Harmonic Guitar
Acoustic Bass
Finger Bass
Pick Bass
Fretless Bass
Slap Bass1
Slap Bass2
Synth Bass1
Synth Bass2
Violin
Viola
Cello
Contra Bass
Tremolo Strings
Pizzicato Strings
Harp
Timpani
Strings
Slow Strings
Synth Strings1
Synth Strings 2
Choir Aahs
Voice Oohs
Synth Voice
Orchestra Hit
Trumpet
Trombone
Tuba
Muted Trumpet
French Horn
Brass Section
Synth Brass1
Synth Brass2
065
066
067
068
069
070
071
072
073
074
075
076
077
078
079
080
081
082
083
084
085
086
087
088
089
090
091
092
093
094
095
096
097
098
099
100
101
102
103
104
105
106
107
108
109
110
111
112
113
114
115
116
117
118
119
120
121
122
123
124
125
126
127
128
Soprano Saxophone
Alto Saxophone
Tenor Saxophone
Baritone Saxophone
Oboe
English Horn
Basson
Clarinet
Piccolo
Flute
Recorder
Pan Flute
Bottle Blow
Shakuhachi
Whistle
Ocarina
Square
Sawtooth
Calliope
Chiffer
Charang
Solo Vox
Fifths
Bass Lead
Fantasia
Warm Pad
Poly Synth
Space Vox
Bow Glass
Metal Pad
Halo Pad
Sweep Pad
Ice Rain
Sound Track
Crystal
Atmosphere
Brightness
Goblin
Echo Drop
Star Theme
Sitar
Banjo
Shamishen
Koto
Kalimba
Bagpipe
Fiddle
Shanai
Tinkle Bell
Agogo
Steel Drum
Wood Block
Taiko
Melody Tom
Synth Drum
Reversed Cymbal
Guitar Noise
Breath Noise
Sea Shore
Birds
Telephone
Helicopter
Applause
Gunshot
☞ When connecting with PC or other MIDI device via MIDI or USB port, 128 GM voices and all drum sets on
the table can be used.
29
SGP500 영영 영영영 Rev1_SGP500 영영영 (영영).qxd 2012-05-23 영영 5:00 Page 30
GM Voice & Drum Table
27 - D#1
28 - E1
29 - F1
30 - F#1
31 - G1
32 - G#1
33 - A1
34 - A#1
35 - B1
36 - C2
37 - C#2
38 - D2
39 - D#2
40 - E2
41 - F2
42 - F#2
43 - G2
44 - G#2
45 - A2
46 - A#2
47 - B2
48 - C3
49 - C#3
50 - D3
51 - D#3
52 - E3
53 - F3
54 - F#3
55 - G3
56 - G#3
57 - A3
58 - A#3
59 - B3
60 - C4
61 - C#4
62 - D4
63 - D#4
64 - E4
65 - F4
66 - F#4
67 - G4
68 - G#4
69 - A4
70 - A#4
71 - B4
72 - C5
73 - C#5
74 - D5
75 - D#5
76 - E5
77 - F5
78 - F#5
79 - G5
80 - G#5
81 - A5
82 - A#5
83 - B5
84 - C6
85 - C#6
86 - D6
87 - D#6
88 - E6
Prog 1
Standard Drum
High Q
Slap
Scratch Push
Scratch Pull
Sticks
Square Click
Metronome Click
Metronome Bell
Kick drum2/Jazz BD2
Kick drum1/Jazz BD1
Side Stick
Snare Drum1
Hand Clap
Snare Drum 2
Low Floor Tom
Closed Hi Hat [EXC1]
High Floor Tom
Pedal Hi-Hat [EXC1]
Low Tom
Open Hi-Hat [EXC1]
Low-Mid Tom
Hi Mid Tom
Crash Cymbal 1
High Tom
Ride Cymbal 1
Chinese Cymbal
Ride Bell
Tambourine
Splash Cymbal
Cowbell
Crash Cymbal2
Vibraslap
Ride Cymbal2
Hi Bongo
Low Bongo
Mute Hi Conga
Open Hi Conga
Low Conga
High Timbale
Low Timbale
High Timbale
Low Agogo
Cabasa
Maracas
Short Whistle[EXC2]
Long Whistle[EXC2]
Short Guiro[EXC3]
Long Guiro[EXC3]
Claves
Hi Wood Block
Low Wood Block
Mute Cuica[EXC4]
Open Cuica[EXC4]
Mute Triangle[EXC5]
Open Triangle[EXC5]
Shaker
Jingle Bell
Belltree
Castanets
Mute Surdo[EXC6]
Open Surdo[EXC6]
Prog 9
Room Drum
Prog 17
Rock Drum
Prog 25
Elec. Drum
Prog 26
Analog Drum
Power Kick
Elec BD
Gated Snare
Elec SD
808 Bass Drum
808 Rim shot
808 Snare Drum
Room Low Tom2
Room Low Tom2
Elec Low Tom2
Room Low Tom1
Room Low Tom1
Elec Low Tom1
Room Mid Tom2
Room Mid Tom2
Elec Mid Tom2
Room Mid Tom1
Room Hi Tom2
Room Mid Tom1
Room Hi Tom2
Elec Mid Tom1
Elec Hi Tom2
Room Hi Tom1
Room Hi Tom1
Elec Hi Tom1
808 Low Tom2
808 CHH[EXC1]
808 Low Tom2
808 CHH[EXC1]
808 Mid Tom2
808 OHH[EXC1]
808 Mid Tom1
808 Hi Tom2
808 Cymbal
808 Hi Tom1
Reverse Cymbal
808 Cowbell
808 High Conga
808 Mid Conga
808 Low Conga
808 Maracas
808 Claves
30
SGP500 영영 영영영 Rev1_SGP500 영영영 (영영).qxd 2012-05-23 영영 5:00 Page 31
GM Voice & Drum Table
27 - D#1
28 - E1
29 - F1
30 - F#1
31 - G1
32 - G#1
33 - A1
34 - A#1
35 - B1
36 - C2
37 - C#2
38 - D2
39 - D#2
40 - E2
41 - F2
42 - F#2
43 - G2
44 - G#2
45 - A2
46 - A#2
47 - B2
48 - C3
49 - C#3
50 - D3
51 - D#3
52 - E3
53 - F3
54 - F#3
55 - G3
56 - G#3
57 - A3
58 - A#3
59 - B3
60 - C4
61 - C#4
62 - D4
63 - D#4
64 - E4
65 - F4
66 - F#4
67 - G4
68 - G#4
69 - A4
70 - A#4
71 - B4
72 - C5
73 - C#5
74 - D5
75 - D#5
76 - E5
77 - F5
78 - F#5
79 - G5
80 - G#5
81 - A5
82 - A#5
83 - B5
84 - C6
85 - C#6
86 - D6
87 - D#6
88 - E6
Prog 33
Jazz Drum
Prog 41
Brush Drum
Prog 49
Orchestra
Closed Hi Hat
Pedal Hi-Hat
Open Hi Hat
Ride Cymbal
Jazz BD2
Jazz BD1
Jazz BD2
Jazz BD1
Concert BD 2
Concert BD1
Brush Tap
Brush Slap
Brush Swirl
Concert SD
Castanets
Concert SD
Timpani F
Timpani F#
Timpani G
Timpani G#
Timpani A
Timpani A#
Timpani B
Timpani c
Timpani c#
Timpani d
Timpani d#
Timpani e
Timpani f
Concert Cymbal2
Concert Cymbal1
31
Remark
SGP500 영영 영영영 Rev1_SGP500 영영영 (영영).qxd 2012-05-23 영영 5:00 Page 32
MIDI Implementation Chart
MIDI Implementation Chart
Function Recognized Transmitted
Remark
Basic Channel
Default
ALL
1-3
Mode
Default
OMNI OFF, POLY
OMNI OFF, POLY
Note ON/OFF
9nH kk vv
O
O
#kk:note ON (0-127)
#vv:velocity (1-127)
Pitch Bender
EnH bi bh
O
X
Maximum swing +/- 1 tone
00
BnH 00H cc
O
X
Bank Select
01
BnH 01H cc
O
X
Modulation Wheel
05
BnH 05H cc
O
X
Portamento Time
06
BnH 06H cc
O
X
Data Entry
07
BnH 07H cc
O
X
Volume
10
BnH 0AH cc
O
X
Pan Out
11
BnH 0BH cc
O
X
Expression
64
BnH 40H cc
O
O
Sustain (Damper) Pedal
65
BnH 41H cc
O
X
Portamento ON/OFF
66
BnH 42H cc
O
O
Sostenuto Pedal
Control
67
BnH 43H cc
O
O
Soft Pedal
Change
80
BnH 80H vv
O
X
Reverb Prog.(vv=00H-70H)
81
BnH 51H vv
O
X
Chorus Prog.
91
BnH 5BH vv
O
X
Reverb Send Level
93
BnH 5DH vv
O
X
Chorus Send Level
120
BnH 78H 00H
O
X
All Sound Off
121
BnH 79H 00H
O
X
Reset All Controller
123
BnH 7BH 00H
O
X
All Notes Off
126
BnH 7EH 00H
O
X
Mono On
127
BnH 7FH 00H
O
X
Poly On
Program Change
CnH PP
O
O
Sounds/Drum Set List
System Exclusive
General MIDI
O
X
Reset
O : Yes,
32
X : No
SGP500 영영 영영영 Rev1_SGP500 영영영 (영영).qxd 2012-05-23 영영 5:00 Page 33
Troubleshooting
Troubleshooting
※ Be sure to check the following table whenever you encounter problems with the DIGITAL
PIANO operation.
PROBLEM
CAUSE
SOLUTION
1. Power supply problem.
1. Check whether the power
cord is properly in AC outlet.
2. Volume setting is too low.
2. Adjust the volume.
3. Headphone is plugged in.
3. Unplug the headphone.
Occasional interference
1. Refrigerators, washing
machines and similar
electric appliances are
interfering.
1. Use outlet as far away as
possible from appliances
thought to be the cause.
No sound when connected
to external amplifier.
1. Volume setting is too low.
1. Adjust the volume.
2. Defective connection cord.
2. Replace connection cord.
No sound
33
SGP500 영영 영영영 Rev1_SGP500 영영영 (영영).qxd 2012-05-23 영영 5:00 Page 34
Specifications
Specifications
PRODUCT
SLIM DIGITAL GRAND PIANO
KEYBOARD
88 HAMMER ACTION KEYBOARD - 7 1/4 OCTAVES
MAX. POLYPHONY
128 NOTES
SOUND
25 Voices and 1 DRUM KIT
FUNCTIONS
LAYER
SPLIT
TWIN PIANO
TUNE
TRANSPOSE
TOUCH (Off, Hard, Normal, Soft)
DSP
3D EFFECT
REVERB with Adjustable Level Control
EFFECT with Adjustable Level Control
METRONOME
YES (Available to adjust Tempo & Beat)
RECORD
REAL-TIME-RECORDING
1 TRACK
APPROX. 4,500 NOTES
PEDAL
3PEDALS (DAMPER, SOSTENUTO, SOFT)
VOLUME CONTROLS
MAIN VOLUME
I/O TERMINALS
MIDI IN/OUT
AUX L/R IN
AUX L/R OUT
USB IN
2 HEADPHONE JACKS
SPEAKER
6:9 INCHES× 2, 2INCH x 2
POWER
AC IN
POWER CONSUMPTION
90W
DIMENSIONS (W x D X H)
1400 x 860 x 795 mm
WEIGHT
82KGS
ACCESSORY
OWNER’ S MANUAL, AC POWER CABLE
34
SGP500 영영 영영영 Rev1_SGP500 영영영 (영영).qxd 2012-05-23 영영 5:00 Page 37
DYNATONE CORP.
www.dynatone.biz
Part No. 11958291