1
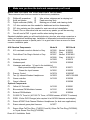
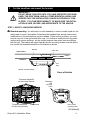
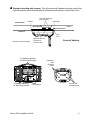
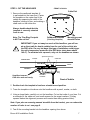
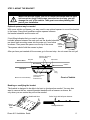
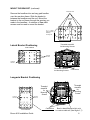
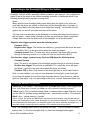
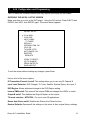
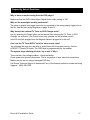
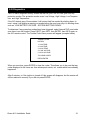
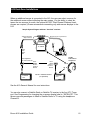
Installation Guide A10 DVD Entertainment System BEFORE YOU START THE INSTALLATION, READ THIS GUIDE! Rosen “all-in-one” systems are the easiest-to-install DVD entertainment systems available today. Even though they are very easy to install, we still strongly recommend reading this guide before starting the installation! Below is an outline of the installation process, showing the installation sequence we recommend, and the pages that describe each step. Contents - Steps to a successful installation: Step One: Make sure you have all the components and tools you’ll need 2 Step Two: Check out the vehicle and plan your work console location, harness routing, etc. 3 Step Three: Cut the headliner and mount the Bracket 4-9 Step Four: Route the harnesses and make all wiring connections 10 Connecting the Domelight wires 11 Step Five: Install the main unit 12 Step Six: Test the system, reassemble the vehicle, re-test quickly 13 Step Seven A10 Configuration and Programming 14-16 Frequently Asked Questions 17 A10 Diagnostics 18 Dual Zone and Multi-screen Installations 19 System Diagram 20 A10 Installation Manual Revision A(060204) RES PN 9100390 Copyright 2004 Rosen Entertainment Systems 866-Go Rosen www.rosenentertainment.com NOTICE OF INTENDED INSTALLATION AND USE ROSEN ENTERTAINMENT SYSTEMS OVERHEAD VIDEO PRODUCTS ARE NOT INTENDED FOR VIEWING BY THE DRIVER, AND ARE TO BE INSTALLED ONLY TO BE VIEWED BY REAR-SEAT OCCUPANTS. IMPROPER INSTALLATION COULD DISTRACT THE DRIVER OR INTERFERE WITH SAFE OPERATION OF THE VEHICLE, WHICH COULD RESULT IN SERIOUS INJURY OR DEATH, AND COULD ALSO VIOLATE STATE LAW. ROSEN ENTERTAINMENT SYSTEMS DISCLAIMS ANY LIABILITY FOR ANY BODILY INJURY OR PROPERTY DAMAGE THAT MAY RESULT FROM ANY IMPROPER OR UNINTENDED INSTALLATION AND/OR USE. Rosen A10 Installation Guide 1 1 Make sure you have the tools and components you’ll need MAKE SURE YOU HAVE THE TOOLS AND PARTS YOU’LL NEED These common hand tools are needed in almost every installation: ! ! ! Phillips #2 screwdriver Knife and blades Digital multimeter (DMM) ! ! ! Wire cutters, strippers,and a crimping tool Panel-removing tools Marking pen or chalk, and cleaning cloths ! 1/4” drive sockets are often needed for dashboard and trim disassembly. ! 3/8” drive sockets are often needed for seat removal and reinstallation. ! Check if Torx or Allen-drive bolts are used on any panels you will be removing. ! You will need a DVD in good condition when testing the system. Standard installation parts you will need include wire, wire ties, wire crimp connectors or solder, and electrical insulating tape. Installation of aftermarket automotive electronics also often requires access to special parts. It is a good idea to have a source for these common installation parts. A10 Standard Components: ! A10 overhead console in Neutral or Gray Model # AC3300 AC3301 ! Flush-Mount Trim Ring in Neutral or Gray AC3207 AC3208 ! Mounting bracket AC3206 ! Hardware pack AC3104 ! Harnesses and cables: *(if used in the installation) Black power/domelight harness AC3076 *Green Aux Input harness AC3081 ! Remote Control AC3074 ! Two (2) Infrared Wireless Headphones AC3003 ! Game controller AC3169 ! Owner’s Manual Optional Components: RES Part # Neutral 9100321 Gray 9100322 Neutral 9100180-2 Gray 9100181-2 9100270 9100240 9100371 9100392 91002387 4007-0158-000 9100369 9100389 ! ! ! Yellow A/V Out cable Blue external FM Modulator harness External FM Modulator ! CV4000 TV Tuner kit ( AC3105 TV Tuner, AC3024 harness, AC3035 TV antenna) ! R5001 10-disc DVD Changer (also requires kit w/ AC3024 harness and adapter) ! Rosen AC3007 Dual-Channel Wireless Headphones (for dual-zone applications) ! Rosen external game plate/ harness ! Rosen 43mm Tall Trim Ring (CV2033 G and N), 60mm Tall Trim Ring (CV2034N), or Toyota Sienna Trim Ring (CV2035N) Rosen A10 Installation Guide AC3192 AC3191 AC3195 9100261 9100265 9100244 AC3077 2 2 Check out the vehicle and plan your work IMPORTANT! The vehicle’s roof beam (above the headliner) must support the weight of the overhead console. The supplied mounting bracket must be firmly attached to the roof beam. Determine if this is possible to ensure that the vehicle is suitable for the installation. CHECK THE BATTERY Test the battery voltage and inspect battery terminals for tightness and any corrosion. This takes 30 seconds and can save hours of troubleshooting later. ! DECIDE ON A LOCATION FOR THE MAIN UNIT Location of the main unit varies by vehicle, but is typically on the center line of the vehicle and is always aft of the front seats. Often, the main unit’s domelights replace the factory dome light. Always attach the mounting bracket to the existing roof cross beams. NOTICE OF INTENDED INSTALLATION AND USE ROSEN ENTERTAINMENT SYSTEMS OVERHEAD VIDEO PRODUCTS ARE NOT INTENDED FOR VIEWING BY THE DRIVER, AND ARE TO BE INSTALLED ONLY TO BE VIEWED BY REAR-SEAT OCCUPANTS. IMPROPER INSTALLATION COULD DISTRACT THE DRIVER OR INTERFERE WITH SAFE OPERATION OF THE VEHICLE, WHICH COULD RESULT IN SERIOUS INJURY OR DEATH, AND COULD ALSO VIOLATE STATE LAW. ROSEN ENTERTAINMENT SYSTEMS DISCLAIMS ANY LIABILITY FOR ANY BODILY INJURY OR PROPERTY DAMAGE THAT MAY RESULT FROM ANY IMPROPER OR UNINTENDED INSTALLATION AND/OR USE. The main unit requires adequate roof support and a relatively flat headliner. Before you begin installation, drop the dome light and partially drop the headliner, and verify that you have sufficient clearance and sufficient support from a roof beam. Inspect the vehicle roof and headliner area and consider the following questions. ! Does the vehicle have overhead climate controls? Does their location interfere with installation of the main unit? ! Is the dome light located where it would interfere with your installation of the unit? The main unit has built-in dome lights which connect to the existing vehicle domelight wiring, so it can replace the factory dome light. ! Does the vehicle headliner contour require using an optional Tall Trim Ring and modifying it? (Make sure you have the tools needed). Rosen A10 Installation Guide 3 3 Cut the headliner and mount the bracket ! IMPORTANT! DO NOT BEGIN THIS STEP UNTIL YOU HAVE INSPECTED THE HEADLINER, THE ROOF BEAM, AND ALL OTHER ESSENTIAL AREAS, AND VERIFIED THAT THE INSTALLATION CAN BE SUCCESSFULLY COMPLETED! IT IS YOUR RESPONSIBILITY TO MAKE SURE THE INSTALLATION IS SAFE, SECURE, AND APPROPRIATE TO THE VEHICLE. STEP 1: SELECT A MOUNTING METHOD ! Standard mounting. You will need to cut the headliner in order to create a path for the cables and to mount the bracket. Sometimes the headliner has enough contour that modifications to the included trim ring are needed. (If this contour is severe, you may need to use one of the optional tall trim rings.) It is critical to modify the trim ring when working with uneven surfaces, as the uneven pressure can cause various problems with the unit. The bracket will mount laterally and the mounting screws must be able to line up with the threaded standoffs on the bracket as shown. Bracket Cable Exit Vehicle Roof Roof Beam Cables Headliner Trim Ring Bracket oriented laterally Front of Vehicle Threaded standoffs for Mounting Screws Passenger side mounting holes SOURCE ENTER Connectors OPEN Threaded standoffs for Mounting Screws Driver’s side mounting holes (Continued) Rosen A10 Installation Guide 4 ! Standard mounting with a spacer. This is the same as Standard mounting except that optional spacers are inserted between the Bracket and the beam to allow extra room. Optional Spacer(s) (not included) Bracket Cable Exit Vehicle Roof Roof Beam Cables Headliner Trim Ring Optional Spacers (included in hardware kit) Bracket oriented laterally Threaded standoffs for Mounting Screws Front of Vehicle Passenger side mounting holes SOURCE ENTER Connectors Rosen A10 Installation Guide OPEN Threaded standoffs for Mounting Screws Driver’s side mounting holes 5 ! Custom mounting. This involves modifying the bracket or using appropriate brackets, and can also involve using a Universal Tall Trim Ring, and modifying it to fit the vehicle. Again, sometimes the headliner has enough contour that modifications to the included trim ring are needed. (If this contour is severe, you may need to use one of the optional tall trim rings.) It is critical to modify the trim ring when working with uneven surfaces, as the uneven pressure can cause various problems with the unit. As with every installation, it is your responsibility to make the installation safe, secure, and appropriate to the vehicle. RES does not recommend recessed mounting (without a trim ring) due to possible high-temperature operation issues. Bracket (Bent) Cable Exit Vehicle Roof Roof Beam Roof Beam Cables Headliner Trim Ring Bracket oriented lengthways Front of Vehicle Bending or modifying the bracket The bracket is designed to be able to be bent or shortened as needed. You may also want to remove the four unused threaded standoffs with a hammer as shown, but only when you are certain they will not be needed. Bend/break lines Bend/ break lines Rosen A10 Installation Guide Strike firmly with ball-peen hammer Sturdy workbench 6 STEP 2: CUT THE HEADLINER FRONT of Vehicle Cable Exit 1 Remove the cardboard template (it is perforated into the inner box). Center the template on the center line of the vehicle by measuring the width of the headliner, dividing by two, and making a chalk mark on the center line. Always double-check that the template is correctly oriented front-to-rear. Note: The Trim Ring Footprint is NOT the cut line! ! Cardboard template (Trim Ring Footprint) Mounting screw/ standoff holes IMPORTANT! If you cut away too much of the headliner, you will create a direct path for heat to radiate from the roof of the vehicle into the DVD drive. On very hot days, this type of installation could trigger the unit’s temperature protection (the DVD drive shuts down above 140O F). To minimize heat exposure, only cut the headliner as shown. Optional Spacer(s) Bracket Cable Exit Vehicle Roof Roof Beam Cables Headliner Trim Ring Headliner between DVD drive and roof cavity Threaded standoffs Front of Vehicle 2 Double-check the template’s front/rear orientation and position. 3 Trace the template cut locations onto the headliner with a pencil, marker, or chalk. 4 Using a sharp blade, carefully cut out the headliner. Cut on the inside of your lines. Cut a rectangle for the cable exit, and small squares for the screw locations. (Cutting squares makes the alignment process much easier than drilling precise holes). Note: If you plan on removing unused standoffs from the bracket, you can reduce the number of holes to cut - see page 8. 5 Test-fit the mounting bracket into the headliner opening from above. Rosen A10 Installation Guide 7 STEP 3: MOUNT THE BRACKET CAUTION! ! Make sure that the screws you use to mount the bracket and the main unit are not too long! If the screws you select are too long, you will damage the roof of the vehicle. Take great care when planning this part of your installation. Optional spacers may be needed With some vehicle roof beams, you may need to use optional spacers to mount the bracket to the beam. Some thick headliners require spacers between the bracket standoffs and the main unit. If test-fitting indicates that you need to use the included spacers between the main unit and the bracket standoffs, pre-insert each mounting screw into the main unit from below Insert mounting as shown. Then press the spacer over the tip of the screw. screw The spacers should hold the screws in place. After you have pre-inserted all four screws, go to the next step - do not mount the unit yet! Optional Spacer(s) (not included) Bracket Stand Cable Exit Vehicle Roof Roof Beam Cables Headliner Trim Ring Bracket oriented laterally Optional Spacers (included in hardware kit) Front of Vehicle Bending or modifying the bracket The bracket is designed to be able to be bent or shortened as needed. You may also want to remove the four unused threaded standoffs with a hammer as shown, but only when you are certain they will not be needed. Bend/break lines Bend/ break lines Rosen A10 Installation Guide Strike firmly with ball-peen hammer Sturdy workbench 8 MOUNT THE BRACKET (continued) Bend/break lines Remove the headliner trim and any grab handles over the rear door frame. Slide the bracket in between the headliner and the roof. Mount the bracket to the roof beam through the opening you made in the headliner. A minimum of four short screws must be used to mount the bracket. Threaded standoffs CAUTION! Slots for screws or optional AC3024 stabilizing mounting feet Threaded standoffs for Mounting Screws Lateral Bracket Positioning Front of Vehicle Threaded standoffs Threaded standoffs Threaded standoffs for Mounting Screws Connectors Long-axis Bracket Positioning Threaded standoffs for Mounting Screws Threaded standoffs Threaded standoffs for Mounting Screws Threaded standoffs Connectors Front of Vehicle Rosen A10 Installation Guide Bend or break Bracket at this point to create a cable exit! (See Pages 5, 7) 9 4 Route the harnesses and make all wiring connections Basic connections are described in this section. Also see wiring diagrams starting on p.15. INSTALLATION PRECAUTIONS • • • Use caution to assure that harnesses and cables are protected from sharp edges. Where necessary, add tape to cover sharp surfaces. Avoid sharp bends (always less than 90O, but less than 45O is preferred). The locking connectors in this system require that even force be applied to the release latch when harnesses are disconnected. Failure to use reasonable care will damage the connector and cause system failure. CABLE AND HARNESS ROUTING 1 Starting at the headliner cutout, route the black power harness to the underdash area. Leave about six inches of cable hanging through the cutout. Allow enough slack in the harnesses above the headliner to allow working room. You may want to leave a short loop hanging out the side of the headliner until final re-assembly (this makes stuffing cables into the headliner easier when you mount the unit). 2 You may want to secure the cables with tape so they lie flat. This makes it easier to reassemble the vehicle trim correctly, especially with sunroof vehicles. 3 If any other optional harnesses are being used, route them from the headliner cutout to their destination. Remember to leave working slack. When using optional harnesses, you may need to split the harness paths, routing some harnesses down one side of the vehicle and the rest down the other. CONNECTING THE POWER HARNESS The system requires both constant 12V (+) and switched 12V (+) energized when the key is in the Accessory position. These can be found at the ignition switch harness. The ground wire should mount to bare metal, using a factory ground bolt whenever possible. Power Harness Connections: Yellow 12V (+) Constant Battery Power (Fused 7.5 A) Red 12V(+) Switched Accessory (Fused 1 A) Black Chassis (-) Ground Orange Vehicle Illumination Input (12V(+) when the parking lights are on) ! IMPORTANT: - Connecting the Red wire to constant 12V(+) causes battery drain and premature battery failure. Rosen A10 Installation Guide 10 Connecting to the Domelight Wiring in the Vehicle The A10 has two domelight wires coming from the main unit. Remove the vehicle domelight, find the vehicle domelight harness connector, and unplug it. Use a digital multimeter to test all the wires in the vehicle domelight connector, to determine which of the following domelight wiring systems is being used. Notes: Many vehicles have domelight delay timers which keep the lights on for a few seconds after the doors are closed, or which shut off the domelight after it has been on for too long. Make sure these timers don’t defeat your testing - occasionally turn the ignition key on and off, and open and close all the doors. The wire color and operation at the domelight is not always the same as the wiring in the kick panel - alarm wiring information is often not accurate for these connections. Always determine how the wires work at the domelight, not at the kick panel ! Negative door trigger systems have the following wires: Constant 12V(+). Negative door trigger. This will test as switched (-) ground when the doors are open, and either 12V(+) or an open circuit when the doors are closed. Constant ground. Note: This wire may not be present if the dome light grounds through its mounting screws, or if it does not have an on/off switch built in. Positive door trigger systems (many Ford and GM) have the following wires: Constant Ground. Note: This wire is not present if the domelight grounds through its mounting screws. Positive door trigger. This will test as switched 12V(+) when the doors are open, and either (-) ground or an open circuit when the doors are closed. Constant 12V(+). Note: Only present if the dome light has an on/off switch built in. Note: In some vehicles, you may not have displaced a dome light, or the dome light circuit may not operate in one of the ways described above. If you choose to use the lights as “map lights” only, not responding to the doors, connect Yellow and Black only. Domelight Harness Connections: Green wire to the vehicle (-) door trigger wire, or Purple wire to the (+) door trigger wire. Note: If the Green wire is unused, you must cap it off to prevent it shorting to ground! Yellow* wire to 12V(+) constant voltage (Note: in newer positive- trigger GM cars, do not use the GM 12V constant orange domelight wire - use another source of 12V constant). Black* wire - vehicle chassis (-) ground. *Note: On A10, the Yellow and Black wires are with the Power harness - they are not with the Green and Purple wires. If the Yellow Domelight 12V wire and the Yellow A10 Constant 12V wire are connected to the same point, you may have audio noise issues while the domelight is on. To avoid this, always connect this wire to another 12V Constant circuit in the vehicle. Note: The domelight has a built-in five-minute limit timer . This is to prevent accidental battery drain. To turn the domelight back on, press the domelight button again. Rosen A10 Installation Guide 11 5 Install the Main Unit 1 Test-fit the main unit and the trim ring to determine if the trim ring or headliner should be trimmed. Optimally, the top of the trim ring will be in complete contact with the roof beam, without any gaps – achieving this may require trimming the edges of the trim ring (if there are gaps, the domelights may backlight them and make them more noticeable). You can also insert foam above the headliner to help seal gaps from above. Some thicker headliners may require the use of the included spacers - see Page 8 for details. 2 Plug in all the harnesses and cables that you are using, following the color-coded label on the top (remember the domelight harness). All harnesses aren’t used in all installations. ROSEN Power A10 - DVD Entertainment System FMM TV Tuner/ 10 Disc DVD Game/Aux Screen 2 3 Mount the main unit to the bracket with four machine screws of a safe length. Four 45mm-long machine screws are included - use only if they are appropriate for your installation. Some thicker headliners may require the use of the included spacers - see Page 8 for details and more information. CAUTION! ! Make sure that the screws you use to mount the unit are not too long! If the screws you select are too long, you will damage the vehicle roof. ! IMPORTANT! Do NOT overtighten! Check for proper deployment of the screen and proper ejection of discs – if there is any binding, check for uneven screw torquing. Difficulty in ejecting discs means that the front screws are too tight. Binding indicates that the side edges of the trim ring need to be trimmed to relieve pressure on the sides of the A10. Note: Do not re-assemble the vehicle yet! Rosen A10 Installation Guide 12 6 Test, reassemble, and basic re-test Remember - until you test your installation, you’re not finished! Testing the system before you reassemble the vehicle can save you time troubleshooting any problems. Quick, basic testing after reassembling the vehicle assures that everything is ready to go for your customer. INITIAL SYSTEM AND INSTALLATION TEST 1 Reconnect the battery (if disconnected). 2 Make sure the vehicle can be started safely (for example, there are no tools or workers under the hood and you have appropriate exhaust ventilation). 3 Start the vehicle. 4 Open the monitor to power up system. IMPORTANT: DO NOT ENTER THE REGISTRATION INFO ON POWER UP! Let the owner do this. The screen will go away after 15 seconds. 5 Insert the battery into the remote control. Press the Speaker button to determine the FM Modulator frequency. Tune radio to the FM Modulator frequency: 87.7, 87.9, 88.1, 88.3, 88.5, 88.7, 88.9 106.7, 106.9, 107.1, 107.3, 107.5, 107.7, 107.9, Off. 6 Press SOURCE SOURCE and select INTERNAL DVD. Insert a DVD into the slot. 7 Test “TV Tuner” or “DVD Changer” sources if installed, and the “Auxiliary Input” source if in use. 8 Check both headphones for proper operation (after properly inserting the batteries). 9 Listen to DVD and CD audio with the FM Modulator. 10 Test for Audio and Video noise with the engine running and the alternator loaded (headlights on high, rear defroster on). If noise is heard or seen: ! Check your ground connection on the Power Harness Black wire. ! Check the battery voltage and the connection quality of the (+) and (-) terminals (these should already have been checked). ! If you are using the optional Blue External FMM Harness, check your ground connection on the FMM Black/White wire. Separate the FM Modulator and Power harnesses as far as possible and retest. REASSEMBLE THE TRIM PANELS Carefully reassemble the vehicle. Make sure not to pinch, pierce, or damage any of the cables or harnesses. QUICKLY RETEST THE SYSTEM BASICS After you reassemble the vehicle, quickly retest the system for power-up, audio and video, and noise to verify that no cables or harnesses were disconnected or damaged during reassembly. Rosen A10 Installation Guide 13 7 A10 Configuration and Programming The A10 has some software features that may require some setup by the installer. ENTERING THE INSTALL SETUP SCREEN Make sure there is no disc in the DVD player. Using the A10 remote, Press EJECT, then ENTER, then INFO, then ENTER again. The screen below appears. INSTALL SETUP CH A: MAIN CH B: DVD INPUT LABEL: TV TUNER REGION: 1 INTERNAL FMM: ON OP B: ON TV MODE: NTSC AUTO-PAUSE: ON RESTORE DEFAULTS UP/DN TO SELECT L/R TO CHANGE PRESS ENTER TO SAVE AND EXIT To exit the screen without making any changes, press Enter. Here is a list of the menu options: IR Transmitter Channel A on/off: This setting allows you to use only IR Channel B. Input Label Selection: DVD Changer, TV Tuner, Satellite, External Game, Aux Input 2. DVD Region: Allows authorized change to the DVD Region setting. Internal FMM on/off. This turns off the Internal FMM and changes the OSD’s to match. Output B on/off. This disables the Output B button on the remote. TV mode selection - NTSC/PAL. For use in non-US applications. Rosen Auto-Pause on/off. Disables the Rosen Auto-Pause function. Restore Defaults: Restores all the settings on this menu to their original factory settings. Rosen A10 Installation Guide 14 A10 Configuration and Programming (continued) Channel A on/off Some new vehicles already have IR transmitters for wireless headphones that transmit on Channel A. If this transmitter operates at the same time as the A10 IR transmitter, interference between the two transmitters will result. The A10 can be configured to transmit only on Channel B. Note that optional Rosen AC3007 dual-channel headphones are required in order to receive Channel B. They can receive the vehicle’s audio signal on Channel A, and the A10 audio signal on Channel B. To configure the A10 to transmit only on Channel B: 1) When the screen first appears, “CH A: MAIN” will have a cursor to the left (as shown). Use the RIGHT arrow button to change the setting to “OFF”. CH B changes to “MAIN”. 2) Press ENTER to save the setting. Note: When you turn off CH A, CH B is automatically forced to transmit the audio associated with the Main screen at all times. When CH A is turned off, the A10 loses its Dual-Zone Audio capabilities. With Channel A off INSTALL SETUP CH A: OFF CH B: MAIN INPUT LABEL: TV TUNER REGION: 1 EXT FMM: OFF OP B: ON TV MODE: NTSC AUTO-PAUSE: ON RESTORE DEFAULTS UP/DN TO SELECT L/R TO CHANGE PRESS ENTER TO SAVE AND EXIT Rosen A10 Installation Guide 15 A10 Configuration and Programming (continued) Changing the label on the Aux Input 2 port The A10 has an input which is labeled “AUX INPUT 2” . (You will only see this label if you have plugged in the green or magenta input harnesses.) You can change this label in the A10 Setup Screen. Note: When using the DVD Changer or TV Tuner on this input, for proper operation you MUST program the A10 to display the correct input label . 1) Enter the Install Setup screen. Using the UP and DOWN arrow keys, select INPUT LABEL: AUX INPUT 2. 2) Use the RIGHT and LEFT keys to scroll through the available labels: TV TUNER, DVD CHANGER, EXTERNAL GAME, SATELLITE, AUX INPUT 2. 3) Press ENTER to save the label setting. Turning off the internal FMM and enabling an external FMM When an External FMM is used, or you are not using an FMM, it’s a good idea to turn off the Internal FMM. 1) Enter the Install Setup screen: Scroll down to EXT FMM 2) Use the RIGHT and LEFT keys to select EXT FMM ON. 3) Press ENTER to save the label setting. Now the SPEAKER button will turn an external FMM on and off, and the Internal FMM will not work. Disabling OUTPUT B control The A10 has the ability to independantly control which signals are routed to IR Channel B, and to the second A/V output. If you should want to disable this feature: 1) Enter the Install Setup screen. Scroll down to OUTPUT B: ON 3) Use the RIGHT and LEFT keys to select OUTPUT B: OFF. 4) Press ENTER to save the label setting and exit the setup screen. Now the OUTPUT B button on the remote will not operate. Channel B headphone audio will now be the same as channel A. If a second screen is added, it will show the same image as the main screen. Turning off Auto-Pause The A10 will automatically pause the DVD when you change from the Internal DVD player to another source, and it will re-start playback when you switch back to the Internal DVD player. This feature is very convenient in single-screen systems. If you have a multi-screen, multi-zone system, you may want to turn Auto-Pause off. To restore all Install Setup settings to their original factory defaults 1) Enter the Install Setup screen: Scroll down to RESTORE DEFAULTS 2) Use the RIGHT button to reset the settings to factory defaults. Rosen A10 Installation Guide 16 Frequently Asked Questions Why is there no audio coming from the DVD player? Make sure that the DVD’s Setup Menu Digital Audio output setting is “Off”. Why are the domelights working backwards? The green or purple door-trigger input wire is connected to the wrong polarity trigger wire in the car. See the main wiring diagrams on page 15 and 16. Why doesn’t the optional TV Tuner or DVD Changer work? Are you pressing the Power button on the remote after selecting the TV Tuner or DVD Changer as a source? (The Power button only operates on the selected source). Is the IR mini-jack plugged from the Magenta harness plugged in to the unit? Can I use the TV Tuner/DVD-C input for other source units? Yes, although the user won’t be able to control them with the system remote. Use the AC3024 TV Tuner/VCR cable. The OSD label is programmable by the installer. The system keeps shutting off while I try to test it. Why? This could be a low-voltage problem - check the battery. Check power and ground connections. This is a symptom of poor electrical connections. Make sure you are not using a damaged DVD disc. Call Rosen Technical Support to determine if any of the internal protection modes are being triggered - (888) 883-2790. Rosen A10 Installation Guide 17 A10 Diagnostics The A10 has a disgnostic history screen that can tell you if the A10 has gone into any protection modes. The protection modes cover Low Voltage, High Voltage, Low Temperature, and High Temperature. If the A10 detects any of these states, it will protect itself as needed by shutting down. In most cases it will display a warning on-screen letting the user know why it is shutting down, such as “LOW BATTERY VOLTAGE - SYSTEM SHUTTING DOWN”. To determine if any protection modes have been triggered, select Internal DVD, and make sure there is no disc loaded. Press EJECT, then INFO, then ENTER, then INFO again on the A10 remote control. The Trouble Code History screen will appear (example below). TROUBLE CODE HISTORY 1- LOW TEMP 2- LOW TEMP 3 –HIGH TEMP 4 –LOW VOLTAGE 5 –HIGH VOLTAGE TO CLEAR CODES PRESS ENTER When you are done, press ENTER to clear the codes. This allows you to be sure that any codes displayed in the future are from subsequent events, not events which have already happened. After 2 minutes, or if the ignition is turned off, this screen will disappear, but the events will still be retained in memory if you did not press ENTER. Rosen A10 Installation Guide 18 A10 Dual-Zone Installations When an additional screen is connected to the A10, the user can select a source for the additional screen without affecting the main screen. (For the ability to select between the two sources for audio, the optional AC3007 Dual-Channel Wireless Headphones are required.) Rosen recommends connecting only wide-screen displays to the A10. Sample System Diagram with two “headrest” monitors Magenta Source Input Harness Yellow Audio/Video Output Harness OPEN ENTER SOURCE A10 TV TUNER Yellow Video Output RCA CV4000 TV Tuner Kit AC3007 Dual-Channel Headphones Video Input RCA On Headrest Monitor VIdeo Output RCA on Headrest Monitor INTERNAL DVD VIdeo Input RCA on Headrest Monitor necvox 7" headrest monitors (or equivalent) CH A CH B INTERNAL DVD See the A10 Owner’s Manual for user instructions. You can also connect a Satellite Radio or Satellite TV receiver to the Aux 2/TV Tuner port. See Programming for changing the on-screen display label to “SATELLITE”. This allows rear-seat passengers to listen to Satellite Radio or TV using the headphone Channel B. Rosen A10 Installation Guide 19 Rosen A10 Installation Guide Rosen A10 System Wiring Diagram A10 connector map This color-coded label is on the top of the A10. Plug in cables and harnesses as shown. Note: Black cables are required, Gray cables are optional. (The Green cable is included, but not required) R OSEN Power Red FMM 12V(+) ACC RCA connections Front of Unit (Disc Slot) Black FMM Ground Optional Blue FMM Cable (AC3191) ROSEN Power A10 - DVD Entertainment System FMM TV Tuner/ 10 Disc DVD Game/Aux Screen 2 *Optional Yellow Audio/Video Output Cable AC 3192 Note: When adding the optional AC3077 Game Plate/ Harness, connect it to the Green port, shown here with the Green Aux Input Harness. *Optional Magenta Cable, TVT/ DVD-C (AC3024) FMM TV Tuner/ 10 Disc DVD Game/Aux Screen 2 * Wiring Connections, Optional AC3024 Magenta Harness RCA connections: Red Right Audio In White Left Audio In Yellow Video In Wiring connections for source unitpower/ground: Red 12V(+) ACC output Blue 12V(+) Constant output Black (-) Ground output Green Aux Input Harness (AC3081)** Domelight Input Wires Green: (-) Negative door input Purple: (+) Positive door input (Usually located at dome light) A10 - DVD Entertainment System Yellow Dome Black Light Dome 12V(+) Light Constant (-) Chassis Ground Black (-) Chassis Ground Red 12V(+) Switched Accessory Note: Connect the orange wire to a source of (+)12V when the parking lights are on. Some vehicles lack such a wire - in these vehicles, do not use the orange wire. Orange Yellow (+) 12V(+) Illumination Constant Input Battery 7.5A capable Black Power/Domelight Cable/ Harness (AC 3xx) 20 Note: Connecting the Yellow Domelight power wire and the Yellow wire of the system to the same point can cause audible system noise during dome light operation.