1
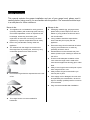
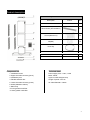
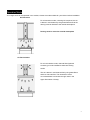
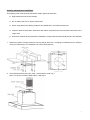
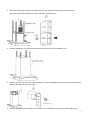
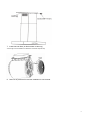
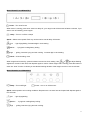
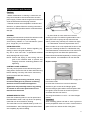
20121211 issue2
Island Range Hood
啊哈
Installation and User manual
Content
Safety instructions---------------------------------- 2
Product description--------------------------------- 4
Operation mode-------------------------------------- 5
Installation--------------------------------------------- 6
Start using the range hood------------------------ 10
Maintenance and cleaning-------------------------12
Warranty------------------------------------------------ 13
For warranty service call 1300 373 199(Australia)
or 0508 123108(New Zealand) to connect you to
the nearest authorised service centre
BR903IPX
BR903IPX-F
BR903IDX
BR903IDX-F
1
BR903ITX
BR903ITX-F
Safety instructions
This manual explains the proper installation and use of your range hood, please read it
carefully before using even if you are familiar with the product. The manual should be kept
in a safe place for future reference.
Never to do:
Always to do:
z
z
This appliance is not intended for use by persons
(including children) with reduced physical, sensory
plastic items) must be kept out of reach of
and mental capabilities, or lack of experience and
babies or young children at all times due to
knowledge, unless they have been given
risk of suffocation.
supervision or instruction concerning use of the
z
z
Young children should be supervised to
appliance by a person responsible for their safety.
ensure that they do not play with the
Never carry out flamable cooking under the
appliance.
appliance
z
Packaging materials (eg; polystyrene and
z
Ensure the range hood is switched off before
The exhaust from the range hood must not be
carrying out maintenance, to avoid any
discharged into any heating flue, which may carry
possibility of electric shock.
combustion products from other sources.
z
Grease filters must be removed every four
weeks (maximum) for cleaning to reduce the
risk of fire.
z
There must be adequate ventilation of the
room when the range hood is used at the
same time as appliances burning gas or other
fuels.
z
Always cover lit gas burners with pots or pans
when range hood is in use.
z
z
Do not leave lit gas burners exposed due to the risk
of fire.
Always switch off gas burners before you
remove pots or pans.
z
If the supply cord is damaged, the cord must
be replaced by the manufacturer, its service
agent or similarly qualified persons in order to
avoid a hazard
z
z
Plug must be accessible after installation.
This range hood is not recommended for
barbecues.
2
Safety instructions
Never to do:
Always to do:
z
This range hood cannot be installed for outdoor use.
z
z
It is prohibited to fit the range hood over a solid fuel
applicable regulations concerning discharge
stove
of exhaust air are fulfilled.
z
z
z
z
This appliance must not be connected to a chimney
z
Attention should be given to ensure that any
This appliance should be installed and
or vent flue which is in use.
maintained by a suitably qualified and
This appliance is not to be vented into the roof
competent person in accordance with the
cavity, must exit into open air.
relevant safety regulations.
Exhaust air must not be discharged into a wall
z
Before connecting the appliance to the mains
cavity, unless the cavity is designed for the purpose.
supply, ensure that the voltage and frequency
This appliance should not be connected to ducting
details on the rating plate are consistent with
which ventilates rooms with fire places.
the source of supply.
3
Product description
Accessories bag
Description
Component list:
Picture
QTY
User Manual
1
Wood Screw (ST4.5x40mm)
6
Screw (M4x14mm)
36
Nut(M4)
16
Hose clip
1
Technical data:
1. Installation board
Power supply: 220 – 240v~, 50Hz
2. Upper decorative chimney (Inner)
Motor: 500W
3. Installation post
Lights: 4x15W Halogen lamp
4. Flexible exhaust duct
Length of power cord: 2m
5. Lower decorative chimney (outer)
Air outlet diameter: 150mm
6. Outlet (diameter 150mm)
7. Main body
8. Inner grease mesh filter
9. Outer grease mesh filter
4
Operation Mode
Your range hood can be operated in two modes, choose the mode suitable for your kitchen before installation.
Air Extraction
For air extraction mode, a ducting kit is required, the air
is drawn in and cleaned by the grease filters and via the
ducting must be directed to the outside atmosphere.
Ducting must be vented to outside atmosphere
Air Recirculation
For air recirculation mode, charcoal filter (Optional
Accessory) must be installed to eliminate cooking
smells.
The air is drawn in and cleaned first by the grease filters
and then charcoal filter. The cleaned air is then
re-circulated back into kitchen through vents in the
Upper Decorative Chimney.
5
Installation
Dimensions:
Installation:
Warning:
Check that the installation complies with the standards of local building, gas and electrical authorities. Before
connecting to the mains supply ensure the mains voltage corresponds to the voltage on the appliance rating
plate inside the range hood.
The distance from the bottom line of range hood to an electrical cooktop underneath must be minimum of
600mm & 650mm to the gas cook top and a maximum height of 800mm.
*If the instructions of the hob specify a greater distance than the minimum above, then that shall be the minimum height for installation
The ceiling joints must be able to bear at least 40kgs weight, and the thickness of the ceiling must be ≧30MM.
After installation, the range hood must be horizontal and secure.
6
Hints for exhaust duct installation
The following rules must be strictly followed to obtain optimal air extraction
•
Keep exhaust duct short and straight
•
Do not reduce the size or restrict exhaust duct
•
When using flexible duct always install the duct pulled taut to minimize pressure loss
•
Failure to observe these basic instructions will reduce the performance and increase noise levels of the
range hood
•
Ensure the exhaust ducting selected for installation complies with relevant standards and is fire retardant
1. Determine position of ceiling where the chimney will go down from. According to installation board, use 6pcs
Screw (ST4.5x40mm) to fix installation board onto ceiling security.
2. Fit the flexible exhaust duct onto outlet. ( Air Extraction mode only )
Note : For the Air Circulation Mode option , skip step 2.
7
3. Use 16pcs Screw (M4x14mm) to fix installation post onto range hood main body, and 8pcs Screw
(M4x14mm) and 8pcs Nut (M4) to fix upper and lower installation post.
4. Carefully slide down inner and outer decorative chimney from top of installation posts.
5. Raising whole unit up and secure upper installation post onto installation board by 8pcs Screw (M4x14mm)
and 8pcs Nut (M4), plug in power cord.
6. Carefully slide decorative chimney up and secure it onto installation board by 4pcs Screw (M4x14mm)
8
7. Install charcoal filter( Air Recirculation mode only)
*If the range hood is installed as Air Extraction mode then skip this step.
8. Remove all protective film and the installation is now finished.
9
Start using your range hood
Model BR903IDX and BR903IDX-F
Lamp – Turn on or off the 4 lamps.
Speed –select speed to suit cooking conditions, increase time setting
Low – light frying/boiling
Medium – frying/wok cooking/heavy boiling
High – grilling, intensive frying and wok cooking
Timer – programmed how long time you would like motor keep running, decrease time setting
Depress timer button once, “timer” display flash and enter into timer function. Depress “Speed” button to
increase setting or “Timer” button to decrease setting, programmed timer duration will circulate set as below.
Timer duration will be confirmed if no any operation for 5s and program start counting down. When time is up,
LCD return to display O’clock time, motor stop running and lamp turned off.
Any time during the program, depress “Delay” button will terminate “Timer” function but enter into 5min delay off
function. Any time during the program, depress “Power” button will terminate “Timer” function.
Clock – O’Clock setting
1.
Depress “Clock”, hour digit segment will flash, depress “Speed” to increase and “Timer” to decrease hour
digit until current clock hour time appears.
2.
Depress “Clock” again, minute digit segment will flash, depress “Speed” to increase and “Timer” to decrease
minute digit until current clock minute time appears.
3.
Depress “Timer” again to confirm and finalize clock time setting.
*During the O’clock setting, if 5s no operation or “Power” button been depressed, the setting will be terminated
Delay – Auto off after 5 minutes
At the end of cooking simply depress “Delay”. the range hood will continue to run for 5 minutes remove any odors
that remain at the completion of cooking. After the set up duration the range hood will turn itself OFF. This
function is available only when range hood motor is running.
If you need longer auto off duration, please use “Timer” function.
Power – Turn on/off motor, terminate O-clock, timer setting.
10
Model BR903ITX and BR903ITX-F
Power - Turn on/off motor
When motor is running, press once enter into delay-off, your range hood will be turned off after 5 minutes, if you
want to turn off instantly, press it again.
Lamp – Turn on or off the 4 lamps
Speed – Select motor speed. Each key can be used to cancel delay-off function.
Low – light frying/boiling. Decrease digit in clock setting.
Medium – frying/wok cooking/heavy boiling
High – grilling, intensive frying and wok cooking . Increase digit in clock setting.
Clock – O’Clock setting, timer
When range hood is stand by, press this button to enter into clock setting. Use
or
to adjust flashing
segment to current O’clock time, then depress again to confirm. When range hood is running, press this button to
enter into “timer” function. It allows you set desired working duration of the range hood from 10 to 90 minutes.
Model BR903IPX and BR903IPX-F
Lamp – Turn on/off light
Power – turn on or off the motor
Speed –select speed to suit cooking conditions. Depress once can enter into each speed and depress again to
turn off motor.
Low – light frying/boiling.
Medium – frying/wok cooking/heavy boiling.
High – grilling, intensive frying and wok cooking.
11
Maintenance and cleaning
Caution:
• Before maintenance or cleaning is carried out, the
range hood should be disconnected from the main
power supply. Ensure that the range hood is switched
off at the wall socket and the plug removed.
• External surfaces are susceptible to scratches and
abrasions, so please follow the cleaning instructions
to ensure the best possible result is achieved without
damage.
GENERAL
- By hand: Soak in warm water and a neutral
Cleaning and maintenance should be carried out with
washing up liquid. For stubborn grease stains use a
the appliance cold especially when cleaning
soft nylon brush or sponge to help remove these
Avoid leaving alkaline or acid substances (lemon
stains. (Leave to dry naturally out of direct sun light)
juice, vinegar etc.) on the surfaces
- In a dishwasher: Ensure that placement of the
STAINLESS STEEL
filters is made so as to not impede the function of the
The stainless steel must be cleaned regularly (e.g.
spray arm. Washing the filters in a dishwasher may
weekly) to ensure long life expectancy.
cause discoloration of the aluminum inner mesh over
Dry with a clean soft cloth. A specialized stainless
time although it will not affect their performance.
steel cleaning fluid may be used.
Filters should be washed separately to crockery and
NOTE: Ensure that wiping is done along with the
kitchen utensils. it is advisable not to use rinse aid.
grain of the stainless steel to prevent any
unsightly crisscross scratching patterns from
Replace Lamps
appearing.
CONTROL PANEL SURFACE
The inlay control panel can be cleaned using warm
soapy water. Ensure the cloth is clean and well wrung
before cleaning. Use a dry soft cloth to remove any
excess moisture left after cleaning.
Important
Avoid using harsh cleaning chemicals, strong
Switch the range hood off and disconnect supply cord
household detergents or products containing
from Power outlet.
abrasives as this will affect the appliance
Unscrew the Chrome rims in an anti clockwise
appearance and potentially remove any printing
direction to gain access to the halogen globe.
of artwork on the control panel and will void
Remove Halogen globe whilst cool and replace with
manufactures warrantee
new globe. Screw chrome rims back into place in
clockwise direction until secure.
GREASE MESH FILTERS
The range hood takes 4 x 15 W – 12 Volts Halogen
Press the condensing board, it can be opened and
Globes.
disassembled to clean. And only when it is opening,
Important
mesh filter can be removed for cleaning.
When handling globes hold with a cloth or gloves to
The mesh filters can be cleaned either by hand or in
ensure perspiration does not come in contact with the
the dishwasher. After cleaning ensure that the filters
globe as this can reduce the life of the globe.
are completely dry before refitting.
12
WARRANTY
1.1
In this warranty:
1.1.1 Australian Consumer Law means the law as set out in Schedule 2 of the Competition and
Consumer Act 2010;
1.1.2 Company means GSM Sales Pty Ltd ABN 53 007 682 475 of 142-144 Fullarton Road, Rose
Park SA 5067. Telephone 08 8122 2390. Email [email protected];
1.1.3 Consumer means a “consumer” as that term is defined in Section 3 of the Australian Consumer
Law as the original purchaser of a Bellini product;
1.1.4 Consumer Guarantees means the guarantees under the Australian Consumer Law;
1.1.5 You means the Consumer.
1.2
Nothing in this warranty affects any person’s rights under the Australian Consumer Law. The benefits to
any Consumer under this warranty are in addition to the rights and remedies available under any
Consumer Guarantees.
1.3
Subject to the other clauses of this warranty, the Company warrants to the Consumer that the Bellini
product will be free of manufacturing defects and will perform to the Company’s specifications.
1.4
The benefit of this warranty extends only to the Consumer as original purchaser of a Bellini product which
is installed in a residential property.
1.5
This warranty commences on the date of purchase of the Bellini product by the Consumer and continues
for the benefit only of the Consumer until the expiry of two (2) years (Warranty Period).
1.6
If within the Warranty Period a manufacturing defect is discovered in the Bellini product or it fails to perform
to the Company’s specifications as a result of some defect in materials, components or workmanship
(Defect) then the Company will, at its option, repair the Bellini product or supply a replacement Bellini
product free of charge. A replacement Bellini product may differ from the original product purchased by the
Consumer.
1.7
This warranty will not apply to any Bellini product:
1.7.1
Installed by any person other than a qualified tradesperson; or
1.7.2
Subjected to misuse, neglect, negligence or accidental damage; or
1.7.3
Operated in any way contrary to any operating or maintenance instructions; or
1.7.4
Improperly handled, installed or maintained; or
1.7.5
Altered or modified prior to or after installation; or
1.7.6
Damaged directly or indirectly by power surges, electrical storm damage or connection to incorrect
power supply
The Australian Consumer Law requires the inclusion of the following statement with this warranty: Our goods come with guaranteed that cannot be excluded under the Australian Consumer Law. You are
entitled to a replacement or refund for a major failure and for compensation for any other reasonably
foreseeable loss or damage. You are also entitled to have the goods repaired or replaced if the goods
fail to be of acceptable quality and the failure does not amount to a major failure.
IN ORDER TO MAKE A CLAIM UNDER THIS WARRANTY THE
CONSUMER MUST CALL 1300 373 199 (AUSTRALIA) OR 0508 123 108
(NEW ZEALAND) TO CONNECT TO THE NEAREST AUTHORISED CENTRE
13
1.8
You must provide proof of your purchase of the Bellini product and the date of purchase in order to obtain
the benefit of this warranty.
1.9
If you live outside the service area of the Company or one of its service agents, this warranty does not
cover the cost of transport of the Bellini product for service nor the service agent’s traveling costs to and
from your home.
1.10 If you are required to transport the Bellini product to the Company or its service agent, you must ensure it is
safely disconnected by a qualified tradesman and securely packed and insured. The Company does not
accept any responsibility for loss or damage of the Bellini product prior to it being received by the Company
or its service agent.
1.11 You will be responsible for all costs of returning a Bellini product to the Company and for redelivery of the
Bellini product by the Company (whether it is the original or a repaired and/or a replacement Bellini product)
and for any other expenses you incur in claiming under this warranty.
1.12 The Company or its service agent will examine any Bellini product and if the Company determines that it is
defective through no fault of the Owner and is otherwise undamaged, the Company will repair or replace
the Bellini product in accordance with this warranty.
DO NOT SEND IN THIS WARRANTY
Fill out the following details and file with your purchase invoice.
RETAIN & FILE WITH YOUR RECEIPT
Your Purchase Receipt/Invoice is proof of date of purchase. If you are unable to establish the date of purchase,
or if the fault is not covered by this warranty, or if the product is found to be in working order, you will be required
to bear all service call charges.
GSM Sales Pty Ltd reserves the right to discontinue items, modify designs and change specifications without
incurring obligation.
Whilst every effort is made to ensure that descriptions, specifications and other information in this publication is
correct, no warranty is given in respect thereof and the company shall not be liable for any errors therein.
Purchased from:
Co. Name:
Address:
Date of Purchase:
Serial number:
NOTE:
Consistent with our continuing product development policy, improvements may have been made
which render the contents of this packaging slightly different to that shown.
FOR WARRANTY SERVICE CALL 1300 373 199 (AUSTRALIA)
OR 0508 123 108 (NEW ZEALAND) TO CONNECT YOU TO THE NEAREST
AUTHORISED SERVICE CENTRE
14