1
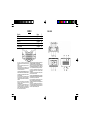
AM/FM Digital Alarm Clock Radio
CLR-2618
Instruction manual
Bedienungsanleitung
Manuel d’instructions
Manuale d’istruzioni
Manual de instrucciones
Manual de instruções
is a registered Trademark of Roadstar S.A. - Switzerland All rights reserved
INDEX
CLR-2618
English
Deutsch
Français
Italiano
Español
Page
Seite
Page
Pagina
Página
1
9
17
25
33
Portuguese
Página
41
• Your new unit was manufactured and
assembled under strict ROADSTAR quality
control.
Thank-you for purchasing our product for your
music enjoyment.
Before operating the unit, please read this
instruction manual carefully. Keep it also handy
for further future references.
• Votre nouvel appareil a été fabriqué et monté en
étant soumis auxnombreaux tests ROADSTAR.
Nous espérons que cet appareil vous donnera
entière satisfaction.
Avant de vous adonner à ces activités, veuillez
lire attentivement ce manuel d’instructions.
Conservez-le àportée de main àfin de référence
ultérieure.
• Vuestro nuevo sistema ha sido construido
según las normas estrictas de control de
calidad ROADSTAR.
Le felicitamos y le damos las gracias por su
elección de este aparado. Por favor leer el
manual antes de poner en funcionamiento el
equipo y guardar esta documentación en case
de que se necesite nuevamente.
• Ihr neues Gerät wurde unter Beachtung der strengen
ROADSTAR-Qualitätsvorschriften gefertigt.
Wir dankenIhnen für den Kauf unseres Produktes und
wünschen Ihnen optimalen Hörgenuss. Bitte lesen
Sie diese Bedienungsanleitung durch, und heben Sie
sie auf, um jederzeit darin nachschlagen zu können.
• Il vostro nuovo apparecchio é stato prodotto ed
assemblato sotto lo stretto controllo di qualità
ROADSTAR.
Vi ringraziamo di aver acquistato un nostro prodotto
per il vostro piacere d’ascolto.
Prima diprocedere all'utilizzo dell'apparecchio, leggete
attentamente il manuale d’istruzioni e tenetelo sempre
a portata di mano per futuri riferimenti.
• Seu novo aparelho foi construido e montado sob o
estrito controle de qualidade da ROADSTAR.
Agradecemos porter comprado nosso produto para a
sua diversão.
Antes de usar esta unidade é necessário ler com
atençâo este manual de instruções pare que possa
ser usada apropriadamente; mantenha o manual ao
seu alcance para outras informações.
English
1
WARNINGS
The exclamation point within the triangle is a warning sign
alerting the user of important instructions accompanying the
product.
The lightening flash with arrowhead symbol within the triangle is
a warning sign alerting the user of “dangerous voltage” inside
the unit.
To reduce the risk of electric shock, do not remove the cover.
No user serviceable parts inside the unit. Refer all servicing to
qualified personnel.
This unit operates on 230V ~ 50Hz. If the unit is not used for a
long period of time, remove the plug from the AC mains.
This unit must not be exposed to moisture or rain.
The power switch in this unit is mounted on the secondary
circuit and does not disconnect the whole unit from the mains
in OFF position.
Ensure all connections are properly made before operating the unit.
This unit should be positioned so that it is properly ventilated.
Avoid placing it, for example, close to curtains, on the carpet
or in a built-in installation such as a bookcase.
Do not expose this unit to direct sunlight or heat radiating
sources.
Make sure the battery is inserted according to the proper
polarity.
2
English
CLR-2618
AM/FM DIGITAL ALARM CLOCK RADIO
TABLE OF CONTENTS
•
•
•
•
LOCATION OF CONTROLS
POWERSUPPLY
AC POWER
SPECIFICATIONS
LOCATION OF CONTROLS
1.
2.
3.
4.
5.
6.
7.
8.
9.
10.
11.
12.
13.
14.
15.
16.
17.
VOLUME KNOB
TIMESET BUTTON
ALARM RADIO/BUZZ SWITCH
MINUTEBUTTON
ALARM ON/OFF BUTTON
HOURBUTTON
AM/FM BAND SWITCH
ALARM SET BUTTON
TUNINGKNOB
SLEEPBUTTON
SNOOZE BUTTON
RADIO ON/OFF BUTTON
RATING LABEL
LCD DISPLAY
BATTERY DOOR
SPEAKER
LINE IN JACK
English
3
18. DISPLAY LOW / HIGH DIMMER
19. FMANTENNA WIRE
20. ACPOWERCORD
POWERSUPPLY
This unit operates from a main supply of 230V ~ 50Hz. Connect the
AC power cord to the AC household main outlet. Ensure that the
voltage is as indicated on the rating plate on the rear of the unit.
Battery Back-up Power Failure Protection
This radio has a battery back up circuit that will keep the correct time
and alarm settings in the event of a temporary power interruption.
Install a 3V CR2032 flat lithium battery (not included), into the battery
compartment located on the bottom of the unit.
If power is temporarily interrupted the display will blink and the radio
will not play. However, the battery back-up circuit will continue to
maintain the clock and alarm settings. When power is restored the
clock will display the correct time and alarm settings, and no
adjustment is necessary.
Note: If power is interrupted and there is no battery in the compartment
or the battery is exhausted. The time and alarm settings will be
lost. When power is restored the clock will begin to flash
indicating that the time and alarm settings must be corrected.
4
English
SETTINGTHECORRECTTIME
1. With the Radio Off, press and hold the TIME SET button (2).
2. Press the HOURbutton (6) to advance hour, press MINUTE button
(4) until the correct time is displayed.
3. Release the TIME SET Button.
SETTINGTHE WAKEUPTIME
1. Press and hold the ALARM SET button (8).
2. Press the HOURbutton (6) to advance hour, press MINUTE button
(4) until the correct time is displayed.
3. Release the ALARM SET button.
WAKETOBUZZERALARM
1. Set the alarm time as shown above.
2. Set the ALARM SWITCH (3) to the BUZZER position.
3. Set the ALARM ON/OFF button (5) to ON (Clock icon appears).
WAKETOTHE RADIO
1. Set the alarm time as shown above.
2. Set the ALARM SWITCH (3) to the RADIO position.
3. Set the Band Selector (7) to the desired radio band, and follow
English
5
the procedure in LISTENING TO THE RADIO to tune the radio to
a station.
4. Set the VOLUME Control (1) to a level you feel will wake you.
ALARMOFFFUNCTION
1. Select ALARM OFF with the ALARM ON/OFF button (5) to turn
the alarm off (Clock icon disappears).
LISTENINGTOTHERADIO
1.
2.
3.
4.
5.
Set the ON/OFF button (12) to the ON RADIO position.
Set the BAND Selector (7) to the desired band (FM or AM).
Turn the TUNING Knob (9) until the desired station is heard.
Adjust the VOLUME Control (1) to a comfortable listening level.
To turn off the radio, set the ON/OFF button (12) to the OFF
position.
Note: The MW band uses a built in directional serial. You may have
to rotate the clock radio for the best reception.
SNOOZE FUNCTION
6
English
SLEEPFUNCTION
1. This function enables you to go to sleep listening to the Radio.
2. Set the Radio ON/OFF button (12) to OFF.
3. Press the SLEEP Button (10). The clock display will show 90
minutes. The Radio turns on and will turn off automatically after
90 minutes.
4. To select a shorter time press the SLEEP Button (10) repeatedly
until the desired sleep time is displayed (90-10 minutes).
5. To turn off the Radio at any time during the Sleep period, press
the Radio ON/OFF button (12) to OFF.
EXTERNALAUDIOLINE-IN
Connect an external audio device (CD/MP3 player, etc.) in the Linein jack (17) to amplify its sound through the Clock-radio.
DIMMERSWITCH
Select the desired display illumination with the Display LOW/HIGH
Dimmer (18).
FM WIREANTENNA
When the alarm sounds, pressing the SNOOZE Button (11) will
temporarily stop about 5 minutes then the alarm sounds again.
Snooze will continue until the ALARM ON/OFF button (5) is pressed
to OFF.
Extend the FM wire antenna (19) completely to obtain best reception
in FM band.
English
7
8
English
CAREANDMAINTENANCE
SPECIFICATIONS
To prevent fire or shock hazard, do not allow this clock radio to be
exposed to rain or moisture.
This clock radio should not be exposed to direct sunlight, very high
or low temperature, moisture, vibration, or placed in a dusty
environment.
Do not use abrasives, benzine, thinners, or other solvents to clean
the surfaces of the clock radio. To clean it, wipe with a mild nonabrasive defergent solution on a clean soft cloth.
Never attempt to insert wires, pins, or other objects into the venlilation
holes or openings on the clock radio.
Note: When setting the Clock or Alarm times remember that this clock
radio has a 24 Hour clock mode.
FM Band:
AM Band:
Power Supply:
DC Back-up:
ACPOWER
For your own safety read following instructions carefully before
attempting to connect this clock radio to the mains.
This unit is designed to operate on a 230V~50Hz supply only.
Connecting it to other power sources may damage it.
Ensure that supply corresponds to the information on the rating label
on the bottom of the unit.
87.5 to 108 MHz
525 to 1615 kHz
230V AC, 50 Hz
3V, CR2032 Lithium Battery
Note: Specifications and the design are subject to possible modifications
without notice due to improvement.
Correct Disposal of This Product
(Waste Electrical & Electronic Equipment)
This marking shown on the product or its literature, indicates
that it should not be disposed with other household wastes
at the end of its working life. To prevent possible harm to
the environment or human health from uncontrolled waste
disposal, please separate this from other types of wastes
and recycle it responsibly to promote the sustainable reuse
of material resources.
Household users should contact either the retailer where they
purchased this product, or their local government office, for
details of where and how they can take this item for
environmentally safe recycling.
Business users should contact their supplier and check the
terms and conditions of the purchase contract. This product
should not be mixed with other commercial wastes for
disposal.