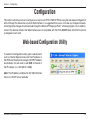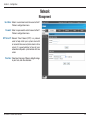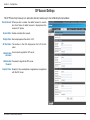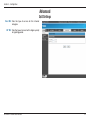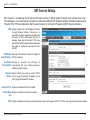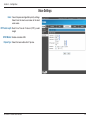
1
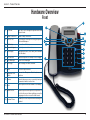
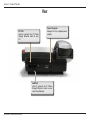
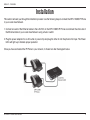
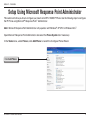
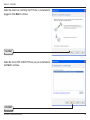
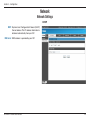
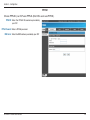
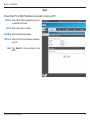
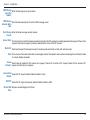
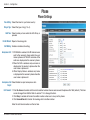
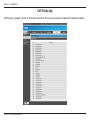
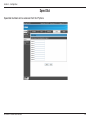
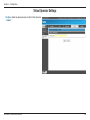
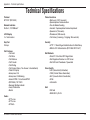
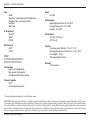
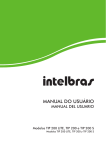
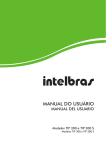
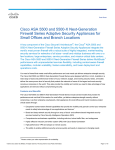
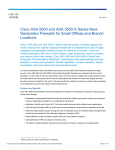
Table of Contents
Table of Contents
Product Overview......................................................... 3
Package Contents.................................................... 3
System Requirements.............................................. 3
Introduction............................................................... 4
Features.................................................................... 5
Hardware Overview.................................................. 6
Front.................................................................... 6
Rear.................................................................... 7
Installation..................................................................... 8
Setup Using Microsoft Response Point Administrator9
Setting Up the IP Phone Manually.......................... 14
Operating the IP Phone.......................................... 20
Configuration.............................................................. 23
Web-based Configuration Utility............................. 23
Network............................................................. 24
Management................................................. 24
Network............................................................. 25
Network Settings........................................... 25
VoIP.................................................................. 28
SIP Settings.................................................. 28
SIP Account Settings.................................... 30
Advanced.......................................................... 31
QoS Settings................................................. 31
NAT Traversal Settings.................................. 32
Voice Settings................................................ 34
Phone............................................................... 35
D-Link DPH-125MS User Manual
Phone Settings.............................................. 35
Call Tracing Log............................................. 37
Speed Dial..................................................... 38
Virtual Operator Settings............................... 39
Reboot.............................................................. 40
Restart System............................................. 40
Restore Factory Setting................................ 41
Troubleshooting.......................................................... 42
Networking Basics..................................................... 43
Check your IP address........................................... 43
Statically Assign an IP address.............................. 44
Technical Specifications............................................ 45
Contacting Technical Support................................... 47
Warranty...................................................................... 48
Registration................................................................. 53
Section 1 - Product Overview
Product
PackageOverview
Contents
• D-Link DPH-125MS IP Phone
• Power Adapter
• CAT5 Ethernet Cable
• CD-ROM with User Manual, and QIG
Note: Using a power supply with a different voltage rating than the one included with the DPH-125MS will cause damage
and void the warranty for this product.
System Requirements
•Computers with Windows® XP SP2 or Windows Vista™ operating systems with an installed Ethernet
adapter
•Internet Explorer Version 6.0, Mozilla 1.7.12 (5.0), or Firefox 1.5 and above (for configuration)
D-Link DPH-125MS User Manual
Section 1 - Product Overview
Introduction
D-Link® VoiceCenter™, a Microsoft® Response Point™ phone system, is designed for small to medium-sized businesses with
support for up to 50 users. VoiceCenter is an IP-based phone system that provides numerous advantages over traditional PSTN
(analog) phone systems. Unlike previous generations of complicated, hard-to-use IP-based products, VoiceCenter is easy to
install, manage, and maintain. VoiceCenter is also portable - businesses that need to relocate offices can take the phone system
along. In addition, VoiceCenter provides state-of-the-art features such as Voice-activated Dialing, built-in Automated Attendant
for answering and routing calls, Call Logs for managing phone usage, and Automatic Phone and Gateway Discovery allowing
for a simplified setup process.
VoiceCenter is a scalable solution that supports up to 50 IP Phones and Users on a network. There are no fees or licenses
required for adding more phones to the system. Thus, as your company grows and hires new employees, you only need to
purchases more phones.
The DPH-125MS IP Phones include many features not found in analog phones as well as standard features that you are used
to having. The One-touch Voice-activated Dialing feature allows users to reach anyone in the company directory and Microsoft
Outlook address book by simply saying their name. Users can also transfer, park, and retrieve calls the same way. Voicemail
to e-mail forwarding is another convenient feature. With the Administrator program you can easily view incoming and outgoing
phone calls made by using the Call History function. In addition, standard features such as Mute, Hold, Transfer, Speakerphone,
and 3-Way Conference functions are included.
Because the entire phone system is designed with simplicity in mind, you can set up a phone and user from start to finish in
minutes. To minimize time and hassle with hardware setup, the IP Phone provides two Ethernet ports for connecting to a network
and another Ethernet device such as a computer. This means instead of having to run an extra Ethernet cable for connecting
a phone to a network, you can simply attach the phone with the Ethernet cable that was once connected to a computer and
attach the computer to the phone for enabling network connectivity to both devices. Once the hardware connection is made,
you can use the Configure Phone Wizard provided by the Microsoft Response Point software to assign extensions and names
that only takes a couple of steps.
The D-Link DPH-125MS IP Phones, which is part of VoiceCenter, is ideal for today’s productivity and efficiency-minded small
to medium-sized business by providing state-of-the-art telephony features that is easy to install and convenient use.
*Requires a third party local phone service plan. D-Link Systems, Inc. is not a Telephone Service Provider or VoIP Phone Service Provider.
D-Link DPH-125MS User Manual
Section 1 - Product Overview
Features
• Easily Add More IP Phones to Microsoft® Response Point™ Phone System - Up to 50.
• Designed with Simplicity in Mind - Easy to Install, Use and Manage.
• No Fees or Licenses Required for Adding More Phones.
• One-touch Voice-activated Dialing and Voicemail Access.
• Voicemail to E-mail Forwarding
• 3-way Call-conferencing
• Speakerphone
• Mute, Hold, or Transfer calls
• View Call History on the LCD Display
• Connect a Phone and Computer Using a Single Ethernet Connection From a Network.
• Auto Phone Discovery Feature Makes Installing Hardware Quick and Easy.
D-Link DPH-125MS User Manual
Section 1 - Product Overview
Hardware Overview
Front
6
1
(1) Up / Down
Use this to cycle through the phone menu and
adjust volume.
(2) 3-Way Conference
Enable 3-way conference.
(3) Cancel / Left
Deny changes, cancel phone calls, ignore phone
calls and backspace.
(4) Call History
(5) Numeric Keypad
Access the call history.
(6) LCD Display
Displays menu, time, clock, name, phone number
and call status.
(7) LED Indicator
Indicates that phone is currently in use or ringing.
(8) Voice Message
Check voice messages.
(9) OK / Right
Save settings, exit menu, and dial.
(10) Menu
Access the phone menu.
(11) Response Point
Button
Access the Response Point features and
functions.
(12) Transfer
Transfer the person you are currently having a
conversation with to another line.
(13) Hold
Place a person on Hold or answer a call waiting.
(14) Mute/Function
Disable the phone’s microphone so the person on
the other line can not hear anything, access the
language selection, access the time format.
(15) Speaker Phone
Enables you to use the phone without using the
handset.
7
2
9
4
Input alphanumeric characters.
D-Link DPH-125MS User Manual
8
3
10
11
12
5
13
14
15
Section 1 - Product Overview
Rear
PC Port
Used to connect the IP Phone
through Ethernet cable to your
PC.
Power Receptor
Receptor for the supplied power
adapter.
LAN Port
Used to connect the IP Phone
through Ethernet cable to your
Local Area Network.
D-Link DPH-125MS User Manual
Section 2 - Installation
Installation
This section will walk you through the installation process. Use the following steps to connect the DPH-125MS IP Phone
to your Local Area Network.
1. Connect one end of the Ethernet cable to the LAN Port on the DPH-125MS IP Phone and connect the other end of
the Ethernet cable to your Local Area Network using a hub or switch.
2. Plug the power adapter into an AC outlet or power strip and plug the other in into the phone’s AC input. The Power LEDs will light up to indicate proper operation.
Once you have connected the IP Phone to your network, it should look like the diagram below.
D-Link DPH-125MS User Manual
Section 2 - Installation
Setup Using Microsoft Response Point Administrator
This section will show you how to configure your new D-Link DPH-125MS IP Phone. Use the following steps to configure
the IP Phone using Microsoft® Response Point™ Administrator.
Note: Microsoft Response Point Administrator only operates with Windows® XP SP2 or Windows Vista™.
Open Microsoft Response Point Administrator and select the Phone System tab if necessary.
In the Tasks menu, under Phones, click Add Phone to launch the Configure Phone Wizard.
Click Add Phone
D-Link DPH-125MS User Manual
Section 2 - Installation
Select the check box confirming the IP Phone is connected and
plugged in. Click Next to continue.
Click Next
Select the D-Link DPH-125MS IP Phone you just connected and
click Next to continue.
Click Next
D-Link DPH-125MS User Manual
10
Section 2 - Installation
For this step, you will add a new user and assign that user to the
phone you just configured. Click Assign User to open the New
User screen.
Click Assign User...
On the Identification tab, in the User Type box, select Person from the drop
down menu if it is not already selected.
In the Name boxes, type the first and last name, and optional nick names or
titles of the person who will use this phone. You should specify nicknames and
titles if you think callers will use them when asking for this user.
In the Extension number box, change the extension number if desired and
click OK to continue.
Click OK
D-Link DPH-125MS User Manual
11
Section 2 - Installation
You have now assigned the person’s name to Line 1 with the
extension number you specified. You can assign up to 3 additional
users to this phone or click Next to continue.
Click Next
The owner and phone name have automatically been created for
you. Click Finish to continue.
Click Finish
D-Link DPH-125MS User Manual
12
Section 2 - Installation
The IP Phone has been successfully added to the phone system.
Click Close to exit the configuration wizard.
Click Close
D-Link DPH-125MS User Manual
13
Section 2 - Installation
Setting Up the IP Phone Manually
This section will guide you in setting up the DPH-125MS IP Phone using the phone’s built in Setup Menu. Please
Refer to the Hardware Overview on page 6 for the key reference. Although this device has a built-in Web Interface,
it is suggested that you do not make any changes manually. All configuration changes should be made through the
Microsoft® Response Point™ software program only. In addition, some of the features listed in the Web Interface are
not compatible with the DVX-2000MS Base Unit that this phone is designed to work with.
Display Name
• Press the Menu Key
• Enter in a Display Name for the phone
ADSL Dialup
Some Internet Service Providers (mostly ADSL) use PPPoE which requires that the user enter in an ID and a password to access the
Internet. In this case, Enable ADSL DIALUP and enter the PPPoE ID and PPPoE password.
To Enable ADSL Dialup
• Press the Down-Arrow key
• Use the Right-Arrow key to select Enable
Setup ADSL ID
• Press the Down-Arrow key
• Enter the ADSL ID
Setup ADSL Password
• Press the Down-Arrow key
• Enter the ADSL Password
D-Link DPH-125MS User Manual
14
Section 2 - Installation
To Disable ADSL Dialup
• Press the Down-Arrow key
• Use the Right-Arrow key to select Disable
DHCP (Dynamic Host Configuration Protocol)
DHCP allows the network administrator to distribute IP addresses when a computer is plugged into a different place on the network. If your
ISP provides a static IP address, you must disable DHCP and enter the IP address provided.
To Enable DHCP
• Press the Down-Arrow key
• Use the Right-Arrow or Left-Arrow key to select Enable
• Press the Down-Arrow key
• The IP address is automatically acquired
• Press the Down-Arrow key
• The Subnet mask is automatically acquired
• Press the Down-Arrow key
• Router IP automatically acquired
To Disable DHCP
• Press the Down-Arrow key
• Use the Right-Arrow or Left-Arrow key to select Disable
• Press the Down-Arrow key
• Enter in the IP Address
• Press the Down-Arrow key
• Enter in the Subnet Mask
• Press the Down-Arrow key
• Enter the router’s IP Address
D-Link DPH-125MS User Manual
15
Section 2 - Installation
DNS Server IP
The Domain Name System (DNS) is the way that Internet domain names are located and translated into Internet Protocol addresses. There
is probably a DNS server within close geographic proximity to your ISP that maps the domain names in your Internet request or forwards
them to other servers on the Internet.
• Press the Down-Arrow key and the DNS Server IP will display.
SNTP Server IP
Simple Network Time Protocol (SNTP) is a protocol used to help match your system clock with an accurate time source. If you do not know
your SNTP Server IP, please ignore this section. SNTP Server IP address can either be a URL or IP address.
• Press the Down-Arrow key
• Enter in the SNTP server IP or URL
Do Not Disturb
This setting allows the user to reject all incoming phone calls.
• Press the Down-Arrow key
• Use the Right-Arrow or Left-Arrow key to select “Enable” or “Disable”
CF (Call Forward) Unconditional
Enable CD Unconditional to forward all the incoming calls to another number. Otherwise set to disable. You will need to use a web-browser
to input the forwarded phone number.
• Press the Down-Arrow key
• Use the Right-Arrow or Left-Arrow key to select “Enable” or “Disable”
D-Link DPH-125MS User Manual
16
Section 2 - Installation
CF (Call Forward) User Busy
Forwards all the incoming calls to another number when the user is busy on the phone.
• Press the Down-Arrow key
• Use the Right-Arrow or Left-Arrow key to select “Enable” or “Disable”
CF (Call Forward) No Answer
Forwards all incoming calls to another phone number after a certain number of rings.
• Press the Down-Arrow key
• Use the Right-Arrow or Left-Arrow key to select “Enable” or “Disable”
Anonymous Call
Enables the caller (user) to hide the name and phone number from the receiver.
• Press the Down-Arrow key
• Use the Right-Arrow or Left-Arrow key to select “Enable” or “Disable”
Anoy Call Rej. (Anonymous Call Rejection)
Reject any anonymous incoming calls.
• Press the Down-Arrow key
• Use the Right-Arrow or Left-Arrow key to select “Enable” or “Disable”
D-Link DPH-125MS User Manual
17
Section 2 - Installation
Ringing Type
Select one of the eight ring tones available.
• Press the Down-Arrow key
• Use the Right-Arrow or Left-Arrow key to select the ring type.
Note: At this point you may save the settings and exit. The next two sections explain how to obtain the MAC address and firmware
version.
• Press the Menu key to exit the menu.
• When asked to save or cancel, press the Right-Arrow button to save the settings.
MAC Address
This menu displays the MAC address. User cannot modify the MAC address.
• Press the Down-Arrow key and the MAC address is displayed on the screen.
Version
The Version Menu displays the firmware version. You cannot modify the version number.
• Press the Down-Arrow key and the firmware version is displayed on the screen.
Language Selection
The DHP-125MS IP Phone supports 4 languages: English, German, Italian and Spanish.
• Press the Mute/Func. followed by the number 1 key
• Use the UP or Down arrows to select the preferred language.
D-Link DPH-125MS User Manual
18
Section 2 - Installation
Time Format
You may select the 12hr or 24hr time format.
• Press the Mute/Func. followed by the number 2 key
• Use the UP or Down arrows to select the time format.
• Press the Right-Arrow key when you are done.
Volume Adjustment
Ringer Volume
While the handset is in it’s place:
• Press the Up-Arrow key to increase the ringer volume and the Down-Arrow key to decrease the ringer volume.
Speaker Volume
While the handset in it’s place:
• Press the Speaker key
• Press the Up-Arrow key to increase the volume and the Down-Arrow key to decrease the volume.
Handset Volume
• Pick up the handset and press the Up-Arrow key to increase the volume, or press the Down-Arrow key to decrease the volume.
D-Link DPH-125MS User Manual
19
Section 2 - Installation
Operating the IP Phone
Dialing an IP Address
• Lift the handset or press the Speaker key.
• Dial the IP address (For Example: 192.168.0.1)
• Press the Right-Arrow key or wait until the timer expires to dial.
Dialing SIP Number
• Lift the handset or press the Speaker key.
• Dial the SIP number (For Example: 1866)
• Press the Right-Arrow key or wait until the timer expires to dial.
Speed Dialing
• Lift the handset or press the Speaker key.
• Dial the Speed Dial number (For Example: 08)
Answering a Phone Call
Note: The CANCEL Key may be used to reject a call.
• When the phone rings, lift the handset or press the Speaker key to begin the conversation.
Switching to another Line
• While your in a conversation on one line, press Hold to switch to another line.
D-Link DPH-125MS User Manual
20
Section 2 - Installation
Mute
Note: While mute is activated, sound from the caller can be heard from your speaker buy your sound can not be heard by the caller.
• While having a conversation, press the Mute/Func. key to mute.
• Press the Mute/Func. key again to resume conversation.
Call Transfer
• While having a conversation, press Hold to place the person on hold.
• Press the Transfer key
• Dial the IP address or the extension number where you would like the call to be transferred.
• Press the Transfer key to transfer the call.
On Hold
• While having a conversation, press the Hold key to place the call on hold.
• Press the Hold key again to resume the conversation.
Call Forward
Note: Please refer to page 35 to setup call forwarding.
Three Way Conference
• Pickup the handset or press the Speaker key and call Person A.
• After Person A answers the phone, press the Hold key to place Person A on hold.
• Dial the extension or phone number of Person B and wait until Person B picks up the phone.
• Press the Conference key to begin a 3-way conference call.
D-Link DPH-125MS User Manual
21
Section 2 - Installation
Check Voice Messages
• Press the Voice Message key
• Enter the extension in which you want to check for voice messages
D-Link DPH-125MS User Manual
22
Section 3 - Configuration
Configuration
This section will show you how to configure your new D-Link DPH-125MS IP Phone using the web-based configuration
utility. Although this device has a built-in Web Interface, it is suggested that you do not make any changes manually.
All configuration changes should be made through the Microsoft® Response Point™ software program only. In addition,
some of the features listed in the Web Interface are not compatible with the DVX-2000MS Base Unit that this phone
is designed to work with.
Web-based Configuration Utility
To access the configuration utility, open a web-browser
such as Internet Explorer and enter the IP address of
the IP Phone. The phone should get a DHCP IP address
automatically. You will need to add 9999 at the end of
the IP Address. (i.e. 192.168.15.1:9999)
Note: The IP address will default to 192.168.0.25 when
there is no DHCP server available.
D-Link DPH-125MS User Manual
23
Section 3 - Configuration
Network
Management
User Name: Enter in a username to restrict access to the IP
Phone’s configuration menu.
Password: Enter in a password to restrict access to the IP
Phone’s configuration menu.
NTP Server IP: Network Time Protocol (NTP) is a protocol
used to help match your system clock with
an accurate time source (atomic clock or time
server). It is good practice to have all your
networked computers synchronized with one
server.
Time Zone: Select your time zone. If there is daylight savings
in your area, click the check box.
D-Link DPH-125MS User Manual
24
Section 3 - Configuration
Network
Network Settings
DHCP
DHCP: Dynamic Host Configuration Protocol (DHCP)
Server address. The IP address information is
obtained automatically from your ISP.
DNS Server: DNS address is provided by your ISP.
D-Link DPH-125MS User Manual
25
Section 3 - Configuration
PPPoE
Choose PPPoE if your ISP uses PPPoE. (Most DSL users use PPPoE).
PPPoE ID: Enter the PPPoE ID/username provided by
your ISP.
PPPoE Password: Enter a PPPoE password.
DNS Server: Enter the DNS address provided by your ISP.
D-Link DPH-125MS User Manual
26
Section 3 - Configuration
Static
Choose Static IP if all WAN IP addresses are provided to you by your ISP.
IP Address: Enter in the IP address assigned to you by your
Internet Service Provider.
Router IP: Enter in the router’s IP address.
Subnet Mask: Enter the Subnet mask address.
DNS Server: Enter in the DNS server address provided by
your ISP.
Submit: Click Submit for the new settings to take
effect.
D-Link DPH-125MS User Manual
27
Section 3 - Configuration
VoIP
SIP Settings
Session Initiation Protocol (SIP) is the most popular Voice over IP standard. It enables two or more people to make
phone calls, share multimedia and make multimedia conference over the internet. Please have an administrator setup
these settings for you or obtain this information from your SIP service provider.
SIP Phone Port Enter the SIP phone port number.
Number:
Registrar Server Enter the registrar server domain name or IP address.
Domain Name/IP
Address:
Registrar Server Enter the port number for the registrar server.
Port Number:
Authentication The time that the phone waits to connect to the SIP server
Expire Time: after the user dialed a number. If still not connected, the
phone will disconnect and redial.
Outbound Proxy Enter the outbound proxy domain name or IP address.
Domain Name/IP
Address:
Outbound Proxy Port Enter the outbound proxy port number.
Number:
Send messages via You can Enable or Disable this option.
Outbound Proxy:
MWI Message Enter the message server domain name or IP address.
Server Domain
Name/IP Address:
D-Link DPH-125MS User Manual
28
Section 3 - Configuration
MWI Message Enter the Message server port number.
Server Port
Number:
MWI Message Send the Subscribe Expire Time to the MWI message server.
Subscribe Expire
Time:
Voice Message Enter the Voice message account number.
Account:
Session Timer: The time interval in which the phone periodically refreshes the SIP sessions by sending repeated Invite requests. These Invite
requests allow the user agent or proxies to determine the status of the SIP session.
Media Port: Real-time Transport Protocol port number. Provides end-to-end transfer of data with real-time audio.
Prack: Prack ensures that media information is exchanged and that the network checks before connecting the call. Select Enable
for a more reliable connection.
Session Select None to disable the SIP session timer support. Select UAC to initiate a SIP request. Select UAS to receive a SIP
Refresher: request and then return a response.
Session Timer Select the SIP request method. Default method is Invite.
Method:
UDP/TCP: Select the SIP signal transmission method. Default method is UDP.
Register With Enable or disable Register with Proxy.
Proxy:
D-Link DPH-125MS User Manual
29
Section 3 - Configuration
SIP Account Settings
The IP Phone may have up to 4 accounts and can receive up to four different phone numbers.
Default Account: When you dial a number, the default account is used to
dial. User Name of default account is displayed on the
receiver’s IP phone.
Account Active: Enable or disable this account.
Display Name: Name displayed on the caller’s LCD..
SIP User Name: The number in the URI displayed on the LCD for the
caller.
Authentication User name to log into the SIP server.
Username:
Authentication Password to log into the SIP server.
Password:
Register Status: Displays if the current phone is registered or unregistered
with the SIP server.
D-Link DPH-125MS User Manual
30
Section 3 - Configuration
Advanced
QoS Settings
Voice TOS: Sets the type of service for this Internet
datagram.
SIP TOS: Sets the type of service for this higher priority
of signaling packet.
D-Link DPH-125MS User Manual
31
Section 3 - Configuration
NAT Traversal Settings
NAT traversal is a challenge that all Service Providers looking to deliver public IP-based voice service must solve.
The challenge is to provide secure connection to subscribers behind NAT (Network Address Translation) devices and
Firewalls. This IP Phone implements NAT traversal function for solving the Firewall and NAT traversal problems.
STUN: Simple Traversal of User Datagram Protocol
through Network Address Translators is a
protocol that allows applications to determine
the types of NATs and firewalls that are in
between them and the internet. STUN also
provides the ability for applications to determine
the public IP addresses allocated to them
the NAT.
by
STUN Domain Enter the STUN domain name or IP address if
Name/IP Address: STUN is enabled.
User Defined E n a b l e o r d i s a b l e t h e s e t t i n g s f o r
External IP/Port: configur ing the user defined exter nal
address and port number.
IP
External IP Select whether you want to use the STUN
Address: server to get the external IP address or use
UPnP to get the external IP address.
External SIP Port: Displays the External SIP port number.
External Media Displays the External media port number.
Port:
UPnP: Enable or disable universal plug and play devices. Some NAT supports UPnP so STUN is not required and must be disabled.
D-Link DPH-125MS User Manual
32
Section 3 - Configuration
Always send Choose to Enable or disable Always Send KeepAlive Packets.
KeepAlive Packet:
KeepAlive Time: The time interval that the IP phone always sends the keep alive packet in order to ensure NAT works properly.
D-Link DPH-125MS User Manual
33
Section 3 - Configuration
Voice Settings
Codec: Voice Compression Algorithm priority settings.
Select from the most used codec to the least
used codec.
RTP Packet Length: Real-Time Transfer Protocol (RTP) packet
length.
DTMF Method: Enable or disable VAD.
Payload Type: Select the tone method for IP phone.
D-Link DPH-125MS User Manual
34
Section 3 - Configuration
Phone
Phone Settings
Tone Setting: Select the tone for a particular country.
Ringer Type: Select the type of ring (1 to 4).
Hold Tone: Select melody or tone when the HOLD key is
pressed.
Do Not Disturb: Reject all incoming calls.
Call Waiting: Enable or disable call waiting.
Anonymous Call: 1. If DISABLE is selected, full URI and name are
sent to the receiver’s phone when the user
makes a phone call. The URI and name of the
caller are displayed on the receiver’s phone.
2. When Full URI is selected, only user name is
displayed on the receiver’s phone when the
user makes a phone call.
3. When Display Name is selected, only name
is displayed on the receiver’s phone when the
user makes a phone call.
Anonymous Call Select Enable to reject anonymous calls.
Reject:
Call Forward: 1. Click No Answer to enable call forward to another number when no one answers the phone after 180s (default). The timer
can be changed from 0-600s. Refer to section 7.14 to change the timer.
2. Click Busy to enable call forward to another number when user is busy on the phone.
3. Click Unconditional to transfer all incoming calls to another number.
Enter the call forward number on the text box.
D-Link DPH-125MS User Manual
35
Section 3 - Configuration
Transfer End of Can transfer the call after the end of conference call.
Conference Call:
Pound Key Dial: Enable or disable Pound key Dial. Pound Key ( # ) can be defined as a <send> key.
Miss Call Display: Enable or disable the miss call which display on the LCD.
D-Link DPH-125MS User Manual
36
Section 3 - Configuration
Call Tracing Log
Call Tracing Log keeps a record of all the phone activities. This log can be used to troubleshoot hardware problems.
D-Link DPH-125MS User Manual
37
Section 3 - Configuration
Speed Dial
Speed dial numbers can be accessed from the IP phone.
D-Link DPH-125MS User Manual
38
Section 3 - Configuration
Virtual Operator Settings
Telephone Enter the phone number for the Virtual Operator.
Number:
D-Link DPH-125MS User Manual
39
Section 3 - Configuration
Reboot
Restart System
Restart: Click Restart to update all the settings and
reboot the system.
D-Link DPH-125MS User Manual
40
Section 3 - Configuration
Restore Factory Setting
Restore: Click Restore to restore the Gateway to it’s
factory default settings.
D-Link DPH-125MS User Manual
41
Section 6 - Troubleshooting
Troubleshooting
This chapter provides solutions to problems that can occur during the installation and operation of the DHP-125MS.
Read the following descriptions if you are having problems.
There is no DIAL tone.
• Check if there are any loose connections.
Why can’t I dial my friend’s SIP number?
•Check Registrar Server Domain Name/IP address and Outbound Proxy Domain Name/IP Address (under SIP Settings in Configuration Menu). Make sure you have the right Name or IP Address.
• Check the LCD display on your phone to see if there is a name or number displayed on the screen. If the name or number is not displayed, use a web browser and access the configuration menu. Make sure that the Registrar Server Domain Name/IP Address is correct.
•Check the register status under SIP Account Settings in the configuration menu (from web browser). If your status is unregistered, it means you do not have a SIP account. Contact your SIP service provider to get an account.
I accidentally set DSL to enable and now the phone does not boot up?
• Unplug the power cord from the IP phone. Wait 2 seconds and plug the power cord back in the IP phone. Press and hold MENU key. The system should bypass boot up and go straight into phone setup menu. Modify the phone setting and make sure you save it before you exit.
Why do I get “Can’t Upgrade Now” screen when I click Submit in the configuration menu?
• Make sure you exit setting mode (phone book, menu, speed dial…) before you click Submit in the configuration menu.
D-Link DPH-125MS User Manual
42
Appendix B - Networking Basics
Networking Basics
Check your IP address
After you install your new D-Link adapter, by default, the TCP/IP settings should be set to obtain an IP address from a
DHCP server (i.e. wireless router) automatically. To verify your IP address, please follow the steps below.
Click on Start > Run. In the run box type cmd and click OK.
At the prompt, type ipconfig and press Enter.
This will display the IP address, subnet mask, and
the default gateway of your adapter.
If the address is 0.0.0.0, check your adapter
installation, security settings, and the settings
on your router. Some firewall software programs
may block a DHCP request on newly installed
adapters.
If you are connecting to a wireless network at a hotspot (e.g. hotel, coffee shop, airport), please contact an employee
or administrator to verify their wireless network settings.
D-Link DPH-125MS User Manual
43
Appendix B - Networking Basics
Statically Assign an IP address
If you are not using a DHCP capable gateway/router, or you need to assign a static IP address, please follow the steps
below:
Step 1
Windows® XP - Click on Start > Control Panel > Network Connections.
Windows® 2000 - From the desktop, right-click My Network Places > Properties.
Step 2
Right-click on the Local Area Connection which represents your D-Link network adapter and select Properties.
Step 3
Highlight Internet Protocol (TCP/IP) and click Properties.
Step 4
Click Use the following IP address and enter an IP address that is on the same subnet as your network or the LAN
IP address on your router.
Example: If the router´s LAN IP address is 192.168.0.1, make your IP address
192.168.0.X where X is a number between 2 and 99. Make sure that the number
you choose is not in use on the network. Set Default Gateway the same as the LAN
IP address of your router (192.168.0.1).
Set Primary DNS the same as the LAN IP address of your router (192.168.0.1). The
Secondary DNS is not needed or you may enter a DNS server from your ISP.
Step 5
Click OK twice to save your settings.
D-Link DPH-125MS User Manual
44
Appendix C - Technical Specifications
Technical Specifications
Protocol
IETF SIP (RFC3261)
Network Interface
RJ45 x 2, 10/100BaseT
LCD Display
2 x 16 characters
Key Pad
25 Keys
Call Features
• Call Hold
• Call Mute
• Call Retrieve
• Call Transfer
• Call Waiting
• Call Forward (Busy / No Answer / Unconditional)
• Caller ID Display
• Anonymous Call
• Anonymous Call Blocking
• In band DTMF / Out-of-band DTMF
• (RFC2833) / SIP INFO
• Message Waiting Indicator
• 3-way Conference
• Redial
Phone Functions
• Multi-user (4 SIP Accounts)
• Speakerphone Communication
• Pre-dial Before Sending
• Handset / Speakerphone Volume Adjustment
• Speed-dial (10 records)
• Phonebook (200 records)
• Call History (Incoming / Outgoing / Missed calls)
Security
• HTTP 1.1 Basic/Digest Authentication for Web Setup
• MD5 for SIP Authentication (RFC 2069/ RFC 2617)
Dial Methods
• Direct IP Call without SIP Registration
• Dial Registered Number via SIP Server
• Dial URI from Phonebook / Speed-dial
Voice Quality
• VAD (Voice Activity Detection)
• CNG (Comfort Noise Generation)
• AEC (Acoustic Echo Cancellation)
• G168
• Jitter buffer
QoS
• ToS field
• IEEE 802.1q VLAN
Codec
• G711u-law
• G711a-law
• G729a/b
D-Link DPH-125MS User Manual
45
Appendix C - Technical Specifications
Tone
• DTMF
• Ring Tone, 4 Selectable and 4 Editable Tones
• Ring Back Tone (Local and Remote)
• Dial Tone
• Busy Tone
IP Assignment
• Static IP
• DHCP
• PPPoE
NAT Traversal
• UPnP
• STUN
TCP/IP
IP/TCP/UDP/DHCP/RTP/RTCP/
ICMP/HTTP/NTP/TFTP/DNS
Configuration
• Key & LCD Configuration
• Web browser Configuration
• Auto/Manual Provisioning System
Power
• 5V, 2.0A
Environmental
• Operating Temperature: 32°F to 104°F
• Storage Temperature: -4°F to 140°F
• Humidity: 5% to 90%
Certifications
• FCC Part 15 Class B
• CE Class B
Physical
• Item Dimensions (WxHxD): 7.9” x 3.2” x 7.9”
• Packaging Dimensions (WxHxD): 8.2” x 3.8” x 10.8”
• Item Weight: 1.61 lbs
• Packaging Weight: 3.48 lbs
Warranty*
• 1-Year Limited
Firmware Upgrade
• TFTP
• Auto Provisioning System
*1-Year Limited Warranty available only in the USA and Canada.
©2007-2008. D-Link Corporation/D-Link Systems, Inc. All rights reserved. D-Link, the D-Link logo, and the VoiceCenter logo are trademarks or registered trademarks of D-Link Corporation
or its subsidiaries in the United States and/or other countries. Microsoft Response Point is either a registered trademark or trademark of Microsoft Corporation in the United States and/or
other countries. Windows is a registered trademark of Microsoft Corporation in the United States and other countries. Other trademarks or registered trademarks are the property of their
respective owners. The example companies, organizations, products, domain names, e-mail addresses, logos, people, places, and events deplicted herein are fictitious. No association
with any real company, organization, product, domain name, e-mail address, logo, person, places or events is intended or should be inferred.
D-Link DPH-125MS User Manual
46
Appendix D - Contacting Technical Support
Contacting Technical Support
U.S. and Canadian customers can contact D-Link technical support through our web site or by phone.
Before you contact technical support, please have the following ready:
• Model number of the product (e.g. DPH-125MS)
• Hardware Revision (located on the label on the bottom of the phone (e.g. rev A1))
• Serial Number (s/n number located on the label on the bottom of the phone).
Please check the D-Link support site below for the latest product information including FAQ’s, known issues, and other
product-related updates.
For customers within the United States:
For customers within Canada:
Phone Support:
(888) 404-6262
Phone Support:
(888) 404-6262
Internet Support:
http://support.dlink.com
Internet Support:
http://support.dlink.com
D-Link DPH-125MS User Manual
47
Appendix E - Warranty
Warranty
Subject to the terms and conditions set forth herein, D-Link Systems, Inc. (“D-Link”) provides this Limited Warranty:
• Only to the person or entity that originally purchased the product from D-Link or its authorized reseller or distributor, and
• Only for products purchased and delivered within the fifty states of the United States, the District of Columbia, U.S. Possessions or Protectorates, U.S. Military Installations, or addresses with an APO or FPO.
Limited Warranty:
D-Link warrants that the hardware portion of the D-Link product described below (“Hardware”) will be free from material defects in
workmanship and materials under normal use from the date of original retail purchase of the product, for the period set forth below
(“Warranty Period”), except as otherwise stated herein.
• Hardware (excluding power supplies and fans): One (1) year
• Power supplies and fans: One (1) year
• Spare parts and spare kits: Ninety (90) days
The customer’s sole and exclusive remedy and the entire liability of D-Link and its suppliers under this Limited Warranty will be, at
D-Link’s option, to repair or replace the defective Hardware during the Warranty Period at no charge to the original owner or to refund the
actual purchase price paid. Any repair or replacement will be rendered by D-Link at an Authorized D-Link Service Office. The replacement
hardware need not be new or have an identical make, model or part. D-Link may, at its option, replace the defective Hardware or any part
thereof with any reconditioned product that D-Link reasonably determines is substantially equivalent (or superior) in all material respects
to the defective Hardware. Repaired or replacement hardware will be warranted for the remainder of the original Warranty Period or ninety
(90) days, whichever is longer, and is subject to the same limitations and exclusions. If a material defect is incapable of correction, or if
D-Link determines that it is not practical to repair or replace the defective Hardware, the actual price paid by the original purchaser for the
defective Hardware will be refunded by D-Link upon return to D-Link of the defective Hardware. All Hardware or part thereof that is replaced
by D-Link, or for which the purchase price is refunded, shall become the property of D-Link upon replacement or refund.
D-Link DPH-125MS User Manual
48
Appendix E - Warranty
Limited Software Warranty:
D-Link warrants that the software portion of the product (“Software”) will substantially conform to D-Link’s then current functional specifications
for the Software, as set forth in the applicable documentation, from the date of original retail purchase of the Software for a period of ninety
(90) days (“Software Warranty Period”), provided that the Software is properly installed on approved hardware and operated as contemplated
in its documentation. D-Link further warrants that, during the Software Warranty Period, the magnetic media on which D-Link delivers the
Software will be free of physical defects. The customer’s sole and exclusive remedy and the entire liability of D-Link and its suppliers under
this Limited Warranty will be, at D-Link’s option, to replace the non-conforming Software (or defective media) with software that substantially
conforms to D-Link’s functional specifications for the Software or to refund the portion of the actual purchase price paid that is attributable
to the Software. Except as otherwise agreed by DLink in writing, the replacement Software is provided only to the original licensee, and
is subject to the terms and conditions of the license granted by D-Link for the Software. Replacement Software will be warranted for the
remainder of the original Warranty Period and is subject to the same limitations and exclusions. If a material non-conformance is incapable
of correction, or if D-Link determines in its sole discretion that it is not practical to replace the non-conforming Software, the price paid by
the original licensee for the non-conforming Software will be refunded by D-Link; provided that the non-conforming Software (and all copies
thereof) is first returned to D-Link. The license granted respecting any Software for which a refund is given automatically terminates.
Non-Applicability of Warranty:
The Limited Warranty provided hereunder for Hardware and Software portions of D-Link’s products will not be applied to and does not cover
any refurbished product and any product purchased through the inventory clearance or liquidation sale or other sales in which D-Link, the
sellers, or the liquidators expressly disclaim their warranty obligation pertaining to the product and in that case, the product is being sold
“As-Is” without any warranty whatsoever including, without limitation, the Limited Warranty as described herein, notwithstanding anything
stated herein to the contrary.
Submitting A Claim:
The customer shall return the product to the original purchase point based on its return policy. In case the return policy period has expired
and the product is within warranty, the customer shall submit a claim to D-Link as outlined below:
• The customer must submit with the product as part of the claim a written description of the Hardware defect or Software
nonconformance in sufficient detail to allow DLink to confirm the same, along with proof of purchase of the product (such
as a copy of the dated purchase invoice for the product) if the product is not registered.
• The customer must obtain a Case ID Number from D-Link Technical Support at 1-888-404-6262, who will attempt to assist
the customer in resolving any suspected defects with the product. If the product is considered defective, the customer must
obtain a Return Material Authorization (“RMA”) number by completing the RMA form and entering the assigned Case ID
Number at https://rma.dlink.com/.
D-Link DPH-125MS User Manual
49
Appendix E - Warranty
• After an RMA number is issued, the defective product must be packaged securely in the original or other suitable shipping
package to ensure that it will not be damaged in transit, and the RMA number must be prominently marked on the outside
of the package. Do not include any manuals or accessories in the shipping package. DLink will only replace the defective
portion of the product and will not ship back any accessories.
• The customer is responsible for all in-bound shipping charges to D-Link. No Cash on Delivery (“COD”) is allowed. Products
sent COD will either be rejected by D-Link or become the property of D-Link. Products shall be fully insured by the customer
and shipped to D-Link Systems, Inc., 17595 Mt. Herrmann, Fountain Valley, CA 92708. D-Link will not be held responsible
for any packages that are lost in transit to D-Link. The repaired or replaced packages will be shipped to the customer via
UPS Ground or any common carrier selected by D-Link. Return shipping charges shall be prepaid by D-Link if you use an
address in the United States, otherwise we will ship the product to you freight collect. Expedited shipping is available upon
request and provided shipping charges are prepaid by the customer. D-Link may reject or return any product that is not
packaged and shipped in strict compliance with the foregoing requirements, or for which an RMA number is not visible from
the outside of the package. The product owner agrees to pay D-Link’s reasonable handling and return shipping charges
for any product that is not packaged and shipped in accordance with the foregoing requirements, or that is determined by
D-Link not to be defective or non-conforming.
What Is Not Covered:
The Limited Warranty provided herein by D-Link does not cover:
Products that, in D-Link’s judgment, have been subjected to abuse, accident, alteration, modification, tampering, negligence, misuse, faulty
installation, lack of reasonable care, repair or service in any way that is not contemplated in the documentation for the product, or if the
model or serial number has been altered, tampered with, defaced or removed; Initial installation, installation and removal of the product for
repair, and shipping costs; Operational adjustments covered in the operating manual for the product, and normal maintenance; Damage
that occurs in shipment, due to act of God, failures due to power surge, and cosmetic damage; Any hardware, software, firmware or other
products or services provided by anyone other than D-Link; and Products that have been purchased from inventory clearance or liquidation
sales or other sales in which D-Link, the sellers, or the liquidators expressly disclaim their warranty obligation pertaining to the product.
While necessary maintenance or repairs on your Product can be performed by any company, we recommend that you use only an Authorized
D-Link Service Office. Improper or incorrectly performed maintenance or repair voids this Limited Warranty.
Disclaimer of Other Warranties:
EXCEPT FOR THE LIMITED WARRANTY SPECIFIED HEREIN, THE PRODUCT IS PROVIDED “AS-IS” WITHOUT ANY WARRANTY
OF ANY KIND WHATSOEVER INCLUDING, WITHOUT LIMITATION, ANY WARRANTY OF MERCHANTABILITY, FITNESS FOR A
PARTICULAR PURPOSE AND NONINFRINGEMENT.
D-Link DPH-125MS User Manual
50
Appendix E - Warranty
IF ANY IMPLIED WARRANTY CANNOT BE DISCLAIMED IN ANY TERRITORY WHERE A PRODUCT IS SOLD, THE DURATION OF
SUCH IMPLIED WARRANTY SHALL BE LIMITED TO THE DURATION OF THE APPLICABLE WARRANTY PERIOD SET FORTH ABOVE.
EXCEPT AS EXPRESSLY COVERED UNDER THE LIMITED WARRANTY PROVIDED HEREIN, THE ENTIRE RISK AS TO THE QUALITY,
SELECTION AND PERFORMANCE OF THE PRODUCT IS WITH THE PURCHASER OF THE PRODUCT.
Limitation of Liability:
TO THE MAXIMUM EXTENT PERMITTED BY LAW, D-LINK IS NOT LIABLE UNDER ANY CONTRACT, NEGLIGENCE, STRICT LIABILITY
OR OTHER LEGAL OR EQUITABLE THEORY FOR ANY LOSS OF USE OF THE PRODUCT, INCONVENIENCE OR DAMAGES OF ANY
CHARACTER, WHETHER DIRECT, SPECIAL, INCIDENTAL OR CONSEQUENTIAL (INCLUDING, BUT NOT LIMITED TO, DAMAGES FOR
LOSS OF GOODWILL, LOSS OF REVENUE OR PROFIT, WORK STOPPAGE, COMPUTER FAILURE OR MALFUNCTION, FAILURE OF
OTHER EQUIPMENT OR COMPUTER PROGRAMS TO WHICH D-LINK’S PRODUCT IS CONNECTED WITH, LOSS OF INFORMATION
OR DATA CONTAINED IN, STORED ON, OR INTEGRATED WITH ANY PRODUCT RETURNED TO D-LINK FOR WARRANTY SERVICE)
RESULTING FROM THE USE OF THE PRODUCT, RELATING TO WARRANTY SERVICE, OR ARISING OUT OF ANY BREACH OF
THIS LIMITED WARRANTY, EVEN IF D-LINK HAS BEEN ADVISED OF THE POSSIBILITY OF SUCH DAMAGES. THE SOLE REMEDY
FOR A BREACH OF THE FOREGOING LIMITED WARRANTY IS REPAIR, REPLACEMENT OR REFUND OF THE DEFECTIVE OR
NONCONFORMING PRODUCT. THE MAXIMUM LIABILITY OF D-LINK UNDER THIS WARRANTY IS LIMITED TO THE PURCHASE
PRICE OF THE PRODUCT COVERED BY THE WARRANTY. THE FOREGOING EXPRESS WRITTEN WARRANTIES AND REMEDIES
ARE EXCLUSIVE AND ARE IN LIEU OF ANY OTHER WARRANTIES OR REMEDIES, EXPRESS, IMPLIED OR STATUTORY.
Governing Law:
This Limited Warranty shall be governed by the laws of the State of California. Some states do not allow exclusion or limitation of incidental
or consequential damages, or limitations on how long an implied warranty lasts, so the foregoing limitations and exclusions may not apply.
This Limited Warranty provides specific legal rights and you may also have other rights which vary from state to state.
Trademarks:
D-Link is a registered trademark of D-Link Corporation/D-Link Systems, Inc. Other trademarks or registered trademarks are the property
of their respective owners.
Copyright Statement:
No part of this publication or documentation accompanying this product may be reproduced in any form or by any means or used to make
any derivative such as translation, transformation, or adaptation without permission from D-Link Corporation/D-Link Systems, Inc., as
stipulated by the United States Copyright Act of 1976 and any amendments thereto. Contents are subject to change without prior notice.
Copyright ©2008 by D-Link Corporation/D-Link Systems, Inc. All rights reserved.
D-Link DPH-125MS User Manual
51
Appendix E - Warranty
FCC Statement:
This equipment has been tested and found to comply with the limits for a Class B digital device, pursuant to part 15 of the FCC Rules.
These limits are designed to provide reasonable protection against harmful interference in a residential installation. This equipment
generates, uses, and can radiate radio frequency energy and, if not installed and used in accordance with the instructions, may cause
harmful interference to radio communication. However, there is no guarantee that interference will not occur in a particular installation. If
this equipment does cause harmful interference to radio or television reception, which can be determined by turning the equipment off
and on, the user is encouraged to try to correct the interference by one or more of the
following measures:
• Reorient or relocate the receiving antenna.
• Increase the separation between the equipment and receiver.
• Connect the equipment into an outlet on a circuit different from that to which the receiver is connected.
• Consult the dealer or an experienced radio/TV technician for help.
FCC Caution:
Any changes or modifications not expressly approved by the party responsible for compliance could void the user’s authority to operate
this equipment.
This device complies with Part 15 of the FCC Rules. Operation is subject to the following two conditions:
(1) This device may not cause harmful interference, and (2) this device must accept any interference received, including interference that
may cause undesired operation.
IMPORTANT NOTICE:
FCC Radiation Exposure Statement:
This equipment complies with FCC radiation exposure limits set forth for an uncontrolled environment. This equipment should be installed
and operated with minimum distance 20cm between the radiator & your body. This transmitter must not be co-located or operating in
conjunction with any other antenna or transmitter.
The availability of some specific channels and/or operational frequency bands are country dependent and are firmware programmed at
the factory to match the intended destination. The firmware setting is not accessible by the end user.
For detailed warranty information applicable to products purchased outside the United States, please contact the corresponding local
D-Link office.
This class B digital apparatus complies with Canada ICE-003
D-Link DPH-125MS User Manual
52
Appendix F - Registration
Registration
Product registration is entirely voluntary and failure to complete or return this form will not diminish your warranty
rights.
Version 1.2
October 16, 2008
D-Link DPH-125MS User Manual
53