1
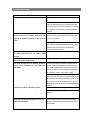
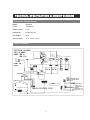
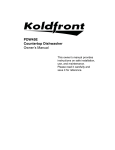
TABLE OF CONTENTS
IMPORTANT SAFETY INSTRUCTIONS…………………………………………………1
PREPARING YOUR ICE MAKER FOR USE
IMPORTANT SAFETY TIPS.……………………………………………………………….2
GETTING TO KNOW YOUR UNIT…
………………………………………………………..3
OPERATING PROCEDURES & MAINTENANCE
UNPACKING YOUR ICE MAKER ..………….…………………………………………...4
CONNECTING YOUR ICE MAKER……………….……….……………………………..4
CLEANING AND MAINTAINING YOUR ICE MAKER….……………………………….4
USING YOUR ICE MAKER……………….……..………………………………………...5
TROUBLESHOOTING..……………………….……………………………………………6
TECHNICAL SPECIFICATIONS & CIRCUIT DIAGRAM…..……………..….………..8
WARRANTY…………………………..……….………………………………………….…9
9
TABLE OF CONTENTS
IMPORTANT
SAFETY INSTRUCTIONS
Your safety and the safety of others are very important.
We have provided many important safety messages in this manual and on your appliance.
Always read and obey all safety messages.
This is the safety alert symbol:
!
All safety messages will follow the safety alert symbol and the word “DANGER” or
“WARNING”.
!
DANGER
!
WARNING
ING
These words mean:
You can be killed or seriously injured if you don’t immediately follow instructions.
All safety messages will tell you what the potential hazard is, tell you how to reduce the
chance of injury, and tell you what can happen if the instructions are not followed.
1
PREPARING YOUR ICE MAKER FOR USE
IMPORTANT SAFETY TIPS
When using electrical appliances, basic safety precautions should be followed to reduce the
risk of fire, electric shock, and/or injury to persons or property. Read all instructions before
using any appliance.
z
Do not operate this or any other appliance with a damaged cord.
Connect to properly polarized outlets only. No other appliance should be plugged into the
same outlet. Be sure that the plug is fully inserted into the receptacle.
z
Do not run cord over carpeting or other heat insulators. Do not cover the cord. Keep cord
away from traffic areas, and do not submerge in water.
z
We do not recommend the use of an extension cord, as it may overheat and become a
fire risk. If you must use an extension cord, use a cord of No.14 AWG minimum size and
rated for no less than 1875 watts.
z
Unplug the ice maker before cleaning it or making repairs.
z
Exercise caution and use reasonable supervision when appliance is used near children.
z
Do not clean your ice maker with flammable fluids. The fumes can create a fire hazard or
explosion.
z
Do not tip over.
z
If the ice maker is brought in from outside in wintertime, give it a few hours to warm up to
room temperature before plugging it in.
2
GETTING TO KNOW YOUR UNIT
1. Cover: Features a transparent window for interior visibility.
2. Ice shovel.
3. Control Panel: Easy to use, with touch controls.
A. Ice-full light.
B. Ice size indicators: Small, Medium, and Large.
C. Ice size selector button.
D. Add water light: when lit, add water.
E. Power indicator.
F. Power button.
4. Foot
5. Water drain cap: For draining water from water reservoir.
6. Air vent.
Note: Ice scoop not shown.
1
2
3
6
5
4
D
A
B
E
C
F
3
OPERATING PROCEDURES & MAINTENANCE
UNPACKING YOUR ICE MAKER
1. Remove the exterior and interior packaging. Check that ice basket and ice scoop is
included. If any parts are missing, please contact customer service.
2. Clean the interior with lukewarm water and a soft cloth. Take out the ice basket and clean
it .
3. Find a location for your ice maker that is protected from direct sunlight and other sources
of heat (e.g., stove, furnace, radiator). Place the ice maker on a level surface. Maker sure
that there is at least 5 inches of space between the back and sides of your ice maker and
the wall.
4. Allow one hour for the refrigerant fluid to settle before plugging ice maker in.
5. The appliance must be positioned so that the plug is accessible.
CONNECTING YOUR ICE MAKER
DANGER
!
* Improper use of the grounded plug can result in the risk of electrical shock. If the
power cord is damaged please call customer service.
1. This unit should be properly grounded for your safety. The power cord of this appliance is
equipped with a three-prong plug which mates with standard three prong wall outlets to
minimize the possibility of electric shock.
2. Plug your appliance into an exclusive, properly installed, grounded wall outlet. Do not
under any circumstances, cut or remove the third (ground) prong from the power cord. Any
questions concerning power and/or grounding should be directed toward a certified
electrician.
3. This appliance requires a standard 110~120 volt, 60Hz electrical outlet with three-prong
ground.
CLEANING AND MAINTAINING YOUR ICE MAKER
Before using your ice maker, it is strongly recommended to clean it thoroughly.
1. Take out the ice basket.
2. Clean the interior with diluted detergent, warm water and a soft cloth.
3. The outside of the ice maker should be cleaned regularly with a mild detergent solution
and warm water.
4. Dry the interior and exterior with a soft cloth.
5. When the machine is not in use, open the water drain cap to completely drain the water
reservoir.
4
USING YOUR ICE MAKER
1. Select the size of the ice cube by pressing the “Select” button. If the room temperature is
lower than 60°F, it is best to select the small or medium ice size, otherwise the ice cubes
might stick together.
2. Open the cover, remove the ice basket and pour water into tank.
Keep water level below the level mark.
3. Press “Power” on the control panel to begin the ice making cycle.
4. The ice making cycle lasts 6 to 15 minutes, depending on the size of the ice cubes
selected.
5. While the ice maker is on, verify the water level periodically. If the water level is too low,
the ice maker will stop automatically, and the “Water” indicator will turn on.
Press the “Power” button, fill the unit with water, and press “Power” again.
Allow the refrigerant inside the compressor at least 3 minutes to settle before restarting.
6. The ice maker automatically stops working when the ice basket is full.
7. Change the water in the water reservoir every 24 hours to ensure a reasonable hygiene
level.
If the ice maker will not be used for an extended period of time, you should drain the water
from the reservoir and wipe out the inside of the unit.
5
TROUBLESHOOTING
Issue
Solution
No power to the unit.
Check to make sure the power cord is plugged
in
Check the control panel for any lights or if there
is any movement with any components of the
unit such as the ice case or water pump. If there
is no light or no movement, contact EdgeStar
support.
Only the power and/or ice cube size lights
When the ice maker is plugged in, the power
are on, unit is not working and does not
light may blink until you push the power button
respond to buttons pushed on the control
to turn on the unit.
panel.
If you push the power button, but the unit does
not respond, then the probable cause is a faulty
control panel, and needs to be replaced.
Contact EdgeStar support.
Contact EdgeStar support.
After pushing the power button and making
ice cube selections, the ice maker does
nothing.
Contact EdgeStar support.
Ice case moves back and forth but does not
stop in the water fill position.
Unit goes through the ice making process,
Check to see if the ice maker is being used in
but no ice is produced, or ice cubes are
proper ambient temperature. If unit is run in a
very small.
room that is particularly hot at times, such as
kitchen or laundry rooms, Please move the unit
to a different, cooler room and try again.
If ice maker is being used in proper ambient
temperatures, then check to see if the fan on the
side of the unit is working during the cycle. If not,
then the fan needs to be replaced as it is not
drawing the heat off the coils. Contact EdgeStar
support.
Make sure the unit is sitting level
Compressor makes a knocking noise
If the unit is sitting level, then contact EdgeStar
support
When the unit tries to dump the ice, the ice
The ice case hinges or the ice shovel plastic
case and shovel jam.
tabs (on older models) are broken and need to
be replaced.
6
The ice maker has a funny smell or the ice
Clean the machine out with a mild soapy
that is being produced has an unappealing
solution and a soft cloth
taste.
Add a tablespoon of vinegar to the water in the
reservoir and then run a few batches of
ice. After removing the vinegar ice and water,
run a few more cycles with regular water.
Remove this water and ice. The machine
should then be free of a bad smell and you
should be able to produce better tasting ice.
The “add water” light is on even though the
Your water may not have enough impurities
machine is full of water.
(distilled, reverse osmosis [RO], purified, etc.)
in it. Add a pinch of salt to the distilled water.
This will add impurities to the water which will
allow the machine to detect the water.
The water uptake filter may be clogged (at the
bottom of the lower water reservoir). Using a
flathead screwdriver to pry it out, clean the filter
and replace.
Ice maker freezes one big block of ice
If the ambient temperature in the room is less
instead of individual cubes.
than 60 degrees, use only the small and
medium ice cube size settings.
If the ambient temperature in the room is
normal, the compressor may be faulty. Contact
EdgeStar support
If there is a steady drip coming from the
The unit is leaking.
machine, the drain plug may be loose or a
hose may have been damaged. If the drain
plug is securely attached, contact EdgeStar
support
If the machine is leaking when water is poured
into the lower water reservoir, a hose may have
become dislodged. Contact EdgeStar support.
The evaporator coils are not freezing/The
Contact EdgeStar support
evaporator coils are not releasing the ice/Only
half of the evaporator coils are freezing.
7
TECHNICAL SPECIFICATIONS & CIRCUIT DIAGRAM
TECHNICAL SPECIFICATIONS
Model
IP210SS
Power
115V/60Hz
Rated Current
2.7 A
Refrigerant
R134a/ 2.3 Oz
Net Weight
30 Lb
Size (HxWxD)
14 ¾” x 11¾” x 14½”
CIRCUIT DIAGRAM
ELECTRI CAL DI AGRAM
FOR I CE- MAKER
MODEL: HZB- 12
HZB- 12/ S
St ar t
Rel ay
Sol enoi d
Val ve f or
I ce har vest
MW
M
COMPRESSOR ~
AW
N
L
G
Mot or For
I ce shovel
SM
DC
DC Fan Mot or
Wat er
Pump
Bl ue
Over l oad
Pr ot ect or
POWER
SUPPLY
MOTOR
VALVE
+PUMPCOMP
AC-N
TRANSFORMER
AC-L
Rel ay
Rel ay
Rel ay
MI CRO SWI TCH
MI CRO SWI TCH
OPERATI ON PCB
LED2
SET
- FAN +
MCU
LED1
LED3
LED6(ON/OFF)
LED5(ICE) LED4(WATER)
ON/OFF
MAIN CONTROL PCB
7C
8
WATER DETECTI NG SWI TCH
SOR FOR
T1 SEN
CONTROLI NG FAN
MOTOR
T2
SENSOR FOR I CE
FULL DETECTI NG
LIMITED WARRANTY
This EdgeStar product is warranted to be free from defective workmanship and materials for
the first year following the date of original purchase. Replacement parts will be supplied free of
charge for the first year following the date of original purchase. Labor will be performed free of
charge for the first 90 days following the date of original purchase.
WHAT IS COVERED
This warranty applies to the original purchaser only, and only covers defects in workmanship
experienced during operation of the product under normal service, maintenance, and usage
conditions. This warranty applies to the purchase and use of this product in residential settings
within the United States of America.
WHAT IS NOT COVERED
The following limitations apply to the coverage of this warranty:
Optional accessories, attachments, and appearance items are excluded from warranty
coverage, as is shipping damage, and any damage caused by improper voltage or any other
misuse, including abnormal service, handling, or usage.
This warranty does not cover normal wear and tear on parts or replacement of parts designed
to be replaced, e.g. filters, etc.
This warranty does not cover service trips to deliver, pick-up, repair, or install the product, or to
instruct in proper usage of the product.
Damages or operating problems resulting from abuse, operation outside environmental
specifications, uses contrary to instructions provided in the owner’s manual, accidents, vermin,
fire, flood, improper installation, unauthorized service, acts of God, unauthorized installation or
modification, or commercial use are excluded from warranty coverage.
Damage or loss of items stored inside the appliance are excluded from warranty coverage.
This warranty does not cover labor incurred 91 days or more after the date of original
purchase.
This warranty does not cover use of EdgeStar products in commercial settings.
DESCRIPTION OF WARRANTY SERVICE
All defective product components covered by this warranty will be repaired or replaced, at
EdgeStar’s option, free of charge on a mail-in basis to EdgeStar’s authorized repair facility
during the first 90 days from the date of original purchase.
All defective product components covered by this warranty will be repaired or replaced, at
EdgeStar’s option, on a mail-in basis to EdgeStar’s authorized repair facility during the time
period beginning on the 91st day from the date of original purchase and ending one year from
the date of original purchase. During this time period, parts will be supplied free of charge, but
labor charges will apply.
All replacement parts and units will be new, remanufacturered, or refurbished.
All products and components replaced by EdgeStar under warranty service become the
9
property of EdgeStar.
OBTAINING WARRANTY SERVICE
Contact EdgeStar for troubleshooting assistance and warranty service authorization at
1-866-319-5473. Please have your order receipt available to confirm the date of purchase.
Once an EdgeStar authorized representative has confirmed that your product is eligible for
warranty service, the product must be returned to an EdgeStar authorized repair facility.
The purchaser is solely responsible for prepaying all shipping related costs to and from the
repair facility.
EdgeStar is not responsible for damage resulting from shipper mishandling or improper
packaging.
Do not return defective product to the place of purchase.
THIS WARRANTY IS IN LIEU OF ANY OTHER WARRANTY, EXPRESS OR IMPLIED,
INCLUDING WITHOUT LIMITATION, ANY WARRANTY OF MERCHANTABILITY OR
FITNESS FOR A PARTICULAR PURPOSE. TO THE EXTENT ANY IMPLIED WARRANTY IS
REQUIRED BY LAW, IT IS LIMITED IN DURATION TO THE EXPRESS WARRANTY PERIOD
ABOVE. NEITHER THE MANUFACTURER NOR ITS DISTRIBUTORS SHALL BE LIABLE
FOR ANY INCIDENTAL, CONSEQUENTIAL, INDIRECT, SPECIAL, OR PUNITIVE DAMAGES
OF ANY NATURE, INCLUDING WITHOUT LIMITATION, LOST REVENUES OR PROFITS,
OR ANY OTHER DAMAGE WHETHER BASED IN CONTRACT, TORT, OR OTHERWISE.
SOME STATES DO NOT ALLOW THE EXCLUSION OF INCIDENTAL OR CONSEQUENTIAL
DAMAGES, SO THE ABOVE EXCLUSION MAY NOT APPLY TO YOU. THIS WARRANTY
GIVES YOU SPECIFIC LEGAL RIGHTS. YOU MAY HAVE OTHER RIGHTS THAT VARY
FROM STATE TO STATE.