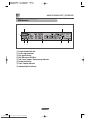
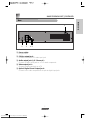
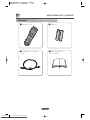
1
IMPORTANT SAFEGUARDS RISK OF ELECTRIC SHOCK DO NOT OPEN CAUTION: TO REDUCE THE RISK OF ELECTRIC SHOCK, DO NOT REMOVE COVER (OR BACK). NO USER-SERVICEABLE PARTS INSIDE. REFER SERVICING TO QUALIFIED SERVICE PERSONNEL. The exclamation point within an equilateral triangle is intended to alert the user to the presence of important operating and servicing instructions in the literature accompanying the appliance. WARNING : TO REDUCE THE RISK OF FIRE OR ELECTRIC SHOCK, DO NOT EXPOSE THIS APPLIANCE TO RAIN OR MOISTURE. CAUTION : TO PREVENT ELECTRIC SHOCK, MATCH WIDE BLADE OF PLUG TO WIDE SLOT, FULLY INSERT. IMPORTANT FOR LASER PRODUCTS LASER : This Digital Video Disc Player employs a Laser System. To ensure proper use of this product please read this owner’s manual carefully and retain for future reference. Should the unit require maintenance, contact an authorized service location - see service procedure. Use of control adjustments or the performance of procedures other than those specified may result in hazardous radiation exposure. To prevent direct exposure to the laser beam, do not try to open the enclosure. Visible laser radiation when open and interlocks defeated. DO NOT STARE INTO THE BEAM. • DANGER : Visible laser radiation when open and interlock failed or defeated. Avoid direct exposure to beam. • CAUTION : Do not open the top cover. There are no user serviceable parts inside the Unit; leave all servicing to qualified service personnel. CLASS1 LASER PRODUCT FCC NOTICE: This equipment has been tested and found to comply with the limits for a Class B digital device, pursuant to part 15 of the FCC Rule. These limits are designed to provide reasonable protection against harmful interference in a residential installation. This equipment generates, uses and can radiate radio frequency energy and if not installed and used in accordance with the instructions, may cause harmful interference to radio communications. However, there is no guarantee that interference will not occur in a particular installation. If this equipment does cause harmful interference to radio or television reception; which can be determined by turning the equipment off and on, the user is encouraged to try to correct the interference by one or more of the following measures: • Reorient or relocate the receiving antenna. • Increase the separation between the equipment and receiver. • Connect the equipment to an outlet on a circuit different from that to which the receiver is connected. • Consult the dealer or an experience radio/TV technical for help. i Downloaded From Disc-Player.com Daewoo Manuals IMPORTANT SAFEGUARDS The lightning flash with arrowhead symbol, within an equilateral triangle, is intended to alert the user to the presence of uninsulated “dangerous voltage” within the product’s enclosure that may be of sufficient magnitude to constitute a risk of electric shock. CAUTION IMPORTANT SAFEGUARDS (CONTINUED) This set has been designed and manufactured to assure personal safety. Improper use can result in electric shock or fire hazard. The safeguards incorporated in this unit will protect you if you observe the following procedures for installation, use and servicing. This unit is fully transistorized and does not contain any parts that can be repaired by the user. 1 Read Instructions All the safety and operating instructions should be read before the unit is operated. 2 Retain Instructions The safety and operating instructions should be retained for future reference. 3 Heed Warnings All warnings on the unit and in the operating instructions should be adhered to. 4 FOLLOW INSTRUCTIONS All operating and use instructions should be followed. 5 Cleaning Unplug this unit from the wall outlet before cleaning. Do not use liquid cleaners or aerosol cleaners. Use a damp cloth for cleaning. 6 Attachments Do not use attachments unless recommended by the unit’s manufacturer as they may cause hazards. 7 Water and Moisture Do not use this unit near water- for example, near a bath tub, wash bowl, kitchen sink or laundry tub, in a wet basement, or near a swimming pool. 8 Accessories Do not place this unit on an unstable cart, stand, tripod, bracket, or PORTABLE CART WARNING table. The unit may fall, causing serious injury to a child or adult (symbol provided by RETAC) as well as serious damage to the unit. Use this unit only with a cart, stand , tripod, bracket, or table recommended by the manufacturer. 8A A unit and cart combination should be moved with care. Quick stops, excessive force, and uneven surfaces may cause the video product and cart combination to overturn. 9 Ventilation Slots and openings in the case are provided for ventilation to ensure reliable operation of the unit and to protect it from overheating. These openings must not be blocked or covered. These openings must not be blocked by placing the unit on a bed, sofa, rug, or other similar surface. This unit should never be placed near or over a radiator or heat radiator. This unit should not be placed in a built-in installation such as a bookcase or rack unless proper ventilation is provided or the manufacturer’s instructions have been adhered to. 10 Power Sources This unit should be operated only from the type of power source indicated on the marking label. If you are not sure of the type of power supply to your home, consult your video dealer or local power company. For units intended to operate from battery power, or other sources, refer to the operating instructions. 11 grounding or Polarization This unit is equipped with a polarized alternating -current line plug (a plug having one blade wider than the other). This plug will fit into the power outlet only one way. This is a safety feature. If you are unable to insert the plug fully into the outlet, try reversing the plug. If the plug still fails to fit, contact your electrician to replace your obsolete outlet. To prevent electric shock, do not use this polarized plug with an extension cord, receptacle, or other outlet unless the blades can be fully inserted without blade exposure. If you need an extension cord, use a polarized cord. 12 Power-Cord Protection Power-supply cords should be routed so that they are not likely to be walked on or pinched ii Downloaded From Disc-Player.com Daewoo Manuals IMPORTANT SAFEGUARDS (CONTINUED) iii Downloaded From Disc-Player.com Daewoo Manuals IMPORTANT SAFEGUARDS by items placed upon or against them, paying particular attention to cords at plugs, convenience receptacles, and the point where they exit from the unit. 13 Lightning For added protection for this unit during a lightning storm, or when it is left unattended and unused for long periods of time, unplug it from the wall outlet and disconnect the antenna or cable system. This will prevent damage to the unit due to lightning and power line surges. 14 DISC TRAY Keep your fingers well clear of the disc as it is closing. It may cause serious personal injury. 15 Overloading Do not overload wall outlets of extension cords as this can result in a risk of fire or electric shock. 16 Object and Liquid Entry Never push objects of any kind into this unit through openings as they may touch dangerous voltage points or “short-out” parts that could result in a fire or electric shock. Never spill liquid of any kind on the unit. 17 BURDEN Do not place a heavy object on or step on the product. The object may fall, causing serious personal injury and serious damage to the product. 18 DISC Do not use a cracked, deformed or repaired disc. These discs are easily broken and may cause serious personal injury and product malfunction. 19 Servicing Do not attempt to service this unit yourself as opening or removing covers may expose you to dangerous voltage or other hazards. Refer all servicing to qualified service personnel. 20 Damage Requiring Service Unplug this unit from the wall outlet and refer servicing to qualified service personnel under the following conditions. A. When the power-supply cord or plug is damaged. B. If liquid has been spilled, or objects have fallen into the unit. C. If the unit has been exposed to rain or water. D. If the unit does not operate normally by following the operating instructions. Adjust only those controls that are covered by the operating instructions. Improper adjustment of other controls may result in damage and will often require extensive work by a qualified technician to restore the unit to its normal operation. E. If the video product has been dropped or the cabinet has been damaged. F. When the unit exhibits a distinct change in performance-this indicates a need for service. 21 Replacement Parts When replacement parts are required, have the service technician verify that the replacements he uses have the same safety characteristics as the original parts. Use of replacements specified by the unit manufacturer can prevent fire, electric shock, or other hazards. 22 Safety Check Upon completion of any service or repairs to this unit, ask the service technician to perform safety checks recommended by the manufacturer to determine that the unit is in safe operating condition. 23 Wall or Ceiling Mounting The product should be mounted to a wall or ceiling only as recommended by the manufacturer. 24 Heat The product should be situated away from heat sources such as radiators, heat registers, stoves, or other products (including amplifiers) that produce heat. TABLE OF CONTENTS BEFORE USE Features ........................................................................................................................ 1 Warning or Notice for safety ....................................................................................... 2 Name for each part ...................................................................................................... 5 Buttons on the remote control ..................................................................................... 9 Preparation before use ............................................................................................... 11 DVD SECTION What is DVD? ............................................................................................................. 12 To play a DVD ............................................................................................................. 13 To see the menu on the disc ...................................................................................... 16 VCD SECTION What is VCD? ............................................................................................................. 17 To play a VCD ............................................................................................................. 17 PBC(PlayBack Control) function .................................................................................. 18 Digest function ........................................................................................................... 19 CD SECTION What is CD? ............................................................................................................... 20 To play a CD .............................................................................................................. 20 COMMON USE SECTION When the screen flows because of the difference of the TV system ....................... 21 To set the Set-Up menu ............................................................................................. 22 To move quickly to a desired song or screen ............................................................. 26 To search and play desired screen or music .............................................................. 27 To play the desired time ............................................................................................. 28 Slow, Each frame playback, Zoom, 3D ....................................................................... 29 MARK, A-B Repeat function ...................................................................................... 30 To use the Play mode ................................................................................................. 31 To use the Display, Volume Up/Down function ......................................................... 34 CONNECTION SECTION Basic connection instruction ...................................................................................... 35 Connection variation instruction ................................................................................ 37 BEFORE REQUESTING A SERVICE Disc type and features ............................................................................................... 39 Troubleshooting guide ................................................................................................ 40 Specification .............................................................................................................. 42 iv Downloaded From Disc-Player.com Daewoo Manuals FEATURES [SUPERB QUALITY OF SOUND] You can enjoy lively original sound and magnificent sound effects by the adopted AC-3 type, new surround sound developed by Dolby Research Institute. [CLEAR IMAGE] The clear image looks so real, you will mistake them as the real thing. When you connect the player to a wide screen (16:9), you will feel the sensation of the screen of a movie theater. [INTERACTIVE CONVERSATION TYPE MENU FEATURE] With this menu you can select spoken language and language of the subtitle in various languages you desire while playing the DVD, and switch the angle of the screen in various ways. [WATCH AGAIN? LISTEN AGAIN? AS MUCH AS YOU DESIRE] When you desire to watch or listen to the image or music, selecting the repeat feature will automatically repeat playing. [WATCH THE IMAGE SLOWLY AND IN DETAIL] You can watch the thrilling or important part slowly or by each frame. [AS YOU DESIRE TO WATCH--AS YOU DESIRE TO LISTEN] You can watch or listen in the order you desire when program the tracks in the order you desire! 1 Downloaded From Disc-Player.com Daewoo Manuals BEFORE USE Presents DVD, VIDEO-CD, CD, CD-R with magnificent surround sound and clear image. WARNING OR NOTICE FOR SAFETY You should follow the instructions to prevent any danger or material loss. [DESCRIPTION OF WARNING/NOTICE] [DESCRIPTION OF INDICATION] Warning this shows prohibition A person may die or get serious wound by the following matter. this shows disassembling prohibited Notice this shows contacting prohibited A person may get hurt or material loss may happen by the following matter. this shows things you must follow. this shows you must disconnect the plug from the outlet. 2 Downloaded From Disc-Player.com Daewoo Manuals WARNING OR NOTICE FOR SAFETY_CONTINUED Do not plug many things in one outlet. * Cause for extraordinary generation of heat and fire. Do not bend excessively or put heavy material on the power cable which causes damage. * Cause for fire. Do not put a container with fluid on the product. * If the liquid gets in to the machine it will cause malfunction. Do not use water or thinner or organic cleaning agent for cleaning. * Cause for malfunction and electric shock. Use dry cloth for cleaning. Do not put it on a damp environment. * Cause for electric shock and fire. Do not pull the wire when pulling out the power cord. * Damage of the electric cable will cause fire or electric shock. Do not push in or pull out the plug with wet hands. * May cause electric shock. Must not disassemble or repair or modify. * Malfunction may cause danger for fire, electric shock and injury. Clean out the alien substance from the electric plug. * Using without cleaning may cause fire. The product is for only 120V use. * Malfunction may cause danger for fire, electric shock and injury. 3 Downloaded From Disc-Player.com Daewoo Manuals BEFORE USE WARNING WARNING OR NOTICE FOR SAFETY_CONTINUED NOTICE Do not push in the plug when the outlet is loose. * Cause for electric shock or fire. Do not pull or push the tray with excessive force. * Cause for malfunction. Do not allow dust or alien substance on the surface of the disc. Do not move the product while playing a disc. * Cause for malfunction. Do not allow alien substance getting in the product. * Cause for malfunction. Do not put heavy object on the product. * Cause for malfunction. Do not disassemble or put extreme impact on the remote control. Avoid direct light or heating component when installing. Use the disc properly. * Do not use broken disc or disc with scratch. Install on a flat and stable place. * May not play properly. Pull the plug when not using for long period of time. Pull the plug immediately and contact the service center when there is strange noise or smell. 4 Downloaded From Disc-Player.com Daewoo Manuals NAME FOR EACH PART FRONT BEFORE USE 1 2 9 10 5 3 4 8 7 ! Stand-by button : Use when turning it on or off. @ Open/Close button : Use when opening and closing the tray. # Play button $ Pause button % Stop button ^ Skip FWD button : Use when going to the next music or chapter. & Skip REV button : Use when going back to the previous music or chapter. * Tray : Place various disc for playing. ( Remote signal receiver ) VFD Indicator (refer to the detailed description on the next page) 5 Downloaded From Disc-Player.com Daewoo Manuals 6 NAME FOR EACH PART _CONTINUED VFD INDICATOR 1 8 2 3 4 5 6 ! Playback mode indicator @ Screen angle indicator # Disc type indicator $ PBC indicator of VCD Disc % Title, Track, Chapter, Time message indicator ^ Playback indicator & Track, Chapter indicator * Repeat playback indicator 6 Downloaded From Disc-Player.com Daewoo Manuals 7 NAME FOR EACH PART _CONTINUED BACK 2 3 4 5 ! Power cable : Only for 120V. @ S Video output jack : Connect to a TV with a S video input jack. # Audio output jack (L, R 2 for each) : Connect to audio input jack on a TV or audio component. $ Video output jack : Connect to video input jack on a TV. % Optical Digital Sound Output jack : Connect to an audio component with optical digital input jack. 7 Downloaded From Disc-Player.com Daewoo Manuals BEFORE USE 1 NAME FOR EACH PART _CONTINUED ACCESSORIES Œ Remote Control ´ Batteries ¨ Video/Audio connection cable ˆ Product Warranty /User manual 8 Downloaded From Disc-Player.com Daewoo Manuals BUTTONS ON THE REMOTE CONTROL 16 2 1 15 24 10 29 28 25 8 7 3 17 5 9 4 18 22 23 19 21 20 14 26 13 12 27 6 BASIC OPERATING BUTTONS ! Stand-by button @ Open/Close button # Play button $ Pause button % Stop button ^ Volume control button (Up, Down) & Fast FWD/STEP, Fast REV/STEP : Use to find the desired music or screen. Or STEP play on pause mode. * Skip FWD, Skip REV : Use to move to desired music or Chapter. ( Slow FWD, Slow REV : Use to play the DVD showing in slow-motion. ) Display button : Use to verify the playing status. 1 TV System button : Select between NTSC or PAL. 9 Downloaded From Disc-Player.com Daewoo Manuals BEFORE USE 11 BUTTONS ON THE REMOTE CONTROL _CONTINUED DVD RELATED BUTTONS OTHER ADDITIONAL FUNCTION BUTTONS 2 AUDIO select button : Use to select spoken language. 3 Subtitle select button : Use to select subtitle language. 4 Angle select button : Use to change angle view of the screen. (When there is Angle Option on the disc) 5 Menu button : Use for the menu offered by the disc. (Use PBC button for VCD) 6 Title button : Use to play title. (Use Digest function button for VCD) 7 ZOOM button : Use to zoom in on the showing screen. 8 3D button : Use to change 2 CH Stereo Sound to 3D surround sound. 9 MARK button : Use to mark the point to watch later. 0 Play mode button : Use for Repeat play, Random play, Program play and PBC function for VCD. “ Section repeat button : If two points (A, B) are selected while playing section between two points, selected part will be played repeatedly. ‘ SCART control button : Control output of the SCART jack. + Search button : Use for input on desired time, chapter and title number, and move to specific section. = Set Up button : Use to set a preferred state when power is turned on every time. Q List move buttons : Use to move to desired positions of the menu. q Number buttons : Use to put in numbers. W Clear button : Use to clear the input or cancel the program function action. w Return button : Use to return to previous menu on VCD. E Enter button : Use to execute selected functions from the menu. 10 Downloaded From Disc-Player.com Daewoo Manuals PREPARATION BEFORE USE 1. INSTALL AND CONNECTION First connect TV and audio component on the DVD player. 1 Power connection : The product is for use on 120V only. 2 Audio connection : Red jack is right, white jack is left on the audio output jack. 3 TV connection : Connect the video output jack (yellow) on TV’s video input. If you have S-video input jack on the TV, connect DVD player’s S-video output jack to it. You’ll enjoy a better quality picture. 2. TURNING ON THE DVD PLAYER. Press the Power button on the DVD. * VFD Indicator in the front will light up showing “-ON-“. 3. TURNING ON THE TV AND SELECTING Turn on the TV, and press the TV/Video button to select “Video“. * Some TV may show “outside input“ instead of “Video“. 4. TURNING ON THE AUDIO COMPONENT AND SELECTING select “AUX“ after turning on the audio component. * You may select “CD“ or “DVD“ according to the connection. 11 Downloaded From Disc-Player.com Daewoo Manuals BEFORE USE You can use the product more easily after reading the following section on TV connection, turning it on and what to select. WHAT IS DVD? DVD is a disc that uses Dolby Digital(AC-3) newly developed by Dolby research center and image compressed in MPEG-II type for outstanding quality of sound and image which makes home environment available for movie theater quality image and sound. * DVD is a disc with image and sound recorded for 135 minute (max.). * It is very convenient to play the desired part because of the conversation type menu screen. Get the movie theater into your home. Live real sound and surround sound is waiting for you. Connect it with wide screen (16:9) and play the movie recorded in Dolby Digital (AC-3), you'll get same effect as you were in a movie theater. Play limited area indicating number The product plays discs with 1 play limited area indicating number and discs with no play limited area indicating number. (The product cannot play discs with numbers other than “3“ for play limited area indicating number.) 12 Downloaded From Disc-Player.com Daewoo Manuals TO PLAY A DVD 1. DVD PLAYING INSTRUCTION 1 Select “Video“ by pressing the TV/VIDEO button on the TV. *Some TV may show “outside input“ instead of “Video“. 2 Select “AUX“ or “CD“ on the function selection menu on the audio component. *May be different according to the audio component, refer to user manual of the audio component. 3 Press Open/Close button after pressing the Power button. Pressing the Power button makes the VFD Indicator show “-ON-“, and pressing the Open/Close button opens the disc tray. 4 Put the DVD on the disc tray. Put the DVD correctly showing the label on the upside. 5 Press Open/Close button or Play button. It will play after the disc tray closes. * It will play the “Title“ first and the movie will start afterwards. * Whenever you desire to see the “Title“, pressing the “Title“ button will make it happen. To stop the play temporarily Press the Pause button. *The picture will stop and the sound will stop. *To play again press play button or pause button once again. To stop the play Press the Stop button. *The product has a Resume Stop function which makes the DVD player to Resume Play on the point where it stopped by pressing the play button. *When the Resume Stop and Resume Play function is not needed press the Stop button twice. To pull out the disc Press the Open/Close button. The disc tray will open. 13 Downloaded From Disc-Player.com Daewoo Manuals BEFORE USE & DVD SECTION Turn on the TV and the audio component. Some functions may not operate according to the disc. TO PLAY A DVD _CONTINUED 2. TO CHANGE SPOKEN LANGUAGE This is possible only when there are several spoken languages available. Do you desire to change the language spoken during play? You can change the language easily and quickly using just the Audio button. (Disc with a menu, languages can be changed with the menu button) 1 Press the Audio button. As you press the Audio button, the language spoken will change to such languages as Korean-English-Japanese as recorded on the disc, and it will play with language you selected. AUDIO: KOREAN AUDIO: ENGLISH AUDIO: JAPANESE AUDIO: FRENCH SS * To set the spoken language(Audio) to a preferred language, refer to “Set-Up preference“. 3. TO CHANGE LANGUAGE OF THE SUBTITLE This is possible only when more than one languages for subtitle are available. Do you desire to change the language of the subtitle to another language? You can change the language easily and quickly using just the Subtitle button. (Disc with a menu, languages can be changed with the menu button) 1 Press the Subtitle button. As you press the Subtitle button, the language of the subtitle will change to such language as Korean-English-Japanese as recorded on the disc, and it will play with the language you chose. AUDIO: KOREAN AUDIO: ENGLISH AUDIO: JAPANESE AUDIO: FRENCH SS * To set the language of the subtitle to a preferred language, refer to “Set-Up preference“. 14 Downloaded From Disc-Player.com Daewoo Manuals TO PLAY A DVD _CONTINUED 4. TO CHANGE THE ANGLE OF THE MOVIE 1 2 Check if the “Angle“ indication is showing on the screen. When the “Angle“ is showing, press the Angle button. As you press the button, angles of the shot will be changed to such as Angle 1Angle 2-Angle 3, as recorded on the disc. ANGLE 1 ANGLE 2 ANGLE 3 ANGLE N SS * On the part where angle change is available, some buttons may not work. *“Angle“ indication will disappear after showing for 6 seconds. Do you desire to know what part is available for angle change? On the Set-Up preference menu, turn on the “OSD“. This will show the “angle“ indication, when the angle of the shot can be changed on screen. 15 Downloaded From Disc-Player.com Daewoo Manuals DVD SECTION This is possible only when there are various angles shot recorded on the disc. Do you desire to watch the movie in other angles? When the part with several angles is playing you can enjoy the movie in several different angles just by pressing the Angle button. (Disc with a menu, angles can be changed with the menu button) TO SEE THE MENU ON THE DISC * * * * There are various menus on the DVD disc. Menu shown on screen will be different for each disc. Select an item after you see the menu. Menu screen can be seen only when the menu is recorded on the disc. 1 Press the “Menu“ button to see the menu. MENU 1 AUDIO 2 SUB PICTURE 3 ANGLE MENU 1 LOVE STORY 2 RAMBO MENU 1 PLAY 2 ETC * Above menu is just an example, usually it includes various graphics and different menu for each disc. * “Audio“, “Subtitle“, “Angle“, “Title“ and “Play“ is available on a normal menu screen. 2 Move to a desired position using the “List Move“ button, then press the “Enter“ button. MENU 1 AUDIO 2 SUB PICTURE 3 ANGLE When selecting the Audio MENU 1 KOREAN 2 ENGLISH 3 JAPANESE When selecting the Subtitle MENU 1 KOREAN 2 ENGLISH 3 JAPANESE When selecting the Angle MENU 1 CENTER 2 LEFT 3 RIGHT 3 Move to a desired position using the “List Move“ button, then press the “Enter“ button. *On the above example, the spoken language is set to Korean, subtitle to English, and Angle to Center. 4 Press the Menu button one more time to remove the menu screen. 16 Downloaded From Disc-Player.com Daewoo Manuals WHAT IS VCD? TO PLAY A VCD * Turn on the TV and the Audio component by pressing the Power button. * Some menu may not be available depending on the disc. 1. VCD PLAYING INSTRUCTION 1 Select “Video“ mode by pressing the TV/Video button of TV. *Some TV may show outside input. 2 Select “AUX“ or “CD“ on the function selection on the audio component. *It may be different for some audio component, refer to the user manual of the audio component. 3 Press the Open/Close button after pressing the Power button. VFD indicator will show “-ON-“ on pressing the Power button, it will show “Open“ on pressing the Open/Close button. 4 Put the VCD on the disc tray. Put the disc showing the label upwards. 5 Press the Open/Close button. Disc tray will be closed. 6 Press the Play button. It will start to play. 17 Downloaded From Disc-Player.com Daewoo Manuals DVD SECTION * Unlike normal CD, both sound and image are recorded on VCD. * 74 minutes of image and sound are recorded on a Video-CD. * Image is compressed as MPEG-I type which has similar quality with a VHS tape, and the sound quality is the same as the CD. * The image and the sound is divided by track. TO PLAY A VCD _CONTINUED To stop the play temporarily Press the Pause button. * The picture will stop and the sound will stop. * To play again press play button or pause button once again. To stop the play Press the Stop button. * This product has a Resume Stop function which makes the DVD player Resume Play on the point where it stopped by pressing the play button. * When the Resume Stop and Resume Play function is not needed, press the Stop button twice. To pull out the disc Press the Open/Close button. The disc tray will open. PBC(PLAYBACK CONTROL) FUNCTION The function is available only on Video-CD with version above 2.0. By turning “On“ the PBC function various data is available through a menu provided by the disc. PBC FUNCTION USING INSTRUCTION 1 Put in the VCD and the disc data will be displayed on the VFD. 2 Current status will show on the OSD by pressing the “menu” button on the remote control. 3 The status will invert and it will play by pressing the Menu button once again. Disable PBC (default option): PBC Playback Control (VCD2.0) enabled via playmode menu. OFF PBC ON by MENU button 18 Downloaded From Disc-Player.com Daewoo Manuals PBC(PLAYBACK CONTROL) FUNCTION_CONTINUED MENU 1 2 3 4 5 MENU 1& ENTER RETURN 1 2 3 4 5 2) If you desire to watch the movie after looking at the various additional data provided by the disc select “Watch Movie“. *It will be seen as in the order set by the menu instead of the order of the track number by pressing the Skip button. 5 Playing while the PBC is off 1) The movie will start from the first part of the disc by pressing the play. *It will play a selected track unit on the disc by pressing the skip button. DIGEST FUNCTION * Function that will divide the screen into 9 parts, then show the first scene of each part. Selecting one of the parts will start to play the selected part. INSTRUCTIONS FOR USING THE DIGEST FUNCTION 1 Press the “Title“ button on the remote control. * Whether it is playing or not it will divide the screen into 9 parts. 2 The desired scene will play by selecting the part with the List Move button and pressing the Input button. 19 Downloaded From Disc-Player.com Daewoo Manuals VCD SECTION 4 Playback when the PBC is on 1) The menu will show up instead of starting the movie by pressing the play button. *You will see various additional data provided by the disc. WHAT IS CD? * CD is the most popular format for a disc, which has clear sound quality and can be stored for a long period of time. * Only sound is recorded in CD, and there are two types of CD, 12cm(74 minutes) and 8cm(20minutes). * Sound of CD is recorded in digital signal unlike LP, which makes it virtually the same as the original, and long period use does not drop the quality of the sound. * CD-R(Compact Disc Recordable) is also playable. TO PLAY CD *Turn on the audio component by pressing the Power button. 1. CD PLAYING INSTRUCTION 1 select “AUX“ or “CD“ on the function selection menu on the audio component. *May be different according to the audio component, refer to user manual of the audio component. 2 Press Open/Close button after pressing the Power button. Pressing the Power button makes the VFD Indicator show “-ON-“, and pressing the Open/Close button opens the disc tray. 3 Put the CD on the disc tray. Put the disc correctly, showing the label on the upside. 4 Press Open/Close button or Play button. It will play after the disc tray closes. To stop the play temporarily Press the Pause button. *The picture will stop and the sound will stop. *To play again press the play button or pause button once again. To stop the play Press the Stop button. * The product has a Resume Stop function which makes the DVD player Resume Play on the point where it stopped by pressing the play button. * When the Resume Stop and Resume Play function is not needed, press the Stop button twice. To pull out the disc Press the Open/Close button. The disc tray will open. 20 Downloaded From Disc-Player.com Daewoo Manuals ABOUT COMMON USE SECTION WHEN THE SCREEN FLOWS BECAUSE OF THE DIFFERENCE OF THE TV SYSTEM * Pressing the “NTSC/PAL“ button on the remote control will set to your TV System. (Refer to TV System on Set-Up) 21 Downloaded From Disc-Player.com Daewoo Manuals VCD SECTION & CD SECTION * There are many functions such as searching or repeating the screen or music while playing. * Some functions may not be available according to DVD, VCD and CD. TO SET THE SET-UP MENU * If you set several things following the below instruction, you won’t have to set the DVD each time you watch it. * It is to control the menu if you just know one method of setting because the setting method is same for every menu. WHAT IS SET-UP? * It is setting the preference so that once it is done, even if the power is off or the value has changed the value of the Set-Up will be maintained. * The user can set preferred state in the Set-Up, but if the disc does not support it, it will be ignored. TO SEE THE SET-UP MENU 1 Press the Set-Up button while on stop. LANGUAGE SUBTITLE AUDIO TV TYPE TV SYS <EXIT> ENGLISH AUTO ENGLISH 16:9 NTSC <NEXT> NEXT AUD OUT PASSWORD RATING OSD 6-CHANNEL ---VIEW ALL ON BACK <BACK> 2 Use the List Move button to move through the Set-Up menu and point to desired position. 3 When the desired item is lighted, pressing the Input button will change the contents consecutively. 4 When the Set-Up is as desired through pressing the Input button, press the List Move button to move the selection. 5 Change the selection of the Set-Up using (3) and (4) repeatedly. 6 User can come out from the Set-Up Mode through selecting “Exit“ on set-Up menu, Pressing the Input button, or pressing other button. 22 Downloaded From Disc-Player.com Daewoo Manuals TO SET THE SET-UP MENU_CONTINUED Language : OSD subtitle selection LANGUAGE ENGLISH ENTER LANGUAGE FRENCH ENTER LANGUAGE GERMAN ENTER ENTER LANGUAGE ENTER SPANISH LANGUAGE ITALIAN * Selecting the OSD Subtitle using the Input button will change the language of the Set-Up menu. * Press the Input button repeatedly until the desired language comes up. * When the desired OSD Subtitle language comes up, press the List Move button to move to other items. Subtitle : Setting the language of the subtitle Subtitle preference is primary language on disc. SUBTITLE AUTO ENTER SUBTITLE ENGLISH ENTER SUBTITLE FRENCH ENTER ENTER SUBTITLE OFF SUBTITLE GERMAN ENTER ENTER SUBTITLE ENTER SPANISH SUBTITLE ITALIAN * Press the Input button until the desired Subtitle language comes up. Audio : Setting the Spoken language Soundtrack preference is original track. AUDIO AUTO ENTER AUDIO ENGLISH ENTER AUDIO FRENCH ENTER ENTER AUDIO SPANISH ENTER AUDIO ITALIAN ENTER AUDIO * Press the Input button until the desired spoken language comes up. 23 Downloaded From Disc-Player.com Daewoo Manuals GERMAN COMMON USE SECTION DESCRIPTIONS FOR THE SET-UP MENU TO SET THE SET-UP MENU_CONTINUED TV Type : Setting the TV Type TV TYPE TV type is 4:3; letterbox preferred for widescreen material: (factory default) 4:3 LB ENTER 4:3 PS ENTER TV TYPE ENTER TV TYPE TV type is 4:3; pan-scan preferred for widescreen material: (if not pan-scan, revert to letterbox) TV type is 16:9; show widescreen anamorphic, 4:3 material letterbox: 16:9 * Press the Input button until the desired TV Type comes up. TV sys : Setting the TV system TV SYS AUTO ENTER TV SYS NTSC ENTER TV SYS PAL ENTER ENTER TV SYS ENTER PAL60R TV SYS PAL60 * Press the Input button until the desired TV System comes up. Audio Out : setting the Audio Output Audio is PCM via SPDIF output: Audio is PCM via SPDIF output: AUD OUT STEREO PCM ENTER Audio is 2channel analog: AUD OUT ANALOG 2CH Audio is bitstream via SPDIF output: ENTER AUD OUT BITSTREAM ENTER * Press the Input button until the desired Audio Out comes up. Note : for stereo programs, digital audio reverts to PCM 2-channel operation. 24 Downloaded From Disc-Player.com Daewoo Manuals TO SET THE SET-UP MENU_CONTINUED PASSWORD ---- PASSWORD ENTER PASSWORD ENTER PASSWORD **** ENTER PASSWORD ---- **** ENTER ---- PASSWORD * Press 4 digits for the password and press input for lock. ---- * Press the 4 digits of the password to unlock. Rating : Setting for the password needed to play for certain discs. (Discs with ratings above the specified ratings need the password for watching) Allow any region-compatible title to be played: RATING Allow any region-compatible title to be played: (factory default) VIEW ALL ENTER NO ADULT ENTER RATING ENTER RATING KID’S ONLY Forbid play of ‘adult’ titles: (e.g. no ‘X’, ‘NC-17’ or ‘R’) Allow only children’s titles to be played: (e.g. only ‘G’) Notes about Password and Rating 1. Parental Control functions only if the DVD titles has it encoded in its program. Parental Control does not work for Video CD or CD Audio. 2. The Rating can be changed if the Password is ‘unlocked’ ( shown). 3. The Rating cannot be changed if the Password is ‘locked’ ( shown). 4. A Password is always 4 digits. 5. To lock, enter four digits followed by ‘Enter’. The password digits are shown on the screen as they are entered. When ‘Enter’ is pressed, they are over-written with ****, the ‘locked’ icon appears, and the Password is saved in non-volatile memory. 6. To unlock, enter four digits followed by ‘Enter’. When ‘Enter’ is pressed, they are over-written with ****, the ‘unlocked’ icon appears, and the Password is erased from memory. 7. Do not forget your password. However, a special front panel sequence may be used to clear it. (TBD) OSD : Setting for OSD on/off OSD ON enables the ‘pop-up’ displays. OSD ON OSD OFF suppresses ‘pop-up’ except where noted. ENTER 25 Downloaded From Disc-Player.com Daewoo Manuals OSD OFF COMMON USE SECTION Password : Setting the Password for locking the Rating field. RATING field unlocked (factory default): RATING field locked: TO MOVE QUICKLY TO A DESIRED MUSIC OR SCREEN * You can go through quickly while playing and go to next track or chapter quickly. 1. TO SEARCH FOR A SCREEN OR MUSIC QUICKLY 1 2 Press the search button. * Pressing the F.F./STEP ( ) button will play the disc quickly. Pressing the F.R. ( ) will play the disc quickly backwards. * Pressing the F.F./STEP ( ) and F.R. ( ) repeatedly will speed up the process. [DVD] 2 TIMES 4 TIMES 8 TIMES [VCD] & [CD] 2 TIMES 4 TIMES 8 TIMES 20 TIMES Press the Play ( ) button to change the speed to normal. 2. TO JUMP TO NEXT SCREEN OR MUSIC 1 Press the skip button. * Pressing the Skip FWD ( ) button on DVD will move to next chapter of the current playing chapter, pressing Skip REV ( ) button will move back to previous chapter. * Pressing the Skip FWD ( ) button on VCD and CD will move to next track of the current playing track, pressing Skip REV ( ) button once will move to the start of the playing track, twice will move back to previous track. * Skip buttons are both on the remote control and the player. 26 Downloaded From Disc-Player.com Daewoo Manuals TO SEARCH AND PLAY DESIRED SCREEN OR MUSIC TO PLAY THE DESIRED TITLE/CHAPTER OR TRACK IMMEDIATELY 1 Pressing the Search button will show below screens. [For DVD] [For VCD or CD] GO TO TIME CHAPTER TITLE 2 TM/CH/TL -:--:-**5 -- DISC SEARCH TIME -:--:-TRACK *5 TM/CH/TL -:--:-**5 -- Input the number of the Title using the Number button. [For DVD] GO TO TIME CHAPTER TITLE 6 DISC SEARCH TIME -:--:-TRACK -- * Omit (4) and (5) then go straight to (6) for VCD and CD. Select the “Title“ using the List Move button for DVD. [For DVD] GO TO TIME CHAPTER TITLE 5 TM/CH/TL -:--:---- Input the desired chapter or track number using the number button. [For DVD] [For VCD or CD] GO TO TIME CHAPTER TITLE 4 DISC SEARCH TIME -:--:-TRACK -- Use the List Move button to select the “Chapter“ or “Track“. [For DVD] [For VCD or CD] GO TO TIME CHAPTER TITLE 3 TM/CH/TL -:--:---- TM/CH/TL -:--:-**5 **2 Pressing the Input button will play the desired Title/Chapter or Track. *When the wrong number is pressed, you can cancel using the Cancel button. *For VCD, it is possible on “VCD version 1.1 or version 2.0 PBC OFF“ 27 Downloaded From Disc-Player.com Daewoo Manuals COMMON USE SECTION * You can find the desired Title/chapter, track or time while playing or on stop and play it. TO PLAY THE DESIRED TIME 1 Pressing the Search button will show the below screen. [For DVD] [For VCD or CD] GO TO TIME CHAPTER TITLE 2 TM/CH/TL -:--:---- DISC SEARCH TIME -:--:-TRACK -- Input the desired time using the Number button. [For DVD] [For VCD or CD] GO TO TIME CHAPTER TITLE 4 DISC SEARCH TIME -:--:-TRACK -- Select the “Time“ using the List Move button. [For DVD] [For VCD or CD] GO TO TIME CHAPTER TITLE 3 TM/CH/TL -:--:---- TM/CH/TL 1 : 23 : 45 --- DISC SEARCH TIME 1 : 23 : 45 TRACK -- Pressing the Input button will play from the desired time. *When the wrong number is pressed, you can cancel using the Cancel button. 28 Downloaded From Disc-Player.com Daewoo Manuals SLOW, EACH FRAME PLAYBACK, ZOOM, 3D 1 Press the Slow play button. * Pressing the Slow F ( ) button will slow down the play, Pressing the Slow R ( ) button will slow down the backward play. * Pressing the Slow F ( ) and Slow R ( ) button repeatedly will change the speed of the play. 1/10 TIMES 2 1/5 TIMES 1/2 TIMES To play normally, press the play ( ) button. TO PLAY BY EACH FRAME 1 2 3 Press the Pause button while playing. Pressing the F.F./Step button will play frame by frame. * It is impossible to play backwards by frame. Press the Play button to play ( ) normally. TO USE THE ZOOM FUNCTION 1 2 Press the Zoom button while playing. Pressing the button repeatedly will change the rate of zoom. ZOOM 1 ZOOM 2 ZOOM 3 1.3TIMES 1.5TIMES 2TIMES NO ZOOM NORMAL TO USE THE 3D FUNCTION 1 Pressing the 3D button once will show the current state, twice will invert the state. 3D OFF 3D ON 3D * Turning on the 3D function will add 3D effect to the 2 channel output. 29 Downloaded From Disc-Player.com Daewoo Manuals COMMON USE SECTION TO PLAY SLOWLY MARK, A-B REPEAT FUNCTION TO USE THE MARK FUNCTION 1 * Using the Mark button will mark the desired scene, and play it again later as desired. To mark while playing press the Mark button. * ”Mark 1” is lighted. MARKS * You can select between ”Mark 1”~”Mark 3” using the MARK 1 *:**:** MARK 2 : : List Move button. * ** ** MARK 3 *:**:** <PRESS CLEAR, ENTER> 2 Press Enter button on the scene you desire to leave a mark. * You can erase the mark using the Erase button. MARKS MARK 1 MARK 2 MARK 3 1 : 23 : 45 *:**:** *:**:** <PRESS CLEAR, ENTER> 3 You can mark another scene using the List Move button as ”Mark 2” or ”Mark 3”. MARKS MARK 1 MARK 2 MARK 3 1 : 23 : 45 *:**:** *:**:** <PRESS CLEAR, ENTER> 4 5 Mark another scene using the method on (2). After you mark all the desired scenes, press Mark button one more time to remove the OSD on screen. TO USE THE A-B REPEAT FUNCTION * Using the A-B Repeat function will mark a certain part to repeat play the selected part. 1 Press the A-B button on the start of the desired part. REPEAT A 2 3 4 While it is playing, when the end of the desired part comes up press A-B button again. * ON the moment you press “A-B”, it will go to point REPEAT A-B SET “A“ (the point you pressed “A-B” for the first time) and play. OSD will disappear after a while, and the selected part will play repeatedly. To cancel `repeat play’, press A-B button one more time. *Sign on the left will come up for awhile, and the REPEAT A-B CANCELLED repeat mode will be canceled. 30 Downloaded From Disc-Player.com Daewoo Manuals TO USE THE PLAY MODE 1 Pressing the Play mode button will show the below screen, [For DVD] [For VCD or CD] PLAY MODES REPEAT OFF RANDOM OFF PLAY MODES REPEAT OFF RANDOM OFF PBC ON <EXIT> <0K> <PROGRAM> <EXIT> <0K> <PROGRAM> * You can select between several modes of playing using the List Move button. REPEAT FUNCTION * Repeat function is a convenient function that repeats playing desired image or sound. 1 Press Input button after selecting “Repeat” using the List Move button. *As you press the Input button the settings will change as shown below. [For DVD] [For VCD or CD] REPEAT OFF REPEAT Disable repeat (default): REPEAT CHAPTER REPEAT Repeat same chapter: REPEAT OFF Disable repeat (default): ONE Repeat same track: TITLE REPEAT Repeat all title: ALL Repeat all VCD/CD: 2 After the settings are as desired, use the List Move button to select “OK“ then press Input button, Repeat Play mode will be set, and OSD screen will disappear. 3 Repeat play will be available immediately while playing, pressing Play button on stop will start the repeat play. * Repeat Chapter/Track should be set while the desired Chapter/Track for repeat play is playing.(If you set it on stop, the first Chapter/Track will repeat play.) * The “ “ sign will show on the VFD. * While repeat playing, if you press buttons that don’t have anything to do with play such as Stop button, the Repeat Play mode will be canceled. 31 Downloaded From Disc-Player.com Daewoo Manuals COMMON USE SECTION * Using the Play mode allows various ways of playing for your viewing pleasure. TO USE THE PLAY MODE_CONTINUED RANDOM FUNCTION 1 Press Input button after selecting “Random“ using the List Move button. * Pressing Input button repeatedly will change the setting as shown below. RANDOM 2 OFF RANDOM ON * “Random” function randomizes the order of the image or music for your enjoyment. When it is set as desired, use the List Move button to select “Exit” and press Input button or press Play mode button one more time to set, then the OSD screen will disappear. * “RAND“ sign will show on the VFD. * When the Random play is set, it will Random play even if you don’t press the Play button. * While Random playing, if you press buttons that don’t have anything to do with play such as Stop button, the Random Play mode will be canceled. PBC FUNCTION * The function is available only on VCD 2.0. 1 Press Input button after selecting “PBC“ using the List Move button. * Pressing the Input button repeatedly will change the setting as shown below. PBC 2 OFF PBC ON When the setting is as desired, use List Move button to select “OK” then press input to set PBC On/Off, and the OSD screen will disappear. * When the PBC setting is changed it will play automatically. * If the disc is VCD 1.1 PBC will be fixed to “Off“, unable to use this function. * If the disc is VCD 2.0 and the PBC is “On“ other functions(Repeat, Random, Program) can be set to desirable state. * VCD can be played selecting the menu when the PBC(PlayBack Control) is “On“.(When the menu is provided by the disc) * You can set the PBC On/Off using the Menu Key of the Remote Control. 32 Downloaded From Disc-Player.com Daewoo Manuals TO USE THE PLAY MODE_CONTINUED * The function sets the playing order as desired. 1 Press the Input button after selecting “Program“ using the List Move button. [For DVD] [For VCD or CD] TC **-** **-** **-** **-** TC **-** **-** **-** **-** TC **-** **-** **-** **-** TC **-** **-** **-** **-** PROGRAM EDIT 1** 5** 9** 2** 6** 10** 3** 7** 11** 4** 8** 12** <BACK> <0K> <CLEAR> 1-_ 13** 14** 15** 16** <BACK> <0K> <CLEAR> 2 Use the List Move button and number button to set the play order. * The play order is “most left top to bottom, then second most left top to bottom and on“. * The wrong input of the play order or if you desire change the order can be fixed using the Cancel button, or select <Clear> and press input button using the List Move button to erase the whole program. 3 Select “OK“ and press Input button after setting the play order to Program play. * While Program playing, if you press buttons that don’t have anything to do with play such as Stop button, the Program Play mode will be canceled. * The programmed contents will be erased when pressing the Open/Close button or turing the player off. 33 Downloaded From Disc-Player.com Daewoo Manuals COMMON USE SECTION PROGRAM FUNCTION TO USE THE DISPLAY, VOLUME UP/DOWN FUNCTION TO USE THE DISPLAY FUNCTION * The Display function can be used to verify Media type, elapsed time/ left time, whole Title/Chapter/Track number, current Title/Chapter/Track number, Spoken language, language of the subtitle, and the kind of angle. 1 Press the Display while the disc is loaded. [For DVD] [For VCD or CD] DVD * The elapsed/left time is the elapsed/left time of the current Chapter. 2 3 * The elapsed/left time is the elapsed/ left time of the current track. * Disc media shown is one of VCD 1.0/ VCD 2.0/ CDDA. Press Display button one more time. [For DVD] DVD CHAPTER TITLE AUDIO SUBTITLE VCD (or CD) [For VCD or CD] TOTAL TOTAL VCD (or CD) TRACK TOTAL Pressing Display button one more time will remove the above OSD. TO USE THE UP/DOWN FUNCTION * The function controls the volume level of the DVD player. 1 Press Vol. Up or Vol Down button on the remote control while the disc is loaded. VOLUME - - - - - - - - 00 VOLUME * * * * * * 32 * Pressing the Volume Up/Down button changes from volume “00” to volume ”32” as shown above. 34 Downloaded From Disc-Player.com Daewoo Manuals BASIC CONNECTION INSTRUCTION CONNECTION WITH THE TV yellow white red *Connect one of these cables. INSTRUCTIONS FOR USING THE TV 1 2 Turn on the TV and select video mode. Select the “Video“ or “S-Video” mode pressing the TV/Video selection button. * Some TV may show outside or S-Image input. 35 Downloaded From Disc-Player.com Daewoo Manuals COMMON USE SECTION Connect the player referring to following connection instruction. Instructions for connecting to the TV and the audio component using the AV cable. BASIC CONNECTION INSTRUCTION_CONTINUED CONNECTION WITH THE AUDIO COMPONENT *Connect one of these cables. INSTRUCTIONS FOR USING THE AUDIO COMPONENT 1 2 Press the Power button of the audio component Select CD or AUX from the function selection menu. * Select after verifying where the DVD player is connected to. 36 Downloaded From Disc-Player.com Daewoo Manuals CONNECTION VARIATION INSTRUCTION INSTRUCTION OF CONNECTION FOR CLEAR IMAGE. Connecting to a TV with a S-Video input jack yellow white red *Connect one of these cables. INSTRUCTION FOR USING TV 1 2 Press the Power button of the TV. Select “S-Video“ mode pressing the TV/Video button. * Some TV may show S-Image. 37 Downloaded From Disc-Player.com Daewoo Manuals CONNECTION SECTION instructions of connection for enjoying better image and sound. CONNECTION VARIATION INSTRUCTION_CONTINUED INSTRUCTION OF CONNECTION FOR CLEAR SOUND. Connection with an amp capable of Dolby Pro Logic function. Front left speaker Center speaker Rear left speaker Front right speaker Rear right speaker Dolby Pro-Logic Amp *Connect one of these cables. *Connect one of these cables. INSTRUCTION OF CONNECTION FOR CLEAR SOUND Connection with Digital amp with optical digital sound input jack Front left speaker Center speaker Front right speaker SUPER WOOFER Rear left speaker Digital Amp *Connect one of these cables. 38 Downloaded From Disc-Player.com Daewoo Manuals Rear right speaker DISC TYPE AND FEATURES 1 Disc type Diameter -- 8cm, 12cm 2 Recording time 12cm : Sound only 74 minutes 8cm : Sound only 20 minutes 3 Features Sound of CD is recorded in digital signal unlike LP, which makes it virtually the same as the original, and long period use does not drop the quality of the sound. 4 Image/Sound classification and state of the sound on high speed search * Image/Sound classification : Classifies sound as track * State of the sound on high speed search : small sound is heard through high speed VIDEO - CD 1 Disc type Diameter 12cm 2 Recording time *74 minutes for both Image/Sound 3 Features Plays up to 74 minutes of 12cm compact disc Image compressed as MPEG-I type which has similar quality with a VHS tape, and the sound quality is same as the CD. 4 Image/Sound classification and state of sound on high speed search Image/Sound Classification: Classifies image and sound as track State of sound on high speed search : Image moves on high speed and sound is muted. DVD 1 Disc type Diameter 12cm 2 Recording time *135 minutes of both Image/Sound 3 Features Various ways of play mode available through conversation type menu screen Audio same as the AC-3 5.1ch using movie theater *Max 8 different spoken language and 32 different language of subtitle available 4 Image/Sound classification and state of sound on high speed search Image/Sound Classification : Classifies image and sound as chapter State of sound on high speed search : Image moves on high speed and sound is muted. 39 Downloaded From Disc-Player.com Daewoo Manuals CONNECTION SECTION CD TROUBLESHOOTING GUIDE MALFUNCTION THINGS TO CHECK The power is not turned on when the power button on the remote control is pressed - Confirm there is enough battery in the remote control The tray does not come out - Confirm if the power is turned on - Verify the voltage On time search, it searches different time from the set time. - Confirm if there is excessive alien substance on the disc or modified. The sound does not come out - Confirm if the screen is playing as slow or frame by frame. (The sound does not come out on high speed play) - Confirm if the connection is set right It does not play - Confirm the disc is loaded - Verify the voltage The sound is not stable - Confirm if the connection with amp is right - Confirm if the connection plug is set right - Confirm is there is alien substance on the connection terminal The remote does not work - Confirm if the angle, distance is right, and if there is an obstacle - Confirm if there is enough battery in the remote control The sound does not come out - Is the disc loaded upside down? (Place the disc with label side up) - Is the disc damaged too much? (Clean the surface of the disc) The disc is turning but the image is not showing or the image is showing but the quality is bad and shaky - Confirm if the TV is on Confirm the connection is set right Confirm if the player is set to pause Confirm if there is alien substance on the surface of the disc or damaged - If the disc is manufactured badly it may not play 40 Downloaded From Disc-Player.com Daewoo Manuals TROUBLESHOOTING GUIDE_CONTINUED THINGS TO CHECK While playing the DVD, the menu did not show up on the screen even if the menu button was pressed - There is no menu on the disc - There are many contents recorded on the DVD, it may not work with the button. DVD does not play - DVD bought in foreign countries may not work. 41 Downloaded From Disc-Player.com Daewoo Manuals SERVICE REQUEST SECTION MALFUNCTION SPECIFICATIONS GENERAL SUBJECT Source of electricity 120V/60hz Consuming electric power 18W Weight 4kg Size 420(W) X 305(D) X 80(H) Allowed temperature for operation 5°C~40°C Allowed humidity for operation 10%~75% RH 2 Channel left(1/L) right(2/R) Output level Analog sound quality 2Vms(1khz) Digital sound (5Vp_p) Digital sound features Frequency characteristic 20Hz - 20Khz S/N ratio 90dB Channel Separation 80dB Optical Digital Output USED DISC RCA Jack 2 Channel CD: 12cm CD : 8cm Video CD 1.0V p_p Line speed Max play time Line speed Max play time Line speed Max play time 1.2-1.4m/sec 74 minutes 1.2-1.4m/sec 20 minutes 1.2-1.4m/sec 74 minutes (image + sound) VIDEO OUTPUT RCA jack Super Video 2 Channel 1Vp_p Brightness signal (Y) 0.714Vp_p(75ohm on load) Color signal (C) 0.286 Vp_p (75ohm on load) AUDIO OUTPUT 2 channel Output level Digital sound features left(1/L) right(2/R) Analog sound quality 2Vms(1Khz) Digital sound 5Vp_p Frequency characteristic 20 Hz-20Khz S/N ratio 95dB Channel separation 80 dB Optical digital output 42 Downloaded From Disc-Player.com Daewoo Manuals DAEWOO DVD PLAYER MODEL : DQD-2000 Downloaded From Disc-Player.com Daewoo Manuals