1
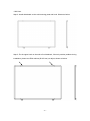
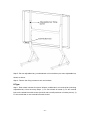
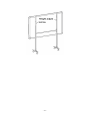
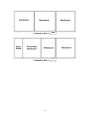
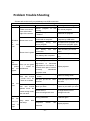
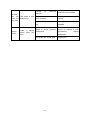
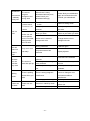
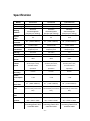
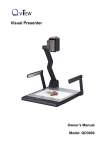
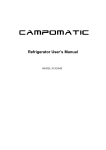
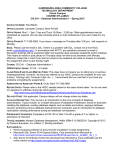
Interactive Whiteboard Owner’s Manual V20100107 Qomo HiteVision, LLC www.QOMO.com Note: Attentions during installing and operating. Caution: Damages to people during operating or damages to machine caused by improper operation. To prevent fire or electric shock, please don’t expose the whiteboard in rain or wet environment. Interactive Whiteboard should avoid fire, electric shock and direct sunlight. Whiteboard’s net weight is 23~30kg. Please fix the whiteboard on the wall with screws to make it safe. When use Interactive Whiteboard together with projector, please don’t look steadily at the light sent by projector or look at it for a long time, especially for the children. This manual is only for Interactive Whiteboard on “technical specification list”. You can write and operate on the whiteboard only with matched whiteboard pen. This product use electromagnetic calibration technology. There should not be strong electromagnetic field nearby to prevent interference. If connecting Whiteboard and computer with USB cable, you’d better place the cable in hidden place to avoid pulling. If connect Whiteboard and computer with USB cable, please use the attached USB cable. If you would like to buy USB cable by yourself, please select the USB cable of resistance lower than 0.5Ω. If connect Whiteboard and computer in wireless way, the distance between wireless receiver and Interactive Whiteboard is no more than 15 meters. And there shouldn’t be any barrier against electromagnetic waves. Don’t touch or scratch the Whiteboard panel and frame with hard and sharp object. Don’t drill holes or drive nails in anywhere of the Whiteboard. —2— System Requirements ....................................................................................................................... 4 Instruction ......................................................................................................................................... 5 Software Features: ............................................................................................................................ 6 How to install hardware .................................................................................................................... 7 Install whiteboard ..................................................................................................................... 7 Install whiteboard on wall .............................................................................................. 7 Install whiteboard on floor stands ................................................................................ 9 Install whiteboard behind blackboard ........................................................................ 13 Install whiteboard pen ............................................................................................................ 15 How to use..................................................................................................................... 15 Replace pen tip ............................................................................................................. 15 Replace battery............................................................................................................. 15 Install eraser ............................................................................................................................ 16 Replace battery of eraser ............................................................................................ 16 How to use..................................................................................................................... 17 Whiteboard Connection .......................................................................................................... 18 USB connection ............................................................................................................ 18 RF wireless connection ............................................................................................... 18 How to install and uninstall the software ............................................................................... 20 Install Software ............................................................................................................. 20 How to uninstall the software ...................................................................................... 22 Search and bind whiteboard ........................................................................................................... 23 Calibration ....................................................................................................................................... 26 *Two pen writing (optional) ............................................................................................................ 28 Problem Trouble Shooting............................................................................................................... 29 Questions and Answers ................................................................................................................... 33 Specification .................................................................................................................................... 34 —3— System Requirements Lowest Environmental Requirements: · · · · · · CPU: 1.0GHz×86 Memory: 256M Display Card: Support 256 or above Hard Disk: 1G Screen Display Resolution: 800×600, 1024×768, 1280×1024 USB 1.1 port Recommended: · · · · · · CPU: 2.0GHz×86 Memory: 512M or above Display Card: Support 256 or above Hard Disk: 2G Screen Display Resolution: 1024×768 、1280×1024 USB2.0 port Software Running Environment: Microsoft Windows 2000/XP/2003/Vista/7 —4— Instruction Interactive whiteboard uses scanning induction technology. Working together with projector and computer, Interactive whiteboard can be used as a big writing panel. To any image projected on the whiteboard, you can write on and touch the whiteboard directly with writing pen. Interactive Whiteboard provides more advanced system functions and more effective presentation than before. Main Features: Writing: Write, draw and perform mouse functions with your finger. The whiteboard displays your penmanship instantaneously. Annotating: The user can operate and annotate over any computer applications, or save notes directly into Software, including PPT, WORD, EXECL, AVI, MEPG, Flash, JPEG and etc. Interacting: In video conferencing, both parties can share data and write in real time just like a standard conference room. Once integrated with Polycom or other video conferencing systems, using Interactive whiteboard can improve video conference results and efficiency. The system can support 12 screen short-cut buttons. Teaching: Can replace traditional teaching equipment, whiteboard software provides different teaching range and level, improve teaching results and efficiency. Energy conservation: Controls energy cost within 2W. No need for additional. Connection: Provide two connection options: USB connection and wireless connection, use can select based on their need. —5— Software Features: Flow!Works(E) software has below features: Designed for teaching and conference systems. The screen display is high light and low glare. Saves images in Vector image format. Vector images take up less storage space and makes file transferring easier and faster. Users can customize pen type, line width, and color schemes to fit their individual preferences. Powerful screen functioning supports real-time editing. Graphic tools allow users to choose a background, input graphics and images. Paintbrush pen is pressure sensitive. Writing file allows for easy conversion to many other formats such as: PDF, JPG, GIF, PNG, TIFF, BMP, etc. Simulate mouse operation. The Hot Keys can realize functions of Page up & Down, Create new page, Pen width selection, Save, Clear full screen, Restore, etc. Supports other application software. Support handwriting recognition of Chinese word, English word, Number, and special character’s. —6— How to install hardware Install whiteboard Before install whiteboard application software, please refer below instruction to install whiteboard first. There are three installation ways based on different whiteboard model: Install whiteboard on wall (1330.5) Step 1: Set desired height according to user’s preferences, place the stilettos on the wall to make holes for wall mounting parts and hook, then fix wall mounting parts and hook by screws. Install hook at the lower and install wall mounting parts at the higher. Shown as below: Notes: For model QWB200EM/QWB100WS, the distance between wall mounting parts is 1210.5mm. For model QWB300EM, the distance between wall mounting parts is —7— 1330.5mm. Step 2: Install whiteboard on the wall mounting parts and hook. Shown as below: Step 3: Fix the upper hook on the wall to fix whiteboard, if there is position problem during installation, please use EVA cushion(45*20*1mm) to adjust, shown as below: —8— Install whiteboard on floor stands There are two stands: A (SD10)type and B type. Please check your stand type before install. A(SD10) Type: Adjustable bar Fixing Screw A Vertical bar Middle bar Fixing screwBB 固定螺丝 Movable hook Three hook position Fixing screw C Triangle stand Wheel Step 1: Open two vertical bars into triangle stand, fix their fixing screws C at two sides. Step 2: Fix two middle bars on two vertical bars with fixing screws A and Screw B. Step 3: According to your need, adjust hook to desired height. Step 4: Referring “Install whiteboard on Wall” to install main control box. —9— Step 5: Pull out adjustable bar, put whiteboard on hool and then put down adjustable bar, shown as above. Step 6: Fastern the fixing screws on two vertical bars. B Type: Step 1: Each stand includes four parts: Wheels, middle bard, and vertical bar (including adjustable bar). Here are setup steps: 1). Fix four wheels on stand.2). Fix two vertical bars on the wheel bars with screws (screw A and screw B positions on below picture). 3). Fix the middle bar on two vertical bars with screws. —10— Step 2: Referring “Install whiteboard on Wall” to install main control box. Step 3: Put the whiteboard on stands, the adjustable bar is flexible, adjust height you desired and then fix with height adjustment screws. Shown as below: —11— —12— Install whiteboard behind blackboard You can install whiteboard behind blackboard to work with blackboard. Here is installation step: 1. Take off a removable blackboard. 2. Make a rectangle hole under the removable blackboard taken off based on whiteboard connection box’s position, make sure the whiteboard cable can put through. 3. Take off connection box on whiteboard, put whiteboard on the frame, then put whiteboard cable pass through rectangle hole. 4. Connect cable and connection box, fix connection box on the wall. 5. Install the removable blackboard that you taken off on the wall. Shown as below: —13— —14— Install whiteboard pen Pen tip (Left button) Right button Moving button Charger Socket How to use The Whiteboard pen can simulate three kinds of mouse modes as follows: 1. Mouse move: Put the pen tip close to the whiteboard and move. 2. Mouse left click: Press down the pen tip on the whiteboard and move. 3. Mouse right click: Put the pen tip close to the whiteboard and press down the button on the pen. Replace pen tip When the pen tip gets damaged and can not write properly, please change it with new pen tip provided with whiteboard. Take off the pen tip cover with clamp, and then replace with new pen tip. Notes: 1. When you write on the Whiteboard, please put the pen tip straight on the Whiteboard writing surface, or it will cause bad writing effect. 2. Please change the battery termly to make sure the normal use of the Whiteboard pen. 3. Please charge the pen only by pen charger provided with whiteboard. 4. When the Whiteboard pen is not used for a long time, it will change to stand-by mode automatically. Under this mode, it will no respond when put the pen close to the Whiteboard. Press the right button or the pen tip to enable the pen to work. Replace battery If your electromagnetic pen is using AAA battery and can not be charged, please replace battery termly. Here is how to install battery: Open the battery cover on pen, put in an AAA alkalescent battery according to the anode and cathode (the spring side is the cathode) to the battery hole, and then fasten the battery cover before use the pen. —15— Install eraser Replace battery of eraser Open the battery cover on eraser, put in an AAA alkalescent battery according to the anode and cathode (the spring side is the cathode) to the battery hole, and then fasten the battery cover before use the eraser. —16— How to use Press active button once to make eraser inter work mode. The eraser can simulate as traditional eraser, place eraser on the electromagnetic whiteboard surface and wipe slightly to clear stroke on whiteboard. Tips: The eraser will enter stand by model to save power when it is not used. So please press active button before use. The eraser is mainly used to clear electronic pen stroke, in order to prolong its use life, please do not use it to clear stroke of water pen and chalk. Please do not use pen and eraser at same time on whiteboard. —17— Whiteboard Connection There are two connection ways of whiteboard: USB connection, and RF wireless connection, please select your connection way based on whiteboard model you purchased. USB connection Step 1: Setup whiteboard. Step 2: Adjust the position of projector and whiteboard. Step 3: There is USB port on connection box at the lower right corner of whiteboard, plug one end of USB cable to this USB port. Step 4: Plug another end of USB cable to host computer’s USB port. Step 5: Connect computer and projector (refer to projector’s user’s manual). USB connection figure RF wireless connection Step 1: Setup whiteboard and adjust the position of projector and whiteboard. Step 2: Connect 5V power adapter to electromagnetic whiteboard. Step 3: Plug wireless receiver to host computer’s USB port. —18— Step 4: Connect computer and projector (refer to projector’s user’s manual). Notes: Wireless receiver’s place position need ensure the distance between wireless receiver and whiteboard ≤15 meters and there is no barrier to block electromagnetic wave. RF wireless connection figure —19— How to install and uninstall the software Install Software Once whiteboard is connected to computer, the system will prompt “Find new hardware”, shown as below: Click “Cancel”, please install software as below: Insert the installation CD into the computer’s ROM, double click CD, the below dialog window appears: —20— Click , the below dialog window appears: Follow screen prompt to finish application software installation, then start to install driver. Click “Next” to install driver step by step: Click “Install” to install driver, after installation is finished, the below dialog window appears: —21— Please save other files and click “Yes,I want to restart my computer now.” to restart computer, then the application software and driver have been installed successfully. How to uninstall the software If you want to remove the Whiteboard control software from your computer, please use “Add/Delete Program” in “Control Panel” to uninstall, select “Flow!Works(E)” and click “Remove/Delete” to uninstall the software. —22— Search and bind whiteboard Tips: No need to search and bind software if you use USB or USB-COM connection. If you use RF wireless connection, after finish software installation, you need search and bind software. Step 1: Connect all hardware and whiteboard server program, the following prompt appears at the lower right task bar. Step 2: Single click server icon, click “Search and bind”, shown as below: Step 3: Click “Re-search board” on dialog window: Step 4: Wait a moment, until “IEEE address” appears the whiteboard found. If it does not appear, please check if connection of hardware is good, then you can set a name of this whiteboard. —23— Step 5: Check whiteboard’s IEEE address, the whiteboard main control box shows whiteboard’s IEEE address. Step 6: Click to open pop down list and then you can select the whiteboard that you want to bind. For example: If you want to bind whiteboard with IEEE address is 01 02 00 09 12 09 00 02, please select 01 02 00 09 12 09 00 02 item on list. If you can not find its IEEE address on list, please click “Re-search board” and search again. Step 7: The user can define a name for whiteboard in “describe”, it can be blank. Then click “Bind and write-back the describe” and input description character. —24— After bind successfully, the server icon will turn to green: —25— Calibration To make the whiteboard work normally, you must make sure the pen track in the projector accords with the actual pen track accurately. And calibration of pen function will get good writing accuracy. You need calibrate your Whiteboard for the below conditions: The first time to use the Whiteboard After reinstall application software and driver When change the position of the Whiteboard When change the computer connected with the Whiteboard After change the resolution and frame rate of the computer The whiteboard adopts the method of 9 points locate. The steps are as follows: Step 1: Connect all the equipments and run the whiteboard driver program. Step 2: Adjust the projector position to make the video project on the Whiteboard and make sure the projected area is within the range that can be displayed on the Whiteboard. Step 3: Click the icon of the Whiteboard driver program at the lower right corner of the screen, a menu as followed will appear: Click “Calibrate” to enter calibration screen, shown as below: —26— Step 4: Click the center of the flashing “十” with pen to make four “十”s stop flashing. This is a successful calibration. And according to the operation to calibrate the other three “十” one by one to finish the Whiteboard calibration. Tips: Improper calibration will cause whiteboard can not work, please do calibration properly again. Click the key “ESC”, you will cancel the calibration operation. For different model product, the calibration interface is a little different but calibration steps are same. The short-cut calibration is available on the whiteboard that has short-cut buttons. Please refer to calibration prompt to calibrate whiteboard. —27— *Two pen writing (optional) If your purchased electromagnetic whiteboard has two pens writing function, please pay attention to below instruction: When you use two pens writing, need select hard pen You can use two pens writing on the whiteboard at same time. The computer system can not support two-mouse operation, so when the whiteboard is not in writing mode, two pens can not operate at same time. The pens are provided together with whiteboard, so can not exchange with other pens, please pay attention to different them. When you use two pens writing function, please make sure you are using special two pen writing software. —28— or brush pen . Problem Trouble Shooting ※Please refer to this list if your whiteboard use USB connection. Problem Trouble Shooting Reason Reason Reason There is no server icon at the lower right of the screen Whiteboa rd Do not work Server icon is red Can not see green “ 十 ” cursor on whiteboard Can see mouse pointer move, but there is no stroke Can not write Wireless pen can write, but there warp is Server program running is not Server program installed is not Under desk mode, can see mouse pointer move, but under writing mode, can not write Only some has warp Run server program Install server program Whiteboard is not connected to computer Connect whiteboard computer by USB cable Something wrong server program Uninstall server program and install server program again with Wrong calibration Server icon is green The calibratio n points can not appear Try the following Pen battery connection has to Please calibrate again bad Take off battery and install again. Pen battery has not power Replace battery or charge pen. The writing pen is damaged Replace pen The projector vertical adjustment or horizontal adjustment is not correct, it caused some part of screen overstep whiteboard projection area Adjust projector The software is not in writing mode Switch to writing mode The pen tip did not pressed been Press pen tip on screen when you write pressed right button on pen when you write Please do not press right button on pen when you write stroke color is same to background color Change stroke color or background color Wrong calibration Calibrate again area Projection distortion screen —29— has Adjust projector Wireless pen can write but very slow Spiking stroke Caused software The stroke is slow than pen tip There stroke write is spiking when you by anti-virus Close anti-virus software The computer is running too many software Close some software you do not use The computer setting is too low Please update hardware There is strong magnetic interference Remove the interference source or change a new environment without interference. The writing pen is damaged Replace pen —30— computer ※Please refer to this list if your whiteboard use wireless connection. Problem Trouble Shooting Reason phenomenon There is no server icon at the lower right of the screen Whiteboard Do not work Server icon is red Server icon is green The calibration points can not appear Can not search and bind whiteboard Can not see green “十” cursor on whiteboard Can not search whiteboard Reason Try the following Server program is not running Run server program Server program is not installed Install server program Whiteboard is not connected to computer Connect whiteboard to computer by USB cable Something wrong with server program Uninstall server program and install server program again Wrong calibration Please calibrate again Pen battery has bad connection Take off battery and install again. Pen battery has not power Replace battery or charge pen. The writing pen is damaged Replace pen The projector vertical adjustment or horizontal adjustment is not correct, it caused some part of screen overstep whiteboard projection area Adjust projector DC 5V power adapter could not supply power to whiteboard Connect DC 5V power adapter to supply power to electromagnetic board. Wireless receiver did not plug on computer Connect computer and wireless receiver with USB cable There is some block between wireless receiver and whiteboard that can shield electromagnetic wave Adjust wireless receiver’s position and make sure good communication between whiteboard and wireless receiver The connection between computer and electromagnetic whiteboard is broken. Shut off whiteboard’s power or wireless receiver’s power, bind the whiteboard again. The distance between wireless receiver and whiteboard is more than 15 meters Adjust distance between wireless receiver and whiteboard. —31— Whiteboard is disconnecte d suddenly during use Can not write Wireless pen can write, but there is warp Wireless pen can write but very slow Spiking stroke Eraser can not work The server program changes to red during work When there is many whiteboard around yours, others bound your whiteboard wrongly Please bind your whiteboard again and remind others do not bind your whiteboard. Can see mouse pointer move, but there is no stroke The software is not in writing mode Switch to writing mode The pen tip did not been pressed Press pen tip on screen when you write Under desk mode, can see mouse pointer move, but under writing mode, can not write pressed right button on pen when you write Please do not press right button on pen when you write stroke color is same to background color Change stroke color or background color Wrong calibration Calibrate again Projection screen has distortion Adjust projector Caused by anti-virus software Close anti-virus software The computer is running too many software Close some software you do not use The computer setting is too low Please update computer hardware There is strong magnetic interference Remove the interference source or change a new environment without interference. The writing pen is damaged Replace pen Eraser is in stand by mode Please press active button before use Eraser battery has not power Replace battery Only some area has warp The stroke is slow than pen tip There is spiking stroke when you write Eraser can not work —32— Questions and Answers What kinds of projector should I use? You can use any projector that can project the computer image on the Whiteboard, including LCD project with high resolution and LCD board projector in lower price. Make sure the projector supports the resolution of the computer and 650ANSL is enough. What should I do if I write on the Whiteboard by the water pen or permanent pen that can not be erased? The whiteboard has two kind of surface: erasable surface and non-erasable surface. For Erasable surface whiteboard, you can use water pen to write, but can not use permanent pen to write. For non-erasable surface whiteboard, can not use water pen or permanent pen to write. In case such things happen, please use a little alcohol to erase. How to clean the surface of the Whiteboard? Please use the dishcloth with a little water to clean the surface of the whiteboard and don’t let the water seep into the Whiteboard inside from the bottom frame. What’s the requirement of the place where install the Whiteboard? There is no magnetic field in the place where install the Whiteboard. If you will fix the whiteboard on the wall, the wall must be upright. The place must be dry. Avoid straight sunshine. For RF wireless connection whiteboard, there is no block between wireless receiver and whiteboard that can shield electromagnetic wave. —33— Specification Model QWB200EM QWB300EM QWB100WSEM Frame size 88” 96” 100” Technology Electromagnetic Electromagnetic Electromagnetic Writing method Wireless electromagnetic pen(two pen writing) Wireless electromagnetic pen(two pen writing) Wireless electromagnetic pen(two pen writing) Aspect Ratio 4:3 4:3 16:9 83″(1740*1200mm) 92″(1920*1320mm) 96″(2130*1200mm) Resolution 17400*12000 19200*13200 21300*12000 Hardware Resolution 100points/cm 254points/inch 100points/cm 254points/inch 100points/cm 254points/inch Two sides Two sides NA 5m/s,200inch/s 5m/s,200inch/s 5m/s,200inch/s <8ms <8ms <8ms Real time response wireless pen’s click, simulate mouse operation Real time response wireless pen’s click, simulate mouse operation Real time response wireless pen’s click, simulate mouse operation 0.1mm 0.1mm 0.1mm < 2W < 2W < 2W 79″(1600*1200mm) 87″(1760*1320mm) 96″(2130*1200mm) USB/RF (confirmed by connection box) USB/RF (confirmed by connection box) USB/RF (confirmed by connection box) 1820*1280*34mm 2000*1400*34mm 2210*1280*34mm Operation System Win2000/2003/XP/Vista/ Win 7 32bit or 64bit Win2000/2003/XP/Vista/ Win 7 32bit or 64bit Win2000/2003/XP/Vista/ Win 7 32bit or 64bit Accessory Wireless pen/wall mounting parts/U S B extended cable Wireless pen/wall mounting parts/U S B extended cable Wireless pen/wall mounting parts/U S B extended cable Sensitive area size Hot Key Track Speed Response Speed Cursor speed Location accuracy Power consumptio n Projection Area Size Port Whiteboard Size —34— Stand(optional)/Eraser /Pen holder Stand(optional)/Eraser /Pen holder Stand(optional)/Eraser /Pen holder Wireless connection box, wireless dongle, 5V power adapter, COM port connection box, 15M special USB-COM cable Wireless connection box, wireless dongle, 5V power adapter, COM port connection box, 15M special USB-COM cable Wireless connection box, wireless dongle, 5V power adapter, COM port connection box, 15M special USB-COM cable -20℃~ 50℃ -20℃~ 50℃ -20℃~ 50℃ 15%*90% 15%*90% 15%*90% Storage temperature -20℃~ 55℃ -20℃~ 55℃ -20℃~ 55℃ Storage Humidity 15%*90% 15%*90% 15%*90% Frame Material Grey, Aluminum Grey, Aluminum Grey, Aluminum Support (Decided by main control box) Support (Decided by main control box)) Support (Decided by main control box) Packing dimension 2110*1410*120mm 2290*1530*120mm 2500*1410*120mm Net Weight 25Kg 28Kg 30Kg Gross Weight 36Kg 40Kg 42Kg Optional Working temperature Working humidity Two Pen Writing Note: The design and specifications are subject to change without notice. —35— If you want to learn more about our products, please visit our website: www.qomo.com If you need more assistance, please kindly send email to our technical support: [email protected] —36— 28265 Beck Road, Suite C-1 Wixom, MI, 48393, USA Phone: 1-866-990-QOMO (1-866-990-7666) Fax: (248)281-1999(US) or (248)281-1998(International) Sales Information and Quotes: [email protected] Literature Request: [email protected] Technical Assistance and Service:[email protected]