1
RECORDABLE MP3+G PROF. KARAOKE PLAYER W/HDMI & VGA OUTPUTS
AVC7505
AC
C7
50
5 -0
1
P LA
Y /P
AU
SE
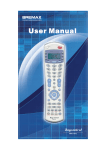
OWNER’S MANUAL
Safety Instructions
Package Contents
FRONT PANEL
REAR PANEL
REMOTE CONTROL
USB & SD CARD
A/V Connection
MAKING THE CONNECTION BETWEEN PLAYER WITH 5.1 CHANNEL AMPLIFIERS
POWER CONNECTION
CD, CDG and VCD Playback
DVD Playback
Operations(MP3 and AVI/DivX):
USB and SD Card Operations (Disc Mode)
REC/COPY OPERATIONS
REC OPERATIONS (DISC PLAYER to USB/SD Only)
“COPY MP3” OPERATIONS
DVD SYSTEM SETUP MENU
LANGUAGE SETUP
AUDIO SETUP
VIDEO SETUP
SPEAKER SETUP
DIGITAL SETUP
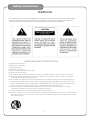
Safety Instructions
WARNING
* TO PREVENT FIRE OR SHOCK HAZARD,DO NOT EXPOSE THIS APPLIANCE TO RAIN OR MOISTURE.
*THIS APPLIANCE SHALL NOT BE EXPOSED TO DRIPPING OR SPLASHING WATER AND THAT NO
OBJECT FILLED WITH LIQUIDS SUCH AS VASES SHALL BE PLACED ON APPARATUS.
IMPORTANT SAFETY INSTRUCTIONS
1) Read these instructions.
2) Keep these instructions.
3) Heed all warnings.
4) Follow all instructions.
5) Do not use this apparatus near water.
6) Clean only with dry cloth.
7) Do not block any ventilation openings. Install in accordance with the manufacturer's instructions.
8) Do not install near any heat sources such as radiators, heat registers, stoves, or other apparatus
(including amplifiers) that produce heat.
9) Do not defeat the safety purpose of the polarized or grounding-type plug. A polarized plug has two
blades with one wider than the other. A grounding type plug has two blades and a third grounding
prong. The wide blade or the third prong are provided for your safety. If the provided plug does not
fit into your outlet, consult an electrician for replacement of the obsolete outlet.
10) Protect the power cord from being walked on or pinched particularly at plugs, convenience
receptacles, and the point where they exit from the apparatus.
11) Only use attachments/accessories specified by the manufacturer.
12) Use only with the cart, stand, tripod, bracket, or table specified by the manufacturer, or sold with the
apparatus. When a cart is used, use caution when moving the cart/apparatus combination to avoid
injury from tip-over.
S3125A
1
Safety Instructions
13 ) Unplug this apparatus during lightning storms or when unused for long periods of time.
14 ) Refer all servicing to qualified service personnel. Servicing is required when the apparatus has been
damaged in any way, such as power-supply cord or plug is damaged, liquid has been spilled or objects
have fallen into the apparatus, the apparatus has been exposed to rain or moisture, does not operate
normally, or has been dropped.
15) Grounding or Polarization This product may be equipped with a polarized alternating current line plug
(a plug having one blade wider than the other). This plug will fit into the power outlet only one way.
This is a safety feature. If you are unable to insert the plug fully into the outlet, try reversing the plug.
If the plug should still fail to fit, contact your electrician to replace your obsolete outlet. Do not defeat
the safety purpose of the polarized plug.
16) Ventilation Slots and openings in the cabinet are provided for ventilation and to ensure reliable
operation of the product and to protect it from overheating, and these openings must not be blocked
or covered. The openings should never be blocked by placing the product on a bed, sofa, rug, or other
similar surface. This product should not be placed in a built-in installation such as a bookcase or rack
unless proper ventilation is provided or the manufacturer's instructions have been adhered to.
17) The MAINS plug or an appliance coupler is used as the disconnect device, the disconnect device shall
remain readily operable.
Class 1 Laser Product
CAUTION: USE OF ANY CONTROLS, ADJUSTMENTS, OR PROCEDURES OTHER THAN
THOSE SPECIFIED HEREIN MAY RESULT IN HAZARDOUS RADIATION EXPOSURE.
PRODUCT COMPLIES WITH DHHS RULE 21 CFR SUBCHAPTER J IN EFFECT AT DATE
OF MANUFACTURE .
CAUTION: INVISIBLE LASER RADIATION WHEN OPEN. DO NOT STARE INTO BEAM.
Class II equipment symbol
This symbol indicates that the unit has
a double insulation system
2
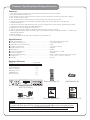
Features /Specifications / Package Contents
Features
1. The "REC" button at the front panel records the mixed music and microphone
sound to the USB or the SD card.
2. The "COPY" button at the front panel copies from CD or CDG to the USB or the SD card in MP3 or
MP3+G format respectively.
3. The "COPY" button at the front panel copies between the USB and the SD card.
4. The built-in USB and SD card readers play VCD, WMA, AVI, MP4, DAT, MPG, and JPG files
in USB and SD card.
5. A multi-format player with the direct track access supports DVD, CDG, DVD-R, DVD-RW, VCD, MP4,
DIVX, Photo-CD, CD, CD-R, and CD-RW formats.
6. Digital key control and Digital echo control
7. Two microphone inputs (MIC1 and MIC2) with individual volume controls.
8. HDMI, VGA, SCART, Coaxial, S-Video, Optical, Component Video, Composite Video, 5.1 Audio and
Mixed Audio outputs.
9. Remote Control.
10. AC 100V-240V and NTSC-PAL compatible for worldwide use.
Specifications
● AC Input Voltage................................ AC 100V-240V 60Hz/50Hz
● Video Input Sensitivity ............................ 1 V (peak to peak)
● Microphone Input Sensitivity ........................ 8 mV
● Video Output Level. . . . . . . . . . . . . . . . . . . . . . . . . . . . . . 1 V (peak to peak)
● Audio Output Level . . . . . . . . . . . . . . . . . . . . . . . . . . . . . . 500 mV
● S/N Ratio. . . . . . . . . . . . . . . . . . . . . . . . . . . . . . . . . . . . . 90 dB
● Frequency Response.................................... 20Hz-20KHz:+/-1dB
● Dynamic Range ....................................... ≥90dB
● Output Characterristic .................................... RCA.S-video/video/Y,Pb,Pr/scart output
● Dimension .................................... 16.9" x 9.0" x 3.2" (L x W x H)
● Weight . . . . . . . . . . . . . . . . . . . . . . . . . . . . . . . . . . . . . 5.5 lbs
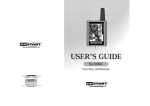
Package Contents
Items
Quantities
AVC7505 Unit
A/V RCA Cable
Owner’s Manual
Remote Control
AAA Batteries
Warranty Card
(1)
(1)
(1)
(1)
(2)
(1)
PLAY/PAUSE
ACC7505-01
AVC7505
RECORDABLE MP3 + G PROF . KARAOKE
PLAYER W / HDMI & VGA OUTPUTS
Remote Control (1)
AAA Batteries (2)
USB
SD CARD
AVC7505 Unit(1)
A/V RCA Cable (1)
Owner’s Manual (1)
Warranty Card (1)
Note
If you find that any of the items mentioned above are missing from
®
the box, please contact AUDIO2000’S before proceeding.
3
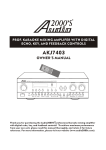
FRONT PANEL
AVC7505
RECORDABLE MP3 + G PROF . KARAOKE
PLAYER W / HDMI & VGA OUTPUTS
USB
SD CARD
1
2
3
4
5 6
7
8
9
10
11
12
13
14
15
16
17
18
19
20
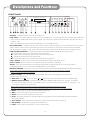
1.POWER - Press the button to turn on or off the unit.
2.USB INPUT - This USB Input port can be used as a USB player or as a storage device to store the MP3 or MP3+G
files created in the REC operations (refer to page 15) or the files created in the COPY MP3 operations (refer to
page 15-18).
(Note: This USB Input supports only the USB device in the FAT32 format.)
3.SD CARD INPUT - This SD Card Input port can be used as an SD card player or as a storage device to store the
MP3 or MP3+G files created in the REC operations (refer to page 15) or the files created in the COPY MP3
operations (refer to page 15-18). (Note: This SD Card Input supports only the SD Card in the FAT32 format.)
4. DIGITAL KEY CONTROL - These buttons direct the DIGITAL KEY CONTROLLER to either raise,
lower or reset the musical key of audio from the disc player.
●# - Raises the musical key a quarter-step each time it is pressed.
● - Resets the musical key to its original key.
●b - Lowers the musical key a quarter-step each time it is pressed.
5.VOL1 & VOL2 - These are the volume control knobs for the MIC1 and MIC2 inputs.
6.MIC1 & MIC2 - These are the ¼” microphone input jacks for MIC1 and MIC2.
7.ECHO - This control adjusts the level of ECHO applied to the MIC channels. Turn control clockwise
to INCREASE and counter-clockwise to DECREASE the level of ECHO.
8.REMOTE SENSOR - This sensor receives infrared signals transmitted by the REMOTE CONTROL transmitter.
Note: Obstacles located between the remote control and remote sensor should be avoided
as they can prevent signal recognition
9.DISPL AY PANEL - This panel displays all graphical information regarding system operations,
settings and performance.
10. DISC TRAY -Press to open tray . Press or to close the tray and it will play the disc auto m aticall y
11. DIRECT TRACK ACCESS - These buttons are used for DIRECT TRACK selection. Use the +10 button
for all the tracks higher than 10. For example, press +10 and 6 to go directly to track 16, and press +10,
+10, and 3 to go directly to track 23.
Note: When playing DivX files, to skip to the desired track directly using the number
buttons, refer to the Direct track access for DivX operations section (page 13) of this manual;
12. EJECT - This button is used to OPEN/CLOSE the DISC tray.
13. PREV - Press this button to go to the previous track.
14. NEXT - Press this button to go to the next track.
15. STOP - Stops disc playback in standby mode when pressed once and completely stops disc playback
when pressed twice.
16. PL AY/PAUSE - Plays a disc that is stopped or paused, pauses a disc that is playing.
17. REC USB/SD - Please refer to page 15 for the details.
18. COPY - Please refer to page pages 15-18 for the details.
4
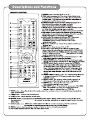
19. L/R - Cycles through the different multiplex CDG output modes for canceling the vocals: MONO-LEFT, MONORIGHT, MIX-MONO and STEREO. See the Operations section (page11) in this manual for detailed instructions on
canceling vocals on multiplex CDG discs.
20. N/P - Press this button to switch between the PAL and NTSC video modes.
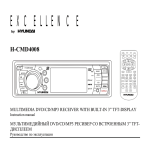
1
2 3 4
5
6
7
8
9
10
5 .1 CHANNEL AUDIO OUTPUTS
DOWN
5
11
-
detailed
section (page 11) of
REPEAT A/B button
section (page 11) in
6
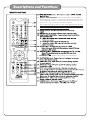
25. DIRECT TRACK ACCESS - These buttons are used for DIRECT
TRACK selection. Use the +10 button for all the tracks higher than
10. For example, press +10 and 6 to go directly to track 16, and
press +10, +10, and 3 to go directly to track 23.
Note: When playing DivX files, to skip to the desired track directly
using the number buttons, refer to the Direct track access for DivX
operations section (page 13) of this manual;
31. RECORD button – Please refer to page 15 for the details.
7
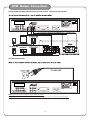
DVD Output Connections
USB & SD CARD
A/V Connection
8
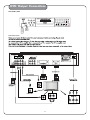
DVD Output Connections
MAKING THE CONNECTION BETWEEN PL AYER WITH 5.1 CHANNEL AMPLIFIERS
POWER CONNECTION
Note: AVC7505 Power supply AC 100V-240V 50/60Hz.
Caution: Make sure the voltage of the AC outlet matches the requirement of your karaoke system.
9
the remote control
PLAY/PAUSE button
10
11
Insert a CD, CD-G, or VCD in the disc tray and press the PROG button to enter the program mode.
In the program menu, the track numbers of the songs on a disc can be entered to the program menu
in a desired order, up to 20 tracks. The same track on a disc can be entered multiple times. Use the
directional buttons (
) to go to the track location in the program menu to make any correction
or delete the track from the program menu by pressing the CLEAR button.
12
When the programmed palyback is in progress. Press the PLAY button on the remote control
twice to stop the programmed playback.
13
Use the DISC/SD/USB select button on the remote control to directly select the desired DISC MODE, then insert
USB and SD CARD to the USB and SD CARD jacks, then begin to load the media sources from USB or SD CARD.
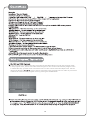
14
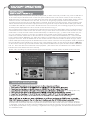
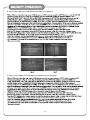
With a compact disc (in CD, CDG, VCD, MP3, MP4, DIVX, or MP3+G format) in the disc tray, insert a USB device
or SD card and press the REC button on the front panel or REC button on the remote control to start recording.
Right before the recording process, the AVC7505 will search fort the "MP3" folder. A "MP3" folder will be created
if it dose not exist in the USB device or SD card. The music or song being replayed will be restarted and the
recording process will start once the REC button is pressed. During the recording process, the microphone input
will be automatically mixed with the replayed music or song from the compact disc and the mixed signal will be
recorded to the USB device or SD card in the MP3 format. In the meantime, the recording progress (in percentage,
0-100%) will be displayed on the TV or monitor screen as shown in Fig. A.
The recorded content will be recorded and numbered consecutively in the "MP3" folder. Each recorded content is
named with the track number on the disc as shown in Fig. B. If the same track number from the same disc or from
another disc is used, the track number will be followed by an underscore sign ("_") and a serial number (01,02,...
etc.). For example, if track 5 on one disc is recorded, the recorded content will be named "TRACK05". When
another track 5 from another disc or the same disc is recorded, it will be named "TRACK05_01". Next recorded
track 5 will be named "TRACK05_02". After the recording is completed, the compact disc player will proceed to
replay the next track. Press the DVD button on the remote control to enter the window as shown in Pig. C. Select
USB or CARD (SD Card) and press the ENTER button on the remote control to enter the playback mode to playback
the recorded files in the USB device or the SD card. In the playback mode, use the directional buttons (
)
on the remote control to go to the "MP3" folder and press the ENTER button to open the "MP3" folder as shown in
FIG. C1. Go to the desired recorded file to start playback. (The order of the recorded files in the "MP3" folder is
based on the times that the files were created.)
NOTE : This recording function does NOT support any DVD disc. In other words, any DVD content can NOT
be recorded to the USB device or SD card through the AVC7505.
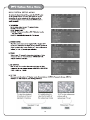
"COPY MP3" OPERATIONS
(not including MP3+G).
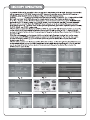
1 . Copy from the disc player in the MP3 format to USB/SD Card in MP3 format (File Copy)
TARGET
DEVICE (USB OR CARD) In the Fig. F window, enter the TRACKS section to select the track titles by checking
the boxes next to the track titles to be copied from. The box next to TRK is used to check or uncheck all boxes
in the folder. In the Fig. G window, enter the START section to start the copying process and the copying progress
will be displayed as shown in Fig. H and Fig. I. Right before the copying process, the AVC7505 will search foe
the "CDROM" folder.
15
Disc/SD/USB
Fig . D
Fig . E
25
16
Fig . F
2. Copy from the disc player in the MP4 format to USB/SD Card in MP4 format (File Copy)
With an MP4 disc in the disc tray, insert a USB device or an SD card and press the COPY button to enter the FILE
COPY window as shown in Fig. D. In the Fig. D window, enter the OPTIONS section to select the FILE TYPE
(MUSIC, PHOTO, VIDEO, TEXT, or GAME), the SOURCE DEVICE (DISC or USB, or CARD) or the TARGET
DEVICE (USB or CARD). In the Fig. F window, enter the TRACKS section to select the track titles by checking the
boxes next to the track titles to be copied from. The box next to TRK is used to check or uncheck all boxes in the
folder. In the Fig. G window, enter the START section to start the copying process and the copying progress will
be displayed as shown in Fig. H and Fig. I. Right before the copying process, the AVC7505 will search for the
"CDROM" folder. A "CDROM" folder will be created if it does not exist in the USB device or the SD card. The files
in the MP4 disc will be copied into the "CD ROM" folder in the MP4 format with same file names. After the MP4
copying is completed, enter the QUIT section as shown in Fig. J to leave the copying process.
Press the DVD button on the remote control to enter the window as shown in Fig. K. Select USB or CARD (SD
Card) and press the ENTER button on the remote control to enter the window as shown in Fig. L.
In the Fig. L window, use the directional buttons (
) on the remote control to go to the "CDROM" folder
and press the ENTER button to open the "CDROM" folder. Go to the desired recorded file to start playback.
(The order of the recorded files in the "CDROM" folder is based on the times that the files were created.)
At the bottom of the Fig. L window, there are four symbols representing (from left to right) the options of MUSIC,
PHOTO, GAME and VIDEO respectively.
3. Copy from the USB device to SD card or from SD card to USB device in any format (File Copy)
Insert both USB device and SD card and press the Disc/SD/USB button on the remote control to enter the window as
shown in Fig. C. Select CARD in Fig. C window if the files are to be copied from the SD card to the USB device.
Select USB in Fig. C window if the files are to be copied from the USB device to the SD card.
Press the COPY button to enter the FILE COPY window as shown in Fig. D. In the Fig. D window, enter the
FOLDERS section to select one of the available folders to be copied from. In the Fig. F window, enter the
TRACKS section to select the track titles by checking the boxes next to the track titles to be copied from. The box
next to TRK is used to check or uncheck all boxes in the folder. In the Fig. G window, enter the START section to
start the copying process and the copying progress will be displayed as shown in Fig. H and Fig. I. Right before
copying from the USB device to the SD card or from the SD card to the USB device, the AVC7505 will
search for the "USBROM" folder or the "SDROM" folder. An "USBROM" folder or a "SDROM" folder will be
created if it does not exist in the SD card or the USB device. The files in the USB device or the SD card will be
copied into the "USBROM" folder in the SD card or the "SDROM" folder in the USB device respectively with same
file names. After the copying process is completed, enter the QUIT section as shown in Fig. J to leave the process.
Press the DVD button on the remote control to enter the window as shown in Fig. K. Select USB or CARD (SD Card)
and press the ENTER button on the remote control to enter the window as shown in Fig. L.
In the Fig. L window, use the directional buttons (
) on the remote control to go to the "USBROM" or "SDROM"
folder and press the ENTER button to open the "USBROM" or "SDROM" folder. Go to the desired recorded file to
start playback. (The order of the recorded files in the "USBROM" or "SDROM" folder is based on the times that the
files were created.)
At the bottom of the Fig. L window, there are four symbols representing (from left to right) the options of MUSIC,
PHOTO, GAME and VIDEO respectively.
17
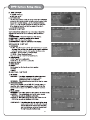
4 . Copy from the CD disc to USB/SD Card in MP3 format (Ripping)
Fig.M
Fig.N
5 . Copy from the CDG disc to USB/SD Card in MP3+G format (Ripping)
18
DVD SYSTEM SETUP MENU
19
L ANGUAGE SETUP
AUDIO SETUP
20
VIDEO SETUP
SPEAKER SETUP
DIGITAL SETUP
21
22