1
MODELN0:
NO:
MODEL
ZE-DVBT1 0
1 CH DVB-T TUNER
CAR SPECIFIC NAVICEIVER FOR VW CARS
INSTRUCTION MANUAL
ABOUT THIS INSTRUCTION MANUAL
The instruction manual contains important information and warnings about the operation of
the ZE-NC2010. Please add this instruction manual to the log book of your vehicle to have
access to it any time.
NOTE:
■ Text passages with this symbol indicate particular information, which are very important for
correct operation.
CONTENTS
SAFETY INSTRUCTIONS....................................................................................................41
FRONT PANEL BUTTONS............................................................................................ 42-43
REMOTE CONTROL BUTTONS................................................................................... 44-47
BASIC OPERATION....................................................................................................... 48-49
MAIN MENU AND SETTINGS....................................................................................... 50-57
RADIO MODE................................................................................................................ 58-60
CD/DVD MODE....................................................................................................................61
CD/MP3/WMA MODE..........................................................................................................62
SD/USB MODE....................................................................................................................63
IPOD MODE.........................................................................................................................64
BLUETOOTH MODE...................................................................................................... 65-71
NAVIGATION MODE............................................................................................................72
EXTERNAL PLAYING SOURCES.......................................................................................72
CAN-BUS.............................................................................................................................73
GENERaL INFORMATION..................................................................................................74
TROUBLESHOOTING....................................................................................................75-76
SPECIFICATIONS................................................................................................................77
WARRANTY................................................................................................................... 78-79
40
ENGLISH
SAFETY INSTRUCTIONS
1. This unit is designed to be used in a vehicle with a 12V battery and negative ground.
2. Do not operate the unit in any other way than described in this manual. Failure to follow
the instructions within this manual will invalidate your warranty.
3. Do not disassemble or alter the unit in any way, because it can cause a defect and your
warranty claim will be rejected. Do not attempt to repair or to service the unit yourself, but
contact an authorized ZENEC dealer instead.
4. Use only original accessories which are designed and manufactured to install and to use
the unit, otherwise you will risk to damage it. Install the unit according to the mounting
manual and use only the supplied mounting accessories. The forces of acceleration for
accidents are sometimes huge. Incorrect mounted units are a big risk for the driver and
the passenger of the car, during an accident.
5. Protect the unit from water and other liquids, which can intrude into the housing. A short
circuit with fire could be the result.
6. Before you replace a defect fuse, try to find the cause for the short circuit. Please pay
attention to the cables of the power supply! If the short circuit doesn't result from a mistake
of the power supply or wiring, you can replace the defect fuse against a new one with
the identical data. If the short-circuit is still existing, please contact an authorized ZENEC
dealer.
7. Be careful not to drain the car battery while using the unit when the car engine is turned
off. Because the unit is an appliance and the battery will be charged only while the engine
is running, it's possible that the battery will discharge to a point it's not longer possible to
start the engine.
8. According to the law in different European countries, driving with monitors in use in the
viewing range of the driver is not allowed, because the driver will be distracted from the
traffic. Please respect the traffic regulations of your country, or you might face penalties
in case of an accident. Please pay attention to the volume inside your vehicle, because
you have to notice exterior sounds like police siren.
9. Don't expose the unit to hard impacts. A mechanical or electrical damage of the unit could
be the result.
41
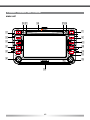
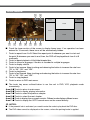
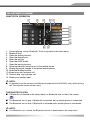
FRONT PANEL BUTTONS
MAIN UNIT
bq bs
br
bs bt
1
7
2
8
3
9
4
bl
5
bm
bn
6
bo
bp
42
ENGLISH
1. POWER/MUTE
■ Press the POWER/MUTE-button to turn
on the unit.
■ Press and hold the POWER/MUTEbutton to turn off the unit.
■ Press the POWER/MUTE-button to mute
the audio output and press the button
again, to go back to the last volume level.
2. FM/AM
■ Press the FM/AM-button to enter the
radio mode.
■ Change in radio mode between the
following radio bands: FM-1, FM-2, FM3, AM-1, AM-2
3. DVD
■ Press the DVD-button to enter the DVD/
CD mode.
4. SRC
■ Press and hold the SRC-button to enter
the main menu.
■ Press the SRC-button to change between the following playing modes:
RADIO ➞ Disc ➞ NAVI ➞ AV IN ➞
DVBT ➞ SD CARD ➞ iPod ➞ USB ➞
CAMERA
The selected playing mode will be
displayed on the screen.
5. NAV
■ Press the NAV-button to enter the
navigation mode. The audio output of the
last playing mode will be played back.
■ Press the NAV-button in navigation mode
to change between the navigation mode
and the last playing mode.
6. PUSH/VOL
■ Turn the PUSH/VOL rotary knob to
change the volume.
■ Press the PUSH/VOL rotary knob to
enter the equalizer menu.
7. EJECT
■ Press the EJECT-button to insert or eject
a disc.
8. PREVIOUS
■ Press the PREVIOUS-button to choose
the previous track/chapter.
■ Press the PREVIOUS-button in radio
mode to auto search down.
9. NEXT
■ Press the NEXT-button to choose the
next track/chapter.
■ Press the NEXT-button in radio mode to
auto search up.
10. WIDE PIC
■ Press the WIDE PIC-button to enter the
video setup.
■ Press and hold the WIDE PIC-button
to change the brightness of the panel
directly.
11. BT
■ Press the BT-button to enter the Bluetooth
mode.
■ Press the BT-button in Bluetooth mode
to change between the Bluetooth mode
and the last playing mode.
12. RESET
■ Press the RESET-button to make a
hardware reset.
13. PUSH/ENT
■ Turn the PUSH/ENT rotary knob to
choose a preset station or a track etc.,
which is stored on a media.
■ Press the PUSH/ENT-button to confirm
your selection.
14. SD-card slot
15.Internal microphone for Bluetooth
mode 16. DVD/CD slot
■ Insert a disc with the label on the top
side into the DVD/CD slot until it will be
inserted automatically.
17. Disc indicator
■ Disc inside: red.
■ No disc inside: white.
18.Receiver for IR-remote control
43
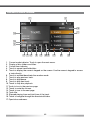
REMOTE CONTROL BUTTONS
FRONT REMOTE CONTROL
2
1
3
4
6
7
8
bl
bm
bo
bp
bq
bu
cl
co
cp
cs
ct
5
9
bn
br
bs
bt
cm
cn
cq
cr
44
ENGLISH
1. POWER
■ Press the POWER/MUTE-button to turn
on the unit.
2. EJECT
■ Press the EJECT-button to insert or eject
a disc.
3. MUTE
■ Press the MUTE-button to mute the audio
output.
4. SRC
■ Press the SRC-button to change between the following playing modes:
RADIO ➞ Disc ➞ NAVI ➞ AV IN ➞
DVBT ➞ SD CARD ➞ iPod ➞ USB ➞
CAMERA
The selected playing mode will be
displayed on the screen.
5. Numeric keypad
■ Directly access to track/chapter or preset
station.
6. VOL up
■ Increase the volume.
7. VOL down
■ Decrease the volume.
8. INFO
■ Display the available disc information.
9. GOTO SEARCH
■ Position search function for CD/DVD
mode.
10. STOP/BAND
■ Change in radio mode between the
following radio bands: FM-1, FM-2, FM3, AM-1, AM-2
■ Stop playback in other playing modes.
11. SELECT
■ Enter the equalizer menu.
12. No function
13. Main menu
■ Enter the main menu.
14. Brightness adjustment
15. REPEAT A-->B
■ Set start point A and end point B to
repeat continually.
16. OK
■ Start or pause the playback.
■ Confirm the selected adjustment.
17. Direction buttons
■ Up/Down/Left/Right to select an item to
adjust.
18. TITLE
■ Enter the title menu of the DVD.
19. ROOT
■ Enter the main menu of the DVD.
■ Turn on PBC while playing VCD.
20. REPEAT
■ Press the REPEAT-button to repeat the
track/folder/chapter/disc playback.
21. NEXT
■ Press the NEXT-button to choose the
next track/chapter.
■ Press the NEXT-button in radio mode to
auto search up.
22. PREVIOUS
■ Press the PREVIOUS-button to choose
the previous track/chapter.
■ Press the PREVIOUS-button in radio
mode to auto search down.
23. FAST REVERSE
■ Fast reverse the disc content ("2X", "4X",
"8X", "16X").
24. FAST FORWARD
■ Fast forward the disc content (2X", "4X",
"8X", "16X").
25. AUDIO
■ Change the audio language for DVD
playback (if available).
26. ZOOM
■ Zooming in/out an image ("+1", "+2",
"+3", "OFF")
27. ANGLE
■ Change between different angles for a
scene (if available).
28. SUB-T
■ Language selection for DVD subtitle (if
available).
45
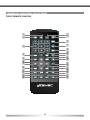
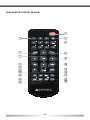
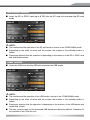
REAR REMOTE CONTROL (M-ZONE)
1
3
4
2
DTV
U
MEN
ROO
T
5
7
9
bn
bm
bq
bp
bt
bu
6
8
bl
EPG
TV/RADIO
bo
br
bs
cm
cl
P P
46
ENGLISH
1. R-SRC
■ After you have activated M-Zone in the
main menu, press the R-SRC-button to
choose the playing mode for the rear
zone.
2. Numeric keypad
■ No function.
3. MUTE
■ Press the MUTE-button to mute the audio
output.
4. GOTO Search
■ No function.
5. TITLE
■ Enter the title menu of the DVD.
■ Scan function for CD mode. Each track
will be played back for 10 seconds.
6. ROOT
■ Enter the main menu of the DVD.
■ Turn on PBC while playing VCD.
7. OK
■ Start or pause the playback.
■ Confirm the selected adjustment.
8. Direction buttons
■ Up/Down/Left/Right to select an item to
adjust.
9. PREVIOUS
■ Press the PREVIOUS-button to choose
the previous track/chapter.
10. NEXT
■ Press the NEXT-button to choose the
next track/chapter.
11. STOP
■ Stop playback.
12. PLAY/PAUSE
■ Start or pause the playback.
13. ZOOM
■ Zooming in/out an image ("+1", "+2",
"+3", "OFF").
14. FAST REVERSE
■ Fast reverse the disc content ("2X", "4X",
"8X", "16X").
15. FAST FORWARD
■ Fast forward the disc content ("2X", "4X",
"8X", "16X").
16. SLOWER PLAY
■ Activate the slow-motion function.
17. REPEAT
■ Press the REPEAT-button to repeat the
track/folder/chapter/disc playback.
18. AUDIO
■ Change the audio language for DVD
playback (if available).
19. SUB-T
■ Language selection for DVD subtitle (if
available).
20. ANGLE
■ Change between different angles for a
scene (if available).
21. REPEAT A -> B
■ Set start point A and end point B to
repeat continually.
47
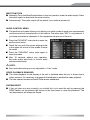
BASIC OPERATION
POWER ON/OFF
■ Press the POWER/MUTE-button on the front panel to turn on the unit. Press and hold
the button for 2 seconds to turn off the unit.
■ It's also possible to turn on and off the unit with the ignition, but this depends on the last
state, before the unit was turned off.
Current playing mode
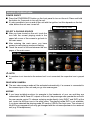
SELECT A PLAYING SOURCE
■ After you have turned on the unit, touch the
icon with the current playing mode in the
upper left corner of the screen to go back to
the main menu.
■ After entering the main menu, you have
access to each playing mode and setting.
■ Touch the arrow to choose between the two
pages of the main menu.
Arrow
NOTE:
■ If a medium is not inserted or the external unit is not connected, the respective icon is greyed
out.
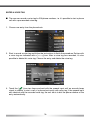
REAR VIEW CAMERA
■ The rear view camera mode will be activated automatically, if a camera is connected to
the camera input of the unit and you go into reverse gear.
M-ZONE
■ If you have installed monitors for example to the headrests of your car and they are
connected to the M-Zone A/V outputs of the unit, the passenger can operate the unit with
the rear remote control. To choose a playing mode directly (only DVB-T and DVD) at the
unit, touch the M-Zone icon in the main menu. The playing mode DVD is not available,
if you have selected the playing mode SD card or USB for the front zone. The volume of
the M-Zone components can only get changed with the volume adjustment of an external
unit (e.g. IR headphones).
48
ENGLISH
MUTE FUNCTION
■ Manually: Press the Mute/Power-button on the front panel to mute the audio output. Press
the button again to deactivate the mute function.
■ Automatically: The audio output will be muted, if you make a phone call.
AUDIO CONTROL MENU
■ The audio control menu allows you to adjust your audio system to meet your requirements
and the acoustical characteristics of the vehicle. The menu item "SW" is only relevant, if
you have connected a subwoofer to the respective sub pre-out of the unit.
■ Press the PUSH/ENT rotary knob to enter the
audio control menu.
■ Touch the icon with the current playing mode
in the upper left corner of the screen to leave
the menu.
■ Press the PUSH/ENT rotary knob again to
leave the menu.
■ After 15 seconds without any operation,
the audio menu exits back to current audio
source automatically.
NOTE:
■ Bass and treble settings are only adjustable in "User"-mode.
VIDEO PLAYBACK DISABLED
■ The video playback on the display of the unit is disabled when the car is driven due to
safety reasons. It's necessary to engage the handbrake to enable the video playback.
■ The rear camera mode and the M-Zone remain unaffected.
SYSTEM RESET
■ If the unit does not work correctly, you should first try to reset the unit by pressing the
RESET-button on the bottom-right corner of the front panel to reset the processor. The
last adjustments will always be saved.
49
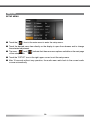
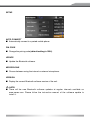
SETUP
SETUP MENU
■ Touch the [
]-Icon in the main menu to enter the setup menu.
■ Touch the desired menu item directly on the display to open the submenu and to change
the selected adjustment.
] and [
■ The icons [
of the setup menu.
] indicate that there are more options available on the next page
■ Touch the "SETUP" icon in the right upper corner to exit the setup menu.
■ After 15 seconds without any operation, the audio menu exits back to the current audio
source automatically.
50
ENGLISH
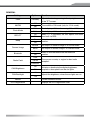
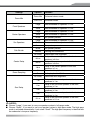
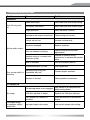
GENERAL
Settings
Options
Function
Clock
(HH:MM)
Adjusts the clock appearing in the top right corner
of the TFT screen.
AM/PM
AM
PM
Choose AM or PM mode (only for 12 Hr mode).
12Hr
Clock displays 12 hour time using AM and PM.
24Hr
Clock displays 24 hour time up to 23:59.
Clock Mode
RDS CT
Beep
Camera Image
Bluetooth
On
Off
On
Off
When ”CT” is activated, the unit adjusts the clock/
time itself via RDS.
Select to activate/deactivate the beeper
function.
Normal
The output of camera image is in normal mode.
Mirror
The output of camera image is in inverted mode.
On
Off
Select to activate/deactivate the Bluetooth
function.
USA
Radio Field
LATIN
Choose your country or region for best radio
reception.
EUROPE
CAN Brightness
CAN Backlight
Version
DivX Registration
On
Off
-10
+10
Activate or deactivate the display brightness,
coupled or decoupled from the car lights.
Adjusts the brightness, when the car lights are on.
Current software version.
Displays the DivX registration code.
51
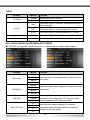
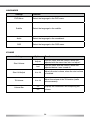
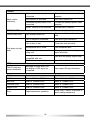
VIDEO
Settings
TV Shape
Aux IN
Options
Function
cinema
Widescreen picture scaling.
normal
Normal picture scaling.
Auto
The video output is switched automatically based on
the current disc.
PAL
The video output is in the standard PAL format.
NTSC
Brightness
-10 to +10
Monitor Off
The video output is in the standard NTSC format.
Adjusts the brightness of the screen.
Turns the monitor off.
ASP (AUDIO SIGNAL PROCESSING) SETUP MENU
■ The ASP configuration menu allows you to make some finer audio adjustments.
Settings
Options
Function
60 Hz
Bass Freq
80 Hz
100 Hz
Select the bass center frequency to achieve the best
bass effect.
200 Hz
10 kHz
Treble Freq
12.5 kHz
15 kHz
17.5 kHz
80 Hz
Sub Filter
120 Hz
160 Hz
1.0
Bass Q-Factor
1.25
1.5
2.0
Select the treble center frequency to achieve the best
treble effect.
Selecting a crossover frequency sets a cut-off
frequency of the subwoofer’s LPF (low-pass filter)
and the speaker's HPF (high-pass filter).
When the bass center frequency is selected,
adjusting the bass Q-factor alters the perceived
"weight" of the bass output.
52
ENGLISH
Settings
Options
Function
Down Mix
2-channel stereo mode.
Full 6 CH
6-channel mode.
Down Mix
Front Speakers
Center Speakers
Sur Speakers
Sub Woofer
Large
Recommended for speakers > 5.25".
Small
Recommended for speakers < 5.25".
Large
Recommended for speakers > 5.25".
Small
Recommended for speakers < 5.25".
None
No speaker present.
Large
Recommended for speakers > 5.25".
Small
Recommended for speakers < 5.25".
None
No speaker present.
None
No speaker present.
Present
No Delay
0.3 m
Center Delay
0.6 m
1.0 m
Down Sampling
Delay of the center speaker to the front
speakers is 0.3 m.
Delay of the center speaker to the front
speakers is 0.6 m.
Delay of the center speaker to the front
speakers is 1 m.
Off
Normal audio playback.
Audio playback in 48 kHz.
No Delay
Deactivate time alignment.
2m
3m
4m
5.1 m
Deactivates time alignment.
On
1m
Surr Delay
Existing and connected.
Delay of the surround speaker to the front
speakers is 1 m.
Delay of the surround speaker to the front
speakers is 2 m.
Delay of the surround speaker to the front
speakers is 3 m.
Delay of the surround speaker to the front
speakers is 4 m.
Delay of the surround speaker to the front
speakers is 5.1 m.
NOTES:
■ Choose "Large", if you want to use your speaker system in full range mode.
■ Choose "Small", if you want to use your speaker system in high pass mode. The high pass
mode is activated automatically, if you select "Small". The high pass frequency is identical with
the subwoofer's low pass frequency.
53
LANGUAGES
Settings
DVD Menu
Subtitle
Function
Select the language for the DVD menu.
Select the language for the subtitle.
Audio
Select the language for the soundtrack.
OSD
Select the language for the OSD menu.
VOLUME
Settings
Options
Function
Adjusts
The unit starts with the volume, which was
adjusted with the menu item"start vol adjust".
Start Volume
Last
The unit starts with the volume, which was
adjusted before it was turned off.
Start Vol Adjust
0 to 10
Adjusts the start volume, when the start volume
is enabled.
TA Volume
0 to 10
Adjust the volume of the TA function (traffic
announcement).
Volume Bar
Off
On
Displays the volume bar while adjusting the
volume.
54
ENGLISH
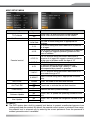
MISC SETUP MENU
Settings
TS Calibrate
Set Password
Options
No
Yes
Locked
1. Kid Safe
2. G
3. PG
Parental control
4. PG-13
5. PG-R
6. R
Anti CODE
Anti Theft SW
Load Factory
Software Update
Navi Update
Function
Touch "Yes" to enter the touch screen calibrate
mode.Then follow instructions on the screen.
Enter your password to unlock the parental lock.
Kid safe: A movie rating that is appropriate for
children.
G: A movie rating that allows admission to persons
of all ages.
PG: A movie rating that allows admission of persons
of all ages but suggests parental guidance in the
case of children.
PG-13: A movie rating that allows admission of
persons of all ages but suggests parental guidance
in the case of children under the age of 13.
PG-R: PG-related.
R: Amovie rating that allows admission only
to persons of a certain age, usually 17, unless
accompanied by a parent or guardian.
7. NC-17
NC-17: A movie rating that allows admission to no
one under the age of 17.
8. ADULT
Adult: A movie rating that is appropriate for adults
only.
Locked
On
Off
No
Yes
No
Yes
No
Yes
Enter the code for the anti-theft function.
Deactivate or activate the anti-theft function.
Restore the factory default settings.
Touch "Yes" to update the operating software of the
unit.
Touch "Yes" to update the navigation software of the
unit.
NOTE:
■ The DVD system has a built-in parental lock feature to prevent unauthorized persons from
viewing restricted disc content. By default, the parental control system is unlocked. Once setup,
the parental lock is released only by entering the correct password. Once the password is
entered, parental control is available.
55
ANTI-THEFT CODE
■ To secure the unit from a theft and later use, it’s possible to enter a four-digit anti-theft
code.
If the anti-theft code is activated and the unit will be disconnected from the power supply
and reconnected again, it’s necessary to enter the anti-theft code to start up the unit.
Otherwise it’s not possible to restart the unit.
The delivery status for the input of the anti-theft code is deactivated, so it’s not necessary
to enter the anti-theft code, when the unit was disconnected from the power supply.
1. Touch the Anti theft icon and activate the anti-theft function.
2. Touch the AntiCode icon and use the keypad, which appears on the screen, to enter the
four-digit anti-theft code and confirm your input by entering the same code a second time.
NOTE:
■ The delivery status of the anti-theft code, with the unit new cut of the box is deactivated and
you must activate it manually.
■ Please note down the anti-theft code and keep it in a safe place, so you can find it when you
need it. If the anti-theft code is entered wrong three times, it’s necessary to enter the super
code to unlock the unit again. To unlock the unit with the super code, it’s unavoidable to send
it back to an authorized ZENEC-dealer. ■ If you want to change or deactivate the anti-theft code, you must enter a valid code first. 56
ENGLISH
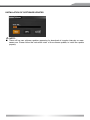
INSTALLATION OF SOFTWARE UPDATES
NOTE:
■ There will be new software updates appearing for download at irregular intervals on www.
zenec.com. Please follow the instruction notes of the software update, to install the update
properly.
57
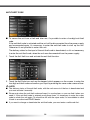
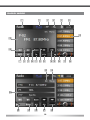
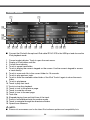
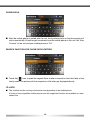
RADIO MODE
1
2
3
4
5
6
cm
bu
cl
7 8 9 bl bm bn bo
cn
bp bq br
co
cu
cp
cq
cr
cs
58
ct
bs bt
ENGLISH
1. Current mode of unit. Touch to open the
main menu.
2. Displays the signal strength.
14.Touch to seek forward.
15.Touch to switch between the two submenus.
3. The TP button lights up orange when
the radio station provides traffic
announcements.
16.Touch to turn to previous page.
4. The TA button lights up orange when a
traffic announcement is transmitted.
18.Touch to turn to next page.
17. Touch to mute the volume.
5. Bluetooth indicator.
19.Current radio band, preset station playing
back and radio frequency indicator.
6. Current time indicator.
20.Touch to seek backward.
7. When AF and Region are activated,
auto tuning to those stations within the
region is assigned. When AF is activated
and region is deactivated, auto tuning
attempts to find stations without any
region boundary.
21. Preset radio stations: Touch to recall
preset stations or touch and hold to store
a station, (total 6 stations for each band).
8. Touch to tune backward one step.
9. Touch to activate/deactivate the AF
function. When AF is activated and
a radio signal is too weak, the tuner
automatically switches to the best
available frequency.
10.Touch on the screen to automatically
scan all stations of the current band to
preview stations. Press any button to
stop scanning and listen to the selected
station.
11. Touch to activate/deactivate the AF
function. When TA is activated, the unit
will auto seek an available TP or TA
station. When TA is activated and a traffic
announcement is received, the current
playing source is overridden by the traffic
announcement automatically, if the tuner
was last set to the FM band but not, if
it was last set to the AM band. When
traffic announcement is over, the current
playing source will be resumed.
22.Displays whether LOC or DX mode is
active.
23.Displays whether mono or stereo sound
is playing. The unit switches automatically
between mono and stereo, depending on
the reception quality of the radio station.
24.Touch to switch between the two submenus.
25.Touch to change among the following
bands: FM-1, FM-2, FM-3, AM-1, AM-2.
26.Touch to automatically scan and store the
best 6 stations of the current radio band.
27. Scan the stations in the 6 preset channels
of the current band.
28.Switch to choose between LOC and DX
tuner searching mode.
29. Current radio band, preset station playing
back and radio frequency indicator.
12.Touch to tune forward one step.
13.Touch to enter the PTY menu, then touch
to select a choice in the PTY menu. The
unit will auto seek the next available PTY
by increasing tuning frequency until the
program type matches the PTY, if no
match is found, the tuner will return to
original radio and "None" is displayed.
59
NOTE:
■ This product features a tuner with RDS function. RDS (Radio Data System) is a system that
transmits broadcast station information together with FM programs. RDS service is not available
in AM broadcasting. RDS service availability depends on the FM broadcasting provider.
■ To use the RDS features, the AF function needs to be enabled. Please be sure to activate the
AF function at the very first time.
60
ENGLISH
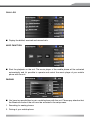
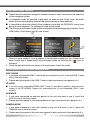
DVD MODE
3 4
Area A
Area F
Area B
Area C
Area D
Area E
1 2
5 6 7 8 9
■ Touch the lower section of the screen to display these icons. If no operation has been
entered for 10 seconds, these icons will be automatically hidden.
1. Touch to repeat from A to B. Select the repeat point A whenever you want to start and
the point B whenever you want to end, then, the DVD will be played back from A to B
continually.
2. Touch to repeat playback of title/folder/chapter/disc.
3. Touch to choose a language, if the disc is recorded in multiple languages.
4. Touch to display subtitle.
5. Touch to fast reverse. Keep touching and releasing the button to increase the rate from
"2X" to "4X", "8X", and "16X".
6. Touch to play/pause.
7. Touch to fast forward. Keep touching and releasing the button to increase the rate from
"2X" to "4X", "8X", and "16X".
8. Touch to stop playback.
9. Touch to return to DVD main menu.
■ The touch key areas outlined below to run the unit in DVD, VCD, playback mode
conveniently.
Area A:■ Touch to return to main menu.
Area B:■ Touch to display playing information.
Area C:■ Touch to select the previous chapter.
Area D:■ Touch to select the next chapter.
Area E:■ Touch to display the on-screen controls. Different mode displays different menu.
Area F:■ Touch to display the GOTO search menu on the screen directly.
NOTES:
■ If the parental lock is activated, you need to enter the code to play back the DVD disc.
■ The DVD video cannot be displayed on the screen, unless the parking brake is applied.
61
CD/MP3/WMA MODE
1
3
br
2
bp
bq
5
4 7 6 8 9 bl bs
bm
bn
bo
1. Current mode indicator. Touch to open the main menu.
2. Display of disc folders and titles.
3. Current time indicator.
4. Touch to repeat track/folder/disc.
5. Touch to display the numeric keypad on the screen. Use the numeric keypad to access
a track directly.
6. Touch to activate/deactivate the random mode.
7. Touch to play previous track.
8. Touch to play/pause.
9. Touch to play next track.
10. Touch to stop disc playback.
11. Touch to turn to the previous page.
12. Touch to mute the volume.
13. Touch to turn to the next page.
14. Track title.
15. Elapsed playing time and total time of the track.
16. Touch to navigate through the directories/folders.
17. Open/close submenu.
62
ENGLISH
SD-CARD MODE
■ Insert the SD or SDHC card (up to 8 GB) into the SC-card slot and enter the SD card
mode.
NOTE:
■ The interface and the operation of the SD card mode is similar to the CD/MP3/WMA mode.
■ Depending on the folder structure and the content, the number of the available folders is
limited.
■ Please pay attention that the operation is depending on the memory of the SD or SDHC card
and stored data volume.
USB MODE
■ Insert the USB stick into the USB slot and enter the USB mode.
NOTE:
■ The interface and the operation of the USB mode is similar to the CD/MP3/WMA mode.
■ Depending on the folder structure and the content, the number of the available folders is
limited.
■ Please pay attention that the operation is depending on the memory of the USB device and
stored data volume.
■ The max. current supply for the connected USB device must be below 400 mA. Otherwise it's
not possible to use it with this unit.
63
iPod MODE
1
3
bt
bq
2
br
5
4 bs 6 8 bu bn
bo bp
7 9 bl bm
■ Connect the iPod with the optional iPod cable ZE-NC-IPS to the USB port and choose the
iPod playback mode.
1. Current mode indicator. Touch to open the main menu.
2. Display of iPod folders and title.
3. Current time indicator.
4. Touch to repeat track/folder.
5. Touch to display the numeric keypad on the screen. Use the numeric keypad to access
a track directly.
6. Touch to scan each file in the current folder for 10 seconds.
7. Touch to play previous track.
8. Touch to show the available video folder of the iPod. Touch it again to show the music
folder.
9. Touch to play/pause.
10. Touch to play next track.
11. Touch to stop disc playback.
12. Touch to turn to the previous page.
13. Touch to mute the volume.
14. Touch to turn to the next page.
15. Track title.
16. Elapsed playing time and total time of the track.
17. Touch to activate/deactivate the random mode.
18. Touch to navigate through the directories/folders.
19. Open/close submenu.
NOTE:
■ Please visit www.zenec.com for the latest iPod software updates and compatibility lists.
64
ENGLISH
BLUETOOTH MODE
BLUETOOTH OPERATION
1
9
bm
bo 2
3
4
5
6
7
bl
bn 8
1. Current playing source: Bluetooth. Touch to go back to the main menu.
2. Bluetooth icon.
3. Open the dialling function.
4. Open the phone book.
5. Open the call log.
6. Open the A2DP mode.
7. Open the pairing function.
8. Voice transfer back from the unit to the mobile phone.
9. Display the signal strengh of the paired mobile phone.
10. Open the Bluetooth setup.
11. Accept resp. start a phone call.
12. Dismiss resp. stop a phone call.
13. Delete your number input.
NOTE:
■ It's possible to set the volume of the Bluetooth mode with the PUSH/VOL rotary knob during a
call. The adjusted volume will be saved.
THE BLUETOOTH ICON
■ If Bluetooth is activated in the setup, there is a Bluetooth icon on the of the screen
[
].
■ The Bluetooth icon is gray, if Bluetooth is activated, but no mobile phone is connected.
■ The Bluetooth icon is blue, if Bluetooth is activated and a mobile phone is connected.
NOTE:
■ If no Bluetooth icon is visible, the Bluetooth function is deactivated in the setup menu.
65
PHONE BOOK
■ After the mobile phone is paired with the unit, the synchronisation of the phone book will
start automatically. All entries get transferred from the mobile phone to the unit. Set ”Auto
Connect” at the unit and your mobile phone to ”On”.
SEARCH FUNCTION FOR PHONE BOOK ENTRIES
]-icon to open the keypad. Enter a letter to search for the initial letter of the
■ Touch the [
family name. The entries with the respective initial letter get displayed directly.
NOTE:
■ The function and the sorting of the entries are depending of the mobile phone.
A listing of the compatible mobile phones and the supported function are available on www.
zenec.com.
66
ENGLISH
CALL LOG
■ Display the dialled, received and missed calls.
A2DP FUNCTION
■ Start the playback on the unit. The music player of the mobile phone will be activated
automatically and it's possible to operate and control the music player of your mobile
phone with the unit.
PAIRING
■ You have two possibilities to pair a mobile phone with the unit. Please pay attention that
the Bluetooth mode of the unit must be activated in the setup menu.
1. Searching for nearby phones.
2. Pairing of your mobile phone.
67
1. Searching for nearby phones.
1. Activate the Bluetooth mode on the mobile phone und check, if it allows to detect it from
other devices resp. if the function to search for Bluetooth devices is activated.
2. Touch the Add icon to open the search menu and to start the search run.
3. After the mobile phone was found from the unit and a Bluetooth connection was
established, the name of the mobile phone will appear on the screen of the unit.
4. Choose the mobile phone on the unit, touch the Connect icon and enter the PIN code,
which is in the delivery status 1234.
Depending on the mobile phone and the settings, it's also required to enter the PIN code
on the mobile phone a second time.
5. After the pairing between the unit and the mobile phone is finished, depending on the
mobile phone, it's necessary to confirm the pairing once more to complete this process.
2. Pairing from your mobile phone.
1. Activate the Bluetooth mode on the mobile phone.
2. Open the Bluetooth mode of the unit.
3. Start the search for Bluetooth units on the mobile phone.
4. After the unit is found by the mobile phone and a Bluetooth connection was established,
the unit will appear with the description ZE-NC2010 on the mobile phone.
5. Choose ZE-NC2010 on the mobile phone and enter the PIN code, which is in the delivery
status 1234.
6. After the pairing between the unit and the mobile phone is finished, depending on the
mobile phone, it's necessary to confirm the pairing again to complete the procedure.
68
ENGLISH
SETUP
AUTO CONNECT
■ Automatically connect to a paired mobile phone.
PIN CODE
■ Change the pairing code (default setting is 1234).
UPDATE
■ Update the Bluetooth software.
MICROPHONE
■ Choose between using the internal or external microphone.
VERSION
■ Display the current Bluetooth software version of the unit.
NOTE:
■ There will be new Bluetooth software updates at regular intervals available on
www.zenec.com. Please follow the instruction manual of the software update to
install it.
69
ENTER A VOICE TAG
■ The user can record a voice tag for 200 phone numbers, i.e. it's possible to start a phone
call with a pre-recorded voice tag.
1. Choose one entry form the phone book.
2. Start to record a voice tag and follow the instructions to finish the procedure. Entries with
a voice tag are indicated with a [voice tag]-icon. After a voice tag was recorded, it's also
possible to delete this voice tag. Choose the entry and delete the voice tag.
3. Touch the [
]-icon two times and wait with the speech input until an acoustic beep
signal is audible, to start a call of a phone book entry with voice tag. If the speech input
was identical with the recorded voice tag, the unit starts to dial the phone number of the
entry automatically.
70
ENGLISH
NOTES:
■ The line-of-sight distance between the unit and the mobile phone must be 8 metres or
less, otherwise a flawless function can't be guaranteed. The transmission distance may
become shorter than the estimated distance, depending on the environment during
use.
■ It cannot be guaranteed, that all mobile phones can be paired and all that functions will
work with the unit.
■ The operation of the mobile phone is different according to the model and brand. Please
pay attention to the manual of the mobile phone to get more information about its
operation.
■ Depending on the mobile phone brand and model, the speakers of the vehicle may not
produce a ring sound.
■ The synchronisation, the transferring, the sorting and the display of the phone book
entries are depending on the mobile phone brand and model. If the synchronisation
doesn't work or if it's faulty, disconnect the phone and perform pairing again with the unit.
■ A listening with compatible mobile phones and functions are available on www.zenec.com.
■ It's possible to pair up to 5 mobile phones with the unit.
■ It's possible to synchronise and handle up to 1000 phone book entries.
■ Pls check if the automatic synchronisation of the phone book is activated on the mobile
phone. Please read the manual of the mobile phone to activate the function resp. to
activate the manual synchronisation.
■ Please read the mounting manual, which is included in the set content of the unit, to learn
more about the placement, mounting and usage of the internal and external microphones.
■ There will be new software updates at irregular intervals available on www.zenec.com.
Pls follow the instruction manual of the software update to install it.
71
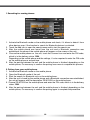
NAVIGATION MODE
■ Please read the separate navigation software manual to learn more about the operation
of the navigation system.
■ In navigation mode, it's possible to play back an audio source. In this case, the audio
output of the current playing mode will be lowered during a voice response.
■ It's possible to adjust the volume of the navigation voice with the PUSH/VOL rotary knob
during a voice response. The adjusted volume will be saved.
■ The unit has a splitscreen mode, which is available in the following playing modes: Tuner,
USB (audio), iPod (audio) and SD card (audio).
1
2
1. Once you have started a route guidance in the navigation mode you can change to an
audio source that is supported by the splitscreen mode, by touching the [
]-icon to
activate it.
2. Touch the field with the arrow display of the splitscreen to exit this mode.
EXTERNAL PLAYING SOURCES
DVB-T MODE
1. If you have connected a DVB-T tuner to the unit and want to use it, touch the DVB-T tuner
icon in the main menu.
2. Please read the manual of the DVB-T tuner to learn more about the operation of it.
NOTE:
■ If you are using a compatible ZENEC DVB-T tuner, it's possible to operate it with the touchscreen of the ZE-NC2010. Please visit www.zenec.com to find compatible DVB-T tuner
model(s).
AUX MODE
1. If you have connected an external device to the unit and want to use it, touch the
AUX-IN icon in the main menu.
2. Please read the manual of the external device to learn more about the operation of it.
CAMERA MODE
1. If you have connected a rear view camera to the unit and want to use it, touch the
CAMERA icon in the main menu.
2. Please read the manual of the rear view camera to learn more about the operation of it.
72
ENGLISH
CAN BUS
■ CAN is the abbreviation for controller area network. It’s a international standard Bus
protocol of the automotive industry. Because of this protocol, it's possible to use the
steering wheel buttons and other functions of the vehicle in which the ZE-NC2010 is
mounted to. Connect the CAN Bus interface with the ZE-NC2010 and pay attention to the
connection diagram first.
Because of the different functions of the steering wheel buttons in the different vehicles,
the ZE-NC2010 doesn't support all functions. You will find a list of the supported functions
on www.zenec.com.
73
GENEREL INFORMATION
ABOUT DIVX
ABOUT DIVX VIDEO: DivX® is a digital video format created by DivX, Inc. This is an official
DivX Certified device that plays DivX video. Visit www.divx.com for more information and
software tools to convert your files into DivX video.
ABOUT DIVX VIDEO-ON-DEMAND: This DivX Certified® device must be registered in order
to play DivX Video-on-Demand (VOD) content. To generate the registration code, locate the
DivX VOD section in the device setup menu. Go to vod.divx.com with this code to complete
the registration process and learn more about DivX VOD.
BASIC KNOCKLEDGE OF DISC
Region Code:
According to DVD sale region, the whole world is divided into six regions. A DVD disc can be
played back only when the DVD region number is the same with the DVD disc.
Region 1: USA, Canada, East Pacific Ocean Islands
Region 2: Japan, West Europe, North Europe, Egypt, South Africa, Middle East
Region 3: Taiwan of China, Hong Kong of China, South Korea, Indonesia, South East Asia
Region 4: Australia, New Zealand, Mid & South America, South Pacific Thailand, Ocean Islands/Oceania
Region 5: Russia, Mongolia, India, Middle Asia, East Europe, North Korea, North Africa, North West Asia
Region 6: Chinese Mainland
Caution of disc using:
1. Do not use irregular shaped discs.
2. Use a dry, soft cloth to wipe the disc from center to edge. Only neutral detergent can be
used.
3. New discs may have some rough spots around the inner and outer edges. If such a disc
is used, remove these rough spots with a pencil or ball-point pen.
MP3 COMPATIBILITY
All the file naming format below are compatible
■ ISO 9660 – Level file name: 12 characters, file extension: 3 characters
■ ISO 9660 – Level file name: 31 characters, file extension: 3 characters
■ Joliet – 64 characters
If the file or folder name does not conform to ISO 9660 file system, it may not be displayed
correctly or be normally played back.
This unit is manufactured under license from Dolby Laboratories. “Dolby” and the double-D symbol
are trademarks of Dolby Laboratories.
74
ENGLISH
TROUBLESHOOTING
Problem
GENEREL
Unit will not power
on.
Cause
Solution
Radio fuse blown.
Install new fuse with correct rating.
Car battery fuse blown.
Install new fuse with correct rating.
Illegal operation.
Press the RESET button.
Improper audio output connection. Check wiring and correct.
Volume set too low.
Increase volume level.
Speakers damaged.
Replace speakers.
Only one channel is playing.
Check the balance and fader
adjustments.
Speaker wiring is in contact with
metal part of car.
Insulate all speaker wiring
connections or replace the speaker
cable.
Mute is activated.
Turn off the Mute function.
Unauthorized disc is in use.
Use original disc.
No/low audio output.
Speaker power rating not
Poor sound quality or compatible with unit.
distortion.
Connect proper speakers.
Speaker is shorted.
Check speaker connections.
The parking brake is not engaged.
Stop vehicle in a safe place and
apply parking brake.
CAN-Bus Interface is defect.
Replace the CAN-bus interface.
The "Monitor off"-function is
activated.
Touch the monitor to activate the
display.
Improper aspect ratio setup.
Use correct aspect ratio setting.
TFT MONITOR
No image.
Prolonged image
or improper height/
width ratio.
75
TUNER
Auto antenna not properly
connected.
Connect the auto antenna cable
properly.
REG function is activated.
Turn REG function off.
The antenna power cable is not
connected.
Connect the antenna power cable
properly.
The AF function is not activated.
Activate the AF function.
Disc already inside unit.
Eject current disc and insert new
one.
Disc is warped or scratched.
Use disc in good condition.
Disc is dirty or wet.
Clean disc with soft cloth.
Incompatible disc is used.
Use compatible disc.
Disc rating exceeds parental lock
rating limit.
Change parental lock settings to
lower restriction.
Disc region code is not
compatible with unit.
Use disc with proper region code.
Disc is inserted upside down.
Insert disc with label side up.
The ID3 tags are
shown incorrectly
Message is longer than LCD
can display or ID3 tag is not
compatible.
Use proper ID3 tag information.
Problem
Cause
Solution
No Disc.
Refer to "Problem DVD".
Refer to "Problem DVD".
Weak station
searching.
DVD-PLAYER
Cannot insert disc.
Disc does not play
back.
MP3
Bad Disc.
Refer to "Problem DVD".
Refer to "Problem DVD".
Unknown Disc.
Refer to "Problem DVD".
Refer to "Problem DVD".
Region Error.
Refer to "Problem DVD".
Refer to "Problem DVD".
Error.
Illegal mechanism operation.
Press EJECT key for 5 seconds to
reset loading mechanism.
76
ENGLISH
SPECIFICATIONS
Main Amplifier
Power Output: 20 watts X 4 channels into 4-ohms @ < 10% THD+N
Signal to Noise Ratio: 70dBA below reference. (Reference: 1 watt, 4-ohms)
MAX Power: 50 X 4 watts into 4-ohms, all channels driven
Frequency Response: 20Hz to 20 kHz, -3dB. Aux input used as source reference
Reference Supply Voltage: 14.4VDC
DVD Player
Compatible formats: CD, CD-R/RW, MP3, WMA, DVD, DVD-R/RW, DVD+R/RW, DVD-MP3, Avi,
MPEG4, DivX6, JPEG and Picture CD
Signal to Noise Ratio: 85dBA
Dynamic Range: >95dB
Frequency Response: 20Hz to 20 kHz, -3dB
Channel Separation: > 60dB @ 1kHz
D/A Converter(s): 6-channel high performance 24-bit, 192 kHz, multi-bit Sigma Delta modulation.
DAC supports sample rates from 8~192 kHz.
Region code: 2
FM Tuner Section
Tuning Range: 87.5MHz - 108MHz
Mono Sensitivity (-30dB): 10dBu
Signal to Noise Ratio @ 1kHz: 58dB
Image Rejection: 60dB
Stereo Separation @ 1kHz: 30dB
Frequency Response: 30Hz - 15kHz, -3dB
AM Tuner Section
Tuning Range: 522kHz - 1629kHz
Sensitivity (-20dB): 20dBu
Signal to Noise Ratio @ 1kHz: 50dB
Image Rejection: 60dB
Frequency Response: 50Hz - 2kHz, -3dB
Monitor Section
Screen Size: 6.5" (measured diagonally).
Screen Type: TFT Liquid Crystal Display (LCD)
Response Time: 30 ms
Resolution, CD/Composite Video in: 336,960 sub pixels,
1440 (W) X 234 (H)
Viewing angle:
•45~60 degrees left or right
•20~30 degrees up
•40~60 degrees down
General
Auxiliary Input impedance: 10k
Power Supply: 10.5 to 16V DC, negative ground
Fuse: 10-amp, mini ATM type
DIN chassis dimensions: 178mm x 153mm x100mm
NOTE:
Specifications and designs of this model are necessarily subject to changes without any notice.
77
Warranty 2 Years
Dear customer
Thank you for purchasing this ZENEC product. It is advisable to keep the original packing material
for any future transporting of the product.
Should your ZENEC product require warranty service, please return it to the retailer from whom it
was purchased or the distributor in your country.
This ZENEC product is warranted against defective materials or workmanship for a period of TWO
years from date of purchase at retail.
Warranty Limitations
This warranty does not cover any damage due to:
1. Improper installation, incorrect audio or mains connection(s).
2. Exposure to excessive humidity, fluids, heat sun rays or excessive dirt or dust.
3. Accidents or abuse, unauthorized repair attempts and modifications not explicitly authorized by the manufacturer.
This warranty is limited to the repair or the replacement of the defective product at the manufacturer’s
option and does not include any other form of damage, whether incidental, consequential or
otherwise. The warranty does not cover any transport costs or damages caused by transport or
shipment of the product. Warranty work will not be carried out unless this warranty certificate is
presented fully completed with model, serial number, purchaser’s address, purchasing date and
dealer stamp together with the original sales slip!
2 Jahre Garantie
Sehr geehrter Kunde,
Vielen Dank, dass Sie sich zum Kauf dieses Produktes von ZENEC entschlossen haben. Wir
bitten Sie, die Originalverpackung aufzuheben, z.B. für den Transport bei einem Garantiefall.
Wenn Sie Garantie-Leistungen für dieses ZENEC Produkt beanspruchen, wenden Sie sich bitte
direkt an den Händler, bei dem das Gerät gekauft wurde.
Dieses ZENEC Produkt ist durch eine Werksgarantie von 2 Jahren ab Kaufdatum im Fachhandel
gegen Material- oder Herstellungsfehler geschützt.
Garantie-Einschränkungen
Nicht unter Garantie fallen Schäden infolge von:
1. unsachgemässem Einbau oder inkorrektem Audio- oder Stromanschluss.
2. Einwirkung von übermässiger Feuchtigkeit, Flüssigkeit, Hitze, Sonneneinstrahlung oder starker Verschmutzung.
3. mechanischer Beschädigung durch Unfall, Fall oder Stoss; Schäden durch nicht autorisierte
Reparaturversuche und/oder Modifikationen.
Die Garantie dieses Produkts bleibt in jedem Fall auf die Reparatur bzw. den Ersatz (Entscheidung
beim Hersteller) des ZENEC Produktes beschränkt. Transportschäden und die Kosten des
Rücktransportes sind durch diese Garantie nicht abgedeckt. Jeder über diese Garantie-Erklärung
hinausgehende Anspruch und Haftung für direkte / indirekte Folgeschäden werden ausdrücklich
abgelehnt. Garantie-Ansprüche können nur mit einer korrekt und vollständig ausgefüllten GarantieKarte und dem Original-Kaufbeleg geltend gemacht werden.
78
WARRANTY
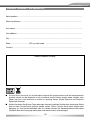
ZENEC Model: ZE-NC2010
Serial number:............................................................................................................................... Date of purchase:...........................................................................................................................
Your name:.....................................................................................................................................
Your address:.................................................................................................................................
City:...............................................................................................................................................
State: ................................... ZIP or postal code: . ........................................................................
Country: ........................................................................................................................................
Dealer’s address & stamp
■ If at any time in the future you should need to dispose this product please note that waste electrical
products should not be disposed of with household waste. Please recycle where facilities exist.
Check with your Local Authority or retailer for recycling advice. (Waste Electrical and Electronic
Equipment Directive)
■ Sollten Sie dieses Gerät eines Tages entsorgen müssen, beachten Sie bitte dass elektrische Geräte
nicht mit dem Haushaltsmüll entsorgt werden sollten. Führen Sie das Gerät wenn möglich dem
Recycling zu. Ihre lokalen Behörden oder Ihr Händler können Sie dementsprechend informieren
(Richtlinie über die Entsorgung elektrischer und elektronischer Ausstattungen).
79
MODEL NO:
ZE-DVBT1 0
1 CH DVB-T TUNER
ZENEC · By ACR AG · Bohrturmweg 1 · Bad Zurzach · Switzerland