1
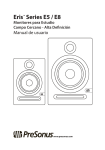
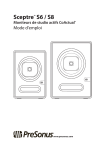
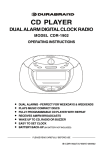
Contents
Important Safety Instructions
Important Safety Instructions................................................................. 2-3
Contents and equipment ........................................................................ 4-6
Package Content...................................................................................... 4
Front Panel.............................................................................................. 4
Rear Panel............................................................................................... 4
The Remote Control.................................................................................. 5
Using the Remote control...........................................................................6
Batteries.................................................................................................. 6
Notes on Using Batteries........................................................................... 6
How To Connect Your Digital TV Receiver.................................................. 7
Basic Operation...................................................................................... 8-9
Power On/Off and Standby........................................................................ 8
Changing Channels.................................................................................. 8
Adjusting the Volume................................................................................ 8
TV sound Mode Selection.......................................................................... 8
Display Program Information..................................................................... 9
Adjusting Aspect Ratio…........................................................................... 9
Signal State............................................................................................. 9
Subtitle On/Off......................................................................................... 9
Viewing the EPG Information..................................................................... 9
Auxiliary Channel Selection....................................................................... 9
Menu Tree................................................................................................ 10
Using the On-Screen Display Menu......................................................11-16
Channel Menu................................................................................... 11-12
Option Menu...................................................................................... 12-14
Lock Menu......................................................................................... 14-16
FCC Customer Information...................................................................... 17
Trouble shooting......................................................................................18
Specification........................................................................................... 19
ATSC TV RECEIVER
1
WARNING
TO PREVENT FIRE OR SHOCK HAZARD, DO NOT USE AN EXTENSION CORD,
RECEPTACLE OR OTHER OUTLET UNLESS THE BLADES CAN BE TO PREVENT
BLADE EXPOSURE.
TO PREVENT FIRE OR SHOCK HAZARD. DO NOT EXPOSE THIS APPLIANCE.
TO RAIN OR MOISTURE.
TO PREVENT ELECTRICAL SHOCK, MATCH WIDE BLADE PLUG TO WIDE
SLOT FULLY INSERTED.
CAUTION
RISK OF ELECTRIC SHOCK
DO NOT OPEN
This lightning flash with
arrowhead symbol in an
equilateral triangle alerts
users to the presence of
uninsulated dangerous
voltage within the
products enclosure that
may be of sufficient
magnitude to constitute
a risk of electric shock to
persons.
Warning: To reduce the risk of
electric shock, do not remove
cover(or bark). No user
serviceable parts inside. Refer
servicing to qualified service
personnel.
The exclamation mark
within an equilateral
triangle alerts users
to the presence of
important operating
and maintenance
(servicing) instructions
in the literature
accompanying the
appliance.
This appliance should not be exposed to water and no object filled with liquid such as a vase
should be placed on the unit.
ATSC TV RECEIVER
2
1. Read Instructions-All the safety and operating instructions should be read before the appliance is
Contents and Equipment
operated.
2. Retain Instructions-The safety and operating instructions should be retained for future reference.
3. Heed Warnings-All warnings on the appliance and in the operating instructions should be adhered
to.
4. Follow Instructions-All operating instructions should be followed.
Package Contents
1. MPI-500 Receiver
2. User Manual
3. Remote Control
4. AV Connection Cable
5. AC Adapter
6. RF Coaxial Cable
5. Water and Moisture-The appliance should not be used near water.
MPI-500 Receiver
User Manual
Remote Control
AAA Batteries(x2)
AV Connection Cable
AC Adapter
RF Coaxial Cable
Front Panel
4
6. Cart and Stands-The appliance should only be used with a cart or stand that is recommended by
7.
8.
9.
10.
11.
12.
13.
14.
15.
16.
17.
18.
19.
the manufacturer.
Wall or Ceiling Mounting-The appliance should be mounted to a wall or ceiling only as recommended
by the manufacturer.
Ventilation-The appliance should be well situated so that its location or position does not interfere
with its proper ventilation.
Heat-This appliance should be placed away from heat sources such as radiators, heat registers
and stoves.
Power Sources-The appliance should only be connected to a power supply as described in the
operating instructions or as marked on the appliance.
Grounding or Polarization-Precautions should be taken.
Power Cord Protection-Power supply cord should be routed so that it is not likely to be walked on,
pinched by items placed upon it against the cord and its end.
Cleaning-The appliance should be cleaned only as recommended by the manufacturer.
Power Lines-An outdoor antenna should be located away from power lines.
Outdoor Antenna Grounding-If an outside antenna is connected to the receiver , the antenna
system must be grounded so as to provide against voltages and built-up static charges.
Non-use Periods-The power cord of the appliance should be unplugged from the outlet when left
unused for a long period of time.
Object and Liquid Entry-Care should be taken so that objects do not fall, and liquids are not
spilled into the enclosure through openings.
Conditions Requiring Service-The appliance should be serviced by qualified service personnel
when:
The power-supply cord or the plug has been damaged.
Objects have fallen on or liquid has been spilled into the appliance.
The appliance has been exposed to rain.
The appliance does not appear to operate normally or exhibits a marked change in performance.
This appliance should not be exposed to water and no objects filled with liquids such as a vase should
be placed on the unit. Where the MAINS plug or an appliance coupler is used as the disconnect
device, the disconnect device shall remain readily operable.
ATSC TV RECEIVER
1
2
5
3
1. STANDBY: toggles unit between on and standby mode.
2. MENU: Displays the main menu.
3. V+/-: Adjusts the volume level.
4. CH+/-: Changes channels up/ down.
5. OK: Selects a menu or confirms the selected operation.
Rear Panel
1
2
3
4
5
1. IN: Receives the signal from antenna.
2. OUT: Supports a share antenna output.
3. AUDIO OUT (L/R): Two stereo channel audio output.
4. VIDEO OUT: Composite video output.
5. POWER IN: Connects to AC Adapter.
3
ATSC TV RECEIVER
4
The Remote Control
Using the Remote Control
POWER
switches the STB ON/
STANDBY mode.
MUTE
Temporarily turns
off sound volume.
0-9 Numerical keys
Enters numeric values
and selects the
channel directly by
entering its number.
SIGNAL
Displays the received
signal strength.
/
Changes channels.
Moves the cursor to the
up/down menu option.
INFO
Displays the program
information box in the
screen.
EXIT
Exits a menu.
MENU
Opens up the menu or
return to the previous
menu.
/
Increases or decreases
the volume.
Moves the cursor to the
left/right menu option.
AUDIO
Changes the audio.
EPG
Displays the simple TV
Program guide.
CC
Chooses Close
Caption.
ATSC TV RECEIVER
ENTER
ENTER
Enters and confirms
any data to the STB
in the menu system.
This key is used
to select the item.
Press while viewing
TV, the name and
number of channels
is displayed.
When using the remote control, aim it at remote control sensor window on the unit, If there is an
object between the remote control and the signal remote control sensor window on the unit, the
remote control may not operate.
Note: When using the remote control, please note:
Do not strike or drop the remote. Do not expose the remote control to liquids and do not place it
in humid environments.
Do not install or place the remote control in direct sunlight. The heat may damage the remote
control.
If the remote control sensor window on the unit is in direct sunlight or strong light, the remote
control may not operate normally. In this situation, change the light source or read just the angle
of your unit, or operate the remote control from a location closer to the remote control sensor
window on the display.
Batteries
You will need to install the supplied batteries into the remote control to make it operate
following the instructions below.
1. Open the lid of the remote control battery compartment.
2. Insert two size-AAA batteries.
Ensure that the batteries are inserted with the positive
and negative terminals in the correct direction
corresponding to the (+) and (-) marks in the battery
compartment.
3. Install the lid of the remote control battery compartment.
Notes on Using Batteries
RATIO
Changes the display
aspect ratio.
DASH
Auxiliary select channel.
5
The use of the wrong type of batteries may cause chemical leaks and/or explosion. Please note
the following:
Always ensure that the batteries are inserted with the positive and negative terminals in the
correct direction as shown in the battery compartment.
Different types of batteries have different characteristics. Do not mix different types.
Do not mix old and new batteries. Mixing old and new batteries will shorten battery life and/or
cause chemical leaks from the old batteries.
When batteries fail to function, replace them immediately.
Chemicals which leak from batteries may cause skin irritation. If any chemical matter seeps out
of the batteries, wipe it up immediately using a dry cloth.
Due to varying storage conditions, the battery life for the batteries included with your unit may
be shortened. If the remote control is not used for a long period of time, remove the batteries.
ATSC TV RECEIVER
6
Basic Operation
How To Connect Your Digital TV Receiver
Power On/ Off and Standby
TELEVISION
After the power cord is plugged into a wall outlet, the unit will enter standby mode and the red
indicator will be on.
Turn off the unit
AN TE NN A
Press STANDBY button at the control panel, or
POWER on the remote control once more, and the
unit will turn off.
30 0 OH M
AN TE NN A
AU DI O
VI DE O
STANDBY
Turn on the unit
In standby mode, press STANDBY button at the
control panel on the unit, or POWER button on the
remote control. The unit will turn on and power
indicator will light up in blue before picture appears.
2
Changing Channels
MPI-500
DTV RECEIVER
2A
POWER
Using CH+ /- button on your unit or on the remote
control to sequentially select the TV channels
available in your channel list.
To
Antenna
Using numerical buttons to directly input channel.
Eg. To select channel 8, press 8 button on the
remote control. To select channel 12, press 1
button and then 2 on the remote control. Using
CH+ button to return to the previous channel.
3
Adjusting the Volume
1
Press V+ button on your unit or press VOL+
button on your remote control to increase volume.
The volume indicator will increase in length as
volume rises.
Press V- button on your unit or press VOL- button
on your remote control to decrease volume. The
volume indicator will decrease in length as volume
falls.
Mute setting:
1. Press MUTE button on your remote control
to temporarily cut off the sound.
2. Press MUTE button again, or VOL+/- to
restore the sound.
1. Connect Digital TV Receiver to Antenna
(Required) - Receiver must be connected to either a rooftop or attic installed antenna or a TV top Antenna.
NOTE - If your Antenna connection is a Twin-Lead wire, you must purchase a 300 Ohm to 75 Ohm Transformer.
Screw the Twin- leads onto the Transformer, then carefully plug the Transformed into the RF-IN Connection
on the Rear of the MPI-500 Digital TV Receiver.
2. Connect Digital TV Receiver to Television
Attach included RF connector cable to the RF OUT Connection on the Rear of the Digital TV Receiver
Attach the other end of the RF Cable to the Antenna IN Connection on the rear of your Television.
NOTE - If your Television is of an older type that does not have a round COAX connection, but instead has two
300 Ohm Screw Terminals, you will need to purchase a Balun Transformer. Attach it to the screw leads on the
Television, and then attach the RF Cable to the other side of the Balun
VOL+/-
TV sound Mode Selection
2A. Composite AV connection
Press AUDIO button to select Digital TV
Sound mode.
Note: Items available will depend on the TV
sound system being broadcasted.
For BEST PICTURE results, connecting the Receiver to a TV (That is equipped) Composite AV is recommended
(Consult your Television Owners Manual for location, connections and Input Selection Feature to use such Signal Inputs.)
3. Connect Digital TV Receiver to Power Outlet
Connect the External Power Adapter Pak to the Read POWER IN port on the MPI-500 Digital TV Receiver FIRST.
Connect AC Cord end of External Power Pak to AC Wall Outlet ( Microprose Recommends using a Surge Protector Power Strip.)
ATSC TV RECEIVER
CH+/-
7
ATSC TV RECEIVER
AUDIO
8
Menu Tree
Display Program Information
While viewing a program, press INFO button to display
program information and press EXIT button to exit
from this function.
INFO
Channel Scan
Channel Add
Channel Edit
Manual Scan
Channel
Current Time
Time Zone
Clock
Adjusting Aspect Ratio
Press RATIO button on your remote control to select
the image aspect ratio you prefer.
RATIO
Aspect Ratio
Set by program
Letter box
cropped
squeezed
Language
English
Spanish
French
Press the button several times to cycle through various
ratios.
Signal State
SIGNAL
English
Spanish
French
ACC
DCC
DCC Service
DCC View
CC
Font Size
Font Type
Text Color
Text Opacity
BG Color
BG Opacity
Edge Color
Edge Type
Sleep Mode
off
1 hour
2 hour
4 hour
8 hour
Press SIGNAL button to display the received signal strength.
Audio Language
Option
Caption Select
Subtitle On/ Off
Press CC button to display among CC1-4,
Text1-4 and off.
Press EXIT to exit the subtitle.
Viewing the EPG( Electronic Program Guide ) information
The Unit supports EPG function. You can press EPG
button to navigate all TV programs you had saved.
This function depends on program service support.
Output Channel
Lock System
EPG
Lock
Auxiliary Channel Selection
Password
While viewing TV, press DASH button and then enter
your desired channel number and station number for
your wanted program.
TV Rating-Children
DASH
ATSC TV RECEIVER
Set Password
Block Channel
TV Rating-Children
9
ATSC TV RECEIVER
On
Off
Age
Fantasy Violence
Age
Dialogue
Language
Sex
Violence
10
Using the On-Screen Display(OSD) Menu
Manual Scan
1. Press or ENTER on the menu Manual Scan.
2. Press or to move to the specific channel.
3. You can view the signal strength meter to help you
adjust your antenna system.
4. Press ENTER to add or delete the channel on your
channel list.
5. Press ENTER or MENU to return to the previous menu.
1. Press MENU button to display the OSD menu.
2. Press MENU or EXIT to close the menu.
3. Use the or to highlight the desired content.
4. Use to scroll down to a corresponding
function.
5. If no buttons are pressed, the menu closes
automatically after 60 seconds.
6. Use or to scroll through to a corresponding
function.
Option Menu
Clock
Channel Menu
Channel Scan
1. Press in the CHANNEL icon.
2. Press or ENTER to start channel scanning
automatically.
3. If you want to stop the Channel Scan during
scanning, press MENU or ENTER.
4. When Channel Scan is done, Completed
Channel Scan screen will appear.
5. Press ENTER or MENU to return to the previous
menu.
Channel Add
1. The current time will be automatically set by DTV
channel.
2. The correct time zone must be set for all other
functions to work properly (Guide, Info, Channel
banner, etc)
3. Press or ENTER on the menu Clock to highlight
the Time Zone icon.
4. Press or to change the area you are in.
5. Time zone sequence :
Eastern
Central
Mountain
Pacific
Alaska
Hawaii
New F. Land
Atlantic
6. Press ENTER or MENU to return to the previous menu.
Aspect Ratio
1. Go to Channel Add using or .
2. Press or ENTER to start adding the channels.
3. If a channel is already scanned by Channel Scan,
or stored in channel list, it skips that channel.
4. If you press MENU or ENTER to stop this
operation, the Canceled Channel Add screen will
appear.
5. Press ENTER or MENU to return to the previous
menu.
1. Press or ENTER on the menu Aspect Ratio to
select the display mode.
2. Press or to select an available mode.
3. According the highlighted mode, the display
format will be changed.
4. Press ENTER or MENU to return to the previous
menu.
Channel Edit
Language
1. Press or ENTER on the menu Channel Edit.
2. Press or to move to the desired channel.
3. Press ENTER to add or delete the channel on your
channel list.
4. Press ENTER or MENU to return to the previous
menu.
ATSC TV RECEIVER
1. Press or ENTER on the menu Language to
change the menu language display.
2. Press or to select a menu language.
3. According the highlighted language, all the menu
display will be changed.
4. LGDT1111 supports :
English, Spanish, and French.
5. Press ENTER or MENU to return to the previous
menu.
11
ATSC TV RECEIVER
12
Audio Language
Sleep Mode
1. Press or ENTER on the menu Audio Language
to select an available audio language.
2. Press or to select your default language.
3. Press ENTER or MENU to return to the previous
menu.
* If there are other audio languages, then the
primary audio language of the channel will
be heard.
Caption Select
1. Go to Sleep Mode using or .
2. Press or ENTER to select Sleep Mode Options.
3. Select Off to turn off Automatic Sleep.
4. Select appropriate time to automatically turn off TV.
5. Press ENTER or MENU to return to the previous
menu.
Output Channel (Optional)
1. Go to Caption Select using or .
2. Press or ENTER to select Caption Options.
3. Go to ACC if you want to display EIA-608 Caption.
4. Go to DCC if you want to display EIA-708 Caption.
5. Select Standard to see DCC.
6. Select Custom, if you want to customize DCC look
on DCC View Menu.
7. Press ENTER or MENU to return to the previous
menu.
1. Go to Output Channel using or .
2. Press or ENTER to select Output Channel Options.
3. Select appropriate channel to TV.
4. Press ENTER or MENU to return to the previous
menu.
Lock Menu
1. Press MENU button.
2. Press or button on remote control to highlight the LOCK icon and press
prompt window will appear.
button. Password
3. Enter your 4-digit Password by pressing the NUMBER button on the remote control. The
default code is 0000 and the MAGIC code is 7777.
DCC View
4. If you enter Magic code, New Password prompt menu will appear.
Enter and re-enter your new 4-digit password by pressing the NUMBER button on the remote
control.
1. If DCC Custom Mode is selected, .
2. Press or ENTER to select DCC View Options.
3. Go to Font Size if you want to change font size of
DCC Font.
4. Go to Font Type if you want to change font type of
DCC Font.
5. Go to Text Color if you want to change text color of
DCC Font.
6. Go to Text Opacity if you want to change text opacity
of DCC Font.
7. Go to BG Color if you want to change background
color of DCC Font.
8. Go to BG Opacity if you want to change background opacity of DCC Font.
9. Go to Edge Color if you want to change edge color of DCC Font.
10. Go to Edge Type if you want to change edge type of DCC Font.
11. Press ENTER or MENU to return to the previous menu.
ATSC TV RECEIVER
13
ATSC TV RECEIVER
14
Lock System
TV Rating - General
1. Press or button on the remote control to
highlight Lock System and press ENTER or
button to change setting.
1. Press or button on the remote control to
highlight TV Rating - General and press ENTER
or button to change setting.
2. Press or button on the remote control to highlight
Age, Dialogue, Language, Sex or Violence, and
press ENTER or button to change setting. Blocking
menu window will appear.
3. Press or button on the remote control to select
block level or unblocking.
2. If you want to use the rating control, On should
be checked. Or If you do not want to use the
rating control, Off should be checked.
Set Password
1. Press or button on the remote control to
highlight Set Password and press ENTER or
button to change setting. Password prompt
menu will appear.
2. Enter and re-enter your new 4-digit password
by pressing the NUMBER button on the remote
control.
Block Channel
1. Press or button on the remote control to highlight
Block Channel and press ENTER or button to
change setting. Antenna Channels menu will appear.
2. Press or button on the remote control to highlight
channel and press ENTER button to block or unblock
channel.
TV Rating - Children
1. Press or
ENTER or
2. Press or
ENTER or
3. Press or
button on the remote controller to highlight TV Rating - Children and press
button to change setting.
button on the remote controller to highlight Age or Fantasy Violence and press
button to change setting. Blocking menu window will appear.
button on the remote control to select block level or unblocking.
ATSC TV RECEIVER
15
ATSC TV RECEIVER
16
FCC Customer Information
Trouble Shooting
This device complies with Part 15 of the FCC Rules. Operation is subject to the following two
conditions: (1) this device may not cause harmful interference, and (2) this device must accept
any interference received, including interference that may cause undesired operation.
Responsible Party:
Microprose Systems, LLC.
1209 Orange Street
Wilmington, DE 19801
1-888-694-7265
Trade Name: Microprose
Type of Equipment: Digital Television Receiver
Model No. MPI-500
MPI-500.
Federal Communications Commission (FCC): This equipment complies with Part 15 of the
FCC rules.
This equipment generates, uses, and can radiate radio frequency energy and, if not installed
and used in accordance with the instructions, may cause harmful interference to radio
communications. However, there is no guarantee that interference will not occur in a particular
installation. If this equipment does cause harmful interference to radio or television reception,
which can be determined by removing and applying power to the equipment, the user is
encouraged to try to correct the interference by one or more of the following measures:
MPI-500
Reorient or replace the receiving antenna.
Increase the separation between the equipment and receiver.
Connect the equipment into an outlet on a circuit different from that which the receiver is
connected.
Consult the dealer or an experienced radio / TV technician for help.
Shielded cables must be used with this unit to ensure compliance with the Class B FCC limits.
CAUTION: Changes or modifications not expressly approved by the manufacturer responsible
for compliance could void the user
ATSC TV RECEIVER
17
ATSC TV RECEIVER
18
Specification
Receiver Input
Signal In
Item
Input Frequency Range
RF Connector Type
Modulation Format
Channel Bandwidth
Video Decoder
Audio Decoder
Specification
54 MHz ~ 807 MHz
F Female Type
8VSB,QAM
6MHz
MPEG-2 MP@HL
Dolby AC3 2 Channels,MPEG Audio
Receiver Output Item
Video output
Video
Aspect Ratio
Video Format
Sampling frequency
Audio
Analog Audio output
Digital Audio output
Specification
Composite(RCA) x1
Set By Program,Letter Box,Cropped,Sequeezed
NTSC
32, 44.1, 48KHz
L/R(RCA) 2Ch
N/A
General
Power supply
Specification
~100-240VAC, 50/60Hz
DC 6V / 1.5A
max 10Watts
255(L)x208(W)x42(H)mm
0.9kg
Dimension
Item
Adaptor input Voltage
Adaptor output
Consumption
Size
Weight
ATSC TV RECEIVER
19