1
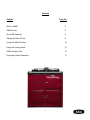
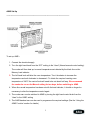
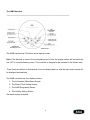
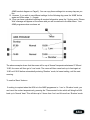
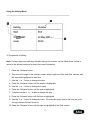
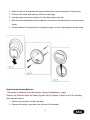
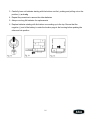
A.I.M.S AGA Intelligent Management System Step by Step User Instructions www.aga.ie Contents Chapter Page No. What is AIMS? 3 AIMS Set-Up 5 The AIMS Handset 6 Setting the Date & Time 8 Using the AIMS Function 10 Using the Holiday Mode 12 AIMS Handset Care 14 Frequently Asked Questions 17 2 What is AIMS? ________________________________________________________________ The AGA Intelligent Management System is a sophisticated programme, which allows you to adjust the output of your AGA, to suit your way of life. In short, it means that your AGA can sleep when you sleep and only operate at normal power when you need it. It comes fitted with all 13amp electric heat storage models and it is operated by a beautifully simple and exquisitely stylish remote control handset. Using the innovative hand-held remote controller, AIMS allows you to easily pre-programme your AGA on a daily, weekly, or even yearly basis, with complete flexibility. Normal Ready when you are. Although the AIMS programme is extremely flexible, for ease of use it is supplied pre-set, with two active periods each day. In this mode, your AGA will be at normal temperature ready to cook breakfast in the morning, drop down to a lower temperature during the day and then return to normal temperature ready to prepare dinner in the evening. After dinner, the system automatically enters ‘Slumber’ mode – its lowest temperature. Low However, you can programme your 13amp Heat Storage AGA to perform exactly as you need it. For those days when you are not planning on using your AGA in the morning for example, you can over-ride the default setting and choose two completely different cooking times. Alternatively, you could of course, have it running at normal temperature all day, for example if you were planning a lot of baking or wanted to raise the ambient temperature of the kitchen over a winter weekend. Slumber Holidays, business trips, sabbaticals, long weekends – a 13amp AGA can be set to ‘Slumber’ at the lowest energy level (or switched off completely) before automatically restarting ready for your arrival home. Within this mode, settings can be programmed for any duration from a day, a week, a month or even a year if necessary. 3 A Better Way of Life The AIMS system is available on all 13amp Electric Heat Storage AGAs and can be controlled to match your individual needs. There are three models to choose from, a 2-oven, 3-oven and 4-oven, all available in a choice of fourteen colours. It all depends on what you need, but each model can provide a modern answer to a modern way of living, including highly versatile ovens, with no need for a flue and just a simple service once every five years. If you already own a 13amp Electric AGA without an AIMS system, you to can benefit from its extensive features as the AIMS system can be retrofit to all existing 13amp models. Drop into your local AGA specialist today or visit www.aga-web.co.uk for more information. 4 AIMS Set-Up ________________________________________________________________ To set up AIMS – 1. Connect the electrical supply 2. Turn the right hand knob from the ‘OFF’ setting to the ‘Hand’ (Normal manual control setting). The cooker will then heat up to normal temperature as indicated by the black line on the Mercury heat indicator 3. The left hand knob will alter the oven temperature. Turn it clockwise to increase the temperature and anti-clockwise to decrease it. To obtain the required roasting oven temperature of 240˚C the control knob will need to be set about half way. We recommend the cooker be run on the Manual setting for two days, before switching to AIMS 4. When the normal temperature has been set with the heat indicator, it should no longer be necessary to alter the temperature control again 5. The cooker can now be switched to AIMS by turning the right hand control knob from the ‘Hand’ to the ‘AIMS’ setting 6. The AIMS handset can now be used to programme the required settings (See the ‘Using the AIMS Function’ section for details) 5 The AIMS Handset ________________________________________________________________ The AIMS handset has 10 buttons and a display screen. Note: If the handset is unused for an extended period of time, the display screen will automatically turn OFF to conserve battery power. The controller is designed to be operated in the kitchen area. Press firmly any button on the handset to turn the display back on, and the main menu screen will be displayed automatically. The AIMS controller has four display screens: 1. The Information (Main Menu) Screen 2. The Date & Time Setting Screen 3. The AIMS Programme Screen 4. The Holiday Setting Screen See each section for details. 6 The Information (Main Menu) Screen To bring up the ‘Main Menu’ screen press firmly on the ‘i’ button and the following should appear. When the oven ‘Vent Fan’ button is pressed, the fan will be switched on and a blue light will appear on the Main Base Station. This is also the best way to test if the handset is communicating with the Base Station correctly. Press the ‘Vent Fan’ button again to turn the fan off and the blue light will disappear. 7 Setting the Date & Time ________________________________________________________________ To Set the Date and Time - Note: If at any stage you make any mistakes during this process, use the ‘Back Arrow’ button to return to the relevant area and re-enter the correct information. 1. Press the ‘Clock’ button 2. The view will change to the Date and Time ‘Settings’ screen and the date will be highlighted in dark blue 3. Using the ‘+’ or ‘-‘ button, cycle through the numbers until you get to the correct date e.g. 15th 4. Press the ‘Clock’ button again until the month is highlighted 5. Again using the ‘+’ or ‘-‘ button change the month to the correct month 6. Press the ‘Clock’ button again until the year is highlighted 7. If needed use the ‘+’ or ‘-‘ button to change the year 8. Press the ‘Clock’ button again until the time is highlighted 9. Use the ‘+’ or ‘-‘ button to change the time. This may take some time as the clock will cycle through minutes followed by hours 10. Press the ‘Clock’ button again until the day is highlighted 11. Use the ‘+’ or ‘-‘ button to change the day to the correct day e.g. Tuesday 8 12. Finally press the ‘Clock’ button once again to store the new information. A ‘Please Wait’ message will appear and then it will go back to the main screen and the alterations should be displayed. The date and time are now set 9 Using the AIMS Function ________________________________________________________________ AIMS can be set with one or two daily events. The two events programme will enable the AGA to be at ‘Normal’ in the morning (i.e. to cook breakfast) drop to a lower temperature during the day and return to ‘Normal’ temperature in the evening (i.e. to cook dinner) and drop to ‘Slumber’ later in the evening and throughout the night. The one event programme will enable the AGA to drop to ‘Slumber’ during the night and return to ‘Normal’ throughout the day. This will be shown as ‘Once’ or ‘Twice’ on the AIMS programme screen (1). The ‘Normal’ temperature for the two events can be set using the cooker thermostat (See AIMS Set-Up section for details). The modes in between the events can be set to ‘Low’ or ‘Slumber’ depending on personal preference. To set your AIMS system – Note: If at any stage you make any mistakes during this process, use the ‘Back Arrow’ button to return to the relevant area and re-enter the correct information. 1. Press the ‘AIMS’ button 2. The ‘AIMS Program’ screen will be displayed with the event programme frequency highlighted in dark blue 3. If required use the ‘+’ or ‘-‘ button to change to ‘Once’ or ‘Twice’ daily events 4. Press the ‘AIMS’ button until the first event time is highlighted 5. Use the ‘+’ or ‘-‘ button to change the start time of the first event i.e. the time you want the cooker to be at ‘Normal’ heat to cook breakfast 6. Press the ‘AIMS’ button until the end first event time is highlighted 7. Use the ‘+’ or ‘-‘ button to change the end time of the first event 8. Press the ‘AIMS’ button again until the temperature is highlighted 9. Use the ‘Thermometer’ button to change the temperature the cooker will drop to after the first event. You can choose between ‘Low’, ‘Slumber’ and ‘Off’ Note: If you only programmed one event please jump to Step 14 for further instructions, otherwise please continue 10. Press the ‘AIMS’ button again until the second event time is highlighted 11. Repeat steps 5 – 9 for the second event 12. At this stage you can copy the information you have input to the following day rather than having to program the handset again. This can be done by pressing the ‘Copy’ button (See 10 AIMS handset diagram on Page 6). You can copy these settings into as many days as you like 13. However, if you wish to use different settings for the following day press the ‘AIMS’ button again and follow steps 1 – 9 again 14. Once you have completed inputting all required information press the ‘i’ button and a ‘Please Wait’ message will appear on the screen and you will be returned to the Main Menu. Your AIMS programme has now been set The above example shows that the ovens will be up at ‘Normal’ temperature between 07:00 and 10:00; the ovens will then go to ‘Low’ mode. The ovens will then come back up to heat again at 16:00 until 19:00 before automatically entering ‘Slumber’ mode, its lowest setting, until the next morning. To use the ‘Boost’ feature – If cooking is required when the AGA is in the AIMS programme i.e. ‘Low’ or ‘Slumber’ mode, you can boost the cooker temperature by pressing the ‘Thermometer’ button which will bring the AGA back up to ‘Normal’ heat. This will take up to 2 hours from ‘Low’ and 4 hours from ‘Slumber’ mode. 11 Using the Holiday Mode ________________________________________________________________ To Programme a Holiday - Note: If at any stage you make any mistakes during this process, use the ‘Back Arrow’ button to return to the relevant area and re-enter the correct information. 1. Press the ‘Suitcase’ button 2. The view will change to the ‘Holiday’ screen which is split into ‘Start’ and ‘End’ columns with the start date highlighted in dark blue 3. Use the ‘+’ or ‘-‘ button to change the date 4. Press the ‘Suitcase’ button until the month is highlighted 5. Use the ‘+’ or ‘-‘ button to change the month 6. Press the ‘Suitcase’ button until the year is highlighted 7. If needed use the ‘+’ or ‘-‘ button to change the year 8. Press the ‘Suitcase’ button until the time is highlighted 9. Use the ‘+’ or ‘-‘ button to change the time. This may take some time as the time will cycle through minutes followed by hours 10. Press the ‘Suitcase’ button until the date is highlighted in the ‘End’ column 12 11. Repeat steps 3 -9 for the ‘End’ column 12. Press the ‘Suitcase’ button again to store the new information. A ‘Please Wait’ message will appear and then it will go back to the main screen. ‘Holiday Enabled’ should now appear at the bottom left corner of the screen on your AIMS handset To Cancel a Holiday - 1. When the ‘Holiday Enabled’ message is visible on the main screen, press the ‘Suitcase’ button 2. The view will change to the ‘Holiday’ screen and display your current holiday ‘Start’ and ‘End’ times (You can use this opportunity to adjust your set time and dates here if you wish, following the procedure from the beginning of this section.) 3. If you wish to cancel your current holiday settings press the ‘i’ button 4. You will then be asked if you want to ‘Cancel Holiday?’ and ‘No’ will be highlighted in dark blue. If you do not wish to cancel your holiday at this time just press the ‘i’ button again and you will be returned to the main screen and ‘Holiday Enabled’ will still be visible 5. If you are certain you want to cancel your holiday, press the ‘Suitcase’ button again until ‘Yes’ is highlighted in dark blue 6. Finally press the ‘i’ button and ‘Please Wait’ will appear briefly before you are returned to the main screen and the ‘Holiday Enabled’ message should now be gone. Your holiday has now been cancelled In the event of a power cut – If mains power is lost or disconnected for more than 15 minutes, when the power is restored the handset will display a ‘Power Cut’ message. Press the ‘i’ button to select ‘OK’. This will send the correct Date & Time settings to the Base Unit. 13 AIMS Handset Care ________________________________________________________________ Operating Distance The handset will only operate in the same room as the AGA and up to a maximum distance of 4 metres from the base unit. If out of recommended range, the handset may show ‘OFFLINE’. Move handset back to within the recommended distance and the handset should correct itself. Cleaning The handset should be wiped clean with a soft cloth. DO NOT USE ABRASIVE CLEANING PRODUCTS OR SUBMERGE HANDSET IN WATER. Handset Failure In the event of handset failure, the appliance would still be operational with the last selected programme. The appliance can also be changed to ‘Manual’ mode if required using the control knob on the Base Unit. If the handset is damaged or lost, replacement can be obtained from AGA and reprogrammed to suit your appliance. Call 01-4136466 and ask for AGA Service to order replacement handsets. Handset to Base Unit Signal Check Follow the following procedure to check the handset is communicating with the Base Unit correctly – 1. Press the oven ‘Vent Fan’ button on the control panel and hold down for 5 seconds 2. On release of the ‘Vent Fan’ button the blue neon light on the control panel should flash 3. Immediately press the ‘+’ and ‘-‘ buttons together on the handset until the blue light goes out completely 4. If the light does not go out repeat the above steps again Using the Handset Wall Mount The handset can be wall mounted as follows: 1. Remove the back plate from the rear of the handset by sliding down with the hand and away from the handset 14 2. Select the site for the handset and use the back plate to mark the position of fixing holes 3. Drill 6mm dia. holes with masonry drill for the raw plugs 4. Use raw plugs and screws supplied to fix the back plate to the wall 5. Stick the round self adhesive label supplied to the inside of the back plate to cover the screw heads 6. Fix the handset to the back plate by locating the tag on to slot in back plate as shown below Replacing the Handset Batteries The handset is fitted with four AAA batteries. Battery life depends on usage. Replace the batteries when the battery symbol on the handset is down to one bar following the instructions below: 1. Remove the handset from the back plate 2. Remove the battery cover plate from the rear of the handset 15 3. Carefully lever out batteries starting with the bottom one first, pushing and pulling out on the positive (+) end only 4. Repeat the procedure to remove the other batteries 5. Always use long life batteries for replacements 6. Replace batteries starting with the bottom one working up to the top. Ensure that the negative (-) end of the battery is under the location pegs in the housing before pushing the other end into position 16 Frequently Asked Questions ________________________________________________________________ How long do I need to calculate to get the AGA up to heat? There is no need to calculate a heat up time for an AGA, as AIMS calculates itself, (hence the intelligent part) so you just need to program the time you want to start cooking, AIMS will do the rest. Can my AGA have AIMS retrofit? AIMS can be fitted to all previous 13amp models provided they are extended vent models – not centre shroud. Do I need an engineer to reprogram my replacement remote control? The engineer is certainly capable of reprogramming the handset, but the customer can do it themselves. The instructions for doing so are in the owner’s manual, delivered with the cooker or via the Technical Library on www.aga-web.co.uk (under Existing Owners). Go to the appropriate AGA instructions and read the Handset to Base Unit Signal Check. Alternatively see the ‘AIMS Handset Care section of this manual. Does the engineer set up my AIMS programmes? The engineer is certainly able to, however the handset is easy to program and the customer can set it to suit their particular or ever-changing lifestyle. Can I use AIMS straight away? Although the handset can be programmed immediately after the AGA is commissioned we recommend 48 hours pass before switching from manual to AIMS. This is to allow the cooker to reach full heat storage, where the Mercury is up to the black line on the indicator. What do I do if I come home early and decide I want to use the AGA at normal heat? If the AGA is on a low mode, which is between normal settings, then the customer can do one of two things: 17 Press the ‘Thermometer’ button on the handset to bring up the ‘Boost’ function. This will over-ride the current AIMS programme and will bring the cooker up to normal working temperature. To remove the boost function, simply press the ‘Thermometer’ button again. OR turn the control switch on the Base Unit to Manual – but remember to turn it back to the AIMS programme afterwards. The AGA may take up to 2 hours from ‘Low’ dependant on the state of the programme to reach full heat. However, most foods could be started off before the 2 hours elapses. The Boiling Plate will get hotter first, followed by the ovens. How do I know when the batteries are low? The battery life is shown in the top-centre area of the Main Screen of the handset. 3 dark bars indicate a full battery. Battery life depends on usage but batteries should be changed when the indicator is down to one bar. What happens if the batteries fail? If the batteries run out, do not worry, the memory settings for the cooker are contained in the Base Station. Just put 4 x new AAA batteries and the handset will soon show the correct settings. Does AIMS automatically change when the clocks change? No, the handset will need to be reprogrammed each time the clocks change (the handset will be used in different countries other than the UK so local differences are better accounted for by the customer resetting their own handset). The handset does not use ‘real time’ technology. Does AIMS account for a leap year? No, the handset will need to be reprogrammed. What happens if there is a power cut? The Base Station memory of the time of day will be affected. With regard to the handset, the time and date settings will require re-setting dependant on how long the cooker has been without power. 18 Is the handset covered by the 5 year warranty? The handset is covered by general AGA 5 year warranty, apart from consumable parts (batteries). If the handset is dropped or damaged by the customer this is not covered. How much does AIMS save on the electricity bill? Electric tariffs vary considerably, dependant on supplier. However, our field trials have told us using two ‘Normal’ periods with ‘Low’ in between and ‘Slumber’ overnight that they saved about 20% on their fuel bill. 19