1
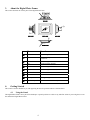
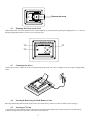
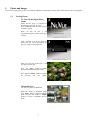
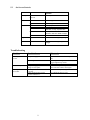
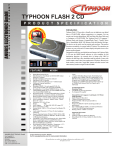
Model NV-560
User Manual
Table of Contents
1.
2.
3.
4.
4.1
4.2
4.3
4.4
5.
5.1
5.2
6.
7.
Introduction............................................................................. 3
Package Contents .................................................................... 3
About the Digital Photo Frame ............................................... 4
Getting Started ........................................................................ 4
Using the Stand ................................................................... 4
Mounting the Frame on the Wall ........................................ 5
Connecting the Power ......................................................... 5
Inserting & Removing the Flash Memory Cards................ 5
Photos and Images .................................................................. 7
Viewing Photos................................................................... 7
On Screen Controls ............................................................. 9
Troubleshooting ...................................................................... 9
Specifications........................................................................ 10
2
1.
Introduction
Congratulations! You are the proud owner of a NuVuetm Digital Picture Frame. Boasting high-quality image resolution the NuVuetm is the
perfect product for displaying your favorite digital photos. With its ease of use and configuration, you can now display all your favorite
pictures for everyone to see!
Safety Instructions
2.
Package Contents
Before using the NuVuetm, be sure to check all the accessories contained in the package. NuVuetm comes with the following items:
1.
NuVuetm unit with desktop stand
2.
A.C. Power Adapter
3.
User Manual
3
3.
About the Digital Photo Frame
This section describes the various parts of the Digital Photo Frame.
6
5
4
3
2
1
7
9
8
10
4.
Items
Functions
c
d
Power / Menu
Turn the Digital Photo Frame on and off.
Enter
Press to display menu or to confirm a setting
or function
e
f
g
Forward
Used to navigate forwards.
Up
Used to navigate upwards.
Down
Used to navigate downwards.
h
i
j
Back
Used to navigate backwards.
CF Card Slot
Slot for CF card.
3 in 1 Card Slot
Slot for SD/MMC/MS
k
l
Desktop Stand
Placing the Digital Photo Frame on a desk..
DC In Receptacle
Power Connection to the adaptor.
Getting Started
This section is used to familiarize you with preparing the unit for operation and use as defined below.
4.1
Using the Stand
The Digital Photo Frame can be placed in a landscape or portrait position on a desk or any other flat surface by removing the screw on
the stand of the Digital Photo Frame.
4
Remove the screw
4.2
Mounting the Frame on the Wall
Digital Photo Frame can also be mounted on the wall in landscape or portrait position by placing the hanging holes “A” at the rear
housing of Digital Photo Frame over the screw or nail in the wall.
'A'
'A'
'A'
4.3
Connecting the Power
Connect the AC Power Adapter to the AC wall outlet and plug the other end of the AC adapter to the DC-In jack of Digital Photo
Frame.
4.4
Inserting & Removing the Flash Memory Cards
Removing and inserting different multi-media cards is convenient and easy. Please see below for details for each card type.
4.5
Inserting a CF Card
1. Position the CF card so that the pin-hole connections are facing the bottom flash memory card slot. Place the card label side up.
2. Slide the card gently into the slot until it seats in the bottom of the slot.
5
4.6
Inserting Other Types of Cards (SD/MMC/MS )
1. Position the SD/MMC/MS cards so that the pin hole connections are
facing the bottom flash memory card slot. Place the card label side up.
2. Slide the card gently into the slot until it touches the bottom.
4.7
Removing a Memory Card
To remove a memory card, gently pull the card out of the slot.
6
5.
Photos and Images
You can view single images or play in a continuous slideshow as noted below. Images must be JPEG format to be viewed properly.
5.1
Viewing Photos
To Turn On the Digital Photo
Frame
Ensure that the power is connected as
described in Connecting the Power.
Press the Power button for three seconds
to turn the unit On.
When you turn On unit, it will
automatically display a splash screen while
booting.
After 3 seconds, if you do not insert any
media card, the screen will display the
message “Please insert media card”
When you insert the media card, it will
auto play from the card.
Press the “ Enter ” button to change
between Manual and Slideshow mode.
Press “Up” and “Down” buttons to display
the
previous
and
next
photos.
Thumbnail View
You can view photos as thumbnails.
While the display in Slideshow mode,
press “Enter” button to change to Manual
mode and press the “Left” or “Right”
buttons to switch to thumbnail preview
mode.
7
While the display is in thumbnail preview
mode,
Press the “Enter” button to change to
Slideshow mode.
Press the “Up” or “Down” buttons to
select the previous or next page to view
more photos.
Press the “Menu” button to activate the
OSD (On Screen Display) Mode.
To power Off the Digital Photo
Album
Press the “Power” button for about three
seconds to turn it off. A screen showing the
machine shutting down is displayed.
POWER OFF..
8
5.2
On Screen Controls
OSD Menus Sub-Menus
Description and Function of
Operation
Slide Speed 5s / 10s / 30s / 60s / 1hr / Select Speed of Slide Show
8hrs / 1d
Rotate image counter-clockwise 90
Photo Rotate Left
Right
Rotate image clockwise 90
Off
No display of “EXIF” information
Camera
Display camera make, camera model,
date taken, F-stop, exposure time
Basic
All
Memory source--SD/ MMC/ CF/ MS
Filename / File size / Width x Height
Camera + Basic
Brightness
Brightness Bar
As it towards to the right, it get brighter
Contrast
Contrast Bar
As it towards to the right, it get
stronger
Problem
Possible Causes
What to do
No display on LCD
screen.
No power supply
Check the connection of AC adaptor and the
unit.
LCD Brightness might be at min level,
toggle brightness up switch.
Contact Authorized Customer Care
Disconnect the power adapter from the
amin unit and reconnect back again.
Insert the memory cards again.
Information
Troubleshooting
LCD Brightness at min level.
Abnormal operation
Memory card not
accessible
LCD connector or LCD gone bad
No power supply or abnormal
image on LCD panel
Memory cards are not inserted
correctly.
Faulty flash memory card or
external USB device
9
Use a different memory card.
7.
Specifications
Model
Image Format
Placement support
Control buttons
OSD Language
Media types
Power requirements
Display
Included accessories
Unit Dimension
Weight
Nu Vue 560
Up to 6.6M pixels JPEG photos following EXIF and DCF standards
Landscape , Portrait
6 buttons : Power/Menu, Enter, Up, Down, Left Right
Display mode Automatic slideshow,
Full screen browse,
Thumbnails browse 9 pics,
Slide show interval/speed 5,10,30,60 sec,1 hour, 8 hour, 1 day
Transition mode 16 types
English
CompactFlash TM Card typeI/typeII (CF),
SecureDigital (SD), Multimedia Card (MMC), Memory Stick (MS)
DC 5 V @ 2A
Effective display area 113.28 (w) x 84.704(h) mm, 5.6” diagonal
Vertical dot pitch 0.362 mm
Horizontal dot pitch 0.118 mm
Resolution 320 x 234 pixels
Viewing angle 300:1
AC power adaptor
Quick start guide
Desktop stand
165 (h) x 210 (w) x 35 (d) mm
1 lb.
10
Digital Spectrum Solutions, Inc.
17811 Mitchell North
Irvine, Ca. 92614
www.dsicentral.com
1862-N5-YG-4
11