1
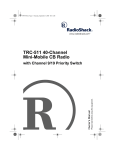
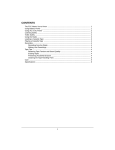
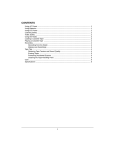
21-1850.RC.fm Page 1 Tuesday, September 19, 2000 3:06 PM
14-Channel FRS Radio
Please read before using this equipment.
Owner’s Manual
Mobile/Marine Use
21-1850.RC.fm Page 2 Tuesday, September 19, 2000 3:06 PM
ˆ Contents
Features .................................................................
FCC Statement ................................................
Mounting the Microphone Holder .....................
Mounting the Radio ..........................................
Vehicle Mounting ......................................
Boat/RV Mounting .....................................
Operation .............................................................
Listening Safely ..............................................
Traffic Safety ...........................................
Selecting a Channel .......................................
FRS Frequencies ....................................
Using the Quiet Feature .................................
Quiet Codes ............................................
3
4
6
7
8
9
10
12
13
13
14
15
16
Care ...................................................................... 17
Replacing the Fuse ........................................ 17
Specifications ...................................................... 19
© 2000 RadioShack Corporation. All Rights Reserved.
RadioShack and RadioShack.com are registered trademarks
used by RadioShack Corporation.
2
21-1850.RC.fm Page 3 Tuesday, September 19, 2000 3:06 PM
ˆ Features
RadioShack welcomes you to the next generation of
personal communication — the Family Radio Service
(FRS). FRS is a new license-free, two-way, shortrange voice radio service that lets families and groups
keep in touch with each other on specific reserved
channels. Your 14-Channel FRS Radio is sealed inside the antenna’s water-resistant, magnetic-mount
base for maximum range. All controls are located on
the microphone for added convenience. Because of
its convenient, compact size, you can mount it in a
vehicle for mobile use, or on a boat for marine use.
Efficient External Antenna — significantly improves
range for car-to-car use providing ranges up to 3
miles.
500 mW — provides the maximum transmit power allowed for a mobile FRS, with 14 channels and 38 quiet codes.
Temperature Stabilized — operates normally even
in extreme temperatures (–4 °F to 122 °F or –20 °C to
50 °C).
Features
3
21-1850.RC.fm Page 4 Tuesday, September 19, 2000 3:06 PM
Handheld Microphone — lets you control all radio
functions and includes a backlit display.
Headset Jack — allows use of an external headset
for hands-free operation.
Versatile Antenna Mount — lets you attach the antenna base to a non-metallic surface for marine or
camper use.
PLL (Phase-Locked Loop) Controlled Circuitry —
provides accurate and stable channel selection.
Quiet Codes (Continuous Tone Control Squelch
System) — reduces interference from other systems
in the area that are operating on the same frequency.
FCC STATEMENT
This equipment complies with the limits for a Class B
digital device as specified in Part 15 of FCC Rules.
These limits provide reasonable protection against radio and TV interference in a residential area. However, your equipment might cause TV or radio
interference even when it is operating properly. To
determine whether your radio is causing the interference, turn it off. If the interference goes away, your
4
Features
21-1850.RC.fm Page 5 Tuesday, September 19, 2000 3:06 PM
radio is causing it. Try to eliminate the interference
by:
• reorienting or relocating the receiving antenna
• increasing the distance between the equipment
and the radio or TV
• moving your radio away from the receiver
• contacting your local RadioShack store for help
If you cannot eliminate the interference, the FCC requires that you stop using the radio.
Important: Do not open your radio to make any internal adjustments. Your radio is set up to transmit a
regulated signal on one of fourteen assigned frequencies. It is against the law to alter or adjust the settings
inside. Adjustments or alterations to the radio must be
made by a qualified technician using the proper test
equipment.
• Never open your radio’s case.
• Never change or replace any radio components.
Features
5
21-1850.RC.fm Page 6 Tuesday, September 19, 2000 3:06 PM
MOUNTING THE MICROPHONE
HOLDER
Caution: Do not mount the radio’s microphone holder
where it could damage or interfere with the operation
of any passive restraint safety device (an airbag or
seat belt).
1. Using the holder as a template, mark the positions for the screw holes.
2. At each marked position, drill a hole slightly
smaller than the mounting screws.
Caution: Be careful not to drill into anything
behind the mounting surface.
3. Mount the holder using the supplied machine
screws, spring washers, plain washers, and nuts.
Microphone
Holder
Washers
Screws
6
Features
21-1850.RC.fm Page 7 Tuesday, September 19, 2000 3:06 PM
Notes:
• If you cannot reach the area behind the
mounting surface to attach the nuts to the
machine screws, use the two supplied 1/8 inch
(3 mm) self-tapping screws and plain washers.
• You can attach the microphone holder using
the supplied double-sided mounting tape.
Caution: If you use double-sided tape to attach
the microphone holder, select a location that is
not exposed to high temperatures.
MOUNTING THE RADIO
For the best reception, place the antenna’s magnetic
mount base as high as possible on top of your vehicle, or boat, in a vertical position and away from any
source of electrical noise.
Note: Choose a non-metallic surface when using
screws to mount the base.
Features
7
21-1850.RC.fm Page 8 Tuesday, September 19, 2000 3:06 PM
Vehicle Mounting
Cautions:
• To reduce the risk of damage to your vehicle’s
finish, read the vehicle manufacturer’s recommendations fully before you use a magnetically–
mounted antenna.
• Be sure the base and contact area are dry before
you place the magnetically mounted antenna on
the car surface.
• Condensation trapped beneath the magnetic
base can discolor the vehicle’s finish. We recommend that you occasionally remove the magnetic
base from the vehicle by tilting the antenna’s
base on its edge. Do not drag it across the vehicle’s surface, as this may scratch the vehicle’s
finish. Use a soft cloth to wipe away any condensation that has formed under the base, then
replace the base.
• New paint must cure for a period of time before
you can place equipment such as a magneticallymounted antenna on the finish. Check with the
vehicle’s manufacturer or whoever painted the
vehicle for their recommendations.
8
Features
21-1850.RC.fm Page 9 Tuesday, September 19, 2000 3:06 PM
Insert the 12V DC cigarette-lighter plug into the vehicle’s cigarette-lighter socket. Place the microphone
on the microphone holder.
Boat/RV Mounting
1. Push from the bottom of the antenna to remove
the rubber plugs from the two screw holes on the
side of the antenna.
Rubber
Plugs
Screw Holes
2. Using the antenna’s base as a template, mark
the position for the mounting screw holes on the
mounting surface.
3. At each marked position, drill a hole slightly
smaller than the supplied mounting screws.
Features
9
21-1850.RC.fm Page 10 Tuesday, September 19, 2000 3:06 PM
4. Mount the antenna base to the mounting surface
using the supplied bolts, spring washers, plain
washers, and nuts.
Note: If you cannot reach the area behind the
mounting surface to attach the nut on the bolts,
use the supplied self-tapping screws and plain
washers to secure the base unit.
5. Insert the 12V DC cigarette-lighter plug into the
cigarette-lighter socket.
6. Place the microphone on the microphone holder.
ˆ Operation
OFF6VOL — Rotate to turn your radio on and off and
adjust its volume.
PTT (Push to Talk) — To transmit, hold down until
appears, then speak into the microphone. Release
PTT when you finish.
10
Operation
21-1850.RC.fm Page 11 Tuesday, September 19, 2000 3:06 PM
OFF6VOL
PTT
SPKR
MIC
MON/
SHIFT
CALL/
LOCK
8/ 9
QUIET
CALL/LOCK — Hold down to sound a ring on all radi-
os tuned to the same FRS channel (and quiet code, if
one is used) as your radio.
Important: The FCC does not allow you to send a
continuous tone for more than 15 seconds at a time
on FRS frequencies. Do not hold down CALL for more
than 15 seconds.
Note: If the radio does not work, hold down CALL
while turning on the radio. The radio resets to channel
1 and quiet code 12, with the quiet feature disabled
(see “Using the Quiet Feature” on Page 16).
QUIET — press to eliminate interference from other radios which are not tuned to the same channel and
quiet code as your radio.
MON/SHIFT — Hold down to turn off auto-squelch and
hear everything happening on a channel, including
Operation
11
21-1850.RC.fm Page 12 Tuesday, September 19, 2000 3:06 PM
weak transmissions. Release MON/SHIFT to turn autosquelch back on.
8/9
9 — Press to select a channel or hold down to
rapidly change channels. The selected channel’s
number appears.
To lock or unlock the keypad, hold down MON/SHIFT
and press CALL/LOCK.
appears. QUIET and 8/
9 will not operate while the keypad lock is on.
Note: BUSY appears any time the radio receives a
signal.
You can connect an optional microphone or speaker
with a 3/32-inch (2.5 mm) mini plug and a 1/8-inch (3.5
mm) plug into the microphone’s SPKR or MIC jacks.
Or, you can connect an optional earphone with a 1/8inch plug to the microphone’s SPKR jack.
LISTENING SAFELY
To protect your hearing, follow these guidelines when
you use an earphone.
• Set the volume to the lowest setting before you
begin listening. After you begin listening, adjust
the volume to a comfortable level.
12
Operation
21-1850.RC.fm Page 13 Tuesday, September 19, 2000 3:06 PM
• Do not listen at extremely high volume levels.
Extended high-volume listening can lead to permanent hearing loss.
• Once you set the volume, do not increase it.
Over time, your ears adapt to the volume level,
so a volume level that does not cause discomfort
might still damage your hearing.
Traffic Safety
Do not use an earphone with your radio when operating a motor vehicle in or near traffic. Doing so can
create a traffic hazard and could be illegal in some areas.
Even though an earphone lets you hear some outside
sounds when listening at normal volume levels, it still
can present a traffic hazard.
SELECTING A CHANNEL
To manually select a channel, press 8 or 9. The selected channel number appears.
To scan through the channels, hold down 8 or 9 for
about 2 seconds. SCAN appears. The radio automatically scans through the channels and stops for about
4 seconds on each active channel. Press any key exOperation
13
21-1850.RC.fm Page 14 Tuesday, September 19, 2000 3:06 PM
cept QUIET to select the desired channel, or press
QUIET to return to the original channel setting.
Once SCAN appears, the radio continues to scan
through channels if you do not press a button.
FRS Frequencies
Channel
Frequency
(MHz)
Channel
Frequency
(MHz)
1
462.5625
8
467.5625
2
462.5875
9
467.5875
3
462.6125
10
467.6125
4
462.6375
11
467.6375
5
462.6625
12
467.6625
6
462.6875
13
467.6875
7
462.7125
14
467.7125
14
Operation
21-1850.RC.fm Page 15 Tuesday, September 19, 2000 3:06 PM
USING THE QUIET FEATURE
The quiet feature eliminates interference from other
radios which are not tuned to the same quiet code as
your radio. When you set a quiet code (1–38) and
turn on this feature, you can only communicate with
users who have a radio set to the same channel and
code as your radio.
1. Hold down QUIET until QUIET appears and the
quiet code flashes.
2. Hold down 8 or 9 until you see the code number you want to use (see “Quiet Codes” on
Page 17).
3. Press QUIET to store the code.
To turn on the quiet feature, press QUIET so QUIET
appears. To turn off the feature, press QUIET so
QUIET disappears.
Note: For the most effective communication, select a
quiet code from 7 to 30. If you select a code outside
that range, you must wait 1 to 2 seconds after holding
down PTT before you start talking.
Operation
15
21-1850.RC.fm Page 16 Tuesday, September 19, 2000 3:06 PM
Quiet Codes
Channel
Frequency
(Hz)
Channel
Frequency
(Hz)
1
67.0
20
131.8
2
71.9
21
136.5
3
74.4
22
141.3
4
77.0
23
146.2
5
79.7
24
151.4
6
82.5
25
156.7
7
85.4
26
162.2
8
88.5
27
167.9
9
91.5
28
173.8
10
94.8
29
179.9
11
97.4
30
186.2
12
100.0
31
192.8
13
103.5
32
203.5
14
107.2
33
210.7
15
110.9
34
218.1
16
114.8
35
225.7
17
118.8
36
233.6
18
123.0
37
241.8
19
127.3
38
250.3
16
Operation
21-1850.RC.fm Page 17 Tuesday, September 19, 2000 3:06 PM
ˆ Care
Modifying or tampering with the radio’s internal components can cause a malfunction and invalidate its
warranty. If your radio is not performing as it should,
take it to your local RadioShack store for assistance.
REPLACING THE FUSE
The DC power adapter’s 2-amp fuse helps protect
your adapter from power surges and short circuits.
When that fuse blows, use the supplied spare fuse or
a 2 amp glass fuse.
Caution: Do not use a fuse with ratings other than
those specified here. Doing so might damage your
adapter.
To replace the fuse:
1. Make sure the adapter is not connected to power
and the radio is turned off.
2. Turn the adapter’s screw cap counterclockwise
to remove it.
Care
17
21-1850.RC.fm Page 18 Tuesday, September 19, 2000 3:06 PM
3. Remove the old fuse and inspect it. If it is not
blown, reinsert it. If it is blown, insert the supplied
spare fuse or a new fuse of the same type and
rating.
4. Reinsert the screw cap and turn it clockwise until
it is secure.
18
Care
21-1850.RC.fm Page 19 Tuesday, September 19, 2000 3:06 PM
ˆ Specifications
Transmitter
RF Output ....................................................... 500 mW ERP
General
Number of Channels ....................................................... 14
RX Frequency Range .................. 462.5625–467.7125 MHz
Power Supply ............................................. 12V DC 500 mA
Operating Temperature ................................... –4° to 122°F
(–20° to 50°C)
Dimensions (HWD)
Microphone ................................ 23/8 × 33/4 × 11/8 Inches
(60 × 95 × 29 mm)
Base Unit ........................33/4 × 13/4 Inches (95 × 44 mm)
Specifications are typical; individual units might vary. Specifications are subject to change and improvement without notice.
Specifications
19
21-1850.RC.fm Page 20 Tuesday, September 19, 2000 3:06 PM
Limited Ninety-Day Warranty
This product is warranted by RadioShack against manufacturing defects in material
and workmanship under normal use for ninety (90) days from the date of purchase
from RadioShack company-owned stores and authorized RadioShack franchisees
and dealers. EXCEPT AS PROVIDED HEREIN, RadioShack MAKES NO EXPRESS WARRANTIES AND ANY IMPLIED WARRANTIES, INCLUDING THOSE
OF MERCHANTABILITY AND FITNESS FOR A PARTICULAR PURPOSE, ARE
LIMITED IN DURATION TO THE DURATION OF THE WRITTEN LIMITED WARRANTIES CONTAINED HEREIN. EXCEPT AS PROVIDED HEREIN, RadioShack
SHALL HAVE NO LIABILITY OR RESPONSIBILITY TO CUSTOMER OR ANY
OTHER PERSON OR ENTITY WITH RESPECT TO ANY LIABILITY, LOSS OR
DAMAGE CAUSED DIRECTLY OR INDIRECTLY BY USE OR PERFORMANCE
OF THE PRODUCT OR ARISING OUT OF ANY BREACH OF THIS WARRANTY,
INCLUDING, BUT NOT LIMITED TO, ANY DAMAGES RESULTING FROM INCONVENIENCE, LOSS OF TIME, DATA, PROPERTY, REVENUE, OR PROFIT OR ANY
INDIRECT, SPECIAL, INCIDENTAL, OR CONSEQUENTIAL DAMAGES, EVEN IF
RadioShack HAS BEEN ADVISED OF THE POSSIBILITY OF SUCH DAMAGES.
Some states do not allow limitations on how long an implied warranty lasts or the exclusion or limitation of incidental or consequential damages, so the above limitations
or exclusions may not apply to you.
In the event of a product defect during the warranty period, take the product and the
RadioShack sales receipt as proof of purchase date to any RadioShack store. RadioShack will, at its option, unless otherwise provided by law: (a) correct the defect
by product repair without charge for parts and labor; (b) replace the product with one
of the same or similar design; or (c) refund the purchase price. All replaced parts
and products, and products on which a refund is made, become the property of RadioShack. New or reconditioned parts and products may be used in the performance
of warranty service. Repaired or replaced parts and products are warranted for the
remainder of the original warranty period. You will be charged for repair or replacement of the product made after the expiration of the warranty period.
This warranty does not cover: (a) damage or failure caused by or attributable to acts
of God, abuse, accident, misuse, improper or abnormal usage, failure to follow instructions, improper installation or maintenance, alteration, lightning or other incidence of excess voltage or current; (b) any repairs other than those provided by a
RadioShack Authorized Service Facility; (c) consumables such as fuses or batteries; (d) cosmetic damage; (e) transportation, shipping or insurance costs; or (f) costs
of product removal, installation, set-up service adjustment or reinstallation.
This warranty gives you specific legal rights, and you may also have other rights
which vary from state to state.
RadioShack Customer Relations,
200 Taylor Street, 6th Floor, Fort Worth, TX 76102
We Service What We Sell
RadioShack Corporation
Fort Worth, Texas 76102
21-1850
63-1185011-A00
09A00
Printed in Hong Kong