1
»
HD-R1
D01047620A
Professional Stereo Audio Recorder
QUICK START GUIDE
Battery Recycling
For European Customers
Disposal of your old appliance
1 When this crossed-out wheeled bin symbol is
attached to a product it means the product is
covered by the European Directive 2002/96/EC.
2 All electrical and electronic products should
be disposed of separately from the municipal
waste stream via designated collection facilities appointed by the government or the local
authorities.
3 The correct disposal of your old appliance will
help prevent potential negative consequences for
the environment and human health.
4 For more detailed information about disposal
of your old appliance, please contact your city
office, waste disposal service or the shop where
you purchased the product.
Recycling the battery
This unit uses a lithium ion battery. Lithium ion
batteries are a valuable, recyclable resource. Before
disposing of this unit, please remove and recycle its
battery.
CAUTION
NEVER TAKE THE UNIT APART FOR ANY PURPOSE OTHER
THAN TO REMOVE THE BATTERY BEFORE DISPOSAL!
1 Remove the eight top panel screws and remove
the top panel.
2 Remove the button-type battery from the unit.
2 TASCAM
HD-R1
Contents
1–Main Functions and Features. ............... 4
2–System Organization.................................. 5
Fundamentals. ...................................................... 5
Audio files............................................................. 5
Non-audio files....................................................... 5
Tracks and files....................................................... 5
Folders.................................................................. 5
Markers................................................................. 5
Playlists................................................................. 5
Settings................................................................. 6
Media considerations. .......................................... 6
File system format. ............................................... 6
3–Preparations for Use................................... 7
Making connections. ............................................ 7
Turning on the power........................................... 8
Inserting the CF card. ........................................... 8
Removing the CF card............................................. 8
Setting the time.................................................... 9
Formatting the CF card......................................... 9
Display screens.................................................... 10
Home Screen........................................................ 10
Menu screens....................................................... 10
Panel lockout. ..................................................... 10
4–Recording. ...................................................... 11
Making settings related to recording................. 11
Standard recording procedures.......................... 13
Other recording functions. ................................. 13
Media capacity and recording............................ 13
5-Playback. .......................................................... 14
Standard playback operations............................ 14
Setting the playback mode................................. 14
Other playback functions. .................................. 14
6–Folders and Playlists................................. 15
Creating new folders. ......................................... 15
Setting the current folder................................... 15
Creating playlists. ............................................... 16
Setting the current playlist. ................................ 16
7–Marker Functions........................................ 17
Setting markers................................................... 17
Locating to markers............................................ 17
Setting marker names......................................... 17
Editing markers................................................... 17
8–System Settings........................................... 18
Meter settings..................................................... 18
Resume mode setting......................................... 18
Shuttle mode setting ......................................... 18
Analog reference level setting............................ 18
Contrast adjustment .......................................... 18
9–Saving settings as a preset................... 19
10–Editing Audio Files.................................. 19
11–Transferring Files. ..................................... 20
Transfer between CF card and USB media......... 20
Transfer between this unit and a computer....... 20
12–Using the Ducking Function............... 21
13–Using External Controllers.................. 21
Using a USB keyboard. ....................................... 21
Using parallel control.......................................... 21
Using serial control............................................. 21
14–Menu Tree.................................................... 22
TASCAM HD-R1
3
1–Main Functions and Features
• Rack-mountable stereo audio recorder for
professional use and installations
• Records uncompressed audio in WAV format or
compressed audio in MP3 format
• High reliability, durability and resistance to
vibration-caused skipping realized by design that
uses Compact Flash memory cards (CF cards) to
record without moving parts
• 192 x 32 pixel LCD display with a backlight
• Direct playback control of tracks 1–16 possible
using 25-pin D-sub parallel remote interface
• USB type A port on the front panel allows file
exchange with USB storage devices and text input
with USB computer keyboards
• Playback control of up to 1023 track possible using
Binary Play mode
• Record and play both uncompressed WAV-format
(16/24-bit) audio files and compressed MP3-format
audio files
• File exchange with a computer and remote control
(FTP and Telnet) are possible using RJ45 Ethernet
interface at 10/100 Mbps
• Handles MP3 files with a variety of bit rates
(64/80/96/112/128/160/192/224/256/320 kbps for
stereo MP3s)
• Supports various playback modes including
playback of a single file, all files on a CF card, all
files in a designated folder, all files in a playlist,
and random playback
• Handles 44.1 kHz /48 kHz /88.2 kHz /96 kHz
sampling rates
• Records in either mono or stereo
• Failsafe mechanism closes recording files every 4
seconds
• Playback and stereo input signals can be mixed and
monitored
• Mic/line inputs (with a 20 dB PAD) and line
outputs use balanced analog XLR connectors
• Euro terminal block input and output
• Unbalanced RCA inputs and outputs (−10 dBV)
• XLR/TRMNL input switch on the back panel and
input level knob on the front panel to adjust the
analog input
• Phantom power switch on the rear panel (indicator
on the front)
• S/PDIF digital input and output
• Standard jack and level knob for headphone
monitoring on the front panel
4 TASCAM
HD-R1
• RS-232C serial control port
• Power On Play function starts playback
automatically when power is turned ON
• Ducking mode with threshold and attenuation
functions
• Adjustable reference level (+15/+18/+20/+22/+24
dBu)
• Auto Marker function sets markers at fixed
intervals (1, 2, 3, 4, 5, 10, 30, 60 minutes)
automatically
• Preference and marker files are saved in XML
format
• Playlist allows various settings, including track
playback order, playback start and end points
for individual tracks, and volume adjustment for
individual tracks
2–System Organization
Fundamentals
Audio files
When the HD-R1 starts recording, it creates a new,
automatically-named audio file in the currently active
folder (Main Menu ˘ Folder). Audio file
naming preferences are configurable (Main Menu
˘ Record Settings ˘ File Base
Name). The HD-R1 has an internal real-time clock, so
the file will also carry its actual creation date and time.
The HD-R1 is designed to protect recorded audio
data. If power is lost during recording, no more than
4 seconds of audio will be lost.
Non-audio files
Non-audio files created by the HD-R1 are small text
files that adhere to the XML (Extensible Markup
Language) standard. While this is a common file
format, it is strongly recommended that you do not
edit or modify these files yourself. This format was
chosen for ease of troubleshooting and also so you can
copy them, as a means of back-up.
Tracks and files
Audio data is stored on the media as audio files.
These files are treated as “tracks” by this unit. For
this reason, we call these files “tracks” when we are
discussing recording and playback. When explaining
their handling in various management operations, for
example, we call them “files.” The important thing to
remember is that “files” and “tracks” are the same.
Folders
Newly recorded audio files are always placed in
a folder specified by the user (Main Menu ˘
Folder). This is called the active folder. By default,
the HD-R1 creates and uses a folder named “Audio”.
If the HD-R1’s Playback Mode is set to
Folder (Main Menu ˘ Play Settings
˘ Playback Mode), it will play back all files in
the currently active folder.
It is important to know that the HD-R1 is limited to
one level of folders for audio files. Audio files that
exist in subfolders will not be visible to the HD-R1.
Markers
Markers are used to quickly identify and locate
specific points within an audio file. Pressing the
MARK button at any time will automatically create
a marker at the current transport position. If the
Shuttle Mode is set to Track/Mark Only,
instead of using the menu system, the SHUTTLE/DATA
wheel can be used to locate to markers. Additionally,
there are optional settings for automatically placing
markers at predefined intervals or at events such as
input signal overload (Main Menu ˘ Record
Settings ˘ Auto Markers).
Marker names
are automatically created but can be renamed, if
desired, and the marker times may also be modified
(Main Menu ˘ Manage Folders/
Files ˘ Compact Flash ˘ {path to
folder} ˘ View Files ˘ {filename} ˘ Edit
Markers). This is only accessible if the file actually
has markers. A maximum of 256 markers can be set
within one CF Card.
Playlists
The HD-R1 can use playlists to determine what to
play. A playlist is a collection of tracks in a specified
order. A track is typically an entire audio file but may
be just a portion of an audio file.
A maximum of 1023 tracks can be added to a playlist.
If, during playback, the HD-R1 cannot find an audio
file that the playlist references, it will simply skip to
the next track and continue playing. When this occurs,
a brief message will appear on the screen. This will
happen if the user moves or deletes audio files after
the playlist has been created.
TASCAM HD-R1
5
2–System Organization
Settings
The HD-R1 maintains its current settings in nonvolatile memory, meaning that they are retained even
if the unit is turned off.
and Record Settings
can be saved as a user preset to internal non-volatile
memory or as a file on the CF card, making it simple
to switch between various playback and recording
scenarios. In addition, there are several factory presets
available that can be used to quickly configure the
Play Settings
HD-R1’s play and record settings for some of the most
common uses.
can also be saved as a file
on the CF card. This is useful for backing up the
system configuration, should it need to be restored in
the future. As with the play and record settings, there
are several factory presets available that can be used
to quickly configure the HD-R1’s system settings for
some of the most common uses.
System Settings
Media considerations
The capabilities and performance of the HD-R1 will
vary based on the speed and abilities of the Compact
Flash (CF) media used. Older and some less expensive
CF cards use slower memory components and little
internal buffering which results in poor recording
performance. Newer CF cards, especially those
tailored for high-resolution digital cameras, not only
perform reading and writing faster, but also come in
larger storage sizes. The HD-R1 supports Type I and
II Compact Flash media. Type I cards are typically
based on Flash memory chips and provide higher
performance and durability than hard disk cards, while
Type II cards are more commonly used for CF hard
disks and can offer greater overall storage capacities.
The HD-R1 can test and display the performance
of the CF card being used. (See Main Menu ˘
Utilities ˘ Media Tools ˘ Media
Speed Check.)
The following table gives the approximate recording
time of four representative recording modes for
various sizes of Compact Flash cards.
Compact Flash card
44.1 kHz mono 32
kbps MP3
44.1 kHz stereo
128 kbps MP3
44.1 kHz stereo
16-bit WAV
96 kHz stereo
24-bit WAV
512 MB
35 hours
8.75 hours
0.8 hours
0.25 hours
1 GB
70 hours
17.5 hours
1.6 hours
0.5 hours
4 GB
280 hours
70 hours
6.5 hours
2 hours
8 GB
560 hours
140 hours
13 hours
4 hours
16 GB
1120 hours
280 hours
26 hours
8 hours
File system format
When a new CF card is first inserted into the HD-R1,
a screen pops up offering to format the media. This
is to ensure that the optimal file system is being used
with the card. The HD-R1 supports both FAT16 and
FAT32 file system formats. FAT32 is required for CF
cards 2GB and larger. While either file system can be
used on smaller cards, FAT16 is most efficient and,
therefore, recommended. The HD-R1 will always
format the card with the optimal file system.
Windows, by default, will format all cards using
FAT32, so if Windows is used to format cards smaller
than 2GB, be sure to select FAT16.
Due to font and screen resolution limitations, only
English and Western European characters will be
drawn. If a character is not supported, a box will be
drawn in its place.
By default, the HD-R1 names new audio files
using the “TRACK” name prefix. This prefix can
be customized (Main Menu ˘ Record
Settings ˘ File Base Name). Files and
folders can be renamed at any point using the builtin renaming screen. File and folder names must be
unique within their containing folder.
6 TASCAM
HD-R1
NOTE
• Names of files can be up to 20 characters. When a new
track is created, the audio file will have the File Base
Name followed by a three-digit number, such as 001.
These three digits are included in the total length, so
please limit the File Base Name to 17 characters or less.
FAT16 and FAT32 formats do allow longer names, but
this device does not support editing of more than 20
characters.
• The name must be eight characters or less and not use
any special (non-FAT supported) characters. In addition,
the name must be unique: projects must be named
uniquely on a storage card; audio files must be unique
within their project. Non-FAT supported characters
include: # , % , & , ‘ , ( ) , * , + , Comma , “ , / , : , ; , < >
, ?, = , \ , [ ] , ` , { } , ~.
3–Preparations for Use
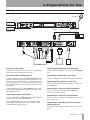
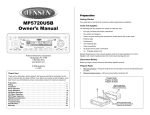
Making connections
Headphones
USB media
USB computer
LAN Cable
keyboard
Computer
Mixer
External controller
Power outlet
Connecting the power
Connecting headphones for monitoring
Connect the included power cord to the ~IN connector
on this unit and a standard power outlet.
Connect stereo headphones to the front panel PHONES
jack.
Connecting the recording source
Connecting a keyboard for text input
Connect analog sources to the MIC/LINE INPUTS or the
Euroblock. Balanced mics and line level sources can
be connected to the XLR jacks, −10 dBV unbalanced
line level sources can be connected to the RCA jacks,
and +4 dBu balanced sources can be connected to the
Euroblock.
Connect a USB keyboard to the front panel USB port.
Connect digital sources to the DIGITAL IN jack. (This
unit accepts S/PDIF digital, but does not accept AES/
EBU digital sources.)
Connecting an external parallel controller
Connecting output destinations
Use the XLR or RCA LINE OUTPUTS or the Euroblock
to connect analog output destinations.
Use the DIGITAL OUT jack to connect digital output
destinations. (This unit works with S/PDIF, but not
with AES/EBU digital sources.)
Connecting USB memory to copy files
Connect the USB media (flash memory) to the front
panel USB port.
Connect a parallel controller to the PARALLEL
connector on the rear panel.
Connecting an external serial controller
Connect a serial controller to the RS-232C connector
on the rear panel.
Connecting a LAN cable for remote control
and file transfer
Connect the unit using the LAN connector on the rear
panel.
TASCAM HD-R1
7
3–Preparations for Use
Turning on the power
Press the POWER switch on the front panel to turn the
power ON. After the unit starts-up, the display shows
the Home Screen.
To turn the power OFF, press the POWER switch
again.
This unit uses CF cards (type I and type II) for
recording and playback.
Inserting the CF card
1 Open the CF card slot door on the front panel.
2 Insert the CF card.
3 Close the door.
4 Use the included security screws to fasten the
door shut as necessary.
NOTE
You can set the unit to either display a warning message
or to automatically unmount the CF card when the CF card
slot door is opened. (See “System settings” in the Owner’s
Manual.)
Removing the CF card
The CF card can be removed when the unit’s power is
OFF or when it is not recording or playing a file.
8 TASCAM
HD-R1
CAUTION
Some data will be lost if the card is removed during recording. If it is necessary to remove the card during recording,
press the STOP key and then remove it.
3–Preparations for Use
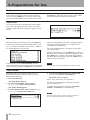
Setting the time
Set the unit’s system clock to the current date and
time.
1 Press the MENU key.
The Main Menu appears.
2 Use the SHUTTLE/DATA wheel to select
Utilities, and press the ENTER key.
5 When the setting is finished, use the SKIP
(µ/≤) keys to select SAVE, and press the
ENTER key.
The system time setting is confirmed and the
Utility Menu returns to the screen.
NOTE
The Utility Menu appears.
3 Use the SHUTTLE/DATA wheel to select Set
System Time, and press the ENTER key.
To cancel the setting, press the CANCEL key. The screen
returns to the Utility Menu and the system time reverts to
the previous setting.
The setting screen appears.
The Home Screen reopens.
6 Press the MENU key.
4 Set the date and time in the following manner.
While the screen is open, use the SKIP (µ/≤)
keys to move between data fields, and use the
SHUTTLE/DATA wheel to change the values.
Formatting the CF card
When a new CF card is inserted it must be formatted.
1 Press the MENU key.
The Main Menu appears.
2 Use the SHUTTLE/DATA wheel to select
Utilities, and press the ENTER key.
The Utility Menu appears.
3 Use the SHUTTLE/DATA wheel to select Media
Tools, and press the ENTER key.
The Media Tools submenu appears.
When formatting completes and the completion
screen appears, press the ENTER key to return to
the Media Tools submenu.
NOTE
If you press the CANCEL key instead of the ENTER key, you
will return to the Media Tools submenu without formatting
the card.
6 Press the MENU key.
The Home Screen reappears.
4 Use the SHUTTLE/DATA wheel to select
Reformat Media, and press the ENTER key.
The following confirmation screen appears.
5 Press the ENTER key.
The CF card is formatted.
TASCAM HD-R1
9
3–Preparations for Use
Display screens
The Home Screen appears when the unit’s power
is ON and it is starting up. This screen is the basic
screen. Press the MENU key to enter the menu mode
and open the Main Menu screen. Other menu screens
appear according to selections you make. If you press
the MENU key when any menu screen is open, menu
mode ends and the Home Screen reappears.
Home Screen
Level meters that show playback and record (input)
levels, the time display, the track name, the current
transport mode and other information appear on this
screen.
Menu screens
While the Home Screen is open, press the MENU key
to enter menu mode and open the Main Menu screen.
See “3–Screens and Menus” in the Owner’s Manual
for details about the various items.
selection. Depending on the item, a submenu appears,
a parameter setting mode starts or an operation is
executed after confirmation.
For items with submenus, a ˘ appears at the right
side of the display.
When in menu mode, press the MENU key to return to
the Home Screen. When a submenu is displayed, press
the CANCEL key to return to the parent menu. When
the Main Menu is displayed, press the CANCEL key to
return to the Home Screen.
In menu mode, use the SHUTTLE/DATA wheel to
select items (letters appear light on a dark background
when selected), and press the ENTER key to confirm a
NOTE
Items that are currently unavailable are shown in italic.
Panel lockout
Operation from the front panel of this unit can
be disabled using the lockout function to prevent
unintentional operation.
1 Press the MENU key.
The Main Menu appears.
2 Use the SHUTTLE/DATA wheel to select
Utilities, and press the ENTER key.
The Utility Menu appears.
3 Use the SHUTTLE/DATA wheel to select Panel
Lockout, and press the ENTER key.
4 Use the SHUTTLE/DATA wheel to switch from
OFF to ON, and press the ENTER key.
The Home Screen reopens.
In this state, all the keys are inoperative.
The Panel Lockout setting is retained even if the
power is turned OFF.
To unlock the front panel, hold down the ENTER,
CANCEL , and MENU keys simultaneously.
NOTE
When the front panel is locked, external control via
RS-232, parallel, and LAN are still possible.
10 TASCAM
HD-R1
4–Recording
Use this unit to record audio as WAV or MP3 format
files. Recording is conducted in the same manner as
with a conventional recorder.
Making settings related to recording
Before recording, use the Menu to select, for example,
the recording file format (WAV/MP3), the sampling
rate, the bit length (WAV) or bit rate (MP3), the
stereo/mono setting, the input source and other
standard settings. In addition to these, various other
settings can be made as necessary. (See “Record
Settings” in the Owner’s Manual.)
In addition, if the input source is set to analog input,
the rear panel switches are also used to make some
settings related to input.
1 Press the MENU key.
The Main Menu appears.
2 Use the SHUTTLE/DATA wheel to select Record
Settings, and press the ENTER key.
The Record Settings Menu appears.
NOTE
When the Home Screen is open, you can press the ENTER
key while holding down the MENU key (SHIFT key) to open
the Record Settings Menu directly.
Recording file format, stereo/mono and input source
are selected in the following procedures.
3 Use the SHUTTLE/DATA wheel to select File
Format, and press the ENTER key.
4 Use the SHUTTLE/DATA wheel to select WAV or
MP3, and press the ENTER key.
If WAV is selected:
5aUse the SHUTTLE/DATA wheel to select WAVE
Settings, and press the ENTER key.
The Wave Settings submenu appears.
Use the SHUTTLE/DATA wheel to select the
item to set, and press the ENTER key. Use the
SHUTTLE/DATA wheel to make the setting and
press the ENTER key again to confirm it.
•• WAVE Sample Rate: 44.1 kHz, 48 kHz, 88.2 kHz or 96
kHz
•• Sample Width: 16-bit or 24-bit
NOTE
When the input source is S/PDIF, if the input signal sample
rate differs from the sample rate setting, the unit cannot
record and an error message appears.
If MP3 is selected:
5bUse the SHUTTLE/DATA wheel to select MP3
Settings and press the ENTER key.
The MP3 Settings submenu appears.
Use this Menu to set the sampling rate (MP3
Sample Rate) and bit rate (Stereo Bit Rate,
Mono Bit Rate). The bit rates can be set separately for stereo and mono recording.
Use the SHUTTLE/DATA wheel to select the
item to set and press the ENTER key. Use the
SHUTTLE/DATA wheel to make the setting and
press the ENTER key again to confirm it.
•• MP3 Sample Rate: 44.1 kHz or 48 kHz
NOTE
When the input source is S/PDIF, if the input signal sample
rate differs from the sample rate setting, the unit cannot
record and an error message appears.
•• Stereo Bit Rate: 64 kbps, 80 kbps, 96 kbps, 112 kbps,
128 kbps, 160 kbps, 192 kbps, 224 kbps, 256 kbps or
320 kbps
•• Mono Bit Rate: 32 kbps, 40 kbps, 64 kbps, 80 kbps,
96 kbps, 112 kbps, 128 kbps or 160 kbps
6 After completing the setting procedures in 5a
or 5b, press the CANCEL key to return to the
Record Settings Menu.
With this Menu, you can set the sampling
rate (WAVE Sample Rate) and bit depth
(Sample Width).
TASCAM HD-R1
11
4–Recording
7 Use the SHUTTLE/DATA wheel to select
Channels, and press the ENTER key.
11As necessary, conduct other settings related to
recording.
See “Record settings” in the Owner’s Manual for
more details about those items.
12When setting is completed, press the MENU key
to return to the Home Screen.
Set the record channel mode with this item.
13If Analog/Mic was selected in procedure
10 above, set the switches on the rear panel
according to the analog input used as follows.
8 Use the SHUTTLE/DATA wheel to select the
channel mode, and press the ENTER key.
•• Stereo: records in stereo
•• Mono Right: records R channel input in mono
•• Mono Left: records L channel input in mono
9 Use the SHUTTLE/DATA wheel to select Input
Source, and press the ENTER key.
Set the record input source with this item.
When using XLR inputs:
• Set the INPUT switch to XLR.
• Set the L INPUT and R INPUT switches to 0 or −20.
If the input level is too high, use the −20 setting,
which engages a 20 dB pad.
10Use the SHUTTLE/DATA wheel to select the record
input source, and press the ENTER key.
•• Analog/Mic: sets the input source to the MIC/LINE
INPUTS (XLR, RCA or Euro connectors) on the rear
panel
•• S/PDIF: sets the input source to the DIGITAL IN jack
on the rear panel
When using the Euroblock:
• Set the INPUT switch to TRMNL
When using the RCA INPUT:
• Set the INPUT switch to XLR.
• Set the L INPUT and R INPUT switches to RCA.
NOTE
If Analog/Mic is selected, the switches on the rear panel
also need to be set. See step 13 below.
12 TASCAM
• If a condenser mic that requires +48V phantom
power is connected set the PHANTOM switch to ON.
HD-R1
4–Recording
Standard recording procedures
After making the above settings, the unit is ready to
record. A new file is automatically created for every
recording.
1 Press the RECORD key.
The unit becomes ready to record and input
monitoring is turned ON.
The RECORD and READY keys light up.
2 Check the input level using the meters on the
Home Screen.
When INPUT is set to Analog/Mic, use
the INPUT knob on the front panel to adjust the
level.
When INPUT is set to S/PDIF, the level
cannot be adjusted. Adjust the level at the
source if it is not suitable.
NOTE
3 Press the PLAY key to start recording.
The RECORD and PLAY keys light.
4 When finished recording, press the STOP key.
A file is created.
With the default setting, the files are automatically named “Track001,” “Track002,” etc.
Press the READY key to pause recording.
Pausing also creates a file. A new file is created
for the next recording.
NOTE
Audio files created when recording are stored in the
current folder. Moreover, when the playback mode is set
to playlist, the created audio file is automatically added to
the current playlist. See “6–Folders and Playlists” on page
15 for information about the current folder and the playlist.
See also “Setting the playback mode” on page 14.
When connecting headphones to the PHONES jack to
monitor recording, use the PHONES knob to adjust the
level. This knob only affects the headphone level; it does
not affect the output level from the LINE OUT jack on the
rear panel.
Other recording functions
Using the Record Settings Menu, you can also set the
following functions.
•Automatically create markers during recording at
specified time intervals or when the input signal
clips.
•Turn ON/OFF the prerecord function, which retains
the input signal in a buffer when the unit is in
ready-to-record mode.
•Set the maximum size for audio files.
•Turn ON/OFF the Sync Record function, which
automatically starts recording if the input signal
exceeds a certain level.
•Set the base name that is given automatically to
new files.
•Set the base name that is given automatically to
new markers.
Please see “Record settings” in the Owner’s Manual
for more about these functions.
Media capacity and recording
During recording, the media space indicator on the
screen displays the remaining space.
When there is no remaining space, the unit stops
recording, the file closes, and a warning message that
there is no space appears on the screen.
In the FAT file system used by this unit, the maximum
size for each file is limited to 2GB. If the file size
reaches the limit, the unit closes that file and continues
recording to a new file. In this situation, no gap in
recording occurs, so the files can be relinked in a
DAW, for example. Moreover, if the unit’s playback
mode is set to playlist, the files can be played back in
order without an audible gap between them.
TASCAM HD-R1
13
5-Playback
This section explains standard playback operation and
playback modes.
Standard playback operations
At the default setting, all files on a card are played
back in the order that they were recorded. The
transport keys function like those on an ordinary CD
player or similar device.
•Press the PLAY key to start playback.
•When stopped or during playback, press the SKIP
(µ/≤) keys to jump to the previous/next track
(file).
•When stopped or during playback, press and hold
the SKIP (µ/≤) keys to fast reverse and fast
forward.
•Press the READY key to pause playback. When
playback restarts, it will begin playing from this
paused position.
•Press the STOP key to stop playback. When
playback restarts, it will begin playing from the
beginning of the playback area.
•Turn the SHUTTLE/DATA wheel to move the
playback point to earlier and later tracks and
markers. The wheel can also be set, however,
to move the playback point in time units (hour,
minute, second, 1/100 second). See “System
settings” in the Owner’s Manual.
•Press the SKIP (µ/≤) keys while pressing
and holding the STOP key, to move the playback
point to the beginning of the first/last track in the
playback area.
Setting the playback mode
By setting the playback mode, the unit can be set to
play all tracks, a single track, the tracks in a folder or
the tracks in the current playlist. (See “6–Folders and
Playlists” on page 15.)
Use the following procedures to set the playback
mode.
1 Press the MENU key.
The Main Menu appears.
2 Use the SHUTTLE/DATA wheel to select Play
Settings, and press the ENTER key.
The Play Settings Menu appears.
3 Use the SHUTTLE/DATA wheel to select
Playback Mode, and press the ENTER key.
4 Use the SHUTTLE/DATA wheel to select the
playback mode, and press the ENTER key.
•All: all files on the card are available for playback
•Single: all files on the card are available for
playback, but only one file plays and then playback
stops
•Folder: all files in the current folder are available
for playback
•Playlist: all files in the current playlist are available
for playback
See “6–Folders and Playlists” for instructions on how
to create folders and playlists and how to select the
current folder and current playlist. For more details,
see “Folder” and “Playlist” in the “3–Screens and
Menus” chapter of the Owner’s Manual.
NOTE
NOTE
While the Home Screen is open, press the MODE key while
pressing and holding the MENU key (SHIFT key) to open
the Play Settings Menu directly.
When the unit’s power is turned ON with a CF card
inserted, the playback mode used previously will be used
again if the same folder or playlist can be found. If the
previously used folder or playlist cannot be found, the
playback mode is automatically set to All.
Other playback functions
This unit features other playback functions, including
random playback and repeat playback of all tracks
in the playback area, as well as an Auto Ready
function that waits at the beginning of the next track
after finishing playback of a track, and an Auto Cue
14 TASCAM
HD-R1
function that starts playback from the first sound in a
track. For how to set these, see the “Play settings” in
the Owner’s Manual.
6–Folders and Playlists
By categorizing and organizing audio files in folders,
they can be managed effectively and played back
in folder units. Moreover, by creating playlists and
adding audio files to them as necessary, you can play
the files that you want in the order that you want. (See
“Setting the playback mode” on page 14.)
Creating new folders
By creating folders, files can be categorized and
organized by genre and artist, for example, much like
file management on a computer.
A CF card that has just been formatted does not have
any folders. Recording in this state will create an
audio file in the card’s top directory.
When FAT16 format is used, the number of folders
and tracks in the root directory is limited to 512 total,
and the number of sub-directories is limited to 65534.
When FAT32 format is used, this total number is
limited to 65535 in the root directory and 65534 in the
sub-directories.
Audio files from any top-level folder on the HD-R1
can be read, but those in lower level folders cannot be
read.
NOTE
When the Home Screen is open, press the SKIP µ key
while pressing and holding the MENU key (SHIFT key) to
open the Folder Menu directly.
3 Use the SHUTTLE/DATA wheel to select Create
New Folder, and press the ENTER key.
A new folder called “Audio01” is created and
becomes the current folder.
Audio files created during recording are saved in the
current folder.
Create folders using the following procedures.
1 Press the MENU key.
The Main Menu appears.
2 Use the SHUTTLE/DATA wheel to select Folder,
and press the ENTER key.
The Folder Menu appears.
You can edit the names of folders as well as delete
them. For how to do this, see “Manage folders/files”
in the Owner’s Manual.
Setting the current folder
When the playback mode (See “Setting the playback
mode” on page 14) is set to Folder, the playback
area is the current folder. Use one of the following
operations to set the current folder.
Using the menu to set the current folder
1 Follow steps 1 and 2 in “Creating new folders”
above to open the Folder Menu.
2 Use the SHUTTLE/DATA wheel to select the
desired folder, and press the ENTER key.
This folder loads and becomes the current folder.
Using the panel keys to set the current folder
Press the SKIP ≤ or SKIP µ keys while
pressing and holding the MODE key.
The current folder is changed in alphabetical
order.
NOTE
The current folder is not only used as the playback area
when the playback mode is set to Folder, it is also where
new files from recordings are always saved regardless of
the playback mode.
TASCAM HD-R1
15
6–Folders and Playlists
Creating playlists
In playlist playback mode, this unit plays audio files
(tracks) that have been added to the current playlist.
There are no playlists on a CF card that has just been
formatted. You can make as many playlists as needed.
NOTE
When the playback mode is set to Playlist, new files
created in recording are added to the current playlist.
Create playlists using the following procedures.
1 Press the MENU key.
The Main Menu appears.
2 Use the SHUTTLE/DATA wheel to select
Playlist, and press the ENTER key.
The Playlist Menu appears.
Add files to the playlist using the following
procedures
5 With “Add Entry” selected, press the ENTER
key.
The files and folders at the top level of the card
appear.
To show the files and folders inside a folder,
select the folder and press the ENTER key.
6 Select the file that you want to add the playlist,
and press the ENTER key.
NOTE
When the Home Screen is open, press the SKIP ≤ key
while pressing and holding the MENU key (SHIFT key) to
open the Playlist Menu directly.
3 Use the SHUTTLE/DATA wheel to select Create
New Playlist, and press the ENTER key.
A playlist called “Playlist00” is created,
and this playlist becomes the current playlist.
The file is added to the playlist.
The playlist content screen reopens, so you
can confirm that the file has been added to the
playlist. Instead of the “Add Entry” item,
“Add Entry To Bottom” appears if one
or more files have already been added.
7 To add more files to the playlist, select “Add
Entry To Bottom” and press the ENTER
key.
The same screen appears as in procedure 5
above.
8 Select the file you want to add to the playlist
and press the ENTER key as in procedure 6
above.
The file is added to the end of the playlist, and
the playlist content screen reopens.
9 Repeat steps 7 and 8 as necessary.
4 With Playlist00 (current) selected,
press the ENTER key.
A screen showing the contents of the playlist
opens. The newly created playlist does not have
any files yet, so only “Add Entry” is shown,
as in the following screen.
You can also edit the names of playlists, as well as
copy and delete them. You can also change the order
of the added files, remove files from playlists, and
set playback start and end points, set Fade In and
Fade Out, and set playback volume, for example. For
how to conduct these operations, see “Playlist” in the
Owner’s Manual.
Setting the current playlist
When the playback mode (See “Setting the playback
mode” on page 14) is set to Playlist, the playback
area is the current playlist. Use one of the following
operations to set the current playlist.
Using the menu to set the current playlist
1 Follow steps 1 and 2 in “Creating new playlists”
to open the Playlist Menu.
16 TASCAM
HD-R1
2 Use the SHUTTLE/DATA wheel to select the
desired playlist, and press the ENTER key.
This loads and becomes the current playlist.
Using the panel keys to set the current playlist
Press the SKIP ≤ or SKIP µ keys while pressing
and holding the MODE key. The current playlist is
changed in alphabetical order.
7–Marker Functions
By setting markers within files, you can locate desired
track positions easily.
Setting markers
When recording or playing a track, press the MARK
key to set a marker at the current position.
When recording, you can set the unit to automatically
create markers at set intervals or whenever input
clipping occurs by using the Auto Markers item
in the Record Settings Menu. (See “Record settings”
in the Owner’s Manual.)
Locating to markers
At the default setting, you can use the SHUTTLE/
wheel to locate to markers, but you can also
change how the SHUTTLE/DATA wheel functions. (See
“System settings” in the Owner’s Manual.)
DATA
Setting marker names
New markers are automatically given names. The
base name can be set by using the Marker Base
Name item in the Record Settings Menu. (See
“Record settings” in the Owner’s Manual.)
Editing markers
Using the Manage Folders/Files Menu, markers can
be deleted, and their positions (times) and names
edited. For details see “Manage folders/files” in the
Owner’s Manual.
TASCAM HD-R1
17
8–System Settings
Use the System Settings Menu to make various
system settings. The main settings are introduced
below. For a detailed explanation and information
about other settings, please see “System settings” in
the Owner’s Manual.
the SHUTTLE/DATA wheel to select System
Settings and press the ENTER key. Alternatively,
press and hold the MENU key (SHIFT key) and press
the TIME key.
To display the System Settings Menu, press the
MENU key to open the Main Menu, and then use
SHUTTLE/DATA
With the System Settings Menu open, use the
wheel to select and set the various
items.
Meter settings
Select the Metering item and press the ENTER key
to open the following submenu.
From this screen, settings can be made for the hold
time for the overload indicators that occur when
the meters clip, the meter decay speed, the meter
peak decay speed, and the threshold level for meter
overload indication.
For details, see “System settings” in the Owner’s
Manual.
Resume mode setting
Select the Resume item and press the ENTER key to
turn the Resume mode ON and OFF.
When ON, the unit remembers the playback position
when the STOP key was pushed, and the next to time
playback is started, it continues from that position.
This setting is effective even if the power is turned
OFF, so when the power it turned ON again and
playback restarts, it will play from the same position.
Shuttle mode setting
Select the Shuttle Mode item and press the
ENTER key to set the transport control mode of the
SHUTTLE/DATA wheel.
At the default setting, use of the wheel skips between
track start points and markers, but it can also be set
to skip in units of hours, minutes, seconds or 1/100
seconds.
Analog reference level setting
Select the Ref Level item and press the ENTER
key to set the analog reference level. The reference
level shows the relationship between the digital audio
level (dBFS) and the analog reference level (dBu). Set
this to suit your audio system.
Contrast adjustment
Select the Adjust Contrast item and press
the ENTER key. Then, use the SHUTTLE/DATA wheel
to adjust the display contrast. The adjusted contrast
setting is retained even if the power is turned OFF.
18 TASCAM
HD-R1
In addition, the contrast adjustment screen can be
opened directly by pressing the CANCEL key while
pressing and holding the MENU key (SHIFT key) when
the Home Screen is open. After adjusting, press the
CANCEL key or MENU key (SHIFT key).
9–Saving settings as a preset
The current record, playback and system settings
made using the Play Settings Menu, Record Settings
Menu and System Settings Menu can be saved as a
preset file on a CF card.
The settings made in the Play Settings Menu and
Record Settings Menu are saved together in the
same preset file, but the settings made in the System
Settings Menu are saved in a separate preset file.
Saved presets can be recalled as necessary and also
loaded on a different HD-R1. Moreover, preset files
for the Play Settings Menu and Record Settings Menu
can also be saved in the internal memory of this unit.
(System Settings Menu preset files can only be saved
to CF cards.)
Use the Manage Settings Menu to save presets. For
details, see “Manage settings” in the Owner’s Manual.
10–Editing Audio Files
Audio files that have been created can have their
names edited, and be deleted or copied. Markers set in
audio files can also be edited or deleted.
3 Select the desired file from this list to open the
following screen.
In addition to audio files on the CF card, files on USB
media connected to this unit can also be edited.
Use the Manage Folders/Files Menu to edit audio
files.
1 Open this menu and select Compact Flash
or USB.
4 Select the item to be edited from this screen and
change it as desired.
For details see “Manage folders/files” in the Owner’s
Manual.
NOTE
2 Then, select the folder with the desired file, and
select View Files to open a list of all files in
the folder.
After selecting a folder, it can be deleted or its name can
be edited by choosing Delete Folder or Rename Folder.
TASCAM HD-R1
19
11–Transferring Files
Files can be transferred (copied) between a CF card
and USB media using this unit. In addition, files can
be transferred (copied) over a LAN from this unit to a
connected computer.
Transfer between CF card and USB media
If both a CF card and USB media are connected to this
unit, files can be transferred between the media.
1 Press the MENU key to open the Main Menu.
The top directory of the transfer destination
media appears.
2 Select Manage Folders/Files, and press
the ENTER key.
Select the file that you want to transfer.
Select Copy File to USB (when copying
from a CF card to USB storage).
3 Select the transfer source (copy source) media,
and press the ENTER key.
4 Select the folder or (top dir) of the transfer
destination, and press the ENTER key to start
file transfer.
NOTE
This unit mounts the USB media immediately before file
operation, and unmounts it when file operation completes.
Do not disconnect the USB media during a file operation.
Transfer between this unit and a computer
By connecting this unit and a computer by LAN, files
can be transferred (copied) between a computer and
the CF card in the unit or attached USB media.
1 Connect a computer with this unit directly
using a LAN cross-cable.
Using an ordinary broadband router, you can
also connect them using LAN straight cables.
2 Press the MENU key to open the Main Menu.
3 Select System Settings, and press the
ENTER key.
Host: Enter the IP address.
Username: HDR1
Password: hdr1 (default)
Port: 21
7 Click the connect button in the FTP application.
In most FTP applications, the PC and its file
structure should appear on the left and the CF
card in the HD-R1 should appear on the right.
4 Select Network and press the ENTER key.
5 Select the IP Mode item and press the ENTER
key. Set whether the IP address is fixed or automatically acquired (DHCP).
NOTE
If DHCP is selected, the network must support DHCP.
6 Launch an FTP application that supports
Unicode and make the following settings. (One
recommended FTP application is FileZilla.)
20 TASCAM
HD-R1
8 Use the FTP application to transfer files.
12–Using the Ducking Function
This unit has a ducking function. By using this
function, the playback signal can automatically be
reduced when an analog signal is input into the unit,
or the analog input signal can be reduced when a
track is playing. One specific use, for example, is to
automatically reduce the volume of background music
when an announcement is being made.
To use the ducking function, in the Ducking submenu
of the System Settings Menu, set the Ducking
Mode to “Attenuate Playback” or
“Attenuate Input”. Use this submenu to set
the analog input threshold level, the playback signal
reduction level and the time until the playback signal
returns to the ordinary level after the analog input
has stopped. (See “System settings” in the Owner’s
Manual.)
13–Using External Controllers
Using a USB keyboard
By connecting a computer USB keyboard to the USB
port on the front panel of this unit, you can control the
transport, and call up and operate menus, for example,
with this keyboard. For the key assignments, see
“USB computer keyboard equivalents” in the Owner’s
Manual.
Using parallel control
Using the PARALLEL port on the rear panel, you
can control playback on this unit externally. For
an overview and pin assignments, see “5–Parallel
Interface” in the Owner’s Manual.
For menu settings related to the parallel port, see
“System settings” in the Owner’s Manual.
Using serial control
Using the RS-232C port on the rear panel, you can
control the transport of this unit and make various
setting externally. For details see “6–RS-232C Serial
Interface” in the Owner’s Manual.
TASCAM HD-R1
21
22 TASCAM
HD-R1
Sync Rec
File Base Name
Marker Base Name
L
L
L
System Settings
Pre-Record
Auto Track
Metering
L
|
|
Ducking
L
|
|
|
Channels
Input Source
Auto Markers
MP3 Settings
File Format
WAVE Settings
--L
|
L
|
|
L
L
L
|
L
L
Record Settings
Playback Mode
Track Sorting
Random
Repeat
Auto Reay
Auto Cue
--L
L
L
L
L
Play settings
Create New Playlist
Rename Playlist
Copy Playlist
Delete Playlist
(All), Single, Folder, Playlist
(Name), Time
(Off), On
(Off), On
(Off), On
(Off), -72, -66, -60, -54, -48, -42, -36, -30,
-24 dBFs
--L
L
L
--L
L
L
Meter Clip Hold
Meter Decay Rate
Meter Peak Decay
Meter Overload Threshold
Ducking Mode
Ducking Threshold
Ducking Attenuation
Ducking Hold Time
(WAV), MP3
WAVE Sample Rate
Sample Width
MP3 Sample Rate
Stereo Bitrate
Mono Bitrate
Mono Left, Mono Right, (Stereo)
(Analog/Mic), S/PDIF
Audio Overs
Time Interval
(Off), On
512MB, 1GB, 1.5GB, 1.8GB, (2GB), 5Min,
10Min, 15Min, 30Min, 60Min
--- (Off), -72, -66, -60, -54, -48, -42, -36, -30,
-24 dBFs
--- Track_
--- Mark_
----L
--L
L
------L
-----
-------------
(44.1kHz), 48kHz, 88.2kHz, 96kHz
16Bits, (24Bits)
(44.1kHz), 48kHz
64, 80, (128), 160, 192, 224, 256, 320 kbps
32, 40, (64), 80, 96, 112, 128, 160 kbps
Track Info
(Off), Attenuate Input, Attenuate Play
(-6dBFs), -12dBFs, -18dBFs, -24dBFs, -30dBFs
(-3dB), -6dB, -9dB,-12dB, -18dB, -24dB, Infinite
(0.1sec), 0.5, 1.0, 1.5, 2.0, 2.5, 3.0, 3.5, 4.0, 4.5,
5.0 sec
--- Flash, (3 sec), 6 sec, 10 sec, Infinite
Fast Decay, (Medium Decay), Slow Decay
Hold, Fast Decay, Medium Decay, (Slow Decay), Off
--- -0.2dBFs, (0dBFs)
---------
--- (Off), On
--- (Off), 1, 2, 3, 4, 5, 10, 30, 60 minutes
-----------
|
|
L
|
|
|
L
L
L
L
Parallel Control
L
L
Repeat Count
Interruptible
SKIP and Shuttle/Data
Off, (On)
Off, (On)
-30 to (0)dB in 1dB step
(0)-9 in 1sec steps, 10-55 in 5sec
steps, 1-9 in 1min steps, 10-60 in
5min steps
--- Trigger Mode
-----------
Remove from Playlist
Start/End
Fade In
Fade Out
Volume
Delay Interval
--- Shuttle/Data
Level 5
--- Change Playlist Position
Level 4
L
L
L
L
L
L
L
--- Add Entry To Bottom
L Track name
Level 3
|
Playlist(*2)
--- Playlist name (current)
*2: Current playlist name or L Playlist name
"no playlist"
|
|
|
|
|
|
Level 2
Folder(*1)
--- (top dir)
*1:Current Folder name or L Folder name
"top dir"
L Create New Folder
Level 1
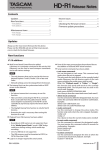
Level 0 is the Main Menu. Values in parentheses are default values.
--- (Trigger), Momentary,
Toggle
--- (0) to 20, Infinite
--- (Yes), No
Level 6
14–Menu Tree
--|
|
L
L
L
Panel Lockout
Set System Time
Software Version
Media Tools
--- Compact Flash
L USB
Manage Files/Folders
Utilities
--- Manage Play/Rec Settings
|
|
|
L Manage System Settings
--L
L
-------
Media Information
Media Speed Check
Format Media
(Off),On
Input Day and Time
Display Softare version
--- (Top dir)
|
L Select Files
|
|
|
|
|
|
|
|
|
L Select Folder
Settings File (Setting File Name)
New Settings File
Save as Preset
Delete Settings
Load From File
Save To File
Delete File
Select Current File
("Using Factory Default")*3, preset…
Select User Preset1-5
Select User Preset1-6
Select File
Select File
Select File
(Trigger), Momentary, Toggle
(Yes), No
(Off), 0 to 20, Infinite
-30 to -1 dB, (0dB)
Sample Rate KHz
([disabled]), [enabled]
--L
L
|
L
|
L
|
|
L
--L
L
Delete All Markers
View Folder
Reneme Folder
Delete Folder
Edit Markers
Copy File to USB
More Information
Rename File
Delete File
--- View Files
---------------
CF Door Action
Keyboard Type
Audio Clock Information
L
L
L
|
L
L
--L
L
L
--L
L
Ref Level
L
Adjust Contrast
Playlist Defaults
L Busy2 Polarity
--- (Off), On
--- (Ttack/Mark Only), Hours, Minutes, Seconds,
Hundredths
--- (-20dBFs=+4dBu), -18dBFs, -16dBFs, -14dBFs
=+4dBu, -9dBFs=+6dBu
--- (Off), Show Warning, Unmount CF
--- (English), Japanese
--- Sample Rate[Internal]
L S/PDIF Input
--- Adjust Contrast with JOG
--- Trigger Mode
--L Interruptible
--L Repeat Count
--L Attenuation
---
Level 4
hdr1_
display IP Address
(DHCP), Static
Input IP Address
Input mask
Input Gateway
(Off), Direct Play, Binary Play, Program Play
(Active Low), Active High
(Playback), Recording, Finished, Ducking, CF Doo,
Media Full
--- (Normally Open), Normally Closed
--- (Playback), Recording, Finished, Ducking, CF Doo,
Media Full
--- (Normally Open), Normally Closed
-------------------
Resume
Shuttle Mode
Busy1 Polarity
Busy2 Signal
Change Password
IP Address : 127 . 0 . 0 . 1
IP Mode
IP Address (192 . 168 . 1 . 4)
IP Mask (255 . 255 . 255 . 0)
Gateway (192 . 168 . 1 . 1)
Parallel Mode
Input Polarity
Busy1 Signal
Level 3
|
L
L
--L
L
L
L
L
--L
L
L
L
Parallel Port
Network
Level 2
|
|
L
|
|
|
|
|
L
|
|
Manage Settings
Level 1
Select a Folder or an Audio File
Done Selecting
Select a Folder or an Audio File
Done Selecting
Rename Marker
Edit Marker
Delete Marker
--- See Files
--L
--L
--L
L
--- See Files
*3: Factory setting
Level 5
Level 6
14–Menu Tree
TASCAM HD-R1
23
»
HD-R1
TEAC CORPORATION
Phone: +81-42-356-9143
1-47 Ochiai, Tama-shi, Tokyo 206-8530, Japan
TEAC AMERICA, INC.
www.tascam.com
www.tascam.com
Phone: +1-323-726-0303
7733 Telegraph Road, Montebello, California 90640 USA
TEAC CANADA LTD.
www.tascam.com
Phone: +1905-890-8008 Facsimile: +1905-890-9888
5939 Wallace Street, Mississauga, Ontario L4Z 1Z8, Canada
TEAC MEXICO, S.A. De C.V
www.tascam.com
Phone: +52-55-5010-6000
Río Churubusco 364, Colonia Del Carmen, Delegación Coyoacán, CP 04100, México DF, México
TEAC UK LIMITED
www.tascam.co.uk
Phone: +44-8451-302511
Suites 19 & 20, Building 6, Croxley Green Business Park, Hatters Lane, Watford, Hertfordshire, WD18 8TE, UK
TEAC EUROPE GmbH
www.tascam.de
Phone: +49-611-71580
Bahnstrasse 12, 65205 Wiesbaden-Erbenheim, Germany
Printed in China